

Page 1
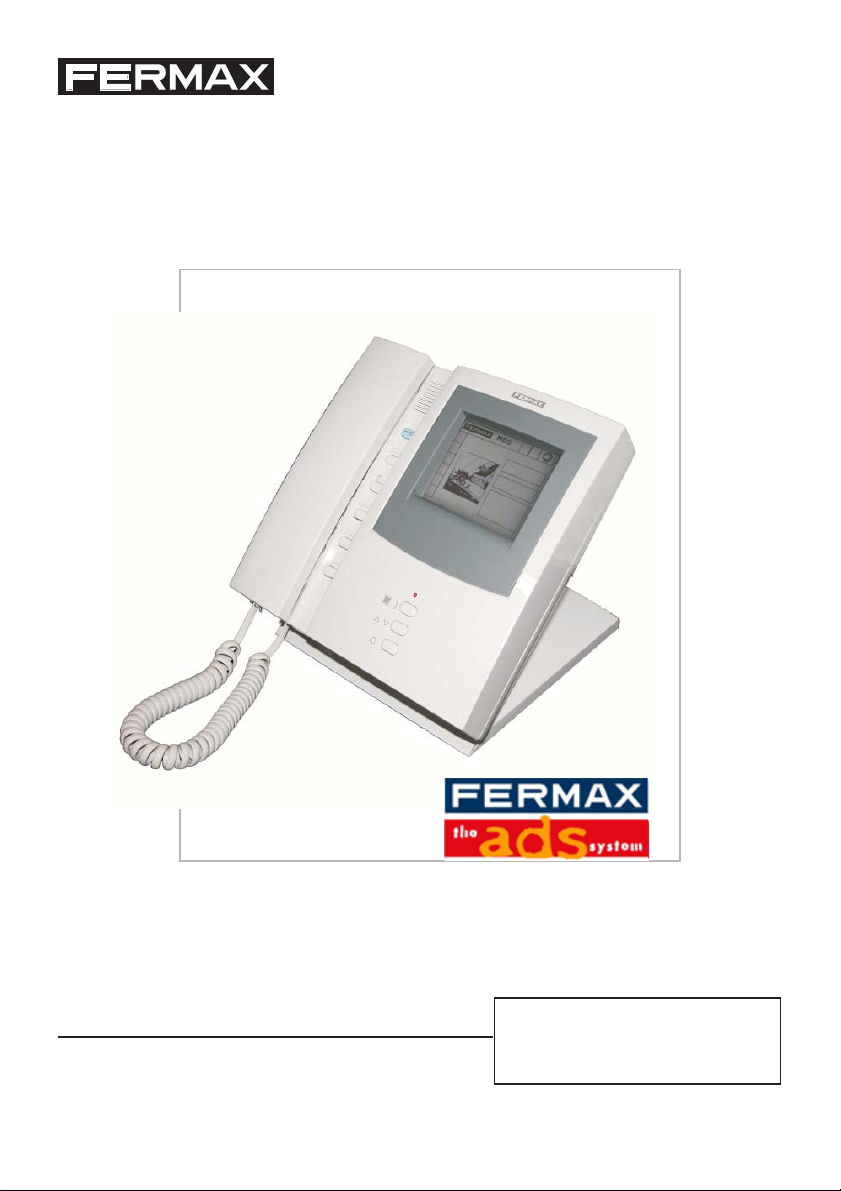
Central de Conserjería ADS
ADS Guard Unit
Page 2

MANUAL CONSERJERIA ADS SOBREMESA Ref. 2536
Cod. 97001EI V07_05
Este documento técnico lo edita FERMAX ELECTRONICA con carácter informativo, y se
reserva el derecho a modificar características de los productos que en él se refieren en
cualquier momento y sin previo aviso. Estos cambios vendrán reflejados en posteriores
ediciones del mismo.
ESPAÑOL
Pag 2
Page 3

INDICE
INTRODUCCION ............................................................................................. 4
Controles de la Central de Conserjería de Sobremesa ........................5
MODOS DE FUNCIONAMIENTO BASICOS.................................................7
Selección del modo de funcionamiento................................................8
DISPLAY .........................................................................................................9
Display Principal MDS.......................................................................... 9
FUNCIONAMIENTO COMO CENTRAL DE CONSERJERÍA .......................11
Gestión de Colas de llamada ...............................................................11
Selección de cola de llamadas Teléfonos-Placas................................. 12
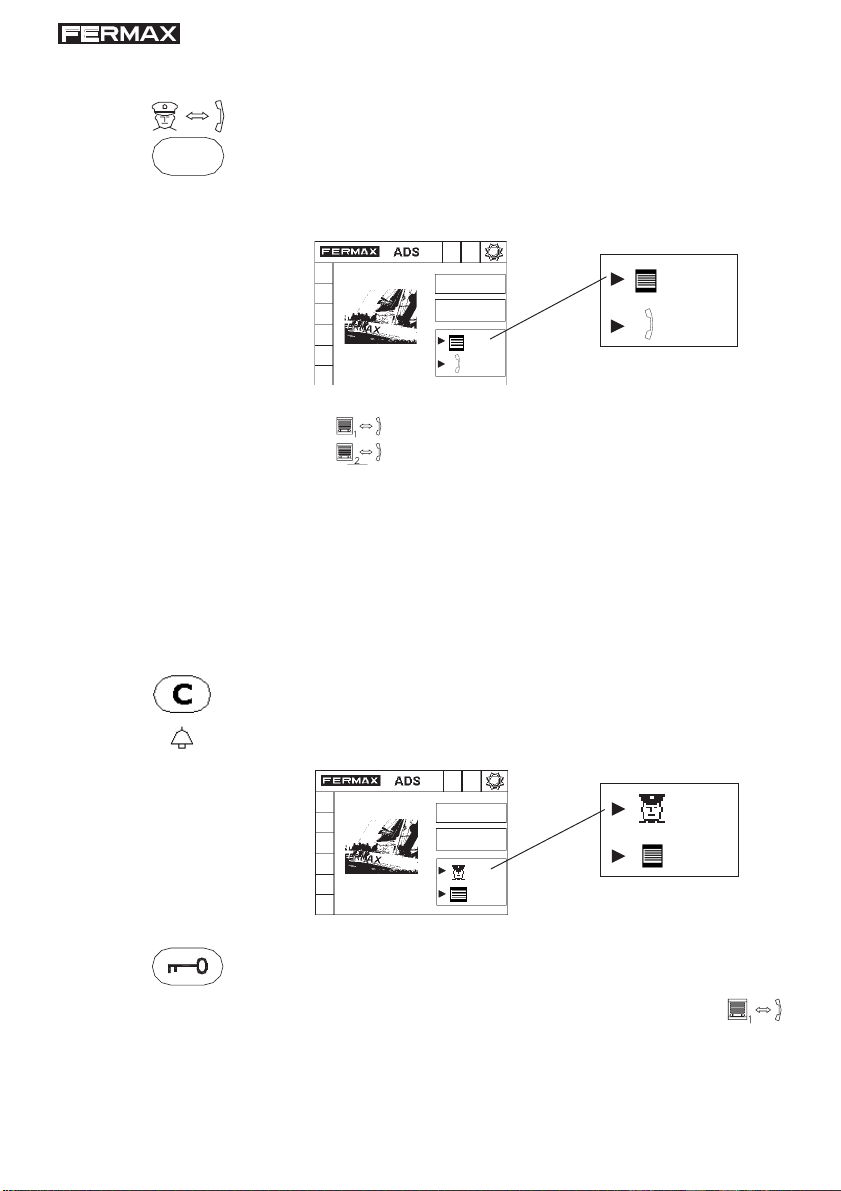
Atender llamada procedente de teléfono................................................. 13
Atender llamada procedente de placa de calle ...................................... 14
- Establecer comunicación entre Conserje-Placa-Teléfono ......... 15
- Transferir directamente la llamada de Placa al Teléfono .......... 16
- Abrir la puerta a la visita ............................................................... 16
- Transferir la llamada a una vivienda distinta de la llamada...... 17
Realizar llamadas desde la conserjería ............................................... 18
Llamar a una vivienda (teléfono) .............................................................. 18
Llamar a una placa .................................................................................... 19
FUNCIONAMIENTO COMO CENTRAL DE INTERCOMUNICACIÓN ..........20
PROGRAMACIÓN Y CONFIGURACIÓN DE PARÁMETROS ...................... 21
Códigos .................................................................................................22
Parámetros (tiempo mínimo y conversación, idioma, beep) ...............23
Display (ajuste del contraste)............................................................... 24
Programación de teléfonos ...................................................................25
Llamar a una vivienda ...........................................................................25
ESQUEMA DE CONEXIONADO CENTRAL DE CONSERJERÍA................ 26
ESQUEMA DE CONEXIONADO CENTRAL DE INTERCOMUNICACIÓN...27
CARACTERÍSTICAS TÉCNICAS ..................................................................28
GUIA RAPIDA CENTRAL DE CONSERJERIA ADS .................................... 29
Pag 3
Page 4

INTRODUCCIÓN
Dependiendo de la configuración y el tipo de instalación, las funciones de la
Central de Conserjería ADS son las siguientes:
Funcionamiento como Central de Conserjería en edificios
Su función es la de atender llamadas desde y hacia las viviendas y la de hacer de
"filtro" entre las llamadas que desde las placas de calle se hacen a las viviendas.
En éste tipo de configuración están operativas todas las funciones disponibles en el
equipo, y cuyo manejo está explicado en las páginas 1 1 hasta la 19.
La Central de Conserjería sólo funciona con teléfonos y/o monitores ADS.
Para el montaje de la Central de Conserjería se requiere un Módulo de Conexiones
Ref. 2492. (Esquema de conexionado en la página 26).
Funcionamiento como Central de Intercomunicación
Una aplicación especial de éste equipo es la de Central de Recepción de llamadas en el denominado Sistema de Intercomunicación Radial ADS.
En éste tipo de configuración sólo están operativas las funciones de comunicación con teléfonos, por lo que el manejo está explicado en la página 20.
La Central de Intercomunicación sólo funciona con teléfonos y/o monitores ADS.
Esquema de conexionado en la página 27.
Pag 4
Page 5
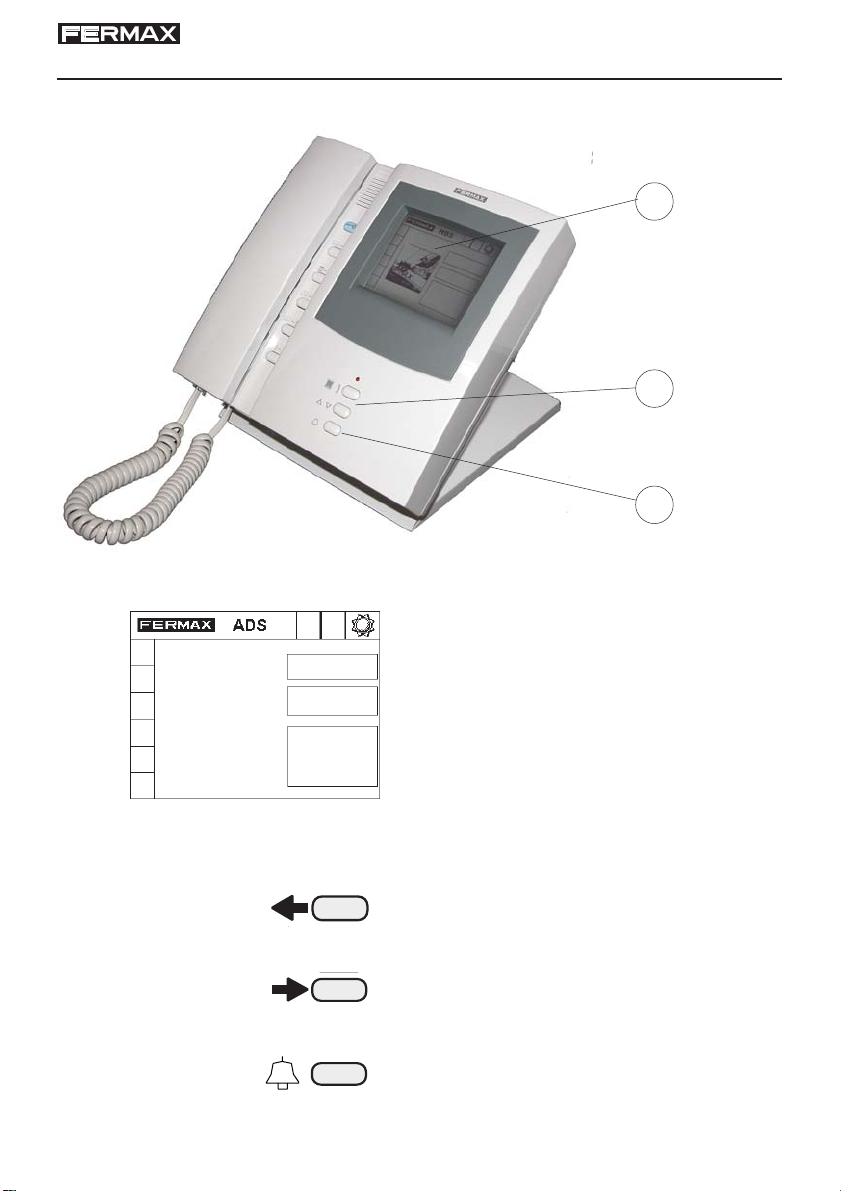
Controles de la Central de Conserjería de Sobremesa
1. DISPLAY
Ofrece información diversa durante el
manejo de la Central de Conserjería.
1
2
3
2. TECLAS DE CONTROL DE COLA
DE LLAMADAS
Conmutación entre la cola de llamadas
de placas y de teléfonos.
Selección cíclica de la llamada de la
cola actual (de placas o teléfonos).
3. LLAMADA (CAMPANA)
Para llamar a los teléfonos de las viviendas.
Pag 5
Page 6
4
4. TECLADO DE MARCACION
Se localiza debajo del brazo del teléfono. Sirve para
introducir el número de teléfono de la vivienda, número de placa y datos en general.
5. ACTIVACIÓN/DESACTIVACIÓN VISUALIZACIÓN DE
LAS COLAS DE LLAMADA.
Se utiliza para activar o desactivar la visualización de
las colas de llamada en el display de la conserjería.
6. BORRAR/ANULAR
65
Pulsar esta tecla para borrar los datos introducidos o
para anular la llamada actualmente seleccionada.
10
11
7
7. COMUNICACION CONSERJE-TELEFONO
Selecciona el canal de comunicación CONSERJERIA-TELÉFONO. Comunica con el último teléfono que
se ha llamado.
8
8. COMUNICACION PLACA PRINCIPAL-TELÉFONO
Activa el canal de comunicación entre la PLACA PRINCIPAL y el último TELÉFONO llamado.
9
9. COMUNICACION PLACA SECUNDARIA-TELÉFONO
Activa el canal de comunicación entre la PLACA SECUNDARIA y el último TELÉFONO llamado.
10. COMUNICACION CONSERJE- PLACA PRINCIPAL
Activa el canal de comunicación entre la CONSERJERÍA y la PLACA PRINCIPAL.
11. COMUNICACION CONSERJE- PLACA SECUNDARIA
Activa el canal de comunicación entre la CONSERJERÍA y la PLACA SECUNDARIA.
Pag 6
12
12. ABREPUERTAS
Tecla de accionamiento de abrepuertas.
Page 7
MODOS DE FUNCIONAMIENTO
Las características de los distintos modos de funcionamiento para edifica-
ciones con una sola Central de Conserjería son:
MODO DÍA
SI
NO
SI
SI
SI
SI
* La Central de Conserjería puede llamar y reci-
bir llamadas de los teléfonos.
* Las placas de calle no pueden llamar directa-
mente a los teléfonos.
* Las llamadas desde placa de calle hacia los
teléfonos son interceptadas por la Central de
Conserjería, que puede transferirlas al teléfono llamado o a cualquier otro.
MODO AUTOMÁTICO
* La Central de Conserjería puede llamar y reci-
bir llamadas de los teléfonos.
* Las placas de calle pueden llamar directamen-
te a los teléfonos.
* Las llamadas desde las placas de calle hacia
los teléfonos son monitorizadas en la Central
de Conserjería, pudiendo el conserje atender
las llamadas o no, y transferirlas a voluntad al
teléfono llamado o a cualquier otro.
SI
NO
NO
SI
MODO NOCHE
* La Central de Conserjería no atiende llamadas
de los teléfonos ni de las placas de calle. Funciona como si fuese una placa de calle más.
* Las placas de calle pueden llamar directamen-
te a los teléfonos.
Pag 7
Page 8
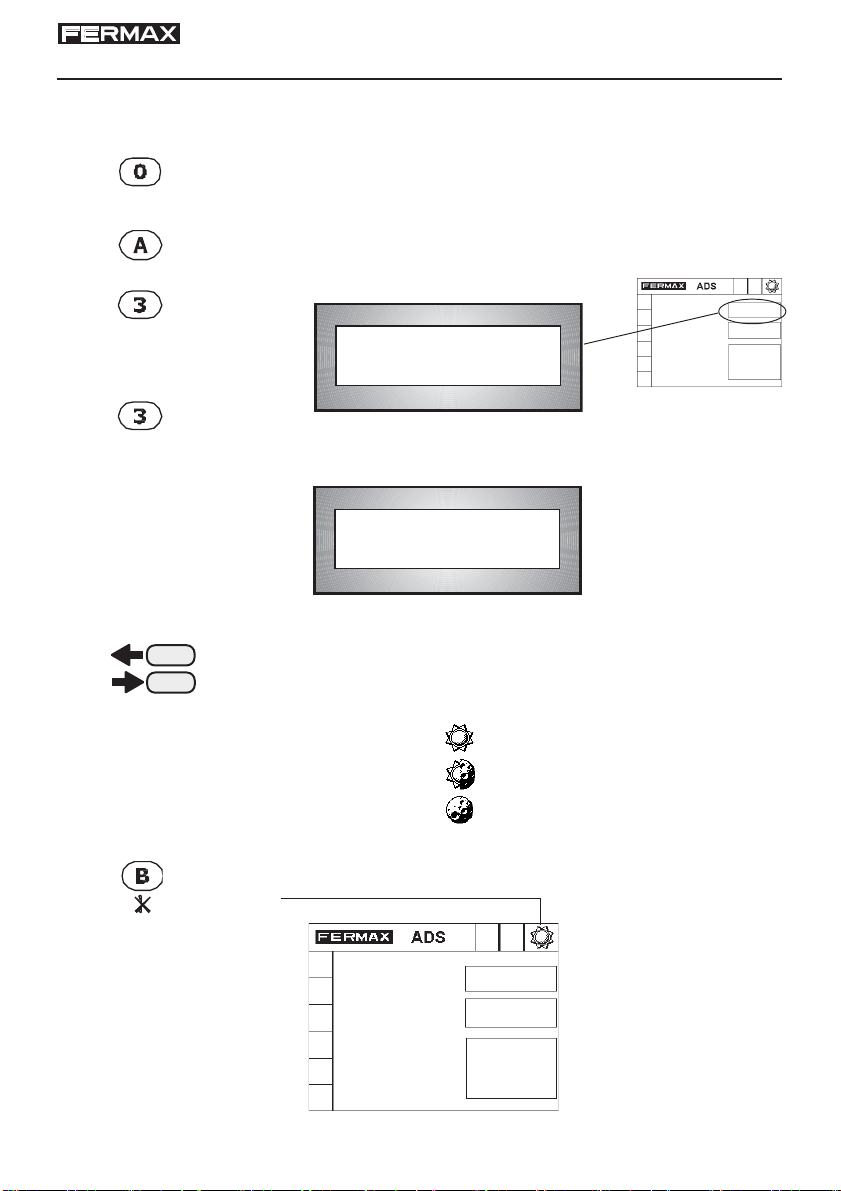
Selección del MODO de funcionamiento
La forma de seleccionar el MODO de funcionamiento es:
1. Pulsar "0"
El display mostrará una serie de guiones.
2. Pulsar la tecla "A" seguida de "3" repetidamente
hasta completar los guiones:
+
.
.
A333_ _
.
El display presentará el MODO actual:
Modo Actual
Dia
Pag 8
3. Utilizar las teclas de flecha (bajo el display) para
seleccionar el MODO deseado:
DIA
AUTO
NOCHE
4. Pulse la "B" cuando el MODO deseado aparezca en el
display.
Page 9
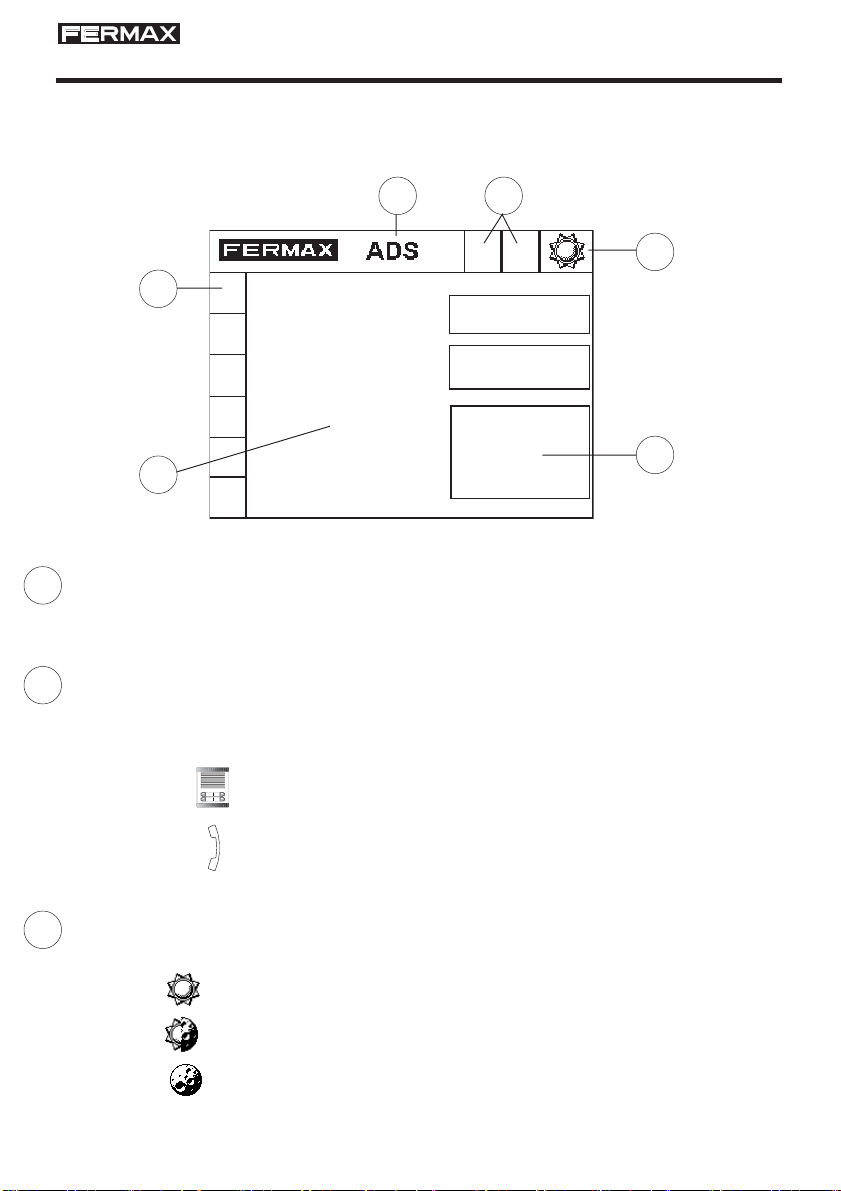
DISPLAY
La Central de Conserjería cuenta con un display gráfico de alta resolución (320x240
puntos) en el que se muestra la información al usuario. Se pueden distinguir varias
zonas en la pantalla, como muestra la figura:
1 2
3
6
5
TIPO DE CENTRAL DE CONSERJERIA
1
Indica que se trata de una Central de Conserjería ADS.
INDICACION DE LLAMADAS EN MEMORIA
2
Si aparecen los iconos de teléfono o placa, indica que hay llamadas
pendientes de tratar: llamadas en cola.
Llamadas pendientes de tratar procedentes de placas de calle.
Llamadas pendientes de tratar procedentes de teléfonos.
MODO DE FUNCIONAMIENTO
3
Según el icono mostrado indica el MODO en que está la Conserjería.
Modo DIA
Modo AUTOMÁTICO
4
Modo NOCHE
Pag 9
Page 10
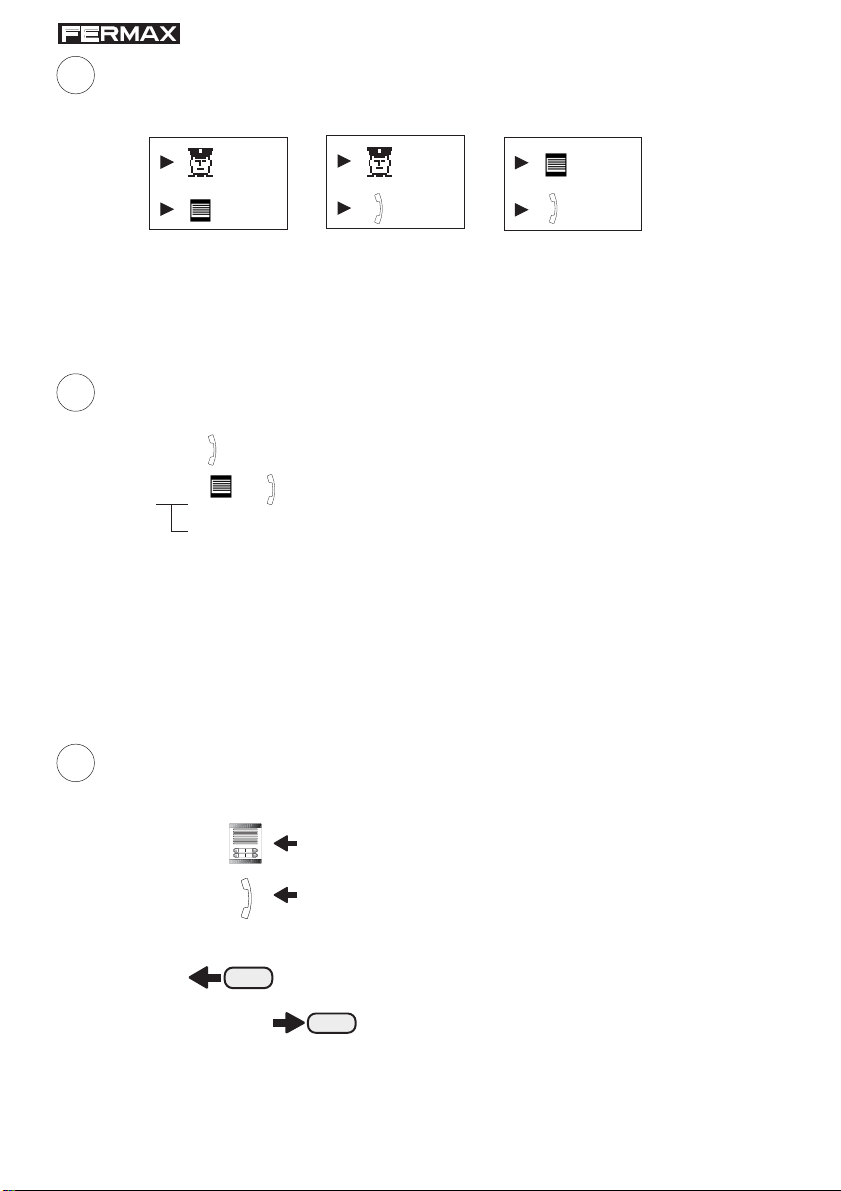
4
COMUNICACION EN CURSO
Informa de la comunicación que hay actualmente seleccionada:
a)
b) c)
02
01
012
027
a) Comunicación Conserje - Placa 1
b) Comunicación Conserje - Teléfono 12
c) Comunicación Placa 2 - Teléfono 27
DISPLAY PRINCIPAL - ZONA AUXILIAR
5
- Muestra información de las colas de llamada:
01 001 => Llamada en cola de la vivienda 1.
01 01 015 => Llamada en cola de la Placa 1 al Teléfono 15.
Indica el número de llamada en cola
Para activar o desactivar la visualización de las colas de llamada
pulsar la tecla "A"
- En modo programación, esta zona de la pantalla muestra los menús de
programación y configuración del sistema. Para más información ver
apartado "Programación".
6
MENU LATERAL
Muestra qué cola de llamadas se está atendiendo (teléfonos o placas).
Para seleccionar la cola de llamadas de Placas o de Teléfonos pulsar la
tecla .
Pulsar la tecla para seleccionar cíclicamente una llamada de
la cola actual (placas o teléfonos).
Pulsar la tecla "C" o "Campana" para establecer comunicación con el
teléfono o placa seleccionada.
Pag 10
Cola de llamadas de Placa seleccionada.
Cola de llamadas de teléfonos (viviendas) seleccionada.
Page 11
FUNCIONAMIENTO DE LA CENTRAL DE CONSERJERÍA
Gestión de Colas de Llamada
Estando en modos Día o Automático, la conserjería recibe y memoriza llamadas
que quedan automáticamente almacenadas en lo que denominamos COLAS de
llamadas hasta que son contestadas, que puede ser inmediatamente o posteriormente si el conserje está ausente.
Existen 3 tipos de cola:
* COLA de teléfonos: se almacenan las 20 últimas llamadas provenientes de
los teléfonos de las viviendas.
* COLA de llamadas de PLACA 1: se almacena la última llamada proveniente de
la Placa de Calle nº 1 o principal.
* COLA de llamadas de PLACA 2: se almacena la última llamada proveniente de
la PLACA de Calle nº 2 o secundaria (si existe).
Cuando la conserjería recibe una llamada, comienza a emitir una serie de "bips"
que no cesarán mientras haya llamadas en alguna de las COLAS, que podrán
ser seleccionadas por el conserje para atenderlas y/o anularlas en el orden que
desee.
Además de los "bips", el display de la conserjería ofrece una información relativa
a la naturaleza de las llamadas recibidas, y que quedó explicado en el apartado
anterior "Display".
Llamadas pendientes de
Placas y Teléfonos.
Pag 11
Page 12
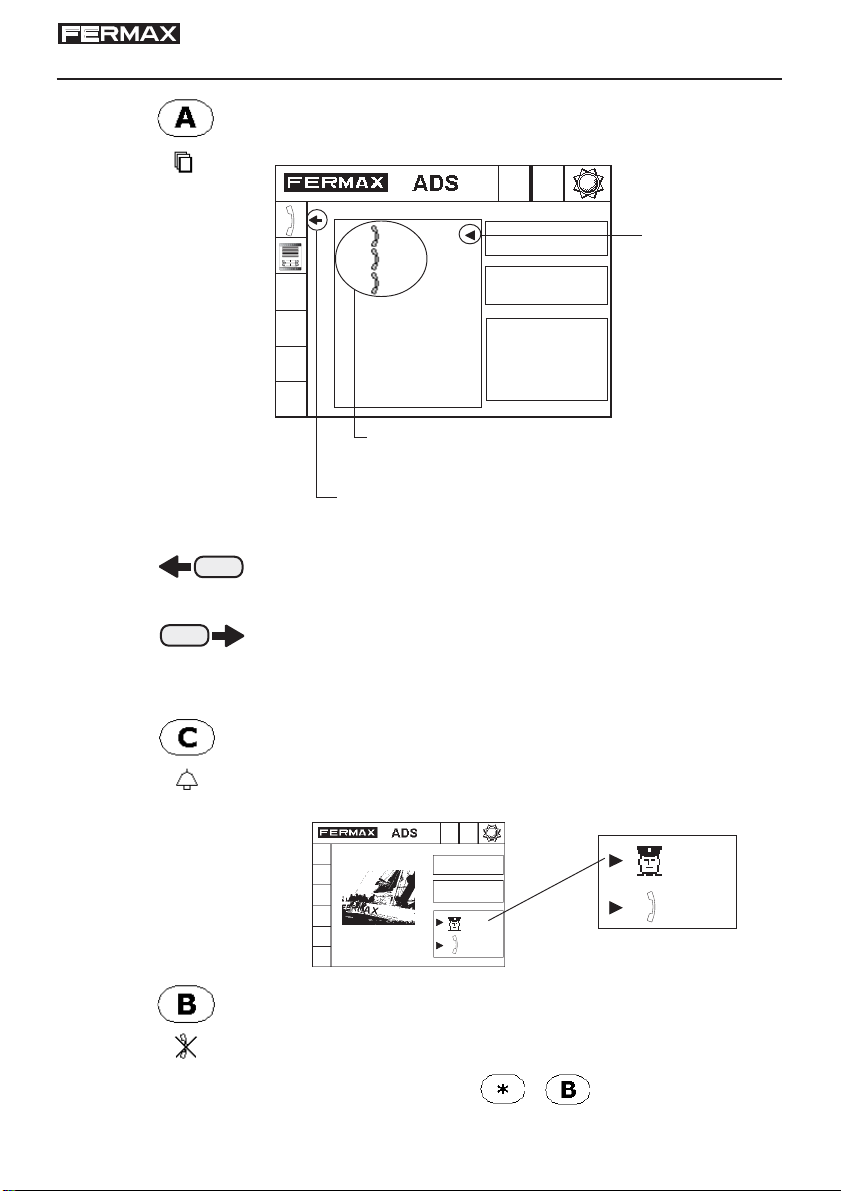
Selección de Cola de llamadas Teléfonos-Placa
1.Pulse el botón "A" para acceder a la pantalla de visua-
lización de cola de llamadas:
01 012
02 001
03
008
Llamada seleccionada de la lista de llamadas
pendientes.
Listado de llamadas pendientes de la cola seleccionada.
Indica la cola seleccionada (en este caso "cola
de llamadas desde teléfonos").
2.Pulse el botón "Flecha Izquierda" para seleccionar la
cola de llamadas de Placas o de Teléfonos.
3.Pulse el botón "Flecha derecha" para seleccionar
cíclicamente una llamada de la cola actual (placas o teléfonos).
4.1. Pulse la tecla "C" o "Campana" para establecer comuni-
cación con el teléfono o placa seleccionada.
El display indicará la comunicación actual
008
008
Comunicación entre Conserje
y Teléfono llamado (8)
4.2. Pulse la tecla "B" para borrar la llamada seleccionada de
la lista de llamadas pendientes.
Nota: Presionando simultáneamente las teclas y se eliminan todas las
llamadas pendientes de la cola seleccionada.
Pag 12
Page 13
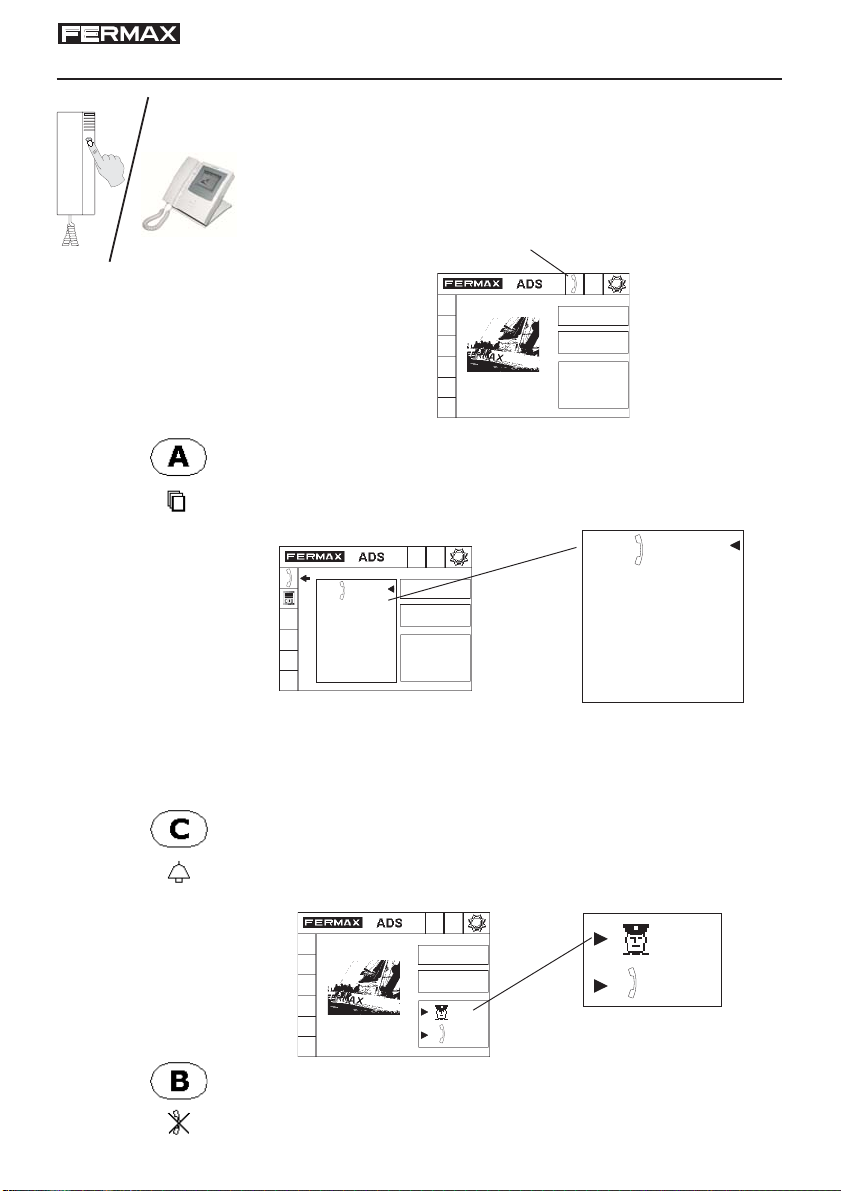
Atender llamada procedente de teléfono (vivienda)
!
Bip
Bip...
1.Un vecino llama al Conserje.
La Central de Conserjería comenzará a emitir unos "bips",
indicando que están llamando.
Además, parpadeará el LED de la Conserjería y el icono
correspondiente en la zona 2: Cola de llamadas de te-
léfono.
2.Para contestar la llamada descuelgue el teléfono de la
conserjería y pulse la tecla "A". Visualizará la pantalla
de cola de llamadas:
01 012
01 012
El display indica el número de teléfono desde el que
están llamando.
Ejemplo: Llamada desde el teléfono nº 12.
3. Para establecer comunicación con el teléfono, pulse la tecla
"C" o "Campana"
El display indicará comunicación CONSERJERÍA-TELÉFONO
012
012
Comunicación entre Conserje
y Teléfono 12
4. Para finalizar la comunicación cuelgue el teléfono o pulse la
tecla "B".
Pag 13
Page 14
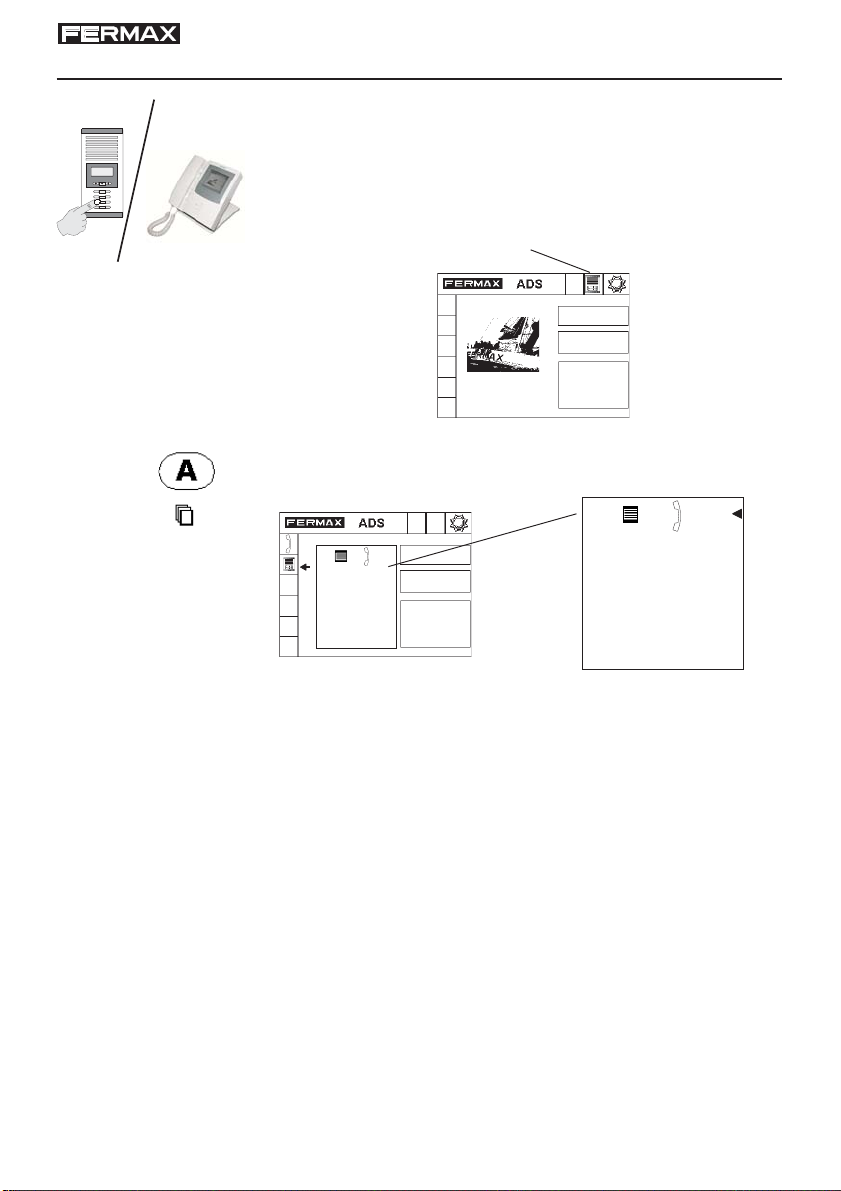
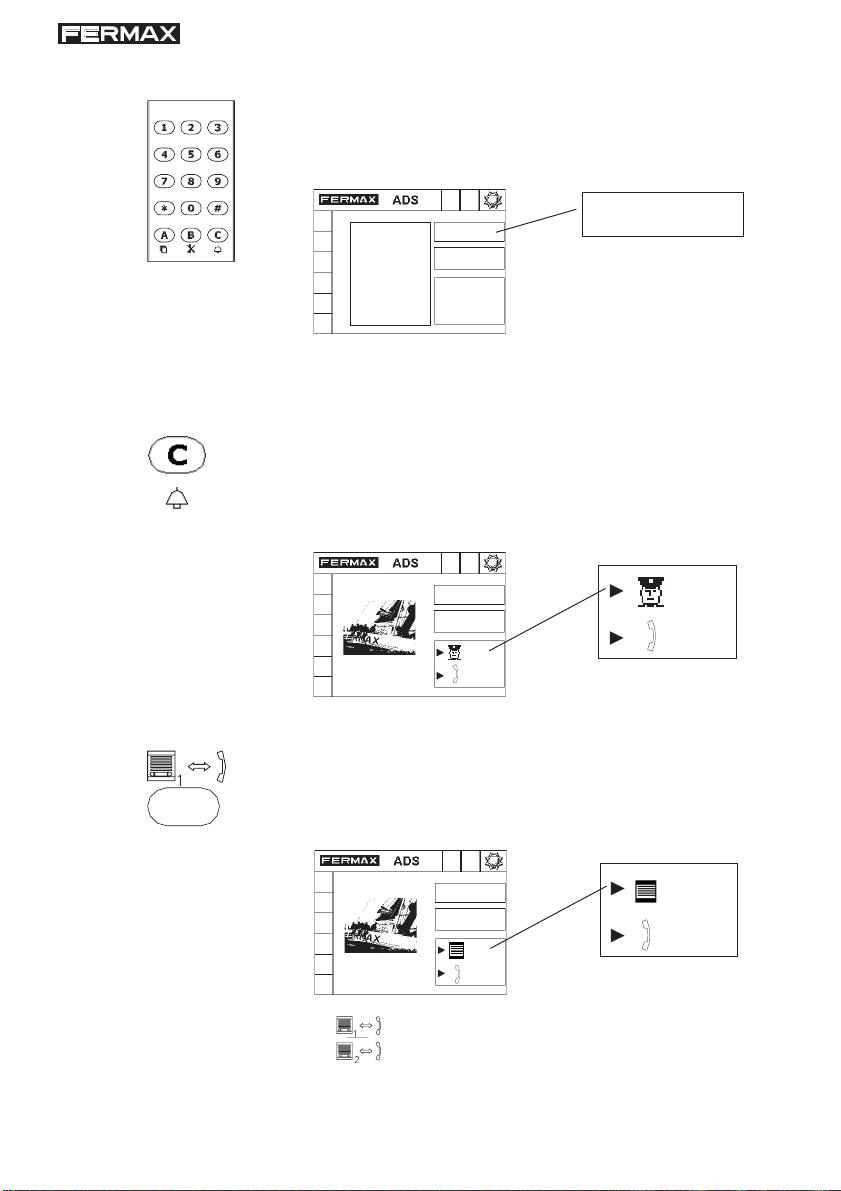
Atender llamada procedente de placa de calle
!
Bip
Bip...
1.Desde una placa de calle llaman a un teléfono.
La Central de Conserjería comenzará a emitir unos "bips",
indicando que están llamando.
132
465
798
A
B0
Además, parpadeará el LED de la Conserjería y el icono
correspondiente en la zona 2: Cola de llamadas de pla-
ca.
2.Para visualizar la cola de llamadas descuelgue el teléfo-
no de la conserjería y pulse la tecla "A":
01 01 027
01 01 027
El display indica el número de placa desde la que se
está llamando y el número de teléfono al que llaman.
Ejemplo: Llamada de la Placa nº1 (principal) al teléfono
nº 27.
En este momento se pueden realizar varias acciones diferentes:
- 3.A. Establecer comunicación entre Conserje-Placa-Teléfono
(para atender a la visita, informar de la visita y posteriormente poner a am-
bos en comunicación, si es lo deseado).
- 3.B. Transferir directamente la llamada de la Placa al Teléfono.
- 3.C. Abrir la puerta a la visita.
- 3.D. Transferir la llamada a una vivienda distinta a la que han llamado.
Pag 14
Page 15
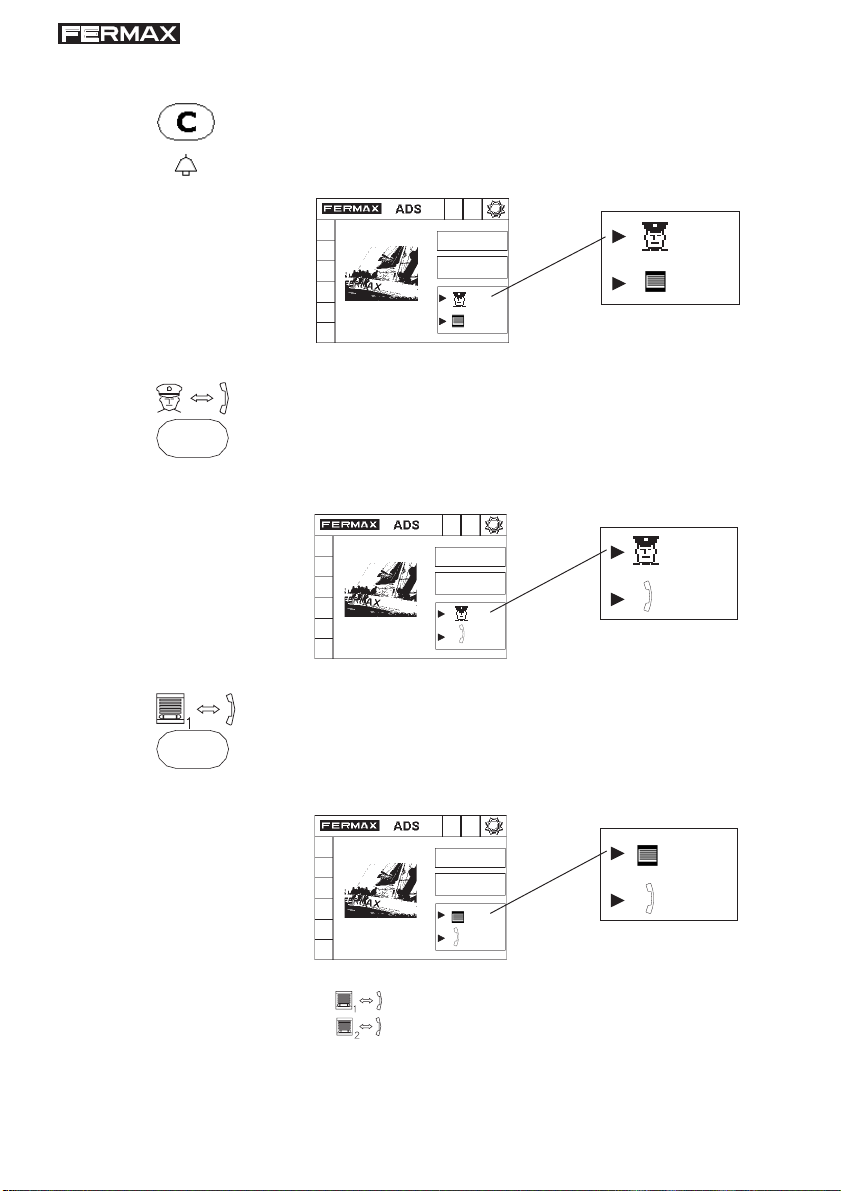
3.A. Establecer comunicación entre Conserje-Placa-Teléfono.
3.A.1. Para establecer comunicación con la Placa, pulse la
tecla "C" o "Campana"
El display indicará comunicación CONSERJE-PLACA.
01
Comunicación entre Conserje
y Placa 1 (o principal)
3.A.2. Pulse la tecla Conserje-Teléfono para establecer co-
municación CONSERJERÍA-TELÉFONO.
El display indicará comunicación CONSERJE-TELÉFONO.
01
027
027
Comunicación entre Conserje
y Teléfono llamado (27)
3.A.3. Pulse la tecla Placa (*)-Teléfono para establecer comu-
nicación PLACA-TELÉFONO.
El display indicará comunicación PLACA-TELÉFONO.
01
01
027
(*) si la llamada ha sido realizada desde la placa 1 o principal
si la llamada ha sido realizada desde la placa 2 o secundaria
Comunicación entre Placa 1 y
Teléfono llamado (27)
027
Cuelgue el teléfono de la conserjería. La visita podrá hablar
con la vivienda y abrir la puerta si lo desea.
Pag 15
Page 16
3.B. Transferir directamente la llamada de la Placa al Teléfono.
3.B.1. Para transferir directamente la llamada desde la placa de
calle al teléfono llamado y establecer la comunicación entre
ambos pulsar Placa (*)-Teléfono.
El display indicará comunicación PLACA-TELÉFONO.
01
(*) si la llamada ha sido realizada desde la placa 1 o principal
Cuelgue el teléfono de la conserjería. La visita podrá hablar
con la vivienda y abrir la puerta si lo desea.
3.C. Abrir la puerta a la visita.
3.C.1. Pulse la tecla "C" o "Campana" para establecer comuni-
cación con el Placa.
El display indicará comunicación CONSERJE-PLACA.
01
027
si la llamada ha sido realizada desde la placa 2 o secundaria
Comunicación entre Placa 1 y
Teléfono llamado (27)
027
01
01
Comunicación entre Conserje
y Placa 1 (o principal)
Pag 16
3.C.1. Pulse la tecla "Abrepuertas (Llave)" para abrir la puerta
mientras la comunicación entre Conserje-Placa aparece en
el display (si no aparece pulse la tecla Placa-Conserje
correspondiente).
Page 17
3.D. Transferir la llamada a una vivienda distinta a la que han llamado.
3.D.1. Estando en la pantalla de visualización de colas de pla-
ca, marque el número de la vivienda a la que desea trans-
ferir la llamada .
Código llamada:
6
Código llamada:
6
El display indica el nuevo número de teléfono al que
se quiere transferir la llamada.
3.D.2. Pulse la tecla "C" o "Campana" para establecer comu-
nicación entre el Conserje y el nuevo teléfono marcado.
El display indicará comunicación CONSERJE-TELÉFONO.
006
006
Comunicación entre Conserje
y Teléfono llamado (6)
3.D.3. Pulse la tecla Placa (*)-Teléfono para establecer comu-
nicación PLACA-TELÉFONO.
El display indicará comunicación PLACA-TELÉFONO.
01
01
006
(*) si la llamada ha sido realizada desde la placa 1 o principal
s i la llamada ha sido realizada desde la placa 2 o secundaria
Comunicación entre Placa 1 y
nuevo Teléfono llamado (6)
006
Cuelgue el teléfono de la conserjería. La visita podrá hablar
con la vivienda y abrir la puerta si lo desea.
Pag 17
Page 18
Realizar llamadas desde la conserjería
Desde la conserjería se pueden realizar llamadas a cualquier vivienda o placa
(principal o secundaria) de la instalación.
No se podrá establecer comunicación con las placas estando la conserjería en
modo Noche.
Llamar a una vivienda (teléfono).
1. Descuelgue el teléfono y marque el número de la vivienda
a la que desea llamar.
Código llamada:
12
Código llamada:
12
El display indica el número de teléfono al que se quie-
re llamar.
2. Puse la tecla "C" o "Campana" para establecer comunica-
ción con el teléfono marcado.
El display indicará comunicación CONSERJE-TELÉFONO.
012
012
Comunicación entre Conserje
y Teléfono llamado (12)
3. Para finalizar la comunicación cuelgue el teléfono o pulse la
tecla "B".
Nota
Una vez establecida la comunicación con la vivienda puede transferir la llamada a la
placa principal o secundaria pulsando el botón correspondiente ( o )
Pag 18
Page 19
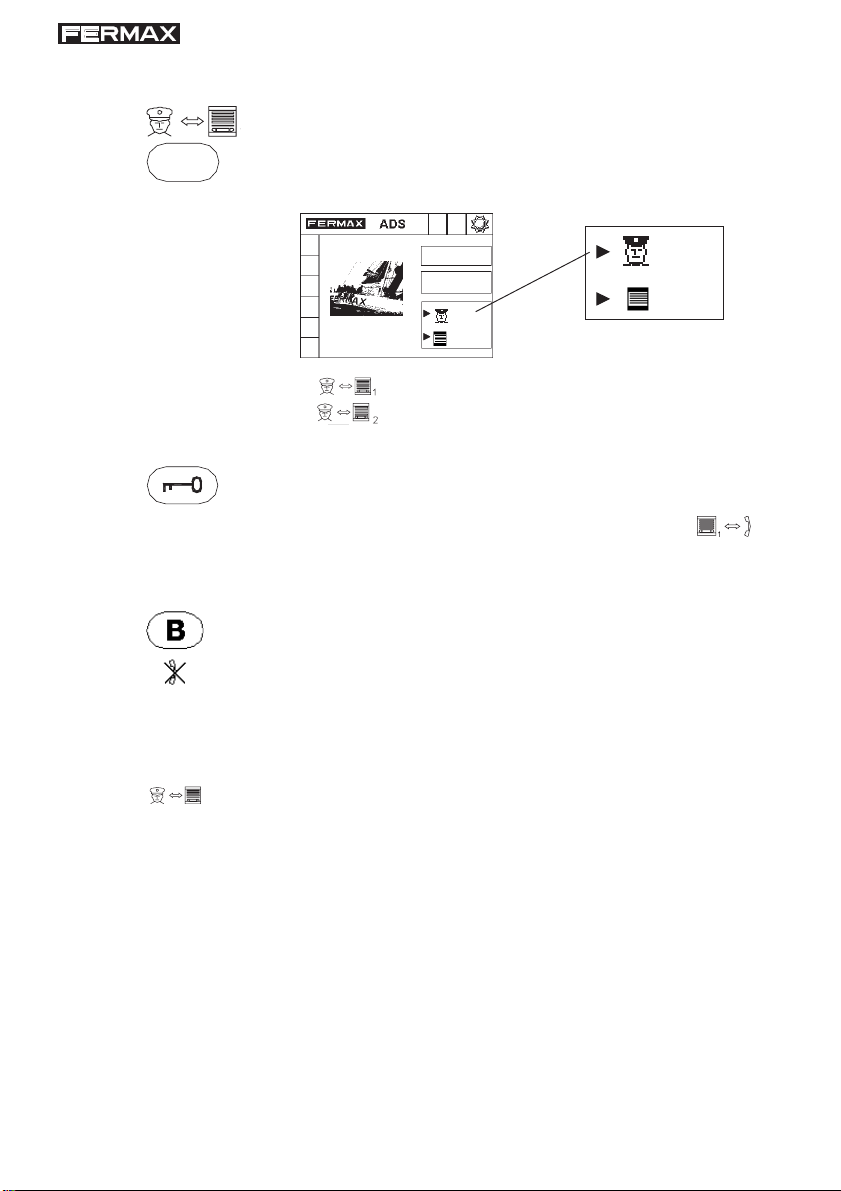
Llamar a una placa (establecer comunicación con la placa).
1. Descuelgue el teléfono y pulse la tecla Conserje-Placa (*)
para establecer comunicación CONSERJE-PLACA.
El display indicará comunicación CONSERJE-PLACA
01
(*) si desea establecer comunicación con la placa 1 o principal
si desea establecer comunicación con la placa 2 o secundaria
Comunicación entre Conserje
y Placa 1 (o principal)
2. Pulse la tecla "Abrepuertas (Llave)" para abrir la puerta mien-
tras la comunicación entre Conserje-Placa aparece en el display (si no aparece pulse la tecla Placa-Conserje co-
rrespondiente).
3. Para finalizar la comunicación cuelgue el teléfono o pulse la
tecla "B".
01
Nota
Puede conmutar la comunicación entre una placa u otra pulsando el botón correspondiente a Placa principal (1) o secundaria (2).
Pag 19
Page 20

FUNCIONAMIENTO COMO CENTRAL DE INTERCOMUNICACIÓN
Una aplicación especial de la Central ADS es la de central de Intercomunicación en
un Sistema de Intercomunicación Radial ADS, utilizándose únicamente las
funciones de hacer y recibir llamadas desde y hacia los teléfonos secundarios
conectados al sistema.
Al igual que en el funcionamiento como conserjería, cada vez que se recibe una
llamada la central comienza a emitir una serie de "bips" constantemente,
memorizándose dicha llamada en lo que denominamos COLA de llamadas, pudiendo
contestar inmediatamente, como se explica en el apartado "Atender llamada
procedente de teléfono (vivienda)" en la página 13, o bien posteriormente,
realizando una llamada al teléfono correspondiente, ver aparatado "Llamar a una
vivienda (teléfono)" en la página 18.
Según el Modo de Funcionamiento seleccionado, la central de intercomunicación
funcionará de la siguiente manera:
- MODO DIA o MODO AUTOMATICO: Puede hacer y recibe llamadas de los
teléfonos secundarios.
- MODO NOCHE: Puede hacer llamadas a los teléfonos secundarios, pero no
las recibe.
Pag 20
Page 21

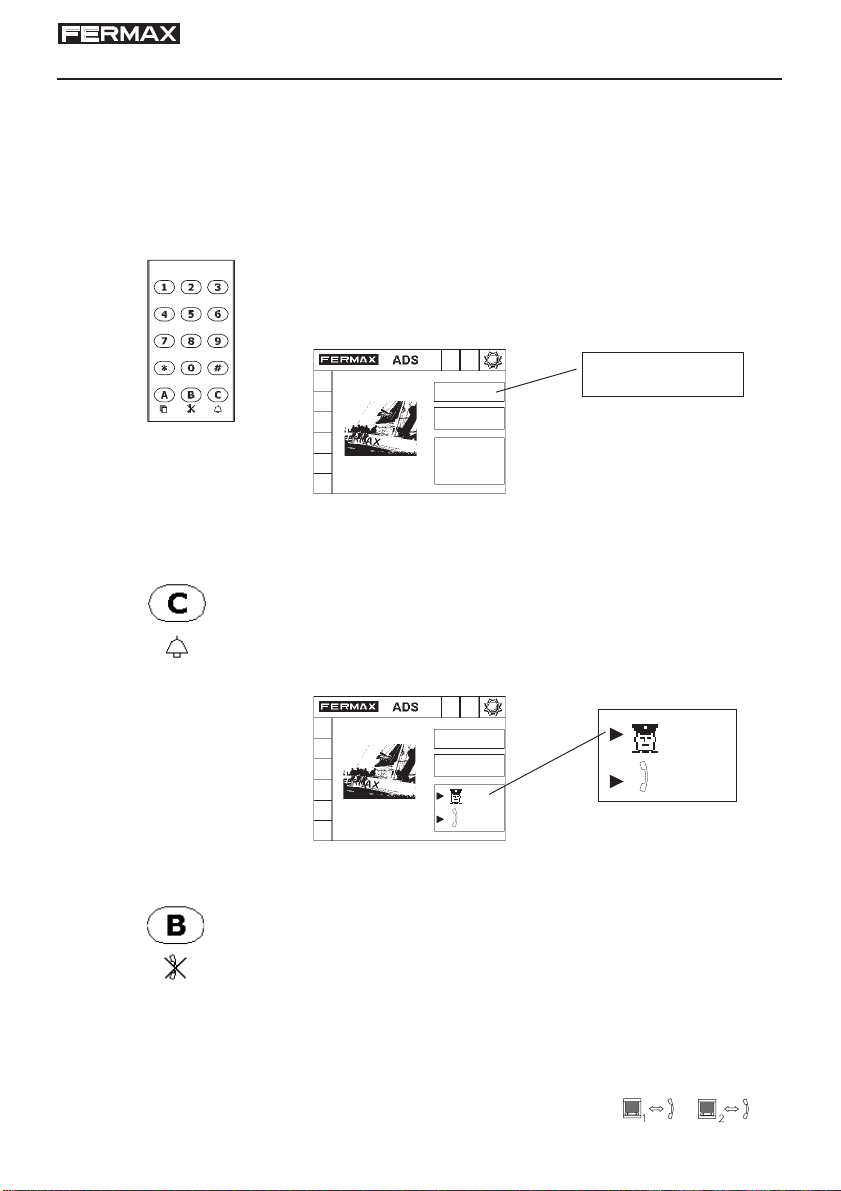
PROGRAMACIÓN Y CONFIGURACIÓN DE PARÁMETROS
A continuación se explican algunos aspectos que, más que de funcionamiento se
refieren a parámetros de configuración del equipo, por lo que, para evitar anomalías
indeseadas en el funcionamiento, solo deberían ser utilizados por el personal técnico
encargado del mantenimiento del sistema.
Programación
Para entrar en modo programación:
1. Pulsar "0"
El display mostrará una serie de guiones.
2. Introducir el código de acceso: AB21AB
Código de acceso
Código de acceso
_______
A continuación introducir el código de programación: 19025
(este código puede ser modificado por el instalador).
Cod. programacion
_______
******
Cod. programacion
******
El display muestra el menú principal de programación:
Menu Principal
Menu Principal
1-Codigos
2-Parametros
3-Display
4-Prog. Telefon
B-Salir
1-Codigos
2-Parametros
3-Display
4-Prog. telefon
B-Salir
Para acceder a cada una de las opciones del menú principal pulsar la
tecla correspondiente al número que precede a cada opción (por ejemplo, para acceder a la opción "Códigos" pulsar la tecla 1") .
Pulsar la tecla "B" para salir del modo programación.
Pag 21
Page 22

Menú Principal - Códigos
Este menú permite modificar el número de dígitos del código de acceso y el
código de entrada en programación (por defecto 19025).
Para acceder a "Códigos" desde el menú principal:
1. Pulsar "1"
El Menú Códigos presenta dos opciones:
Menu Codigos
Menu Codigos
1-Digitos
2-Cod.Prog
B-Salir
1-Digitos
2-Cod. Prog
B-Salir
2. Seleccionar la opción a modificar pulsando la tecla
correspondiente al número que precede a cada opción.
La información referente a la opción seleccionada
aparece en el recuadro superior derecho del display:
Digitos (4, 5, 6)
6
Cod. programacion
Pag 22
Menu Codigos
1-Digitos
2-Cod.Prog
B-Salir
Digitos (4, 5, 6)
6
Dígitos: Permite modificar el nº de dígitos del código
de acceso.
Cod. Prog: Permite modificar el código de entrada
en programación
Introducir mediante el teclado los nuevos valores de cada
opción.
Pulsar la tecla "B" para confirmar.
Pulsar de nuevo la tecla "B" para salir.
Page 23

Menú Principal - Parámetros
Este menú permite modificar los tiempos mínimo y máximo de conversación, el
idioma y activar/desactivar el indicador acústico de cola de llamadas.
Para acceder a "Parámetros" desde el menú principal:
1. Pulsar "2"
El Menú Parámetros presenta cuatro opciones:
Menu Parametros
Menu Parametros
1-Tiempo Minimo
2-T.Convers.
3-Idioma
4-Beep Auto
B-Salir
1-Tiempo Minimo
2-T. Convers.
3-Idioma
4-Beep Auto
B-Salir
2. Seleccionar la opción a modificar pulsando la tecla
correspondiente al número que precede a cada opción.
La información referente a la opción seleccionada
aparece en el recuadro superior derecho del display:
T. Minimo (10-60)
10
Menu Parametros
1-Tiempo Minimo
2-T.Convers.
3-Idioma
4-Beep Auto
B-Salir
Tiempo Mínimo: Define la duración mínima de una
llamada (entre 10 y 60 segundos) durante a cual
T. Minimo (10-60)
10
nadie (excepto el conserje) puede cortar la
comunicación.
T. Conv. (10-90)
010
Tiempo Conversación: Es el máximo tiempo de
duración de una conversación, tras el cual se
interrumpe ésta automáticamente. Es seleccionable
de 10 a 90 seg.
Idioma (1 - 4)
1
idioma: Esta opción permite elegir el idioma de los
menús de la conserjería. Se puede seleccionar entre
1 (español), 2 (inglés), 3 (francés), 4 (alemán).
Beep Auto
1-Beep ON
2-Beep OFF
Beep Auto: Permite activar (1) o desactivar (2) el
aviso acústico de llamadas en cola.
Introducir mediante el teclado los nuevos valores de cada opción. Pulsar la tecla "B"
para confirmar .
Pulsar de nuevo la tecla "B" para salir.
Pag 23
Page 24

Menú Principal - Display
Este menú permite modificar el contraste de la pantalla LCD de la conserjería.
Para acceder a "Display" desde el menú principal:
1. Pulsar "3"
El Menú Display presenta dos opciones:
Menu Display
Menu Display
CONTRASTE
M1 decrementa
M2 incremente
B-Salir
CONTRASTE
M1 decrementa
M2 incrementa
B-Salir
2.Pulse el botón "Flecha Izquierda (M1)" para disminuir
el contraste de la pantalla.
Pulse el botón "Flecha derecha (M2)" para aumentar el
contraste de la pantalla.
Pulsar la tecla "B" para confirmar y salir del menú Display
Pag 24
El valor de contraste seleccionado se almacenará en una memoria no
volátil por lo que, aún quitando alimentación, se mantendrá en el valor
establecido.
Page 25

Menú Principal - Programación Teléfonos
Este menú permite habilitar la programación de teléfono/monitores ADS desde la
Central de Conserjería ADS.
Para acceder a "Prog. telefon" desde el menú principal:
1. Pulsar "4"
El Menú Prog. telefon presenta dos opciones:
Menu Prog.
Menu prog.
1-Prog. ON
2-Prog. OFF
B-Salir
1-Prog. ON
2-Prog. OFF
B-Salir
Prog. ON: Habilita la programación de teléfonos/Monitores
ADS desde la Central de Conserjería ADS.
1º- Pulsar la tecla "1" para habilitar la programación.
Si la programación de teléfonos/monitores desde
conserjería está permitida, aparece en la parte
Menu prog.
1-Prog. ON
2-Prog. OFF
izquierda del display un símbolo de un teléfono
Las placas se deshabilitan (no se puede llamar) y la
conserjería se queda esperando la programación de
teléfonos.
B-Salir
Si se resetea el equipo, la programación se deshabilita.
2º - Salir del menú programación y del menú principal
(pulsar dos veces la tecla "B").
3º- Poner el teléfono/monitor en modo programación
(dispondrá de comunicación de audio con el mismo).
4º- Introducir, mediante el teclado de la conserjería, el
nº de vivienda a asignar (entre 1 y 199) y pulse la
tecla "C" o "Campana".
5º- Poner el teléfono/monitor fuera de programación.
Repitir los pasos del 3 al 5 hasta programar todos los teléfonos/
monitores de la instalación. Deshabilitar la opción Prog. ON
Prog. OFF: No se permite la programación de teléfonos/
monitores ADS desde la central de conserjería ADS.
Pulsar la tecla "2" para deshabilitar la programación.
Pulsar la tecla "B" para salir.
Pag 25
Page 26

ESQUEMA DE CONEXIONADO CENTRAL DE CONSERJERÍA
Conexión a Plantas
COAX
HIGH RESOLUTION
FLAT MONITOR
1
2
Conexión a Placas de calle
PLACA
ACCESO 2
ALIMENTACION
18 Vdc
-
+
-
+
L
-
+
-
MODULO DE CONEXIONES
CONSERJERÍA
ADS
-
+
L
C3
A
MM WMVxM A
V1C2 V2
MV
+
S
Vx
+
LB SMS
REF.2492
PLACA
ACCESO 1
COAX
-
L
-
L
M
V2
+-
COAX
-
L
+
+
-
L
M
C1
V1
B
C2
C1
LxC3 Li
Conexión a
Conserjería ADS
Pag 26
MODULO DE CONEXIONES
CONSERJERIA ADS
CENTRAL DE CONSERJERIA ADS
Page 27

ESQUEMA DE CONEXIONADO CENTRAL DE INTERCOMUNICACIÓN
106CI06E
T-AT
106CI06E
T-AT
n-1 n-2
++A-
L
(*) VER NOTA
10 Kohm
L
+
ULTIMA PLANTA
1-1 1-2
++A-
L
106CI06E
-A +A
T T
106CI06E
-A +A
T T
PRIMERA PLANTA
+
100 : 240 Vac
L
-
+-
L
+-
L
-+ -+
SEC. 18VDCPRIM 220VAC
ALIMENTADOR VIDEO
VIDEO POWER SUPPLY
18 Vdc
CONSERJERIA ADS
* NOTA: Es necesario colocar una resistencia de 10 Kohm entre los bornes + y L del ramal, (o de cada
ramal si son varios, hasta un máximo de 5).
Pag 27
Page 28

CARACTERÍSTICAS TÉCNICAS
Características técnicas
Alimentación: 18Vdc
Rango de Temperaturas: 10 ~ 60 ºC
La instalación de la Central de Conserjería ADS Ref. 2536 es compatible con la
anterior Central de Conserjería.
Se ha previsto un módulo de conexiones que incorpora todas las conexiones necesarias para su instalación.
Conectores:
‘+’ Alimentación (+18VDC)
‘-’ Alimentación (GND)
‘Sa’ Sin función en este modelo
‘Sb’ Sin función en este modelo
‘C1,C2,C3’ Líneas de control
‘LX’ Sin función en este modelo
‘LI’ Línea L ADS
(Datos+Audio de/hacia la C. de Conserjería)
‘AT’ Altavoz externo.
Pag 28
Page 29

GUIA RAPIDA CENTRAL DE CONSERJERIA ADS
Las principales funciones de la Central de Conserjería ADS son:
* Atender llamadas de Teléfonos o Monitores
* Atender llamadas de Placas de Calle
* Comunicar con Placas de Calle
* Comunicar con Teléfonos o Monitores
Modos básicos de operación
Para efectuar estas operaciones, es preciso haber configurado la Central
de Conserjería en un modo adecuado a las funciones a realizar.
Los modos básicos de funcionamiento son NOCHE, DIA y AUTOMÁTICO.
Las llamadas de Placas de Calle sólo se capturarán si el modo es DIA, mientras
que las de Teléfonos o Monitores se reciben en DIA y AUTO. En modo NOCHE,
la Conserjería actúa como una placa más.
Selección del modo de operación
El modo de trabajo de la Conserjería se selecciona introduciendo la secuencia 0 A 3 3 3 3 3 y pulsando seguidamente las flechas de búsqueda para
elegir el modo deseado:
Modo Actual:
Día
Introducir 0 A 3 3 3 3 3
Selección de modo
Validación de la selección
Pag 29
Page 30

Atender llamadas
Si la Conserjería está en modo DIA o AUTO, se recibirán llamadas de
placas y de teléfonos.
Llamada desde TELEFONO o MONITOR
!
Bip
Bip...
Llamada desde teléfono
o monitor
Para comunicar con el Teléfono, pulsaremos:
Visualiza la pantalla de
cola de llamadas:
01 012
+
Establece comunicación con la vivienda:
Si queremos repetir la llamada al último Teléfono, pulsaremos:
Pag 30
012
Page 31

Llamada desde PLACA
!
Bip
Bip...
132
465
798
A
B0
Para comunicar con la Placa, pulsaremos:
Visualiza la pantalla de
cola de llamadas:
+
Establece comunicación con la Placa.
Para abrir la puerta, pulsaremos:
Llamada desde Placa
01 01 027
Para comunicar con el teléfono o monitor llamado, pulsaremos:
Si finalmente deseamos transferir la llamada, pulsaremos:
(*)
(*) si la llamada ha sido realizada desde la placa 1 o principal
si la llamada ha sido realizada desde la placa 2 o secundaria
En caso de no desear transferir la comunicación, pulsar de nuevo:
o bien anular la comunicación con
Nota: Para transferir la llamada a otro teléfono diferente al llamado ver página 17.
Pag 31
Page 32

Comunicar con Placas y Teléfonos
Si la Conserjería está en modo DIA o AUTO, el Conserje puede comunicar, de
iniciativa propia, con cualquier Placa o Teléfono de la instalación.
Comunicar con PLACAS
Si el Conserje desea establecer comunicación con la Placa 1 (Principal) o Placa
2 (Secundaria) (si existe), debe marcar:
Establece comunicación con Placa 1.
Establece comunicación con Placa 2.
01
Para abrir la puerta, pulsaremos:
Comunicar con TELEFONOS o MONITORES
Para establecer comunicación con cualquier Teléfono o Monitor, sin mediar llamada previa, se debe marcar:
NNN +
(1-199)
(ó )
Ejemplo: para llamar al teléfono 35 pulsaremos:
35 +
035
Pag 32
Page 33

ENGLISH
Page 34

ADS DESKTOP GUARD UNIT MANUAL Ref. 2536
Code 97001EI V07_05
This technical document is published by FERMAX ELECTRONICA for information purposes,
and the company reserves the right to modify features of the products referred to herein, at
any time and without prior notice. Said changes shall be reflected in subsequent editions
of the same.
ENGLISH
Pag 2
Page 35

INDEX
INTRODUCTION ............................................................................................. 4
Desktop Guard Unit Controls................................................................ 5
BASIC OPERATING MODES ........................................................................7
Operating mode selection ..................................................................... 8
DISPLAY .........................................................................................................9
Main MDS Display ................................................................................9
GUARD UNIT OPERATION ............................................................................ 11
Call queues management ..................................................................... 11
Telephone-Panels call queue selection .................................................. 12
Answering calls from telephone ............................................................... 13
Answering calls from outdoor panel........................................................ 14
-Set up communication between Guard Unit-Panel-Telephone ... 15
-Transfer call from Panel to Telephone directly ............................. 16
-Open door to visitor......................................................................... 16
-Transfer call to home other than called ......................................... 17
Making calls from Guard Unit ............................................................... 18
House call (telephone) .............................................................................. 18
Call to a panel............................................................................................ 19
OPERATION AS INTERCOMMUNICATION CENTRE ..................................20
PARAMETER PROGRAMMING AND CONFIGURATION ............................ 21
Codes .................................................................................................... 22
Parameters (minimum time and conversation, language, beep) ......... 23
Display (adjust contrast) ...................................................................... 24
Programming telephones ......................................................................25
House call ............................................................................................. 25
GUARD UNIT CONNECTION DIAGRAM....................................................... 26
INTERCOMMUNICATION CENTRE CONNECTION DIAGRAM ................... 27
TECHNICAL FEATURES ............................................................................... 28
ADS GUARD UNIT FAST GUIDE ..................................................................29
Pag 3
Page 36

INTRODUCTION
Depending on the configuration and type of installation, the ADS Guard Unit
operations are as follows:
Operation as Guard Unit in buildings
The function is to answer calls to and from homes and operate as a 'filter' between
the calls made from the outdoor panels to the homes.
In this type of configuration, all the functions available in the equipment are operative,
and their handling is explained on pages 1 1 to 19.
The Guard Unit only works with ADS telephones and/or monitors.
Assembly of the Guard Unit requires a Connections Module Ref. 2492. (Connection
diagram on page 26).
Operation as Intrercommunication Centre
One special application of this equipment is as an Alarms Reception Centre in
the designated ADS Radial Intercommunication System.
In this type of configuration only the telephone communication functions are
operative, so the handling is explained on page 20.
The Intercomunication Centre only works with ADS telephones and/or monitors.
Connection diagram on 27.
Pag 4
Page 37

Desktop Guard Unit Controls
1
2
3
1. DISPLAY
Provides different types of information
during Guard Unit operation.
2. CALL QUEUE CONTROL KEYS
Switch between panel and telephone
call queues.
Cyclic call selection from current queue
(from panels or telephones).
3. CALL (BELL)
For calls to house telephones.
Pag 5
Page 38

4
4. DIALLING KEYPAD
Located under the telephone handset. Serves to enter
the house telephone number, panel number and data in
general.
5. CALL QUEUE VIEWER ACTIVATION/DEACTIVATION.
Used to activate or deactivate call queue viewing on
the guard unit display.
6. DELETE/CANCEL
Press this key to delete the data entered or to cancel
65
the call currently selected.
10
11
7
7. GUARD UNIT-TELEPHONE COMMUNICATION
Selects the GUARD UNIT-TELEPHONE
communication channel. Communicates with the last
telephone called.
8
8. MAIN PANEL-TELEPHONE COMUNICATION
Activates the communication channel between the
MAIN PANEL and the last TELEPHONE called.
9
9. SECONDARY PANEL-TELEPHONE COMMUNICATION
Activates the communication channel between the
SECONDARY PANEL and the last TELEPHONE
called.
10. GUARD UNIT-MAIN PANEL COMMUNICATION
Activates the communication channel between the
GUARD UNIT and the MAIN PANEL.
11. GUARD UNIT-SECONDARY PANEL COMMUNICATION
Activates the communication channel between the
GUARD UNIT and the SECONDARY PANEL.
Pag 6
12
12. DOOR RELEASE
Electric lock action key.
Page 39

OPERATING MODES
Features of the different operational modes for buildings with only one Guard
unit are:
DAY MODE
YES
NO
YES
YES
YES
YES
* The Guard Unit can make and receive calls from
the telephones.
* The outdoor panels cannot call the telephones
directly.
* Calls from the outdoor panel to the telephones
are intercepted by the Guard Unit, which may
transfer them to the telephone called, or to any
other.
AUTOMATIC MODE
* The Guard Unit can make and receive calls from
the telephones.
* The outdoor panels can call the telephones
directly.
* Calls from the outdoor panels to the telephones
are monitored in the Guard Unit, where the
concierge can answer the calls or not, and
transfer them at will to the telephone called, or
to any other.
YES
NO
NO
YES
NIGHT MODE
* The Guard Unit does not answer calls from the
telephones or from the outdoor panels. It works
as though it were any other outdoor panel.
* The outdoor panels can call the telephones
directly.
Pag 7
Page 40

SELECT OPERATING MODE
Here is how to select the Operating MODE:
1. Press "0"
The display shows a series of dashes .
2. Press the "A" key followed by "3" repeatedly
to fill in the dashes:
+
.
.
A333_ _
.
The display shows the current MODE:
Current Mode
Day
Pag 8
3. Use the arrow keys (below the display) to select the
desired MODE:
DAY
AUTO
NIGHT
4. Press the"B" key when the MODE you want comes up on
the display.
Page 41

DISPLAY
The Guard Unit has a high resolution graphic display (320x240 pts) showing
information for the user. Several zones may be distinguished on screen, as shown in
the figure:
1 2
3
6
5
GUARD UNIT TYPE
1
Indicates that it is an ADS Guard Unit.
INDICATION OF CALLS IN MEMORY
2
If the telephone or panel icons appear, it indicates that there are
calls waiting to be dealt with: calls in queue.
Calls waiting from outdoor panels.
Calls waiting from telephones.
OPERATING MODE
3
Depending on the icon shown, indicates the MODE the Guard Unit is
in.
DAY Mode
AUTOMATIC Mode
4
NIGHT Mode
Pag 9
Page 42

4
COMMUNICATION IN PROGRESS
Informs on the communication currently selected:
a)
b) c)
02
01
012
027
a) Guard Unit communication - Panel 1
b) Guard Unit communication - Telephone 12
c) Panel 2 communication - Telephone 27
MAIN DISPLAY - AUXILIARY ZONE
5
- Shows information on the call queues:
01 001 => Call waiting from house number1.
01 01 015 => Call waiting from Panel 1 to Telephone 15.
Indicates the call queue number
To activate or deactivate the call queue viewer, press the "A" key
- In programming mode this screen zone shows the system programming
and configuration menus. For further information, see the "Programming"
section.
6
LATERAL MENU
Shows which call queue is being attended to (telephones or panels).
To select the Panels or Telephones call queue, press the . key
Press the key to select a current call queue cyclically (panels
or telephones).
Press the "C" or "Bell" key to set up communication with the telephone
or panel selected.
Pag 10
Panel call queue selected.
Call queue from telephones (homes) selected.
Page 43

GUARD UNIT OPERATION
Call Queue Management
When in DAY or AUTOMATIC mode, the guard unit receives and memorises calls
which are automatically stored in the so-called call QUEUES until they are
answered, which may be immediately or later if the concierge is away.
Ther are 3 type of queue:
* Telephones QUEUE : the last 20 calls from house telephones are stored.
* QUEUE of calls from PANEL 1: the last call from Outdoor Panel nº 1 or Main
Panel is stored.
* QUEUE of calls from PANEL 2: the last call from Outdoor Panel nº 2 or Secondary
Panel (if there is one) is stored.
When the guard unit receives a call, it starts to emit a series of "beeps" that will
not stop while there are calls in any of the QUEUES, which may be selected by
the concierge to answer and/or cancel them in the desired order.
In addition to the "beeps", the guard unit display offers information relating to the
nature of the calls received, and which is explained in the "Display" section above.
Calls waiting from Panels
and Telephones
Pag 11
Page 44

Telephone-Panel Call Queue Selection
1. Press button "A" to access the call queue viewing
screen:
01 012
02 001
03
008
Call selected
from the list of
calls waiting
List of calls pending from selected list
Indicates the queue selected (in this case, "calls
from telephones queue")
2. Press the "Left Arrow" button to select the queue of
calls from Panels or Telephones.
3. Press the "Right Arrow" button to select a call from
the current queue (panels or telephones).
4.1. Press the "C" or "Bell" key to set up communication with
the telephone or panel selected.
The display indicates the current communication
008
008
Communication between
Concierge and Telephone
called (8)
4.2. Press the"B" key to delete the call selected from the list
of calls waiting.
Note: Pressing the and keys simultaneously deletes all calls pending
from the queue selected.
Pag 12
Page 45

Answering a Call from a Telephone (home)
!
Bip
Bip...
1. A resident call the concierge.
The Guard Unit starts to emit "beeps", indicating there
is a call coming through.
In addition, the Guard Unit LED starts to blink as well as
the corresponding icon in zone 2: Telephone Calls
Queue.
2. To answer the call, unhook the Guard Unit phone and
press the "A" key. You will see the call queue screen:
01 012
01 012
The display indicates the telephone number the call is
coming from.
Example: Call from telephone nº 12.
3. To set up communication with the telephone, press the "C"
or "Bell" key.
The display will indicate GUARD UNIT-TELEPHONE
communication.
012
012
Communication between
Concierge and Telephone12
4. To end the call, hang up the phone or press the "B" key.
Pag 13
Page 46

Answering a call from an Outdoor Panel
!
Bip
Bip...
1. A call is made from an outdoor panel to a telephone.
The Guard Unit starts to emit "beeps" indicating that a
call is coming in.
132
465
798
A
B0
In addition, the Guard Unit LED and the corresponding
icon start to blink in zone 2: Panel call queue.
2. To view the call queue, unhook the Guard Unit phone
and the press the "A" key:
01 01 027
01 01 027
The display indicates the panel number the call is made
from and the telephone number being called.
Example: Call from Panel nº1 (main) to telephone nº 27.
At this point, different actions may be taken:
- 3.A. Set up communication between Guard Unit-Panel-Telephone
(to greet the visitor, notify of the same and then put them both in
communication, if so desired).
- 3.B. Directly transfer the call from the Panel to the Telephone.
- 3.C. Open the door to the visitor.
- 3.D. Transfer the call to a home other than the one called.
Pag 14
Page 47

3.A. Set up communication between Guard Unit-Panel-Telephone.
3.A.1. To set up communication with the Panel, press the "C"
or "Bell" key.
The display indicates GUARD UNIT-PANEL communication
01
01
Communication between
Guard Unit and Panel 1 (or
main)
3.A.2. Press the Guard Unit-Telephone key to set up GUARD
UNIT-TELEPHONE communication.
The display will indicate GUARD UNIT-TELEPHONE
communication.
027
027
Communication between
Concierge and phone called
(27)
3.A.3. Press the Panel (*)-Telephone key to set up PANEL-
TELEPHONE communication.
The display will indicate PANEL-TELEPHONE
communication.
01
01
027
(*) if the call has been made from panel 1 or main
if the call has been made from panel 2 or secondary
Communication between
Panel 1 and phone called (27)
027
Hang up the Guard Unit phone. The visitor can talk to the
resident and open the door if desired.
Pag 15
Page 48

3.B. Transfer call directly from Panel to Telephone.
3.B.1. To transfer the call directly from the outdoor panel to the
telephone called and set up communication between them,
press Panel (*)-Telephone.
The display will indicate PANEL-TELEPHONE
communication.
01
(*) if the call has been made from Panel 1 or main
Hang up the Guard Unit phone. The visitor can talk to the
resident and open the door if they wish.
3.C. Open the door to the visitor
3.C.1. Press the "C" or "Bell" key to set up communication
with the Panel.
The display will indicate GUARD UNIT-PANEL
communication.
01
027
if the call has been made from Panel 2 or secondary
Communication between Panel
1 and Telephone called (27)
027
01
01
Communication between
Concierge and Panel1 (or main)
Pag 16
3.C.1. Press the "Door Release (Key)" key to open the door
while Guard Unit-Panel communication appears on the display (if it does not, press the corresponding Panel-Guard Unit
).
Page 49

3.D. Transfer the call to a home other than the one called
3.D.1. On the panel queues viewing screen, key in the house
number you wish to transfer the call to.
Código llamada:
6
Call code:
6
The display indicates the new telephone number you
want to transfer the call to.
3.D.2. Press the "C" or "Bell" key to set up communication
between the Guard Unit and the new phone number entered.
The display indicates GUARD UNIT-TELELPHONE
communication
006
006
Communication between
Concierge and Telephone called (6)
3.D.3. Press the Panel (*)-Telephone key to set up PANEL-
TELEPHONE communication.
The display indicates PANEL-TELEPHONE.
01
01
006
(*) if the call has been made from Panel 1 or main
if the call has been made from Panel 2 or secondary
Communication between Panel
1 and new Telephone called (6)
006
Hang up the Guard Unit phone. The visitor can talk to the
resident and open the door if they wish.
Pag 17
Page 50

Making calls from the Guard Unit
From the Guard Unit you can make calls to any home or panel (main or secondary)
in the facility.
It is not possible to communicate with the panels when the Guard Unit is in Night
Mode.
House call (telephone).
1. Pick up the telephone and key in the house number you
wish to call.
Código llamada:
12
Call code:
12
The display indicates the telephone number you want
to call.
2. Press the "C" or "Bell" key to set up communication with
the desired telephone.
The display indicates GUARD UNIT-TELEPHONE
communication
012
012
Communication between Concierge
and Telephone called (12)
3. To end the call, hang up the phone or press the "B" key.
Note
Once in communication with the home, you can transfer the call to the main or
secondary panel by pressing the corresponding button ( o )
Pag 18
Page 51

Panel call (set up communication with the Panel).
1. Pick up the phone and press the Guard Unit-Panel (*) key
to set up GUARD UNIT-PANEL communication.
The display indicates GUARD UNIT-PANEL communication
01
(*) for communication with Panel 1 or main
for communication with Panel 2 or secondary
2. Press the "Door Release (Key)" key to open the door while
while Guard Unit-Panel communication appears on the display (if it does not come up, press the corresponding Panel-
Guard Unit key).
3. To end comunication, hang up the phone or press "B".
01
Communication between
Concierge and Panel 1 (or main)
Note
You can switch communication between one panel or another by pressing the button
corresponding to main (1) or secondary (2) Panel.
Pag 19
Page 52

OPERATION AS INTERCOMMUNICATION CENTRE
One special application of the ADS Guard Unit is as Intercomunication centre in an
ADS Radial Intercommunication System, using only the functions or making and
receiving calls to and from the secondary telephones connected to the system.
As with Guard Unit operation, every time you receive a call the centre starts to give
off a series of "beeps" constantly, memorising said call in what are designated call
QUEUES and can be answered immediately, as explained in the section "Answer a
Call from a Telephone (Home)" on page 13, or else later, by making a call to the
corresponding telephone. See section "House Call (Telephone)" on page 18.
Depending on the Operating Mode selected, the intercommunication centre will
function as follows:
- DAY MODE or AUTOMATIC MODE: Can make and receive calls from the
secondary telephones.
- NIGHT MODE: Can make calls to the secondary telephones but does not
receive them.
Pag 20
Page 53

PARAMETER PROGRAMMING AND CONFIGURATION
Now we shall explain some aspects which, rather than operation, refer more to
equipment configuration parameters. So, in order to prevent any unwanted anomalies
in operations, these should only be used by the technical staff in charge of maintenance
of the system.
Programming
To enter programming mode:
1. Press"0"
The display shows a series of dashes
2. Enter the access code: AB21AB
Access code
Código de acceso
_______
Now enter the programming code: 19025 (this code may
be modified by the installer)
Programming Code
_______
******
Prog. code ******
The display shows the main programming menu:
Main Menu
Main Menu
1- Codes
2- Parameters
3- Display
4- Telephone Prog
B- Exit
1- Codes
2- Parameters
3- Display
4- Telephone Prog
B- Exit
To access each of the main menu options, press the key corresponding
to the number that precedes each option (for example, to access the
"Codes" option, press key1") .
Press the "B" key to exit programming mode.
Pag 21
Page 54

Main Menu - Codes
This menu lets you modify the number of digits in the access code and the
programming entry code (19025 by default).
To access "Codes" from the main menu:
1. Press "1"
The codes menu has two otions:
Codes Menu
Codes Menu
1- Digits
2- Prog. Code
B- Exit
1- Digits
2- Prog. Code
B- Exit
2. Select the option to be modified by pressing the
key corresponding to the number that precedes each
option.
The information on the option selected appears in the
upper right part of the display:
Digits (4, 5, 6)
6
Programming Cod.
Pag 22
Codes Menu
1- Digits
2- Prog. Code
B- Exit
Digits (4, 5, 6)
6
Digits: Lets you modify the nº of digits in the access
code.
Prog. Code: Lets you modify the code to enter
programming mode.
Use the keypad to introduce the new values for each option.
Press "B" to confirm.
Press the "B" key again to exit.
Page 55

Main Menu - Parameters
This menu lets you modify the minimum and maximum conversation times, the
language, and activate/deactivate the acoustic call queue indicator.
T o access"Parameters" from the main menu:
1. Press"2"
The Parameters Menu has four options:
Parameters menu
Parameters Menu
1- Minimum Time
2- Convers. Time
3- Language
4- Auto Beep
1-Minimum Time
2-Convers.Time
3-Language
4-Auto Beep
Minimum T. (10-60)
10
Conv. T (10-90)
010
Language (1 - 4)
1
Auto Beep
1- Beep ON
2- Beep OFF
B- Exit
B- Exit
2. Select the option to modify by pressing the key
corresponding to the number that precedes each option.
The information on the option selected appears in the
upper right part of the display:
Parameters Menu
1- Minimum Time
2- Convers. Time
3- Language
4- Auto Beep
B- Exit
Minimum T. (10-60)
10
Minimum Time: Defines the minimum duration of
a call (between 10 and 60 seconds) during which
nobody (except the concierge) can interrupt the
conversation.
T alk Time: The maximum duration of conversation,
after which it is cut off automatically. Selectable
from 10 to 90 secs.
Language: This option lets you choose the
language for the Guard Unit menus. You can select
1 (Spanish), 2 (English), 3 (French), 4 (German).
Auto Beep: Lets you activate (1) or deactivate (2)
the call queue acoustic alert.
Use the keypad to introduce the new values for each option. Press "B" to confirm.
Press the "B" key again to exit.
Pag 23
Page 56

Main Menu - Display
This menu lets you modify the contrast of the Guard Unit LCD screen.
To access "Display" from the main menu:
1. Press "3"
The Display Menu offers two options:
Display Menu
Display Menu
CONTRAST
M1 decrease
M2 increase
B- Exit
CONTRAST
M1 decrease
M2 increase
B-Exit
2. Press the "Left Arrow (M1)" button to lower the screen
contrast.
Press the "Right Arrow (M2)" button to increase the
screen contrast.
Press "B" to confirm and exit the Display menu.
Pag 24
The contrast value selected is stored in a non-volatile memory, so that
even if the power is cut off, the set value will be kept.
Page 57

Main Menu - Programming Telephones
This menu lets you enable programing of ADS telephones/monitors from the ADS
Guard Unit.
To access "Telephone Prog" from the main menu:
1. Press"4"
The Telephone Prog menu has two options:
Prog. Menu
Prog. Menu
1- Prog. ON
2- Prog. OFF
B- Exit
1- Prog. ON
2- Prog. OFF
B- Exit
Prog. ON: Enables programming of ADS telephones/monitors
from the ADS Guard Unit.
1º- Press key "1" to enable programming.
If programming telephones/monitors from the Guard
Unit is allowed, a telephone symbol appears on
Menu prog.
1-Prog. ON
2-Prog. OFF
the left part of the display.
The panels are disabled (they cannot be called) and
the Guard Unit waits for the telephones to be
programmed.
B-Salir
If the equipment is reset, programming mode is
disabled.
2º - Exit the programming menu and the main menu
(press the "B" key twice).
3º- Set the telephone/monitor in programming mode.
(there will be audio communication with the same).
4º- Use the Guard Unit keypad to introduce the house
nº to be allocated (from 1 to 199) and press the "C"
or "Bell" key.
5º- Take the telephone/monitor out of programming mode.
Repeat steps 3 to 5 until all the telephones/monitors in the
installation are programmed. Disable the Prog. ON option.
Prog. OFF: Programming ADS telephones/monitors ADS
from the ADS Guard Unit is not allowed.
Press key "2" to disable programming.
Press "B" to exit.
Pag 25
Page 58

GUARD UNIT CONNECTION DIAGRAM
Floor Connections
COAX
HIGH RESOLUTION
FLAT MONITOR
1
2
Outdoor Panels Connections
PANEL
ACCESS 2
POWER SUPPLY
18 Vdc
-
+
-
+
+
-
C3
A
Vx
LB SMS
+
S
+
PANEL
ACCESS 1
COAX
-
L
-
L
M
V2
COAX
-
L
+
+
-
L
M
C1
V1
L
-
ADS GUARD UNIT
Connections Module
-
+
L
MV
REF.2492
MM WMVxM A
V1C2 V2
Connection to ADS
+-
B
Guard Unit
C2
C1
LxC3 Li
Pag 26
ADS GUARD UNIT
CONNECTIONS MODULE
ADS GUARD UNIT
Page 59

INTERCOMMUNICATION CENTRE CONNECTION DIAGRAM
106CI06E
T-AT
106CI06E
T-AT
n-1 n-2
++A-
L
(*) SEE NOTE
10 Kohm
L
+
TOP FLOOR
1-1 1-2
++A-
L
106CI06E
-A +A
T T
106CI06E
-A +A
T T
FIRST FLOOR
+
100 : 240 Vac
L
-
+-
L
+-
L
-+ -+
SEC. 18VDCPRIM 220VAC
ALIMENTADOR VIDEO
VIDEO POWER SUPPLY
18 Vdc
ADS GUARD UNIT
* NOTE: It is necessary to place a 10 Kohm resistance between terminals + and L of the branch, (or of
each branch if there are several, up to a maximum of 5).
Pag 27
Page 60

TECHNICAL FEATURES
Technical Features
Power Supply: 18Vdc
Temperature range: 10 ~ 60 ºC
The ADS Guard Unit Ref. 2536 installation is compatible with the previous Guard
Unit.
A connections module is provided, incorporating all the connections needed for
installation.
Connectors:
‘+’ Power supply (+18VDC)
‘-’ Power supply (GND)
‘Sa’ No function in this model
‘Sb’ No function in this model
‘C1,C2,C3’ Control lines
‘LX’ No function in this model
‘LI’ ADS line
(Data+Audio to/from Guard Unit)
‘AT’ External loudspeaker
Pag 28
Page 61

ADS GUARD UNIT FAST GUIDE
The main ADS Guard Unit functions are:
* Answer calls from Telephones or Monitors
* Answer calls from Outdoor Panels
* Communicate with Outdoor Panels
* Communicate with Telephones or Monitors
Basic operating modes
To perform these operations, the Guard Unit must be correctly configured for the
functions to be carried out.
The basic operating modes are NIGHT, DAY and AUTOMATIC. Calls from Outdoor
Panels are only taken in DAY mode, whereas those from Telephones or Monitors
are received in DAY and AUTO. In NIGHT mode, the Guard Unit acts like any
other panel.
Operating mode selection
The Guard Unit working mode is selected by entering the sequence 0 A 3 3 3 3 3
and then pressing the search arrows to choose the desired mode:
Current Mode:
Day
Enter 0 A 3 3 3 3 3
Mode selection
Selection validation
Pag 29
Page 62

Answer calls
If the Guard unit is in DAY or AUTO mode, calls will be received from panels and
telephones.
Call from TELEPHONE or MONITOR
!
Bip
Bip...
Call from telephone or
monitor
To communicate with the Telephone, press:
View the call queue
screen:
01 012
+
Set up communication
with the home:
If you want to repeat the call to the last number called, press:
Pag 30
012
Page 63

Call from PANEL
!
Bip
Bip...
132
465
798
A
B0
To communicate with the Panel, press:
View the call queue
screen:
+
Set up communication
with Panel.
To open the door, press:
Call from Panel
01 01 0027
To communicate with the telephone or monitor called, press:
If finally you want to transfer the call, press:
(*)
(*) if call is made from panel 1 or main
if call is made from panel 2 or secondary
If you do not wish to transfer the call, press again:
or else cancel the call with
Note: To transfer the call to a telephone other than the one called, please see page
17.
Pag 31
Page 64

Communicate with Panels and Telephones
If the Guard Unit is in DAY or AUTO mode, the Concierge can communicate with
any Panel or Telephone in the installation at will.
Communicate with Panels
If the Concierge wishes to set up communication with Panel 1 (Main) or Panel 2
(Secondary) (where present), they must enter:
Set up communication with Panel 1.
Set up communication with Panel 2.
01
To open the door, press:
Communicate with TELEPHONES or MONITORS
To set up communication with any Telephone or Monitor, without any prior call,
you must enter:
NNN +
(1-199)
(ó )
Example: to call telephone 35 we press:
35 +
035
Pag 32
Page 65

NOTAS - NOTES
Pag 33
Page 66

NOTAS - NOTES
Pag 34
 Loading...