

Page 1

TECLADO DE PROGRAMACION DE PROXIMIDAD Ref. 2306
COD. 94748 V10_08
Led Rojo / Red Led / Led Rouge
12
5
4
8
7
ON
0
OFF
6
9
CLR
F1: Añadir código /Add code / Ajouter code
F2
F2: Borrar código / Delete code / Effacer code
F3
F3: Tiempo activación abrepuertas
F4
Release door activation time
Led Verde/ / Green Led / Led Verte
F1
3
Temps d’activation gâche
F4: Tiempo de puerta abierta
Open door time
Temps d’ouverture de la porte
Características técnicas - Technical Features Caracteristiques Techniques
• Alimentación / Supply / Alimentation:
• 1 pila /1 battery / 1 pile : 6F22 (9Vdc
• Consumo / Consumption / Consommation :
• 10 mA. (encendido) / 10 mA. (ON) / 10 mA. (allumé).
• 1 mA. (apagado) / 1 mA. (OFF) / 1 mA. (éteint).
• Rango especificaciones / Range / Rang:
• El código menor que / Code Value lower than / Le code ne peux
être supérieur à 16.777.215.
• Los tiempos deben ser menores que 99 / Value of programmed
times lower than 99 / Les temps ne peuvent être supérieurs à 99.
• Temperatura de funcionamiento/ Temperature range /
Température de fonctionnement : 0...65 ºC
(*)
+
) (*)
PROGRAMMING PROXIMITY KEYPAD REF. 2306
CLAVIER DE PROGRAMMATION DE PROXIMITÉ Réf. 2306
Deposite la batería en el correspondiente punto de recogida para el reciclado.
Deposit the battery at the relevant collection point for recycling.
Afin de pouvoir recycler la batterie, veuillez la déposer au point de collecte approprié.
NOTAS (sobre la tabla página siguiente)
• Presentar el teclado al lector es aproximarlo hasta que se encienda el led verde (a una distancia máxima
de 5 cm)
• No dejar transcurrir más de 30 segundos entre cada paso.
• El teclado no admite la introducción de datos fuera de rango, haciendo parpadear el Led verde 10 veces
como aviso.
• Para borrar un dato erróneamente introducido, pulsar CLR
• Para alargar la vida de la batería el sistema incorpora una función de autoapagado. Transcurridos 60
segundos sin que se haya pulsado una tecla, éste se apaga automáticamente. De todas formas se
recomienda, al finalizar las tareas de programación, apagar el teclado (tecla ON/OFF).
• No es necesario teclear los «0» iniciales del código de tarjeta.
• Una vez finalizadas las tareas de programación, dejar el controlador en modo normal.
NOTES (of table shown in the next page)
• To show the keypad to the Reader means to approach it until green led switches on (to a maximun distance
of 5 cm)
• Time between steps must be less than 30 seconds.
• Data out of range are not allowed. This is advised by means of green Led blinking 10 times.
• Press CLR to delete any wrong data.
• This device is provided with a 60 seconds switch off system. Anyway, we recommended to disconnect
the system by means of to ON/OFF button after using it.
• It is not neccesary to enter the initial «0» of the code card.
• When programming setting has been finished, returns the reader to normal mode.
REMARQUES (au sujet du tableau de la page suivante):
• Présenter le clavier au lecteur signifie l’approcher de celui-ci jusqu’à ce que la led verte s’allume (à une
distance maximum de 5cm).
• Ne laissez pas passer plus de 30 secondes entre chaque étape.
• Le clavier n’admet pas l’introduction de données hors de rang, la Led verte clignote 10 fois en avertissement.
• Pour effacer une donnée introduite par erreur, appuyez sur CLR.
• Pour prolonger la durée de vie du système, une fonction de déconnexion automatique est intégrée. Il
s’éteint automatiquement au bout de 60 secondes sans appuyer sur aucune touche. Il est cependant
recommandé d’éteindre le clavier (touche ON/OFF) une fois la programmation terminée.
• Il n’est pas nécessaire de marquer les «0» par lesquels commencent les codes de carte.
• En fin de programmation, revenez en mode normal
.
Page 2
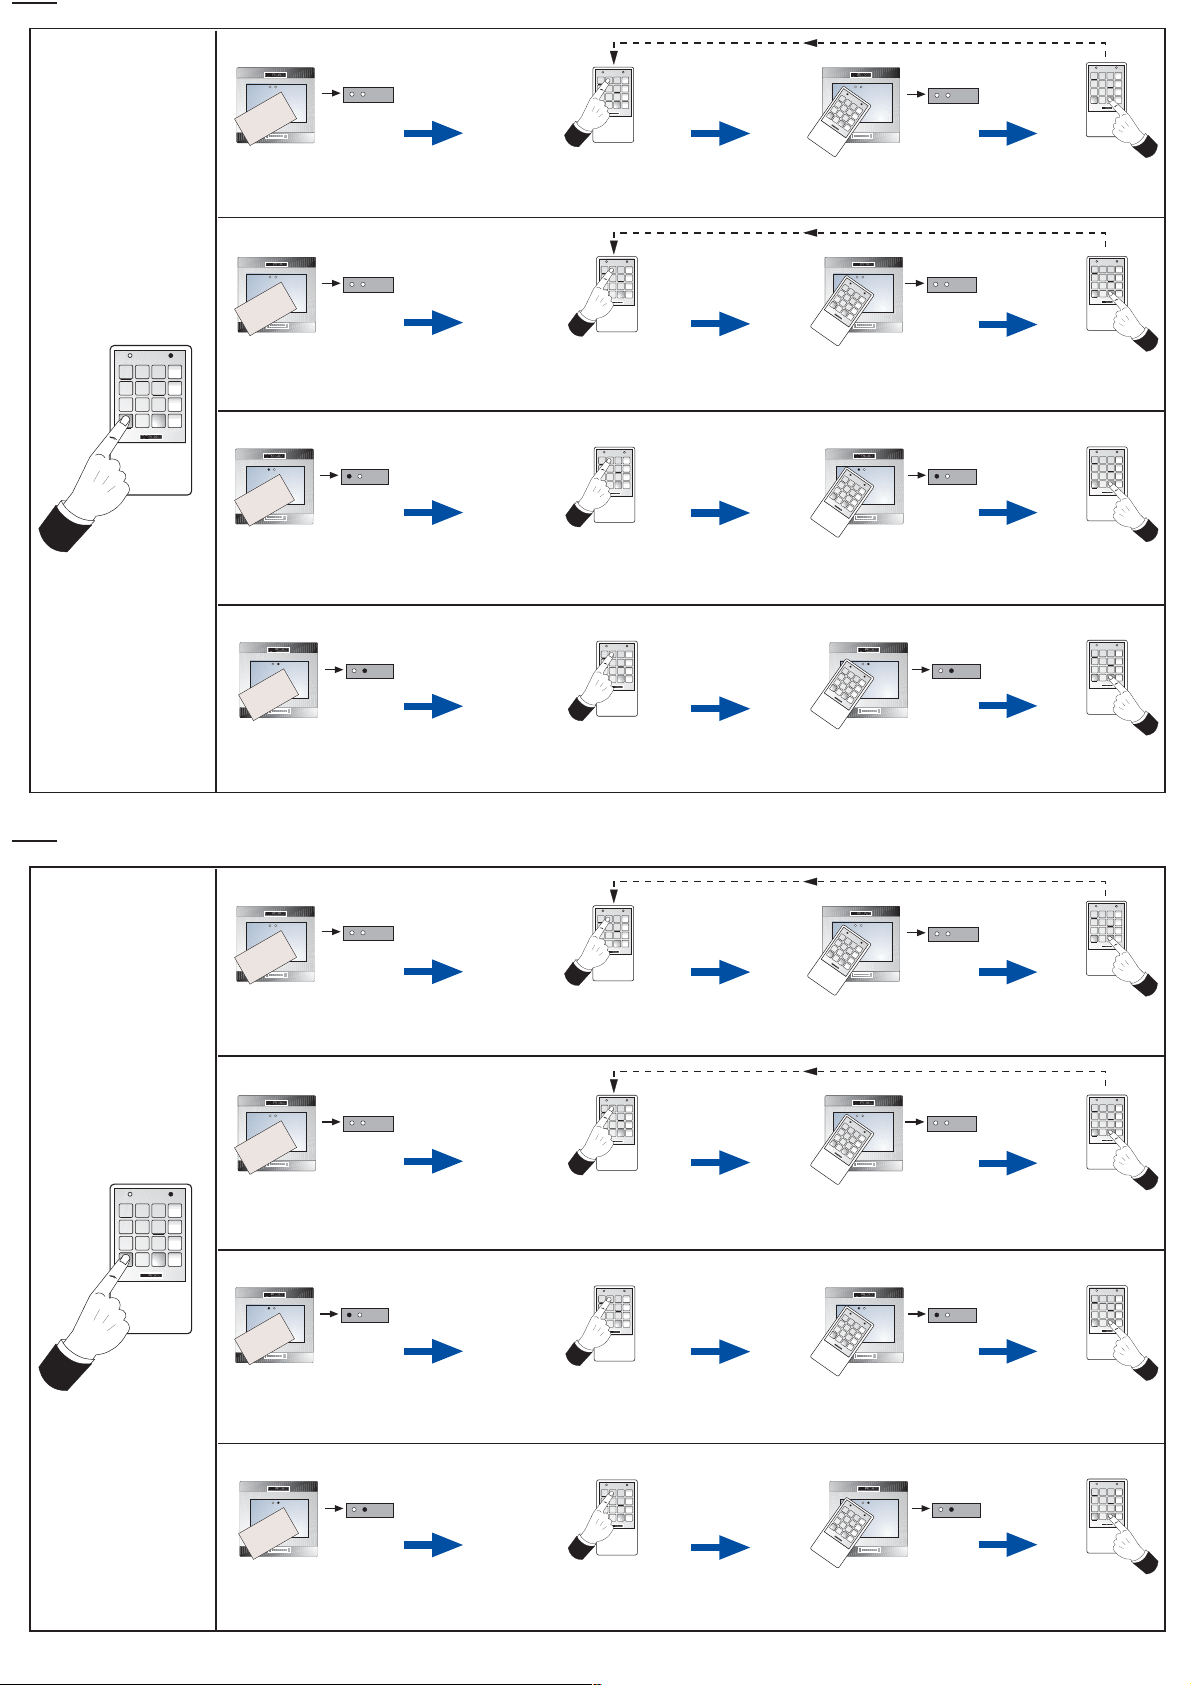
Dar de alta tarjetas / Add cards / Enregistrer des cartes
¡Bip!
-
+
r
aste
M
-
+
más tarjetas / more cards / Autres cartes
F1
3
12
F2
5
6
4
F3
9
8
7
ON
CLR
F4
0
OFF
F1
3
¡Bip!
-
+
12
4
3
5
F
7
1
6
O
8
N
O
F
2
F
F
9
0
F
3
C
L
R
F
4
-
+
12
4
7
ON
OFF
F2
5
6
F3
9
8
F4
CLR
0
1. Presentar la Tarjeta MASTER 1 vez.
1. Show MASTER Card 1 time.
1. Présenter la carte MASTER 1 fois.
2. Marcar el Código de tarjeta + F1
2. Press the Code card + F1.
2. Marquer le Code de carte + F1
Dar de baja tarjetas / Erase cards / Effacer des cartes
¡Bip!
12
4
7
ON
OFF
¡Bip!
-
+
aster
M
1. Presentar la Tarjeta MASTER 2 vez.
F1
3
5
6
9
8
CLR
0
1. Show MASTER Card 2 time.
F2
1. Présenter la carte MASTER 2 fois.
F3
F4
Tiempo activación abrepuertas / Release door activation time / Temps d’activation de la gâche
-
+
¡Bip!
+
¡Bip!
+
-
2. Marcar el Código de tarjeta + F2
2. Press the Code card + F2.
2. Marquer le Code de carte + F2
¡Bip!
-
12
4
7
ON
OFF
12
5
4
8
7
ON
0
OFF
Master
2. Marcar el Tiempo activación abrepuertas+ F3
2. Press the Release door activation time + F3.
2. Marquer le Temps d’activation de la gâche + F3
12
4
7
ON
OFF
Encender el Teclado.
Switch on the Keypad.
Allumer le Clavier.
1. Presentar la Tarjeta MASTER 3 vez.
1. Show MASTER Card 3 time.
1. Présenter la carte MASTER 3 fois.
Tiempo de puerta abierta / Open door time / Temps d’ouverture de la porte
¡Bip!
¡Bip!
-
+
¡Bip! ¡Bip!
-
+
Master
1. Presentar la Tarjeta MASTER 4 vez.
1. Show MASTER Card 4 time.
1. Présenter la carte MASTER 4 fois.
2. Marcar el Tiempo de puerta abierta + F4
2. Press the Open door time + F4.
2. Marquer le Temps d’overture de la porte + F4
Ver notas en la otra página / See notes in the next page / Voir remarques sur l’autre page.
3. Presentar Teclado al Lector.
3. Show the Keypad to the Reader.
3. Présenter le Clavier au Lecteur.
más tarjetas / more cards / Autres cartes
F1
3
F2
5
6
F3
9
8
F4
CLR
0
3. Presentar Teclado al Lector.
3. Show the Keypad to the Reader.
3. Présenter le Clavier au Lecteur.
F1
3
F2
6
F3
9
CLR
F4
3. Presentar Teclado al Lector.
3. Show the Keypad to the Reader.
3. Présenter le Clavier au Lecteur.
F1
3
F2
5
6
F3
9
8
F4
CLR
0
3. Presentar Teclado al Lector.
3. Show the Keypad to the Reader.
3. Présenter le Clavier au Lecteur.
4. Pulsar CLR.
4. Press CLR.
4. Appuyer sur CLR.
¡Bip!
-
+
12
4
3
5
F
7
1
6
O
8
N
O
F
2
F
F
9
0
F
3
C
L
R
F
4
-
+
12
4
7
ON
OFF
F1
3
F2
5
6
F3
9
8
CLR
F4
0
4. Pulsar CLR.
4. Press CLR.
4. Appuyer sur CLR.
¡Bip!
-
+
12
4
3
5
F
7
1
6
O
8
N
O
F
2
F
F
9
0
F
3
C
L
R
F
4
-
+
12
4
7
ON
OFF
F1
3
F2
5
6
F3
9
8
CLR
F4
0
4. Pulsar CLR.
4. Press CLR.
4. Appuyer sur CLR.
12
4
3
5
F
7
1
6
O
8
N
O
F
2
F
F
9
0
F
3
C
L
R
F
4
-
+
¡Bip!
-
+
12
4
7
ON
OFF
F1
3
F2
5
6
F3
9
8
CLR
F4
0
4. Pulsar CLR.
4. Press CLR.
4. Appuyer sur CLR.
F1
3
12
F2
5
6
4
F3
9
8
7
ON
F4
CLR
0
OFF
Encender el Teclado.
Switch on the Keypad.
Allumer le Clavier.
Dar de alta tarjetas / Add cards / Enregistrer des cartes
más tarjetas / more cards / Autres cartes
¡Bip!
-
+
-
+
Master
1. Presentar la Tarjeta MASTER 1 vez.
1. Show MASTER Card 1 time.
1. Présenter la carte MASTER 1 fois.
2. Marcar el Código de tarjeta + F1
2. Press the Code card + F1.
2. Marquer le Code de carte + F1
F1
3
12
F2
5
6
4
F3
9
8
7
ON
CLR
F4
0
OFF
3. Presentar Teclado al Lector.
3. Show the Keypad to the Reader.
3. Présenter le Clavier au Lecteur.
Dar de baja tarjetas / Erase cards / Effacer des cartes
más tarjetas / more cards / Autres cartes
¡Bip!
¡Bip!
-
+
-
+
F1
3
12
F2
5
6
4
F3
9
8
7
ON
CLR
F4
0
OFF
Master
1. Presentar la Tarjeta MASTER 2 vez.
1. Show MASTER Card 2 time.
1. Présenter la carte MASTER 2 fois.
2. Marcar el Código de tarjeta + F2
2. Press the Code card + F2.
2. Marquer le Code de carte + F2
3. Presentar Teclado al Lector.
3. Show the Keypad to the Reader.
3. Présenter le Clavier au Lecteur.
Tiempo activación abrepuertas / Release door activation time / Temps d’activation de la gâche
¡Bip!
¡Bip!
-
+
¡Bip!
-
+
12
4
7
ON
OFF
F1
3
F2
5
6
F3
9
8
CLR
F4
0
Master
1. Presentar la Tarjeta MASTER 3 vez.
1. Show MASTER Card 3 time.
1. Présenter la carte MASTER 3 fois.
2. Marcar el Tiempo activación abrepuertas+ F3
2. Press the Release door activation time + F3.
2. Marquer le Temps d’activation de la gâche + F3
3. Presentar Teclado al Lector.
3. Show the Keypad to the Reader.
3. Présenter le Clavier au Lecteur.
Tiempo de puerta abierta / Open door time / Temps d’ouverture de la porte
¡Bip!
¡Bip! ¡Bip!
-
+
12
4
7
ON
OFF
F1
3
F2
5
6
F3
9
8
CLR
F4
0
Master
¡Bip!
-
+
F1
3
¡Bip!
-
+
12
4
3
5
F
7
1
6
O
8
N
O
F
2
F
F
9
0
F
3
C
L
R
F
4
-
+
12
4
7
ON
OFF
F2
5
6
F3
9
8
F4
CLR
0
4. Pulsar CLR.
4. Press CLR.
4. Appuyer sur CLR.
¡Bip!
-
+
12
4
3
5
F
7
1
6
O
8
N
O
F
2
F
F
9
0
F
3
C
L
R
F
4
-
+
12
4
7
ON
OFF
F1
3
F2
5
6
F3
9
8
F4
CLR
0
4. Pulsar CLR.
4. Press CLR.
4. Appuyer sur CLR.
¡Bip!
-
+
12
4
3
5
F
7
1
6
O
8
N
O
F
2
F
F
9
0
F
3
C
L
R
F
4
-
+
12
4
7
ON
OFF
F1
3
F2
5
6
F3
9
8
F4
CLR
0
4. Pulsar CLR.
4. Press CLR.
4. Appuyer sur CLR.
12
4
3
5
F
7
1
6
O
8
N
O
F
2
F
F
9
0
F
3
C
L
R
F
4
-
+
¡Bip!
-
+
12
4
7
ON
OFF
F1
3
F2
5
6
F3
9
8
F4
CLR
0
1. Presentar la Tarjeta MASTER 4 vez.
1. Show MASTER Card 4 time.
1. Présenter la carte MASTER 4 fois.
2. Marcar el Tiempo de puerta abierta + F4
2. Press the Open door time + F4.
2. Marquer le Temps d’overture de la porte + F4
Ver notas en la otra página / See notes in the next page / Voir remarques sur l’autre page.
3. Presentar Teclado al Lector.
3. Show the Keypad to the Reader.
3. Présenter le Clavier au Lecteur.
4. Pulsar CLR.
4. Press CLR.
4. Appuyer sur CLR.
 Loading...