

Page 1
100 CODE MEMOKEY
USER& INSTALLER’S MANUAL
321
654
987
0
B
A
cityline
ENGLISH
321
654
987
0
B
A
skyline
Page 2
Memokey
Memokey
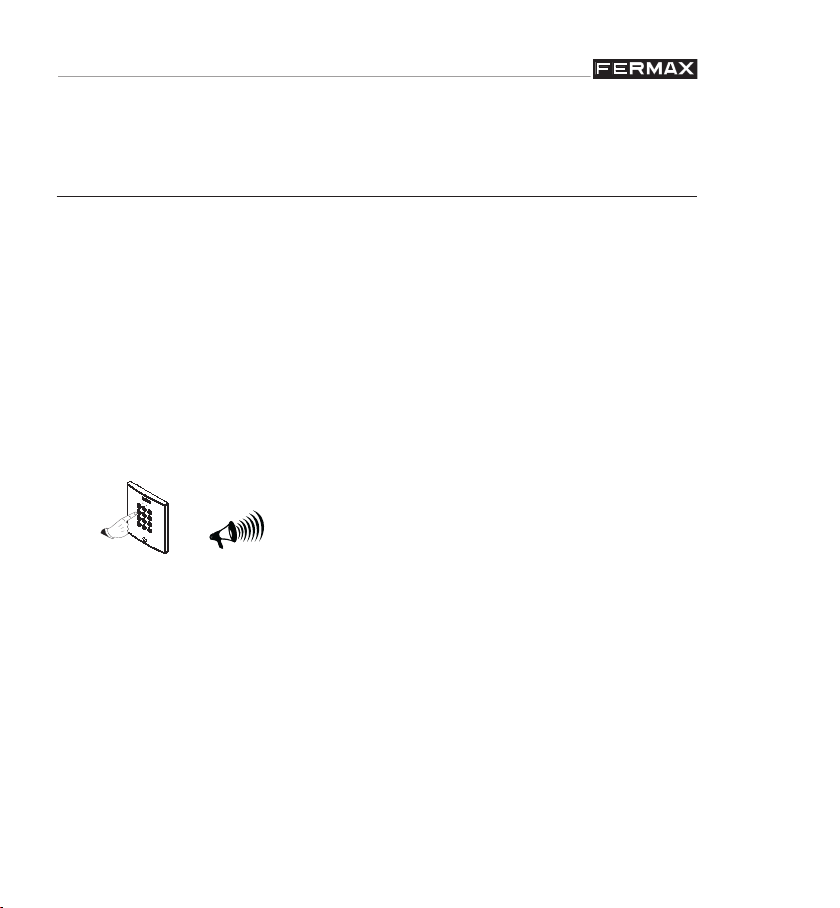
KEYPAD MODULE TEST
This kit is programmed at the factory with 3 default codes.
The preprogrammed codes are different for each unit, there-
fore you are the only one to know them.
You can use this codes to test the equipment operation as
well.
To test the code, dial the the one corresponding to the de-
vice you want to verify.
CODE ACTION
CODE 1 (*) OPEN THE DOOR
CODE 2 (*) ACTIVATE THE AUXILIARY DEVICE (if any)
CODE 3 (*) BOTH OPEN THE DOOR AND ACTIVATE
THE AUXILIARY DEVICE
(*) These codes are shown in a sticker in the back side of the panel
controller.
Code 97528I, V04_13
Technical publication of an informative nature published by FERMAX
ELECTRONICA S.A.U.
As part of its policy of constant improvement, FERMAX ELECTRONICA
S.A.U. reserves the right to modify the content of this document and the
characteristics of the products referred to in it at any time and without
prior notice.
Any modifi cation will be refl ected in subsequent editions of this document.
ENGLISH
Pag 2
Page 3

Memokey
Memokey
PROGRAMMING MANUAL
INDEX
Introduction .... ........................................................... 4
Function Programming and Confi guration .... ........ 6
Changing the Master Code....................................... 9
Establishing the User Code Length ......... ................10
Full Reset of All Codes .............................................12
Restoring Factory Settings ..... ................................13
Adding or Editing User Codes ..................................14
Deleting User Codes ................................................16
Allowing User Codes to be Changed ........................17
Changing the Free Access Code ..............................18
Activating/Deactivating the Free Access Button .......20
Enabling/Disabling the Exit Buttons (interior) ...........21
Timing Lock-Release Activat. Relays and Aux.
Devices. ....................................................................22
Enabling the Auxiliary Output (AUX).........................24
Quick Programming Guide .............................. ........26
Technical Features ....................................................29
Wiring Diagram ..........................................................30
USER MANUAL
INDEX
Introduction .... ...........................................................31
Keypad Operation......................................................32
Pag 3
Page 4
Memokey
Memokey
PROGRAMMING MANUAL
Introduction
The Memokey’s 100 codes are designed for keypad based
access control, where we want each system user to have their
own access code.
System Features:
- The Memokey has capacity for 100 different codes of variable
length (between 4 and 6 digits).
Entering one of the codes via the keypad activates a relay
which activates the lock-release or another device.
- The system does not allow user codes to be repeated.
- To enter programming mode, you must enter a special code,
known as the Master Code.
- If this option is enabled, any user can modify their personal
access code without knowing the Master code.
-The system has an auxiliary output which supplies a maximum
of 125mA to connect/activate another device (auxiliary relay,
alarm ...) or a speaker, with the memokey itself generating
an alarm tone.
- It is equipped with 2 auxiliary inputs for the exit button.
- Free Access Codes
- Key Press Confi rmation via an acoustic tone.
Pag 4
Page 5
Memokey
Memokey
The following sections in the Manual explain in detail the
confi guration and management of each of the system functions.
Acoustic Tones and Signal Leds.
The Memokey has a series of acoustic tones and leds which
advise as to the system’s current status:
Acoustic Tones: Each time an access code, programming
code or confi guration setting is entered the system emits
a different tone depending on whether the data entered is
correct or not:
beep (x3) : correct
moc : incorrect
beep (1 second) : Lock Release
Pag 5
Page 6
Memokey
Memokey
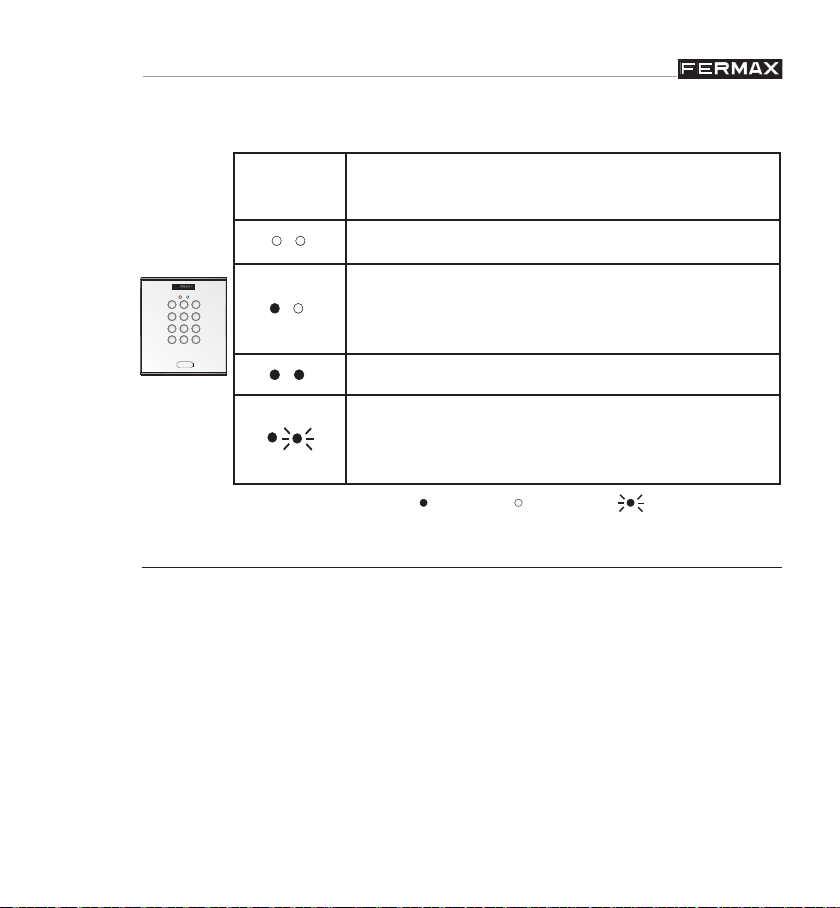
Signal Leds: Has two leds, one red and one green.
RED -
GREEN
DEFINITION
No Power
Normal mode (awaiting access code
321
654
987
0
B
A
entry , programming...). Device Powered
Up.
Opening Door
Quick Flashes: Programming Mode
Slow Flashes: A waiting the new value for
the selected function
( Led on Led off Leds fl ashing)
PROGRAMMING AND CONFIGURATION
Programming Mode allows you to modify the system’s
different settings and confi guration.
Initially the system is programmed by default with a 4 digit
code. As such the user codes and MASTER code are 4 digits
in length. If you require greater security you can change the
length to 5 or 6 digits. See the chapter on: “Establishing the
User Code Length”
Pag 6
Page 7
Memokey
Memokey
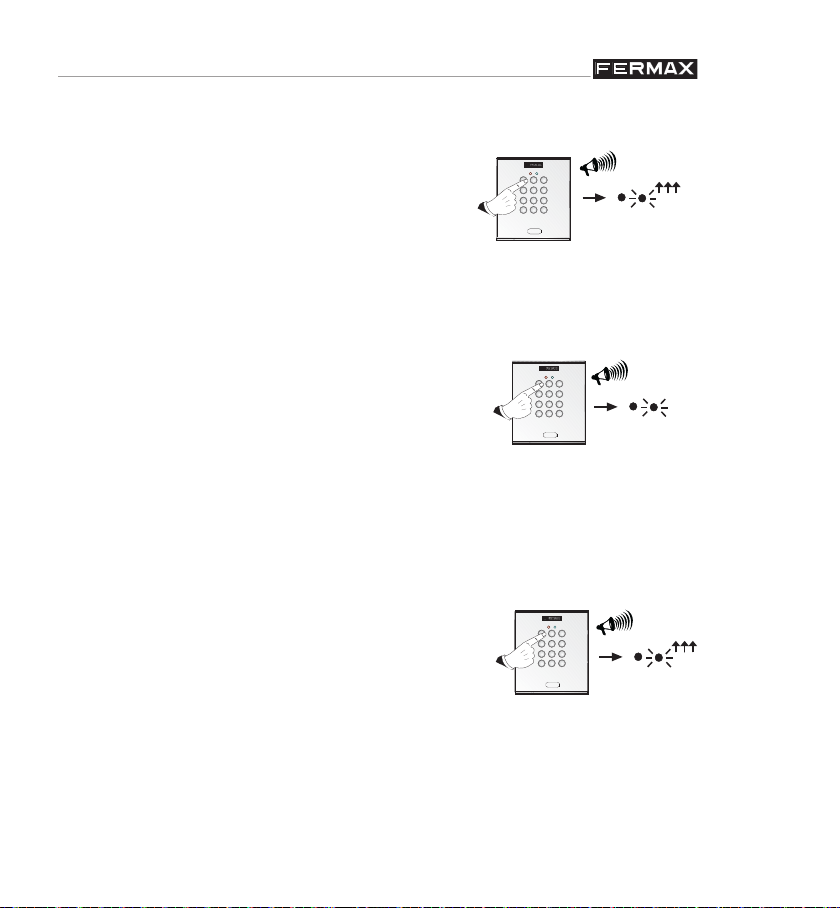
1) To enter programming mode (having
been in normal mode), enter the
Master Code (1480 by default).
The system emits “3 beeps” to advise
we are in programming mode, and the
green led fl ashes in quick sequence.
321
654
987
0
B
A
Enter 1480
beep
(x3) :
2) To confi gure each of the functions
(in programming mode) enter the
corresponding function code (for
321
654
987
0
B
A
example: “A4” code length).
At this point the system once again
emits “3 beeps” to advise that the setting
entered is correct, and the green led
fl ashes in a slow sequence .
3) Then a new value is entered to be
assigned to the function selected (for
321
654
987
0
B
A
example: selecting a code of 6 digits
in length).
T o exit Programing mode at any time, press B or allow
20 seconds to elapse without any activity.
beep
(x3) :
Enter A4
beep
(x3) :
Press 6
Pag 7
Page 8

Memokey
Memokey
NOTES:
Default Master Code:
- 4 digit length: 1480
- 5 digit length: 14803
- 6 digit length: 148036
If for any reason we need to reset the master code, having
forgotten the previous one (refer to the corresponding chapter:
“Restoring Factory Settings”), this will be the master code
established for this operation.
Below are all the system functions and the confi guration
steps for each of these.
Pag 8
Page 9
Memokey
Memokey
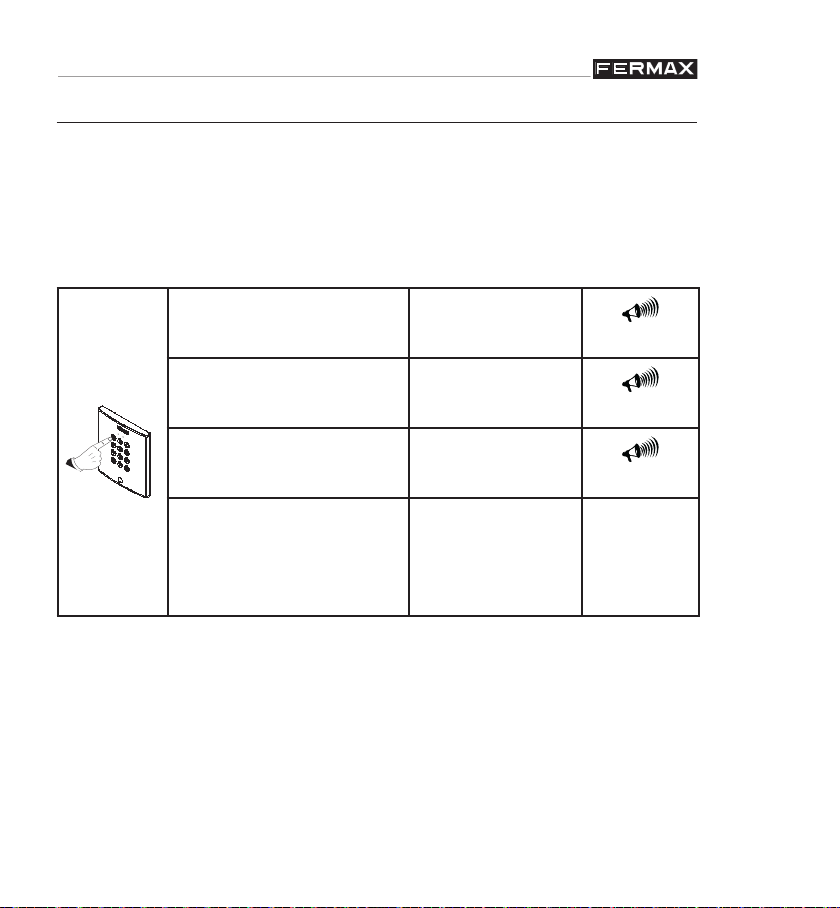
Changing the Master Code (A0)
The Master code is necessary to enter programming mode.
The equipment is programmed with a default Master code in
factory (1480 by default). The procedure to change it is
the following:
1 Enter programming
mode:
2 Enter the relevant
option:
3 Indicate the new
Master code:
Code Master
(1480)
A0
New Master
Code
Example:
New Master Access
Code for Program-
1480 A0 1234
ming. 1234
NOTE: If you forget the Master code, you can reset it to the
default code of 1480, as explained in the “Restoring the Master
Code” section.
A master code cannot be a user code and vice versa.
Bip (3 x)
Bip (3 x)
Bip (3 x)
Pag 9
Page 10
Memokey
Memokey
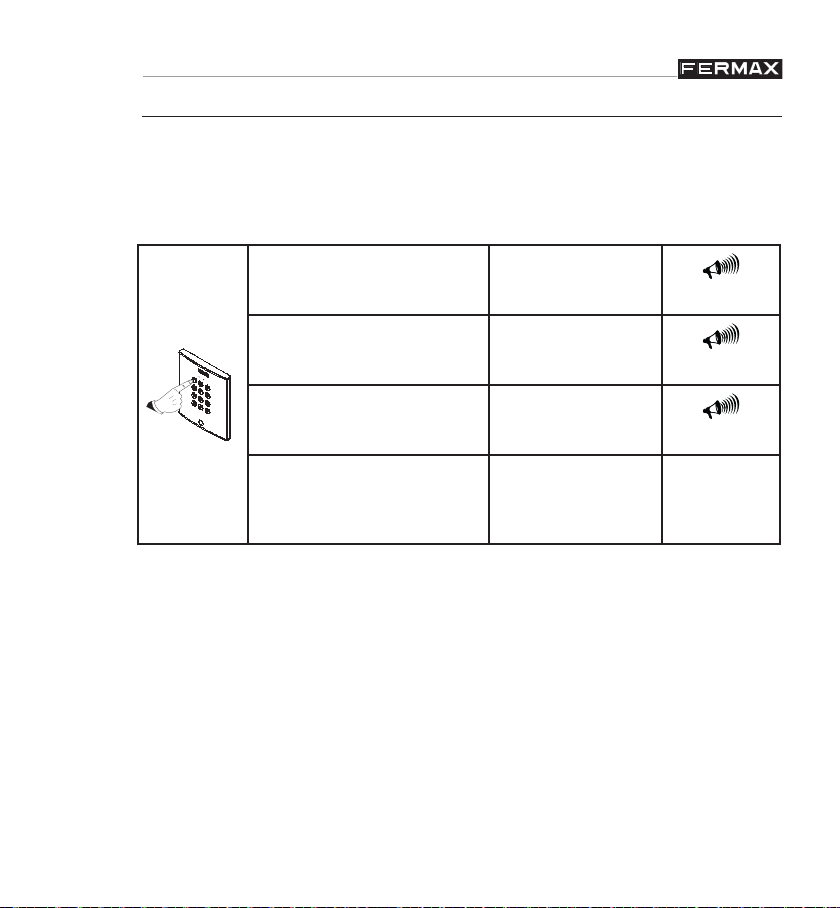
Establishing the User and Master Code Length (A4)
Initially the user codes are 4 digits in length, including the
MASTER code. If you require greater security you can change
the length to 5 or 6 digits.
1 Enter programming
mode:
2 Enter the relevant
option:
3 Indicate the new
length:
Code Master
(1480)
A4
4, 5 or 6
Bip (3 x)
Bip (3 x)
Bip (3 x)
Example :
6 Digit Access and
1480 A4 6
Master Codes
NOTE:
If once the user codes have been programmed their length
is changed to include a greater number of digits, additional
zeros will be added to the existent codes to bring them in line
with the new length.
e.g.: User Code:
- 4 digits: 1234 => select a greater nº of digits.
For example: 6
- 6 digits: 123400Code.
Pag 10
Page 11

Memokey
Memokey
If once the user codes have been programmed their length
is changed to include a fewer number of digits, the existent
codes will have the last digits removed to bring them in line
with the new length.
e.g. User Code:
- 6 digits: 123456 => select a fewer nº of digits.
For example: 4
- 4 digits: 1234
If additional digits are to be re-added to the existing codes,
the original digits will automatically be re-added.
e.g. User Code:
- 4 digits: 1234 => select a greater nº of digits.
For example: 6
- 6 digits: 123456
Each time the code length is changed, the existing codes
should be reset to avoid the codes being deleted or
overwritten. The confi guration of “code length” should
be done before setting up the codes on the system.
This will also effect the MASTER Code and the Free Access
Code.
Pag 11
Page 12

Memokey
Memokey
Default Master Code:
- 4 digit length: 1480
- 5 digit length: 14803
- 6 digit length: 148036
Default Free Access (trade) Code :
- 4 digit length: 1593
- 5 digit length: 15935
- 6 digit length: 159357
If for any reason we need to reset any of these codes, having
forgotten the previous one (refer to the corresponding chapter:
“Restoring Factory Settings”), these are the codes that will be
set on undertaking the operation in line with the code length
established on the system.
Full Code Reset (A9)
This operation allows deletion of all existing access codes in
the system’s memory.
Pag 12
Page 13

Memokey
Memokey
1 Enter programming
mode
Code Master
(1480)
Bip (3 x)
2 Enter the relevant
option:
A9
Bip (3 x)
3 Re-enter the master
code (set by default
as 1480) to confirm
all codes have been
1480
Bip (3 x)
deleted.
Example :
Reset all existing ac-
1480 A9 1480
cess codes.
NOTE: Resetting is an irreversible operation, whereby any
previously stored codes cannot be recovered.
Restoring Factory Settings
Resetting the Master and Free Access/Trade Code
(where you have forgotten the previous one)
This operation is carried out by electrically modifying the
equipment, in the aim of ensuring it is impossible for anyone
without physical access to the equipment to modify it in any
way.
Pag 13
Page 14

Memokey
Memokey
1. Disconnect the system’s power supply.
2. Short-circuit the “S2” and ground.
If the system is equipped with a PI exit button, just press
and hold it down (refer to the installation diagram).
3. Reconnect the system’s power supply and remove the
short-circuit (or release the exit button) within 5 seconds.
4. If the process has been carried out correctly a double “beep”
will sound and the green light will stay on. Next enter the
following code A708B9. A double “beep” will sound and
the system will reset itself, restoring its factory settings.
NOTE: The restoration of default factory settings does
not delete the rest of the information programmed on the
system.
Add or Edit User Codes (00 .....99)
The codes are stored in the memory in sequence: position
- code - action. Allows up to 100 access codes be stored.
Pag 14
Page 15

Memokey
Memokey
1 Enter programming
mode:
2 Enter the position
in the access code’s
memory:
3 Re-enter the new access code:
(The code length must
coincide with that established on the system).
4 Enter the associated
action:
1: The door will open.
(Relay 1)
2: The auxiliary devi-
ce will be activated (if
exists). (Relay 2)
3: The door will open
and the auxiliary device will be activated
simultaneously.
Code Master
(1480)
00...99
New Access
Code
1, 2 or 3
Bip (3 x)
Bip (3 x)
Bip (3 x)
Bip (3 x)
Example: New access
code 1111 saved in the
00 position.
1480 00 1111 1
Pag 15
Page 16

Memokey
Memokey
NOTES: If the position to be recorded is already in use, the
new code will replace the old one. If the code entered already
exists you cannot record and an error message will sound. It
is very important that a list is prepared of the codes, their
positions and actions.
Deleting User Codes (AA)
It is possible to delete a specifi c user code. The procedure to
follow is the following:
Pag 16
1 Enter programming
mode:
2 Enter the relevant
option:
3 Enter the position
of the access code
to be deleted in the
system’s memory:
Example: Delete the
access code saved in
the 00 position.
Code Master
(1480)
AA
00...99
1480 AA 00
Bip (3 x)
Bip (3 x)
Bip (3 x)
Page 17

Memokey
Memokey
NOTES: It is only possible to delete a code if the associated
position is known, based on which we reiterate the importance
of keeping a list with the position data, codes and actions
programmed on the system.
Deleting a code is irreversible, such that once a code has been
deleted it cannot be recovered.
Allows user codes to be changed by users themselves
(A7)
Users can change their assigned access code for another
code of their choice if they wish. To do this the following option
must be enabled.
1 Enter programming
mode:
2 Enter the relevant
option:
Code Master
(1480)
A7
Example: Allows
users change their
1480 A7
personal access code
NOTE: See the User Manual Section.
Bip (3 x)
Bip (3 x)
Pag 17
Page 18

Memokey
Memokey
Changing the Free Access Code (A1)
There is a special “free access” code (initially this code is:
“1593”) which allows free access via an additional button.
It has an associated default relay which activates the lockrelease.
This function is especially useful when you want to offer free
access to an area to be controlled. Entering the “free access”
code, (by default 1593), the button remains enabled until this
code is re-entered at which point it will be disabled.
Pag 18
1 Enter programming
mode:
2 Enter the relevant
option:
3 Enter the Free Access
Code:
Code Master
(1480)
A1
New Free Ac-
cess Code
Bip (3 x)
Bip (3 x)
Bip (3 x)
Page 19

Memokey
Memokey
4 Enter the associated
action:
1:The door will open.
(Relay 1).
2:The auxiliary device
will be activated (if
1, 2 or 3
Bip (3 x)
exists). (Relay 2).
3: The door will open
and the auxiliary device will be activated
simultaneously.
Example :Create a Free
Access Code: 5251 to
1480 A1 5251 1
open the door.
NOTE: The default free access (trade) code based on the
number of digits will be:
- 4 digit length: 1593
- 5 digit length: 15935
- 6 digit length: 159357
Pag 19
Page 20

Memokey
Memokey
Activate/Deactivate the Free Access Button
Entering the “free access” code, (by default 1593), the button
remains enabled until this code is re-entered at which point it
will be disabled.
1 Enter the “free access” code (1593 by
default)
Free Access
Code (1593)
2 Button Enabled
Example: Enable the
“free access” button. 1593
4 Re-enter the “free
access” code (1593
by default)
Free Access
Code (1593)
5 Button Disabled.
Example: Disable the
“free access” button.
1593
Bip (3 x)
Bip (3 x)
Pag 20
Page 21

Memokey
Memokey
Enabling/Disabling the Exit Buttons (A5 - A6)
The system can be equipped with one or two buttons (P1 and
P2) which are installed in the interior of the building and allow
you to open the door (relay activation) from inside or activate
an additional electronic device installed.
These buttons can be enabled or disabled in the following way:
Code
1 Enter programming mode:
Master
(1480)
Bip
(3 x)
2 Enter the relevant option:
A5: 1 Button. (Relay 1)
A6: 2 Button. (Relay 2)
A5 or A6
Bip
(3 x)
Pag 21
Page 22

Memokey
Memokey
3 Enter the associated
action:.
0: Button Disabled.
1: Button Enabled. Action,
the door will open. (Relay 1)
2: Button Enabled. Action,
the auxiliary device will be
activated (if exists). (Relay
2)
3: Button Enabled. Action,
the door will open and the
auxiliary device will be activated simultaneously.
0, 1, 2 or 3
Bip
(3 x)
Example : Enable exit button
1 to open the door.
1480 A5 1
Relay Timing:
- lock-release activation (A2)
- auxiliary device activation (A3)
Initially the relays (which will activate the lock-release or the
auxiliary device) are set at 3 seconds.
The activation time can be changed to any value between 00
and 99 seconds or it can also operate in bistable mode (the fi rst
valid code activates the relay and the next one deactivates it):
Pag 22
Page 23

Memokey
Memokey
1 Enter programming
mode:
2 Enter the relevant option:
A2 Relay 1 (lock-release)
A3: Relay 2 (additional
electrical device activation)
3 Enter the new activation
code or select bistable
mode:
4 Enter 1 if the device is
normally deactivated.
Enter 0 if the device is
normally activated.
Example: Change the relay timing to 5 seconds and
normally deactivated.
Code Master
(1480)
A2 or A3
00:
Bistable Mode
01..99:
(01 to 99 seconds
1 or 0
1480 A2 05 0
Bip
(3 x)
Bip
(3 x)
Bip
(3 x)
Bip
(3 x)
NOTE: The most common case is that of normally deactivated
devices such as normal lock-releases for example. The
inversely operated lock-releases on the other hand are
normally activated devices.
Pag 23
Page 24

Memokey
Memokey
Enabling the Auxiliary Output (all-purpose device) - AUX
(A8)
This equipment has a free contact auxiliary output which can
be connected to a 12 Vdc device with a maximum current of
125 mA to carry out various functions.
Where the equipment to be connected does not adjust to these
specifi cations, a relay should be used (Ref. 2013).
Pag 24
1 Enter programming mode:
2 Enter the relevant
option:
Code Master
(1480)
A8
Bip (3 x)
Bip (3 x)
Page 25

Memokey
Memokey
3 Select the option you require:
0: The all purpose output is not used (by
default). The auxiliary output remains deactivated.
1: Each time a valid code is entered a 1
second pulse will be generated.
2: Every time Relay 1 is activated the allpurpose device will also activate, and will
remain activated for 5 seconds longer than
the associated device.
3: The all purpose output will switch every
time a valid code is entered.
4: The all purpose output will be activated
and will remain active every time you press
“A” and a valid keypad code, (purpose
output will remain during 1 minute active).
5: The all purpose output activates once 5
erroneous codes are entered in order, and
will remain active for 5 minutes or until a
valid code is entered.
6: The all purpose output activates once
any key is pressed or deactivates after 15
seconds with inactivity.
Bip
(3 x)
Example: Enable auxiliary output.
1480 A8 1
Pag 25
Page 26

Memokey
Memokey
GUIDE RAPIDE DE PROGRAMMATION
Function
Code
00...99
Function Description
Activation and Assignment of Access Codes
(100 codes).
A A Code Deactivation.
A0 Master Code Programming.
A1 Programming the Free Access (trades) Code.
Programming the Relay Activation Time.
A2
(Relay 1)
Programming the Auxiliary Device Time.
A3
(Relay 2)
A4 Changing the code length from 4 to 6 fi gures.
A5
A6
A7
Enabling/Disabling the P1 lock-release exit
button.(Relay 1)
Enabling/Disabling the P2 auxiliary device
button. (Relay 2)
Enabling/Disabling the option for users to
change their code.
A8
All-Purpose Device Auxiliary Output
Confi guration (which is called “AUX”).
A9 Delete all Codes.
Pag 26
Page 27

Memokey
Memokey
Sequence of codes to be entered:
Code Master
(1480)
+
Example
00...99
Memory
Position
Access Code (4 to 6
+
digits) + associated
action (1, 2 or 3).
1480 02 1144 1
00...99: Memory Posi-
AA +
tion of the Code to be
1480 AA 02
Deleted .
A0 + New Master Code 1480 A0 1234
A1 +
A2/A3 +
New Free Access
Code:
00: Bistable Mode
01..99 (01 to 99 seconds)
1480 A2 00 0
1480 A2 05 1
A4 + 4, 5 or 6 1480 A4 6
Pag 27
Page 28

Memokey
Memokey
Sequence of codes to be entered:
0: Button Disabled. 1480 A5 0
Code Master
(1480)
+
Example
A5/
A6
A7 +
1: Button Enabled. Lock Release.
(Relay 1)
+
2: Button Enabled. Activate auxiliary devices. (Relay 2)
3: Button Enabled. Activate door
+ auxiliary device simultaneously
Allowing User Codes to be Changed
1480 A5 1
1480 A5 2
1480 A5 3
1480 A7
All-Purpose Device Auxiliary Out-
A8 +
put Confi guration (0, 1, 2, 3, 4, 5
1480 A8 1
or 6).
A9 + Code Master (1480) 1480 A9 1480
Pag 28
Page 29

Memokey
Memokey
TECHNICAL FEATURES
Power Supply: 12 Vdc/Vac.
Operating Temperature: -20º to 55º C.
Capacity: 100 Access Codes Non-Volatile Memory.
Consumption:
* On standby: 40 mA
* With the lock-release relay active: 110 mA
Panel Connectors:
+, -: 12 Vdc Power Supply.
C1, R1: relay output 1 (potential free)
- C1: relay 1 common wire (lock-release).
- R1: Normally open (NA) or normally closed (NC)
contact (based on confi guration).
C2, R2: relay output 2 (potential free)
- C2: relay 2 common wire (lock-release).
- R2: Normally open (NA) or normally closed (NC)
contact (based on confi guration).
A: auxiliary/panic output. Collector Output Open. Maximum
current of 125 mA
Pag 29
Page 30

Memokey
Memokey
CABLING DIAGRAM
UP
PAL
TRADE
Vac
12V
R1
C1
C1 R1S1 S2 C2R2 A-
MÓDULO MEMOKEY
MEMOKEY MODULE
MODULE MEMOKEY
MEMOKEYMODUL
ALL-PURPOSE
DEVICE AUXI-
-
S2
A
R2
C2
S1
LIARY
OUTPUT
PI2 PI1
POWER SUPPLY
12 Vac /12 Vdc
LOCK-RELEASES
12 Vac / 12 Vdc
Memokey Connections:
PI1-Output Button (S1,-): Button to open the door from inside.
PI2-Exit Button (S2,-): Auxiliary Electronic Device Activation
Button.
P AL-Free Access Button (TRADE): Optional button to allow
free access to the building.
Notes:
The operating parameters for the free access, auxiliary exit (all purpose) and lockrelease buttons are confi gurable.
Use a lock-release suitable for the power supply you are going to use (Vac or Vdc).
Pag 30
Page 31

Memokey
Memokey
USER MANUAL
Introduction
This equipment includes a keypad which allows the door be
opened in addition to the activation of an auxiliary electronic
device on entering a personalised code.
It is possible to programme up to 100 different personalised
codes.
Generally one of these codes is given to each of the system
users, taking users to be not just the people that frequently
access the residence or the area, but also those who will be
granted access in the future (for example in the case of offi ces).
In the case of personalised codes, we can prohibit the use
of any code by a specifi c user just by deleting the code from
the system.
Management of all these personalised codes (activation, deactivation, etc) is done by the system administrator.
NOTES:
The SYSTEM ADMINISTRATION can assign a personal
code for opening the door and/or activate auxiliary devices
for any of the authorised users.
Users can change their personal code if this option has
been enabled by the SYSTEM ADMINISTRATOR.
The system has anti-sabotage protection, such that once
5 erroneous codes have been entered on the keypad it
will remain locked for 30 seconds, emitting a warning tone
throughout this period.
Pag 31
Page 32

Memokey
Memokey
Keypad Operation
• Code: Code to be entered using the keypad to activate
the lock-release.
• Emergencies: Opens the door and generates an alarm
tone (where this option has been confi gured).
• Free Access: Entering this code the door will remain
open until the free access code is re-entered.
• Changing the Code: Users can change their own personal
code if this option has been enabled by the SYSTEM
ADMINISTRATOR.
Pag 32
Page 33

Memokey
Memokey
User:__________________________________________________
Code: _____________
Emergencies (*):
Free Access (*):
Change Code (*):
(*) This option should be enabled. Contact the system administrator.
‘A’ + CODE
_____________
‘AB’ + CODE to be
changed + NEW
Cut out and deliver a copy of this section to each of the
users.
Pag 33
Page 34

Memokey
Memokey
Pag 34
Page 35

Memokey
Memokey
Pag 35
Page 36

 Loading...