

Page 1
wwwwww..ffeerrmm..ccoomm 00881100--1155..11
GGBBSSuubbjjeecctt ttoo cchhaanngge
e
DDÄÄnnddeerruunnggeenn vvoorrbbeehhaalltteen
n
NNLLWWiijjzziiggiinnggeenn vvoooorrbbeehhoouuddeen
n
FFSSoouuss rréésseerrvvee ddee mmooddiiffiiccaattiioonns
s
EERReesseerrvvaaddoo eell ddeerreecchhoo dde
e
mmooddiiffiiccaacciioonneess ttééccnniiccaas
s
PPRReesseerrvvaaddoo oo ddiirreeiittoo aa mmooddiiffiiccaaççõõees
s
IICCoonn rreesseerrvvaa ddii mmooddiiffiicchhe
e
wwwwww..ffeerrmm..ccoom
m
FFGGGG--22000000N
N
AArrtt..nnoo PPGGMM1100006
6
GGBB
D
D
NNL
L
F
F
E
E
P
P
I
I
UUSSEERRSS MMAANNUUAALL 0044
GGEEBBRRAAUUCCHHSSAANNWWEEIISSUUNNGG 0099
GGEEBBRRUUIIKKSSAAAANNWWIIJJZZIINNGG 1144
MMOODDEE DD’’EEMMPPLLOOII 2200
MMAANNUUAALL DDEE IINNSSTTRRUUCCCCIIOONNEESS 2255
IISSTTRRUUÇÇÕÕNN AA UUSSAARR 3311
MMAANNUUAALLEE UUTTIILLIIZZZZAATTII 3366
Page 2
2
2
Ferm
Ferm
4
488
EEXXPPLLOODDEEDD VVIIEEWW F
F
EEXXPPLLOODDEEDD VVIIEEWW G
G
1
3
1
5
1
6
1
4
3
4
6
7
5
1
2
9
8
12
11
10
17
FFiigg.. 11
Page 3
447
7
Ferm Ferm
3
3
EEXXPPLLOODDEEDD VVIIEEWW D
D
EEXXPPLLOODDEEDD VVIIEEWW E
E
FFiigg.. 22
FFiigg.. 44
FFiigg.. 33
FFiigg.. 55
(0.70 - 0.80 mm)
X
A
M
NIM
Page 4
15
16
GGEENNEERRAATTOORR ((44 SSTTRROOKKEE)
)
TTHHEE NNUUMMBBEERRSS IINN TTHHEE FFOOLLLLOOWWIINNGG TTEEXXT
T
CCOORRRREESSPPOONNDD WWIITTHH TTHHEE PPIICCTTUURREESS AAT
T
PPAAGGEE 22 ++ 3
3
SSAAFFEETTYY AANNDD OOPPEERRAATTIINNG
G
IINNSSTTRRUUCCTTIIOONNS
S
For your own safety and for the safety
of others, please read these
instructions carefully before using
this appliance. It will help you understand
your product more easily and avoid
unnecessary risks. Keep this instruction
manual in a safe place for future use.
CCOONNTTEENNTTSS:
:
1. Machine data
2. Safety instructions
3. Use
4. Service & maintenance
11.. MMAACCHHIINNEE DDAATTA
A
IINNTTRROODDUUCCTTIIOON
N
The generator is designated to generate
electricity with help of a 4 stroke fuel engine.
Now you can use your electric tools in the field
in spite of the lack of the electricity grid.
AAVVR
R
The AVR-system Automatic Voltage
Regulator) inside this generator produces a
stable and precise voltage output.
TTEECCHHNNIICCAALL SSPPEECCIIFFIICCAATTIIOON
N
FFEEAATTUURREESS
FFiigg.. 1
1
1. Fuel tank
2. Fuel level indicator
3. Fuel cap
4. Exhaust
5. AC socket
6. Ground terminal
7. AC Switch
8. Oil filler cap
9. Oil drain plug
10. Oil sensor
11. Voltmeter
12. Engine switch
13. Choke lever
14. Recoil starter
15. Fuel tap
16. Air filter cover
17. Spark plug
TTyyppee E
Ennggiinnee
||AAiirr ccoooolleedd
||44--ssttrrookkee ppeettrrool
l
Cylinder arrangement
| Inclined, 1
cylinder
Continuous
|
4.0 kW
Max. output | 4.8 kW
Operation hours | 13 hours
Fuel | Unleaded petrol
Fuel tank capacity | 15 L
Engine oil capacity | 600 ml
Spark contact
point distance | 0.7 – 0.8 mm
Rated voltage | AC 230 V
Rated frequency (AC) | 50 Hz
Rated output | 2000W
Max. output power
of apparatus
| 2200 W
Tool class | I
Weight | 44 kg
Dimensions | 590x430x440 mm
Outdoor noise (Lwa) | 94,0 dB(A)
Sound pressure capacity(
Lpa ) | 65,0dB(A)
4
4
Ferm
Ferm
4
455
EEXXPPLLOODDEEDD VVIIEEWW B
B
EEXXPPLLOODDEEDD VVIIEEWW C
C
Page 5
22.. SSAAFFEETTYY IINNSSTTRRUUCCTTIIOONNS
S
Explanation of symbols
In this manual and/or on the machine the
following symbols are used:
In accordance with essential
applicable safety standards of
European directives
Risk of damaging material and/or
physical
injuries
Risk of an electric shock
Read instruction manual
Keep bystanders away
Do not expose to rain
Outdoor noise
Risk of high temperature
Caution: the generator contains some
parts which might reach high
temperatures
Faulty and/or discarded electrical or
electronic apparatus have to be
collected at the appropriate recycling
locations.
SSAAFFEETTYY IINNSSTTRRUUCCTTIIOONNS
S
PPeerrssoonns
s
• Never allow children or people unfamiliar
with these instructions to use the
appliance. Local regulations may restrict
the age of the operator.
• Always operate outdoors with good
ventilation. Exhaust gas contains
poisonous carbon monoxide.
•
Always stop the engine before refilling the
fuel tank and clean the machine after filling
the fuel tank.
•
Do not inhale fumes from petrol.
EElleeccttrriicciitty
y
• Do not touch the generator if you have wet
hands
• Do not operate the generator in wet
conditions.
•
Do not operate the generator near water.
• Never connect two generators together.
• Never connect the generator to any
commercial power outlet.
• Make sure any extension cords used are in
a safe condition and of sufficient capacity
for the task.
• Ensure that the load on the generator falls
within its capacity as specified in the table
before plugging in any cords.
FFiirree aanndd bbuurrnn hhaazzaarrdds
s
• The exhaust system gets hot enough to
ignite some materials:
- keep the generator at least 1 meter
away from buildings and other
equipment during operation.
- keep flammable materials away from
the generator.
•
The exhaust becomes very hot during
operations and remains hot for a while
after stopping the engine:
- Let the engine cool before storing the
generator indoors.
- Do not touch the hot exhaust with your
hands.
• Gasoline is extremely flammable and is
explosive under certain conditions. Do not
smoke or allow flames or sparks where the
generator is refueled or where gasoline is
stored.
• Fuel vapors are extremely flammable and
may ignite after the engine has started.
Make sure that any spilled fuel has been
wiped up before starting the generator.
• Never shade the generator with clothes or
other articles.
Ferm
5
5
444
4
Ferm
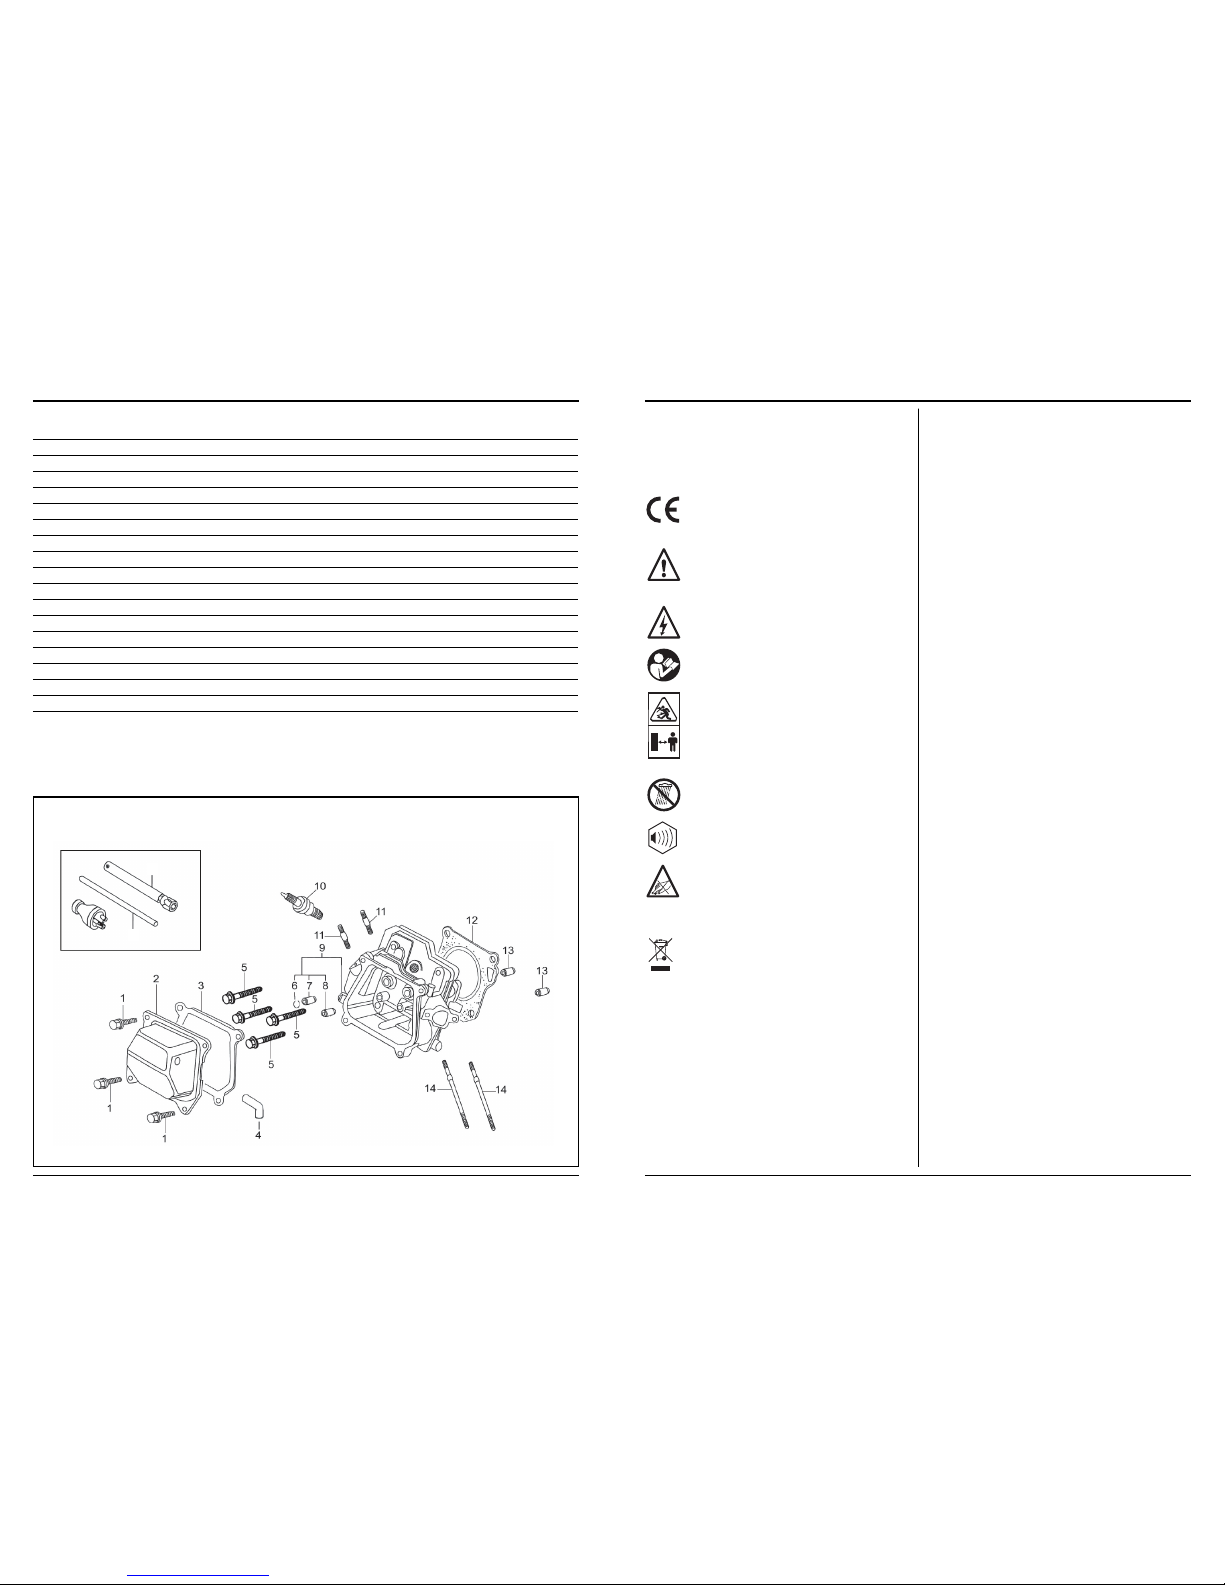
SSPPAARREEPPAARRTTSS LLIISST
T
NNOO.. DDEESSCCRRIIPPTTIIOONN PPOOSSIITTIIOONN
203078 GASKET SET CYLINDERHEAD A3, 12
203079 SPARK PLUG A10
203080 SPARK PLUG WRENCH A15, 16
203081 GASKET SET CARBURATOR B14, 15, 17
203082 AIR FILTER COMPLETE C10
203083 GASKET SET EXHAUST D5, 11
203084 FUEL CAP E2, 3
203086 FILTER E4
203092 FUEL GAUGE E5
203091 GASKET E15
203087 MOTOR SUPPORT F2
203089 MOTOR SUPPORT F3
203085 RUBBER FOOT F6, 7
400890 ENGINE SWITCH 400891 CIRCUIT BREAKER SWITCH 203093 CARBON BRUSH WITH HOLDER -
15
16
EEXXPPLLOODDEEDD VVIIEEWW A
A
Page 6
Ferm
4
433
33.. UUSSE
E
BBEEFFOORREE SSTTAARRTTIINNGG TTHHE
E
GGEENNEERRAATTOOR
R
Ground terminal
The generator ground terminal is
connected to the frame of the generator, the
metal non-current-carrying parts of the
generator, and the ground terminals of each
receptacle. Before using the ground terminal,
consult a qualified electrician, electrical
inspector or local agency having jurisdiction for
local codes or ordinances that apply to the
intended use of the generator.
FFiillll aanndd cchheecckk ooiill lleevveell ((qquuaannttiittyy iiss 660000 mmll)
)
Always check the oil level (with machine in a
level position) before starting and if the
engine unexpectedly stops (fig. 2).
For general use you can use an “all
temperature” oil 10W-30
≤ 0ºC SAE#10
0ºC - 25 ºC SAE#20
25ºC -35 ºC SAE#30
≥ 35ºC SAE#40
FFiillll aanndd cchheecckk ffuueell lleevveel
l
•
Use unleaded fuel only
• Remove any power cords
•
Turn power switches off
• Do not overfill – leave air gap at top of fuel
level
• Always screw down fuel cap
• Clean up any spilled fuel
• Do not smoke while operating the
generator
Always use caution!
SSttaarrttiinngg tthhee ggeenneerraattoorr
FFiigg.. 11 ++ 44 ++ 55
1. Turn on fuel tap (15).
2. Turn on engine switch (12).
3. Move choke lever (13) to closed position
(to restart a warm engine, leave the choke
lever in open or half-open position).
4. Pull slowly on the starter cord until it
engages, then pull sharply to start the
engine (14).
5. Allow the engine to run until it warms up,
and then move the choke lever to the open
position (13).
UUssiinngg tthhee AACC OOuuttppuutt ((223300 VV)
)
• Start the generator.
• Plug in the electrical appliance plug.
•
Press AC current protector downward to
“ON”(7).
• The voltmeter (11) displays the voltage on
the AC socket. Normally this should be ±
230 V during use.
SSttooppppiinngg tthhee ggeenneerraattoor
r
FFiigg.. 11 ++ 5
5
1. Unplug all cords (5)
2. Turn engine switch to “OFF” (12)
3. Turn off fuel tap (15)
44.. SSEERRVVIICCEE && MMAAIINNTTEENNAANNCCE
E
PPEERRIIOODDIICC MMAAIINNTTEENNAANNCCE
E
Daily (pre-operation check)
• Check engine oil level
• Check fuel hose for cracks or other
damage. Replace if necessary.
• Check exhaust-system for leakage.
Retighten or replace gasket if necessary.
• Check choke operation
• Check recoil starter operation
11sstt MMoonntthh oorr 2200 hhrrs
s
• Replace engine oil
33 MMoonntthhss oorr 5500 hhrrs
s
• Check condition of spark plug. Adjust gap
and clean. Replace if necessary.
•
Clean, replace if necessary.
66 MMoonntthhss oorr 110000 hhrrs
s
•
Replace engine oil
• Clean fuel tap and fuel tank filter. Replace if
necessary.
• Check fittings and fasteners. Replace if
necessary.
1122 MMoonntthhss oorr 330000 hhrrs
s
• Contact a specialized service centre to
check the valve clearance.
•
Check the fan of the cooling system for
damage.
6
6
Ferm
Page 7

SSeerrvviiccee –– nnootteess oonn mmaaiinntteennaanncce
e
FFiigg..1
1
OOiill rreeppllaacceemmeenntt
• Warm up engine on level ground
• Remove filler cap (8)
•
Open drain plug (9) and let oil drain
completely into a pan placed under the
engine.
• Check gaskets, replace if required. Refit
drain plug and refill engine with clean oil.
• Replace filler cap.
SSppaarrkk pplluugg iinnssppeeccttiioon
n
FFiigg.. 3
3
• Disconnect the spark plug cap, and
remove any dirt from around the spark
plug area.
• Remove spark plug (17) with the plug
spanner supplied.
• Inspect the spark plug. It should be a tan
colour.
• Measure the gap (distance contact point)
with a suitable gauge. The gap should be
0,7 - 0,8 mm. Correct the gap, if necessary,
by carefully bending the side electrode.
• Replace the spark plug if the electrodes
are worn, or if the insulator is cracked or
chipped.
• Install the spark plug carefully, by hand, to
avoid cross-threading.
• Place the spark plug with correct torque:
20 Nm.
• Attach the spark plug cap.
EExxhhaauusstt ssccrreeeen
n
• Wait for exhaust to cool.
•
Exhaust screen may be blocked up with
carbon deposits.
•
Undo the screw cap and remove the
exhaust screen.
• Clean the screen with a wire brush and
refit.
• Replace exhaust screen if damaged.
AAiirr ffiilltteerr cclleeaanniinng
g
• Remove the air filter cover (16).
• Remove filter element and wash well in
solvent.
•
Pour a small amount of oil onto the filter
element and gently squeeze out any
excess oil.
•
Replace the filter element and air filter cover.
• Be sure the filter cover seals properly all
around.
Do not run the engine without the air
filter element in place.
Never place a wet filter (with solvent)
on the machine.
FFuueell ttaap
p
• To remove the fuel tap filter, simply undo
the cup at the bottom of the fuel tank
• Use a small spanner to remove the tap
•
Clean and wash out the filter and cup, and
replace.
TTRROOUUBBLLEESSHHOOOOTTIINNG
G
BBaassiicc cchheecckks
s
• Make sure you have plenty of fuel
• Make sure the fuel tap is on
•
Make sure the engine-switch is on
• Make sure the oil level is correct
• The generator has an oil sensor. When the
oil level is too low, the generator will not be
able to start.
• Remove spark plug, connect spark plug
lead and earth it to the generator. Pull
starter cord gently and look for a spark. If
there is no spark, replace spark plug.
SSppaarrkk pplluugg iiss OOKK,, bbuutt eennggiinnee ssttiillll wwoonn’’t
t
ssttaarrt
t
• Check fuel tap filter is clean
• Check fuel line is clear
• Check carburetor is not clogged
EEnnggiinnee wwiillll nnoott
ssttaarrt
t
•
Clean or replace spark plug
• Check ignition system – if faulty, contact
your service centre
•
Check compression – if low, contact your
service centre
•
Check for loose cylinder head – tighten
bolts
• Check for damaged cylinder head gasket –
replace if necessary
Ferm
7
7
Dichiariamo, assumendo la piena
responsabilità di tale dichiarazione, che il
FFGGGG--22000000N
N
è conforme alle seguenti normative ai relativi
documenti.
EENN1122660011,, EENN5555001144--11,, EENN5555001122,,
E
ENN6611000000--66--11
conforme alle direttive
9988//3377//EECC,, 22000066//9955//EECC,, 22000044//110088//EECC,
,
22000022//9955//EECC,, 22000022//9966//EEC
C
dal 01-01-2007
ZZWWOOLLLLEE NNL
L
J.A. Bakker - van Ingen J. Lodewijk
CEO Ferm BV
Quality Manager
Ferm Global
La nostra politica è sempre volta a migliorare i
nostri prodotti . Prodotti soggetti a modifiche
senza preavviso.
FFeerrmm BBVV •• LLiinnggeennssttrraaaatt 66 •• 88002288 PPM
M
ZZwwoollllee •• OOllaannddaam
m
CE
ı
DDIICCHHIIAARRAAZZIIOONNEE DDII CCOONNFFOORRMMIITTÀ
À
(
(
I
I
)
)
442
2
Ferm
Page 8
• Assicurarsi che ci sia il tappo per il
carburante
• Assicurarsi che l’interruttore del motore
sia acceso
• Assicurarsi che il livello dell’olio sia giusto
• Il generatore è dotato di un sensore olio.
Quando il livello dell'olio è troppo basso, il
generatore non può essere avviato.
• Rimuovere la candela d’accensione,
collegare il filo della candela d’accensione
e collegarlo a terra al generatore. Tirare
gentilmente il filo d’accensione per
controllare se c’è una scintilla. Se non c’è
scintilla, sostituire la candela
d’accensione.
LLaa ccaannddeellaa dd’’aacccceennssiioonnee èè OOKK,, mmaa iil
l
mmoottoorree nnoonn ppaarrttee aannccoorra
a
• controllare che il filtro del tappo per il
carburante sia pulito
• Controllare che il tubo di alimentazione sia
pulito
• Controllare che il carburatore non sia
intasato
IIll mmoottoorree nnoonn ppaarrtte
e
• Pulire o sostituire la candela di
accensione.
• Controllare il sistema di accensione – se
difettoso, contattare il proprio centro
servizi
• Controllare la compressione – se bassa,
contattare il proprio centro servizi
• Controllare che la testa del cilindro non si
sia allentata – stringere i bulloni
• Controllare che la guarnizione della testa
del cilindro non sia danneggiata –
sostituirla se necessario
PPUULLIIZZIIA
A
Pulire la carcassa regolarmente con un
panno morbido, preferibilmente prima d’ogni
uso. Eliminare polvere e sporco dalle prese di
ventilazione.
Togliere lo sporco ostinato con uno straccio
morbido, inumidito con acqua saponata.
Non usare solventi come petrolio, alcool,
ammoniaca, ecc. perché questi potrebbero
danneggiare i componenti di plastica.
CCOONNSSEERRVVAAZZIIOONNEE ((AA LLUUNNGGO
O
TTEERRMMIINNEE)
)
• Svuotare il serbatoio, il tappo per il
carburante, la ciotola del carburatore e il
carburatore.
• Versare una coppa d’olio da motore nel
serbatoio e scuotere il generatore per
spargere l’olio in tutto il serbatoio.
Svuotare l’olio in eccesso.
• Rimuovere la candela d’accensione e
versarvi 1 cucchiaio di olio da motore,
tirare il filo d’accensione diverse volte con
l’interruttore d’accensione spento.
Sostituire la candela di accensione
• Tirare il filo d’accensione finché non si
sente compressione e fermarsi.
• Pulire i generatori esteriori e di
rivestimento con un prodotto antiruggine.
• Posizionare il generatore su un piano e
coprirlo con un panno asciutto e pulito.
RRIIPPAARRAAZZIIOONNII EE CCOOMMMMEERRCCIIAANNTTI
I
Se si presentano problemi a causa di, per
esempio, usuradi una parte della sega, si
prega di contattare il servizio diassistenza
all'indirizzo riportato sulla scheda di garanzia.
AAMMBBIIEENNTTE
E
Per evitare che si danneggi durante il
trasporto, la macchina è imballata in un
contenitore resistente. La maggior parte dei
componenti dell'imballaggio sono riciclabili.
Portare tali materiali presso gli appositi centri
di riciclaggio.
Strumenti elettrici e/o elettronici
difettosi o usurati devono essere
smaltiti in appropriate aree di
riciclaggio.
GGAARRAANNZZIIA
A
Si prega di leggere le condizioni di garanzia
sulla carta di garanzia che è inclusa.
Ferm
4
411
CCLLEEAANNIINNG
G
Clean the housing regularly with a soft cloth,
preferably every time it is used. Keep the air
vents free of dust and dirt.
Remove stubborn dirt with a soft rag
moistened in soapy water. Do not use any
solvents such as petrol, alcohol, ammonia,
etc. as such substances can damage the
plastic parts.
SSTTOORRAAGGEE ((LLOONNGG TTEERRMM)
)
• Drain fuel tank, fuel tap, carburetor bowl
and carburetor
• Pour 1 cup of engine oil into the fuel tank
and shake the generator to spread the oil
around the tank. Drain excess oil.
• Remove spark plug and pour in 1 spoonful
of engine oil, pull the starter cord several
times with the starter switch OFF. Replace
spark plug.
• Pull on the starter cord until you feel
compression and stop.
• Clean the generators exterior and coat
with rust inhibitor.
• Place the generator on flat ground and
cover with a clean dry cloth.
FFAAUULLTTS
S
Should a fault occur, e.g. after wear of a part,
please contact the service address on the
warranty card. In the back of this manual you
find an exploded view showing the parts that
can be ordered.
EENNVVIIRROONNMMEENNT
T
To prevent damage during transport, the
appliance is
delivered in a solid packaging which consists
largely of reusable material. Therefore please
make use of options for recycling the
packaging.
Faulty and/or discarded electrical or
electronic apparatus have to be
collected at the appropriate recycling
locations.
WWAARRRRAANNTTY
Y
Read the terms of warranty on the separate
warranty card which is enclosed.
We declare under our sole responsibility that
this
FFGGGG--22000000N
N
is in conformity with the following standards
or standardized documents
EENN1122660011,, EENN5555001144--11,, EENN5555001122,,
EENN6611000000--66--1
1
in accordance with the regulations
9988//3377//EECC,, 22000066//9955//EECC,, 22000044//110088//EECC,
,
22000022//9955//EECC,, 22000022//9966//EEC
C
from 01-01-2007
ZZWWOOLLLLEE NNL
L
J.A. Bakker - van Ingen J. Lodewijk
CEO Ferm BV Quality Manager
Ferm Global
It is our policy to continuously improve our
products and we therefore reserve the right to
change the product specification without
prior notice.
FFeerrmm BBVV •• LLiinnggeennssttrraaaatt 66 •• 88002288 PPM
M
ZZwwoollllee •• TThhee NNeetthheerrllaanndds
s
CE
ı
DDEECCLLAARRAATTIIOONN OOFF CCOONNFFOORRMMIITTY
Y
(
(
GGB
B
)
)
8
8
Ferm
Page 9

GGEENNEERRAATTOORR ((44--TTAAKKTT)
)
DDIIEE NNUUMMMMEERRNN IIMM NNAACCHHFFOOLLGGEENNDDEEN
N
TTEEXXTT KKOORRRREESSPPOONNDDIIEERREENN MMIITT DDEEN
N
AABBBBIILLDDUUNNGGEENN AAUUFF SSEEIITTEE 22 ++ 3
3
SSIICCHHEERRHHEEIITTSSVVOORRSSCCHHRRIIFFTTEENN UUNND
D
BBEEDDIIEENNUUNNGGSSAANNLLEEIITTUUNNG
G
Lesen Sie diese Anleitung im Hinblick
auf Ihre eigene Sicherheit und die
Sicherheit anderer bitte vor der
Benutzung dieses Geräts gründlich durch.
Dadurch verstehen Sie Ihr Produkt besser
und vermeiden unnötige Risiken. Bewahren
Sie diese Anleitung zum künftigen Gebrauch
an einer sicheren Stelle auf.
IINNHHAALLTT:
:
1. Gerätedaten
2. Sicherheitsvorschriften
3. Benutzung
4. Service und Wartung
11.. GGEERRÄÄTTEEDDAATTEEN
N
EEIINNLLEEIITTUUNNG
G
Der Generator ist für die Stromerzeugung mit
Hilfe eines 4-Takt-Benzinmotors ausgelegt.
Bei Ausfall des Stromnetzes können Sie also
Ihre Elektrowerkzeuge außen benutzen.
AAVVR
R
Der automatische Spannungsregler im
Inneren des Stromerzeugers sorgt für eine
stabile, präzise Ausgangsspannung.
TTEECCHHNNIISSCCHHEE DDAATTEEN
N
MMEERRKKMMAALLE
E
AAbbbb.. 1
1
1. Kraftstofftank
2. Kraftstoffstandanzeige
3. Tankdeckel
4. Auspuff
5. Wechselstromanschluss
6. Erdanschluss
7. Wechselstromschalter
8. Öleinfüllverschluss
9. Ölablassstopfen
10. Ölsensor
11. Voltmeter
12. Motorschalter
13. Starterklappenhebel
14. Reversierstarter
15. Kraftstoffhahn
16. Luftfilterabdeckung
17. Zündkerze
MMoottoorr TTyyp
p
||LLuuffttggeekküühhlltteerr
||44--TTaakktt-
-
||BBeennzziinnmmoottoor
r
Zylinderanordnung | Geneigt, 1
Zylinder Kontinu Leistung
| 4.0 kW
Max. Leistung | 4.8 kW
Betriebsstunden | 13 Stunden
Kraftstoff | Bleifreies Benzin
Kraftstofftankinhalt | 15 L
Motorölinhalt | 600 ml
Elektrodenabstand | 0.7 – 0.8 mm
Nennspannung | 230 VAC
Nennfrequenz (AC) | 50 Hz
Nennleistung | 2000W
Max. Ausgangsleist.
des Geräts | 2200 W
Werkzeugklasse | I
Gewicht | 44 kg
Abmessungen |
590x430x440 mm
Außengeräusch (Lwa) | 94,0 dB(A)
Schalldruck (Lpa ) | 65,0dB(A)
Ferm
9
9
33 mmeessii oo 5500 oorre
e
• Controllare la condizione della candela di
accensione. Regolare l’apertura e pulire.
Sostituirla se necessario.
• Pulire, sostituirla se necessario.
66 mmeessii oo 110000 oorre
e
• Sostituire l’olio nel motore
• Pulire il tappo per il carburante e il filtro del
serbatoio per il carburante. Sostituirli se
necessario.
• Controllare accessori e chiusure.
Sostituirli se necessario.12 mesi o 300 ore
• Contattare un centro servizi specializzato
per controllare l’autorizzazione della
valvola.
• Controllare il ventilatore del sistema di
raffreddamento per danni.
RREEVVIISSIIOONNEE -- NNOOTTEE SSUULLLLA
A
MMAANNUUTTEENNZZIIOONNE
E
FFiigg.. 1
1
Sostituzione dell’olio
• Scaldare il motore in piano
• Togliere il tappo di riempimento olio (8)
• Aprire il rubinetto di scarico (9) e lasciare che
l’olio scoli completamente nel piatto
posizionato sotto al motore.
• Controllare le guarnizioni, sostituirle se
necessario.
• Risistemare il rubinetto di scarico e
riempire il motore con olio pulito.
• Sostituire il tappo di riempimento olio.
IIssppeezziioonnee ddeellllaa ccaannddeellaa ddii aacccceennssiioonne
e
FFiigg.. 3
3
• Scollegare il cappuccio della candela di
accensione e rimuovere lo sporco intorno
alla zona della candela di accensione.
• Rimuovere la candela di accensione (17)
con la chiave per la spina in dotazione.
• Ispezionare la candela di accensione.
Dovrebbe essere di color marrone chiaro.
• Misurare lo spazio (distanza punto di
contatto) con un calibro adatto. Lo spazio
dovrebbe essere 0.7 – 0.8 mm. Correggere
lo spazio, se necessario, piegando
attentamente l’elettrodo laterale.
• Sostituire la candela d’accensione se gli
elettrodi sono consumati o se l’isolante è
spaccato o scheggiato.
• Installare la candela d’accensione
attentamente, a mano, evitando la
filettatura.
• Sistemare la candela d’accensione con
una corretta coppia di torsione: 20 Nm.
• Attaccare il cappuccio della candela di
accensione.
FFiillttrroo ddii ssccaarriicco
o
• Aspettare che lo scarico si raffreddi.
• Il filtro di scarico potrebbe essere intasato
con depositi di carbone.
• Sciogliere la vite e rimuovere il filtro di
scarico.
• Pulire il filtro con una spazzola metallica e
risistemarlo.
• Sostituire il filtro di scarico se
danneggiato.
PPuulliizziiaa ddeell ffiillttrroo ddeellll’’aarriia
a
• Rimuovere la copertura per il filtro dell’aria
(16).
• Rimuovere l’elemento filtro e lavarlo bene
nel solvente.
• Versare una piccola quantità di olio
nell’elemento filtro e spremere
gentilmente ogni eccesso di olio.
• Sostituire l’elemento filtro e la copertura
per il filtro dell’aria.
• Assicurarsi che la copertura per il filtro
dell’aria sigilli adeguatamente tutto
intorno.
Non azionare il motore senza che
l’elemento filtro dell’aria sia a posto.
Non mettere mai un filtro bagnato
(con solvente) sulla macchina.
TTaappppoo ppeerr iill ccaarrbbuurraanntte
e
• Per rimuovere il filtro del tappo per il
carburante, sciogliere semplicemente la
coppa in fondo al serbatoio.
• Usare una piccola chiave per rimuovere il
tappo
• Pulire e togliere il filtro e la coppa e
sostituirli.
RRIISSOOLLUUZZIIOONNEE DDEEII PPRROOBBLLEEMMI
I
CCoonnttrroollllii ddii bbaasse
e
• Assicurarsi di avere sufficiente carburante
440
0
Ferm
Page 10

GGEENNEERRAATTOORRE
E
Terminale di terra
Il terminale di terra è collegato al telaio
del generatore, alle parti metalliche non
destinate al trasporto di corrente e ai terminali di
terra di ogni presa elettrica.Prima di usare il
terminale di terra, consultare un elettricista
qualificato, un collaudatore di impianti o
un'agenzia locale che dispongano delle
normative o delle ordinanze previste per l'uso
del generatore.
RRiieemmppiirree ee ccoonnttrroollllaarree iill lliivveellllo
o
ddeellll’’oolliioo
((llaa qquuaannttiittàà èè 660000 mmll)
)
Controllare sempre il livello dell’olio (con la
macchina in posizione orizzontale) prima di
accendere e se il motore si ferma
inaspettatamente (fig. 2).
Per un uso generale potete utilizzare una
temperatura dell’olio 10W-30
≤ 0ºC SAE#10
0ºC - 25 ºC SAE#20
25ºC -35 ºC SAE#30
≥ 35ºC SAE#40
RRiieemmppiirree ee ccoonnttrroollllaarree iill lliivveelllloo ddeel
l
ccaarrbbuurraanntte
e
• Usare solo carburante senza piombo
• Rimuovere ogni filo di corrente
• Spegnere gli interruttori
• Non riempire troppo – lasciare uno spazio
d’aria sopra al livello del carburante
• Riavvitare sempre il tappo per il
carburante
• Pulire il carburante rovesciato
• Non fumare mentre si sta azionando il
generatore
Stare sempre attenti!
AAvvvviiaarree iill ggeenneerraattoorre
e
FFiigg.. 11 ++ 44 ++ 5
5
1. Aprire il tappo per il carburante (15).
2. Accendere l’interruttore del motore (12).
3. Muovere la leva della valvola dell’aria (13)
sulla posizione chiuso (per riavviare il
motore caldo, lasciare la leva della valvola
dell’aria sulla posizione aperto o semiaperto).
4. Tirare lentamente sul filo del motorino
d’avviamento finché si innesta, poi tirare
bruscamente per avviare il motore (14).
5. Lasciare il motore acceso finché si scalda e
poi muovere la leva della valvola dell’aria
sulla posizione aperto (13).
UUssoo ddeellll''uusscciittaa cc..aa.. ((223300 VV)
)
• Avviare il generatore
• Inserire la spina dell'apparecchio elettrico
• Premere la protezione da corrente c.a.
verso il basso portandola su “ON” (7).
• Il voltmetro (11) consente di visualizzare la
tensione sulla presa c.a. Normalmente la
tensione dovrebbe essere pari a ± 230 V
durante l'uso
FFeerrmmaarree iill ggeenneerraattoorre
e
FFiigg.. 11 ++ 5
5
1. Scollegare tutti i fili (5)
2. Spegnere l’interruttore del motore (12).
3. Chiudere il tappo per il carburante (15).
44.. SSEERRVVIIZZIIOO && MMAANNUUTTEENNZZIIOONNE
E
MMAANNUUTTEENNZZIIOONNEE PPEERRIIOODDIICCA
A
GGiioorrnnaallmmeennttee ((ccoonnttrroolllloo ddii pprree--uussoo)
)
• Controllare il livello di olio nel motore
• Controllare il tubo del carburante per
spaccature o altri danni. Sostituirlo se
necessario.
• Controllare il sistema di scarico per
perdite. Ristringere o sostituire la
guarnizione se necessario.
• Controllare il funzionamento della valvola
dell’aria
• Controllare il funzionamento del motorino
d’avviamento con rinculo
PPrriimmoo mmeessee oo 2200 oorre
e
• Sostituire l’olio nel motore
Ferm
3
399
22.. SSIICCHHEERRHHEEIITTSSVVOORRSSCCHHRRIIFFTTEEN
N
Erklärung der Symbole
In dieser Anleitung und/oder am Gerät
werden folgende Symbole verwendet:
Entspricht grundlegenden
anwendbaren Sicherheitsnormen der
europäischen Richtlinien.
Gefahr von Materialbeschädigung
bzw. Verletzungen.
Bezeichnet Stromschlaggefahr.
Gebrauchsanleitung durchlesen
Zuschauer fernhalten
Keinem Regen aussetzen.
Außengeräusch
Gefährdung durch hohe
temperaturen. Achtung! Der
Generator enthält Bauteile, die sich
stark erhitzen können.
Schadhafte und/oder entsorgte
elektrische oder elektronische Geräte
müssen an den dafür vorgesehenen
Recycling-Stellen abgegeben
werden.
SSIICCHHEERRHHEEIITTSSVVOORRSSCCHHRRIIFFTTEEN
N
PPeerrssoonneen
n
• Lassen Sie das Gerät nie von Kindern oder
Personen bedienen, die damit nicht
vertraut sind. Örtlich geltende
Bestimmungen schreiben für die
Benutzung eventuell ein Mindestalter vor.
• Gerät immer im Freien mit guter Belüftung
benutzen. Abgase enthalten giftiges
Kohlenmonoxid.
• Stellen Sie den Motor vor dem Auffüllen
des Kraftstofftanks immer ab und reinigen
Sie das Gerät, nachdem der Kraftstofftank
gefüllt wurde.
• Benzindämpfe dürfen nicht eingeatmet
werden.
SSttrroommnneettz
z
• Generator nicht mit feuchten Händen
berühren.
• Generator nicht in nasser Umgebung
betreiben.
• Generator nicht in der Nähe von Wasser
betreiben.
• Niemals zwei Generatoren
zusammenschalten.
• Niemals den Generator an eine
handelsübliche Steckdose anschließen.
• Vergewissern Sie sich, dass eventuell
benutzte Verlängerungskabel sicher und
für die betreffende Aufgabe mit
ausreichender Kapazität versehen sind.
• Vergewissern Sie sich, dass die
Generatorbelastung in den in der Tabelle
genannten Leistungsbereich fällt, bevor
Kabel eingesteckt werden.
BBrraanndd-- uunndd VVeerrbbrreennnnuunnggssggeeffaahhrreen
n
• Das Auspuffsystem wird heiß genug, um
einige Materialien zu entzünden:
- Halten Sie den Generator während der
Benutzung wenigstens 1 Meter von
Gebäuden und anderen Ausrüstungen
entfernt.
- Halten Sie entzündbare Materialien
vom Generator fern.
• Der Auspuff wird bei der Arbeit sehr heiß
und bleibt nach dem Abschalten des
Motors eine Zeit lang heiß:
- Lassen Sie den Motor, bevor Sie ihn im
Gebäudeinnern unterbringen,
abkühlen.
- Berühren Sie den heißen Auspuff nicht
mit den Händen.
• Benzin ist hochentzündbar und unter
bestimmten Bedingungen explosiv. An
Stellen, an denen der Generator
aufgetankt oder Benzin gelagert wird, darf
nicht geraucht werden und es dürfen keine
Flammen oder Funken entstehen.
• Kraftstoffdämpfe sind extrem entzündbar
und können sich nach dem Starten des
Motors entzünden. Vergewissern Sie sich,
110
0
Ferm
Page 11

dass eventuell verschütteter Kraftstoff vor
dem Anlassen des Generators abgewischt
wurde.
• Der Generator darf nie mit Kleidung oder
anderen Objekten abgedeckt werden.
33.. BBEENNUUTTZZUUNNG
G
VVOORR DDEEMM AANNLLAASSSSEENN DDEES
S
GGEENNEERRAATTOORRS
S
Erdanschluss
Der Erdanschluss des Generators ist
mit dem Generatorgestell, den nicht
spannungsführenden Teilen des
Stromerzeugers und den Erdanschlüssen der
einzelnen Buchsen verbunden. Vor
Verwendung des Erdanschlusses muss ein
qualifizierter Elektriker, ein Inspektor für
Elektroanlagen oder die für die sich auf den
Verwendungszweck des Generators
beziehenden örtlichen Vorschriften und
Bestimmungen zuständige Behörde zu Rate
gezogen werden.
ÖÖllssttaanndd kkoonnttrroolllliieerreenn uunndd aauuffffüülllleenn
((ddiiee MMeennggee bbeettrrääggtt 660000 mmll)
)
Vor dem Anlassen und wenn der Motor
unerwartet anhält, immer den Ölstand
kontrollieren (das Gerät muss dabei
waagerecht stehen) (Abb. 2).
Für den allgemeinen Gebrauch kann ein “AllTemperatur”-Öl 10W-30 verwendet werden.
≤ 0ºC SAE#10
0ºC - 25 ºC SAE#20
25ºC -35 ºC SAE#30
≥ 35ºC SAE#40
ÖÖllssttaanndd kkoonnttrroolllliieerreenn uunndd aauuffffüülllleen
n
• Nur bleifreien Kraftstoff benutzen.
• Eventuell vorhandene Stromkabel
entfernen.
• Stromschalter ausschalten.
• Nicht überfüllen – oberhalb des
Kraftstoffpegels etwas Luft lassen.
• Tankverschluss immer gut festschrauben.
• Eventuell verschütteten Kraftstoff
aufwischen.
• Bei Benutzung des Generators nicht rauchen.
Arbeiten Sie immer vorsichtig!
AAnnllaasssseenn ddeess GGeenneerraattoorrss
AAbbbb.. 11 ++ 44 ++ 5
5
1. Kraftstoffhahn öffnen (15).
2. Motorschalter (12) einschalten.
3. Starterklappenhebel (13) auf “Zu” stellen
(um einen warmen Motor neu zu starten,
lassen Sie den Starterklappenhebel in
offener oder halb geöffneter Position).
4. Langsam an dem Anlasserkabel ziehen,
bis es einrastet; anschließend kräftig
ziehen, um den Motor zu starten (14).
5. Lassen Sie den Motor warmlaufen und
bewegen Sie anschließend den
Starterklappenhebel in Position “Auf” (13).
VVeerrwweenndduunngg ddeer
r
WWeecchhsseellssttrroommaauussggaabbee ((223300 VV)
)
• Starten Sie den Generator.
• Stecken Sie den Stecker des elektrischen
Geräts ein.
• Drücken Sie die Wechselstromsicherung
nach unten auf „ON“ (7).
• Das Voltmeter (11) zeigt die Spannung im
Wechselstromanschluss an. Diese beträgt
im Normalfall bei Gebrauch ±230 V.
AAuusssscchhaalltteenn ddeess GGeenneerraattoorrs
s
AAbbbb.. 11 ++ 5
5
1. Alle Kabel herausziehen (5).
2. Motorschalter auf “OFF” stellen (12).
3. Kraftstoffhahn schließen (15).
44.. SSEERRVVIICCEE UUNNDD WWAARRTTUUNNG
G
PPEERRIIOODDIISSCCHHEE WWAARRTTUUNNG
G
Täglich (Kontrolle vor dem Betrieb)
• Motorölstand kontrollieren.
• Kraftstoffschlauch auf Risse oder andere
Schäden kontrollieren. Ggf. erneuern.
• Auspuffsystem auf Undichtigkeit
kontrollieren. Ggf. Dichtung anziehen oder
erneuern.
• Starterklappenfunktion kontrollieren.
• Rückstoßanlasserfunktion kontrollieren.
11.. MMoonnaatt ooddeerr nnaacchh 2200 SSttuunnddeen
n
• Motoröl wechseln.
Ferm
1
111
22.. IISSTTRRUUZZIIOONNII SSUULLLLA
A
SSIICCUURREEZZZZA
A
Spiegazione dei simboli
In questo manuale e/o sulla macchina sono
usati i seguenti simboli:
In conformità con gli standard
essenziali sulla sicurezza applicabili
delle direttive europee.
Rischio di danni al materiale/o di
lesioni fisiche
Rischio di scossa
Legga il manuale di istruzioni
Tenere lontani gli astanti
Non esporre alla pioggia
Rumore all’aperto
Rischio di temperature elevate.
Attentione: nel generatore ci sono
alcune parti che protrebbero
raggiungere temperature elevate.
IISSTTRRUUZZIIOONNII SSUULLLLAA SSIICCUURREEZZZZA
A
PPeerrssoonne
e
• Non permettere che bambini o persone,
che non sono pratiche di queste istruzioni,
usino questo apparecchio. Le leggi locali
potrebbero porre limiti d’età all’operatore.
• Azionare sempre all’aperto con una buona
ventilazione.
• Il gas di scarico contiene monossido di
carbonio tossico.
• Fermare sempre il motore prima di
riempire il serbatoio del carburante e pulire
la macchina dopo aver riempito il
serbatoio del carburante.
• Non inalare vapori dalla benzina.
EElleettttrriicciittà
à
• Non toccare il generatore con le mani
bagnate.
• Non azionare il generatore in condizioni di
umidità.
• Non azionare il generatore vicino
all’acqua.
• Non collegare mai due generatori insieme.
• Non collegare il generatore ad alcuna
presa di corrente commerciale.
• Assicurarsi che le prolunghe utilizzate siano in
buone condizioni e abbiano una capacità
sufficiente per lo scopo.
• Assicurarsi che il carico del generatore
rientri nella sua capacità come specificato
nella tavola prima di attaccare qualsiasi
filo.
PPeerriiccoollii ddii iinncceennddiioo ee uussttiioonne
e
• Il sistema di scarico si scalda
sufficientemente per incendiare alcuni
materiali:
- tenere il generatore lontano almeno 1
metro da edifici e altre apparecchiature
durante il funzionamento.
- tenere i materiali infiammabili lontano
dal generatore.
• Lo scarico si scalda molto durante il
funzionamento e resta caldo per un po’
dopo aver spento la macchina:
- Lasciare raffreddare il motore prima di
mettere dentro il generatore.
- Non toccare lo scarico caldo con le
mani.
• La benzina è estremamente infiammabile
ed è esplosiva in certe condizioni. Non
fumare o creare fiamme o scintille dove
viene riempito il generatore di carburante o
dove viene conservata la benzina.
• I vapori del carburante sono
estremamente infiammabili e possono
incendiarsi dopo che il motore è avviato.
Assicurarsi che qualsiasi carburante
rovesciato venga asciugato prima di
accendere il generatore.
• Non schermare mai il generatore con
indumenti o altri oggetti.
33.. UUTTIILLIIZZZZO
O
PPRRIIMMAA DDII AACCCCEENNDDEERREE IIL
L
338
8
Ferm
Page 12

GGEENNEERRAATTOORREE ((44 TTEEMMPPII)
)
TTHHEE NNUUMMBBEERRSS IINN TTHHEE FFOOLLLLOOWWIINNGG TTEEXXT
T
CCOORRRREESSPPOONNDD WWIITTHH TTHHEE PPIICCTTUURREESS AAT
T
PPAAGGEE 22 ++ 3
3
IISSTTRRUUZZIIOONNII SSUULLLLAA SSIICCUURREEZZZZAA E
E
SSUULL FFUUNNZZIIOONNAAMMEENNTTO
O
Per la vostra sicurezza e quella degli
altri, per favore leggere attentamente
queste istruzioni prima di usare questo
apparecchio. Vi aiuteranno a capire il
funzionamento del vostro prodotto più
facilmente e ad evitare rischi. Conservare
questo manuale di istruzioni in un luogo
sicuro per uso futuro.
CCOONNTTEENNUUTTI
I
1. Dati della macchina
2.
Istruzioni sulla sicurezza
3. Utilizzo
4.
Servizio & manutenzione
11.. DDAATTII DDEELLLLAA MMAACCCCHHIINNA
A
IINNTTRROODDUUZZIIOONNE
E
Il Generatore è progettato per generare
elettricità con l’aiuto di un motore carburante
a 4 tempi. Ora potete usare i vostri attrezzi
elettrici nel campo nonostante la mancanza
di rete elettrica.
AAVVR
R
Il sistema AVR (Automatic Voltage Regulator
(regolatore automatico della tensione))
all'interno di questo generatore produce una
tensione d'uscita stabile e precisa.
CCAARRAATTTTEERRIISSTTIICCHHEE TTEECCNNIICCHHE
E
CCOOMMPPOONNEENNTTI
I
FFiigg..1
1
1. Serbatoio combustibile
2. Indicatore livello combustibile
3. Tappo combustibile
4. Scarico
5. Presa c.a.
6. Polo di massa
7. Interruttore c.a.
8. Tappo serbatoio olio
9. Tappo di scarico olio
10. Sensore olio
11. Voltmetro
12. Interruttore motore
13. Levetta dell'aria
14. Avviamento autoavvolgente
15. Rubinetto combustibile
16. Copertura filtro dell'aria
17. Candela
MMoottoorree TTiippoo ||aa bbeennzziinnaa
r
raaffffrreeddddaattoo
||aadd aarriiaa aa 44 tteemmppi
i
Disposizione dei cilindri | Inclinato, 1
cilindro
Continuo | 4.0kW
Potenza massima | 4.8 kW
Ore di funzionamento | 13 ore
Benzina |
Benzina senza
piombo
Capacità del serbatoio | 15 L
Capacità dell’olio
del motore | 600 ml
Distanza dal
punto di contatto |
di accensione | 0.7 - 0.8 mm
Tensione nominale | c.a 230 V
Frequenza nominale (c.a)
| 50 Hz
Potenza nominale | 2000W
Massima potenza
assorbita del sistema | 2200 W
Classe della macchina | I
Peso | 44 kg
Dimensioni |
590x430x440 mm
Rumore all’aperto (Lwa) | 94,0 dB(A)
Capacità di pressione
del suono (Lpa) | 65,0dB(A)
Ferm
3
377
NNaacchh 33 MMoonnaatteenn ooddeerr 5500 SSttuunnddeen
n
• Zustand der Zündkerze kontrollieren.
Elektrodenabstand einstellen und
reinigen. Ggf. erneuern.
• Reinigen, ggf. erneuern.
NNaacchh 66 MMoonnaatteenn ooddeerr 110000 SSttuunnddeen
n
• Motoröl wechseln.
• Kraftstoffhahn und Kraftstofftankfilter
reinigen. Ggf. erneuern.
• Fittings und Befestigungselemente
kontrollieren. Ggf. erneuern.
NNaacchh 1122 MMoonnaatteenn ooddeerr 330000 SSttuunnddeen
n
• Setzen Sie sich mit einem SpezialServicecenter in Verbindung, um das
Ventilspiel kontrollieren zu lassen.
• Ventilator des Kühlsystems auf
Beschädigung kontrollieren.
SSEERRVVIICCEE –– WWAARRTTUUNNGGSSHHIINNWWEEIISSE
E
AAbbbb.. 1
1
ÖÖllwweecchhsseel
l
• Motor auf waagerechter Unterlage
warmlaufen lassen.
• Einfüllverschluss entfernen (8).
• Ablassstopfen (9) öffnen und Öl vollständig
in eine unter dem Motor aufgestellte
Schale abfließen lassen.
• Dichtungen kontrollieren, ggf. erneuern.
Ablassstopfen wieder anbringen und
Motor wieder mit sauberem Öl füllen.
• Einfüllverschluss wieder anbringen.
ZZüünnddkkeerrzzeenniinnssppeekkttiioon
n
AAbbbb.. 3
3
• Zündkerzenkappe lösen und eventuell
vorhandenen Schmutz aus dem
Kerzenbereich entfernen.
• Zündkerze (17) mit dem mitgelieferten
Kerzenschlüssel entfernen.
• Zündkerze überprüfen. Sie sollte eine
gelbbraune Farbe aufweisen.
• Elektrodenabstand mit einer geeigneten
Lehre messen. Der Abstand sollte 0,7 – 0,8
mm betragen. Abstand nötigenfalls durch
vorsichtiges Verbiegen der seitlichen
Elektrode korrigieren.
• Zündkerze erneuern, wenn die Elektroden
abgenutzt sind oder der Isolator
geborsten oder abgeblättert ist.
• Zündkerze vorsichtig von Hand einsetzen,
damit das Gewinde nicht ausreißt.
• Zündkerze mit dem richtigen Drehmoment
einsetzen: 20 Nm.
• Zündkerzenkappe anbringen.
AAuussppuuffffaabbsscchhiirrmmbblleecch
h
• Auspuff abkühlen lassen.
• Das Auspuffabschirmblech kann durch
Kohleablagerungen blockiert sein.
• Schraubverschluss lösen und
Auspuffabschirmblech entfernen.
• Abschirmblech mit einer Drahtbürste
reinigen und wieder anbringen.
• Auspuffabschirmblech erneuern, falls es
beschädigt wurde.
LLuuffttffiilltteerrrreeiinniigguunng
g
• Luftfilterdeckel (16) entfernen.
• Filterelement entfernen und gründlich in
Lösungsmittel waschen.
• Eine geringe Ölmenge auf das
Filterelement gießen und überschüssiges
Öl vorsichtig ausdrücken.
• Filterelement und Luftfilterdeckel
erneuern.
• Vergewissern Sie sich, dass der
Filterdeckel rundherum dicht ist.
Motor nicht ohne eingebautes
Filterelement laufen lassen.
Niemals einen nassen Filter (mit
Lösungsmittel) am Gerät anbringen.
KKrraaffttssttooffffhhaahhn
n
• Um den Kraftstoffhahnfilter auszubauen,
braucht lediglich die Schale unten am
Kraftstoffbehälter entfernt zu werden.
• Zum Ausbau des Hahns ist ein kleiner
Schlüssel zu verwenden.
• Filter und Schale reinigen und waschen
bzw. erneuern.
FFEEHHLLEERRSSUUCCHHE
E
GGrruunnddkkoonnttrroolllleen
n
• Vergewissern Sie sich, dass ausreichend
Kraftstoff vorhanden ist.
• Vergewissern Sie sich, dass der
Kraftstoffhahn geöffnet ist.
• Vergewissern Sie sich, dass der
Motorschalter auf “On” steht.
112
2
Ferm
Page 13

• Vergewissern Sie sich, dass der Ölstand
stimmt.
• Der Stromerzeuger ist mit einem Ölsensor
ausgestattet. Bei zu niedrigem Ölstand
kann der Stromerzeuger nicht angelassen
werden.
• Zündkerze entfernen, Zündkerzenkabel
anschließen und am Generator erden.
Vorsichtig am Anlasserkabel ziehen und
auf Funkenbildung achten. Entstehen
keine Funken, Zündkerze erneuern.
ZZüünnddkkeerrzzee iisstt OOKK,, ddoocchh ddeerr MMoottoor
r
llääuufftt nniicchhtt aan
n
• Kontrollieren, ob Kraftstoffhahnfilter
sauber ist.
• Kontrollieren, ob Kraftstoffleitung sauber
ist.
• Kontrollieren, ob Vergaser nicht verstopft
ist.
MMoottoorr llääuufftt nniicchhtt aan
n
• Zündkerze reinigen oder erneuern.
• Zündsystem kontrollieren – wenn
fehlerhaft, Kontakt mit dem Servicecenter
aufnehmen.
• Kompression kontrollieren – wenn zu
gering, Kontakt mit dem Servicecenter
aufnehmen.
• Auf lockeren Zylinderkopf kontrollieren –
Bolzen anziehen.
• Auf beschädigte Zylinderkopfdichtung
kontrollieren – ggf. erneuern.
RREEIINNIIGGUUNNG
G
Reinigen Sie das Gehäuse regelmäßig mit
einem weichen Tuch, am besten nach jeder
Benutzung. Halten Sie die
Belüftungsöffnungen frei von Staub und
Schmutz.
Beseitigen Sie hartnäckigen Schmutz mit
einem weichen, mit Seifenwasser
befeuchteten Tuch. Verwenden Sie dazu
keine Lösungsmittel wie Benzin, Alkohol,
Ammoniak usw., da solche Substanzen die
Kunststoffteile beschädigen können.
LLAAGGEERRUUNNGG ((LLAANNGGFFRRIISSTTIIGG)
)
• Kraftstofftank, Kraftstoffhahn,
Vergasermulde und Vergaser entleeren.
• 1 Becher Motoröl in den Kraftstofftank
gießen und den Generator schütteln,
damit sich das Öl im ganzen Tank verteilt.
Überschüssiges Öl ablassen.
• Zündkerze entfernen und 1 Esslöffel
Motoröl hineingießen, Anlasserkabel
mehrmals mit dem Anlasserschalter in
Stellung OFF durchziehen. Zündkerze
erneuern.
• Anlasserkabel ziehen, bis Sie die
Kompression fühlen, dann stoppen.
• Generator-Außenseite reinigen und mit
Rostschutzmittel beschichten.
• Generator auf flachen Untergrund legen
und mit einem sauberen, trockenen Tuch
abdecken.
FFEEHHLLEER
R
Sollte beispielsweise nach Abnutzung eines
Teils ein Fehler auftreten, dann setzen Sie
sich bitte mit der auf der Garantiekarte
angegebenen Serviceadresse in Verbindung.
Im hinteren Teil dieser Anleitung befindet sich
eine ausführliche Übersicht über die Teile, die
bestellt werden können.
UUMMWWEELLT
T
Um Transportschäden zu verhindern, wird
die Maschine in einer soliden Verpackung
geliefert. Die Verpackung besteht
weitgehend aus verwertbarem Material.
Benutzen Sie also die Möglichkeit zum
Recyclen der
Verpackung.
Schadhafte und/oder entsorgte
elektrische oder elektronische Geräte
müssen an den dafür vorgesehenen
Recycling-Stellen abgegeben
werden.
Ferm
1
133
LLIIMMPPEEZZA
A
Limpe regularmente o corpo da máquina
com um pano macio, de preferência, após
cada utilização. Mantenha as entradas de
ventilação livres de poeiras e sujidades.
Retire sujidades mais resistentes com uma
pano suave e humedecido com água com
detergente. Não utilize solventes, tais como
petróleo, álcool, amónia, etc., uma vez que
estas substâncias podem danificar as peças
de plástico.
AARRMMAAZZEENNAAMMEENNTTOO ((LLOONNGGOO PPRRAAZZOO)
)
• Esvazie o depósito de combustível, a
torneira de combustível, o recipiente do
carburador e o carburador.
• Coloque um 1 chávena de óleo do motor
no depósito de combustível e agite o
gerador para espalhar o óleo pelo
depósito. Drene o excesso de óleo.
• Retire as velas e coloque 1 colher cheia de
óleo do motor, puxe o fio de arranque
várias vezes com o interruptor na posição
OFF (delsigado). Coloque novamente a
vela.
• Puxe o fio de arranque até sentir
compressão e pare.
• Limpe as camadas exteriores e
revestimento do gerador com antiferrugem.
• Coloque o gerador num solo plano e
cubra-o com um pano limpo e seco.
FFAALLHHAAS
S
Se ocorrer alguma falha, por exemplo, devido
a desgaste duma peça, contacte o endereço
de assistência indicado no cartão de
garantia. No fim deste manual encontra um
diagrama de componentes alargado com as
peças que podem ser encomendadas.
PPRROOTTEECCÇÇÃÃOO DDOO MMEEIIOO AAMMBBIIEENNTTE
E
Com vista a evitar quaisquer danos de
transporte, a máquina é fornecida numa
embalagem resistente, fabricada na medida
do possível em materiais recicláveis.
Entregue, portanto, a embalagem para
reciclagem.
Os aparelhos eléctricos ou
electrónicos avariados e/ou
eliminados têm de ser recolhidos nos
pontos de reciclagem adequados.
GGAARRAANNTTIIA
A
Leia os termos da garantia, que se encontra
no cartão de garantia em separado.
Declaramos sob nossa responsabilidade que
este
FFGGGG--22000000N
N
está em conformidade com as seguintes
normas ou documentos normalizados
EENN1122660011,, EENN5555001144--11,, EENN5555001122,,
E
ENN6611000000--66--11
de acordo com os regulamentos
9988//3377//EECC,, 22000066//9955//EECC,, 22000044//110088//EECC,
,
22000022//9955//EECC,, 22000022//9966//EECC
de 01-01-2007
ZZWWOOLLLLEE NNL
L
J.A. Bakker - van Ingen J. Lodewijk
CEO Ferm BV Quality Manager
Ferm Global
É nossa política continuarmos a melhorar os
nossos produtos e, assim, reservamo-nos o
direito de alterar a especificação do produto
sem notificação prévia.
FFeerrmm BBVV •• LLiinnggeennssttrraaaatt 66 •• 88002288 PPMM ZZwwoolllle
e
HHoollaanndda
a
CE
ı
DDEECCLLAARRAAÇÇÃÃOO DDEE CCOONNFFOORRMMIIDDAADDE
E
(
(
P
P
)
)
336
6
Ferm
Page 14

dobrando cuidadosamente o eléctrodo
lateral.
• Substitua a vela, se os eléctrodos
estiverem desgastados ou se o isolador
estiver rachado ou falhado.
• Instale cuidadosamente a vela, à mão,
para evitar o cruzamento das roscas.
•
Instale a vela com o binário correcto: 20 Nm.
• Coloque a tampa da vela.
EEccrrãã ddee eessccaappe
e
• Aguarde até o escape arrefecer.
• O ecrã de escape pode ficar entupido com
depósitos de carbono.
• Desaparafuse a tampa e retire o ecrã de
escape.
• Limpe o ecrã com uma escova e instale
novamente.
• Substitua o ecrã de escape, se
necessário.
LLiimmppeezzaa ddoo ffiillttrroo ddoo aar
r
• Remova a cobertura do filtro do ar (16).
• Remova o elemento do filtro e lave bem
com solvente.
• Coloque uma pequena quantidade de
óleo no elemento do filtro e aperte,
suavemente, qualquer excesso de óleo.
• Substitua o elemento do filtro e a tampa do
filtro do ar.
• Certifique-se de que a tampa do filtro está
bem vedada.
Não coloque o motor em
funcionamento sem o elemento do
filtro do ar instalado.
Nunca coloque um filtro molhado
(com solvente) na máquina.
TToorrnneeiirraa ddee ccoommbbuussttíívveel
l
• Para retirar o filtro da torneia de
combustível, basta simplesmente
desapertar o recipiente da parte inferior do
depósito de combustível
• Utilize uma chave pequena para retirar a
torneira
• Limpe e lave o filtro e o recipiente e
coloque novamente.
OORREESSOOLLUUÇÇÃÃOO DDEE PPRROOBBLLEEMMAAS
S
VVeerriiffiiccaaççõõeess bbáássiiccaas
s
• Certifique-se de que existe combustível
suficiente
• Certifique-se de que a torneia do
combustível está colocada
• Certifique-se de que o interruptor do
motor está ligado
• Certifique-se de que o nível do óleo está
correcto
• El generador dispone de un sensor del
nivel de aceite. Si este nivel es demasiado
bajo, el generador no se pondrá en
funcionamiento.
• Retire a vela, ligue o cabo da vela e ligue à
terra ao gerador. Puxe suaveemen5te o fio
de arranque e procure uma fagulha. Se
não existir uma fagulha, substitua a vela.
AA vveellaa eessttáá OOKK,, mmaass oo mmoottoorr nnãão
o
aarrrraanncca
a
• Verificar se o filtro do combustível está
limpo
• Verifique se a conduta de combustível
está limpa
• Verifique se o carburador não está
entupido
OO mmoottoorr nnããoo aarrrraanncca
a
• Limpe ou substitua a vela
• Verifique o sistema de ignição – se
defeituoso, contacte o seu centro de
serviço
• Verifique a compressão – se reduzida,
contacte o seu centro de serviço
• Verifique se a cabeça do cilindro está solta
– aperte os parafusos
• Verifique se a junta da cabeça do cilindro
está danificada – substituir, se necessário
Ferm
3
355
GGAARRAANNTTIIE
E
Lesen Sie die Garantiebedingungen auf der
separat beigefügten Garantiekarte durch.
Wir erklären auf unsere alleinige
Verantwortung, dass dieses
FFGGGG--22000000N
N
folgende Normen oder Normdokumente
erfüllt:
EENN1122660011,, EENN5555001144--11,, EENN5555001122,,
EENN6611000000--66--1
1
entsprechend den Vorschriften:
9988//3377//EECC,, 22000066//9955//EECC,, 22000044//110088//EECC,
,
22000022//9955//EECC,, 22000022//9966//EEC
C
Ab 01-01-2007
ZZWWOOLLLLEE NNL
L
J.A. Bakker - van Ingen J. Lodewijk
CEO Ferm BV Quality Manager
Ferm Global
Unsere Firmenpolitik ist auf ständige
Verbesserung unserer Produkte ausgerichtet
und wir behalten uns das Recht vor, die
Produktspezifikation ohne vorherige
Benachrichtigung zu ändern.
FFeerrmm BBVV •• LLiinnggeennssttrraaaatt 66 •• 88002288 PPMM ZZwwoolllle
e
•• NNiieeddeerrllaanndde
e
GGEENNEERRAATTOORR ((44--TTAAKKTT)
)
DDEE NNUUMMMMEERRSS IINN DDEE NNUU VVOOLLGGEENNDDE
E
TTEEKKSSTT VVEERRWWIIJJZZEENN NNAAAARR DDE
E
AAFFBBEEEELLDDIINNGGEENN OOPP PPAAGGIINNAA 22 ++ 3
3
VVEEIILLIIGGHHEEIIDDSSIINNSSTTRRUUCCTTIIEESS EEN
N
BBEEDDIIEENNIINNGGSSVVOOOORRSSCCHHRRIIFFTTEEN
N
Voor uw eigen veiligheid en die van
anderen raden wij u aan deze
gebruikershandleiding zorgvuldig door te
lezen, voordat u dit apparaat in gebruik
neemt. Hierdoor zult u het functioneren van
het apparaat beter begrijpen en kunt u
onnodige risico’s voorkomen. Bewaar deze
gebruikershandleiding en de overige
documentatie bij het apparaat.
IINNHHOOUUDDSSOOPPGGAAVVE
E
1. Machinegegevens
2. Veiligheidsinstructies
3. Gebruik
4. Service & onderhoud
11.. MMAACCHHIINNEEGGEEGGEEVVEENNS
S
IINNTTRROODDUUCCTTIIE
E
De generator is bedoeld voor het opwekken
van elektriciteit met behulp van een 4-takt
benzinemotor. Met deze machine kunt u nu uw
elektrische gereed-schappen ook gebruiken
op plaatsen waar geen elektriciteit is.
AAVVR
R
Dankzij het AVR-systeem (Automatic Voltage
Regulator, automatische spanningsregelaar)
produceert deze generator een stabiele
uitgangsspanning.
CE
ı
KKOONNFFOORRMMIITTÄÄTTSSEERRKKLLÄÄRRUUNNG
G
(
(
D
D
)
)
114
4
Ferm
Page 15

TTEECCHHNNIISSCCHHEE SSPPEECCIIFFIICCAATTIIEES
S
BBEENNAAMMIINNGG OONNDDEERRDDEELLEEN
N
AAffbb.. 1
1
1. Brandstoftank
2. Indicator brandstofniveau
3. Brandstoftankdop
4. Uitlaat
5. AC-aansluiting
6. Klem voor de massaverbinding
7. AC-schakelaar
8. Olievuldop
9. Olieaftapplug
10. Olieniveausensor
11. Voltmeter
12. Motorschakelaar
13. Chokehendel
14. Trekstarter
15. Brandstofkraantje
16. Deksel luchtfilter
17. Bougie
22.. VVEEIILLIIGGHHEEIIDDSSVVOOOORRSSCCHHRRIIFFTTEEN
N
SSyymmbboolleennlliijjsst
t
In deze handleiding en/of op de machine
worden de volgende pictogrammen gebruikt:
CE Conform de Europese
toepasselijke standaards op het
gebied van veiligheid
Gevaar voor lichamelijk letsel of
materiële schade wanneer de
instructies in deze handleiding niet
worden opgevolgd
Gevaar voor elektrische schok
Lees de gebruiksaanwijzing
Houd omstanders op afstand
Niet gebruiken in de regen
Geluidsoverlast
Risico van hoge temperaturen.
Opgelet! Op de generator zijn enkele
delen die hoge temperaturen kunnen
bereiken.
Defecte en/of afgedankte elektrische
of elektronische gereedschappen
dienen ter verwerking te worden
aangeboden aan een daarvoor
verantwoordelijke instantie.
SSPPEECCIIFFIIEEKKE
E
VVEEIILLIIGGHHEEIIDDSSIINNSSTTRRUUCCTTIIEES
S
PPeerrssoonneen
n
• Laat kinderen en volwassenen die niet
bekend zijn met deze instructies en
voorschriften nooit gebruik maken van dit
apparaat. De toegestane leeftijd van de
gebruiker is afhankelijk van de lokale
voorschriften.
• Gebruik dit apparaat alleen buiten en met
een goede ventilatie. De uitlaatgassen
bevatten het giftige koolmonoxide.
• Stop de motor voordat u de benzinetank
MMoottoorrttyyppee ||LLuucchhttggeekkooeelldde
e
||44--ttaakktt bbeennzziinnee-
-
||mmoottoor
r
Cilinderplaatsing |
Gekanteld, 1
cilinder
Continu |
4.0 kW
Max. vermogen | 4.8 kW
Gebruiksuren | 13 uren
Brandstof | Loodvrije
benzine
Inhoud benzinetank | 15 L
Inhoud motorolietank | 600 ml
Contactpuntafst.
ontsteking | 0.7 – 0.8 mm
Spanning | AC 230 V~
Frequentie (AC) | 50 Hz
Nominaal vermogen | 2000W
Max. vermogen van app. | 2200 W
Gereedschapsklasse | I
Gewicht | 44 kg
Afmetingen |
590x430x440 mm
Geluidsniveau (Lwa) | 94,0 dB(A)
Lpa (geluidsdruk) | 65,0dB(A)
Ferm
1
155
Tenha sempre cuidado!
AArrrraannqquuee ddoo ggeerraaddoor
r
FFiigg.. 11 ++ 44 ++ 5
5
1. Rode a torneira de combustível (15).
2. Ligue o motor (12).
3. Movimente a alavanca da borboleta (13)
para a posição fechada (para reiniciar um
motor quente, deixe a alavanca da
borboleta numa posição aberta ou semiaberta).
4. Puxe lentamente o fio de arranque até
engrenar; em seguida, puxe abruptamente
para iniciar o motor (14).
5. Permita o funcionamento do motor até
aquecer e, em seguida, movimente a
alavanca da borboleta para a posição
aberta (13).
UUttiilliizzaarr aa SSaaííddaa ddee VVccaa ((223300 VV)
)
• Accione o gerador
• Introduza a ficha do aparelho eléctrico na
tomada
• Carregue o protector de Vca para baixo
para “ON” (7) (ligado).
• El voltímetro (11) indica el voltaje presente
en el enchufe para CA. Normalmente, éste
debe ser de ± 230 V durante el uso del
aparato.
PPaarraarr oo ggeerraaddoor
r
FFiigg.. 11 ++ 5
5
1. desligar todos os cabos (5)
2. coloque o interruptor do motor na posição
“OFF” (desligado) (12)
3. rode a torneira de combustível (15).
44.. SSEERRVVIIÇÇOO EE MMAANNUUTTEENNÇÇÃÃO
O
MMAANNUUTTEENNÇÇÃÃOO PPEERRIIÓÓDDIICCA
A
Diária (verificação antes do funcionamento)
• Verificar o nível do óleo do motor
• Verificar a mangueira do combustível para
identificar fissuras ou outros danos.
Substituir, se necessário.
• Verificar o sistema de escape para a
identificação de fugas. Apertar ou
substituir a junta, se necessário.
• Verificar a posição da borboleta
• Verificar o funcionamento do motor de
arranque de retorno
11..ºº MMêêss oouu 2200 hhoorraas
s
• Substituir o óleo do motor
33 MMeesseess oouu 5500 hhoorraas
s
• Verificar as condições das velas. Ajustar
as folgas e limpar. Substituir, se
necessário.
• Limpar; substituir, se necessário.
66 MMeesseess oouu 110000 hhoorraas
s
• Substituir o óleo do motor
• Limpar a torneira de combustível e o filtro
do depósito de combustível. Substituir, se
necessário.
• Verificar os encaixes e dispositivos de
aperto. Substituir, se necessário.
1122 MMeesseess oouu 330000 hhoorraas
s
• Contacte um centro de serviços
especializado para verificar a folga da
válvula.
• Verificar a ventoinha do sistema de
refrigeração para identificar danos.
SSEERRVVIIÇÇOO –– NNOOTTAASS AACCEERRCCAA DDAA
MMAANNUUTTEENNÇÇÃÃOO
FFiigg..1
1
MMuuddaannççaa ddoo óólleeo
o
• Aqueça o motor em solo nivelado
• Retire a tampa do depósito (8)
• Abra o bujão de drenagem (9) e permita a
drenagem completa do óleo para um
recipiente colocado por baixo do motor.
• Verificar as juntas; substituir, se
necessário. Coloque novamente o bujão
de drenagem e abasteça com óleo limpo.
• Coloque novamente a tampa.
IInnssppeeccççããoo ddaass vveellaass
FFiigg.. 3
3
• Desligue a tampa das velos e retire
qualquer sujidade que esteja alojada em
torno da área das velas.
• Retire a vela (17) com a chave fornecida.
• Inspeccione a vela. Deve ter uma cor
acastanhada.
• Meça a folga (distância do ponto de
contacto) com um dispositivo adequado.
O intervalo deve ter entre 0,7 - 0,8 mm.
Corrija o intervalo, se necessário,
334
4
Ferm
Page 16

escape contêm monóxido de carbono
venenoso.
• Pare sempre o motor antes de abastecer o
depósito de combustível e limpe a
máquina depois de abastecer.
• Não inale os gases da gasolina.
EElleeccttrriicciiddaadde
e
• Não toque no gerador se tiver as mãos
molhadas
• Não utilize o gerador em condições
molhadas.
• Não utilize o gerador nas imediações de
água.
• Nunca ligue dois geradores um ao outro.
• Nunca ligue o gerador a qualquer saída de
electricidade comercial.
• Certifique-se de que os cabos de
extensão são utilizados em situações de
segurança e têm a capacidade suficiente
para a tarefa.
• Certifique-se de que a carga do gerador
está entre a capacidade especificada no
quadro, antes de ligar quaisquer cabos.
PPeerriiggooss ddee iinnccêênnddiiooss ee qquueeiimmaadduurraas
s
• O sistema de escape fica quente o
suficiente para entrar em combustão com
alguns materiais:
- mantenha o gerador a, pelo menos, 1
metro de distância de quaisquer
edifícios e qualquer equipamento
durante o funcionamento.
- mantenha materiais inflamáveis
afastados do gerador.
• O escape fica bastante quente durante a
utilização e permanece quente durante
algum tempo depois de parar o motor:
- Permita que o motor arrefeça antes de
armazenar o gerador num espaço
fechado.
- Não toque na superfície da serra com
as mãos.
• A gasolina é extremamente inflamável e
explosiva em determinadas condições.
Não fume, nem permita a presença de
chamas ou fagulhas sempre que o
gerador esteja a ser abastecido ou perto
de armazenamentos de gasolina.
• Os vapores de combustível são
extremamente inflamáveis e podem entrar
em combustão depois de ter sido iniciado
o motor. Certifique-se de que qualquer
combustível derramado é limpo antes de
iniciar o gerador.
• Nunca tape o gerador com roupa ou
outros artigos.
33.. UUTTIILLIIZZAAÇÇÃÃO
O
AANNTTEESS DDEE IINNIICCIIAARR OO GGEERRAADDOOR
R
Terminal terra
O terminal terra do gerador é ligado
ao quadro do gerador, às partes metálicas do
gerador não-portadoras de corrente e aos
terminais de terra de cada receptor.
Antes de utilizar o terminal terra, consulte um
electricista qualificado, um técnico de
inspecção eléctrica ou um agente local
autorizado conhecedor das
regulamentações e normas locais que se
aplicam ao uso do gerador.
EEnncchhaa ee vveerriiffiiqquuee oo nníívveell ddoo óólleeoo
((aa qquuaannttiiddaaddee éé ddee 660000 mmll)
)
Verifique sempre o nível do óleo (com a
máquina numa posição nivelada) antes de
iniciar e se o motor parar inesperadamente
(fig. 2).
Para utilização geral, pode utilizar óleo “al
temperatura” 10W-30
≤ 0ºC SAE#10
0ºC - 25 ºC SAE#20
25ºC -35 ºC SAE#30
≥ 35ºC SAE#40
AAbbaasstteeççaa ee vveerriiffiiqquuee oo nníívveell dde
e
ccoommbbuussttíívveel
l
• Utilize apenas combustível sem chumbo
• Retire quaisquer fios de alimentação
• Desligue todos os interruptores
• Não abasteça demasiado – deixe um
intervalo de ar na parte superior do nível de
combustível
• Aparafuse sempre a tampa do
combustível
• Limpe o combustível derramado
• Não fume durante a utilização do gerador
Ferm
3
333
bijvult en maak na het tanken de machine
schoon.
• Inhaleer nooit benzinedampen.
EElleekkttrriicciitteeiit
t
• Raak de generator niet aan met natte
handen.
• Gebruik de generator niet bij regen of
onder vochtige omstandigheden.
• Gebruik de generator niet in de buurt van
water.
• Sluit nooit twee generatoren op elkaar aan.
• Sluit de generator nooit aan op een
stopcontact van het commerciële
elektriciteitsnetwerk.
• Controleer of eventuele verlengsnoeren
veilig zijn en berekend op hun taak.
• Controleer voordat u snoeren en kabels
aansluit of de belasting van de generator
binnen de in de tabel gespecificeerde
grenswaarden blijft.
GGeevvaaaarr vvaann vvuuuurr eenn bbrraannd
d
• Het uitlaatsysteem wordt zó heet, dat
sommige materialen door de hitte kunnen
ontbranden:
- houd tijdens het gebruik de generator
op tenminste 1 meter afstand van
gebouwen en andere apparatuur.
- houd ontvlambare materialen uit de
buurt van de generator.
• Tijdens het gebruik wordt de uitlaat erg
heet. Hij blijft ook na het stoppen van de
motor nog geruime tijd heet:
- Laat de motor afkoelen voordat u de
generator binnenshuis opbergt.
- Raak een hete uitlaat niet aan met uw
handen.
• Benzine is onder bepaalde
omstandigheden zeer licht ontvlambaar
en explosief. Rook niet in de omgeving van
de generator en op plekken waar benzine
staat opgeslagen en zorg ook dat er geen
vlammen of vonken zijn.
• Benzinedampen zijn zeer licht
ontvlambaar en kunnen na het starten van
de motor vlam vatten. Zorg ervoor dat
eventueel gemorste benzine wordt
opgenomen voordat u de generator start.
• Dek de generator nooit af met kleding of
andere voorwerpen.
33.. GGEEBBRRUUIIK
K
VVOOOORRDDAATT UU DDEE GGEENNEERRAATTOORR SSTTAARRT
T
Klem voor de massaverbinding
De klem voor de massaverbinding van
de generator wordt verbonden met het frame
van de generator, de metalen niet-geleidende
onderdelen van de generator en de klemmen
voor de massaverbinding van elk reservoir.
Voordat u klem voor de massaverbinding
gebruikt, dient u contact op te nemen met een
gekwalificeerde elektricien,
elektriciteitsdeskundige of plaatselijke
instantie die rechtsbevoegdheid heeft om
plaatselijke regels of verordeningen die van
toepassing zijn op het gebruik van de
generator op te vragen.
VVuull oolliiee bbiijj eenn ccoonnttrroolleeeerr hheett ppeeiill
((ttaannkkiinnhhoouudd iiss 660000 mmll)
)
Controleer altijd het oliepeil (bij machine in
horizontale positie) voordat u de motor start
en wanneer de motor onverwacht stopt (afb. 2).
Voor algemeen gebruik kunt u een olie “voor
alle temperaturen” gebruiken (10W-30)
≤ 0ºC SAE#10
0ºC - 25 ºC SAE#20
25ºC -35 ºC SAE#30
≥ 35ºC SAE#40
VVuull bbeennzziinnee bbiijj eenn ccoonnttrroolleeeerr hheett ppeeiil
l
• Gebruik alleen ongelode benzine
• Koppel alle stroomdraden af
• Zet de aan-/uitschakelaars op “OFF”
• Gooi niet te veel benzine in de tank – zorg
ervoor dat er nog wat lucht onder de dop
overblijft
• Schroef de benzinedop altijd goed vast
• Neem gemorste benzine direct op
• Tijdens het gebruik van de generator mag
er niet worden gerookt
Wees voorzichtig bij alles wat u doet!
DDee ggeenneerraattoorr ssttaarrtteen
n
AAffbb.. 11 ++ 44 ++ 5
5
1. Draai de benzinekraan open (15).
2. Zet de motorschakelaar “ON” (12).
116
6
Ferm
Page 17

3. Zet de choke (13) in de gesloten positie
(om een warme motor opnieuw te starten,
zet u de choke open of half open).
4. Trek langzaam aan de starterkabel tot u bij
het omslagpunt bent en geef dan een
flinke ruk om de motor te starten (14).
5. Laat de motor eerst goed lopen tot hij
helemaal opgewarmd is en zet de choke
daarna open (13).
DDee wwiisssseellssttrroooommuuiittggaanngg ggeebbrruuiikkeen
n
((223300 VV)
)
• Start de generator
• Steek de stekker van het elektrische
apparaat in het contact
• Druk de wisselstroombeveiliging in op
'ON' (7).
• De voltmeter (11) geeft de spanning op de
AC-aansluiting aan. Tijdens gebruik zal
deze rond 230 V liggen.
DDee ggeenneerraattoorr ssttooppppeen
n
AAffbb.. 11 ++ 5
5
1. Verwijder alle snoeren en kabels (5)
2. Zet de motorschakelaar op “OFF” (12)
3. Draai de benzinekraan dicht (15)
44.. SSEERRVVIICCEE && OONNDDEERRHHOOUUD
D
PPEERRIIOODDIIEEKK OONNDDEERRHHOOUUD
D
DDaaggeelliijjkkss ((ccoonnttrroolleess vvóóóórr ggeebbrruuiikk)
)
• Controleer het motoroliepeil
• Controleer de benzineslang op barsten,
scheuren of andere beschadigingen.
Vervang defecte onderdelen en
accessoires.
• Controleer het uitlaatsysteem op lekken.
Draai zonodig de pakking aan of vervang
hem.
• Controleer of de choke goed werkt
• Controleer of de terugloopstarter goed
werkt
11ee mmaaaanndd ooff 2200 uuuur
r
• Ververs de motorolie
33 mmaaaannddeenn ooff 5500 uuuur
r
• Controleer de ontstekingsbougie. Herstel
de opening en maak schoon. Vervang
indien nodig.
• Maak schoon, vervang indien nodig.
66 mmaaaannddeenn ooff 110000 uuuur
r
• Ververs de motorolie
• Maak de benzineafsluiter en
benzinetankfilter schoon. Vervang indien
nodig.
• Controleer de fittings en sluitklemmen.
Vervang indien nodig.
1122 mmaaaannddeenn ooff 330000 uuuur
r
• Laat een gespecialiseerd servicecentrum
de kleppen controleren.
• Controleer de ventilator van het
koelsysteem op beschadigingen.
SSEERRVVIICCEE –– OOPPMMEERRKKIINNGGEENN OOVVEERR
OONNDDEERRHHOOUUD
D
AAffbb..1
1
Verversen van de olie
• Zet de motor op een vlakke achtergrond
en warm de motor op
• Verwijder de vuldop (8)
• Open de aftapdop (9) en laat olie in een
opvangbak onder de motor lopen.
• Controleer de pakkingen, vervang indien
nodig. Draai de aftapdop weer vast en vul
de motor met schone olie.
• Draai de vuldop weer aan.
IInnssppeeccttiiee oonnttsstteekkiinnggssbboouuggiie
e
AAffbb.. 3
3
• Verwijder de dop van de
ontstekingsbougie en maak het gebied om
de ontstekingsbougie goed schoon.
• Verwijder de ontstekingsbougie (17) met
de bijgeleverde steeksleutel.
• Inspecteer de ontstekingsbougie. Deze
moet geelbruin van kleur zijn.
• Meet de opening (afstand tussen
contactpunten) met een geschikt
meetapparaat. De opening moet 0,7 - 0,8
mm zijn. Corrigeer zonodig de opening
door de zijelektrode voorzichtig om te
buigen.
Ferm
1
177
EESSPPEECCIIFFIICCAAÇÇÃÃOO TTÉÉCCNNIICCA
A
CCAARRAACCTTEERRÍÍSSTTIICCAAS
S
FFiigg.. 1
1
1. Depósito de combustible
2. Indicador de nivel de combustible
3. Tapa de combustible
4. Escape
5. Enchufe para CA
6. Terminal de tierra
7. Conmutador de CA
8. Tapa del conducto de llenado de aceite
9. Tapón de drenaje de aceite
10. Sensor de nivel de aceite
11. Voltímetro
12. Interruptor del motor
13. Palanca de choque
14. Arranque de retroceso
15. Llave de combustible
16. Cubierta del filtro de aire
17. Bujía de encendido
22.. IINNSSTTRRUUÇÇÕÕEESS DDEE SSEEGGUURRAANNÇÇA
A
EExxpplliiccaaççããoo ddooss ssíímmbboolloos
s
Neste manual e/ou na máquina, são
utilizados os seguintes símbolos:
Em conformidade com as normas de
segurança aplicáveis e essenciais das
directivas europeias.
Risco de danos no material e/ ou
lesões físicas
Indica risco de choque eléctrico.
Ler o manual de instruções
Mantenha as pessoas afastadas
Não exponha ferramentas à chuva.
Ruído exterior
Perigo de temperaturas elevadas.
Antenção, no gerador existem
algumas partes que poderão atingir
temperaturas elevadas.
Os aparelhos eléctricos ou
electrónicos avariados e/ou
eliminados têm de ser recolhidos nos
pontos de reciclagem adequados.
IINNSSTTRRUUÇÇÕÕEESS DDEE SSEEGGUURRAANNÇÇA
A
PPeessssooaas
s
• Não permita, em circunstância alguma,
que crianças ou pessoas não
familiarizadas com estas instruções
utilizem este aparelho. Regulamentos
locais poderão restringir a idade mínima
de utilização do aparelho.
• Utilize sempre ao ar livre e com boas
condições de ventilação. Os gases de
MMoottoorr TTiippo
o
||RReeffrriiggeerraaddoo aa aarr,,
||ppeettrróólleeoo,, 44
t
teemmppooss
Disposição dos cilindros | Inclinado, 1
cilindro
Contínuo | 4.0 kW
Rendimento máximo | 4.8 kW
Horas de funcionamento | 13 horas
Combustível |
Gasolina sem
chumbo
Capacidade do tanque |
de combustível | 15 L
Capacidade
de óleo do motor | 600 ml
Distância do ponto de
contacto das velas | 0.7 – 0.8 mm
Tensão | Vca 230 V
Frequência (Vcc) | 50 Hz
Tensão de saída | 2000W
Corrente | 3.8 A
Potência de entrada
máxima do aparelho | 2200 W
Classe da ferramenta | I
Peso | 44 kg
Dimensões |
590x430x440 mm
Ruído exterior (Lwa) | 94,0 dB (A)
Nível de pressão
acústica (Lpa ) | 65,0dB(A)
332
2
Ferm
Page 18

Declaramos, bajo nuestra única
responsabilidad, que este
FFGGGG--22000000N
N
cumple las directivas o documentos
normativos siguientes:
EENN1122660011,, EENN5555001144--11,, EENN5555001122,,
EENN6611000000--66--1
1
de acuerdo con las directivas:
9988//3377//EECC,, 22000066//9955//EECC,, 22000044//110088//EECC,
,
22000022//9955//EECC,, 22000022//9966//EEC
C
desde el 01-01-2007
ZZWWOOLLLLEE NNL
L
J.A. Bakker - van Ingen J. Lodewijk
CEO Ferm BV Quality Manager
Ferm Global
Es nuestra política mejorar continuamente
nuestros productos y por tanto nos
reservamos el derecho a cambiar las
características del producto sin previo aviso.
FFeerrmm BBVV •• LLiinnggeennssttrraaaatt 66 •• 88002288 PPMM ZZwwoolllle
e
•• HHoollaanndda
a
GGEERRAADDOORR ((44 TTEEMMPPOOSS)
)
LLOOSS NNÚÚMMEERROOSS CCOONNSSTTAANNTTEESS NNOO TTEEXXTTO
O
QQUUEE SSEE SSEEGGUUEE TTÊÊM
M
CCOORRRREESSPPOONNDDÊÊNNCCIIAA NNAASS FFIIGGUURRAAS
S
PPRREESSEENNTTEESS NNAA PPÁÁGGIINNAA 22 ++ 3
3
IINNSSTTRRUUÇÇÕÕEESS DDEE SSEEGGUURRAANNÇÇAA
EE FFUUNNCCIIOONNAAMMEENNTTO
O
Para a sua própria segurança e para a
segurança dos outros, leia
cuidadosamente estas instruções antes de
utilizar este aparelho. Vai ajudá-lo a
compreender o produto mais facilmente e a
evitar riscos desnecessários. Guarde este
manual de instruções num local seguro para
futuras utilizações.
CCOONNTTEEÚÚDDOOS
S
1. Dados da máquina
2. Instruções de segurança
3. Utilização
4. Serviço e manutenção
11.. DDAADDOOSS DDAA MMÁÁQQUUIINNA
A
IINNTTRROODDUUÇÇÃÃO
O
O Gerador foi concebido para gerar
electricidade com a ajuda de um motor a
diesel de 4 tempos. Agora, pode utilizar as
suas ferramentas eléctricas apesar da
ausência de um quadro eléctrico.
AAVVR
R
El sistema AVR (sigla en inglés para
Regulador Automático de Voltaje) contenido
en este generador provee una salida de
voltaje estable y precisa.
CE
ı
DDEECCLLAARRAACCIIÓÓNN DDEE CCOONNFFOORRMMIIDDAAD
D
(
(
E
E
)
)
Ferm
3
311
• Vervang de ontstekingsbougie als de
elektroden versleten zijn of als de isolator
gescheurd of gebarsten is .
• Installeer de ontstekingsbougie
voorzichtig met de hand om kortsluiting te
voorkomen.
• Plaats de ontstekingsbougie met het juiste
koppel: 20 Nm.
• Breng de dop van de ontstekingsbougie
weer aan.
VVeennttiillaattiieerroooosstteer
r
• Wacht tot de uitlaat is afgekoeld.
• Het ventilatierooster kan verstopt zijn
geraakt met koolstofresten.
• Draai de schroefdeksel open en verwijder
het ventilatierooster.
• Reinig het rooster met een staalborstel en
plaats het weer terug.
• Vervang het ventilatierooster indien het
beschadigd is.
SScchhoooonnmmaakkeenn lluucchhttffiilltteer
r
• Verwijder de deksel van het luchtfilter (16).
• Verwijder het filterelement en was het
goed af in een oplosmiddel.
• Giet een klein beetje olie op het
filterelement en verwijder alle overtollige
olie.
• Zet het filterelement en het
luchtfilterdeksel weer op hun plaats.
• Controleer of de filterdeksel overal goed
afsluit.
Laat de motor nooit draaien zonder
luchtfilterelement.
Plaats nooit een nat filter (met
oplosmiddel) op de machine.
BBeennzziinneekkrraaaan
n
• Om het benzinekraanfilter te verwijderen,
draait u het bakje onderaan de
benzinetank los
• Gebruik een kleine steeksleutel om de
afsluiter te verwijderen
• Maak de filter en het bakje goed schoon en
plaats ze weer terug.
PPRROOBBLLEEMMEENN OOPPLLOOSSSSEEN
N
BBaassiissccoonnttrroollees
s
• Zorg dat er voldoende benzine is
• Zorg dat de benzinekraan open staat
• Zorg dat de motorschakelaarop “ON”
staat
• Controleer het oliepeil
• De generator is voorzien van een
olieniveausensor. De motor zal niet starten
als het oliepeil te laag is.
• Verwijder de ontstekingsbougie, sluit de
voedingsdraad van de ontstekingsbougie
aan en aard hem op de generator. Trek
voorzichtig aan het startkoord en kijk of er
een vonk is. Als er geen vonk is, vervang
dan de ontstekingsbougie.
Ontstekingsbougie is OK, maar motor wil
toch niet starten
• Controleer of het filter van de benzinekraan
schoon is
• Controleer of de benzineleiding niet is
verstopt
• Controleer of de carburator niet verstopt is
geraakt
MMoottoorr wwiill nniieett ssttaarrtteen
n
• Maak de ontstekingsbougie schoon of
vervang hem
• Controleer het ontstekingssysteem –
wanneer deze defect is, neem dan contact
op met uw servicecentrum
• Controleer de compressie – als deze laag
is, neem dan contact op met uw
servicecentrum
• Controleer of de cilinderkop niet los zit –
draai de moeren aan
• Controleer op beschadigde pakkingen in
de cilinderkop – vervang indien nodig
RREEIINNIIGGEEN
N
Reinig de machinebehuizing regelmatig met
een zachte doek, bij voorkeur iedere keer na
gebruik. Gebruik bij hardnekkig vuil een
zachte doek bevochtigd met zeepwater.
Gebruik geen oplosmiddelen als benzine,
alcohol, ammonia, etc. Dergelijke stoffen
beschadigen de kunststof onderdelen.
118
8
Ferm
Page 19

OOPPSSLLAAGG ((LLAANNGGDDUURRIIGG)
)
• Tap de benzinetank, benzinekraan,
carburatorbak en carburator af
• Giet 1 kopje motorolie in de benzinetank
en schud de generator om de olie over de
tank te verspreiden. Laat overtollige olie
weglopen.
• Verwijder de ontstekingsbougie en laat 1
theelepel motorolie in de opening lopen;
zorg dat de startschakelaar op “OFF” staat
en trek een aantal malen aan het
startkoord. Draai de ontstekingsbougie
weer terug.
• Trek aan het startkoord tot u compressie
voelt en stop.
• Maak de buitenkant van de generator
schoon en spuit er een laagje anticorrosiemiddel op.
• Plaats de generator op een vlakke
ondergrond en bedek hem met een
schone droge doek.
SSTTOORRIINNGGEEN
N
Wanneer er zich een storing voordoet,
bijvoorbeeld bij slijtage van een onderdeel,
neem dan contact op met het
onderhoudsadres op de garantiekaart.
Achter in deze handleiding ziet u een
opengewerkte afbeelding van de onderdelen
die besteld kunnen worden.
MMIILLIIEEU
U
Om transportbeschadiging te voorkomen,
wordt de machine in een stevige verpakking
geleverd. De verpakking is zo veel mogelijk
gemaakt van recyclebaar materiaal. Maak
daarom gebruik van de mogelijkheid om de
verpakking te recyclen.
Defecte en/of afgedankte elektrische
of elektronische gereedschappen
dienen ter verwerking te worden
aangeboden aan een daarvoor
verantwoordelijke instantie.
GGAARRAANNTTIIE
E
Lees voor de garantievoorwaarden de
garantiekaart achter in deze
gebruiksaanwijzing.
Wij verklaren dat dit
FFGGGG--22000000N
N
voldoet aan de volgende normen of
normatieve documenten
EENN1122660011,, EENN5555001144--11,, EENN5555001122,,
EENN6611000000--66--1
1
overeenkomstig de bepalingen in de
richtlijnen
9988//3377//EECC,, 22000066//9955//EECC,, 22000044//110088//EECC,
,
22000022//9955//EECC,, 22000022//9966//EEC
C
vanaf 01-01-2007
ZZWWOOLLLLEE NNL
L
J.A. Bakker - van Ingen J. Lodewijk
CEO Ferm BV
Quality Manager
Ferm Global
Het is ons beleid om onze producten
voortdurend verder te verbeteren en wij
behouden ons daarom het recht voor om
zonder voorafgaande berichtgeving de
productspecificaties te wijzigen.
FFeerrmm BBVV •• LLiinnggeennssttrraaaatt 66 •• 88002288 PPMM ZZwwoolllle
e
NNeeddeerrlla
a
nnd
d
CE
ı
CCOONNFFOORRMMIITTEEIITTSSVVEERRKKLLAARRIINNG
G
(
(
NNL
L
)
)
Ferm
1
199
LLaa bbuujjííaa ddee eenncceennddiiddoo ffuunncciioonna
a
ccoorrrreeccttaammeennttee,, ppeerroo eell mmoottoorr nnoo sse
e
ppoonnee eenn mmaarrcchha
a
• Compruebe que el filtro de la llave del
combustible está limpio
• Compruebe que el circuito del
combustible no está obstruido
• Compruebe que no haya obstrucciones
en el carburador
EEll mmoottoorr nnoo ffuunncciioonna
a
• Limpie o cambie la bujía de encendido
• Revise el estado del sistema de ignición y
si está defectuoso, póngase en contacto
con su servicio técnico
• Revise la compresión y si está baja,
póngase en contacto con su servicio
técnico
• Compruebe si hay alguna culata suelta y,
en tal caso, apriete las abrazaderas
• Compruebe las juntas de culata por si están
dañadas – cámbielas si es necesario.
LLIIMMPPIIEEZZA
A
Limpie la carcasa de forma regular con un
paño suave, preferiblemente después de
cada uso. Mantenga las entradas de aire
libres de polvo y suciedad.
Retire la suciedad incrustada con un trapo
suave humedecido con agua y jabón. No
utilice disolventes como gasolina, alcohol,
amoniaco, etc., ya que estas sustancias
pueden dañar las piezas de plástico.
CCOONNSSEERRVVAACCIIÓÓNN ((AA LLAARRGGOO PPLLAAZZOO)
)
• Vacíe el depósito del combustible, la llave
combustible, la cubeta del carburador y el
carburador.
• Vierta una taza de aceite para el motor en
el depósito del combustible y, a
continuación, agite el generador para
hacer que el aceite se extienda por todo el
depósito. Retire el aceite sobrante.
• Retire la bujía de encendido y vierta una
cucharada pequeña de aceite de motor,
tire del cable de arranque varias veces con
el botón de arranque en la posición de
APAGADO. Cambie la bujía de encendido.
• Tire del cable de arranque hasta que sienta
la compresión y pare.
• Limpie el exterior del generador y cúbralo
con una sustancia antioxidante.
• Coloque el generador en una superficie
plana y cúbralo con una tela limpia y seca.
AAVVEERRÍÍAAS
S
Si se presenta una avería, por ejemplo, por el
desgaste de una pieza, póngase en contacto
con el proveedor de servicios indicado en la
tarjeta de garantía. En el dorso de este
manual encontrará un amplio resumen de las
partes de recambio que se pueden ordenar.
UUSSOO EEGGOOLLÓÓGGIICCO
O
Para prevenir los daños durante el
transporte, el aparato ha sido embalado.
Dicho embalaje está hecho, en la medida de
lo posible, de material reciclable. Le
rogamos, por lo tanto, que recicle dicho
material.
Cualquier aparato eléctrico o
electrónico desechado y/o
defectuoso tiene que depositarse en
los lugares apropiados para ello.
GGAARRAANNTTÍÍA
A
Lea las condiciones de la garantía que
aparecen en la tarjeta de garantía que se
adjunta a este manual.
330
0
Ferm
Page 20

• Abra el tapón de drenaje (9) y deje que todo
el aceite se vierta en un recipiente colocado
debajo del motor.
• Revise las juntas y reemplácela si resulta
necesario. Vuelva a colocar en su sitio el
tapón de drenaje y vuelva a llenar el motor
con aceite limpio.
• Vuelva a colocar en su sitio el tapón de
llenado de aceite.
RReevviissiióónn ddee llaa bbuujjííaa ddee eenncceennddiiddo
o
FFiigg.. 3
3
• Desconecte la carcasa de la bujía y limpie
la suciedad que encuentre alrededor de
ésta.
• Quite la bujía de encendido (17) con la llave
que se facilita para ello.
• Compruebe el estado en el que se
encuentra la bujía de encendido. Debería
tener un color marrón.
•
Mida la separación (la distancia con
respecto al punto de contacto) con un
calibrador apropiado. La separación
debería ser de 0,7 – 0,8 mm. Reajústela, si es
necesario, arqueando el electrodo lateral.
• Cambie la bujía de encendido si los
electrodos están deteriorados o si el
aislante presenta grietas o agujeros.
• Instale la bujía de encendido
manualmente y con cuidado para que no
se cruce la rosca.
• Coloque la bujía de encendido con el
torque correcto. 20 Nm
• Ajuste la carcasa de la bujía de encendido.
IInnddiiccaaddoorr ddee ggaasseess ddee eessccaappe
e
• Espere que el escape se enfríe.
• El indicador de gases de escape puede
quedar bloqueado por acumulación de
hollín.
• Quite el casquillo de rosca y retire el
indicador de gases de escape.
• Limpie la pantalla con un cepillo de
alambre y vuelva a colocarla en su sitio.
• Reemplace la pantalla de escape si está
dañada.
LLiimmppiieezzaa ddeell ffiillttrroo ddee aaiirre
e
• Retire la cubierta del filtro de aire (16).
• Retire el elemento del filtro y límpielo a
fondo con disolvente.
• Vierta un poco de aceite en el elemento del
filtro y deshágase del aceite sobrante
escurriéndolo con mucho cuidado.
• Vuelva a colocar el elemento del filtro y la
cubierta del filtro de aire.
• Asegúrese de que el filtro del aire queda
bien ajustado.
No ponga en marcha el motor sin que
el elemento de filtro de aire se
encuentre colocado en su lugar
correspondiente.
Nunca coloque un filtro mojado (con
disolvente) en la máquina.
LLllaavvee ddeell ccoommbbuussttiibblle
e
• Para retirar el filtro de la llave del
combustible, tan sólo ha de quitar la
cubeta que se encuentra en el fondo del
depósito del aceite.
• Utilice una herramienta pequeña para
retirar la llave
• Limpie y enjuague tanto el filtro como la
cubeta, y vuelva a colocarlas en su sitio
correspondiente.
LLOOCCAALLIIZZAACCIIÓÓNN YY
SSOOLLUUCCIIÓÓNN DDEE PPRROOBBLLEEMMAAS
S
RReevviissiioonneess bbáássiiccaas
s
• Asegúrese de que dispone de bastante
combustible
• Asegúrese de que la llave del combustible
esté abierta.
• Asegúrese de que el interruptor del motor
se encuentra en posición de encendido.
• Asegúrese de que el nivel de aceite es el
correcto.
• El generador dispone de un sensor del
nivel de aceite. Si este nivel es demasiado
bajo, el generador no se pondrá en
funcionamiento.
• Retire la bujía de encendido, conecte el
cable de la bujía y conéctela a tierra a
través del generador. Tire con cuidado del
cable de arranque y espere a que salte una
chispa. Si no salta ninguna chispa, cambie
la bujía de encendido.
Ferm
2
299
GGÉÉNNÉÉRRAATTEEUURR ((44 TTEEMMPPSS)
)
LLEESS CCHHIIFFFFRREESS DDUU TTEEXXTTEE SSUUIIVVAANNT
T
CCOORRRREESSPPOONNDDEENNTT AAUUXX IILLLLUUSSTTRRAATTIIOONNS
S
PPAAGGEE 22 ++ 3
3
MMAANNUUEELL DD’’UUTTIILLIISSAATTIIOONN EETT
CCOONNSSIIGGNNEESS DDEE SSÉÉCCUURRIITTÉ
É
Pour votre sécurité et celle des
autres, veuillez lire attentivement ces
instructions avant d’utiliser cet appareil. Cela
vous permettra de mieux comprendre votre
produit et d’éviter tout risque inutile. Gardez
toujours ce manuel en lieu sûr, pour une
future utilisation.
CCOONNTTEENNUUS
S
1. Données de la machine
2. Consignes de sécurité
3. Utilisation
4. Service & entretien
11.. DDOONNNNÉÉEESS DDEE LLAA MMAACCHHIINNE
E
IINNTTRROODDUUCCTTIIOON
N
Le Générateur a été conçu pour générer de
l’électricité à l’aide d’un moteur 4 temps. Dès
lors, il vous est possible d’utiliser vos
appareils électriques en extérieur, malgré
l’absence de réseau électrique.
AAVVR
R
À l'intérieur de la génératrice se trouve le
système AVR (Automatic Voltage Regulator)
qui règle automatiquement la tension,
produisant un courant de sortie stable et
précis.
DDÉÉTTAAIILLSS TTEECCHHNNIIQQUUEES
S
CCAARRAACCTTÉÉRRIISSTTIIQQUUEESS
FFiigg.. 1
1
1. Réservoir de carburant
2. Témoin de niveau de carburant
3. Bouchon de réservoir de carburant
4. Échappement
5. Prise CA
6. Borne de mise à la terre
7. Interrupteur CA
8. Bouchon de remplissage d'huile
9. Bouchon de vidange d'huile
10. Détecteur de niveau d'huile
11. Voltmètre
12. Interrupteur du moteur
13. Levier du starter
14. Démarreur
15. Robinet de carburant
16. Capot du filtre à air
17. Bougie
MMootteeuurr TTyyppe
e
||RReeffrrooiiddiissssaanntt à
à
||ll’’aaiirr,, 44 tteemmppss,
,
||eesssseennccee
Disposition du cylindre | Incliné, 1
cylindre
Puissance continue
|
4.0kW
Puissance de sortie max.| 4.8 kW
Durée de fonctionnement
(en heures) | 13 heures
Carburant | Essence sans
plomb
Capacité du réservoir | 15 L
Capacité de l’huile
de moteur | 600 ml
Dist. de la bougie
d’allumage | 0.7 – 0.8 mm
Tension nominale | 230 V CA
Fréquence nominale (CA) | 50 Hz
Puissance
de sortie assignée | 2000W
Puissance d’entrée
maximale de l’appareil | 2200 W
Classe d’outil | I
Poids | 40 kg
Dimensions |
590x430x440 mm
Bruits extérieurs (Lwa) | 94,0 dB(A)
Capacité de pression
du son (Lpa) | 65,0dB(A)
220
0
Ferm
Page 21

22.. CCOONNSSIIGGNNEESS DDEE SSEECCUURRIITTE
E
Explication des symboles
Dans ce manuel et/ou sur la machine, sont
utilisés les symboles suivants :
Conforme aux normes essentielles de
sécurité applicables des directives
européennes
Risque de dommages sur le matériel
et/ou de lésions corporelles
Risque de choc électrique
Lire le manuel d’instruction
Ne laisser aucun visiteur s’approcher
de la zone de travail
Ne pas exposer à la pluie
Bruits extérieurs
Risque de temperature elevees.
Attention, à l’interieur du génerateur
se trouvent des certaines pièces
susceptibles d’atteindre des
températures élevées.
Tout équipement électronique ou
électrique défectueux dont vous vous
seriez débarrassé doit être déposé
aux points de recyclage appropriés.
CCOONNSSIIGGNNEESS DDEE SSÉÉCCUURRIITTÉ
É
PPeerrssoonnnnees
s
• Ne laissez jamais les enfants ou les
personnes inconnues avec ces
instructions. Ces derniers seraient
susceptibles d’utiliser l’appareil. Les
règlementations locales peuvent limiter
l’âge de l’utilisateur.
• Utilisez toujours l’appareil en extérieur, à
un endroit bien aéré. Les gaz
d’échappement contiennent du
monoxyde de carbone toxique.
• Eteignez toujours le moteur avant de
remplir à nouveau le réservoir et nettoyez
la machine après l’avoir rempli.
• N’inhalez pas les vapeurs d’essence.
EElleeccttrriicciitté
é
• Ne touchez en aucun cas le générateur si
vous avez les mains mouillées.
• N’utilisez pas le générateur dans un
environnement humide ou mouillé.
• N’utilisez pas le générateur à proximité
d’eau.
• Ne branchez jamais deux générateurs
ensemble.
• Ne branchez jamais le générateur à une
prise de courant industrielle.
• Assurez-vous que les câbles
prolongateurs utilisés sont en bon état et
ont une capacité suffisante pour le travail
qui lui est assigné.
• Veillez à ce que la charge du générateur
soit conforme à sa capacité indiquée sur la
plaque signalétique, avant de brancher les
câbles.
RRiissqquueess ddee bbrrûûlluurreess eett dd’’iinncceennddiiees
s
• Le système d’échappement est assez
chaud pour enflammer certains
matériaux
:
- gardez le générateur à une distance
d’au moins 1 mètre des bâtiments et
des autres équipements au cours de
l’utilisation de l’appareil.
- gardez les produits inflammables à
distance du générateur.
•
L’échappement devient très brûlant au
cours de l’utilisation et conserve sa
chaleur pendant une longue période après
l’arrêt du moteur.
- Laissez le moteur refroidir avant de
ranger le générateur à l’intérieur.
- Ne touchez en aucun cas
l’échappement brûlant avec les mains.
• L’essence est extrèmement inflammable
et peut exploser sous certaines
conditions. Ne fumez pas, ou ne créez
aucune flamme ou étincelle, à proximité
du générateur, quand vous ravitaillez ce
dernier en carburant, ou à proximité du lieu
de stockage de l’essence.
• Les vapeurs d’essence sont extrèmement
Ferm
2
211
• Limpie todas las salpicaduras de
combustible
• No fume mientras esté utilizando el
generador
¡Sea prudente en todo momento!
CCóómmoo ppoonneerr eenn mmaarrcchhaa eell ggeenneerraaddoor
r
FFiigg.. 11 ++ 44 ++ 5
5
1. Abra la llave del combustible (15)
2. Coloque el interruptor del motor en la
posición de encendido (12).
3. Coloque el estrangulador (13) en la
posición de cerrado (para volver a poner
en marcha el motor caliente, deje el
estrangulador en la posición de abierto o
en la posición de semiabierto).
4. Tire lentamente del cordón de arranque
hasta que ofrezca resistencia y, a
continuación, de un tirón para poner en
marcha el motor (14).
5. Deje que el motor siga funcionando hasta
que se caliente y, a continuación, coloque
el estrangulador en la posición de abierto
(13).
UUssoo ddee llaa ssaalliiddaa ddee CCAA ((223300 VV)
)
• Arranque el generador
• Enchufe el conector de la herramienta
eléctrica
• Pulse el protector de corriente CA para
colocarlo en la posición “ON” (7).
• El voltímetro (11) indica el voltaje presente
en el enchufe para CA. Normalmente, éste
debe ser de ± 230 V durante el uso del
aparato.
CCóómmoo ppaarraarr eell ggeenneerraaddoor
r
FFiigg.. 11 ++ 5
5
1. Desenchufe todos los cables (5)
2. Coloque el interruptor del motor en la
posición de “APAGADO” (12)
3. Cierre la llave del combustible (15)
44.. RREEPPAARRAACCIIÓÓNN YY
MMAANNTTEENNIIMMIIEENNTTO
O
MMAANNTTEENNIIMMIIEENNTTOO PPEERRIIÓÓDDIICCO
O
DDiiaarriiaammeennttee ((rreevviissiióónn pprreevviiaa aa lla
a
ppuueessttaa eenn mmaarrcchhaa ddee llaa mmááqquuiinnaa)
)
• Revise el nivel de aceite del motor
• Revise el tubo del combustible para
detectar posibles grietas o cualquier otro
tipo de daño. Cámbielo si es necesario.
• Revise el sistema de escape para detectar
posibles fugas. Reajuste o reemplace la
junta si es necesario.
• Revise el funcionamiento del
estrangulador.
• Revise el funcionamiento del arranque del
retroceso.
AAll ccaabboo ddee uunn mmeess oo 2200 hhoorraas
s
• Cambie el aceite del motor.
AAll ccaabboo ddee ttrreess mmeesseess oo 5500 hhoorraas
s
• Revise la condición en la que se encuentra
la bujía de encendido. Ajuste la distancia y
límpiela. Cámbiela si resulta necesario.
• Límpiela y cámbiela si resulta necesario.
AAll ccaabboo ddee sseeiiss mmeesseess oo 110000 hhoorraas
s
• Cambie el aceite del motor.
• Limpie la llave y el filtro del depósito del
combustible. Cámbielos si resulta
necesario.
• Revise los ajustes y las abrazaderas.
Cámbielos si resulta necesario.
AAll ccaabboo ddee ddooccee mmeesseess oo 330000 hhoorraas
s
• Póngase en contacto con un centro de
servicio técnico para comprobar la
holgura de la válvula.
•
Compruebe el ventilador del sistema de
enfriamiento para detectar posibles daños.
RREEPPAARRAACCIIÓÓNN –– NNOOTTAASS SSOOBBRREE EELL
MMAANNTTEENNIIMMIIEENNTTOO
FFiigg.. 1
1
CCaammbbiioo ddee aacceeiittee
• Caliente el motor colocando la máquina en
una superficie horizontal
• Quite el tapón de llenado (8)
228
8
Ferm
Page 22

carbono venenoso.
• Pare siempre la máquina antes de llenar el
depósito de combustible y límpiela una
vez haya finalizado.
• No inhale los humos emitidos en la
combustión de la gasolina.
EElleeccttrriicciiddaad
d
• No toque el generador con las manos
mojadas
• No ponga en marcha el generador en
zonas mojadas.
• No ponga en marcha el generador cerca
del agua
• Nunca conecte dos generadores juntos.
• Nunca conecte el generador a ninguna
toma de corriente comercial.
• Asegúrese de que los cables alargadores
se utilizan en condiciones de seguridad y
que tengan capacidad suficiente para
llevar a cabo su función.
• Asegúrese de no conectar el generador a
elementos que requieran una carga
superior a la que se especifica en la tabla.
RRiieessggooss ddee iinncceennddiiooss yy qquueemmaadduurraas
s
• El sistema de escape se calienta lo
suficiente como para prender fuego a
determinados materiales.
- mantenga el generador como mínimo a
1 metro de distancia de los edificios u
otros equipos o instalaciones.
- mantenga los materiales inflamables a
una distancia prudencial del
generador.
• El escape alcanza temperaturas muy altas
durante el funcionamiento del equipo y no
descienden hasta que ha pasado un rato
desde que dejó de utilizarse.
- Deje que el motor se enfríe antes de
guardar el generador en un sitio
cubierto.
- No toque el escape caliente con las
manos mojadas
• La gasolina es extremadamente
inflamable y puede explotar en
determinadas condiciones. No fume, no
acerque ninguna llama ni permita que
caigan chispas en las zonas donde se llene
el generador de combustible o en las que
se almacene la gasolina.
• Los vapores provocados por la
combustión son muy inflamables y
pueden prenderse una vez que la máquina
ha sido puesta en marcha. Asegúrese de
que toda salpicadura de combustible se
haya limpiado antes de poner en marcha el
generador.
• Nunca debe cubrirse el generador con
ropa u otros objetos.
33.. IINNSSTTRRUUCCCCIIOONNEESS DDEE UUSSO
O
AANNTTEESS DDEE PPOONNEERR EENN MMAARRCCHHAA EELL
GGEENNEERRAADDOOR
R
Terminal de tierra
El terminal de tierra del generador
está conectado a la estructura del
mismo, a sus partes metálicas no portadoras
de corriente, y a las terminales de tierra de
cada receptáculo. Antes de usar el terminal
de tierra, consulte a un electricista
cualificado, a un inspector de electricidad o a
una agencia local que tenga autorización para
códigos locales u ordenanzas que apliquen al
uso previsto del generador.
Eche el aceite y revise el nivel del mismo
(la cantidad es 600 ml)
Revise siempre el nivel de aceite antes de
poner la máquina en marcha (colocándola en
una superficie horizontal) y en aquellos casos
en los que el motor se para de repente (Fig. 2).
De manera general, puede usar aceite 10W30 apto para todas las temperaturas
≤ 0ºC SAE#10
0ºC - 25 ºC SAE#20
25ºC -35 ºC SAE#30
≥ 35ºC SAE#40
Llene el depósito de combustible y
compruebe el nivel del mismo
• Use únicamente gasolina sin plomo
• Retire cualquier cable de alimentación
• Coloque los interruptores de potencia en
posición de apagado
• No llene el depósito en exceso; deje una
bolsa de aire por encima de la columna de
combustible
• Fije siempre el tapón del combustible
Ferm
2
277
inflammables et peuvent s’enflammer lors
du démarrage du moteur. Veillez à
nettoyer l’essence renversée avant de
démarrer le générateur.
• Ne couvrez jamais le générateur avec des
habits ou d'autres objets.
33.. UUTTIILLIISSAATTIIOON
N
Borne de mise à la terre
La borne de mise à la terre de la
génératrice est branchée sur le
châssis de la génératrice, sur les parties
métalliques non porteuses de courant de la
génératrice, et sur les bornes de mise à la terre
de chaque prise.
Avant d'utiliser la borne de mise à la terre,
consultez un électricien qualifié, un
inspecteur de l'électricité ou le bureau local
ayant la juridiction pour les règlements et
ordonnances locales applicables à
l'utilisation que vous prévoyez de faire de la
génératrice.
AAVVAANNTT LLEE DDÉÉMMAARRRRAAGGEE DDU
U
GGÉÉNNÉÉRRAATTEEUUR
R
Remplissez et vérifiez le niveau d’huile
(quantité: 600 ml)
Vérifiez toujours le niveau d’huile (avec la
machine en position horizontale) avant de
démarrer le générateur, et également,
lorsque le moteur s’arrête de manière
inopinée (Fig. 2).
En règle générale, vous pouvez utiliser une
huile 10W-30 “toutes températures”.
≤ 0ºC SAE#10
0ºC - 25 ºC SAE#20
25ºC -35 ºC SAE#30
≥ 35ºC SAE#40
RReemmpplliisssseezz eett vvéérriiffiieezz llee nniivveeaauu dde
e
ccaarrbbuurraannt
t
• Utilisez uniquement une essence sans
plomb
• Débranchez les câbles d’alimentation
• Eteignez la machine
• Ne remplissez pas trop le réservoir.
Laissez une poche d’air au-dessus du
niveau de carburant.
• Vissez toujours complètement le bouchon
du réservoir.
• Nettoyez toute essence renversée
• Ne fumez pas lors de l’utilisation du
générateur
Soyez toujours vigilant !
DDéémmaarrrraaggee dduu ggéénnéérraatteeuur
r
FFiigg.. 11 ++ 44 ++ 5
5
1. Serrez le robinet de carburant (15).
2. Allumez le moteur à l’aide de l’interrupteur
de démarrage (12).
3. Mettez le levier d’étrangleur (13) en
position fermée (pour redémarrer un
moteur déjà chaud, laissez le levier
d’étrangleur en position ouverte ou semiouverte).
4. Tirez doucement le câble du démarreur
jusqu’à l’enclencher, puis tirez-le
brusquement pour démarrer le moteur
(14).
5. Laissez le moteur fonctionner jusqu’à ce
qu’il chauffe, et placez ensuite le levier
d’étrangleur en position ouverte (13).
UUttiilliissaattiioonn ddee llaa ssoorrttiiee CCAA ((223300 VV)
)
• Mettez le générateur en marche
• Branchez la fiche mâle de l'appareil
électrique
• Poussez la protection de courant CA en
bas sur “ON” (7) (MARCHE).
• Le voltmètre (11) affiche la tension de la
prise CA. Normalement, pendant
l'utilisation, la tension devrait être
d'environ ±
230 V.
Arrêt du générateur
Fig. 1 + 5
1. Débranchez tous les câbles (5)
2. Mettez l’interrupteur de démarrage sur
“ARRÊT“ (12).
3. Fermez le robinet de carburant (15).
222
2
Ferm
Page 23

44.. SSEERRVVIICCEE && EENNTTRREETTIIEEN
N
EENNTTRREETTIIEENN PPÉÉRRIIOODDIIQQUUE
E
QQuuoottiiddiieenn ((vvéérriiffiiccaattiioonn aavvaanntt llaa mmiissee een
n
mmaarrcchhee)
)
• Vérifiez le niveau d’huile du moteur
•
Vérifiez que le tuyau à carburant ne
présente aucune fissure ou autre
dommage. Remplacez-le si nécessaire.
•
Vérifiez la présence de fuite sur le système
d’échappement. Resserrez ou remplacez
le joint si nécessaire.
• Vérifiez le bon fonctionnement du
démarreur.
• Vérifiez le bon fonctionnement du lanceur
à rappel.
1
1
eer
r
mmooiiss oouu aapprrèèss 2200 hheeuurrees
s
dd’’uuttiilliissaattiioon
n
• Remplacez l’huile du moteur
33 mmooiiss oouu aapprrèèss 5500 hheeuurreess dd’’uuttiilliissaattiioon
n
• Vérifiez l’état de la bougie d’allumage.
Réglez l’écartement et nettoyez la bougie.
Remplacez-la si nécessaire.
• Nettoyez et remplacez-la si nécessaire.
66 mmooiiss oouu aapprrèèss 110000 hheeuurrees
s
dd’’uuttiilliissaattiioon
n
• Remplacez l’huile du moteur
• Nettoyez le robinet et le filtre du réservoir.
Remplacez-les si nécessaire.
• Vérifiez les raccords et les attaches.
Remplacez-les si nécessaire.
1122 mmooiiss oouu aapprrèèss 330000 hheeuurrees
s
dd’’uuttiilliissaattiioon
n
• Contactez un centre de service spécialisé
afin de vérifier le jeu des soupapes.
• Vérifiez que le ventilateur du système de
refroidissement n’est pas endommagé.
RRÉÉVVIISSIIOONN –– RREEMMAARRQQUUEESS SSUURR
LL’’EENNTTRREETTIIEENN
FFiigg..1
1
RReemmppllaacceemmeenntt ddee ll’’hhuuiille
e
• Faites chauffer le moteur à plat
• Enlevez le bouchon de remplissage (8)
• Ouvrez le bouchon de vidange (9) et
laissez l’huile s’écouler complètement
dans une cuvette placée sous le moteur.
• Vérifiez les joints et remplacez-les si
nécessaire. Replacez le bouchon de
vidange et remplissez le moteur avec une
huile propre.
• Replacez le bouchon de remplissage.
VVéérriiffiiccaattiioonn ddee llaa bboouuggiiee dd’’aalllluummaagge
e
FFiigg.. 3
3
• Retirez le capuchon de la bougie, et
enlevez la saleté située autour de la bougie
d’allumage.
• Enlevez la bougie d’allumage (17) à l’aide
de la clé à bougie fournie.
• Vérifiez la bougie d’allumage. Elle doit être
de couleur brune.
• Mesurez l’écartement (distance entre les
points de contact) à l’aide d’une jauge
approprié. L’écartement doit être de 0,7 –
0,8 mm. Corrigez cet écartement, si
nécessaire, en tordant avec précaution
l’électrode située sur le côté.
• Remplacez la bougie d’allumage si les
électrodes sont usées, ou si l’isolant est
fissuré ou ébréché.
• Montez la bougie d’allumage avec
précaution, à la main, afin d’éviter une
déformation du filetage.
• Placez la bougie d’allumage en respectant
le couple de serrage : 20 Nm.
• Fixez le capuchon de la bougie.
EEccrraann ddee ccoonnttrrôôllee dd’’éécchhaappppeemmeennt
t
• Attendez que l’échappement refroidisse.
• L’écran de contrôle d’échappement peut
être bouché par des dépôts de carbone.
• Dévissez le bouchon et retirez l’écran de
contrôle d’échappement.
• Nettoyez l’écran avec une brosse
métallique et replacez-le.
• Remplacez l’écran de contrôle
d’échappement s’il est endommagé.
NNeettttooyyaaggee dduu ffiillttrree àà aaiir
r
• Retirez le carter du filtre à air (16).
• Retirez le filtre et nettoyez-le correctement
avec du dissolvant.
• Versez une petite quantité d’huile sur le
filtre et extrayez doucement l’excès
d’huile.
• Replacez le filtre ainsi que le carter du filtre
à air.
Ferm
2
233
CCAARRAACCTTEERRÍÍSSTTIICCAASS TTÉÉCCNNIICCAAS
S
CCAARRAACCTTEERRÍÍSSTTIICCAAS
S
FFiigg.. 1
1
1. Depósito de combustible
2. Indicador de nivel de combustible
3. Tapa de combustible
4. Escape
5. Enchufe para CA
6. Terminal de tierra
7. Conmutador de CA
8. Tapa del conducto de llenado de aceite
9. Tapón de drenaje de aceite
10. Sensor de nivel de aceite
11. Voltímetro
12. Interruptor del motor
13. Palanca de choque
14. Arranque de retroceso
15. Llave de combustible
16. Cubierta del filtro de aire
17. Bujía de encendido
22.. IINNSSTTRRUUCCCCIIOONNEESS DDE
E
SSEEGGUURRIIDDAAD
D
EExxpplliiccaacciióónn ddee llooss ssíímmbboolloos
s
En este manual o en el equipo se utilizan los
siguientes símbolos:
De acuerdo con las normas de
seguridad vigentes de las directivas
europeas.
Riesgo de dañar el material o de sufrir
heridas.
Riesgo de descarga eléctrica
Lea el manual de instrucciones
Mantenga a las demás personas
alejadas de la herramienta
No exponga el equipo a la lluvia
Ruido exterior
Riesgo de temperaturas elevadas.
¡Cuidado! En el generador algunas
partes podrían alcanzar temperaturas
elevadas.
Cualquier aparato eléctrico o
electrónico desechado y/o
defectuoso tiene que depositarse en
los lugares apropiados para ello.
IINNSSTTRRUUCCCCIIOONNEESS DDEE SSEEGGUURRIIDDAAD
D
PPeerrssoonnaas
s
• Nunca permita que los niños o gente que
no esté familiarizada con estas
instrucciones utilice este equipo. La
normativa vigente debe retringir la edad
del usuario.
• El equipo puede utilizarse únicamente al
aire libre y donde haya buena ventilación.
El gas de escape contiene monóxido de
MMoottoorr TTiippo
o
||DDee 44 ttiieemmppooss,,
|
|rreeffrriiggeerraacciióónn ppoorr
||aaiirree,, aa ggaassoolliinna
a
Disposición
de los cilindros | Inclinado, 1 cilindro
Corriente continua | 4.0kW
Potencia máxima | 4.8 kW
Horas de funcionamiento | 13 horas
Combustible | Gasolina sin
plomo
Capacidad del depósito | 15 L
Capacidad de
aceite del motor | 600 ml
Dist. de la bujía
de encendido | 0.7 - 0.8 mm.
Tensión nominal | 230 V. CA
Frecuencia nominal (CA) | 50 Hz
Potencia nominal | 2000W
Potencia de entrada
máxima del aparato | 2200 W
Tipo de herramienta |I
Peso | 40 kg
Dimensiones |
590x430x440 mm
Ruido exterior (Lwa) | 94,0 dB(A)
Capacidad
presión sonora (Lpa) | 65,0dB(A)
226
6
Ferm
Page 24

EENNVVIIRROONNNNEEMMEENNT
T
Pour éviter les dommages liés au transport, la
machine est livré dans un emballage robuste.
L’emballage est autant que possible
constitué de matériau recyclable. Veuillez par
conséquent destiner cet emballage au
recyclage.
Tout équipement électronique ou
électrique défectueux dont vous
seriez débarrassé doit être déposé
aux points de recyclage appropriés.
GGAARRAANNTTIIE
E
Lisez les termes de garantie sur la carte de
garantie ci-jointe.
Nous déclarons sous notre propre
responsabilité que ce
FFGGGG--22000000N
N
est conforme aux normes et aux documents
normaliséssuivants :
EENN1122660011,, EENN5555001144--11,, EENN5555001122,,
EENN6611000000--66--1
1
Conforme aux réglementations :
9988//3377//EECC,, 22000066//9955//EECC,, 22000044//110088//EECC,
,
22000022//9955//EECC,, 22000022//9966//EEC
C
Du 01-01-2007
ZZWWOOLLLLEE NNL
L
J.A. Bakker - van Ingen J. Lodewijk
CEO Ferm BV Quality Manager
Ferm Global
C’est notre politique d’améliorer continuellement nos produits et par conséquent de
réserver le droit de changer les instructions
des produits sans un avis antérieur.
FFeerrmm BBVV •• LLiinnggeennssttrraaaatt 66 •• 88002288 PPMM ZZwwoolllle
e
•• HHoollllaannddee
GGEENNEERRAADDOORR DDEE 44 TTIIEEMMPPOOS
S
LLOOSS NNÚÚMMEERROOSS IINNDDIICCAADDOOSS EENN EELL TTEEXXTTOO
SSIIGGUUIIEENNTTEE CCOORRRREESSPPOONNDDEENN AA LLAASS
I
ILLUUSSTTRRAACCIIOONNEESS DDEE LLAA PPÁÁGGIINNAA 22 ++ 33
IINNSSTTRRUUCCCCIIOONNEESS DDEE SSEEGGUURRIIDDAADD Y
Y
FFUUNNCCIIOONNAAMMIIEENNTTO
O
Por su propia seguridad y por la de los
demás, le rogamos que lea
detenidamente estas instrucciones antes de
utilizar el equipo. Le ayudará a comprender
mejor su producto y a evitar riesgos
innecesarios. Guarde estas instrucciones en
un lugar seguro por si necesita usarlas más
adelante.
CCOONNTTEENNIIDDOOS
S
1. Datos del equipo
2. Instrucciones de seguridad
3. Instrucciones de uso
4. Reparación y mantenimiento
11.. DDAATTOOSS DDEELL EEQQUUIIPPO
O
IInnttrroodduucccciióón
n
El Generador está diseñado para producir
electricidad con ayuda de un motor de 4
tiempos que funciona con combustible. Con
él, podrá utilizar herramientas eléctricas en el
campo sin necesidad de conectarlas a la red
eléctrica.
AAVVR
R
El sistema AVR (sigla en inglés para
Regulador Automático de Voltaje) contenido
en este generador provee una salida de
voltaje estable y precisa.
CE
ı
DDÉÉCCLLAARRAATTIIOONN DDEE CCOONNFFOORRMMIITTÉ
É
(
(
F
F
)
)
Ferm
2
255
• Assurez-vous que le carter du filtre soit
correctement scellé tout autour.
Ne faites pas fonctionner le moteur
sans avoir mis en place le filtre à air.
Ne placez jamais un filtre mouillé
(avec du dissolvant) dans la machine.
RRoobbiinneett ddee ccaarrbbuurraannt
t
• Pour retirer le filtre du robinet de
carburant, dévissez simplement le godet
sur la partie inférieure du réservoir.
•
Utilisez une petite clé pour retirer le robinet.
• Rincez et nettoyez le filtre et le godet, et
replacez ces derniers.
DDÉÉPPAANNNNAAGGE
E
VVéérriiffiiccaattiioonnss ddee bbaasse
e
• Assurez-vous que vous avez rempli le
réservoir de carburant
• Assurez-vous que le robinet de carburant
soit ouvert
• Assurez-vous que l’interrupteur du moteur
soit allumé
• Assurez-vous que le niveau d’huile soit
correct
• La génératrice est équipée d'un détecteur
de niveau d'huile. Lorsque le niveau
d'huile baisse trop, la génératrice ne
démarre pas.
• Enlevez la bougie d’allumage, connectez
son fil de sortie et le fil terre au générateur.
Tirez doucement le câble du démarreur et
cherchez la présence d’une étincelle. Si
aucune étincelle n’est créée, remplacez la
bougie d’allumage.
LLaa bboouuggiiee dd’’aalllluummaaggee ffoonnccttiioonnnne
e
ccoorrrreecctteemmeenntt,, mmaaiiss llee mmootteeuurr nne
e
ddéémmaarrrree ttoouujjoouurrss ppaas
s
• Vérifiez si le filtre du robinet de carburant
est propre
• Vérifiez si la canalisation de carburant
n’est pas obstruée
• Vérifiez si le carburateur n’est pas obstrué
LLee mmootteeuurr nnee ddéémmaarrrree ppaas
s
• Nettoyez ou remplacez la bougie
d’allumage
• Vérifiez le système de démarrage - si ce
dernier est défectueux, contactez votre
centre de service
• Vérifiez la compression – si cette dernière
s’avère basse, contactez votre centre de
service
• Vérifiez si la culasse est bien fixée – serrez
les boulons
• Vérifiez si le joint de culasse n’est pas
endommagé – remplacez-le si nécessaire
NNEETTTTOOYYAAGGE
E
Nettoyez régulièrement le carter de la
machine à l’aide d’un chiffon doux, de
préférence après chaque utilisation. Veillez à
ce que les fentes d’aération soient exemptes
de toute traces de poussière et de saletés.
Retirez la saleté difficile à l’aide d’un chiffon
doux imbibé d’eau savonneuse. N’utilisez
aucun solvant tel que l’essence, l’alcool,
l’amoniac, etc. car de telles substances
peuvent abîmer les pièces en plastique.
SSTTOOCCKKAAGGEE ((LLOONNGGUUEE PPÉÉRRIIOODDEE))
• Videz le réservoir, le robinet du carburant,
la cuvette du carburateur et le carburateur
lui-même
• Versez l’équivalent d’un gobelet d’huile de
moteur dans le réservoir et agitez le
générateur afin de répandre l’huile dans le
réservoir. Videz l’excès d’huile.
• Retirez la bougie d’allumage et versez
l’équivalent d’une cuillère d’huile de
moteur, tirez plusieurs fois sur le câble du
démarreur avec l’interrupteur de celui-ci
sur la position ARRÊT. Remplacez la
bougie d’allumage
• Tirez sur le câble du démarreur jusqu’à ce
qu’une compression se fasse sentir, puis
arrêtez.
• Nettoyez l’extérieur du générateur et
enduisez-le d’un protecteur anti-rouille.
• Placez le générateur sur une surface plane
et couvrez-le d’un chiffon propre et sec.
DDYYSSFFOONNCCTTIIOONNNNEEMMEENNTTS
S
Veuillez vous adresser au centre de service
indiqué sur la carte de garantie en cas d'un
dysfonctionnement, par exemple après
l'usure d'une pièce. Vous trouverez, à la fin de
ce manuel, un schéma avec toutes les pièces
que vous pouvez commander.
224
4
Ferm
 Loading...