

Page 1

www.ferm.com 0604-12.1
GB Subject to change
D Änderungen vorbehalten
NL Wijzigingen voorbehouden
F Sous réserve de modifications
E Reservado el derecho de
modificaciones técnicas
P Reservado o direito a modificações
I Con riserva di modifiche
RUS Комлания Ferm постоянно
совершенству ет выпускаему ю ею
проедукцию. Позтому в техничесие
характеристики могут вноситься
без предварительного
уведомления.
GR Hρούµε το δικαίωµα αλλαγών
Art. No. PGM1001
FGG-1100
www.ferm.com
GB
D
NL
F
E
P
I
RUS
GR
USERS MANUAL 04
GEBRAUCHSANWEISUNG 11
GEBRUIKSAANWIJZING 18
MODE D’EMPLOI 25
MANUAL DE INSTRUCCIONES 32
MANUAL DE INSTRUÇÕES 39
MANUALE UTILIZZATI 46
РУКОВОДСТВО ПО ЭКСПЛУАТАЦИИ 53
O¢∏°π∂™ Ã∏™∂ø™ 60
Page 2
02 Ferm Ferm 71
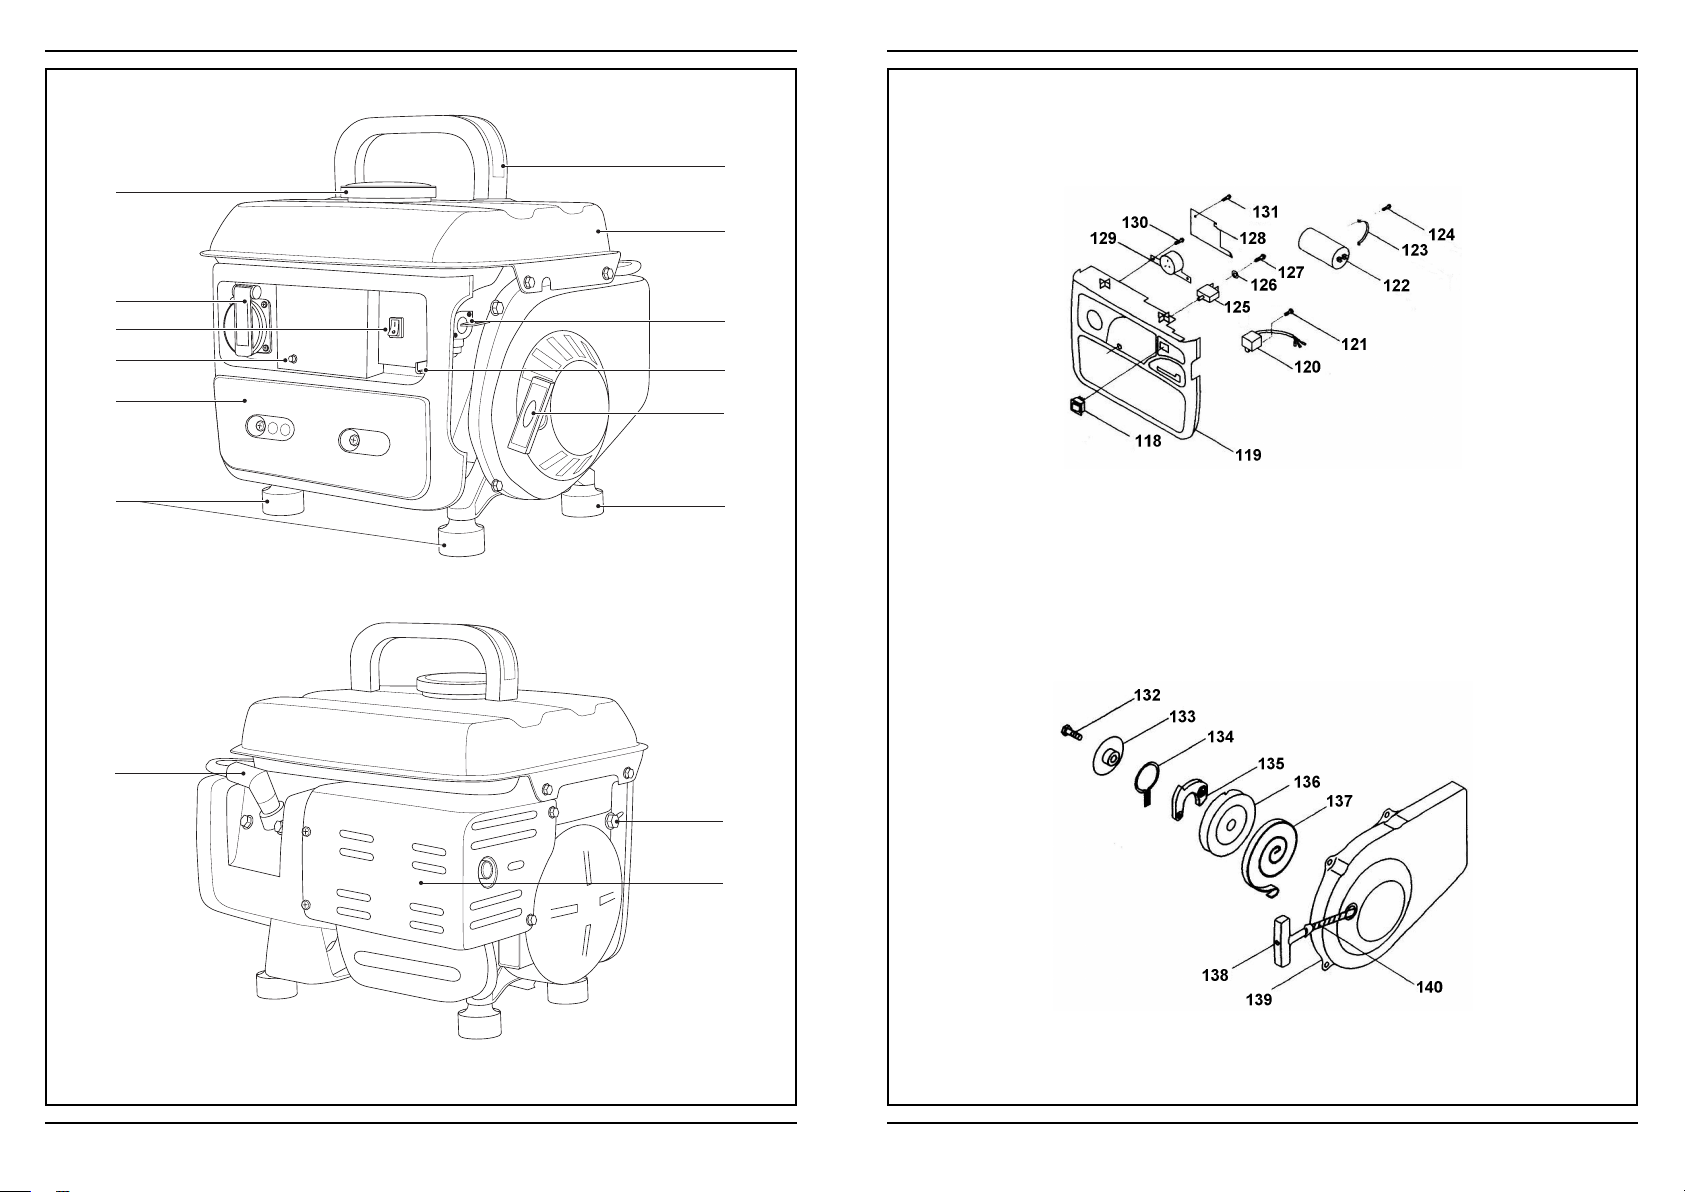
Exploded view
Fig.1
9
1
8
14
11
5
2
6
10
3
4
7
7
13
12
Page 3
Ferm 0370 Ferm
Fig.2
Fig.3
Fig.4
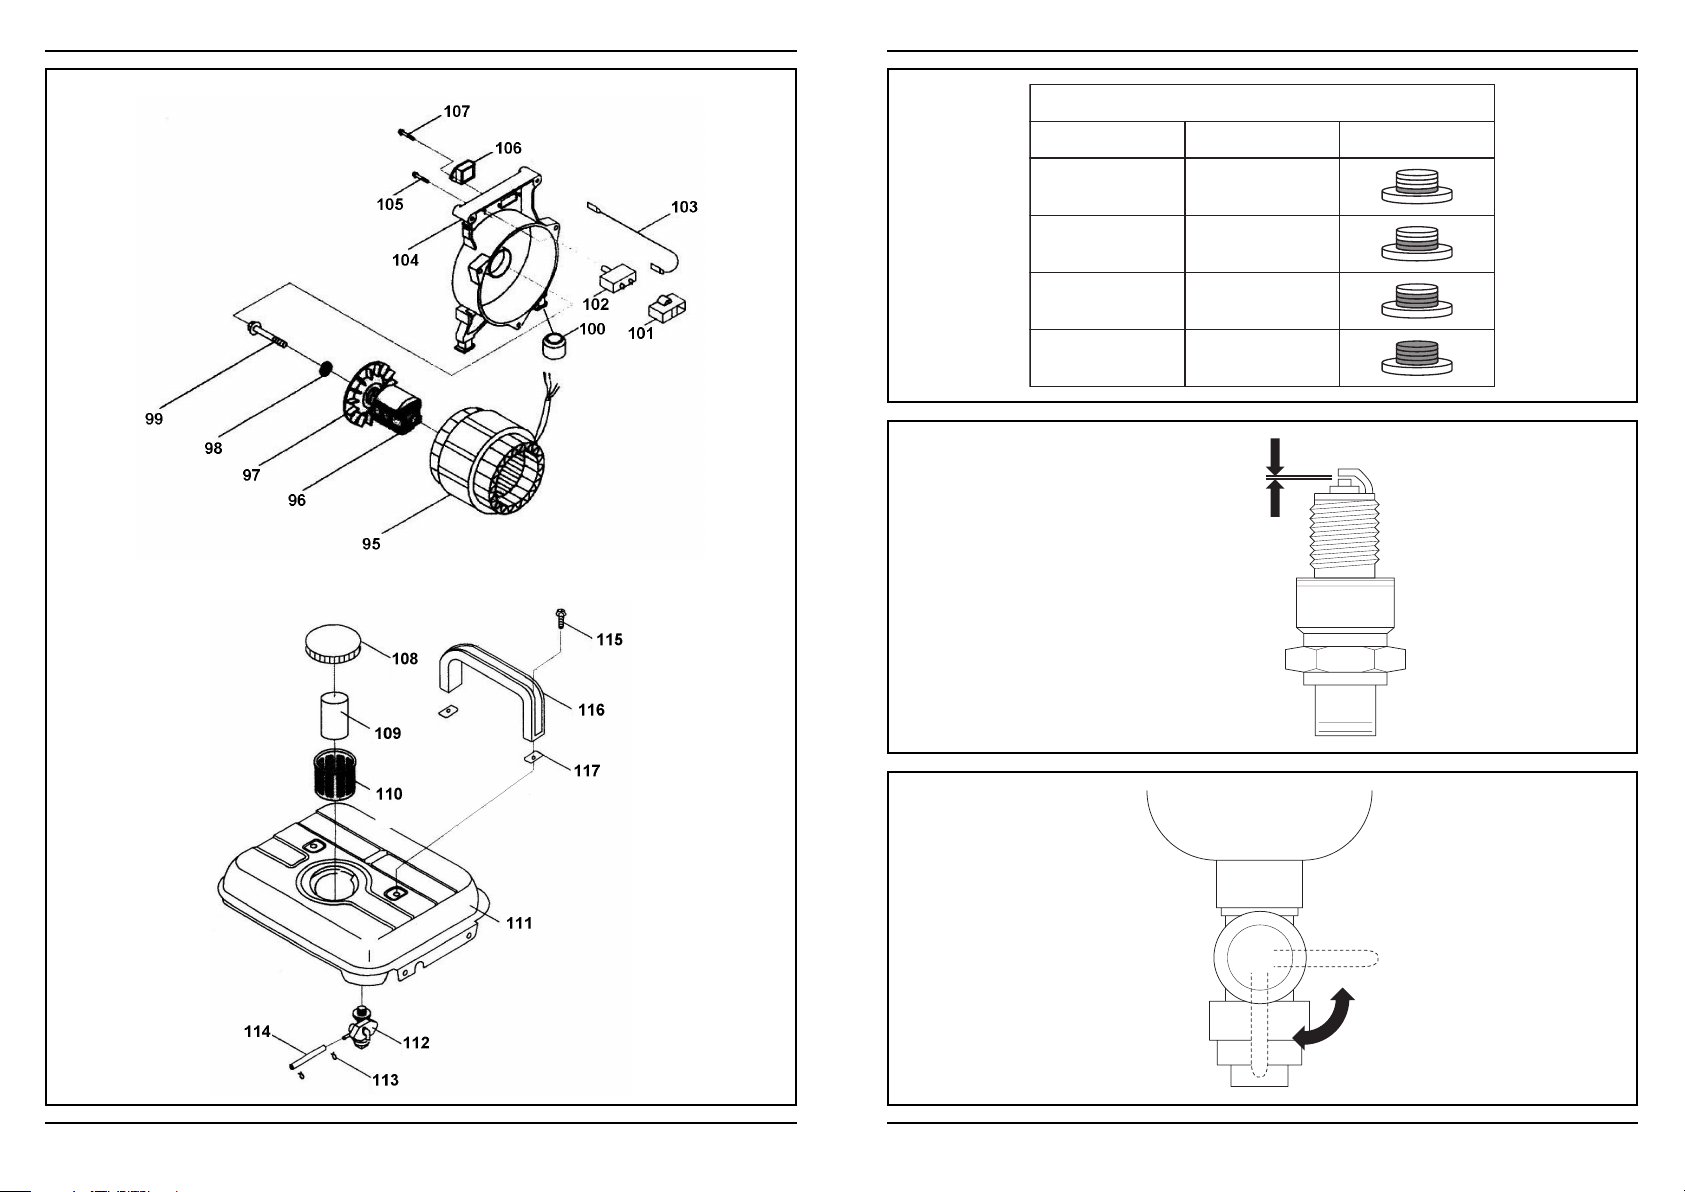
Exploded view
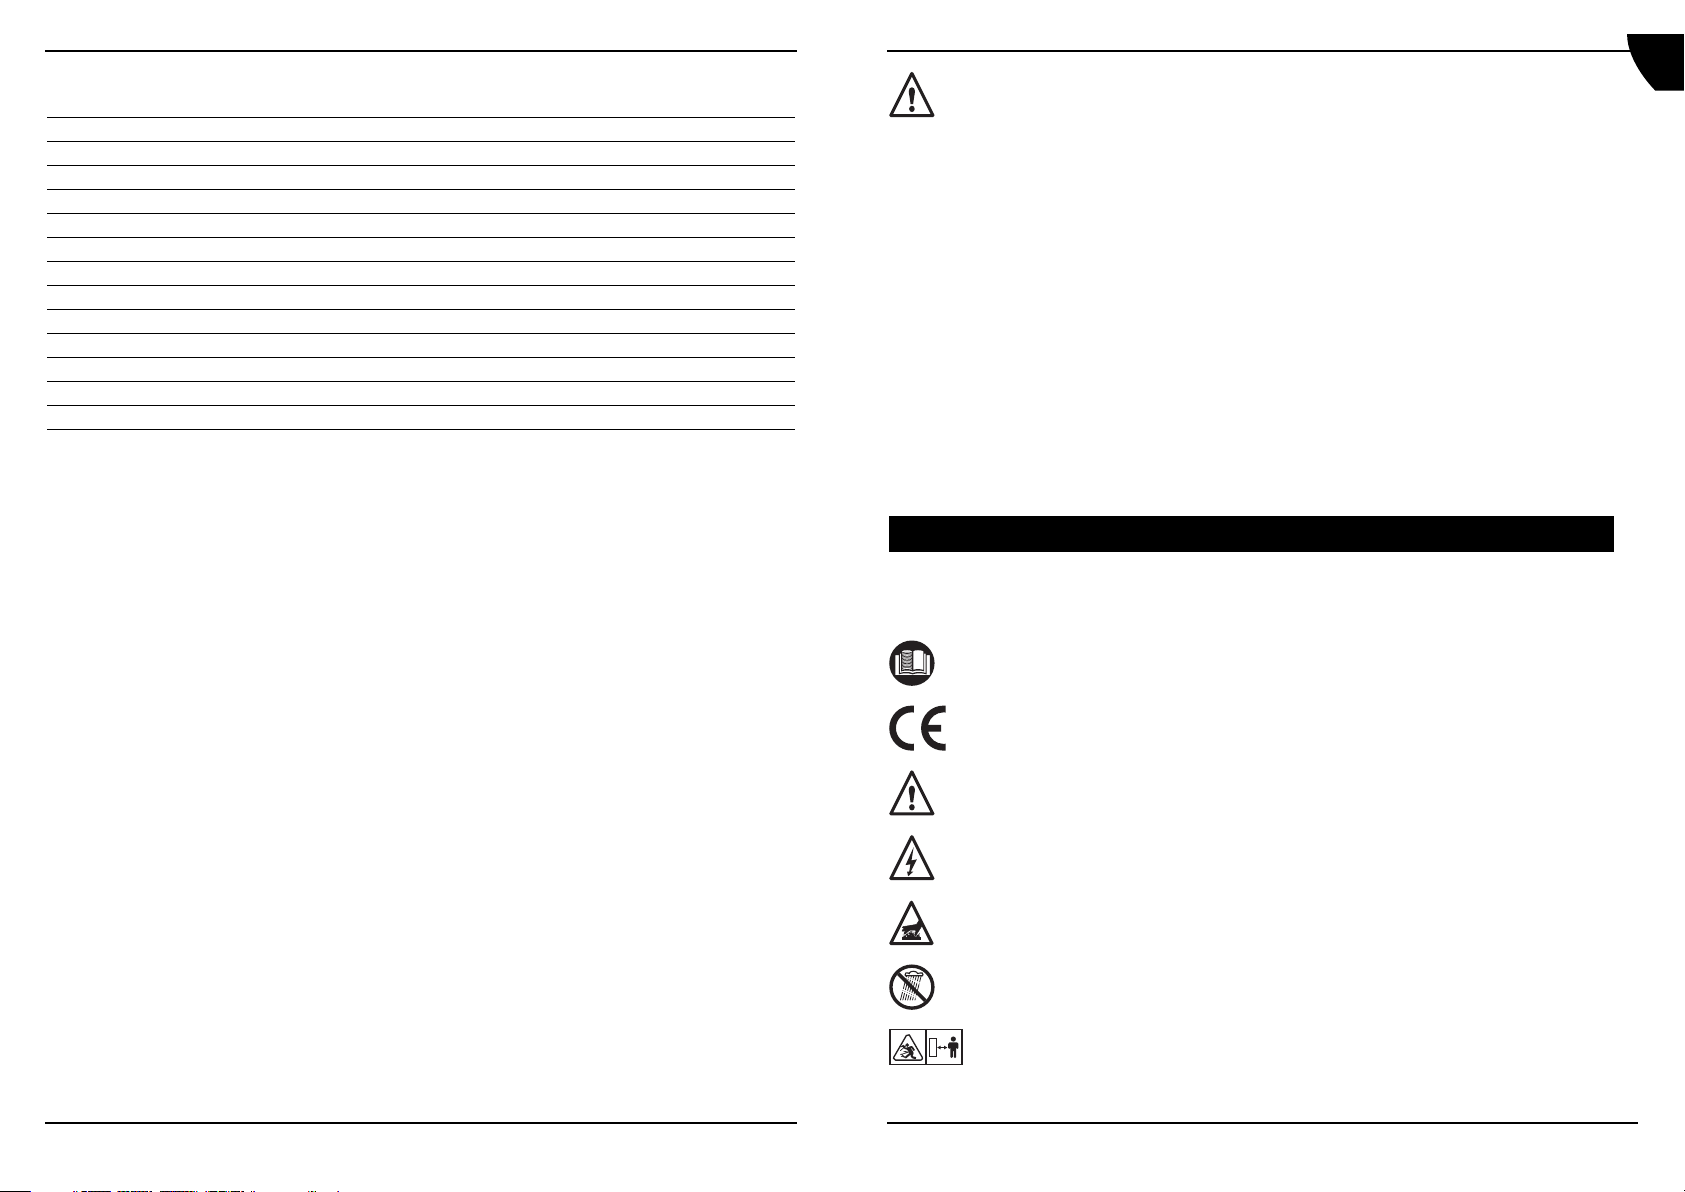
MIXED PETROL 50:1
PETROL
0.70 - 0.80 mm
2-STROKE OIL
0.02 LITER1 LITER
0.04 LITER2 LITER
0.06 LITER3 LITER
0.08 LITER4 LITER
FUEL CAP
OFF
ON
Page 4

Ferm 6904 Ferm
GENERATOR FGG-1100 (2 STROKE)
The numbers in the following text correspond with the pitcures at page 2 - 4.
For your own safety and for the safety of others, please read these instructions
carefully before using this appliance. It will help you understand your product more
easily and avoid unnecessary risks. Keep this instruction manual in a safe place for
future use.
Introduction
The Generator is designated to generate electricity with help of a 2 stroke fuel engine. Now you
can use your electric tools in the field in spite of the lack of the electricity grid.
Contents
1. Machine data
2. Safety instructions
3. Use
4. Service & maintenance
1. MACHINE DATA
Technical specification
Generator
Rated voltage 230 V
Rated frequency 50 Hz
Rated output 650 W
Rated current 3.2 A
Max. input power of apparatus:
Lamp 650 W
Electric tools 570 W
Fluorescent lamp 480 W
Tool class I
Weight 19.7 kg
Dimensions 400 x 350 x 340 mm
Outdoor noise 91 dB(A)
Engine
Type Air cooled, 2-stroke petrol
Cylinder arrangement Inclined, 1 cylinder
Displacement 63 cm
3
Operation hours 6 hours
Fuel Mixed petrol
Fuel tank capacity 4.0 L
Spark plug type F6RTC
Spark contact point distance 0.7 - 0.8 mm
GB
D
F
E
P
I
RUS
GR
NL
Exploded view
Page 5
Ferm 05
Warning! Do not connect sensitive electronic equipment (such as TV or laptop) on
this generator, because of possible high peak voltages.
Features
Fig. 1
1. Fuel cap
2. On/off switch
3. Choke lever
4. Recoil starter
5. AC socket
6. AC protector
7. Rubber
8. Fuel tank
9. Handle
10. Fuel tap
11. Spark plug
12. Exhaust
13. Ground terminal
14. Air filter cover
2. SAFETY INSTRUCTIONS
Explanation of symbols
In this manual and/or on the machine the following symbols are used:
Read instruction manual
In accordance with essential applicable safety standards of European directives
Risk of damaging material and/or physical injuries
Risk of an electric shock
Risk of high temperature. Caution! The generator contains some parts which might
reach high temperatures
Do not expose to rain
Keep bystanders away
GB
D
NL
F
E
P
I
RUS
FIN
68 Ferm
Spare parts list FGG-1100
Ferm no. Description Position no.
203018 Control panel 2+3+119
203019 Gasket set carburator 11+12+14
203020 Exhaust 21
203021 Gasket set cylinder 80+82
203022 Spark plug 85
203023 Cylinder cover 90
203024 Overload switch 101+102
203025 Fuel cap 108
203026 Fuel filter 109+110
203027 Fuel tank 111
203028 Handle complete 116+117
203029 Starter complete 132+140
Page 6

Ferm 67
CE ¢∏§ø™∏ ™Àªª√ƒºø™∏™ (GR)
¢ЛПТУФ˘МВ ˘В‡ı˘У· fiЩИ ЩФ ЪФ˚fiУ ·˘Щfi Ы˘ММФЪКТУВЩ·И МВ Щ· ВН‹˜ ЪfiЩ˘· ‹
ВУ·ЪМФУИЫМ¤У· ¤ББЪ·К·:
EN12601
Û‡Ìʈӷ Ì ÙȘ Ô‰ËÁ›Â˜
98/37/∂√∫, 73/23/∂√∫, 89/336/∂√∫, 2002/96/EOK
·fi 01-02-2006
ZWOLLE NL
W. Kamphof
∆М‹М· ФИФЩИОФ‡ ВП¤Б¯Ф˘
¢В‰ФМ¤УФ˘ fiЩИ Л ‰И·ЪО‹˜ ‚ВПЩ›ˆЫЛ ЩˆУ ЪФ˚fiУЩˆУ М·˜ ·ФЩВПВ› ФПИЩИО‹ ЩЛ˜ ВЩ·ИЪВ›·˜
М·˜, ВИК˘П·ЫЫfiМВı· ЩФ˘ ‰ИО·ИТМ·ЩФ˜ У· ЩЪФФФИФ‡МВ ЩИ˜ ЪФ‰И·БЪ·К¤˜ ЩФ˘ ЪФ˚fiУЩФ˜
¯ˆЪ›˜ ЪФЛБФ‡МВУЛ ВИ‰ФФ›ЛЫЛ.
Ferm BV ñ Lingenstraat 6 ñ 8028 PM Zwolle ñ √ÏÏ·Ó‰›·
GB
D
NL
F
E
P
I
RUS
GR
06 Ferm
Outdoor noise
Safety instructions
Persons
• Never allow children or people unfamiliar with these instructions to use the appliance.
Local regulations may restrict the age of the operator.
• Always operate outdoors with good ventilation. Exhaust gas contains poisonous carbon
monoxide.
• Always stop the engine before refilling the fuel tank and clean the machine after filling the
fuel tank.
• Do not inhale fumes from petrol.
Electricity
• Do not touch the generator if you have wet hands
• Do not operate the generator in wet conditions.
• Do not operate the generator near water.
• Never connect two generators together.
• Never connect the generator to any commercial power outlet.
• Make sure any extension cords used are in a safe condition and of sufficient capacity for
the task.
• Ensure that the load on the generator falls within its capacity as specified in the table
before plugging in any cords.
Fire and burn hazards
• The exhaust system gets hot enough to ignite some materials:
• keep the generator at least 1 meter away from buildings and other equipment during
operation.
• keep flammable materials away from the generator.
• The exhaust becomes very hot during operations and remains hot for a while after
stopping the engine:
• let the engine cool before storing the generator indoors.
• do not touch the hot exhaust with your hands.
• Gasoline is extremely flammable and is explosive under certain conditions. Do not smoke
or allow flames or sparks where the generator is refueled or where gasoline is stored.
• Fuel vapors are extremely flammable and may ignite after the engine has started. Make
sure that any spilled fuel has been wiped up before starting the generator.
GB
D
F
E
P
I
RUS
GR
NL
Page 7
Ferm 07
3. USE
Before starting the generator
Ground terminal
The generator ground terminal is connected to the frame of the generator, the
metal non-current-carrying parts of the generator, and the ground terminals of
each receptacle. Before using the ground terminal, consult a qualified electrician,
electrical inspector or local agency having jurisdiction for local codes or
ordinances that apply to the intended use of the generator.
Fill and check fuel level
Fig. 2
Use mixed petrol (1:50) only. You can use the fuel cap to measure the quantity of the 2-stroke
oil.
• Remove any power cords
• Turn power switches off
• Do not overfill – do not fill above fuel filter top
• Always screw down fuel cap
• Clean up any spilled fuel
• Do not smoke while operating the generator
Always use caution!
Starting the generator
Fig. 1
• Disconnect electric apparatus
• Turn on fuel tap (10).
• Turn on engine switch (2).
• Move choke lever (3) to closed position (to restart a warm engine, leave the choke lever in
open or half-open position).
• Pull slowly on the starter cord until it engages, then pull sharply to start the engine (4).
• Allow the engine to run until it warms up, and then move the choke lever to the open
position (3).
• Plug in the power cord.
Stopping the generator
Fig. 1
• Unplug electric apparatus
• Turn switch to “OFF” (2)
• Turn off fuel tap (10)
GB
D
NL
F
E
P
I
RUS
FIN
66 Ferm
§›·ÓÛË
∆Ô Ì˯¿ÓËÌ· ‰ÂÓ ¯ÚÂÈ¿˙ÂÙ·È ÚfiÛıÂÙË Ï›·ÓÛË.
∞Фı‹ПВ˘ЫЛ (БИФ МВБ¿ПФ ¯ЪФУИОfi ‰И¿ЫЩУМ·)
ñ ∞ÔÛÙÚ·ÁÁ›ÛÙ ÙË ‰ÂÍ·ÌÂÓ‹ η˘Û›ÌÔ˘, ÙË ÛÙÚfiÊÈÁÁ· η˘Û›ÌÔ˘, ÙÔ Î·ÚÌ˘Ú·Ù¤Ú Î·È ÙË
ÏÂοÓË ÙÔ˘ ηÚÌ˘Ú·Ù¤Ú.
ñ Г‡ЫЩВ 1 О‡ВППФ П·‰ИФ‡ ОИУЛЩ‹Ъ· М¤Ы· ЫЩЛ ‰ВН·МВУ‹ О·˘Ы›МФ˘ О·И ОФ˘У‹ЫЩВ ЩЛ БВУУ‹ЩЪИ·
БИ· У· ·ПТЫВЩВ ЩФ П¿‰И ЫЩЛ ‰ВН·МВУ‹. ∞ФЫЩЪ·ББ›ЫЩВ ЩФ ПВФУ¿˙ФУ П¿‰И.
ñ ∞К·ИЪ¤ЫЩВ ЩФ МФ˘˙› О·И ‚¿ПЩВ 1 ОФ˘Щ·ПИ¿ П¿‰И ОИУЛЩ‹Ъ·, ЩЪ·‚‹НЩВ МВЪИО¤˜ КФЪ¤˜ ЩФ
Û¯ÔÈÓ› ÂÎΛÓËÛ˘ Ì ÙÔÓ ‰È·ÎfiÙË ÂÎΛÓËÛ˘ ÛÙË ı¤ÛË OFF. •·Ó·‚¿ÏÙ ÙÔ ÌÔ˘˙›.
ñ ∆Ú·‚‹ÍÙ ÙÔ Û¯ÔÈÓ› ÂÎΛÓËÛ˘ ̤¯ÚÈ Ó· ·ÈÛı·Óı›ÙÂ Û˘Ì›ÂÛË Î·È ÛÙ·Ì·Ù‹ÛÙÂ.
ñ ∫·ı·Ъ›ЫЩВ ЩФ ВЪ›‚ПЛМ· ЩЛ˜ БВУУ‹ЩЪИ·˜ О·И ВЪ¿ЫЩВ ЩФ МВ ¤У· ·УЩИЫОˆЪИ·Оfi ЪФ˚fiУ.
с ∆ÔÔıÂÙ‹ÛÙ ÙË ÁÂÓÓ‹ÙÚÈ· Û ÌÈ· Â›Â‰Ë ÂÈÊ¿ÓÂÈ· Î·È ÛοÛÙ ÙËÓ Ì ¤Ó· ηı·Úfi,
ЫЩВБУfi ·У›.
Βλαβες
Εάν προκύψει κάποια βλάβη π.χ. λγω της φθοράς κάποιου εξαρτήµατος,
παρακαλούµε επικοινωνήστε µε το Κέντρο επισκευών που αναγράφεται στην κάρτα
εγγύησης. Στο πίσω µέρος αυτού του εγχειριδίου υπάρχει ένα αναπτυγµένο
διάγραµµα, στο οποίο παρουσιάζονται τα εξαρτήµατα που µπορείτε να παραγγείλετε.
Περιβαλλον
Για να µην πάθει ζηµιά το µηχανήµα κατά τη µεταφορά,παραδίδεται µέσα σε κλειστή
συσκευασία.Τα περισστερα αττ τα υλικά συσκευασίας µπορούν να ανακυκλωθούν.
Πήγαίνετε αυτά τα υλικα στα κατάλληγα σηµεία ανκύκλωσης.
∂ÁÁ‡ËÛË
¢È·‚¿ÛÙ ÙÔ˘˜ fiÚÔ˘˜ Ù˘ ÂÁÁ‡ËÛ˘ ÛÙËÓ Í¯ˆÚÈÛÙ‹ οÚÙ· ÂÁÁ‡ËÛË Ô˘ ÂÛˆÎÏ›ÂÙ·È.
GB
D
F
E
P
I
RUS
GR
NL
Page 8

Ferm 65
√‰ËÁ›Â˜ ·ÛÊ·Ï›·˜
¶ÚfiÛˆ·
ñ ªЛУ ·К‹УВЩВ ФЩ¤ ·И‰И¿ ‹ ¿ЩФМ· Щ· ФФ›· ‰ВУ ¤¯Ф˘У ВНФИОВИˆıВ› МВ ·˘Щ¤˜ ЩИ˜ Ф‰ЛБ›В˜
¯Ъ‹ЫВˆ˜ У· ¯ЪЛЫИМФФИ‹ЫФ˘У ЩФ МЛ¯¿УЛМ·. ∂У‰¤¯ВЩ·И У· ˘¿Ъ¯Ф˘У ЩФИОФ›
О·УФУИЫМФ› ФИ ФФ›ФИ ı¤ЩФ˘У fiЪИ· ЫЩЛУ ЛПИО›· ЩФ˘ ¯ВИЪИЫЩ‹.
ñ ГЪЛЫИМФФИВ›ЩВ ЩФ МЛ¯¿УЛМ· ¿УЩФЩВ ЫВ ВНˆЩВЪИОФ‡˜ ¯ТЪФ˘˜ МВ О·Пfi ВН·ВЪИЫМfi. ∆·
О·˘Ы·¤ЪИ· ВЪИ¤¯Ф˘У ЩФНИОfi МФУФНВ›‰ИФ ЩФ˘ ¿УıЪ·О·.
ñ £· Ъ¤ВИ ¿УЩФЩВ У· Ы‚‹УВЩВ ЩФУ ОИУЛЩ‹Ъ· ЪИУ Ы˘МПЛЪТЫВЩВ Щ· О·‡ЫИМ· ЫЩЛ
‰ÂÍ·ÌÂÓ‹ Î·È Ó· ηı·Ú›˙ÂÙ ÙÔ Ì˯¿ÓËÌ· ÌÂÙ¿ ÙÔ Á¤ÌÈÛÌ· Ù˘ ‰ÂÍ·ÌÂÓ‹˜.
ñ ªËÓ ÂÈÛÓ¤ÂÙ ÙȘ ·Ó·ı˘ÌÈ¿ÛÂȘ Ù˘ ‚ÂÓ˙›Ó˘.
∏ПВОЩЪИЫМfi˜
ñ ªËÓ ·ÁÁ›˙ÂÙ ÙË ÁÂÓÓ‹ÙÚÈ· Ì ‚ÚÂÁ̤ӷ ¯¤ÚÈ·.
ñ ªЛ ¯ЪЛЫИМФФИВ›ЩВ ЩЛ БВУУ‹ЩЪИ· ЫВ ˘БЪfi ВЪИ‚¿ППФУ.
с ªЛ ¯ЪЛЫИМФФИВ›ЩВ ЩЛ БВУУ‹ЩЪИ· ОФУЩ¿ ЫВ УВЪfi.
с ªË Û˘Ó‰¤ÂÙ ÔÙ¤ ‰‡Ô ÁÂÓÓ‹ÙÚȘ ÌÂٷ͇ ÙÔ˘˜.
ñ ªЛ Ы˘У‰¤ВЩВ ФЩ¤ ЩЛ БВУУ‹ЩЪИ· ЫЩФ ЛПВОЩЪИОfi ‰›ОЩ˘Ф.
с µВ‚·ИˆıВ›ЩВ fiЩИ Щ· О·ПТ‰И· ЪФ¤ОЩ·ЫЛ˜ Ф˘ ¯ЪЛЫИМФФИФ‡УЩ·И В›У·И ·ЫК·П‹ О·И
В·ЪОФ‡˜ ¯ˆЪЛЩИОfiЩЛЩ·˜ БИ· ЩЛУ ЪФ‚ПВfiМВУЛ ВЪБ·Ы›·.
ñ µÂ‚·Èˆı›Ù fiÙÈ ÙÔ ÊÔÚÙ›Ô Ì ÙÔ ÔÔ›Ô ÂÈ‚·Ú‡ÓÂÙ·È Ë ÁÂÓÓ‹ÙÚÈ· ‰ÂÓ ÍÂÂÚÓ¿ ÙȘ
ИО·УfiЩЛЩВ˜ ЩФ˘ МЛ¯·У‹М·ЩФ˜ Ф˘ ВЪИБЪ¿КФУЩ·И ЫЩФУ ·Ъ·¿Уˆ ›У·О·, ЪИУ
Ы˘У‰¤ЫВЩВ ФФИФ‰‹ФЩВ О·ПТ‰ИФ.
∫›Ó‰˘ÓÔÈ ˘ÚηÁÈ¿˜ Î·È ÂÁη˘Ì¿ÙˆÓ
ñ ∆Ф Ы‡ЫЩЛМ· ЩЛ˜ ВН¿ЩМИЫЛ˜ В›У·И ·ЪОВЩ¿ ˙ВЫЩfi ТЫЩВ У· МФЪВ› У· ·У·КП¤НВИ ФЪИЫМ¤У·
˘ÏÈο:
ñ ОЪ·Щ¿ЩВ ЩЛ БВУУ‹ЩЪИ· ЫВ ·fiЫЩ·ЫЛ 1 ЩФ˘П¿¯ИЫЩФУ М¤ЩЪФ˘ ·fi ОЩ›ЪИ· О·И ·fi ¿ППВ˜
Ы˘ЫОВ˘¤˜ О·Щ¿ ЩЛ ‰И¿ЪОВИ· ЩЛ˜ ПВИЩФ˘ЪБ›·˜.
с ОЪ·Щ¿ЩВ Щ· В‡КПВОЩ· ˘ПИО¿ М·ОЪИ¿ ·fi ЩЛ БВУУ‹ЩЪИ·.
с ∏ ВН¿ЩМИЫЛ ıВЪМ·›УВЩ·И ¿Ъ· ФП‡ О·Щ¿ ЩЛ ПВИЩФ˘ЪБ›· О·И М¤УВИ ˙ВЫЩ‹ БИ· ·ЪОВЩfi
¯ЪФУИОfi ‰И¿ЫЩЛМ· МВЩ¿ ЩФ Ы‚‹ЫИМФ ЩФ˘ ОИУЛЩ‹Ъ·.
с ∞К‹ЫЩВ ЩФУ ОИУЛЩ‹Ъ· У· ОЪ˘ТЫВИ ЪИУ ·ФıЛОВ‡ЫВЩВ ЩЛ БВУУ‹ЩЪИ· ЫВ ВЫˆЩВЪИОfi ¯ТЪФ.
с ªЛУ ·ББ›˙ВЩВ ЩЛ ˙ВЫЩ‹ ВН¿ЩМИЫЛ МВ Щ· ¯¤ЪИ·.
с ∏ ‚ВУ˙›УЛ В›У·И ¤У· ФП‡ В‡КПВОЩФ ˘ПИОfi О·И ˘¿Ъ¯ВИ О›У‰˘УФ˜ У· ВОЪ·БВ› О¿Щˆ ·fi
ФЪИЫМ¤УВ˜ Ы˘Уı‹ОВ˜. ªЛУ О·У›˙ВЩВ О·И ·ФКВ‡БВЩВ ЩЛ ‰ЛМИФ˘ЪБ›· КПfiБ·˜ ‹
ÛÈÓı‹ÚˆÓ ηٿ ÙÔ Á¤ÌÈÛÌ· Ù˘ ‰ÂÍ·ÌÂÓ‹˜ η˘Û›ÌÔ˘ Ù˘ ÁÂÓÓ‹ÙÚÈ·˜ Î·È ÛÙÔÓ ¯ÒÚÔ˘
Ô˘ ·ÔıË·ÂÙ ÙË ‚ÂÓ˙›ÓË.
ñ √И ·У·ı˘МИ¿ЫВИ˜ О·˘Ы›МˆУ В›У·И ВН·ИЪВЩИО¿ В‡КПВОЩВ˜ О·И ˘¿Ъ¯ВИ О›У‰˘УФ˜ У·
·У·КПВ¯ıФ‡У МВЩ¿ ЩЛУ ВОО›УЛЫЛ ЩФ˘ ОИУЛЩ‹Ъ·. ™ОФ˘›ЫЩВ Щ˘¯fiУ ¯˘М¤У· О·‡ЫИМ· ЪИУ
ВООИУ‹ЫВЩВ ЩЛ БВУУ‹ЩЪИ·.
∫·ı·ÚÈÛÌfi˜
∫·ı·Ъ›˙ВЩВ Щ·ОЩИО¿ ЩФ ВЪ›‚ПЛМ· ¯ЪЛЫИМФФИТУЩ·˜ ¤У· М·П·Оfi ·У›, О·Щ¿ ЪФЩ›МЛЫЛ МВЩ¿
·fi О¿ıВ ¯Ъ‹ЫЛ. ¢И·ЩЛЪВ›ЩВ ЩИ˜ Ф¤˜ ВН·ВЪИЫМФ‡ О·ı·Ъ¤˜, ¯ˆЪ›˜ ЫОfiУЛ О·И ·О·ı·ЪЫ›В˜.
∞К·ИЪ¤ЫЩВ Щ˘¯fiУ В›МФУВ˜ ·О·ı·ЪЫ›В˜ ¯ЪЛЫИМФФИТУЩ·˜ ¤У· М·П·Оfi ·У› МФ˘ЫОВМ¤УФ ЫВ
Ы·Ф˘У¿‰·. ªЛ ¯ЪЛЫИМФФИВ›ЩВ ‰И·П‡ЩВ˜ fiˆ˜ ВЩЪ¤П·ИФ, ФИУfiУВ˘М·, ‰И¿П˘М· ·ММˆУ›·˜
О.П. ∞˘ЩФ› ФИ ‰И·П‡ЩВ˜ МФЪВ› У· ЪФО·П¤ЫФ˘У ˙ЛМИ¿ ЫЩ· П·ЫЩИО¿ М¤ЪЛ ЩФ˘ МЛ¯·У‹М·ЩФ˜.
GB
D
NL
F
E
P
I
RUS
GR
08 Ferm
4. SERVICE & MAINTENANCE
Periodic maintenance
Daily (pre-operation check)
• Check fuel hose for cracks or other damage. Replace if necessary.
• Check choke operation
• Check recoil starter operation
1st Month or 50 hrs
• Check condition of spark plug. Adjust gap and clean. Replace if necessary.
3 Months or 150 hrs
• Clean the air filter. Replace if necessary.
• Clean the fuel filter. Replace if necessary.
• Clean the exhaust (decarbonisation). Replace if necessary.
Service - notes on maintenance
Spark plug inspection
Fig. 3
• Disconnect the spark plug cap, and remove any dirt from around the spark plug area.
• Remove spark plug (11) with the plug spanner supplied.
• Inspect the spark plug. It should be a tan colour.
• Measure the gap (distance contact point) with a suitable gauge. The gap should be 0.7 -
0.8 mm. Correct the gap, if necessary, by carefully bending the side electrode.
• Replace the spark plug if the electrodes are worn, or if the insulator is cracked or chipped.
• Install the spark plug carefully, by hand, to avoid cross-threading.
• Place the spark plug with correct torque: 20 Nm.
• Attach the spark plug cap.
Air filter cleaning
• Unscrew the air filter cover (14).
• Remove filter element and wash well in solvent.
• Pour a small amount of oil onto the filter element and gently squeeze out any excess oil.
• Replace the filter element and air filter cover.
Do not run the engine without the air filter element in place.
Never place a wet filter (with solvent) on the machine.
Fuel tap
Fig. 4
• Stop the engine
• Close the fuel tap
GB
D
F
E
P
I
RUS
GR
NL
Page 9

Ferm 09
• To remove the fuel tap filter, remove the cup at the bottom of the fuel tap with help of a
spanner
• Remove the joint and the small filter
• Clean and wash out the filter and cup, and replace.
Fuel filter
• Stop the engine
• Remove fuel cap
• Remove fuel filter
• Clean and wash out the filter with solvent, and replace.
Troubleshooting
Basic checks
• Make sure you have plenty of fuel
• Make sure the fuel tap is open (“ON”)
• Make sure the engine-switch is on
• Remove spark plug, connect spark plug lead and earth it to the generator. Pull starter cord
gently and look for a spark. If there is no spark, replace spark plug.
Spark plug is OK, but engine still won’t start
• Check fuel tap filter is clean
• Check fuel line is clear
• Check carburetor is not clogged
Cleaning
Clean the housing regularly with a soft cloth, preferably every time it is used. Keep the air vents
free of dust and dirt. Remove stubborn dirt with a soft rag moistened in soapy water. Do not
use any solvents such as petrol, alcohol, ammonia, etc. as such substances can damage the
plastic parts.
Lubrication
The appliance does not need any extra lubrication.
Storage (long term)
• Drain fuel tank, fuel tap, carburetor bowl and carburetor
• Pour 1 cup of engine oil into the fuel tank and shake the generator to spread the oil around
the tank. Drain excess oil.
• Remove spark plug and pour in 1 spoonful of engine oil, pull the starter cord several times
with the starter switch OFF. Replace spark plug.
• Pull on the starter cord until you feel compression and stop.
• Clean the generators exterior and coat with rust inhibitor.
• Place the generator on flat ground and cover with a clean dry cloth.
Faults
Should a fault occur, e.g. after wear of a part, please contact the service address on the
warranty card. In the back of this manual you find an exploded view showing the parts that can
be ordered.
GB
D
NL
F
E
P
I
RUS
FIN
64 Ferm
ñ ∂БО·Щ·ЫЩ‹Ы·ЩВ ЩФУ ЫИУıЛЪИЫЩ‹ ЪФЫВОЩИО¿, ‰И· ¯ВИЪfi˜, ‰И· У· МЛУ ¯·П¿ЫФ˘У Щ· ¿Ы·.
с ∆ФФıВЩ‹Ы·ЩВ ЩФУ ЫИУıЛЪИЫЩ‹ МВ ЩЛУ О·Щ¿ППЛПЛ ЫЩЪФКФЪМ‹: 20 Nm.
с ¶ЪФЫ·ЪЩ‹Ы·ЩВ ЩФ ТМ· ЩФ˘ ЫИУıЛЪИЫЩ‹.
∫·ı·ÚÈÛÌfi˜ ÙÔ˘ Ê›ÏÙÚÔ˘ ·¤ÚÔ˜
ñ •Â‚ȉÒÛ·Ù ÙÔ Î¿Ï˘ÌÌ· ÙÔ˘ Ê›ÏÙÚÔ˘ ·¤ÚÔ˜ (14).
ñ ∞ÔÌ·ÎÚ‡Ó·Ù ÙÔ ÛÙÔÈ¯Â›Ô Ê›ÏÙÚÔ˘ Î·È Ï‡ÓÂÙ ηϿ Û ‰È·Ï‡ÙË.
ñ Ç۷Ù ̛· ÌÈÎÚ‹ ÔÛfiÙËÙ· Ï·‰ÈÔ‡ ¿Óˆ ÛÙÔ ÛÙÔÈ¯Â›Ô Ê›ÏÙÚÔ˘ Î·È È¤Û·Ù ̷Ϸο ÒÛÙÂ
Ó· ·Ê·ÈÚÂı› ÙÔ Ù˘¯fiÓ ÏÂÔÓ¿˙ÔÓ Ï¿‰È.
ñ ∂·Ó·ÙÔÔıÂÙ‹Û·Ù ÙÔ ÛÙÔÈ¯Â›Ô Ê›ÏÙÚÔ˘ Î·È ÙÔ Î¿Ï˘ÌÌ· ÙÔ˘ Ê›ÏÙÚÔ˘ ·¤ÚÔ˜.
ªЛУ ПВИЩФ˘ЪБ‹ЫВЩВ ЩФУ ОИУЛЩ‹Ъ· ¯ˆЪ›˜ ЩФ ЫЩФИ¯В›Ф К›ПЩЪФ˘ ·¤ЪФ˜ ЫЩЛУ ı¤ЫЛ
ЩФ˘.
¶ÔÙ¤ ÌËÓ ÙÔÔıÂÙ‹ÛÂÙ ¤Ó· ˘ÁÚfi Ê›ÏÙÚÔ (Ì ‰È·Ï‡ÙË) ÛÙÔ Ì˯¿ÓËÌ·.
™ÙÚfiÊÈÁÁ· η˘Û›ÌˆÓ
EÈÎ. 4
ñ ∞ВУВЪБФФИ‹Ы·ЩВ ЩФУ ОИУЛЩ‹Ъ·
с ∫Ï›۷Ù ÙËÓ ÛÙÚfiÊÈÁÁ· η˘Û›ÌˆÓ
ñ ¢È· ÙËÓ ·Ê·›ÚÂÛË ÙÔ˘ Ê›ÏÙÚÔ˘ Ù˘ ÛÙÚfiÊÈÁÁ·˜ η˘Û›ÌˆÓ, ·Ê·ÈÚ¤Û·Ù ÙÔ Î‡ÂÏÏÔ ÛÙÔÓ
˘ı̤ӷ Ù˘ ÛÙÚfiÊÈÁÁ·˜ η˘Û›ÌˆÓ Ì ÙËÓ ‚Ô‹ıÂÈ· ÂÓfi˜ Ì˯·ÓÈÎÔ‡ ÎÏÂȉÈÔ‡.
ñ ∞Ê·ÈÚ¤Û·Ù ÙËÓ Û˘Ó·ÚÌÔÁ‹ Î·È ÙÔ ÌÈÎÚfi Ê›ÏÙÚÔ.
ñ ∫·ı·Ú›Û·ÙÂ Î·È Ï‡ÓÂÙ ÙÔ Ê›ÏÙÚÔ Î·È ÙÔ Î‡ÂÏÏÔ, Î·È Â·Ó·ÙÔÔıÂÙ‹Û·Ù ٷ.
º›ÏÙÚÔ Î·˘Û›ÌˆÓ
ñ ∞ВУВЪБФФИ‹Ы·ЩВ ЩФУ ОИУЛЩ‹Ъ·
с ∞Ê·ÈÚ¤Û·Ù ÙÔ Î‡ÂÏÏÔ Î·˘Û›ÌˆÓ
ñ ∞Ê·ÈÚ¤Û·Ù ÙÔ Ê›ÏÙÚÔ Î·˘Û›ÌˆÓ
ñ ∫·ı·Ú›Û·ÙÂ Î·È Ï‡ÓÂÙ ÙÔ Ê›ÏÙÚÔ Ì ‰È·Ï‡ÙË, Î·È Â·Ó·ÙÔÔıÂÙ‹Û·Ù ÙÔ.
∂›Ï˘ÛË ÚÔ‚ÏÈËÌ¿ÙˆÓ
µ·ÛÈÎÔ› ¤ÏÂÁ¯ÔÈ
ñ µÂ‚·Èˆı›Ù fiÙÈ ¤¯ÂÙ ·Ú΋ ÔÛfiÙËÙ· η˘Û›ÌˆÓ
ñ µВ‚·ИˆıВ›ЩВ fiЩИ Л ЫЩЪfiКИББ· О·˘Ы›МˆУ В›У·И ·УФИОЩ‹ «ON»
с µВ‚·ИˆıВ›ЩВ fiЩИ Ф ‰И·ОfiЩЛ˜ ЩФ˘ ОИУЛЩ‹Ъ· В›У·И ВУВЪБФФИЛМ¤УФ˜
с ∞К·ИЪ¤Ы·ЩВ ЩФУ ЫИУıЛЪИЫЩ‹, Ы˘У‰¤Ы·ЩВ ЩФ О·ПТ‰ИФ ЩФ˘ ЫИУıЛЪИЫЩ‹ О·И БВИТЫ·ЩВ ЩФ
ЫЩЛУ БВУУ‹ЩЪИ·. ∆Ъ·‚‹Н·ЩВ М·П·О¿ ЩФ ЫОФИУ› ВОО›УЛЫЛ˜ О·И ·Ъ·ЩЛЪ‹Ы·ЩВ В¿У
ЪФО‡ЩВИ ЫИУı‹Ъ·˜. ∂¿У ‰ВУ ˘¿Ъ¯ВИ ЫИУı‹Ъ·˜, ·УЩИО·Щ·ЫЩ‹Ы·ЩВ ЩФУ ЫИУıЛЪИЫЩ‹.
√ ЫИУıЛЪИЫЩ‹˜ В›У·И ВУЩ¿НВИ, ·ПП¿, Ф ОИУЛЩ‹Ъ·˜ ‰ВУ ВУВЪБФФИВ›Щ·И
ñ ∂ϤÁÍ·ÙÂ Â¿Ó Â›Ó·È Î·ı·Úfi ÙÔ Ê›ÏÙÚÔ Î·˘Û›ÌÔ˘ Ù˘ ÛÙÚfiÊÈÁÁ·˜
ñ ∂ϤÁÍ·Ù ÙËÓ ÛˆÏ‹ÓˆÛË Î·˘Û›ÌˆÓ ÁÈ· Ù˘¯fiÓ ÊÚ·Á¤˜
ñ ∂ϤÁÍ·Ù ÙÔ Î·ÚÌ˘Ú·Ù¤Ú ÁÈ· Ù˘¯fiÓ ÊÚ·Á¤˜
GB
D
F
E
P
I
RUS
GR
NL
Page 10

Ferm 63
ñ °˘Ъ›ЫЩВ ЩФУ ‰И·ОfiЩЛ ЩФ˘ ОИУЛЩ‹Ъ· (2).
с ªВЩ·ОИУ‹Ы·ЩВ ЩФУ МФ¯Пfi ЩФ˘ ЩЫФО (3) ЫВ ОПВИЫЩ‹ ı¤ЫЛ (‰И· ЩЛУ В·УВОО›УЛЫЛ ВУfi˜
˙ВЫЩ·М¤УФ˘ ОИУЛЩ‹Ъ·,, ·К‹Ы·ЩВ ЩФУ МФ¯Пfi ЩФ˘ ЩЫФО ЫВ ·УФИОЩ‹ ‹ МИЫ¿УФИ¯ЩЛ ı¤ЫЛ).
ñ ∆Ъ·‚‹Н·ЩВ ·ЪБ¿ ЩФ ЫОФИУ› ВОО›УЛЫЛ˜ ¤ˆ˜ fiЩФ˘ ВМП·ОВ›, О·И О·ЩfiИУ ЩЪ·‚‹Н·ЩВ
·fiЩФМ· БИ· У· ВООИУ‹ЫВЩВ ЩФУ ОИУЛЩ‹Ъ· (4).
ñ ∞К‹Ы·ЩВ ЩФУ ОИУЛЩ‹Ъ· У· ПВИЩФ˘ЪБВ› ¤ˆ˜ fiЩФ˘ У· ˙ВЫЩ·ıВ›, О·И О·ЩfiИУ ОИУ‹Ы·ЩВ ЩФУ
МФ¯Пfi ЩФ˘ ЩЫФО ЫЩЛУ ·УФИОЩ‹ ı¤ЫЛ (3).
ñ ™˘У‰¤Ы·ЩВ ЩФ ЛПВОЩЪИОfi О·ПТ‰ИФ.
∞ВУВЪБФФ›ЛЫЛ ЩЛ˜ БВУУ‹ЩЪИ·˜
EÈÎ. 1
ñ ∞ФЫ˘У‰¤Ы·ЩВ ЩИ˜ ЛПВОЩЪИО¤˜ Ы˘ЫОВ˘¤˜
с ∞ВУВЪБФФИ‹Ы·ЩВ Б˘Ъ›˙ФУЩ·˜ ЩФУ ‰И·ОfiЩЛ ЫЩФ «OFF» (2)
с ∫Ï›۷Ù ÙËÓ ÛÙÚfiÊÈÁÁ· η˘Û›ÌˆÓ (10)
4. ∂•À¶∏ƒ∂∆∏™∏ & ™À¡∆∏ƒ∏™∏
¶ÂÚÈÔ‰È΋ Û˘ËÙ‹ÚËÛË
∫·ıЛМВЪИУ¿ (¤ПВБ¯Ф˜ ЪИУ ЩЛУ ¯Ъ‹ЫЛ)
ñ ∂ÍÂÙ¿Û·Ù ÙÔÓ ÛˆÏ‹Ó· η˘Û›ÌˆÓ ÁÈ· ÚˆÁ̤˜ ‹ ¿ÏϘ ÊıÔÚ¤˜. ∞ÓÙÈηٷÛÙ‹Û·Ù ÙÔÓ
Â¿Ó ·˘Ùfi Â›Ó·È ·Ó·Áη›Ô.
ñ ∂П¤БН·ЩВ ЩЛУ ПВИЩФ˘ЪБ›· ЩФ˘ ЩЫФО
с ∂П¤БН·ЩВ ЩЛУ ПВИЩФ˘ЪБ›· ЩФ˘ ЫОФИУИФ‡ ВОО›УЛЫЛ˜.
ªÂÙ¿ ÙÔÓ 1Æ ª‹Ó· ‹ ÌÂÙ¿ ·fi 50 ÒÚ˜
ñ ∂П¤БН·ЩВ ЩЛУ О·Щ¿ЫЩ·ЫЛ ЩФ˘ ЫИУıЛЪИЫЩ‹. ƒ˘ıМ›Ы·ЩВ ЩФ ‰И¿ОВУФ О·И О·ı·Ъ›Ы·ЩВ.
∞ÓÙÈηٷÛÙ‹Û·ÙÂ Â¿Ó ·˘Ùfi Â›Ó·È ··Ú·›ÙËÙÔ.
ªÂÙ¿ ·fi 3 ª‹Ó˜ ‹ ÌÂÙ¿ ·fi 150 ÒÚ˜
ñ ∫·ı·Ú›Û·Ù ÙÔ Ê›ÏÙÚÔ ·¤Ú·. ∞ÓÙÈηٷÛÙ‹Û·ÙÂ Â¿Ó ·˘Ùfi Â›Ó·È ··Ú·›ÙËÙÔ.
ñ ∫·ı·Ú›Û·Ù ÙÔ Ê›ÏÙÚÔ Î·˘Û›ÌˆÓ. ∞ÓÙÈηٷÛÙ‹Û·ÙÂ Â¿Ó ·˘Ùfi Â›Ó·È ·Ó·Áη›Ô.
ñ ∫·ı·Ъ›Ы·ЩВ ЩЛУ ВН¿ЩМИЫЛ (О·ı·Ъ›Ы·ЩВ ЩИ˜ ‚·П‚›‰В˜ ВЫˆЩВЪИО‹˜ О·‡ЫВˆ˜ ЩФ˘
ОИУЛЩ‹Ъ·). ∞УЩИО·Щ·ЫЩ‹Ы·ЩВ В¿У ·˘Щfi В›У·И ··Ъ·›ЩЛЩФ.
∂˙˘ËÚ¤ÙËÛË - ¶·Ú·ÙËÚ‹ÛÂȘ Û¯ÂÙÈΤ˜ Ì ÙËÓ Û˘ÓÙ‹ÚËÛË
ŒПВБ¯Ф˜ ЫИУıЛЪИЫЩ‹
EИО. 3
ñ ∞ÔÛ˘Ó‰¤Û·Ù ÙÔ ÒÌ· ÙÔ˘ ÌÔ˘˙› Î·È ·Ê·ÈÚ¤Û·Ù ÙÔ˘˜ Ú‡Ô˘˜ ·fi ÙËÓ ÂÚÈÔ¯‹ Á‡Úˆ
·fi ЩФУ ЫИУıЛЪИЫЩ‹.
с ∞К·ИЪ¤Ы·ЩВ ЩФУ ЫИУıЛЪИЫЩ‹ (11) МВ ЩФ О·Щ¿ППЛПФ ОПВИ‰› Ф˘ Ы·˜ ·Ъ¤¯ВЩ·И.
с ∂П¤БН·ЩВ ЩФУ ЫИУıЛЪИЫЩ‹. ¶Ъ¤ВИ У· ¤¯ВИ О·К¤ ¯ЪТМ·.
с ªВЩЪ‹Ы·ЩВ ЩФ ‰И¿ОВУФ (·fiЫЩ·ЫЛ ЫЛМВ›ˆУ В·К‹˜) МВ ЩФ О·Щ¿ППЛПФ fiЪБ·УФ
М¤ЩЪЛЫЛ˜. ∆Ф ‰И¿ОВУФ Ъ¤ВИ У· В›У·И 0,7 - 0,8 mm. ¢ИФЪıТЫ·ЩВ ЩФ ‰И¿ОВУФ, В¿У ·˘Щfi
В›У·И ··Ъ·›ЩЛЩФ, О¿МЩФУЩ·˜ ЪФЫВОЩИО¿ ЩФ П·˚Уfi ЛПВОЩЪfi‰ИФ.
ñ ∞УЩИО·Щ·ЫЩ‹Ы·ЩВ ЩФУ ЫИУıЛЪИЫЩ‹ В¿У ¤¯Ф˘У Кı·ЪВ› Щ· ЛПВОЩЪfi‰И·, ‹ В¿У ЩФ МФУˆЩИОfi
˘ÏÈÎfi ¤¯ÂÈ ÚˆÁ̤˜ ‹ Á‰·Ú̷ۛٷ.
GB
D
NL
F
E
P
I
RUS
GR
10 Ferm
Environment
To prevent damage during transport, the appliance is delivered in a solid packaging which
consists largely of reusable material. Therefore please make use of options for recycling the
packaging.
Warranty
Read the terms of warranty on the separate warranty card which is enclosed.
CE DECLARATION OF CONFORMITY (GB)
We declare under our sole responsibility that this product is in conformity with the following
standards or standardized documents:
EN12601
in accordance with the regulations:
98/37/EEC, 73/23/EEC, 89/336/EEC, 2002/96/EEC
from 01-02-2006
ZWOLLE NL
W. Kamphof
Quality department
It is our policy to continuously improve our products and we therefore reserve the right to
change the product specification without prior notice.
Ferm BV • Lingenstraat 6 • 8028 PM Zwolle • The Netherlands
GB
D
F
E
P
I
RUS
GR
NL
Page 11
Ferm 11
GENERATOR FGG-1100 (2-TAKT)
Die Nummern im nachfolgenden text korrespondieren mit den Abbildungen auf
Seite 2 - 5
Lesen Sie diese Anleitung im Hinblick auf Ihre eigene Sicherheit und die Sicherheit
anderer bitte vor der Benutzung dieses Geräts gründlich durch. Dadurch
verstehen Sie Ihr Produkt besser und vermeiden unnötige Risiken. Bewahren Sie
diese Anleitung zum künftigen Gebrauch an einer sicheren Stelle auf.
Einleitung
Der Generator ist für die Stromerzeugung mit Hilfe eines 2-Takt-Benzinmotors ausgelegt. Bei
Ausfall des Stromnetzes können Sie also Ihre Elektrowerkzeuge außen benutzen.
Inhalt
1. Gerätedaten
2. Sicherheitsvorschriften
3. Benutzung
4. Service und Wartung
1. GERÄTEDATEN
Technische Daten
Generator
Nennspannung 230 V
Nennfrequenz 50 Hz
Nennleistung 650 W
Nennstrom 3,2 A
Max. Eingangsleistung des Geräts
Lampe 650 W
Elektrowerkzeuge 570 W
Leuchtstoffröhre 480 W
Werkzeugklasse I
Gewicht 19,7 kg
Abmessungen 400 x 350 x 340 mm
Außengeräusch 91 dB(A)
Motor
Typ Luftgekühlter
2-Takt-Benzinmotor
Zylinderanordnung Geneigt, 1 Zylinder
Verdrängung 63 cm
3
Betriebsstunden 6 Stunden
GB
D
NL
F
E
P
I
RUS
GR
62 Ferm
∫›У‰˘УФ˜ ˘„ЛПТУ ıВЪМФОЪ·ЫИТУ. ¶ЪФЫФ¯‹: ЩФ МЛ¯¿УЛМ· ·ФЩВПВ›ЩВ ·fi
О¿ФИ· ВН·ЪЩ‹М·Щ· Щ· ФФ›· ВУ‰¤¯ВЩ·И У· ·У·Щ‡НФ˘У ˘„ЛП‹ ıВЪМФОЪ·Ы›·.
ªËÓ ÂÎı¤ÙÂÙ ÙÔ Ì˯¿ÓËÌ· ÛÙË ‚ÚÔ¯‹.
∫Ú·Ù‹ÛÙ Û ·fiÛÙ·ÛË ÙÔ˘˜ ·Ú¢ÚÈÛÎfiÌÂÓÔ˘˜.
∂НˆЩВЪИОfi˜ ıfiЪ˘‚Ф˜
3. Ã∏™∏
¶ÚÈÓ ·fi ÙËÓ ÂÎΛÓËÛË Ù˘ ÁÂÓÓ‹ÙÚÈ·˜
∞ОЪФ‰¤ОЩЛ˜ БВ›ˆЫЛ˜
√ ·ОЪФ‰¤ОЩЛ˜ БВ›ˆЫЛ˜ ЩФ˘ БВУУ‹ЩЪИ· В›У·И Ы˘У‰ВМ¤УФ˜ МВ ЩФ ЫТМ· ЩФ˘
БВУУ‹ЩЪИ·, ЫЩ· МВЩ·ППИО¿ ЛПВОЩЪ·БˆБfi ОФММ¿ЩИ· ЩФ˘ БВУУ‹ЩЪИ· О·И ЫЩФ˘˜
·ОЪФ‰¤ОЩВ˜ БВ›ˆЫЛ˜ ЩˆУ МФУ·¯ИОТУ ‰Ф¯В›ˆУ. ¶ЪИУ ЩЛ ¯Ъ‹ЫЛ ЩФ˘ ·ОЪФ‰¤ОЩЛ
БВ›ˆЫЛ˜ ‰И·‚Ф˘ПВ˘ЩВ›ЩВ МВ ¤МВИЪФ ЛПВОЩЪФПfiБФ, ЛПВОЩЪИОfi ВИıВˆЪЛЩ‹ ‹ МВ
ЩЛУ ЩФИО‹ ·Ъ¯‹ ФФ›· ¤¯ВИ ЩЛУ ·ЪМФ‰ИfiЩЛЩ· МВ В›‚ПВ„Л ЩˆУ ЩФИОТУ УФМТУ О·И
‰И·Щ·БТУ Л ФФ›ФИ ·У‹ОФ˘У ЫЩЛУ ЫОВЩfiМВУЛ ¯Ъ‹ЫЛ ЩФ˘ БВУУ‹ЩЪИ·.
ПЛЪТБ·ЩВ О·И ВП¤Б˙·ЩВ ЩЛУ ЫЩ¿ıМЛ ЩˆУ О·˘Ы›МˆУ
∂ÈÎ. 2
ГЪЛЫИМФФИ‹Ы·ЩВ МИОЩ‹ ‚ВУ˙›УЛ МfiУФУ (1:50). Œ¯ВЩВ ЩЛУ ‰˘У·ЩfiЩЛЩ· У· ¯ЪЛЫИМФФИ‹ЫВЩВ
ЩФ ТМ· О·˘Ы›МˆУ БИ· У· МВЩЪ‹ЫВЩВ ЩЛУ ФЫfiЩЛЩ· ЩФ˘ П·‰ИФ‡ ЩФ˘ ‰›¯ЪФУФ˘ ОИУЛЩ‹Ъ·.
ñ ∞К·ИЪ¤Ы·ЩВ Щ· fiФИ· ЛПВОЩЪИО¿ О·ПТ‰И·
с ∞ВУВЪБФФИ‹Ы·ЩВ ЩФ˘˜ ‰И·ОfiЩВ˜
с ªËÓ ˘ÂÚ¯ÂÈÏ›ÛÂÙ – ÌËÓ ˘Âڂ›Ù ÙËÓ ÎÔÚ˘Ê‹ ÙÔ˘ Ê›ÏÙÚÔ˘ η˘Û›ÌˆÓ
ñ ¶¿УЩФЩВ У· ‚И‰ТУВЩВ ЩФ ТМ· ЩЛ˜ ‰ВН·МВУ‹˜ О·˘Ы›МˆУ
с ∫·ı·Ú›Û·Ù ٷ fiÔÈ· η‡ÛÈÌ· ¤¯Ô˘Ó ¯˘ı›
ñ ªЛУ О·У›˙ВЩВ О·Щ¿ ЩЛУ ‰И¿ЪОВИ· ЩФ˘ ¯ВИЪИЫМФ‡ ЩЛ˜ БВУУ‹ЩЪИ·˜
¡· В›ЫıВ ¿УЩФЩВ ЪФЫВОЩИОФ›.
∂ÎΛÓËÛË Ù˘ ÁÂÓÓ‹ÙÚÈ·˜
EÈÎ. 1
ñ ∞ФЫ˘У‰¤Ы·ЩВ ЩФУ ЛПВОЩЪИОfi ВНФПИЫМfi
с °˘Ú›ÛÙ ÙËÓ ÛÙÚfiÊÈÁÁ· η˘Û›ÌˆÓ (10).
GB
D
F
E
P
I
RUS
GR
NL
Page 12

Ferm 61
¶ЪФВИ‰ФФ›ЛЫЛ! ªЛ Ы˘У‰¤ВЩВ ЫЩЛУ ·ЪfiУ БВУУ‹ЩЪИ· ·ИЫıЛМ·ЩИО¤˜
ЛПВОЩЪФУИО¤˜ Ы˘ЫОВ˘¤˜ (fiˆ˜ В›У·И ФИ ЩЛПВФЪ¿ЫВИ˜ Л МВЩ·‚И‚·ЫЩИОФ›
˘ФПФБИЫЩ¤˜) БИ· ЩЛУ Щ˘¯fiУ ‰˘У·Щ‹ О·М‡ПЛ БЪ·ММ‹ ЩЛ˜ Щ¿ЫЛ˜.
Г·Ъ·ОЩЛЪИЫЩИО¿
∂ÈÎ. 1
1. ¶ÒÌ· η˘Û›ÌˆÓ
2. ¢И·ОfiЩЛ˜ ВУВЪБФФИ‹ЫВˆ˜ / ·ВУВЪБФФИ‹ЫВˆ˜
3. ªÔ¯Ïfi˜ ÂÌÏÔ˘ÙÈÛÙ‹ Ì›ÁÌ·ÙÔ˜ η‡Ûˆ˜
4. ™¯ÔÈÓ› ÂÎΛÓËÛ˘
5. ÀÔ‰Ô¯‹ AC
6. ¶ÚÔÛٷ٢ÙÈÎfi AC
7. §¿ÛÙȯ·
8. ¢ÂÍ·ÌÂÓ‹ η˘Û›ÌˆÓ
9. ГВИЪФП·‚‹
10. ™ÙÚfiÊÈÁÁ· ‰ÂÍ·ÌÂÓ‹˜ η˘Û›ÌˆÓ
11. ™ИУıЛЪИЫЩ‹Ъ·˜
12. ∂Н¿ЩМИЫЛ
13. ∞ÎÚÔ‰¤ÎÙ˘ Á›ˆÛ˘
14. ∫¿Ï˘ÌÌ· Ê›ÏÙÚÔ˘ ·¤Ú·
2. √¢∏°π∂™ ∞™º∞§∂π∞™
∂Â˙‡ÁËÛË Û˘Ì‚fiψÓ
™’ ·˘Щfi ЩФ ВБ¯ВИЪ›‰ИФ О·И/‹ ЫЩФ МЛ¯¿УЛМ· ¯ЪЛЫИМФФИФ‡УЩ·И Щ· ·ОfiПФ˘ı· Ы‡М‚ФП·:
¢È·‚¿ÛÙ ÙÔ ÂÁ¯ÂÈÚ›‰ÈÔ ¯Ú‹Ûˆ˜.
™В ВУ·ЪМfiУИЫЛ МВ Ф˘ЫИТ‰Л ИЫ¯‡ФУЩ· ЪfiЩ˘· ·ЫК·ПВ›·˜ ЩˆУ ∂˘Ъˆ·˚ОТУ
√‰ЛБИТУ.
∫›У‰˘УФ˜ КıФЪ¿˜ ˘ПИОТУ О·И / ‹ ЩЪ·˘М·ЩИЫМФ‡.
∫›У‰˘УФ˜ ЛПВОЩЪФПЛН›·˜.
ŒЪВ˜ ПВИЩФ˘ЪБ›·˜ 6 ÒÚ˜
∫·‡ÛÈÌ· ªИОЩ‹ ‚ВУ˙›УЛ
ГˆЪЛЩИОfiЩЛЩ· ‰ВН·МВУ‹˜ О·˘Ы›МˆУ 4,0 L
∆‡Ф˜ ‚‡ЫМ·ЩФ˜ ·У¿КПВНЛ˜ F6RTC
∞fiЫЩ·ЫЛ В·К‹˜ ЫИУıЛЪИЫЩ‹| 0,7 - 0,8 mm
GB
D
NL
F
E
P
I
RUS
GR
12 Ferm
Achtung! Schließen Sie an diesen Generator keine empfindlichen elektronischen
Geräte (wie Fernsehgerät oder Laptop) an, da Spannungsspitzen auftreten
können.
Merkmale
Abb. 1
1. Kraftstofftankdeckel
2. Ein/Aus-Schalter
3. Starterklappenhebel
4. Rückstoßanlasser
5. AC-Steckdose
6. AC-Schutzvorrichtung
7. Gummi
8. Kraftstofftank
9. Griff
10. Kraftstoffhahn
11. Zündkerze
12. Auspuff
13. Masseklemme
14. Luftfilterdeckel
2. SICHERHEITSVORSCHRIFTEN
Erklärung der Symbole
In dieser Anleitung und/oder am Gerät werden folgende Symbole verwendet:
Gebrauchsanleitung durchlesen
Entspricht grundlegenden anwendbaren Sicherheitsnormen der europäischen
Richtlinien.
Gefahr von Materialbeschädigung bzw. Verletzungen.
Bezeichnet Stromschlaggefahr.
Gefährdung durch hohe temperaturen. Achtung! Der Generator enthält Bauteile,
die sich stark erhitzen können.
Kraftstoff Kraftstoffgemisch
Kraftstofftankinhalt 4,0 l
Zündkerzentyp F6RTC
Elektrodenabstand 0,7 – 0,8 mm
GB
D
F
E
P
I
RUS
GR
NL
Page 13

Ferm 13
Keinem Regen aussetzen.
Zuschauer fernhalten
Außengeräusch
Sicherheitsvorschriften
Personen
• Lassen Sie das Gerät nie von Kindern oder Personen bedienen, die damit nicht vertraut
sind. Örtlich geltende Bestimmungen schreiben für die Benutzung eventuell ein
Mindestalter vor.
• Gerät immer im Freien mit guter Belüftung benutzen. Abgase enthalten giftiges
Kohlenmonoxid.
• Stellen Sie den Motor vor dem Auffüllen des Kraftstofftanks immer ab und reinigen Sie das
Gerät, nachdem der Kraftstofftank gefüllt wurde.
• Benzindämpfe dürfen nicht eingeatmet werden.
Stromnetz
• Generator nicht mit feuchten Händen berühren.
• Generator nicht in nasser Umgebung betreiben.
• Generator nicht in der Nähe von Wasser betreiben.
• Niemals zwei Generatoren zusammenschalten.
• Niemals den Generator an eine handelsübliche Steckdose anschließen.
• Vergewissern Sie sich, dass eventuell benutzte Verlängerungskabel sicher und für die
betreffende Aufgabe mit ausreichender Kapazität versehen sind.
• Vergewissern Sie sich, dass die Generatorbelastung in den in der Tabelle genannten
Leistungsbereich fällt, bevor Kabel eingesteckt werden.
Brand- und Verbrennungsgefahren
• Das Auspuffsystem wird heiß genug, um einige Materialien zu entzünden:
• hHalten Sie den Generator während der Benutzung wenigstens 1 Meter von
Gebäuden und anderen Ausrüstungen entfernt.
• halten Sie entzündbare Materialien vom Generator fern.
• Der Auspuff wird bei der Arbeit sehr heiß und bleibt nach dem Abschalten des Motors eine
Zeit lang heiß:
• lassen Sie den Motor, bevor Sie ihn im Gebäudeinnern unterbringen, abkühlen.
• berühren Sie den heißen Auspuff nicht mit den Händen.
• Benzin ist hochentzündbar und unter bestimmten Bedingungen explosiv. An Stellen, an
denen der Generator aufgetankt oder Benzin gelagert wird, darf nicht geraucht werden
und es dürfen keine Flammen oder Funken entstehen.
• Kraftstoffdämpfe sind extrem entzündbar und können sich nach dem Starten des Motors
entzünden. Vergewissern Sie sich, dass eventuell verschütteter Kraftstoff vor dem
Anlassen des Generators abgewischt wurde.
GB
D
NL
F
E
P
I
RUS
GR
60 Ferm
°∂¡¡◊∆ƒπ∞ FGG-1100 (ª∂ ¢ÿÃ√¡√ ∫π¡∏∆◊ƒ∞)
√И ·ЪИıМФИ ЫЩФ ·Ъ·О·Щˆ ОВИМВУФ ·У·КВЪФУЩ·И ЫЩИ˜ ВИОФУВ˜ ЩЛ˜ ЫВПИ‰·˜ 2 - 5.
°И· ЩЛУ ‰ИО‹ Ы·˜ ·ЫК¿ПВИ· fiˆ˜ О·И ЩˆУ ¿ППˆУ, ·Ъ·О·ПФ‡МВ ·У·БУТЫ·ЩВ
ЪФЫВОЩИО¿ ЩИ˜ О¿ЩˆıИ Ф‰ЛБ›В˜ ЪИУ У· ¯ЪЛЫИМФФИ‹ЫВЩВ ·˘Щfi ЩФ МЛ¯¿УЛМ·. ∏
·Ó¿ÁÓˆÛË ı· Û·˜ ‚ÔËı‹ÛÂÈ Ó· ηٷÓÔ‹ÛÂÙ ¢ÎÔÏfiÙÂÚ· ÙÔ ÚÔ˚fiÓ Ô˘
·ÔÎÙ‹Û·ÙÂ Î·È Ó· ·ÔʇÁÂÙ ·ÓÂÈı‡ÌËÙÔ˘˜ ÎÈÓ‰‡ÓÔ˘˜. º˘Ï¿Í·Ù ÛÂ
·ЫК·П¤˜ М¤ЪФ˜ ЩФ ·ЪfiУ ВБ¯ВИЪ›‰ИФ Ф‰ЛБИТУ, ‰И· ЩЛУ МВППФУЩИО‹ ¯Ъ‹ЫЛ ЩФ˘.
∂ÈÛ·ÁˆÁ‹
∏ °ВУУ‹ЩЪИ· ¤¯ВИ Ы¯В‰И·ЫıВ› ‰И· ЩЛУ ·Ъ·БˆБ‹ ЛПВОЩЪИО‹˜ ВУВЪБВ›·˜ М¤Ыˆ ВУfi˜ ‰›¯ЪФУФ˘
ОИУЛЩ‹Ъ· О·˘Ы›МˆУ. Œ¯ВЩВ П¤ФУ ЩЛУ ‰˘У·ЩfiЩЛЩ· У· ¯ЪЛЫИМФФИ‹ЫВЩВ Щ· ЛПВОЩЪИО¿ Ы·˜
ВЪБ·ПВ›· ЫЩЛУ ‡·ИıЪФ ¤ЫЩˆ О·И ·У Л ВЪИФ¯‹ ЫЩВЪВ›Щ·И Ы˘У‰¤ЫВˆ˜ ЫЩФ ‰›ОЩ˘Ф ·ЪФ¯‹˜
ЛПВОЩЪИО‹˜ ВУВЪБВ›·˜.
¶ÂÚȯÔÌÂÓ·
1. ¢Â‰Ô̤ӷ Ì˯·Ó‹Ì·ÙÔ˜
2. √‰ËÁ›Â˜ ·ÛÊ·Ï›·˜
3. ÃÚ‹ÛË
4. ÀÔÛÙ‹ÚÈÍË & Û˘ÓÙ‹ÚËÛË
1. ¢∂¢√ª∂¡∞ ª∏Ã∞¡∏ª∞∆√™
∆¯ÓÈΤ˜ ÚԉȷÁڷʤ˜
Γεννήτρια
√ÓÔÌ·ÛÙÈ΋ Ù¿ÛË 230 V
√ÓÔÌ·ÛÙÈ΋ Û˘¯ÓfiÙËÙ· 50 Hz
√ÓÔÌ·ÛÙÈ΋ ·fi‰ÔÛË 650 W
√ÓÔÌ·ÛÙÈÎfi Ú‡̷ 3,2 A
ª¤БИЫЩЛ ИЫ¯‡˜ ВИЫfi‰Ф˘ Ы˘ЫОВ˘ТУ
§·ÌÙ‹Ú·˜ 650 W
∏ПВОЩЪИО¿ ВЪБ·ПВ›· 570 W
§·МЩ‹Ъ·˜ КıФЪИЫМФ‡ 480 W
∫·ЩЛБФЪ›· ВЪБ·ПВ›Ф˘ I
µ¿ÚÔ˜ 19,7 kg
¢È·ÛÙ¿ÛÂȘ 400 x 350 x 340 mm
∂НˆЩВЪИОfi˜ ıfiЪ˘‚Ф˜ 91 dB(A)
Κινητήρας
∆‡Ô˜ ∞ÂÚfi„˘ÎÙÔ˜ ‰›¯ÚÔÓÔ˜
‚ВУ˙ИУФОИУЛЩ‹Ъ·˜
¢И¿Щ·НЛ О˘П›У‰ЪˆУ 1 О‡ПИУ‰ЪФ˜ ОВОПИМ¤УФ˜
ªВЩ·ЩfiИЫЛ 63 cm
3
GB
D
F
E
P
I
RUS
GR
NL
Page 14

Ferm 59
• Потяните пусковой кабель до тех пор, пока вы не почувствуте компрессию и
остановитесь.
• Очистите внешние части генератора и кожух резиновым ингибитором.
• Установите генератор на плоскую поверхность и накройте чистой сухой тканью.
Hеисправности
В случае неисправности, напр., после износа какой-либо части, обратитесь по адресу
пункта обслуживания, указанному в гарантийном талоне. Покомпонентное
представление изображения частей, которые можете заказать, вы найдете на
последней странице руководства.
Защита окружающей среды
Во избежание транспортных повреждений изделие поставляется в прочной упаковке.
Значительная часть материалов упаковки подлежит утилизации, поэтому просим
передать упаковку в соответствующую специализированную организацию.
Гарантия
Ознакомьтесь с условиями гарантии, которые изложены в прилагаемом гарантийном
талоне.
CE ЗАЯВЛЕНИЕ О СООТВЕТСТВИИ (RUS)
Мы заявляем со всей полнотой нашей исключительной ответственности, что
настоящее изделие соответствует следующим нормам или нормативным документам
EN12601
в соответствии с правилами
98/37/EEC,73/23/EEC,89/336/EEC, 2002/96/EEC
начиная с 01-02-2006
ZWOLLE NL
В. Капмхоф
Отдел контроля качества
Постоянное улучшение нашей продукции является нашей политикой и, поэтому, мы
оставляем за собой право на изменение технических характеристик продукции без
предварительного уведомления.
Ferm BV • Lingenstraat 6 • 8028 PM Zwolle • Нидерланды
GB
D
NL
F
E
P
I
RUS
GR
14 Ferm
3. BENUTZUNG
Vor dem Anlassen des Generators
Erdanschluss
Der Erdanschluss des Generators ist mit dem Generatorgestell, den nicht
spannungsführenden Teilen des Stromerzeugers und den Erdanschlüssen der
einzelnen Buchsen verbunden. Vor Verwendung des Erdanschlusses muss ein
qualifizierter Elektriker, ein Inspektor für Elektroanlagen oder die für die sich auf
den Verwendungszweck des Generators beziehenden örtlichen Vorschriften und
Bestimmungen zuständige Behörde zu Rate gezogen werden.
Kraftstoffstand kontrollieren und auffüllen
Abb. 2
Verwenden Sie nur Kraftstoffgemisch (1:50). Zum Abmessen der 2-Takt-Ölmenge können Sie
den Kraftstofftankdeckel verwenden.
• Eventuell vorhandene Stromkabel entfernen.
• Stromschalter ausschalten.
• Nicht überfüllen – der Füllstand darf nicht über die Oberseite des Kraftstofffilters
hinausgehen.
• Tankverschluss immer gut festschrauben.
• Eventuell verschütteten Kraftstoff aufwischen.
• Bei Benutzung des Generators nicht rauchen.
Arbeiten Sie immer vorsichtig!
Anlassen des Generators
Abb. 1
• Elektrisches Gerät abklemmen.
• Kraftstoffhahn (10) öffnen.
• Motorschalter (2) einschalten.
• Starterklappenhebel (3) auf "Zu" stellen (um einen warmen Motor neu zu starten, lassen
Sie den Starterklappenhebel in offener oder halb geöffneter Position).
• Langsam an dem Anlasserkabel ziehen, bis es einrastet; anschließend kräftig ziehen, um
den Motor (4) zu starten.
• Lassen Sie den Motor warmlaufen und bewegen Sie anschließend den
Starterklappenhebel in Position "Auf" (3).
• Netzkabel einstecken.
Anhalten des Generators
Abb. 1
• Stecker des elektrischen Geräts ziehen.
• Motorschalter auf "OFF" (2) stellen.
• Kraftstoffhahn (10) schließen.
GB
D
F
E
P
I
RUS
GR
NL
Page 15

Ferm 15
4. SERVICE UND WARTUNG
Periodische Wartung
Täglich (Kontrolle vor dem Betrieb)
• Kraftstoffschlauch auf Risse oder andere Schäden kontrollieren. Ggf. erneuern.
• Starterklappenfunktion kontrollieren.
• Rückstoßanlasserfunktion kontrollieren.
1. Monat oder nach 50 Stunden
• Zustand der Zündkerze kontrollieren. Elektrodenabstand einstellen und reinigen. Ggf.
erneuern.
Nach 3 Monaten oder 150 Stunden
• Luftfilter reinigen. Ggf. erneuern.
• Kraftstofffilter reinigen. Ggf. erneuern.
• Auspuff reinigen (entrußen). Ggf. erneuern.
Service – Wartungshinweise
Zündkerzeninspektion
Abb. 3
• Zündkerzenkappe lösen und eventuell vorhandenen Schmutz aus dem Kerzenbereich
entfernen.
• Zündkerze (11) mit dem mitgelieferten Kerzenschlüssel entfernen.
• Zündkerze überprüfen. Sie sollte eine gelbbraune Farbe aufweisen.
• Elektrodenabstand mit einer geeigneten Lehre messen. Der Abstand sollte 0,7 – 0,8 mm
betragen. Abstand nötigenfalls durch vorsichtiges Verbiegen der seitlichen Elektrode
korrigieren.
• Zündkerze erneuern, wenn die Elektroden abgenutzt sind oder der Isolator geborsten
oder abgeblättert ist.
• Zündkerze vorsichtig von Hand einsetzen, damit das Gewinde nicht ausreißt.
• Zündkerze mit dem richtigen Drehmoment einsetzen: 20 Nm.
• Zündkerzenkappe anbringen.
Luftfilterreinigung
• Luftfilterdeckel (14) abschrauben.
• Filterelement entfernen und gründlich in Lösungsmittel waschen.
• Eine geringe Ölmenge auf das Filterelement gießen und überschüssiges Öl vorsichtig
ausdrücken.
• Filterelement und Luftfilterdeckel erneuern.
Motor nicht ohne eingebautes Filterelement laufen lassen.
Niemals einen nassen Filter (mit Lösungsmittel) am Gerät anbringen.
GB
D
NL
F
E
P
I
RUS
GR
58 Ferm
Топливный вентиль
Рис.4
• Остановите двигатель.
• Закройте топливный вентиль.
• Для снятия фильтра топливного вентиля просто снимите колпачок внизу
топливного бака с помощью походящего гаечного ключа.
• Снимите муфту и маленький фильтр.
• Очистите и вымойте фильтр и колпачок, затем установите обратно.
Топливный фильтр
• Остановите двигатель.
• Снимите колпачок топливного бака.
• Снимите топливный фильтр.
• Очистите и вымойте фильтр в растворителе, затем установите обратно.
Устранение неполадок
Основной контроль
• Убедитесь в достаточном количестве топлива.
• Убедитесь в том, что топливный вентиль включен.
• Убедитесь в том, что включен переключатель двигателя.
• Выньте свечу зажигания, подсоедините провод свечи и заземлите его на генератор
Осторожно потяните пусковой тросик и посмотрите, появилась ли искра. Если она
не появилась, замените свечу.
Свеча зажигания в порядке,но двигатель не запускается
• Проверьте, чист ли фильтр топливного вентиля.
• Проверьте, чист ли бензопровод.
• Проверьте, не засорился ли карбюратор.
Чистка
Регулярно протирайте корпус мягкой тканью, предпочтительно, после каждого
использования. Содержите в чистоте вентиляционные отверстия..
Удаляйте устойчивые загрязнения при помощи мягкой ткани, смоченной в мыльном
растворе. Во избежание повреждения деталей из пластика не допускается
применение таких растворителей как бензин, спирт, аммиачный раствор и т.д.
Смазка
Аппарат не нуждается в дополнительной смазке.
Хранение (долговременное)
• Осушите топливный бак, топливный вентиль, резервуар карбюратора и
карбюратор.
• Налейте 1 чашку масла для двигателя в топливный бак и встряхните генератор для
распределения масла по баку. Вытрите излишки масла.
• Снимите свечу зажигания и налейте 1 ложку масла для двигателя, потяните
пусковой кабель несколько раз с пусковым переключателем в положении OFF
(Выкл). Установите на место свечу зажигания.
GB
D
F
E
P
I
RUS
GR
NL
Page 16

Ferm 57
• Закройте вентиль подачи топлива (10).
4. ЭКСПЛУАТАЦИЯ И ОБСЛУЖИВАНИЕ
Периодическое обслуживание
Ежедневное (проверка подготовки к работе)
• Проверьте топливный шланг на наличие трещин или других повреждений. При
необходимости, замените его.
• Проверьте работу дросселя
• Проверьте работу пускового устройства
После 1-го месяца или через 50 часов работы
• Проверьте состояние свечи зажигания. Отрегулируйте зазор между электродами
и почистите их. Замените при необходимости.
Через 3 месяца или через 150 часов работы
• Почистите воздушный фильтр. При необходимости замените его.
• Почистите топливный фильтр. При необходимости замените его.
• Почистите выхлопную трубу (декарбонизация). При необходимости замените ее.
Сесвисное обслуживание – Примечания по уходу
Проверка свечи зажигания
Рис.3
• Отсоедините крышку свечи зажигания и удалите грязь, накопившуюся вокруг свечи.
• С помощью поставляемого ключа выньте свечу (11).
• Осмотрите свечу. Она должна быть желтовато-коричневого цвета.
• Соответствующим прибором измерьте зазор (расстояние между электродами). Он
должен составлять 0,7-0,8 мм. При необходимости отрегулируйте зазор, осторожно
изгибая боковой электрод.
• Замените электроды при появлении признаков износа или повреждении изоляции.
• Осторожно руками установите свечу, не повредив резьбу.
• Установите свечу с соответствующим моментом: 20 Нм.
• Установите крышку на свечу.
Очистка воздушного фильтра
• Отвинтите крышку воздушного фильтра (14).
• Снимите фильтрующий элемент и хорошо промойте его в растворителе.
• Налейте немного масла на фильтрующий элемент и осторожно выдавите лишнее
масло.
• Установите обратно фильтрующий элемент и крышку воздушного фильтра.
Не запускайте двигатель без установленного воздушного фильтра.
Ни в коем случае не устанавливайте влажный фильтр (с растворителем) на
устройство.
GB
D
NL
F
E
P
I
RUS
GR
16 Ferm
Kraftstoffhahn
Abb. 4
• Motor abstellen.
• Kraftstoffhahn schließen.
• Um den Kraftstoffhahnfilter auszubauen, entfernen Sie die Schale unten am
Kraftstoffhahn mit Hilfe eines Schlüssels.
• Dichtung und kleinen Filter entfernen.
• Filter und Schale reinigen und waschen bzw. erneuern.
Kraftstofffilter
• Motor abstellen.
• Kraftstofftankdeckel entfernen.
• Kraftstofffilter entfernen.
• Filter mit Lösungsmittel reinigen und waschen bzw. erneuern.
Fehlersuche
Grundkontrollen
• Vergewissern Sie sich, dass ausreichend Kraftstoff vorhanden ist.
• Vergewissern Sie sich, dass der Kraftstoffhahn geöffnet "(ON") ist.
• Vergewissern Sie sich, dass der Motorschalter auf "ON" steht.
• Zündkerze entfernen, Zündkerzenkabel anschließen und am Generator erden. Vorsichtig
am Anlasserkabel ziehen und auf Funkenbildung achten. Entstehen keine Funken,
Zündkerze erneuern.
Zündkerze ist OK, doch der Motor läuft nicht an
• Kontrollieren, ob Kraftstoffhahnfilter sauber ist.
• Kontrollieren, ob Kraftstoffleitung sauber ist.
• Kontrollieren, ob Vergaser nicht verstopft ist.
Reinigung
Reinigen Sie das Gehäuse regelmäßig mit einem weichen Tuch, am besten nach jeder
Benutzung. Halten Sie die Belüftungsöffnungen frei von Staub und Schmutz.
Beseitigen Sie hartnäckigen Schmutz mit einem weichen, mit Seifenwasser befeuchteten
Tuch. Verwenden Sie dazu keine Lösungsmittel wie Benzin, Alkohol, Ammoniak usw., da
solche Substanzen die Kunststoffteile beschädigen können.
Schmierung
Das Gerät erfordert keine zusätzliche Schmierung.
Lagerung (langfristig)
• Kraftstofftank, Kraftstoffhahn, Vergasermulde und Vergaser entleeren.
• 1 Becher Motoröl in den Kraftstofftank gießen und den Generator schütteln, damit sich
das Öl im ganzen Tank verteilt. Überschüssiges Öl ablassen.
• Zündkerze entfernen und 1 Esslöffel Motoröl hineingießen, Anlasserkabel mehrmals mit
dem Anlasserschalter in Stellung OFF durchziehen. Zündkerze erneuern.
• Anlasserkabel ziehen, bis Sie die Kompression fühlen, dann stoppen.
• Generator-Außenseite reinigen und mit Rostschutzmittel beschichten.
GB
D
F
E
P
I
RUS
GR
NL
Page 17

Ferm 17
• Generator auf flachen Untergrund legen und mit einem sauberen, trockenen Tuch
abdecken.
Fehler
Sollte beispielsweise nach Abnutzung eines Teils ein Fehler auftreten, dann setzen Sie sich
bitte mit der auf der Garantiekarte angegebenen Serviceadresse in Verbindung. Im hinteren
Teil dieser Anleitung befindet sich eine ausführliche Übersicht über die Teile, die bestellt
werden können.
Umwelt
Um Beschädigung beim Transport zu verhindern, wird das Gerät in einer soliden Verpackung
geliefert, die weitgehend aus wiederverwendbarem Material besteht. Bedienen Sie sich daher
bitte der Optionen für das Recyceln der Verpackung.
Garantie
Lesen Sie die Garantiebedingungen auf der separat beigefügten Garantiekarte durch.
CE KONFORMITÄTSERKLÄRUNG (D)
Wir erklären auf unsere alleinige Verantwortung, dass dieses Produkt folgende Normen oder
Normdokumente erfüllt:
EN12601
entsprechend den Vorschriften:
98/37/EWG, 73/23/EWG, 89/336/EWG, 2002/96/EWG
ab 01-02-2006
ZWOLLE NL
W. Kamphof
Quality department
Unsere Firmenpolitik ist auf ständige Verbesserung unserer Produkte ausgerichtet und wir
behalten uns das Recht vor, die Produktspezifikation ohne vorherige Benachrichtigung zu
ändern.
Ferm BV • Lingenstraat 6 • 8028 PM Zwolle • Niederlande
GB
D
NL
F
E
P
I
RUS
GR
56 Ferm
3. ПРИМЕНЕНИЕ
Перед запуском гдндратора
Заземляющий терминал
Заземляющий терминал генератора подключен к раме генератора,
металлическим не проводящим частям генератора и заземляющим
терминалам отдельных ёмкостей.Перед использованием заземляющего
терминала проконсультируйтесь с квалифицированным электриком,
инспектором Энергонадзора или региональным агентством,имеющим
полную информацию о законах и нормах,распространяющихся на
предполагаемое использование генератора.
Залейтеи проверьте уровень топлива
Рис.2
Используйте только смешанный бензин (1:50). Для определения количества топлива в
двухтактном двигателе можно использовать колпачок топливного бака.
• Отсоедините все силовые кабели.
• Отключите силовые переключатели.
• Не переливайте топливо – не заливайте его выше топливного фильтра.
• Всегда закручивайте колпачок топливного бака.
• Вытрите случайно пролитый бензин.
• Не курите во время работы генератора.
Всегда соблюдайте меры предосторожности!
Запуск генератора
Рис.1
• Отсоедините электроприборы.
• Откройте вентиль подачи топлива (10).
• Включите переключатель двигателя (2).
• Переведите дроссельный рычаг (3) в закрытое положение (для перезапуска
теплого двигателя оставьте дроссельный рычаг в открытом или полуоткрытом
положении).
• Осторожно потяните пусковой тросик до захвата, затем резко запустите двигатель
(4).
• Подождите, пока двигатель не прогреется, а затем переведите дроссельный рычаг
в открытое положение (3).
• Подсоедините силовой кабель.
Остановка генератора
Рис.1
• Обесточьте электроприборы.
• Выключите переключатель (2).
GB
D
F
E
P
I
RUS
GR
NL
Page 18

Ferm 55
Не оставляйте под дождём.
Не позволяйте приближаться посторонним
Шум снаружи
Инструкция по технике безопасности
Люди
• Ни в коем случае не допускайте эксплуатацию данного устройства детьми или
лицами, не ознакомленными с данными инструкциями. Местные законы могут
ограничивать возраст оператора данного устройства.
• Используйте только на улице в условиях хорошей вентиляции. Выхлопной газ
содержит отравляющий угарный газ.
• Обязательно выключайте двигатель перед тем, как заполнить топливный бак или
очистить устройство после заполнения топливного бака.
• Не вдыхайте бензиновые пары.
Электричество
• Не притрагивайтесь к генератору влажными руками.
• Не эксплуатируйте генератор во влажных условиях.
• Не эксплуатируйте генератор возле воды.
• Ни в коем случае не соединяйте два генератора вместе.
• Ни в коем случае не подключайте генератор к какому-либо коммерческому
источнику энергии.
• Убедитесь в том, что удлинители используются в безопасных условиях и имеют
достаточную емкость для выполняемой задачи.
• Убедитесь в том, что загрузка генератора соответствует емкости, указанной на
табличке, перед тем, как подключить какой-либо кабель.
Опасность возгорания и ожога
• Выхлопная система нагревается настолько сильно, что может воспламенить
некоторые материалы.
• во время работы генератор должен находиться на расстоянии минимум 1 метр
от строений и другого оборудования.
• храните горючие материалы вдали от генератора.
• Во время работы выхлопная система сильно нагревается и остается горячей в
течение некоторого времени после остановки двигателя.
• перед хранением в помещении двигатель генератора необходимо охладить.
• не притрагивайтесь руками к горячей выхлопной трубе.
• Бензин является крайне легковоспламеняемым веществом и при определенных
условиях может взорваться. Не курите и не допускайте возникновения искр или
огня во время заправки генератора или в месте хранения бензина.
• Бензиновые пары легковоспламеняемы и могут загореться после запуска
двигателя. Проверьте и вытрите пролитый бензин перед запуском генератора.
GB
D
NL
F
E
P
I
RUS
GR
18 Ferm
GENERATOR FGG-1100 (2-TAKT)
De nummers in de nu volgende tekst verwijzen naar de afbeeldingen op pag. 2 - 5.
Voor uw eigen veiligheid en die van anderen raden wij u aan deze
gebruikershandleiding zorgvuldig door te lezen, voordat u dit apparaat in gebruik
neemt. Hierdoor zult u het functioneren van het apparaat beter begrijpen en kunt u
onnodige risico’s voorkomen. Bewaar deze gebruikershandleiding en de overige
documentatie bij het apparaat.
Introductie
De Generator is bedoeld voor het opwekken van elektriciteit met behulp van een 2-slag
benzinemotor. Met deze machine kunt u nu uw elektrische gereedschappen ook gebruiken op
plaatsen waar geen elektriciteit is.
Inhoud
1. Machinegegevens
2. Veiligheidsinstructies
3. Gebruik
4. Service & onderhoud
1. MACHINEGEGEVENS
Technische specificaties
Generator
Spanning 230 V
Frequentie 50 Hz
Nominaal uitgangsvermogen 650 W
Nominale stroom 3,2 A
Max. invoervermogen van app.:
Lamp 650 W
Elektrische gereedschappen 570 W
TL-lamp 480 W
Gereedschapsklasse I
Gewicht 19,7 kg
Afmetingen 400 x 350 x 340 mm
Geluidsniveau 91 dB(A)
Motor
Type Luchtgekoelde
2-takt benzinemotor
Cilinderplaatsing Gekanteld, 1 cilinder
Slagvolume 63 cm
3
Werking 6 uur
GB
D
F
E
P
I
RUS
GR
NL
Page 19

Ferm 19
Waarschuwing! Sluit geen gevoelige elektronische apparatuur (zoals een tv of een
laptop) aan op deze generator, wegens mogelijke hoge voltagepieken.
Benaming onderdelen
Afb. 1
1. Benzinedop
2. Aan-/uitschakelaar
3. Choke
4. Startkoord
5. Wisselstroomstekkerbus
6. Wisselstroombeveiliging
7. Rubber
8. Brandstoftank
9. Handgreep
10. Brandstofafsluiter
11. Ontstekingsbougie
12. Uitlaat
13. Aardklem
14. Luchtfilterdeksel
2. VEILIGHEIDSVOORSCHRIFTEN
Symbolenlijst
In deze handleiding en/of op de machine worden de volgende pictogrammen gebruikt:
Lees de gebruiksaanwijzing
CE Conform de Europese toepasselijke standaards op het gebied van veiligheid
Gevaar voor lichamelijk letsel of materiële schade wanneer de instructies in deze
handleiding niet worden opgevolgd
Gevaar voor elektrische schok
Risico van hoge temperaturen. Opgelet! Op de generator zijn enkele delen die
hoge temperaturen kunnen bereiken.
Brandstof Mengsmering
Inhoud brandstoftank 4,0 L
Type ontstekingsbougie F6RTC
Contactpuntafstand ontsteking 0,7 – 0,8 mm
GB
D
NL
F
E
P
I
RUS
GR
54 Ferm
Предупреждение! Не подключайте к этому генератору чувствительные электронные
приборы (например, телевизоры или ноутбуки) из-за возможного большого колебания
напряжения.
Компоненты
Рис.1
1. Колпачок топливного бака
2. Выключатель
3. Дроссельный рычаг
4. Пусковое устройство
5. Гнездо переменного тока
6. Устройство токовой защиты
7. Резина
8. Топливный бак
9. Рукоятка
10. Топливный вентиль
11. Свежа зажигания
12. Выхлопная система
13. Зажим заземления
14. Крышка воздушного фильтра
2. ИНСТРУКЦИЯ ПО ТЕХНИКЕ БЕЗОПАСНОСТИ
Перечеень обозначеий
В этой инструкции и/или на самом инструменте применяются следующие обозначения:
Прочитайте инструкции
Соответствии с основными действующими стандартами европейских
директив по безопасности
Существует опасность получения материального ущерба и/или телесных
повреждений
Вероятность поражения электрическим током
Риск высоких температур. Предупреждение: устройство состоит из
деталей, некоторые из которых могут нагреваться до крайне высокой
температуры
Топливо Бензиновая смесь
Емкость топливного бака 4,0 л
Тип свечи зажигания F6RTC
Расстояние между контактами 0,7 - 0,8 мм
GB
D
F
E
P
I
RUS
GR
NL
Page 20

Ferm 53
ГЕНЕРАТОР FGG-1100 (С ДВУХТАКТНЫМ ДВИГАТЕЛЕМ)
Для обеспечения безопасной для вас и окружающих эксплуатации
инструмента перед применением данного устройства внимательно
прочитайте настоящую инструкцию.Это облегчит ознакомление с
особенностями использования инструмента и позволит избежать
ненужного риска.Сохраните эту инструкцию для дальнейшего
использования.
Введение
Генератор предназначен для выработки электроэнергии с помощью двухтактного
бензинового двигателя. Теперь вы можете использовать электроинструменты
независимо от того, подведено ли к данному участку электричество.
Содржание
1. Информация об изделии
2. Инструкция по технике безопасности
3. Применение
4. Эксплуатация и обслуживание
1. ИНФОРМАЦИЯ ОБ ИЗДЕЛИИ
Тежнические характеристики
Генератор
Номинальное напряжение 230 В
Номинальная частота 50 Гц
Номинальная производительность 650 ВА
Номинальный ток 3,2 А
Макс. входная мощность аппаратуры
Лампа 650 Вт
Электроинструменты 570 Вт
Люминесцентная лампа 480 Вт
Класс инструмента I
Масса 19,7 кг
Габаритные размеры 400x350x340 мм
Шум снаружи 91 дБ (А)
Двигатель
Тип Двухтактный бензиновый
с воздушным охлаждением
Расположение цилиндра Наклонный, 1 цилиндр
Рабочий объем 63 см3
Время работы 6 часов
GB
D
NL
F
E
P
I
RUS
GR
20 Ferm
Niet gebruiken in de regen
Houd omstanders op afstand
Geluidsoverlast
Specifieke veiligheidsinstructies
Persons
• Laat kinderen en volwassenen die niet bekend zijn met deze instructies en voorschriften
nooit gebruik maken van dit apparaat. De toegestane leeftijd van de gebruiker is
afhankelijk van de lokale voorschriften.
• Gebruik dit apparaat alleen buiten en met een goede ventilatie. De uitlaatgassen bevatten
het giftige koolmonoxide.
• Stop de motor voordat u de benzinetank bijvult en maak na het tanken de machine
schoon.
• Inhaleer nooit benzinedampen.
Elektriciteit
• Raak de generator niet aan met natte handen.
• Gebruik de generator niet bij regen of onder vochtige omstandigheden.
• Gebruik de generator niet in de buurt van water.
• Sluit nooit twee generatoren op elkaar aan.
• Sluit de generator nooit aan op een stopcontact van het commerciële
elektriciteitsnetwerk.
• Controleer of eventuele verlengsnoeren veilig zijn en berekend op hun taak.
• Controleer voordat u snoeren en kabels aansluit of de belasting van de generator binnen
de in de tabel gespecificeerde grenswaarden blijft.
Gevaar van vuur en brand
• Het uitlaatsysteem wordt zó heet, dat sommige materialen door de hitte kunnen
ontbranden:
• houd tijdens het gebruik de generator op tenminste 1 meter afstand van gebouwen en
andere apparatuur.
• houd ontvlambare materialen uit de buurt van de generator.
• Tijdens het gebruik wordt de uitlaat erg heet. Hij blijft ook na het stoppen van de motor nog
geruime tijd heet:
• laat de motor afkoelen voordat u de generator binnenshuis opbergt.
• raak een hete uitlaat niet aan met uw handen.
• Benzine is onder bepaalde omstandigheden zeer licht ontvlambaar en explosief. Rook
niet in de omgeving van de generator en op plekken waar benzine staat opgeslagen en
zorg ook dat er geen vlammen of vonken zijn.
• Benzinedampen zijn zeer licht ontvlambaar en kunnen na het starten van de motor vlam
vatten. Zorg ervoor dat eventueel gemorste brandstof wordt opgenomen voordat u de
generator start.
GB
D
F
E
P
I
RUS
GR
NL
Page 21

Ferm 21
3. GEBRUIK
Voordat u de generator start
Klem voor de massaverbinding
De klem voor de massaverbinding van de generator wordt verbonden met het
frame van de generator, de metalen niet-geleidende onderdelen van de generator
en de klemmen voor de massaverbinding van elk reservoir.
Voordat u klem voor de massaverbinding gebruikt, dient u contact op te nemen
met een gekwalificeerde elektricien, elektriciteitsdeskundige of plaatselijke
instantie die rechtsbevoegdheid heeft om plaatselijke regels of verordeningen die
van toepassing zijn op het gebruik van de generator op te vragen.
Controleer het brandstofpeil en vul zonodig bij
Afb. 2
Gebruik uitsluitend mengsmering (1:50). U kunt de benzinedop gebruiken om de hoeveelheid
olie meten.
• Koppel alle stroomdraden af
• Zet de aan-/uitschakelaars op Uit
• Gooi niet te veel benzine in de tank – zorg ervoor dat er nog wat lucht onder de dop overblijft
• Schroef de benzinedop altijd goed vast
• Neem gespilde benzine direct op
• Tijdens het gebruik van de generator mag er niet worden gerookt
Wees voorzichtig bij alles wat u doet!
De generator starten
Afb. 1
• Koppel alle elektrische apparatuur af
• Draai de brandstofafsluiter open (10).
• Zet de motorschakelaar aan (2).
• Zet de choke (3) in de gesloten positie (om een warme motor opnieuw te starten, zet u de
choke open of half open).
• Trek langzaam aan de starterkabel tot u bij het omslagpunt bent en geef dan een flinke ruk
om de motor te starten (4).
• Laat de motor eerst goed lopen tot hij helemaal opgewarmd is en zet de choke daarna
open (3).
• Plug de stroomkabel in.
De generator stoppen
Afb. 1
• Koppel alle elektrische apparatuur af
• Zet de schakelaar op “UIT” (2)
• Draai de brandstofafsluiter dicht (10)
GB
D
NL
F
E
P
I
RUS
GR
52 Ferm
Riparazioni e commercianti
Se si presentano problemi a causa di, per esempio, usuradi una parte della sega, si prega di
contattare il servizio diassistenza all'indirizzo riportato sulla scheda di garanzia.
Ambiente
Per evitare che si danneggi durante il trasporto, la macchina è imballata in un contenitore
resistente. La maggior parte dei componenti dell'imballaggio sono riciclabili. Portare tali
materiali presso gli appositi centri di riciclaggio.
Garanzia
Si prega di leggere le condizioni di garanzia sulla carta di garanzia che è inclusa.
CE DICHIARAZIONE DI CONFORMITÀ (I)
Dichiariamo, assumendo la piena responsabilità di tale dichiarazione, che il prodotto è
conforme alle seguenti normative ai relativi documenti:
EN12601
conforme alle direttive:
98/37/CEE, 73/23/CEE, 89/336/CEE, 2002/96/CEE
dal 01-02-2006
ZWOLLE NL
W. Kamphof
Ufficio Qualità
La nostra politica è sempre volta a migliorare i nostri prodotti . Prodotti soggetti a modifiche
senza preavviso.
Ferm BV • Lingenstraat 6 • 8028 PM Zwolle • Olanda
GB
D
F
E
P
I
RUS
GR
NL
Page 22

Ferm 51
Tappo del carburante
Fig. 4
• Fermare il motore
• Chiudere il tappo del carburante
• Per rimuovere il filtro del tappo del carburante, rimuovere la coppa in fondo al tappo del
carburante con l’aiuto di una chiave
• Rimuovere la guarnizione e il filtro piccolo
• Pulire e sciacquare il filtro e la coppa e riposizionarli.
Filtro del carburante
• Fermare il motore
• Rimuovere il tappo del carburante
• Rimuovere il filtro del carburante
• Pulire e sciacquare il filtro con un solvente e riposizionarlo.
In caso di guasti
Controlli di base
• Assicurarsi di avere abbastanza carburante
• Assicurarsi che il tappo del carburante sia aperto ("APERTO").
• Assicurarsi che l’interruttore del motore sia acceso
• Rimuovere la candela, collegare il filo della candela e collegarlo a terra al generatore.
Tirare il cavo del motorino d’avviamento e cercare la scintilla. Se non c’è scintilla,
sostituire la candela.
La candela è OK, ma il motore ancora non parte
• Controllare che il filtro del tappo del carburante sia pulito
• Controllare che il tubo di alimentazione sia pulito
• Controllare che il carburatore non sia intasato
Pulizia
Pulire la carcassa regolarmente con un panno morbido, preferibilmente prima d’ogni uso.
Eliminare polvere e sporco dalle prese di ventilazione. Togliere lo sporco ostinato con uno
straccio morbido, inumidito con acqua saponata. Non usare solventi come petrolio, alcool,
ammoniaca, ecc. perché questi potrebbero danneggiare i componenti di plastica.
Lubrificazione
Questo apparecchio non ha bisogno d’extra lubrificazione.
Conservazione (a lungo termine)
• Svuotare il serbatoio, il tappo per il carburante, la ciotola del carburatore e il carburatore.
• Versare una coppa d’olio da motore nel serbatoio e scuotere il generatore per spargere
l’olio in tutto il serbatoio. Svuotare l’olio in eccesso.
• Rimuovere la candela d’accensione e versarvi 1 cucchiaio di olio da motore, tirare il filo
d’accensione diverse volte con l’interruttore d’accensione spento. Sostituire la candela
di accensione
• Tirare il filo d’accensione finché non si sente compressione e fermarsi.
• Pulire i generatori esteriori e di rivestimento con un prodotto antiruggine.
• Posizionare il generatore su un piano e coprirlo con un panno asciutto e pulito.
GB
D
NL
F
E
P
I
RUS
GR
22 Ferm
4. SERVICE & ONDERHOUD
Periodiek onderhoud
Dagelijks (controles vóór gebruik)
• Controleer de brandstofslang op barsten, scheuren of andere beschadigingen. Vervang
indien nodig.
• Controleer of de choke goed werkt
• Controleer of de terugloopstarter goed werkt
1e maand of 50 uur
• Controleer de ontstekingsbougie. Herstel de opening en maak schoon. Vervang indien
nodig.
3 maanden of 150 uur
• Maak het luchtfilter schoon. Vervang indien nodig.
• Maak het brandstoffilter schoon. Vervang indien nodig.
• Maak de uitlaat schoon (ontkoling). Vervang indien nodig.
Service – opmerkingen over onderhoud
Inspectie ontstekingsbougie
Afb. 3
• Verwijder de dop van de ontstekingsbougie en maak het gebied om de
ontstekingsbougie goed schoon.
• Verwijder de ontstekingsbougie (11) met de bijgeleverde bougiesleutel.
• Inspecteer de ontstekingsbougie. Deze moet geelbruin van kleur zijn.
• Meet de opening (afstand tussen contactpunten) met een geschikt meetapparaat. De
opening moet 0,7 - 0,8 mm zijn. Corrigeer zonodig de opening door de zijelektrode
voorzichtig om te buigen.
• Vervang de ontstekingsbougie als de elektroden versleten zijn of als de isolator
gescheurd of gebarsten is.
• Installeer de ontstekingsbougie voorzichtig met de hand om kortsluiting te voorkomen.
• Plaats de ontstekingsbougie met het juiste koppel: 20 Nm.
• Breng de dop van de ontstekingsbougie weer aan.
Schoonmaken luchtfilter
• Draai de deksel van het luchtfilter open (14).
• Verwijder het filterelement en was het goed af in een oplosmiddel.
• Giet een klein beetje olie op het filterelement en verwijder alle overtollige olie.
• Zet het filterelement en het luchtfilterdeksel weer op hun plaats.
Laat de motor nooit draaien zonder luchtfilterelement.
Plaats nooit een nat filter (met oplosmiddel) op de machine.
GB
D
F
E
P
I
RUS
GR
NL
Page 23

Ferm 23
Brandstofafsluiter
Afb. 4
• Stop de motor
• Sluit de brandstofafsluiter
• Om het brandstofafsluiterfilter te verwijderen, draait u het bakje onderaan de benzinetank
los met een steeksleutel
• Verwijder het verbindingsstuk en het kleine filter
• Maak het filter en het bakje goed schoon en plaats ze weer terug.
Brandstoffilter
• Stop de motor
• Verwijder de benzinedop
• Verwijder het brandstoffilter
• Was het filterelement goed af in een oplosmiddel en plaats het weer terug.
Problemen oplossen
Basiscontroles
• Zorg dat er voldoende brandstof is
• Zorg dat de brandstofafsluiter open staat
• Zorg dat de motorschakelaar AAN staat
• Verwijder de ontstekingsbougie, sluit de voedingsdraad van de ontstekingsbougie aan
en aard hem op de generator. Trek voorzichtig aan het startkoord en kijk of er een vonk is.
Als er geen vonk is, vervang dan de ontstekingsbougie.
Ontstekingsbougie is OK, maar motor wil toch niet starten
• Controleer of het filter van de brandstofafsluiter schoon is
• Controleer of de brandstofleiding niet is verstopt
• Controleer of de carburator niet verstopt is geraakt
Reinigen
Reinig de machinebehuizing regelmatig met een zachte doek, bij voorkeur iedere keer na
gebruik. Gebruik bij hardnekkig vuil een zachte doek bevochtigd met zeepwater. Gebruik
geen oplosmiddelen als benzine, alcohol, ammonia, etc. Dergelijke stoffen beschadigen de
kunststof onderdelen.
Smeren
De machine heeft geen extra smering nodig.
Opslag (langdurig)
• Tap de benzinetank, brandstofafsluiter, carburatorbak en carburator af
• Giet 1 kopje motorolie in de benzinetank en schud de generator om de olie over de tank te
verspreiden. Laat overtollige olie weglopen.
• Verwijder de ontstekingsbougie en laat 1 theelepel motorolie in de opening lopen; zorg
dat de startschakelaar op UIT staat en trek een aantal malen aan het startkoord. Draai de
ontstekingsbougie weer terug.
• Trek aan het startkoord tot u compressie voelt en stop.
• Maak de buitenkant van de generator schoon en spuit er een laagje anti-corrosiemiddel
op.
GB
D
NL
F
E
P
I
RUS
GR
50 Ferm
4. SERVIZIO & MANUTENZIONE
Manutenzione periodica
Giornalmente (controllo pre-funzionamento)
• Controllare che nel tubo del carburante non ci siano spaccature o altri danni. Sostituire se
necessario.
• Controllare il funzionamento della bobina di arresto
• Controllare il funzionamento del motorino d’avviamento con contraccolpo
Primo mese o 50 ore
• Controllare la condizione della candela. Regolare la distanza e pulire. Sostituire se
necessario.
3 mesi o 150 ore
• Pulire il filtro dell’aria. Sostituire se necessario.
• Pulire il filtro del carburante. Sostituire se necessario.
• Pulire lo scappamento (decarbonizzazione). Sostituire se necessario.
Servizio – note sulla manutenzione
Controllo della candela
Fig. 3
• Scollegare il tappo della candela e rimuovere lo sporco attorno alla zona della candela.
• Rimuovere la candela (11) con la chiave in dotazione.
• Controllare la candela. Dovrebbe essere color marrone chiaro.
• Misurare la distanza (distanza dal punto di contatto) con un metro adatto. La distanza
dovrebbe essere 0,7 – 0,8 mm. Correggere la distanza, se necessario, piegando
attentamente l’elettrodo laterale.
• Sostituire la candela se gli elettrodi sono logori o se l’isolante è spaccato o scheggiato.
• Installare attentamente la candela, a mano, per evitare che la filettatura si rovini.
• Posizionare la candela con una coppia di torsione corretta: 20 Nm.
• Attaccare il tappo della candela.
Pulizia del filtro dell’aria
• Svitare la copertura del filtro dell’aria (14).
• Rimuovere l’elemento filtrante e lavarlo bene in un solvente.
• Versare una piccola quantità di olio nell’elemento filtrante e spremere delicatamente l’olio
in eccesso.
• Riposizionare l'elemento filtrante e la copertura del filtro dell'aria.
Non azionare il motore se l’elemento filtrante dell’aria non è in posizione.
Non mettere mai un filtro bagnato (con solvente) sulla macchina.
GB
D
F
E
P
I
RUS
GR
NL
Page 24

Ferm 49
3. USO
Prima di avviare il generatore
Terminale di terra
Il terminale di terra è collegato al telaio del generatore, alle parti metalliche non
destinate al trasporto di corrente e ai terminali di terra di ogni presa elettrica.Prima
di usare il terminale di terra, consultare un elettricista qualificato, un collaudatore di
impianti o un'agenzia locale che dispongano delle normative o delle ordinanze
previste per l'uso del generatore.
Riempire e controllare il livello del carburante
Fig. 2
Usare solo benzina mista (1:50). Si può usare il tappo del carburante per misurare la quantità
dell’olio a 2 tempi.
• Rimuovere tutti i cavi di alimentazione
• Spegnere gli interruttori
• Non riempire troppo – non riempire al di sopra della superficie del filtro del carburante
• Riavvitare sempre il tappo del carburante
• Pulire il carburante fuoriuscito
• Non fumare mentre si aziona il generatore
Essere sempre prudenti!
Avviare il generatore
Fig. 1
• Disconnettere il sistema elettrico
• Aprire il tappo del carburante (10).
• Accendere l’interruttore del motore (2).
• Spostare la leva della bobina di arresto (3) sulla posizione chiuso (per riavviare a motore
caldo, lasciare la leva della bobina di arresto sulla posizione aperto o semi-aperto).
• Tirare lentamente il cavo del motorino d’avviamento finchè non si innesta, quindi tirare
nettamente per avviare il motore (4).
• Lasciar andare il motore finchè si scalda e quindi spostare la leva della bobina di arresto
sulla posizione aperto (3).
• Collegare il cavo di alimentazione.
Fermare il generatore
Fig. 1
• Disconnettere il sistema elettrico
• Spegnere l’interruttore (2)
• Chiudere il tappo del carburante (10).
GB
D
NL
F
E
P
I
RUS
GR
24 Ferm
• Plaats de generator op een vlakke ondergrond en bedek hem met een schone droge
doek.
Storingen
Wanneer er zich een storing voordoet, bijvoorbeeld bij slijtage van een onderdeel, neem dan
contact op met het onderhoudsadres op de garantiekaart. Achter in deze handleiding ziet u
een opengewerkte afbeelding van de onderdelen die besteld kunnen worden.
Milieu
Om transportbeschadiging te voorkomen, wordt de machine in een stevige verpakking
geleverd. De verpakking is zo veel mogelijk gemaakt van recyclebaar materiaal. Maak daarom
gebruik van de mogelijkheid om de verpakking te recyclen.
Garantie
Lees voor de garantievoorwaarden de garantiekaart achter in deze gebruiksaanwijzing.
CE CONFORMITEITSVERKLARING (NL)
Wij verklaren dat dit product voldoet aan de volgende normen of normatieve documenten:
EN12601
overeenkomstig de bepalingen in de richtlijnen:
98/37/EEG, 73/23/EEG, 89/336/EEG
vanaf 01-02-2006
ZWOLLE NL
W. Kamphof
Quality department
Het is ons beleid om onze producten voortdurend verder te verbeteren en wij behouden ons
daarom het recht voor om zonder voorafgaande berichtgeving de productspecificaties te
wijzigen.
Ferm BV • Lingenstraat 6 • 8028 PM Zwolle • Nederland
GB
D
F
E
P
I
RUS
GR
NL
Page 25

Ferm 25
GÉNÉRATEUR FGG-1100 (2 TEMPS)
Les chiffres du texte suivant correspondent aux illustrations page 2 - 5.
Pour votre sécurité et celle des autres, veuillez lire attentivement ces instructions
avant d’utiliser cet appareil. Cela vous permettra de mieux comprendre votre
produit et d’éviter tout risque inutile. Gardez toujours ce manuel en lieu sûr, pour
une future utilisation.
Introduction
Le Générateur a été conçu pour générer de l'électricité à l'aide d'un moteur 2 temps. Dès lors,
il vous est possible d’utiliser vos appareils électriques en extérieur, malgré l’absence de
réseau électrique.
Contenus
1. Données de la machine
2. Consignes de sécurité
3. Utilisation
4. Service & entretien
1. DONNÉES DE LA MACHINE
Détails techniques
Générateur
Tension nominale 230 V
Fréquence nominale 50 Hz
Puissance de sortie assignée 650 W
Courant nominal 3,2 A
Puissance d’entrée maximale de l’appareil
Lampe 650 W
Outils électriques 570 W
Lampe fluorescente 480 W
Classe d’outil I
Poids 19,7 kg
Dimensions 400 x 350 x 340 mm
Bruits extérieurs 91 dB(A)
Moteur
Type Refroidi par air, 2 temps, essence
Disposition du cylindre Incliné, 1 cylindre
Déplacement 63 cm
3
Durée de fonctionnement 6 heures
GB
D
NL
F
E
P
I
RUS
GR
48 Ferm
Non esporre alla pioggia
Tenere lontani gli astanti
Rumore all’aperto
Istruzioni sulla sicurezza
Persone
• Non permettere che bambini o persone, che non sono pratiche di queste istruzioni, usino
questo apparecchio. Le leggi locali potrebbero porre limiti d’età all’operatore.
• Azionare sempre all’aperto con una buona ventilazione.
• Il gas di scarico contiene monossido di carbonio tossico.
• Fermare sempre il motore prima di riempire il serbatoio del carburante e pulire la
macchina dopo aver riempito il serbatoio del carburante.
• Non inalare vapori dalla benzina.
Elettricità
• Non toccare il generatore con le mani bagnate.
• Non azionare il generatore in condizioni di umidità.
• Non azionare il generatore vicino all’acqua.
• Non collegare mai due generatori insieme.
• Non collegare il generatore ad alcuna presa di corrente commerciale.
• Assicurarsi che le prolunghe utilizzate siano in buone condizioni e abbiano una capacità
sufficiente per lo scopo.
• Assicurarsi che il carico del generatore rientri nella sua capacità come specificato nella
tavola prima di attaccare qualsiasi filo.
Pericoli di incendio e ustione
• Il sistema di scarico si scalda sufficientemente per incendiare alcuni materiali:
• tenere il generatore lontano almeno 1 metro da edifici e altre apparecchiature durante
il funzionamento.
• tenere i materiali infiammabili lontano dal generatore.
• Lo scarico si scalda molto durante il funzionamento e resta caldo per un po’ dopo aver
spento la macchina:
• lasciare raffreddare il motore prima di mettere dentro il generatore.
• non toccare lo scarico caldo con le mani.
• La benzina è estremamente infiammabile ed è esplosiva in certe condizioni. Non fumare o
creare fiamme o scintille dove viene riempito il generatore di carburante o dove viene
conservata la benzina.
• I vapori del carburante sono estremamente infiammabili e possono incendiarsi dopo che
il motore è avviato. Assicurarsi che qualsiasi carburante rovesciato venga asciugato
prima di accendere il generatore.
GB
D
F
E
P
I
RUS
GR
NL
Page 26

Ferm 47
Avvertenza! Non collegare apparecchi elettronici sensibili (come la TV o il
computer portatile) su questo generatore, a causa di possibili picchi di alta
tensione.
Componenti
Fig. 1
1. Tappo del carburante
2. Interruttore acceso/spento
3. Leva della bobina di arresto
4. Motorino d’avviamento con contraccolpo
5. Presa AC
6. Protettore AC
7. Gomma
8. Serbatoio
9. Maniglia
10. Tappo del carburante
11. Candela
12. Scappamento
13. Terminale di messa a terra
14. Copertura del filtro dell’aria
2. ISTRUZIONI SULLA SICUREZZA
Spiegazione dei simboli
In questo manuale e/o sulla macchina sono usati i seguenti simboli:
Legga il manuale di istruzioni
In conformità con gli standard essenziali sulla sicurezza applicabili delle direttive
europee.
Rischio di danni al materiale/o di lesioni fisiche
Rischio di scossa
Rischio di temperature elevate. Attentione: nel generatore ci sono alcune parti che
protrebbero raggiungere temperature elevate.
Carburante Benzina mista
Capacità del serbatoio 4,0 L
Tipo di candela F6RTC
Distanza dal punto di contatto della scintilla 0,7 - 0,8 mm
GB
D
NL
F
E
P
I
RUS
GR
26 Ferm
Avertissement ! Ne connectez jamais d’équipements électroniques sensibles (tels
qu’une télé ou un ordinateur portable) sur ce générateur, car il pourrait générer des
pics de tension élevés.
Caractéristiques
Fig. 1
1. Bouchon du réservoir
2. Interrupteur marche/arrêt
3. Levier d’étrangleur
4. Lanceur à rappel
5. Prise de courant CA
6. Protecteur CA
7. Caoutchouc
8. Réservoir
9. Poignée
10. Robinet de carburant
11. Bougie d’allumage
12. Echappement
13. Borne de terre
14. Carter du filtre à air
2. CONSIGNES DE SECURITE
Explication des symboles
Dans ce manuel et/ou sur la machine, sont utilisés les symboles suivants :
Lire le manuel d’instruction
Conforme aux normes essentielles de sécurité applicables des directives
européennes
Risque de dommages sur le matériel et/ou de lésions corporelles
Risque de choc électrique
Risque de temperature elevees. Attention, à l’interieur du générateur se trouvent
des certaines pièces susceptibles d’atteindre des températures élevées.
Carburant Essence mélangée
Capacité du réservoir 4,0 L
Type de bougie d’allumage F6RTC
Distance de la bougie d'allumage 0,7 – 0,8 mm
GB
D
F
E
P
I
RUS
GR
NL
Page 27

Ferm 27
Ne pas exposer à la pluie
Ne laisser aucun visiteur s’approcher de la zone de travail
Bruits extérieurs
Consignes de sécurité
Personnes
• Ne laissez jamais les enfants ou les personnes inconnues avec ces instructions. Ces
derniers seraient susceptibles d’utiliser l’appareil. Les règlementations locales peuvent
limiter l’âge de l’utilisateur.
• Utilisez toujours l’appareil en extérieur, à un endroit bien aéré. Les gaz d’échappement
contiennent du monoxyde de carbone toxique.
• Eteignez toujours le moteur avant de remplir à nouveau le réservoir et nettoyez la machine
après l’avoir rempli.
• N’inhalez pas les vapeurs d’essence.
Electricité
• Ne touchez en aucun cas le générateur si vous avez les mains mouillées.
• N’utilisez pas le générateur dans un environnement humide ou mouillé.
• N’utilisez pas le générateur à proximité d’eau.
• Ne branchez jamais deux générateurs ensemble.
• Ne branchez jamais le générateur à une prise de courant industrielle.
• Assurez-vous que les câbles prolongateurs utilisés sont en bon état et ont une capacité
suffisante pour le travail qui lui est assigné.
• Veillez à ce que la charge du générateur soit conforme à sa capacité indiquée sur la plaque
signalétique, avant de brancher les câbles.
Risques de brûlures et d’incendies
• Le système d’échappement est assez chaud pour enflammer certains matériaux :
• gardez le générateur à une distance d’au moins 1 mètre des bâtiments et des autres
équipements au cours de l’utilisation de l’appareil.
• gardez les produits inflammables à distance du générateur.
• L’échappement devient très brûlant au cours de l’utilisation et conserve sa chaleur
pendant une longue période après l’arrêt du moteur:
• laissez le moteur refroidir avant de ranger le générateur à l’intérieur.
• ne touchez en aucun cas l’échappement brûlant avec les mains.
• L’essence est extrèmement inflammable et peut exploser sous certaines conditions. Ne
fumez pas, ou ne créez aucune flamme ou étincelle, à proximité du générateur, quand
vous ravitaillez ce dernier en carburant, ou à proximité du lieu de stockage de l’essence.
• Les vapeurs d’essence sont extrèmement inflammables et peuvent s’enflammer lors du
démarrage du moteur. Veillez à nettoyer l’essence renversée avant de démarrer le
générateur.
GB
D
NL
F
E
P
I
RUS
GR
46 Ferm
GENERATORE FGG-1100 (2 TEMPI)
I numeri presenti nel seguente testo si riferiscono alle immagini a pag.2 - 5.
Per la propria sicurezza e per quella degli altri, si prega di leggere attentamente
queste istruzioni prima di utilizzare questo apparecchio. Aiuteranno a capire il
proprio prodotto più facilmente e ad evitare rischi inutili. Conservare questo
manuale d’istruzioni in un posto sicuro per uso futuro.
Introduzione
Il Generatore è progettato per generare elettricità con l’aiuto di un motore a carburante a 2
tempi. Ora si possono usare i propri attrezzi elettrici sul campo nonostante la mancanza di rete
elettrica.
Contenuti
1. Dati della macchina
2. Istruzioni sulla sicurezza
3. Uso
4. Servizio & manutenzione
1. DATI DELLA MACCHINA
Caratteristiche tecniche
Generatore
Tensione nominale 230 V
Frequenza nominale 50 Hz
Potenza nominale 650 W
Corrente nominale 3,2 A
Massima potenza in ingresso del sistema
Lampadina 650 W
Attrezzi elettrici 570 W
Lampadina fosforescente 480 W
Classe dell’attrezzo I
Peso 19,7 kg
Dimensioni 400 x 350 x 340 mm
Livello sonoro 91 dB(A)
Motore
Tipo Raffreddato ad aria a 2 tempi a
benzina
Disposizione dei cilindri Inclinato, 1 cilindro
Cilindrata 63 cm
3
Ore di funzionamento 6 ore
GB
D
F
E
P
I
RUS
GR
NL
Page 28

Ferm 45
Falhas
Se ocorrer alguma falha, por exemplo, devido a desgaste duma peça, contacte o endereço de
assistência indicado no cartão de garantia. No fim deste manual encontra um diagrama de
componentes alargado com as peças que podem ser encomendadas.
Protecção do meio ambiente
Com vista a evitar quaisquer danos de transporte, a máquina é fornecida numa embalagem
resistente, fabricada na medida do possível em materiais recicláveis. Entregue, portanto, a
embalagem para reciclagem.
Garantia
Leia os termos da garantia, que se encontra no cartão de garantia em separado.
CE DECLARAÇÃO DE CONFORMIDADE (P)
Declaramos sob nossa responsabilidade que este produto está em conformidade com as
seguintes normas ou documentos normalizados:
EN12601
de acordo com os regulamentos:
98/37/CEE, 73/23/CEE, 89/336/CEE, 2002/96/CEE
de dal 01-02-2006
ZWOLLE NL
W. Kamphof
Quality department
É nossa política continuarmos a melhorar os nossos produtos e, assim, reservamo-nos o
direito de alterar a especificação do produto sem notificação prévia.
Ferm BV • Lingenstraat 6 • 8028 PM Zwolle • Holanda
GB
D
NL
F
E
P
I
RUS
GR
28 Ferm
3. UTILISATION
Avant de démarrer le générateur
Borne de mise à la terre
La borne de mise à la terre de la génératrice est branchée sur le châssis de la
génératrice, sur les parties métalliques non porteuses de courant de la
génératrice, et sur les bornes de mise à la terre de chaque prise.
Avant d'utiliser la borne de mise à la terre, consultez un électricien qualifié, un
inspecteur de l'électricité ou le bureau local ayant la juridiction pour les règlements
et ordonnances locales applicables à l'utilisation que vous prévoyez de faire de la
génératrice.
Remplissez et vérifiez le niveau de carburant
Fig. 2
Utilisez uniquement l’essence mélangée (1:50). Vous pouvez utiliser le bouchon du réservoir
pour mesurer la quantité de l’huile pour le moteur 2 temps.
• Débranchez les câbles d’alimentation
• Eteignez la machine
• Ne remplissez pas trop le réservoir – ne dépassez pas le haut du filtre du carburant.
• Vissez toujours complètement le bouchon du réservoir
• Nettoyez toute essence renversée
• Ne fumez pas lors de l’utilisation du générateur
Soyez toujours vigilant !
Démarrage du générateur
Fig. 1
• Débranchez les outils électriques.
• Ouvrez le robinet de carburant (10).
• Allumez le moteur à l’aide de l’interrupteur de démarrage (2).
• Mettez le levier d’étrangleur (3) en position fermée (pour redémarrer un moteur déjà
chaud, laissez le levier d’étrangleur en position ouverte ou semi-ouverte).
• Tirez doucement le câble du démarreur jusqu’à l’enclencher, puis tirez-le brusquement
pour démarrer le moteur (4).
• Laissez le moteur fonctionner jusqu’à ce qu’il chauffe, et placez ensuite le levier
d’étrangleur en position ouverte (3).
• Branchez le câble d’alimentation
Arrêt du générateur
Fig. 1
• Débranchez les outils électriques.
• Mettez l'interrupteur sur “ARRÊT“ (2).
• Fermez le robinet de carburant (10).
GB
D
F
E
P
I
RUS
GR
NL
Page 29

Ferm 29
4. SERVICE & ENTRETIEN
Entretien périodique
Quotidien (vérification avant la mise en marche)
• Vérifiez que le tuyau à carburant ne présente aucune fissure ou autre dommage.
Remplacez-le si nécessaire.
• Vérifiez le bon fonctionnement du démarreur.
• Vérifiez le bon fonctionnement du lanceur à rappel.
1er mois ou après 50 heures d’utilisation
• Vérifiez l’état de la bougie d’allumage. Réglez l’écartement et nettoyez la bougie.
Remplacez-la si nécessaire.
3 mois ou après 150 heures d’utilisation
• Nettoyez le filtre à air. Remplacez-le si nécessaire.
• Nettoyez le filtre à carburant. Remplacez-le si nécessaire.
• Nettoyez l’échappement (décalaminage). Remplacez-le si nécessaire.
Révision – remarques sur l’entretien
Vérification de la bougie d’allumage
Fig. 3
• Retirez le capuchon de la bougie, et enlevez la saleté située autour de la bougie
d’allumage.
• Enlevez la bougie d’allumage (11) à l’aide de la clé à bougie fournie.
• Vérifiez la bougie d’allumage. Elle doit être de couleur brune.
• Mesurez l’écartement (distance entre les points de contact) à l’aide d’une cale
d’épaisseur appropriée. L’écartement doit être de 0,7 – 0,8 mm. Corrigez cet écartement,
si nécessaire, en tordant avec précaution l’électrode située sur le côté.
• Remplacez la bougie d’allumage si les électrodes sont usées, ou si l’isolant est fissuré ou
ébréché.
• Montez la bougie d’allumage avec précaution, à la main, afin d’éviter une déformation du
filetage.
• Placez la bougie d’allumage avec le couple de serrage qui convient : 20 Nm.
• Fixez le capuchon de la bougie.
Nettoyage du filtre à air
• Dévissez le carter du filtre à air (14).
• Retirez le filtre et nettoyez-le correctement avec du dissolvant.
• Versez une petite quantité d’huile sur le filtre et extrayez doucement l’excès d’huile.
• Replacez le filtre ainsi que le carter du filtre à air.
Ne faites pas fonctionner le moteur sans avoir mis en place le filtre à air.
Ne placez jamais un filtre mouillé (avec du dissolvant) dans la machine.
GB
D
NL
F
E
P
I
RUS
GR
44 Ferm
Torneira de combustível
Fig. 4
• Pare o motor
• Feche a torneira de combustível
• Para remover o filtro da torneira de combustível, retire o recipiente na parte inferior com a
ajuda de uma chave
• Retire a junta e o pequeno filtro
• Limpe e lave o filtro e o recipiente e coloque novamente.
Filtro do combustível
• Pare o motor
• Retire a tampa do combustível
• Retire o filtro do combustível
• Limpe e lave o filtro com solvente e coloque novamente.
Resolução de problemas
Verificações básicas
• Certifique-se de que existe combustível suficiente
• Certifique-se de que a torneia do combustível está aberta (“ON”)
• Certifique-se de que o interruptor do motor está ligado
• Retire a vela, ligue o cabo da vela e ligue à terra ao gerador. Puxe suaveemen5te o fio de
arranque e procure uma fagulha. Se não existir uma fagulha, substitua a vela.
A vela está OK, mas o motor não arranca
• Verificar se o filtro do combustível está limpo
• Verifique se a conduta de combustível está limpa
• Verifique se o carburador não está entupido
Limpeza
Limpe regularmente o corpo da máquina com um pano macio, de preferência, após cada
utilização. Mantenha as entradas de ventilação livres de poeiras e sujidades. Retire sujidades
mais resistentes com uma pano suave e humedecido com água com detergente. Não utilize
solventes, tais como petróleo, álcool, amónia, etc., uma vez que estas substâncias podem
danificar as peças de plástico.
Lubrificação
O aparelho não necessita de qualquer lubrificação adicional.
Armazenamento (longo prazo)
• Esvazie o depósito de combustível, a torneira de combustível, o recipiente do carburador
e o carburador.
• Coloque um 1 chávena de óleo do motor no depósito de combustível e agite o gerador
para espalhar o óleo pelo depósito. Drene o excesso de óleo.
• Retire as velas e coloque 1 colher cheia de óleo do motor, puxe o fio de arranque várias
vezes com o interruptor na posição OFF (delsigado). Coloque novamente a vela.
• Puxe o fio de arranque até sentir compressão e pare.
• Limpe as camadas exteriores e revestimento do gerador com anti-ferrugem.
• Coloque o gerador num solo plano e cubra-o com um pano limpo e seco.
GB
D
F
E
P
I
RUS
GR
NL
Page 30

Ferm 43
4. SERVIÇO E MANUTENÇÃO
Manutenção periódica
Diária (verificação antes do funcionamento)
• Verificar a mangueira do combustível para identificar fissuras ou outros danos. Substituir,
se necessário.
• Verificar a posição da borboleta
• Verificar o funcionamento do motor de arranque de retorno
1.º Mês ou 50 horas
• Verificar as condições das velas. Ajustar as folgas e limpar. Substituir, se necessário.
3 Meses ou 150 horas
• Limpe o filtro do ar. Substituir, se necessário.
• Limpe o filtro do combustível. Substituir, se necessário.
• Limpe o escape (descarbonização). Substituir, se necessário.
Serviço – notas acerca da manutenção
Inspecção das velas
Fig. 3
• Desligue a tampa das velos e retire qualquer sujidade que esteja alojada em torno da área
das velas.
• Retire a vela (11) com a chave fornecida.
• Inspeccione a vela. Deve ter uma cor acastanhada.
• Meça a folga (distância do ponto de contacto) com um dispositivo adequado. O intervalo
deve ter entre 0,7 - 0,8 mm. Corrija o intervalo, se necessário, dobrando cuidadosamente
o eléctrodo lateral.
• Substitua a vela, se os eléctrodos estiverem desgastados ou se o isolador estiver
rachado ou falhado.
• Instale cuidadosamente a vela, à mão, para evitar o cruzamento das roscas.
• Instale a vela com o binário correcto: 20 Nm.
• Coloque a tampa da vela.
Limpeza do filtro do ar
• Desaperte a cobertura do filtro do ar (14).
• Remova o elemento do filtro e lave bem com solvente.
• Coloque uma pequena quantidade de óleo no elemento do filtro e aperte, suavemente,
qualquer excesso de óleo.
• Substitua o elemento do filtro e a tampa do filtro do ar.
Não coloque o motor em funcionamento sem o elemento do filtro do ar instalado.
Nunca coloque um filtro molhado (com solvente) na máquina.
GB
D
NL
F
E
P
I
RUS
GR
30 Ferm
Robinet de carburant
Fig. 4
• Arrêtez le moteur
• Fermez le robinet de carburant
• Pour retirer le filtre du robinet de carburant, retirez le godet sur la partie inférieure du
robinet de carburant à l’aide d’une clé.
• Retirez le joint et le petit filtre.
• Rincez et nettoyez le filtre et le godet, et replacez ces derniers.
Filtre de carburant
• Arrêtez le moteur
• Retirez le bouchon de réservoir
• Retirez le filtre de carburant
• Rincez et nettoyez le filtre avec du dissolvant, et replacez-le.
Dépannage
Vérifications de base
• Assurez-vous d’avoir rempli le réservoir de carburant
• Assurez-vous que le robinet de carburant soit ouvert (“ON”)
• Assurez-vous que l'interrupteur du moteur soit allumé
• Enlevez la bougie d’allumage, connectez son fil de sortie et le fil terre au générateur. Tirez
doucement le câble du démarreur et cherchez la présence d’une étincelle. Si aucune
étincelle n’est créée, remplacez la bougie d’allumage.
La bougie d’allumage fonctionne correctement, mais le moteur ne démarre toujours pas
• Vérifiez si le filtre du robinet de carburant est propre
• Vérifiez si la canalisation de carburant n’est pas obstruée
• Vérifiez si le carburateur n’est pas obstrué
Nettoyage
Nettoyez régulièrement le carter de la machine à l’aide d’un chiffon doux, de préférence après
chaque utilisation. Veillez à ce que les fentes d’aération soient exemptes de toute traces de
poussière et de saletés. Retirez la saleté difficile à l’aide d’un chiffon doux imbibé d’eau
savonneuse. N’utilisez aucun solvant tel que l’essence, l’alcool, l’amoniac, etc. car de telles
substances peuvent abîmer les pièces en plastique.
Lubrification
L’appareil ne nécessite aucune lubrification supplémentaire.
Stockage (longue période)
• Videz le réservoir, le robinet du carburant, la cuvette du carburateur et le carburateur luimême
• Versez l’équivalent d’un gobelet d’huile de moteur dans le réservoir et agitez le générateur
afin de répandre l’huile dans le réservoir. Videz l’excès d’huile.
• Retirez la bougie d’allumage et versez l’équivalent d’une cuillère d’huile de moteur, tirez
plusieurs fois sur le câble du démarreur avec l’interrupteur de celui-ci sur la position
ARRÊT. Remplacez la bougie d’allumage
GB
D
F
E
P
I
RUS
GR
NL
Page 31

Ferm 31
• Tirez sur le câble du démarreur jusqu’à ce qu’une compression se fasse sentir, puis
arrêtez.
• Nettoyez l’extérieur du générateur et enduisez-le d’un protecteur anti-rouille.
• Placez le générateur sur une surface plane et couvrez-le d’un chiffon propre et sec.
Dysfonctionnements
Veuillez vous adresser au centre de service indiqué sur la carte de garantie en cas d'un
dysfonctionnement, par exemple après l'usure d'une pièce. Vous trouverez, à la fin de ce
manuel, un schéma avec toutes les pièces que vous pouvez commander.
Environnement
Pour éviter les dommages liés au transport, la machine est livré dans un emballage robuste.
L’emballage est autant que possible constitué de matériau recyclable. Veuillez par
conséquent destiner cet emballage au recyclage.
Garantie
Lisez les termes de garantie sur la carte de garantie ci-jointe.
CE DÉCLARATION DE CONFORMITÉ (F)
Nous déclarons sous notre propre responsabilité que ce produit est conforme aux normes et
aux documents normalisés suivants :
EN12601
Conforme aux réglementations :
98/37/CEE, 73/23/CEE, 89/336/CEE, 2002/96/CEE
dès 01-02-2006
ZWOLLE NL
W. Kamphof
Quality department
C’est notre politique d’améliorer continuellement nos produits et par conséquent de réserver
le droit de changer les instructions des produits sans un avis antérieur.
Ferm BV • Lingenstraat 6 • 8028 PM Zwolle • Hollande
GB
D
NL
F
E
P
I
RUS
GR
42 Ferm
3. UTILIZAÇÃO
Antes de iniciar o gerador
Terminal terra
O terminal terra do gerador é ligado ao quadro do gerador, às partes metálicas do
gerador não-portadoras de corrente e aos terminais de terra de cada receptor.
Antes de utilizar o terminal terra, consulte um electricista qualificado, um técnico
de inspecção eléctrica ou um agente local autorizado conhecedor das
regulamentações e normas locais que se aplicam ao uso do gerador.
Abasteça e verifique o nível de combustível
Fig. 2
Utilize apenas gasolina mista (1:50). Pode utilizar a tampa do combustível para medir a
quantidade de óleo de 2 tempos.
• Retire quaisquer fios de alimentação
• Desligue todos os interruptores
• Não abasteça em demasiado – não abasteça acima do topo do filtro de combustível
• Aparafuse sempre a tampa do combustível
• Limpe o combustível derramado
• Não fume durante a utilização do gerador
Tenha sempre cuidado!
Arranque do gerador
Fig. 1
• Desligue os aparelhos eléctricos
• Rode a torneira de combustível (10).
• Ligue o motor (2).
• Movimente a alavanca da borboleta (3) para a posição fechada (para reiniciar um motor
quente, deixe a alavanca da borboleta numa posição aberta ou semi-aberta).
• Puxe lentamente o fio de arranque até engrenar; em seguida, puxe abruptamente para
iniciar o motor (4).
• Permita o funcionamento do motor até aquecer e, em seguida, movimente a alavanca da
borboleta para a posição aberta (3).
• Ligue o fio de alimentação
Parar o gerador
Fig. 1
• Desligue os aparelhos eléctricos
• Coloque o interruptor do motor na posição “OFF” (desligado) (2)
• Desligue a torneira de combustível (10).
GB
D
F
E
P
I
RUS
GR
NL
Page 32

Ferm 41
Não exponha ferramentas à chuva.
Mantenha as pessoas afastadas
Ruído exterior
Instruções de segurança
Pessoas
• Não permita, em circunstância alguma, que crianças ou pessoas não familiarizadas com
estas instruções utilizem este aparelho. Regulamentos locais poderão restringir a idade
mínima de utilização do aparelho.
• Utilize sempre ao ar livre e com boas condições de ventilação. Os gases de escape
contêm monóxido de carbono venenoso.
• Pare sempre o motor antes de abastecer o depósito de combustível e limpe a máquina
depois de abastecer.
• Não inale os gases da gasolina.
Electricidade
• Não toque no gerador se tiver as mãos molhadas
• Não utilize o gerador em condições molhadas.
• Não utilize o gerador nas imediações de água.
• Nunca ligue dois geradores um ao outro.
• Nunca ligue o gerador a qualquer saída de electricidade comercial.
• Certifique-se de que os cabos de extensão são utilizados em situações de segurança e
têm a capacidade suficiente para a tarefa.
• Certifique-se de que a carga do gerador está entre a capacidade especificada no quadro,
antes de ligar quaisquer cabos.
Perigos de incêndios e queimaduras
• O sistema de escape fica quente o suficiente para entrar em combustão com alguns
materiais:
• mantenha o gerador a, pelo menos, 1 metro de distância de quaisquer edifícios e
qualquer equipamento durante o funcionamento.
• mantenha materiais inflamáveis afastados do gerador.
• O escape fica bastante quente durante a utilização e permanece quente durante algum
tempo depois de parar o motor:
• permita que o motor arrefeça antes de armazenar o gerador num espaço fechado.
• não toque na superfície da serra com as mãos.
• A gasolina é extremamente inflamável e explosiva em determinadas condições. Não
fume, nem permita a presença de chamas ou fagulhas sempre que o gerador esteja a ser
abastecido ou perto de armazenamentos de gasolina.
• Os vapores de combustível são extremamente inflamáveis e podem entrar em
combustão depois de ter sido iniciado o motor. Certifique-se de que qualquer
combustível derramado é limpo antes de iniciar o gerador.
GB
D
NL
F
E
P
I
RUS
GR
32 Ferm
GENERADOR FGG-1100 DE 2 TIEMPOS
Los números contenidos en el texto siguiente se refieren a las ilustraciones de la página
2 - 5.
Por su propia seguridad y por la de los demás, le rogamos que lea detenidamente
estas instrucciones antes de utilizar la máquina. Le ayudará a comprender mejor el
funcionamiento su producto y evitar riesgos innecesarios. Guarde este manual de
instrucciones en un lugar seguro por si lo necesita más adelante.
Introducción
El Generador está diseñado para producir electricidad con ayuda de un motor de dos
tiempos. Con él podrá utilizar herramientas eléctricas en el campo sin necesidad de
conectarlas a la red eléctrica.
Contenidos
1. Datos de la máquina
2. Instrucciones de seguridad
3. Instrucciones de uso
4. Reparación y mantenimiento
1. DATOS DE LA MÁQUINA
Especificaciones técnicas
Generador
Tensión nominal 230 V
Frecuencia nominal 50 Hz
Potencia nominal 650 W
Corriente nominal 3,2 A
Potencia máxima de entrada al aparato
Bombilla 650 W
Herramientas eléctricas 570 W
Lámpara fluorescente 480 W
Tipo de herramienta I
Peso 19,7 kg
Dimensiones 400 x 350 x 340 mm
Ruido exterior 91 dBA
Motor
Tipo De gasolina de 2 tiempos con
refrigeración por aire
Disposición de los cilindros Inclinado, 1 cilindro
Desplazamiento 63 cm
3
Horas de funcionamiento 6 horas
GB
D
F
E
P
I
RUS
GR
NL
Page 33

Ferm 33
¡Aviso! No conecte equipos electrónicos delicados (como televisores u
ordenadores portátiles) a este generador, puesto que pueden ocurrir picos de
voltaje.
Características
Fig. 1
1. Tapa del depósito de combustible
2. Interruptor de encendido/apagado
3. Palanca del estrangulador
4. Arrancador de retroceso
5. Toma de CA
6. Protector de sobrecarga de CA
7. Caucho
8. Depósito de combustible
9. Mango
10. Llave del combustible
11. Bujía de encendido
12. Tubo de escape
13. Terminal de tierra
14. Cubierta del filtro de aire
2. INSTRUCCIONES DE SEGURIDAD
Explicación de los símbolos
En este manual o en el equipo se utilizan los siguientes símbolos:
Lea el manual de instrucciones
De acuerdo con las normas de seguridad vigentes de las directivas europeas.
Riesgo de dañar el material o de sufrir heridas.
Riesgo de descarga eléctrica
Riesgo de temperaturas elevadas. ¡Cuidado! En el generador algunas partes
podrían alcanzar temperaturas elevadas.
Combustible Gasolina (mezcla)
Capacidad del depósito de combustible 4,0 L
Tipo de bujía de encendido F6RTC
Distancia de la bujía de encendido 0,7 - 0,8 mm
GB
D
NL
F
E
P
I
RUS
GR
40 Ferm
Aviso! Não ligar equipamento electrónico sensível (tal como uma TV ou
computador portátil) neste gerador, devido a possíveis picos de tensão.
Características
Fig. 1
1. Tampa do combustível
2. Botão ligar/desligar
3. Alavanca da borboleta
4. Motor de arranque de retorno
5. Tomadas de CA
6. Potector de CA
7. Borracha
8. Depósito de combustível
9. Punho
10. Torneira de combustível
11. Vela
12. Escape
13. Terminal de ligação à terra
14. Tampa do filtro do óleo
2. INSTRUÇÕES DE SEGURANÇA
Explicação dos símbolos
Neste manual e/ou na máquina, são utilizados os seguintes símbolos:
Ler o manual de instruções
Em conformidade com as normas de segurança aplicáveis e essenciais das
directivas europeias.
Risco de danos no material e/ ou lesões físicas
Indica risco de choque eléctrico.
Perigo de temperaturas elevadas. Antenção, no gerador existem algumas partes
que poderão atingir temperaturas elevadas.
Combustível Gasolina mista
Capacidade do tanque de combustível 4,0 L
Tipo de velas F6RTC
Distância do ponto de contacto das velas 0,7 – 0,8 mm
GB
D
F
E
P
I
RUS
GR
NL
Page 34

Ferm 39
GERADOR FGG-1100 (2 TEMPOS)
Os números no texto seguinte correspondem às figuras na página 2 - 5.
Para a sua própria segurança e para a segurança dos outros, leia cuidadosamente
estas instruções antes de utilizar este aparelho. Vai ajudá-lo a compreender o
produto mais facilmente e a evitar riscos desnecessários. Guarde este manual de
instruções num local seguro para futuras utilizações.
Introdução
O Gerador foi concebido para gerar electricidade com a ajuda de um motor a combustível de
2 tempos. Agora, pode utilizar as suas ferramentas eléctricas apesar da ausência de um
quadro eléctrico.
Conteúdos
1. Dados da máquina
2. Instruções de segurança
3. Utilização
4. Serviço e manutenção
1. DADOS DA MÁQUINA
Especificação técnica
Gerador
Tensão 230 V
Frequência 50 Hz
Tensão de saída 650 W
Corrente 3,2 A
Potência de entrada máxima do aparelho
Lâmpada 650 W
Ferramentas eléctricas 570 W
Lâmpada fluorescente 480 W
Classe da ferramenta I
Peso 19,7 kg
Dimensões 400 x 350 x 340 mm
Ruído exterior 91 dB (A)
Motor
Tipo Refrigerado a ar, petróleo, 2
| tempos
Disposição dos cilindros Inclinado, 1 cilindro
Disposição 63 cm
3
Horas de funcionamento 6 horas
GB
D
NL
F
E
P
I
RUS
GR
34 Ferm
No exponga el equipo a la lluvia
Mantenga a las demás personas alejadas de la herramienta
Ruido exterior
Instrucciones de seguridad
Personas
• Nunca permita que los niños o gente que no esté familiarizada con estas instrucciones
utilice este equipo. La normativa vigente debe retringir la edad del usuario.
• El equipo puede utilizarse únicamente al aire libre y donde haya buena ventilación. El gas
de escape contiene monóxido de carbono venenoso.
• Pare siempre la máquina antes de llenar el depósito de combustible y límpiela una vez
haya finalizado.
• No inhale los humos emitidos en la combustión de la gasolina.
Electricidad
• No toque el generador con las manos mojadas
• No ponga en marcha el generador en zonas mojadas.
• No ponga en marcha el generador cerca del agua
• Nunca conecte dos generadores juntos.
• Nunca conecte el generador a ninguna toma de corriente comercial.
• Asegúrese de que los cables alargadores se utilizan en condiciones de seguridad y que
tengan capacidad suficiente para llevar a cabo su función.
• Asegúrese de no conectar el generador a elementos que requieran una carga superior a la
que se especifica en la tabla.
Riesgos de incendios y quemaduras
• El sistema de escape se calienta lo suficiente como para prender fuego a determinados
materiales:
• mantenga el generador como mínimo a 1 metro de distancia de los edificios u otros
equipos o instalaciones.
• mantenga los materiales inflamables a una distancia prudencial del generador.
• El escape alcanza temperaturas muy altas durante el funcionamiento del equipo y no
descienden hasta que ha pasado un rato desde que dejó de utilizarse:
• deje que el motor se enfríe antes de guardar el generador en un sitio cubierto.
• no toque el escape caliente con las manos mojadas
• La gasolina es extremadamente inflamable y puede explotar en determinadas
condiciones. No fume, no acerque ninguna llama ni permita que caigan chispas en las
zonas donde se llene el generador de combustible o en las que se almacene la gasolina.
• Los vapores provocados por la combustión son muy inflamables y pueden prenderse una
vez que la máquina ha sido puesta en marcha. Asegúrese de que toda salpicadura de
combustible se haya limpiado antes de poner en marcha el generador.
GB
D
F
E
P
I
RUS
GR
NL
Page 35

Ferm 35
3. INSTRUCCIONES DE USO
Antes de poner en marcha el generador
Terminal de tierra
El terminal de tierra del generador está conectado a la estructura del mismo, a sus
partes metálicas no portadoras de corriente, y a las terminales de tierra de cada
receptáculo. Antes de usar el terminal de tierra, consulte a un electricista
cualificado, a un inspector de electricidad o a una agencia local que tenga
autorización para códigos locales u ordenanzas que apliquen al uso previsto del
generador.
Compruebe y rellene el nivel de combustible
Fig. 2
Utilice únicamente gasolina mezcla (1:50). Puede utilizar la tapa del depósito para medir la
cantidad de aceite para el motor de 2 tiempos.
• Retire los cables de alimentación.
• Coloque los interruptores de alimentación en posición de apagado.
• No lo cargue demasiado (no lo rellene hasta el tope del filtro del combustible).
• Apriete siempre la tapa del depósito de combustible.
• Limpie todas las salpicaduras de combustible.
• No fume mientras esté utilizando el generador.
Sea prudente en todo momento.
Cómo poner en marcha el generador
Fig. 1
• Desconecte los aparatos eléctricos.
• Abra la llave del combustible (10).
• Coloque el interruptor del motor en la posición de encendido (2).
• Coloque la palanca del estrangulador (3) en la posición de cerrado (para volver a poner en
marcha el motor caliente, deje el estrangulador en la posición de abierto o semiabierto).
• Tire lentamente del arrancador hasta que ofrezca resistencia y, a continuación, tire
fuertemente para poner en marcha el motor (4).
• Deje que el motor siga funcionando hasta que se caliente y, a continuación, coloque la
palanca del estrangulador en la posición de abierto (3).
• Enchufe el cable de alimentación.
Cómo parar el generador
Fig. 1
• Desenchufe el aparato eléctrico.
• Coloque el interruptor en la posición de apagado (“OFF”) (2).
• Cierre la llave del combustible (10).
GB
D
NL
F
E
P
I
RUS
GR
38 Ferm
• Retire la bujía de encendido y vierta una cucharada pequeña de aceite de motor, tire del
cable de arranque varias veces con el botón de arranque en la posición de APAGADO.
Cambie la bujía de encendido.
• Tire del cable de arranque hasta que sienta la compresión y pare.
• Limpie el exterior del generador y cúbralo con una sustancia antioxidante.
• Coloque el generador en una superficie plana y cúbralo con una tela limpia y seca.
Averías
Si se presenta una avería, por ejemplo, por el desgaste de una pieza, póngase en contacto
con el proveedor de servicios indicado en la tarjeta de garantía. En el dorso de este manual
encontrará un amplio resumen de las partes de recambio que se pueden ordenar.
Uso egológico
Para prevenir los daños durante el transporte, el aparato ha sido embalado. Dicho embalaje
está hecho, en la medida de lo posible, de material reciclable. Le rogamos, por lo tanto, que
recicle dicho material.
Garantía
Lea las condiciones de la garantía que aparecen en la tarjeta de garantía que se adjunta a este
manual.
CE DECLARACIÓN DE CONFORMIDAD (E)
Declaramos, bajo nuestra única responsabilidad, que este producto cumple las directivas o
documentos normativos siguientes:
EN12601
de acuerdo con las directivas:
98/37/CEE, 73/23/CEE, 89/336/CEE, 2002/96/CEE
del 01-02-2006
ZWOLLE NL
W. Kamphof
Quality department
Es nuestra política mejorar continuamente nuestros productos y por tanto nos reservamos el
derecho a cambiar las características del producto sin previo aviso.
Ferm BV • Lingenstraat 6 • 8028PM Zwolle • Holanda
GB
D
F
E
P
I
RUS
GR
NL
Page 36

Ferm 37
Nunca coloque un filtro mojado (con disolvente) en la máquina.
Llave del combustible
Fig. 4
• Pare la máquina.
• Cierre la llave del combustible.
• Retire el filtro de la llave del combustible y la cubeta de la parte superior ayudándose de
una llave de tuercas.
• Retire la junta y el filtro pequeño.
• Limpie y enjuague tanto el filtro como la cubeta y vuelva a colocarlos.
Filtro de combustible
• Pare la máquina.
• Retire la tapa del depósito de combustible.
• Retire el filtro de combustible.
• Limpie y enjuague el filtro con disolvente y vuelva a colocarlo.
Revisión y reparación
Revisiones básicas
• Asegúrese de que dispone de bastante combustible.
• Asegúrese de que la llave del combustible esté abierta (“ON”).
• Asegúrese de que el interruptor del motor se encuentra en posición de encendido.
• Retire la bujía de encendido, conecte el cable de la bujía y conéctela a tierra a través del
generador. Tire con cuidado del cable de arranque y espere a que salte una chispa. Si no
salta ninguna chispa, cambie la bujía de encendido.
La bujía de encendido funciona correctamente, pero el motor no se pone en marcha
• Compruebe que el filtro de la llave del combustible esté limpio.
• Compruebe que el circuito del combustible no esté obstruido.
• Compruebe que no haya obstrucciones en el carburador.
Limpieza
Limpie la carcasa de forma regular con un paño suave, preferiblemente después de cada uso.
Mantenga las entradas de aire libres de polvo y suciedad. Retire la suciedad incrustada con un
trapo suave humedecido con agua y jabón. No utilice disolventes como gasolina, alcohol,
amoniaco, etc., ya que estas sustancias pueden dañar las piezas de plástico.
Lubricación
El aparato no necesita ser engrasado.
Conservación (a largo plazo)
• Vacíe el depósito del combustible, la llave combustible, la cubeta del carburador y el
carburador.
• Vierta una taza de aceite para el motor en el depósito del combustible y, a continuación,
agite el generador para hacer que el aceite se extienda por todo el depósito. Retire el
aceite sobrante.
GB
D
NL
F
E
P
I
RUS
GR
36 Ferm
4. REPARACIÓN Y MANTENIMIENTO
Mantenimiento periódico
Diariamente (realizar la revisión previa a la puesta en marcha de la máquina)
• Revise el tubo del combustible para detectar posibles grietas o cualquier otro tipo de
desperfecto. Cámbielo si lo considera necesario.
• Revise el funcionamiento del estrangulador.
• Revise el funcionamiento del arrancador de retroceso.
Al primer mes o a las 50 horas
• Revise la condición en que se encuentra la bujía de encendido. Ajuste la distancia y límpiela.
Cámbielo si lo considera necesario.
Al cabo de tres meses o 150 horas
• Limpie el filtro de aire. Cámbielo si lo considera necesario.
• Limpie el filtro de combustible. Cámbielo si lo considera necesario.
• Limpie el tubo de escape (descarbonización). Cámbielo si lo considera necesario.
Reparación – notas sobre el mantenimiento
Revisión de la bujía de encendido
Fig. 3
• Desconecte el casquillo de la bujía de encendido y limpie la suciedad que encuentre
alrededor de ésta.
• Retire la bujía de encendido (11) con la llave de tuercas que se facilita para ello.
• Compruebe en que estado se encuentra la bujía de encendido. Ha de tener color marrón.
• Mida la separación (la distancia con respecto al punto de contacto) con un juego de
galgas apropiado. La separación ha de ser de 0,7 – 0,8 mm. Reajústela, si es necesario,
arqueando cuidadosamente el electrodo lateral.
• Cambie la bujía de encendido si los electrodos están deteriorados o si el aislante presenta
grietas o desperfectos.
• Instale la bujía de encendido cuidadosamente con la mano para que no se estropee la
rosca.
• Coloque la bujía de encendido con el par de torsión correcto: 20 Nm.
• Ajuste el casquillo de la bujía de encendido.
Limpieza del filtro de aire
• Desenrosque la cubierta del filtro de aire (14).
• Retire el elemento del filtro y límpielo a fondo con disolvente.
• Vierta un poco de aceite en el elemento de filtro y deshágase del aceite sobrante
escurriéndolo con sumo cuidado.
• Vuelva a colocar el elemento del filtro y la cubierta del filtro de aire.
No ponga en marcha el motor sin que el elemento del filtro de aire esté en su lugar
correspondiente.
GB
D
F
E
P
I
RUS
GR
NL
 Loading...