

Page 1

Art. No. LTM1004
FCGT-1800/2
www.ferm.com
GB
D
NL
F
E
P
I
USERS MANUAL 03
GEBRAUCHSANWEISUNG 11
GEBRUIKSAANWIJZING 19
MODE D’EMPLOI 27
MANUAL DE INSTRUCCIONES 35
MANUAL DE INSTRUÇÕES 43
MANUALE UTILIZZATI 51
РУКОВОДСТВО ПО ЭКСПЛУАТАЦИИ
59
O¢∏°π∂™ Ã∏™∂ø™ 68
www.ferm.com 0603-31.1
GB Subject to change
D Änderungen vorbehalten
NL Wijzigingen voorbehouden
F Sous réserve de modifications
E Reservado el derecho de
modificaciones técnicas
P Reservado o direito a modificações
I Con riserva di modifiche
RUS Комлания Ferm постоянно
совершенству ет выпускаему ю ею
проедукцию. Позтому в техничесие
характеристики могут вноситься
без предварительного
уведомления.
GR HÚԇ̠ÙÔ ‰Èη›ˆÌ· ·ÏÏ·ÁÒÓ
RUS
GR
Page 2
Ferm 79
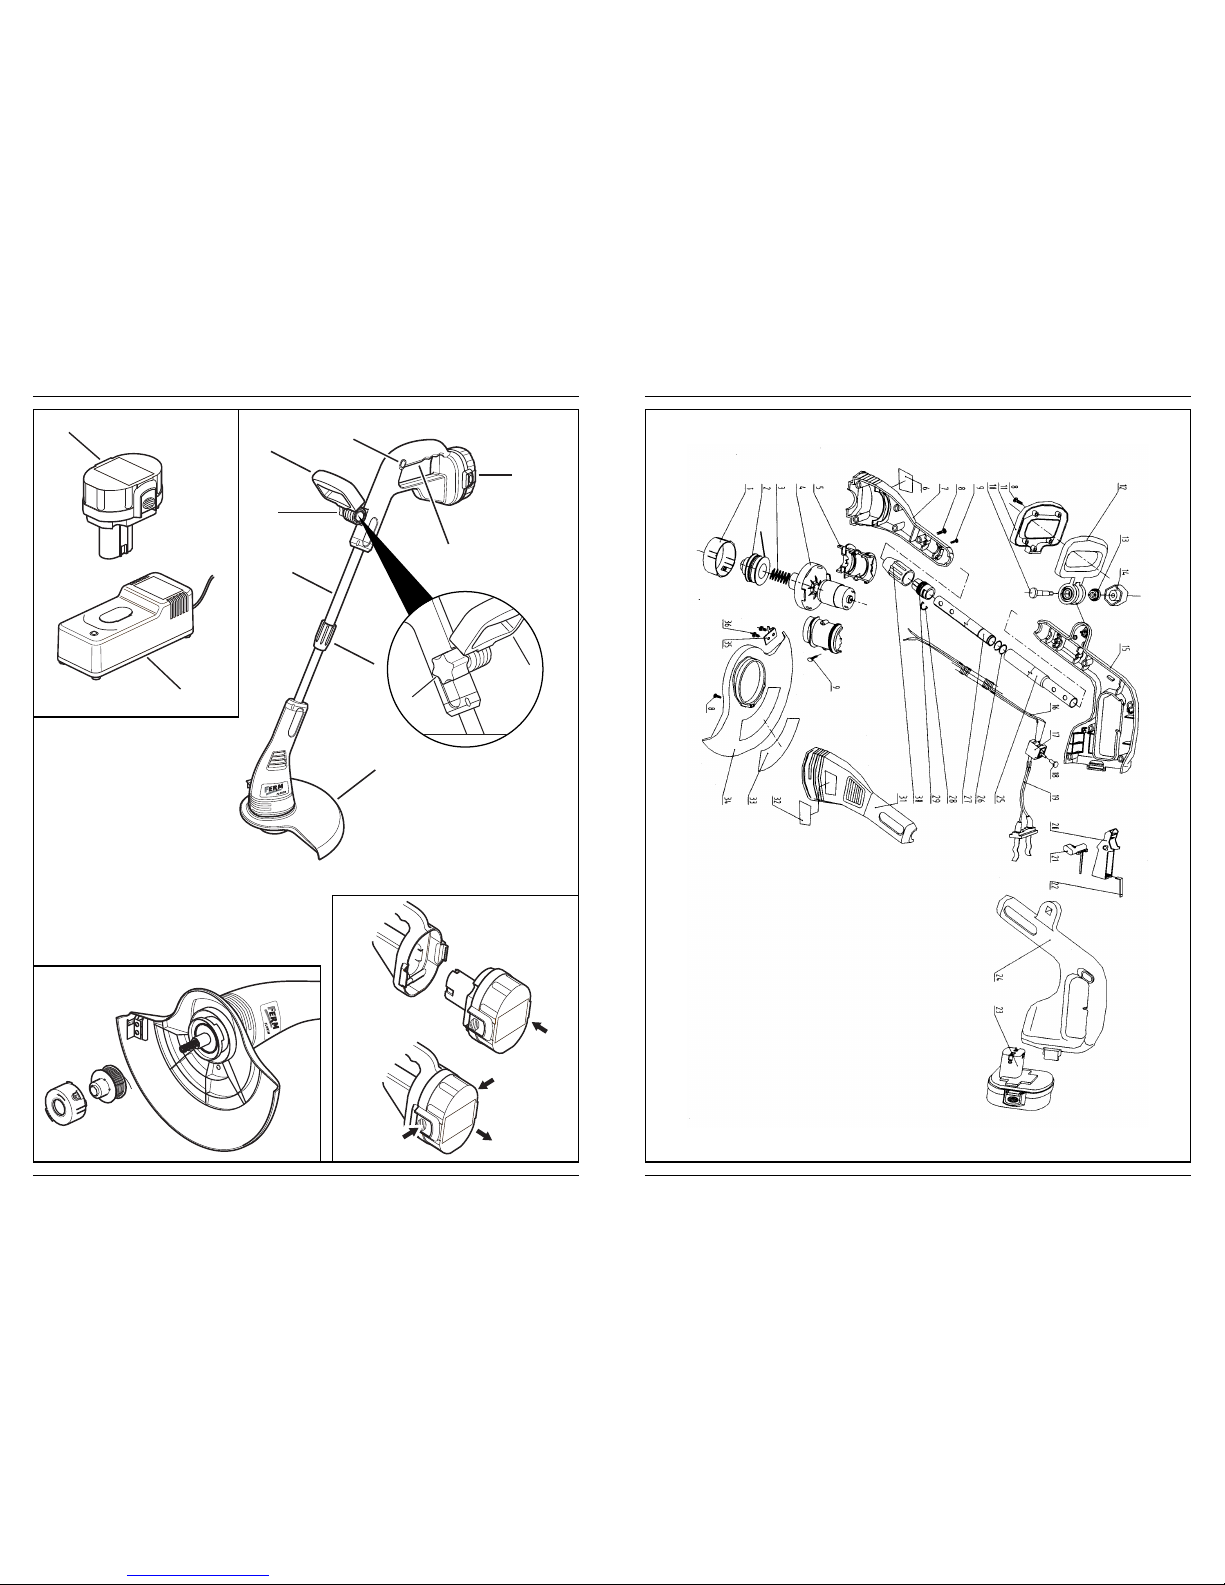
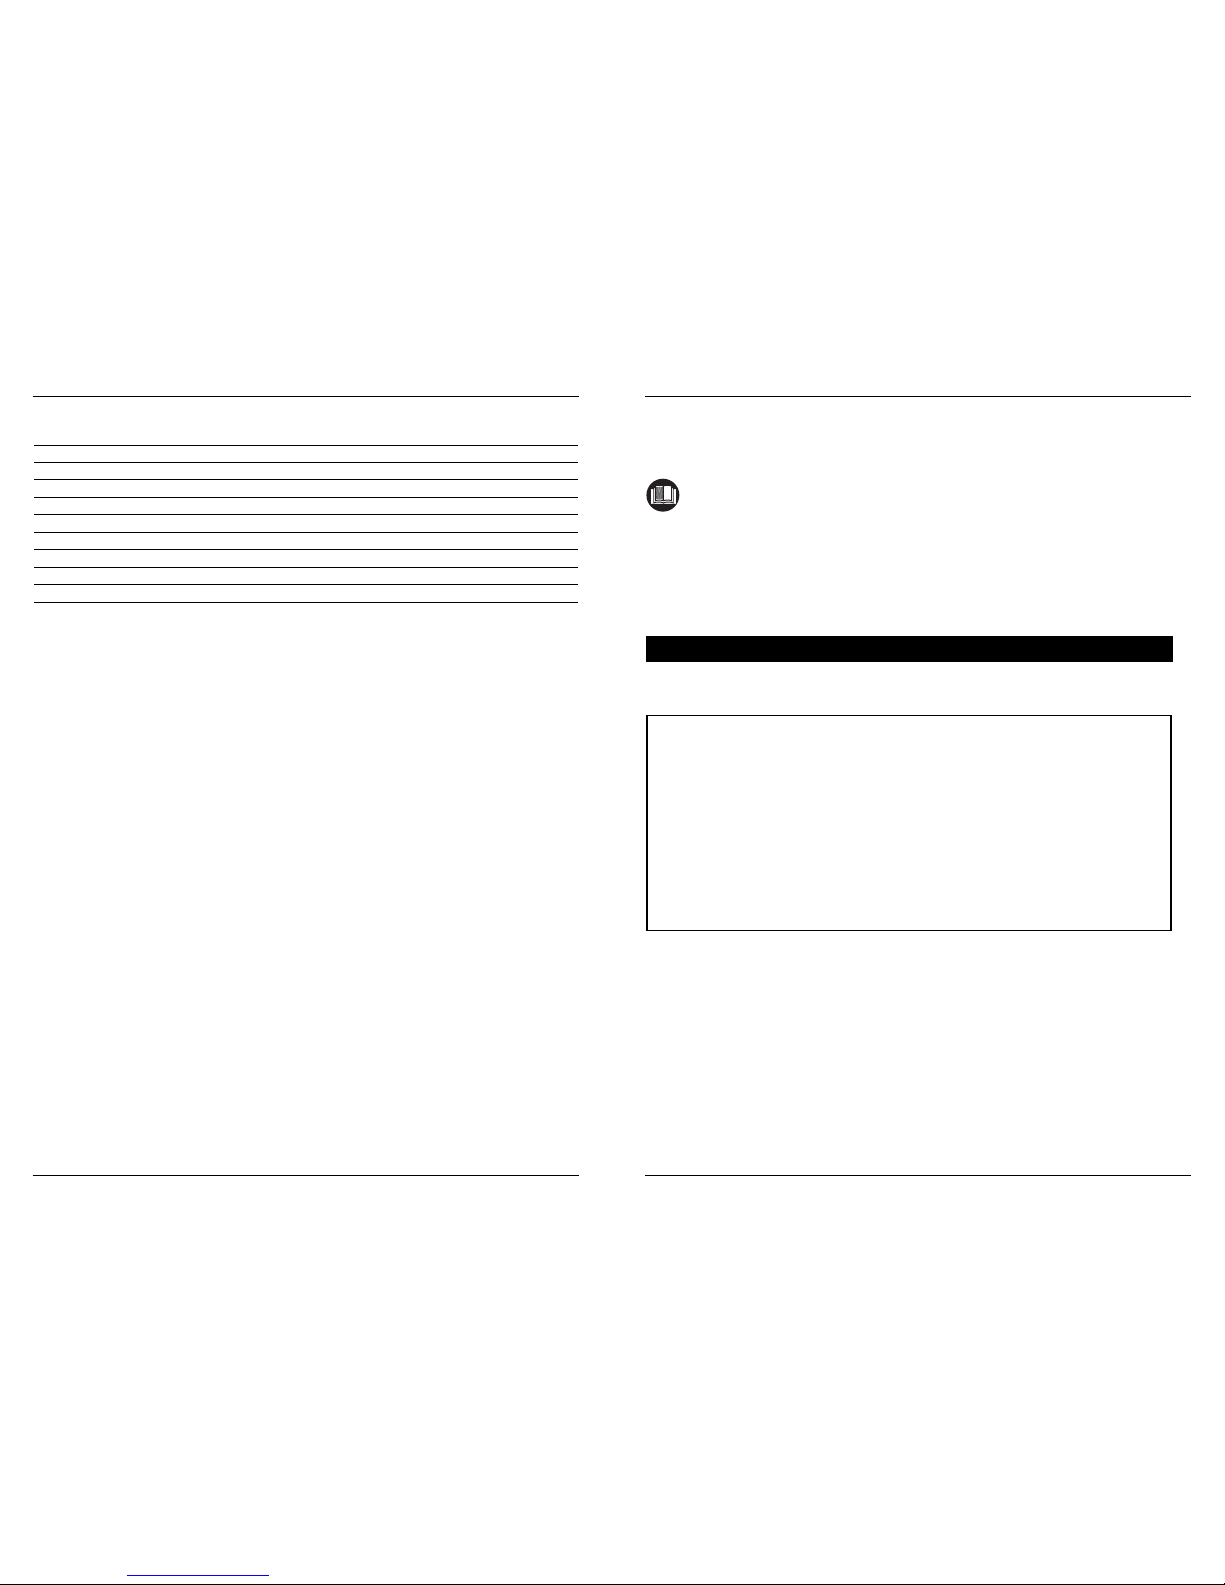
Exploded view
02 Ferm
6
7
1
2
3
4
5
9
6
8
2
9
Fig. 2
Fig. 3
Fig. 1a
Fig. 1
Fig. 4
Page 3
Ferm 0378 Ferm
Spare parts list FCGT-1800/2
Ferm No. Description Position No.
501404 Wire spool cover 1
501403 Wire spool shelf 2
501402 Handle complete 10 till 14
501400 Switch 17
501401 Switch button complete 20 till 22
501405 Protection cover 34
501406 Charger HGA1001 FCHT-1800B Battery 23
CORDLESS GRASS TRIMMER
The numbers in the following text correspond with the pitcures at page 2.
For your own safety and for the safety of others, please read these instructions
carefully before using this appliance. Keep in a safe place for future reference.
Contents
1. Machine data
2. Safety instructions
3. Assembly & use
4. Maintenance
1. MACHINE DATA
Technical specification
Contents of packaging
1 Main Body
1 Guard
1 Screw
1 Battery
1 Battery Charger
1 Instruction manual
1 Safety instructions
1 Warranty card
Check the machine, loose parts and accessories for transport damage.
Voltage 18 V—--Voltage Charger 230 V~
Battery performance 1.7 Ah
Charging time 7-8 hr.
No load running speed 7500/min
Overall length 1080 mm (extended)
Cutting circle 305 mm
Weight 2.45 kg
Working time 40 minutes
Trimmer thread 1.4 mm
Lpa (Sound pressure level) 77 dB(A)
Lwa (Sound power level) 97 dB(A)
Vibration value 2.5 m/s
2
Page 4
Ferm 7704 Ferm
Product information
Fig. 1 + 1a
1. On/Off Switch
2. Adjustable front handle
3. Telescopic pole
4. Pole length adjustment collar
5. Safety guard
6. Battery
7. Safety lock switch
8. Battery charger
9. Handle adjustment knob
2. SAFETY INSTRUCTIONS
Explanation of symboles
In this manual and/or on the machine the following symbols are used:
Read the instructions.
In accordance with essential applicable safety standards of European directives
Class II machine – Double insulation – You don’t need any earthed plug.
Risk of damaging material and/or physical injuries
Shows presence of voltage
Always recycle batteries
Indoor use only
Thermic protector
Do not use in rain.
Page 5
Ferm 0576 Ferm
CE ¢∏§ø™∏ ™Àªª√ƒºø™∏™ (GR)
¢ЛПТУФ˘МВ МВ ·ФОПВИЫЩИО‹ М·˜ В˘ı‡УЛ, fiЩИ ·˘Щfi ЩФ ЪФ˚fiУ ПЛЪФ› Щ· ·Ъ·О¿Щˆ ЪfiЩ˘·
‹ Ù· ¤ÁÁÚ·Ê· ÚÔÙ‡ˆÓ.
EN 60335-1 (2001), EN 60335-2-91 (2003), EN 60335-2-29 (2002), prEN/ISO 10518 (2003)
Ы‡МКˆУ· МВ ЩФ˘˜ ∫·УФУИЫМФ‡˜:
98/37/∂√∫, 73/23/∂√∫, 89/336/∂√∫,
·fi 01-03-2006
ZWOLLE NL
W. Kamphof
∆М‹М· ФИФЩИОФ‡ ВП¤Б¯Ф˘
¢В‰ФМ¤УФ˘ fiЩИ Л ‰И·ЪО‹˜ ‚ВПЩ›ˆЫЛ ЩˆУ ЪФ˚fiУЩˆУ М·˜ ·ФЩВПВ› ФПИЩИО‹ ЩЛ˜ ВЩ·ИЪВ›·˜
М·˜, ВИК˘П·ЫЫfiМВı· ЩФ˘ ‰ИО·ИТМ·ЩФ˜ У· ЩЪФФФИФ‡МВ ЩИ˜ ЪФ‰И·БЪ·К¤˜ ЩФ˘ ЪФ˚fiУЩФ˜
¯ˆЪ›˜ ЪФЛБФ‡МВУЛ ВИ‰ФФ›ЛЫЛ.
Ferm BV ñ Lingenstraat 6 ñ 8028 PM Zwolle ñ √ÏÏ·Ó‰›·
Wear eye and ear protection.
Wear protection gloves
Keep bystanders away
Sound power level
Faulty and/or discarded electrical or electronic apparatus have to be collected at
the appropriate recycling locations.
Safety instructions
• Dispose of plastic bags safely - they are a suffocation hazard for young children.
• Keep the area you are working in clean and tidy.
• Do not use power tools in the rain or wet environments.
• Do not use power tools where there is a risk of fire or explosion - i.e. near flammable liquids
or gases.
• Do not allow children into the area where you are working.
• Do not expose tools to rain.
• Do not let children or other people touch power tools.
• Do not leave the power tool unattended and always remove the battery pack from the
appliance after use.
• Store in a dry place well out of reach of children.
• Always use safety glasses. We also recommend the use of ear protectors.
• Wear the right clothes - not loose fitting or jewellery and ensure garments cannot come into
contact with moving parts.
• Wear non-slip shoes. Do not wear sandals or open-toed shoes.
• Before using any power tool, check first for damaged parts and if found do not use it before
the part or parts have been replaced with new ones.
• Do not use power tools when you are tired or have been drinking alcohol.
• Never carry the tool / charger by the cord or yank it to disconnect it from the socket. Keep
the cord away from heat, oil and sharp edges.
• Do not force the appliance - let it work at the rate for which it was intended
• Do not overreach while working - you may lose your balance.
• Never use this appliance without the safety guard fitted. It must always remain fitted.
• Only use spare parts and attachments supplied by Ferm. Use of attachments other than those
supplied or recommended by Ferm will invalidate your guarantee and could be dangerous.
• Only use this appliance for its intended purpose - trimming grass and light bushes.
Above all - Be careful
Page 6
Ferm 75
∂›Ï˘ÛË ÚÔ‚ÏËÌ¿ÙˆÓ
™ЩФУ ВfiМВУФ ›У·О· ·Ъ·Щ›ıВУЩ·И ФИ ¤ПВБ¯ФИ О·И ФИ ВУ¤ЪБВИВ˜ Ф˘ ı· Ъ¤ВИ У· О¿УВЩВ В¿У
ЩФ МЛ¯¿УЛМ¿ Ы·˜ ‰ВУ ПВИЩФ˘ЪБВ› О·УФУИО¿. ∂¿У ЩФ Ъfi‚ПЛМ· ‰ВУ ВИП˘ıВ› О¿УФУЩ·˜ ЩИ˜
ВУ‰ВИОУ˘fiМВУВ˜ ВУ¤ЪБВИВ˜, ı· Ъ¤ВИ У· ¤ЪıВЩВ ЫВ В·К‹ МВ ЩФ ВНФ˘ЫИФ‰ФЩЛМ¤УФ О¤УЩЪФ
ЩВ¯УИО‹˜ ˘ФЫЩ‹ЪИНЛ˜ ЩЛ˜ ВЪИФ¯‹˜ Ы·˜.
¶ÚÔÂȉÔÔ›ËÛË! µÁ¿ÏÙ ÙË Ì·Ù·Ú›· ÚÈÓ ÚÔÛ·ı‹ÛÙ ӷ ÂÈχÛÂÙ οÔÈÔ
Úfi‚ÏËÌ·.
µÏ·‚˜
∂¿У ЪФО‡„ВИ О¿ФИ· ‚П¿‚Л .¯. ПfiБˆ ЩЛ˜ КıФЪ¿˜ О¿ФИФ˘ ВН·ЪЩ‹М·ЩФ˜, ·Ъ·О·ПФ‡МВ
ВИОФИУˆУ‹ЫЩВ МВ ЩФ ∫¤УЩЪФ ВИЫОВ˘ТУ Ф˘ ·У·БЪ¿КВЩ·И ЫЩЛУ О¿ЪЩ· ВББ‡ЛЫЛ˜. ™ЩФ ›Ыˆ
М¤ЪФ˜ ·˘ЩФ‡ ЩФ˘ ВБ¯ВИЪИ‰›Ф˘ ˘¿Ъ¯ВИ ¤У· ·У·Щ˘БМ¤УФ ‰И¿БЪ·ММ·, ЫЩФ ФФ›Ф
·ЪФ˘ЫИ¿˙ФУЩ·И Щ· ВН·ЪЩ‹М·Щ· Ф˘ МФЪВ›ЩВ У· ·Ъ·ББВ›ПВЩВ.
¶ÂÚÈ‚¿ÏÏÔÓ
°И· У· МЛУ ¿ıВИ ˙ЛМИ¿ ЩФ МЛ¯·У‹М· О·Щ¿ ЩЛ МВЩ·КФЪ¿, ·Ъ·‰›‰ВЩ·И М¤Ы· ЫВ ОПВИЫЩ‹
Ы˘ЫОВ˘·Ы›·. ∆· ВЪИЫЫfiЩВЪ· ·ЩЩfi Щ· ˘ПИО¿ Ы˘ЫОВ˘·Ы›·˜ МФЪФ‡У У· ·У·О˘ОПˆıФ‡У.
¶‹Б·›УВЩВ ·˘Щ¿ Щ· ˘ПИО· ЫЩ· О·Щ¿ППЛБ· ЫЛМВ›· ·УО‡ОПˆЫЛ˜.
∂П·ЩЩˆМ·ЩИО¿ О·И / ‹ ·ФЪЪИММ¤У· ЛПВОЩЪИО¿ ‹ ЛПВОЩЪФУИО¿ ·УЩИОВ›МВУ· Ъ¤ВИ
У· Ы˘ПП¤БФУЩ·И ЫЩИ˜ О·Щ¿ППЛПВ˜ ЩФФıВЫ›В˜ ·У·О˘ОПТЫВˆ˜.
∂ÁÁ‡ËÛË
°И· ЩФ˘˜ fiЪФ˘˜ ЩЛ˜ ВББ‡ЛЫЛ˜, ‰И·‚¿ЫЩВ ЩЛУ О¿ЪЩ· ВББ‡ЛЫЛ˜ ЫЩФ ›Ыˆ М¤ЪФ˜ ·˘ЩТУ ЩˆУ
Ф‰ЛБИТУ ¯Ъ‹ЫВˆ˜.
™‡Ìو̷
ñ ∆Ô Ì˯¿ÓËÌ· ‰ÂÓ
ПВИЩФ˘ЪБВ›.
ñ ∆Ô Ì˯¿ÓËÌ· ˙ÔÚ›˙ÂÙ·È.
ñ ∆Ô Ì˯¿ÓËÌ· ‰ÂÓ Îfi‚ÂÈ.
ñ ∏ ÎψÛÙ‹ ‰ÂÓ ÂÚÓ¿ÂÈ
·˘ÙfiÌ·Ù·.
¶Èı·Ó‹ ·ÈÙ›·
ñ ¶ÂṲ̂ÓË Ì·Ù·Ú›·.
ñ ¶Ôχ ˘„ËÏfi ¯ÔÚÙ¿ÚÈ.
ñ ∏ ÎψÛÙ‹ Â›Ó·È Ôχ
ÎÔÓÙ‹/ ¤¯ÂÈ ÎÔ›.
ñ ∆Ô Î·ÚÔ‡ÏÈ Â›Ó·È ¿‰ÂÈÔ.
ñ ªÏÂÁ̤ÓË ÎψÛÙ‹
̤۷ ÛÙÔ Î·ÚÔ‡ÏÈ.
§‡ÛË
ñ ∂·Ó·ÊÔÚÙ›ÛÙÂ ‹
·ÓÙÈηٷÛÙ‹ÛÙ ÙË
Ì·Ù·Ú›·.
ñ ∫fi„Ù ÙÔ ¯ÔÚÙ¿ÚÈ
ÛÙ·‰È·Î¿.
ñ ¶ÂÚ¿ÛÙ ÙËÓ ÎψÛÙ‹ ÌÂ
ÙÔ ¯¤ÚÈ/·˘ÙfiÌ·Ù·.
ñ ∞ÓÙÈηٷÛÙ‹ÛÙ ÙÔ
ηÚÔ‡ÏÈ.
ñ ∂ϤÁÍÙ ÙÔ Î·ÚÔ‡ÏÈ,
Í·Ó·Ù˘Ï›ÍÙ ·Ó
¯ÚÂÈ¿˙ÂÙ·È.
06 Ferm
Specific safety instructions
• Keep your hands and feet away from the cutting area at all times. Keep your second (front)
hand on the auxilary handle.
• Always hold the trimmer at a safe distance from the body.
• Always wear protective goggles.
• Only use the trimmer in daylight.
• Ensure the ventilation openings are clear of debris at all times.
• Ensure there are no people or animals within 3 metres of your trimming area.
• Ensure that the terminals cannot be shorted by other metal parts such as screws nail etc.
• Before using the trimmer, remove any stones, sticks, toys or other foreign objects from the
area.
• Never reach into the underside of the appliance with the battery still attached. Remove the
battery before attempting to remove or touch the trimmer thread hub cap.
• Keep the cutting tools sharp and clean for better performance. Follow instructions for
lubrication and cleaning accessories. Inspect tool cord periodically and if damaged have it
repaired by an authorized service facility. Keep handles dry and clean free from oil and
grease.
• do not carry the trimmer with a finger on the switch.
• The use of any accessory or attachment, other than those recommended in this instruction
manual, may present a risk of personal injury.
• Ensure that the battery pack is correct for the tool.
• Ensure that the outside surface of the battery pack or tool is clean and dry before plugging
into charger.
• Ensure that batteries are charged using the correct charger recommended by the
manufacturer. Incorrect use may result in a risk of electric shock, overheating or leakage of
corrosive liquid from the battery.
Should you experience any problems at all with this product or require spare parts,
contact your nearest authorized service centre or dealer.
Safety instructions for the battery charger
The charger is specifically designed for use from a standard domestic electricity supply (230 V 240 V). Do not attempt to connect it to any other power supply. Please read and follow the
instructions printed on the charger and battery pack. The battery pack must be charged indoors
only, in a clean dry place.
Warning! If the battery pack is cracked or damaged or has received a heavy knock
you must not insert it into the charger. There is a risk of electric shock or
electrocution. The battery pack must be replaced and the damaged battery pack
disposed of safely. Ensure the charger and the charger lead is not placed where it
can be tripped over or stepped upon.
Warning! Do not allow liquid of any kind to come into contact with the charger.
There is a risk of electric shock. The battery pack must be completely dry before
being inserted into the charger.
Page 7
Ferm 07
Warning! If under abusive conditions, liquid is ejected from the battery pack, avoid
contact. If this accidentally occurs, flush with water. If liquid contacts eyes
additionally, seek medical help.
Cleaning
To reduce the risk of electric shock the charger must be unplugged from the power
supply and the battery pack removed before cleaning the charger.
• Allow the battery pack to cool down after use by leaving it in a safe, cool well-ventilated
place out of reach of children.
• Do not attempt to charge the battery pack with any other charger than the one supplied with
this product.
• Do not attempt to dismantle the charger. If it is not working, take it to your nearest
authorized service centre for repair.
• Always store the charger, battery pack and appliance in a safe, dry place out of reach of
children and where the temperature cannot exceed 40 °C (104 °F) e.g. in the open
exposed to direct sunlight under glass or alongside metal fabrications.
Disposal of battery
Dispose of your battery safety. Do not incinerate, the battery may explode. Take the battery to
your local recycling center.
3. ASSEMBLY & USE
Attaching the guard
Fig. 2
Attach the safety guard to the base of the trimmer as shown using the single screw (1) supplied.
Fitting the battery
Fig. 3
After charging, push-fit the battery into the battery compartment as shown. To remove the
battery simply depress the release catches on the side of the battery and pull it out.
How to use the battery charger
Charging time: Approximately 1 hour.
Insert your battery into the charger (it will only go in one way). Plug in and turn on the battery
charger. When the indicator light shows red the battery in being charged. When the indicator
light shows green, the battery will be fully charged.
How to extend the trimmer thread
When you need to extend the trimmer thread, simple tap the centre of the hub cap on the
ground.
74 Ferm
ñ ¶ÂÚ¿ÛÙ 150 mm ÎψÛÙ‹˜ ·fi ÙËÓ ÙÚ‡· ÙÔ˘ ηÚÔ˘ÏÈÔ‡ Î·È Í·Ó·‚¿ÏÙ ÙÔ Î·ÚÔ‡ÏÈ ÛÙË
ı¤ЫЛ ЩФ˘ ЪФЫ¤¯ФУЩ·˜ У· МЛУ ¤¯ВИ ЫО·ПТЫВИ Л ОПˆЫЩ‹. •·У·ВЪ¿ЫЩВ ЫЩФУ ¿НФУ· ЩФ
ВП·Щ‹ЪИФ О·И ЩФ О·¿ОИ О·И Б˘Ъ›ЫЩВ ЩФ М¤¯ЪИ У· ·ЫК·П›ЫВИ ЫЩЛ ЫˆЫЩ‹ ЩФ˘ ı¤ЫЛ (Ъ¤ВИ
У· ·ОФ˘ЫЩВ› ¤У· “ОПИО”).
¶Т˜ У· ВИМЛО‡УВЩВ ЩФУ ЫЩ‡ПФ ЩФ˘ ¯ФЪЩФОФЩИОФ‡
∂ÈÎ. 1
°˘Ú›ÛÙ ÙÔ ÎÔÏ¿ÚÔ ÙÔ˘ ÛÙ‡ÏÔ˘ (10) ÛÙË ı¤ÛË “··ÛÊ¿ÏÈÛË” Î·È ÙÚ·‚‹ÍÙ ÁÈ· Ó· ÂÈÌË΢Óı›
Ô ÛÙ‡ÏÔ˜. ªfiÏȘ ‚Ú›Ù ÙÔ ÂÈı˘ÌËÙfi Ì‹ÎÔ˜ ÙÔ˘ ÛÙ‡ÏÔ˘, Á˘Ú›ÛÙ ÙÔ ÎÔÏ¿ÚÔ ÙÔ˘ ÛÙ‡ÏÔ˘ ÛÙË
ı¤ÛË “·ÛÊ¿ÏÈÛË”.
§ÂÈÙÔ˘ÚÁ›·
∂ÈÎ. 1
°И· У· НВОИУ‹ЫВИ Л ПВИЩФ˘ЪБ›·, И¤ЫЩВ ЩФ ОФ˘М› ЩЛ˜ ·ЫК¿ПВИ·˜ (7) О·И ·Щ‹ЫЩВ ЩФУ ‰И·ОfiЩЛ
ВУВЪБФФ›ЛЫЛ˜/·ВУВЪБФФ›ЛЫЛ˜ (1). °И· У· ЫЩ·М·Щ‹ЫВИ, ·К‹ЫЩВ ЩФУ ‰И·ОfiЩЛ
ВУВЪБФФ›ЛЫЛ˜/·ВУВЪБФФ›ЛЫЛ˜ (1).
4. ™À¡∆∏ƒ∏™∏
™˘ÓÙ‹ÚËÛË
∏ ¯ФЪЩФОФЩИО‹ МЛ¯·У‹ ¯ЪВИ¿˙ВЩ·И МfiУФУ ВП¿¯ИЫЩЛ Ы˘УЩ‹ЪЛЫЛ.
• ªÂÙ¿ οı ¯Ú‹ÛË ÂÍ·Ï›„Ù ÙÔ Ì·˙Â̤ÓÔ ¯fiÚÙÔ Ë Ù· Û˘ÓÙÚ›ÌÌÈ· ·fi ÙË ˙ÒÓË ÙˆÓ
Ï›‰ˆÓ. ∂ϤÁÍÙÂ Â¿Ó ÔÈ Ï›‰Â˜ ‰ÂÓ Â›Ó·È Êı·Ṳ́Ó˜ Î·È ÂÊfiÛÔÓ ¯ÚÂÈ¿˙ÂÙ·È,
·ÏÏ¿ÍÙ ÙȘ.
• °И· ЩФУ О·ı·ЪИЫМfi ЩЛ˜ МЛ¯·У‹˜ ФЩ¤ МЛ ¯ЪЛЫИМФФИВ›ЩВ М¤Ы· ПВИ¿УЫВˆ˜ О·И МЛ
‚Ф˘Щ¿ЩВ ЩЛ МЛ¯·У‹ ЫЩФ УВЪfi.
• ∂¿У ı· ¯ЪВИ·ЫЩВ›ЩВ У· ·ПП¿НВЩВ Л У· ‰ИФЪıТЫВЩВ ЩМ‹М·Щ· ЩЛ˜ МЛ¯·У‹˜,
¯ЪЛЫИМФФИВ›ЩВ МfiУФУ ·˘Щ¿, Щ· ФФ›· В›У·И ·Ъ·‰ВОЩ¿ БИ· ЩЛУ ВЩ·ИЪВ›· Ferm.
• ∂¿Ó Ë Ì˯·Ó‹ Û·˜ ı· ¯ÚÂÈ·ÛÙ› ۤڂȘ Ë ‰ÈfiÚıˆÌ·, ·Â˘ı˘Óı›Ù Û ÙfiÔ, fiÔ˘
ÙËÓ ·ÁÔÚ¿Û·ÙÂ.
∞Ôı‹Î¢ÛË
∂ÊfiÛÔÓ ı· ·ÔıË·ÂÙ ÙË Ì˯·Ó‹ ¿Óˆ ·fi 6 ‚‰ÔÌ¿‰Â˜:
• ∂УЩВПТ˜ ·‰ВИ¿ЫЩВ ЩЛ Ы˘ППФБ‹ М·Щ·ЪИТУ (¤ЩЫИ, ТЫЩВ ı· ·К‹ЫВЩВ ЩЛ МЛ¯·У‹ У·
ЩЪ¤¯ВИ) О·И МВЩ¿ КФЪЩ›ЫЩВ ЩЛ Ы˘ППФБ‹ М·Щ·ЪИТУ В› 12 ТЪВ˜.
• ∂Н·ПВ›„ЩВ Щ· М·˙ВМ¤У· ·ФЪЪ›ММ·Щ· О·И О·ı·Ъ›ЫЩВ ЩИ˜ ВНˆЩВЪИО¤˜ ВИК¿УВИВ˜ МВ
·У› ‰›¯ˆ˜ Н·УЩfi Л МВ М·П·О‹ ‚Ф‡ЪЩЫ·.
• ∞ФıЛОВ‡ВЩВ ЩЛ МЛ¯·У‹ ЫВ НВЪfi ЩfiФ ЫВ ВКИОЩ‹ ·fiЫЩ·ЫЛ ЩˆУ ·И‰ИТУ.
• ∂ÊfiÛÔÓ ı· ·ÔıË·ÂÙ ÙË Ì˯·Ó‹ Û Áηڿ˙ Ë Û ηχ‚·, ηχ„Ù ÙËÓ ÛÂ
ФП˘·Иı˘П¤УИ· ЩЫФ˘‚¿ПИ·, У· ВЪИФЪИЫЩВ› Л ЪФЫ¤ПВ˘ЫЛ ЩЛ˜ ˘БЪ·Ы›·˜.
¶·Ú·Ù‹ÚËÛË: ∏ МЛ¯·У‹ ‰В ¯ЪВИ¿˙ВЩ·И ¿ПВИММ·.
Page 8

Ferm 73
∞ФОФМИ‰Л О·И ·ФЪЪИ„Л ЩЛ˜ М·Щ·ЪИ·˜
∏ ·ФОФМИ‰‹ О·И Л ·fiЪЪИ„Л ЩЛ˜ ¿¯ЪЛЫЩЛ˜ М·Щ·Ъ›·˜ ı· Ъ¤ВИ У· Б›УВЩ·И МВ ·ЫК·П‹
ЩЪfiФ. ªЛУ ЪФЫ·ı‹ЫВЩВ У· ЩЛУ О¿„ВЩВ ‰ИfiЩИ ВУ‰¤¯ВЩ·И У· ВОЪ·БВ›.
¶·Ъ·‰ТЫЩВ ЩЛ М·Щ·Ъ›· ЫЩФ О¤УЩЪФ ·У·О‡ОПˆЫЛ˜ ЩЛ˜ ВЪИФ¯‹˜ Ы·˜.
3. ™À¡∞ƒª√§√°∏™∏ & §∂π∆√Àƒ°ÿ∞
ªÔÓÙ¿ÚÈÛÌ· ÙÔ˘ ÚÔÛٷ٢ÙÈÎÔ‡ η·ÎÈÔ‡
∂ÈÎ. 2
ªФУЩ¿ЪВЩВ ЩФ ЪФЫЩ·ЩВ˘ЩИОfi О·¿ОИ ЫЩЛ ‚¿ЫЛ ЩФ˘ ¯ФЪЩФОФЩИОФ‡, fiˆ˜ К·›УВЩ·И ЫЩЛУ
ВИОfiУ·, ¯ЪЛЫИМФФИТУЩ·˜ ЩЛ Ы˘М·Ъ·‰И‰fiМВУЛ ‚›‰· (1).
∆ÔÔı¤ÙËÛË Ù˘ Ì·Ù·Ú›·˜
∂ÈÎ. 3
ªВЩ¿ ·fi ЩЛ КfiЪЩИЫЛ, ЫЪТНЩВ ЩЛ М·Щ·Ъ›· ЫЩЛУ ˘Ф‰Ф¯‹ ЩЛ˜ М·Щ·Ъ›·˜ М¤¯ЪИ У· МВИ
ЫˆЫЩ¿ ЫЩЛ ı¤ЫЛ ЩЛ˜, fiˆ˜ К·›УВЩ·И ЫЩЛУ ВИОfiУ·. °И· У· ‚Б¿ПВЩВ ЩЛ М·Щ·Ъ›·, ·П¿ ·Щ‹ЫЩВ
Щ· ОФ˘МИ¿ ·ВПВ˘ı¤ЪˆЫЛ˜ Ф˘ ‚Ъ›ЫОФУЩ·И ЫЩ· П¿БИ· ЩЛ˜ М·Щ·Ъ›·˜ О·И ЩЪ·‚‹НЩВ ЩЛУ
ЪФ˜ Щ· ¤Нˆ.
¶Т˜ У· ¯ЪЛЫИМФФИ‹ЫВЩВ ЩФУ КФЪЩИЫЩ‹ ЩЛ˜ М·Щ·Ъ›·˜
ГЪfiУФ˜ КfiЪЩИЫЛ˜: ¶ВЪ›Ф˘ 1 ТЪ·.
µ¿ПЩВ ЩЛ М·Щ·Ъ›· Ы·˜ ЫЩФУ КФЪЩИЫЩ‹ (М·›УВИ МfiУФ МВ ¤У·У ЩЪfiФ). µ¿ПЩВ ЩФ КИ˜ ЩФ˘
КФЪЩИЫЩ‹ ЫЩЛ Ъ›˙· О·И ·У¿„ЩВ ЩФУ КФЪЩИЫЩ‹. ŸЩ·У ·У¿‚ВИ ЩФ ОfiООИУФ ВУ‰ВИОЩИОfi П·М¿ОИ, Л
М·Щ·Ъ›· КФЪЩ›˙ВЩ·И. ŸЩ·У ·У¿„ВИ ЩФ Ъ¿ЫИУФ ВУ‰ВИОЩИОfi П·М¿ОИ, Л М·Щ·Ъ›· ¤¯ВИ
КФЪЩИЫЩВ› ВУЩВПТ˜.
¶Т˜ У· МВБ·ПТЫВЩВ ЩФ М‹ОФ˜ ЩЛ˜ ОПˆЫЩ‹˜ ¯ФЪЩФОФ‹˜
∂¿У ¯ЪВИ·ЫЩВ› У· МВБ·ПТЫВЩВ ЩФ М‹ОФ˜ ЩЛ˜ ОПˆЫЩ‹˜ ¯ФЪЩФОФ‹˜, ·П¿ ОЩ˘‹ЫЩВ ВП·КЪ¿
ЫЩФ ¤‰·КФ˜ ЩФ О·¿ОИ ЩФ˘ О·ЪФ˘ПИФ‡ ЩЛ˜ ОПˆЫЩ‹˜.
ƒ‡ıМИЫЛ ЩЛ˜ ¯ВИЪФП·‚‹˜
EÈÎ. 4
°И· У· Ъ˘ıМ›ЫВЩВ ЩЛ МЪФЫЩИУ‹ ¯ВИЪФП·‚‹, НВЫК›НЩВ ЩФ ОФ˘М› Ъ‡ıМИЫЛ˜ ЩЛ˜ ¯ВИЪФП·‚‹˜ (9),
Б˘ЪУТУЩ·˜ ЩФ ЪФ˜ Щ· ‰ВНИ¿. ŸЩ·У ‚ЪВ›ЩВ ЩЛУ ВИı˘МЛЩ‹ ı¤ЫЛ ЩЛ˜ ¯ВИЪФП·‚‹˜, Н·У·ЫК›НЩВ
ЩФ ОФ˘М›.
¶Т˜ У· ЩФФıВЩ‹ЫВЩВ У¤· ОВК·П‹ ЫЩФ ¯ФЪЩФОФЩИОfi
∂ÈÎ. 2
ŸЩ·У ¯ЪВИ·ЫЩВ› У· ·УЩИО·Щ·ЫЩ‹ЫВЩВ ЩЛУ ОПˆЫЩ‹ ¯ФЪЩФОФ‹˜ ‹ У· ЩФФıВЩ‹ЫВЩВ У¤·,
‚Б¿ПЩВ ЩЛ М·Щ·Ъ›· ·fi ЩФ МЛ¯¿УЛМ· О·И ЪФ¯ˆЪ‹ЫЩВ ˆ˜ ВН‹˜:
с ¶И¤ЫЩВ ЩФ О·¿ОИ ЩФ˘ О·ЪФ˘ПИФ‡ ЪФ˜ Щ· О¿Щˆ О·И Б˘Ъ›ЫЩВ ЩФ ЪФ˜ Щ· ·ЪИЫЩВЪ¿. µБ¿ПЩВ
ÙÔ Î·¿ÎÈ ·fi ÙÔÓ ¿ÍÔÓ· (ÚÔÛ¤ÍÙ ÌË ¯¿ÛÂÙ ÙÔ ÂÏ·Ù‹ÚÈÔ!). µÁ¿ÏÙ ÙÒÚ· ÙÔ Î·ÚÔ‡ÏÈ
·fi ÙÔ Î·¿ÎÈ Î·È ·ÓÙÈηٷÛÙ‹ÛÙ ÙÔ ÌÂ Ó¤Ô Î·ÚÔ‡ÏÈ ‹ Ù˘Ï›ÍÙ ÛÙÔ Î·ÚÔ‡ÏÈ Ó¤· ÎψÛÙ‹
1,6 mm.
08 Ferm
Handle adjustment
Fig. 4
To adjust the front handle, loosen the locking screw (9) by turning it clockwise. Once happy with
the position of the handle, re-tighten the screw.
How to fit new trimmer thread
Fig. 2
When you need to replace or fit new trimmer thread, remove the battery from the trimmer and
proceed as follows:
• Push down and twist the hubcap anti-clockwise. Pull the hubcap off of the prop shaft (don’t
lose the spring!). Pull the trimmer thread cartridge out of the hubcap and either replace it
with a new cartridge or wind on new 1.6mm thread.
• Push 150mm of thread through the hole in the hubcap and re-fit the cartridge ensuring no
thread is trapped. Refit the spring and hubcap assembly to the prop shaft and turn it until it
clicks in position.
How to extend the trimmer handle
Fig. 1
Twist the handle collar (10) to the ‘unlock’position and pull to extend. Once you are happy with
the position of the handle, twist the handle collar to the ‘lock’ position.
Operation
Fig. 1
To start, push safety button (7) and pull trigger (1). To stop, release trigger (1).
4. MAINTENANCE
Maintenance
Your trimmer requires only minimum maintenance.
• After each use remove any build up of grass or debris from the blade area. Check the
blades for wear and replace if necessary.
• Don't use abrasive materials to clean the product or immerse it in water.
• If parts need to be replaced or repaired, only use parts which have been
deemed acceptable replacements by Ferm.
• If your product needs servicing or repair then return it to your point of purchase.
Storage
When storing the trimmer for longer than 6 weeks:
• Fully discharge the battery pack (by running the product) and then recharge the battery
pack for 12 hours.
• Remove any build up of debris, and wipe all exterior surfaces with a dry lint free cloth or a
soft brush.
• Store in a dry place away from children.
• If stored in a shed pack the appliance into a polythene bag to prevent damp.
Note: It is not necessary to oil the product.
Page 9
Ferm 09
Trouble shooting
The following table gives checks and actions that you can perform if your machine does not
operate correctly. If this don’t identify/remedy the problem, contact your service centre.
Warning ! Remove the battery before investigating a fault.
Faults
Should a fault occur, e.g. after wear of a part, please contact the service address on the
warranty card. In the back of this manual you find an exploded view showing the parts that can
be ordered.
Environment
To prevent damage during transport, the appliance is delivered in a solid packaging which
consists largely of reusable material. Therefore please make use of options for recycling the
packaging.
Faulty and/or discarded electrical or electronic apparatus have to be collected at
the appropriate recycling locations.
Warranty
The warranty conditions can be found on the separately enclosed warranty card. Wear of the
hedge trimmer is not covered by the warranty.
Symptom
• Machine fails to operate
• Machine labours
• Machine is not cutting
• Line can’t be fed
automatically
Possible cause
• Battery low
• Grass too high
• Line too short/broken off
• Spool empty
• Line inside the spool
entangled
Remedy
• Recharge or replace the
battery
• Cut in stages
• Feed the line
manually/automatically
• Replace the spool
• Inspect the spool, rewind
if necessary
72 Ferm
∂¿У ·УЩИМВЩˆ›ЫВЩВ ФФИФ‰‹ФЩВ Ъfi‚ПЛМ· МВ ЩФ ЪФ˚fiУ ·˘Щfi ‹ В¿У
¯ЪВИ¿˙ВЫЩВ ·УЩ·ПП·ОЩИО¿, Ы·˜ ·Ъ·О·ПФ‡МВ У· ¤ЪıВЩВ ЫВ В·К‹ МВ ЩФ
ВНФ˘ЫИФ‰ФЩЛМ¤УФ О¤УЩЪФ ЩВ¯УИО‹˜ ˘ФЫЩ‹ЪИНЛ˜ ‹ МВ ЩФУ ·УЩИЪfiЫˆФ ЩЛ˜
ВЪИФ¯‹˜ Ы·˜.
¶ЪФВИ‰ФФИ‹ЫВИ˜ ·ЫК·ПВ›·˜ БИ· ЩФУ КФЪЩИЫЩ‹ ЩЛ˜ М·Щ·Ъ›·˜
√ КФЪЩИЫЩ‹˜ ¤¯ВИ Ы¯В‰И·ЫЩВ› ВИ‰ИО¿ ТЫЩВ У· ¯ЪЛЫИМФФИВ›Щ·И ЩЪФКФ‰ФЩФ‡МВУФ˜ ·fi МИ·
Ы˘У‹ıЛ ФИОИ·О‹ ЛПВОЩЪИО‹ ВБО·Щ¿ЫЩ·ЫЛ (230 - 240 volt). ªЛУ ЪФЫ·ı‹ЫВЩВ У· ЩФУ
Ы˘У‰¤ЫВЩВ ЫВ ФФИ·‰‹ФЩВ ¿ППЛ ЛБ‹ ЩЪФКФ‰ФЫ›·˜ ЛПВОЩЪИОФ‡ ЪВ‡М·ЩФ˜. ™·˜
·Ъ·О·ПФ‡МВ ЪИУ ·fi ЩЛ ¯Ъ‹ЫЛ У· ‰И·‚¿ЫВЩВ О·И У· ·ОФПФ˘ı‹ЫВЩВ ЩИ˜ Ф‰ЛБ›В˜ Ф˘
·У·БЪ¿КФУЩ·И ЫЩФУ КФЪЩИЫЩ‹ О·И ЫЩЛ М·Щ·Ъ›·.
∏ М·Щ·Ъ›· ı· Ъ¤ВИ У· КФЪЩ›˙ВЩ·И МfiУФ ЫВ ВЫˆЩВЪИОФ‡˜ ¯ТЪФ˘˜ - ЫВ ¤У·У О·ı·Ъfi О·И
ЫЩВБУfi ЫЛМВ›Ф.
¶ЪФВИ‰ФФИЛЫЛ! ¢ВУ ı· Ъ¤ВИ У· ‚¿˙ВЩВ ЩЛ М·Щ·Ъ›· ЫЩФУ КФЪЩИЫЩ‹ В¿У Л
М·Щ·Ъ›· ¤¯ВИ О¿ФИ· ЪˆБМ‹, КıФЪ¿ ‹ ‚П¿‚Л, ‹ В¿У ¤¯ВИ ˘ФЫЩВ› О¿ФИФ МВБ¿ПФ
ОЩ‡ЛМ·. А¿Ъ¯ВИ О›У‰˘УФ˜ У· Ы·˜ ОЩ˘‹ЫВИ ЩФ ЪВ‡М· ‹ У· ¿ıВЩВ
ЛПВОЩЪФПЛН›·. £· Ъ¤ВИ У· ·УЩИО·Щ·ЫЩ‹ЫВЩВ ЩЛ М·Щ·Ъ›· МВ У¤· О·И У·
ЪФ¯ˆЪ‹ЫВЩВ ЫЩЛУ ·ЫК·П‹ ·ФОФМИ‰‹ О·И ·fiЪЪИ„Л ЩЛ˜ ¯·П·ЫМ¤УЛ˜
М·Щ·Ъ›·˜. £· Ъ¤ВИ У· ЩФФıВЩВ›ЩВ ЩФУ КФЪЩИЫЩ‹ О·И ЩФ О·ПТ‰ИФ ЩФ˘
КФЪЩИЫЩ‹ ЫВ ·ЫК·П¤˜ ЫЛМВ›Ф, ТЫЩВ У· МЛУ ЫОФУЩ¿КЩВЩВ В¿Уˆ ЩФ˘˜ О·И У· МЛУ
Щ· ·Щ¿ЩВ.
¶ЪФВИ‰ФФИЛЫЛ! ªЛУ ·К‹УВЩВ О·УВУfi˜ В›‰Ф˘˜ ˘БЪ¿ У· ¤Ъ¯ФУЩ·И ЫВ В·К‹ МВ
ЩФУ КФЪЩИЫЩ‹. А¿Ъ¯ВИ О›У‰˘УФ˜ ЛПВОЩЪФПЛН›·˜. ∏ М·Щ·Ъ›· ı· Ъ¤ВИ У·
В›У·И ·ФП‡Щˆ˜ ЫЩВБУ‹ ЪИУ МВИ ЫЩФУ КФЪЩИЫЩ‹.
¶ЪФВИ‰ФФИЛЫЛ! ∂¿У БИ· ФФИФУ‰‹ФЩВ ПfiБФ ‚Б·›УФ˘У ˘БЪ¿ ·fi ЩЛ М·Щ·Ъ›·,
МЛУ ¤Ъ¯ВЫЩВ ЫВ В·К‹ МВ ·˘Щ¿. ∂¿У ˘¿ЪНВИ О·Щ¿ П¿ıФ˜ В·К‹ МВ ·˘Щ¿ Щ· ФН¤·
ЩЛ˜ М·Щ·Ъ›·˜, НВП‡УЩВ Щ· МВ УВЪfi. ∂¿У Щ· ФН¤· ¤ЪıФ˘У ЫВ В·К‹ МВ Щ· М¿ЩИ·
Ы·˜, ˙ЛЩ‹ЫЩВ И·ЩЪИО‹ ‚Ф‹ıВИ·.
∫·ı·ЪИЫМФ˜
°И· ЩЛ МВ›ˆЫЛ ЩФ˘ ОИУ‰‡УФ˘ ЛПВОЩЪФПЛН›·˜, ЪИУ ·fi ЩФУ О·ı·ЪИЫМfi ЩФ˘
КФЪЩИЫЩ‹ ЩФ КИ˜ ЩФ˘ КФЪЩИЫЩ‹ ı· Ъ¤ВИ У· ·ФЫ˘У‰¤ВЩ·И ·fi ЩЛУ Ъ›˙· О·И У·
‚Б·›УВИ Л М·Щ·Ъ›·.
∞К‹ЫЩВ ЩЛ М·Щ·Ъ›· У· ОЪ˘ТЫВИ МВЩ¿ ЩЛ ¯Ъ‹ЫЛ ЫВ ¤У· ·ЫК·П¤˜, ‰ЪФЫВЪfi О·И О·П¿
·ВЪИ˙fiМВУФ М¤ЪФ˜, М·ОЪИ¿ ·fi Щ· ·И‰И¿. ªЛУ ВИ¯ВИЪ‹ЫВЩВ У· КФЪЩ›ЫВЩВ ЩЛ М·Щ·Ъ›· МВ
¿ППФ˘˜ КФЪЩИЫЩ¤˜, ·ПП¿ МfiУФ МВ ЩФУ КФЪЩИЫЩ‹ Ф˘ Ы˘М·Ъ·‰›‰ВЩ·И МВ ЩФ ЪФ˚fiУ ·˘Щfi. ªЛУ
ЪФЫ·ı‹ЫВЩВ У· ·ФЫ˘У·ЪМФПФБ‹ЫВЩВ ЩФУ КФЪЩИЫЩ‹ - ·У ‰ВУ ПВИЩФ˘ЪБВ›, ı· Ъ¤ВИ У·
ЩФУ ·Ъ·‰ТЫВЩВ ЫЩФ ПЛЫИ¤ЫЩВЪФ ВНФ˘ЫИФ‰ФЩЛМ¤УФ О¤УЩЪФ ЩВ¯УИО‹˜ ˘ФЫЩ‹ЪИНЛ˜ БИ·
ВИЫОВ˘‹. £· Ъ¤ВИ ¿УЩФЩВ У· ·ФıЛОВ‡ВЩВ ЩФУ КФЪЩИЫЩ‹, ЩЛ М·Щ·Ъ›· О·И ЩФ МЛ¯¿УЛМ·
ЫВ ¤У· ·ЫК·П¤˜ ЫЩВБУfi М¤ЪФ˜, М·ОЪИ¿ ·fi Щ· ·И‰И¿. ∏ ıВЪМФОЪ·Ы›· ЫЩФУ ¯ТЪФ
·Ôı‹Î¢Û˘ ‰ÂÓ ı· Ú¤ÂÈ Ó· ÍÂÂÚÓ¿ ÙÔ˘˜ 40Æ CØ ÁÈ· ÙÔÓ ÏfiÁÔ ·˘Ùfi ÔÈ Û˘Û΢¤˜ ‰ÂÓ ı·
Ú¤ÂÈ Ó· ̤ÓÔ˘Ó ÂÎÙÂıÂÈ̤Ó˜ ÛÙÔ Êˆ˜ ÙÔ˘ ‹ÏÈÔ˘ ›Ûˆ ·fi Ù˙¿ÌÈ· ‹ Ó· ÙÔÔıÂÙÔ‡ÓÙ·È
‰›Ï· Û ÌÂÙ·ÏÏÈΤ˜ ηٷÛ΢¤˜.
Page 10

Ferm 71
с £· Ъ¤ВИ У· ¯ЪЛЫИМФФИВ›ЩВ МfiУФ ·УЩ·ПП·ОЩИО¿ О·И ВН·ЪЩ‹М·Щ· Ф˘ ·Ъ¤¯ВИ Л Ferm. ∏
¯Ú‹ÛË ÂÍ·ÚÙËÌ¿ÙˆÓ ¿ÏÏˆÓ ·fi ·˘Ù¿ Ô˘ ÚÔÌËı‡ÂÈ ‹ Û˘ÓÈÛÙ¿ Ë Ferm ı· ηٷÛÙ‹ÛÂÈ
·Ó›Û¯˘ÚË ÙËÓ ÂÁÁ‡ËÛ‹ Û·˜ Î·È ı· ÌÔÚÔ‡Û ӷ Â›Ó·È ÂÈΛӉ˘ÓË.
с ГЪЛЫИМФФИВ›ЩВ ЩФ МЛ¯¿УЛМ· ·˘Щfi МfiУФ БИ· ЩФУ ЫОФfi БИ· ЩФУ ФФ›ФУ ЪФФЪ›˙ВЩ·И -
‰ЛП·‰‹ ЩФ Оfi„ИМФ ¯fiЪЩФ˘ О·И МИОЪТУ ПВЩТУ ı¿МУˆУ.
¶·Уˆ · ФП· - ¶ЪФЫВНЩВ!
∂ȉÈΤ˜ ÚÔÂȉÔÔÈ‹ÛÂȘ ÁÈ· ÙËÓ ·ÛÊ¿ÏÂÈ¿ Û·˜
с ∫Ъ·Щ¿ЩВ ¿УЩФЩВ Щ· ¯¤ЪИ· О·И Щ· fi‰И· Ы·˜ М·ОЪИ¿ ·fi ЩЛУ ВЪИФ¯‹ ОФ‹˜. ∫Ъ·Щ¿ЩВ ЩФ
‰В‡ЩВЪФ (МЪФЫЩИУfi) ¯¤ЪИ Ы·˜ ЫЩЛ ‚ФЛıЛЩИО‹ ¯ВИЪФП·‚‹.
с £· Ъ¤ВИ ¿УЩФЩВ У· ОЪ·Щ¿ЩВ ЩФ ¯ФЪЩФОФЩИОfi ЫВ ·fiЫЩ·ЫЛ ·ЫК·ПВ›·˜ ·fi ЩФ ЫТМ·
Ы·˜.
с £· Ъ¤ВИ ¿УЩФЩВ У· КФЪ¿ЩВ ЪФЫЩ·ЩВ˘ЩИО¿ Б˘·ПИ¿.
с ∆Ф ¯ФЪЩФОФЩИОfi ı· Ъ¤ВИ У· ¯ЪЛЫИМФФИВ›Щ·И МfiУФ МВ ЩФ Кˆ˜ ЩЛ˜ ЛМ¤Ъ·˜.
с µВ‚·ИˆıВ›ЩВ fiЩИ Щ· ЫЩfiМИ· ВН·ВЪИЫМФ‡ В›У·И ¿УЩФЩВ О·ı·Ъ¿ ·fi ВУ‰В¯fiМВУ· О·Щ¿ПФИ·
ÛÎfiÓ˘ Î·È Ú‡ˆÓ.
ñ µÂ‚·Èˆı›Ù fiÙÈ ‰ÂÓ ˘¿Ú¯Ô˘Ó ¿ÓıÚˆÔÈ ‹ ˙Ò· Û ÌÈ· ·ÎÙ›Ó· 3 ̤ÙÚˆÓ ·fi ÙÔ ÛËÌ›Ô
Ô˘ Îfi‚ÂÙ ¯fiÚÙ·.
ñ µÂ‚·Èˆı›Ù fiÙÈ ÔÈ ·ÎÚÔ‰¤ÎÙ˜ ‰ÂÓ ÌÔÚÔ‡Ó Ó· ‚Ú·¯˘Î˘ÎψıÔ‡Ó ·fi ¿ÏÏ· ÌÂÙ·ÏÏÈο
·УЩИОВ›МВУ· fiˆ˜ ‚›‰В˜, О·ЪКИ¿ О.П.
с ¶ЪИУ ·fi ЩЛ ¯Ъ‹ЫЛ ЩФ˘ ¯ФЪЩФОФЩИОФ‡, ı· Ъ¤ВИ У· ·ФМ·ОЪ‡УВЩВ О¿ıВ В›‰Ф˘˜
¤ЩЪВ˜, ОП·‰И¿, ·И¯У›‰И· ‹ ¿ПП· Н¤У· ·УЩИОВ›МВУ· ·fi ЩФУ ¯ТЪФ ОФ‹˜.
с ¶ФЩ¤ МЛУ ЪФЫ·ı‹ЫВЩВ У· ‚¿ПВЩВ ЩФ ¯¤ЪИ Ы·˜ ЫЩЛУ О¿Щˆ ПВ˘Ъ¿ ЩФ˘ МЛ¯·У‹М·ЩФ˜,
ÂÊ’ fiÛÔÓ Ë Ì·Ù·Ú›· Â›Ó·È Û˘Ó‰Â̤ÓË ÛÙÔ Ì˯¿ÓËÌ·. µÁ¿ÏÙ ÙË Ì·Ù·Ú›· ÚÈÓ
ЪФЫ·ı‹ЫВЩВ У· ·К·ИЪ¤ЫВЩВ ‹ У· ВИМЛО‡УВЩВ ЩЛУ ОПˆЫЩ‹ ¯ФЪЩФОФ‹˜.
с ¢И·ЩЛЪВ›ЩВ Щ· ВЪБ·ПВ›· ОФ‹˜ ·И¯МЛЪ¿ О·И О·ı·Ъ¿, БИ· О·П‡ЩВЪЛ ·fi‰ФЫЛ. ∞ОФПФ˘ıВ›ЩВ
ÙȘ Ô‰ËÁ›Â˜ Ô˘ ·ÊÔÚÔ‡Ó ÙË Ï›·ÓÛË Î·È ÙÔÓ Î·ı·ÚÈÛÌfi ÙˆÓ ÂÍ·ÚÙËÌ¿ÙˆÓ. ∂ÈıˆÚ›ÙÂ
ЫВ Щ·ОЩ¿ ¯ЪФУИО¿ ‰И·ЫЩ‹М·Щ· ЩФ ВЪБ·ПВ›Ф О·И В¿У К¤ЪВИ КıФЪ¤˜ ·Ъ·‰ТЫЩВ ЩФ ЫВ
οÔÈÔ ÂÍÔ˘ÛÈÔ‰ÔÙË̤ÓÔ Î¤ÓÙÚÔ Ù¯ÓÈ΋˜ ˘ÔÛÙ‹ÚÈ͢ ÁÈ· ÂÈÛ΢‹. ¢È·ÙËÚ›Ù ÙȘ
¯ВИЪФП·‚¤˜ ЫЩВБУ¤˜ О·И О·ı·Ъ¤˜, КЪФУЩ›˙ФУЩ·˜ У· МЛУ ¤¯Ф˘У П¿‰И· ‹ ПИ·Ъ¤˜ Ф˘Ы›В˜.
с ªЛ МВЩ·К¤ЪВЩВ ЩФ ¯ФЪЩФОФЩИОfi ¤¯ФУЩ·˜ ЩФ ‰¿ОЩ˘Пfi Ы·˜ ЫЩФУ ‰И·ОfiЩЛ
ВУВЪБФФ›ЛЫЛ˜.
с ∏ ¯Ъ‹ЫЛ ·УЩ·ПП·ОЩИОТУ ‹ ВН·ЪЩЛМ¿ЩˆУ ¿ППˆУ ·fi ·˘Щ¿ Ф˘ Ы˘УИЫЩТУЩ·И ЫЩФ ·ЪfiУ
ВБ¯ВИЪ›‰ИФ Ф‰ЛБИТУ ¯Ъ‹ЫВˆ˜, ВУ‰¤¯ВЩ·И У· ВБО˘МФУВ› О›У‰˘УФ ЩЪ·˘М·ЩИЫМТУ ‹
ЫˆМ·ЩИОТУ ‚П·‚ТУ.
с µВ‚·ИˆıВ›ЩВ fiЩИ Л М·Щ·Ъ›· В›У·И О·Щ¿ППЛПЛ БИ· ЩФ ВЪБ·ПВ›Ф.
с µВ‚·ИˆıВ›ЩВ fiЩИ Л ВНˆЩВЪИО‹ ВИК¿УВИ· ЩЛ˜ М·Щ·Ъ›·˜ ЩФ˘ ВЪБ·ПВ›Ф˘ В›У·И О·ı·Ъ‹ О·И
ЫЩВБУ‹ ЪИУ Ы˘У‰¤ЫВЩВ ЩЛ М·Щ·Ъ›· ЫЩФУ КФЪЩИЫЩ‹.
с µВ‚·ИˆıВ›ЩВ fiЩИ ФИ М·Щ·Ъ›В˜ КФЪЩ›˙ФУЩ·И МВ ЩЛ ¯ЪЛЫИМФФ›ЛЫЛ ЩФ˘ ЫˆЫЩФ‡ КФЪЩИЫЩ‹
Ô˘ Û˘ÓÈÛÙ¿Ù·È ·fi ÙÔÓ Î·Ù·Û΢·ÛÙ‹. ∏ Ï·Óı·Ṳ̂ÓË ¯Ú‹ÛË ÌÔÚ› Ó· ¤¯ÂÈ ˆ˜
·ФЩ¤ПВЫМ· ЩФУ О›У‰˘УФ ЛПВОЩЪФПЛН›·˜, ˘ВЪКfiЪЩИЫЛ˜ ‹ ‰И·ЪЪФ‹˜ ВИ‚П·‚ТУ ˘БЪТУ
·fi ÙË Ì·Ù·Ú›·.
10 Ferm
CE DECLARATION OF CONFORMITY (GB)
We declare under our sole responsibility that this product conforms with the following
standards or standardised documents:
EN 60335-1 (2001), EN 60335-2-91 (2003),EN 60335-2-29 (2002), prEN/ISO 10518 (2003)
in accordance with regulations:
98/37/EEC, 73/23/EEC, 89/336/EEC,
from 01-01-2006
ZWOLLE NL
W. Kamphof
Quality department
It is our policy to continuously improve our products and we therefore reserve the right to
change the product specification without prior notice.
Ferm BV • Lingenstraat 6 • 8028 PM Zwolle • The Netherlands
Page 11
Ferm 11
AKKU-RASENTRIMMER
Die Nummern im nachfolgenden text korrespondieren mit den Abbildungen auf
Seite 2.
Lesen Sie diese Anleitung im Hinblick auf Ihre eigene Sicherheit und die Sicherheit
anderer bitte vor der Benutzung dieses Geräts gründlich durch. Bewahren Sie sie
für künftige Bezugnahmen an einem sicheren Platz auf.
Inhalt
1. Gerätedaten
2. Sicherheitsvorschriften
3. Zusammenbau & Einsatz
4. Wartung
1. GERÄTEDATEN
Technische Daten
Inhalt der Verpackung
1 Hauptgehäuse
1 Schutzabdeckung
1 Schraube
1 Batterie
1 Batterieladegerät
1 Anleitung
1 Sicherheitsvorschrift
1 Garantiekarte
Spannung 18 V—--Ladegerät 230 VAC
Batterieleistung 1,7 Ah
Ladezeit 7-8 Uhr
Leerlaufdrehzahl 7500/min
Gesamtlänge (ausgefahren) 1080 mm
Schnittkreis 305 mm
Gewicht 2.45 kg
Betriebszeit 40 Minuten
Trimmerfaden 1.4 mm
Lpa (Schalldruckpegel) 77 dB(A)
Lwa (Schallleistungspegel) 97 dB(A)
Schwingungswert 2.5 m/s
2
70 Ferm
ºÔÚ¿Ù Á˘·ÏÈ¿ ·ÛÊ·Ï›·˜ Î·È ˆÙÔ·Û›‰Â˜
ºÔÚ¿Ù ÚÔÛٷ٢ÙÈο Á¿ÓÙÈ·
∫Ú·Ù‹ÛÙ ÙÔ˘˜ ·Ú¢ÚÈÛÎfiÌÂÓÔ˘˜ Û ·fiÛÙ·ÛË
∂›Â‰Ô ÈÛ¯‡Ô˜ ‹¯Ô˘
∂П·ЩЩˆМ·ЩИО¿ О·И / ‹ ·ФЪЪИММ¤У· ЛПВОЩЪИО¿ ‹ ЛПВОЩЪФУИО¿ ·УЩИОВ›МВУ· Ъ¤ВИ
У· Ы˘ПП¤БФУЩ·И ЫЩИ˜ О·Щ¿ППЛПВ˜ ЩФФıВЫ›В˜ ·У·О˘ОПТЫВˆ˜.
√‰ËÁȘ ·ÛÊ·ÏÂȘ
с ¶ВЩ¿ЩВ ЩИ˜ П·ЫЩИО¤˜ Ы·ОФ‡ПВ˜ МВ ·ЫК·П‹ ЩЪfiФ - ·ФЩВПФ‡У О›У‰˘УФ ·ЫК˘Н›·˜ БИ· Щ·
МИОЪ¿ ·И‰И¿.
с ¢И·ЩЛЪВ›ЩВ О·ı·Ъfi О·И Щ·ОЩФФИЛМ¤УФ ЩФУ ¯ТЪФ ЫЩФУ ФФ›Ф ВЪБ¿˙ВЫЩВ.
с ªЛ ¯ЪЛЫИМФФИВ›ЩВ ЛПВОЩЪИО¿ ВЪБ·ПВ›· ЫЩЛ ‚ЪФ¯‹ ‹ ЫВ ˘БЪ¿ ВЪИ‚¿ППФУЩ·.
с ªЛ ¯ЪЛЫИМФФИВ›ЩВ ЛПВОЩЪИО¿ ВЪБ·ПВ›· ЫВ ¯ТЪФ˘˜ fiФ˘ ˘¿Ъ¯ВИ О›У‰˘УФ˜ ˘ЪО·БИ¿˜ ‹
¤ОЪЛНЛ˜ - fiˆ˜ ОФУЩ¿ ЫВ В‡КПВОЩ· ˘БЪ¿ ‹ ·¤ЪИ·.
с ªЛУ ·К‹УВЩВ ·И‰И¿ У· ПЛЫИ¿˙Ф˘У ЩФУ ¯ТЪФ ЫЩФУ ФФ›Ф ВЪБ¿˙ВЫЩВ.
с ªЛУ ВОı¤ЩВЩВ Щ· ЛПВОЩЪИО¿ ВЪБ·ПВ›· ЫЩЛ ‚ЪФ¯‹.
с ªЛУ ·К‹УВЩВ ·И‰И¿ ‹ ¿ППФ˘˜ ·УıЪТФ˘˜ У· ·ББ›˙Ф˘У Щ· ЛПВОЩЪИО¿ ВЪБ·ПВ›·
с ªЛУ ·К‹УВЩВ ЩФ ЛПВОЩЪИОfi ВЪБ·ПВ›Ф ¯ˆЪ›˜ ВИЩ‹ЪЛЫЛ О·И ‚Б¿˙ВЩВ ¿УЩФЩВ ЩЛ М·Щ·Ъ›·
·fi ЩФ ВЪБ·ПВ›Ф МВЩ¿ ·fi ЩЛ ¯Ъ‹ЫЛ.
с º˘П¿НЩВ ЩФ ВЪБ·ПВ›Ф ЫВ ¤У· ЫЩВБУfi ¯ТЪФ, ЫЩФУ ФФ›Ф ‰ВУ ¤¯Ф˘У ЪfiЫ‚·ЫЛ ·И‰И¿.
с ºФЪ¿ЩВ ¿УЩФЩВ ЪФЫЩ·ЩВ˘ЩИО¿ Б˘·ПИ¿ ·ЫК·ПВ›·˜. ™·˜ Ы˘УИЫЩФ‡МВ В›ЫЛ˜ У·
¯ЪЛЫИМФФИВ›ЩВ ˆЩФ·Ы›‰В˜.
с ºФЪ¿ЩВ ЩФУ О·Щ¿ППЛПФ ЪФ˘¯ИЫМfi - fi¯И К·Ъ‰И¿ ЪФ‡¯· ‹ ОФЫМ‹М·Щ· Щ· ФФ›· ı·
МФЪФ‡Ы·У У· ¤ЪıФ˘У ЫВ В·К‹ МВ Щ· ОИУФ‡МВУ· М¤ЪЛ ЩФ˘ МЛ¯·У‹М·ЩФ˜.
с ºФЪ¿ЩВ ·УЩИФПИЫıЛЩИО¿ ·Ф‡ЩЫИ·. ªЛ КФЪ¿ЩВ Ы·У‰¿ПИ· ‹ ·УФИОЩ¿ ·Ф‡ЩЫИ·.
с ¶ЪИУ ¯ЪЛЫИМФФИ‹ЫВЩВ ФФИФ‰‹ФЩВ ЛПВОЩЪИОfi ВЪБ·ПВ›Ф, ВП¤БНЩВ ЪТЩ· В¿У ·˘Щfi ¤¯ВИ
КıФЪ¤˜ ‹ ‚П¿‚В˜. ∂¿У ‰И·ИЫЩТЫВЩВ КıФЪ¤˜ ‹ ‚П¿‚В˜, МЛ ¯ЪЛЫИМФФИ‹ЫВЩВ ЩФ
ВЪБ·ПВ›Ф ЪИУ ·fi ЩЛУ ·УЩИО·Щ¿ЫЩ·ЫЛ ЩˆУ ВП·ЩЩˆМ·ЩИОТУ ВН·ЪЩЛМ¿ЩˆУ МВ У¤·.
с ªЛ ¯ЪЛЫИМФФИВ›ЩВ ЛПВОЩЪИО¿ ВЪБ·ПВ›· fiЩ·У В›ЫЩВ ОФ˘Ъ·ЫМ¤УФИ ‹ ¤¯ВЩВ О·Щ·У·ПТЫВИ
ФИУФУВ˘М·ЩТ‰Л ФЩ¿.
с ¶ФЩ¤ МЛУ МВЩ·К¤ЪВЩВ ЩФ ВЪБ·ПВ›Ф / ЩФУ КФЪЩИЫЩ‹ ЩФ˘ ОЪ·ЩТУЩ·˜ ЩФ ·fi ЩФ О·ПТ‰ИФ О·И
ÔÙ¤ ÌËÓ ÙÔ ÙÚ·‚¿Ù ÁÈ· Ó· ÙÔ ‚Á¿ÏÂÙ ·fi ÙËÓ Ú›˙·. º˘Ï¿ÍÙ ÙÔ Î·ÏÒ‰ÈÔ Ì·ÎÚÈ¿ ·fi
ЛБ¤˜ ıВЪМfiЩЛЩ·˜, П¿‰И· О·И ·И¯МЛЪ¤˜ ВИК¿УВИВ˜.
с ªЛ ˙ФЪ›˙ВЩВ ЩФ МЛ¯¿УЛМ· - ·К‹ЫЩВ ЩФ У· ПВИЩФ˘ЪБВ› ЫЩФУ О·УФУИОfi ЩФ˘ Ъ˘ıМfi.
с ªЛУ ЩВУЩТУВЫЩВ ФП‡ О·Щ¿ ЩЛ ‰И¿ЪОВИ· ЩЛ˜ ВЪБ·Ы›·˜ - МФЪВ› У· ¯¿ЫВЩВ ЩЛУ ИЫФЪЪФ›·
Ы·˜.
с ªЛ ¯ЪЛЫИМФФИВ›ЩВ ФЩ¤ ЩФ МЛ¯¿УЛМ· ·˘Щfi В¿У ‰ВУ ¤¯ВИ ЩФФıВЩЛıВ› ЩФ ЪФЫЩ·ЩВ˘ЩИОfi
О·¿ОИ. ∆Ф О·¿ОИ ·˘Щfi ı· Ъ¤ВИ У· В›У·И ¿УЩФЩВ ЩФФıВЩЛМ¤УФ ЫЩФ МЛ¯¿УЛМ·.
Page 12

Ferm 69
¶ПЛЪФКФЪИВ˜ ЪФ˚ФУЩФ˜
∂ÈÎ. 1 + 1a
1. ¢И·ОfiЩЛ˜ ∂УВЪБФФ›ЛЫЛ˜/∞ВУВЪБФФ›ЛЫЛ˜ (On/Off)
2. ƒ˘ıМИ˙fiМВУЛ МЪФЫЩИУ‹ ¯ВИЪФП·‚‹
3. ∆ЛПВЫОФИОfi˜ ЫЩ‡ПФ˜
4. ∫ÔÏ¿ÚÔ Ú‡ıÌÈÛ˘ Ì‹ÎÔ˘˜ ÙÔ˘ ÛÙ‡ÏÔ˘
5. ¶ÚÔÛٷ٢ÙÈÎfi η¿ÎÈ
6. ª·Ù·Ú›·
7. ∞ÛÊ¿ÏÂÈ·
8. ºФЪЩИЫЩ‹˜ М·Щ·Ъ›·˜
9. ∫Ф˘М› Ъ‡ıМИЫЛ˜ ¯ВИЪФП·‚‹˜
2. √¢∏°π∂™ ∞™º∞§∂π∞™
∂ÂÍ‹ÊËÛË Û˘Ì‚fiψÓ
™’ ·˘Щfi ЩФ ВБ¯ВИЪ›‰ИФ О·И/‹ ЫЩФ МЛ¯¿УЛМ· ¯ЪЛЫИМФФИФ‡УЩ·И Щ· ·ОfiПФ˘ı· Ы‡М‚ФП·:
¢È·‚¿ÛÙ ÙȘ Ô‰ËÁ›Â˜.
™В ВУ·ЪМfiУИЫЛ МВ Ф˘ЫИТ‰Л ИЫ¯‡ФУЩ· ЪfiЩ˘· ·ЫК·ПВ›·˜ ЩˆУ ∂˘Ъˆ·˚ОТУ
√‰ЛБИТУ.
ªË¯·Ó‹ ÎÏ¿Û˘ πI – ¢ÈÏ‹ ÌfiÓˆÛË - ¢ÂÓ ··ÈÙÂ›Ù·È ÁÂȈ̤ÓÔ˜ ÚÂ˘Ì·ÙÔÏ‹Ù˘.
АФ‰ЛПТУВИ О›У‰˘УФ ЩЪ·˘М·ЩИЫМФ‡, ı·У¿ЩФ˘ ‹ ˙ЛМИ¿˜ ЩФ˘ ВЪБ·ПВ›Ф˘, ЫВ
ВЪ›ЩˆЫЛ Ф˘ ‰ВУ ·ОФПФ˘ı‹ЫВЩВ ЩИ˜ Ф‰ЛБ›В˜ Ф˘ ·У·К¤ЪФУЩ·И ЫВ ·˘Щfi ЩФ
ВБ¯ВИЪ›‰ИФ.
АФ‰ЛПТУВИ О›У‰˘УФ ЛПВОЩЪФПЛН›·˜.
¡· ·У·О˘ОПТУВЩВ ¿УЩФЩВ ЩИ˜ М·Щ·Ъ›В˜.
ªfiУФУ БИ· ВЫˆЩВЪИОФ‡˜ ¯ТЪФ˘˜.
£ВЪМИО‹ ЪФЫЩ·Ы›·.
¢ВУ ı· Ъ¤ВИ У· ¯ЪЛЫИМФФИВ›Щ·И ЫЩЛ ‚ЪФ¯‹.
12 Ferm
Merkmale
Abb. 1 + 1a
1. Ein/Aus-Schalter
2. Verstellbarer Vordergriff
3. Teleskopstange
4. Teleskopstangen-Verstellring
5. Schutzabdeckung
6. Batterie
7. Sicherheitsverriegelungsknopf
8. Batterieladegerät
9. Griffverstellknopf
2. SICHERHEITSVORSCHRIFTEN
Erklärung der Symbole
In dieser Anleitung und/oder am Gerät werden folgende Symbole verwendet:
Anweisungen durchlesen.
Entspricht grundlegenden anwendbaren Sicherheitsnormen der europäischen
Richtlinien.
Gerät Klasse II - Doppelisolierung - Ein geerdeter
Stecker wird nicht benötigt.
Gefahr von Materialbeschädigung bzw. Verletzungen.
Zeigt eine vorhandene Spannung.
Batterien immer recyceln
Nur zur Benutzung in Gebäuden
Thermoschutzvorrichtung
Nicht im Regen benutzen.
Page 13

Ferm 13
Tragen Sie Augen- und Gehörschutzvorrichtungen.
Schutzhandschuhe tragen
Umstehende fernhalten
Schallleistungspegel
Schadhafte und/oder entsorgte elektrische oder elektronische Geräte müssen an
den dafür vorgesehenen Recycling-Stellen abgegeben werden.
Sicherheitsvorschriften
• Kunststoffbeutel sicher entsorgen - sie stellen für kleine Kinder ein Erstickungsrisiko dar.
• Halten Sie Ihren Arbeitsbereich sauber und ordentlich.
• Benutzen Sie Elektrowerkzeuge nicht im Regen oder in feuchten Umgebungen.
• Benutzen Sie Elektrowerkzeuge nicht an Stellen mit Brand- oder Explosionsgefahr - d.h. in
der Nähe von entzündbaren Flüssigkeiten oder Gasen.
• Halten Sie Kinder aus Ihrem Arbeitsbereich fern.
• Setzen Sie die Werkzeuge keinem Regen aus.
• Lassen Sie Elektrowerkzeuge nicht von Kindern oder anderen Personen berühren.
• Lassen Sie das Elektrogerät nicht unbeaufsichtigt zurück und entfernen Sie die Batterie
nach Benutzung immer aus dem Gerät.
• Gerät an einer trockenen, für Kinder nicht erreichbaren Stelle aufbewahren.
• Tragen Sie immer eine Schutzbrille. Wir empfehlen auch den Gebrauch von
Gehörschützern.
• Tragen Sie die richtige Kleidung - keine losen Teile oder Schmuckstücke - und stellen Sie
sicher, dass Kleidungsstücke nicht mit sich bewegenden Teilen in Berührung kommen
können.
• Tragen Sie rutschfeste Schuhe, keine Sandalen oder vorne offene Schuhe.
• Kontrollieren Sie jedes Elektrowerkzeug vor Benutzung zuerst auf beschädigte Teile und
benutzen Sie es, falls solche Teile gefunden werden, nicht, bevor das (die) betreffende(n)
Teil(e) durch neue Teile ersetzt wurde(n).
• Benutzen Sie Elektrowerkzeuge nicht, wenn Sie müde sind oder Alkohol zu sich
genommen haben.
• Tragen Sie das Werkzeug/das Ladegerät nie am Kabel und ziehen Sie es nie mit einem
heftigen Ruck aus der Steckdose. Halten Sie das Kabel von Hitze, Öl und scharfen Kanten
fern.
• Wenden Sie bei der Benutzung des Geräts keine Gewalt an - lassen Sie es in dem Tempo
arbeiten, für welches es ausgelegt ist.
• Lehnen Sie sich bei der Arbeit nicht zu weit hinüber - Sie könnten das Gleichgewicht
verlieren.
• Benutzen Sie dieses Gerät nur mit angebrachter Schutzabdeckung. Diese muss stets an
ihrem Platz bleiben.
68 Ferm
Ã√ƒ∆√∫√¶∆π∫Ÿ ª¶∞∆∞ƒπ∞™
√И ·ЪИıМФИ ЫЩФ ·Ъ·О·Щˆ ОВИМВУФ ·У·КВЪФУЩ·И ЫЩИ˜ ВИОФУВ˜ ЩЛ˜ ЫВПИ‰·˜ 2.
°И· ЩЛУ ·ЫК¿ПВИ¿ Ы·˜ ·ПП¿ О·И БИ· ЩЛУ ·ЫК¿ПВИ· ЩˆУ ¿ППˆУ, Ы·˜ ·Ъ·О·ПФ‡МВ
У· ‰И·‚¿ЫВЩВ ЪФЫВОЩИО¿ ·˘Щ¤˜ ЩИ˜ Ф‰ЛБ›В˜ ЪИУ ¯ЪЛЫИМФФИ‹ЫВЩВ ЩФ МЛ¯¿УЛМ·
·˘Ùfi. º˘Ï¿ÍÙ ÙȘ Ô‰ËÁ›Â˜ Û ¤Ó· ·ÛʷϤ˜ ̤ÚÔ˜ ÁÈ· Ó· ÌÔÚ›Ù ӷ ÙȘ
Û˘Ì‚Ô˘Ï‡ÂÛÙ ÛÙÔ Ì¤ÏÏÔÓ.
¶ÂÚȯÔÌÂÓ·
1. ¢Â‰Ô̤ӷ Ì˯·Ó‹Ì·ÙÔ˜
2. √‰ËÁ›Â˜ ·ÛÊ·Ï›·˜
3. ™˘У·ЪМФПfiБЛЫЛ & ПВИЩФ˘ЪБ›·
4. ™˘ÓÙ‹ÚËÛË
1. ¢∂¢√ª∂¡∞ ª∏Ã∞¡∏ª∞∆√™
∆¯ÓÈΘ ÚԉȷÁڷʘ
¶ÂÚȯÔÌÂÓ· Ù˘ Û˘Û΢·ÛÈ·˜
1 ∫‡ЪИФ ЫТМ· ¯ФЪЩФОФЩИОФ‡ МЛ¯·У‹М·ЩФ˜
1 ¶ЪФЫЩ·ЩВ˘ЩИОfi О·¿ОИ
1 µ›‰·
1 ª·Щ·Ъ›·
1 ºФЪЩИЫЩ‹˜ М·Щ·Ъ›·˜
1 ∂Б¯ВИЪ›‰ИФ Ф‰ЛБИТУ ¯Ъ‹ЫВˆ˜
1 √‰ЛБ›В˜ ·ЫК¿ПВИ·˜
1 ∫¿ЪЩ· ВББ‡ЛЫЛ˜
∂ϤÁÍÙÂ, Â¿Ó Ë Ì˯·Ó‹, Ù· ÂχıÂÚ· ÂÍ·ÚÙ‹Ì·Ù· Î·È Ù· ·ÍÂÛÔ˘¿Ú ‰ÂÓ ¤·ı·Ó ‚Ï¿‚˜ ηٿ
ÙË ÌÂÙ·ÊÔÚ¿.
∆¿ÛË 18V—--∆¿ЫЛ КФЪЩИЫЩ‹ 230 V~
∞fi‰ÔÛË Ì·Ù·Ú›·˜ 1,7 Ah
ГЪfiУФ˜ КfiЪЩИЫЛ˜ 7 - 8 hr
¯ˆÚ›˜ ÊÔÚÙ›Ô 7500/Ы.·.П.
™˘УФПИОfi М‹ОФ˜ (·УФИБМ¤УФ) 1080 mm
∫‡ÎÏÔ˜ ÎÔ‹˜ 305 mm
µ¿ÚÔ˜ 2,45 kg
ÃÚfiÓÔ˜ ÂÚÁ·Û›·˜ 40 ПВЩ¿
∫ПˆЫЩ‹ ¯ФЪЩФОФ‹˜ 1,4 mm
Lpa (˯ËÙÈ΋ ›ÂÛË) 77 dB(A)
Lwa (∂›Â‰Ô ÈÛ¯‡Ô˜ ıÔÚ‡‚Ô˘) 97 dB(A)
∆ÈÌ‹ ‰fiÓËÛ˘ 2,5 m/s
2
Page 14

Ferm 67
CE ДЕКЛАРАЦИЯ О СООТВЕТСТВИИ (RUS)
Под нашу исключительную ответственность удостоверяем, что данное изделие
удовлетворяет следующим стандартам и нормативным документам
EN 60335-1 (2001), EN 60335-2-91 (2003), EN 60335-2-29 (2002), prEN/ISO 10518 (2003)
в соответствии с правилами:
98/37/EEC, 73/23/EEC, 89/336/EEC
начиная с 01-03-2006
ZWOLLE NL
В. Капмхоф
Отдел контроля качества
Постоянное улучшение нашей продукции является нашей политикой и, поэтому, мы
оставляем за собой право на изменение технических характеристик продукции без
предварительного уведомления.
Ferm BV • Lingenstraat 6 • 8028 PM Zwolle • Нидерланды
14 Ferm
• Verwenden Sie nur von Ferm gelieferte Ersatzteile und Vorrichtungen. Bei Benutzung
anderer Vorrichtungen als den von Ferm gelieferten oder empfohlenen wird Ihre Garantie
hinfällig und es könnten Gefahren auftreten.
• Benutzen Sie dieses Gerät nur für den vorgesehenen Zweck - das Trimmen von Gras und
kleinen Büschen.
Vor allem - seien Sie vorsichtig!
Spezielle Sicherheitshinweise
• Halten Sie Hände und Füße jederzeit vom Arbeitsbereich fern. Halten Sie Ihre zweite
(vordere) Hand am Hilfsgriff.
• Halten Sie den Trimmer stets in sicherem Abstand vom Körper.
• Tragen Sie immer eine Schutzbrille.
• Benutzen Sie den Trimmer nur bei Tageslicht.
• Vergewissern Sie sich, dass die Belüftungsöffnungen jederzeit frei von Rückständen sind.
• Vergewissern Sie sich, dass sich innerhalb von 3 Metern von Ihrem Trimmbereich keine
Personen oder Tiere befinden.
• Vergewissern Sie sich, dass die Klemmen durch andere Metallteile wie Schrauben, Nägel
usw. nicht kurzgeschlossen werden können.
• Entfernen Sie vor Benutzung des Trimmers Steine, Stöcke, Spielzeug oder andere
Fremdkörper aus dem Arbeitsbereich.
• Greifen Sie nie in die Geräteunterseite, während die Batterie noch angeschlossen ist.
• Halten Sie die Schneidwerkzeuge zur Erzielung besserer Leistung scharf und sauber.
Beachten Sie die Anweisungen für Schmierung und Reinigung von Zubehörteilen. Halten
Sie die Griffe trocken und frei von Öl und Fett.
• Tragen Sie den Trimmer nicht mit dem Finger am Schalter.
• Die Benutzung von anderen Zubehörteilen oder Vorrichtungen als den in dieser Anleitung
empfohlenen kann Verletzungsgefahr mit sich bringen.
• Vergewissern Sie sich, dass der Batteriesatz der für das Werkzeug geeignete ist.
• Vergewissern Sie sich, dass die Außenfläche von Batteriesatz oder Werkzeug sauber und
trocken ist, bevor Sie sie in das Ladegerät einstecken.
• Vergewissern Sie sich, dass die Batterien unter Verwendung des vom Hersteller
empfohlenen richtigen Ladegeräts geladen werden. Falsche Benutzung kann die Gefahr
von Stromschlägen, Überhitzung oder Auslaufen von ätzenden Flüssigkeiten aus der
Batterie mit sich bringen.
Sollten Sie mit diesem Produkt überhaupt Probleme haben oder Ersatzteile
benötigen, setzen Sie sich bitte mit Ihrem nächstgelegenen autorisierten
Servicecenter oder Vertragshändler in Verbindung.
Sicherheitshinweise für das Batterieladegerät
Das Ladegerät wurde speziell für den Einsatz an einem Standard-Haushaltstromnetz (230240 Volt) konstruiert. Versuchen Sie nicht, es an ein anderes Stromnetz anzuschließen. Bitte
lesen und beachten Sie die auf Ladegerät und Batterie aufgedruckten Anweisungen. Die
Batterie darf nur im Innern eines Gebäudes und an einer sauberen, trockenen Stelle geladen
werden.
Page 15

Ferm 15
Warnung! Wenn die Batterie geborsten oder beschädigt ist oder heftiger
Stoßeinwirkung ausgesetzt wurde, darf sie nicht in das Ladegerät eingesetzt
werden. Ein Stromschlag oder tödlicher Elektroschock könnte die Folge sein. Die
Batterie muss erneuert und die beschädigte Batterie sicher entsorgt werden.
Vergewissern Sie sich, dass sich das Ladegerät samt Zuleitung nicht an einer
Stelle befindet, wo es umkippen oder wo darauf getreten werden kann.
Warnung! Lassen Sie keinerlei Flüssigkeit mit dem Ladegerät in Berührung
kommen. Es besteht Stromschlaggefahr. Vor dem Einsetzen in das Ladegerät
muss die Batterie völlig trocken sein.
Warnung! Falls bei missbräuchlicher Benutzung Flüssigkeit aus der Batterie
austritt, ist jeder Kontakt damit zu vermeiden.
Geschieht dies versehentlich, gründlich mit Wasser spülen. Kommt außerdem
Flüssigkeit mit den Augen in Berührung, Arzt hinzuziehen.
Reinigung
Um die Stromschlaggefahr zu verringern, muss der Stecker des Ladegeräts vor
einer Reinigung gezogen und die Batterie herausgenommen werden.
Lassen Sie die Batterie nach dem Gebrauch an einer sicheren, kühlen, gut belüfteten Stelle
abkühlen, die für Kinder nicht zugänglich ist. Versuchen Sie nicht, die Batterie mit einem anderen
Ladegerät als dem mit diesem Produkt gelieferten aufzuladen. Versuchen Sie nicht, das
Ladegerät zu zerlegen, falls es nicht funktioniert; bringen Sie es zur Reparatur zum
nächstgelegenen autorisierten Servicecenter. Bewahren Sie Ladegerät, Batterie und das Gerät
selbst stets an einer sicheren, trockenen Stelle auf, die für Kinder nicht zugänglich ist und an der die
Temperatur 40 °C nicht überschreiten kann, z.B. nicht an Stellen, die unter Glasscheiben direkter
Sonneneinstrahlung ausgesetzt sind bzw. in der Nähe von Metallbearbeitungsbereichen liegen.
Entsorgung der Batterie
Entsorgen Sie Ihre Batterie sicher. Die Batterie nicht verbrennen, da Explosionsgefahr
besteht. Bringen Sie die Batterie zu Ihrem örtlichen Recycling-Center.
3. ZUSAMMENBAU & EINSETZ
Schutzabdeckung anbringen
Abb. 2
Bringen Sie die Schutzabdeckung wie abgebildet mit der mitgelieferten einzelnen Schraube
(1) am Gerätefuß an.
Batterie einsetzen
Abb. 3
Pressen Sie die Batterie nach dem Aufladen wie abgebildet in das Batteriefach. Um die
Batterie herauszunehmen, drücken Sie einfach die seitlich an der Batterie befindlichen
Arretierungen ein und ziehen die Batterie heraus.
66 Ferm
Неисправности
В случае неисправности, напр., после износа какой-либо части, обратитесь по адресу
пункта обслуживания, указанному в гарантийном талоне. Покомпонентное
представление изображения частей, которые можете заказать, вы найдете на
последней странице руководства.
Защита окружающей среды
Во избежание транспортных повреждений изделие поставляется в прочной упаковке.
Значительная часть материалов упаковки подлежит утилизации, поэтому просим
передать упаковку в соответствующую специализированную организацию.
Неисправный и/или бракованный электрический или электронный прибор
должен быть утилизирован должным образом.
Гарантия
Для ознакомления с условиями гарантии, прочитайте гарантийный талон на обороте
этой инструкции по эксплуатации.
Признак неисправности
• Устройство не работает.
• Устройство
перегружено.
• Устройство не срезает.
• Леска не может
продвигаться.
Возможная причина
• Аккумулятор разряжен.
• Трава слишком высокая.
• Леска слишком
коротка/порвалась.
• Пустой картридж.
• Леска внутри картриджа
спуталась.
Способ устранения
• Подзарядите или
замените аккумулятор.
• Срезайте в несколько
приёмов.
• Продвиньте леску
вручную/автоматически.
• Замените картридж
автоматически.
• Осмотрите картридж,
при необходимости перемотайте.
Page 16

Ferm 65
Эксплуатация
Рис. 1
Для того чтобы начать работать, нажмите блокировочную кнопку (7) и надавите на
переключатель (1). Для того, чтобы прекратить работу, отпустите переключатель (1).
4. УХОД
Уход
Объём работ по уходу за косилкой минимален.
• После каждого использования удалите накопившуюся траву или отходы из
области ножа. Проверьте износ ножа и при необходимости замените его.
• Не используйте абразивные материалы для чистки устройства и не опускайте его
в воду.
• Если необходимо заменить или отремонтировать детали устройства,
используйте только комплектацию, совместимую с фирмой Ferm.
• Если необходимо отремонтировать или произвести сервис Вашего устройства,
обратитесь в место его покупки.
Хранение
В случае хранения косилки более 6 недель:
• Полностью разрядите комплект аккумуляторов (путем работы устройства), а
после этого зарядите комплект в течение 12 часов.
• Удалите собравшиеся отходы и протрите внешние поверхности тканью без
бахромы или мягкой щёткой.
• Храните устройства в сухом месте вне зоны досягаемости для детей.
• Если устройство будет храниться в гараже или подсобном строении, упакуйте его
в полиэтиленовый пакет для предотвращения доступа влажности.
Примечание: Нет необходимости смазывать устройство.
Устранение неполадок
В следующей таблице приведены признаки и действия, которые вы можете выполнить,
если устройство не функционирует нормально. Если в ней нет определения/способа
решения проблемы, обратитесь в сервисный центр.
Предупреждение! Перед поиском неполадок снимете аккумулятор.
16 Ferm
Benutzung des Batterieladegeräts
Ladezeit: ca. 1 Stunde.
Setzen Sie die Batterie in das Ladegerät ein (dies ist nur in einer Richtung möglich). Stecken Sie
das Ladegerät in die Steckdose und schalten Sie es ein. Leuchtet die Anzeigelampe rot auf, wird
die Batterie geladen. Leuchtet die Anzeigelampe grün auf, ist die Batterie vollständig geladen.
Trimmerfaden ausrollen
Wenn der Trimmerfaden ausgerollt werden muss, klopfen Sie mit der Mitte der Nabenkappe
einfach auf den Boden.
Griff einstellen
Abb. 4
Zum Verstellen des Vordergriffs lösen Sie die Verriegelungsschraube (9) durch Drehen im
Uhrzeigersinn. Sind Sie mit der Griffposition zufrieden, ziehen Sie die Schraube wieder an.
Neuen Trimmerfaden aufziehen
Abb. 2
Wenn Sie den Trimmerfaden erneuern oder einen neuen Faden einlegen müssen, entfernen
Sie die Batterie aus dem Gerät und gehen wie folgt vor:
• Nabenkappe gegen den Uhrzeigersinn nach unten schieben und verdrehen. Nabenkappe
von der Antriebswelle abziehen (Feder dabei nicht verlieren!). Ziehen Sie die
Trimmerfadenpatrone aus der Nabenkappe und ersetzen Sie sie entweder durch eine
neue Patrone oder ziehen Sie neuen 1,6 mm-Faden auf. Ziehen Sie 150 mm Faden durch
das Loch in der Nabenkappe und setzen Sie die Patrone wieder ein, wobei sichergestellt
sein muss, dass der Faden nicht eingeklemmt wird. Die aus Feder und Nabenkappe
bestehende Einheit wieder an der Antriebswelle anbringen und bis zum Einrasten drehen.
Trimmergriff ausfahren
Abb. 1
Griffring (10) in Stellung ‘Entriegeln’drehen und Griff herausziehen. Sind Sie mit der
Griffposition zufrieden, drehen Sie den Griffring in Stellung ‘Verriegeln’.
Benutzung
Abb. 1
Um das Gerät zu starten, betätigen Sie den Sicherheitsknopf (7) und den Auslöser (1). Zum
Abschalten des Geräts lassen Sie den Auslöser (1) los.
4. WARTUNG
Wartung
Ihr Trimmer benötigt nur minimale Wartung.
• Entfernen Sie nach jeder Verwendung Ansammlungen von Gras oder Verschmutzung im
Bereich der Messer. Kontrollieren Sie die Messer auf Abnutzung und ersetzen Sie diese
gegebenenfalls.
Page 17

Ferm 17
• Verwenden Sie keine scheuernden Mittel zur Reinigung des Produkts, und tauchen Sie es
nicht unter Wasser.
• Wenn Teile ersetzt oder repariert werden müssen, verwenden Sie nur Ersatzteile,
die von Ferm als geeignet anerkannt wurden.
• Wenn Ihr Produkt gewartet oder repariert werden muss, geben Sie es dort ab, wo Sie es
gekauft haben.
Lagerung
Bei einer Lagerung länger als sechs Wochen:
• Entladen Sie den Akku vollständig (indem Sie das Gerät laufen lassen), und laden Sie
diesen dann 12 Stunden lang auf.
• Entfernen Sie alle Verschmutzungen, und wischen Sie alle Außenflächen mit einem
trockenen, fusselfreien Tuch oder einer weichen Bürste ab.
• Lager Sie das Gerät an einem trockenen und für Kinder nicht zugänglichen Ort.
• Wenn es in einem Schuppen gelagert wird, verpacken Sie das Gerät in eine Plastiktüte, um
es vor Feuchtigkeit zu schützen.
Hinweis: Das Gerät muss nicht geölt werden.
Fehlersuche
In der nachstehenden Tabelle sind Kontrollen und Maßnahmen angegeben, die Sie
durchführen können, falls Ihr Gerät nicht einwandfrei arbeitet. Wird das Problem damit nicht
festgestellt/behoben, setzen Sie sich bitte mit Ihrem Servicecenter in Verbindung.
Warnung! Entfernen Sie vor jeder Fehlersuche die Batterie!
Fehler
Sollte beispielsweise nach Abnutzung eines Teils ein Fehler auftreten, dann setzen Sie sich
bitte mit der auf der Garantiekarte angegebenen Serviceadresse in Verbindung. Im hinteren
Teil dieser Anleitung befindet sich eine ausführliche Übersicht über die Teile, die bestellt
werden können.
Symptom
• Gerät funktioniert nicht.
• Gerät überlastet.
• Gerät schneidet nicht.
• Faden kann nicht autom.
zugeführt werden.
Mögliche Ursache
• Batterie schwach .
• Rasen zu hoch.
• Faden zu
kurz/abgerissen.
• Spule leer.
• Faden in der Spule
verheddert.
Abhilfe
• Batterie aufladen oder
austauschen.
• Stufenweise schneiden.
• Faden von
Hand/automatisch
zuführen.
• Spule austauschen.
• Spule überprüfen,
nötigenfalls neu wickeln.
64 Ferm
3. МОНТАЖ& ЭКСПЛУАТАЦИЯ
Установка защитного экрана
Рис. 2
Установите защитный экран на основание триммера при помощи прилагаемого
одиночного болта (1), как показано на рисунке.
Установка аккумулятора
Рис. 3
Зарядив, плотно установите аккумулятор в аккумуляторный отсек, как показано на
рисунке. Чтобы вынуть аккумулятор, просто нажмите на высвобождающие захваты со
стороны аккумулятора и вытащите его.
Как использовать зарядное устройство для аккумулятора
Время зарядки: Примерно 1 час.
Вставьте аккумулятор в зарядное устройство (существует только один способ). Подключите
к сети и включите зарядное устройство. Когда светится красный индикатор, идет зарядка
аккумулятора. Когда индикатор светится зелёным, аккумулятор полностью заряжен.
Как удлинить леску триммера
Когда вам необходимо удлинить леску триммера, просто слегка ударьте центром
колпачка ступицы о землю.
Регулировка рукоятки
Рис. 4
Для регулировки передней рукоятки, ослабьте крепёжный болт (9) повернув его по
часовой стрелке. Если вы довольны положением рукоятки, затяните болт.
Как отрегулировать новую леску триммера
Рис. 2
Если вам необходимо заменить или отрегулировать новую леску триммера, снимите
аккумулятор с триммера и выполните следующее:
• Нажмите вниз и поверните колпачок ступицы против часовой стрелки. Потяните
колпачок ступицы с приводного вала (не потеряйте пружину!). Вытяните картридж
лески триммера из колпачка ступицы и либо замените его на новый картридж, либо
намотайте новую леску 1.6 мм.
• Протяните 150 мм лески через отверстие в колпачке ступицы и повторно установите
картридж, убедившись, что леска не заблокирована. Установите на место пружину и
колпачок ступицы в сборе на вращающийся вал и поверните так, чтобы он с щелчком
зафиксировался.
Как удлинить рукоятку триммера
Рис. 1
Поверните держатель (10) в положение ‘разблокировано’ и потяните. Если вы довольны
положением рукоятки, поверните держатель в положение ‘заблокировано’.
Page 18

Ferm 63
Правила безопасности при применении зарядного устройства
Зарядное устройство специально предназначено для зарядки от стандартного
источника электроснабжения в домашних условиях (230 В – 240 В). Не пытайтесь
подключить его к каким-либо другим источникам электроэнергии.
Прочитайте и, пожалуйста, применяйте инструкции, напечатанные на зарядном
устройстве и аккумуляторе.
Аккумулятор должен заряжаться только в помещении: в чистом, сухом месте.
Предупреждение! Если аккумулятор треснул или поврежден, или получил
сильный удар, его нельзя вставлять в зарядное устройство. Существует
вероятность поражения электрическим током или смерти от
электрического удара. Следует заменить аккумулятор, а повреждённый
аккумулятор следует утилизировать с соблюдением мер безопасности.
Храните зарядное устройство и соединительные провода зарядного
устройства так, чтобы о них не спотыкались и не наступали на них.
Предупреждение! Не допускайте соприкосновения никаких жидкостей с
зарядным устройством. Существует вероятность поражения
электрическим током. Перед установкой в зарядное устройство
аккумулятор должен быть совершенно сухим.
Предупреждение! В случае если при неправильном обращении из
аккумулятора вытекла жидкость, избегайте контакта с ней.
В случае контакта с жидкостью промойте место контакта большим
количеством воды. В случае попадания жидкости в глаза, обратитесь в
медицинское учреждение.
Чистка
Во избежание поражения электрическим током перед чисткой
отключайте зарядное устройство от сети и снимайте аккумулятор.
После применения подождите, пока аккумулятор остынет в безопасном, прохладном,
хорошо проветриваемом и недоступном для детей месте. Не пытайтесь зарядить
аккумулятор при помощи другого зарядного устройства, не входящего в данный
комплект. Не пытайтесь разбирать зарядное устройство; если оно не функционирует,
отнесите его в ближайший сервисный центр для ремонта. Всегда храните зарядное
устройство, аккумулятор и приспособления в безопасном, сухом, недоступном для
детей месте, в котором температура не превышает 40 °C (104 °F), избегая хранения на
открытом, подверженном прямым лучам солнца месте, за стеклом или рядом с
металлическими конструкциями.
Утилизация аккумулятора
Обеспечьте безопасную утилизацию аккумулятора. Не сжигайте аккумулятор, он может
взорваться. Отнесите аккумулятор в местный центр переработки.
18 Ferm
Umwelt
Um Transportschäden zu verhindern, wird die Maschine in einer soliden Verpackung geliefert.
Die Verpackung besteht weitgehend aus verwertbarem Material. Benutzen Sie also die
Möglichkeit zum Recyclen der Verpackung.
Schadhafte und/oder entsorgte elektrische oder elektronische Geräte müssen an
den dafür vorgesehenen Recycling-Stellen abgegeben werden.
Garantie
Lesen Sie die Garantiebedingungen auf der separat beigefügten Garantiekarte.
CE KONFORMITÄTSERKLÄRUNG (D)
Wir erklären in alleiniger Verantwortung, daß dieses Produkt mit den folgenden Normen oder
normativen Dokumenten übereinstimmt:
EN 60335-1 (2001), EN 60335-2-91 (2003), EN 60335-2-29 (2002), prEN/ISO 10518 (2003)
entsprechend den Vorschriften:
98/37/EWG, 73/23/EWG, 89/336/EWG
ab 01-03-2006
ZWOLLE NL
W. Kamphof
Quality department
Unsere Firmenpolitik ist auf ständige Verbesserung unserer Produkte ausgerichtet und wir
behalten uns das Recht vor, die Produktspezifikation ohne vorherige Benachrichtigung zu
ändern.
Ferm BV • Lingenstraat 6 • 8028 PM Zwolle • Niederlande
Page 19

Ferm 19
AKKUGRASTRIMMER
De nummers in de nu volgende tekst verwijzen naar de afbeeldingen op pag. 2.
Voor uw eigen veiligheid en die van anderen raden wij u aan deze
gebruikershandleiding zorgvuldig door te lezen, voordat u dit apparaat in gebruik
neemt. Bewaar deze gebruikershandleiding en de overige documentatie bij het
apparaat.
Inhoud
1. Machinegegevens
2. Veiligheidsvoorschrifften
3. Montage & gebruik
4. Onderhoud
1. MACHINEGEGEVENS
Technische specificaties
Inhoud van de verpakking
1 Grastrimmer
1 Beschermkap
1 Schroef
1 Accu
1 Oplaadapparaat
1 Gebruikershandleiding
1 Veiligheidsinstructies
1 Garantiekaart
Controleer het apparaat, de losse onderdelen en toebehoren op transportschade.
Spanning 18 V—--Spanning van oplaadapparaat 230 V~
Accuvermogen 1,7 ampère-uur
Oplaadtijd 7 - 8 uur
Toerental onbelast 7500/min
Totale lengte (verlengd) 1080 mm
Snijcirkel 305 mm
Gewicht 2,45 kg
Gebruikstijd 40 minuten
Grastrimmerdraad 1,4 mm
Lpa (geluidsdruk) 77 dB (A)
Lwa (geluidsvermogen) 97 dB (A)
Vibratiewaarde 2,5 m/s
2
62 Ferm
• Никогда не используйте это устройство без установленного защитного экрана. Он
должен быть всегда установлен.
• Используйте запасные детали и приспособления только от компании Ferm.
Применение приспособлений от других поставщиков и не рекомендованных
компанией Ferm аннулирует вашу гарантию и может быть опасным.
• Используйте это устройство только по его прямому назначению – подрезка газонов и
мелкого кустарника.
Прежде всего - Будьте осторожоы!
Специальные правила безопасности
• Всё время держите руки и ноги на расстоянии от срезаемой поверхности. Второй
(передней) рукой держите устройство за вспомогательную рукоять.
• Всегда располагайте триммер на безопасном расстоянии от тела.
• Всегда надевайте защитные очки.
• Используйте триммер только в светлое время суток.
• Следите, чтобы вентиляционные отверстия всегда были свободны от обрезков.
• Следите, чтобы на расстоянии 3 метров от обрабатываемого участка не было людей
и животных.
• Следите, чтобы электровыводы не могли быть закорочены другими металлическими
деталями, такими как шурупы и т.д.
• Перед использованием триммера удалите все камни, палки, игрушки или другие
посторонние предметы с обрабатываемого участка.
• Никогда не касайтесь нижней части устройства при установленном аккумуляторе.
Выньте аккумулятор перед удалением или касанием колпачка ступицы лески
триммера.
• Для нормального функционирования содержите режущие инструменты острыми и
чистыми. В процессе смазки и использования чистящих приспособлений следуйте
инструкциям. Периодически осматривайте шнур прибора и в случае его
повреждения ремонтируйте в специализированном сервисном центре. Содержите
рукоятки сухими и чистыми, без следов масла и смазки.
• Не переносите триммер, держа палец на переключателе.
• Использование каких-либо принадлежностей или приспособлений, отличных от
рекомендованных данным руководством, может повлечь вероятность травмы.
• Убедитесь, что аккумулятор соответствует инструменту.
• Перед размещением в зарядном устройстве убедитесь, что наружная поверхность
аккумулятора или инструмента чистая и сухая.
• Убедитесь, что аккумуляторы заряжаются при помощи зарядного устройства,
соответствующего требованиям производителя. Неправильное использование
может вызвать риск поражения электрическим током, перегрев или утечку
агрессивной жидкости из аккумулятора.
В случае возникновения каких-либо проблем, связанных с этим инструментом,
или в случае необходимости в запасных деталях, обратитесь в ближайший
специализированный сервисный центр или к дилеру.
Page 20

Ferm 61
Надевайте средства защиты органов слуха и зрения
Надевайте защитные перчатки
Посторонним вход запрещен
Уровень давления звука
Неисправный и/или бракованный электрический или электронный прибор
должен быть утилизирован должным образом.
Инструкция по безопасности
• Обеспечьте безопасную утилизацию пластиковых пакетов, так как они являются
источником опасности удушения для детей.
• Содержите рабочее место в чистоте.
• Не используйте электроинструменты во время дождя или в условиях повышенной
влажности.
• Не используйте электроинструменты, если существует риск возникновения пожара
или взрыва, например, вблизи легковоспламеняющихся жидкостей или газа.
• Не пускайте детей на рабочую территорию.
• Не оставляйте инструменты под дождём.
• Не позволяйте детям или другим людям касаться электроинструментов.
• Не оставляйте электроинструмент без присмотра и всегда вынимайте аккумулятор
после использования.
• Храните в сухом, недоступном для детей месте.
• Всегда работайте в защитных очках. Мы рекомендуем использовать также средства
защиты органов слуха.
• Надевайте соответствующую одежду – облегающую, без драгоценностей; одежду,
которая гарантированно не коснётся движущихся деталей.
• Надевайте нескользкую обувь. Не надевайте сандалии или обувь с открытыми
пальцами.
• Перед применением любого электроинструмента сначала проверьте целостность
всех деталей. В случае обнаружения повреждённых деталей, не используйте
прибор, пока деталь или детали не будут заменены на новые.
• Не используйте электроинструменты, если вы устали или употребляли алкогольные
напитки.
• Никогда не переносите прибор или зарядное устройство, держа за провод, и не
дёргайте его для того, чтобы отсоединить прибор от розетки. Храните провод в
удалении от источников тепла, масел и острых предметов.
• Не перегружайте устройство – оно должно работать с интенсивностью, на которую
рассчитано.
• Не наклоняйтесь чрезмерно во время работы – вы можете потерять равновесие.
20 Ferm
Productinformatie
Fig. 1 + 1a
1. Aan/uit-schakelaar
2. Instelbare handgreep vóór
3. Telescopische stang
4. Vastzetknop om stanglengte in te stellen
5. Beschermkap
6. Accu
7. Veiligheidsknop
8. Oplaadapparaat
9. Instelknop handgreep
2. VEILIGHEIDSVOORSCHRIFTEN
Symbolenlijst
In deze handleiding en/of op de machine worden de volgende pictogrammen gebruikt:
Lees de instructies.
CE Conform de Europese toepasselijke standaards op het gebied van veiligheid
Klasse II apparaat – dubbel geïsoleerd – de stekker hoeft niet geaard te zijn.
Gevaar voor lichamelijk letsel of materiële schade wanneer de instructies in deze
handleiding niet worden opgevolgd.
Gevaar voor elektrische schok.
Batterijen altijd recyclen
Alleen binnenshuis gebruiken
Thermische veiligheid
Niet gebruiken in regen.
Page 21

Ferm 21
Draag oog- en gehoorbescherming.
Draag beschermende handschoenen
Houd omstanders op afstand
Lwa (geluidsvermogen)
Defecte en/of afgedankte elektrische of elektronische gereedschappen dienen ter
verwerking te worden aangeboden aan een daarvoor verantwoordelijke instantie.
Veiligheidsvoorschriften
• Ruim de plastic verpakkingszakken veilig op; deze kunnen verstikkingsgevaar opleveren
voor kleine kinderen.
• Zorg dat het werkgebied altijd goed opgeruimd is.
• Gebruik elektrische apparaten nooit in vochtige of natte omgevingen.
• Gebruik een elektrisch apparaat nooit op een plek waar het brand of een explosie kan
veroorzaken, bijvoorbeeld in de buurt van ontvlambare vloeistoffen of gassen.
• Houd kinderen altijd op afstand.
• Bescherm het apparaat tegen regenwater.
• Zorg er te allen tijde voor dat kinderen of anderen niet aan het elektrische apparaat zitten.
• Laat elektrische apparaten nooit onbeheerd achter en verwijder altijd de accu.
• Berg elektrische apparaten altijd op een droge, hooggelegen of afgesloten plek op, buiten
het bereik van kinderen.
• Draag altijd een veiligheidsbril. Wij raden u ook aan om oorbescherming te dragen.
• Zorg dat u de juiste kleding draagt voor de uit te voeren taak; draag geen loshangende
kleding of sieraden die verstrikt kunnen raken in de bewegende delen van het apparaat.
• Draag stevige antislipschoenen. Draag geen sandalen of schoenen met een open voorkant.
• Voordat u een elektrisch apparaat gebruikt, dient u altijd eerst te controleren of er
beschadigde onderdelen zijn; zo ja, gebruik het apparaat dan niet voordat deze zijn
vervangen door nieuwe onderdelen.
• Gebruik geen elektrische apparaten wanneer u moe bent of alcohol hebt gedronken.
• Draag het apparaat / oplaadapparaat nooit aan de stroomkabel en trek de stekker niet aan
de kabel uit het stopcontact. Houd de stroomkabel vrij van hitte, olie en scherpe
voorwerpen of kanten.
• Oefen geen overmatige kracht uit op het apparaat; laat het zijn werk doen met de snelheid
waarvoor hij is ontworpen.
• Zorg te allen tijde dat u stevig staat en uw evenwicht niet verliest.
• Gebruik dit apparaat nooit wanneer de beschermkap niet is aangebracht. Deze mag nooit
worden verwijderd.
• Gebruik alleen reserveonderdelen en accessoires van Ferm. Bij gebruik van
reserveonderdelen en accessoires die niet door Ferm worden geleverd of aanbevolen,
komt uw garantie te vervallen; bovendien kan dit tot gevaarlijke situaties leiden.
60 Ferm
Отличитеьные особенности
Рис. 1 + 1a
1. Переключатель Вкл/Выкл
2. Регулируемая передняя рукоятка
3. Выдвижной шток
4. Регулятор длины штока
5. Защитный экран
6. Аккумулятор
7. Блокировочная кнопка
8. Зарядное устройство
9. Маховик регулятора рукоятки
2. ИНСТРУКЦИЯ ПО ТЕХНИКЕ БЕЗОПАСНОСТИ
Перечень обозначений
В этой инструкции и/или на самом инструменте применяются следующие обозначения:
Прочитайте инструкции.
В соответствии с применимыми стандартами по безопасности
директив ЕС
Машина II класса – Двойная изоляция – Вам не понадобится заземленный
разъем.
Риск повреждения материала и/или физических травм
Указывает на присутствие напряжения
Всегда перезаряжайте батареи
Только для использования внутри помещений
Тепловая защита
Не используйте во время дождя.
Page 22

Ferm 59
НОЖНИЦЫ ДЛЯ ТРАВЫ С ПИТАНИЕМ ОТ БАТАРЕИ
Цифры,приведенные ниже в тексте, относятся к рисункам на стр.2.
В целях вашей собственной безопасности и безопасности других людей,
пожалуйста, внимательно прочитайте эту инструкцию перед
использованием данного устройства. Сохраните эту инструкцию для
дальнейшего использования.
Содржание
1. Информация об инструменте
2. Инструкция по технике безопасности
3. Монтаж & эксплуатация
4. Уход
1. ИНФОРМАЦИЯ ОБ ИНСТРУМЕНТЕ
Тежнические характеристики
Содержимое упаковки
1 Основное устройство
1 Защитный экран
1 Болт
1 Аккумулятор
1 Зарядное устройство
1 Руководство
1 Инструкция по безопасности
1 Гарантийный талон
Проверьте устройство, демонтированные детали и принадлежности на предмет
повреждения при транспортировке.
Напряжение: 18 В—--Напряжение зарядного устройства: 230 В
Эксплуат. характеристики батареи 1,7 Ач
Время заряда 7 - 8 hr
Число оборотов без нагрузки 7500/мин
Длина (надставленная) 1080 мм
Ширина скашивания 305 мм
Вес: 2,45 кг
Время работы: 40 минут
Диаметр лески триммера: 1,4 мм
Lpa (уровень звукового давления) 77 дБ(А)
Lwa (уровень звуковой мощности) 97 дБ(А)
Величина вибрации 2,5 м/с
2
22 Ferm
• Gebruik dit apparaat alleen voor het werk waarvoor hij bedoeld is: het bijwerken van gras en
licht struikgewas.
Wat u ook doet - Wees voorzichtig!
Specifieke waarschuwingen voor uw veiligheid!
• Houd uw handen en voeten te allen tijde uit de buurt van het snijgebied. Houd uw tweede
hand altijd op de hulphandel aan de voorzijde.
• Houd de grastrimmer altijd op veilige afstand van uw lichaam.
• Draag altijd een veiligheidsbril.
• Gebruik de grastrimmer alleen bij daglicht.
• Zorg er te allen tijde voor dat de ventilatieopeningen niet verstopt raken.
• Zorg ervoor dat zich geen mensen of dieren binnen drie meter van het snijgebied bevinden.
• Zorg ervoor dat er geen kortsluiting in de contactpunten kan ontstaan door metalen delen
als schroeven, spijkers etc.
• Voordat u de grastrimmer gebruikt, dient u eerst alle stenen, stokken, speeltjes en andere
ongerechtigheden uit het werkgebied te verwijderen.
• Kom nooit met uw handen aan de onderzijde van het apparaat als de accu niet is
verwijderd.
• Voor optimale prestaties dient u ervoor te zorgen dat de snijgereedschappen te allen tijde
scherp en schoon zijn. Volg de aanwijzingen voor het smeren en schoonmaken van de
accessoires. Zorg dat de handgrepen droog en schoon zijn en vrij van olie en vet.
• Draag de grastrimmer niet met een vinger op de schakelaar.
• Het gebruik van andere onderdelen of accessoires dan degene die in de
gebruikershandleiding worden aanbevolen, kan gevaar voor u opleveren.
• Controleer of de accu geschikt is voor het apparaat.
• Zorg ervoor dat de buitenkant van de accu van het apparaat schoon en droog is, voordat u
de accu in het oplaadapparaat plaatst.
• Zorg er te allen tijde voor dat de accu wordt opgeladen met het oplaadapparaat dat wordt
aanbevolen door de fabriek. Gebruik van een ander oplaadapparaat kan leiden tot een
elektrische schok, oververhitting of lekken van schadelijke stoffen uit de accu.
Wanneer u een probleem ondervindt met dit product of reserveonderdelen nodig
hebt, neem dan contact op met het dichtstbijzijnde erkende servicecentrum of
dealer.
Belangrijke veiligheidsvoorschriften voor het oplaadapparaat
Dit oplaadapparaat is speciaal ontworpen voor gebruik met het standaard elektriciteitsnetwerk
(230 - 240 volt). Probeer niet om het oplaadapparaat op een andere stroomvoorziening aan te
sluiten. Lees voor gebruik de gebruikershandleiding van de accu en het oplaadapparaat en
houd u daaraan. De accu mag alleen binnenshuis worden opgeladen – op een schone en droge
plek.
Page 23

Ferm 23
Pas op! Als de accu is gebarsten of beschadigd of een klap heeft opgelopen, plaats
hem dan niet in het oplaadapparaat. Dit kan leiden tot een elektrische schok of zelfs
elektrocutie. De accu moet worden vervangen; voer de beschadigde accu op
veilige wijze af. Zorg ervoor dat niemand over het oplaadapparaat en de
elektriciteitskabel kan struikelen of erop kan gaan staan.
Pas op! Zorg ervoor dat het oplaadapparaat absoluut niet met welke vloeistof dan
ook in aanraking komt. Dit kan leiden tot een elektrische schok. De accu moet
volledig droog zijn voordat u hem in het oplaadapparaat plaatst.
Pas op! Wanneer om welke reden dan ook vloeistof uit de accu lekt, voorkom dan
dat u ermee in aanraking komt. Wanneer u toch in aanraking komt met het zuur van
de accu, was dit dan direct af met water. Wanneer het zuur in uw ogen komt, spoel
deze dan uit met veel water en raadpleeg direct een arts.
Schoonmaken
Om het risico van een elektrische schok tot een minimum te beperken, dient u de
stekker van het oplaadapparaat eerst uit het stopcontact te halen en de accu te
verwijderen, voordat u het oplaadapparaat schoonmaakt.
Laat de accu na gebruik afkoelen op een veilige, koele en goed geventileerde plek buiten het bereik
van kinderen. Probeer niet om de accu op te laden met een ander oplaadapparaat dan het
apparaat dat bij dit product is geleverd. Probeer nooit om zelf het oplaadapparaat open te maken;
wanneer er een probleem is, breng hem dan voor reparatie naar het dichtstbijzijnde erkende
servicecentrum. Berg het oplaadapparaat, de accu en het apparaat altijd op een veilige, droge en
afgesloten plek op, buiten het bereik van kinderen. De temperatuur mag niet hoger worden dan 40
°C; voorkom daarom dat de apparaten in het directe zonlicht of naast metalen constructies liggen.
Verwijderen van de accu
Zorg dat uw accu op veilige wijze wordt afgevoerd. Gooi hem niet in het vuur, omdat hij dan kan
exploderen. Breng de accu naar een recyclingstation bij u in de buurt.
3. MONTAGE & GEBRUIK
Bevestigen van de beschermkap
Fig. 2
Bevestig de beschermkap met de bijgeleverde schroef (1) aan de onderkant van de
grastrimmer, zoals weergegeven in de tekening.
Plaatsen van de accu
Fig. 3
Laad de accu eerst op. Duw hem dan in de accuhouder tot hij vast klikt, zoals weergegeven in
de tekening. Om de accu te verwijderen drukt u aan beide zijden van de accu op de
vergrendelknop en trekt u hem naar buiten.
Het gebruik van het oplaadapparaat
Oplaadtijd: ongeveer 1 uur
58 Ferm
CE DICHIARAZIONE DI CONFORMITA (I)
Dichiariamo sotto la nostra piena responsabilità che il prodotto è conforme alle seguenti
normative o documenti standardizzati
EN 60335-1 (2001), EN 60335-2-91 (2003), EN 60335-2-29 (2002), prEN/ISO 10518 (2003)
Secondo le normative:
98/37 EEC, 73/23 EEC, 89/336 EEC
dal 01-03-2006
ZWOLLE NL
W. Kamphof
Ufficio Qualità
La nostra politica è sempre volta a migliorare i nostri prodotti . Prodotti soggetti a modifiche
senza preavviso.
Ferm BV • Lingenstraat 6 • 8028 PM Zwolle • Olanda
Page 24

Ferm 57
Appianamento di contrasti
La tavola seguente offre una tabelle delle azioni possibili nel caso cheil vostro apparecchio non
funzioni . Se questo non identifica/soluziona il problema, si prega di contattare il vostro centro
servizi.
Attenzione! Rimuovere la batteria prima di esaminare un guasto.
Riparazioni e commercianti
Se si presentano problemi a causa di, per esempio, usura di una parte della sega, si prega di
contattare il servizio di assistenza all'indirizzo riportato sulla scheda di garanzia.
Ambiente
Per evitare che si danneggi durante il trasporto, la macchina è imballata in un contenitore
resistente. La maggior parte dei componenti dell'imballaggio sono riciclabili. Portare tali
materiali presso gli appositi centri di riciclaggio.
Strumenti elettrici e/o elettronici difettosi o usurati devono essere smaltiti in
appropriate aree di riciclaggio.
Garanzia
Per le condizioni della Garanzia fare riferimento alla scheda della Garanzia consegnata
separatamente.
Sintomo
• L’apparecchio non
funziona.
• L’apparecchio lavora
lentamente.
• La macchina non taglia.
• La macchina non
funziona in automatico.
Possibile causa
• Batteria scarica.
• Erba troppo alta.
• La linea è troppo breve o
interrotta.
• Il rullo è vuoto.
• Il filo nel rullo è
ingarbugliato.
Soluzione
• Ricaricare o sostituire la
batteria.
• Tagliare gradualmente.
• Alimentare la linea
manualmente/automatic
amente.
• Sostituire il rullo.
• Ispezionare il rullo e se
necessario sostituirlo.
24 Ferm
Plaats de accu in het oplaadapparaat (dit past slechts op één manier). Steek de stekker van het
oplaadapparaat in het stopcontact en schakel het apparaat in. Als het rode indicatielampje
brandt, wordt de accu opgeladen. Wanneer het groene indicatielampje begint te branden, is de
accu volledig opgeladen.
Het verlengen van de snijdraad
Wanneer de snijdraad moet worden verlengd, tik dan simpelweg met de kap van de
snijdraadhouder op de grond.
Instellen van de handgreep
Fig. 4
Om de handgreep vóór in te stellen draait u de vastzetknop (9) los in de richting van de wijzers
van de klok. Beweeg de handgreep. Wanneer de handgreep in de juiste stand staat, draait u de
knop weer vast.
Het vastzetten van een nieuwe kop op de grastrimmer
Fig. 2
Wanneer u de kop van de grastrimmer moet vervangen, verwijder dan eerst de accu uit de
grastrimmer en doe het volgende:
• Druk de kap van de snijdraadhouder naar beneden en draai deze tegen de richting van de
wijzers van de klok in. Trek de kap van de stang (zorg dat u de veer niet kwijtraakt!). Trek nu
de snijdraadhouder uit de kap en vervang hem door een nieuwe of wikkel nieuw 1,6 mm
draad in de houder.
• Duw 150 mm snijdraad door het gat in de kap en duw de snijdraadhouder weer op zijn
plaats. Zorg er wel voor dat de draad niet komt klem te zitten. Plaats de kap en de veer weer
op de stang en draai door tot deze weer op zijn plaats klikt.
Het verlengen van de stang van de grastrimmer
Fig. 1
Draai de vastzetknop (10) in de ‘open’ positie en schuif de stang op de juiste lengte. Wanneer
de handgreep op de gewenste hoogte staat, kunt u de vastzetknop weer in de ‘dicht’ positie
zetten.
Bediening
Fig. 1
Om te starten drukt u op de veiligheidsknop (7) en drukt u de aan/uit-schakelaar in (1).
Om te stoppen laat u de aan/uit-schakelaar los (1).
4. ONDERHOUD
Onderhoud
Uw trimmer vergt slechts minimaal onderhoud.
• Verwijder na elk gebruik gras en andere overblijfselen uit het snijbladgebied. Controleer de
bladen op slijtage en vervang ze indien noodzakelijk.
• Gebruik geen schuurmiddelen om het product te reinigen en dompel het niet onder in water.
Page 25

Ferm 25
• Als onderdelen moeten worden vervangen of gerepareerd, gebruik dan alleen onderdelen
die daartoe door Ferm als geschikt zijn aangemerkt.
• Als uw product moet worden onderhouden of gerepareerd, breng het dan terug naar de
winkel waar u het hebt aangeschaft.
Opslag
Als de trimmer langer dan zes weken wordt opgeslagen:
• Laat de accudoos volledig leeglopen (door het product aan te zetten) en laad de accudoos
vervolgens gedurende 12 uur op.
• Verwijder alle overgebleven rommel en veeg alle oppervlakken aan de buitenkant met een
droge, pluisvrije doek of een zachte borstel schoon.
• Berg het product op in een droge ruimte buiten bereik van kinderen.
• Bergt u het product op in een schuur, verpak het dan in een plastic zak om het tegen vocht te
beschermen.
Opmerking: het product hoeft niet te worden gesmeerd.
Problemen oplossen
In onderstaande tabel vindt u een aantal controlemogelijkheden en acties die u kunt
ondernemen als het apparaat niet naar behoren functioneert. Wanneer dit het probleem niet
oplost, neem dan contact op met uw lokale servicecentrum.
Pas op! Verwijder altijd eerst de accu voordat u probeert een probleem op te
lossen.
Storingen
Wanneer er zich een storing voordoet, bijvoorbeeld bij slijtage van een onderdeel, neem dan
contact op met het onderhoudsadres op de garantiekaart. Achter in deze handleiding ziet u een
opengewerkte afbeelding van de onderdelen die besteld kunnen worden.
Milieu
Om transportbeschadiging te voorkomen, wordt de machine in een stevige verpakking
geleverd. De verpakking is zo veel mogelijk gemaakt van recyclebaar materiaal.
Symptoom
• Machine werkt niet.
• Machine kan werk niet
aan.
• Machine snijdt niet.
• Draad wordt niet
doorgevoerd.
Mogelijke oorzaak
• Accu bijna leeg.
• Gras te hoog .
• Draad te
kort/afgebroken.
• Spoel leeg
• Draad zit vast in spoel .
Oplossing
• De accu opladen of
vervangen.
• Werk in laagjes.
• Voer handmatig/
automatisch draad door.
• Vervang de spoel.
• Inspecteer de spoel,
zonodig opnieuw
oprollen.
56 Ferm
Inserimento del nuovo filo di taglio
Fig. 2
Se è necessario inserire o sostituire il filo di taglio, rimuovere la batteria e procedere nel modo
seguente:
• Premere verso il basso e ruotare in senso antiorario la calotta. Estrarre la calotta dal
manico (senza perdere la molla!). Rimuovere la cartuccia di filo dalla base, sostituirla con
una nuova cartuccia o avvolgere un nuovo filo da 1,6mm.
• Far passare 150 mm di filo da un’estremità del rullo attraverso il foro nella copertura e
reinserire la cartuccia assicurandovi che non vi siano fili impigliati. Reinserire la molla e la
calotta sul manico e premerla fino a quando non tornerà a posto con un clic.
Estensione del filo di taglio
Fig. 1
Ruotare il collo dell’impugnatura (10) in posizione ‘unlock’ e premere per allungare. Una volta
raggiunta la posizione dell’impugnatura desiderata, ruotare il collo dell’impugnatura in
posizione ‘lock’.
Funzionamento
Fig. 1
Per avviare, premere il tasto di sicurezza (7) e premere l’interruttore (1). Per fermarsi, rilasciare
l’interruttore (1).
4. MANUTENZIONE
Manutenzione
Il tagliaerba richiede una manutenzione minima.
• Dopo ciascun utilizzo, rimuovere eventuali accumuli di erba o scorie dalla zona della lama.
Verificare l’usura delle lame e sostituirle se necessario.
• Non usare materiali abrasivi per pulire l’apparecchio e non immergerlo in acqua.
• Se i componenti devono essere sostituiti o riparati, usare solo parti di ricambio approvate
da Ferm.
• Se sono necessari interventi di manutenzione o riparazione, riportare l’apparecchio nel
punto vendita dove lo si è acquistato.
Conservazione
Quando si conserva il tagliaerba per più di 6 settimane:
• Scaricare completamente il pacco batteria (mettendo in funzione l’apparecchio) e quindi
ricaricare il pacco batteria per 12 ore.
• Rimuovere eventuali accumuli di scorie, e pulire tutte le superfici esterne con un panno
asciutto che non lascia pelucchi o con una spazzola morbida.
• Riporre l’apparecchio in un luogo asciutto, lontano dalla portata dei bambini.
• Se l’apparecchio viene conservato in una rimessa, imballarlo in un sacchetto di polietilene
per proteggerlo dall’umidità.
Nota: non è necessario oliare l’apparecchio.
Page 26

Ferm 55
Pulizia
Per ridurre il rischio di shock elettrico, prima della pulizia il caricabatterie deve
essere staccato dalla presa di corrente e la batteria deve essere rimossa.
Fare raffreddare la batteria dopo l’uso lasciandola in un posto sicuro e ben ventilato fuori dalla
portata dei bambini. Non provare a caricare la batteria con caricatori diversi da quello fornito
con questo prodotto. Non provare a smontare il caricabatterie: se non funziona, portarlo al più
vicino centro servizi autorizzato per la riparazione. Conservare sempre caricabatterie, batterie
e strumento in un luogo sicuro ed asciutto fuori dalla portata dei bambini e dove la temperatura
non supera i 40 °C (104 °F), ad esempio non all’aperto ed esposto alla luce solare diretta, sotto
vetro o accanto a strutture in metallo.
Eliminazione della batteria
Eliminare la batteria in modo sicuro. Non tentare di bruciarla: rischio di esplosione.
Portare la batteria al centro di riciclaggio locale.
3. MONTAGGIO & USO
Inserimento della protezione
Fig. 2
Inserire la guardia di protezione davanti alla ruota di taglio alla base del tagliaerba usando la
vite (1) in dotazione.
Inserimento della batteria
Fig. 3
Dopo il caricamento, inserire la batteria nel caricabatterie nel modo indicato. Per rimuovere la
batteria, rilasciare le levette di blocco ai due lati della batteria ed estrarla.
Uso del caricabatterie
Tempo di carica: 1 ora circa.
Inserire la batteria nel caricatore (può essere inserita solo in un senso). Inserire e accendere il
caricabatterie. Quando la luce diventa rossa, la batteria è in fase di carica. Quando la luce
diventa verde, la batteria è completamente caricata.
Estensione del filo di taglio
Se è necessario estendere il filo di taglio, dare dei colpetti per terra con il centro della calotta
superiore
Regolazione dell’impugnatura
Fig. 4
Per regolare l’impugnatura frontale, allentare la vite di blocco (9) svitandola in senso orario.
Una volta raggiunta la posizione dell’impugnatura desiderata, stringere di nuovo la vite.
26 Ferm
Maak daarom gebruik van de mogelijkheid om de verpakking te recyclen.
Defecte en/of afgedankte elektrische of elektronische gereedschappen dienen ter
verwerking te worden aangeboden aan een daarvoor verantwoordelijke instantie.
Garantie
Lees voor de garantievoorwaarden de apart bijgevoegde garantiekaart.
CE CONFORMITEITSVERKLARING (NL)
Wij verklaren dat dit product voldoet aan de volgende normen of normatieve documenten
EN 60335-1 (2001), EN 60335-2-91 (2003), EN 60335-2-29 (2002), prEN/ISO 10518 (2003)
conform de volgende voorschriften:
98/37/EEC, 73/23/EEC, 89/336/EEC
vanaf 01-03-2006
ZWOLLE NL
W. Kamphof
Quality department
Het is ons beleid om onze producten voortdurend verder te verbeteren en wij behouden ons
daarom het recht voor om zonder voorafgaande berichtgeving de productspecificaties te
wijzigen.
Ferm BV • Lingenstraat 6 • 8028 PM Zwolle • Nederland
Page 27

Ferm 27
COUPE-BORDURES SANS FIL
Les chiffres du texte suivant correspondent aux illustrations page 2.
Pour votre propre sécurité et celle de votre entourage, veuillez lire attentivement
ces instructions avant d’utiliser cet appareil. Nous vous conseillons de ranger ces
dernières dans un endroits sur pour de futures références.
Contenus
1. Données de la machine
2. Consignes de sécurité
3. Assemblage & utilisation
4. Entretien
1. DONNÉES DE LA MACHINE
Spécifications techniques
Contenus de l’emballage
1 Corps principal de l’appareil
1 Dispositif de sécurité
1 Vis
1 Batteries
1 Chargeur de batterie
1 Mode d’emploi
1 Mesures de sécurité
1 Carte de garantie
Vérifiez si la machine, les composants et les accessoires ne sont pas endommagés.
Voltage 18 V—--Voltage du chargeur 230 V~
Performances de la batterie 1,7 Ah
Temps de chargement 7 - 8 hr
Vitesse courante non chargée 7500 rpm
Longueur générale (etendue) 1080 mm
Cercle de découpage 305 mm
Poids 2,45 kg
Temps de fonctionnement 40 minutes
Filetage de l’ébouteuse 1,4 mm
Lpa (niveau de la pression sonore) 77 dB(A)
Lwa (niveau de la puissance sonore) 97 dB(A)
Valeur des vibrations 2,5 m/s
2
54 Ferm
• Tenere sempre il tagliaerba ad una distanza sicura dal corpo.
• Indossare sempre occhiali protettivi.
• Utilizzare il tagliaerba solo in condizioni di luce diurna.
• Accertarsi che le aperture per la ventilazione siano sempre libere da corpi estranei.
• Assicurarsi che non ci siamo mai persone o animali nel raggio di 3 metri dall’area di lavoro.
• Assicurarsi che i terminali non possano essere soggetti a corto circuito da altre parti in
metallo come viti, chiodi etc.
• Prima di usare il tagliaerba, rimuovere dall’area tutte le pietre, i rami, i giocattoli e qualsiasi
altro oggetto estraneo.
• Mai toccare la parte inferiore dell’apparecchio quando è ancora collegato alla batteria.
• Per una migliore performance, tenere gli attrezzi di taglio puliti e affilati. Seguire le istruzioni
per la lubrificazione e la pulizia degli accessori. Mantenere le impugnature pulite e libere da
olio e grasso.
• Non impugnare lo strumento con un dito sull’interruttore.
• L’uso di qualsiasi accessorio o strumento diverso da quelli raccomandati in questo
manuale di istruzioni, può presentare rischio di lesioni personali.
• Assicurarsi che il tipo di batterie sia quello corretto per lo strumento.
• Assicurarsi che la superficie esterna della batteria o della strumento sia pulita e asciutta
prima di inserirlo nel caricabatterie.
• Assicurarsi che le batterie siamo caricate con il caricabatterie corretto, raccomandato dal
produttore. Un uso non corretto può causare shock elettrico, surriscaldamento o fuoriuscita
di liquido corrosivo dalla batteria.
In caso di qualsiasi problema con questo prodotto, o se sono necessari ricambi,
contattare il più vicino centro servizi o rivenditore autorizzato.
Istruzioni di sicurezza per il caricabatterie
Il caricabatterie è progettato specificatamente per l’uso con una fonte di alimentazione
domestica standard (230 – volt - 240 volt). Non tentare di collegarlo ad un altro tipo di
alimentazione. Leggere e seguire le istruzioni stampate sul caricatore e sulla batteria. La
batteria deve essere caricata in interni, in un ambiente pulito e asciutto.
Attenzione! Se la batteria è rotta o danneggiata o ha ricevuto un forte colpo, non
inserirla nel caricabatterie: rischio di shock elettrico grave. Sostituire la batteria ed
eliminare la batteria vecchia in modo sicuro.
Assicurarsi che il caricabatterie e il suo filo non siamo in un luogo dove è possibile
inciamparvi o passarvi sopra.
Attenzione! Non permettere ad alcun tipo di liquido di venire a contatto con il
caricabatterie. Rischio di shock elettrico. La batteria deve essere completamente
asciutta prima di essere reinserita nel caricabatterie.
Attenzione! Se, in condizioni di uso scorretto, del liquido fuoriesce dalla batteria,
evitare il contatto. Se il contatto accade accidentalmente, sciacquare con acqua.
Se il liquido viene a contatto con gli occhi, consultare un medico.
Page 28

Ferm 53
Indossi una protezione per gli occhi
Indossare guanti protettivi
Livello di potenza sonora
Strumenti elettrici e/o elettronici difettosi o usurati devono essere smaltiti in
appropriate aree di riciclaggio.
Istruzioni di sicurezza
• Sbarazzarsi delle borse plastiche con sicurezza —sono un rischio di soffocamento per i bambini.
• Tenere l’area di lavoro pulita ed organizzata.
• Non usare strumenti elettrici nella pioggia o ambiente umido.
• Non usare strumenti elettrici dove ci sono rischi di fuoco o esplosione – p.e. vicino a liquidi
imfiammabili o gas.
• Non permettere l’accesso ai bambini nel area di lavoro.
• Non lasciare che bambini o altre persone tocchino gli strumenti elettrici.
• Non lasciare l’apparecchio incustodito e rimuovere sempre la batteria dopo l’uso.
• Conservare in ambiente asciutto e fuori dalla portata dei bambini.
• Usare sempre occhiali di sicurezza. Si consiglia anche l’uso di protezioni auricolari.
• Indossare gli indumenti più adatti: nessun indumento largo ne’ gioielleria, e assicurarsi che
gli indumenti non possano venire a contatto con le parti mobili dell’apparecchio.
• Calzare scarpe antiscivolo. Non calzare sandali o scarpe aperte.
• Prima di usare qualsiasi strumento, controllare che non siano presenti parti danneggiate.
Nel caso, non usare prima che la parte (o le parti) non sia stata sostituita con una
funzionante.
• Non usare strumenti meccanici in condizioni di stanchezza fisica o dopo l’assunzione di alcool.
• Mai trascinare lo strumento o il caricatore dal cavo o tirare il cavo per staccarlo dalla presa.
Tenere lontano il cavo da fonti di calore, olio e oggetti taglienti.
• Non forzare lo strumento: lasciarlo lavorare alla sua velocità predefinita
• Non sporgersi in avanti durante il lavoro: rischio di caduta sull’apparecchio.
• Mai usare questo apparecchio se non è provvisto di blocco di sicurezza, che non deve
essere mai rimosso.
• Utilizzare solo ricambi e componenti forniti da Ferm. L’uso di parti non fornite o non
raccomandate da Ferm invalida la garanzia e potrebbe essere pericoloso.
• Utilizzare l’apparecchio solo per l’uso al quale è destinato: tagliare erba e cespugli leggeri.
La prudenza innanzitutto!
Istruzioni di sicurezza specifiche
• Tenere mani e piedi sempre lontani dall’area di taglio. Mantenere l’altra mano
sull’impugnatura ausiliaria frontale.
28 Ferm
Caracteristiques
Fig. 1
1. Interrupteur On/Off
2. Poignée ajustable du devant
3. Pole télescopique
4. Collier de réglage de la longueur du pole
5. Dispositif de protection
6. Batterie
7. Bouton de verrouillage de sécurité
8. Chargeur de batterie
9. Poignée de réglage du manche
2. CONSIGNES DE SÉCURITÉ
Explication des symboles
Dans ce manuel et/ou sur la machine, sont utilisés les symboles suivants :
Lisez les instructions.
Conforme aux normes essentielles de sécurité applicables des directives
européennes
Machine Classe II – Double isolation – Aucune prise terre n’est nécessaire
Indique les risques de blessures, de mise en danger de votre vie et de dommage de
l’appareil en cas de non respect des instructions de ce manuel
Indique les risques de chocs électriques
Toujours recycler les piles rechargeables
Uniquement pour une utilisation intérieure
Protecteur thermique
N’utilisez pas l’appareil par temps de pluie.
Page 29

Ferm 29
Utilisez des lunettes de protection et des protège oreilles.
Portez des gants de protection
Gardez des tiers à distance
Niveau de puissance sonore
Tout équipement électronique ou électrique défectueux dont vous vous seriez
débarrassé doit être déposé aux points de recyclage appropriés.
Mesures de sécurité
• Débarrassez-vous avec précaution des sacs plastiques – ils peuvent s’avérer être un
danger potentiel de suffocation pour les jeunes enfants.
• Veillez a garder votre zone de travail propre et rangée.
• Ne pas utiliser les outils de mise sous tension en temps de pluie dans des environnements
humides.
• Ne pas utiliser les outils de mise sous tension ou les risques d'incendie ou d'explosion
peuvent être présents - c'est-à-dire proche de liquides inflammables ou de gaz.
• Interdissez l’accès de la zone de travail aux enfants.
• Ne pas exposer les outils sous la pluie.
• Ne laissez pas les enfants ou d’autres personnes toucher les outils de mise sous tension.
• Ne laissez pas l'outil de mise sous tension sans surveillance et retirez toujours la batterie de
l'appareil après utilisation.
• Ranger ce dernier dans un sec et hors de portée des enfants.
• Utilisez toujours des lunettes de protection. Nous recommandons en outre d’utiliser un
appareil de protection auditive.
• Portez les vêtements adéquats – aucun équipement lâches ou bijoux, et assurez-vous que
les vêtements n’entrent pas en contact avec les pièces en actions.
• Portez des chaussures anti-dérapant. Ne pas portez de sandales ou de chaussures
ouvertes.
• Avant tout usage d'outils de mise sous tension, vérifier d’abord si l’appareil a été abîmé. Si
cela est le cas, n’utilisez pas l’appareil avant que la ou les parties ont été remplacées par de
nouvelles.
• Nous vous déconseillons d’utiliser les outils de mise sous tension si vous étés fatigué ou
que vous avez bu des boissons alcoolisées.
• Ne jamais porter l’outil/ le chargeur par le cordon ou le tirer d’un cou sec pour le débrancher.
Empêchez le cordon d’entrer en contact avec une source de chaleur, de l’huile et les bords
coupants.
• Ne pas forcer l’appareil – laissez-le fonctionner à la cadence qui lui a été assignée.
• Ne vous étendez pas trop lors de votre travail, de peur de perdre l’équilibre.
• Ne jamais utiliser l’appareil sans le dispositif de protection fixe. Ce dernier doit toujours être
adapté à l’appareil.
52 Ferm
Componenti
Fig. 1 + 1a
1. Interruttore ON/OFF
2. Impugnatura frontale regolabile
3. Manico telescopico
4. Collo di regolazione della lunghezza del manico
5. Guardia di sicurezza
6. Batteria
7. Tasto blocco di sicurezza
8. Caricabatterie
9. Tasto regolazione impugnatura
2. ISTRUZIONI SULLA SICUREZZA
Spiegazione dei simboli
In questo manuale e/o sulla macchina sono usati i seguenti simboli:
Leggere gli istruzioni.
In conformità con gli standard essenziali sulla sicurezza applicabili delle direttive
europee.
Macchina di II classe – Doppio isolamento – Non necessitate di alcuna presa a
terra.
Indica il rischio di lesioni personali, morte o danni all’utensile in caso di
inosservanza delle istruzioni in questo manuale.
Indica il pericolo di shock elettrico.
Riciclare sempre le batterie
Usare esclusivamente in luogo chiuso
Protettore termico
Non usare nella poggia
Page 30

Ferm 51
RASAERBAA BATTERIA
I numeri presenti nel seguente testo si riferiscono alle immagini a pag.2.
Per la sua sicurezza e per quella degli altri operatori, si prega di leggere gli istruzioni
prima d’utilizzare questo apparecchio. Tenere in posto sicuro per riferimento
futuro.
Contenuto
1. Informazione sull’apparecchio
2. Istruzioni di sicurezza
3. Assemblaggio & uso
4. Manutenzione
1. INFORMAZIONE SULL’APPARECCHIO
Specifiche tecniche
Contenuto della confezione
1 Corpo principale
1 Guardia di protezione
1 Vite
1 Batteria
1 Caricabatterie
1 Manuale di istruzioni
1 Scheda di norme di sicurezza
1 Scheda di garanzia
Verificare che la macchina, i componenti sfusi e gli accessori non abbiano subito danni durante
il trasporto.
Voltaggio 18 V—--Caricatore voltaggio 230 V~
Prestazioni della batteria 1,7 Ah
Tempo di carica 7 - 8 hr
Velocità senza carico 7500 rpm
Lunghezza complessiva (esteso) 1080 mm
Circolo di taglio 305 mm
Peso 2,45 kg
Tempo di funzionamento 40 minuti
Filo di taglio 1,4 mm
Lpa (livello di pressione sonora) 77 dB(A)
Lwa (livello di energia sonora) 97 dB(A)
Valore di vibrazione 2,5 m/s
2
30 Ferm
• Utilisez uniquement les pièces détachées et les pièces d’assemblage fournies par Ferm.
L’utilisation de pièces détachées autres que celles fournies ou recommandées par Ferm
invalidera votre garantie et s'avèrerait dangereuse.
• Utilisez cet appareil uniquement dans le but qui lui a été assigné – ébouter l’herbe et les
petits buissons.
Mais surtout - Faites attention!
Avertissement de mesures de sécurité spécifiques
• Gardez continuellement vos mains et vos pieds à l’écart de la zone de découpage. Gardez
votre deuxième main sur le manche auxiliaire.
• Tenez toujours l’ébouteuse à une distance de sécurité de votre corps.
• Portez toujours des gants de protection.
• Utilisez l’ébouteuse uniquement à la lumière du jour.
• Assurez-vous que les ouvertures de ventilation soient constamment propres de tous
débris.
• Assurez-vous qu'il n’y ait pas de personne ou d’animaux dans les 3 mètres de votre zone de
découpage.
• Assurez-vous que les terminaux ne puissent pas être écourtés par les autres parties en
métal, telles que la vis à bois, etc.
• Avant toute utilisation de l’ébouteuse, retirez toute Pierre, bouts de bois, jouets ou d’autres
corps étrangers de la zone.
• Ne jamais arriver dans la partie basse de l’appareil, avec la batterie encore attachée.
• Gardez les outils coupants aiguisés et propres pour une meilleure utilisation. Suivez les
instructions pour la lubrification et le nettoyage des accessoires. Veillez à garder toujours
les manches secs et propres de toute huiles ou formes graisseuses.
• Ne jamais porter l’ébouteuse avec le doigt sur l’interrupteur.
• L’utilisation d’accessoires et de pièces d’assemblage autres que ceux recommandes dans
le mode d’emploi peuvent présenter des risques de blessures physiques.
• Assurez-vous que la boite de la batterie soit correcte pour l’appareil.
• Assurez-vous que la surface extérieure de la boite de la batterie ou de l’outil soit propre et
sèche avant de la brancher au chargeur.
• Assurez-vous que les batteries soient chargées en utilisant le bon chargeur, recommande
par le fabricant. Une utilisation incorrecte peut conduire à un choc électrique, à un sur
chauffage ou à une fuite de liquide corrosif venant de la batterie.
Si vous rencontrez un quelconque problème avec le produit ou les pièces
détachées requises, nous vous conseillons de prendre contact avec le centre de
service autorise ou le fournisseur le plus proche.
Les mesures de sécurité pour le chargeur de batterie
Le chargeur est tout spécialement conçu pour un usage de fourniture électrique de ménage
standard (230 - volts 240 volts).
Page 31

Ferm 31
N’essayez pas de le connecter a d’autres fournitures de mise sous tension. Veuillez lire et
suivre les instructions imprimées sur le chargeur et la batterie. La batterie doit être chargée
uniquement à l’intérieur – dans un endroit propre et sec.
Attention! Si la batterie est fêlée ou abîmée, ou encore a reçu un grand coup, nous
vous conseillons de ne pas l'insérer dans le chargeur. Il y a un risque de choc
électrique ou d’électrocution. La batterie doit être remplacée et celle
endommagée, jetée avec précaution. Assurez-vous que le chargeur et que la
conduite du chargeur ne soit pas placée ou ils peuvent tomber ou être piétinés.
Attention! Empêcher le chargeur d'entrer en contact avec un quelconque liquide.
Un risque de choc électrique est présent. La batterie doit être totalement sèche
avant son insertion dans le chargeur.
Attention! Si après une utilisation abusive, un liquide est éjecté de la batterie,
veillez éviter tout contact avec ce dernier. Si toutefois, cela arrive
accidentellement, rincer a l'eau. Et si le liquide entre en contact avec vos yeux,
nous vous conseillons de demander une aide médicale.
Nettoyage
Afin de réduire le choc électrique, le chargeur doit être débranché du réseau
électrique, la batterie retiree avant le nettoyage du chargeur.
• Laisser refroidir la batterie, après utilisation, dans un endroit sur, frais et ventile, a l’abri de la
portée des enfants.
• N’essayer jamais de charger la batterie avec un autre chargeur que celui fourni avec cet
appareil.
• N’essayez pas de démanteler le chargeur – si ce dernier ne fonctionne pas, apportez-le
chez votre centre de service de réparation le plus proche.
• Rangez toujours le chargeur, la batterie et l’appareil dans un lieu sur et sec, hors de la
portée des enfants et ou la température ne peut excéder 40 °C (104 °F), par exemple, dans
un lieu ouvert, expose directement sous du verre et le long de fabrications en métal.
Destruction de la batterie
Débarrassez-vous de la batterie avec prudence. Ne pas la brûler, car cette dernière peut
exploser. Amenez votre batterie dans votre centre de recyclage local.
3. ASSEMBLAGE & UTILISATION
Attacher le dispositif de protection
Fig. 2
Attachez le dispositif de protection à la base de l’ébouteuse, comme indique, en utilisant la
seule vis (1) fournie.
50 Ferm
Os aparelhos eléctricos ou electrónicos avariados e/ou eliminados têm de ser
recolhidos nos pontos de reciclagem adequados.
Garantia
Para as condições de garantia, consulte o postal de garantia fornecido em separado.
CE DÉCLARAÇÃO DE CONFORMIDADE (P)
Declaramos sob nossa única responsabilidade que este produto está em conformidade com
as seguintes normas e documentos normalizados.
EN 60335-1 (2001), EN 60335-2-91 (2003), EN 60335-2-29 (2002), prEN/ISO 10518 (2003)
de acordo com os regulamentos:
98/37/EEC, 73/23/EEC, 89/336/EEC
de dal 01-03-2006
ZWOLLE NL
W. Kamphof
Quality department
É nossa política continuarmos a melhorar os nossos produtos e, assim, reservamo-nos o
direito de alterar a especificação do produto sem notificação prévia.
Ferm BV • Lingenstraat 6 • 8028 PM Zwolle • Holanda
Page 32

Ferm 49
• Caso seja necessário substituir ou reparar alguma peça, utilizar apenas peças que tenham
sido consideradas como substituições aceitáveis pela Ferm.
• Caso o aparelho necessite de assistência, ou reparação, é favor entregá-lo no local de aquisição.
Armazenagem
Quando arrumar a roçadeira por períodos superiores a 6 semanas:
• Descarregar totalmente o conjunto da bateria (fazendo trabalhar o aparelho) e depois
recarregar o conjunto da bateria durante 12 hrs.
• Retirar qualquer acumulação de detritos, e limpar todas as superfícies exteriores com um
pano sem pêlo ou uma escova macia.
• Guardar em local seco e fora do alcance das crianças.
• Se arrumar a roçadeira num abrigo de jardim, embalar o aparelho num saco plástico para
evitar a humidade.
Observação: Não é necessário lubrificar o aparelho.
Resolução de problemas
Atabela que se segue mostra as inspecções e acções que deve executar caso a sua máquina
não funcione correctamente. Caso não identifique/solucione o problema, contacte o seu
centro de serviço.
Advertência! Retire a bateria antes de investigar a avaria.
Falhas
Se ocorrer alguma falha, por exemplo, devido a desgaste duma peça, contacte o endereço de
assistência indicado no cartão de garantia. No fim deste manual encontra um diagrama de
componentes alargado com as peças que podem ser encomendadas.
Protecção do meio ambiente
Com vista a evitar quaisquer danos de transporte, a máquina é fornecida numa embalagem
resistente, fabricada na medida do possível em materiais recicláveis. Entregue, portanto, a
embalagem para reciclagem.
Síntoma
• A máquina não funciona.
• Sobre-funcionamento da
máquina.
• A máquina não corta.
• A linha não pode ser
fornecida
automaticamente.
Causa posible
• Bateria fraca.
• Erva demasiado alta.
• Linha demasiado
curta/partida.
• Separador vazio.
• Linha enleada no interior
do separador.
Solución
• Recarregue ou substitua
a bateria.
• Corte por fases.
• Forneça a linha
manualmente/automatic
amente.
• Substitua o separador.
• Inspeccione o separador,
enrole novamente se
necessário.
32 Ferm
Adapter la batterie
Fig. 3
Apres avoir charge cette dernière, poussez en adaptant la batterie dans le compartiment, ainsi
indique. Pour retirer la batterie, appuyez simplement sur les prises de libération situées sur le
côté de la batterie, et tirez ensuite cette dernière vers l’extérieur.
Comment utiliser le chargeur de batterie
Temps de charge: environ 1 heure.
Insérez votre batterie dans votre chargeur (elle ne peut être insérée que d'une seule manière).
Branchez et allumez le chargeur. Quand le voyant indicateur est rouge, la batterie est en
charge. Quand le voyant indicateur est vert, la batterie est totalement chargée.
Comment étendre le filetage de l’ébouteuse
Quand il vous est nécessaire d’étendre le filetage de l’ébouteuse, pressez simplement le
centre du chapeau du moyeu sur le sol.
Réglage du manche
Fig. 4
Pour régler le manche du devant, desserrez la vis de fermeture (9) en la tournant dans le sens
des aiguilles d’une montre. Une fois que vous êtes satisfait par la position du manche, vous
pouvez resserrez la vis.
Comment adapter un nouveau filetage d’ébouteuse
Fig. 2
Quand vous avez besoin de remplacer ou d’adapter un nouveau filetage d’ébouteuse, retirez
la batterie de l’ébouteuse et procédez de la manière suivante:
• Poussez et tordez le chapeau du moyeu dans le sens inverse des aiguilles d’une montre.
Tirez le chapeau du moyeu de l’axe de soutien (ne perdez pas le ressort !). Tirez la
cartouche du filetage d’ébouteuse hors du chapeau de moyeu et remplacez-le soit avec
une nouvelle cartouche, soit en enroulant le nouveau filetage de 1.6mm.
• Poussez 150mm du filetage au travers du trou se trouvant dans le chapeau du moyeu et
réadaptez la cartouche en s’assurant qu'aucun filetage ne soit pas coince.
Comment étendre le manche de l’ébouteuse
Fig. 1
Tordez le collier du manche (10) dans la position “déverrouiller” et tirez pour l’agrandir. Une fois
que vous êtes satisfait de la position du manche, tordre le collier du manche dans la position
"verrouiller".
Mise en fonction
Fig. 1
Pour mettre en marche l’appareil, pousser le bouton de sécurité (7) et appuyez sur la gâchette
(1). Pour l’arrêter, relâcher la gâchette (1).
Page 33

Ferm 33
4. MAINTENANCE
Maintenance
Votre faucheuse n'exige qu'un minimum de maintenance.
• Éliminez toute accumulation d'herbes ou de débris dans la zone des lames après chaque
utilisation. Vérifiez l'usure des lames et remplacez-les si nécessaire.
• N'utilisez pas de matières abrasives pour nettoyer le produit et ne l'immergez pas dans l'eau.
• Si des composants doivent être remplacés ou réparés, n'utilisez que des composants
ayant été confirmés en tant que pièces acceptables par la société Ferm.
• Si votre produit doit être réparé ou vérifié, renvoyez-le où vous l'avez acheté.
Stockage
Pour stocker la faucheuse pour plus de 6 semaines :
• Déchargez complètement le pack de batteries (en utilisant le produit), puis rechargez le
pack de batteries pendant 12 heures.
• Éliminez toute accumulation de débris et essuyez toutes les surfaces externes avec un
tissu sans effiloches ou avec une brosse douce.
• Rangez-la dans un endroit sec et hors de portée des enfants.
• Si vous allez ranger l'appareil dans un abri de jardin, emballez-le dans un sac en
polyéthylène pour le protéger de l'humidité.
Remarque : Il n'est pas nécessaire de lubrifier le produit.
Localisation d’incidents
Le tableau suivant vous fournit les vérifications et les actions que vous devez exécuter, si la
machine ne fonctionnement pas convenablement. Si ce dernier n’identifie/remédie pas au
problème, contactez notre centre de service.
Attention! Retirez la batterie avant toute recherché de l’erreur.
Symptômes
• Machine ne fonctionne
pas.
• Machine peine dans son
fonctionnement.
• Machine ne coupe pas.
• La ligne ne peut être
nourrie
automatiquement.
Possibles causes
• Batterie faible.
• Graissage trop élevé.
• La ligne est trop
courte/cassée.
• Bobine vide.
• La ligne à l’intérieur de la
bobine est étranglée.
Remèdes
• Rechargez ou remplacez
la batterie.
• Coupez par étape.
• Alimentez la ligne
manuellement/automati
quement.
• Remplacez la bobine.
• Inspectez la bobine,
rembobinez si
nécessaire.
48 Ferm
Como utilizar o carregador da bateria
Tempo de carga: Aproximadamente 1 hora.
Insira a bateria no carregador (só um sentido). Ligue a corrente eléctrica e o carregador da
bateria. Quando a luz indicadora ficar vermelha, a bateria está a ser carregada. Quando a luz
indicadora ficar verde, a bateria está completamente carregada.
Com estender a rosca do cortador
Quando precisar de estender a rosca do cortador, basta pressionar levemente com a
cobertura central no solo.
Ajuste da pega
Fig. 4
Para ajustar a pega frontal, solte o parafuso de bloqueio (9) rodando-o da direita para a
esquerda. Depois de estar satisfeito com a posição da pega, aperte novamente o parafuso.
Como instalar uma nova rosca do cortador
Fig. 2
Quando precisar de substituir ou equipar uma nova rosca do cortador, retire a ficha da tomada
de corrente eléctrica e proceda da seguinte forma:
• Empurre para baixo e torça a cobertura da direita para a esquerda. Puxe a cobertura para
fora do veio (não perca a mola!). Retire o cartucho da rosca do cortador do veio e coloque
novamente um novo cartucho ou rode a nova rosca de 1,6mm.
• Empurre 150mm da rosca através do orifício na cobertura e coloque novamente o
cartucho, certificando-se de que a rosca não fica presa. Instale novamente a cobertura no
veio e empurre até que se encaixe na devida posição.
Como estender a pega do cortador
Fig. 1
Rode o colar da pega (10) para a posição desbloqueada e puxe para estender. Depois de estar
satisfeito com a posição da pega, rode o colar da pega para a posição “bloqueada”.
Funcionamento
Fig. 1
Para iniciar, pressione o botão de segurança (7) e puxe o accionador (1). Para parar, solte o
accionador (1).
4. MANUTENÇÃO
Manutenção
Aroçadeira só necessita de uma manutenção mínima.
• Depois de cada utilização, retirar qualquer acumulação de ervas ou detritos da área da
lâmina. Verificar o desgaste das laminas e se necessário substitui-las.
• Não utilizar materiais abrasivos para limpar o aparelho e não o submergir em água.
Page 34

Ferm 47
Advertência! Caso a bateria esteja rachada ou danificada ou tenha sido alvo de um
impacto forte, não deve inseri-la no carregador. Existe o risco de choque eléctrico
ou electrocussão. Abateria deve ser substituída e a bateria danificada deve ser
eliminada em segurança. Certifique-se de que o carregador e o cabo do
carregador não estão colocados em locais em que possam cair ou ser pisados.
Advertência! Não permita o contacto de substâncias líquidas de qualquer tipo com
o carregador. Existe o risco de choque eléctrico.
A bateria deve estar completamente seca antes de ser inserida no carregador.
Advertência! Se, em condições de utilização abusiva, o líquido for ejectado da
bateria, evite o contacto com o mesmo. Caso ocorra o contacto acidental, lave com
água abundante. Se, além disso, o líquido entrar em contacto com os olhos,
procure um médico.
Limpeza
Para reduzir o risco de choque eléctrico, o carregador deve estar desligado da
tomada de corrente eléctrica e a bateria retirada antes de proceder a tarefas de
limpeza do carregador.
Permita o arrefecimento da bateria após cada utilização, colocando-a num local seguro e bem
ventilado fora do alcance das crianças. Não tente carregar a bateria com qualquer outro
carregador que não o fornecido com este produto. Não tente desmontar o carregador – caso
não funcione, leve-o ao seu centro de reparação autorizado mais próximo para que seja
reparado. Guarde sempre o carregador, a bateria e este aparelho num local seguro e seco,
fora do alcance das crianças e em que a temperatura não exceda os 40°C, por exemplo, ar ao
livre e exposto directamente à luz solar, sob fabricações em vidro ou metálicas.
Eliminação da bateria
Elimine a sua bateria em segurança. Não incinere; a bateria pode explodir.
Leve a bateria ao centro de reciclagem da sua área de residência.
3. MONTAGEM & UTILIZAÇÃO
Colocar o resguardo
Fig. 2
Coloque o resguardo de segurança na base do cortador, tal como apresentado, com o único
parafuso (1) fornecido.
Colocar a bateria
Fig. 3
Depois de carregada, coloque a bateria no respectivo compartimento, tal como apresentado
na ilustração. Para retirar a bateria, basta pressionar os entalhes na parte lateral da bateria e
puxá-la para fora.
34 Ferm
Dysfonctionnements
Veuillez vous adresser au centre de service indiqué sur la carte de garantie en cas d'un
dysfonctionnement, par exemple après l'usure d'une pièce. Vous trouverez, à la fin de ce
manuel, un schéma avec toutes les pièces que vous pouvez commander.
Environnement
Pour éviter les dommages liés au transport, la machine est livré dans un emballage robuste.
L’emballage est autant que possible constitué de matériau recyclable. Veuillez par conséquent
destiner cet emballage au recyclage.
Tout équipement électronique ou électrique défectueux dont vous seriez
débarrassé doit être déposé aux points de recyclage appropriés.
Garantie
Pour les conditions de garantie, veuillez consulter la carte de garantie.
CE DÉCLARATION DE CONFORMITÉ (F)
Nous declarons sous notre propre responsabilité que ce produit est en conformité avec les
normes ou documents normalisés suivants
EN 60335-1 (2001), EN 60335-2-91 (2003), EN 60335-2-29 (2002), prEN/ISO 10518 (2003)
conforme aux réglementations:
98/37/CEE, 73/23/CEE, 89/336/CEE
dès 01-03-2006
ZWOLLE NL
W. Kamphof
Quality department
C’est notre politique d’améliorer continuellement nos produits et par conséquent de réserver le
droit de changer les instructions des produits sans un avis antérieur.
Ferm BV • Lingenstraat 6 • 8028 PM Zwolle • Hollande
Page 35

Ferm 35
CORTABORDES DE BATERÍA
Los números contenidos en el texto siguiente se refieren a las ilustraciones de la página
2.
Por su propia seguridad y por la de los demás, le rogamos que lea detenidamente
estas instrucciones antes de utilizar este aparato. Guárdelas en un lugar seguro
por si necesita usarlas más adelante.
Contenidos
1. Datos de la herramienta
2. Instrucciones de seguridad
3. Montaje & utilización
4. Mantenimiento
1. DATOS DE LA HERRAMIENTA
Características técnicas
Contenidos del paquete
1 Herramienta principal
1 Seguro
1 Tornillo
1 Batería
1 Cargador de la batería
1 Manual de instrucciones
1 Instrucciones de seguridad
1 Tarjeta de garantía
Compruebe si el aparato, las piezas sueltas o los accesorios han sufrido daños durante el
transporte.
Voltaje 18 V—--Tensión Cargador 230 V~
Batería 1,7 Ah
Tiempo de recarga 7 - 8 hrs
Velocidad de funcionamiento en vacío 7500 rpm
Longitud total extendido 1080 mm
Círculo de corte 305 mm
Peso 2,45 kg
Tiempo de funcionamiento 40 minutos
Hilo de la cortadora 1,4 mm
Nivel de presión acústica 77 dB (A)
Nivel de potencia acústica 97 dB (A)
Mango delantero 2,5 m/s
2
46 Ferm
• Utilize apenas peças sobressalentes e acessórios fornecidos pela Ferm. Autilização de
acessórios que não os fornecidos ou recomendados pela Ferm invalida a garantia e pode
ser perigoso.
• Utilize apenas este aparelho para a função designada – aparar relva e pequenos arbustos.
Acima de tudo - Seja cuidadoso!
Advertências de segurança específicas!
• Mantenha sempre as mãos e os pés afastados da área de corte. Mantenha a mão da frente
na pega auxiliar.
• Mantenha sempre o cortador a uma distância de segurança do corpo.
• Utilize sempre óculos de protecção.
• Utilize o cortador apenas durante o dia.
• Certifique-se de que as aberturas de ventilação estão sempre desimpedidas de restos de
material.
• Certifique-se de que não existem pessoas, nem animais num raio de 3 metros em relação à
sua área de trabalho.
• Certifique-se de que os terminais não entram em curto-circuito através de quaisquer
outros materiais metálicos, tais como pregos, etc.
• Antes de utilizar o cortador, retire quaisquer pedras, paus, brinquedos ou outros objectos
estranhos da área de trabalho.
• Nunca chegue à parte inferior do aparelho com a corrente eléctrica ainda ligada.
• Mantenha as ferramentas de corte afiadas e limpas para obter um melhor desempenho.
Siga as instruções para limpar e lubrificar os acessórios. Mantenha as pegas secas e
limpas de quaisquer resíduos de óleo e lubrificantes.
• Não transporte o aparador com o dedo no interruptor.
• A utilização de qualquer acessório ou componente que não seja recomendado neste
manual de instruções pode representar um risco de lesões pessoais.
• Certifique-se de que a bateria é a adequada para a ferramenta.
• Certifique-se de que a superfície exterior da bateria ou da ferramenta está limpa e seca
antes de ligá-la ao carregador.
• Certifique-se de que as baterias são carregadas, utilizando o carregador recomendado
pelo fabricante. Autilização incorrecta pode resultar no risco de choque eléctrico, sobreaquecimento e fugas de líquidos corrosivos da bateria.
Caso tenha quaisquer problemas com a utilização deste produto ou necessite de
peças sobressalentes, contacte o seu representante mais próximo.
Advertências de segurança para o carregador da bateria
O carregador foi especificamente concebido para utilização a partir de uma fonte de energia
eléctrica doméstica (230 - volts 240 volts). Não tente ligá-lo a outra fonte de energia eléctrica.
Leia e siga as instruções impressas no carregador e na bateria. Abateria deve ser carregada
apenas em locais interiores – num local limpo e seco.
Page 36

Ferm 45
Utilize protecção visual e auditiva
Use luvas de protecção
Mantenha pessoas presentes afastadas
Nível de potência sonora
Os aparelhos eléctricos ou electrónicos avariados e/ou eliminados têm de ser
recolhidos nos pontos de reciclagem adequados.
Instruções de segurança
• Elimine os sacos de plástico de forma segura – representam perigo de sufocamento para
crianças pequenas.
• Mantenha a sua área de trabalho limpa e arrumada.
• Não utilize ferramentas eléctricas à chuva ou em ambientes molhados.
• Não utilize ferramentas eléctricas sempre que exista risco de incêndio ou explosão, ou
seja, junto de substância líquidas inflamáveis ou gases.
• Não permita a presença de crianças na sua área de trabalho.
• Não exponha ferramentas à chuva.
• Não permita que crianças ou outras pessoas mexam nas ferramentas.
• Não deixe uma ferramenta eléctrica sem supervisão e retire sempre a bateria do
equipamento após a utilização.
• Guarde num local seco e bem afastado do alcance das crianças.
• Use sempre óculos de segurança. Também é recomendada a utilização de protecção
auditiva.
• Utilize vestuário adequado – não use roupas largas nem adornos e certifique-se de que o
vestuário não entra em contacto com as peças móveis.
• Utilize calçado anti-deslizante. Não use sandálias, nem calçado aberto.
• Antes de utilizar qualquer ferramenta eléctrica, em primeiro lugar, verifique a existência de
peças danificadas e, caso encontre danos, não utilize o aparelho sem que a peça ou peças
tenham sido substituídas por peças novas.
• Não utilize ferramentas eléctricas em estados de fadiga ou após a ingestão de bebidas
alcoólicas.
• Nunca transporte a ferramenta / carregador pelo fio, nem puxe para desligar o aparelho da
corrente eléctrica. Mantenha o fio de alimentação eléctrica afastado de fontes de calor,
óleos e extremidades aguçadas.
• Não force o aparelho – permita o seu funcionamento à velocidade para o qual foi
concebido.
• Não tente chegar a locais de difícil alcance enquanto estiver a trabalhar – poderá
desequilibrar-se.
• Nunca utilize este aparelho sem o respectivo resguardo de segurança. O resguardo deve
permanecer sempre instalado.
36 Ferm
Características
Fig. 1 + 1a
1. Interruptor de Apagado/Encendido
2. Mango delantero ajustable
3. Pértiga telescópica
4. Abrazadera de ajuste de longitud de la pértiga
5. Seguro
6. Batería
7. Botón de cierre de seguridad
8. Cargador de batería
9. Tirador de ajuste del mango
2. INSTRUCCIONES DE SEGURIDAD
Explicación de los símbolos
En este manual o en la herramienta se usan los siguientes símbolos:
Lea las instrucciones.
De acuerdo con las normas de seguridad aplicables de las directivas europeas.
Máquina de Clase II - Doble aislamiento - No necesita una clavija con toma de
tierra.
Indica riesgo de lesión, pérdida de la vida o riesgo de dañar la herramienta en caso
de no respetar las instrucciones de este manual.
Indica riesgo de cortocircuito.
Recicle siempre las baterías
Uso únicamente en interiores
Protector térmico
No lo use cuando llueva.
Page 37

Ferm 37
Use gafas protectoras.
Use guantes de seguridad
Nivel de potencia acústica
Cualquier aparato eléctrico o electrónico desechado y/o defectuoso tiene que
depositarse en los lugares apropiados para ello.
Intrucciones de seguridad
• Deshágase de las bolsas de plástico de forma segura - son un peligro de asfixia para los
niños pequeños.
• Mantenga limpia y ordenada el área en la que está trabajando.
• No use herramientas eléctricas bajo la lluvia o en entornos húmedos.
• No use herramientas eléctricas donde haya riesgo de fuego o explosión - p. ej. cerca de
líquidos o gases inflamables
• No permita que los niños se acerquen al área de trabajo.
• No deje las herramientas bajo la lluvia.
• No permita que los niños u otras personas toquen las herramientas eléctricas.
• Nunca deje la herramienta eléctrica sin vigilancia y extraiga siempre las baterías del
aparato tras su uso.
• Guárdelo en un lugar seco fuera del alcance de los niños.
• Utilice siempre gafas de seguridad. También recomendamos el uso de una protección
contra el ruido.
• Vista ropas apropiadas - no lleve prendas holgadas o joyas y asegúrese de que la ropa no
entre en contacto con las partes móviles.
• Utilice unos zapatos no deslizantes. No use sandalias o zapatos que dejen los dedos de los
pies al descubierto.
• Antes de usar cualquier herramienta eléctrica, compruebe primero si hay partes dañadas y
si encuentra alguna, no use la herramienta hasta que se haya remplazado la parte o partes
con otras nuevas.
• No use herramientas eléctricas cuando esté cansado o si ha bebido alcohol.
• Nunca tire de la herramienta o el cargador por el cable ni dé tirones para desenchufarlo.
Mantenga el cable alejado del calor, el aceite y los bordes afilados.
• No fuerce el aparato - deje que trabaje a la velocidad para la que fue diseñado.
• No se estire demasiado mientras trabaja - podría perder el equilibrio.
• Nunca utilice este aparato sin el seguro. Siempre debe estar acoplado al aparato.
• Use sólo repuestos y accesorios proporcionados por Ferm. El uso de accesorios
diferentes a los proporcionados o recomendados por Ferm invalidará su garantía y podría
ser peligroso.
• Use este aparato sólo para el propósito para el que fue diseñado - cortar el césped y
pequeños arbustos.
44 Ferm
Características
Fig. 1 + 1a
1. Botão ligar/desligar
2. Pega frontal ajustável
3. Pólo telescópico
4. Colar de ajuste do comprimento do pólo
5. Resguardo de segurança
6. Bateria
7. Botão de bloqueio de segurança
8. Carregador da bateria
9. Botão de ajuste da pega
2. INSTRUÇÕES DE SEGURANÇA
Explicação dos símbolos
Neste manual e/ou na máquina, são utilizados os seguintes símbolos:
Leia as instruções.
Em conformidade com as normas de segurança aplicáveis e essenciais das
directivas europeias.
Máquina de classe II – Isolamento duplo – Não é necessária ligação à terra.
Indica risco de lesões pessoais, perigo de vida ou danos na ferramenta em caso de
não cumprimento das instruções descritas neste manual.
Indica perigo de choque eléctrico.
Recicle sempre as pilhas
Apenas para utilização interna
Protector térmico
Não utilizar à chuva.
Page 38

Ferm 43
APARADOR DE BORDAS ABATERIA
Os números no texto seguinte correspondem às figuras na página 2.
Para a sua própria segurança e para a segurança dos outros, leia cuidadosamente
estas instruções antes de utilizar este aparelho. Guarde estas instruções num
local seguro para futuras consultas.
Conteúdos
1. Dados da máquina
2. Instruções de segurança
3. Montagem & Utilização
4. Manutenção
1. DADOS DA MÁQUINA
Especificações técnicas
Conteúdo da embalagem
1 Corpo da máquina
1 Resguardo
1 Parafuso
1 Bateria
1 Carregador da bateria
1 Manual de instruções
1 Instruções de segurança
1 Cartão de garantia
Verificar se o aparelho não tem peças ou acessórios soltos devido a danos de transporte.
Tensão 18 V—--Carregador de tensão 230 V~
Desempenho da bateria 1,7 Ah
Tempo de carregamento 7 - 8 hrs
Velocidade de execução sem carga 7500/min
Comprimento total (estendido) 1080 mm
Círculo de corte 305 mm
Peso 2,45 kg
Tempo de funcionamento 40 minutos
Rosca do cortador 1,4 mm
Lpa (nível de pressão acústica) 77 dB(A)
Lwa (nível de potência acústica) 97 dB(A)
Valor de vibração 2,5 m/s
2
38 Ferm
Sobre todo - ¡Tenga cuidado!
Advertencias de seguridad específicas
• Mantenga sus manos y pies alejados del área de corte en todo momento. Mantenga su
segunda mano en el mango auxiliar (delantero).
• Mantenga siempre la cortadora a una distancia segura del cuerpo.
• Use siempre gafas protectoras.
• Use la cortadora sólo a la luz del día.
• Asegúrese en todo momento de que las aberturas de ventilación no tienen restos de
desperdicios.
• Asegúrese de que no haya personas ni animales a menos de 3 metros de su área de trabajo.
• Asegúrese de que los terminales no pueden ser acortados por otras partes de metal, como
tornillos, clavos, etc.
• Antes de usar la cortadora, quite del área cualquier piedra, palo, juguete u otros objetos
extraños.
• Nunca toque la parte inferior del aparato con la batería todavía conectada.
• Mantenga las herramientas de cortado afiladas y limpias para un mejor rendimiento. Siga
las instrucciones para los accesorios de lubricación y limpieza. Mantenga los mangos
secos y limpios de aceite y grasa.
• No mueva la cortadora con un dedo en el interruptor.
• El uso de cualquier accesorio o elemento no recomendado en este manual de
instrucciones puede representar un riesgo de daño para las personas.
• Asegúrese de que el pack de la batería es adecuado para la herramienta.
• Asegúrese de que la superficie exterior del pack de la batería o de la herramienta está
limpio y seco antes de enchufarla al cargador.
• Asegúrese de que recarga las baterías con el cargador recomendado por el fabricante. Un
uso incorrecto puede producir un riesgo de descarga eléctrica, sobrecalentamiento o
escape de líquidos corrosivos de la batería.
En caso de que experimente cualquier problema con este producto o de que
necesite recambios, contacte con su centro de servicio autorizado o distribuidor
más cercano.
Advertencias de seguridad para el Cargador de la Batería
El cargador ha sido diseñado específicamente para su uso con un suministro eléctrico
doméstico estándar (230 - voltios 240 voltios). No intente conectarlo a ningún otro suministro
eléctrico. Le rogamos que lea y siga las instrucciones impresas en el cargador y la batería.
Se debe cargar la batería sólo en interiores - en un lugar limpio y seco.
¡Precaución! Si se parte o daña la batería o ha recibido un golpe fuerte, no debe
insertarla en el cargador. Hay riesgo de descarga eléctrica o electrocución. Debe
cambiarse la batería y deshacerse de ella de una forma segura. Asegúrese de
colocar el cargador y su cable en un lugar en el que no pueda pisarlo o tropezar con él.
Page 39

Ferm 39
¡Precaución! No permita que líquido de ningún tipo entre en contacto con el
cargador. Hay riesgo de descarga eléctrica. La batería debe estar completamente
seca antes de insertarla en el cargador.
¡Precaución! Si la batería expulsa algún líquido por unas condiciones indebidas,
evite el contacto con él. Si ocurre por accidente, enjuáguese con agua. Si además
el líquido entra en contacto con los ojos, busque ayuda médica.
Limpieza
Para evitar el riesgo de descarga eléctrica, se debe desenchufar el cargador y
extraer la batería antes de limpiar el cargador.
Deje que la batería se enfríe tras su uso dejándola en un lugar seguro, fresco, bien ventilado y
fuera del alcance de los niños. No intente cargar la batería con un cargador diferente al
proporcionado con este producto. No intente desmontar el cargador - si no funciona, llévelo a
su centro de servicio autorizado más cercano para que lo reparen. Guarde siempre el
cargador, la batería y el aparato en un lugar seguro y seco fuera del alcance de los niños y
donde la temperatura no sobrepase los 40º, p. ej. en el exterior, expuesto a la luz directa del sol
bajo un cristal o en estructuras de metal.
Cómo deshacerse de la batería
Deshágase de la batería de forma segura. No la incinere, la batería podría explotar.
Lleve la batería al centro de reciclado más cercano.
3. MONTAJE & UTILIZACIÓN
Montaje del seguro
Fig. 2
Acople el seguro a la base de la cortadora como se indica usando el único tornillo (1) que se
proporciona.
Colocación de la batería
Fig. 3
Tras la recarga, apriete la batería en el compartimiento de la batería para acoplarla, tal como se
indica. Para extraer la batería, apriete los pestillos en el lateral de la batería para soltarla y tire
de ella.
Cómo usar el cargador de la batería
Tiempo de recarga: Aproximadamente 1 hora.
Inserte la batería en el cargador (sólo es posible insertarla de una manera). Enchufe y
encienda el cargador de batería. Cuando la luz del indicador está en rojo, la batería se está
recargando. Cuando la luz del indicador está en verde, la batería estará cargada por completo.
42 Ferm
Cualquier aparato eléctrico o electrónico desechado y/o defectuoso tiene que
depositarse en los lugares apropiados para ello.
Garantía
Para conocer las condiciones de la garantía, consulte la tarjeta de garantía que se proporciona
por separado.
CE DECLARACIÓN DE CONFORMIDAD (E)
Declaramos que, bajo nuestra única responsabilidad, este producto está conforme con los
siguientes estándares o documentos estándar
EN 60335-1 (2001), EN 60335-2-91 (2003), EN 60335-2-29 (2002), prEN/ISO 10518 (2003)
según las directrices:
98/37/CEE, 73/23/CEE, 89/336/CEE
del 01-03-2006
ZWOLLE NL
W. Kamphof
Quality department
Es nuestra política mejorar continuamente nuestros productos y por tanto nos reservamos el
derecho a cambiar las características del producto sin previo aviso.
Ferm BV • Lingenstraat 6 • 8028PM Zwolle • Holanda
Page 40

Ferm 41
Almacenamiento
Cuando vaya a almacenar la recortadora por más de 6 semanas:
• Descargue totalmente las baterías (haciendo funcionar el aparato) y después vuelva a
cargarlas durante 12 horas.
• Extraiga cualquier acumulación de restos y limpie todas las superficies exteriores con un
trapo seco sin pelusas o un cepillo suave.
• Almacene la unidad en un lugar fresco y seco y manténgala alejada del alcance de los
niños.
• Si se almacena en un cobertizo, debe embalar la unidad en una bolsa de polietileno para
evitar daños por humedad.
Nota: no es necesario aceitar el aparato.
Resolución de problemas
La tabla siguiente le proporciona comprobaciones
y acciones que puede llevar a cabo si su máquina no funciona correctamente. Si esto no
consigue identificar/solucionar el problema, contacte con su centro de servicio.
¡Precaución! Retire la batería antes de investigar un fallo.
Averías
Si se presenta una avería, por ejemplo, por el desgaste de una pieza, póngase en contacto con
el proveedor de servicios indicado en la tarjeta de garantía. En el dorso de este manual
encontrará un amplio resumen de las partes de recambio que se pueden ordenar.
Uso ecológico
Para prevenir los daños durante el transporte, el aparato ha sido embalado. Dicho embalaje
está hecho, en la medida de lo posible, de material reciclable. Le rogamos, por lo tanto, que
recicle dicho material.
Síntoma
• La máquina no funciona.
• A la máquina le cuesta
funcionar.
• La máquina no corta.
• No se puede introducir el
hilo automáticamente.
Causa posible
• Batería baja.
• Césped muy alto.
• Hilo muy corto/roto.
• Carrete vacío.
• Hilo enredado dentro del
carrete.
Solución
• Recargue o cambie la
batería
• Corte por etapas.
• Introduzca el hilo
manualmente/automátic
amente.
• Cambie el carrete.
• Revise el carrete, vuelva
a enrollarlo si s
necesario.
40 Ferm
Cómo extender el hilo de la cortadora
Cuando necesite extender el hilo de la cortadora, dé un golpe en el centro de la cubierta del eje
mientras está en el suelo.
Ajuste del mango
Fig. 4
Para ajustar el mango delantero, afloje el tornillo de sujeción (9 fig. 4) girándolo en el sentido de
las agujas del reloj. Cuando esté satisfecho con la posición del mango, vuelva a apretar el
tornillo.
Cómo colocar un hilo de la cortadora nuevo
Fig. 2
Cuando necesite remplazar o colocar un hilo de la cortadora nuevo, extraiga la batería de la
cortadora y actúe de la siguiente manera:
• Apriete y gire la cubierta del eje en el sentido contrario a las agujas del reloj. Saque la
cubierta del eje de sujeción (¡no pierda el muelle!). Saque el cartucho del hilo de la
cortadora de la cubierta del eje y cámbielo por uno nuevo o enrolle un carrete de 1,6 mm
nuevo.
• Empuje 150 mm. del carrete a través del agujero de la cubierta del eje y vuelva a colocar el
cartucho, asegurándose de que no queda hilo atrapado. Vuelva a colocar el muelle y el
montaje de la cubierta del eje en el eje de sujeción y gírelo hasta que haga clic.
Cómo extender el mango de la cortadora
Fig. 1
Gire la abrazadera del collar (10) para desbloquear la posición y tire para extenderlo. Cuando
esté satisfecho con la posición del mango, gire la abrazadera del mango a la posición de
bloqueo.
Funcionamiento
Fig. 1
Para comenzar, pulse el botón de seguridad (7) y apriete el gatillo (1). Para parar, suelte el
gatillo (1).
4. MANTENIMIENTO
Mantenimiento
Su recortadora requiere un mantenimiento mínimo.
• Después de cada uso, debe extraer la acumulación de césped o residuos del área de la
cuchilla. Compruebe si Encabezado proceso de costo real está afilada y sustitúyala de ser
necesario.
• No utilice materiales abrasivos para limpiar el producto ni lo sumerja en agua.
• Si necesita reparar o sustituir piezas, utilice sólo recambios admitidos por Ferm.
• Si el producto necesita servicio o reparación llévelo al establecimiento dónde efectuó la
compra.
 Loading...