

Page 1
Ferimex IT spol s r.o.
Výtvarná 8
Bratislava
[email protected]
tel.: +421/2/4564 1701
www.ferimex.com
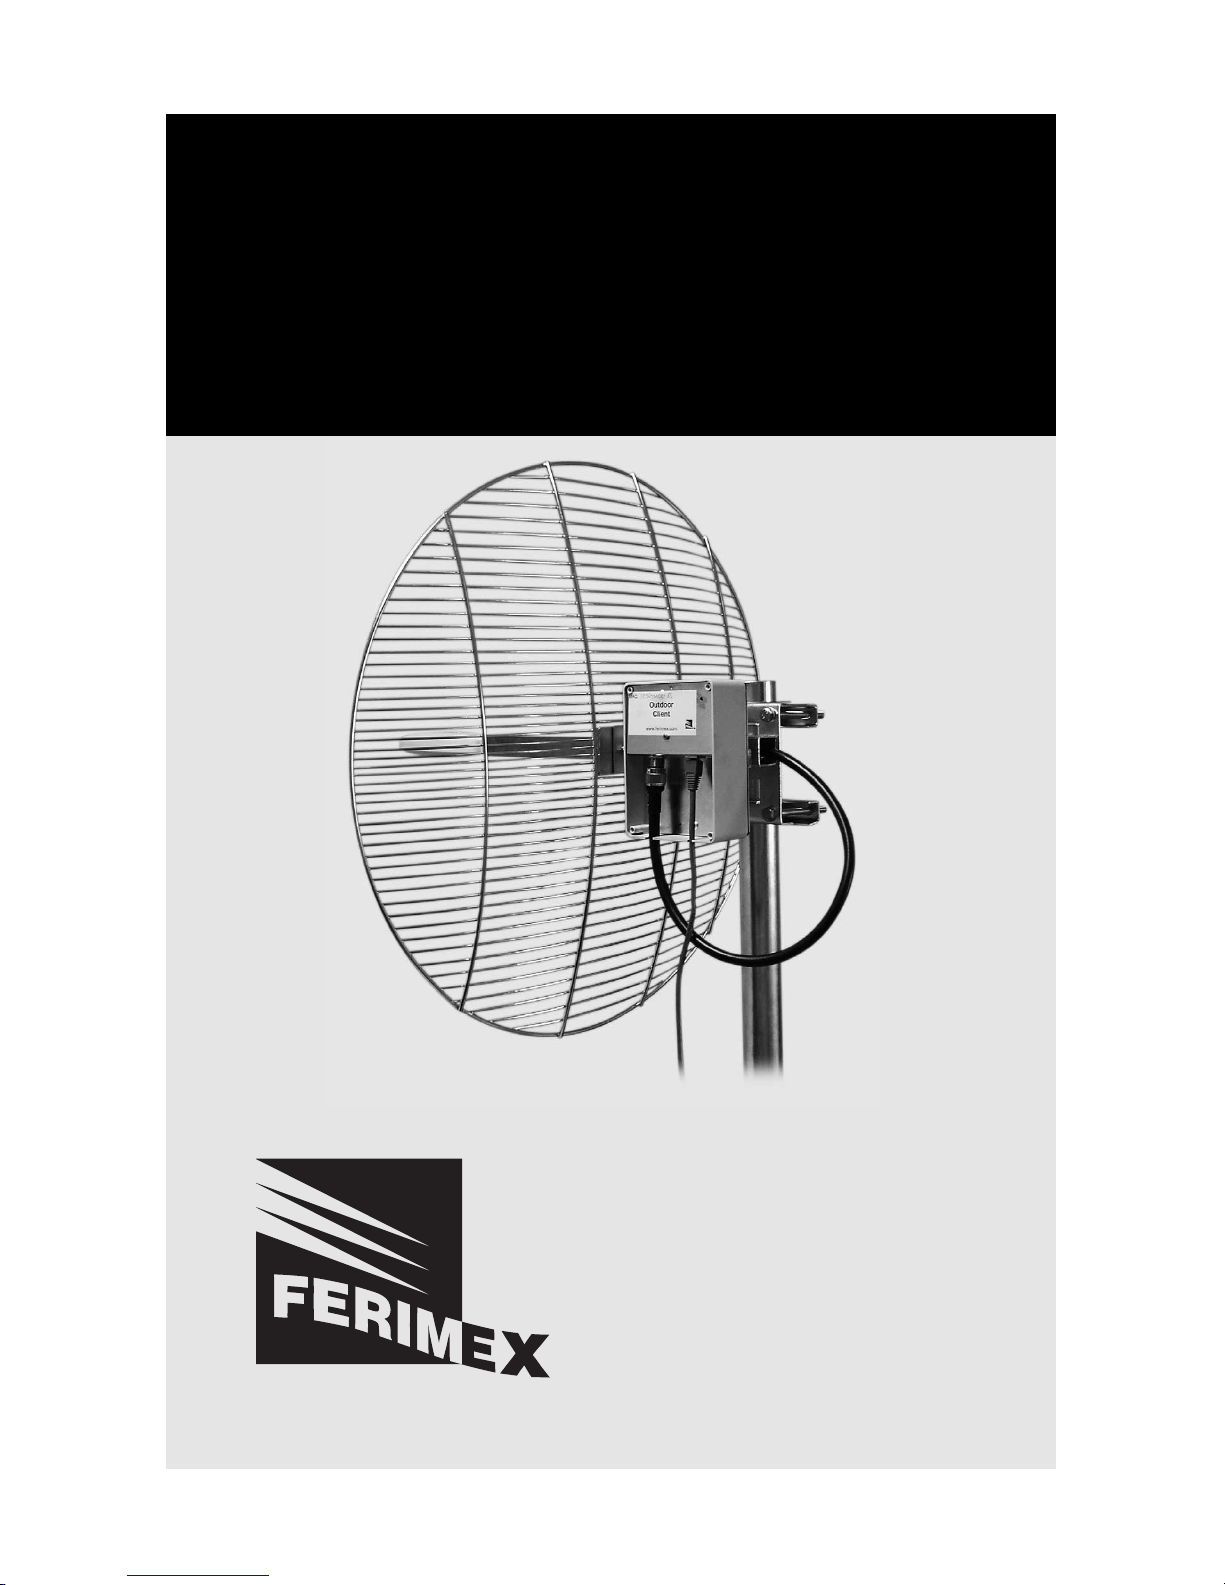
Outdoor Client
User’s Guide
Page 2
Description
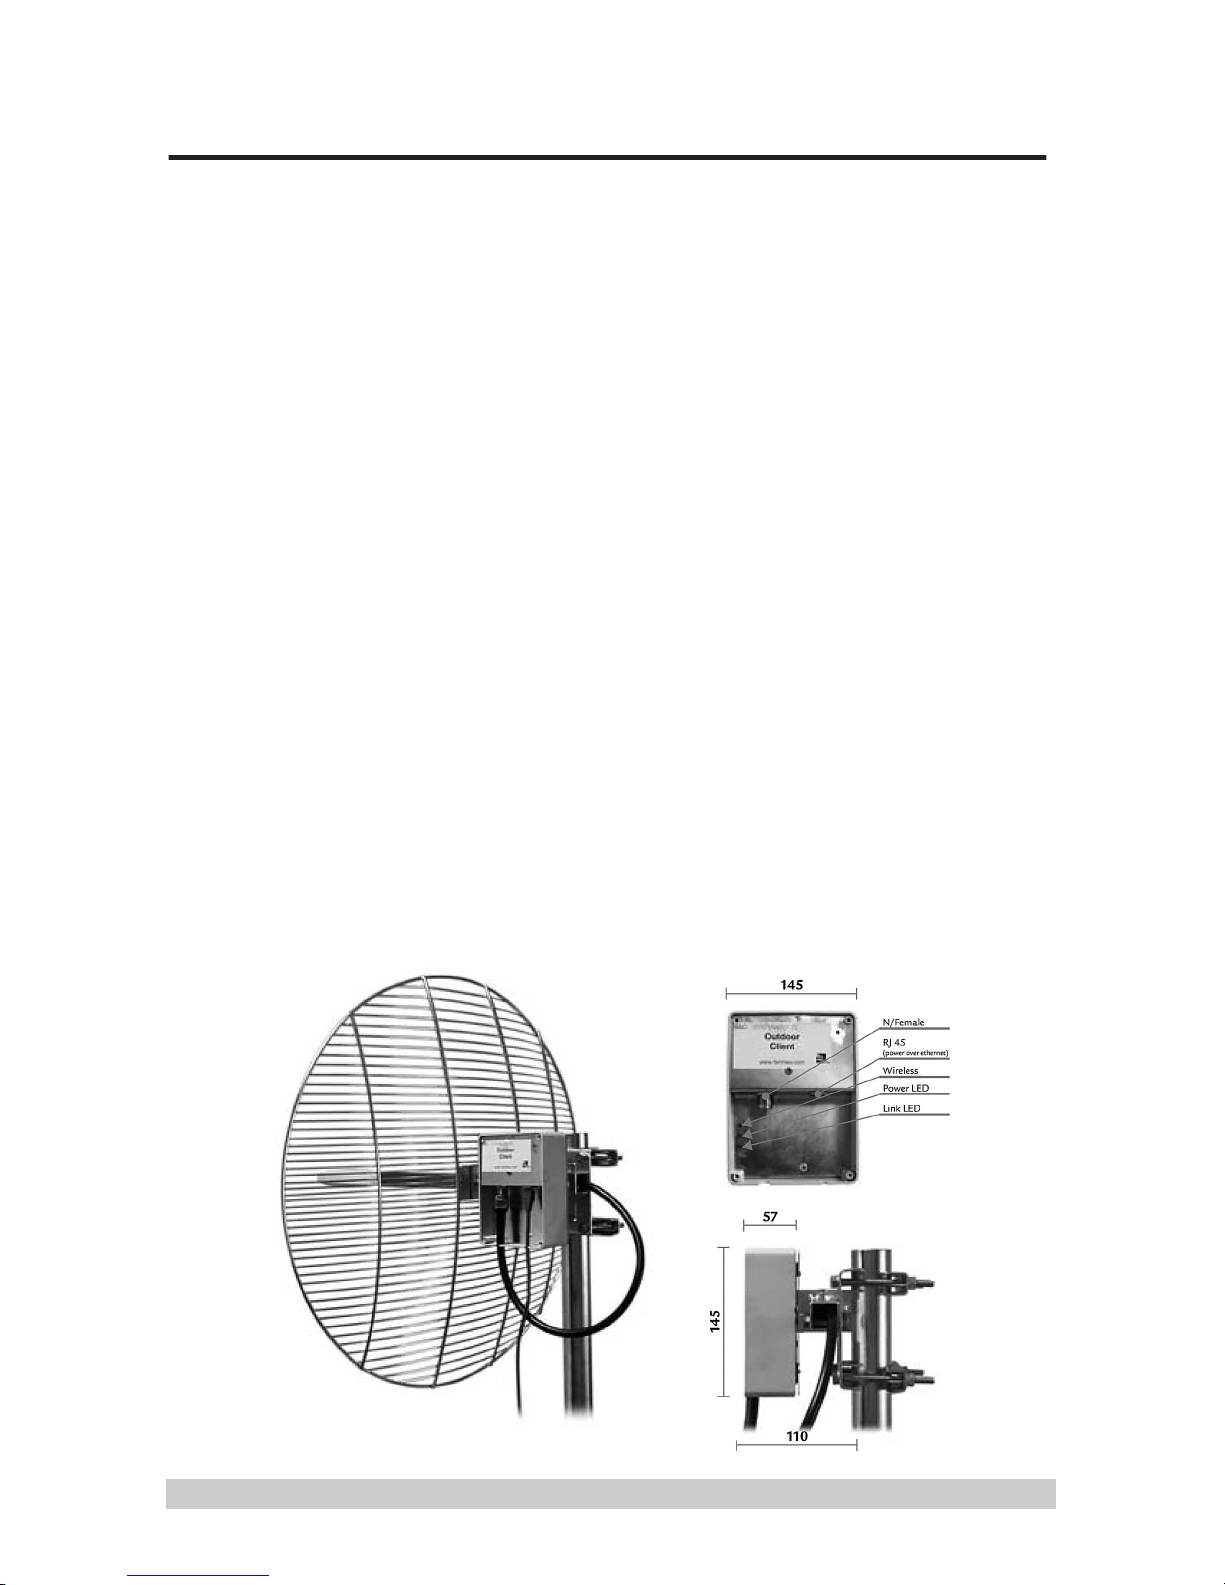
The Outdoor Client is an outdoor wireless device used to connect a client to a wireless
network. It is designed to operate in outdoor conditions, and has water resistant housing which allows for easy installation on the roof with short cables directly to an external antenna. A major advantage is that the device is powered by Power-Over-Ethernet
(POE) so that you do not need long, thick cables running from the antenna to the
interior of the building. It is based on TCP/IP and can be configured with the control
utility via a crossed ethernet cable. This utility contains all controls and can be comfortably run from your Windows desktop. The Outdoor Client is suitable for building
last-mile connections to the internet, but it can also be used for other applications,
such as connecting remote branches in companies, where cable would be too costly.
Wireless components are based on 802.11b wireless ethernet standard and operate in
the free 2.4 Ghz band. The device supports Infrastructure or Ad-Hoc 802.11b modes.
The device can operate at distances over 10km while maintaining a transmission rate
of 11 Mbps. In ideal conditions, high quality and high speed connections for long
distances can be achieved, but one has to consider the noise factor and unsuitable
outdoor conditions, which can result in radical degradation of transmission parameters. Basically you need to have line of sight between connected devices. In towns and
industrial areas the distance shouldn‘t exceed 2km. It uses the free ISM (Industrial,
Scientific, Medical) band and you are probably not the only transmitter. That‘s why it‘s
recommended to use appropriate antennas designed for specific conditions. Ferimex
IT will be happy to advise appropriate antennas for your particular situation. For short
distances we do not recommend high gain antennas, because signal/noise ratio would
remain the same, but you would cause more noise for other users. The Outdoor Client
comes with a one-year warranty for any defects in components and construction not
caused by the user.
3
OUTDOOR CLIENT
Page 3
LED and Connectors description
ACT (green) is flashing during wireless traffic.
POWER (red) is steady when the device is connected to power plug.
LINK (yellow) is flashing during LAN 10BaseT traffic and steady when the cable is
plugged into the ethernet connector RJ45.
RJ45 Connector: to connect the Twisted Pair ethernet cable for the purpose of connecting with Power Over Ethernet HUB (the cable is not included, but the power
supply is included).
N/Female Connector: to connect to the external ISM antenna (not included, see
Ferimex IT offerings of a variety of antennas).
Outdoor Client installation
The installation kit is designed primarily for installation with an ISM antenna holder,
but can be also used separately with a console.
With a console: a special holder is recommended for console operation. Ask
Ferimex for this holder: [email protected]. Two screws with the holder is all you
need for the installation. Tighten the screws in the front panel – only then is the
Outdoor Client weatherproof.
With an ISM antenna holder: Two screws in the horizontal antenna holder are
directly for the Outdoor Client back panel holes. Antenna elevation and azimuth
are set together with the device.
Antenna connection
The RF interface on the Outdoor Client is an N/female type connector. You need to
connect an antenna cable with N/male type connector. You don‘t need any pigtails for
the connection.
Attention! The device is a high-frequency microwave generator. Don’t use the device
without an antenna attached to it. Do not touch any connector during operation. Use
only a correct antenna type.
Power connection
The Outdoor Client is powered with a Power Over Ethernet module (HUB), which is
an AC/DC converter (48V DC). Ethernet UTP cable is used for power feeding.
Maximum distance between POE HUB and Outdoor Client is 100 meters. Use 1:1 UTP
cable. Connect the cable to the connector P-Lan-Out POE.
4
OUTDOOR CLIENT
Page 4
Power Over Ethernet HUB
LAN connection
For a LAN connection you can use the ethernet card installed in your computer, or a
Switch (HUB). The switch standard you need is 10Base-T or 10/100Base-T. Cross cable is used when the Outdoor Client is connected directly to an ethernet card in a computer. Connect the cable to the connector Lan-In POE.
Outdoor Client configuration
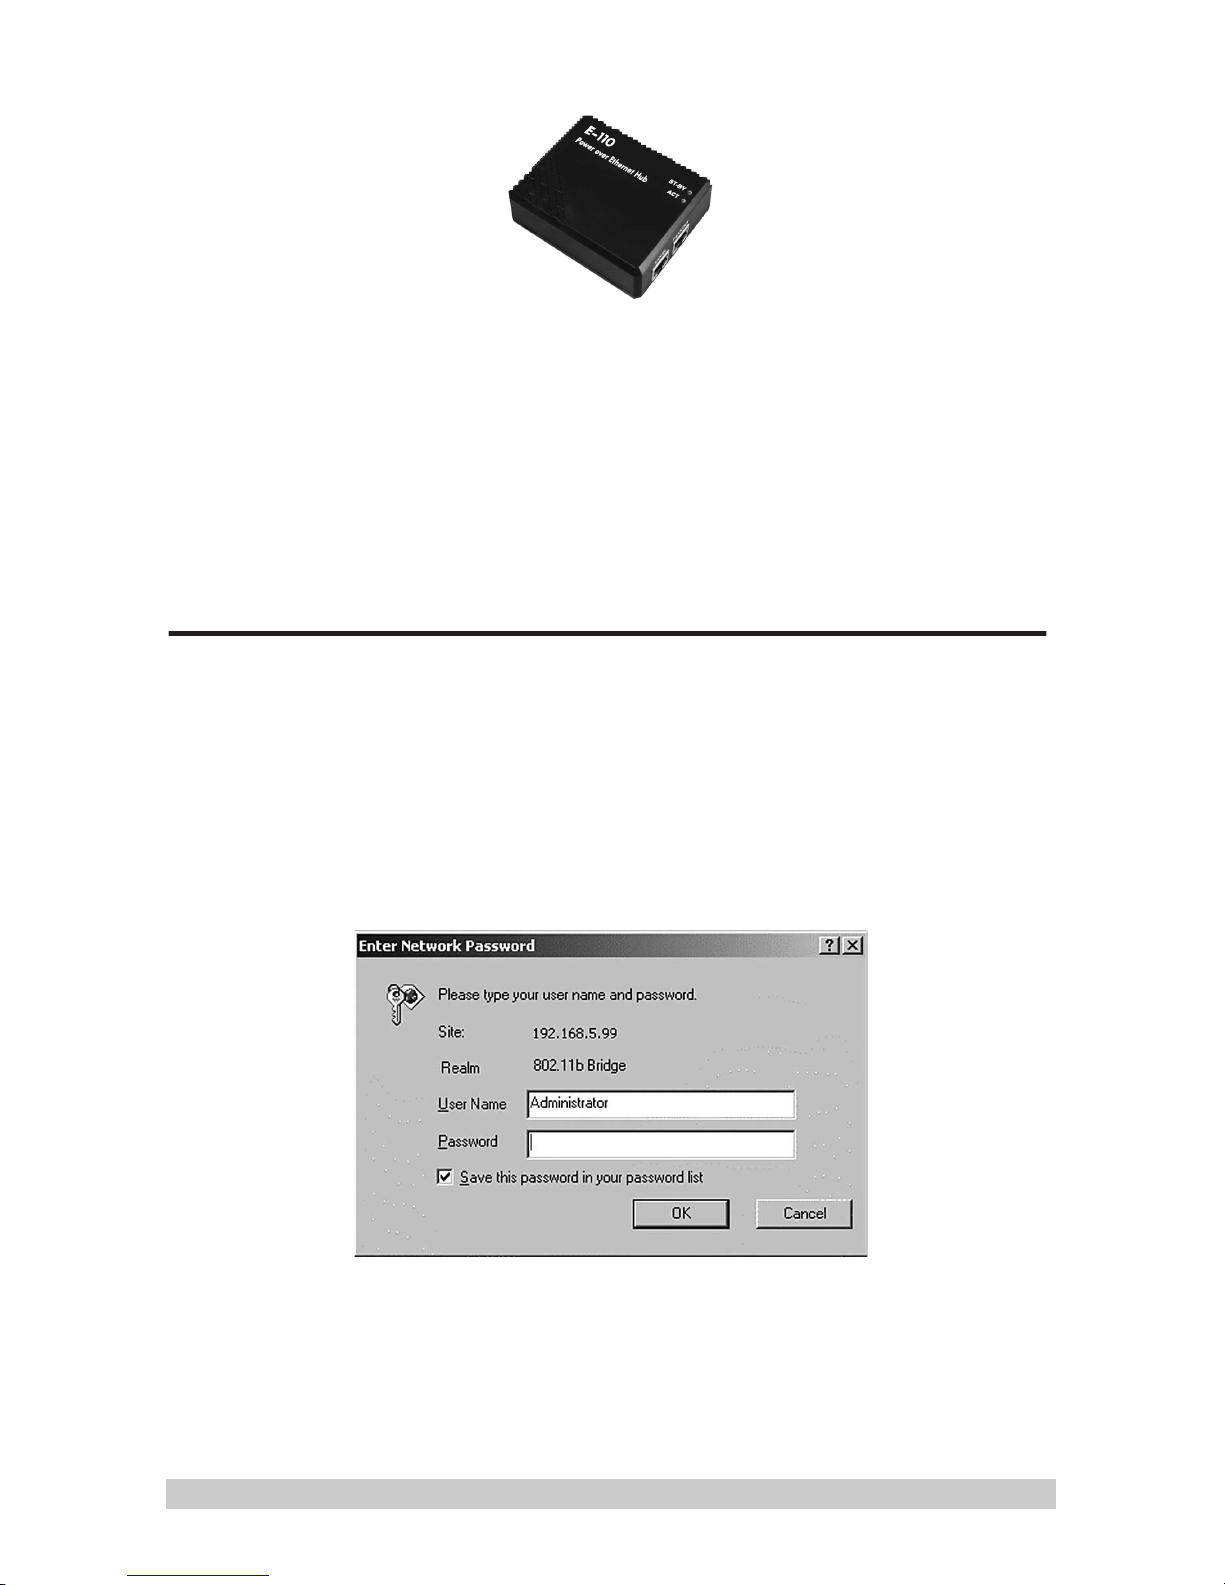
To configure the Outdoor Client you need a web browser running JavaScript – e.g.
Internet Explorer 4 or higher. In your browser, go to the address http://192.168.5.99.
Your computer’s ethernet card must be on the same network – for example
192.168.5.90, as the Outdoor Client, and the Outdoor Client must be connected to
the network. If the device is correctly installed and connected to a LAN, you will see
the following window in your browser. You need to set name: administrator and pass-
word leave empty. The authentification window looks like this:
Attention! After changing the device IP you should change also the computer IP
address to the same network. If you have more than one Outdoor Client or Client
Antenna on your network, you MUST change the IP number of the devices, or they will
conflict.
5
OUTDOOR CLIENT
Page 5
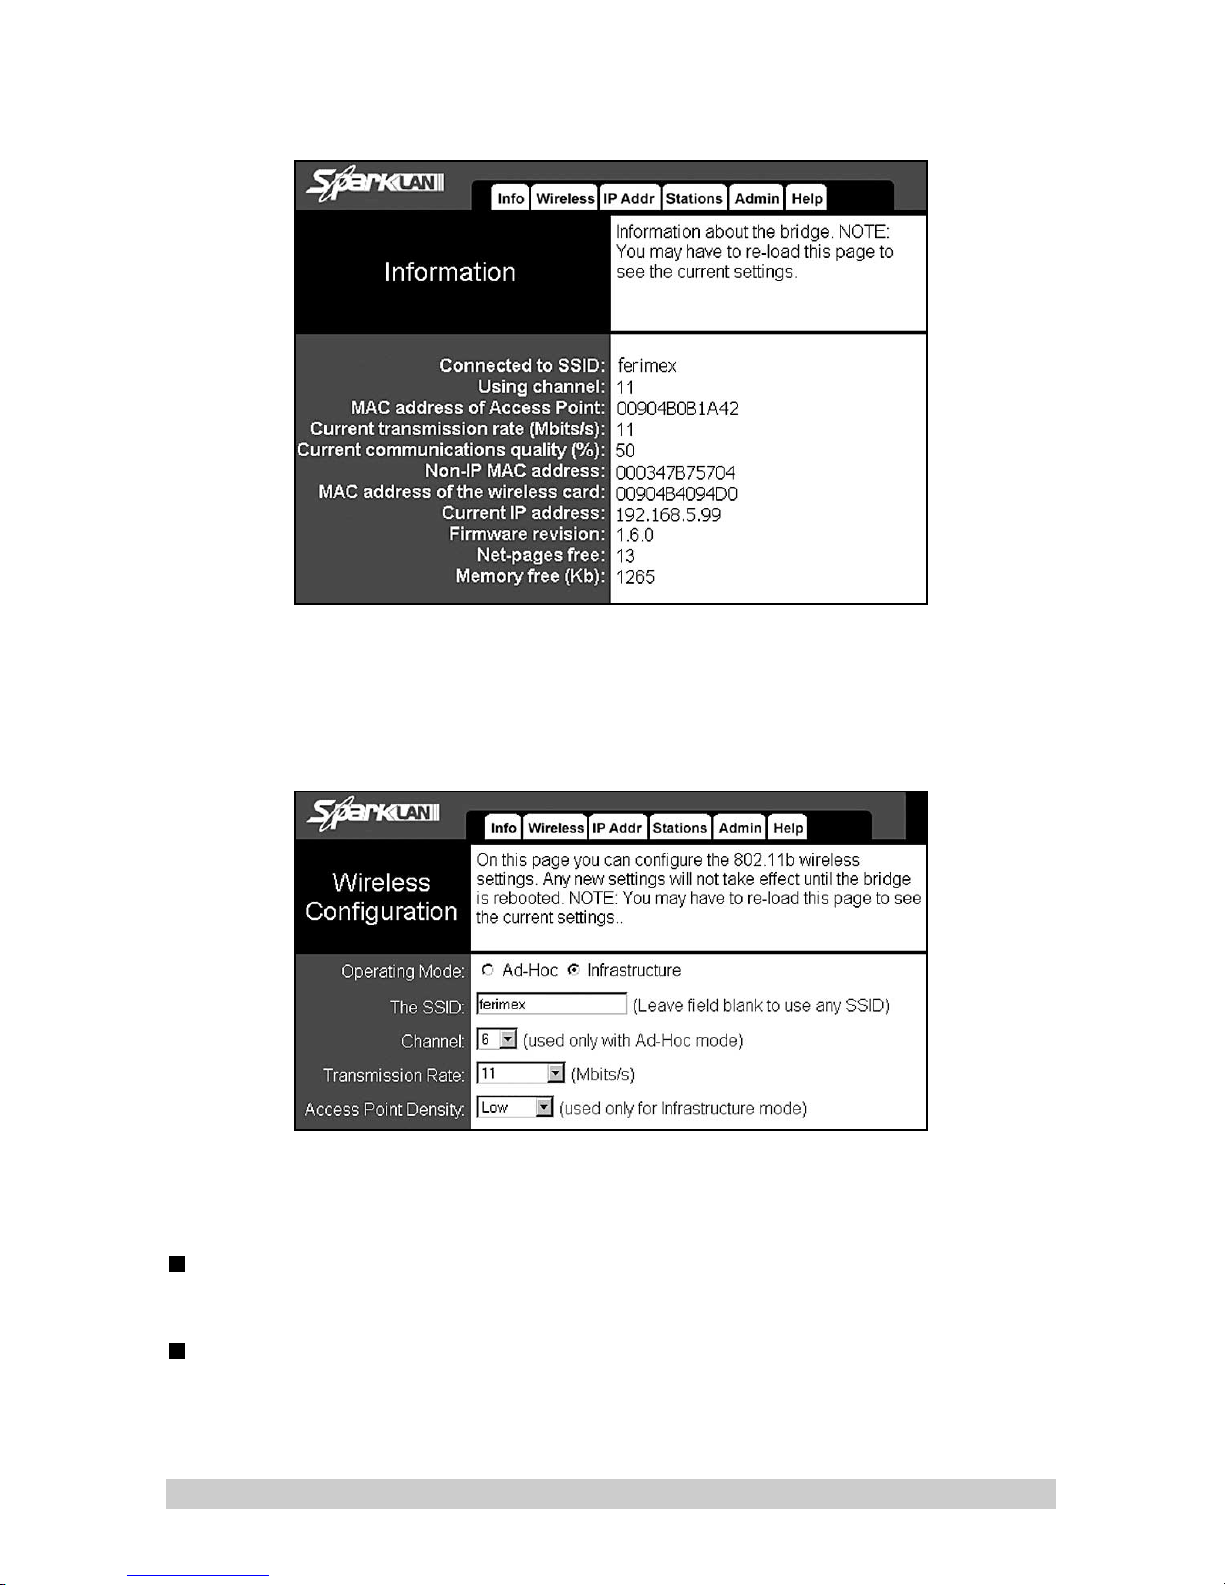
Information
You can see the actual configuration and the wireless state. ESSID, Channel, connection rate, link quality, actual IP address are the most important parameters to check.
Wireless Settings
Operating Mode
Infrastructure or Ad-Hoc mode switch.
Information
Ad-Hoc mode. A special mode primarily for point-to-point connection use. It is
possible to connect the device to only one other device running in the same Ad-Hoc
mode. Required parameters are the ESSID string and the channel number.
Infrastructure mode. What you will normally use. This mode is the client mode
working with any access point. It is possible to connect more than one device in
infrastructure mode to the AP. The required parameter is the ESSID string.
6
OUTDOOR CLIENT
Page 6
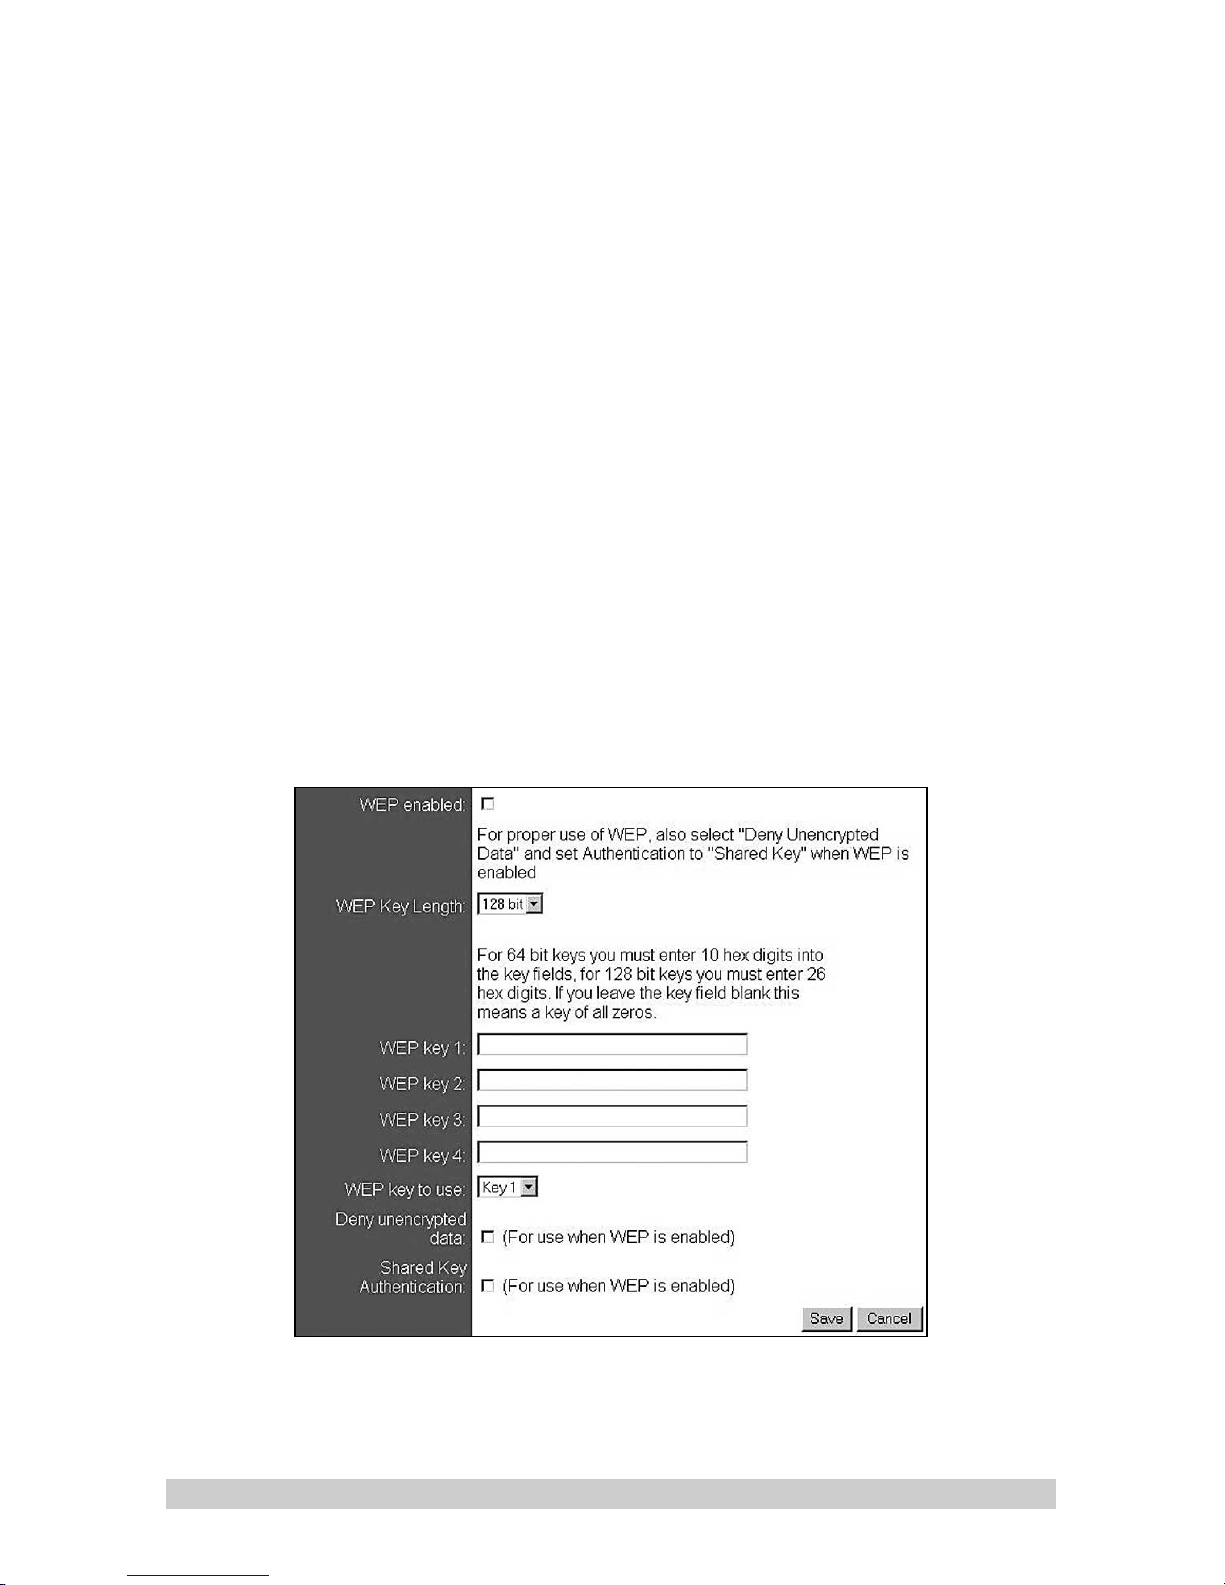
The SSID
(Service Set Identifier): an important string for network characteristics and
identification. This string has to be the same in all devices working in the wireless channel together. IN case the SSID is not specified, the device will connect
automatically to whatever access point has the strongest signal.
Channel
Radio channel setting. Choose one of the available channels different from the
other wireless network channel. You can choose the channel in AD-Hoc mode.
In infrastructure mode you don’t need to set the channel. The Outdoor client
will scan the band and stop after it finds traffic with the same ESSID.
Transmission Rate
4 rates are available. Leave it at 11Mbps if the band is clear. If you have problems with link quality, set one of the lower speeds: 5.5Mbps, 2Mbps or
1Mbps. Or choose automatic setting.
Access Point Density
It is recommended to set one of values Low, Mid, or High depending on the AP
density (how many APs are in use in your small area).
Encryption settings
WEP enabled
Encryption ON/OFF
7
OUTDOOR CLIENT
Page 7
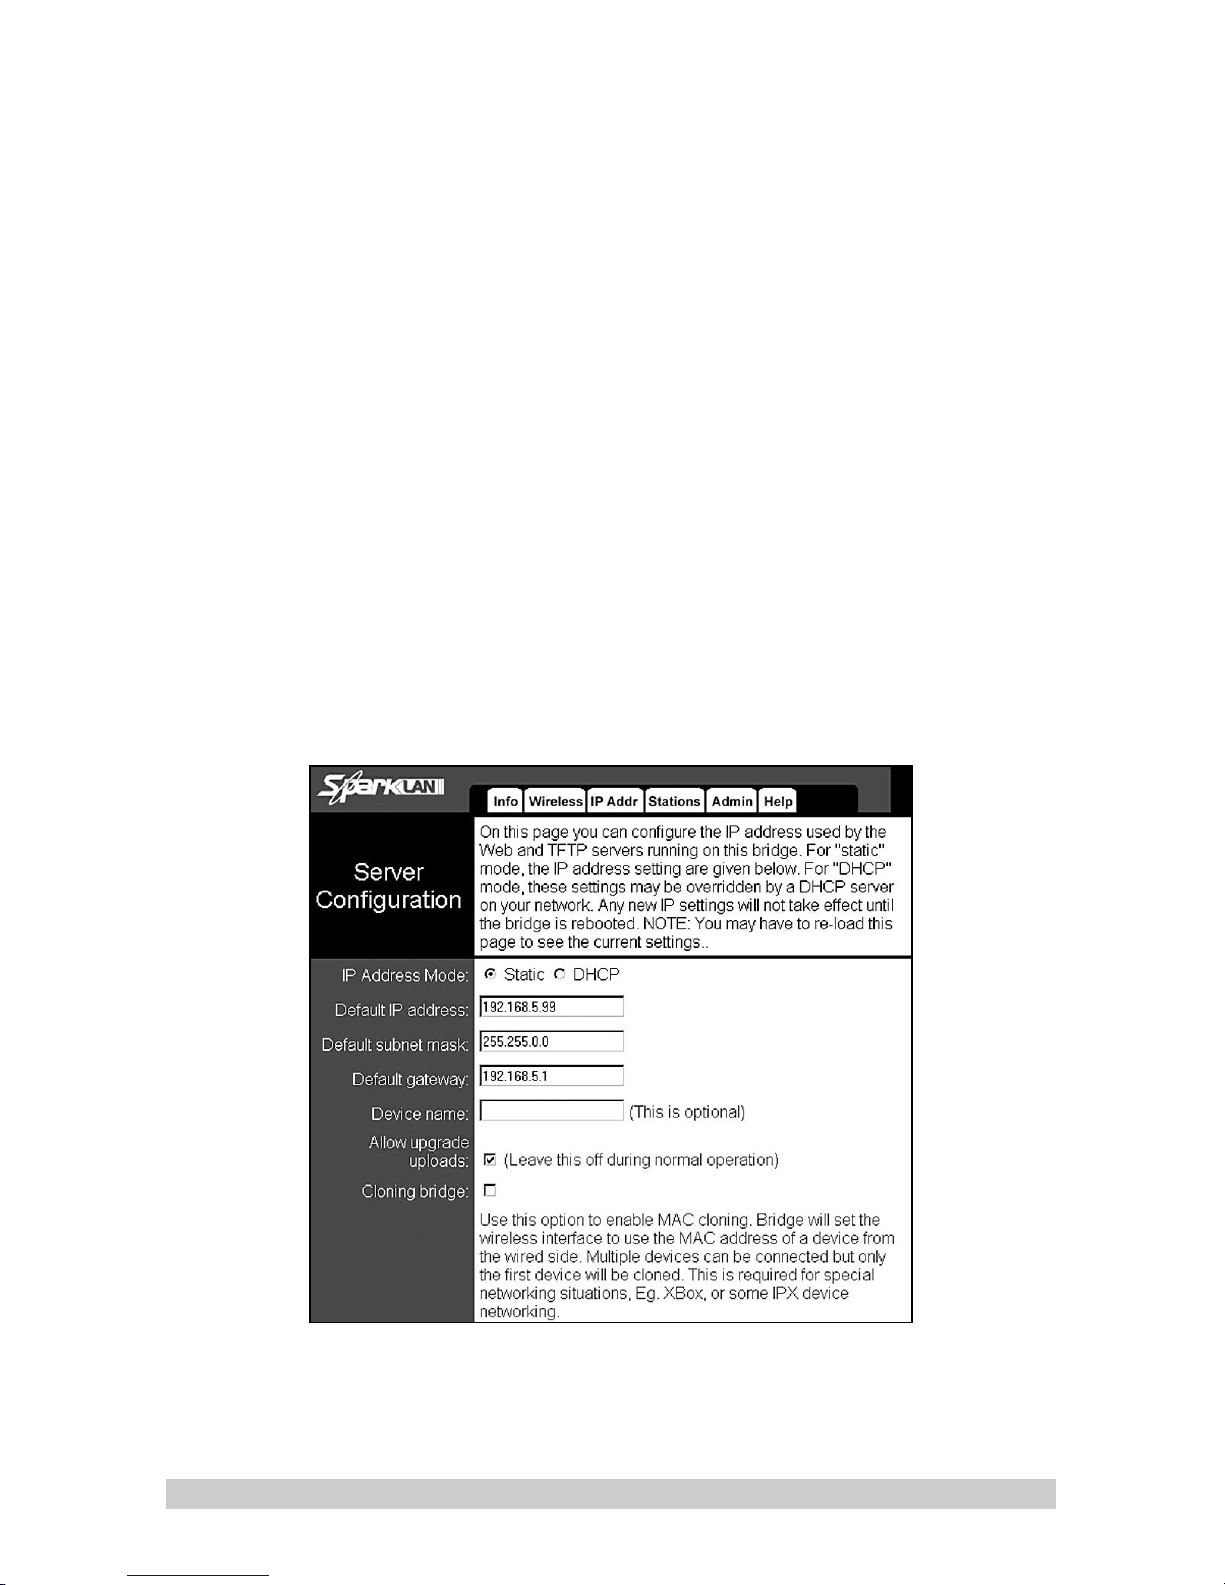
WEP Key Length
Encryption quality depends on the WEP string length (64bit/128bit).
WEP key 1 to key 4
You can choose one of 4 WEP keys
WEP key to use
Set the key for standard use.
Deny Non-Encrypted Data
All non-encrypted data will be ignored when you turn on this switch.
Shared Key Authentification
Open System – Devices can be connected to the Outdoor Client during the aut-
hentification process without using WEP.
Shared Key – Only devices with correct WEP phrase during the authentification
process can connect to the Outdoor Client.
Both – Outdoor Client can be connected with any device, with or without WEP.
Note: If the access point you are using is set for Shared Key, you must also set
the Outdoor Client to use Shared Key.
IP Settings
IP Address Mode
Static: Recommended mode. All parameters can be set by yourself.
DHCP: DHCP server running on your network can be used for IP address setting. It is suitable for a big network with many clients.
8
OUTDOOR CLIENT
Page 8
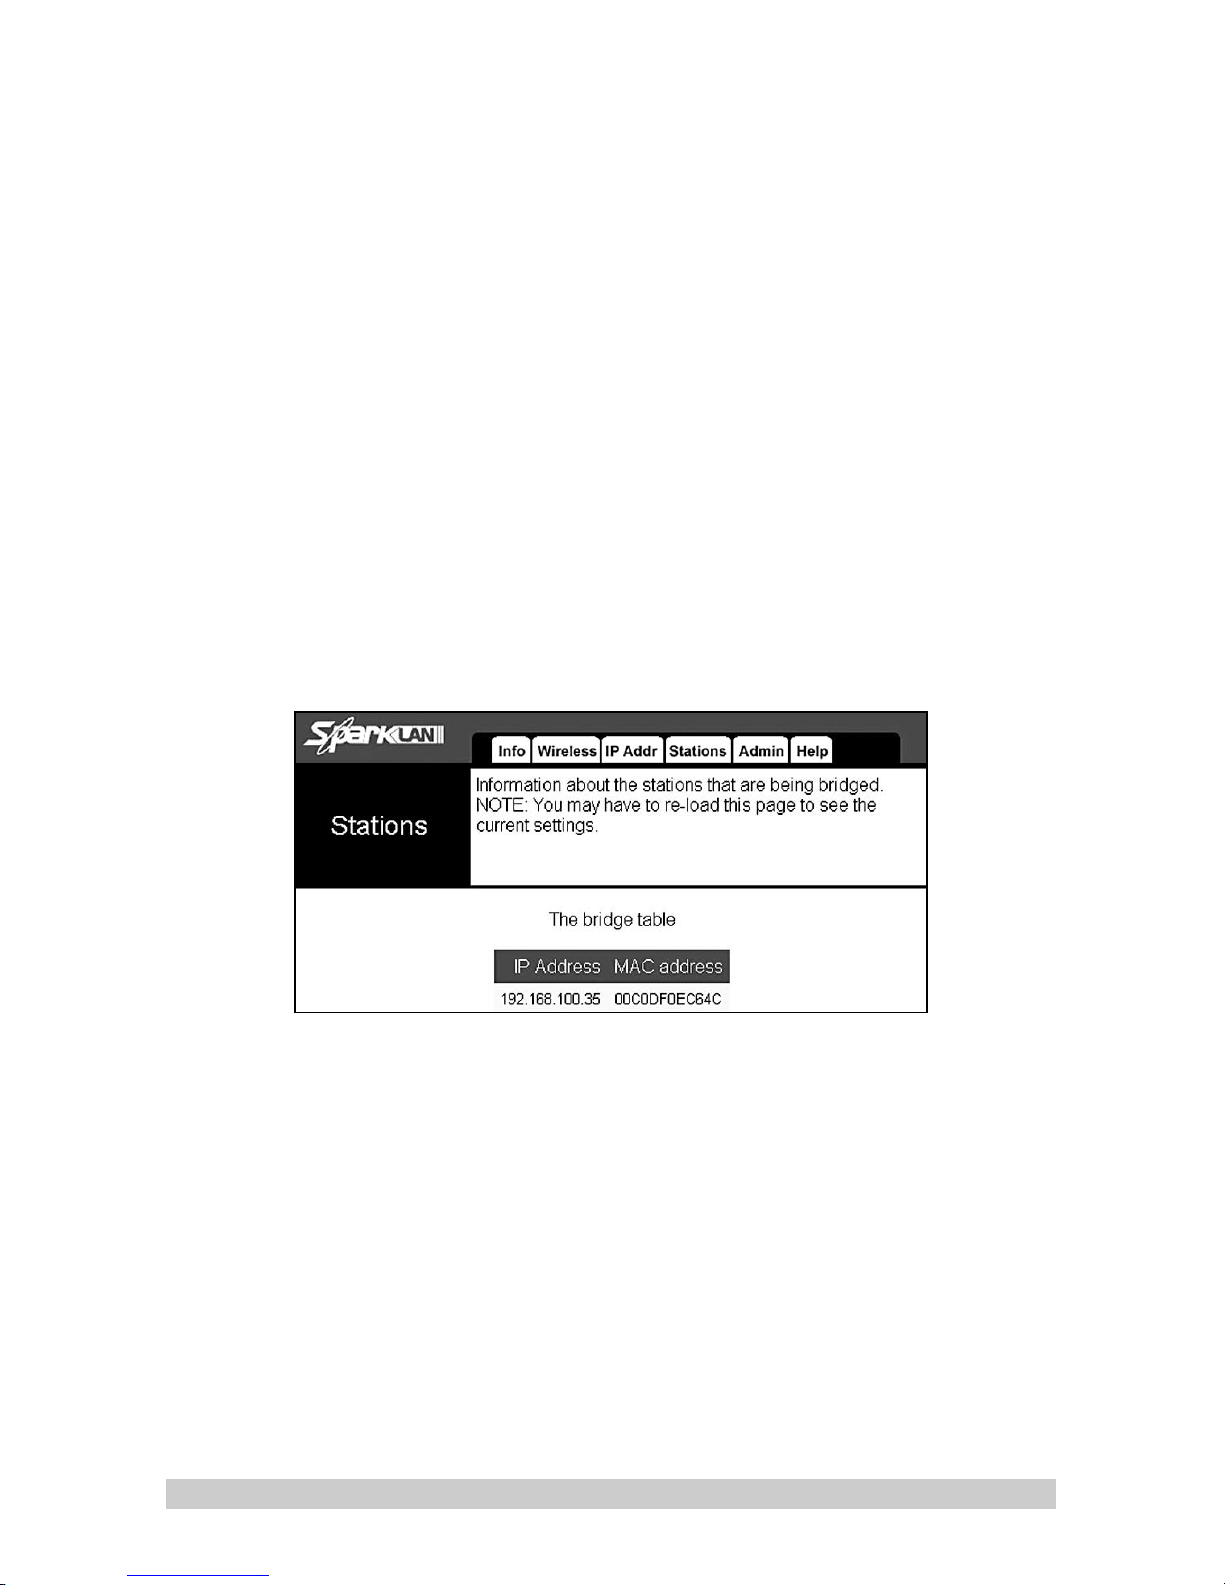
Default IP address
Device IP
Default Subnet Mask
Mask
Default gateway
Router IP address on network
Device name
Not required – Name of user or connection name
Allow Upgrade uploads
It is possible to change firmware when this parameter is on.
Cloning Bridge
Wireless interface has the same MAC address as the first device connected to
the network.
The Bridge table
Table shows all devices connected to LAN. When more computers are used on the network, all MAC addresses of all ethernet interfaces will be shown.
9
OUTDOOR CLIENT
Page 9
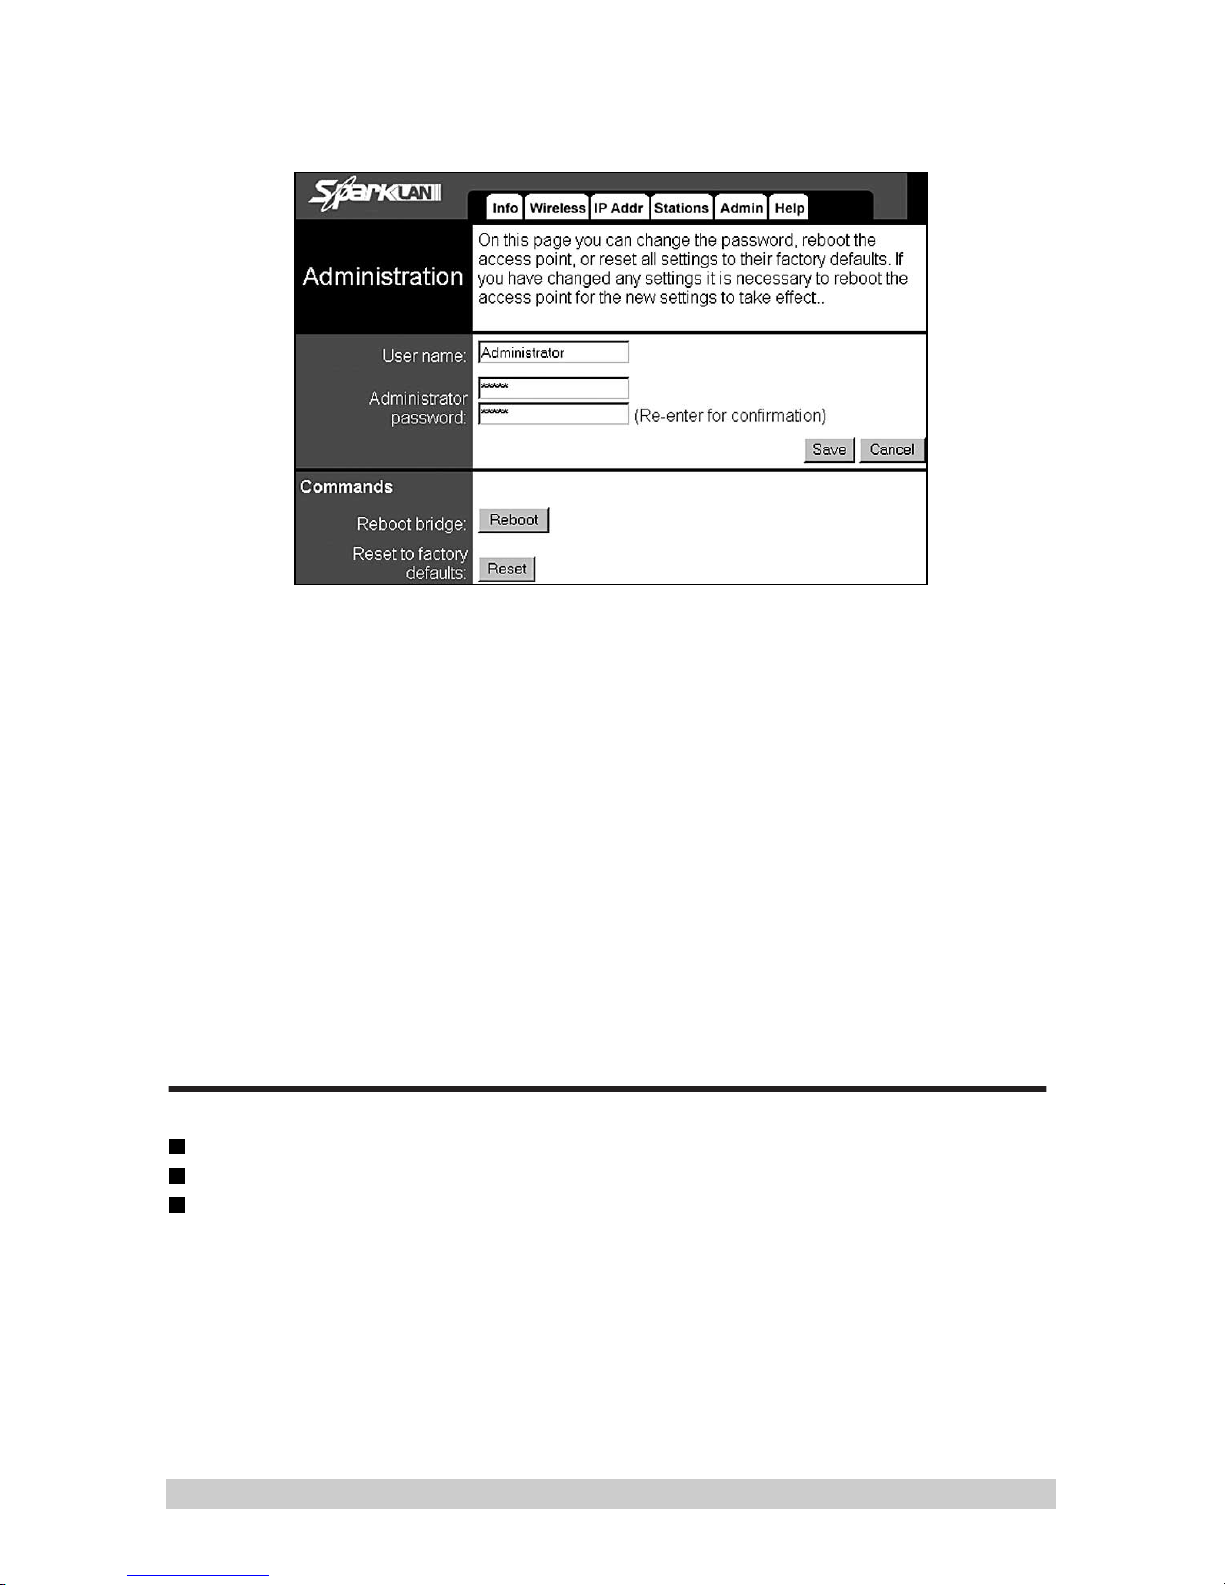
Admin menu
User name
SYSOP name. Default is Administrator
Administrator password
SYSOP password (only sysop with sysop password can change password next
time)
Reboot bridge
Device should be rebooted after all changes. This has the same effect as unplugging the device from power and plugging it in again.
Reset to factory defaults
After wrong changes or problems with many parameters you can reset to
default factory settings.
Package content
1x Outdoor Client
1x Power Over Ethernet HUB
1x User guide
Atttention! This device is only for expert use. If you are not sure about one of the
points in this guide ask Ferimex IT for help or consult a network expert.
10
OUTDOOR CLIENT
Page 10

Technical parameters of Ferimex Outdoor Client:
Lan Port: RJ-45 10Mbps network interface
LED: LEDx3: Ethernet Activity, RF Activity, Power
Wlan Port: N-Type Female
Standard: IEEE 802.11b DSSS, WiFi, Ethernet 802.3
Frequency bands: 2.400 ~ 2.4853 Ghz ISM Band
Modulation: 1Mbps:DBPSK, 2Mbps: DQPSK, 5.5 and 11Mbps: CCK
Media Access Protocol: CSMA/CA with ACK
Communication: Half duplex
Transmit power: 14 dBm +/- 1 at nominal temp. range
Receive sensitivity: 11 Mbps 10-5 BER at -81 dBm
Transmission rates (Mbps): 1, 2, 5.5, 11 Mbps, auto fall back
Encryption: 40/128 bit
Power supply: via ethernet cable, 48V
Power consumption: typically 1A
Temperature range: 0/+50 degree Celsius(operating), -20/+65C (storing)
Humidity: max 95% non-condensing
Warranty: 12 months
Device Management: WEB Management
11
OUTDOOR CLIENT
Page 11

 Loading...