


SMART WIRELESS PARKING SENSOR


FenSens
Smart Wireless Parking Sensor
User Manual
FenSens Product Support
Online: http://FenSens.com
Email: info@FenSens.com

©2017 FenSens, Inc. All rights reserved.
Bluetooth word mark and the Bluetooth logo are both registered trademarks
of Bluetooth SIG. This manual may not be copied in any media or form
without the written consent of FenSens, Inc.

Introduction
Important Safety Instructions
Package Contents
FenSens Overview
Features
Powering On
Setting Up The Mobile App
Mounting Device
Adjusting Sensor Positions
Backing Up Safely
App Features And Functions
Factory Reset
Troubleshooting
Frequently Asked Questions
Warranty
FCC Statement
IC Statement
0
0
0
05
07
07
08
08
10
12
15
18
19
19
21
22
TABLE OF CONTENT
23
24

04
Read all safety and operating instructions before using this
Bluetooth Smart Wireless Parking Sensor.
INTRODUCTION
Read all safety and operation instructions before using the device
IMPORTANT SAFETY INSTRUCTIONS
PACKAGE CONTENTS
Device is suitable for -30°F and 130°F, but it is not recommended to
store or keep the device in below 0°F or above 110°F temperatures.
Do not submerge the device underwater. Note: It is suitable for rain and
car washes. However, large raindrops or snow on the sensors may cause
some false readings just like with parking sensors on new vehicles.
Use only accessories and attachments as supplied and designated in the
instruction manual.
Do not attempt to open or modify the device in any way.
Store the device in a cool, dry place when not in use.
Always dispose of the packaging and unit in accordance with the local
regulations and in a responsible manner.
01.
02.
03.
04.
05.
06.
FenSens Smart Wireless Parking Sensor
User Manual
Smartphone Mount
QuickLaunch Button
Custom Security Screwdriver (Prevents theft)
Universal Screwdriver
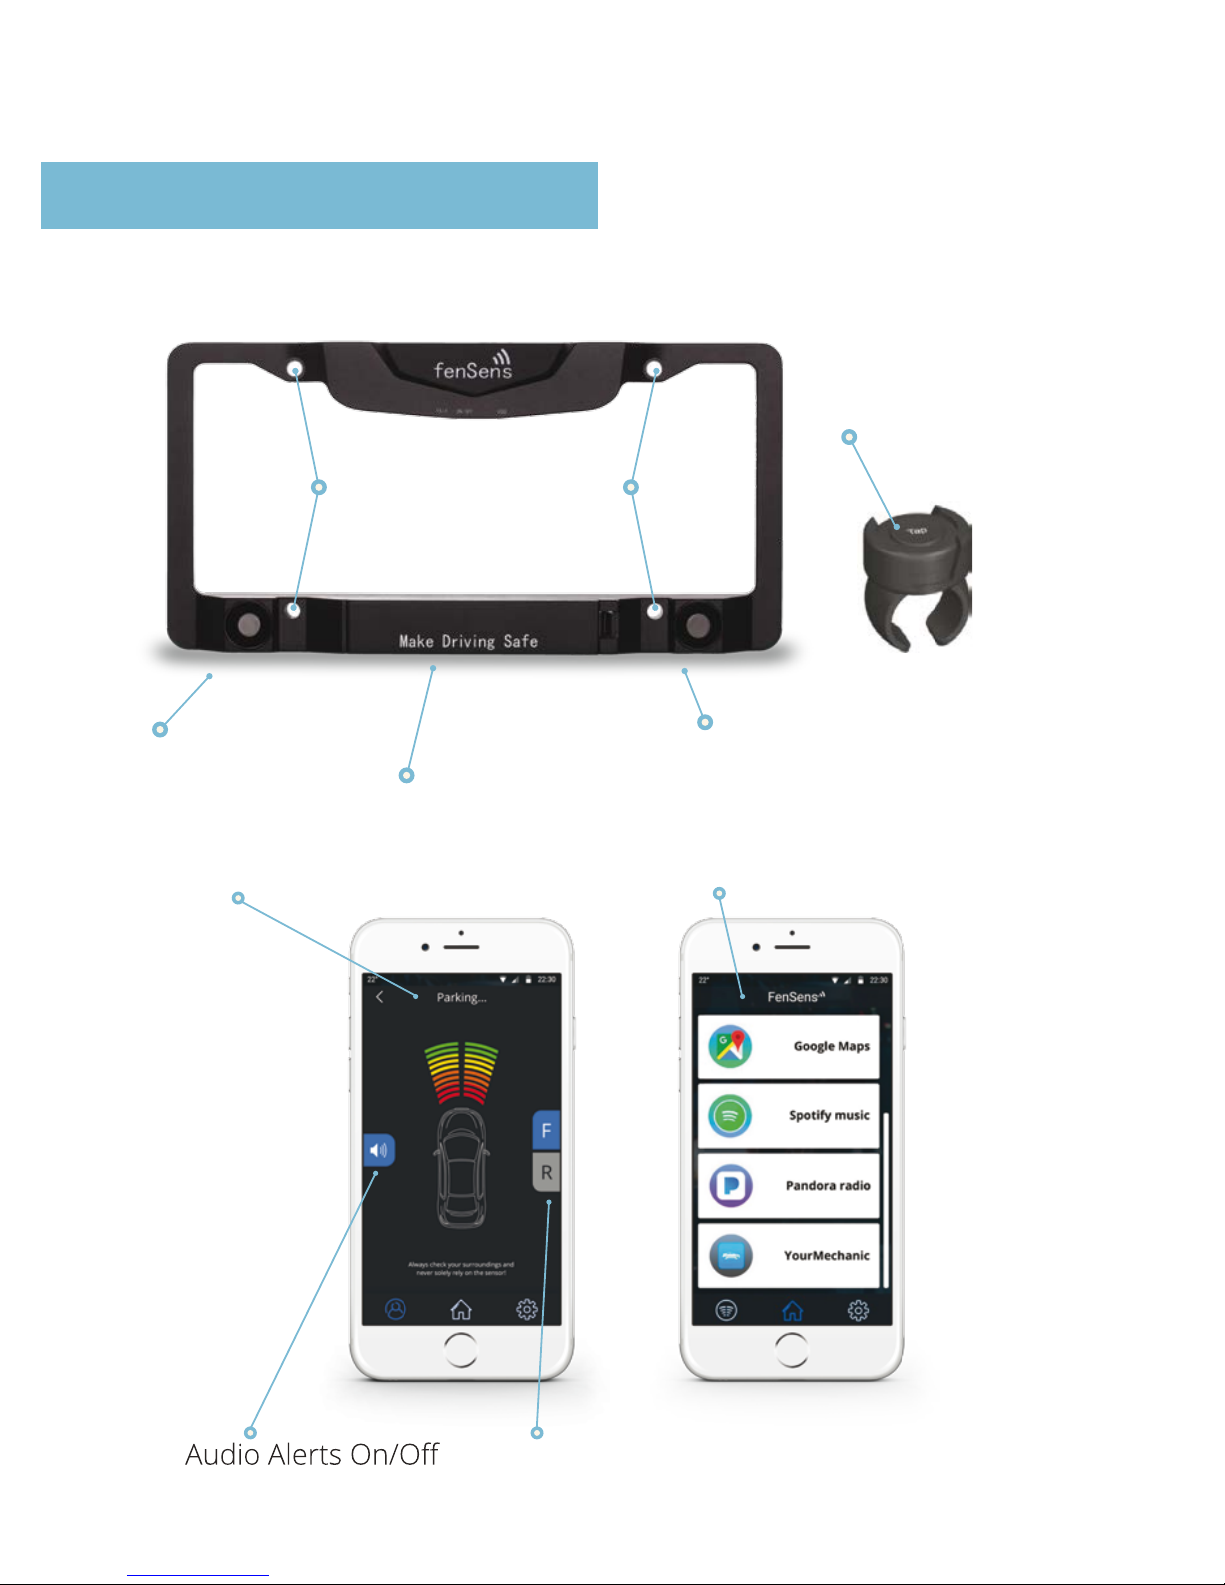
FENSENS OVERVIEW
5. Security Screw Mounts
1.
Left Sensor
6. Battery (Unscrew)
2. Right Sensor
16.
Tap QuickLaunch
Button
10. Car App Launcher
7.
Front/Back Sensor Switcher8.
9. Sensor Visual Display
05
0
11. Alert Settings
13. Account Settings
12. Clearance Settings
14. Add New FenSens Device
(Front or Back)
15. Adjust Device Placement
1. Left Sensor
2. Right Sensor
5. Security Screw Mounts
6. Battery
7. Front/Back Sensor Switcher
8. Audio Alerts On/Off
9. Sensor Visual Display (Not actual coverage area)
10. Car App Launcher
11. Alert Settings
12. Clearance Settings
13. Account Settings
14. Add New FenSens Device (Back or Front)
15. Adjust Device Placement (On App)
16. Tap QuickLaunch Button

07
FEATURES
POWERING ON
Wireless Parking Sensor:1.
Wireless parking sensor utilizes Bluetooth 4.1 technology to send
instant audio, visual, and vibration alerts to your phone.
Auto-launch:2.
Tap the included launcher button to launch the Android app instantly
(when phone screen is unlocked) or receive a push notification (iOS)
to launch your Apple app.
Universal Battery:3.
Enjoy 5 month battery life with average use. Batteries can be replaced
with standard universal AA batteries.
Easy Install:4.
Installs in 5 minutes with included custom security screws to
prevent theft.
Portability:5.
Bring your FenSens with you to your next vehicle purchase or hand
it down to your next of kin.
Hands-free alerts:6.
Mount your phone with the included phone mount and utilize audio
alerts or the visual display to assist you with parking. Turn on your
vibration settings to utilize vibration alerts if your phone is in
your pocket.
Place the batteries in the device and it will turn on. Afterwards, the device
will continue to sit in low power mode thereafter and you will not be
required to turn the device on again. After turning on the device, please
download the app in the app store (iOS and Android only) and follow
the setup instructions. Note: You may have to remove the batteries and
place in the device again to reset the device.

08
SETTING UP THE MOBILE APP
Download the app on the Google Play or Apple iTunes App Store
Select whether the device will be mounted on the front or back of your
vehicle. Select only one option for now, but you can choose a second
device to the front or back after the initial setup process.
Adjust the clearance for your device, especially if it is placed on your
back license plate. This is to compensate for the bumper or hitch
possibly sticking out past the position of the sensors.
Make sure your smartphone Bluetooth settings are turned on, then pair
your smartphone with the FenSens device and the QuickLaunch button.
Launch FenSens anytime you want to use it by simply opening the app,
hitting the sensor icon within the app’s navigation bar, or tapping the
included QuickLaunch button.
1.
2.
3.
4.
5.
MOUNTING DEVICE
Place included batteries within the smart parking sensor device, then
seal it up with the provided screw set. Open up the QuickLaunch button
and remove the protective plastic strip between the battery and the
battery connector.
It is best to setup the mobile app and pair it with the device before
installing on the vehicle.
After setting up the app, place the smart wireless license plate frame
on top of your front or back license plate over the corresponding
screw holes.
1.
2.
3.

09
Use the included custom screwdriver to screw in the smart wireless
license plate frame. It’s important to use the custom security screws
included with your kit as these screws will help prevent people from
stealing your device. Fully tighten the screws so the device is secure.
Make sure your registration tabs and plate numbers are fully visible in
order to stay legally compliant. Please refer to local rules and
regulations regarding license plate visibility.
Wiggle your device to ensure it is fully screwed in and secure.
4.
5.
6.

10
The sensors can be adjusted up or down if you need them to be. We
recommend this if your plate is higher than 3 feet off the ground or you
are concerned about catching low hanging objects, such as curbs. Please
adjust the sensors to a position you are comfortable with using the flat
ground as a reference. You do not want the sensors to be hitting the road
and providing false readings.
The screw holes can be identified in the image below. Be sure to use the
special tool that’s included with your kit to unscrew and adjust the sensors
up or down. Tighten the special sensor screws after making an adjustment
so they do not change position while in use on your vehicle.
ADJUSTING SENSOR POSITION

11
Please note: FenSens is not recommended for vehicles with a license plate
higher than 4 feet off the ground. The higher your smart wireless license
plate is placed off of the ground, the more clearance you need to set within
the app. Please see feature 12 in the Features section along with the
diagram below.
1.0 Foot
Bumper/hitch clearance distance only
PLATE HEIGHT Adjust the clearance on your app*
1.5 Feet
2.4 Inches + Bumper/hitch clearance distance
2.0 Feet
3.6 Inches + Bumper/hitch clearance distance
2.5 Feet
5.50 Inches + Bumper/hitch clearance distance
3.0 Feet
7 Inches + Bumper/hitch clearance distance
3.0 Feet
4 Feet
4 Feet And Above
Not recommended
9 Inches + Bumper/hitch clearance distance
12 Inches + Bumper/hitch clearance distance
*Please adjust the clearance on your app
according to the chart below.
4 Feet Away
3 Feet (actual)

12
Please note: the mobile app display is for visual purposes only and does
not represent exact dimensions for the Smart License Plate Frame.
Always use precaution when driving, checking for blind spots while
operating or parking your vehicle.
BACKING UP SAFELY
FenSens is best used for backing up or pulling forward into a parking spot.
Please visually check the spot before making a parking maneuver.
Listen for audio alerts from your phone if something should suddenly
appear in front or behind your vehicle (depending on sensor placement).
You will only receive sensor alerts from the side of your vehicle that the
device is mounted on.
If the device ever disconnects from your
smartphone’s Bluetooth, you will
receive a pop-up notification and an
audio alert to your smartphone.
Please pay attention to this warning and
proceed with caution or halt the
parking maneuver. The warning will
disappear as soon as the sensor
reestablishes a connection with your
smartphone.
13
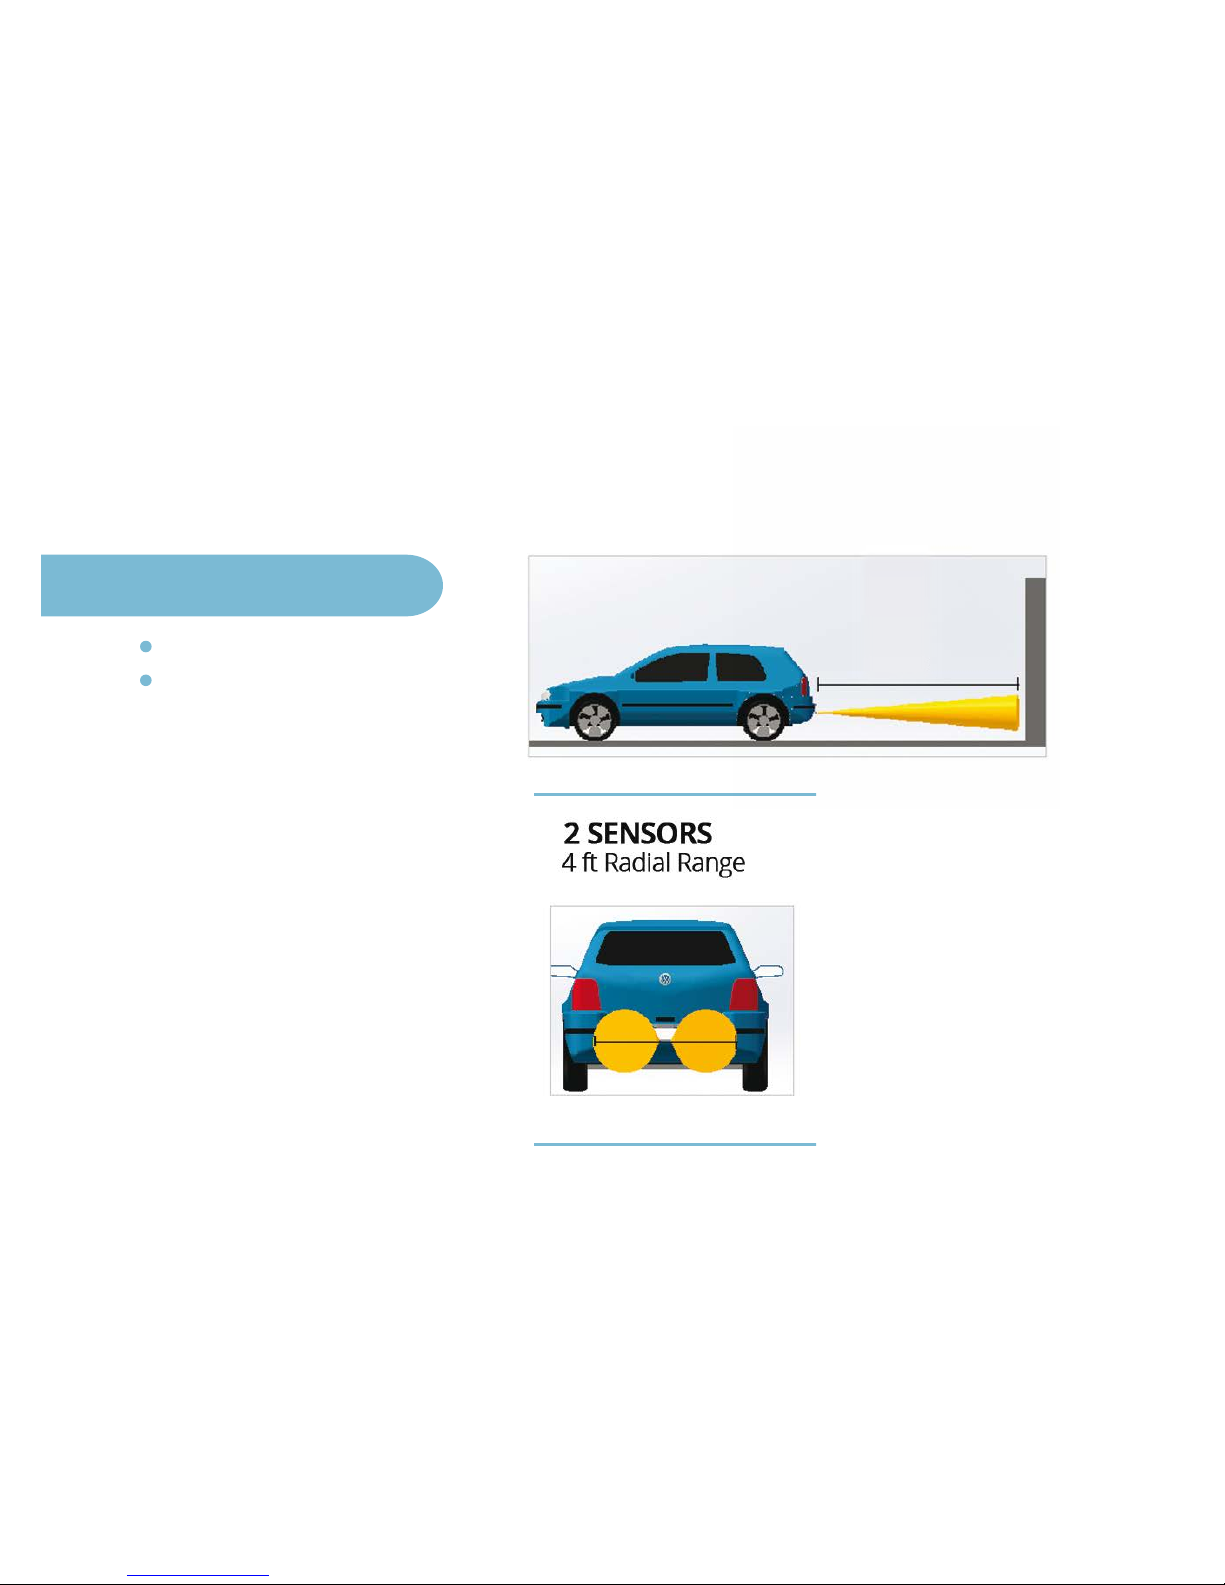
Refer to the diagrams below before using FenSens so that you can fully
understand the field of vision for the device. Please note that the corners
of the bumper are not covered and the field of vision is best used for
objects directly in front or behind the vehicle, which can be seen best by
moving your vehicle forward or backward in a straight line.
SENSORIAL DEVICE
10 ft Longitudinal Range
Max. gap Allowed 6 in
10 Feet

14

1
Launch your device by tapping the QuickLaunch button included with
your FenSens kit. The button will automatically launch your app on Android
if your screen is not locked and it will send a push notification if you are
using an iOS device. If your Android is on screen lock or you are using
Apple iOS, please tap the push notification to open the FenSens app
to begin displaying sensor data.
APP FEATURES AND FUNCTIONS
Sensor Visual Display (Not actual coverage area)9.
Visual indicators:
Use these visual indicators to know how far
away an object is from your vehicle. Practice caution when you
see that you are in the orange and red areas. For proper use,
make sure your clearance is properly configured (See 19). Please
note that these sensor displays are not the actual coverage area,
but rather visual clarity to understand how far away an object is
from your vehicle. See the section Backing Up Safely to understand
the exact field of vision for the device.
A.
Car App Launcher10.
Hold your QuickLaunch button for 3 seconds to pull up the car
app launcher or access it directly by selecting the home icon
on the app’s lower navigation bar.
A.
Use the car app launcher to access your favorite apps driving apps,
such as: Google Maps, Apple Maps, Spotify, Pandora, and
YourMechanic (for roadside assistance).
B.
F/R Toggle Buttons: Use these buttons to toggle between
front or rear sensors individually.
B.
Sound Icon:
This icon will toggle audio alerts (beeps) on/off.
For full effectiveness, we recommend that you keep the alerts
on, but also offer the option to keep the audio alerts turned off.
C.

1
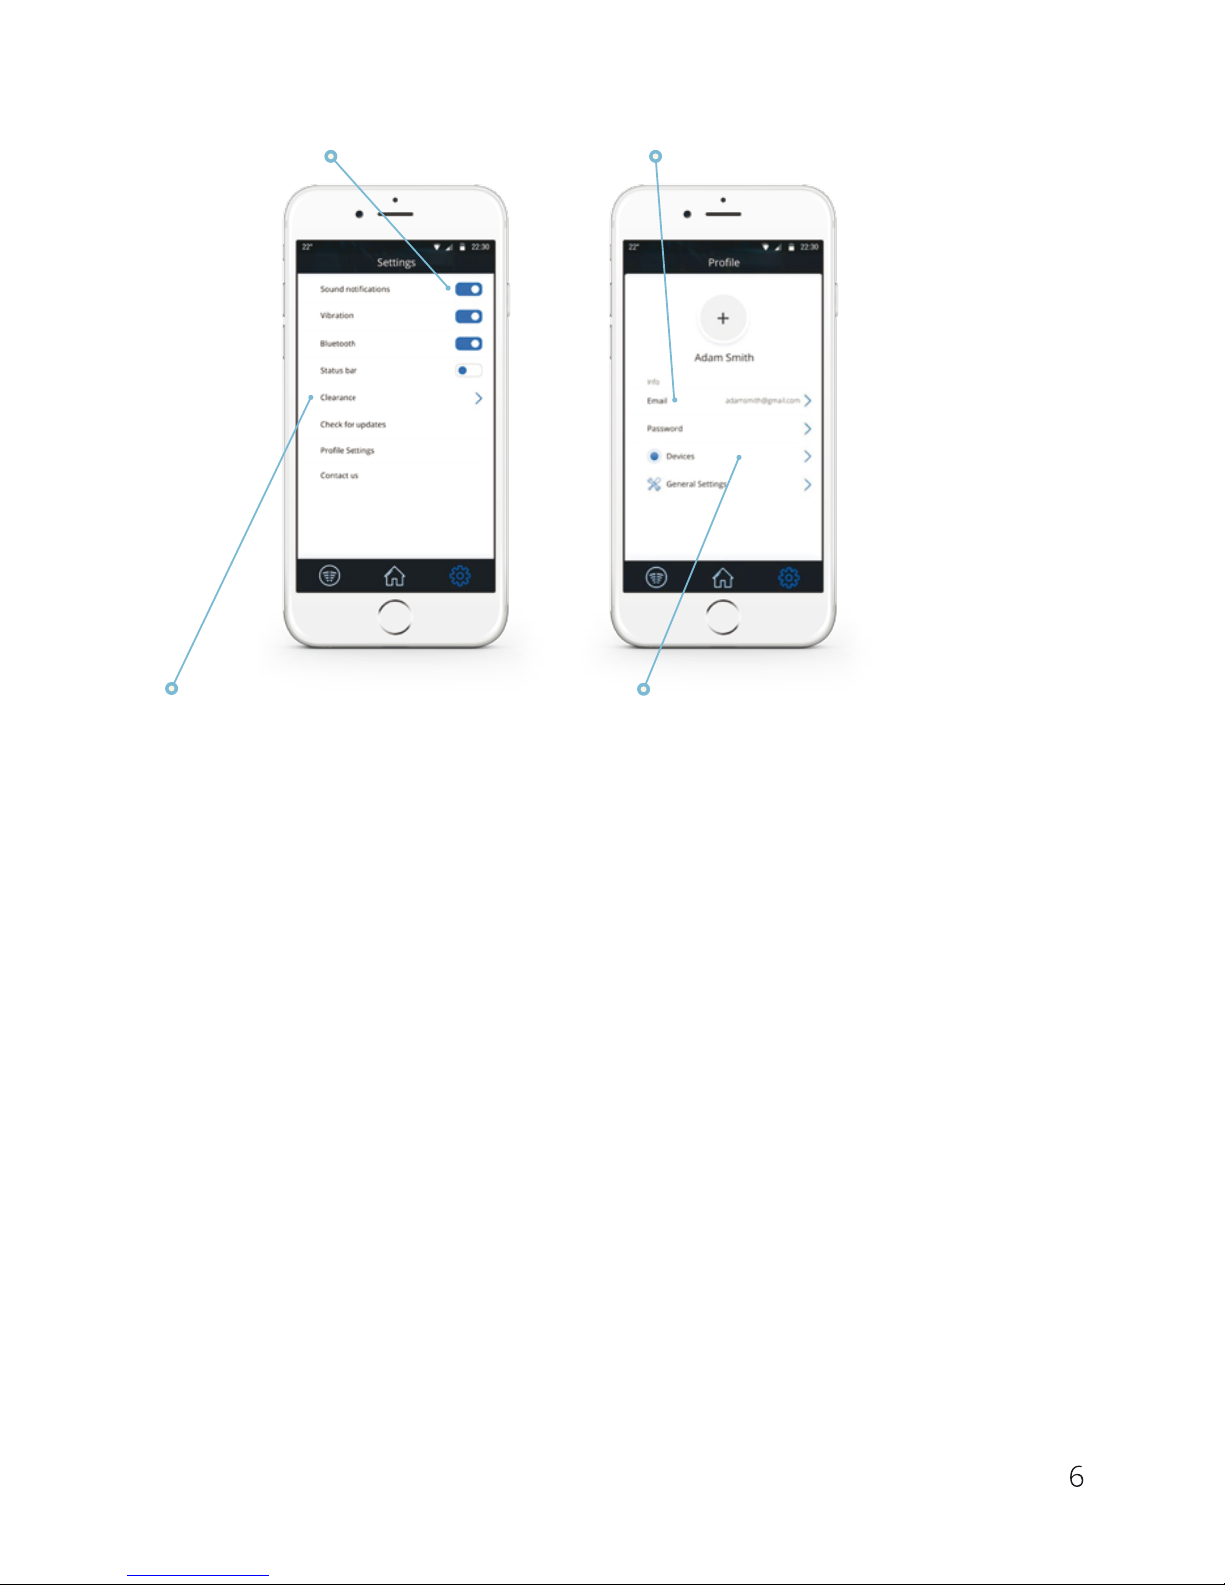
Alert Settings11.
Vibration: This switches on/off the vibration alerts. These alerts
are useful if the phone is in your pocket when you tap the
QuickLaunch button
A.
Sound notifications: Similar to figure 17C, this toggles on/off
audio (beeps) alerts.
B.
Bluetooth: Turn off your Bluetooth connection
(not recommended while driving).
C.
Clearance Settings12.
Adjust your clearance settings to compensate for your bumper
sticking out past the sensor or for smart wireless license plate
frames placed higher than 2 feet off the ground. Please advise
the “Adjusting sensor position” for further instructions.
D.
Clearance Settings13.
Email/Password: Change the email or password associated
with your account.
E.
Device: See details regarding your device battery life and more
F.
Add New FenSens Device (Back or Front)14.
Add new FenSens: After adding your first device, you can add
another sensor on the front or back of your vehicle. It will guide
you through the same setup process.
G.
Adjust Device Placement (On App)15.
Place of installation: Changing your device from the back to
the front of your vehicle? Be sure to adjust this setting so that
your sensor data displays correctly on your app.
H.

17
10. Car App Launcher
7.
Front/Back Sensor Switcher8. Audio Alerts On/Off
9. Sensor Visual Display
11. Alert Settings
13. Account Settings
12. Clearance Settings
14. Add New FenSens Device
(Front or Back)
15. Adjust Device Placement

18
SPECIFICATIONS
SPECIFICATIONS
Bluetooth version
Bluetooth profiles
Operating distance
Battery time
Sensor range
Battery type
App
Dimension
Weight
Battery capacity
Bluetooth V4.1
GATT
10 meters
About 5 months (5 times per day)
Approx 10 feet
AA
iPhone 4s + iOS7.1+ preferred.
Android 5.0 preferred with 4.4 minimum.
12 inch long by 6 inch high
2Lbs
3000mAH

19
Warning: Performing a factory reset on the FenSens device will delete any
previous pairings and will restore the device to factory default settings.
Note: This does not change the registration of your mobile device to the
FenSens device. You can share access to the device from your
app profile settings.
Only perform this if you are experiencing any issues with the product.
Note: After the factory reset is complete, the memory is now cleared.
However, the device will still be registered only to your mobile device
or anyone that you have shared your code with. When reopening the
app, you will be prompted to login and walk through the setup process
once more.
Remove the batteries from the casing for 3 seconds, then put
them back into the license plate frame. This will factory reset
the device, but it will still be registered to you.
1.
FACTORY RESET
TROUBLESHOOTING
Unable to pair with smartphone or tablet1.
Ensure that you have removed and properly
installed the batteries again and that you
have verified your smartphone's Bluetooth
feature is also turned on. If you have yet to
follow the setup instructions, please walk
through the setup process to pair your
FenSens device with your smartphone.
The app will connect with your device when
in range automatically as long as your
smartphone’s bluetooth setting is turned on.

20
FenSens device keeps dropping signal2.
If your device signal keeps dropping, please close out of the app and
open it up again or press the included QuickLaunch button
to auto-launch.
App QuickLaunch is not working correctly3.
The Android app QuickLaunch could have conflicts if you have too many
apps running on your phone or not enough memory space available.
If space is limited, please follow your smartphone’s instructions
regarding memory space availability.
Lost or damaged accessories4.
If you have lost or damaged one of the included accessories, please
contact info@FenSens.com. The custom security screwdriver will require
a replacement if it becomes lost, but the other screws can be easily
removed using a standard screwdriver kit.
Device or QuickLaunch button isn’t powering up6.
Please make sure you have placed the included batteries within the
battery compartment of the FenSens device. If your button isn’t working,
then it could be that you haven’t removed the protective plastic strip
inside the button. Open it up and remove the plastic strip to enable the
battery connect
ion. After you are sure the batteries are connected
properly, hit the grey button on the FenSens device to reset it,
then try opening the app again.
Device has blind spots on the corner of my vehicle.
5.
Please refer to the “Backing Up Safely” section on the sensor’s field of
vision. Please note: FenSens is a “Parking Assist” device and does not
prevent accidents. Always check in the front and the back of your vehicle
before driving, proceeding with caution of your surroundings
throughout the entire duration of your trip. FenSens is recommended
for backing up or pulling forward and receiving alerts when an
object/person suddenly appears in front or behind your vehicle.
FenSens does not possess peripheral abilities.

21
FREQUENTLY ASKED QUESTIONS
What is the FenSens compatible with?1.
The FenSens device will work with most Android or iOS compatible
smartphone and tablet devices.
Where can I replace lost FenSens accessories or tools?2.
Batteries and the standard screwdriver can be replaced at any local
store. Please use a trusted AA battery for your device. The custom
security screws, custom security screwdriver, and QuickLaunch
button must be replaced by contacting info@FenSens.com.
Does FenSens disrupt my other Bluetooth connections?3.
No, FenSens will not interfere with your other Bluetooth connections.
However, if you open the app or tap the QuickLaunch button,
it will then override any other app in use and begin displaying sensor
data and your customized alerts.
Help! I’m unable to use the device. What should I do?4.
Please view the Troubleshooting section. If you are unable to find a
solution, please contact support online via info@FenSens.com
What’s the effective range for the device?5.
See the “Backing Up Safely” section to know the field of vision for your
device. It can see approximately 8 feet behind or in front of your vehicle
with a max width of 4 feet at this distance. It is important to note that
the FenSens device does not cover the corners of your bumper.
Use caution when reversing your vehicle, relying on your own visual scan.
Never rely solely on the sensor of this device or any vehicle
(even in new cars). The Bluetooth range between your phone and
device is effective up to 30 feet, but we recommend being no further
than 20 feet away while in use.
Apple devices- iPhone 4s+, iPod Touch, iPad with iOS7.1+ preferred
Smartphones - Android 5.0 preferred with 4.4 minimum.

22
WARRANTY
One Year Limited Hardware Warranty
FenSens, Inc hereby warrants to the customer of record that this product is
in good-working condition and free from defects in material or workmanship
under normal use for a duration of 1 year after the date of purchase.
The product has been tested to meet the highest quality standards in each
testing category. In the unlikely event that the product proves to be defective,
FenSens will repair or replace the product free of charge. If replacement
is required and if FenSens, Inc then no longer carries the same product,
then FenSens, Inc reserves the right to substitute the product with a
replacement product of like quality and size, suitable for the intended use.
This warranty is limited to repair or replacement of the mentioned product
only, is non-transferable and does not extend to any product damaged by
misuse, natural disasters or any other circumstances beyond FenSens,
Inc’s control. The warranty does not cover or provide for the reimbursement
or payment of incidental or consequential damage resulting from breach of
the limited warranty described above. Except for the limited warranty
described above, we offer no other warranties expressed or implied.
Aside from limited warranty expressly contained herein, we hereby disclaim
any and all warranties, including without limitation any implied warranties
of merchantability, suitability or fitness for a particular purpose.
If your product is not functioning or you have any concerns, please contact
FenSens Support before returning the product to us.

23
FCC Statement:
FCC /IC RF Exposure Statement:
FCC ID: 2AMAJ-FENSENS-BUTTN
IC: 22794-BTTNV1
Model No: FEN-BTTNV1
FCC ID: 2AMAJ-FENSENS-USCAN
IC: 22794-FENV1
Model No: FenV1
This device complies with part 15 of the FCC rules. Operation is subject
to the following two conditions:
(1) this device may not cause harmful interference, and
(2)this device must accept any interference received, including
interference that may cause undesired operation.
NOTE: The manufacturer is not responsible for any radio or TV interference
caused by unauthorized modifications or changes to this equipment. Such
modifications or changes could void the user’s authority to operate the equipment.
When using Smart Wireless Parking
Sensor, maintain a distance of 20cm
from the body to ensure compliance
with RF exposure requirements.
Tap QuickLaunch Button has been
evaluated to meet general RF exposure
requirement, and can be used in portable
exposure condition without restriction.

24
IC Statement:
This device complies with Industry Canada license-exempt RSS standard(s).
Operation is subject to the following two conditions:
(1) this device may not cause interference, and
(2) this device must accept any interference, including interference that may
cause undesired operation of the device.
Le présent appareil est conforme aux CNR d’Industrie Canada applicables
aux appareils radio exempts de licence. L’exploitation est autorisée aux
deux conditions suivantes :
1) l’appareil ne doit pas produire de brouillage;
2) l’appareil doit accepter tout brouillage radioélectrique subi, même si le
brouillage est susceptible d’en compromettre le fonctionnement.

Online Support / Contact Us
Please visit us at http://FenSens.com for support information. You may
also reach us with the contact information provided below.
Online: http://FenSens.com
Email: info@FenSens.com

 Loading...