


1 year warranty
www.kinivo.com
Contact: support@kinivo.com
Ma de i n Ch in a
User Manual
BTX450 Bluetooth Wireless Speaker
Introduction
Introduction
Read all safety and operation instructions before installing and using your
speakers.
Warning: To reduce the risk of fire or electric shock, do not expose this
speaker system to water or moisture.
Important Safety Instructions
l Do not expose the speaker to liquid, moisture or areas of high humidity.
lDo not use abrasive cleaners to clean the speaker’s case as they may
damage the unit. Always unplug and power off the unit before cleaning.
lDo not expose the speaker to extremely high or low temperatures.
lKeep the unit away from direct sunlight.
lUse only accessories and attachments as supplied and designated in the
instruction manual.
lDo not attempt to open or modify the speaker in any way.
lStore the speaker in a cool dry place.
lThe BTX450 contains a lithium ion battery. Lithium ion batteries are
flammable and can cause fire if misused or defective.
lAlways dispose of the packaging and unit in accordance with the local
regulations and in a responsible manner.
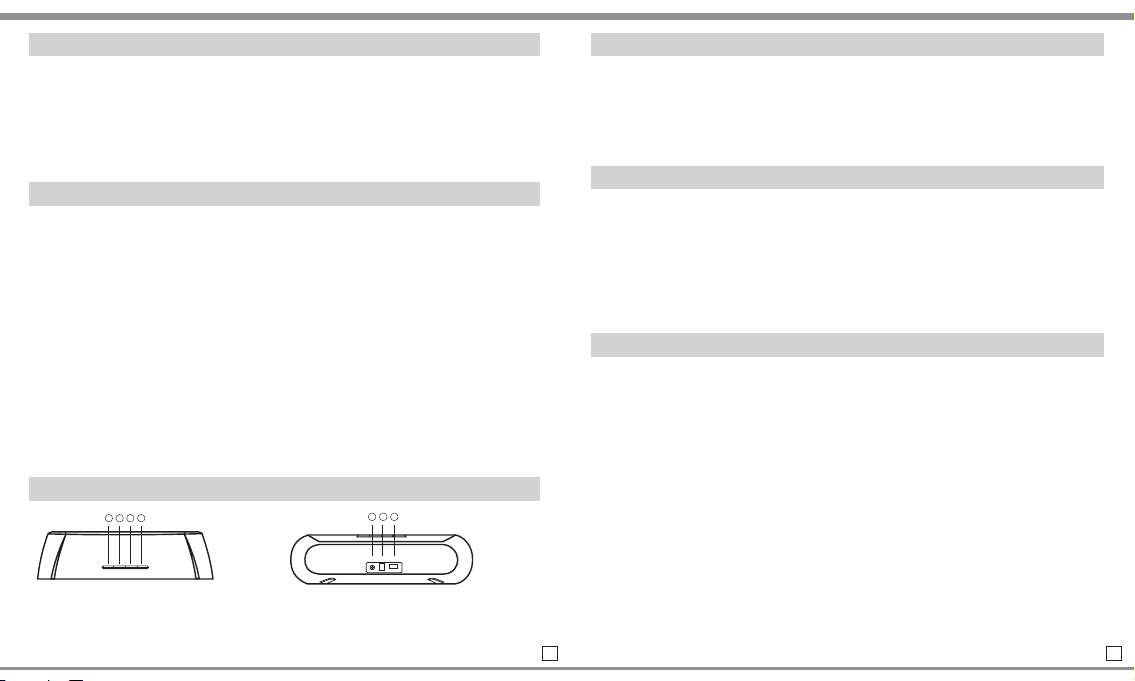
Speaker Overview
1.Power 5. Aux Input
2. Volume Up 6. Power Cord Input
3.Volume Down 7. USB Power Source Output
4.Bluetooth Pairing
Read all safety and operation instructions before installing and using your
speakers.
Warning: To reduce the risk of fire or electric shock, do not expose this
speaker system to water or moisture.
Important Safety Instructions
l Do not expose the speaker to liquid, moisture or areas of high humidity.
lDo not use abrasive cleaners to clean the speaker’s case as they may
damage the unit. Always unplug and power off the unit before cleaning.
lDo not expose the speaker to extremely high or low temperatures.
lKeep the unit away from direct sunlight.
lUse only accessories and attachments as supplied and designated in the
instruction manual.
lDo not attempt to open or modify the speaker in any way.
lStore the speaker in a cool dry place.
lThe BTX450 contains a lithium ion battery. Lithium ion batteries are
flammable and can cause fire if misused or defective.
lAlways dispose of the packaging and unit in accordance with the local
regulations and in a responsible manner.
Speaker Overview
1.Power 5. Aux Input
2. Volume Up 6. Power Cord Input
3.Volume Down 7. USB Power Source Output
4.Bluetooth Pairing
123 4
567
Package Contents
l BTX450 Speaker
l User Manual
l 3.5mm Audio Cable
l AC Power Adapter
Features
l Seamlessly stream music from any Bluetooth (A2DP) capable device
l Class-D digital amplifier
l Supporting Bluetooth protocol v2.1+EDR and A2DP 1.2 audio streaming
profile
l Connect an iPod or MP3 player via 3.5mm port
l Charge your device while listening to music via USB port
Operation
1. Turn Unit On/Off
Press and hold the power button for 3 to 5 seconds to turn the speaker on.
Press and hold the power button to turn the speaker off.
2. Adjust Volume
Press the volume button to increase or decrease volume. Press and hold the
volume button to continuously increase or decrease the volume.
3. Bluetooth Pairing
a.The speaker needs to be paired to a Bluetooth device before using. Press
and hold the Bluetooth button on the speaker for 2 to 3 seconds, the speaker
will play an audible tone and the Bluetooth LED will blink quickly. Activate the
Bluetooth function on your device that you wish to connect to and search for
and pair to the BTX450.
3 4

For iPad, iPhone, iPod Touch
Navigate to Settings > General > Bluetooth (On), then select the BTX450 to
pair the speaker.
For Android smartphones and tablets
Navigate to Settings > Wireless & networks > Bluetooth settings while
Bluetooth is enabled, then select Scan for devices. Select the BTX450 to pair
the speaker.
For all other devices
Please follow your devices’ instructions on how to perform Bluetooth pairing.
After pairing successfully, a solid blue LED light will remain.
b.The BTX450 speaker will automatically connect with your device once initial
setup is complete.
7. LED Indication
Status LED Indicator
Powered off Off
Powered on Steady red
Battery charging (plugged in, powered off) Fast blinking red
Low battery (not plugged in) Slow blinking red
Troubleshooting
1. Unable to pair to device / Device no longer connects to BTX450
Make sure that the speakers are in pairing mode by pressing and holding the
Bluetooth button on the speaker for 2 to 3 seconds (blue LED blinking rapidly).
Now open the Bluetooth configuration on the device you are trying to pair to
and scan for Bluetooth devices. You should see the BTX450 speaker - proceed
to pair and connect the speaker.
4. Auxiliary Input
Use a 3.5mm audio cable to connect the speaker to another audio source. The
Bluetooth audio streaming will be automatically interrupted as the speaker
switches to the AUX function.
5. Charging BTX450 speaker
The BTX450 speaker automatically charges itself when its plugged into the AC
outlet. The power LED will blink (fast) during charging. The LED will switch off
when the speaker is fully charged. Please note that the power LED does not
show the charging status when the speaker is powered on.
6. Charging Other USB Devices
Simply connect charging cable of mobile device to the USB port at the back of
the speaker. It is recommended that the speaker is plugged in via power cord
to preserve battery power.
Please refer to the Operation section for Bluetooth Pairing.
2. Speaker works with my smartphone but not my computer
The Bluetooth adapter in your computer needs to support the Stereo Bluetooth
profile (A2DP). To ensure the Bluetooth adapter for your computer is
functioning correctly, update the drivers to the latest version. You may need to
verify that your computer’s Bluetooth adapter supports A2DP (Advanced Audio
Distribution Profile).
3. Error: Driver missing when trying to pair to computer
The Bluetooth adapter for your computer provides the drivers for all Bluetooth
speaker. To ensure the Bluetooth adapter for your computer is functioning
correctly, update the drivers to the latest version.
In addition, you may need to verify that your Bluetooth adapter supports A2DP
(Advanced Audio Distribution Profile). If you need assistance with locating the
drivers for your computer, you may contact Kinivo Support.
5 6

4. Error messages when connecting on Mac OS X
Verify that the BTX450 speaker are powered on. If you are still unable to
connect, restart the computer and remove the BTX450 from the Bluetooth
device list. Try to pair the speaker again.
If at any point you are unable to resolve your issue, you can contact Kinivo
Support via email at support@kinivo.com.
Frequently Asked Questions
1. What is the BTX450 speaker compatible with?
In general, the BTX450 speaker will work with devices that support the A2DP
(Advanced Audio Distribution Profile) Bluetooth profile. A list of common
devices that support A2DP Bluetooth:
l Apple devices – iPhone, iPod, iPad
l Computers with Bluetooth adapters – Mac Pro, iMac, MacBook, MacBook
Air, MacBook Pro, etc.
l Tablets – Windows, Apple, Android
l Smartphones – Android, BlackBerry, Windows, Samsung, Droids, HTC,
etc.
l Bluetooth USB adapters (for Windows 7 and Vista)
2. Where can I find Windows drivers for the BTX450 speaker?
The BTX450 speaker do not have external drivers. The drivers are
provided by the Bluetooth adapter with A2DP support (see
compatibility list). If you are experiencing driver issues with the speaker
on a computer, update your Bluetooth adapter drivers to the latest
version.
3. How many Bluetooth connections will the BTX450 speaker remember?
The BTX450 will remember up to eight (8) previous Bluetooth connections.
When the BTX450 is powered on, it will automatically connect to the last
device it was connected to. If the last device isn’t found, it will connect to the
second last device, and so on.
4. How can I tell when the battery is low?
When the battery is low, the red LED will blink slowly while the speaker is
unplugged.
5. How can I tell when the battery is charging and is fully charged?
The BTX450 speaker automatically charges itself when its plugged into the
AC outlet. The power LED will blink (fast) during charging. The LED will switch
off when the speaker is fully charged. Please note that the power LED does
not show the charging status when the speaker is powered on.
6. Help! I'm unable to use to the speaker. What should I do?
Please view the Troubleshooting section. If you are unable to find a solution
you can contact Kinivo Support via email at support@kinivo.com.
7
8

Technical Specifications:
Warranty
Power supply: 100-240V, 50/60Hz
Output power: 2x5W (RMS)
Built-in Battery Capacity: 3600 mAh
Speakers: 2
Impedance: 4 ohms
Frequency response: 200Hz-20KHz
S/N Ratio: 80dB
Separation: 55dB
Dimensions: 11.9 (W) x 3.2 (D) x 3.2 (H) in
Weight: 0.85 kg
Compatible with any Bluetooth (A2DP) device
1 Year Limited Hardware Warranty.
Kinivo hereby warrants to the customer of record that this product is in goodworking condition and free from defects in material or workmanship under
normal use for a duration of 1 year after the date of purchase. The product
has been tested to meet the highest quality standards in each testing
category. In the unlikely event that the product proves to be defective, Kinivo
will repair or replace the product free of charge. If replacement is required
and if Kinivo then no longer carries the same product, then Kinivo reserves
the right to substitute the product with a replacement product of like quality
and size, suitable for the intended use.
This warranty is limited to repair or replacement of the mentioned product
only, is non-transferable and does not extend to any product damaged by
misuse, natural disasters or any other circumstances beyond Kinivo’s
control. The warranty does not cover or provide for the reimbursement or
payment of incidental or consequential damage resulting from breach of the
limited warranty described above. Except for the limited warranty described
above we offer no other warranties expressed or implied, and other than
limited warranty expressly contained herein, we hereby disclaim any and all
warranties, including without limitation any implied warranties of
merchantability, suitability or fitness for a particular purpose.
If your product is not functioning or you have any concerns please contact
Kinivo Support before returning the product.
Contact Us
You can reach Kinivo Support by writing to support@kinivo.com. You may
also visit www.kinivo.com for more information.
9
10

FCC Warning:
l This device complies with Part 15 of the FCC Rules. Operation is subject to
the following two conditions:
l (1) this device may not cause harmful interference, and
l (2) this device must accept any interference received, including
interference that may cause undesired operation.
l Changes or modifications not expressly approved by the party responsible
for compliance could void the user's authority to operate the equipment.
l NOTE: This equipment has been tested and found to comply with the limits
for a Class B digital device, pursuant to Part 15 of the FCC Rules. These limits
are designed to provide reasonable protection against harmful interference in
a residential installation. This equipment generates, uses and can radiate
radio frequency energy and, if not installed and used in accordance with the
instructions, may cause harmful interference to radio communications.
However, there is no guarantee that interference will not occur in a particular
installation. If this equipment does cause harmful interference to radio or
television reception, which can be determined by turning the equipment off
and on, the user is encouraged to try to correct the interference by one or more
of the following measures:
l Reorient or relocate the receiving antenna.
l Increase the separation between the equipment and receiver.
l Connect the equipment into an outlet on a circuit different from that to
which the receiver is connected.
l Consult the dealer or an experienced radio/TV technician for help.
FCC RF warning statement: The device has been evaluated to meet general RF
exposure requirement.The device can be used in portable exposure condition
without restriction.
11
12
 Loading...