

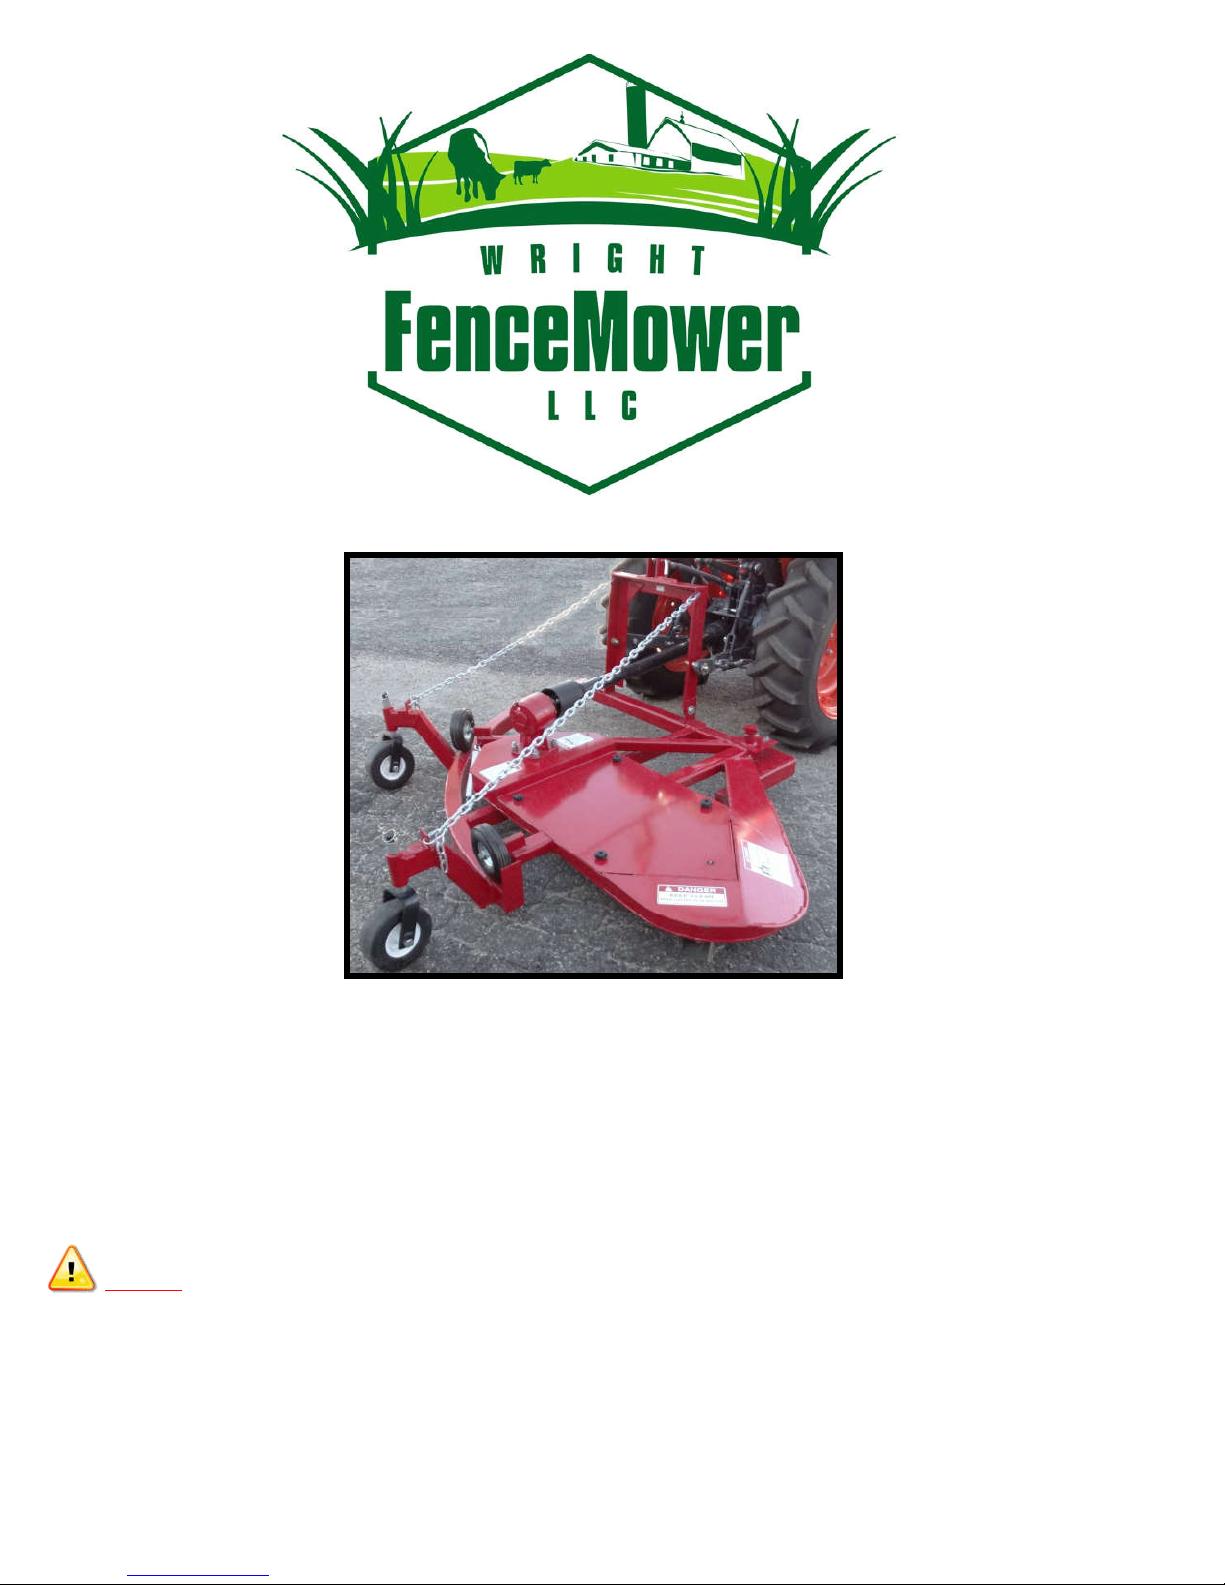
Fence Mower FM30, FM60 Operator And Maintenance Manual
with both machines before
OPERATOR’S AND MAINTENANCE MANUAL
FM30-FM60
FOR SERIAL #s STARTING
DANGER
Read this manual and the
manual for your tractor
carefully to acquaint yourself
operating!
For support and contact information
Visit: www.fencemower.com Phone: 713-501-5356
RELEASED 11/3/17
WITH 1057

MODEL NUMBER
SERIAL NUMBER
DATE OF PURCHASE
Customer Pre-Operation Check List Reference
Read, understand and follow the general safety rules listed in
this manual.
Check decals for position and legibility Page 3
Check all blades for sharpness and condition. Page 7
Check gearbox lube level. Page 8
Page 2

Table of Contents
Section 1 INTRODUCTION
Owner’s Responsibility
Purpose of this Manual
Safety-Alert Symbol
1
1
1
1
Signal Words
Customer Assistance
Section 2 SAFETY INFORMATION
General Safety Rules
General Safety Rules Continued
1
2
2
3
Safety Decals
Section 3 ASSEMBLY INSTRUCTIONS
4
Assembly
Diagram/Photo
Section 4 OPERATING INSTRUCTIONS
Operation
Lights, SMV Emblems
Low Speed
Normal Procedures
Traveling
Mowing
5
5
5
Reverse Operation
Obstacles
4A
5
5
5
5
5
5
Positioning
Height Adjustment
Section 5 LUBRICATION
Spindle
Driveshaft
Tail Wheel
6
6
6
Section 6 MAINTENANCE
Blades
Gearbox
Gearbox Lube Level
7
Check Blade Condition
Remove Blades
Replace Blades
8
5
6
7
7
7
7
8
Gearbox Seals and Gasket
Input Shaft Seal and Cover Gasket
Output Shaft Seal
Gearbox Mounting Hardware
Tail Wheel
Replace Wheel
Replace Pivot
Reference – Parts Lists
Torque Specifications Coarse Thread
Torque Specifications Fine Thread & Head Markings
Warranty
1
3
4
5
8
8
8
8
8
8
8
9-14
15
16
17
© Copyright 2016 All Rights Reserved
Wright Fence Mower, LLC provides this publication “as i s” without warranty of any kind, either expressed or implied. Every precaution has been taken in the design of this manual;
however Wright Fence Mower, LLC assumes no responsibility for errors or omissions. Neither is any liability assumed for damages resulting from the use of the information contained
herein. Wright Fence Mower, LLC reserves the right to revise and improve this product at any time. The illustrations in this manual are not intended for the safe and proper assembly or
disassembly of this product, but for parts ordering reference only.
REVISED 11/3/2017
Section 1
INTRODUCTION
Owner’s Responsibility
The manufacturer has no control over the ultimate use
of the mower and therefore assumes no responsibility
or liability for damage or injury resulting from the use
of this machine.
The upkeep of the fence mower is the responsibility of
the user. This upkeep includes all shielding, guards,
and safety decals (OSHA Regulation 1928.57). You
can obtain replacement parts from Wright Fence
Mower, LLC.
Read this Operator's Manual before operating the
mower. Failure to do so could result in serious injury
or death to the operator or to others. Remember that
most accidents occur due to neglect or carelessness.
The operator is responsible for inspecting and making
repairs as may be necessary. Cleaning after each use
and storage under a shelter will extend the life of the
mower.
Purpose of This Manual
This manual provides information on safety, operation,
adjustments, troubleshooting and maintenance of your
new mower. Please read and follow all the
recommendations to help ensure that you get many
years of service from your new Wright mower.
If you need additional copies of this manual please
contact Wright Fence Mower, LLC. and request part
number 24551.
Safety-Alert Symbol
This symbol is the safety alert symbol. It
appears throughout this manual to call your
attention to instructions involving your personal
safety and the safety of others. Failure to follow
these instructions can result in injury or death.
Signal Words
Safety signal words are words that call attention to the
safety sign and designate a degree or level of hazard
seriousness. The signal words used throughout this
manual are DANGER, WARNING and CAUTION.
Please read and follow all safety messages that have
these signal words shown for your protection.
Wright Fence Mower, LLC
DANGER
Indicates an imminently hazardous situation which, if
not avoided, will result in death or serious injury.
Indicates a potentially hazardous situation which, if not
avoided, could result in death or serious injury.
Indicates a potentially hazardous situation which, if not
avoided, may result in minor or moderate injury.
WARNING
CAUTION
Customer Assistance
The Wright Fence Mower, LLC sales team would like
you to be satisfied with your new FENCE MOWER. If
for some reason you have any questions about the
information in this manual or have a problem with your
mower and need further assistance, please contact:
WRIGHT FENCE MOWER, LLC
For support and contact information
Visit: www.fencemower.com or call: 713-501-5356
FM30-FM60 1
Section 2
SAFETY INFORMATION
Wright Fence Mower, LLC
General Safety Rules
READ AND FOLLOW THE INSTRUCTIONS IN THIS
OPERATING MANUAL AND ESPECIALLY IN THIS
SAFETY SECTION. FAILURE TO DO SO CAN
RESULT IN SERIOUS INJURY OR DEATH.
WARNING
SAFETY of the operator is one of the main concerns in
designing and developing the fence mower. However,
every year accidents occur which could have been
avoided by a few seconds of thought and a more
careful approach to handling equipment. You, the
operator, can avoid many accidents by observing the
following instructions in this manual and insist those
working with you, or for you, to follow them.
DANGER
NEVER allow an UNQUALIFIED OR UNDERAGE
person to operate the mower.
NEVER use alcoholic beverages or drugs that can
hinder alertness or coordination while operating this
equipment. Consult your doctor about operating this
machine while taking prescription medications.
DANGER
THE rotating parts of this machine have been designed
and tested for rugged use. However, they could fail
upon impact with heavy, solid objects such as steel
guardrails, and concrete abutment. Such impact could
cause the broken objects to be thrown outward. To
reduce the possibility of damage to the equipment,
serious injury, or even death, never let the mowing and
dirt removal blade come into contact with such
obstacles.
WARNING
STAY alert for uneven terrain, loose fence wire and
hidden hazards. Keep away from drop-offs and
hazards that could cause roll over. Use extreme care
and maintain minimum ground speed when operating.
Avoid operating on steep slopes.
WARNING
ALWAYS transport the fence mower in a lifted (up)
position behind the tractor when moving from one
location to another.
WARNING
MANY varied objects, such as fence wire, can become
entangled in the operating parts of the mowing and dirt
removal blade. These items MUST BE AVOIDED.
Inspect the fence lines for loose wires, and wires that
may be buried. DO NOT ATTEMPT TO OPERATE
THE EQUIPMENT WHERE LOOSE WIRES, OR
WIRES THAT ARE NOT SECURED BY THE FENCE
POST. Repair the fence before attempting to mow
underneath.
WARNING
ALWAYS stop the tractor, disengage the PTO, set
parking brake, turn off the tractor engine, remove key
and wait for all rotary motion to stop BEFORE
dismounting the tractor.
NEVER leave the equipment unattended with the
tractor running.
DANGER
NEVER place hands or feet under the mower with
the tractor engine running or before you are sure all
motion is stopped. Stay clear of all moving parts.
DO NOT reach or place any part of your body under
equipment until it is blocked securely.
DANGER
UNDER no circumstances should children under the
age of 18 be allowed to work with this equipment. Do
not allow persons to operate or assemble this unit until
they have read this operating manual and have
developed a thorough understanding of the safety
requirements.
DANGER
THIS equipment is dangerous to children and persons
unfamiliar with farm machinery.
WARNING
THE Fence Mower is designed for use only on tractors
with 540-RPM power takeoff. Disengage the power
takeoff (PTO) and place the transmission in neutral
before attempting to start the engine.
WARNING
NEVER exceed the limits of a piece of equipment. If it’s
ability to do a job, or to do so safely, is in question DON'T TRY IT.
FM30-FM60 2
SAFETY INFORMATION
Wright Fence Mower, LLC
General Safety Rules Continued
DANGER
DO NOT modify this equipment in any way.
Unauthorized modification could result in serious
injury or death and may impair the function and life of
the machine.
WARNING
IN addition to the design and the confirmation of this
equipment, including safety signs and safety
equipment, accident prevention is dependent upon the
awareness, concern, prudence, and proper training of
personnel involved in the operation, transport,
maintenance and storage of the machine.
WARNING
THE use of this equipment is subject to certain
hazards that cannot be protected against by the
mechanical means or product design. Most accidents
occur because of neglect or carelessness. Keep all
helpers and bystanders at least several hundred feet
from operating the Fence Mower. Only properly
trained people should operate this machine.
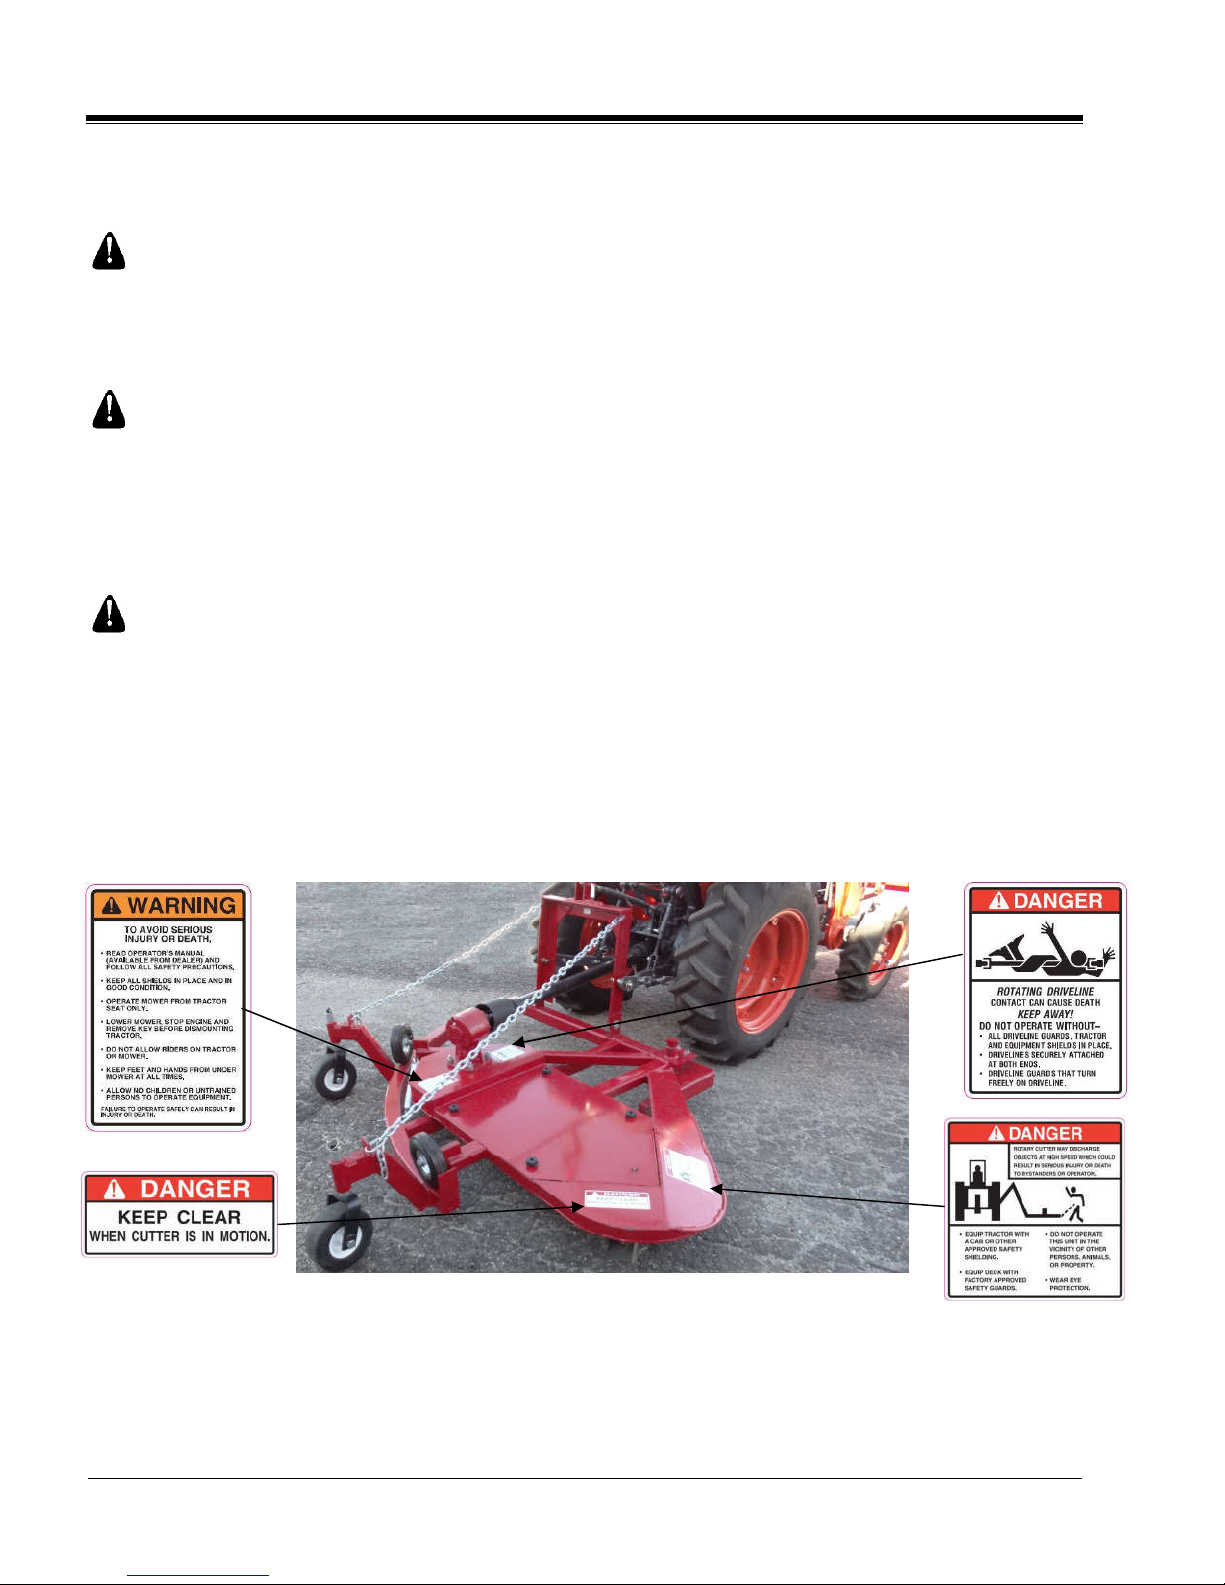
Safety Decals
Your Wright Fence Mower ships with all safety decals
in place. They are located in areas on the mower that
are potentially hazardous. Please locate, read and
follow the information you find on these decals.
By law, you must replace any safety decals that are
damaged or missing. You can order a replacement
decal kit from Wright Fence Mower, LLC. Ask for part
number 16808 when ordering.
To apply the replacement decals:
Clean the surface to place the new decal.
Peel the decal away from the paper backing.
Press firmly onto the clean surface.
Squeeze out any air pockets using a straight
edge.
FM30-FM60 3
SECTION 3
ASSEMBLY INSTRUCTIONS
ASSEMBLY
Before beginning the assembly of your Wright
Fence Mower, read 1) the entire Operating
Manual, 2) the warning decals and 3) the PTO
manual provided. Once this is done, read
and follow the below instructions.
PLEASE REFER TO THE DIAGRAM/PHOTO
ON THE NEXT PAGE (_)
Step 1. Remove and discard the straps holding
the mower to the pallet. (Use proper eye
protection)
Step 2. Remove the cardboard box containing the
trailing wheels.
Step 3. Remove the swing arm cover (A)
and take out the parts packages. The parts
packages will contain the following:
• (2) ¾” bolts, washers, and nuts
• (2) Category 1 lifting arm pins
• (2) Chain with chain links attached
• (1) PTO 1/2” bolt and nut (shear pin)
• (1) Spring
Step 4. Lift-up on the swing arm (B) and
pull it outward. Remove the A-frame (C) and
then return the swing arm to its original position.
Step 5. Attach the A-frame to the base frame
using the two ¾” bolts, washers, and nuts. (D)
Tighten, but allow for some movement of the
A- frame.
Step 6. Attach the category 1 lifting arm pins to
the A-frame and tighten. (E)
Step 7. Extend the swing arm (B) out to the
mowing position.
Step 8. Attach the longer eyebolt to the swing
arm. (F)
Step 9. Attach the shorter eyebolt to the base
frame. (G)
Step 10. Attach the spring to the two eyebolts.
Adjust to permit some slack (one inch) in the
swing arm.
Step 11. Attach the chains from the tail wheels
to the A-frame, as shown. (H)
DENOTES A REFERENCE
Wright Fence Mower, LLC
Step 12. Attach the fence mower to your tractor
using the 3-point hitch. Once attached to your
tractor, start the tractor and lift the fence mower
off the ground high enough to remove the pallet.
Step 13. Remove the trailing wheels from the
cardboard box. Insert the wheels so they are below
the frame. (I) (Spacers are provided to adjust the
desired wheel height.) Insert the locking pins after
adjusting. (I)
Step 14. Install the PTO driveline. (J)
Step 15. Lift-up the fence mower using the lifting
arms of the tractor. Check to make sure there is
clearance between the mower and the rear
tractor wheels. Check to see how close you will
need to be to the fence line when cutting.
Step 16. Lower the mower, clear everyone away,
and engage the PTO to check blade rotation.
Step 17. Lower the fence mower to where the tail
wheels touch the ground. You should have a little
slack in the chain.
Step 18. Before mowing under your fence line,
operate the mower away from the fence.
Make sure the front and back of the mower are
even. Do not operate with the front of the mower
lower than the back.
Operate the mower at a slow speed so as not to
damage your fence posts.
WARNING
ALWAYS use caution when assembling and
making adjustments!
ALWAYS turn the tractor off and disengage the
PTO before making any adjustments to the fence
mower.
FM30-FM60 4
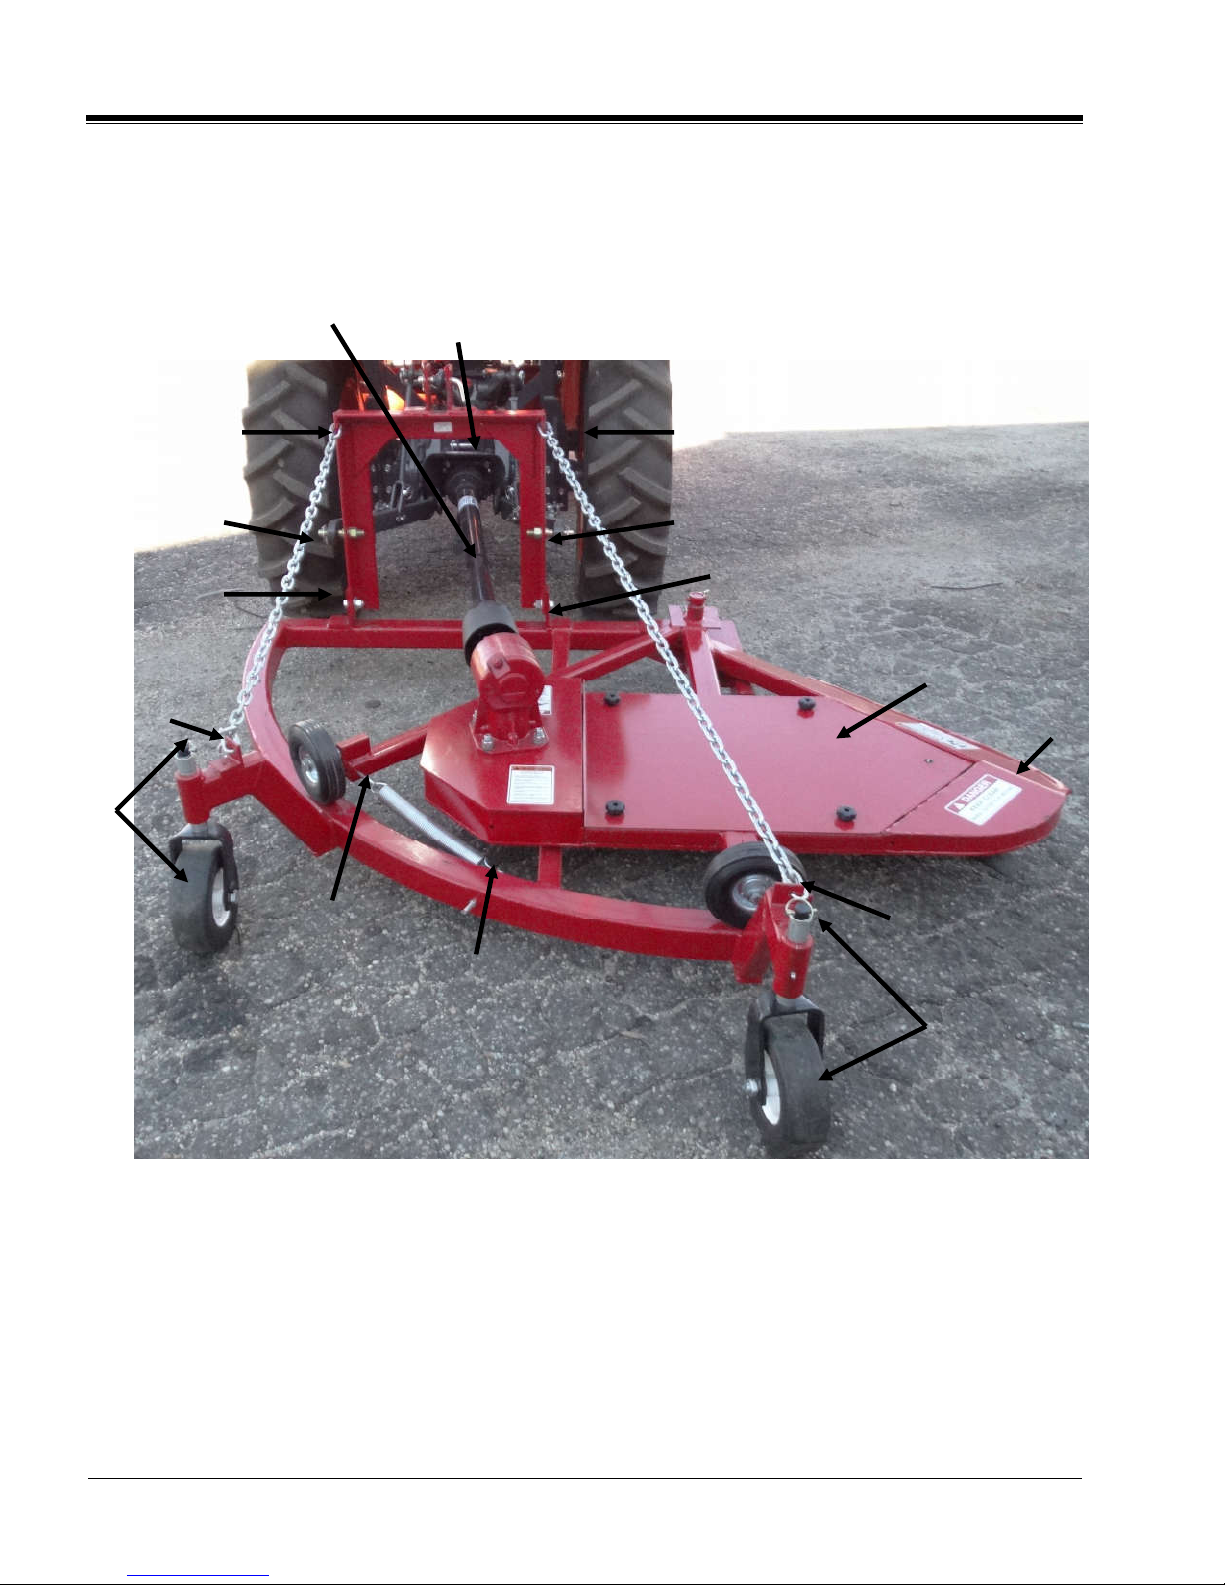
SECTION 3
H
ASSEMBLY INSTRUCTIONS
Wright Fence Mower, LLC
I
H
E
D
J
C
H
E
D
A
B
F
H
G
I
FM30-FM60 4A ASSEMBLY DIAGRAM/PHOTO
 Loading...