

Page 1
EXL 45-2
EXL 95-2
EXL 125-2
Page 2
70-100 gr
20-28 lbs
80 mic
3 mil
100 mic
4 mil
125 mic
5 mil
110-160 gr
30-42 lbs
170-300 gr
44-80 lbs
Page 3
!
"
#
$
%
&
'
Page 4

2
C o n t e n t s
Product Profile . . . . . . . . . . . . . . . . . . . . . . . . . . . . . . . . . . . . . . . . . . . . . . . . . . .3
Important Safety Instructions . . . . . . . . . . . . . . . . . . . . . . . . . . . . . . . . . . . . . . . . .4
Set-up . . . . . . . . . . . . . . . . . . . . . . . . . . . . . . . . . . . . . . . . . . . . . . . . . . . . . . . . .4
Operation . . . . . . . . . . . . . . . . . . . . . . . . . . . . . . . . . . . . . . . . . . . . . . . . . . . . . .4
Maintenance . . . . . . . . . . . . . . . . . . . . . . . . . . . . . . . . . . . . . . . . . . . . . . . . . . . .7
Troubleshooting . . . . . . . . . . . . . . . . . . . . . . . . . . . . . . . . . . . . . . . . . . . . . . . . . .7
Customer Service . . . . . . . . . . . . . . . . . . . . . . . . . . . . . . . . . . . . . . . . . . . . . . . . .8
Limited Warranty . . . . . . . . . . . . . . . . . . . . . . . . . . . . . . . . . . . . . . . . . . . . . . . . .8
Dear Customer,
Thank you for buying a Fellowes laminator. This product represents a new generation of laminators, products that are not
only good-looking, but also smarter and more hardworking.
This means more laminating options, faster processing, greater
ease of use, and more professional results. We know of no laminators on the market today that offer you more value for
your money in this product category.
To ensure that your laminator enjoys a long, productive life,
I hope you take the time to read the few pages of this manual.
If you have any questions or wish to comment on this product,
we welcome your call, email or letter.
Sincerely,
James Fellowes
Chairman & CEO
Page 5

3
Product Pr o f i l e
Our new generation of @Home laminators enables you
to enjoy many of the advantages of large office laminators, while paying only for the capacity you need. All
models are fully
p h o t o-c a p a b l e
, for example, meaning
that you can laminate not only professionally processed
pictures, but digital photos you print yourself as well. You
can also laminate materials other than paper, such as flat, dry decorations, making this
machine a fun addition to the
h a n d i c r a f t s
corner at home or at school.
At the same time, we have built in
more capacity,s p e e d
and
u s e r - f r i e n d l i n e s s
:
O v e r v i e w EXL 45-2 EXL 95-2 EXL 125-2
C a p a c i t y
– P ouch width: Max.
centimeters (document) 12 (A6) 24 (A4) 33 (A3)
inches 4.7 9 12
– P ouch thickness: Min.-Max.
microns 80-125 80-125 80-125
mils 3-5 3-5 3-5
– Paper thickness: Max.
gr 300 300 300
lbs 80 80 80
sheet equivalent* 3-4 3-4 3-4
–
Combined thickness: Max.
millimeters 0.63 0.63 0.63
inches 0.02 0.02 0.02
sheet equivalent* 6-7 6-7 6-7
S p e e d
in minutes to:
– W arm-up to low heat
5 5 5
– W arm-up to high heat
6 6 6
– P rocess one sheet**
< 1 < 1 < 1
Temperature Options
1 cold, 2 hot 1 cold, 2 hot 1 cold, 2 hot
Automatic Switch-o f f
✔ ✔ ✔
Audible Ready Signal
✔ ✔ ✔
* Standard office paper (20 lb/ 75g)
** A4/letter-s i z e
For
best results
, always try to stay within the above capacity limits. When laminating
paper of standard size and weight, just follow the selection guide stored under your
machine; when laminating non-standard paper or materials other than paper, use the
combined thickness of the pouch and its contents as your guide. If the filled pouch
exceeds this thickness, it may reduce the quality of your work and, in extreme cases, damage your machine.
Page 6

4
IMPORTANT SAFETY INSTRUCTIONS
READ ALL INSTRUCTIONS BEFORE USING
Treat your @Home laminator as you would any other piece of electrical equipment:
• Keep it away from heat or water sources
• Plug it in near an easily accessible outlet
• Do not use if it is damaged in any way
• Do not attempt to open or otherwise repair it
• Turn it off after each use, and
• Unplug it when not in use for an extended period.
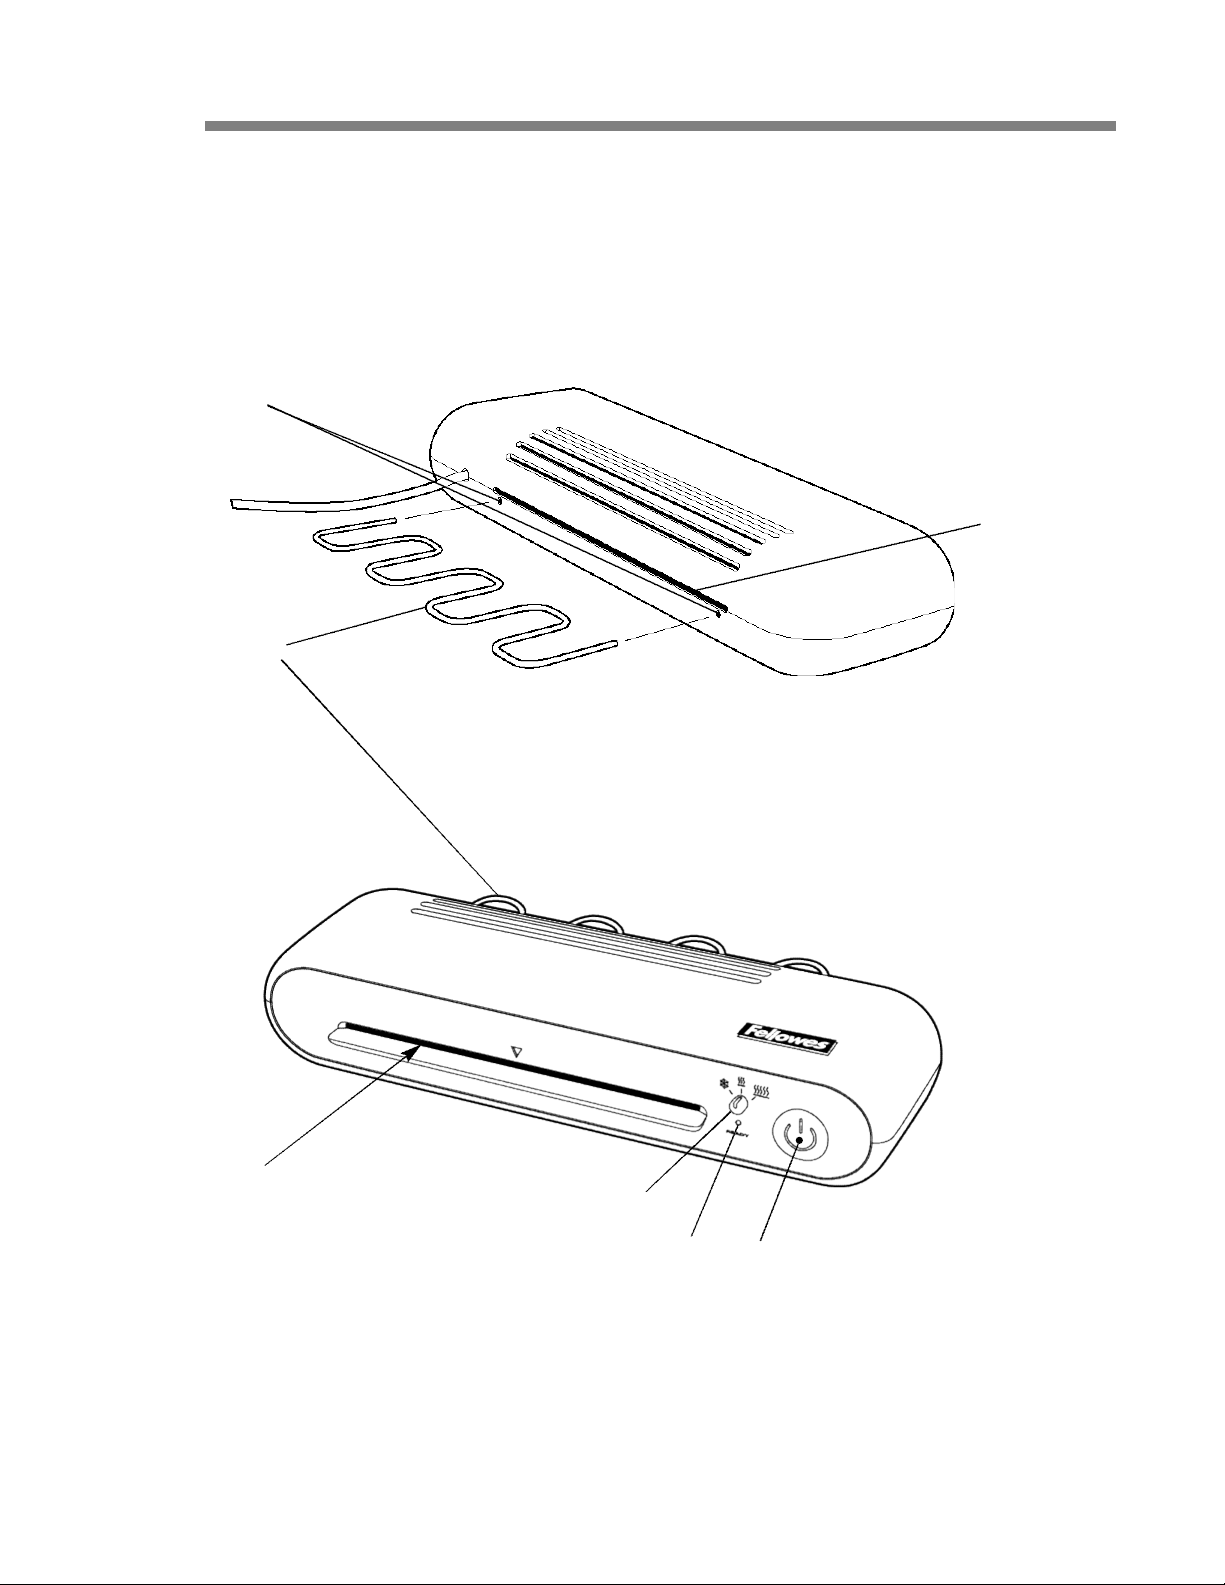
S e t - u p
The only assembly required for an @Home laminator is attaching the wire
support rack
,
which ensures that the sheets coming out of the machine cool in a flat position and do not
curl. Using the illustration on the inside of the manual cover as a reference, push the ends
of the rack "into the holes !in the back of the machine as far as they will go.
O p e r a t i o n
Your laminator works by means of two rollers, one on top of the other, each turning in the
opposite direction to draw a plastic, open-sided pouch coated with adhesives through them
and out of the machine. Understanding this simple mechanism will help you decide what
materials you can laminate
without risk of damage to your machine. You can feel confi-
dent laminating all materials that are
flat and dry
, for example, but should avoid those
that:
• Contain liquids, gels, or even moisture, that could escape
• May crumble or otherwise disperse under pressure, or
• Are likely to break, as could glass or rigid metals and plastics.
With hot lamination, where the rollers are also heated, make sure you don’t put anything
into the pouch that could melt and leak into the machine.
Once you have checked the suitability of your contents, you need to decide whether to
use
cold or hot lamination
. Cold lamination, also called self-adhesive lamination, bonds
materials between an adhesive and a non-adhesive sheet solely by means of pressure. As a
result, this method tends not to produce as tight a seal against water and the elements as
hot lamination, but can be useful for heat-sensitive materials, such as thermal paper or
fragile documents. While the cold method used to be the only good way to laminate photographs, today’s heated-roller technology enables you to achieve excellent results and is
therefore probably the better choice.
Page 7

5
The contents and the mode decided, the next step is to
choose the right pouch
for the job.
Hot and cold laminating pouches are especially designed for their separate purposes and
cannot be substituted for one another. When it comes to pouch size and thickness, you
should make sure that the one you buy is no wider than the entry #of your model and not
thicker, together with the contents, than the capacity of your machine. If you are laminating
paper of a standard size and weight, you can quickly see your pouch thickness options on
the selection guide stored under the machine:
• White and gray boxes indicate that the pouch/paper combination can be used
• No box on the table indicates that there is no combination possible with your machine.
If you find several pouch options for your document, take the one that
best suits the pur-
p o s e
: The thicker the pouch, the more rigid and resistant the laminated sheet will be. If you
are not sure of the paper’s weight or are laminating other materials, the combined thickness of the pouch and contents should be your guide. The maximum in this case is the
equivalent of a stack of 6 to 7 sheets of standard office paper. (See Product Pr o f i l e for
details on capacity limits.)
If even the smallest size pouch will leave a lot of space around your contents or you want
the lamination to conform to the shape of your contents,
wait to cut it to size
until after
lamination: a laminating pouch is precision-cut to ensure minimal leakage of adhesives,
and this cannot be replicated with scissors or a paper-cutter. You’ll also find the pouch easier to cut when it is hardened.
How you
arrange your contents
in the selected pouch is important in both cold and hot
modes. To produce professional-looking results and ensure a long working life for your
machine, follow these simple guidelines (see illustration on the inside of the manual cover)
:
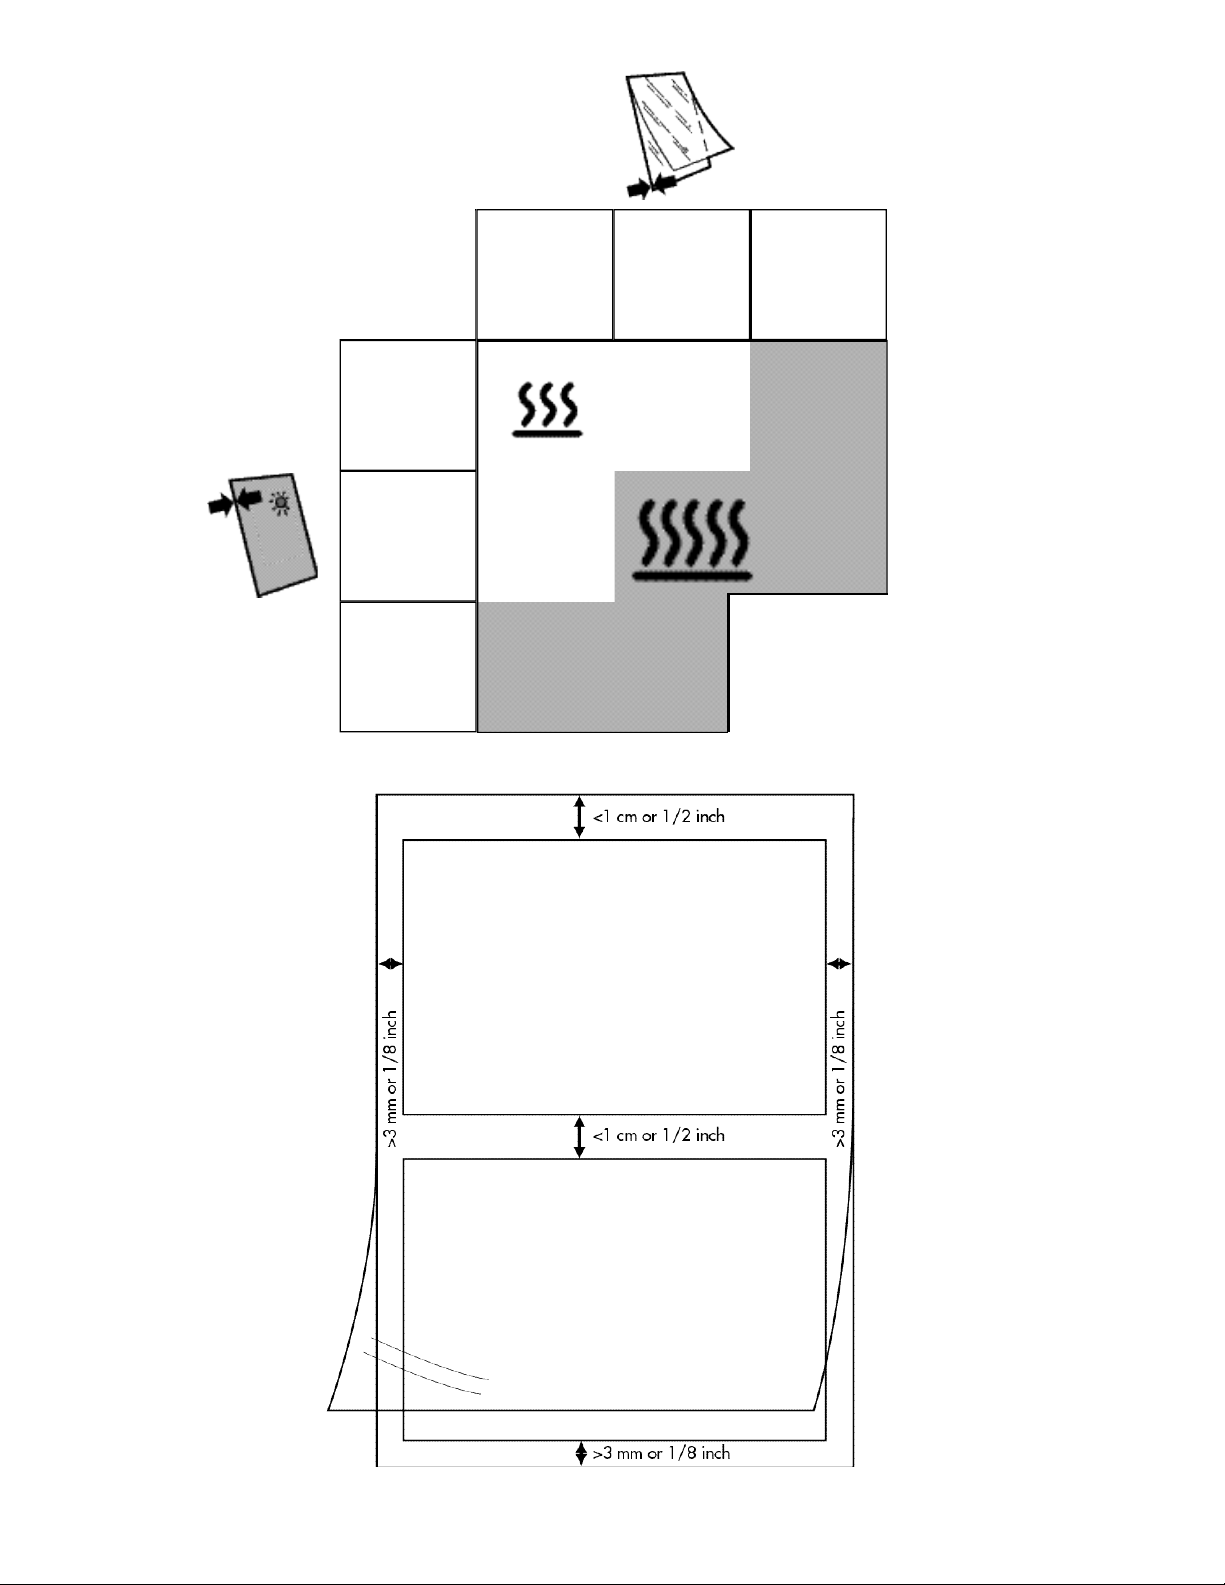
1 .
Lay contents as close as possible
to the sealed edge of the pouch, which is the end you
will be feeding into the machine. If the material is more than 1 cm or 1/2 inch from this
edge, the rollers will not have enough traction to draw in the pouch and will turn continuously without advancing it.
2 .
Arrange multiple items close to each other
in the pouch, with the edges no farther than
1 cm or 1/2 inch apart. If there is a larger gap between items, the rollers will slip into it
and lose their traction. As above, the rollers will turn without advancing the pouch.
3 .
Leave a free margin around contents
of at least 3 mm, or 1/8 inch, on the three
unsealed sides of the pouch to guarantee a strong seal. This is a minimum, meaning you
can have as much margin beyond this as you wish.
To
begin laminating
, place your machine on a work surface where you have enough room
at the back to allow the full length of the pouch to clear the material exit '. Plug in the
machine and press the power button &, which will start the rollers turning. If you plan to
do laminate both cold and hot in one session, it makes sense to
start with cold
, so you
don’t have to wait for the machine to cool down. (This can take one to two hours.)
In either case, to save energy and reduce wear-and-tear on your machine, turn off the
machine as soon as you are finished by pressing the power button &. If you forget, however, the machine has an
automatic switch-o f f
function, which causes it to turn itself off one
hour after not being used.
Page 8

6
Cold Lamination
With the contents and the pouch you have selected at hand:
1 .
Turn temperature selector $t o
. The machine will indicate its readiness by turning on
the green standby light %and giving an audible sig-
nal. If the machine is at room temperature, this will be almost immediate.
2 .
Place contents in pouch
in line with the guidelines (p. 5). Lay the pouch on a flat surface
and open it so that the adhesive side, which is covered by a glossy protective sheet, is vertical. Place the contents face up onto the transparent, non-adhesive side, but do not close
the pouch.
3 .
Insert sealed edge
of the open pouch into the entry, as
shown, bending the protective sheet backwards over the
machine and grasping its free edge. As the machine draws
in the pouch, keep holding on to the protector, which will be
peeled away from the adhesive side as the pouch moves
through. Although it is easier to take off the protector and
close the pouch before you feed it in, you will create air bubbles and other irregularities that the machine will not be able
to even out.
The finished sheet will emerge from the material exit 'by itself. Remove it from the support rack only after it has completely cleared the exit.
Hot lamination
With the contents and the pouch you have selected at hand:
1 .
Turn temperature selector $to or
. The boxes in the selection guide you used to
choose the pouch size and thickness also indicate what temperature setting you should use
with your pouch:
• If the box is white, use ,
• If the box is gray, use .
If you are not sure of the weight or thickness of the contents or pouch, you will avoid possi-
ble damage if you start with the lower temperature. With the lower setting, the machine will
take
5 minutes to warm up and with the higher, one minute longer. When the laminator has
reached the setting you chose, it will indicate its readiness
with a green standby light %and an audible signal.
2 .
Place contents in pouch
in line with the guidelines (p. 5 ) .
Unlike with cold laminating, the contents can be face
down or up within the pouch. Close the pouch once the
contents are arranged.
3 .
Insert sealed edge
of the closed pouch into the entry #,
as shown, and release it as soon as the machine begins
to drawn it in, as shown in the illustration.
The finished sheet will emerge from the material exit 'by
itself. Remove it from the support rack only after it has completely cleared the exit.
Page 9

7
M a i n t e n a n c e
To keep your laminator free of adhesives that could hurt the quality of your work, you
should
clean the rollers
from time to time, or frequently, depending on how often you use
the machine. The best way is to do this right after you have finished hot laminating,
because the rollers will still be hot, which is necessary for the cleaning process.
To clean the rollers:
• Turn selector to if it is not already on this setting
• Wait for the readiness light and signal
• Insert the cleaning sheet included in the package, repeating one or two times
• Insert a plain white sheet of paper to test for remaining traces, and
• Reinsert the cleaning sheet, if necessary, and retest.
To clean the exterior of your machine, just wipe with a soft cloth dampened with plain
water.
Troubleshooting
If you are not getting the results you should be, you can probably solve the problem quickly. If, for example, your end product is:
•
C l o u d y
- The temperature is too low or the pouch/contents combination too thick. Try passing it through the machine one or more times, or raising the temperature if you can.
Otherwise, choose a thinner pouch or reduce the weight or thickness of the contents.
•
C u r l e d
- The support rack is not in place. Install it as described under S e t- u p.
•
Wa v y
- The temperature is too high. Turn the machine to the lower setting if you can.
Passing through the cleaning sheet will also help cool down the rollers.
•
S p o t t e d
- The rollers have deposits of adhesive. Follow the cleaning procedure, as
described under M a i n t e n a n c e .
•
Open edges
- Your material is too close to the edge of the pouch to create a strong seal.
Next time make sure your materials are at least 3 mm, or 0.11 inch, from the three
unsealed edges of the pouch.
If the pouch gets
stuck in the rollers
, it is probably due to incorrect placement of the contents or too thick a pouch/contents combination. If the top of the pouch has emerged from
the material exit, pull on this end of the pouch evenly and slowly, making sure not to speed
up the rollers. If this doesn’t work or the pouch has not yet emerged from the exit, unplug
the machine and send it to us for repair, directly or through your retailer. Do not attempt to
pull it out backwards, against the direction of the rollers. This will damage the machine.
If you have questions or other problems with your laminator that you cannot solve, please
contact us through one of the many channels listed under Customer Service.
S A F E T Y
REMINDER:
Do not attempt to open or otherwise repair your machine.
Page 10

8
Customer Service
Fellowes offers a
toll-free help line
for customers living in the United States, Canada,
Mexico and Australia. If you live outside of these regions or are otherwise unable to use our
help line, please call the Fellowes location nearest you, send us a letter or email, or contact
your local dealer. All of our customer service phone numbers and other points of contact
are listed on the back of this manual.
Limited Wa r r a n t y
Fellowes warrants all parts of the machine to be free of defects in material and workmanship for
1 year
from the date of purchase by the original consumer. If any part is found to
be defective during the warranty period, your sole and exclusive remedy will be repair or
replacement, at Fellowes’ option and expense, of the defective part.
This warranty does not apply in cases of abuse, mishandling or unauthorized repair. ANY
IMPLIED WARRANTY, INCLUDING THAT OF MERCHANTABILITY OR FITNESS FOR A
PARTICULAR PURPOSE, IS HEREBY LIMITED IN DURATION TO THE APPROPRIATE WARRANTY PERIOD SET FORTH ABOVE. IN NO EVENT SHALL FELLOWES BE LIABLE FOR ANY
CONSEQUENTIAL OR INCIDENTAL DAMAGES ATTRIBUTABLE TO THIS PRODUCT. This
warranty gives you specific legal rights. You may have other legal rights that vary from this
warranty. The duration, terms and conditions of this warranty are valid worldwide, except
where different limitations, restrictions or conditions may be required by local law.
For more details or to obtain service under this warranty, please contact us or your dealer.
Page 11

Help Line
Australia + 1-800-33-11-77
Canada + 1-800-665-4339
México + 1-800-234-1185
United States + 1-800-955-0959
F e l l o w e s
Australia + 61-3-8336-9700
Benelux + 31-(0)-347-377988
Canada + 1-905-475-6320
Deutschland + 49-(0)-5131-49770
France + 33-(0)-1-30-06-86-80
Italia + 39-(0)-71-730041
Japan + 81-(0)-3-5496-2401
Korea + 82-(0)-2-3462-2884
Malaysia + 60-(0)-35122-1231
Polska + 48-(0)-22-837-7356
Singapore + 65-6221-3811
United Kingdom + 44-(0)-1302-836836
www.fellowes.com
© 2003 Fellowes, Inc. Printed in China. Form No. 400411C
 Loading...