

Page 1

COSMIC
COSMIC
CL 95/CL 125
CL 95/CL 125
Page 2
CAPABILITIES
CL 95 CL 125
Minutes
Approximate Cool-Down Time 90 Minutes 90
Minutes
cm)/Minute
CL 95 CL 125
Maximum Width 9” (
220 mm)
12.5” (330 mm)
Voltage
120V~
60 Hz
shall be easily accessible.
and do NOT spill water on laminator, electric cord, or wall
socket.
to use.
and will void your warranty. Contact Customer Service if you have questions. Please note the
warranty does not apply in cases of abuse, mishandling or unauthorized repair.
laminate an empty pouch.
your item after laminating and cooling.
one session, use the cold setting fi rst to
avoid having to wait for the laminator to
cool down.
nator on the cold setting for a smoother
fi nish.
TIPS
a test run with an item similar in size
and thickness.
feet for portable ease and optimal stor-
age.
documents (i.e., tickets, ultrasounds,
etc.) only use self-adhesive pouches on
a cold setting.
laminated pouches.
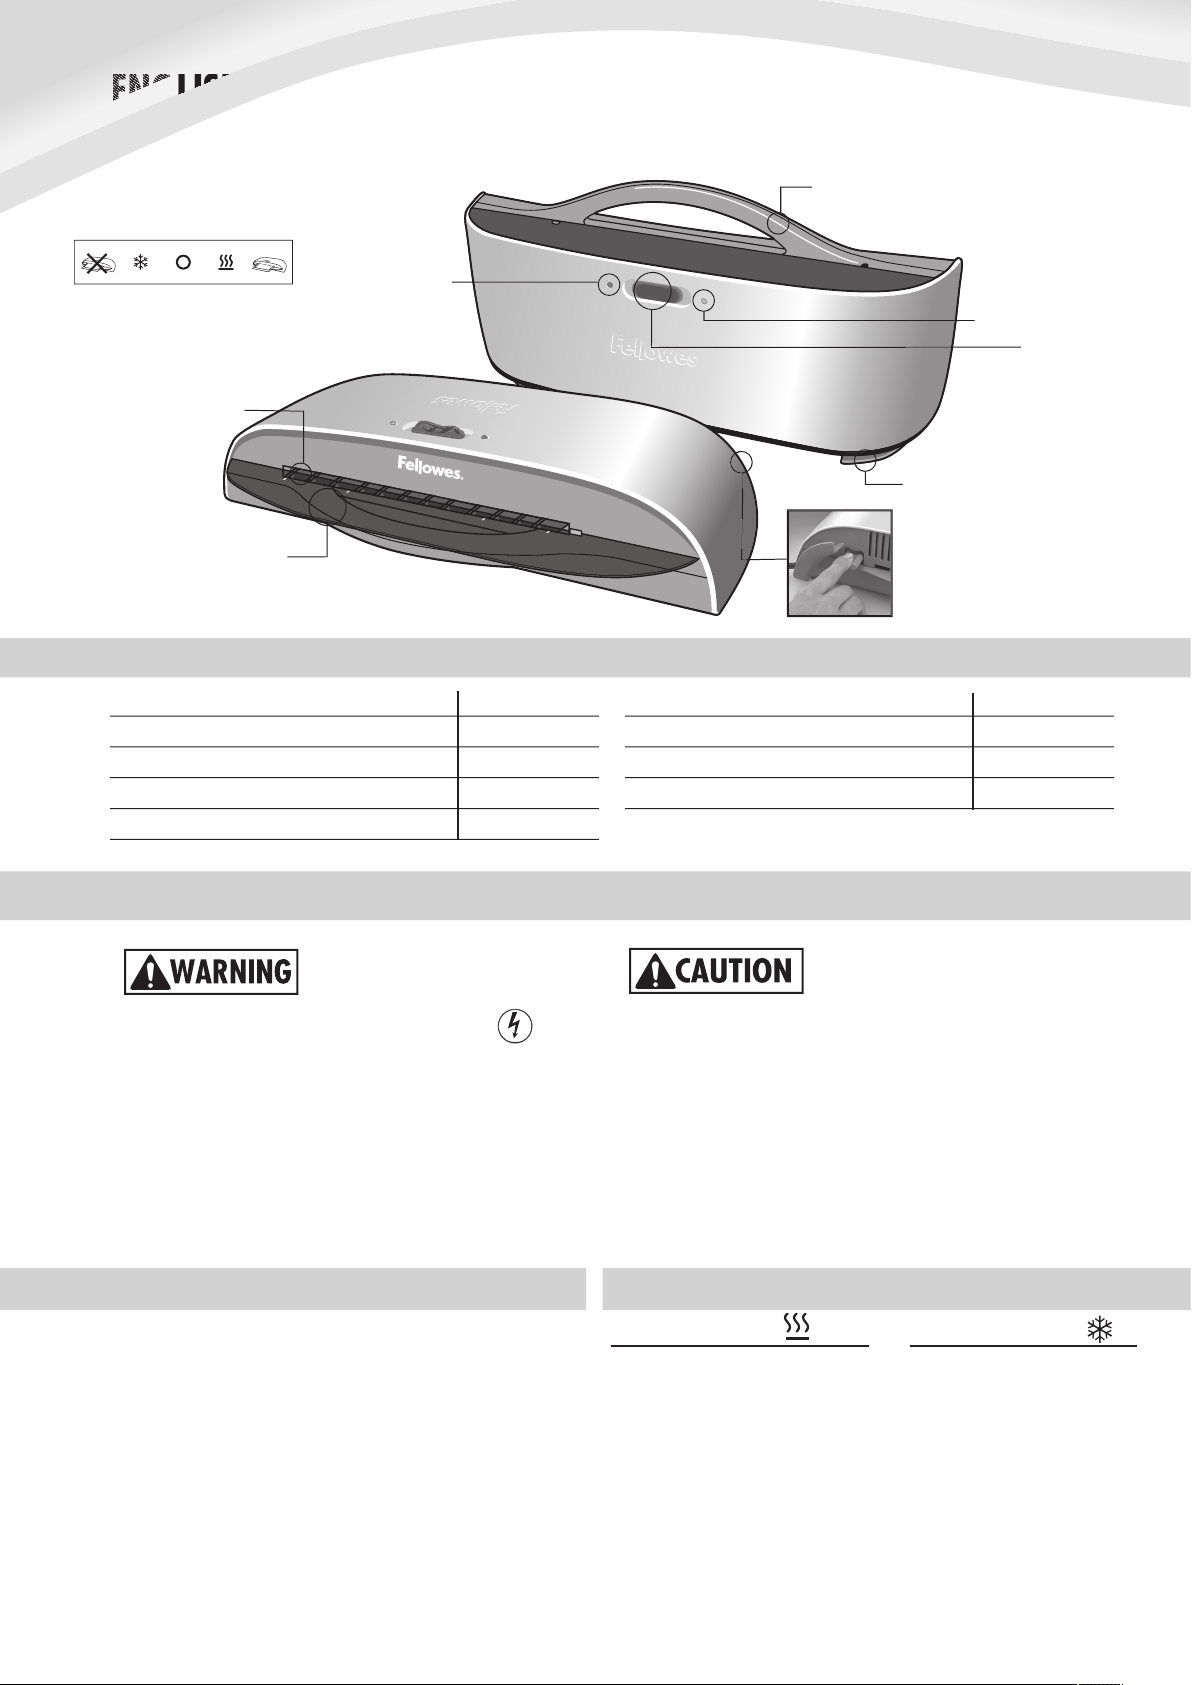
Pouch/Document Entry
Stand-by Light
(red)
Carry Handle
- for easy
portability and tray support
Ready Light
(green)
Dual-Purpose Tray
- serves as
guide and protective dust cover
Hot/Cold
Lamination Selector
Cord Wrap/Feet
- for optimal
cord management and storage
®
brand pouches from your local retailer.
*Includes combination cleaning / carrier sheet.
Stand-by
Light
(Do Not
Laminate)
Indicator Light Key
Cold
Lamination
Off
Hot
Lamination
Ready Light
Anti-Jamming
Release Lever
Page 3

COLD LAMINATION STEPS
TROUBLESHOOTING
WARRANTY
2 years from the date of purchase by the original consumer. If any part is found to be defective
during the warranty period, your sole and exclusive remedy will be repair or replacement, at
mishandling or unauthorized repair. ANY IMPLIED WARRANTY, INCLUDING THAT OF MERCHANT-
ABILITY OR FITNESS FOR A PARTICULAR PURPOSE, IS HEREBY LIMITED IN DURATION
TO THE APPROPRIATE WARRANTY PERIOD SET FORTH ABOVE. IN NO EVENT SHALL FELLOWES BE
This warranty gives you specifi c legal rights. You may have other legal rights that vary from this
warranty. The duration, terms and conditions of this warranty are valid world-wide, except where
different limitations, restrictions or conditions may be required by local law. For more details or to
obtain services under this warranty, please contact us or your dealer.
Problem
time.
lamination.
Jamming
Cause
tion session, the laminator may need time to cool down.
machine or small items were laminated without a carrier.
Solution
Move laminator to a cool dry area.
Wait 90 minutes for laminator to fully cool down.
out of machine. Use cleaning sheet before laminating.
Always put item in a pouch.
Align sealed edge with Pouch/Document Entry. Use guide
to center.
Slide power button to Cold
Setting and wait for green Ready
To prevent jamming, immediately
remove laminated item from back
of machine.
into laminator entry. Keep pouch
straight and use the edge guide
to center it. Continue peeling the
protective sheet away.
Center item on clear side against
sealed edge; documents
cannot
be repositioned once laminated.
power outlet.
so you have enough
space to allow items to
pass freely through the
machine.
Slide power button to Hot
Setting and wait for green
into laminator entry. Keep pouch
straight and use the edge guide
to center it.
To prevent jamming,
immediately
remove laminated item from back
of machine. Let item cool on fl at
surface for several seconds.
Before switching off laminator,
feed empty cleaning/carrier sheet
through machine to clean unit.
Use Fellowes
®
brand
pouches for best results.
Select correct pouch size for
laminated item.
the sealed edge. To prevent jam-
ming, use a carrier when item is
smaller than the pouch.
CAUTION: Only
use self-adhesive pouches when laminating with a cold setting.
sheet away from document.
Customer Service:
Canada: 1-800-665-4339
México: 1-800-234-1185
www.fellowes.com
call us fi rst before contacting your place of
purchase.
3
2
3
Page 4

Australia
Benelux
United Kingdom
United States
Polska
Singapore
Japa
n
Korea
Deutschlan
d
Espa
ña
Canada
China
France
Itali
a
1789 Norwood Avenue, Itasca, Illinois 60143-1095 • USA• 630-893-160
0
2006 Fellowes, Inc. Part No. 401503
Australia + 1-800-33-11-77
México + 1-800-234-1185
Australia + 61-3-8336-9700
Japan + 81-(0)-3-5496-2401
Malaysia + 60-(0)-35122-1231
Singapore + 65-6221-3811
www.fellowes.com
 Loading...