

Page 1
Help Line
Australia + 1-800-33-11-77
Canada + 1-800-665-4339
México + 1-800-234-1185
United States + 1-800-955-0959
Fellowes
Australia + 61-3-8336-9700
Benelux + 31-(0)-76-523-2090
Canada + 1-905-475-6320
Deutschland + 49-(0)-5131-49770
France + 33-(0)-1-30-06-86-80
Italia + 39-(0)-71-730041
Japan + 81-(0)-3-5496-2401
Korea + 82-(0)-2-3462-2884
Malaysia + 60-(0)-35122-1231
Polska +48-(22)-771-47-40
Spain +34 91 748 05 01
Singapore + 65-6221-3811
United Kingdom + 44-(0)-1302-836836
United States + 1-630-893-1600
www.fellowes.com
C14
Please read these instructions before use.
© 2005 Fellowes, Inc. Printed in China. Form No. 400409B
Page 2
C
K
M
L
B
Dear Customer,
Thank you for buying a Fellowes Shredder. We have made
many improvements in our shredder since its introduction in
1982. We are confident that it offers you the greatest value for
your money in its product category today. We hope it meets – or
A
even exceeds – your expectations.
To ensure years of safe, efficient use, please read these few
pages about your new shredder. If this manual doesn’t answer
all your questions
or if you wish to comment on this product, we welcome your
call or letter.
Sincerely,
James Fellowes
Chairman & CEO
D
B
F
Contents
E
H
J
I
Product Profile . . . . . . . . . . . . . . . . . . . . . . . . . . . . . . . . . . . . . . . . . . . . . . . . . . . . .3
Important Safety Instructions . . . . . . . . . . . . . . . . . . . . . . . . . . . . . . . . . . . . . . . . . . .3
Set-Up . . . . . . . . . . . . . . . . . . . . . . . . . . . . . . . . . . . . . . . . . . . . . . . . . . . . . . . . . .4
Operation . . . . . . . . . . . . . . . . . . . . . . . . . . . . . . . . . . . . . . . . . . . . . . . . . . . . . . .4
Maintenance . . . . . . . . . . . . . . . . . . . . . . . . . . . . . . . . . . . . . . . . . . . . . . . . . . . . . .5
Troubleshooting . . . . . . . . . . . . . . . . . . . . . . . . . . . . . . . . . . . . . . . . . . . . . . . . . . .6
Supplies . . . . . . . . . . . . . . . . . . . . . . . . . . . . . . . . . . . . . . . . . . . . . . . . . . . . . . . . .6
Limited Warranty . . . . . . . . . . . . . . . . . . . . . . . . . . . . . . . . . . . . . . . . . . . . . . . . . . .7
2
Page 3

Product Profile
This product is built to shred
credit cards, CDs, and DVDs
It is not built to shred transparencies, adhesive labels, newspaper,
cardboard, large paper clips, or plastic (other than items noted
above). Attempting to shred items not intended for this shredder
may cause damage.
paper, staples, small paper clips,
(CDs and DVDs in designated slot).
Set-Up
• Pull waste basket drawer (A) completely out of cabinet.
• Put waste bag in basket (sample bags provided). Allow edges to overhang. Contact
Fellowes to order more bags. (Part #36053).
• Slide waste basket drawer (A) into cabinet. The shredder will not operate if drawer is not
pushed all the way into cabinet.
• Casters have been added for your convenience.
• Plug power cord into a convenient outlet.
Confetti-cut
Sheet capacity* 15 sheets
CD capacity 1
Paper shred size 5/32" x 1 1/2" (3.9 x 38 mm)
Maximum paper width 9" (230 mm)
Recommended daily capacity 100-200 shredding passes
Maximum running time 25 minutes
Automatic cool-down period 40 minutes
Voltage 120V-60Hz 6.0A
*Based on 20 lb., 8-1/2" x 11" paper with shredder operating at rated voltage; heavier paper, high humidity, or other than
rated voltage may reduce sheet capacity.
(C14)
IMPORTANT SAFETY INSTRUCTIONS
READ ALL INSTRUCTIONS BEFORE USING
While setting up shredder
• Check shredder for damage or defects; some paper particles in the basket are normal
due to product testing and does not indicate a defect.
• If the cord is damaged do not replace cord or use the machine. Return machine for a
replacement.
• Avoid touching exposed blades on underside of confetti-cut shredder head.
• Plug power cord in an outlet that can easily be reached. The plug is the primary electrical
disconnect.
• Make sure the electrical rating listed on the serial label (located inside, just below top of
shredder) matches the available electric power.
• Do not place shredder near or over a heat or water source.
While operating shredder
• Keep hands and hanging objects (jewelry, ties, loose clothing,
long hair, etc.) away from paper entry.
• Keep children and pets away from the shredder.
When not in use
• Always turn off and unplug shredder.
• Unplug before emptying basket.
• Do not open shredder head: Danger of electric shock.
Opening shredder head will void the warranty.
NOTE:
Do not use flammable synthetic oil, petroleum-based products
or aerosols of any kind on or near product at any time.
3
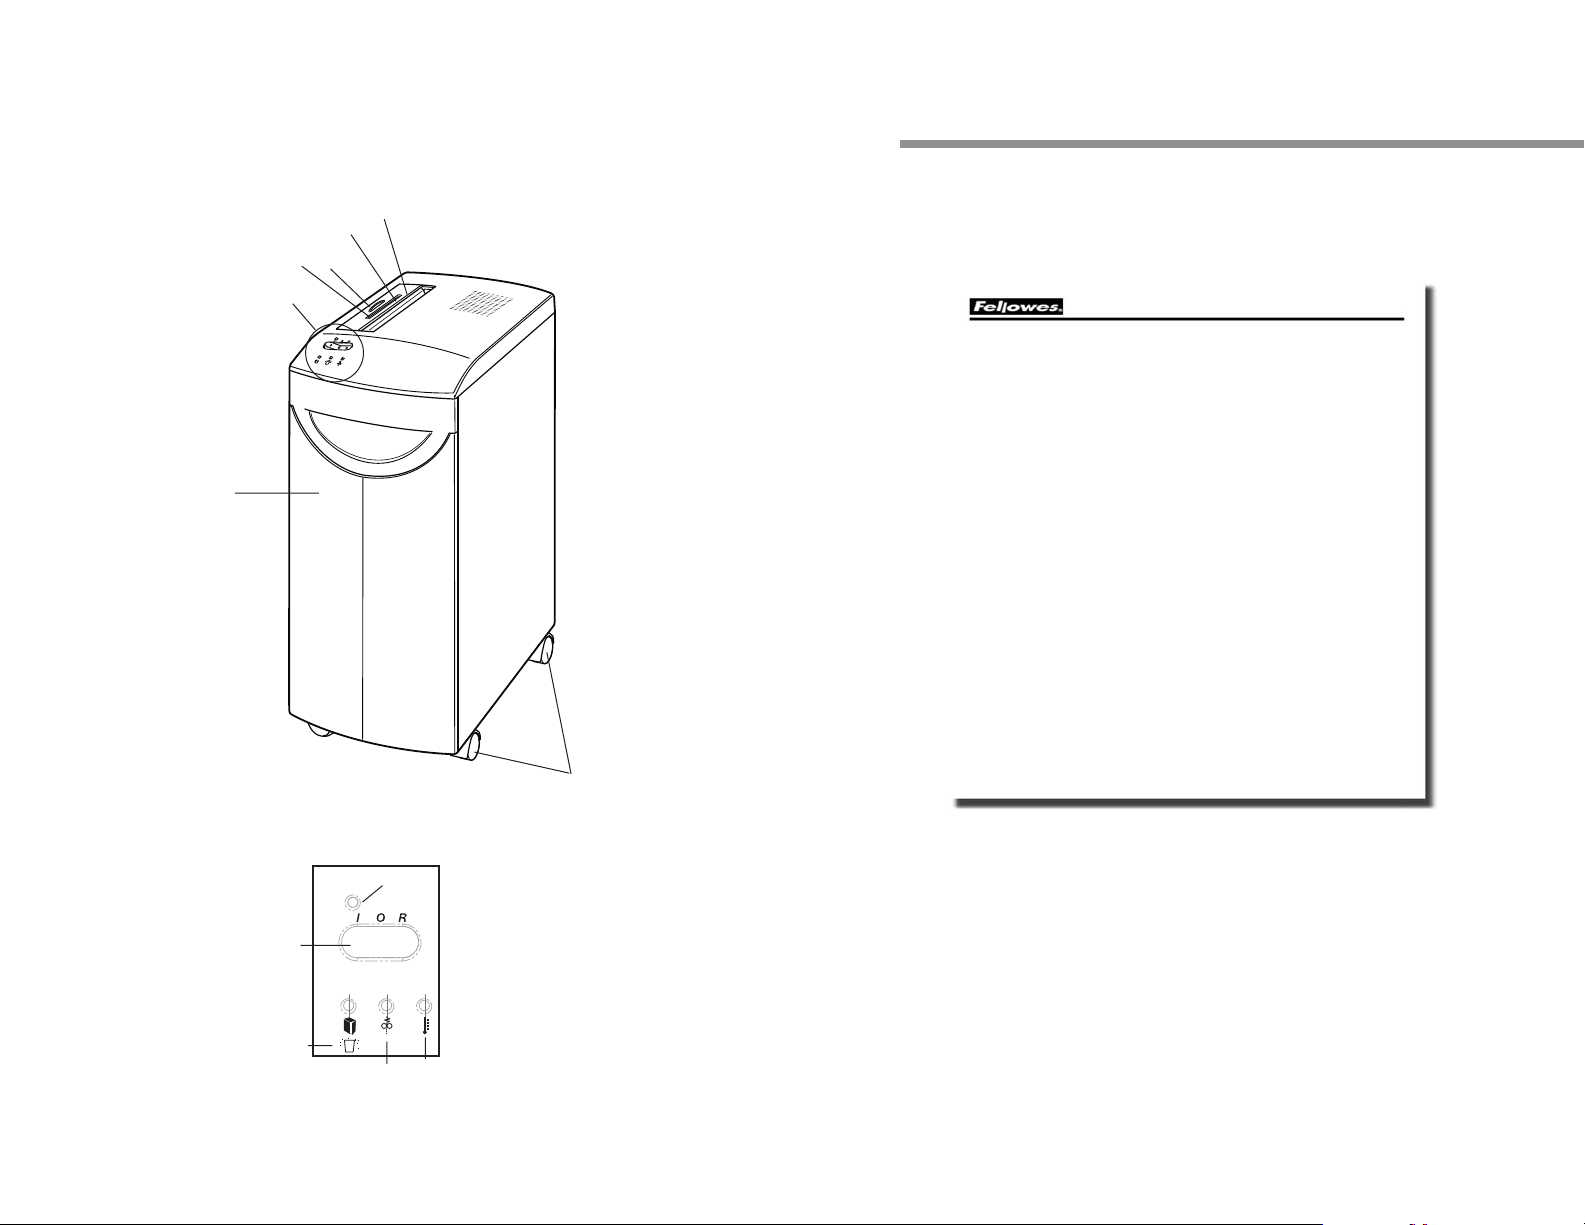
Operation
Control Switches
F
E
H
I
Ready Light (F)
(Green)
Shredder is in
automatic start
mode.
For convenience and energy savings, your shredder is equipped with an
sensor
(K). This means that when the control switch (E) is in the automatic [I] position, the
shredder will start running when paper is fed into it. The shredder stops a few seconds
after the paper has passed through.
CAUTION:
between paper and other objects. This feature can also be a hazard.
Always turn off the shredder when it is not in use. Unplug the shredder
if it will not be used for an extended period.
The automatic-start sensor cannot tell the difference
To shred
• Press control switch (E) to automatic [I] position. Green ready light (F) should turn on.
PAPER
• Feed paper straight into entry (C), releasing when shredder begins shredding; see Product
Profile for limits on paper width, shreddable items, sheet capacity, etc.
• Shred no more than 25 minutes; shredding longer will cause shredder to turn itself off for
40 minutes to cool down.
• Press control switch to off [O] position after cutting has stopped.
Control Switch (E)
I AUTOMATIC
J
Basket Ajar (H)
Waste basket
drawer is open.
Basket Full (H)
Waste basket is
full or paper has
collected under
cutting cylinders.
Turns on the automatic-start sensor
and the green
Ready light.
O OFF
Turns off the automatic-start sensor
and the green
Ready light.
Troubleshooting Lights
Paper Jam (I)
Shredder is
jammed (e.g.,
too much paper
fed at one time).
R REVERSE
Runs shredder in
reverse mode.
Press and hold to
activate.
Overheat Light
(J)
Shredder has
overheated (e.g.
shredder has been
used for more
than 25 minutes).
automatic-start
4
Page 4

CDs, or DVDs
• Slide safety cover (L) to the right to expose the CD entry (M).
• Hold CD, or DVD at the edge and feed one at a time, straight into entry (M) releasing
when shredding begins. Shredder will stop when item has passed through entry. CDs and
DVDs will be shredded into small particles.
• Slide cover (L) to the left when done shredding media.
CAUTION:
shredder.
Do not hold CD or DVD with finger through the center ring while feeding into
To empty waste basket
If basket full light (I) is on, follow these steps until light turns off.
1
• Press control switch (E) to the off [O] position.
• Open the waste basket drawer (A) and remove full bag.
• Place new bag in basket, then slide drawer into cabinet (Fellowes plastic bag 36053).
2
• Press and hold control switch (E) in the reverse [R] position for a few seconds to clear
paper shreds that have collected under cutting cylinders.
• Alternate between automatic [I] and reverse [R] for a few seconds in each position.
CAUTION:
and reverse.
3
• Unplug shredder and remove wastebasket drawer (A).
– Carefully clear any paper shreds that have collected on under side of paper entry (C).
CAUTION:
shreds on underside of paper entry.
The shredder may be damaged if you alternate too rapidly between automatic
Confetti-cut shredders have exposed blades.Use care when removing paper
To clear a paper jam
If paper jam light (I) is on, follow these steps until light turns off.
• Check the waste basket and empty if full.
• Press and hold control switch (E) in the reverse [R] position to back paper out of paper
entry (C). Try pulling gently on paper to remove it from shredder.
• Alternate between automatic and reverse, if needed:
– Move control switch to automatic [I] and run for 1-2 seconds.
– Press and hold control switch (E) in the reverse [R] position for a few seconds.
– Continue alternating between automatic and reverse until the jam clears.
CAUTION:
automatic and reverse.
The shredder may be damaged if you alternate too rapidly between
Troubleshooting
If there is a problem with your shredder, check these symptoms and remedies. If you cannot
solve the problem, contact Fellowes customer service.
attempt repair. You could be exposed to serious electric shock and will void the warranty.
tSymptom
Ready Light (F) will not light
Shredder does not start or stops
while shredding
Basket ajar/basket full
light (H) is on
Paper jam light (I) is on
Overheat light (J) turns on and
shredder will not operate.
Shredder sheet capacity decreases,
noise level increases, or cutting cylinders
stop with a squeak or rubbing sound
Shredder runs for a few seconds after the
paper has cleared the cutters
Do not open shredder head
to
Remedy
Make sure shredder is plugged in and
the control switch (E) is in the automatic [I]
position.
• Make sure shredder is plugged in and
control switch (E) is in the automatic [I]
position.
• Shredder is jammed. Follow the
instructions under Operation.
Make sure the waste basket (A) is all the way
into the cabinet. Empty the waste basket.
Follow the instructions under Operation.
Clear the paper jam. Follow the
instructions under Operation.
Wait 40 minutes for shredder to cool down
before trying again.
Oil the cutting cylinders. Follow the
instructions under Maintenance.
No action required. This is a self-cleaning
function.
Maintenance
Empty waste basket regularly
The shredder will not operate when the basket is full.
Oil regularly to ensure proper operation.
If used at or near daily capacity, apply oil every time you empty the basket.
Use Fellowes Powershred Lubricant #35250 or other non-aerosol vegetable-based oil in
a long-nozzle container (sample oil provided).
CAUTION:
aerosol lubricants of any kind.
Do not use flammable synthetic oil, petroleum-based products, or
To oil the cutting cylinders
• Apply oil over full width of cutting cylinders through the paper entry (C).
• Move control switch (E) to automatic [I] and run for 1-2 seconds.
• Press and hold the control switch (E) in reverse [R] for at least 3 seconds.
• Repeat the automatic/reverse sequence 3 or more times.
5
to ensure the smooth functioning of the cutting cylinders.
Supplies
The following items for the C14 shredders are available from Fellowes:
Item Quantity Part Number
Waste bags (in dispenser) 100/roll 36053
Powershred Lubricant 12 oz. bottle 35250
To purchase supplies, contact Fellowes at the appropriate location listed on the back page
of this instruction manual, or visit us at
www.fellowes.com
.
6
Page 5

Limited Warranty
Fellowes, Inc. (“Fellowes”) warrants the cutting cylinders of the machine to be free from
defects in material and workmanship for
original consumer. Fellowes warrants all other parts of the machine to be free of defects in
material and workmanship for 1 year from the date of purchase by the original consumer.
If any part is found to be defective during the warrant period, your sole and exclusive
remedy will be repair or replacement, at Fellowes’ option and expense, of the defective
part.
This warranty does not apply in cases of abuse, mishandling or unauthorised repair. ANY
IMPLIED WARRANTY, INCLUDING THAT OF MERCHANTABILITY OR FITNESS FOR A
PARTICULAR PURPOSE, IS HEREBY LIMITED IN DURATION TO THE APPROPRIATE WARRANTY PERIOD SET FORTH ABOVE. In no event shall Fellowes be liable for any consequential or incidental damages attributable to this product. This warranty gives you specific
legal rights. You may have other legal rights that vary. The duration, terms and conditions
of this warranty are valid worldwide, except where different limitations, restrictions or conditions may be required by local law.
For more details or to obtain service under this warranty, please contact us (see back
cover) or your dealer.
Warrantor: Fellowes, Inc.
7 years
from the date of purchase by the
7
 Loading...