


OPERATING INSTRUCTIONS AND PARTS LIST
INSTRUCTIONS D’UTILISATION ET LISTE DE PIÈCES
INSTRUCCIONES DE OPERACIÓN Y LISTA DE PIEZAS
FTS-150 TILE SAW
MODEL: FTS-150 115V/60/1
0AF04106
Copyright © December, 2003
Electrolux Construction Products
17400 West 119th Street
Olathe, Kansas 66061
Customer Service ......800-365-4003
Corp. Office ...............913-928-1000
Cust. Service FAX......800-825-0028
Corp. Office FAX .......913-438-7951
Internet ……www.felkersaws.com

EVERY MACHINE IS THOROUGHLY TESTED BEFORE LEAVING THE FACTORY. EACH MACHINE IS
SUPPLIED WITH A COPY OF THIS MANUAL. OPERATORS OF THIS EQUIPMENT MUST READ AND BE
FAMILIAR WITH THE SAFETY WARNINGS. FAILURE TO OBEY WARNINGS MAY RESULT IN INJURY OR
DEATH. FOLLOW INSTRUCTIONS STRICTLY TO ENSURE LONG SERVICE IN NORMAL OPERATION.
CONTENTS
Symbol Definitions .................................................................................................................................4 - 5
Decal Descriptions and Locations..........................................................................................................6
Safety Warnings – DO’s & DO NOT’s ...................................................................................................8 - 9
Instructions
1. Features....................................................................................................................................10
2. Benefits.....................................................................................................................................10
3. Machine Set-Up ........................................................................................................................10 - 14
4. Operating Procedures..............................................................................................................14 - 15
5. Alignment Procedures ………………………………………………………………………………. 15
6. Maintenance..............................................................................................................................15
7. Trouble Shooting Guide………………………………………………………………………………16
8. Repairs......................................................................................................................................16
9. Spare Parts...............................................................................................................................16
10. Accessory Use & Installation.....................................................................................................17
Diagrams and Spare Parts.....................................................................................................................22 - 24
Warranty ................................................................................................................................................25
CHAQUE MACHINE A ÉTÉ ENTIÈREMENT TESTÉE AVANT DE QUITTER L'USINE. CHAQUE MACHINE EST
FOURNIE AVEC UN EXEMPLAIRE DE CE MANUEL. LES OPÉRATEURS DE CE MATÉRIEL DOIVENT LIRE LES
CONSIGNES DE SÉCURITÉ ET BIEN LES CONNAÎTRE. L'INOBSERVATION DE CES CONSIGNES PEUT
PROVOQUER DES BLESSURES OU LA MORT. SUIVRE STRICTEMENT LES INSTRUCTIONS POUR OBTENIR
UNE LONGUE DURÉE DE SERVICE EN UTILISATION NORMALE.
TABLE DES MATIÈRES
Symboles ...............................................................................................................................................4 – 5
Autocollants – descriptions et emplacements........................................................................................6
Mises en garde de sécurité - FAIRE, NE PAS FAIRE ...........................................................................18 - 19
Instructions
1. Caractéristiques………………………………………………………………………………………..10
2. Avantages………………………………………………………………………………………………10
3. Mise en place de la machine…………………………………………………………………………10 - 14
4. Procédures d’utilisation……………………………………………………………………………….14 - 15
5. Procedures d’alignement……………………………………………………………………………..15
6. Entretien………………………………………………………………………………………………..15
7. Guide de dépannage………………………………………………………………………………….16
8. Réparations…………………………………………………………………………………………….16
9. Pièces de rechange……………………………………………………………………………………16
10. Accessoires …………………………………………………………………………….…………….17
Diagrammes et pièces de rechange......................................................................................................22 – 24
Garantie ………………… ……………………………………………………………………………………...25
2
ANTES DE SALIR DE NUESTRA FÁBRICA, CADA MÁQUINA ES SOMETIDA A PUREBAS DETENIDAS. CADA
MÁQUINA DE CORTE ES ENTREGADA CON UNA CIPIA DE ESTE MANUAL. LOS OPERARIOS DE ESTOS
EQUIPOS DEBEN LEER Y FAMILIARIZARSE CON LAS INSTRUCCIONES DE SEGURIDAD. EL NO PRESTAR
ATENCIÓN A ESTAS ADVERTENCIAS PUEDE OCASIONAR GRAVES LESIONE. SIGA ESTRICAMENTE
NUESTRAS INSTRUCCIONES Y SU MÁQUINA LE VA A PRESTAR LARGOS AÑOS DE SERVICIO EN
CONDICIONES NORMALES DE UTILIZACIÓN.
CONTENIDO
Definición De Los Simbolos...................................................................................................................4 - 5
Descripción De Calcamonias y Ubicaciones ........................................................................................6
Advertencias De Seguridad HACER y NO HACER...............................................................................20 - 21
Instrucciones
1. Caracteristica………………………………………………………………………………………….10
2. Beneficio……………………………………………………………………………………………….10
3. Instalacíon De La Cortadora…………………………………………………………………………10
4. Instrucciones De Operación…………………………………………………………………………10 - 14
5. Métodos De Alineamiento……………………………………………………………………………14 - 15
6. Instucciones De Mantenimiento……………………………………………………………………..15
7. Localización Reparación De Averías………………………………………………………………..16
8. Reparaciones…………………………………………………………………………………...….….16
9. Piezas De Recambio………………………………………………………………………………….16
10. Accesorios ………………………………………………………………………..…………………..17
Diagrame y Piezas De Recambio..........................................................................................................22 – 24
Garantía ………………....……………………………………………………………………………………...25
WARNING
HEARING HAZARD
DURING NORMAL USE OF THIS MACHINE, OPERATOR MAY BE EXPOSED TO A
NOISE LEVEL EQUAL TO OR SUPERI O R TO 85 dB (A)
ATTENZIONE!!!
RISCHIO DE LESIONE ALL’APPARATO UDITIVO
NELLE NORMALI CONDIZIONI DI UTILIZZO,
QUESTA MACCHINA PUÒ COMPORTARE PER L’OPERATORE ADDETTO UN ESPOSIZIONE
ACUSTICA DI LIVELLO PARI O SUPERIORE A
85 dB (A)
ATENCION
RIESGO DE DAÑO AUDITIVO
EN CONDICIONES NORMALES DE UTILIZACIÓN, EL OPERADOR DE ESTA MÁQUINA PUEDE
ESTAR EXPUESTO A UN NIVEL DE RUIDO IGUAL O SUPERIOR A 85 dB (A)
3
Symbols Definitions
Symboles
Definición De Simbolos
• Please read the instructions for use prior to operating the machine for the first time.
• Avant toute mise en service, lire attentivement la notice et se familiariser avec la machine.
• Antes de la puesta en marcha, lea detenidamente las instrucciones y familiaricese con la máquina.
• Mandatory
• Obligatoire
• Obligatorio
• Indication
• Indicazione
• Indicación
• Prohibition
• Interdiction
• Prohibición
• Warning Triangle
• Triangle d’advertissement
• Triángwulo De Advertencia
• Wear Eye Protection
• Port obligatoire des lunettes de protection
• Usar Gafas De Protección
• Wear Breathing Protection
• Port obligatoire d’un masque respiratoire protecteur
• Usar Máscara De Protección
• The Use Of Ear Protection Is Mandatory
• Port obligatoire da casque antibruit
• Es Obligatorio El Uso De Protección Auditiva
• Wear Safety Shoes
• Port obligatoire des chaussures de sécurité
• Usar Zapatos De Seguridad
4

• Wear Appropriate Clothing
• Port obligatoire de la tenue appropriée
• Usar Ropa Adecuada
• Machinery Hazard, Keep Hands And Feet Clear
• Danger! Rester à distance de la machine
• Máquina Peligrosa - Mantenga Manos Y Pies Alejados De La Máquina
• No Non-Working Personnel In Area
• Zone interdite au personnel non-ouvrier
• Prohibido Para Personas Ajenas A La Obra
• Keep Work Area Clean/Well Lit, Remove All Safety Hazards
• La zone de travail doit toujours être propre, bien éclairée et ne présenter aucun risque
• Mantenga Limpio El Sitio De Trabajo/Bien Iluminado, Elimine Todos Los Riesgos De Seguridad
• Dangerously High Noise Level
• Niveau de bruit dangereux
• Nivel De Ruido Elevadamente Peligroso
• Repairs Are To Be Done By An Authorized Dealer Only
• Les réparations ne peuvent être exécutées que par un distributeur agréé
• Las Reparaciones Deben Ser Efectuadas Únicamente Por Un Distribuidor Autorizado
• Always Keep the Blade Guards In Place
• Toujours vérifier que les protections de disque sont bien en place
• Mantenga siempre las protecciones de la hoja en su sitio
• Diamond Blade
• Disque diamanté
• Sierra Diamantada
• Electrical Shock Hazard
• Risque de secousses électriques
• Peligro de sacudida eléctrica
5

DECAL DESCRIPTIONS & LOCATION
AUTOCOLLANTS – DESCRIPTIONS ET EMPLACEMENTS
DESCRIPTIÓN DE CALCAMONIAS Y UBICACIONES
LOCATION: Blade Guard – Top Sides
P/N 046326
LOCATION: Motor – Front
P/N 193015
P/N 193014
LOCATION: Water Tray – Front
P/N 046327
LOCATION: Motor – Rear
P/N 189247
LOCATION: Control Box – WP Outlet
6
P/N 187043
LOCATION: Cutting Head – Handle Area

NOTES:
7

SAFETY FIRST!
WARNINGS
DO’s AND DO NOT’s
WARNING: FAILURE TO COMPLY WITH THESE WARNINGS AND OPERATING
INSTRUCTIONS COULD RESULT IN DEATH OR SERIOUS BODILY INJURY.
DO
DO read this entire operator’s manual before operating this machine. Understand all warnings, instructions, and controls.
keep all guards in place and in good condition.
DO
wear safety approved hearing, eye, head and respiratory protection.
DO
read and understand all warnings and instructions on the machine.
DO
read and understand the symbol definitions contained in this manual.
DO
keep all parts of your body away from the blade.
DO
know how to stop the machine quickly in case of emergency.
DO
turn the “ON/OFF” switch to the “OFF” position prior to connecting the machine to the power source.
DO
inspect the blade, flanges and shafts for damage or dirt before installing the blade.
DO
always keep children away from this machine.
DO
use only blades marked with a maximum operating speed greater than the blade shaft speed.
DO
always use a ground fault circuit interrupter when wet sawing.
DO
read all safety materials and instructions that accompany any blade used with this machine.
DO
DO inspect each blade carefully before using it. If there are any signs of damage or unusual wear, DO NOT USE THE
BLADE.
mount the blade solidly and firmly. Wrench tighten the arbor nut.
DO
use the correct blade for the type of work being done. Check with blade manufacturer if you do not know if blade is
DO
correct.
operate this machine only in well ventilated areas.
DO
establish a training program for all operators of this machine.
DO
clear the work area of unnecessary people. Never allow anyone to stand in front of or behind the blade while the motor
DO
is running.
make sure the blade is not contacting anything before starting the motor.
DO
use caution when lifting and transporting this machine.
DO
always tie down the machine when transporting.
DO
use caution and follow instructions when setting up the machine.
DO
have all service performed by competent service personnel.
DO
make sure electric powered machines are plugged into a properly grounded circuit.
DO
make sure power cords are the proper size and in good condition.
DO
maintain a secure grip on the material being cut.
DO
verify the blade arbor hole matches the machine spindle before mounting the blade.
DO
clean the machine after each day’s use.
DO
follow all electrical codes in your area.
DO
consider work area environment. Don’t expose power tools to rain. Don’t use power tools in wet locations.
DO
use caution to guard against electric shock. Prevent body contact with grounded surfaces (i.e., pipes, radiators,
DO
ranges, refrigerators).
use correct voltage and proper extension cords. Never carry tool by cord or yank it to disconnect it from receptacle.
DO
Keep cord away from heat, oil and sharp edges.
always carry the machine with the motor stopped and power cord disconnected.
DO
disconnect tools from power source when not in use, before servicing and when changing accessories.
DO
carefully maintain and clean for better and safer performance. Follow instructions for changing accessories. Inspect
DO
tool cords periodically and, if damaged, have repaired by authorized service facility.
only cut in a straight line.
DO
always give a copy of this manual to the equipment user. If you need extra copies, call TOLL FREE 1-800-365-4003.
DO
8

SAFETY FIRST!
WARNINGS
DO’S AND DO NOTS
WARNING: FAILURE TO COMPLY WITH THESE WARNINGS AND OPERATING
INSTRUCTIONS COULD RESULT IN DEATH OR SERIOUS BODILY INJURY.
DO NOT
DO NOT
DO NOT
DO NOT
DO NOT
DO NOT
DO NOT
DO NOT
DO NOT
DO NOT
DO NOT
DO NOT
DO NOT
DO NOT
DO NOT
DO NOT
DO NOT
DO NOT
DO NOT
DO NOT
DO NOT
DO NOT
DO NOT
DO NOT
DO NOT
DO NOT
DO NOT
DO NOT
DO NOT
DO NOT
DO NOT
DO NOT
This saw was designed for certain applications only. DO NOT modify this saw or use for any application
other than for which it was designed. If you have any questions relative to its application, DO NOT use the
saw until you have written Electrolux Construction Products and we have advised you.
operate this machine unless you have read and understood this operator’s manual.
operate this machine without the blade guard, or other protective guards in place.
stand behind or in front of the blade path while the motor is running.
leave this machine unattended while the motor is running.
work on this machine while the motor is running.
operate this machine when you are tired or fatigued.
use a wet blade without adequate water supply to the blade.
exceed maximum blade speed shown for each blade size. Excessive speed could result in blade breakage.
operate the machine if you are uncertain of how to run the machine.
use damaged equipment or blades.
touch or try to stop a moving blade with your hand.
cock, jam, wedge or twist the blade in a cut.
use a blade that has been dropped or damaged.
use carbide tipped blades.
use abrasive blades.
touch a dry cutting diamond blade immediately after use. These blades require several minutes to cool
after each cut.
use damaged or worn blade flanges.
allow other persons to be near the machine when starting or when the machine is in operation.
operate this machine in an enclosed area unless it is properly vented.
operate this machine in the vicinity of anything that is flammable. Sparks could cause a fire or an
explosion.
allow blade exposure from the guard to be more than 180 degrees.
operate this machine with the blade guard removed.
operate this machine unless you are specifically trained to do so.
use a blade that has been over heated (Core has a bluish color).
jam material into the blade.
grind on the side of the blade.
lay power cords in or near the water.
replace the motor with any motor that does not have a special grounding connection.
stand or lean on machine.
start cutting with a saw until you have a clear work area and secure footing.
operate this machine while using drugs or alcohol.
****************
Electrolux Construction Products
17400 West 119th Street
Olathe, Kansas 66061
1-800-365-4003
9
MANDATORY
INDICATION
INFORMATION
INSTRUCTION
WARNING
PROHIBITION
These signs will give
advise for your safety
Before leaving our factory every machine
is thoroughly tested.
Follow our instructions strictly and your machine
will give you long service in normal operating
conditions.
1. Features
Use: Sawing of any kind of tile, up to 19”
(482mm); diagonal of 13” x 13” (330 x 330mm) tile.
Tools: All accessories come standard with your saw;
including a 10” (254mm) continuous rim
Diamond Blade & Multi-Wrench
Blade Capacity: Ø 10″ (250 mm)
Bore 5/8″ (15.9 mm).
Blade Rotation: Counter-Clockwise (CCW).
Depth of Cut: 3-1/4″ (83mm)
Cutting Length: 19″ (48.3cm)
Blade Cooling: Water pump
Horsepower: 1-1/2
Voltage: 120 Volts, 60 Hertz, 1-Phase
Amperage: 15 amps (Full Load)
Blade Shaft RPM: 2800
Weight lbs. (kg.): 112 (50.8)
Dimensions (L x W x H): 39-3/4″ x 22″ x 20-1/2″
(101 x 55.9 x 52.1cm)
Pan Holding Capacity: 5.3 gallons (20 liters)
Before starting up the machine, make sure
you read this entire manual and are familiar
with the operation of this machine.
The working area mu st be completely clear,
well lit and all safety hazards removed.
The operator must
wear protective
clothing appropriate
to the work he is
doing.
Any persons not involved in the work
should leave the area.
Use only blades marked with a maximum
speed greater than the blade shaft
speed.
2. Benefits
Your FELKER tile saw is a ruggedly constructed unit
engineered to give long, satisfactory performance.
Simple, daily maintenance and care will add to the life
and productivity of your tile saw.
• Full 1-1/2 HP, 115V/60/1 motor for powerful cuts.
• Has a durable polymer cutting table – able to
handle almost any cutting job due to its reinf or c ed
construction.
• Removable extension can also be fastened to
side of cart for holding wide material.
• Cutting table designed to drain water quickly back
into the water tray for efficient recycling of water.
• Cast blade guard will hinge to allow easy removal
of cutting blade. Accepts up to 12” diameter
blade.
• Cutting table runs on nylon wheels for smooth
and accurate cuts and easy maintenance.
• Water tray of durable polymer construction to
resist rust and to drain water and sedim ent much
faster.
3. Machine Set-Up
Follow all of the assembly and
installation instructions completely
before connecting this saw to a power
UNPACKING
(Fig 1 – page 11 & Fig’s 3 & 4 – page 12)
Carefully open the container and remove all the saw
components and packing materials. Be certain you
have checked each item with the checklist below
before discarding the container or the packing
materials. The contents are as follows:
1. Operator’s Manual 6. Blade – 10” [250mm]
2. Cutting Head Assy 7. Water Pump, 115V/60
3. Frame w/Cart 8. Motor Support Shaft
4. Water Tray 9. Multi-Wrench
5. Blade Guard 10. Rip Guide
11. Accessories: Cart Extension, Bullnose Miter, Dual
45° Miter & Adj. Protractor
NOTE: IF ANY OF THE PARTS ARE MISSING OR
DAMAGED PLEASE CONTACT YOUR FELKER
CUSTOMER SERVICE FOR INSTRUCTIONS.
CALL 1-800-365-4003
source.
10

GENERAL ASSEMBLY INSTRUCTIONS
• Assemble Saw Stand (Fig 1). Set on level surface
and lock both wheels to resist movement while
placing Saw on Stand.
• Fasten Saw Frame Assembly onto assembled
Saw Stand using T-Knobs. (10, Fig 1B)
• Install Water Tray Assembly to Frame. (Fig 2)
• Install Motor Support Shaft in Rear Support Post.
(3, Fig 3)
• Install Motor Cutting Head on Motor Support Shaft.
(1, Fig 3)
• Install Blade Guard Assembly onto Cutting Head.
(1, Fig 4) Attach Splash Flap to rear of Guard.
• Place Water Pump Assembly in Water Tray and
connect Tubing from Blade Guard. Plug cord into
Water Pump Outlet on the side of Power Switch
Housing.
• Install the 10” continuous rim Diamond Blade. (6,
Fig 4)
• Install Cart Extension and Accessories as needed.
ASSEMBLING THE SAW STAND (FIGS. 1A & B)
• Open carton and remove all the Saw Stand Parts.
• Attach the two Wheels (3) to the Inner Frame (2)
with the M6x45 Cap Screws (4). Retain with the
M6 Flatwashers (5) and Locknuts (6) as shown in
Fig 1A. Tighten Securely.
• Set the Inner Frame (2) inside the Outer Frame
(1) as shown in Fig 1B.
• Install the two M10x56 Cap Screws (7) through the
pivoting holes in the legs of each frame. Retain
with the M10 Flatwashers (8) and Locknuts (9).
• After the Saw Stand is completely assembled as
shown and all fasteners are securely tightened,
the tile saw can be installed on Stand using the
two Saw Stand Knobs (10, Fig 1B).
WATER TRA Y INSTALLATION
FIG 2
Fig 1A
11
Fig 1B

CUTTING HEAD INSTALLATION
(FIG 3)
• Remove Cutting Head Assembly (1) and Frame
and Pan Assembly (2) from carton.
• Using the multi-wrench provided, install the Motor
Support Shaft (3) into the Rear Support Post (4).
Install and tighten the Capscrew (5) with washer to
retain the Support Shaft (3).
• Slide the Cutting Head Assembly (1) onto the now
installed Motor Support Shaft (3) fully against the
Rear Support Post (4). Install the Head Locking
Knob and Washer (6) through the adjustment slot
in the Rear Support Post (4) and into the tapped
hole on the side of the Cutting Head Assembly (1)
base.
• Install and tighten Capscrew (7) with Washer to
retain the Cutting Head Assembly (1) on the
Support Shaft (3).
• With the Head Locking Knob (6) loosened, pivot
the Cutting Head (1) up for Blade Guard and
Blade installation.
FITTING OR CHANGING THE BLADE
(FIG 4)
BLADE INSTALLATION AND REMOVAL
• Turn motor switch off.
• Disconnect power cord.
• Carefully raise the blade guard (1) to its highest
position and tighten the adjustment knob (6, Fig 3)
on the rear support to hold firmly in place while
installing blade (6).
• Remove the blade shaft nut (4) and the outer
flange (5). With one hand, depress the spring
loaded shaft lock (8) and loosen the blade shaft
nut (4) with the wrench provided. Turn nut
counter-clockwise to loosen.
• Place blade onto the shaft, pushing it up against
the Pulley/Inner Flange (7). Make sure the blade
(6) is mounted with the directional arrow pointing
counter-clockwise.
• Next replace the outer flange (5) and blade shaft
nut (4). Again depress the shaft lock (8) and
tighten nut (4) clockwise with multi-wrench. Do
not over-tighten. Release Shaft lock (8).
• Lower the blade guard (1) into operating position
and tighten the knob (3).
Fig 3
12
FIG 4

WATER PUMP INSTALLATION
• Remove the Water Pump from its packaging and
check it to be sure it is not cracked or damaged in
any way.
• Attach the end of the plastic tubing from the blade
guard and to the water pump.
• Place the water pump in the rear of the water tray
and be sure it is below the water level. Route 8mm
tubing out of the Pump and up to the “Y” Fitting on
the Blade Guard.
• Keep the power cord out of the water and plug into
the receptacle on the side of the Power Switch
Housing.
WATER PUMP SAFETY GUIDELINES AND
MAINTENANCE.
Always plug the saw power cord into a
GFCI outlet when using. If a GFCI type
outlet is not available, use a plug-in type
GFCI plugged into a properly grounded
outlet. Do not use any temporary plug
adapters.
• The water pump is equipped with a ground
electrical plug, to reduce the risk of possible
shock. Be sure to connect to a properly grounded
type receptacle.
• Never pick the water pump up out of the water
when it is plugged in.
• DO NOT EVER use the water pump to pump
anything but water.
• Never service the pump when it is still plugged in.
• Never let the pump operate dry. It is self-cooled
by pumping water. Dry use will cause the pump to
fail.
• Maintain regularly and clean out debris from intake
screen.
• Check the power cord for nicks or frays and never
try to alter the power cord in any way.
Pay attention to the direction of rotation
shown by the arrow on one side of the
Blade (rotation is the opposite direction
to the tightening of the nut). Blade should
rotate counter-clockwise when facing the
bladeshaft nut.
Make sure that the supporting surfaces of
the Blade, the Flanges and the arbor are
clean before installing the Blade.
POSITION OF TILE SAW
• Position the saw to one side of a wall-mounted
receptacle to prevent water from collecting onto
the receptacle or plug. The user should also
create a “drip loop” in the cord. The “drip loop” is
that part of the cord below the level of the
receptacle, or the connector if an extens ion cord is
used, to prevent water traveling along the cord
and coming in contact with the receptacle.
• If the plug or receptacle does get wet, DO NOT
unplug the cord. Disconnect the fuse or circuit
breaker that supplies power to the receptacle.
Then unplug and examine f or pres enc e of water in
the receptacle.
GROUNDING METHODS
ELECTRICAL CONNECTIONS
• ONLY use a grounded circuit.
• Use the correct plug and outlet.
• Check that the m ain voltage is identical to that of
the machine.
13
Note: The Canadian electr ical Code prohibits the use
of adapters.

EXTENSION CORDS
• Use only extension cords that are intended for
outdoor use. These cords are identified by a
marking “Acceptable for use with outdoor
appliances; store indoors while not in use.” Use
only extension cords having an electrical rating not
less than the rating of the product. Do not use
damaged extension cords. Examine extension
cord before using and replace if damaged. Do not
abuse extension cords and do not yank on any
cord to disconnect. Keep cord away from heat
and sharp edges. Always disconnect the
extension cord from the receptacle before
disconnecting the saw from the extension cord.
Minimum wire gage for cord
Ampere Rating
Total length of cord in feet
25ft. 50 ft. 100 ft. 150 ft.
More
Than
Not more
Than
AWG
12 16 14 12 Not
recommended
• WARNING - To reduce the risk of electrocution,
keep all connections dry and off the gr ound. Do
not touch plug with wet hands.
• Ground Fault Circuit Interr upter (GFCI) protection
should be provided on the circuit(s ) or outlet(s) to
be used for the tile saw. Receptacles are
available having built-in GFCI protection and may
be used for this measure of safety.
Before any examination, unplug the
machines power cord.
4. Operating Procedures
• Always be very careful.
• Find a comfortable, well-balanced
position.
• Always keep protective casing in
place while working.
• Place the machine on a dr y surfac e or the optional
stand.
• Fill the holding tank with clean water [holds 5.3
gallons (20 liters).
• Plug the machine into the correct power outlet and
turn the motor switch to the “On” position.
14
CUTTING TABLE
THE CUTTING TABLE IS MARKED IN INCHES AND
MILLIMETERS TO MAKE YOUR DIMENSIONAL
CUTS ACCURATE.
STEPS FOR POSITIONING THE 90 DEGREE RIP
• Slide the rip guide onto the table backstop from
one end.
• Set the rip guide by positioning it at the desired
point on the front end of the cutting table front lip
and flipping down the thumb lock until the rip guide
is firmly locked in place. Note that the thumb lock
will hold accessory firmly in place without using the
full travel of the thumb lock. Additional movement
is designed for any long term wearing that may be
experienced. Unnecessary clamping with the
thumb lock could raise the end of the accessory
up off the table surface.
• The rip guide can be used for straight 90° cuts
from both the left and right sides.
• After the rip guide is positioned for the desired cut,
place material flush against the rip guide and the
measurement rail.
• Now you are ready to make your cut.
After completing any work, switch off
the machine. There is no point in
leaving the motor running and the blade
turning.
QUICK TIPS FOR WATER PUMP OPERATION
If you are having trouble getting water flow properly
through the water pump, try this:
• First, check to see that the pump is fully
submerged in water. Fill the water tray with clean
water to completely cover the pump.
• Second, check to see if all tubing is connected to
the pump correctly and its feeds are properly
attached.
Sometimes the tubing is not pushed far enough into its
attachment, allowing water to escape at the
attachment point. Simply push tubing firmly into fitting
until it stops and will not pull back out.
• Third, if problems still persist, there is also a
chance that debris or sediment is clogging the
water pump intake screen, the pump impeller or
inside the tubing.
- Clearing these areas with fresh water can
alleviate the clogging. The build up sediment
needs to be cleaned from the bottom of the
Water Tray and the intake screen cleaned. Fill
tray with fresh water.
- With pump intake removed, look inside the
area impeller and check for debris. Clean as
needed with fresh water.
- If the tubing is clogged, remove ends from the
water pump and Blade guard fitting. Flush
with fresh water until all debris is removed and
reconnect tubing.

WATER TUBING REMOVAL
Plastic tubing connects the water pump to the blade
guard. The fittings used to connect this tubing seal and
grip the outside diameter of the tubing. Special internal
locking fingers attached to the flanged collet hold the
tubing fast. To clean the water tubing requires the
tubing to be removed from the fittings. To release the
tubing form the fitting, fully depress the collet before
pulling the tube out of the fitting. When you press
down on the collet you are opening the locking fingers
and freeing the tubing to be easily removed.
WATER TRAY REMOVAL AND INSTALLATION
THE REMOVAL AND INSTALLATION OF THE
WATER TRAY IS EASY. See Fig 2 above.
• First turn off the saw and unplug the power cord.
Do the same for the water pump.
• Then remove water pump from tray.
• Then take frame and motor assembly out of the
water tray.
• Take tray and drain water and contents (sediment)
• To install simply reverse this process.
NOTE: THERE ARE NO ADJUSTMENTS TO WATER
TRAY
recommended that the Parallel Alignment in
step 2 be checked to insure the best quality
cuts.
2. Check the Parallel Alignment
• The conveyor cart must travel parallel to the
plane of the flat blade.
• Place a square rule against the backstop,
lightly in contact with the blade. The blade
surface should be parallel to the square; i.e., no
gap between the blade and the square at either
the front or back edge of the blade. Next,
holding the square firmly traverse the cart fore
and aft. The blade should remain parallel to
the square, staying slightly in contact with it
throughout its full travel. If the blade does not
stay in contact with the square, the Parallel
Alignment must be performed.
Parallel Alignment (See Diagram 1)
• Loosen the front two Roller Guide fasteners
(Item 5). Move the Roller Guide Bar (item 5)
and Cart by the Adjustment Clamp until the
square is flush with the blade. Tighten the
fasteners and recheck the alignment again.
The cart should now travel parallel to the blade
and the blade should be centered in the slot.
5. Alignment Procedures
Your FTS-150 tile saw is factory assembled and
aligned prior to shipment to ensure accurate cuts
when your saw is delivered. However, since FELKER
can not control rough handling during shipping, it is
suggested that the alignment be checked. If the saw
is found in need of adjustment, refer to the appropriate
section(s) below.
There are two basic alignment checks for the saw
and any adjustments made must follow these
procedures to ensure that the unit functions freely.
Adjustment tools required: Carpenter’s Square and
the multi-wrench provided with your new saw.
1. Check the Blade in Slot Alignment
• The blade should be centered in the conveyor
cart slot.
• Set-up your saw as described above, move the
conveyor cart back and forth form the front to
the rear of the pan. If the blade contacts either
side of the slot, the Cart Slot Location
Adjustment must be performed.
Cart Slot Location Adjustment (See Diagram 1)
• Move the Conveyor Cart so the Blade is
approximately midway between the front and
back of Cart. Loosen the two Roller Guide Bar
fasteners (Item 5) [Use the 10mm & 16mm
ends of wrench (Item 51)] on end fasteners.
Move the adjustment clamp, Roller Guide Bar
(Item 5) and Cart together until the blade is
6. Maintenance
Before performing any maintenance,
ALWAYS place the machine on a level
surface with the motor OFF and
disconnect the electrical current. Let
FOR LONGEST LIFE AND BEST PERFORMANCE
• Always clean the saw after every use.
• Wipe all of the exterior sediment or dirt off the
motor. Never spray water directly onto the
motor!
• Wipe all exterior surfaces and keep the cutting
table clean and free of all debris.
• Wipe the roller guide bar on the frame.
• Always check the blade for cracks or signs of
damage.
OPTIONAL ACCESSORIES
#185004 Stand with wheels
#185282 Cart Extension
#169872 Adjustable 90° Protractor
#169871 Dual 45° Miter Guide
#169870 Bullnose Miter Guide
the machine cool down!!
Store in a safe place, out of reach of
children.
Maintain all tools carefully.
centered in the slot. Tighten the fasteners. It is
15

7. Trouble Shooting Guide
Saw won’t start, saw is too slow to start, Blade
doesn’t turn and motor makes “Humming” noise
• Make sure plug is in live electrical circuit.
• Voltage from source may be too low.
• Start Capacitor defective. Replace.
SAW SHUTS OFF ABRUPTLY
• Power is interrupted, check power source and
restart the saw.
• Voltage from source may be too low. Check for
low voltage.
• Motor was overloaded. Reset overload Circuit
Breaker. Motor may need to cool before Breaker
will reset.
• GFCI may have tripped. Turn off saw, reset and
try again. If GFCI trips a second time, contact a
qualified service center.
WATER PUMP SYSTEM WON’T START OR STOPS
ABRUPTLY
• Check to see that pump is plugged in and is
connected to plastic tubing.
• Check to see if pump is completely submerged.
• Check to see if the water pump is clean and free
of any chips, debris, clogging, etc.
SAW WON’T CUT STRAIGHT
• Check to see if saw frame or rolling guide bar is
bent.
• Check to see if the support for the cutting table is
bent.
• Blade worn or dull. Check for possible defective
blade.
• Materials may have been pushed or forced
through the cut. Blade has to machine away
material for a clean cut. Excessive forcing can
crack to tile.
• Check cart tracking adjustment.
The manufacturer accepts no responsibility caused by unsuitable use or modifications.
SAW BLADE DOESN’T CUT WELL
• Blade needs to be dressed.
• Blade may be mounted on saw backwards.
• Blade may be worn or damaged.
• Blades life may be used up (old blade).
The manufacturer accepts no
Responsibility caused by unsuitable use
or modifications. At the workstation, the
sound pressure level may exceed 85 dB
(A). In this case hearing p rotection must
be worn.
8. Repairs
Entrust all repairs to your authorized
dealer only.
We carry out all repairs in the shortest possible time
and at the most economical prices. (See front page
for our address and phone numbers) Contact your
authorized FELKER dealer concerning m aintenance
and repairs.
9. Spare Parts
For quick supply of spare parts and to avoid any lost
time, it is essential to quote the data on the
manufacturer’s plate f ixed to the side of the motor and
the part number(s) and desc ription to be replaced with
every order.
The instructions for use and spar e parts found in this
document are for information only and are not binding.
As part of our product quality improvement policy, we
reserve the right to make any and all technical
modifications without prior notice.
16
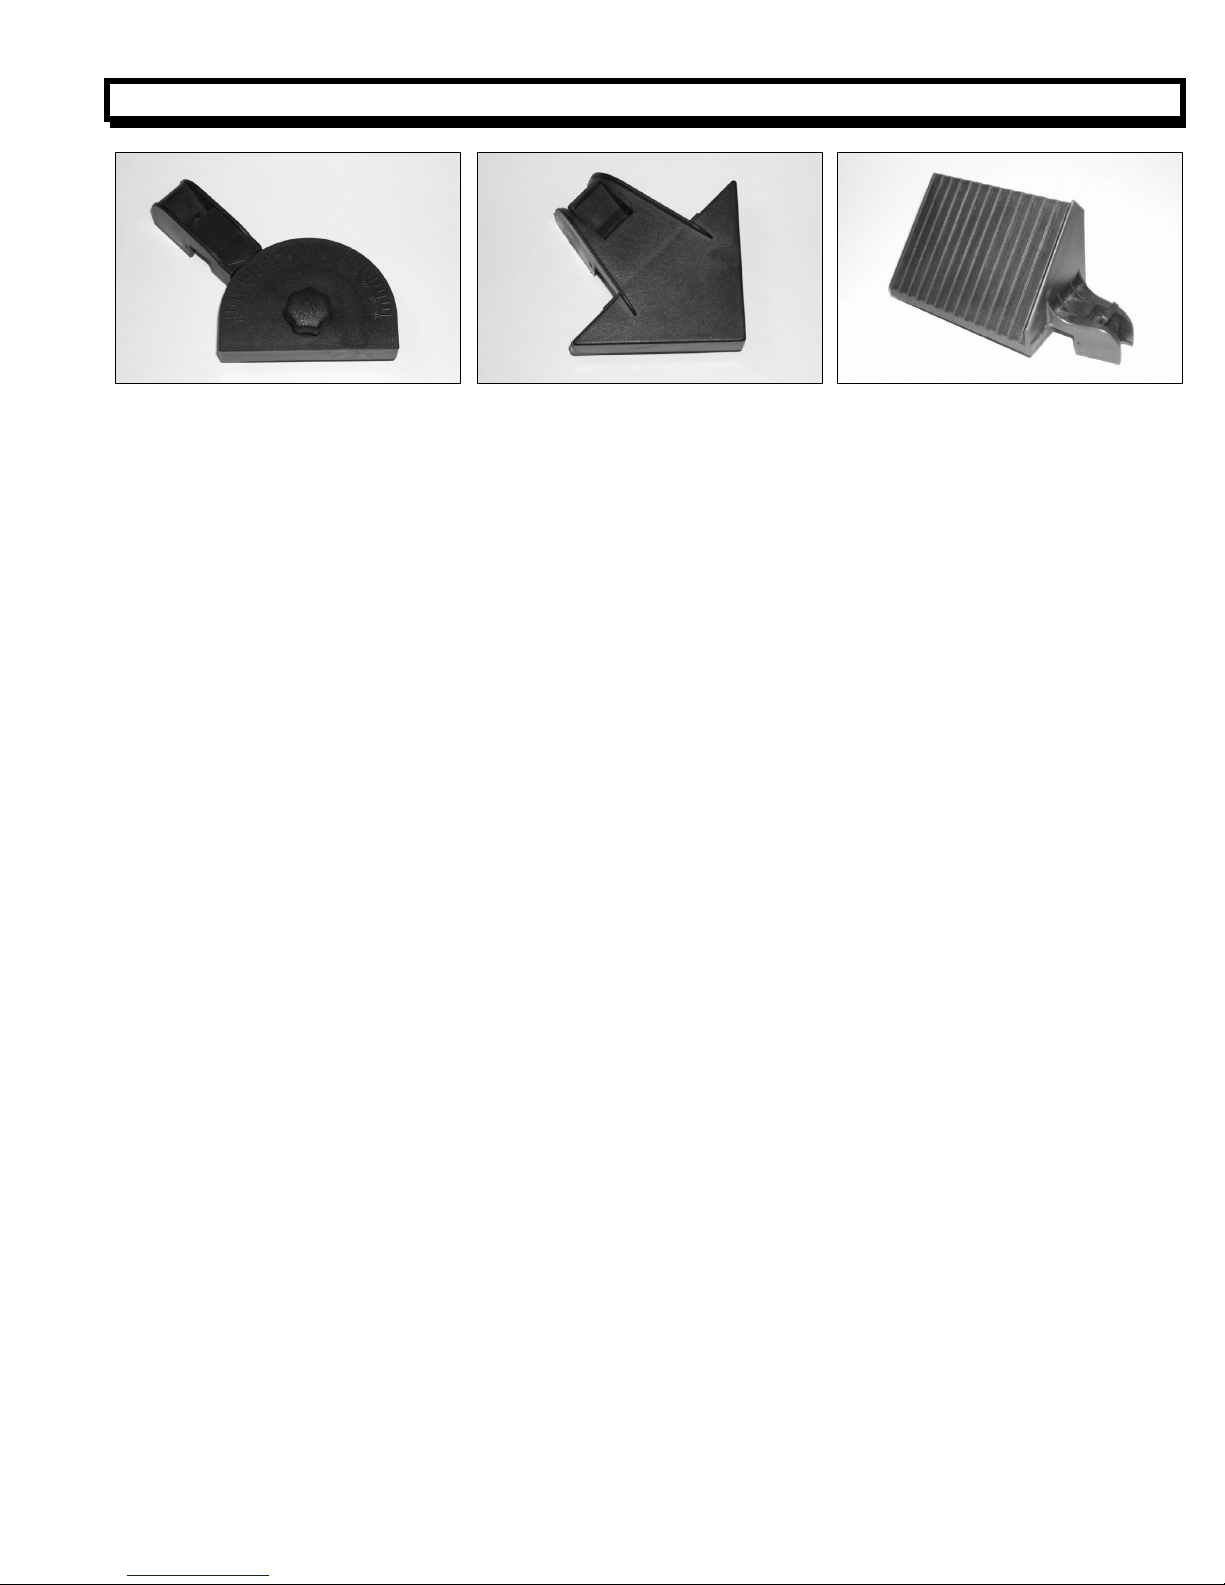
10. Accessory Use & Installation
169872 ADJ. PROTRACTOR
Fig 55, Diagram 1
CART EXTENSION: P/N 185282
The Extension adds supportive length to the Cutting Table. Use when cutting tile that extends beyond the front end of
the basic cart. Install with fasteners provided. Adjust so top of the Extension is level with the top of the Cutting Table. A
second extension can also be purchased and fastened to the outside of the cutting table if additional support is needed
for cutting wide material.
RIP GUIDE: P/N 169887
The Rip Guide is used to provide a repeatable position for rip cuts. The Rip Guide clamps to the special designed
backstop of the cutting table.
90° ADJUSTABLE PROTRACTOR: P/N 169872
The Protractor can be used to rip cut known angles. The protractor clamps to the backstop.
DUAL 45° ANGLE GUIDE : P/N 169871
This is a non-adjustable miter used to quickly position the tile at 45 degrees; either on the left or right side. It is often
used for repeated diagonal rip cuts. The Angle Guide clamps to the backstop.
BULLNOSE MITERING GUIDE: P/N 169870
This is a fixed guide that positions the tile for a 45 degree miter cut. The Mitering Guide clamps to the backstop.
FOLDING STAND: P/N 185004
See Stand Assembly Instruction. The stand comes with two wheels at the rear. Each wheel has its own sturdy brake.
The stand is designed with locating pins at each end to locate the saw frame and securely fastens to the underside of
the frame with two knobs. When saw is removed, the stand conveniently folds flat for storage and transporting.
Instructions for Fastening the Cutting Accessories
1. Fully raise the Accessory Thumb Lock and slide the Accessory onto the Cart Backstop from either side.
2. Locate the Accessory by sliding it to the desired position along the ruled Backstop on the fr ont end of the cutting
table.
3. When at the desired location, flip down the thumb lock until it is firmly locked in place.
Note: The thumb lock will hold the access ory firmly in place without using the full travel of the thumb lock . Unnecess ary
clamping with the thumb lock could raise the end of the accessory up off the table surface. Additional movement is
designed for any long term wearing that may be experienced.
169871 DUAL 45° MITER
Fig 56, Diagram 1
169870 45° BULLNOSE GUIDE
Fig 57, Diagram 1
17

LA SÉCURITÉ AVANT TOUT !
MISES EN GARDE
FAIRE et NE PAS FAIRE
ATTENTION: LE MON RESPECT DE CES MISES EN GARDE ET
INSTRUCTIONS D’UTILISATION PEUT ENTRAÎNER LA MORT OU DES
BLESSURES CORPORELLES GRAVES
FAIRE
Faire
Faire
Faire
Faire
Faire
Faire
Faire
Faire
Faire
Faire
Faire
Faire
Faire
Faire
Faire
Faire
Faire
Faire
Faire
Faire
Faire
Faire
Faire
Faire
Faire
Faire
Faire
Faire
Faire
Faire
Faire
Faire
Faire
Faire
Faire
Faire
Faire
Faire
Faire T oujours donner une copie de ce manuel à l’utilisateur de la machine. Si d’autres copies sont nécessaires, contacter TOLL FREE
Lire ce manuel d’utilisation entièrement avant d’utiliser cette machine. Comprendre toutes les mises en garde, les instructions et les commandes.
Toujours maintenir les protections en place et en bonne condition.
Porter des protections de sécurité approuvées pour les oreilles, les yeux, les voies respiratoire et la tête.
Veiller à lire et à comprendre toutes les mises en garde et instructions figurant sur la machine.
Lire et comprendre les définitions de symboles contenus dans ce manuel.
Rester à l’écart du disque.
Savoir comment arrêter rapidement la machine en cas d’urgence.
Placer l’interrupteur « marche-arrêt » (ON/OFF) à la position d’ARRÊT (OFF) avant de brancher la machine à la source de
courant.
Avant de mettre le disque en place, vérifier qu’il n’est pas abîmé, que les flasques et arbres ne sont pas endommagés ni
sales.
Ne jamais laisser les enfants s’approcher de la machine.
Utiliser uniquement des disques indiquant une vitesse maximale de fonctionnement supérieure à la vitesse de la broche.
Lors du sciage à l’eau, toujours utiliser un disjoncteur différentiel.
Lire tous les documents et consignes de sécurité qui accompagnent les disques utilisés avec cette machine.
Contrôler chaque disque avant de l’utiliser. Si des signes d’endommagement ou d’usure anormale sont constatés, NE PAS UTILISER CE DISQUE.
Monter le disque de faéon solide et ferme, resserrer l’écrou de l’arbre avec une clef.
Utiliser un disque approprié au type de travail à accomplir. Contacter le fabricant de disque en cas d’incertitude concernant le disque à utiliser.
Ne faire fonctionner la machine que dans des zones bien ventilées.
Élaborer un programme de formation pour tous les utilisateurs de cette machine.
Dégager la zone de travail de toute personne qui ne soit pas nécéssaire. Ne jamais autoriser qui que ce soit à se tenir dev ant ou derrière le disque
lorsque le moteur est en marche.
Vérifier que le disque n’est pas en contact avec quoi que ce soit avant de mettre le moteur en marche.
Faire attention en soulevant et en transportant cette machine.
Toujour attacher la machine avant de la transporter.
Prendre des précautions et suivre les instructions pour la mise en place de la machine.
Faire faire l’entretien par un personnel compétent.
Vérifier que les machines électriques sont branchées sur un circuit correctement mis à la terre.
Vérifier que les cordons électriques ont le calibre correct et sont en bon état.
Maintenir fermement le matériau à scier.
Avant de monter le disque, s’assurer que le trou de l’arbre de disque correspond à l’arbre de la machine.
Nettoyer la machine après chaque utilisation journalière.
Observer tous les codes électriques en vigueur sur le plan local.
Vérifier l’aire de travail. Ne pas exposer les outils électriques à la pluie. Ne pas utiliser d’outils électriques dans des
endroits mouillés.
Prendre des précautions pour éviter les secousses électriques. Éviter le contact du corps avec des surfaces reliées à la
terre (ex. : tuyaux, radiateurs, cuisinières, réfrigérateurs).
Utiliser la tension correcte et les rallonges de cordon appropriées. Ne jamais transporter l’outil en le tenant par son cordon
ni tirer d’un coup sec sur le cordon pour débrancher la fiche de la prise de courant.
Maintenir le cordon éloigné de la chaleur, de l’huile et des bords coupants.
Toujours arrêter le moteur et débrancher le cordon avant de transporter la machine.
Débrancher les outils de la source d’alimentation électrique lorsqu’ils ne sont pas utilisés, avant de faire leur entretien et
de changer des accessoires.
Pour obtenir les meilleures performances et le fonctionnement le plus sûr, effectuer un entretien et un nettoyage soigneux.
Suivre les instructions pour changer les accessoires. Inspecter régulièrement les cordons des outils et, s’ils sont
endommagés, les faire réparer par un centre d’entretien agréé.
Ne scier qu’en ligne droite.
1-800-365-4003.
18

LA SÉCURITÉ AVANT TOUT !
MISES EN GARDE
FAIRE et NE PAS FAIRE
ATTENTION : LE MON RESPECT DE CES MISES EN GARDE ET
INSTRUCTIONS D’UTILISATION PEUT ENTRAÎNER LA MORT OU DES
BLESSURES CORPORELLES GRAVES
NE PAS
NE PAS
NE PAS
NE PAS
NE PAS
NE PAS
NE PAS
NE PAS
NE PAS
NE PAS
NE PAS
NE PAS
NE PAS
NE PAS
NE PAS
NE PAS
NE PAS
NE PAS
NE PAS
NE PAS
NE PAS
NE PAS
NE PAS
NE PAS
NE PAS
NE PAS
NE PAS
NE PAS
NE PAS
NE PAS
NE PAS
Cette scie a été conéue pour des utilisations spécifiques. NE PAS modifier cette scie pour toute utilisation autre
que celle pour laquelle elle a été conéue. En cas de doutes concernant son utilisation, NE PAS utiliser la scie avant
d’avoir écrit à Electrolux Construction Products et d’avoir reéu une réponse.
utiliser cette machine avant d’avoir lu et compris ce manuel de fonctionnement.
utiliser cette machine sans protection de disque ou sans qu’une autre protection soit montée.
se tenir derrière ou devant le chemin du disque lorsque le moteur est en marche.
laisser la scie sans surveillance lorsque le moteur tourne.
réparer la machine lorsque le moteur tourne.
utiliser la machine lorsque l’on est fatigué.
utiliser de disque pour sciage à eau sans avoir un approvisionnement en eau suffisant pour le disque.
dépasser la vitesse maximale de disque indiquée pour chaque taille de disque. Une vitesse excessive pourrait
casser le disque.
utiliser cette machine lorsque l’on n’est pas certain de savoir comment elle fonctionne.
utiliser d’équipements ou de disques endommagés.
toucher ou essayer d’arrêter un disque en mouvement avec la main.
incliner, coincer, serrer ou tordre le disque dans l’entaille.
Ne pas utiliser de disque qui est tombé ou endommagé.
utiliser de disques à pointe carbure.
Ne pas utiliser de disque abrasif.
toucher un disque diamanté pour sciage à sec immédiatement après usage. Ces disques ont besoin de plusieurs
minutes pour refroidir après chaque sciage.
utiliser de flasques de disque endommagés ou usés.
autoriser d’autres personnes à se trouver près de la machine lors des opérations de mise en marche, d’appoint
en carburant ou de sciage.
faire fonctionner cette machine dans un espace clos sauf s’il dispose d’une ventilation appropriée.
faire fonctionner cette machine près de tout corps inflammable. Des étincelles pourraient provoquer un incendie
ou une explosion.
autoriser la partie exposée hors de la protection du disque à être supérieure à 180 degrés.
Ne pas utiliser cette machine lorsque la protection de disque est retirée.
utiliser cette machine si l’on n’a pas été spécialement formé pour cela.
utiliser un disque qui a surchauffé. (Le noyau a une couleur bleue).
coincer de matériaux dans le disque.
meuler la partie latérale du disque.
Ne pas poser les cordons électriques dans l’eau ni près de l’eau.
Ne pas remplacer le moteur par un autre qui n’est pas muni d’une connexion spéciale de mise à la terre.
Ne pas se tenir debout sur la machine ni s’appuyer dessus.
Ne pas commencer à scier si la zone de travail n’est pas dégagée et si l’on ne peut se tenir en bon équilibre.
utiliser la scie sous l’influence de drogues ou d’alcool.
NE PAS FAIRE
Electrolux Construction Products
17400 West 119th Street
Olathe, Kansas 66061
États-Unis
19

¡SEGURIDAD ANTE TODOS!
ADVERTENCIAS
HACER y NO HACER
ADVERTENCIA: EL NO RESPETAR ESTAS ADVERTENCIAS E INSTRUCCIONES DE
OPERACION PUEDE PROVOCAR GRAVES LESIONES O LA MUERTE.
HACER
lea todo el manual antes de manejar esta máquina. Entienda todas las advertencias, instrucciones y controles.
SI
mantenga siempre las pr otecciones en su lugar y en buenas condiciones.
SI
siempre use protecciones aprobadas para los oídos, ojos, cabeza y respiración.
SI
lea y entienda todas las advertencias e instrucciones sobre la máquina.
SI
lea y entienda las definiciones de los símbolos que aparecen en este manual.
SI
No acerque ninguna parte del c uerpo a la hoja.
SI
aprenda cómo parar la máquina rápidamente en caso de emergencia.
SI
ponga el interrumpor en la posición OFF antes de corectarlo a la fuente de poda.
SI
Inspeccione la hoja, las bridas y los ejes para ver si están dañados o suc ios antes de instalar la hoja.
SI
utilice hojas abrasivas, o bien, hojas diamantadas con centro de acero fabricadas para utilizaci ón en sierras para albañilería.
SI
Cuando sierre en húmedo, use siempre un interruptor de circuito con puesta a tierra accidental.
SI
lea toda la literatura e instrucciones de seguridad que acompañan a la hoja utilizada con esta máqui na.
SI
SI inspeccione c uidadosamente cada hoja antes de usarl a. Si se obs ervan señales de daño o desgaste poc o común, NO USE
LA HOJA.
instale la hoja firmemente. Apriete la tuerca del eje con un aprietatuercas .
SI
utilice la hoja correcta para el tipo de trabajo que se vaya a ejecutar. En c aso de dudas, consultar c on el fabricante de la hoja.
SI
maneje esta máquina solamente en lugares bien ventilados.
SI
establezca un programa de ent renamiento para todos los operador es de esta máquina.
SI
despeje el lugar de trabajo de per sonas innecesarias . No permita que nadie se s itúe delante o detrás de la hoja mientras el
SI
motor está funcionando.
asegúrese que la hoja no esté haciendo contacto con ninguna cosa antes de arrancar el motor.
SI
tenga cuidado al levantar y transportar esta máquina.
SI
siempre amarre bien la máquina cuando la transporte.
SI
sea duidadoso y siga las intrucciones al i nstalar la máquina.
SI
deje que todos los trabajos de mantenimiento los haga personal especializado.
SI
asegúrese de enchufar las máquinas eléctricas a un circuito debidamente conectado a tierra.
SI
asegúrese que los cordones eléctricos sean del tamaño correcto y estén en buenas condiciones.
SI
sujete bien el material que está cortando.
SI
antes de instalar la hoja, verifique que el agujero del eje de la hoja coincida con el eje portaherramienta de la máquina.
SI
limpie la máquina diariamente.
SI
cumpla con el reglamento eléctrico de su localidad.
SI
tenga en cuenta el medi o ambient e de l a zona de trabajo. No exponga útiles eléct ric os a la l luvia. no use úti les eléct ric os en
SI
lugares húmedos.
sea cuidadoso para evit ar golpes eléct ricos. Evit e el contacto c orporal con las superficies conectadas a tier ra de protección
SI
(como tuberías, radiadores, refriger adores, etc.).
use el voltaje corr ect o y un c able de extens ión adec uado. Nunca t r anspor t e la herrami enta col gando del cable y nunca tire del
SI
cable para desenchufarlo. Aleje el cable del calor, aceite y de las aristas filudas.
Transporte siempr e la máquina con el motor apagado y el cable de alimentación desconectado.
SI
desenchufe los equipos cuando no los usa, antes de hacer mantenimiento y al cambiar accesorios.
SI
limpie y efectúe un manteni miento cuidadoso para obtener un rendimiento mejor y más seguro. Siga las inst rucciones al
SI
cambiar accesorios. Revise los cables del equipo con frecuenci a y, si hay daños, hágalos reparar por un servicio autori zado.
sólo corte en lí nea recta.
SI
sólo corte tan pr ofundamente como las especificaciones del trabajo lo r equieren.
SI
siempre entregar un ejemplar de este manual al usuario del equi po. Si se necesitan ejemplares adici onales, lammar SIN
SI
CARGO al 1-800-365-4003.
20

¡SEGURIDAD ANTE TODOS!
ADVERTENCIAS
HACER y NO HACER
ADVERTENCIA: EL NO RESPETAR ESTAS ADVERTENCIAS E INSTRUCCIONES DE
OPERACION PUEDE PROVOCAR GRAVES LESIONES O LA MUERTE.
NO HACER
NO
NO
NO
NO
NO
NO
NO
NO
NO
NO
NO
NO
NO
NO
NO
NO
NO
NO
NO
NO
NO
NO
NO
NO
NO
NO
NO
NO
NO
NO
NO
Esta sierra fue diseñada para ciertas aplicaciones solamente. NO la modifique ni utilice para ninguna otra
aplicación salvo aquéllas para las cualas fue diseñada. En caso de dudas respecto a su aplicación, NO use la
sierra sin antes haber consultado por escrito a Electrolux Construction Products y haber recibido nuestras
indicaciones.
haga funcionar esta máquina sin antes haber leído y entendido este manual.
maneje esta máquina sin tener la protección de la hoja u otras protecciones instaladas en su lugar.
se sitúe detrás del paso de la hoja mientras el motor está funcionando.
deje esta máquina desatendida mientras el motor está funcionando.
trabaje en esta máquina mientras el motor está funcionando.
maneje esta máquina si está cansado o fatigado.
utilice una hoja de corte húmedo sin tener el suministro adecuado de agua.
sobrepase la velocidad máxima indicada para cada tamaño de hoja. El exceso de velocidad puede causar
la rotura de la hoja.
trabaje con la máquina si tiene dudas sobre su funcionamiento u operación.
utilice equipos u hojas que estén dañados.
toque ni trate de parar con las manos una hoja en movimiento.
incline, atasque, encaje o tuerza la hoja en el corte.
use un disco que haya sufrido un golpe o caída.
use discos con puntas de carburo.
use discos abrasivos.
toque una hoja diamantada de corte en seco inmediatamente después de usarla. Estas hojas se demoran
varios minutos en enfriarse después de cada corte.
use bridas de hojas que estén dañadas o desgastadas.
permita que nadie se acerque a la máquina durante la puesta en marcha o mientras la máquina está
funcionando.
maneje esta máquina en un lugar encerrado a menos que tenga buena ventilación.
maneje esta máquina cerca de ningún objeto que sea inflamable. Las chispas podrían causar un incendio o
una explosión.
permita que la hoja sobresalga más de 180 grados del protector.
maneje esta máquina sin el protector de la correa o de la hoja.
maneje esta sierra sin estar capacitado para hacerlo.
utilice una hoja que se ha sobrecalentado (el núcleo tiene un color azulado).
atasque el material contra la hoja.
esmerile con el costado de la hoja.
deje los córdones eléctricos en o cerca del agua.
cambie el motor por alguno que no tenga una conexión especial de tierra de seguridad.
empiece a cortar con la sierra hasta que tenga un área de trabajo limpia y los pies fijos.
maneje la sierra si está bajo la influencia de drogas o bebidas alcohólicas.
Póngase de pie sobre la máquina o inclínese sobre la misma.
*****************
Electrolux Construction Products
17400 West 119th Street
Olathe, Kansas 66061
1-800-365-4003
21

DIAGRAM 1
22
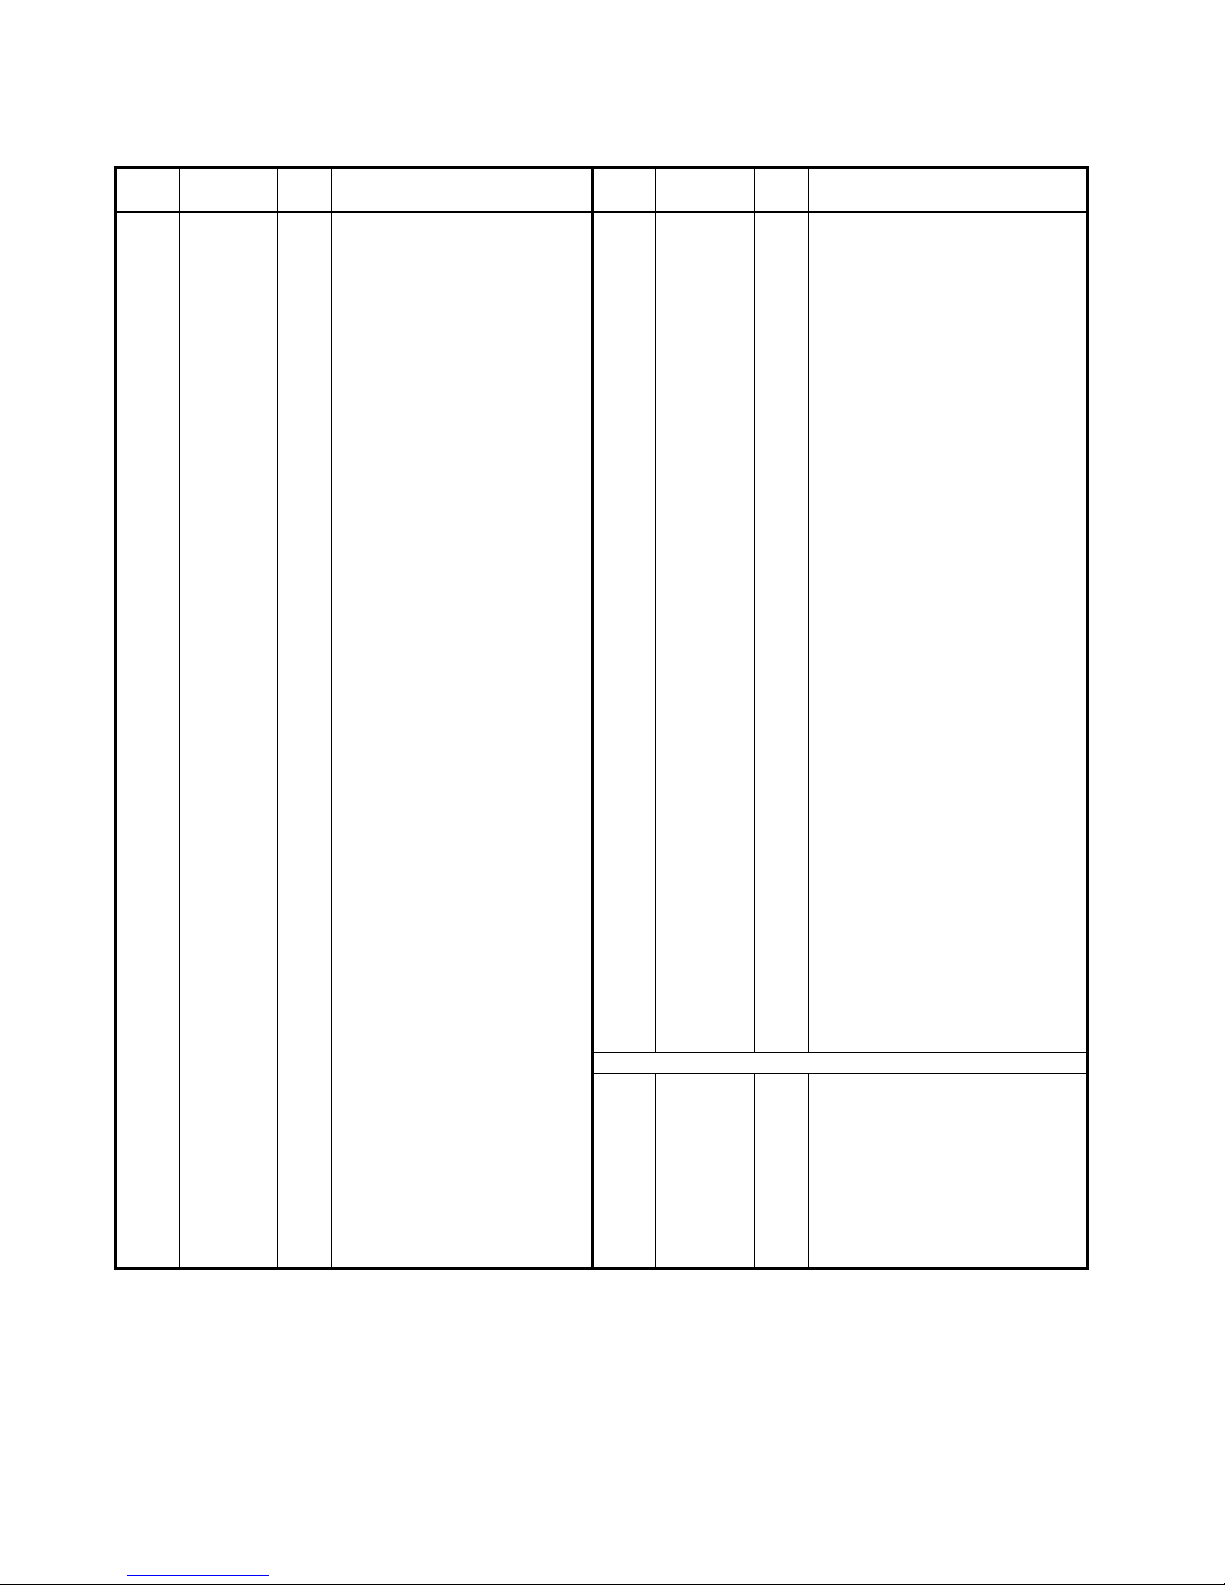
DIAGRAM 1 – FTS-150 PARTS LIST
DIAG.
LOC.
1 185004 1 Stand Assy
2 185017 2 Wheel w/ Brake & fasteners
3 185018 2 Knobs, M8x16 34 185072
4 185019 1 Fame Assy
(incls. 4 & 6) 36 185076
5 185020 1 Bar, Roller Guide
w/ fasteners & clamps
6 185275 2 Latch, Draw w/ fasteners 38 185286
7 185023 1 Water Tray Assy
(Incls. 7-10)
8 185025 1 Bar, Angle w/ fasteners
9 185026
10 185024
11 185276 1 Cutting Table Assy
(Incls. 11-16) 42 185293
12 185277
w/ fasteners
13 185278 2 Kit – Cyl. Roller w/ fasteners Hose Barb & Control Valve)
14 185279 1 Ruler, Cart (Left & Right) 45 185031 1 Adapter, “L” Fitting
15 185280 2 Bracket, U-Roller 46 185029 1 Tubing, 8x6x760mm
w/ fastener
16 185281 2 Kit – U-Roller w/ fasteners
17 185282 1 Extension, Table 50 621652 1 Blade, 10” Continuous Rim
w/ fasteners 51 185090 1 Wrench, Universal
18 185042 1 Post, Rear Support 52 169887 1 Rip Guide
w/ fasteners 53 169870 1
19 185045 1 Knob, M10x18 54 169871 1
w/ Locking Washer 55 169872 1
20 185046 1 Shaft, Motor Mtg w/ fasteners 56 185305 1 Pivot Stud, Blade Guard
21 185049 1 Motor Plate Assy
(Incls. 21 – 28) 58
22 185051 1 Clip, Motor Adjustment
w/ fasteners 59
23 185052 1 Bearing Housing Assy
w/ Bearings & Blade Shaft
24 185058 1 Flange, Pulley/Inner 60
25 185053 1 Cover, Bearing Housing (60) 185296
26 185069 1 Blade Shaft Lock Assy
w/ fasteners NOT SHOWN
27 185059 1 Flange, Outer Blade 193014 1 Decal, FTS150 (Tray)
28 185060 1 Nut, Blade Flange, M16 193015 1 Decal, FTS150 (Bld Grd)
29 185283 1 Motor Assy – 115V/60
30
31 185284
189247 1 Decal: Water Pump Outlet
PART
NO.
542190431 1
QTY
REQ DESCRIPTION
(Incls. 1, 2, & 3)
2 Keeper, Latch w/ fasteners
1
2
(Incls 29 – 31)
1
DIAG.
LOC.
32 185080
33 185294 1 Power Switch Housing Assy
35 185285 1 Circuit Breaker w/ Mtg Nut -20A
37 185302 1 Belt Guard Assy
w/ fasteners
39 185289 1 Blade Guard Assy
40 185064
Plug, Drain
41 185030
Bracket, Cyl. Roller 43 185091
44 050218 1 Water Pump Assy (Incls, 1/4”
57 185306 1 Receptacle, Water Pump
(59) 185295
046326 1 Decal, Elect. Warning (Motor)
Pulley, Motor w/ set screws 046327 1 Decal, Extension Cord (Motor)
Key, 5m x 36 (B5x36)
187043 1 Decal, Warning (Motor Plate)
PART
NO.
542190430
542190432
542190428
QTY
REQ DESCRIPTION
1
1 Switch, Power w/ Mtg Nut & Nameplate
1
1
1
1
2
1
1 Cover, Switch Box
1 Cover, Capacitor - Small
1
1 Cover, Capacitor - Large
1
V-Belt (A-813)
(Incls. 33 – 35 & 57-58)
Cable, Power w/ 125V Plug
(Incls.Blt/Grd & Bld/Grd Rest)
Bracket, Belt Guard
(Incls. 39 - 42)
Knob, M8x20
w/ Locking Washer
“Y” Adapter w/ Tubes & screw
Tubing, 8x6x210mm
Flap, Splash w/ fasteners
Bullnose Miter Guide - 45°
Dual 45° Angle Guide
90° Adj. Protractor
Capacitor-Run, 25Mfd/250V
Capacitor-Start, 400Mfd/125V
23
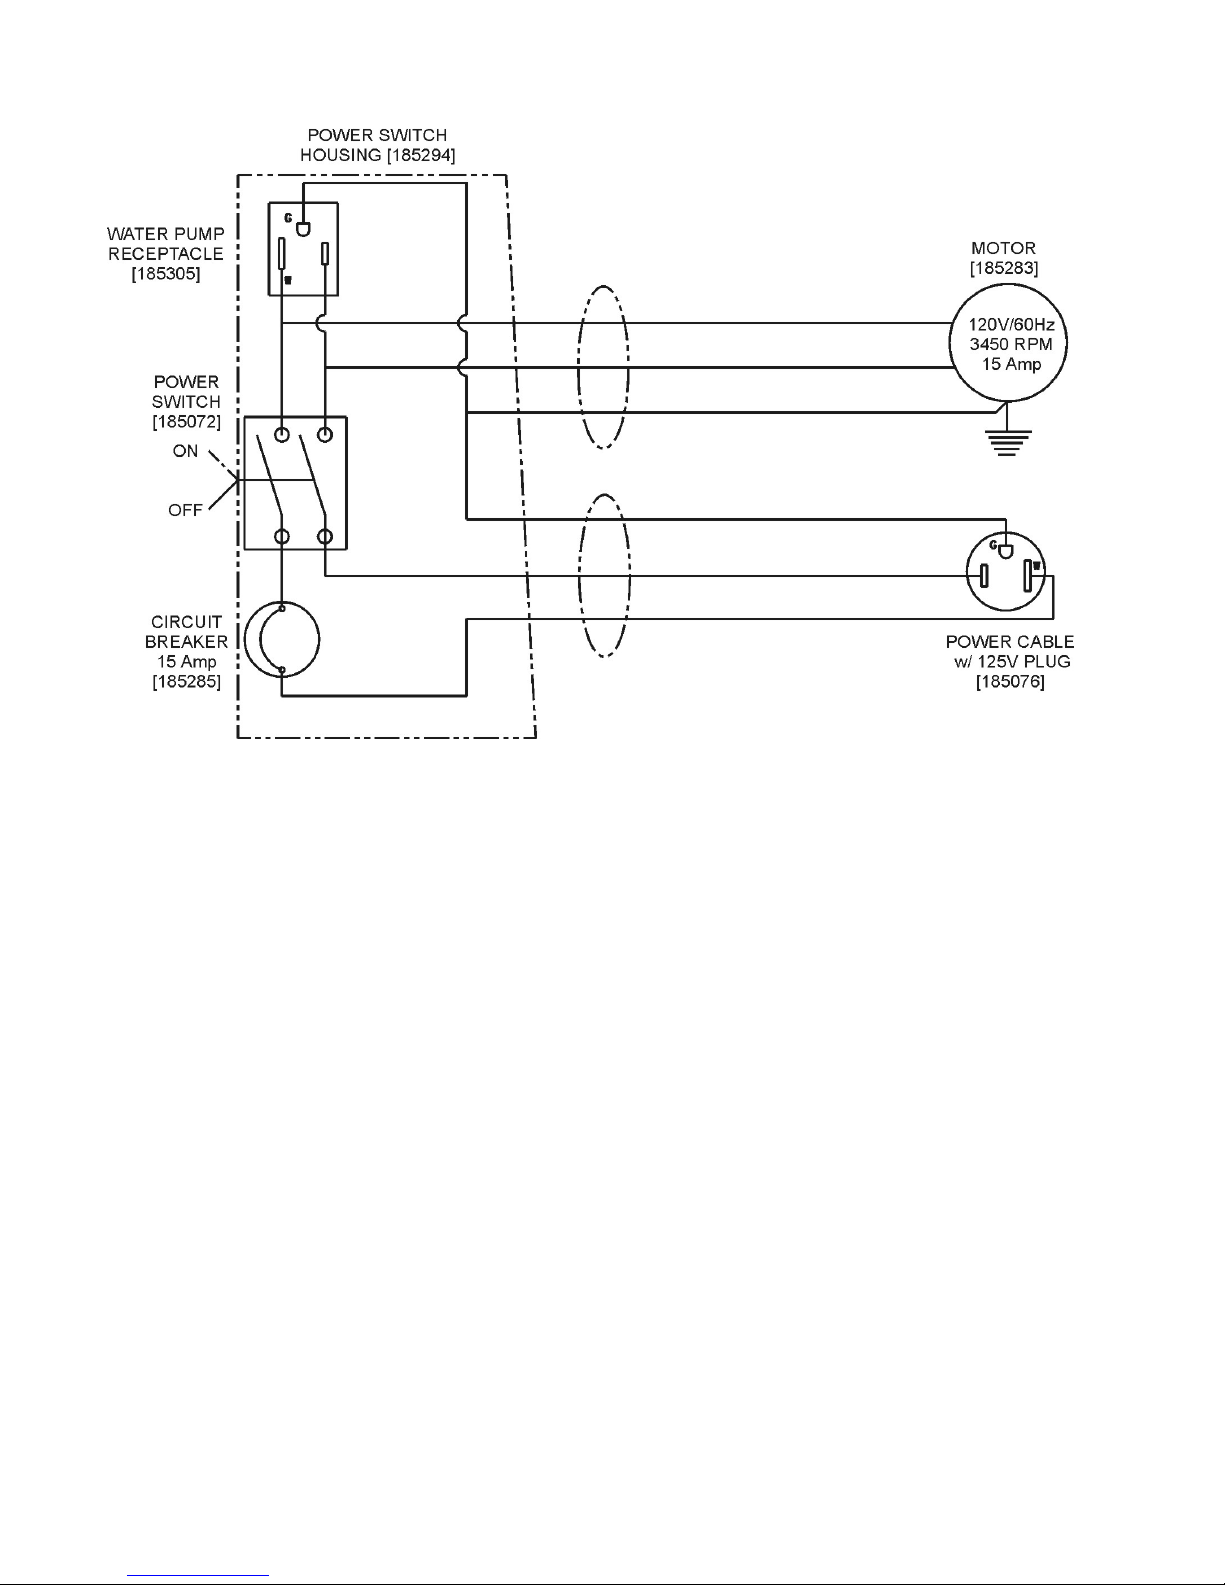
WIRING DIAGRAM:
NOTES:
24

Felker’s New Equipment Warranty
Except as noted below. Felker warrants that its new equipment will be free from manufacturing defects for a period of two
(2) years from date of purchase by the original consumer purchaser.
The above warranty is subject to the following new equipment exceptions:
1. The warranty time period for the following new equipment is limited as follows:
TM-75, FTS-150, FRS-30, FRS-38, FRS-51 --- One (1) year
FTS-70, Little Jack, Jack Junior and Slammer Jack too l s --- Six (6) months
FTS-50 --- Ninety (90) days
2. To the extent the following components are part of any the new equipment, Felker’s warranty on the
component parts is limited to the manufacturer’s warranty period set out below:
Manufacturer.....Warranty Period
GAS and DIESEL ENGINES
Briggs & Stratton....................2 years
Koler Gas................................2 years
Robin Gas................ 2 yrs./2,000 hrs.
Honda Gas..............................2 years
Wisconsin Gas..........1 year/2,000 hrs.
Hatz Diesel..............................1 year
3. Felker’s obligation under this warranty is expressly limited to the replacement or repair at Felker, Olathe, KS 66061, or
at a service facility designated by Felker, of such parts as inspection shall disclose to have been defective. This warranty
does not cover labor, except for gas powered Quickie Super saws and does not cover maintenance items such as belts, air
filters, bearings and wheels. Purchaser will be responsible for paying for shipping costs to and from the location where the
equipment is to be repaired or replaced. Motors and engines are to be serviced by the nearest factory authorized service
center. These service centers are designated by the manufacturer of the engine/motor. Under no circumstances will Felker
be responsible for incidental or consequential damages.
4. Felker’s warranty does not apply to defects caused by damage, abuse, modifications, low voltage, acts of God,
unreasonable use, faulty repairs made by others or defects caused by failure to provide reasonable maintenance. All
warranties are void if the equipment or any of its components are altered or modified by the purchaser, or of the product is
used in a manner or with a blade not recommended by the manufacturer.
5. The forgoing express warranties are in lieu of all other warranties. FELKER EXPRESSLY DISCLAIMS ALL
OTHER WARRANTIES, INCLUDING, WITHOUT LIMITATION, THE IMPLIED WARRANTIES OF
MERCHANTABILITY AND FITNESS FOR A PARTICULAR PURPOSE.
Please record the Date of Purchase and the Serial Number of your saw in the space below. (The serial number is located on
the side of the motor.) When ordering service items, please have this information available.
Manufacturer.....Warranty Period
ELECTRIC MOTORS
Baldor....................................1 year
Leeson...................................1 year
Bosch................................6 months
Milwaukee.........................Lifetime
Black & Decker.....................1 year
DM100.............................6 months
AIR MOTORS and VAC. PUMPS
Gast.......................................1 year
Manufacturer.....Warranty Period
TRANSMISSIONS
Eaton.....................................3 years*
Sunstrand................3 yrs./1,000 hrs.*
(* from date of manufacture)
HYDRAULIC PUMPS
Fenner-Stone............................1 year
John S. Barnes Co....................1 year
WATER PUMPS
Jasbsco.....................................1 year
Beckett.....................................1 year
Serial Number:
Date of Purchase:
Model Number:
Where Purchased:
For any missing, damaged or service items needed, DO NOT return to original store of purchase,
instead contact:
FELKER CUSTOMER SERVICE
Cust. Service Phone.....1-800-365-4003
Cust. Service FAX.......1-800-825-0028

Felker Corporate Office
17400 West 119th Street
Olathe, Kansas 66061
Phone: 913-928-1000
Customer Service Tel: 800-365-4003
Customer Service Fax: 800-825-0028
Corporate Office Fax: 913-438-7951
Customer Service Int'l: 913-928-1258
Western Division Center
2012 Abalone Avenue
Torrance, CA 90501
310-381-3100
Felker Latin America, Mexico, Caribbean,
Central and South America
17400 West 119th Street
Olathe, Kansas 66061
Phone: 913-928-1255
Fax: 913-438-7938
Felker Canada
Phone: 800-365-4003
Fax: 800-825-0028
Warning!
Some dust created by power sanding, sawing, grinding,
drilling and other construction activities contains chemicals
known (to the State of California) to cause cancer, birth
defects or other reproductive harm.
• Lead from lead based paints.
• Crystalline silica from bricks and cement and other
masonry products.
• Arsenic and chromium from chemically-treated
lumber.
Your risk from these exposures varies, depending on how
often you do the type of work. To reduce your exposure to
these chemicals, work in a well-ventilated area, and work
with approved safety equipment such as those dust masks
that are specifically designed to filter out microscopic
particles.
www.felkersaws.com
 Loading...