

Quick Start Guide
FELIX Pro L / XL
www.FELIXprinters.com/support
support@felixprinters.com
Zeemanlaan 15
3401MV IJsselstein
The Netherlands

Quick Start Guide FELIX Pro L / XL
Page 1
1 Safety
General safety
- Keep children under the age of 14 out of reach of the printer
- FELIXprinters are only suitable for professional use.
Considerations when in operation.
- Don’t leave the printer unattended, before making sure the
first layer is printed properly
- Don’t lean on the printer.
- Be careful with long hair and wide clothes.
- Don’t transport the printer.
- Make sure all moving parts can move without any obstructions.
- Don’t remove any objects from the hot plate while printing.
- Caution with any moving parts that move in the X, Y and Z
direction. Moving parts can have a pinching hazard.
Electronic safety
- Only use the power supplies and cables supplied by FELIXprinters.
Always turn off and unplug the printer before performing
maintenance or modifications.
- The power supply meets all CE mark regulations and is protected
against short-circuit, overload, over voltage and over
temperature.
Printer placement
- Place the FELIXprinter on a stable surface.
- Place the printer out of reach of children. Use the FELIXprinter in a
dry environment at room temperature.
Ventilate
- Good ventilation while printing is advised. When printing ABS,
small concentrations of styrene vapor can be released. This can
(in some cases) cause headaches, fatigue, dizziness, confusion,
drowsiness, malaise, difficulty in concentrating, and a feeling of
intoxication.
- We recommend using filament types shown on the
FELIXprinters website. Examples PLA, PETG, ABS-X, Glassbend
etc. Other types may be toxic; please follow instructions from
the filament supplier.
Caution with heater elements
- There is a potential risk of burn, as the print head can reach
temperatures of up to 275°C and the heated bed of up to 120°C.
- Don’t place objects on the heated bed, not even when the
printer is turned off.
- Always let the printer cool down for at least 5 minutes before
doing maintenance or modifications.
- Never try to print without a buildplate in the machine, this can
cause damage to the machine and heated bed.
Quick Start Guide FELIX Pro L / XL
Page 2
2 Introduction
Thank you for choosing FELIXprinters!
It is highly recommended to at least read this manual. It explains in short how to make your first print and contains important
information to operate the printer properly.
Kind regards, FELIXprinters
3 Contents
1 SAFETY ..................................................................................................................... 1
2 INTRODUCTION ...................................................................................................... 2
3 CONTENTS ............................................................................................................... 2
4 PRINTER SPECIFICATIONS ...................................................................................... 1
5 FELIX PRO L / XL AT A GLANCE.............................................................................. 1
6 WHAT’S IN THE BOX? .............................................................................................. 2
INSTALLING TEFLON TUBES ..................................................................................... 3
POWER ON.............................................................................................................. 4
7 DISPLAY OVERVIEW ................................................................................................ 5
CALIBRATION. ............................................ FOUT! BLADWIJZER NIET GEDEFINIEERD.
ERRORS DURING LEVELING .................................................................................... 11
8 Z CALIBRATION ..................................................................................................... 12
ERRORS................................................................................................................. 13
9 XY CALIBRATION .................................................................................................. 15
LOAD FILAMENT ................................................................................................... 17
CLEAN THE PRINT SURFACE ................................................................................... 18
10 PRINTING ........................................................................................................ 19
11 PRINT AND CONTROL PRINTER VIA WIFI OR LAN ...................................... 20
CONNECTING TO WIFI OR WLAN................................................................... 20
REMOTE CONTROL ......................................................................................... 20
PRINT VIA WEB INTERFACE. ............................................................................. 24
12 POWER LOSS RECOVERY ................................................................................ 26
13 TIPS AND TRICKS ............................................................................................ 29
FLEXIBLE FILAMENTS ...................................................................................... 29
MAINTENANCE ................................................................................................................. 30
HOW TO MAINTAIN/EXCHANGE HOT-ENDS ...................................................... 30
DUST CLEANERS ............................................................................................. 33
MOTION SYSTEM ............................................................................................ 33
14 DISPLAY MESSAGES ........................................................................................ 34

Quick Start Guide FELIX Pro L / XL
Page 1
4 Printer specifications
System specifications
- Printer dimensions (L, W, H) 600 x 666 x 776 mm (XL)
- Printer dimensions (L, W, H) 906 x 666 x 966 mm (L)
- Weight 65 kg (L), 80 kg (XL)
- Power requirements: 220 V
Capabilities
- Build volume (L, W, H) 300 x 400 x 400 mm (L)
- Build volume (L, W, H) 600 x 400 x 600 mm (XL)
- Layer height range 0.05 - 0.25 mm (L) 0.05 – 0.35 (XL)
- Bed temperature: max. 110 °C
- Flex plate
- Software bed leveling
- Automatic nozzle calibrations
Extruders
- Diameter nozzle: 0.35 mm (L) 0.5 (XL) (optional 0.5 and
0.7mm)
- Nozzle temperature: max. 275 °C
- Full metal hot-ends
- Filament flow detection
Interface
- Capacitive Touchscreen, with embedded 1.2 Ghz quad
core processor.
- Print server (Repetier-Server)
- Webcam
- Print file management
- 16GB memory
Print materials
- Open source 1.75 mm filaments
- Tolerance: ± 0.15 mm
- PLA, PET(G), Flex, ABS-X, PVA, Wood, Glass
Connectivity
- USB flash drive
- WIFI
- Wired Ethernet
Software
- Simplify3D
- Open source Repetier-Host for FELIXprinters.

Quick Start Guide FELIX Pro L / XL
Page 1
5 FELIX Pro L / XL at a glance
Display unit
Extruder
Heated bed
Filament roll
Power switch
Power plug
LAN port
Filament guide
USB port
Quick Start Guide FELIX Pro L / XL
Page 2
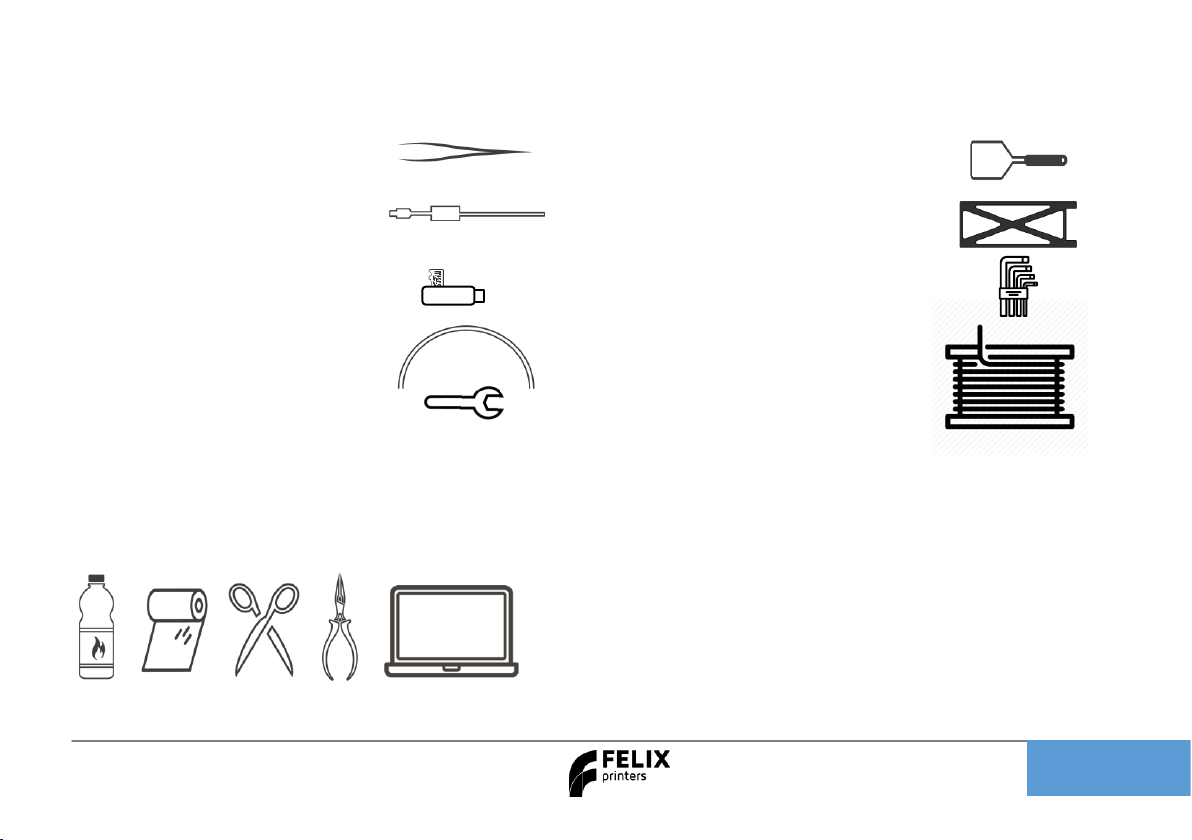
6 What’s in the box?
A
1x Tweezers
F
1x Spatula
B
1x Power cable
G
3x Bed calibration tool
C
1x MicroSD card +
USB reader
H 1x Allen key set
D
2x Teflon tubes
I 1x Premium PLA roll
E
1x Wrench 14mm
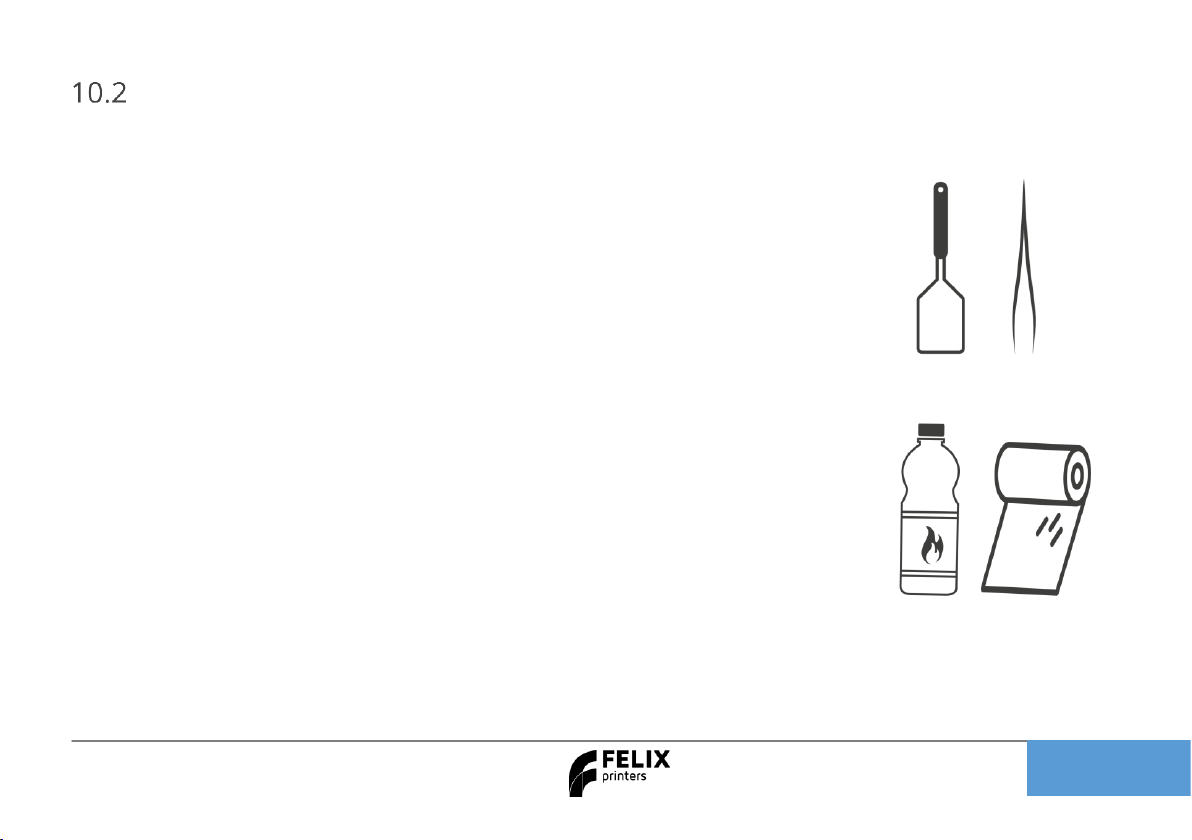
Recommended tools:
NB: The box could contain extra materials like filament you have ordered.
Quick Start Guide FELIX Pro L / XL
Page 3
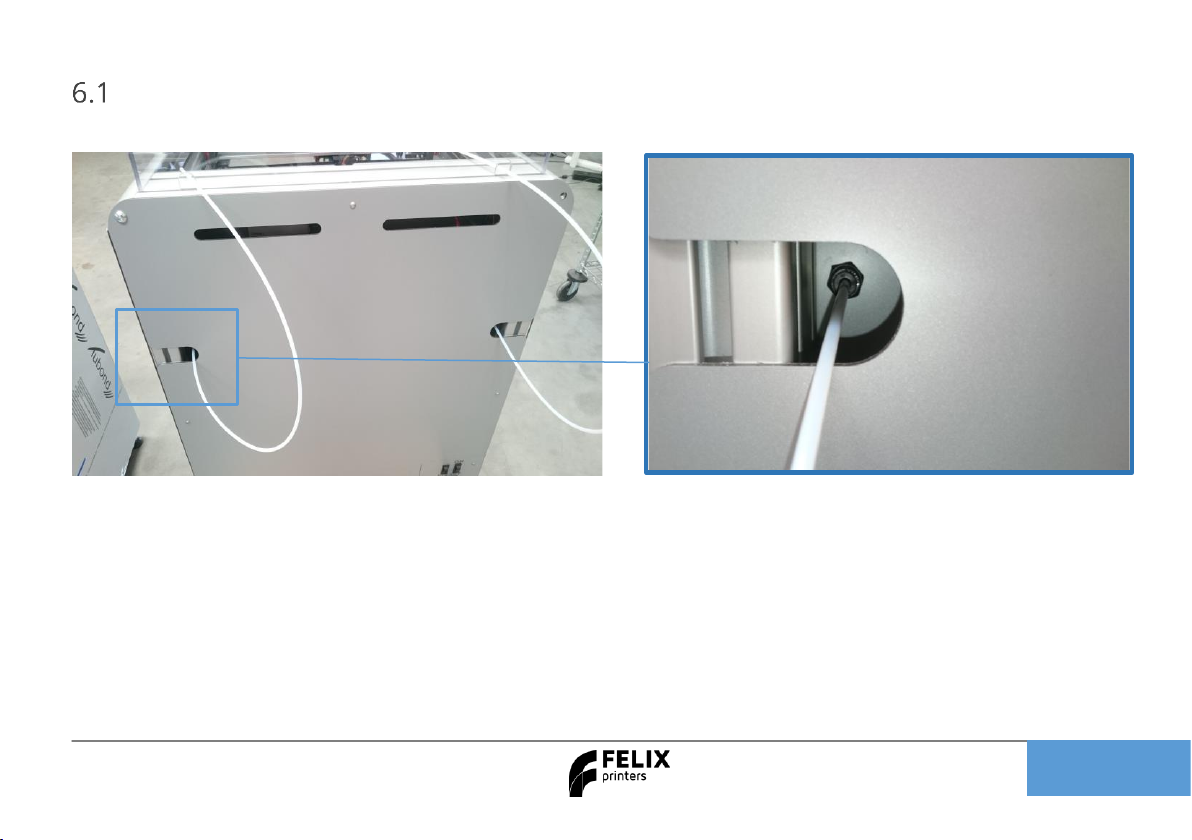
Installing Teflon tubes
Quick Start Guide FELIX Pro L / XL
Page 4
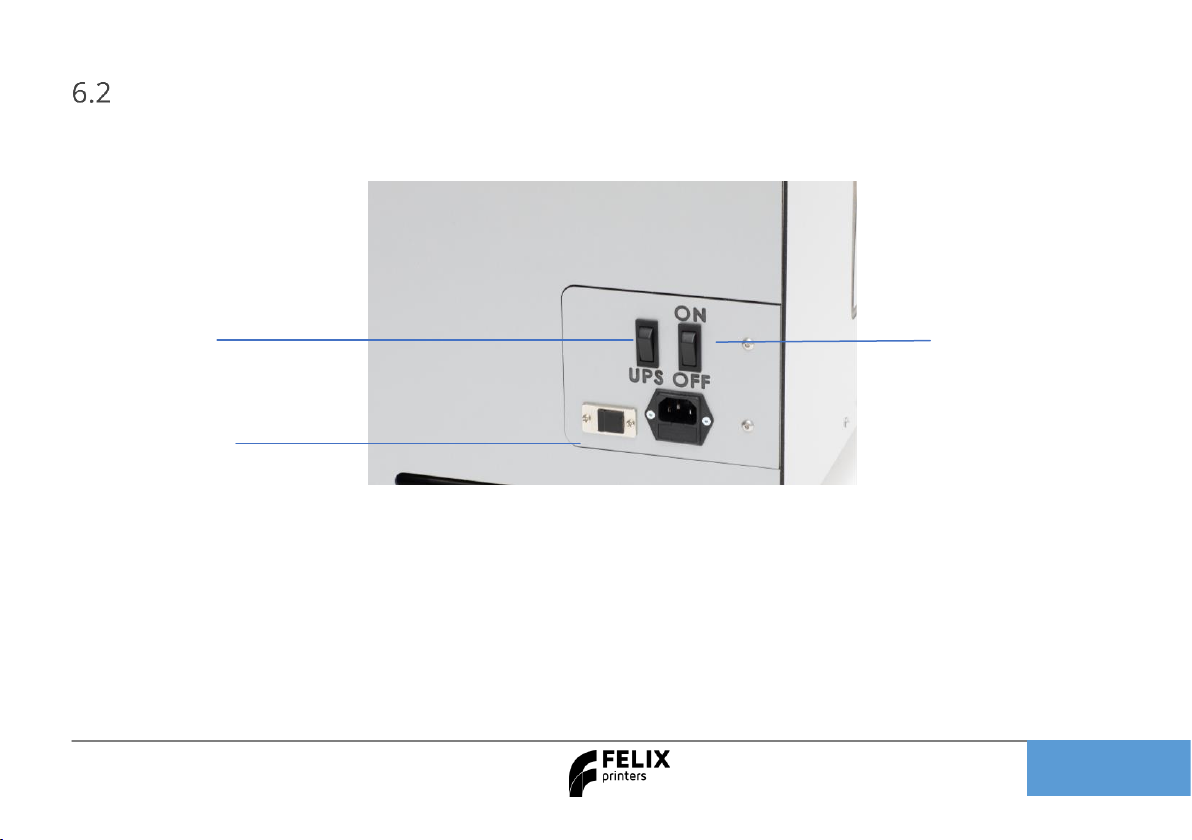
Power on
1. Insert the power cable.
2. Flip ON the UPS (optional) to activate power dip/loss recovery function. Battery will start to charge if not
fully charged already. For this to function properly, the battery needs to be charged.
NOTE: When this switch is on, the battery will charge itself until full even when the power switch is turned
off.
3. Flip ON the power switch.
- The lights of the print-head turn on immediately
- The screen boots up in about 40 seconds.
Power switch
UPS Switch
(power dip/loss recovery)
Ethernet port
Quick Start Guide FELIX Pro L / XL

Page 5
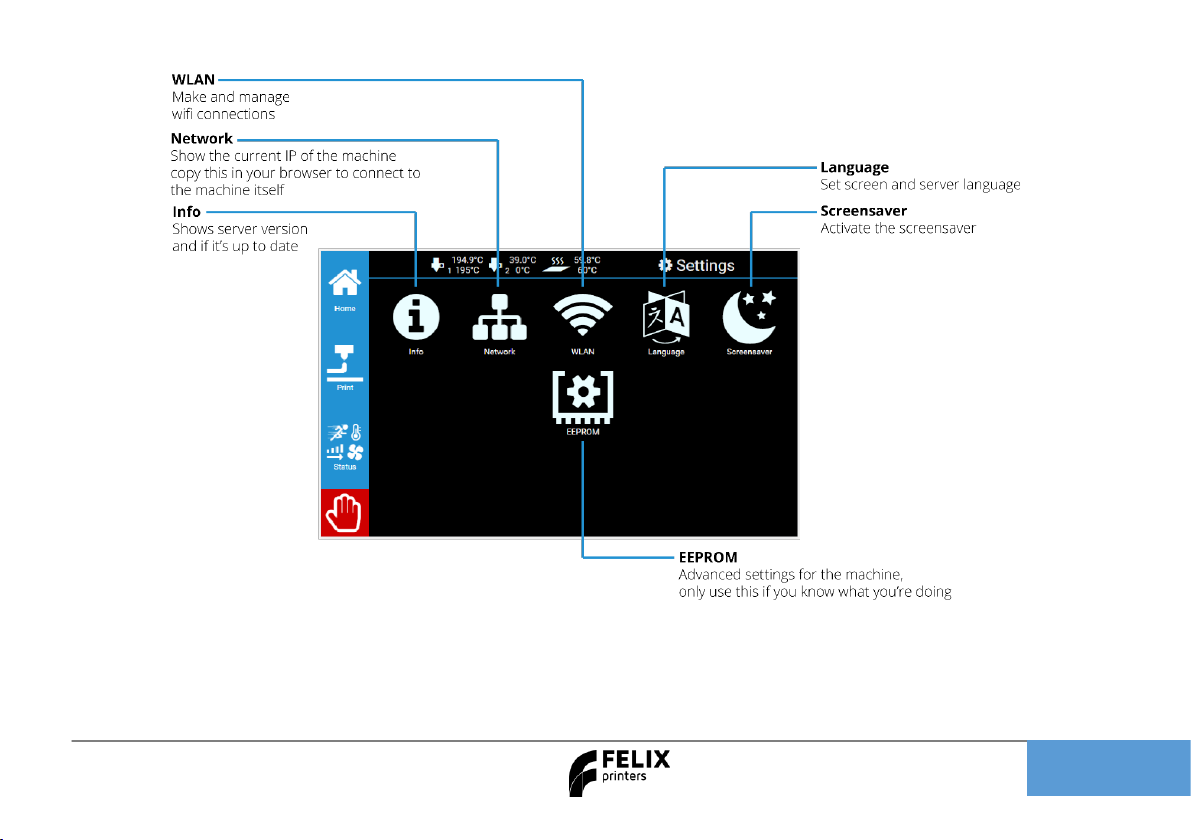
7 Display Overview
Shutdown button: To properly shutdown the printer. First press the shutdown button before turning the power
switch off. This ensures proper shutting down of the operating system on the Display unit.

Quick Start Guide FELIX Pro L / XL
Page 6
8 Printer calibration
For 3d printing, the first layer is the most important
layer. It is the basis of a print job (which can take
more than 70 hours in some cases). An improperly
printed first layer is mostly the cause of a failed
print. With the automatic calibration features
properly executed, the chance of failure will be
minimized. Also see the QuickStart guide for more
in depth calibration.
The calibration mechanism is dependent upon the
following features on the printer.
- The probe sensor in each hot-end.
- The leveling software.
So, when one of the above two systems is not
working properly, the printer will not be able to
calibrate.
What does the calibration do?
For the FELIX Pro L/XL to properly operate the calibrations
described in this chapter need to be performed.
8.1.1 Software based leveling the build plate.
To ensure the distance between the bed and the nozzles is the
same over the whole build plate. This is done automatically.
When to do this calibration?
- When changing to a new bed.
- When the first layer is not sticking to the bed
- When you see that the lines on the first layer,
significantly differ in thickness from one side to the
other side of the build plate.
- After transporting the printer.
When the auto bed leveling routine is started. The following
steps are performed.
1. The hot-ends heat up to 185 ˚C
2. The currently active extruder will touch the bed at a
couple of points.
3. The bed leveling software turn the Z spindles to make
the bed level. (Level in this case means that the
distance between the build plate and the hot-end is the
same over the whole bed surface).
4. After this the software will compensate the first couple
of layers to ensure a proper first layer.

Quick Start Guide FELIX Pro L / XL
Page 7
8.1.2 Detecting the height difference between
the two hot-ends. (automated)
The extruders must operate at the same height. Due to
production tolerances and rotating mechanism of the right
extruder, this has to be calibrated. The printer will do this in an
automated way.
When to do this calibration?
- After changing one of the two hot-ends or nozzles.
- When you see the first purge lines are significantly
different in thickness.
The extruder height calibration routine performs the following:
1. The hot-ends heat up to 185 ˚C.
2. The printer homes all axes.
3. The Extruder moves to a certain position and probes
both extruders a couple of times.
8.1.3 Adjusting the x, y distance between two
hot-ends. (assisted)
The distance between two extruders need to be calibrated
properly in order for a dual head print to successfully finish. If
this is not done properly printed lines from both extruders might
overlap too much and cause a printed failure.
When to do this?
- After exchanging/servicing a hot-end
- When adjacent features printed with both extruders do
no not properly aligning.
Quick Start Guide FELIX Pro L / XL
Page 8
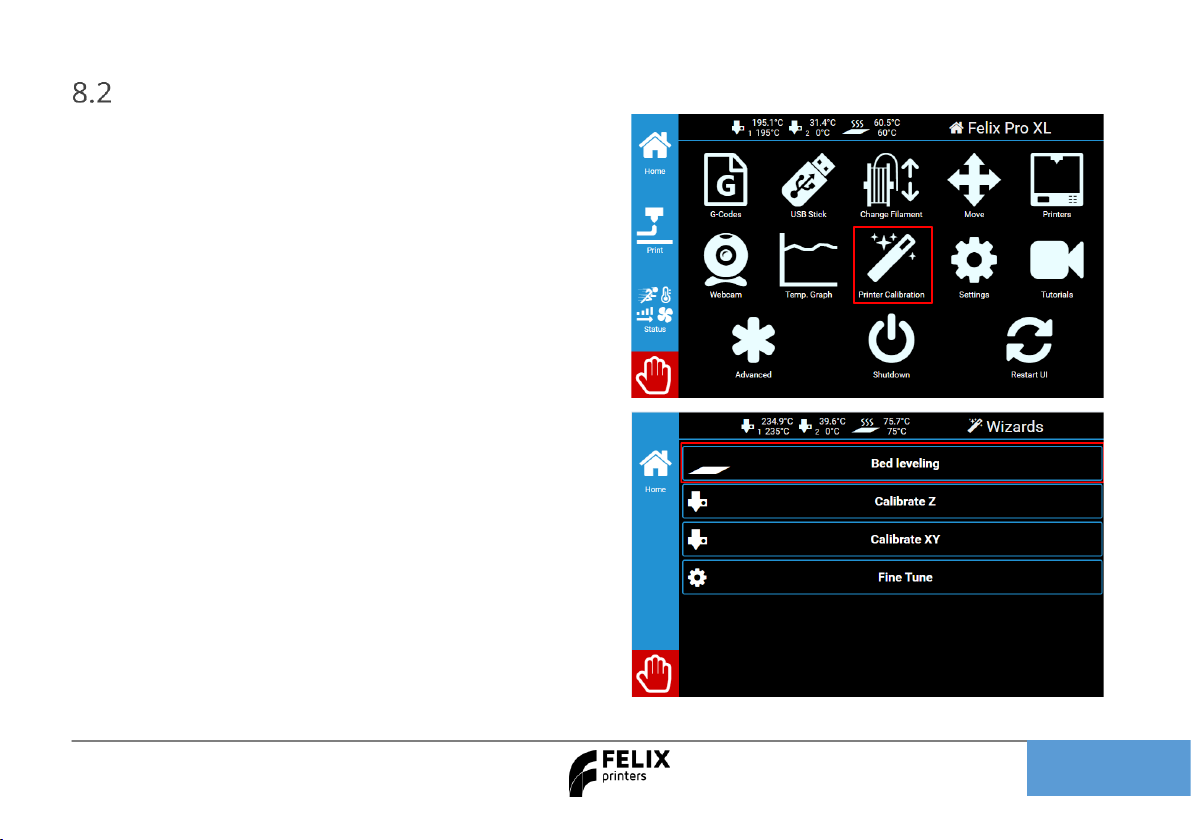
How to do the automatic
calibration?
Please consult the instructions below.
Pro XL and L
For the XL and L the bed leveling works a little
differently from the Pro 2 and 3, follow these steps.
Touchscreen
Follow these steps to start the bed leveling, make
sure the bed is clean before starting.

Quick Start Guide FELIX Pro L / XL
Page 9
Bed leveling itself
After this the machine will probe the bed and adjust
the bed to level the bed to the head of the machine,
this will insure a smooth first layer.
After this the machine should be ready to go If you
see the first layer being too far away from the bed
you can adjust it, follow these steps.
Touchscreen
Follow these steps to adjust the height of the first
layer.
By adjusting the coating thickness you can bring the
nozzle closer or farther away from the bed, - brings
it closer and + moves farther.

Quick Start Guide FELIX Pro L / XL
Page 10
Examples
Too far away, set it closer. You can see the loose layers
Perfect first layer.
Just a little too close. You can see it start to build up at the edges

Quick Start Guide FELIX Pro L / XL
Page 11
Errors during leveling
The machine uses the probe in the extruder to measure the build plate and adjust it accordingly to make the
bed itself leveled, during this process the probes are monitored and if they trigger you can get an error report
that says bed leveling failed or g33 leveling failed. If this happens first check if the machine can home normally if
the machine refuses to go up check our Z triggered manual, bed calibration manual.

Quick Start Guide FELIX Pro L / XL
Page 12
9 Z calibration
Intro
The z calibration involves probing both heads so the machine knows what level both extruders are at, this is
crucial to avoid collision and make a successful dual or multi material print.
To start the process see the instructions below.
After this the machine will heat up and begin probing the heads and comparing the results.

Quick Start Guide FELIX Pro L / XL
Page 13
Errors
Normally the machine’s Z offset is calibrated after this point but sometimes, a small change between them can
be observed. This is usually caused by having 2 probes which probe at different strengths which leads to them
not being calibrated correctly, this is easily adjusted see the instructions. This can only be done in the
touchscreen or when connected to the machine by USB.
You can see the red one is higher than the white one.

Quick Start Guide FELIX Pro L / XL
Page 14
Adjust the Z offset to make the right head print higher or lower the machine calculates this and compares it to
the left nozzle and makes them print on the same level as each other. To make it easier – is further away + is
closer to the bed so if we were to change the value of -0.908 with 0.05 to make it 0.858 it would print 0.05 closer
than before
Quick Start Guide FELIX Pro L / XL
Page 15
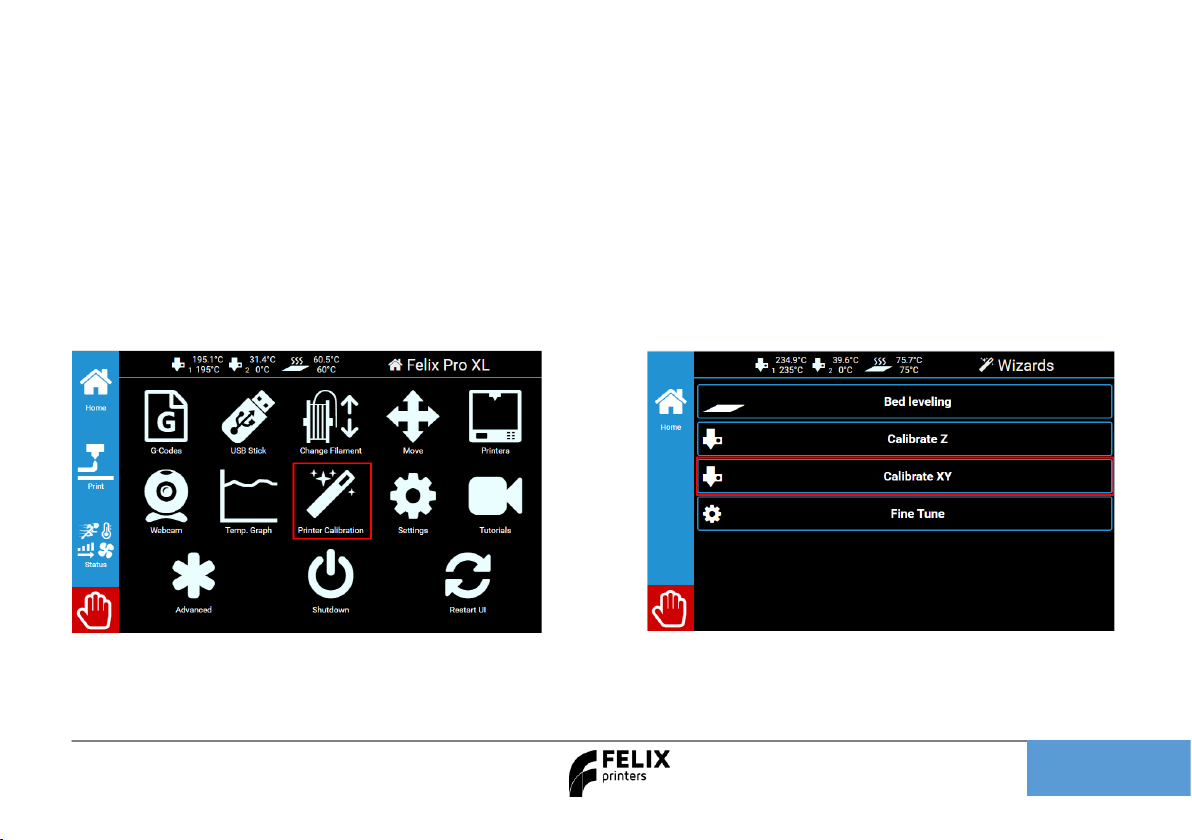
10 XY calibration
Intro
The process of aligning the X and Y offsets of the 2 extruders is crucial for dual color and multi material printing.
With this calibration the machine will print an example that you can match together, after it’s done the machine
will ask which point from 1 to 9 matches the best and stores these offsets. You should do this before dual color
printing and after changing a hot end.
See the instructions, on how to do this but first load both extruders with PLA.
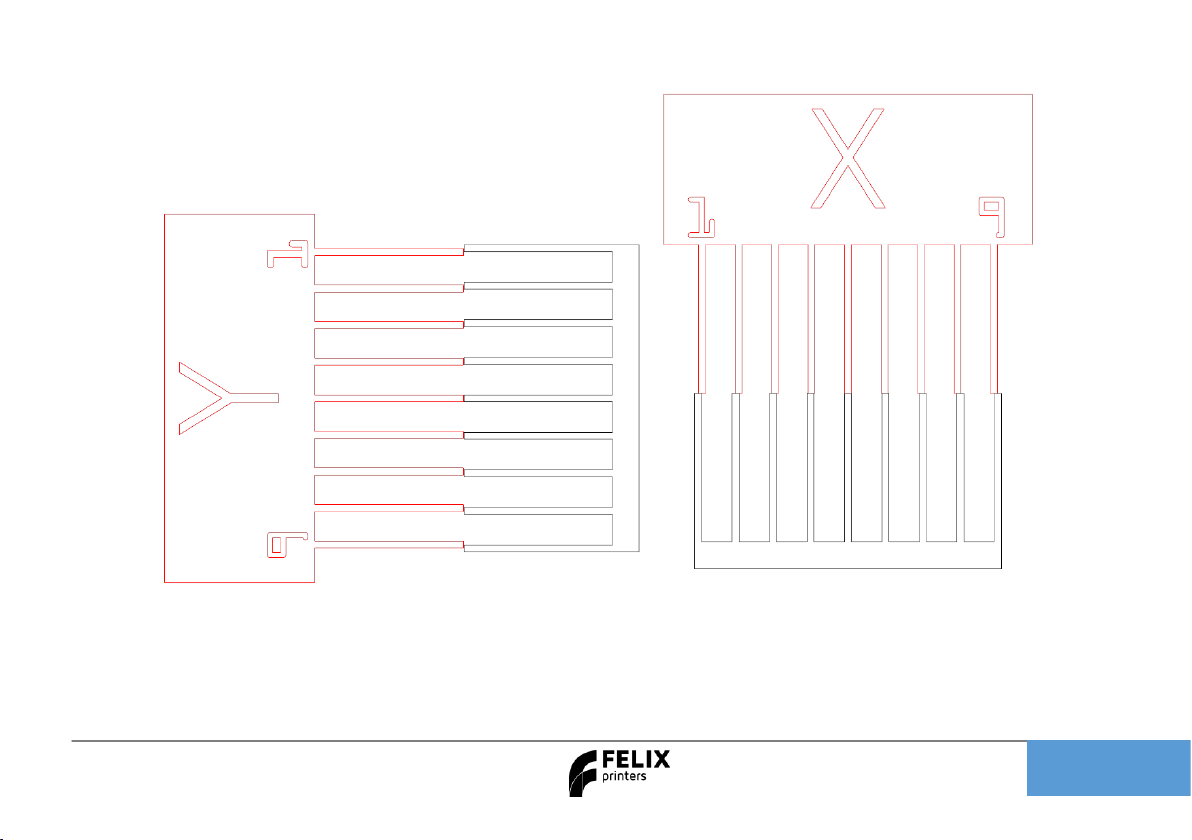
After this the machine will heat up and start printing the example. Insert the best matching points into the
screen, you usually have to do this twice to match the offset correctly.
Quick Start Guide FELIX Pro L / XL
Page 16
The middle point or 5 in this case should match, press
the number that best matches, into the screen and
repeat the process if it’s not 5.
Quick Start Guide FELIX Pro L / XL
Page 17
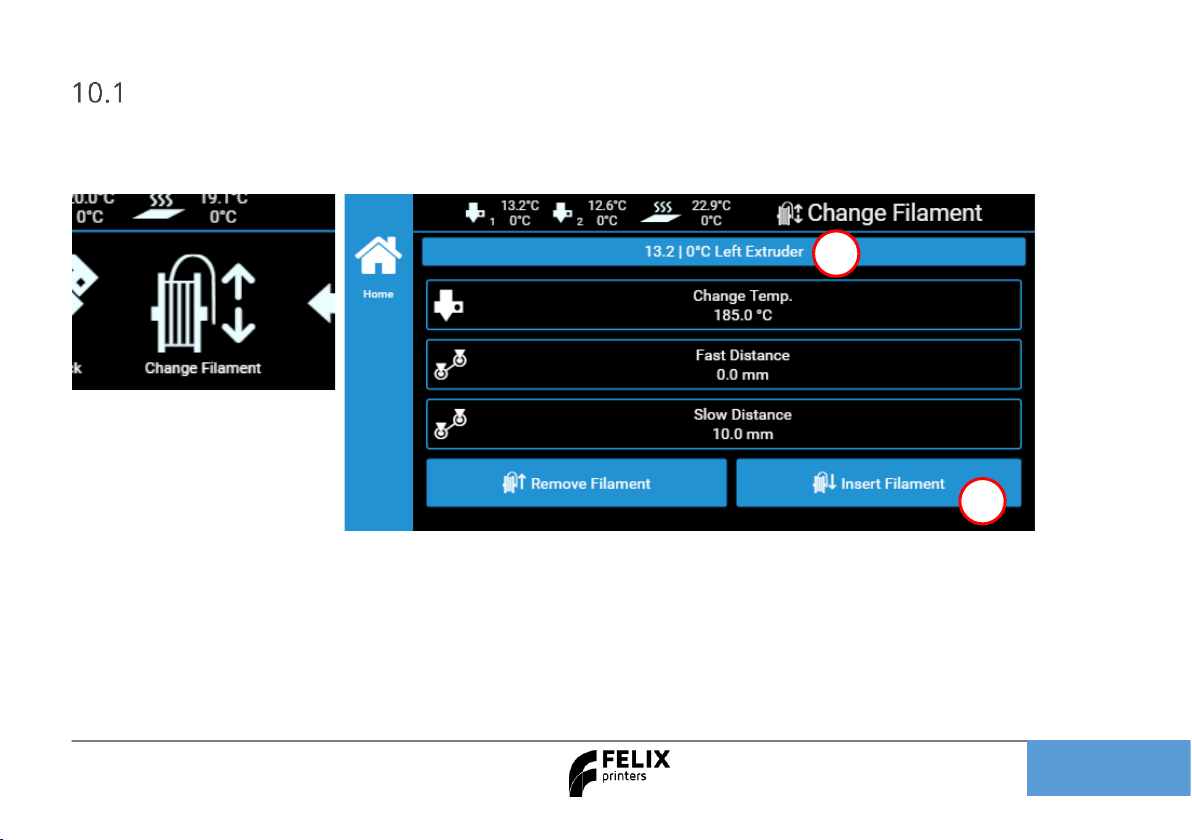
Load Filament
Ensure the filament is cut off in a skew manner, so the extruder can easily grip the filament.
Press the change filament button in the home menu.
1. Select the left or right extruder
2. Press insert filament. The print-heads will warm up and takes about 1 minute.
3. Now continue by pressing insert filament. While inserting the filament, help the printer by pushing it
downwards in the extruder until you feel the printer has gripped the filament.
4. Continue extruding until filament comes out of the printhead.
5. Remove the deposited filament with the supplied tweezer.
1
2
Quick Start Guide FELIX Pro L / XL
Page 18
Clean the print surface
The first layer is the most important layer of a print. It forms the basis for the rest of the print. To ensure the
most optimal first layer adhesion, take the following steps:
First remove any filament residue from the surface, with a spatula or carefully with
the tweezers.
Second use one of the two approaches to further prepare the surface:
A. Use the already applied Kapton layer on the flex plate and clean it with
detergent like methylated spirit or 100% alcohol . It must be absolutely grease
free. Grease from fingers can ruin adhesion to the bed.
B. Use an adhesive like Magigoo, Pritt Powerstick, 3DLac or similar (recommended
for larger prints).
Note: When using a spray adhesives ensure the flex plate is removed from the
printer. The spray can damage the linear motion components of the machine.
Quick Start Guide FELIX Pro L / XL
Page 19
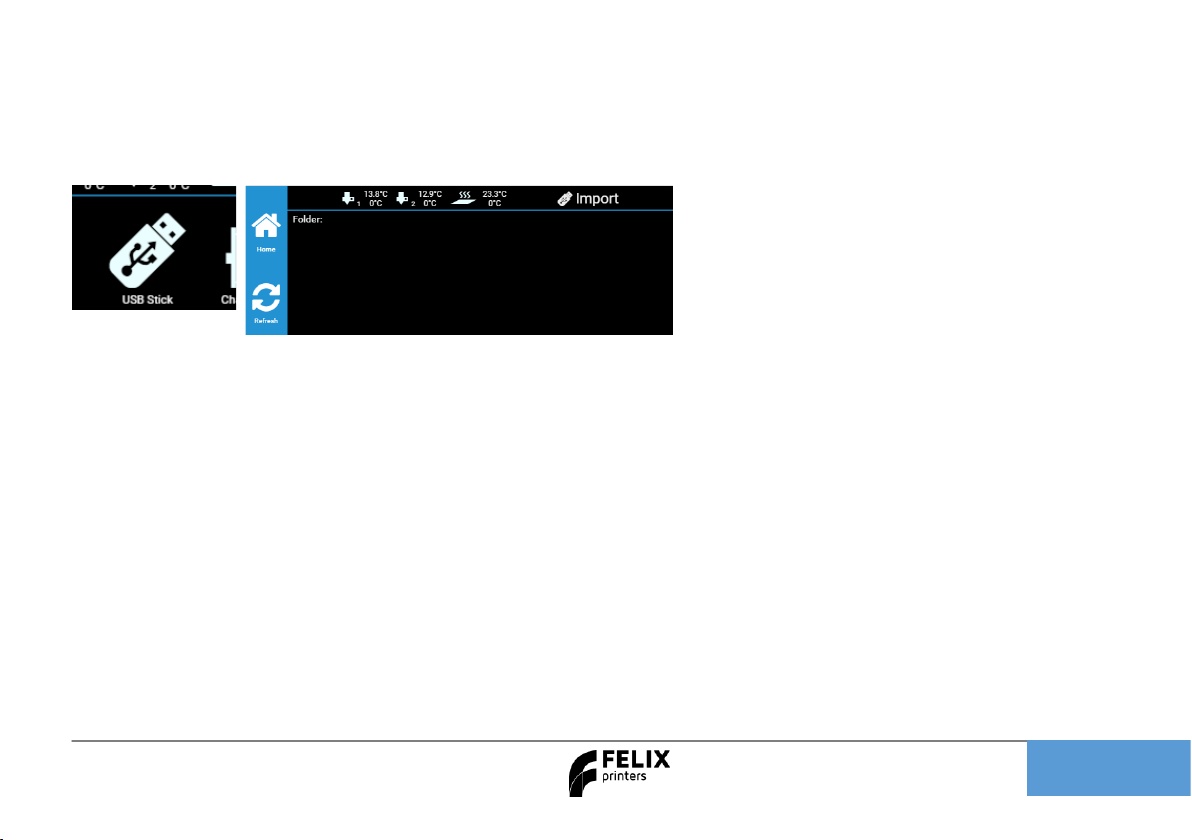
11 Printing
Insert the USB stick supplied with the printer and press refresh and press USB stick button
A file-list should appear. Select the one of the prints,
When you press the gcode file, you get two options.
1. You can save it to the internal library of the touchscreen or
2. Directly print it from the USB stick. The file is temporarily copied to the screen and the print will start.
You can safely remove the USB stick without disturbing the print-process.
Start the PRINTJOB supplied with the printer to ensure proper functioning
IMPORTANT NOTES/RECOMMENDATIONS
✓ Clean/prepare the print bed before starting a print.
✓ Never leave the printer before visually seeing that first layer is printed ok
✓ Always use filament accessories for proper filament guiding and long lifetime of hot-end.
Quick Start Guide FELIX Pro L / XL
Page 20
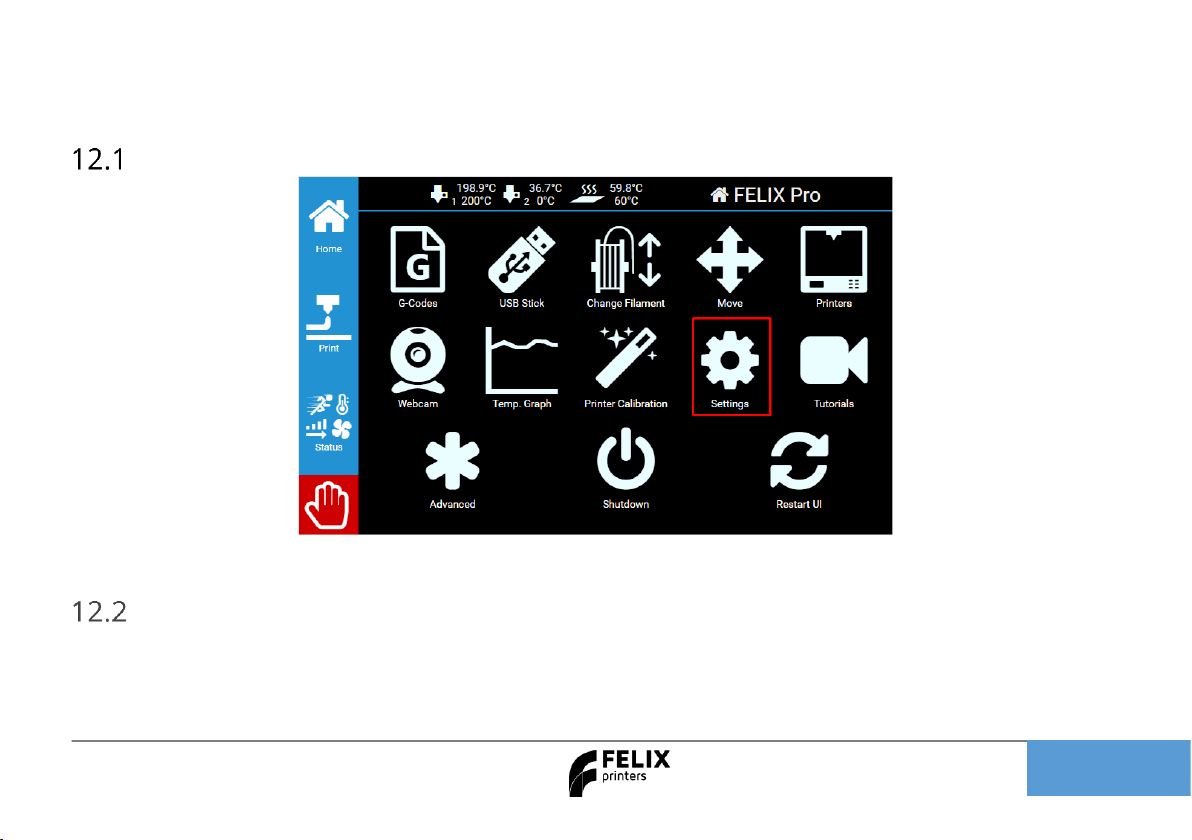
12 Print and Control printer via WIFI or LAN
Connecting to WIFI or WLAN
Navigate to the Settings menu.
Remote control
After connecting printer to a local network, navigate to Settings -> Network. And type in the shown httpaddress in your web browser or scan the QR code on the device which is connected to the same network.
Quick Start Guide FELIX Pro L / XL
Page 21
When connecting the machine to the internet by cable or WLAN follow these steps, when connecting to with a
cable, insert the cable in to the back of the machine and you should be connected for WLAN follow these steps.

Quick Start Guide FELIX Pro L / XL
Page 22
First check under AP if the settings are correct otherwise you might not be able to connect to the machine. Set
the region to your own, this sometimes prevents a proper connection if set incorrectly.
Select the WIFI point you want to connect to. Enter the password and match the settings of the point then press
connect to connect to the internet

Quick Start Guide FELIX Pro L / XL
Page 23
After connecting the machine by cable or to the WIFI the machine will generate its own web address, you can
copy this into your browser to connect to the machine. You can find this page in the network tab under settings.

Quick Start Guide FELIX Pro L / XL
Page 24
Print via web interface.
Overview of the dashboard
Click Go to printer.

Quick Start Guide FELIX Pro L / XL
Page 25
1. Press Upload G-Code, to upload a gcode for
printing to the library
After Uploading the touchscreen will render an
Image for printing.
2. Press the print icon, the print will start.
Webcam monitoring
You can conveniently monitor a print-job via the
webcam. For now this is only enabled on the internal
network. If you want to access this from an external
network, a port needs to be forwarded in your router
directed to the IP-adress of the printer.
Navigate to the webcam tab for further information
Time-lapse
You can create a time lapse video of your print for more information on how to do this please consult the user
manual.
1
2

Quick Start Guide FELIX Pro L / XL
Page 26
13 Power loss recovery
The Pro L and XL come equipped with a power loss recovery system that helps safe prints due to power failure
or blackouts. Follow this guide on how to safe a print.
If you see this message the machine has entered power loss recovery, to release the machine from this state
press the rescue print button and follow these steps.

Quick Start Guide FELIX Pro L / XL
Page 27
First press the resend connection script, then do the checklist if the current print doesn’t pass the checklist it’s
better to cancel the print, if it passes press continue print.

Quick Start Guide FELIX Pro L / XL
Page 28
If you continue the print the machine will start reheating and it will recalculated the print to see where it
stopped, this process might take several minutes. After this the machine will continue the print and you will
have saved a print failure.
Quick Start Guide FELIX Pro L / XL
Page 29
14 Tips and tricks
Flexible Filaments
Our 3d printers can in general handle flexible filaments well. Depending on the amount of flexibility, you might
need to take some extra precautions to print it without trouble.
This is a best practice:
Precautions.
1. Ensure you use the correct slicing profiles for flexible filaments from our supported software.
2. Ensure the extruders are cleared from non-flexible filaments. It is essential that the filament does not
experience any obstructions in the hot-end barrel, before reaching the hot parts of the hot-end. Otherwise
chances of buckling filament inside the extruder are very high. Obstructions can occur if there has been
printed with some hard filament before, make sure it is removed from the barrel of the hot-end. This can be
done by extruding some hard filament and then fully retract it again. Easy way is to do it via the display unit.
Then slowly extrude the fila flex into the hot-end.
3. Adjust filament clamping range. The extruder arm pushes filament onto the extruder drive wheel. When
using flexible filaments it might be that the filament is squashed too much causing a lot of friction and
eventually it buckles and clogs the extrusion.
http://www.felixprinters.com/downloads/1.%20Pro%20Series/2.%20FELIX%20Pro%202/2.%20Tips%20%26%20Tr
icks/How%20To%20-%20Adjust%20filament%20clamping%20range.pdf

Quick Start Guide FELIX Pro L / XL
Page 30
Loading flexible filament.
It is recommended to load filament via the interface at the printer.
Cut the end of the filament in a skew manner. The extruder gears might find it difficult to get grip onto the first part of
the flexible filament which is fed into the extruder.
1. Extrude filament until the first drip comes out. Then slowly extrude more piece by piece. Do not extrude in a
continuous feed at high speed as that will increase chances of buckling.
2. Optional: Lower the overall print speed. Via the display unit take the following steps after starting the print. Press the
rotary button. Then scroll down to Speed Mul. And lower it to 50%. Then by trial and error increase the speed.
Maintenance
The printer is a quite complex motion system and requires maintenance.
How to maintain/exchange hot-ends
For cleaning or maintenance purposes, the hot-end can be easily removed from the FELIX Pro L/XL.
Please take the following steps.
1. Check if there is still filament loaded in the hot-end. If there is no filament loaded, then go to step 4. If yes, from the
display unit or PC interface select the correct extruder and heat it up.
2. Retract the filament from the hot-end.
3. Let it cool down.
4. Turn off the printer.
5. Open the cover in front. (picture is of a Pro 2 but the machine uses the same head)
6. Remove hot-end connector of the corresponding hot-end.
Quick Start Guide FELIX Pro L / XL
Page 31
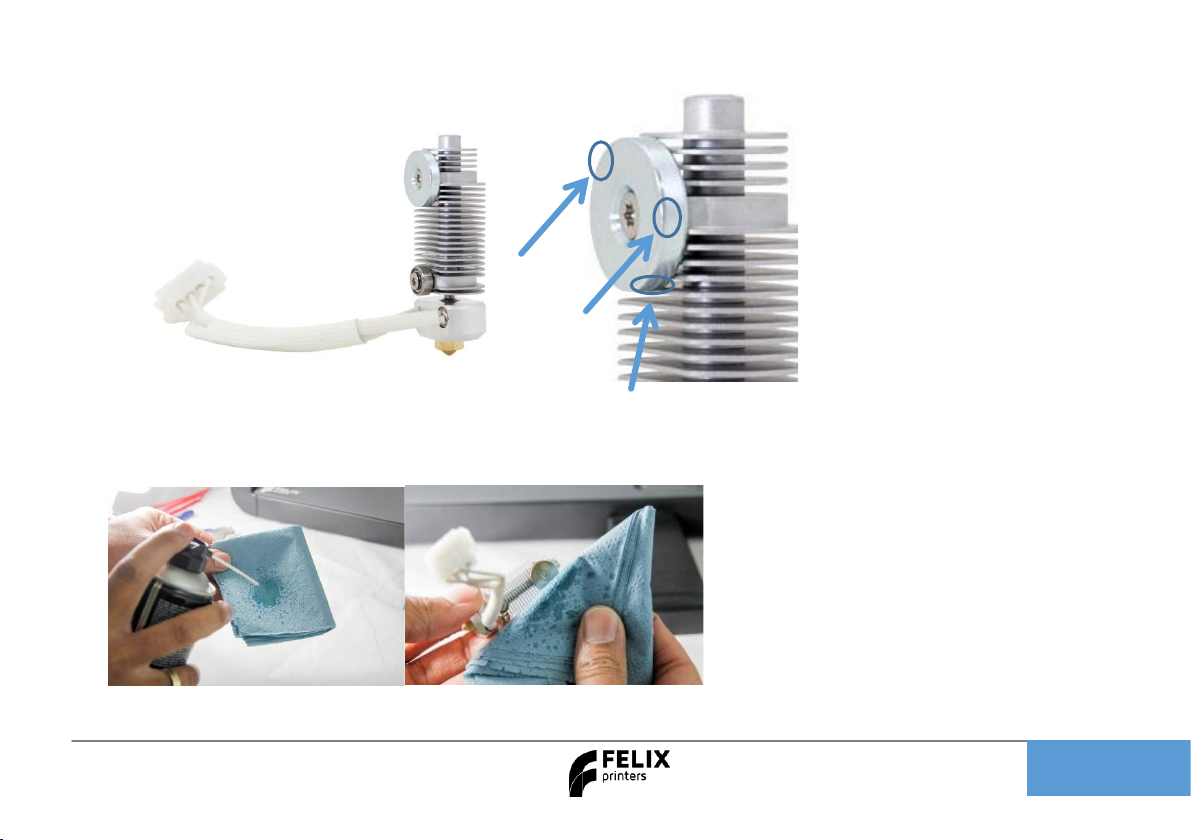
7. Pull connector to the side
8. Inspect hot-end. Check for debris or black spots. Clean the disc.
1 2 3
4
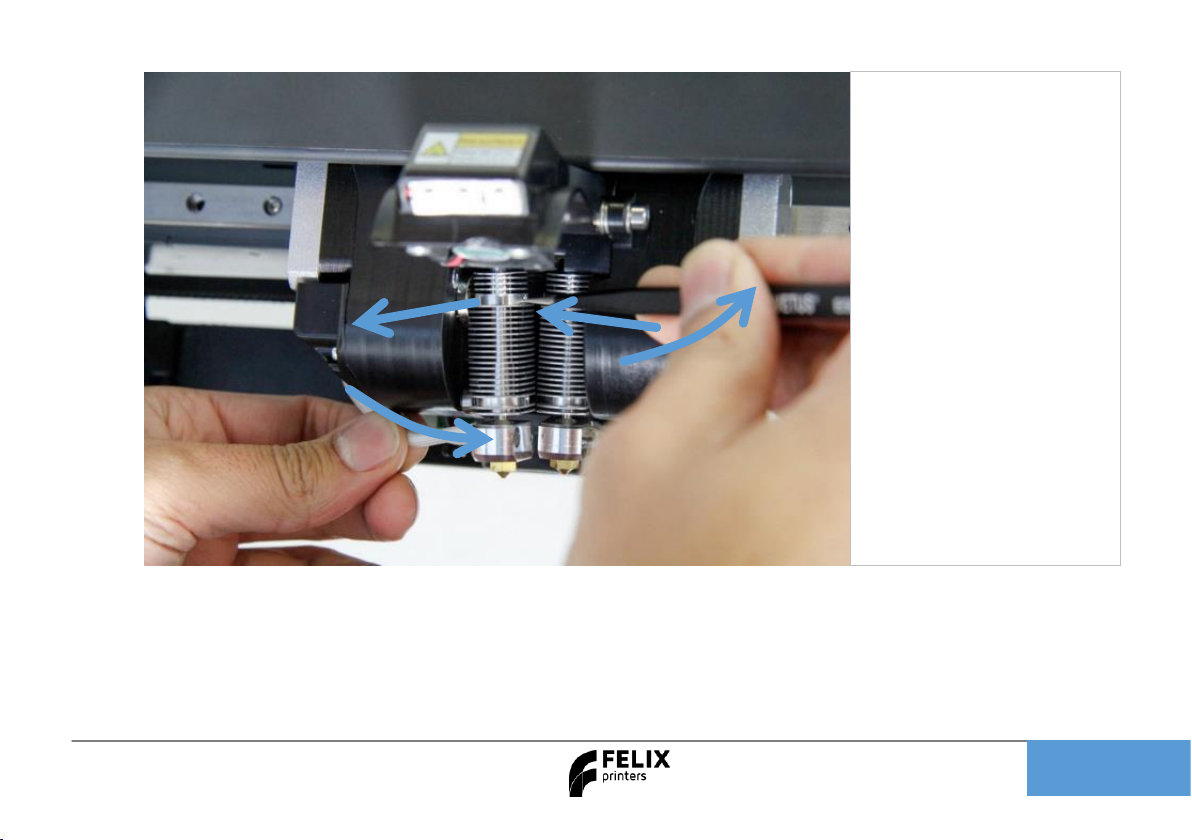
1. Push hot-end 3mm
inwards
2. Insert tweezers in small
hole
3. Rotate tweezers and hot-
end should start to come
out
4. Pull out hot-end
Quick Start Guide FELIX Pro L / XL
Page 32
9. After cleaning, condition the top disc with non-electrically conducting Teflon spray. First spray it on a
cloth, then rub it on the disc. On the side and the bottom of the disc.
10. Then Reverse assembly of the hot-end into the extruder assembly. Do not forget to close the lid.
Quick Start Guide FELIX Pro L / XL
Page 33
11. Please do the following two extruder calibrations, if you wish to properly print dual head.
- Z-height calibration
- XY calibration
Caution: There is a potential risk of burning, as the nozzle can reach temperatures of up to 275°
TIP: Clean hot-end exterior from filament before starting a print, to prevent blobs of plastic on your
printed object.
Dust cleaners
Filament attracts a lot of dust and small particles. Make sure the filament enters the filament holder through the
dust cleaner. After a few months of printing it is recommended to replace the dust cleaners.
Motion system
The linear bearings require almost no maintenance. Recommended is that you put a little grease on them every
3-4 months.
The belt tension of the x and y axis can also be checked in intervals of 3 months.

Quick Start Guide FELIX Pro L / XL
Page 34
15 Display messages
Flow detection
The flow detection system is triggered – the printer moves to its idle position waiting for user action.
The flow detection system is triggered when there is no more filament going through the extruder or when the filament is not extruding at
the expected rate. Go to www.felixprinters.com/support to learn more.
Z-sensor error
The z-sensor triggered message should appear only when the tip of the hot-end touches the print bed.
If the message is displayed continuously go to www.felixprinters.com/support to find out how to solve this issue.
Heater sensor error
Extruder: the sensor is defect or not connected properly. Please check if the connector is placed correctly and is clean on the inside.
Heated bed: The bed temperature sensor circuit is defect. That can mean the temperature sensor, or the wiring of this sensor.
Heater error
Extruder: the heater or sensor are giving improper values. Please check if the connector is placed correctly and is clean on the inside.
Heated bed: please check if the contact pins under the bed look ok.
Leveling failed
The z-sensor triggered falsely during the leveling routine or measured probe values are out of their boundaries.
Go to www.felixprinters.com/support and look for the ‘z-sensor triggered’ topic.

Quick Start Guide FELIX Pro L / XL
Page 35
Review our products
Help us to improve our products and services. It only takes a few minutes!
www.felixprinters.com/survey
(a small reward is waiting for you)
Manuals & tutorials
www.felixprinters.com/support
FELIX Community
www.felixprinters.com/community
Quick Start Manual FELIX Pro L/XL
V5 - 2019
www.felixprinters.com/support
support@felixprinters.com
Zeemanlaan 15
3401MV IJsselstein
The Netherlands
 Loading...