

Page 1
Quick Start Guide
Pro 2 Touch
Page 2
FELIXprinters Quick Start Manual for the FELIX Pro 2 Touch
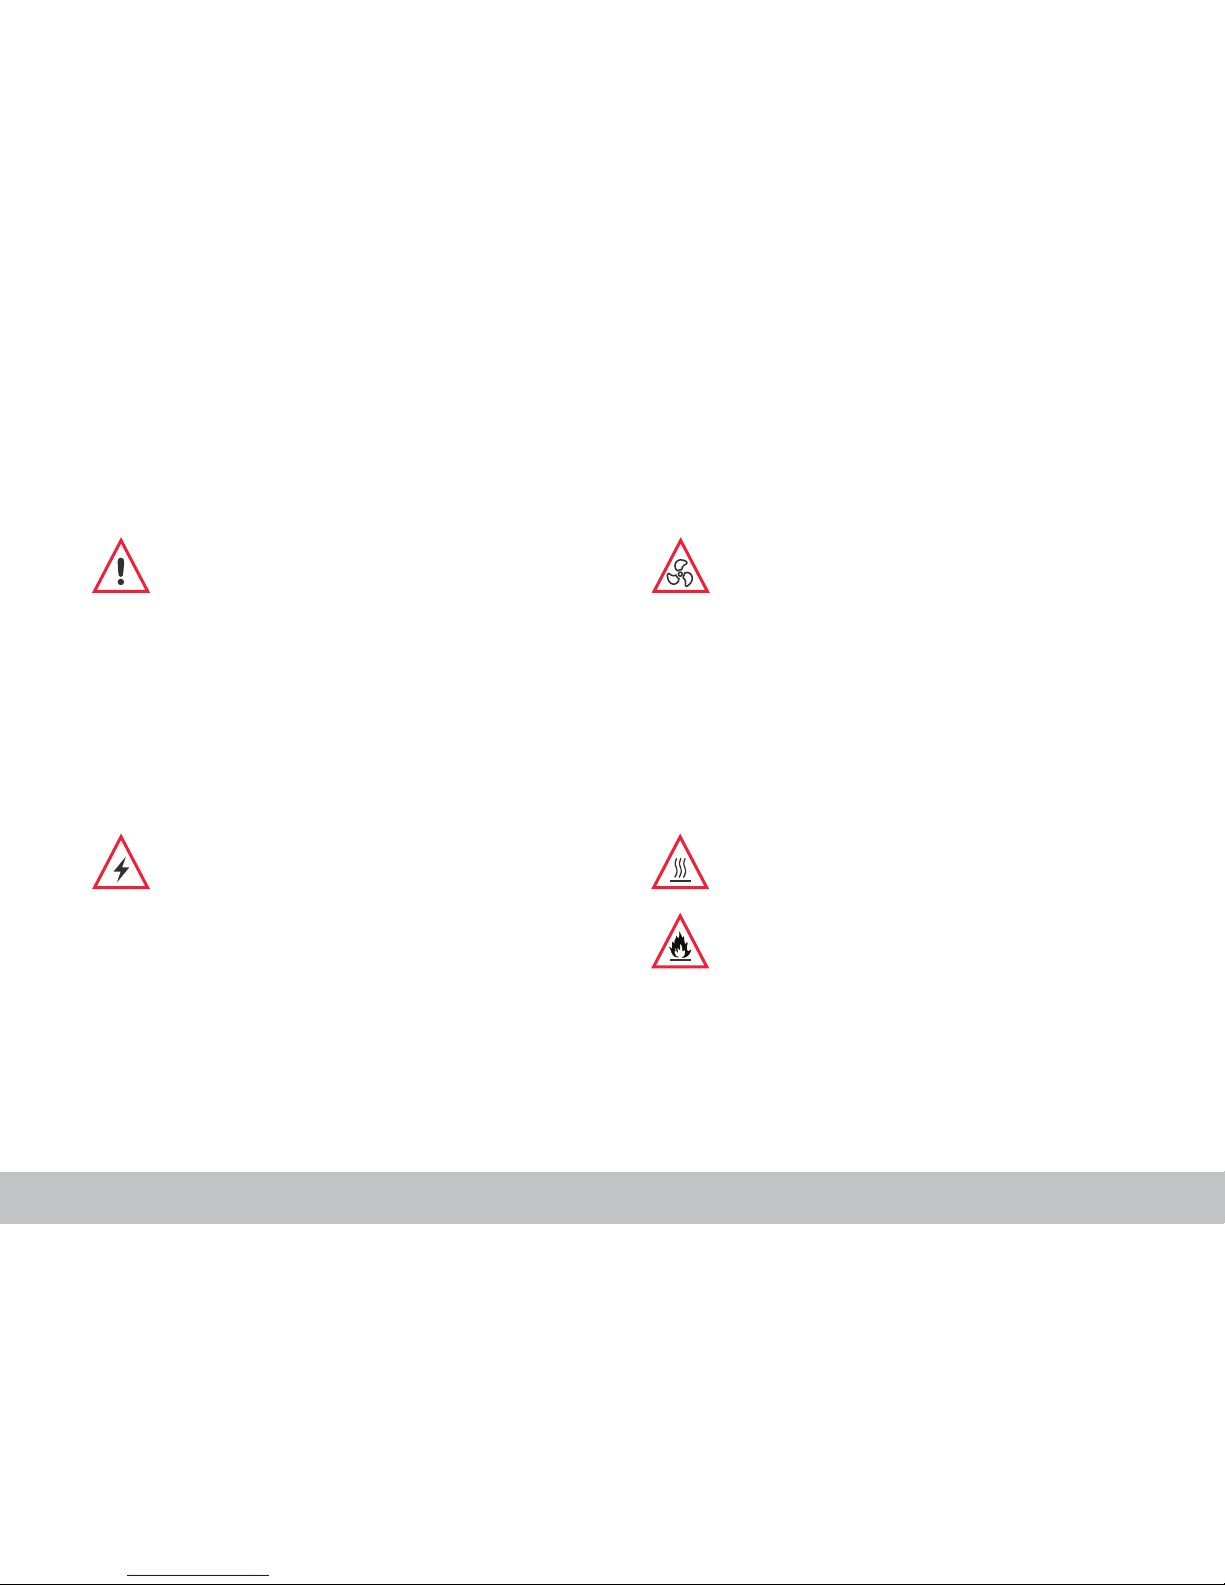
General safety
Keep children under the age of 14 out of reach of the printer.
FELIXprinters are only suitable for professional use.
Considerations when in operation
Do not lean on the printer.
Be careful with long hair and loose clothes.
Do not transport the printer while working.
Make sure all moving parts can move without any obstructions.
Do not remove any objects from the hot plate while printing.
Caution with any moving parts that move in the X, Y and Z
direction. At the end of each moving part there is a pinching
hazard.
Electronic safety
Only use the power supplies and cables supplied by FELIXprinters. Always turn off and unplug the printer before doing
maintenance or modications.
The power supply meets all CE mark regulations and is
protected against short-circuit, overload, over voltage and over
temperature.
Printer placement
Place the FELIXprinter on a stable table/desk.
This will keep it safe from small children.
Use the FELIXprinter in a dry environment.
Ventilate
Good ventilation while printing is advised though printing
pure PLA is considered safe. When printing ABS, small
concentrations of Styrene vapour can be released. This
can (in some cases) cause headaches, fatigue, dizziness,
confusion, drowsiness, malaise, difculty in concentrating,
and a feeling of intoxication.
We recommend using lament types shown on the FELIXprinters website. Examples PLA, PETG, ABS, Glassbend etc.
Other types may be toxic. Please follow instructions from the
lament supplier.
Caution with heater elements
There is a potential risk of injury, as the print head can reach
temperatures of up to 275°C and the heated bed of up to
100°C. Don’t place objects on the heated bed that are not
being printed, not even when the printer is turned off.
Always let the printer cool down for at least 10 minutes
before doing maintenance or modications.
We do not recommend to leave the printer unattended for
a very long period of time. If you do, it is recommended to
leave it in a properly conditioned room with distance from
highly amable objects.
Safety
Page 2
Page 3

FELIXprinters Quick Start Manual for the FELIX Pro 2 Touch
Thank you for choosing the FELIX Pro 2 Touch.
This Quick Start guide contains the following information for you to familiarize yourself with your 3D printer, to use it
to its best advantages and to benet fully from all the functions and the technical developments it incorporates.
It is well worth taking a few minutes to read this guide to familiarize yourself with the information and guidelines it
contains about the machine and its functions.
More manuals and tutorials can be found on www.felixprinters.com/support
Page 3
Chapter 1 – Unboxing
1.1 What’s in the box?
1.2 Installing foot bracket
1.3 Installing display unit
Chapter 2 – Setup
2.1 Preparing the print bed
2.2 Installing lament accessoires and cables
2.3 Power on
Chapter 3 – Preparation
3.1 Display overview
3.2 Print bed calibration
3.3 Loading lament
3.4 Cleaning the print bed
INTRODUCTION & CONTENT
Chapter 4 – Print
4.1 Print from USB
4.2 Remove bed
4.3 Remove and nish printed object
Chapter 5 – Software, maintenance, support
5.1 Software
5.2 Setup cloud printing
5.3 Tips and tricks
5.4 Maintenance
5.5 Display messages
Require additional support?
Have a look at www.felixprinters.com/support
or at our user forum.
Page 4

FELIXprinters Quick Start Manual for the FELIX Pro 2 Touch Page 4
FELIX Pro 2 Touch
System Speci cations
• Printer dimensions (L, W, H) 420 x 400 x 550 mm
• Weight 11.5 kg
• Power requirements: 220 V
Capabilities
• Build volume Single mode (L, W, H) 237 x 245 x 235 mm
• Build volume Dual mode (L, W, H) 237 x 245 x 235 mm
• Layer height range 0.05 - 0.25 mm
• Bed temperature: max. 100 °C
Extruders
• Diameter nozzle: 0.35 mm (optional 0.5mm)
• Nozzle temperature: max. 275 °C
• Full metal hot-ends
Website
www.FELIXprinters.com
Print materials
• Open source 1.75 mm filaments
• Tolerance: ± 0.15 mm
• PLA, PET(G), Flex, ABS, PVA, Wood, Glass
Connectivity
• USB flash drive
• USB cable connection
• WiFi
Software
• Including lifetime licence for Formide cloud
• Support for Simplify3D
• Support for open source Repetier Host for FELIXprinters
Contact
info@FELIXprinters.com
Zeemanlaan 15, 3401 MV IJsselstein, The Netherlands
Specs
Page 5
FELIXprinters Quick Start Manual for the FELIX Pro 2 Touch
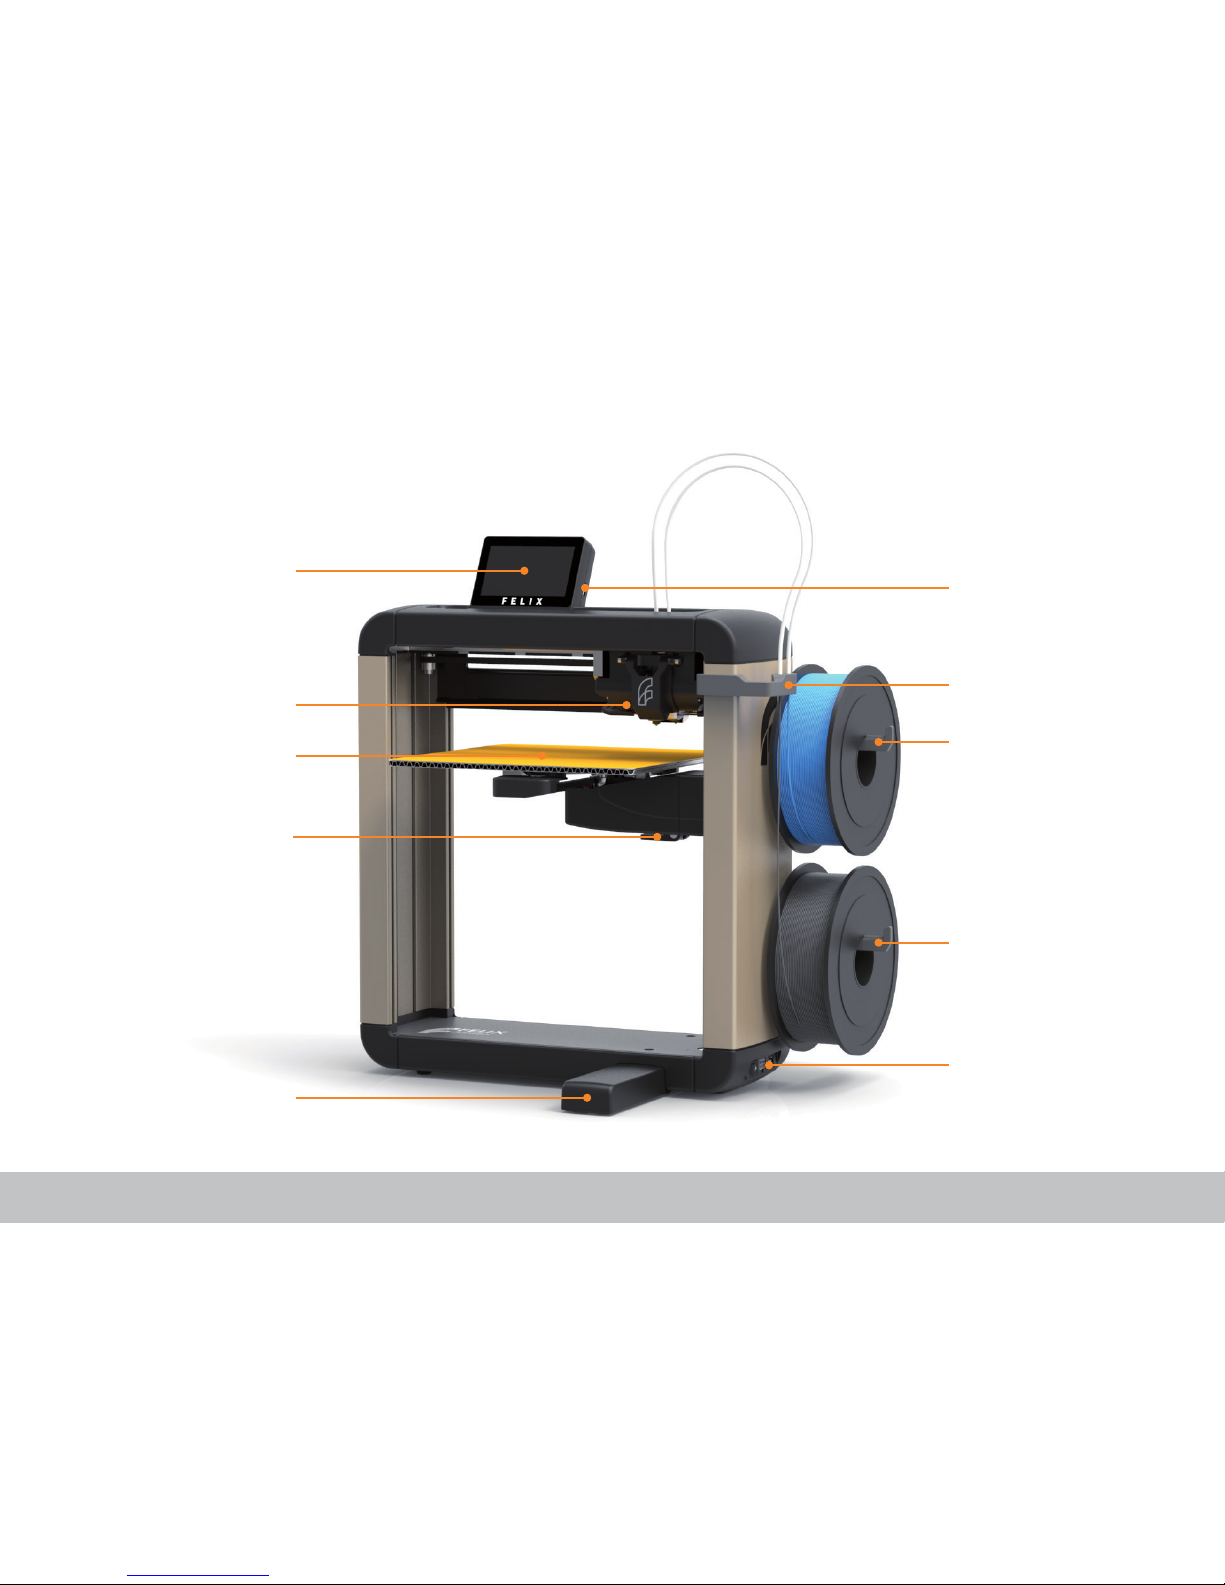
The Basics
Display unit
Nozzles / Extruder
Print bed
Lever for rotating bed
Foot
USB port
Filament guide
Filament spool holder
Filament spool holder
Power switch
Power connection
USB PC connection
Page 5FELIXprinters Quick Start Manual for the FELIX Pro 2 Touch
Page 6
FELIXprinters Quick Start Manual for the FELIX Pro 2 Touch
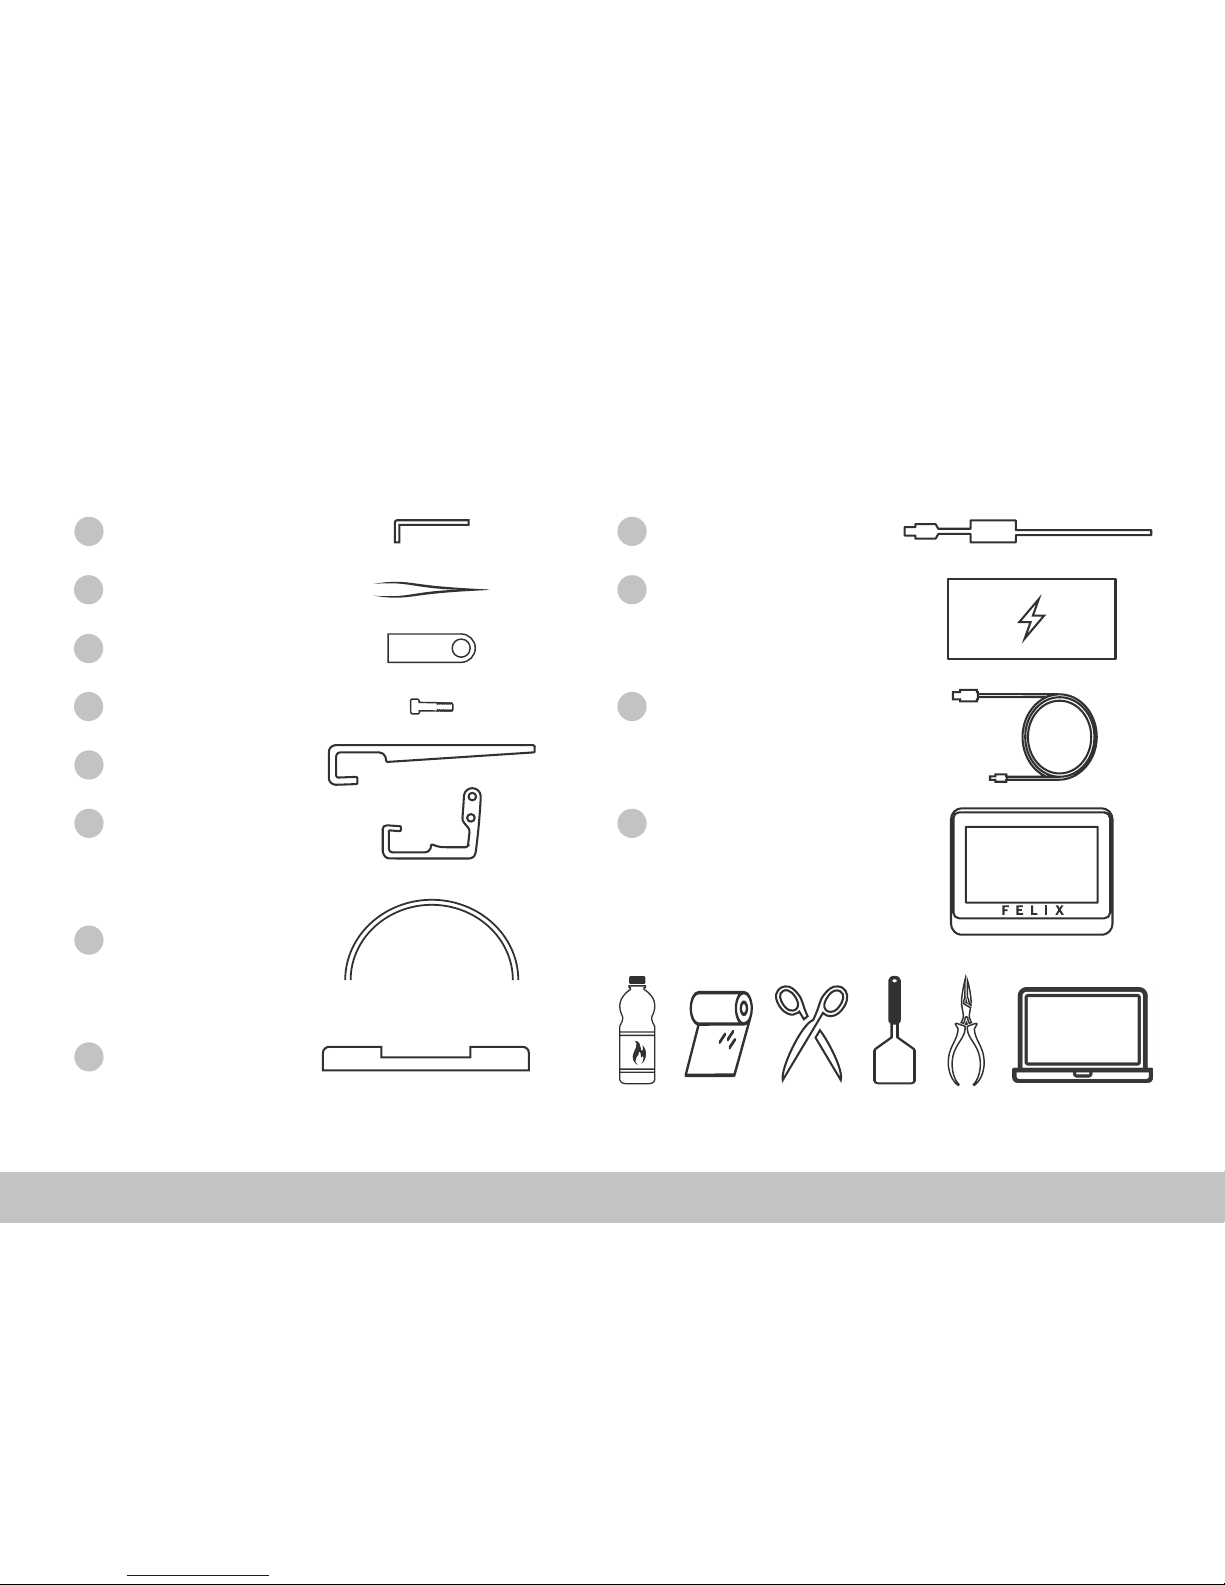
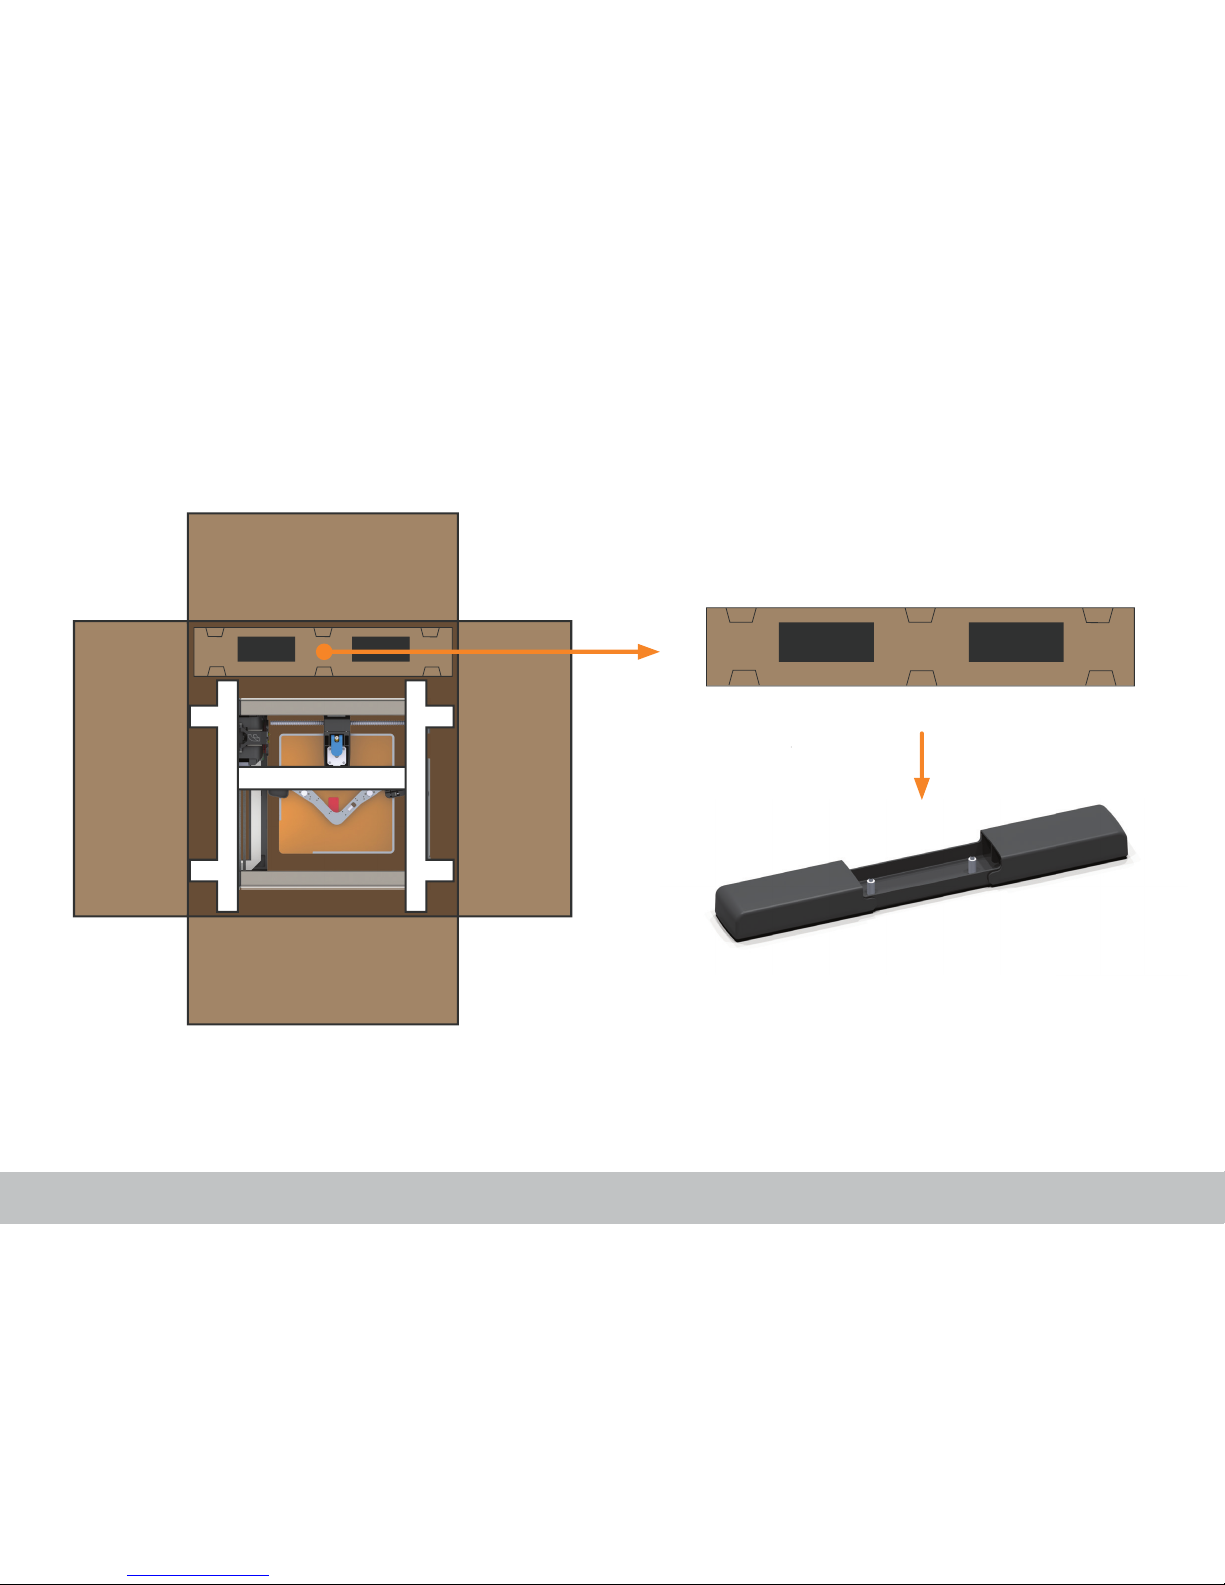
1.1 What’s in the box?
The box could contain extra materials like lament you have ordered.
We recommend to use the following tools: small pliers, scissors, (plastic) spatula, detergent like alcohol, paper towel or cloth.
1 x Allen key
2 x Filament holder
1 x Filament guide
2 x M4x20 bolts
1 x Foot bracket
1 x Display unit
1 x Power unit
1 x Power cable
1 x USB cable
1 x Tweezers
1 x USB ash drive
2 x Teon tubes
Chapter 1: Unboxing
Page 6FELIXprinters Quick Start Manual for the FELIX Pro 2 Touch
Recommended tools:
A
B
C
D
E
F
F
F
F
K
J
I
Page 7
FELIXprinters Quick Start Manual for the FELIX Pro 2 Touch
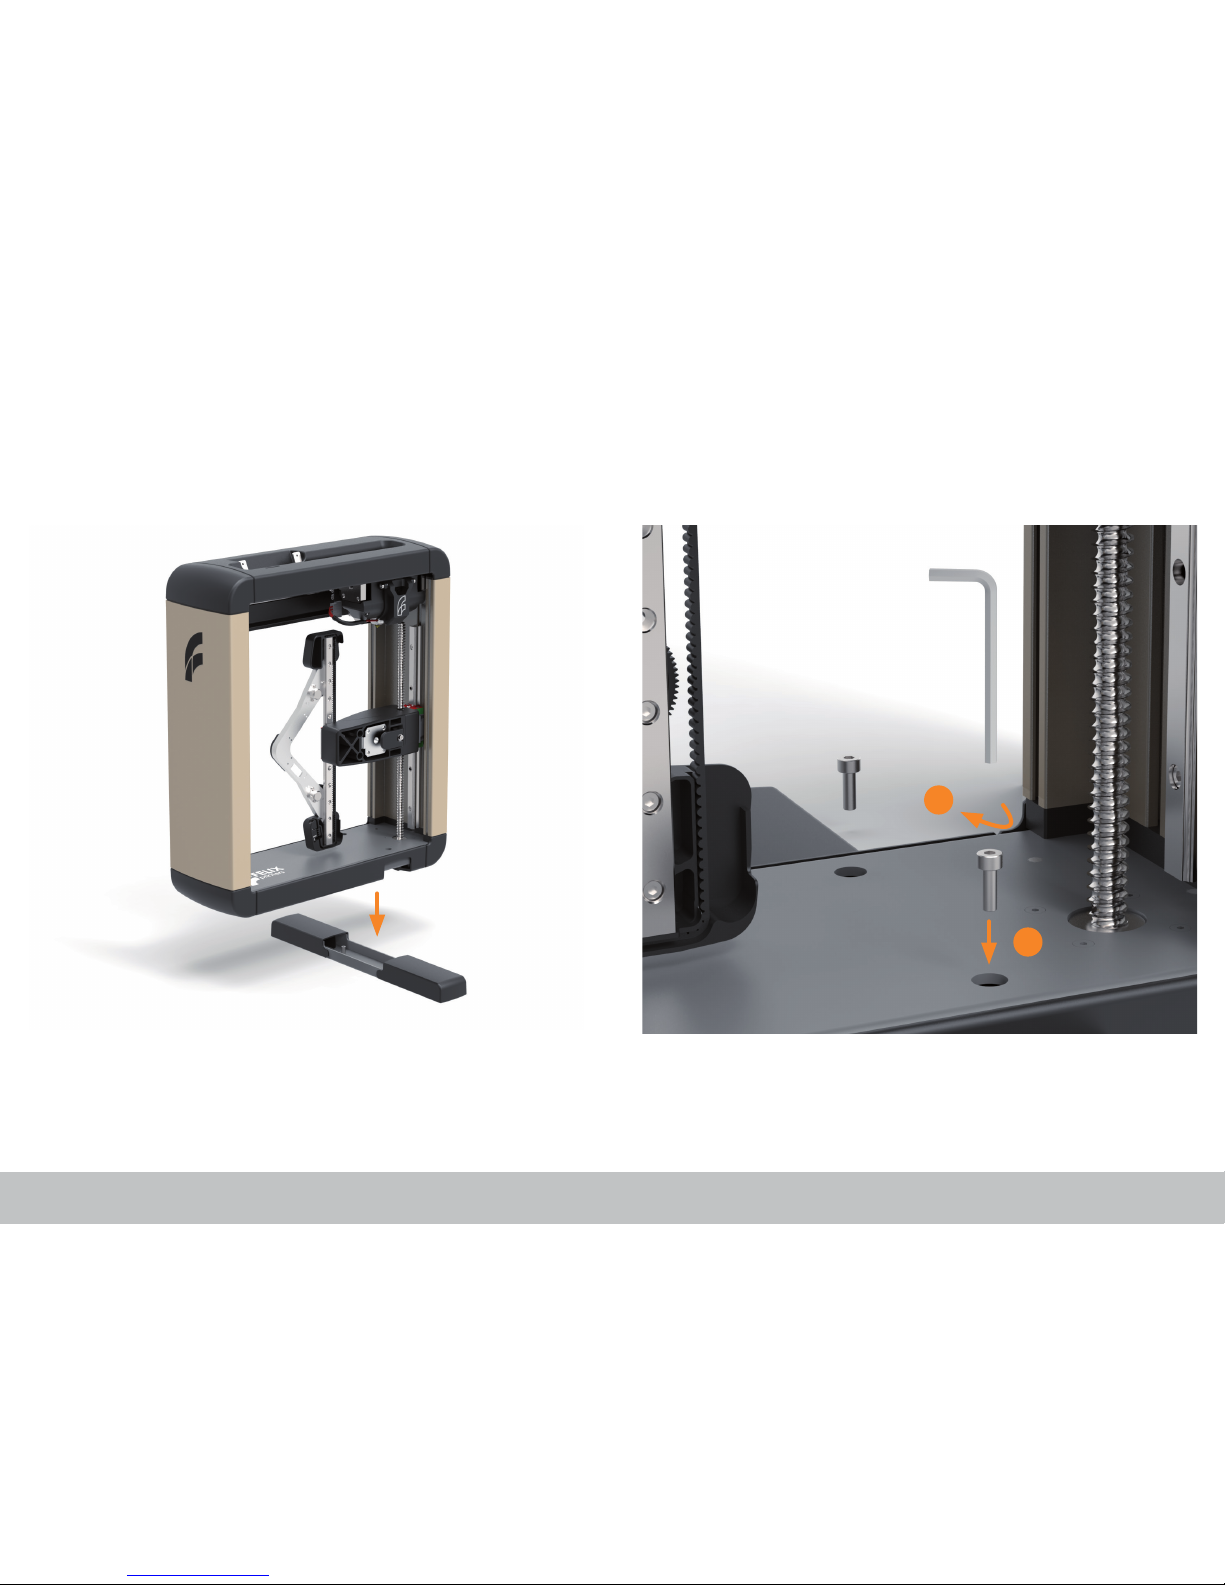
1.2 Installing foot bracket
Chapter 1: Unboxing
Take out the foot bracket. Leave the printer frame in the
box for now.
Place the foot bracket on a stable and at surface.
Page 7Page 7FELIXprinters Quick Start Manual for the FELIX Pro 2 Touch
Page 8
FELIXprinters Quick Start Manual for the FELIX Pro 2 Touch
Fix the printer frame onto the foot bracket with the
supplied M4x20 screws using the provided Allen key.
Remove the foam protection from the printer frame and
place the frame on the foot bracket.
Page 8
Chapter 1: Unboxing
1
2
2x
Page 9
FELIXprinters Quick Start Manual for the FELIX Pro 2 Touch
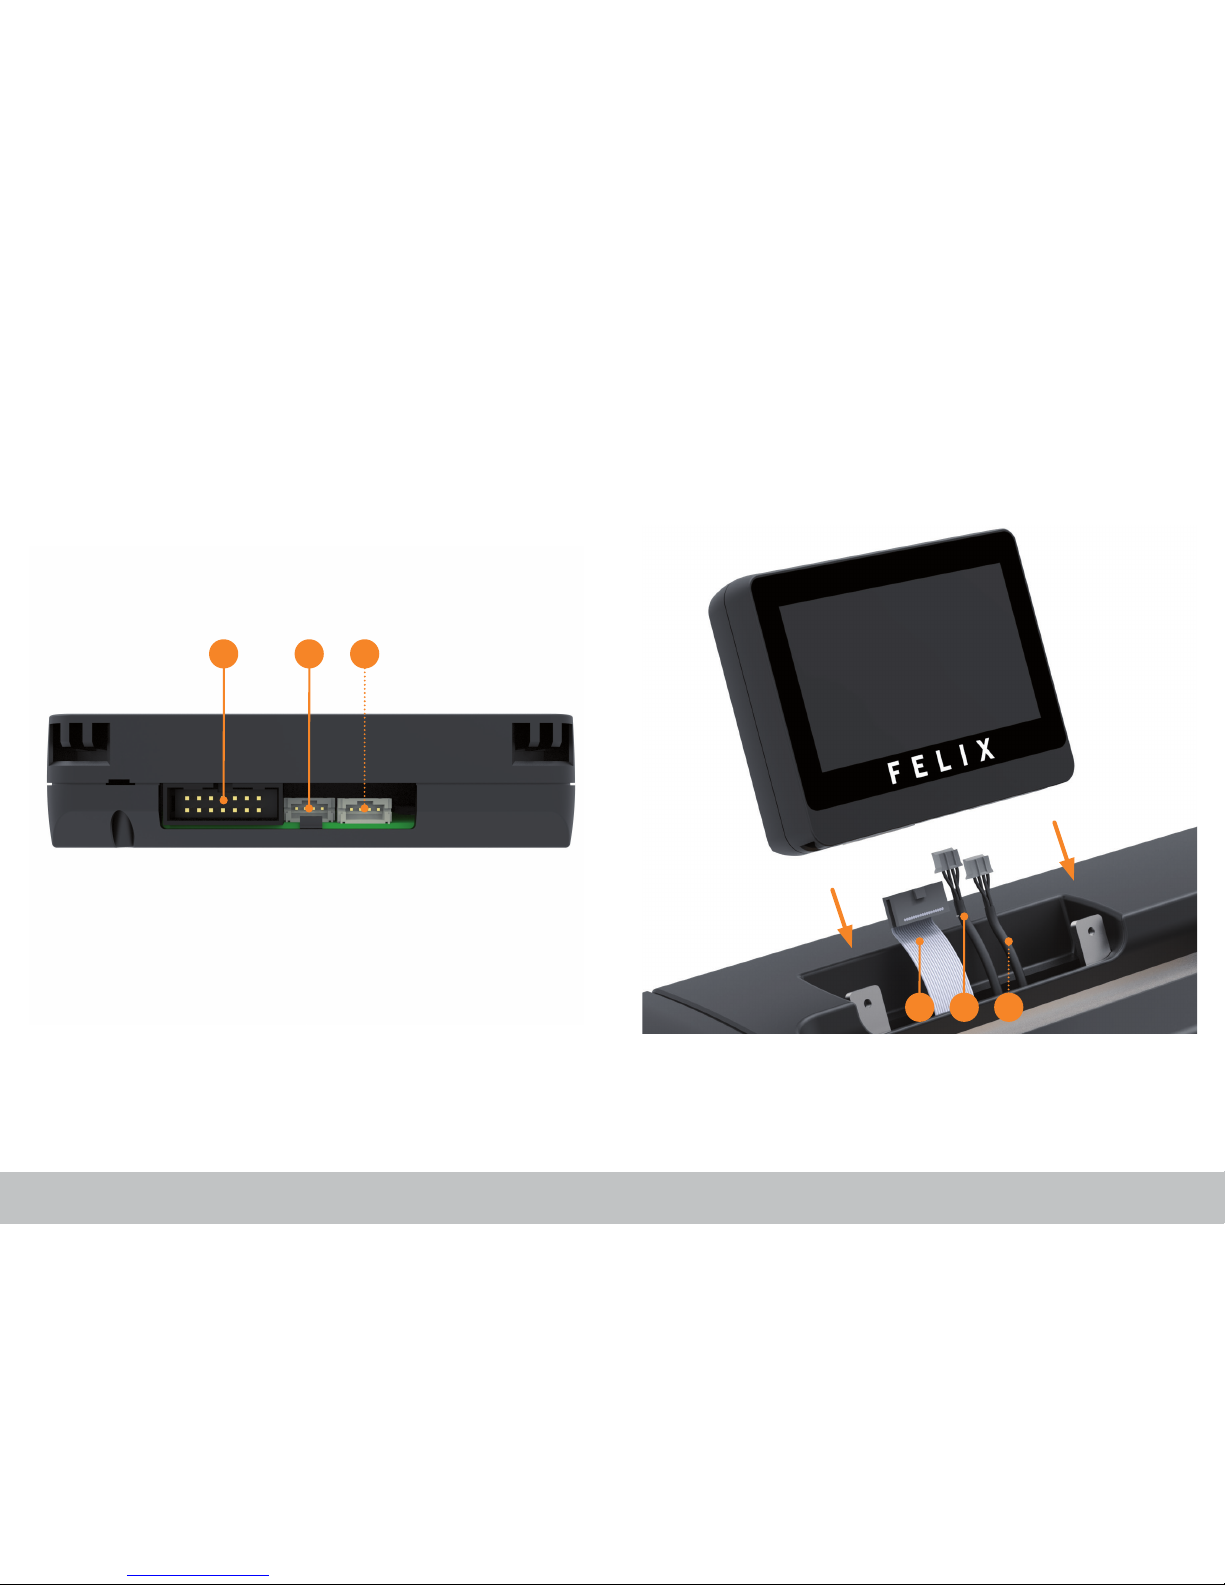
Plug in the connectors into the display unit, then slide the
display onto the metal pins. Do not turn on power just yet.
1.3 Installing the display unit
Page 9
Chapter 1: Unboxing
Connect the cables from the printer with the corresponding
numbers from the display unit (no. 3 is optional).
Make sure the power is turned off when connecting
the display. Failing to do so could cause serious damage.
1 2 3
321
Page 10

FELIXprinters Quick Start Manual for the FELIX Pro 2 Touch
Flip out the lever. Turn the print bed. This might require a little force.
2.1 Preparing the print bed
Chapter 2: Setup
Page 10
Page 11

FELIXprinters Quick Start Manual for the FELIX Pro 2 Touch
Flip back the lever.
It is important that the bed is placed properly to prevent damage to the heater.
Lower the bed until the three magnets match the positions
on the bracket.
Page 11
Chapter 2: Setup
Page 12

FELIXprinters Quick Start Manual for the FELIX Pro 2 Touch
Snap on the two spool holders onto the right back side of the
frame and the lament guide on the right front side of the
frame.
2.2 Installing lament accessoires and cables
Chapter 2: Setup
1. Make sure the power switch is turned off.
2. Insert power cable into the printer and into a power outlet.
3. Insert USB when using a PC.
2x
Page 12
1
2
3
Page 13

FELIXprinters Quick Start Manual for the FELIX Pro 2 Touch
The unboxing is done.
Turn on the on/off (1) switch and continue to the next step to make your rst print!
Page 13
Chapter 2: Setup
2.3 Power on
1
Page 14

FELIXprinters Quick Start Manual for the FELIX Pro 2 Touch
3.1 Display overview
Chapter 3: Preparation
Page 14
Control Print Utilities
Heater status:
● Idle
● Heating up
● Ready to print
Connectivity status - Slide
down for wi settings
Material
Print bed
Extruder 2Extruder 1
Page 15

FELIXprinters Quick Start Manual for the FELIX Pro 2 Touch
3.2 Print bed levelling
Page 15
Enter the utilities menu by selecting the icon
in the far right bottom corner. Select BL to start
bed levelling.
Obstructions on the print bed like printed parts
could seriously damage the printer. After com r-
mation the printer will start the calibration.
Press
to start the bed levelling.
Welcome to the print screen. This screen means
that the printer is busy performing a print job
or calibration. Wait until the calibration is completed.
Calibrating extruders
Extruders only need to be calibrated after replacing the hot-
ends, or nozzles. Calibration can be performed by running
the build in XY and Z calibration found in the Utilities menu.
Chapter 3: Preparation
1 2 3
4
Page 16

FELIXprinters Quick Start Manual for the FELIX Pro 2 Touch
Chapter 3: Preparation
Page 16
3.3 Load lament - Extruder 1 + 2
Enter the utilities menu by selecting the icon
in the far right bottom corner. Select E1 to
continue to the Extruder 1 submenu.
Select Load lament. Select your material, for our rst print we will use
PLA. These temperatures can be customized in
the previous menu under Change preset temp.
Never turn the printer off when the extruder is
above 100 0C.
Select the
icon to show the loading tutorial.
Place the lament spool and load the lament
according to the instructions. Press to hide
the tutorial.
Press Extrude until a small thread of lament
comes out of the nozzle. Use the supplied
tweezer to remove the lament from the nozzle.
Press
when done. Repeat steps 1 - 6 for
extruder 2
1
2 3
4 5 6
Page 17

FELIXprinters Quick Start Manual for the FELIX Pro 2 Touch
3.4 Cleaning the print bed
Chapter 3: Preparation
Remove plastic residue from a previous print job from
the print bed with a (plastic) spatula or carefully use the
supplied tweezers for smaller particles.
Degrease the print bed with a detergent like alcohol,
blue spirit or acetone by putting it on a cloth or paper
towel and gently rubbing the print bed surface.
To improve print quality it is strongly recommended to start every print job with a clean print bed.
Page 17
Page 18

FELIXprinters Quick Start Manual for the FELIX Pro 2 Touch
4.1 Print from USB
Chapter 4: Print
Page 18
Put the provided FELIX drive into the USB port
on the right-hand side of the display unit.
Enter the print menu by selecting the
icon in
the bottom center. Select the le Benchy Dual
from the USB list.
Make sure the print bed is clear of any obstructions. Select
to start printing.
Cancel printing
Pause printing
Advanced print settings
The advanced option gives the control to override
Gcode settings during printing. For now leave
the settings as they were, select
to hide.
1 2
3 4 5
Tip:
Select ‘Benchy Dual PLA-PLA for a dual
extrusion sample, this will take 2 hr.
Select the Benchy Single PLA if you
want to print a quicker single extrusion
sample of 50 min.
Page 19

FELIXprinters Quick Start Manual for the FELIX Pro 2 Touch
4.2 Remove bed
Chapter 4: Print
Page 19
Enter the control menu by selecting the icon
in the bottom left corner.
Select the Remove bed
Do not remove the print bed without using the
Remove bed function. This could damage your
printer.
1
2
Remove the print bed.
The print bed can reach temperatures of up to 100°C, so wait for it to cool off
before touching.
3
Page 20

FELIXprinters Quick Start Manual for the FELIX Pro 2 Touch
Don’t pull the object straight up, but twist it and start
peeling at the edges or use a spatula.
When using support material: Remove support
material with small pliers. If you are using PVA
dissolve it in water.
Support
Material
Page 20
4.3 Remove and nish a printed object
Chapter 4: Print
FELIXprinters Quick Start Manual for the FELIX Pro 2 Touch
1
2
Page 21

FELIXprinters Quick Start Manual for the FELIX Pro 2 Touch
Formide is the recommended software to operate the FELIX Pro 2 Touch. For experienced users who love to tweak we
also support Simplify3D and Repetier-Host for FELIXprinters or third party software like Kisslicer.
www.felixprinters.com/products/software
Page 21
5.1 Software
Chapter 5: Software, maintenance, support
FELIXprinters Quick Start Manual for the FELIX Pro 2 Touch Page 21
Formide - Cloud Platform
Print with the Pro 2 Touch from anywhere with any device
Get started at www.formide.com
Page 22

FELIXprinters Quick Start Manual for the FELIX Pro 2 Touch Page 22
5.2 Setup cloud printing
Chapter 5: Software, maintenance, support
FELIXprinters Quick Start Manual for the FELIX Pro 2 Touch Page 22
Go to the WiFi settings by sliding down the
statusbar or pressing the wi icon in the upper
right corner.
Select your WiFi network, enter the network
password and press ‘Return’ to connect.
Open your internet browser and go to www.
formide.com. Create your formide account for
free by selecting ‘sign up’
Choose the type of device, in our case ‘Integrated
Printer’. Press ‘Generate code’ on your 3D printer (step 3) and enter this code into your formide
account. Search and select ‘Pro 2’ and ‘save new
printer’ to complete the setup.
1 2
4 5 6
When the printer is connected to the WiFi a veri-
cation code can be generated. This code is used
to pair your printer with the formide account.
Login with your account after con rming the registration email. Go to: Manage | Devices and se-
lect ‘Set up a new Device’
3
Page 23

FELIXprinters Quick Start Manual for the FELIX Pro 2 Touch
Chapter 5: Software, maintenance, support
5.3 Tips and tricks
Before starting a print
» Make sure the print bed is properly placed on its base.
» Make sure lament is guided properly through the lament guide and lament spool holders.
» Clean the print bed before starting every print.
» Clean the nozzles with the supplied tweezers before starting a print.
During a print
» Make sure the rst layer is printed properly before leaving the printer unattended. The rst layer is the most
important layer and the basis of a print job. When this layer fails to be printed properly, the object could detach
and cause damage to the printer.
After the print job is nished
» Do not pull off an object from the print bed in a straight manner, always twist it from the build plate or use a
tool. For large objects it is recommended to take off the printbed and start peeling at the corners of the object.
» Let the print bed cool down to about 30-40 0C before removing an object, sometimes an object can pop off the
print bed by just cooling down the print bed.
Other
» Never remove the heated print bed while the printer is heating.
» Never disconnect the display unit, while the printer is still on.
» When turning off the printer, make sure the heaters are cooled down below 100 0C.
Page 23
Page 24

FELIXprinters Quick Start Manual for the FELIX Pro 2 Touch
5.4 Maintenance
Chapter 5: Software, maintenance, support
Replace a hot-end
Because the nozzles are consumable part s , t h ey e ve n t ua l ly n ee d replacement after hours of printing. There is a po-
tential risk of injury, as the nozzle can reach temperatures of up to 275°C, so wait till temperature drops before handling.
Page 24
6
5
4
6
7
1. Retract the lament from the hot-end.
2. Let the hot-end cool down.
The hot-end can reach 275°C so it is essential to do this step
poperly to avoid risk of injury.
3. Turn off the printer.
4. Remove the edge connector of the hot-end.
5. Open the fan cover.
6. Put the tweezer in the top hole of the hot-end and take
the bottom of the hot-end with the other hand.
7. Now gently pull out the hot-end forwards.
Page 25

FELIXprinters Quick Start Manual for the FELIX Pro 2 Touch
Dust cleaners
Filament attracts a lot of dust and small particles.
Make sure the lament enters the lament holder through
the dust cleaner. After a while replace the dust cleaners.
Print bed contact points & Pins
Make sure to keep the contact points on the bottom
of the print bed clean. Use a detergent like alcohol
and rub gently with a paper towel or cloth.
FELIXprinters Quick Start Manual for the FELIX Pro 2 Touch Page 25
5.4 Maintenance
Chapter 5: Software, maintenance, support
Page 26

FELIXprinters Quick Start Manual for the FELIX Pro 2 Touch
Page 26FELIXprinters Quick Start Manual for the FELIX Pro 2 Touch
Flow detection
The ow detection system is triggered – the printer moves to it’s idle position waiting for user action.
The ow detection system is triggered when there is no more lament going through the extruder or when the lament is not extruding at the
expected rate. Go to www.felixprinters.com/support to learn more.
Z-sensor error
The z-sensor triggered message should appear only when the tip of the hot-end touches the print bed.
If the message is displayed continuously go to www.felixprinters.com/support to nd out how to solve this issue.
Sensor error
Extruder: the sensor is defect or not connected properly. Please check if the connector is placed correctly and is clean on the inside.
Heated bed: please check if the bed is placed properly on all 3 magnet points.
Heater error
Extruder: the heater or sensor are giving improper values. Please check if the connector is placed correctly and is clean on the inside.
Heated bed: please check if the contact pins underneath the print bed are ok.
Leveling failed
The z-sensor triggered falsely during the leveling routine or measured probe values are out of their boundaries.
Go to www.felixprinters.com/support and look for the ‘z-sensor triggered’ topic.
5.5 Display messages
Chapter 5: Software, maintenance, support
Page 27

FELIXprinters Quick Start Manual for the FELIX Pro 2 Touch
Page 27FELIXprinters Quick Start Manual for the FELIX Pro 2 Touch
Page 28

Quick Start Manual FELIX Pro 2 Touch
Zeemanlaan 15
3401 MV IJsselstein
The Netherlands
www.felixprinters.com/support
support@felixprinters.com
Review our products
Help us to improve our products and services. It only takes a few minutes!
www.felixprinters.com/survey
(a small reward is waiting for you)
Manuals & tutorials
www.felixprinters.com/support
FELIX Community
www.felixprinters.com/community
V1-2016
 Loading...