

Page 1

Quick
Start
Guide
FELIX Pro 3 Touch
www.FELIXprinters.com/support
support@felixprinters.com
Zeemanlaan 15
3401MV IJsselstein
The Netherlands
Page 2

Quick Start Guide
FELIX
Pro 3 Touch
Page 1
1 Safety
General safety
- Keep children under the age of 14 out of reach of the printer
- FELIXprinters are only suitable for professional use.
Considerations when in operation.
- Don’t leave the printer unattended, before making sure the
first layer is printed properly
- Don’t lean on the printer.
- Be careful with long hair and wide clothes.
- Don’t transport the printer.
- Make sure all moving parts can move without any obstructions.
- Don’t remove any objects from the hot plate while printing.
- Caution with any moving parts that move in the X, Y and Z
direction. Moving parts can have a pinching hazard.
Electronic safety
- Only use the power supplies and cables supplied by
FELIXprinters. Always turn off and unplug the printer before
performing maintenance or modifications.
- The power supply meets all CE mark regulations and is
protected against short-circuit, overload, over voltage and over
temperature.
Printer placement
- Place the FELIXprinter on a stable table/desk or something with
a similar height.
- Place the printer on a height where children cannot reach it.
Use the FELIXprinter in a dry environment at room temperature.
Ventilate
- Good ventilation while printing is advised. When printing
ABS, small concentrations of styrene vapor can be released.
This can (in some cases) cause headaches, fatigue, dizziness,
confusion, drowsiness, malaise, difficulty in concentrating,
and a feeling of intoxication.
- We recommend using filament types shown on the
FELIXprinters website. Examples PLA, PETG, ABS-X,
Glassbend etc. Other types may be toxic; please follow
instructions from the filament supplier.
Caution with heater elements
- There is a potential risk of burn, as the print head can reach
temperatures of up to 275°C and the heated bed of up to
105°C.
- Don’t place objects on the heated bed, not even when the
printer is turned off.
- Always let the printer cool down for at least 5 minutes before
doing maintenance or modifications.
Page 3

Quick Start Guide
FELIX
Pro 3 Touch
Page 2
2 Introduction
Thank you for choosing FELIXprinters!
It is highly recommended to at least read this manual. It explains in short how to make your first print and
contains important information to operate the printer properly.
Kind regards,
FELIXprinters
3 Contents
1 SAFETY .................................................................. 1
2 INTRODUCTION .................................................... 2
3 CONTENTS ............................................................ 2
4 PRINTER SPECIFICATIONS .................................... 4
5 FELIX PRO 3 TOUCH AT A GLANCE .................... 5
6 WHAT’S IN THE BOX? ........................................... 6
6.1 INSTALL FOOT BRACKET ........................................ 7
6.2 INSTALL DISPLAY UNIT ........................................... 8
6.3 PREPARING THE PRINT BED .................................... 9
6.4 INSTALL FILAMENT ACCESSORIES ......................... 11
6.5 POWER ON ....................................................... 12
7 DISPLAY OVERVIEW ........................................... 13
8 PREPARATION FOR PRINTING ........................... 14
8.1 CALIBRATION. ................................................... 14
8.2 LOAD FILAMENT ................................................ 15
8.3 CLEAN THE PRINT SURFACE ................................. 16
9 PRINT FROM USB STICK ...................................... 17
10 PRINT AND CONTROL PRINTER VIA WIFI OR
LAN 18
Page 4

Quick Start Guide
FELIX
Pro 3 Touch
Page 3
10.1 CONNECT VIA WIFI .......................................... 18
10.2 WIRED LAN...................................................... 18
10.3 REMOTE CONTROL ............................................ 19
10.4 PRINT VIA WEB INTERFACE. ................................. 20
11 TIPS AND TRICKS ............................................. 22
11.1 FLEXIBLE FILAMENTS ........................................... 22
12 MAINTENANCE............................................... 24
12.1 REPLACE A PRINT-HEAD ..................................... 24
12.2 DUST CLEANERS ................................................ 26
12.3 MOTION SYSTEM................................................ 26
13 DISPLAY MESSAGES ....................................... 27
Page 5

Quick Start Guide
FELIX
Pro 3 Touch
Page 4
4 Printer specifications
System specifications
- Printer dimensions (L, W, H) 420 x 400 x 550 mm
- Weight 11.5 kg
- Power requirements: 220 V
Capabilities
- Build volume (L, W, H) 235 x 245 x 235 mm
- Layer height range 0.05 - 0.25 mm
- Bed temperature: max. 100 °C
- Flex plate
- Motorized bed leveling
- Automatic nozzle calibrations
Extruders
- Diameter nozzle: 0.35 mm (optional 0.5 and 0.7mm)
- Nozzle temperature: max. 275 °C
- Full metal hot-ends
- Filament flow detection
Interface
- Capacitive Touchscreen with embedded octa core
processor
- Print server (Repetier-Server)
- Webcam
- Print file management
- 16GB memory
Print materials
- Open source 1.75 mm filaments
- Tolerance: ± 0.15 mm
- PLA, PET(G), Flex, ABS-X, PVA, Wood, Glass
Connectivity
- USB flash drive
- WIFI
- Wired Ethernet
Software
- Simplify3D
- Open source Repetier-Host for FELIXprinters.
Page 6

Quick Start Guide
FELIX
Pro 3 Touch
Page 5
5 FELIX Pro 3 Touch at a glance
Display
unit
Extruder
Heated
bed
Filament accessory
Holder
Filament roll
Foot bracket
Power switch
Power plug
Filament guide
Page 7
Quick Start Guide
FELIX
Pro 3 Touch
Page 6
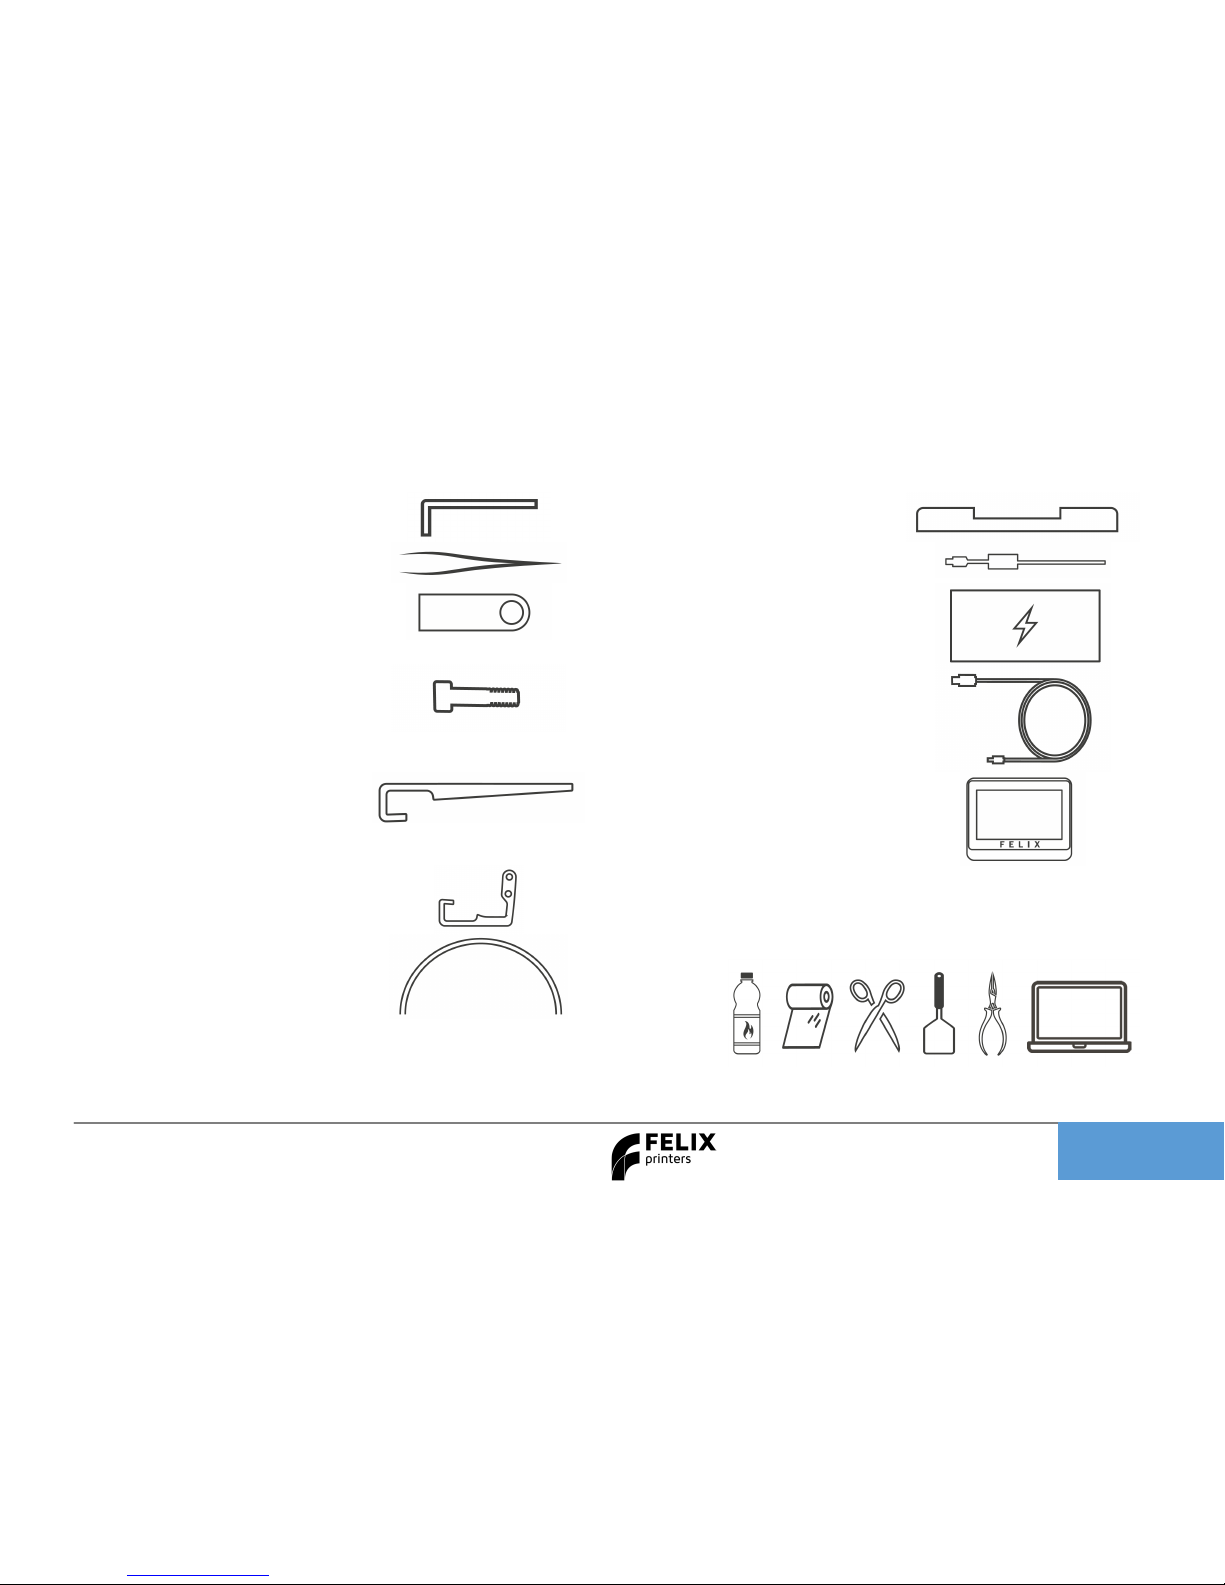
6 What’s in the box?
A
1x Allen Key
H 1x Foot bracket
B
1x Tweezers
I 1x Power cable
C
1x USB flash drive
J 1x Power unit
D
2x M4x20 bolts
K 1x USB cable
E
2x Filament Holder
L 1x Display Unit
F
1
x Filament Guide
G
2x Teflon tubes
Recommended tools
NB: The box could contain extra materials like filament you have ordered.
Page 8

Quick Start Guide
FELIX
Pro 3 Touch
Page 7
6.1 Install Foot bracket
1. Place foot bracket on
sturdy flat table
2. Place the printer onto the
foot bracket
3. Fix the foot with 2x
supplied M4 x 20 bolts
and allen key.
3
1
2
Page 9

Quick Start Guide
FELIX
Pro 3 Touch
Page 8
6.2 Install Display unit
IMPORTANT:
Make sure the power is turned off when connecting the display.
Failing to do so could cause serious damage.
Connect cables on designated positions and slide the screen onto metal pins
1
2 3
Ribbon cable
Webcam
USB internal
Page 10

Quick Start Guide
FELIX
Pro 3 Touch
Page 9
6.3 Preparing the print bed
2
1
1.
Flip the lever
open
2. Firmly push on bolt head to loosen the
mechanism
.
Rotate the bed 90 Degrees. This might require a
little force.
Page 11

Quick Start Guide
FELIX
Pro 3 Touch
Page 10
1.Ensure the edges align
2. Flip back the lever
1.
Place one edge of the flex plate gently on the
indicated edge.
2. Drop the flex plate gently on base.
1 2 1 2
Page 12

Quick Start Guide
FELIX
Pro 3 Touch
Page 11
6.4 Install filament accessories
1.
Push and rotat
e holder onto side of frame.
2. It should snap into place
1.
Place Filament roll onto holder.
2. Place filament guide including dust cleaner
3. Guide filament through Teflon tube into
extruder
1
2
3
1 2
Page 13

Quick Start Guide
FELIX
Pro 3 Touch
Page 12
6.5 Power on
1. Insert the power cable.
2. Flip the power switch of the printer.
3. The lights of the print-head should turn on and immediately after
turning on the printer a FELIX bootscreen should be displayed.
4. Bootup time takes about 40 seconds.
Power
Switch
Power
Cable
USB
– NOT
used for
touchscreen
NOTE:
in some occasions if there is
a firm pull exerted onto the
power cable, the white
housing of the connector
could come out of the
printer. If that happens,
push it back in place to
ensure proper electrical
connection.
Page 14

Quick Start Guide
FELIX
Pro 3 Touch
Page 13
7 Display Overview
Shutdown button: To properly shutdown the printer. First press the shutdown button before turning the
power switch.
Page 15

Quick Start Guide
FELIX
Pro 3 Touch
Page 14
8 Preparation for printing
8.1 Calibration.
IMPORTANT: Only PERFORM BED LEVELING after unboxing. The printer is already fully factory calibrated.
Bed leveling: This physically tilts the bed so the distance between nozzle and bed is the same everywhere.
When to do this?:
1. After unboxing/moving printer.
2. When you see first layer printed lines are deviating from width across the print surface.
XY and Z Nozzle calibration: These calibrations align the printheads with respect to each other to get an
optimal dual head print. When to do this?
1. After exchanging a hot-end
2. When you clearly see that during dual head printing the nozzles are not aligned in x,y or height.
Page 16

Quick Start Guide
FELIX
Pro 3 Touch
Page 15
8.2 Load Filament
Ensure the filament is cut off in a skew manner, so the extruder can easily grip the filament.
Press the change filament button in the home menu.
1. Select the left or right extruder
2. Press insert filament. The print-heads will warm up and can take around 1 minute.
3. Now continue by pressing insert filament. While inserting the filament, help the printer by pushing it
downwards in the extruder until you feel the printer has gripped the filament.
4. Continue extruding until filament comes out of the printhead.
1 2
Page 17

Quick Start Guide
FELIX
Pro 3 Touch
Page 16
8.3 Clean the print surface
The first layer is the most important layer of a print. It forms the basis for the rest of the print. To ensure the
most optimal first layer adhesion do one of the following:
First remove any filament residue from the surface, with a spatula or carefully
with the tweezers.
Second use one of the two approaches to further prepare the surface:
A. Use the already applied Kapton layer on the flex plate and clean it with
detergent like methylated spirit, 100% alcohol or acetone. It must be
absolutely grease free. Grease from fingers can ruin adhesion to the bed.
B. Use an adhesive like Magigoo, Pritt Powerstick, 3DLac or similar.
Note: When using a spray adhesives ensure the flex plate is removed from the
printer. The spray can damage the linear motion components of the machine.
Page 18

Quick Start Guide
FELIX
Pro 3 Touch
Page 17
9 Print from USB stick
Insert the USB stick supplied with the printer and press refresh and press USB stick button
A file-list should appear. Select a *.gcode file for direct printing.
When you press the gcode file, you get two options.
1. You can save it to the library of the device or
2. Directly print it from the USB stick. The file is temporarily copied to the screen and the print will
start. You can safely remove the USB stick without disturbing the print-process.
Start the PRINTJOB supplied with the printer to ensure proper functioning
IMPORTANT NOTES/RECOMMENDATIONS
Clean/prepare the print bed before starting a print.
Never leave the printer before visually seeing that first layer is printed ok
Always use filament accessories for proper filament guiding and long lifetime of hot-end.
Page 19

Quick Start Guide
FELIX
Pro 3 Touch
Page 18
10 Print and Control printer via WIFI or LAN
10.1 Connect via WIFI
Go to Settings in main menu -> Press WLAN
A list of available networks appears, select your network and insert credentials.
10.2 Wired LAN
Plug in cable on the side of touchscreen and the printer should automatically obtain an IP address in the
network.
Page 20

Quick Start Guide
FELIX
Pro 3 Touch
Page 19
10.3 Remote control
After connecting printer to a local network, navigate to Settings -> Network. And type in the shown IP httpaddress in your web browser or scan the QR code on the device which is connected to the same network.
Page 21

Quick Start Guide
FELIX
Pro 3 Touch
Page
20
10.4 Print via web interface.
Overview of the dashboard
Click Go to printer
Page 22

Quick Start Guide
FELIX
Pro 3 Touch
Page 21
1. Press Upload G-Code, to upload a gcode for
printing to the library
After Uploading the touchscreen will render an
Image for printing.
2. Press the print icon, the print will start.
Webcam monitoring
You can conveniently monitor a print-job via the
webcam. For now this is only enabled on the internal
network. If you want to access this from an external
network, a port needs to be forwarded in your router
directed to the IP-adress of the printer.
Navigate to the webcam tap. For further info.
Timelapse
You can create a time lapse video of your print for more information on how to do this please consult the
user manual.
1 2
Page 23

Quick Start Guide
FELIX
Pro 3 Touch
Page 22
11 Tips and tricks
11.1 Flexible Filaments
Our 3d printers can in general handle flexible filaments well. Depending on the amount of flexibility, you
might need to take some extra precautions to print it without trouble.
This is a best practice:
Precautions.
1. Ensure you use the correct slicing profiles for flexible filaments from our supported softwares.
2. Ensure the extruders are cleared from non-flexible filaments. It is essential that the filament does not
experience any obstructions in the hot-end barrel, before reaching the hot parts of the hot-end.
Otherwise chances of buckling filament inside the extruder are very high. Obstructions can occur if
there has been printed with some hard filament before, make sure it is removed from the barrel of the
hot-end. This can be done by extruding some hard filament and then fully retract it again. Easy way is
to do it via the display unit. Then slowly extrude the filaflex into the hot-end.
3. Adjust filament clamping range. The extruder arm pushes filament onto the extruder drivewheel.
When using flexible filaments it might be that the filament is squashed too much causing a lot of
friction and eventually it buckles and clogs the extrusion.
http://www.felixprinters.com/downloads/1.%20Pro%20Series/2.%20FELIX%20Pro%202/2.%20Tips%20%26
%20Tricks/How%20To%20-%20Adjust%20filament%20clamping%20range.pdf
Page 24

Quick Start Guide
FELIX
Pro 3 Touch
Page 23
Loading flexible filament.
It is recommended to load filament via the interface at the printer. Goto Control => Change filament =>
Choose the correct filament and/or temperature.
1. Cut the end of the filament in a skew manner. The extruder gears might find it difficult to get grip onto
the first part of the flexible filament which is fed into the extruder.
2. Extrude filament until the first drip comes out. Then slowly extrude more piece by piece. Do not
extrude in a continuous feed at high speed as that will increase chances of buckling.
3. Optional: Lower the overall print speed. Via the display unit take the following steps after starting the
print. Press the rotary button. Then scroll down to Speed Mul. And lower it to 50%. Then by trial and
error increase the speed.
Page 25

Quick Start Guide
FELIX
Pro 3 Touch
Page 24
12 Maintenance
A 3D printer is a quite complex motion system and requires maintenance.
TIP: Check our YouTube channel to see instruction video’s about maintenance.
https://www.youtube.com/user/FELIXprinters
12.1 Replace a print-head
Caution: There is a potential risk of burning, as the nozzle can reach temperatures of up to 275°
For cleaning or maintenance purposes, the hot-end can be easily removed from the FELIX Pro.
Please take the following steps:
1. Check if there is still filament loaded in the hot-end. If there is no filament loaded, then go to step 4. If
yes, from the display unit or PC interface select the correct extruder and heat it up.
2. Retract the filament from the hot-end.
3. Let it cool down.
4. Turn off the printer.
Page 26

Quick Start Guide
FELIX
Pro 3 Touch
Page 25
1. Pull off edge connector of corresponding print head, do NOT pull the wires.
2. Open the cover in front.
3. Pull out print-head
4. Reverse the assembly of the hot-end into the extruder assembly. Do not forget to close the lid.
IMPORTANT: Ensure the hot-end wires make the bend as shown in picture above
5. Please do the following two extruder calibrations, if you wish to properly print with dual head.
- Z-height calibration
- XY calibration
TIP: Clean hot-end exterior from filament before starting a print, to prevent blobs of plastic on your printed
object.
2
3
1
Page 27

Quick Start Guide
FELIX
Pro 3 Touch
Page 26
12.2 Dust cleaners
Filament attracts a lot of dust and small particles. Make sure the filament enters the filament holder
through the dust cleaner. After a few months of printing it is recommended to replace the dust cleaners.
12.3 Motion system
The linear bearings require almost no maintenance. Recommended is that you put a little some grease on
them every 3-4 months.
The belt tension of the x and y axis can also be checked in intervals of 3 months. Check this small movie to
see how to tension the belts.
https://www.youtube.com/watch?v=dpS6nWn5rE8
Page 28

Quick Start Guide
FELIX
Pro 3 Touch
Page 27
13 Display messages
Flow detection
The flow detection system is triggered – the printer moves to its idle position waiting for user action.
The flow detection system is triggered when there is no more filament going through the extruder or when the filament is not
extruding at the expected rate. Go to www.felixprinters.com/support to learn more.
Z-sensor error
The z-sensor triggered message should appear only when the tip of the hot-end touches the print bed.
If the message is displayed continuously go to www.felixprinters.com/support to find out how to solve this issue.
Heater sensor error
Extruder: the sensor is defect or not connected properly. Please check if the connector is placed correctly and is clean on the inside.
Heated bed: The bed temperature sensor circuit is defect. That can mean the temperature sensor, or the wiring of this sensor.
Heater error
Extruder: the heater or sensor are giving improper values. Please check if the connector is placed correctly and is clean on the inside.
Heated bed: please check if the contact pins underneath the print bed are ok.
Leveling failed
The z-sensor triggered falsely during the leveling routine or measured probe values are out of their boundaries.
Go to www.felixprinters.com/support and look for the ‘z-sensor triggered’ topic.
Page 29

Quick Start Guide
FELIX
Pro 3 Touch
Page 28
Review our products
Help us to improve our products and services. It only takes a few minutes!
www.felixprinters.com/survey
(a small reward is waiting for you)
Manuals & tutorials
www.felixprinters.com/support
FELIX Community
www.felixprinters.com/community
Quick Start Manual
FELIX Pro
3 Touch
V1 -
2019
www.felixprinters.com/support
support@felixprinters.com
Zeemanlaan 15
3401MV IJsselstein
The Netherlands
 Loading...