

Page 1
Copyri gh t In for mati on
This document contains proprietary information that is
protected by copyright. No part of this document may be
photocopied, reproduced, or translated to another language
FELIXrobotics BV
Zeemanlaan 15
3401MV, IJsselstein
The Netherlands
Copyri ght © 2015 FELI Xrobot ics BV .
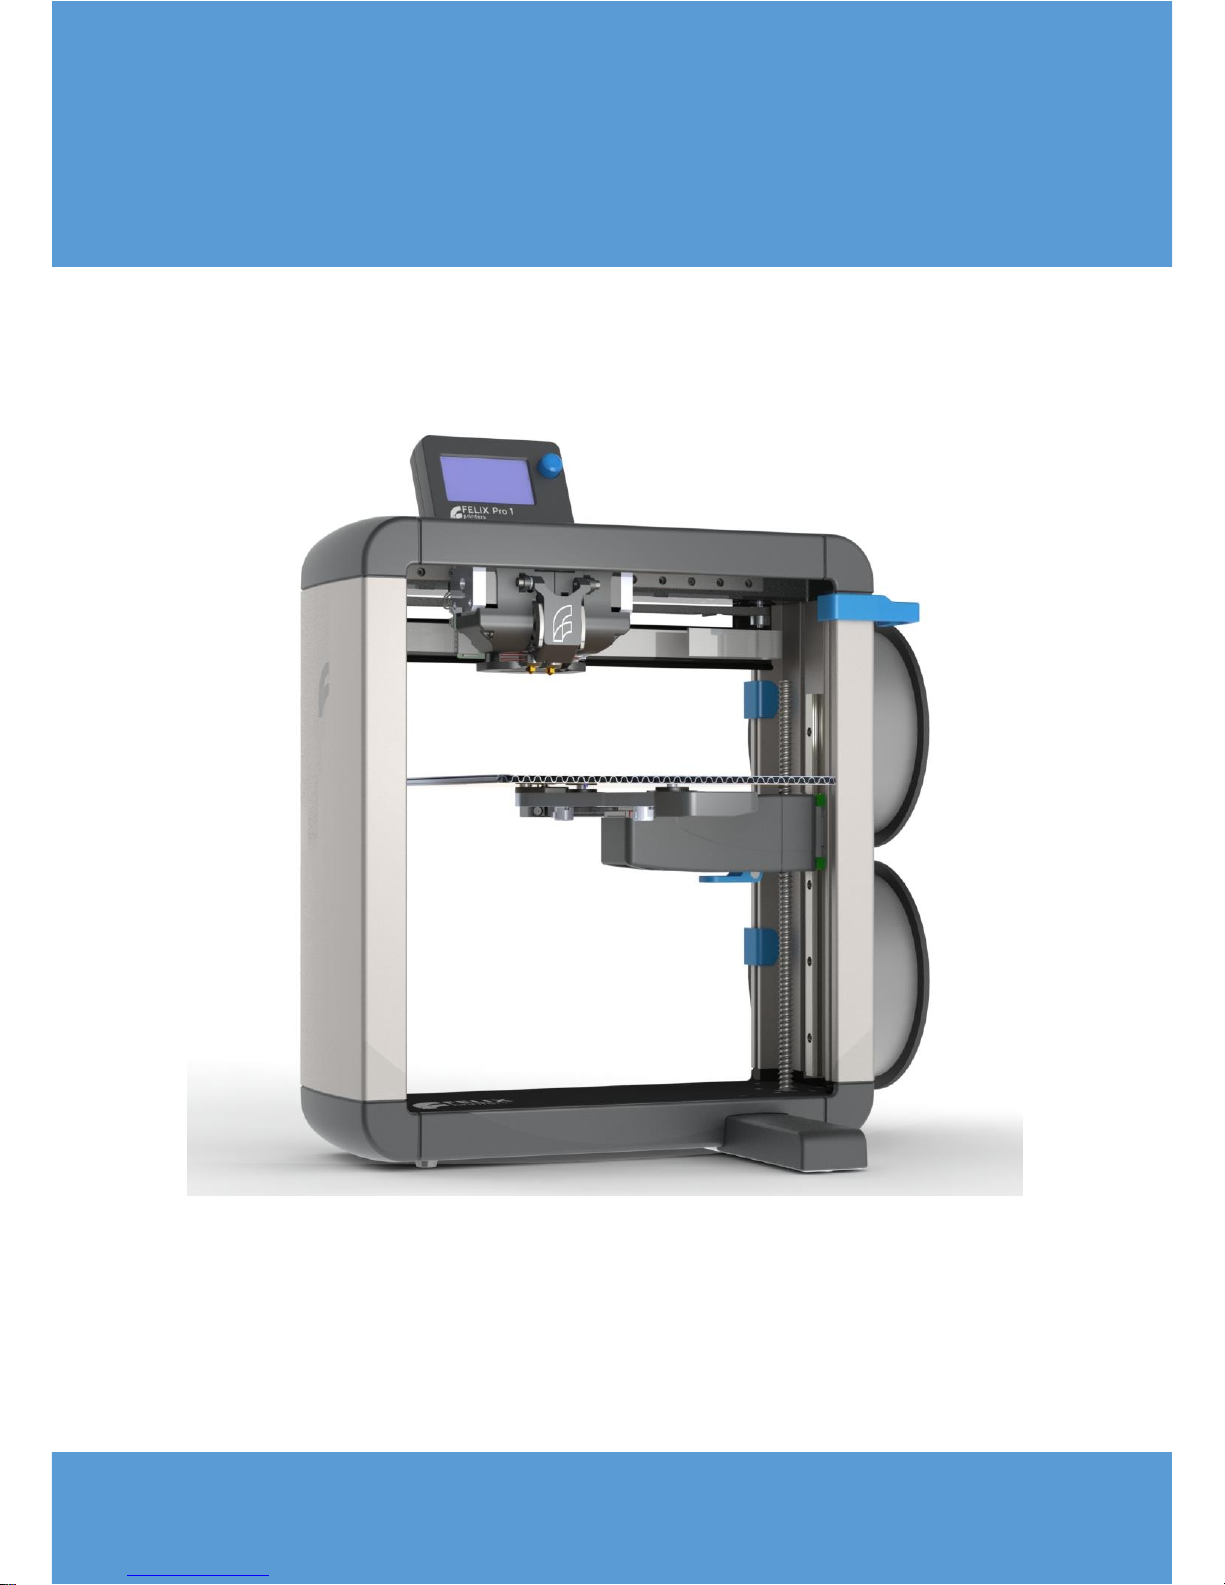
USER MANUAL – FELIX PRO 1
June 4th, 2016
Revision 3
Page 2

Page | 2
User Manual – FELIX Pro 1
Rev 3
www.FELIXprinters.com
support@FELIXprinters.com
1 INTRODUCTION
Thank you for choosing FELIXprinters! It is highly recommended to read this manual. It explains in short
how to make your first print and contains essential tips to operate the printer properly.
If you are unable to continue or have any questions, you can check at the support section of our website
or you can contact us directly:
Website: www.felixprinters.com/support
Email: support@felixprinters.com
Telephone: +31 (0)30 30 31 387
Address: Zeemanlaan 15, 3401MV IJsselstein, The Netherlands
Kind regards,
FELIXprinters
Page 3
Page | 3
User Manual – FELIX Pro 1
Rev 3
www.FELIXprinters.com
support@FELIXprinters.com
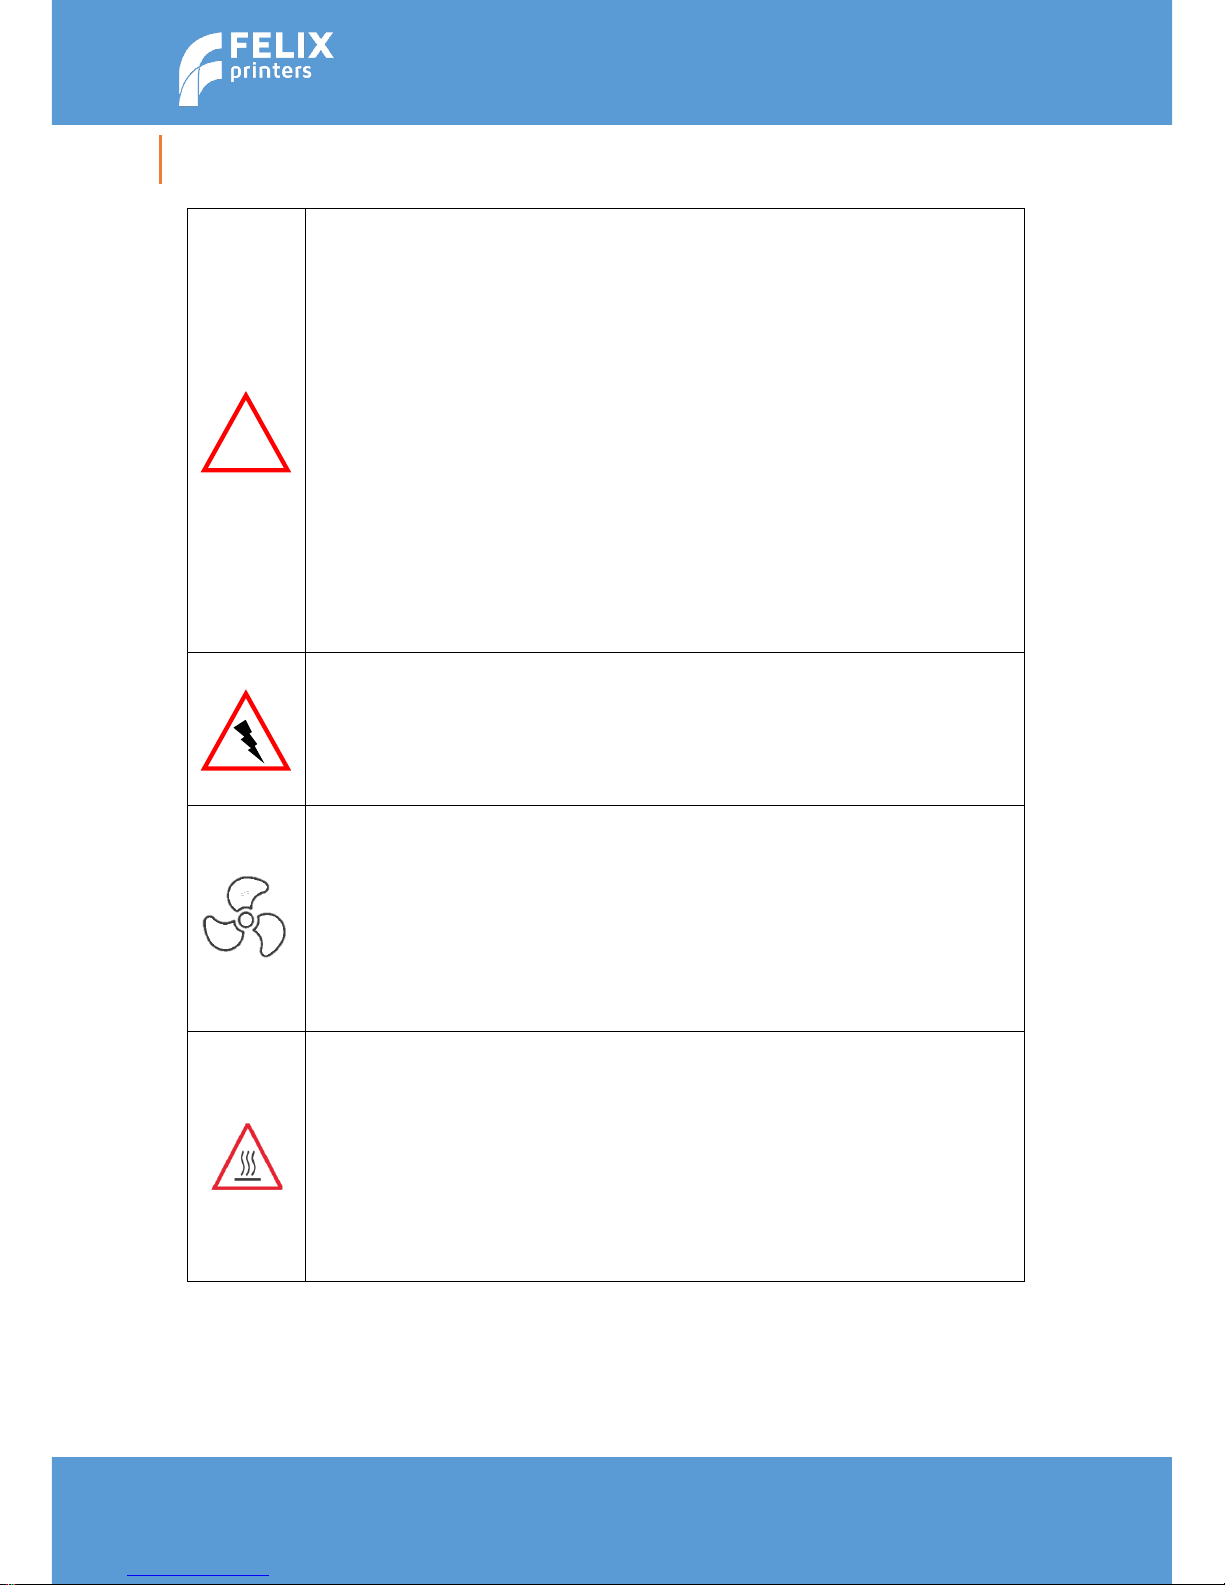
2 SAFETY
To safely operate the FELIXprinter, we advise that you keep the following safety recommendations in mind:
General safety
Keep children under the age of 14 out of reach of the FELIXprinter.
FELIXprinters are only suitable for professional use.
Considerations when printer is in operation.
Don’t lean on the printer.
Be careful with long hair and wide clothes.
Don’t transport the printer.
Make sure all moving parts can move without any obstructions.
Don’t remove any objects from the hot plate while the printing
Caution with any moving parts that move in the X, Y and Z direction. Moving parts can
have a pinching hazard.
Printer placement
Place the FELIXprinter on a stable table/desk or something with a similar height. Place
the printer on a height where children cannot reach it.
Use the FELIXprinter in a dry environment
Electronic safety
Only use the power supplies and cables supplied by FELIXprinters. Always turn off and
unplug the printer before perfoming maintenance or modifications.
The power supply meets all CE mark regulations and is protected against short-circuit,
overload, over voltage and over temperature.
Ventilate
Good ventilation while printing is advised. When printing ABS, small concentrations of
Styrene vapour can be released. This can (in some cases) cause headaches, fatigue,
dizziness, confusion, drowsiness, malaise, difficulty in concentrating, and a feeling of
intoxication.
We recommend using filament types shown on the FELIXprinters website. Examples
PLA, PETG, ABS, Glassbend etc. Other types may be toxic pleaser follow instructions
from the filament supplier.
Caution with heater elements
There is a potential risk of burn, as the print head can reach temperatures of up to
275°C and the heated bed of up to 105°C.
Don’t place objects on the heated bed that are not being printed, not even when the
printer is turned off.
Always let the printer cool down for at least 10 minutes before doing maintenance or
modifications.
!
Page 4

Page | 4
User Manual – FELIX Pro 1
Rev 3
www.FELIXprinters.com
support@FELIXprinters.com
3 CONTENTS
1 Introduction ..................................................................................................................................................................... 2
2 Safety ............................................................................................................................................................................... 3
4 Printer specifications ........................................................................................................................................................ 5
5 FELIX Pro 1 at a glance ..................................................................................................................................................... 6
6 Unboxing .......................................................................................................................................................................... 7
6.1 Contents of box ...................................................................................................................................................... 7
6.2 Opening the box ..................................................................................................................................................... 8
6.3 Install foot bracket and display unit ....................................................................................................................... 9
6.4 Prepare bed assembly. ......................................................................................................................................... 10
6.5 Heated bed ........................................................................................................................................................... 11
6.6 Install accessories ................................................................................................................................................. 12
6.6.1 Filament arm and guide ................................................................................................................................... 12
6.6.2 Cables .............................................................................................................................................................. 14
7 3d print preparations ..................................................................................................................................................... 15
7.1 Turn On the printer/General display unit overview ............................................................................................. 15
7.2 First checks ........................................................................................................................................................... 16
7.3 Clean the print-bed .............................................................................................................................................. 17
7.4 Turn on the heaters .............................................................................................................................................. 18
7.5 Load the filament ................................................................................................................................................. 19
8 Print an object with the SD card interface ..................................................................................................................... 20
8.1 SD card print ......................................................................................................................................................... 20
9 Printer Software ............................................................................................................................................................. 21
9.1 FELIXbuilder .......................................................................................................................................................... 22
9.1.1 FELIXbuilder for Windows ................................................................................................................................ 22
9.1.2 FELIXbuilder for MAC ....................................................................................................................................... 31
9.2 Slicing profiles....................................................................................................................................................... 37
10 Print Finished ................................................................................................................................................................. 40
10.1 Remove the 3d printed object .............................................................................................................................. 40
11 Automatic CAlibration .................................................................................................................................................... 42
11.1 What does the calibration do? ............................................................................................................................. 42
11.2 When to calibrate? ............................................................................................................................................... 42
11.3 How to do the calibration? ................................................................................................................................... 42
12 Dual head printing .......................................................................................................................................................... 44
12.1 X,Y Calibration between nozzles ........................................................................................................................... 44
13 Filament detection ......................................................................................................................................................... 46
13.1 Manually turn off filament detection ................................................................................................................... 46
14 Maintenance .................................................................................................................................................................. 47
14.1 Replace hot-end ................................................................................................................................................... 47
14.2 Print bed contact points ....................................................................................................................................... 48
14.3 Dust cleaners ........................................................................................................................................................ 48
14.4 Motion system ...................................................................................................................................................... 48
15 Tips and tricks ................................................................................................................................................................ 49
15.1 Flexible Filaments ................................................................................................................................................. 49
16 Trouble shooting ............................................................................................................................................................ 50
16.1 Z-sensor triggered, improper leveling, homing and printing in the air. ................................................................ 50
16.2 “Click to reheat" dialogue, filament detection ..................................................................................................... 51
16.3 No filament is coming out of extruder ................................................................................................................. 52
16.4 Z-sensor triggered. ............................................................................................................................................... 53
16.5 Heater decoupled / DEF / DEC message on screen .............................................................................................. 54
16.6 The printer doesn’t connect to FELIXbuilder ........................................................................................................ 55
16.6.1 Installation of drivers in Windows. ............................................................................................................. 55
17 Safety ............................................................................................................................................................................. 58
18 Material Data Safety Sheet ............................................................................................................................................ 59
18.1 PLA ........................................................................................................................................................................ 59
18.2 ABS ....................................................................................................................................................................... 61
19 Appendix: Terms Of Service ........................................................................................................................................... 63
Page 5

Page | 5
User Manual – FELIX Pro 1
Rev 3
www.FELIXprinters.com
support@FELIXprinters.com
4 PRINTER SPECIFICATIONS
Printing
Electrical
Print Technology
Fused Filament Fabrication
AC input:
100-240V, 50-60 Hz
Build Volume
24 x 24.5 x 23.5 cm
Power Requirements
12V DC, 15 Amps
Print Quality
Low
Normal
High
Very High
Extreme
250 microns
200 microns
150 microns
100 microns
50 microns
Connectivity
USB
Coming soon:
Optional WIFI
Postioning Resolution
XY: 13 microns
Z: 0.4 microns
Power Usage
Max 220W
Filament Diameter
1.75 mm
Chipset
Arduino Due, 32bit
Nozzle Diameter
0.35 mm
Internal Voltage
24V
Amount of Nozzles
2
Mechanical
Software
Chassis
Aluminum profiles
and Steel
Software Bundle:
Bundled FELIXbuilder
Optional:
- RepetierHost +
CuraEngine/Slic3r,Skeinforge/SFACT
- Kisslicer
Build platform
Detachable aluminum
sandwich plate.
Heated platform
File Types:
.STL .gcode
XY Bearings
Linear ball bearings
Supports:
Windows, XP and newer
Z bearing
Linear ball bearings
Linux (Ubuntu 12.04+)
Stepper Motors
1.8 deg angle
1/128 micro-stepping
Mac OS X [10.6/10.7/10.8]
Physical Dimensions
Printer dimensions
40 x 42 x 55 cm
Weight
11.5 kg
Shipping Weight
13 kg
Shipping Box
59.5x63.5x22.0 cm
Temperature
Ambient operating
temperature
15-32 ˚C [60 – 90 ˚F]
Storage temperature
0 – 32 ˚C
Warmup time
Heated bed (60 degC)
1.5 min
Nozzle (200degC)
1 min
Page 6
Page | 6
User Manual – FELIX Pro 1
Rev 3
www.FELIXprinters.com
support@FELIXprinters.com
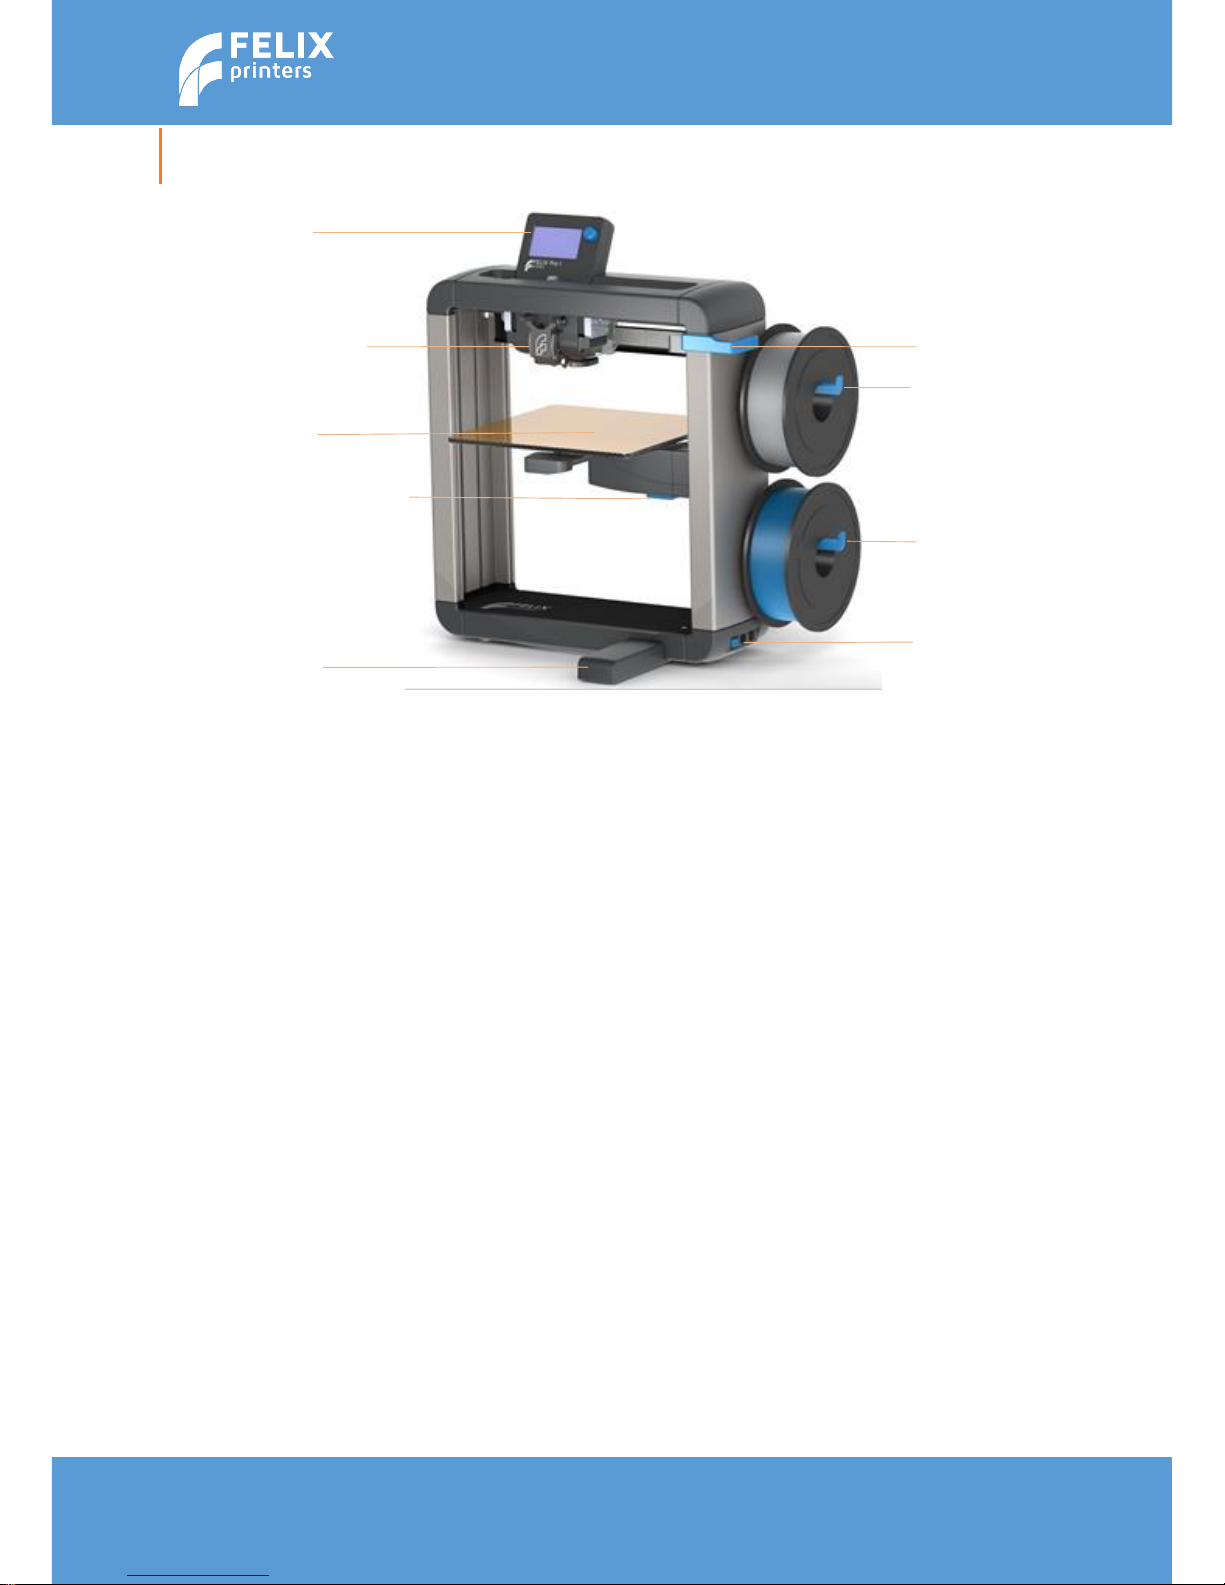
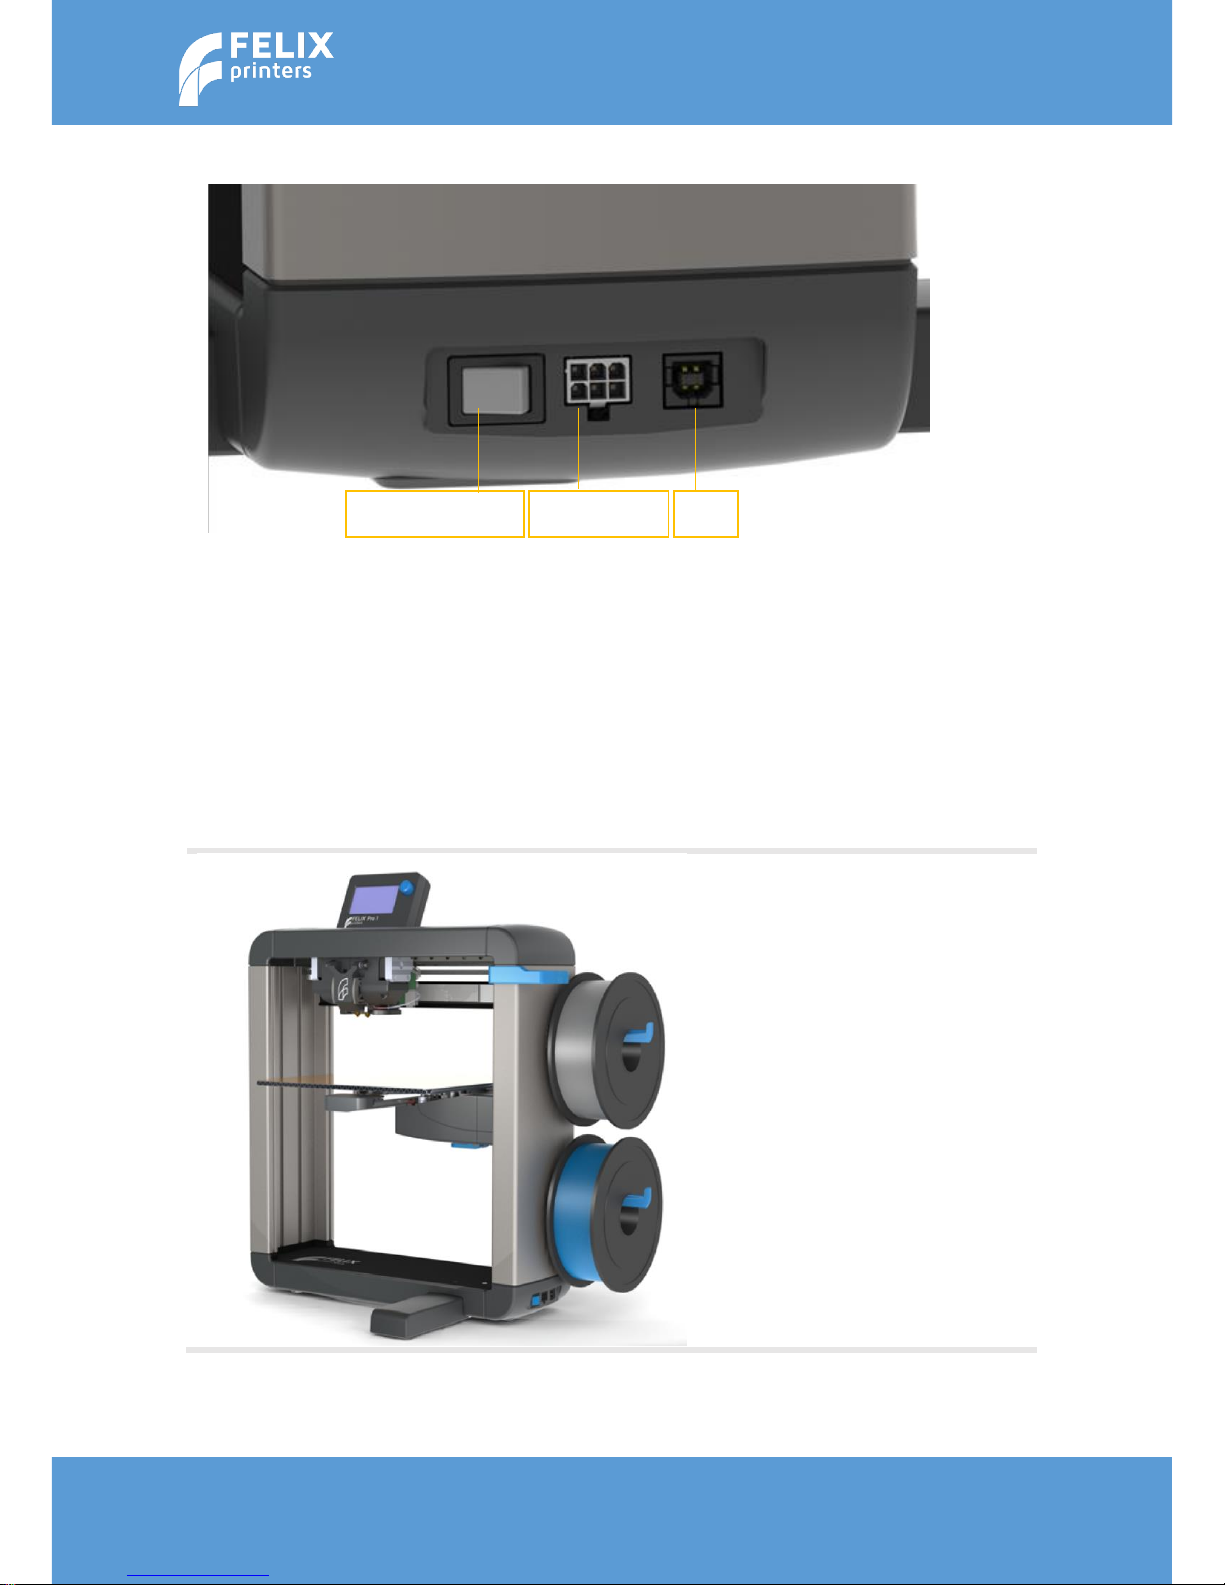
5 FELIX PRO 1 AT A GLANCE
Display unit
Nozzles / Extruder
Detachable
Heated Bed
Lever for rotating bed
Foot Bracket
Filament Holder
Filament Holder
Filament Guide
Power input
USB connection
On / Off switch
Page 7
Page | 7
User Manual – FELIX Pro 1
Rev 3
www.FELIXprinters.com
support@FELIXprinters.com
6 UNBOXING
This chapter will guide you to setup your printer.
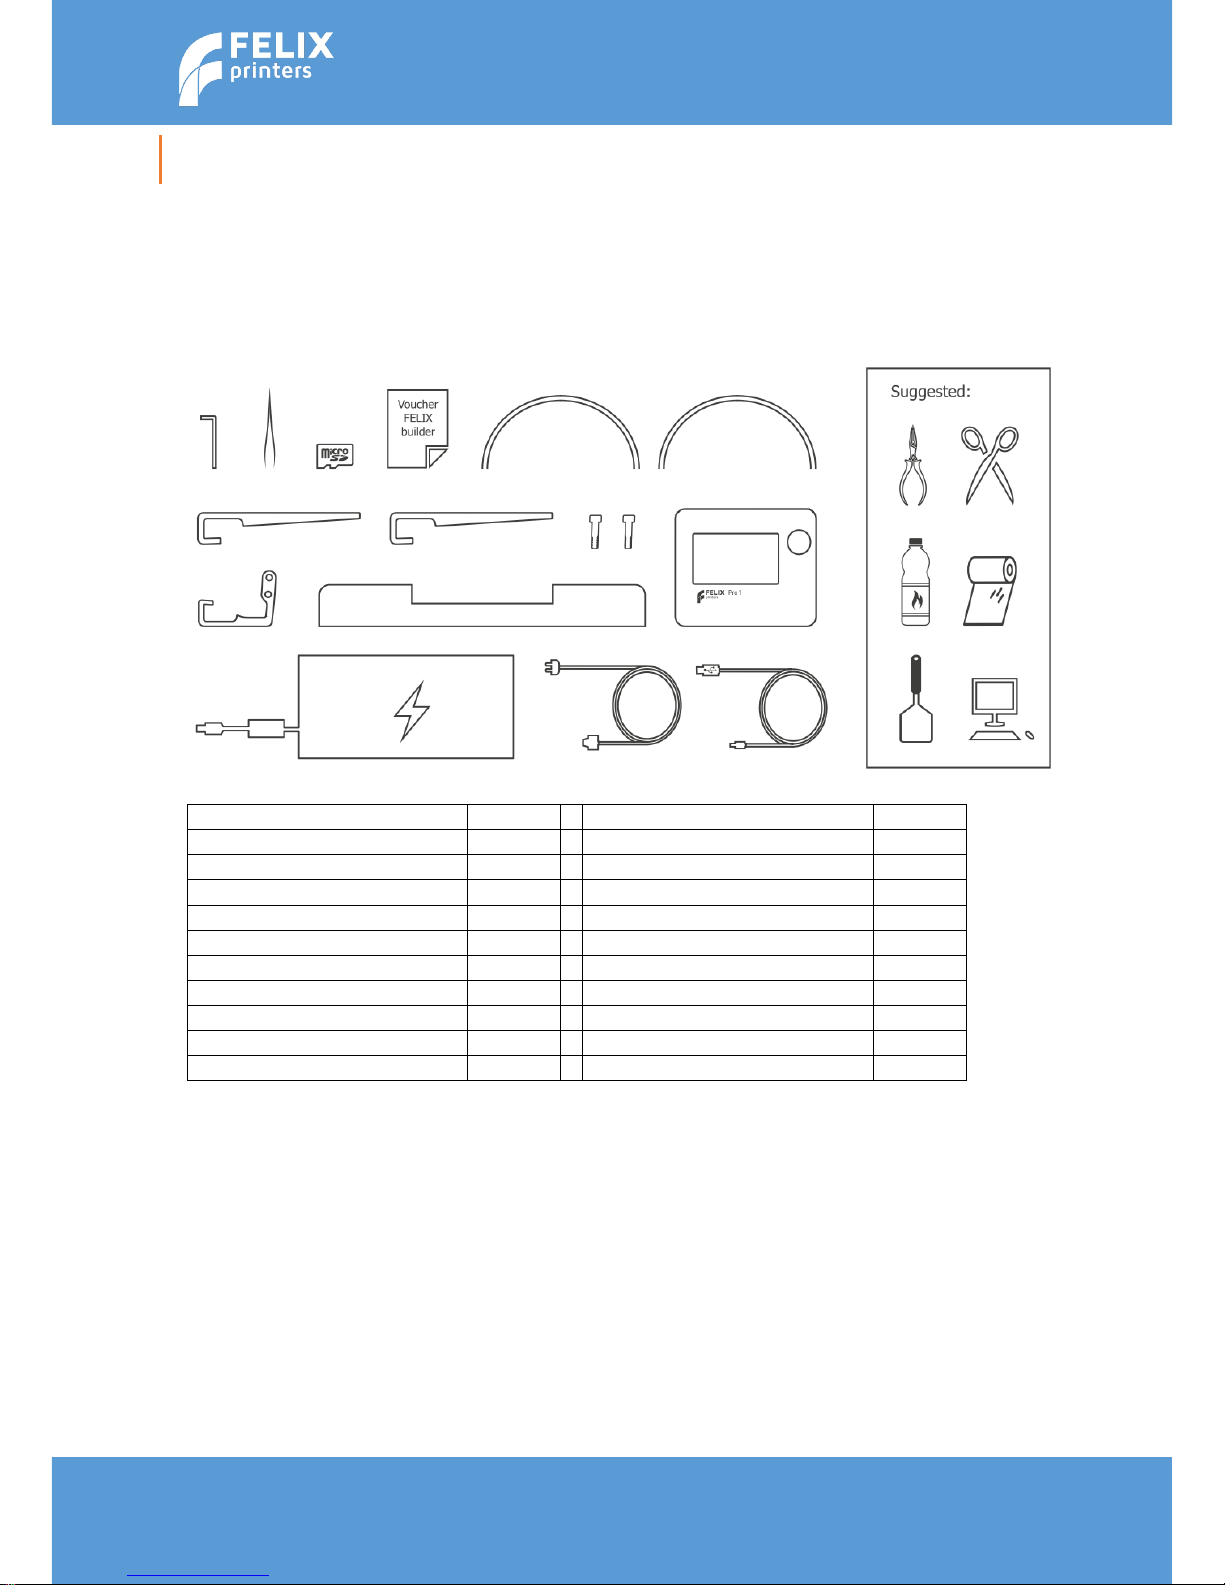
6.1 Contents of box
Check if all the accessories are in the box. The box could contain extra parts like filament you have
ordered.
Item
Amount
Item
Amount
Felix Pro 1
1
Filament holder
2
Foot bracket
1
Filament Guide
1
Heated Bed
1
Teflon tubes
2
Display Unit
1
M4x20 bolts
2
Tweezers
1
Allen key
1
Power supply
1
Power cable EU/US/AU/GB
1
Quick start Manual
1
microSD Card + Reader
1
FELIXbuilder License Voucher
1
USB cable
1
Optional: Filament Roll
1
Next to the provided set we recommend the following tools: small pliers, scissors, (plastic) spatula,
detergent like methylated spirit or denatured alcohol, paper towel or cloth.
Page 8
Page | 8
User Manual – FELIX Pro 1
Rev 3
www.FELIXprinters.com
support@FELIXprinters.com
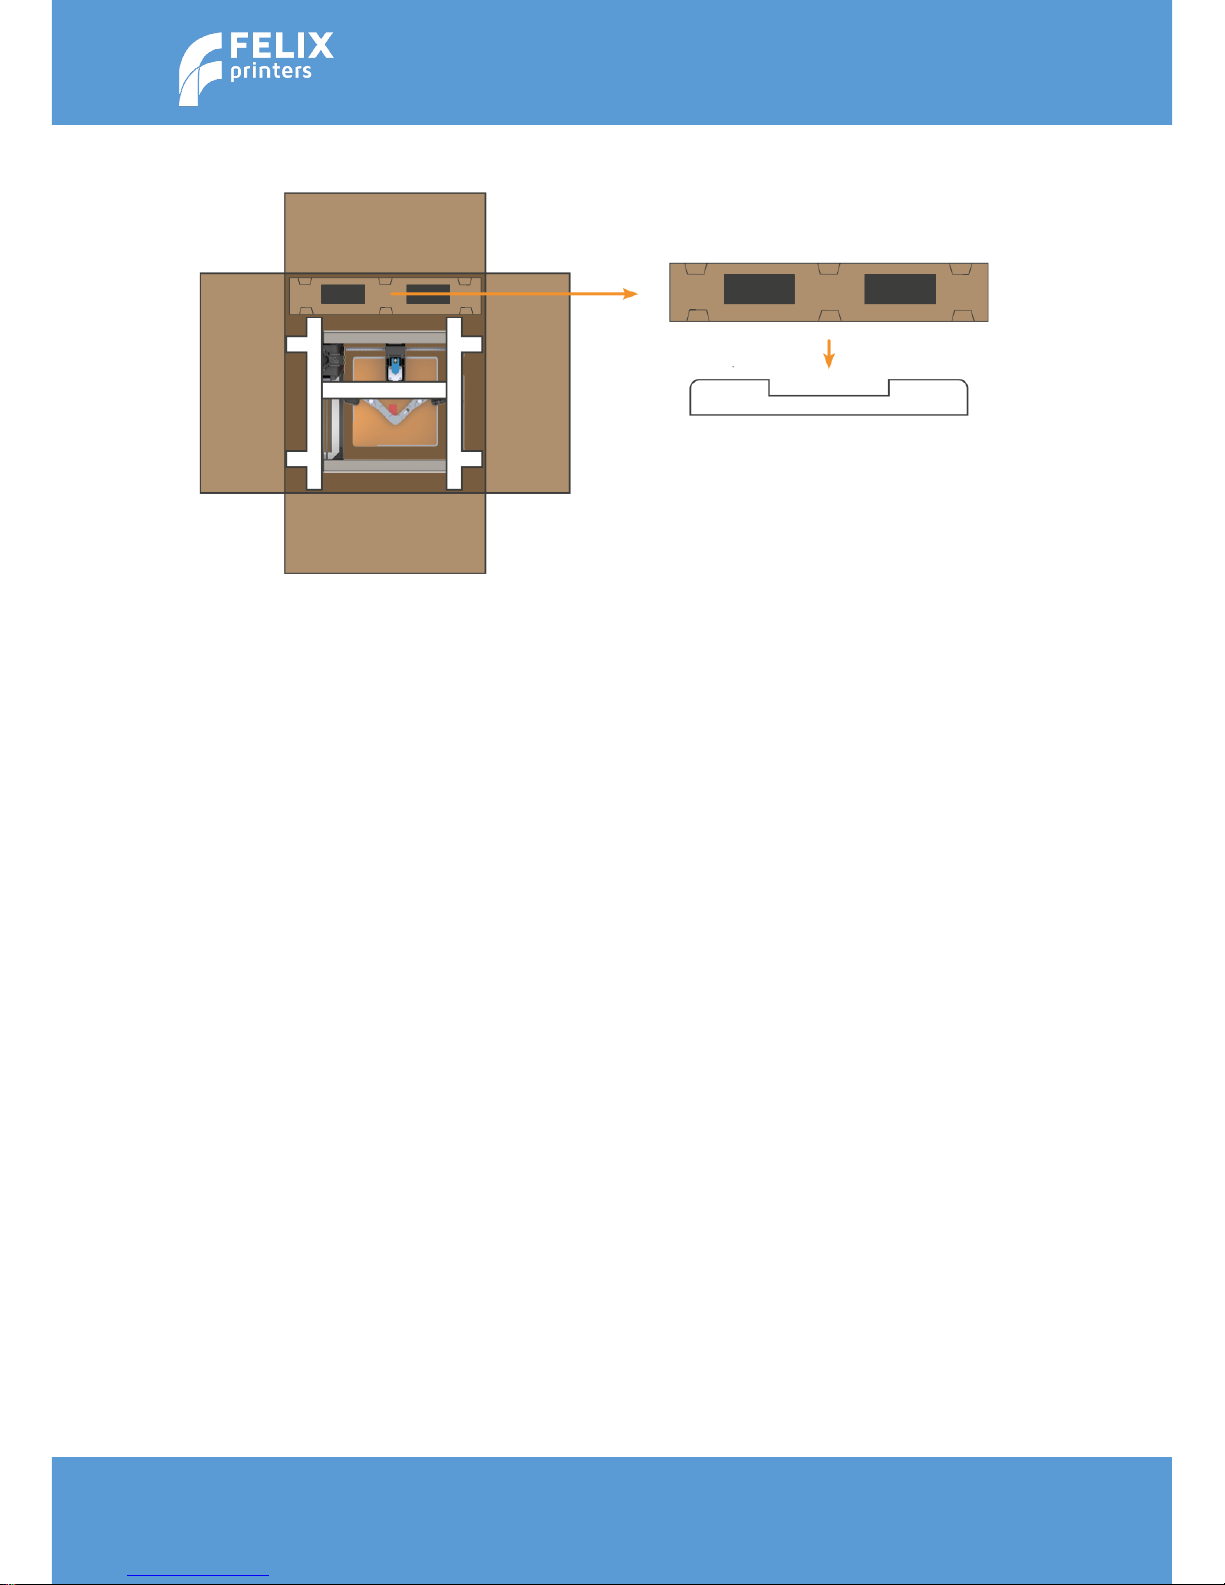
6.2 Opening the box
Take out the foot bracket and leave the
printer in the box for now.
Place the foot bracket on a flat and stable
surface.
Page 9

Page | 9
User Manual – FELIX Pro 1
Rev 3
www.FELIXprinters.com
support@FELIXprinters.com
6.3 Install foot bracket and display unit
Place the foot bracket on a flat and stable surface. Place the printer on top of it and fix the parts together
with the supplied M4 bolts and Allen key.
First push the connector into the display unit and then slide the display unit on the two pins.
WARNING: Make sure the power is turned off when connecting the display.
1 2 2
Page 10
Page | 10
User Manual – FELIX Pro 1
Rev 3
www.FELIXprinters.com
support@FELIXprinters.com
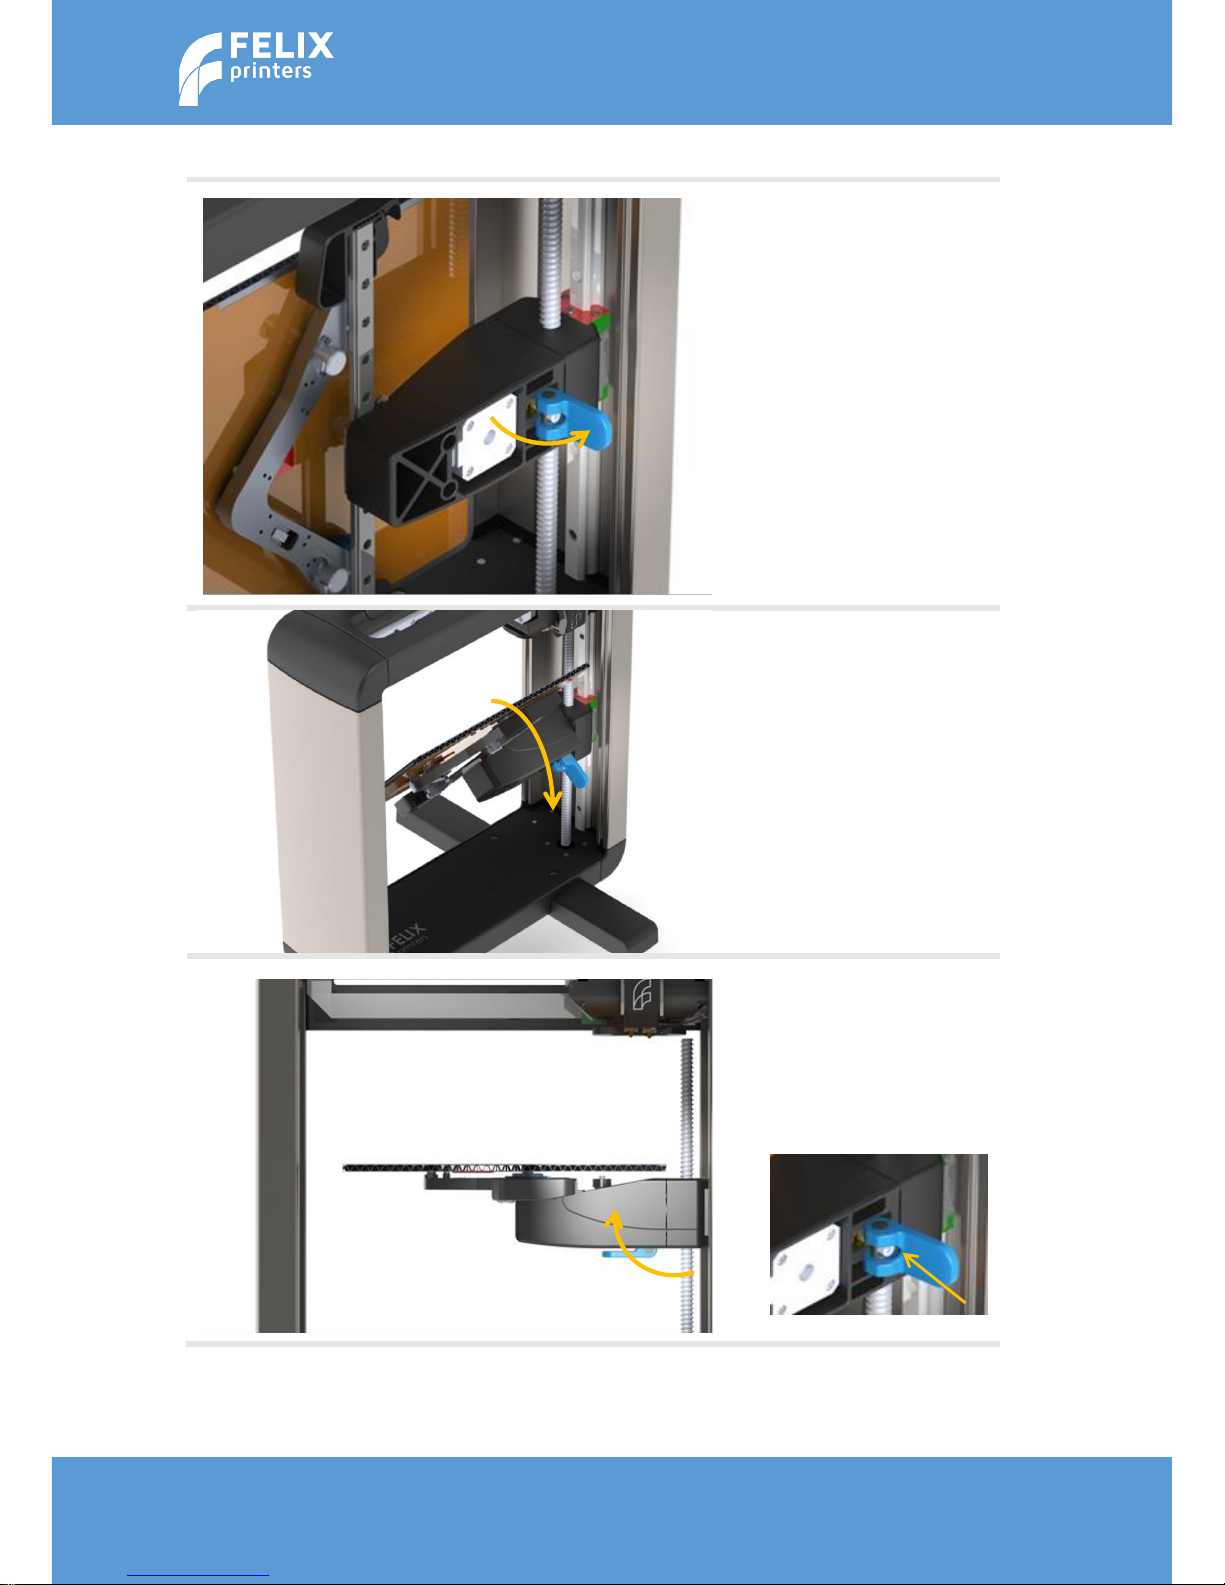
6.4 Prepare bed assembly.
Flip out lever
Turn table assembly, might cost a
little force to turn, and flip lever
back in place
Flip lever back to fasten the table
assembly.
NOTE: When turning the table very
often. The pretension on the table
locking mechanism could become less.
This makes the heated bed assembly
less stable. You can fix this by turning
the bolt clockwise.
Page 11

Page | 11
User Manual – FELIX Pro 1
Rev 3
www.FELIXprinters.com
support@FELIXprinters.com
6.5 Heated bed
Place the edge of the bed in the
slot, indicated with the red line.
Lower the bed until the three
magnets match the positions on
the bracket.
Make sure when looking
from above, the edge of the
bed is in parallel with the yaxis bracket edge.
Note: It is important that the
bed is placed properly to prevent
damage to the heater.
Note2: Do not take off the
bed while the bed is being
heated.
Page 12
Page | 12
User Manual – FELIX Pro 1
Rev 3
www.FELIXprinters.com
support@FELIXprinters.com
6.6 Install accessories
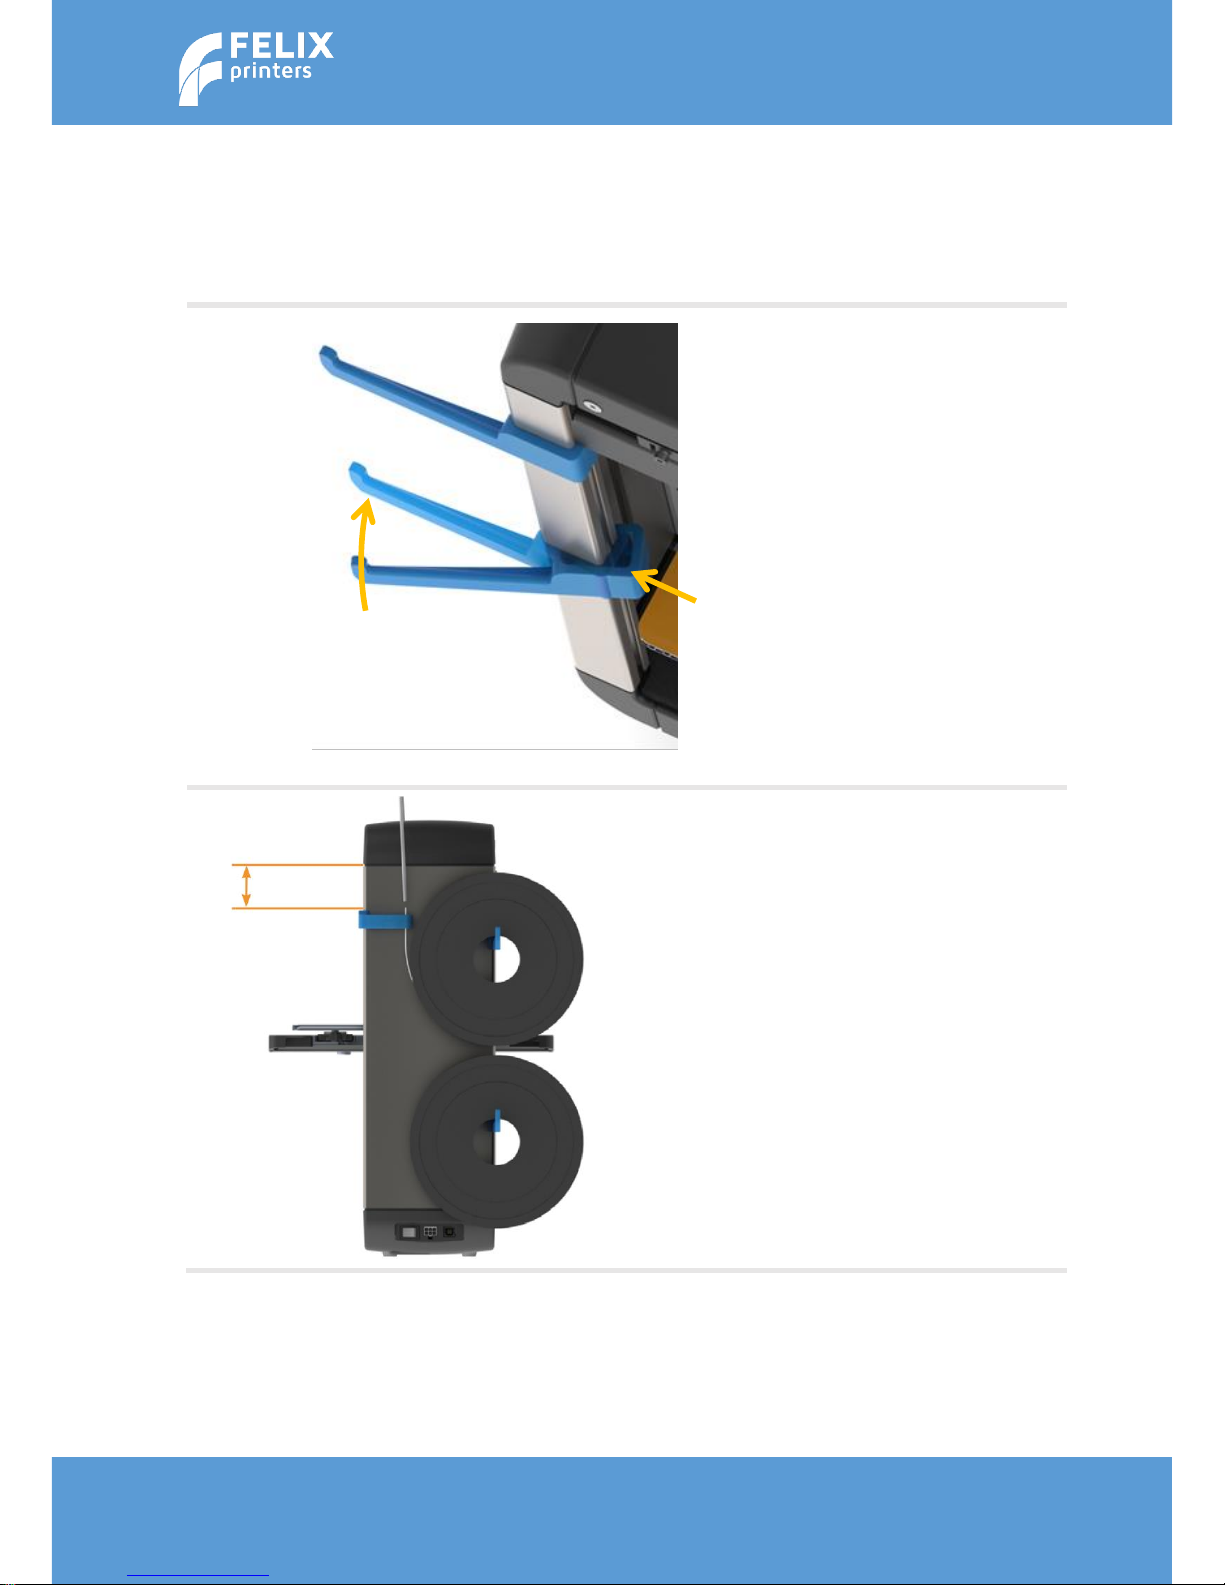
6.6.1 Filament arm and guide
Snap in the two spool holders on
the right back side of
the frame and the filament guide
on the right front side
of the frame.
Position the filament guide at
least 5 cm from the top and
place the filament spools on the
filament spool holders
so that the filament can unwind
clockwise
Click!
1
2
Page 13
Page | 13
User Manual – FELIX Pro 1
Rev 3
www.FELIXprinters.com
support@FELIXprinters.com
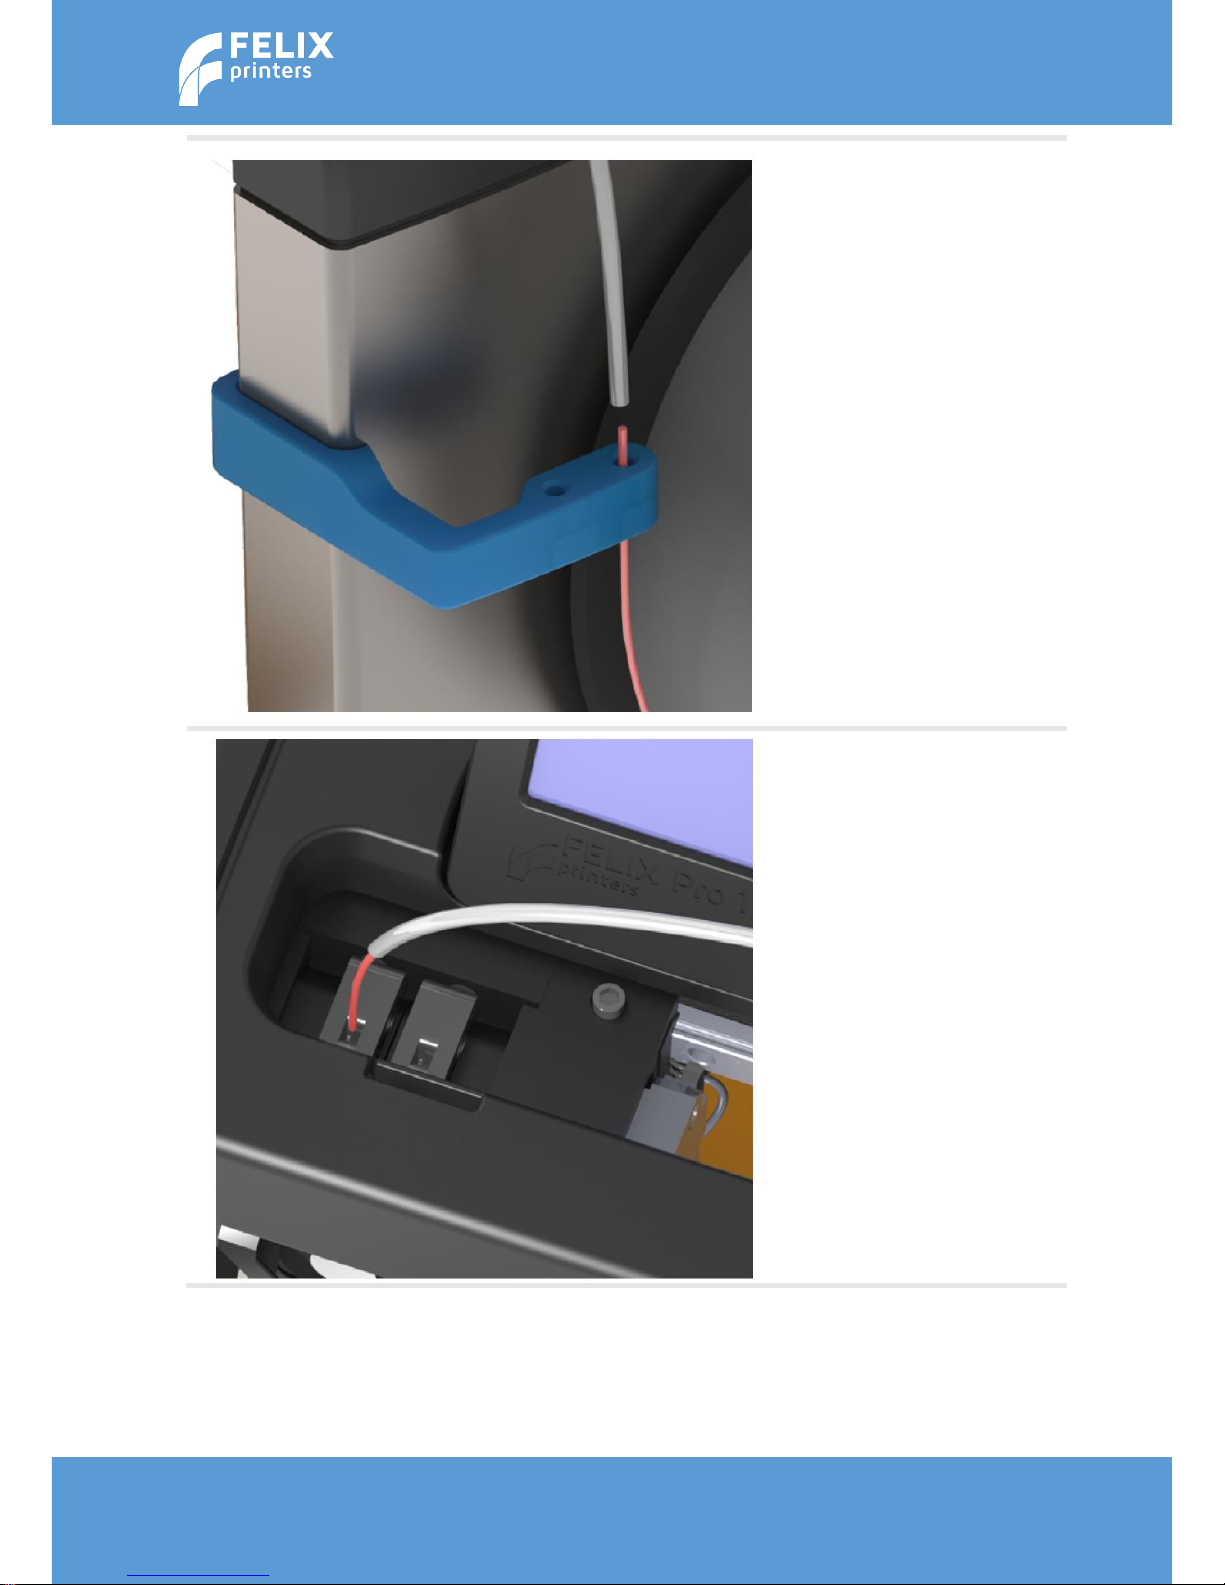
Take the end of the filament and
insert it through the
filament guide and then through
the Teflon tube. Repeat
this process for the second
spool.
The filament should come out
of the Teflon tube and
push it into the hole on the top
of the extruder.
Page 14
Page | 14
User Manual – FELIX Pro 1
Rev 3
www.FELIXprinters.com
support@FELIXprinters.com
6.6.2 CABLES
1. Turn the power off
2. Insert the power cable and connect with a power outlet.
3. Insert the USB cable and connect it to your computer
4. Turn the power on.
Caution:
Never turn off the printer for longer than 20 seconds while heaters are still above 100degC.
The heat in the heater part of the hot-end can travel upwards if the top part is not actively
cooled. This can cause a clog/filament jam in the hot-end.
Make sure the power is turned off when connecting the display. Failing to do so may cause
serious damage
The printer setup is done. Please
continue to the next step to make your
first print.
ON/OFF switch
Power inlet
USB
Page 15

Page | 15
User Manual – FELIX Pro 1
Rev 3
www.FELIXprinters.com
support@FELIXprinters.com
7 3D PRINT PREPARATIONS
Basically to ensure your 3D print finishes successfully, at least make sure the following is true:
A perfectly clean heated bed surface.
A calibrated printer
Proper installation of filament guiding accessories.
Good quality filament
The above points will be explained in more detail in this chapter.
7.1 Turn On the printer/General display unit overview
You can control the printer with the display unit. To navigate through the menu, rotate the button and
push the rotary button to execute a command.
Below is an overview of the main screen of the display unit.
E: 0.00mm
Mul: 100%
Buf: 0
189.1/ 190°
189.1/ 190°
55.3/ 55°
X: 0.00
Y: 0.00
Z: 0.00
Idle
Actual heater
temperatures.
Mul = Speed over
ride
Buf = Amount of
movement
commands pending
Extruder position
Actual position
of printer.
Fan speed
Target heater
temperatures.
Status
Page 16
Page | 16
User Manual – FELIX Pro 1
Rev 3
www.FELIXprinters.com
support@FELIXprinters.com
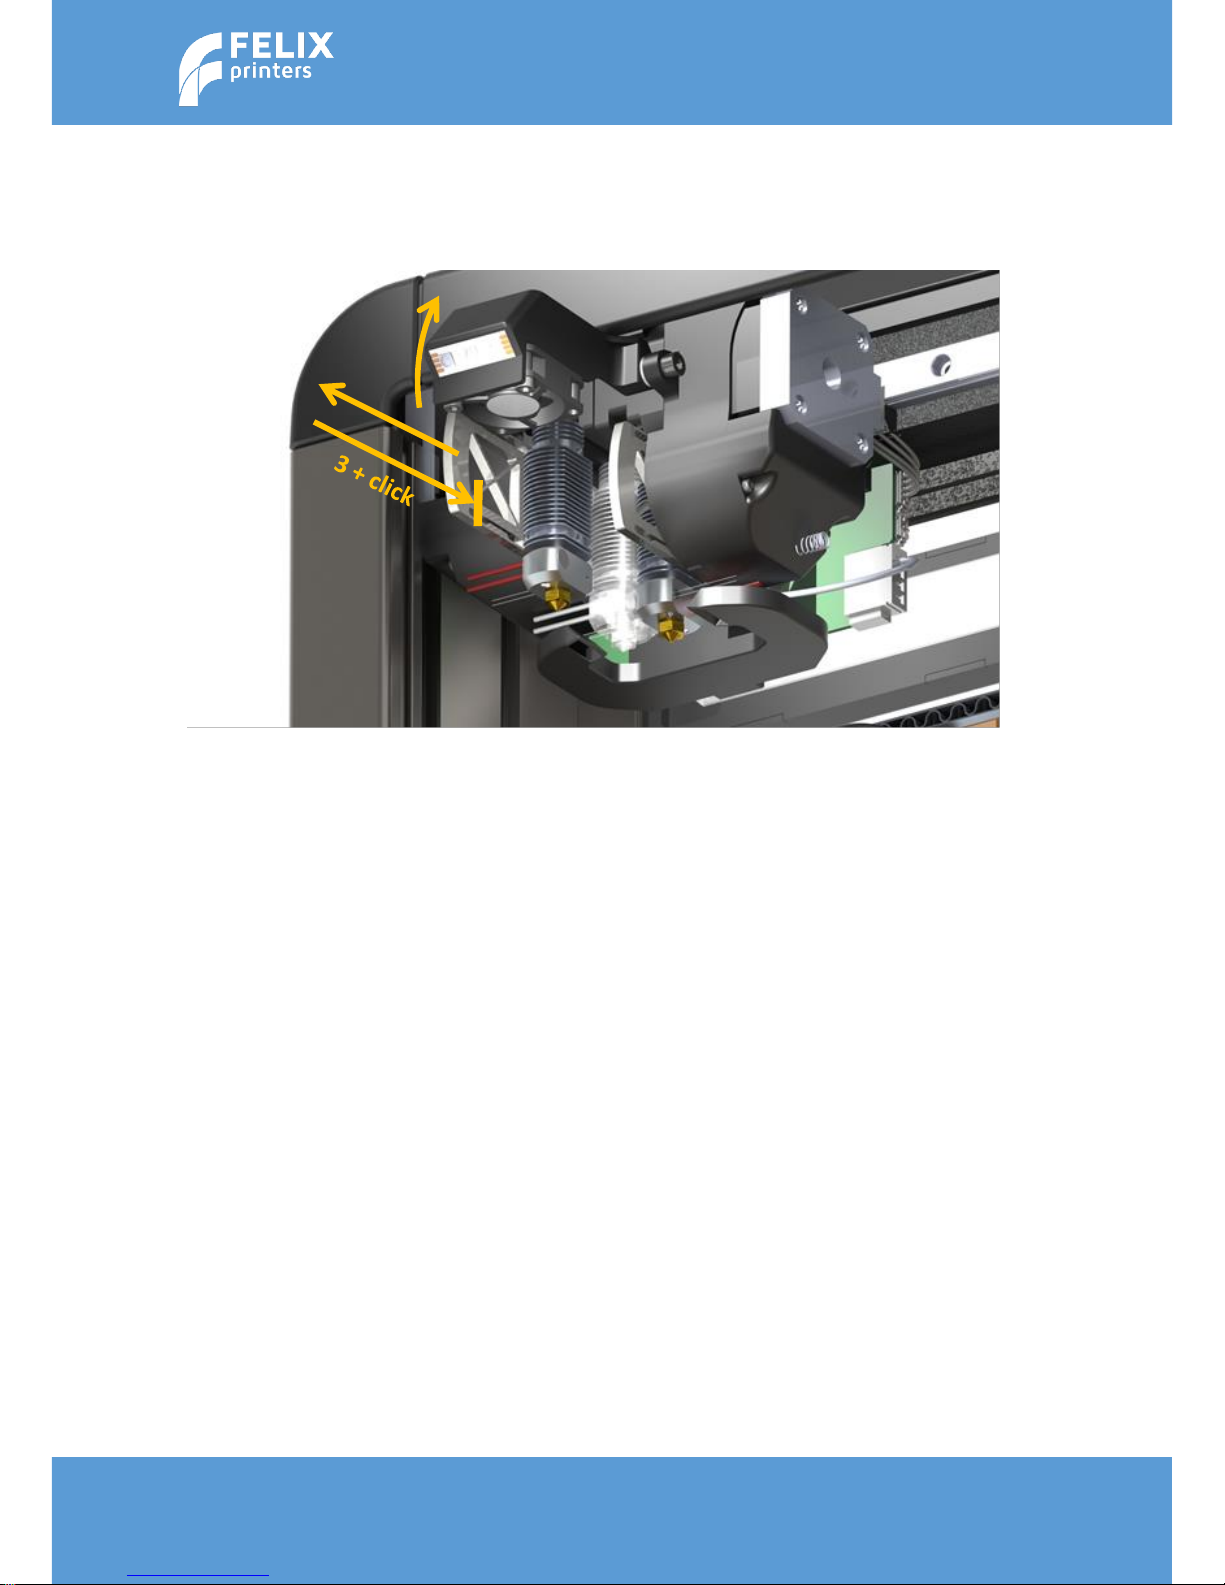
7.2 First checks
Due to shipping it could happen that the electrical contacts of the probe-mechanism inside the
removable hot-ends are slightly loosened. To ensure this is not the case, please do the following.
1. Open front flap
2. Pull out hot-end a few mm, by pulling on the aluminum flange of the hot-end, and firmly push it
backwards again to ensure the electrical contacts inside the hot-ends are properly connected.
3. When the printer is turned on, please make sure the status message z-sensor triggered!! Is not
shown in the main menu.
1
2
Page 17
Page | 17
User Manual – FELIX Pro 1
Rev 3
www.FELIXprinters.com
support@FELIXprinters.com
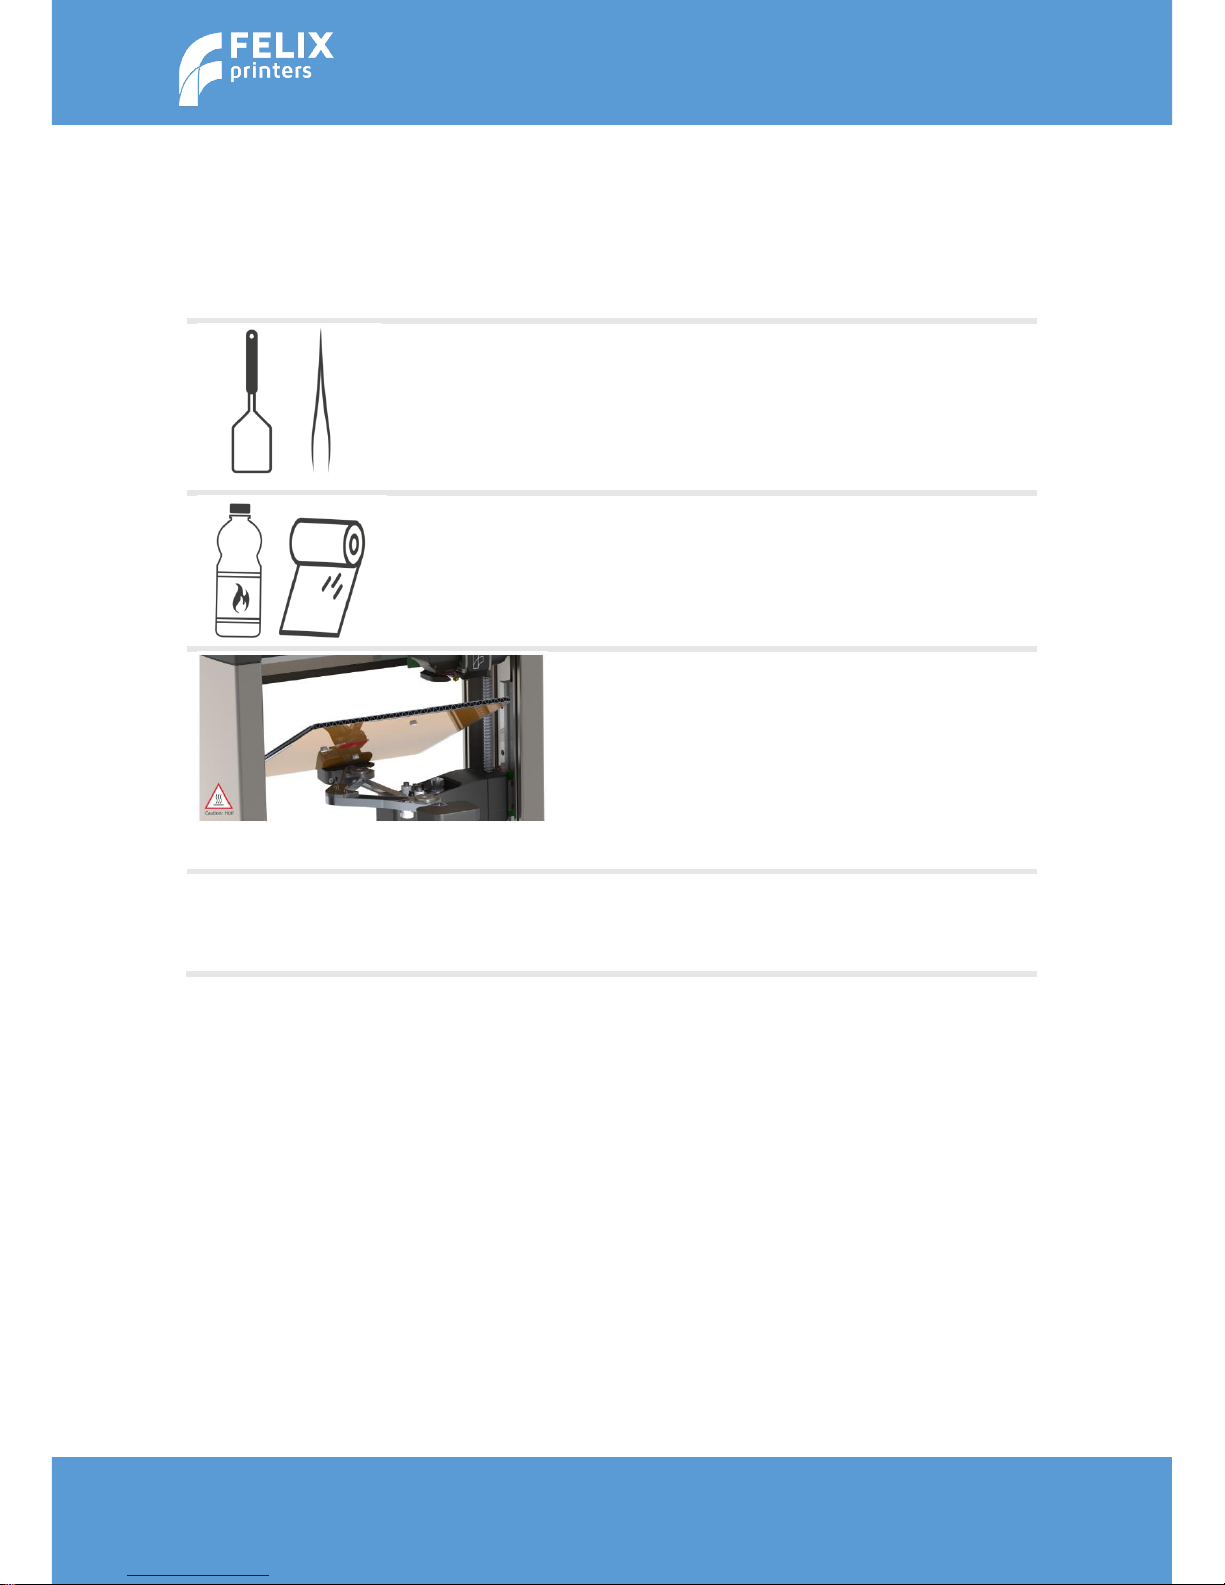
7.3 Clean the print-bed
A grease free bed is essential for proper print-object adhesion to the heated bed. Since the whole object
depends on the adhesion of the first layer, it is the most important layer and you should make sure this
layer finishes perfectly. When the objects comes loose, the print fails or worse it could damage the printer.
To clean the bed please do the following:
Clean the bed from plastic residue from a previous print
job. Scrape it of or carefully use the supplied tweezers for
smaller particles.
Degrease the bed with a detergent like alcohol, blue spirit
or acetone by putting it on a cloth or paper towel and
gently rubbing the heated bed surface.
Tip: For better access, you can remove the print bed.
When placing it back make sure it is placed back properly.
NOTE:
- The bed is able to reach temperatures of 100 °C, so
be aware of the current bed temperature.
- Make sure the contact points underneath the heated
bed are clean from debris and finger grease. This
could cause bad electrical contact.
IMPORTANT:
Please make sure before leaving your printer without supervision, that the first layer is printed
successfully.
Page 18
Page | 18
User Manual – FELIX Pro 1
Rev 3
www.FELIXprinters.com
support@FELIXprinters.com
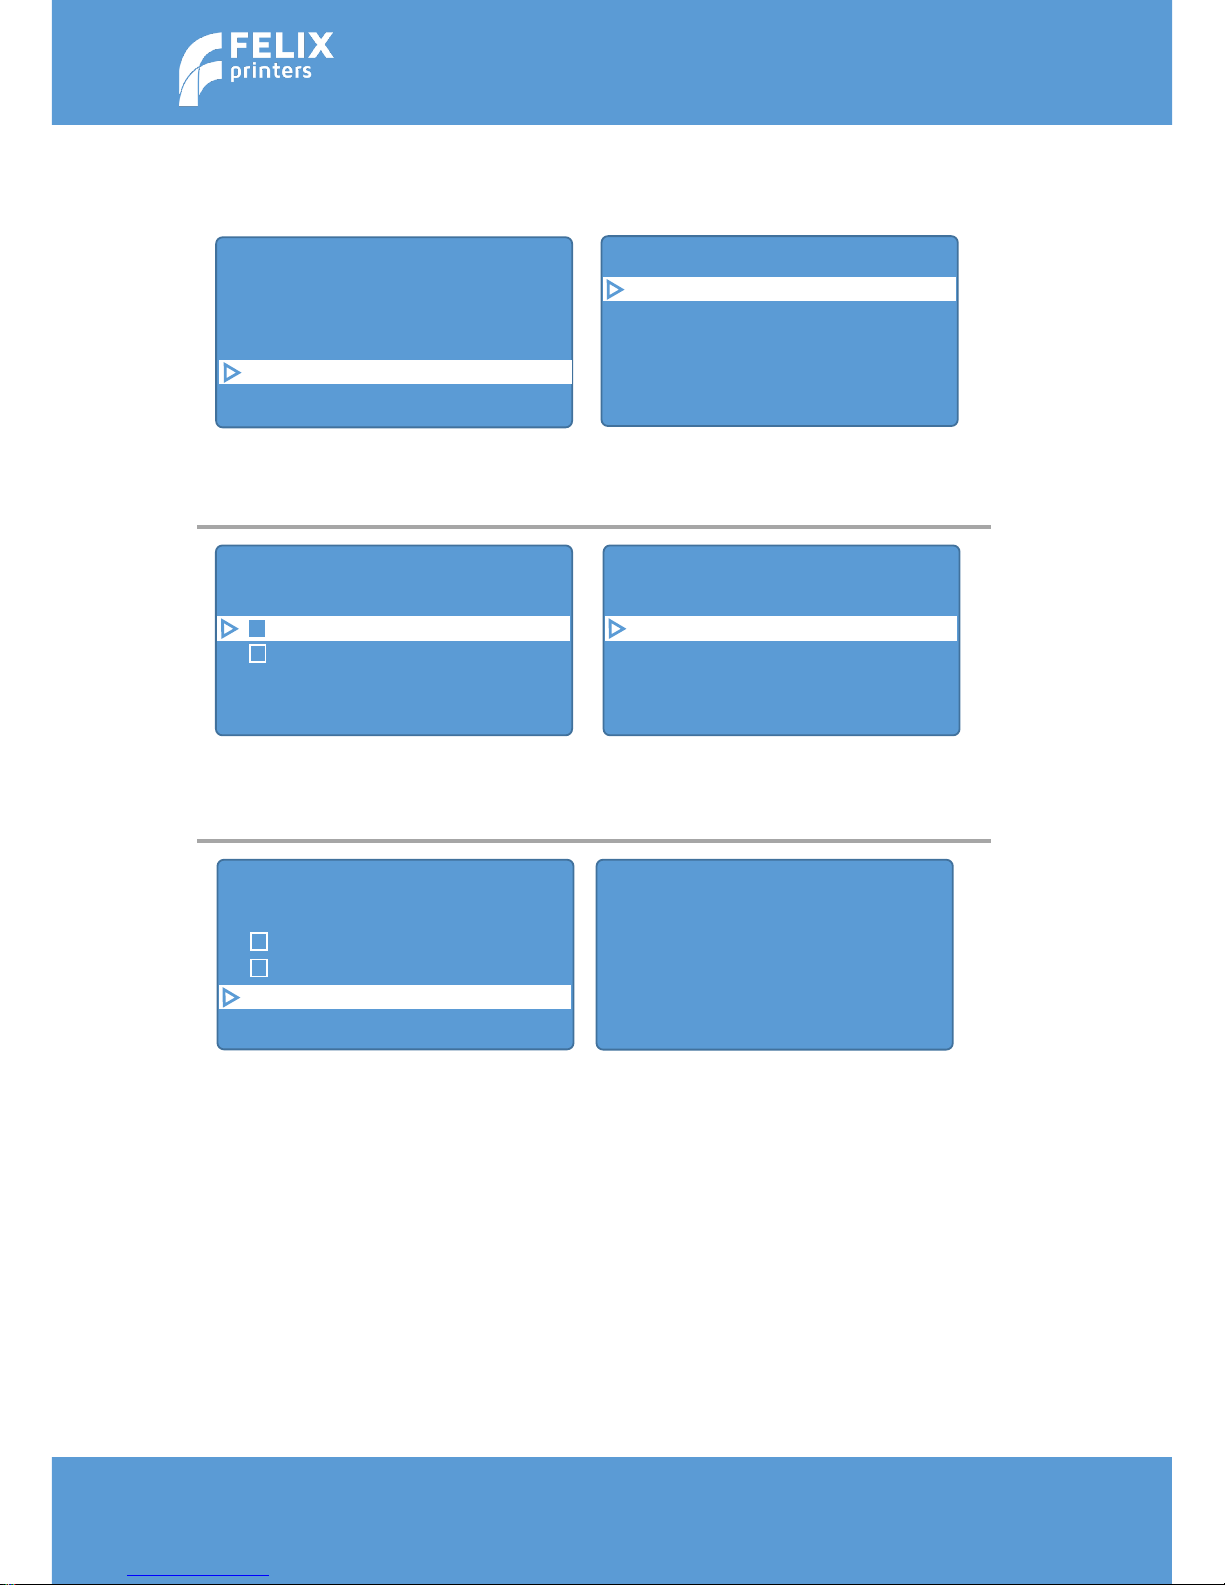
7.4 Turn on the heaters
Turn on the heaters by following the next steps on the display unit:
Back
Quick settings
Print file
Position
Extruder
Fan speed
Back
Bed temp : 20.1/ 55°C
Temp. 1 : 20.1/ 0°C
Temp. 2 : 20.1/ 0°C
Turn extr 1 off
Turn extr 2 off
E: 0.00mm
1 click = 1mm
E:190.3/190°C =>-0.10
0.0 m printed
Back
Bed temp : 20.1/ 55°C
Temp. 1 : 20.1/ 0°C
Temp. 2 : 20.1/ 0°C
Turn extr 1 off
Turn extr 2 off
Turn extr 1 off
Turn extr 2 off
Select extr. 1
Select extr. 2
Extr. Position
Set Origin
Turn extr 1 off
Turn extr 2 off
Select extr.
1
Select extr. 2
Extr. Position >>
Set Origin
Go to extruder settings.
Note: This example is for PLA
Select the bed temp. and rotate the
button until it is set to 55 °C and push
the button to confirm.
Scroll down and make sure extruder
1 is selected.
Set the temp. of extr. 1 to 190 °C.
Note: never turn the printer off
when the extruder is above 100 °C.
Wait until the extruder has reached
the set temperature of 190 °C.
Navigate down and select extr. position.
Page 19
Page | 19
User Manual – FELIX Pro 1
Rev 3
www.FELIXprinters.com
support@FELIXprinters.com
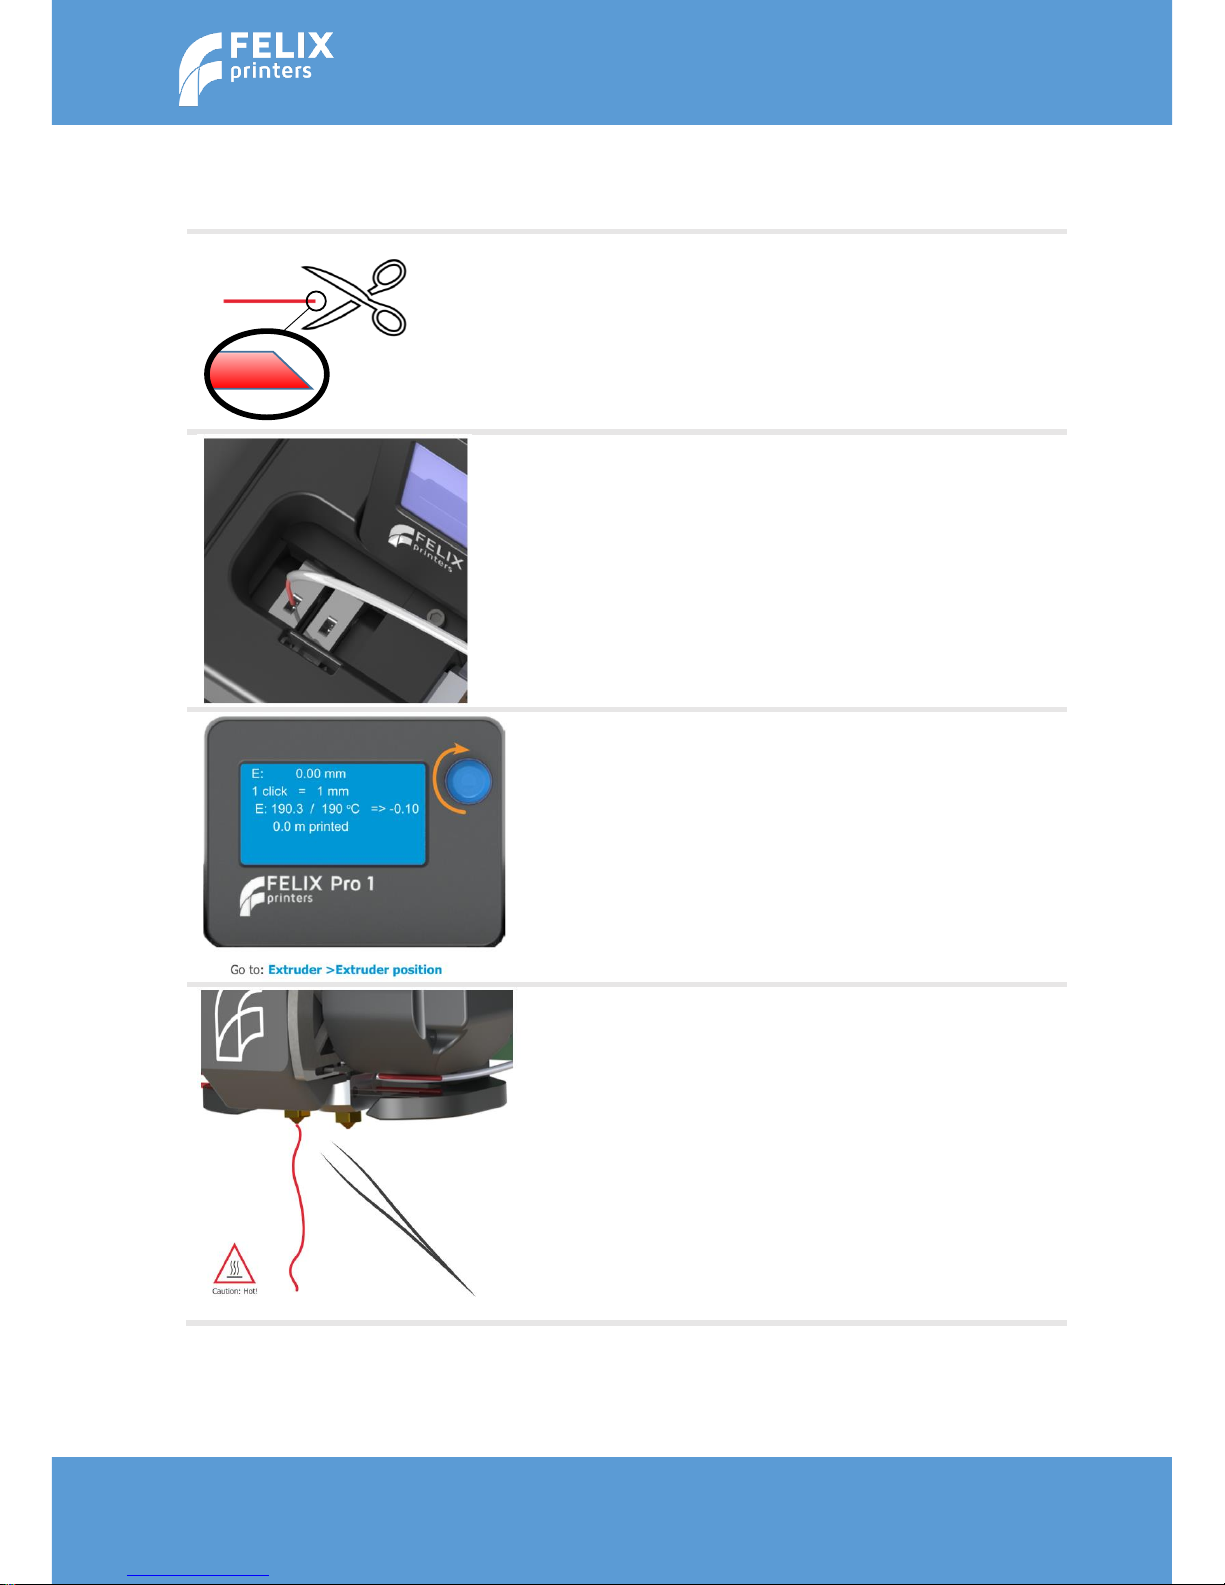
7.5 Load the filament
After setting heater temperatures, you can load the filament into the printer.
From previous step you have guided the filament
through the guiding tube and the filament guide.
The plastic that comes out of the tube it is
recommended to cut off the end in a skew manner
and throw the just cut off debris away.
Insert the filament into the left opening on top of
the extruder.
Push the filament in and rotate the button
clockwise until the filament is automatically pulled
in.
Keep rotating until a small thread comes out of the
extruder. Use the supplied tweezers to remove this
thread.
Page 20

Page | 20
User Manual – FELIX Pro 1
Rev 3
www.FELIXprinters.com
support@FELIXprinters.com
8 PRINT AN OBJECT WITH THE SD CARD INTERFACE
This chapter describes how to start a print-job in several ways. The printer understands gcode files. These
files are obtained by preparing a 3D file (STL, OBJ, 3DS, AMF) into a gcode file. This is called slicing.
We’ll cover printing standalone with an SD card and via a PC through the USB interface. To be sure the
delivered printer is working out of the box, it is recommended to start a print-job from the supplied SD
card.
IMPORTANT: Please make sure before leaving your printer without supervision, that the first layer is
successfully finished.
8.1 SD card print
If this is your first print with the FELIX Pro 1, it is recommended to confirm the printer is working properly
after unboxing by starting a print from the SD card.
Insert the provided micro SD card in
the slot with the logo facing up.
After inserting the SD card a menu will
pop up. Select test_print_1
The print will start automatically.
The print can also be started from the
main menu.
SD print -> Print File -> Select
test_print_1
The print will start immediately.
Page 21

Page | 21
User Manual – FELIX Pro 1
Rev 3
www.FELIXprinters.com
support@FELIXprinters.com
9 PRINTER SOFTWARE
We officially support two software programs. FELIXbuilder which requires a license and Repetier-Host for
FELIXprinters which is open source.
On the supplied SD card including reader, there are several items present.
Printer software
Sample slice objects
Documentation/User manuals
In principle the content of the SD card is the latest version when you receive it. Updates can be found on
our website in the download section. www.felixprinters.com/downloads
Page 22
Page | 22
User Manual – FELIX Pro 1
Rev 3
www.FELIXprinters.com
support@FELIXprinters.com
9.1 FELIXbuilder
Supplied with the printer we offer a year license of the FELIXbuilder 3D printer software. The function of
the software is to control the printer and to prepare 3D CAD files for printing this is called slicing.
This chapter will guide you through the installation process and to start your first print. The complete
manual of the software can be found on the SD card and also on our website. The software is available for
MS windows and Mac OS.
9.1.1 FELIXBUILDER FOR WINDOWS
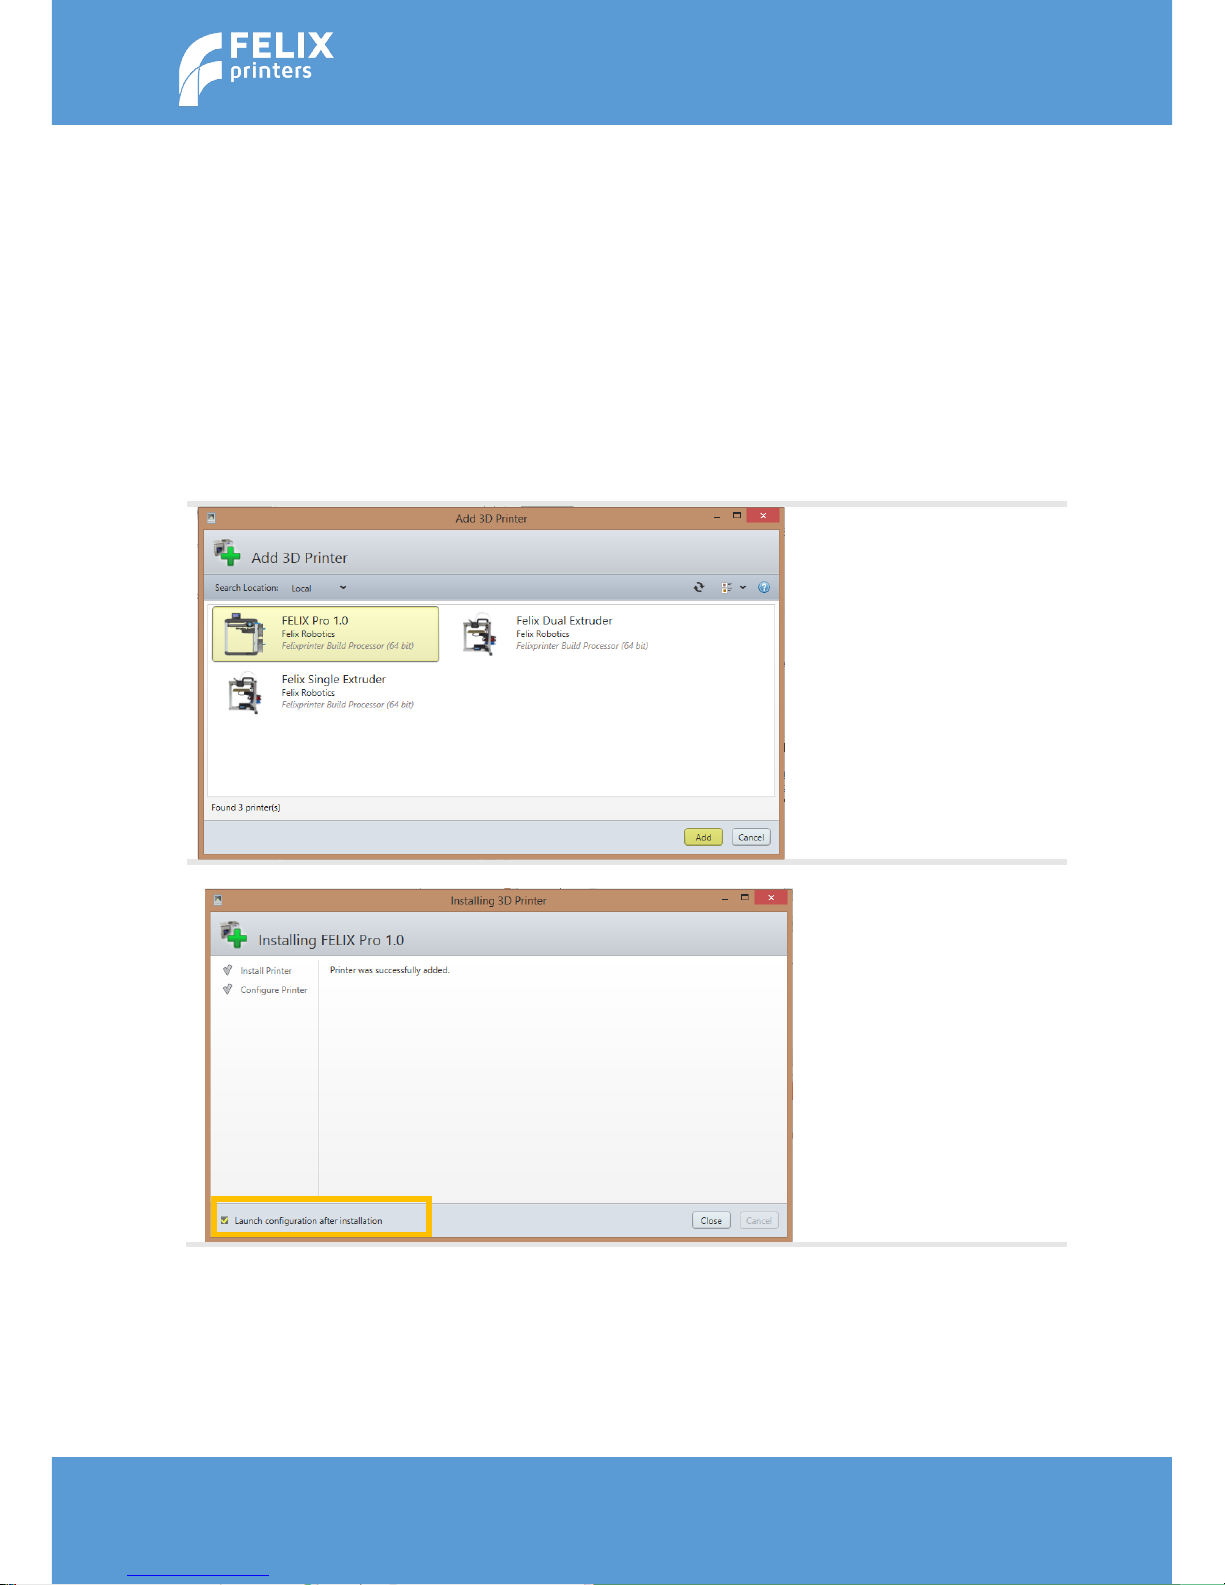
Run the FELIXbuilder.exe file and follow instructions. After installation the software will ask to add a
printer. Select yes and the screen below will pop up.
Select the FELIX Pro 1.0 and
press the Add button.
After the software installed
the printer. The following
screen should be shown. In
the left bottom corner make
sure the “launch
configuration after
installation” is selected. And
press the “Close” button.
Page 23

Page | 23
User Manual – FELIX Pro 1
Rev 3
www.FELIXprinters.com
support@FELIXprinters.com
Go to the edit profiles menu.
To make sure you have the
latest updated slicing
profiles.
The OEM profiles should
indicate version 0.0
After a new install there
should be no profiles
present. If there are profiles
from a previous installation,
please delete the existing
profiles, to make sure you
start with a clean slate. Press
the red X button behind the
shown fields.
Now update the profiles with
the Update button.
Page 24

Page | 24
User Manual – FELIX Pro 1
Rev 3
www.FELIXprinters.com
support@FELIXprinters.com
When the configuration screen
launches for the first time, the
configuration on the left should
be shown. This should be
changed for the first print.
Note the temperatures and the
build platform selection.
Make sure the configuration
matches the left picture.
Important is:
- Make sure the heated bed
is enabled.
- Disable the 2
nd
nozzle. For
our first printable object
we will print single head.
- Make sure the
temperatures show 180 °C
when PLA is selected!!
Then press OK
Page 25

Page | 25
User Manual – FELIX Pro 1
Rev 3
www.FELIXprinters.com
support@FELIXprinters.com
Start the FELIXbuilder software
and open the Registration
Wizard by clicking on the tool
icon.
When installing the software
for the first time this will
happen automatically when
you start the
FELIXbuilder software.
Select the License Option and
click next
Copy the system ID from the
registration wizard and go to
the Materialise password
website by clicking the link.
Make sure you have your
voucher code ready.
Follow the instructions on the
materialise website. You will
finally obtain a license key
which you should use here.
Page 26

Page | 26
User Manual – FELIX Pro 1
Rev 3
www.FELIXprinters.com
support@FELIXprinters.com
Browse for the license key you
stored on your computer in the
previous step and press
the next button
Your license key is registered
successfully and your software
is ready to use. Press the
finish button to exit the
registration wizard. You can
now use the FELIXbuilder
software.
Page 27

Page | 27
User Manual – FELIX Pro 1
Rev 3
www.FELIXprinters.com
support@FELIXprinters.com
Click on the platform button.
Choose the printer you want to
print your object on. (The list is
only longer than one item, when
you have more printers installed
in the configuration menu or
when you already have a license
for a different FELIXprinter)
Click on the Part button and
search for an STL file. As
example you could use this file.
http://www.felixprinters.com/d
ownloads/print_files/test_print
_files/FELIXprinters_gadget.STL
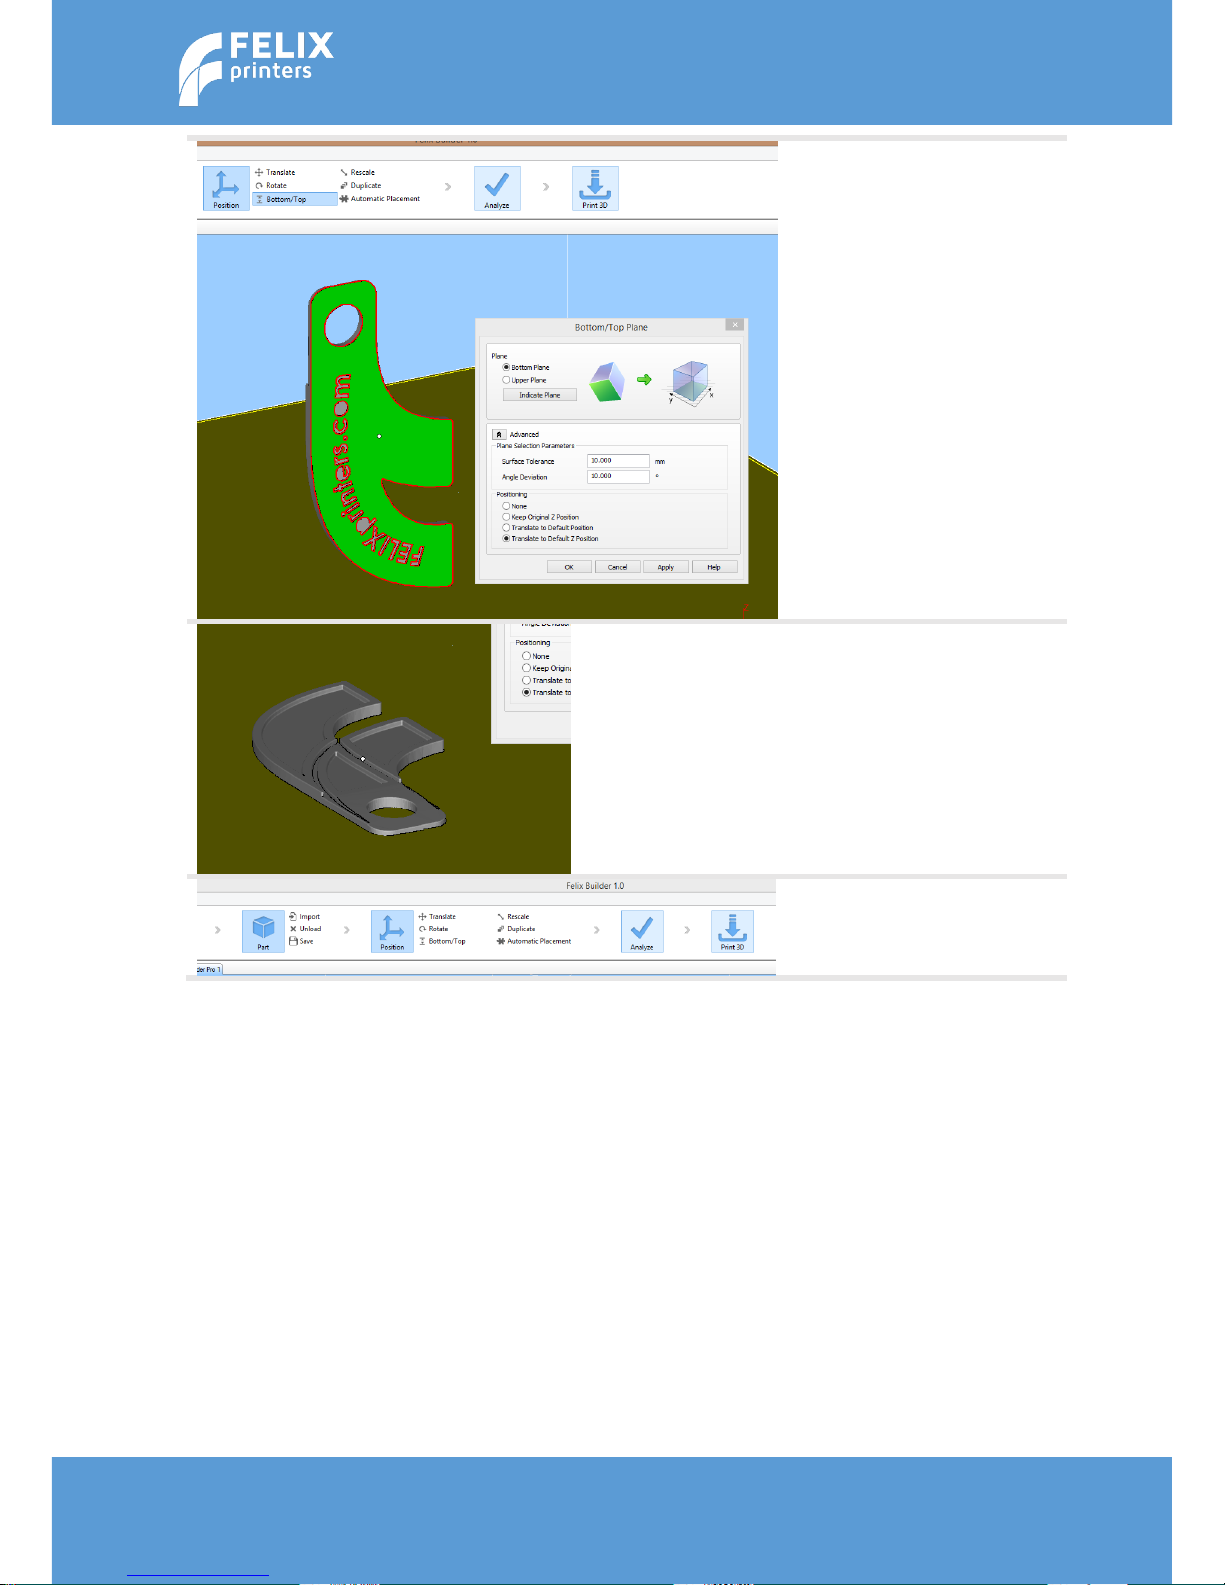
Click the position button.
If you want to re-orient an
object an easy way is to indicate
which plane should touch the
build plate.
Press the Bottom/Top button.
Press indicate plane and select
which plane should be on the
bottom.
Page 28
Page | 28
User Manual – FELIX Pro 1
Rev 3
www.FELIXprinters.com
support@FELIXprinters.com
Then Press the advanced
button. Make sure the
configuration matches the
picture on the left. This way the
object will re-orient and drop
the object to the build plate.
Press Ok or Apply.
The object will orientate so that
the indicated plane will touch
the print bed.
Now select the print button and
the print menu will popup.
Page 29

Page | 29
User Manual – FELIX Pro 1
Rev 3
www.FELIXprinters.com
support@FELIXprinters.com
Match the platform settings in
the picture from the left.
Make sure the printer status is
Online if this is not the case the
USB connection is not
established yet. Click the
preferences button to establish
a connection.
In the configuration menu, press
the reconnect button. The
connection status should turn
green.
Page 30

Page | 30
User Manual – FELIX Pro 1
Rev 3
www.FELIXprinters.com
support@FELIXprinters.com
Close the configuration menu
and press submit job.
The printer will first slice the
object and the printer should
start the print job shortly after
that.
Page 31

Page | 31
User Manual – FELIX Pro 1
Rev 3
www.FELIXprinters.com
support@FELIXprinters.com
9.1.2 FELIXBUILDER FOR MAC
Follow below instructions to install.
Run FELIXbuilder.dmg and
install FELIXbuilder by
dragging the symbol to the
Applications folder.
Approve the end-user license
agreement.
Enter the voucher code that
you have received with the
FELIX 3D printer and press
validate.
The software will be
registered and you will get
notified of the validity
period of the voucher.
installation
Accept the terms to finish the
registration.
Page 32

Page | 32
User Manual – FELIX Pro 1
Rev 3
www.FELIXprinters.com
support@FELIXprinters.com
Select the FELIX Pro 1 and
press continue.
Optional: select two colors of
filament. During the
preparation of multiple STL
files it helps you to determine
which object is printed with
which nozzle.
1. Click on Print
2. Click on ‘Edit Profiles’.
This will open the Profile
Editor screen.
After a new install there
should be no profiles present.
If there are profiles from a
previous installation, please
delete the existing profiles, to
make sure you start with a
clean slate.
1. To update the machine
settings and the latest
filament settings, click on
the ‘Update profiles’
button.
2. When the profiles are
updated, click OK.
Page 33

Page | 33
User Manual – FELIX Pro 1
Rev 3
www.FELIXprinters.com
support@FELIXprinters.com
You are now ready to use
FELIXbuilder together with
your FELIX Pro 1. Now it is
time to make a first print.
First of all it is important to
have an STL file. As example
you could use this file:
http://www.felixprinters.co
m/downloads/print_files/tes
t_print_files/FELIXprinters_g
adget.STL
When the part is
downloaded, go back to
FELIXbuilder and click on
‘Import Part’.
Page 34

Page | 34
User Manual – FELIX Pro 1
Rev 3
www.FELIXprinters.com
support@FELIXprinters.com
A menu will open. Select the
right STL file and click on
open.
The object will be placed onto
the build platform.
In the menu, click on
‘Transform’ to adjust the
object.
If you want to move an
object, click on ‘Move’ in the
left hand panel.
The selected object can be
moved to any location by
dragging the yellow, red or
green slider or by clicking and
dragging the object.
To place the object flat onto
the build platform, click on
‘Drop model’.
Page 35

Page | 35
User Manual – FELIX Pro 1
Rev 3
www.FELIXprinters.com
support@FELIXprinters.com
Now it is time to connect the
3D printer to the computer.
Plug the USB cable into the
Pro 1 and into your computer.
Turn on the 3D printer.
Go to the ‘Print’ tab,
Go to ‘Send to printer’,
Open the selection window
and click on refresh.
Select the Pro 1
Click on connect
To ensure the FELIXprinters
test file will be printed like
intended it is important to
match the settings on your
FELIX Pro 1. Please make sure
the print settings displayed
on the left, match with your
Print settings.
When the Print settings are
matched, click on Start
Printing.
Page 36

Page | 36
User Manual – FELIX Pro 1
Rev 3
www.FELIXprinters.com
support@FELIXprinters.com
The printer will first slice the
object and the printer should
start the print job shortly
after that.
In the bar displayed below
the ‘Pause’ and Stop’ button,
you are able to track the
progress of the current print
job.
Page 37

Page | 37
User Manual – FELIX Pro 1
Rev 3
www.FELIXprinters.com
support@FELIXprinters.com
9.2 Slicing profiles
To get the most out of your printer, you need to select the correct slicing settings for each print job.
Choosing the correct settings, can have a big impact on the print output.
We tried to make it as simple as possible. In this chapter we will explain the basics for in depth information
please read the FELIXbuilder full manual.
In the FELIXbuilder there are several slicing profiles present. We will first explain the several options. Then
we will explain what is a best practice.
Below is an overview of the settings:
Layer Height. This determines the layer height of each printed layer. The smaller, the nicer the object will
look, but it will take more time to print:
0_Normal Detail (200 µm)
1_High Detail (150 µm)
2_Very High Detail (100 µm)
Build Strategy. When you’ve chosen a layer height it is recommended to choose the corresponding build
strategy. In the strategy, the print speeds are configured.
0_Single Head_Normal Detail
0_Dual Head_Normal Detail
1_Single Head_High Detail
1_Dual Head_High Detail
2_Single Head_Very_High Detail
2_Dual Head_Very_High Detail
When you for instance choose the 0_normal Detail setting, it is recommended to choose the 0_Single
Head_Normal Detail or 0_Dual Head_Normal Detail for the build strategy.
Page 38

Page | 38
User Manual – FELIX Pro 1
Rev 3
www.FELIXprinters.com
support@FELIXprinters.com
In general for the build strategy settings, the higher the detail, the longer the print job will take. But
choosing the normal detail build strategy setting (which enables relatively high speeds) with a high detail
(which requires lower speeds) layer height is not a good match.
Support strategy. Each new layer is build on top of an old layer. So a new layer needs to build onto a solid
base. In some cases this base is not enough (for example the layer has a very small build surface or the
object or part of the objects starts in mid air.) Support material can solve this problem. The FELIXbuilder
software is able to generate support for two cases
1. Support generation with the same material as the object itself
2. Support generation with the 2
nd
nozzle. This can be either a different color or for instance soluble
material which can be dissolved afterwards.
Printing the support with the same material and only using one nozzle, is a lot faster but the support is
more difficult to remove afterwards. Also it is in some cases necessary to dissolve the support material,
because you are not able to reach the required support material with a tool.
In general, we recommended to design your object to require the least amount of support material.
Support is required when:
Angles with respect to
the build plate are
less than 45 degrees
When you print an
object with empty
space in it between.
The standard selectable options in the FELIXbuilder software are:
0_No Support. This is the best option when you print an object which doesn’t require support
material at all.
45 degrees
slope
Hollow space
Page 39

Page | 39
User Manual – FELIX Pro 1
Rev 3
www.FELIXprinters.com
support@FELIXprinters.com
1_Support – Same material as part. This is the best option when printing with support material
which is the same as the printed object. This is the fastest method. The support is printed in such
a way that it is still easy to remove mechanically. The support is only effective when you can
physically reach it with a pliers for instance.
2_Support Soluble. This is the best option when printing with soluble support material like PVA.
The support is printed as close as possible to the object, to obtain the best results. Only suitable
for dual head printing.
3_No Support + Extra Part Adhesion. This option prints no support, but creates a raft on which the printed
object will be printed. This is useful, when you want to print a tall object with a small footprint. This
object can sometimes get knocked over. The raft ensures a solid base.
4_Support – Same material as part + Extra Adhesion. The same as point 3, but with support generation
for the same material as the nozzle.
If in some cases above support strategies are not sufficient, you are able to create your own profile.
Please refer to the full manual for further instructions.
Page 40

Page | 40
User Manual – FELIX Pro 1
Rev 3
www.FELIXprinters.com
support@FELIXprinters.com
10 PRINT FINISHED
Congratulations with your first 3D print on the FELIX Pro 1.
10.1 Remove the 3d printed object
When the print-job is
finished the display will
indicate that the 3D printer is
cooling down.
To remove large objects
(larger than about
100x100mm) it is
recommended to take off the
print bed.
Before removing the object it
is recommended to let the
bed cool down to 30°C.
NOTE: Make sure the heated
bed is not heating, when
removing the bed!!
Page 41

Page | 41
User Manual – FELIX Pro 1
Rev 3
www.FELIXprinters.com
support@FELIXprinters.com
Don’t pull the object straight
up, but twist it and start
peeling at the edges.
edges or use a spatula.
Remove support material
with a small pliers, or if you
are using PVA dissolve it in
water.
Page 42

Page | 42
User Manual – FELIX Pro 1
Rev 3
www.FELIXprinters.com
support@FELIXprinters.com
11 AUTOMATIC CALIBRATION
For 3d printing the first layer is the most important layer, because it is the basis of a print job, which
sometimes can take 70+ hours to finish. An improperly printed first layer is mostly the cause of a failed
print. With the automatic calibration features properly executed, the chance of failure will be minimized.
11.1 What does the calibration do?
The FELIX Pro 1, is able to calibrate the following automatically.
- Physically leveling the build plate. To ensure the distance between the bed and the nozzles is the same
over the whole build plate.
- Detecting the height difference between the two hot-ends. To ensure when printing dual head prints
that the nozzles print at the same height. This is necessary, because the right print-head when rotated
to the front is by design lower than the left nozzle. Due to possible production tolerances, this distance
needs to be accurately calibrated.
11.2 When to calibrate?
We recommend to do the auto calibration in the following cases:
- After replacing a hot-end.
- After replacing a heated bed.
- When the first layer is not sticking to the bed
- When you see that the lines on the first layer, significantly differ in thickness.
- When the printer leaves the factory everything is calibrated. Due to shipping, the chance is present
that the bed is not completely level anymore. So it is recommended to level the bed after unboxing
the printer. If you follow the quickstart guide, the first test-print contains the autoleveling routine.
The x, y distance between both hot-ends still needs to be done manually. (only necessary after changing a
hot-end and if you want to print in dual head mode). See chapter 12 for more information
The calibration mechanism is dependent upon the following features on the printer.
- The build in probe-sensor in the hot-end.
- The leveling gears underneath the bed.
When the auto bed leveling routine is started. The probe/hot-end will touch the bed at 4 points. After this
measurement the bed leveling gears will start to turn to make the bed level. (level in this case means that
the distance between the build plate and the hot-end is the same over the whole bed surface).
11.3 How to do the calibration?
We can start the calibration routines at the moment only by running specific print-files which are located
on the supplied SD card or can also be found on the website.
http://www.felixprinters.com/downloads/index.php?path=print_files%2FFELIX_Pro_1%2Fcalibration_file
s/
The file names are:
00A_Auto_bed_leveling_Pro1.gcode, this file calibrates the leveling of the bed.
Page 43

Page | 43
User Manual – FELIX Pro 1
Rev 3
www.FELIXprinters.com
support@FELIXprinters.com
00B_Extruder_Height_Calibration_Pro1.gcode, this file calibrates the height difference between the hotends
Page 44
Page | 44
User Manual – FELIX Pro 1
Rev 3
www.FELIXprinters.com
support@FELIXprinters.com
12 DUAL HEAD PRINTING
12.1 X,Y Calibration between nozzles
At the moment of writing the calibration is not properly implemented in the FELIXbuilder
software. This will be fixed in the next software release being released in 2016. To do this
properly we have to do this via the display unit at the moment.
There are 3 calibrations for the printer.
1. Mechanical bed leveling.
2. Head height between nozzles, recommended when changing a hot-end
3. Distance in X, Y direction between the nozzles. Recommended when changing a hot-end
After changing a nozzle, it is recommended to recalibrate the printer with points 2 and 3.
described above. How to do this will be described below.
1. Insert the original SD card supplied with the printer.
2. Navigate to the subfolder
2_printfiles_assembly
and start the
00_Full_calibration_routine_P1.gcode.
The printer will level the bed and also calibrate
the height between the nozzles.
Import ant note: When starting this routine it will probe the bed at several positions.
Make sure after probing the bed moves downward. If this is not the case the probing
sensor is not working properly and the calibration will be wrong.
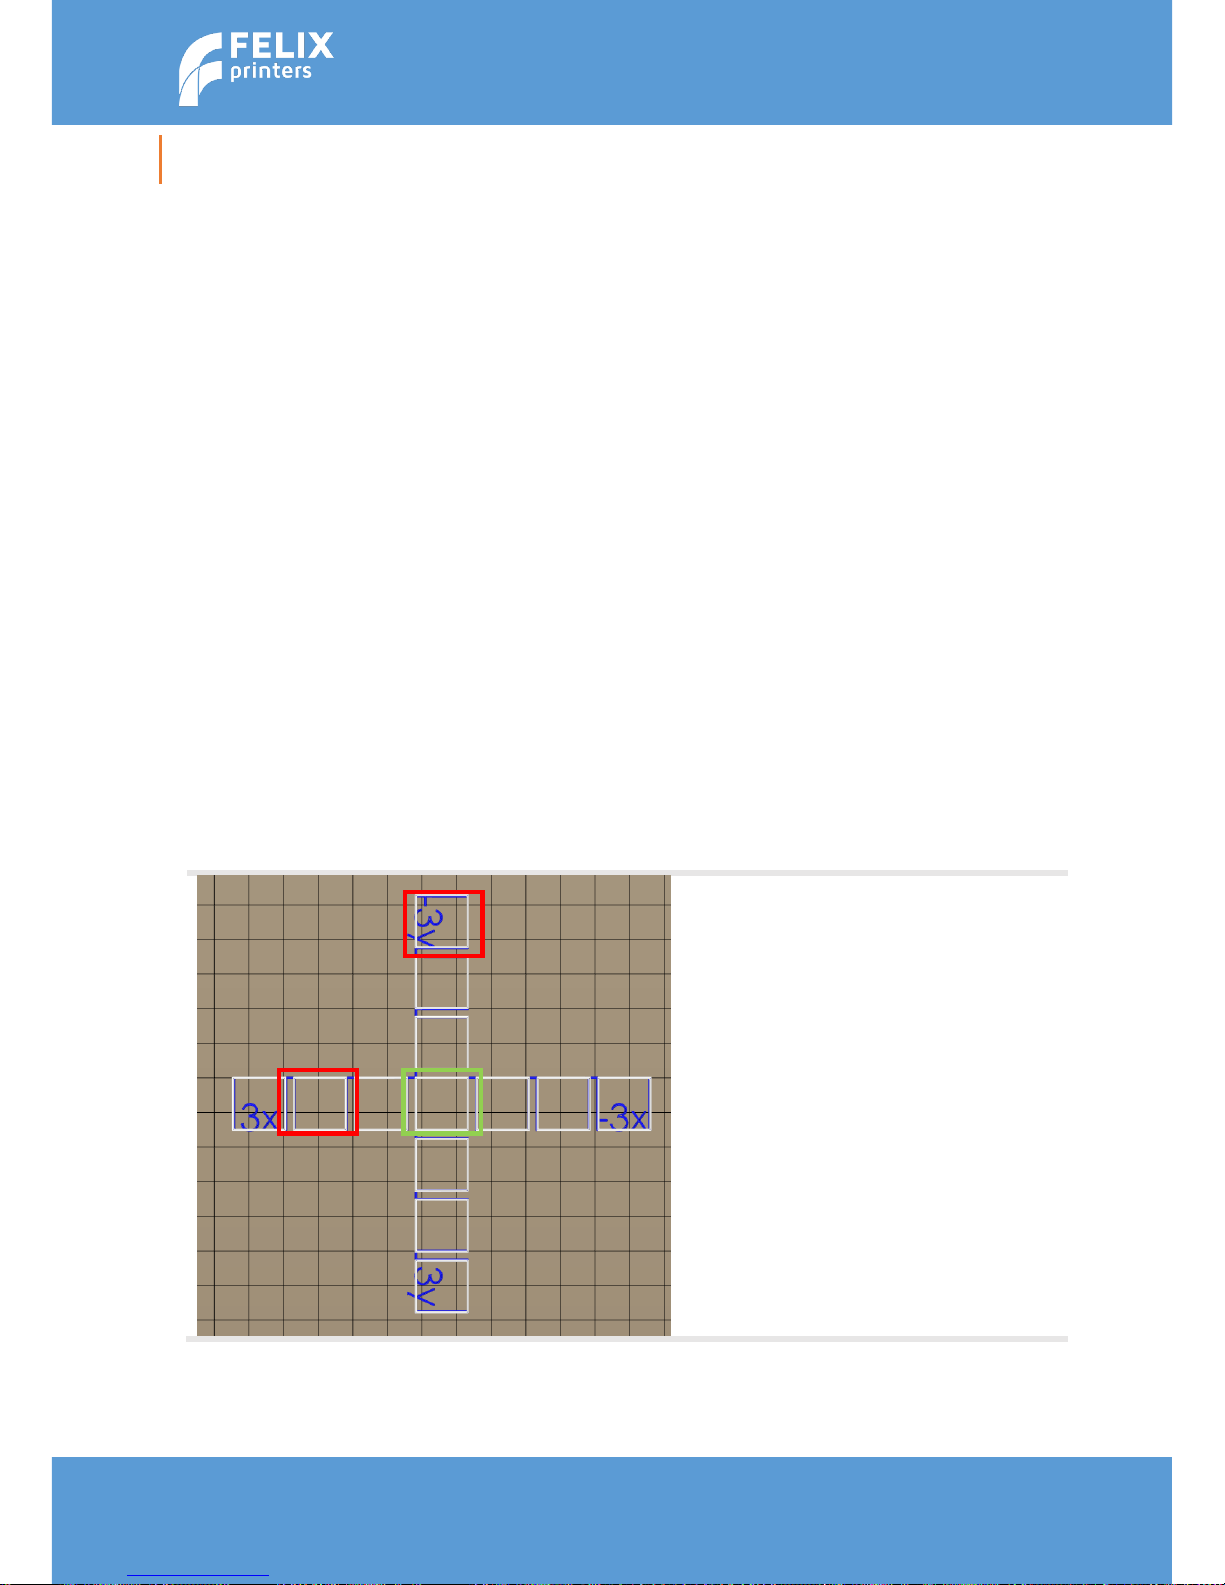
3. After successfully calibrating the height between the nozzles. Start the
02_dual_head_XY_calibration_P1_v6.gcode
file.
After starting the calibration print. The
figure on the left will be printed. A print
which consists of two layers. Each layer
printed with a separate nozzle.
Note which squares match best in x and
y direction. In this example we will take
the -3y square and the 2x square.
When the green middle square aligns
best, the calibration is successful, if this
is not the case then follow next steps
to recalibrate.
Page 45

Page | 45
User Manual – FELIX Pro 1
Rev 3
www.FELIXprinters.com
support@FELIXprinters.com
Position
Extruder
Fan speed
SD card
Debugging
Configuration
Back
General
Language
Acceleration
Feedrate
Extruder
Configuration
Stored in EEPROM
Back
Select extr. 1
Select extr. 2
X-Offset: 16.00
Y-Offset: 0.00
Steps/MM: 147.0
Acceleration
Feedrate
Extruder
Heating Bed
Store to EEPROM
Load f. EEPROM
In main menu scroll down to
configuration.
Scroll down to extruder
Scroll down and make sure extruder
2 is selected.
Then set the new x and y offsets.
The new x offset 16 + 0.2 = 16.2mm
Then new y offset is 0 - 0.3 = -0.3mm
After changing values, go Back one menu
It will show the message above. Click
the rotary button to dismiss this
message. And go all the way back to the
main menu.
Please print the 02_... file again to check
if calibration values have the correct
results. If this is not the case, please
repeat this process.
Store the changed values to memory.
If you don’t do this, values will be lost
after turning off power.
Back
Select extr. 1
Select extr. 2
X-Offset: 16.20
Y-Offset: -0.30
Steps/MM: 147.0
Page 46

Page | 46
User Manual – FELIX Pro 1
Rev 3
www.FELIXprinters.com
support@FELIXprinters.com
13 FILAMENT DETECTION
The filament detection is implemented to prevent failure of a print job due to failure of filament. This
saves a print-job which can save a lot of time and loss of money.
The filament detection sensor does the following:
Detect if there is filament present.
That filament is slipping.
There is a clog in the extruder
In rare cases when filament gets tangled on a spool
When there are blobs on the filament and throughput stagnates.
When filament is too thin.
The filament detection is basically a wheel that runs along with the filament. The controller constantly
compares the amount of flow with the sent out extruder steps. If the difference is too large, an error will
be displayed. “Click to reheat”.
See section trouble shooting for more information what could be the root cause for this issue.
13.1 Manually turn off filament detection
If for some reason the filament detection seems to fail, or in your situation it is not required or
unwanted. You can disable it manually via the manual control panel in FELIXbuilder.
You basically send some gcode commands directly to the printer in the send command text box. This is
the required command to disable the filament detection.
M602 S0 P1
Note: The filament detection function is restored, when you reset or restart the printer.
Page 47

Page | 47
User Manual – FELIX Pro 1
Rev 3
www.FELIXprinters.com
support@FELIXprinters.com
14 MAINTENANCE
14.1 Replace hot-end
For cleaning or maintenance purposes, the hot-end can be easily removed from the FELIX Pro.
Please take the following steps.
1. Check if there is still filament loaded in the hot-end. If there is no filament loaded, then goto step
4. If yes, from the display unit or PC interface select the correct extruder and heat it up.
2. Retract the filament from the hot-end.
3. Let it cool down.
4. Turn off the printer.
5. Open the cover in front.
6. Remove hot-end connector of the corresponding hot-end.
7. Pull out the hot-end by pulling from the arm.
8. Now replace the hot-end and close the front cover. Don’t forget to place back the edge
connector
Caution: There is a potential risk of burning, as the nozzle can reach temperatures of up to 275°C
1
2
Page 48

Page | 48
User Manual – FELIX Pro 1
Rev 3
www.FELIXprinters.com
support@FELIXprinters.com
14.2 Print bed contact points
Make sure to keep the contact points on the bottom of the print bed clean. Use a detergent like alcohol
and rub gently with a paper towel or cloth. Check this regularly, especially, when you remove the bed a lot
from the printer.
14.3 Dust cleaners
Filament attracts a lot of dust and small particles. Make sure the filament enters the filament holder
through the dust cleaner. After a few months of printing it is recommended to replace the dust cleaners.
14.4 Motion system
The linear bearings require almost no maintenance. Recommended is that you put a little some grease on
them every 3-4 months.
The belt tension of the x and y axis can also be checked in intervals of 3 months. Check this small movie
to see how to tension the belts.
https://www.youtube.com/watch?v=dpS6nWn5rE8
Make sure the four
contact pads are clean
from grease or debris
Page 49

Page | 49
User Manual – FELIX Pro 1
Rev 3
www.FELIXprinters.com
support@FELIXprinters.com
15 TIPS AND TRICKS
15.1 Flexible Filaments
Our 3d printers can in general handle flexible filaments. Depending on the amount of
flexibility, you might need to take some extra precautions to print it well.
These are general tips which should work.
Make sure there is no obstruction present. It is essential that the filament does not
experience any obstructions in the hot-end barrel, before reaching the hot parts of the
hot-end. Otherwise chances of buckling filament inside the extruder are very high.
Obstructions can occur if there has been printed with some hard filament before, make
sure it is removed from the barrel of the hot-end. This can be done by extruding some
hard filament and then fully retract it again. Easy way is to do it via the display unit. Then
slowly extrude the filaflex into the hot-end.
Cut the end of the filament in a skew manner. The extruder gears might find it difficult
to get grip onto the first part of the flexible filament which is fed into the extruder.
Lower the print speed settings in slicer. To begin with slice the object with lowest speed
settings.
Lower the overall print speed. Via the display unit take the following steps. main menu -
> quick settings -> choose feedrate and lower it to 50% to begin with. You can increase
the speed gradually to find the the best option.
Page 50

Page | 50
User Manual – FELIX Pro 1
Rev 3
www.FELIXprinters.com
support@FELIXprinters.com
16 TROUBLE SHOOTING
16.1 Z-sensor triggered, improper leveling, homing and
printing in the air.
The FELIX Pro 1, features automatic calibration. This calibration heavily relies on the probe switch, which
is integrated in the hot-end flexure (This is the flange mounted on the side of the top part of the hotend). This flexure, touches two contacts internally in the extruder assembly. When touching the bed this
flexure deformes and the contact is broken between one of the two contacts and the printer-controller at
that moment thinks that the currently active hot-end touches the bed. When the bed is moved away
from the hot-end the flexure restores its shape and the internal contact gets restored.
On the display unit, when hot-end touches the bed (probe is triggered) and there is no active print
command there should be a message "z-sensor triggered!!!". (This status message gets updated every
second). If you see this message, the printer controller thinks the z-probe is triggered. When the printer is
not touching the bed, this means it is falsely triggered and there is something wrong.
Under normal circumstances this mechanism should work. There are however some cases where the
probe can be falsely triggered:
Hot-end not correctly in place due to shipment or after replacement.
Make sure the hot-end is pushed in properly, all the way to the back of the extruder. You should
hear/feel a soft click. THen the flexure is fully attracted to the magnet inside the extruder. Pull
out the hot-end a few mm and push it backwards till you feel/hear a soft click.
Dirt between contactpoints of extruder base and flexure. make sure the contact points in the
extruder and the flexure are clean from debris or small particles.
Cooled filament present in old extruder. In some cases cooled down filament in the non-used
extruder could keep the flexure mechanism slightly deformed and could cause a (sometimes
constant) false trigger. If you will not use the hot-end, press from the top the filament a bit
down, which should restore the probe signal. Another method is to heat up the non-used hotend to approx. 150 degC, this should give the non-used hot-end flexure enough freedom to
restore to its normal position.
The flexure is deformed too much. This typically happens when you drop the hot-end on the
ground when switching between hot-ends. The hot-ends before leaving the factory are
calibrated to switch when approx 350grams of force is exerted. The mechanism is quite sensitive,
so deforming the flexure in any way other than getting deformed during operation is not
recommended.
If none of the above points apply, there might be something else wrong. Possilby a wire breakage. Please
contact us so we can help you further.
Page 51

Page | 51
User Manual – FELIX Pro 1
Rev 3
www.FELIXprinters.com
support@FELIXprinters.com
16.2 “Click to reheat" dialogue, filament detection
If your print gets interrupted and you get the message “Click to reheat” on the display, that means the
printer has detected that the filament is not being fed trough at the expected rate.
The printer pauses the print job at hand and will wait for the user to check the issue. While it is waiting,
the temperature of the extruder is set to a low temperature for safety (it may take a long time before
someone checks the printer again).
If you click the blue button next to the display, the printer will first re-heat the extruder to the printing
temperature again. After that, it allows you to manually feed some filament to get things working again.
You can feed filament by turning the blue knob clockwise. If you click the button again, the printer will
resume what it was doing.
Causes for this behaviour
Filament jam.
A jam can occur when the filament gets tangled on the spool.
Sometimes a bulge or kink in the filament causes a jam.
In this case, make sure the cause of the jam is removed before resuming the print job.
Printer has run out of filament.
Put a new spool of filament on the printer. Cut off the filament so that the end is flat. Feed the filament
through the dust filter and the Teflon tube. Insert the filament into the print head.
If the extruder is at its target temperature, feed through the new filament.
The printer will then push the old filament through the extruder.
When you are sure the new filament has properly entered the extruder, resume printing.
Very soft material (like Flex material).
The filament can get squeezed so much by the clamping mechanism that the detector misjudges the
amount of filament coming through.
It may help to decrease the clamping range (see “Howto adjust filament clamping range”).
A clogged hot end that is preventing the filament being fed through.
See chapter to find a solution.
The nozzle is too close to the bed or printed object.
This can happen if the bed is not leveled right or the object is warping up.
The filament cannot flow through the nozzle properly, causing the filament feeding mechanism to slip.
Level the bed and make sure the first layer adheres really good to the heated bed.
A clamping range that is too small. See this article.
Page 52

Page | 52
User Manual – FELIX Pro 1
Rev 3
www.FELIXprinters.com
support@FELIXprinters.com
16.3 No filament is coming out of extruder
The most common causes to get a clogged hot-end are (ordered from most common to least common):
Chosen print temperature too hot.
Try printing at the recommended temperatures for the chosen filament. For instance, printing PLA at 210
degrees might work in some cases, but it is critical. The top part of the hot-end will become near the
critical 60°C where the filament becomes too soft, too soon and causing a clog.
Fan cap not closed.
The front fan cap should be flipped closed all the time when the extruder heaters are active. Failure to do
so can cause the cooled part of the extruder to become hot, and the filament will soften or melt too
early, causing jamming.
Hot end not really clogged Sometimes the extrusion is partly blocked because the nozzle is too close to
the bed or to the printed object. Please check if the z-homing of the printer is correct. Check if the
printed object is deforming in such a way that it moves too close to the nozzle.
Bad quality filament.
Make sure to get good quality filament. Dimensional tolerances and also bad consistency of the material
itself can cause trouble during printing.
Dust collector not applied around the filament.
Filament attracts a lot of dust, which can potentially all come into the hot-end. In some dusty
environments this could cause a clogged hot-end within a few hours.
Fragment of previously printed material still in extruder.
If you print a material with a high melting temperature and next a material with a low melting
temperature, it may be that a residue of the high melting temperature plastic causes issues inside the
extruder. Try extruding some (20 cm) PLA filament manually at high temperature (220 °C). Make sure to
turn back the temperature to normal while slowly extruding some more material to prevent it to coal
inside the extruder.
Clog from the inside of the hot-end.
It could be that a big dust particle or debris buildup inside the hot-end tip causes clogging from the inside.
You could try the dip-and-pull method:
Insert PLA in the hot end. Heat the hot end to about 220°C. Try to extrude some material.Set the hot end
temperature to 110°C. Disable stepper motors (can be done via the Quick settings menu on the printer
itself). Wait for the extruder to reach the set temperature. Pull out the filament in one smooth and quick
move. With some luck, the clogging material is attached to the solidified end of the filament.
If that fails, you can try hand-drilling the nozzle opening with a drill that matches your nozzle diameter.
The best is to do this when the extruder is warm, but be careful! We sell some small diameter drills in our
web shop.
Hot-end parts are not fixed together properly.
Page 53

Page | 53
User Manual – FELIX Pro 1
Rev 3
www.FELIXprinters.com
support@FELIXprinters.com
This could cause buildup of filament in some internal cavities/edges.
16.4 Z-sensor triggered.
This message normally is shown when the printer detects that one of the nozzles is touching the heated
bed (we call that functionality "Z probing").
It can also be shown when the print head is cooled down while there is filament in the printer.
The filament shrinks when it cools, and then pulls up the print heads a bit. This is detected by the printer.
The message does not need to be a problem. Usually it disappears if both of the print heads are heated to
150 degrees C or more. The plastic in the extruders then becomes soft again, allowing the heads to return
to their normal position.
The printer will heat the heads automatically when it needs the Z probing functionality.
If you still experience problems after the heads have been warmed up the next section.
Page 54

Page | 54
User Manual – FELIX Pro 1
Rev 3
www.FELIXprinters.com
support@FELIXprinters.com
16.5 Heater decoupled / DEF / DEC message on screen
This error presents itself when a part of the heater circuit is not working.
It can generally be caused by one of the following things:
Bad electrical connection with the hot end cartridge.
The white big connector of the hot end should be plugged all the way onto the printed circuit board on the
print head.
If you get the error, please try to pull off the connector sideways and then plug it back on firmly.
Please note: the connector also can be plugged on back to front. This does not damage anything, but it will
not work either.
Turn off and on the printer to reset it after the the hot end has been reconnected.
The heater catrtridge/thermistor (= temperature sensor) is not mounted right
A bad thermal contact between components and aluminum body can cause the printer to detect that the
temperature is rising too slow to be credible.
Solution: tighten set screws that fix the heater cartridge and/or the thermistor.
Be a bit careful with the thermistor set screw, overtightening it may damage the thermistor.
The heater cartridge is broken.
The printer detects that the temperature does not rise when the heater is activated.
Solution: replace the thermistor/heater set.
The thermistor is broken.
The printer decides it is broken when the temperature measured is lower than 0°C or higher than 275°C, or
when the temperature does not seem to rise fast enough.
Solution: replace the thermistor/heater set.
Thermistor wires are (partially) broken.
This can sometimes be seen as a very fast fluctuation of temperature.
Solution: replace the thermistor/heater set.
Page 55

Page | 55
User Manual – FELIX Pro 1
Rev 3
www.FELIXprinters.com
support@FELIXprinters.com
16.6 The printer doesn’t connect to FELIXbuilder
After connecting the FELIX Pro 1 to a computer and after installation of FELIXbuilder, the printer driver
should be automatically installed on the computer. If this is not the case we need to do this manually.not
updated correctly. You can manually download and install the drivers. After installation of the drivers
connecting the 3D printer through FELIXbuilder should be possible.
Drivers for windows:
http://www.felixprinters.com/downloads/software/0_FELIXbuilder/Arduino%20drivers%201.6.5.zip
Drivers for Mac:
http://www.ftdichip.com/Drivers/VCP/MacOSX/FTDIUSBSerialDriver_v2_3.dmg
http://www.ftdichip.com/Drivers/VCP/MacOSX/FTDIUSBSerialDriver_v2_2_18.dmg
16.6.1 INSTALLATION OF DRIVERS IN WINDOWS.
Now goto the device manager. Right click on the windows start icon and select Device Manager
A window will pop up. You will see in the list an item with Arduino due programming port. Right click on it
and select Update Driver Software…
Page 56

Page | 56
User Manual – FELIX Pro 1
Rev 3
www.FELIXprinters.com
support@FELIXprinters.com
After installing the drivers, the printer and the software should communicate at the same speed (called
baud rate).
For Windows, this should work out of the box if the following is met:
The printer profiles are updated (version 11 or later)
The firmware of the printer is up to date (20160209 - firmware_0_92_8_felix or later)
NOTE: For FelixBuilder 1.0 for Mac OS X, it is necessary to manually set the printer baud rate to 250000.
This can be achieved by selecting the "Configuration" menu on the printer display, then selecting the
Page 57

Page | 57
User Manual – FELIX Pro 1
Rev 3
www.FELIXprinters.com
support@FELIXprinters.com
"General" section, and then "Baud rate". Select the right baudrate and confirm it. To store the new
settings permanently, select "Configuration", then "Store to EEPROM".
Page 58

Page | 58
User Manual – FELIX Pro 1
Rev 3
www.FELIXprinters.com
support@FELIXprinters.com
17 SAFETY
To safely operate the FELIXprinter, we advise that you keep the following safety recommendations in mind:
1. Keep children under the age of 14 out of reach of the FELIXprinter
2. Caution with any moving parts that move in the X, Y and Z direction. At the end of each moving
part there is a pinching hazard.
3. Watch out for any other non-protected sharp edges of the printer.
4. Don’t lay objects on the heated bed that are not being printed, not even when the printer is
turned off.
5. Only use the materials polyactide (PLA), Acrylonitrile butadiene styrene (ABS) or Arnitel as
printing material. Consult FELIXprinters if you want to use a different material.
6. FELIXprinters are only suitable for professional use.
7. When removing or feeding material to the hot end, wearing heat-resistant gloves is
recommended.
8. Only operate the FELIXprinter in a sufficiently ventilated environment (fumes from ABS and PLA
aren’t toxic, but can cause respiratory irritation).
9. Don’t lean on the FELIXprinter when it is operating.
10. Make sure all moving parts can move without any obstructions.
11. Don’t remove any objects from the hot plate while the printer is still printing objects.
12. Don’t transport the FELIXprinter when it is in operation.
13. Do not use a different power supply than the provided power supply, it can be dangerous and
cause electronical malfunctions.
14. Use the FELIXprinter in a dry environment.
15. Use the FELIXprinter on a stable and leveled surface.
16. When moving the FELIXprinter only use the handle on top.
17. Turn off the FELIXprinter when errors occur.
18. When operating the FELIXprinter, be carefull with long hair and loose clothes.
19. When unattended, turn off the FELIXprinter.
20. Place the FELIXprinter on a table/Desk or something with a similar height. This will keep it safe
from small children.
Page 59

Page | 59
User Manual – FELIX Pro 1
Rev 3
www.FELIXprinters.com
support@FELIXprinters.com
18 MATERIAL DATA SAFETY SHEET
18.1 PLA
Hazards Identification
Appearance: Clear, translucent, opaque, pellets.
Physical state: Solid
Odor: Sweet
Potential health effects:
Eye contact: Contact with eyes may cause irritation.
Skin contact: Substance may cause slight skin irritation.
Ingestion: Ingestion may cause gastrointestinal irritation, nausea, vomiting and
diarrhoea.
Inhalation: Inhalation of dust may cause shortness of breath, tightness of the chest,
a sore throat and cough. Low hazard for usual industrial or commercial handling.
Target organ effects: There were no target organ effects noted following ingestion or
dermal exposure in animal studies.
Sensitization: Did not cause sensitisation on laboratory animals
Flammability: Fine dust dispersed in air may ignite.
First-aid measures
Eye contact: Rinse immediately with plenty of water, also under the eyelids, for at least 15 minutes. Call a physician
immediately.
Skin contact: Rinse immediately with plenty of water for at least 15 minutes. If skin irritation persists, call a physician.
Cool skin rapidly with cold water after contact with hot polymer.
Inhalation: Move to fresh air. Call a physician immediately.
Ingestion: Drink water as a precaution. Never give anything by mouth to an unconscious person. Do not induce
vomiting without medical advice. Call a physician immediately.
Notes to physician: Treat symptomatically.
Fire Fighting Measures
Flammability:
Autoignition temperature: 388°C
Flammability Limits in Air
Flammable limits in air - lower (%): Not determined
Flammable limits in air - upper (%): Not determined
Suitable extinguishing media: Foam. Water. Carbon dioxide (CO2). Dry chemical. Alcohol resistant foams are preferred
if available. General-purpose synthetic foams (including AFFF) or protein foams may function, but much less effectively.
Extinguishing media which must not be used for safety reasons: No information available Hazardous decomposition
products: Burning produces obnoxious and toxic fumes Aldehydes Carbon monoxide (CO) carbon dioxide (CO2)
Special protective equipment for firefighters: As in any fire, wear self-contained breathing apparatus pressure-demand,
MSHA/NIOSH (approved or equivalent) and full protective gear. Under fire conditions: Cool containers / tanks with
spray water. Water mist may be used to cool closed containers.
Other information: Fine dust dispersed in air may ignite. Risks of ignition followed by flame propagation or secondary
explosions shall be prevented by avoiding accumulation of dust, e.g. on floors and ledges.
Handling and Storage
Safe handling advice: Avoid contact with skin and eyes. Avoid dust formation. Workers should be protected from the
possibility of contact with molten material during fabrication. Low hazard for usual industrial or commercial handling.
Use personal protective equipment.
Storage:
Store in cool place. Keep at temperatures below 122F (50 °C). No special restrictions on storage with other products.
Toxicological Information
Principle Routes of Exposure: Eye contact. Skin contact. Inhalation. Ingestion.
Acute toxicity: There were no target organ effects noted following ingestion or dermal exposure in animal studies.
Local effects: May cause eye/skin irritation. Product dust may be irritating to eyes, skin and respiratory system. Caused
mild to moderate conjuctival irritation in eye irritation studies using rabbits. Caused very mild redness in dermal
irritation studies using rabbits (slightly irritating). Ingestion may cause gastrointestinal irritation, nausea, vomiting and
Page 60

Page | 60
User Manual – FELIX Pro 1
Rev 3
www.FELIXprinters.com
support@FELIXprinters.com
diarrhoea.
Long term toxicity: Did not cause skin allergic reactions in skin sensitization studies using guinea pigs.
Specific effects: May cause skin irritation and/or dermatitis. Ingestion may cause gastrointestinal irritation, nausea,
vomiting and diarrhoea. Inhalation of dust may cause shortness of breath, tightness of the chest, a sore throat and
cough. Burning produces irritant fumes.
Target organ effects: There were no target organ effects noted following ingestion or dermal exposure in animal
studies.
Skin: LD50/dermal/rabbit > 2000 mg/kg
Ingestion: LD50/oral/rat > 5000 mg/kg.
Ecological Information
Bioaccumulation: Does not bioaccumulate. Inherently biodegradable.
Ecotoxicity effects: EC50/72h/algae > 1100 mg/L
Disposal Considerations
Waste from residues / unused products: In accordance with local and national regulations. Do not contaminate ponds,
waterways or ditches with chemical or used container. Contact manufacturer.
THE COMPANY HAS NO CONTROL OVER THE MANAGEMENT PRACTICES OR MANUFACTURING PROCESSES OF
PARTIES HANDLING OR USING THIS MATERIAL. THE INFORMATION PRESENTED HERE PERTAINS ONLY TO THE
PRODUCT AS SHIPPED IN ITS INTENDED CONDITION.
(Composition/Information On Ingredients).
Contaminated packaging: Empty remaining contents. Do not re-use empty containers. Empty containers should be
transported/delivered using a registered waste carrier to local recyclers for disposal.
Page 61

Page | 61
User Manual – FELIX Pro 1
Rev 3
www.FELIXprinters.com
support@FELIXprinters.com
18.2 ABS
Hazards Identification
This product is not classified as dangerous according to EC criteria.
First-aid measures
Eye Contact: Flush eyes with plenty of water; remove contact lenses after the first 1-2 minutes then continue flushing
for several minutes. Only mechanical effects expected. If effects occur, consult a physician, preferably an
ophthalmologist.
Skin Contact: If molten material comes in contact with the skin, do not apply ice but cool under ice water or running
stream of water. DO NOT attempt to remove the material from skin. Removal could result in severe tissue damage.
Seek medical attention immediately.
Inhalation: Move person to fresh air; if effects occur, consult a physician.
Ingestion: If swallowed, seek medical attention. May cause gastrointestinal blockage. Do not give laxatives. Do not
induce vomiting unless directed to do so by medical personnel.
Notes to Physician: If burn is present, treat as any thermal burn, after decontamination. No specific antidote.
Treatment of exposure should be directed at the control of symptoms and the clinical condition of the patient.
Fire Fighting Measures
Extinguishing Media: Water fog or fine spray. Dry chemical fire extinguishers. Carbon dioxide fire extinguishers. Foam.
Fire Fighting Procedures: Keep people away. Isolate fire and deny unnecessary entry. Soak thoroughly with water to
cool and prevent re-ignition. If material is molten, do not apply direct water stream. Use fine water spray or foam. Cool
surroundings with water to localize fire zone. Hand held
dry chemical or carbon dioxide extinguishers may be used for small fires
Special Protective Equipment for Firefighters: Wear positive-pressure self-contained breathing apparatus (SCBA) and
protective fire fighting clothing (includes fire fighting helmet, coat, trousers, boots, and gloves). If protective
equipment is not available or not used, fight fire from a protected
location or safe distance.
Unusual Fire and Explosion Hazards: Pneumatic conveying and other mechanical handling operations can generate
combustible dust. To reduce the potential for dust explosions, do not permit dust to accumulate. Dense smoke is
produced when product burns.
Hazardous Combustion Products: During a fire, smoke may contain the original material in addition to combustion
products of varying composition which may be toxic and/or irritating. Combustion products may include and are not
limited to: Nitrogen oxides. Carbon monoxide. Carbon dioxide.
Combustion products may include trace amounts of: Styrene. Hydrogen cyanide
Handling and Storage
Handling
General Handling: No smoking, open flames or sources of ignition in handling and storage area. Good housekeeping
and controlling of dusts are necessary for safe handling of product. Avoid breathing process fumes. Use with adequate
ventilation. When appropriate, unique handling
information for containers can be found on the product label. Workers should be protected from the possibility of
contact with molten resin. Do not get molten material in eyes, on skin or clothing. Pneumatic conveying and other
mechanical handling operations can generate combustible dust. To
reduce the potential for dust explosions, electrically bond and ground equipment and do not permit dust to
accumulate. Dust can be ignited by static discharge.
Storage
Store in accordance with good manufacturing practices
Personal Protection
Eye/Face Protection: Use safety glasses. If there is a potential for exposure to particles which could cause eye
discomfort, wear chemical goggles. If exposure causes eye discomfort, use a full-face respirator. Use safety glasses.
Safety glasses should be consistent with Directive 89/686/EEC
Category 2. If there is a potential for exposure to particles which could cause eye discomfort, wear chemical goggles.
Chemical goggles should be consistent with EN 166 or equivalent. If exposure causes eye discomfort, use a full-face
respirator.
Skin Protection: No precautions other than clean body-covering clothing should be needed.
Hand protection: Chemical protective gloves should not be needed when handling this material. Consistent with
general hygienic practice for any material, skin contact should be minimized. Use gloves with insulation for thermal
Page 62

Page | 62
User Manual – FELIX Pro 1
Rev 3
www.FELIXprinters.com
support@FELIXprinters.com
protection (EN 407), when needed. Use gloves to protect from mechanical injury. Selection of gloves will depend on
the task.
Respiratory Protection: In dusty or misty atmospheres, use an approved particulate respirator. Use an approved airpurifying respirator when vapors are generated at increased temperatures or when dust or mist is present. Use the
following CE approved air-purifying respirator: When dust/mist are
present use a/an Particulate filter, type P2. When combinations of vapors, acids, or dusts/mists are present use a/an
Organic vapor cartridge with a particulate pre-filter, type AP2.
Ingestion: Use good personal hygiene. Do not consume or store food in the work area. Wash hands before smoking or
eating.
Engineering Controls
Ventilation: Good general ventilation should be sufficient for most conditions. Local exhaust ventilation may be
necessary for some operations
Toxicological Information
Acute Toxicity
Ingestion
Very low toxicity if swallowed. Harmful effects not anticipated from swallowing small amounts. May cause choking if
swallowed.
Estimated LD50, Rat > 5,000 mg/kg
Eye Contact
Solid or dust may cause irritation or corneal injury due to mechanical action. Elevated temperatures may generate
vapor levels sufficient to cause eye irritation. Effects may include discomfort and redness.
Skin Contact
Essentially nonirritating to skin. Mechanical injury only. Under normal processing conditions, material is heated to
elevated temperatures; contact with the material may cause thermal burns.
Skin Absorption
No adverse effects anticipated by skin absorption. Estimated LD50, Rabbit > 2,000 mg/kg
Inhalation
No adverse effects are anticipated from single exposure to dust. Vapors/fumes released during thermal processing
may cause respiratory irritation.
Repeated Dose Toxicity
Additives are encapsulated in the product and are not expected to be released under normal processing conditions or
foreseeable emergency.
Ecological Information
CHEMICAL FATE
Movement & Partitioning
No bioconcentration of the polymeric component is expected because of its high molecular weight. In the terrestrial
environment, material is expected to remain in the soil. In the aquatic environment, material will sink and remain in the
sediment.
Persistence and Degradability
This water-insoluble polymeric solid is expected to be inert in the environment. Surface photo degradation is expected
with exposure to sunlight. No appreciable biodegradation is expected.
ECOTOXICITY
Not expected to be acutely toxic, but material in pellet or bead form may mechanically cause adverse effects if
ingested by waterfowl or aquatic life.
Disposal Considerations
For uncontaminated material the disposal options include mechanical and chemical recycling or energy recovery. In
some countries landfill is also allowed. For contaminated material the options remain the same, although additional
evaluation is required. For all countries the disposal methods
must be in compliance with national and provincial laws and any municipal or local by-laws. All disposal methods must
be in compliance with the EU framework Directives 91/156/EEC, 91/689/EEC and their subsequent adaptations, as
implemented in National Laws and Regulations, as well as EU Directives dealing with priority waste streams.
Transboundary shipment of wastes must be in compliance with EU Regulation 259/93 and subsequent modifications.
Page 63

Page | 63
User Manual – FELIX Pro 1
Rev 3
www.FELIXprinters.com
support@FELIXprinters.com
19 APPENDIX: TERMS OF SERVICE
1. Scope
a) These Terms and Conditions shall apply to all purchases submitted or to be submitted by you for any item, service or
subscription offered to you on or via the FELIXprinters website, a FELIXprinters device or other FELIXprinters application
(referred to in these Terms and Conditions as the “Products”), including, but not limited to, (i) hardware devices,
accompanying items and accessories including devices, items or accessories containing pre-installed software
(“Hardware”), (ii) FELIXprinters software, including content and content programs offered by FELIXprinters and all
Internet-based downloadable (“Software”) and (iii) services offered by FELIXprinters from time to time (“Services”),
which may include (separately or bundled) Internet-based services, (third party) functionality or content, whether
offered to you on a subscription basis (“Subscription”) or on a pre-paid basis and delivered in one or more parts.
2. Orders
a) Any purchase order submitted is subject to acceptance by FELIXprinters. Only upon acceptance by FELIXprinters by
way of an order confirmation is the agreement concluded.
b) FELIXprinters reserves the right to reject any orders in full or in part or to apply a maximum order amount.
c) All orders for Hardware are subject to stock availability.
3. Price and payment
a) Prices indicated on the website are exclusive of state and local sales and use taxes. You are responsible for any such
state and local sales and use taxes, and any other taxes and government levies, if any, associated with your order.
Shipping and handling charges (if any) will apply in addition to the sale price indicated on the website and the applicable
sales and use taxes. Prices are subject to change at any time but will not affect orders for Hardware, Software, or Services
made prior to the date of the change (subject to clause 7c).
b) All orders must be paid for through the payment service as made available by FELIXprinters (“Payment Service”). In
order to submit orders and use the Payment Service you must supply details of your preferred payment method, billing
and shipping address (if applicable) and/or any other details necessary to complete the order.
4. Delivery and risk of loss
a) FELIXprinters will endeavor to deliver or activate the Product within thirty (30) days of order acceptance. If multiple
Products are ordered, FELIXprinters reserves the right to deliver or activate each Product separately.
b) Products will be delivered either to your delivery address or possession, or electronically. The risk of loss or damage
to the Products will pass to you at the moment the Products are delivered to your delivery address or possession.
c) If you refuse or neglect to take delivery of the Products, FELIXprinters reserves the right to charge you for the
reasonable cost of storing and shipping the Products until delivery can be made.
d) If delivery to you should fail for any reason outside of FELIXprinters’s control, FELIXprinters reserves the right to cancel
the purchase agreement and refund any moneys paid
e) If FELIXprinters delivers a Product or an amount of a Product that you did not order or activates a Product on your
device by mistake, you shall immediately inform FELIXprinters of its mistake by email via info@FELIXprinters.com and
you shall, at FELIXprinters’s request, immediately arrange for the return of the Product (the costs of which shall be met
by FELIXprinters), de-install or destruct the Product.
f) Acceptance of a non-ordered Product or amount of a Product does not relieve you from acceptance and payment of
the Product you initially ordered, unless otherwise agreed with FELIXprinters.
5. Return Policy
a) FELIXprinters allows you to return Hardware for any reason provided that it has not yet been used at any time during
the fourteen (14) business days following the date of receipt at your delivery address. If the item has not been opened,
FELIXprinters will refund the purchase price actually paid minus shipping and handling charges. If the item has been
opened, FELIXprinters will charge a 15% restocking fee in addition to shipping and handling charges. FELIXprinters will
not issue refunds for products that have been defaced, altered, used, or damaged in any way. All requests for refunds
are subject to inspection by FELIXprinters of the returned item. FELIXprinters will issue refunds through a bank transfer
or PayPal. If you choose to return any Hardware, you must contact FELIXprinters during the fourteen (14) business days
following receipt by email via info@FELIXprinters.com to obtain a Return Materials Authorization number and return
the Hardware in its original packaging, free of all interests, liens, or claims otherwise, to the address provided by
FELIXprinters. FELIXprinters will not issue any refunds in response to requests made more than fourteen (14) business
days following receipt of the item. FELIXprinters will only accept returns on items purchased directly from the
FELIXprinters store.
b) Purchases of Software may be cancelled in accordance with clause 5(a) provided that the seal has not been broken
nor tie wraps are cut losse. Downloading, installing or activating Software are all considered as breaking the seal.
c) You agree that the supply of Services by FELIXprinters will commence immediately on FELIXprinters’s acceptance of
your purchase order or placed order via the website. You will not be able to cancel the purchase agreement after supply
of the Services commences.
d) All sales of products sold as Refurbished are final.
Page 64

Page | 64
User Manual – FELIX Pro 1
Rev 3
www.FELIXprinters.com
support@FELIXprinters.com
6. License, Copyright & Confidentiality
a) Subject to these Terms and Conditions, you are granted a license to reproduce in order to install and execute the
Software, Services and/or the data, information, functionality or other content (“Content”) provided to you as part of
the Hardware or via for personal and private use only on the terms set out in this article 6 (“License”). You may install
and use the Software, Services and Content on only one computer device at any time and in combination with only one
Product. You may not provide the Software, Services or Content to others, directly or indirectly for their or anyone else’s
use. This License is non-exclusive and non-transferable which means that FELIXprinters is free to license the Software,
Services and Content to other customers and that your right to use the Software, Services and Content cannot be
transferred by you to someone else or to another piece of Hardware. This License does not include any right to obtain
future upgrades, updates or supplements to the Software, Services or Content. If upgrades, updates or supplements to
the Software, Services or Content are obtained, however, the use of such upgrades, updates or supplements will be
governed by these Terms and Conditions or such other terms and conditions as you shall be asked to accept prior to
FELIXprinters supplying you with the relevant upgrade, update or supplement.
b) FELIXprinters reserves the right, with or without notice, to discontinue update, upgrade and supplement services
provided to you or made available to you through the use of the Software, Services or Content, unless the provision of
such updates, upgrades or supplements forms an integral part of the Product, as indicated by FELIXprinters at the time
of sale.
c) Without prejudice to any other rights, FELIXprinters may immediately terminate the License without notice of default
being required if you fail to comply with any material term of these Terms and Conditions which shall be understood to
include clauses 6 and 9. In such event, you must destroy all copies of the Software and all of its component parts as well
as any Content.
d) Copyright and other intellectual, industrial and/or proprietary rights to the Software, to the Content, the Services and
to any copies made of it are owned by FELIXprinters and/or its suppliers. FELIXprinters permits you to use the Software,
Services and Content only in accordance with these Terms and Conditions. All rights not specifically granted in these
Terms and
Conditions are reserved by FELIXprinters. You may either (a) make one copy of the Software solely for backup or archival
purposes, or (b) transfer the Software to a single medium provided the original is kept solely for backup or archival
purposes. Product manual(s) or written materials may not be copied, except for your own use. You may not copy,
download, upload or in any other way reproduce Content, except for creating one copy solely for backup or archival
purposes. You do not acquire ownership of the Software or Content.
e) You acknowledge and agree that the Products were developed at considerable time and expense by FELIXprinters
and are confidential to, and a trade secret of, FELIXprinters and/or other third parties. You undertake to maintain the
Products in strict confidence and not to disclose or provide access to the Product to any third party.
7. Third Party Software Materials
FELIXprinters Products may make use of third party software codes, data, information functionality, other content and
algorithms (“Third Party Materials”). The use of Third Party Materials included in the Products may be subject to other
terms and conditions. The official copyright notices and specific license conditions of these Third Party Materials are to
be found in or via our website. You hereby agree that the submission of any order implies that you have read and
accepted the terms and conditions for any Third Party Materials included in the Products ordered.
8. Other Restrictions
Renting, lending, public presentation, performance or broadcasting or any other kind of distribution of the Products is
prohibited. Other than as permitted by applicable legislation, you will not, and will not allow any person to, modify the
Products or any part thereof, to analyze it by means of reverse engineering, to decompile or disassemble the Products,
or to break or circumvent encryption or to allow or enable third parties to do so.
9. Limited Warranty
a) FELIXprinters does not and cannot warrant that the Products operate in a manner that is completely error-free nor
that any information provided is always accurate. Calculation errors may occur when using systems such as those caused
by local environmental conditions and/or incomplete or incorrect data.
b) FELIXprinters offers a limited warranty that the Hardware will be free from defects in workmanship and materials
under normal use (“Defects”) for a period of one (1) year from the date the Hardware was purchased (“Warranty
Period”). Any warranty obligation of FELIXprinters under this Section is expressly conditioned on your compliance with
this Agreement. During the Warranty Period, the Hardware will be repaired or replaced by FELIXprinters (“Limited
Warranty”) without charge for either parts or labor. If the Hardware is repaired after the Warranty Period has expired,
the Warranty Period for the repair will expire six (6) months after the date of repair. This warranty does not cover
Software or Services.
c) This Limited Warranty does not cover damage caused by normal wear and tear or as a result of the Hardware being
opened or repaired by someone not authorized by FELIXprinters, and does not cover damage caused by: misuse,
moisture, liquids, proximity or exposure to heat and accident, abuse, non-compliance with the instructions supplied with
Page 65

Page | 65
User Manual – FELIX Pro 1
Rev 3
www.FELIXprinters.com
support@FELIXprinters.com
the Hardware, neglect or misapplication. The Limited Warranty does not cover physical damage to the surface of the
Hardware.
d) EXCEPT FOR THIS LIMITED WARRANTY, AND TO THE MAXIMUM EXTENT PERMITTED BY APPLICABLE LAW,
FELIXprinters AND ITS SUPPLIERS PROVIDE THE PRODUCTS “AS IS AND WITH ALL FAULTS”, AND HEREBY DISCLAIM
ALL OTHER WARRANTIES AND CONDITIONS, WHETHER EXPRESS, IMPLIED OR STATUTORY, INCLUDING, BUT NOT
LIMITED TO, ANY (IF ANY) IMPLIED WARRANTIES, DUTIES OR CONDITIONS OF MERCHANTABILITY, NONINFRINGEMENT, QUIET ENJOYMENT, SYSTEM INTEGRATION, TITLE, SATISFACTORY QUALITY, OF FITNESS FOR A
PARTICULAR PURPOSE, OF RELIABILITY OR AVAILABILITY, OF ACCURACY OR COMPLETENESS OF RESPONSES, OF
RESULTS, OF WORKMANLIKE EFFORT, OF LACK OF VIRUSES, AND OF REASONABLE CARE AND SKILL, ALL WITH REGARD
TO THE PRODUCTS; AS WELL AS THE PROVISION OF OR FAILURE TO PROVIDE SUPPORT OR OTHER SERVICES,
INFORMATION, SOFTWARE, AND RELATED CONTENT THROUGH THE PRODUCTS OR OTHERWISE ARISING OUT OF THE
USE OF THE PRODUCTS. ALSO, THERE IS NO WARRANTY OR CONDITION OF QUIET ENJOYMENT, QUIET POSSESSION,
OR NON-INFRINGEMENT WITH REGARD TO THE PRODUCTS.
e) In order to make a claim under the Limited Warranty of a Defect, you must contact FELIXprinters by email during the
Warranty Period via to explain the Defect and to obtain a Return Materials Authorization number if necessary. The
Hardware must be returned to FELIXprinters as soon as possible following your notification of the Defect, along with an
explanation of the Defect, to the address provided by FELIXprinters. You must comply with any other return procedures
stipulated by FELIXprinters, if any.
f) This Limited Warranty is the only express warranty made to you and is provided in place of any other express
warranties or similar obligations (if any) created by any advertising, documentation, packaging, or other
communications.
g) If applicable law requires any implied warranties with respect to the Hardware, all such warranties are limited in
duration to one (1) years. Some states and/or jurisdictions do not allow limitations on how long an implied warranty lasts,
so the above may not apply to you. The provisions of this clause 9 do not affect any of your legal rights under applicable
national legislation governing the sale of consumer goods.
h) This Limited Warranty is not transferable.
i) This clause 9 sets forth your sole and exclusive remedy in connection with any warranties granted by FELIXprinters
hereunder.
10. Limitation of Liability
a) NEITHER FELIXPRINTERS NOR ITS SUPPLIERS SHALL BE LIABLE TO YOU OR TO ANY THIRD PARTY FOR ANY INDIRECT,
INCIDENTAL, CONSEQUENTIAL, SPECIAL, PUNITIVE, OR EXEMPLARY DAMAGES (INCLUDING IN EACH CASE, BUT NOT
LIMITED TO, DAMAGES FOR THE INABILITY TO USE OR ACCESS THE PRODUCTS, LOSS OF DATA, LOSS OF BUSINESS,
LOSS OF PROFITS, BUSINESS INTERRUPTION OR THE LIKE) ARISING OUT OF THE USE OF OR INABILITY TO USE THE
PRODUCTS, EVEN IF FELIXPRINTERS HAS BEEN ADVISED OF THE POSSIBILITY OF SUCH DAMAGES.
b) NOTWITHSTANDING ANY DAMAGES THAT YOU MIGHT INCUR FOR ANY REASON WHATSOEVER (INCLUDING,
WITHOUT LIMITATION, ALL DAMAGES REFERENCED HEREIN AND ALL DIRECT OR GENERAL DAMAGES IN CONTRACT
OR ANYTHING ELSE), THE ENTIRE LIABILITY OF FELIXPRINTERS AND ANY OF ITS SUPPLIERS ARISING FROM OR RELATED
TO THE USE OF THE PRODUCTS SHALL BE LIMITED TO THE AMOUNT ACTUALLY PAID BY YOU FOR THE PRODUCTS
CONCERNED.
c) Some jurisdictions do not allow the exclusion or limitation of incidental or consequential damages, so the above
limitations or exclusions may not apply to you. The above limitation of liability does not affect any legal rights under the
applicable national legislation.
11. Export Controls
You will comply with all applicable laws and regulations, including without limitation the Dutch Administration Act,
regarding the export of technology with respect to the Products.
12. Force Majeure
Force majeure means circumstances that impede the fulfillment of FELIXprinters’s obligations under these Terms and
Conditions which are not within FELIXprinters’s reasonable control, including late and/or delayed deliveries and
incomplete deliveries by FELIXprinters caused by circumstances beyond FELIXprinters’s reasonable control. In a force
majeure situation all of FELIXprinters’s obligations shall be suspended. Should the period in which FELIXprinters cannot
fulfill its obligations as a result of force majeure continue for longer than ninety (90) calendar days, both parties shall be
entitled to dissolve the purchase agreement in writing without there being an obligation to pay any compensation
whatsoever arising out of or in connection with that dissolution.
13. Privacy
FELIXprinters will not disclose information regarding your personal details, account or transactions to any third party
other than in accordance with the privacy policy from Dutch law.
FELIXprinters holds the right to show your company name and logo in FELIXprinters’s promotions, only in the context of
you being one of FELIXprinterss customers. (‘’Our customers include …[Buyer company name and logo]’’)
Page 66

Page | 66
User Manual – FELIX Pro 1
Rev 3
www.FELIXprinters.com
support@FELIXprinters.com
14. Links to Third Party Websites
FELIXprinters is not responsible for the content of any third-party websites or services, any links contained in third-party
websites or services, or any changes or updates to third-party websites or services. Where FELIXprinters provides links
and/or access to third-party websites and/or services it is only as a convenience to you, and the inclusion of any link or
access does not imply an endorsement by FELIXprinters of the third-party site or service.
15. Third Party Rights
Third parties have no rights under applicable legislation in relation to the rights of third parties to rely upon or to enforce
any term of these Terms and Conditions but that does not affect any right or remedy of a third party which exists or is
available apart from such applicable legislation.
16. Survival
Any provisions in these Terms and Conditions which by their nature extend beyond the termination or expiration of any
sale or license of the Products will remain in effect.
17. Severability
If any provision of these Terms and Conditions is deemed to be void, invalid, unenforceable or illegal, the other provisions
shall continue in full force and effect. You and FELIXprinters are deemed to have agreed to new terms and conditions in
substitution for such invalid provisions. These new terms and conditions shall be interpreted, as regards their contents
and effect, as closely as possible to the original text as written but in such a way that rights can indeed be derived from
them.
18. Governing law
These Terms and Conditions and any disputes related to these Terms and Conditions or to the purchase and use of the
Products or otherwise are subject to the laws of The Netherlands. The United Nations Convention on Contracts for the
International Sales of Goods is hereby excluded from application to these Terms and Conditions. All disputes arising out
of these Terms and Conditions shall be settled by courts venued in Amsterdam, which will have exclusive jurisdiction in
respect of any such disputes.
19. Translations
This English version of these Terms and Conditions is the version that governs your purchase, of Products from
FELIXprinters if you are located in the Unites States of America. Should you have any questions, suggestions or
complaints concerning your order, your purchase, these Terms and Conditions, or if you desire to contact FELIXprinters
for any reason, please do so by email by visiting FELIXprinters’s website.
 Loading...