

Page 1

Installation Instructions for
WB1609
Kandira 1 Light Wall
Wall
GP I :ENERAL RODUCT NFORMATION
This product is suitable for damp locations.
This product may be dimmed with a standard incandescent dimmer.
This instruction shows a typical installation.
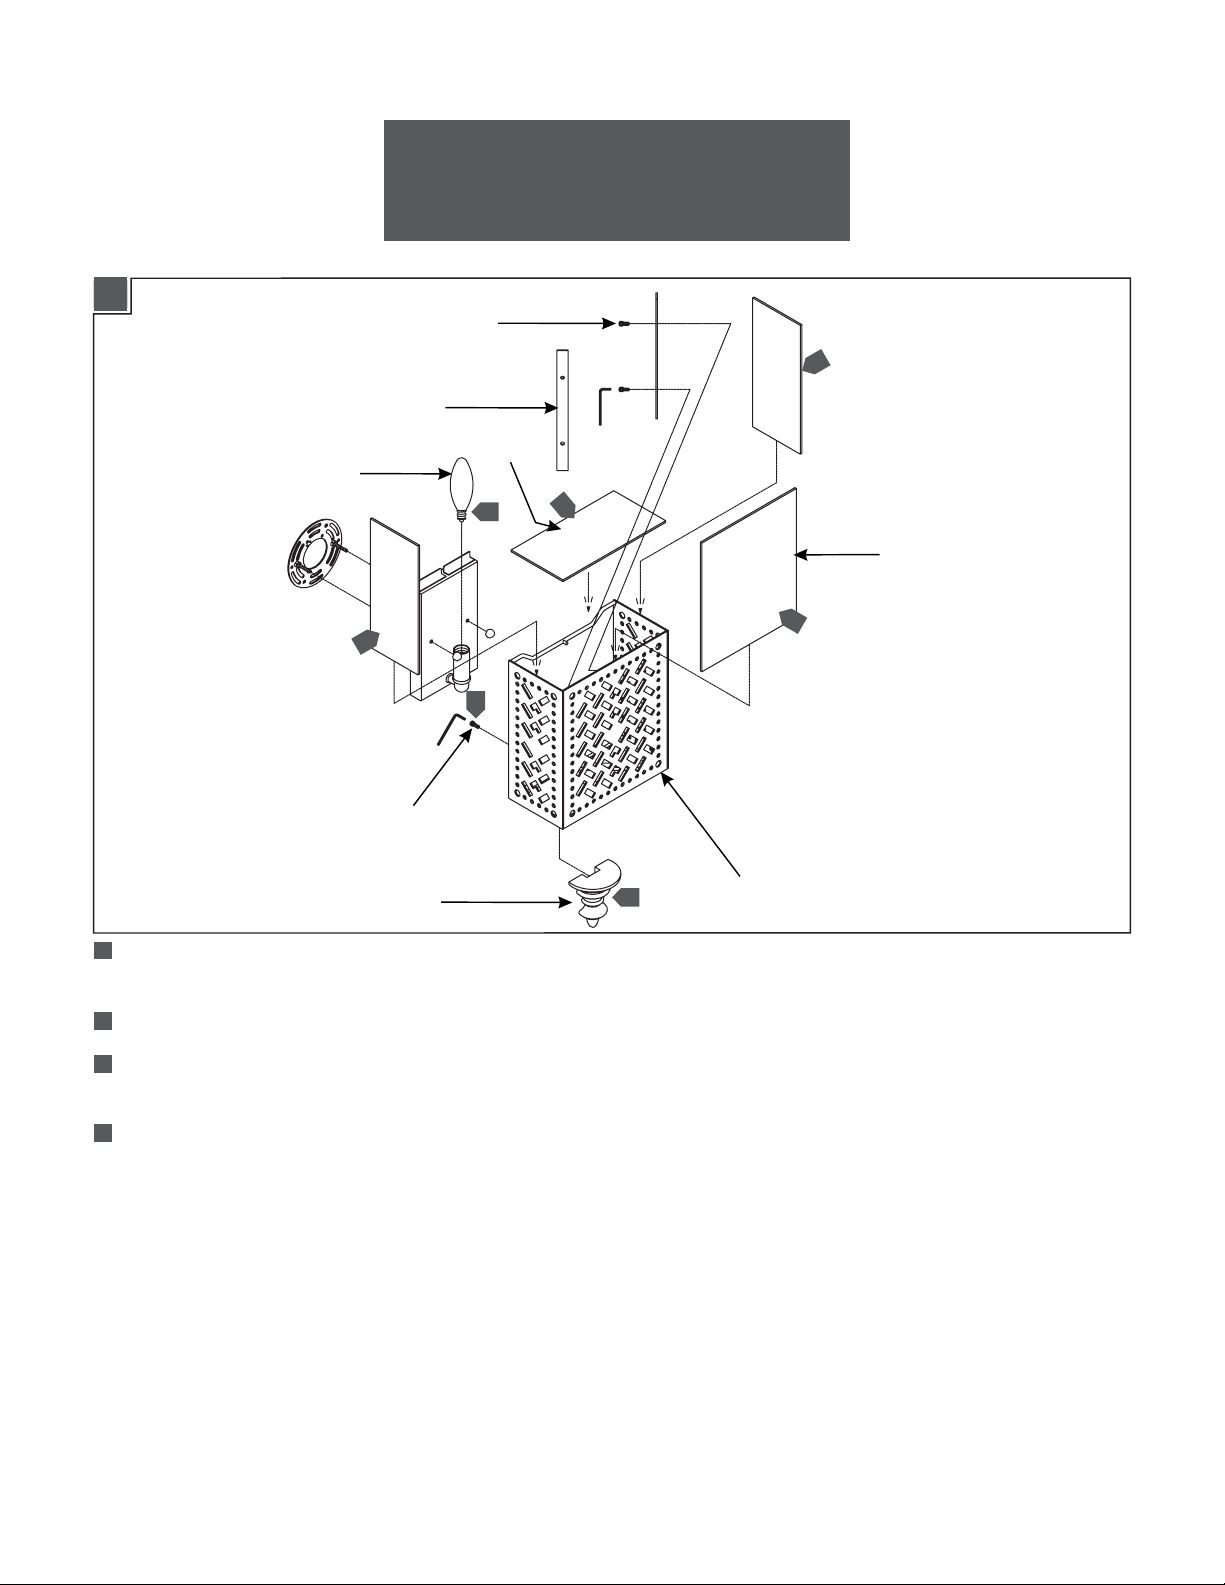
1A
SCREW
WB1609_
CAUTION - RISK OF FIRE
This product requires installation by a qualified electrician.
Before installing be sure to read all instructions and
TURNTHE POWERTOTHE ELECTRICAL BOX OFF.
2
1.0
BRACKET
DIFFUSER
LAMP
3
2
4
FINIAL SCREW
FINIAL
1
Follow enclosed supplement installation instructions for electrical and fixture installation onto house outlet box.
2
SIDE GLASS
2
4
FIXTURE
Install the diffuser and side glass to the fixture by securing them with the provided brackets.
2
3
Install lamp by screwing it into the socket. Refer to the label on the lamp socket for Max Wattage information.
Install finial to the bottom of the fixture and secure it in place with the provided finial screw.
4
1
Page 2
1A
AMPOULE
Ce produit nécessite une installation par un électricien
ATTENTION – RISQUE D’INCENDIE
qualifié.Avant d'installer assurez-vous de lire toutes les
instructions etTOURNER LE POUVOIR DE LA BOITE
ELECTRIQUE OFF
VIS
SUPPORT
DIFFUSEUR
3
2
4
2
2
VERRE LATERAL
2
VIS DE FLEURON
FLEURON
1
Suivez les instructions d'installation jointes supplément pour l'installation électrique et de fixation sur la boîte de sortie de
4
FIXATION
la maison.
2
Installez le diffuseur en verre et un côté à l'appareil en les fixant avec sa bride donnée.
3
Installez la lampe en le vissant dans la douille. Reportez-vous à l'étiquette sur la douille de lampe Puissance max pour plus
d'informations.
4
Installez fleuron vers le bas de l'appareil et le fixer en place avec la vis fournie fleuron.
2
Page 3

1A
BOMBILLA
PRECAUCION – RIESGO DE INCENDIO
Este producto requiere la instalación por un electricista
calificado.Antes de instalar,asegúrese de leer todas las
instrucciones y APAGUE EL PODER DE LA CAJA
ELÉCTRICA NO.
TORNILLO
SUPORTE
DIFUSOR
3
2
4
2
2
VIDRIO DE LADO
2
TORNILLO DE REMATE
REMATE
1
Siga las instrucciones de instalación adjuntas suplemento para la instalación eléctrica y el accesorio en la caja de salida
4
FIXTURE
casa.
2
Instale el difusor de cristal y laterales para el soporte de sujeción con los soportes suministrados.
3
Instale la lámpara enroscándolo en la toma de corriente. Consulte la etiqueta del casquillo de la lámpara para obtener
información Potencia Max.
4
Instale remate a la parte inferior del aparato y seguro en su lugar con el tornillo suministrado remate.
3
Page 4

SAVE THESE INSTRUCTIONS!
555 Theodore Fremd Ave Suite B101 Rye, NY 10580
800.969.3347
www.Feiss.com
© 2012 Feiss.All rights reserved.The "Feiss" graphic is a
registered trademark of Feiss. Feiss reserves the right to
change specifications for product improvements without notification.
A Generation Brands Company
4
 Loading...