

Page 1
Installation Instructions for
P1325
Audrie 4 Light Mini-Pendant (LED)
Pendant
GP I :ENERAL RODUCT NFORMATION
This product is listed by one of the following
“ ationally ecognized esting aboratory”NR TL
This product is suitable for dry locations only.
This instruction shows a typical installation.
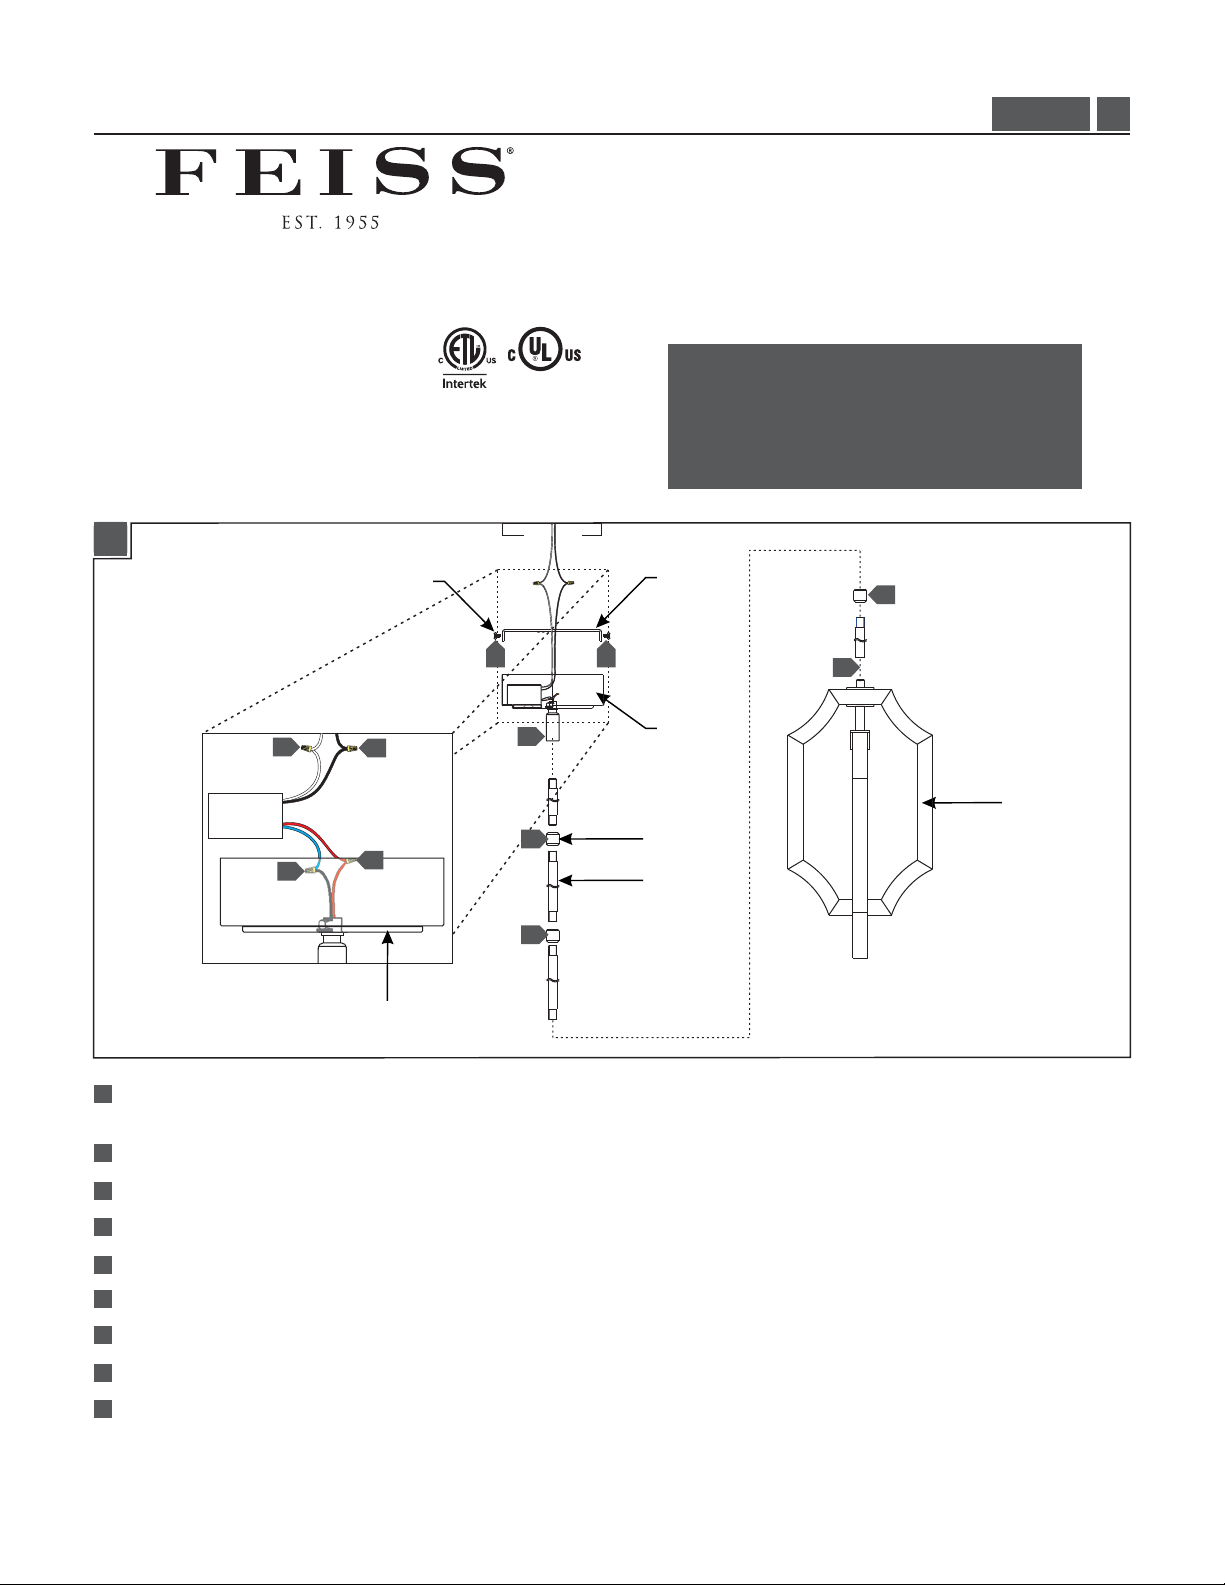
1A
FIXTURE
SCREW
9 9
MOUNTING
PLATE
P1325_
CAUTION - RISK OF FIRE
This product must be installed in accordance with
the applicable installation code by a person familiar
with the construction and operation of the product
and the hazards involved.
Use minimum 90°c supply conductors.
1
3
1.0
7
DRIVER
6
1
Determine the height of the fixture with the provided stems and connectors, then assemble them by screwing them
8
6
CANOPY
4
1
1
CANOPY
CONNECTOR
STEM
together.
2
Secure the mounting plate to the electrical box with two mounting plate screws.
3
Feed the fixture wires through the stems and screw the stem assembly to the pendant.
4
Feed the fixture wires through the canopy and screw the canopy onto the stem assembly.
5
Connect the fixture to a suitable ground in accordance to local electrical codes.
6
Connect the red and blue driver wires to the appropriate fixture wires with wire nuts.
7
Connect the white driver wire to the neutral power line wire with a wire nut.
PENDANT
8
Connect the black driver wire to the hot power line wire with a wire nut.
9
Neatly place the driver and wires into the electrical box and/or canopy, then place the canopy onto the mounting plate and
secure it in place by screwing in the fixture screws.
1
Page 2
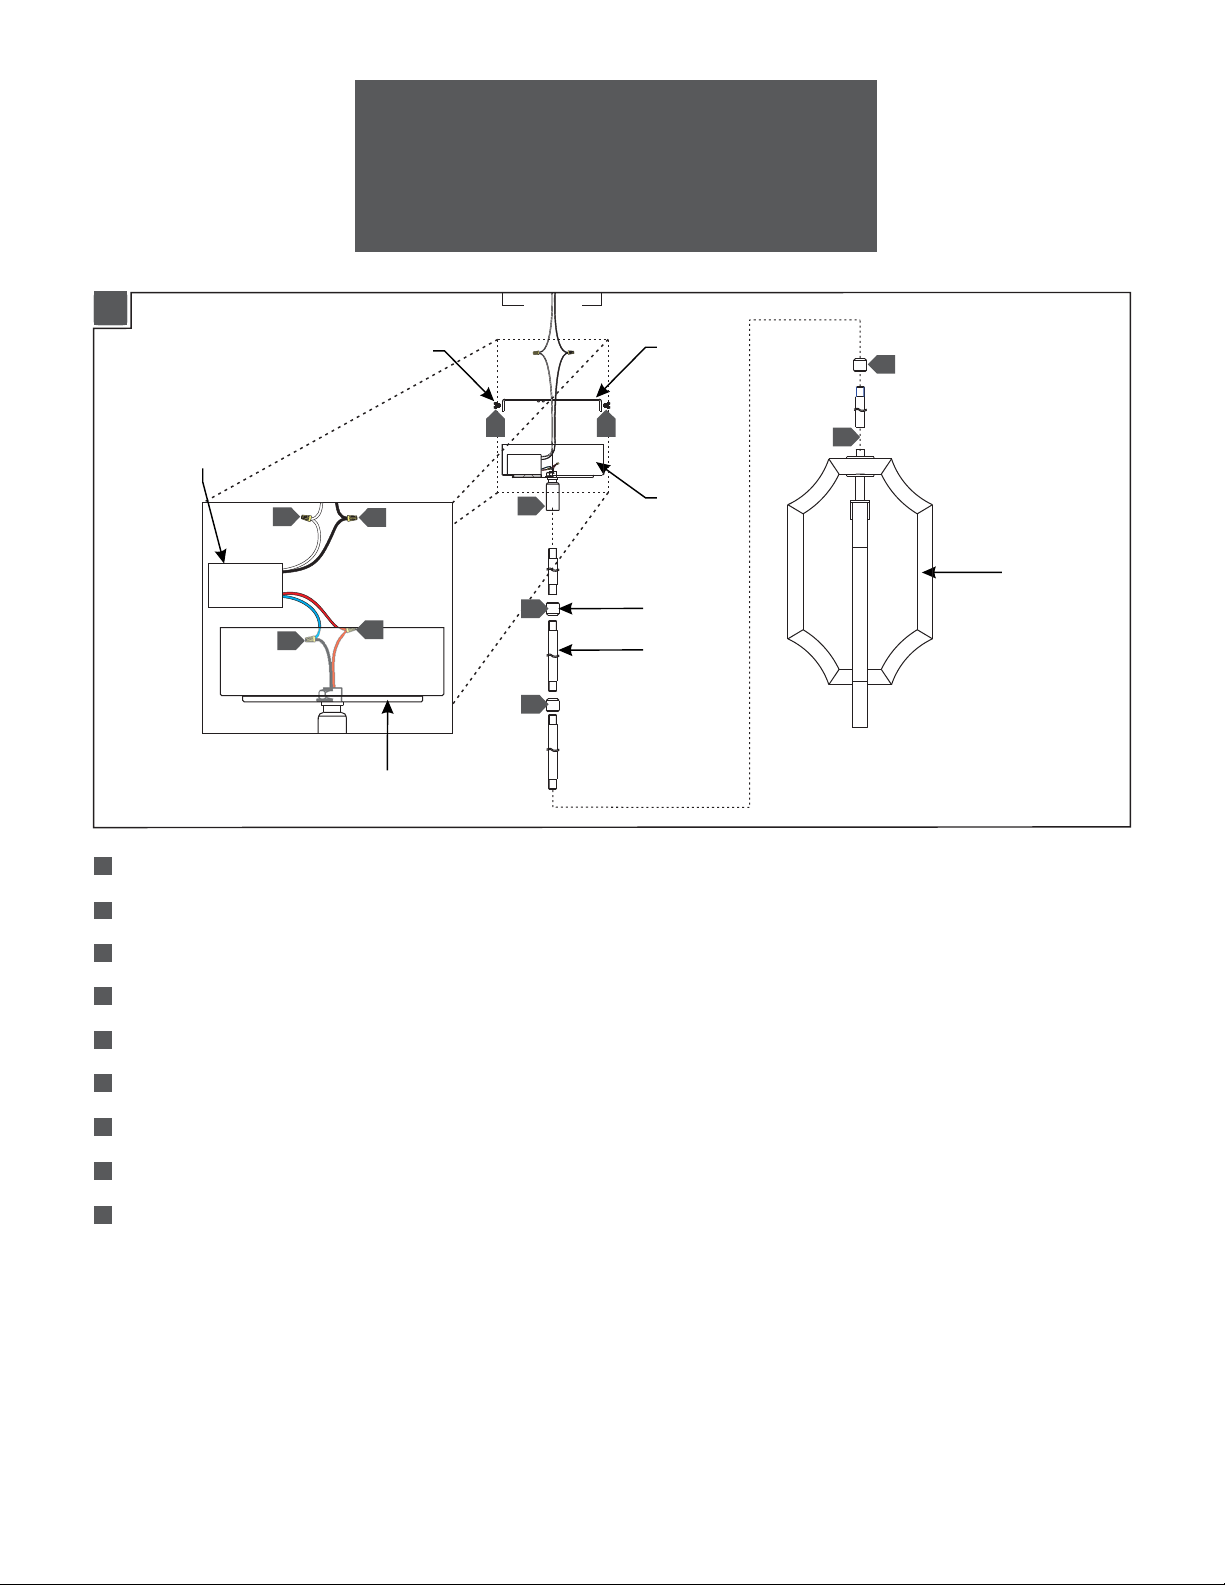
1A
ATTENTION : RISQUE D'INCENDIE
Ce produit doit être installé conformément au code
d'installation en vigueur par une personne familière avec
la construction et l'exploitation du produit et les risques
qu'il entraîne.
Utiliser les conducteurs d'alimentation
supérieure à 90° c.
VIS DE
LUMINAIRE
PLAQUE DE
MONTAGE
1
99
CONDUCTEUR
7
6
1
Déterminer la hauteur du luminaire avec les connecteurs et les tiges fournies, puis les assembler en les vissant ensemble.
2
Fixer la plaque de montage sur le boîtier électrique avec deux vis de plaque de montage.
3
Faire passer les fils du luminaire à travers les tiges et visser l'ensemble de la tige pour le pendentif.
4
Faire passer les fils du luminaire à travers la dais et visser le dais sur l'assemblage de la tige.
8
6
DAIS
4
1
1
DAIS
CONNECTEUR
TIGE
3
PENDENTIF
5
Connectez le luminaire à un terrain approprié conformément aux codes électriques locaux.
6
Connectez les fils rouge et bleu du conducteur pour les fils du luminaire approprié avec capuchons de connexion.
7
Connectez le fil blanc du conducteur au fil ligne neutre avec un capuchon de connexion.
8
Connectez le fil noir du conducteur au fil ligne chaude avec un capuchon de connexion.
9
Parfaitement placer le conducteur et le fils dans le boîtier électrique et/ou de la dais, puis déposer la dais sur la plaque de
montage et fixez-le en serrant les vis de montage.
2
Page 3
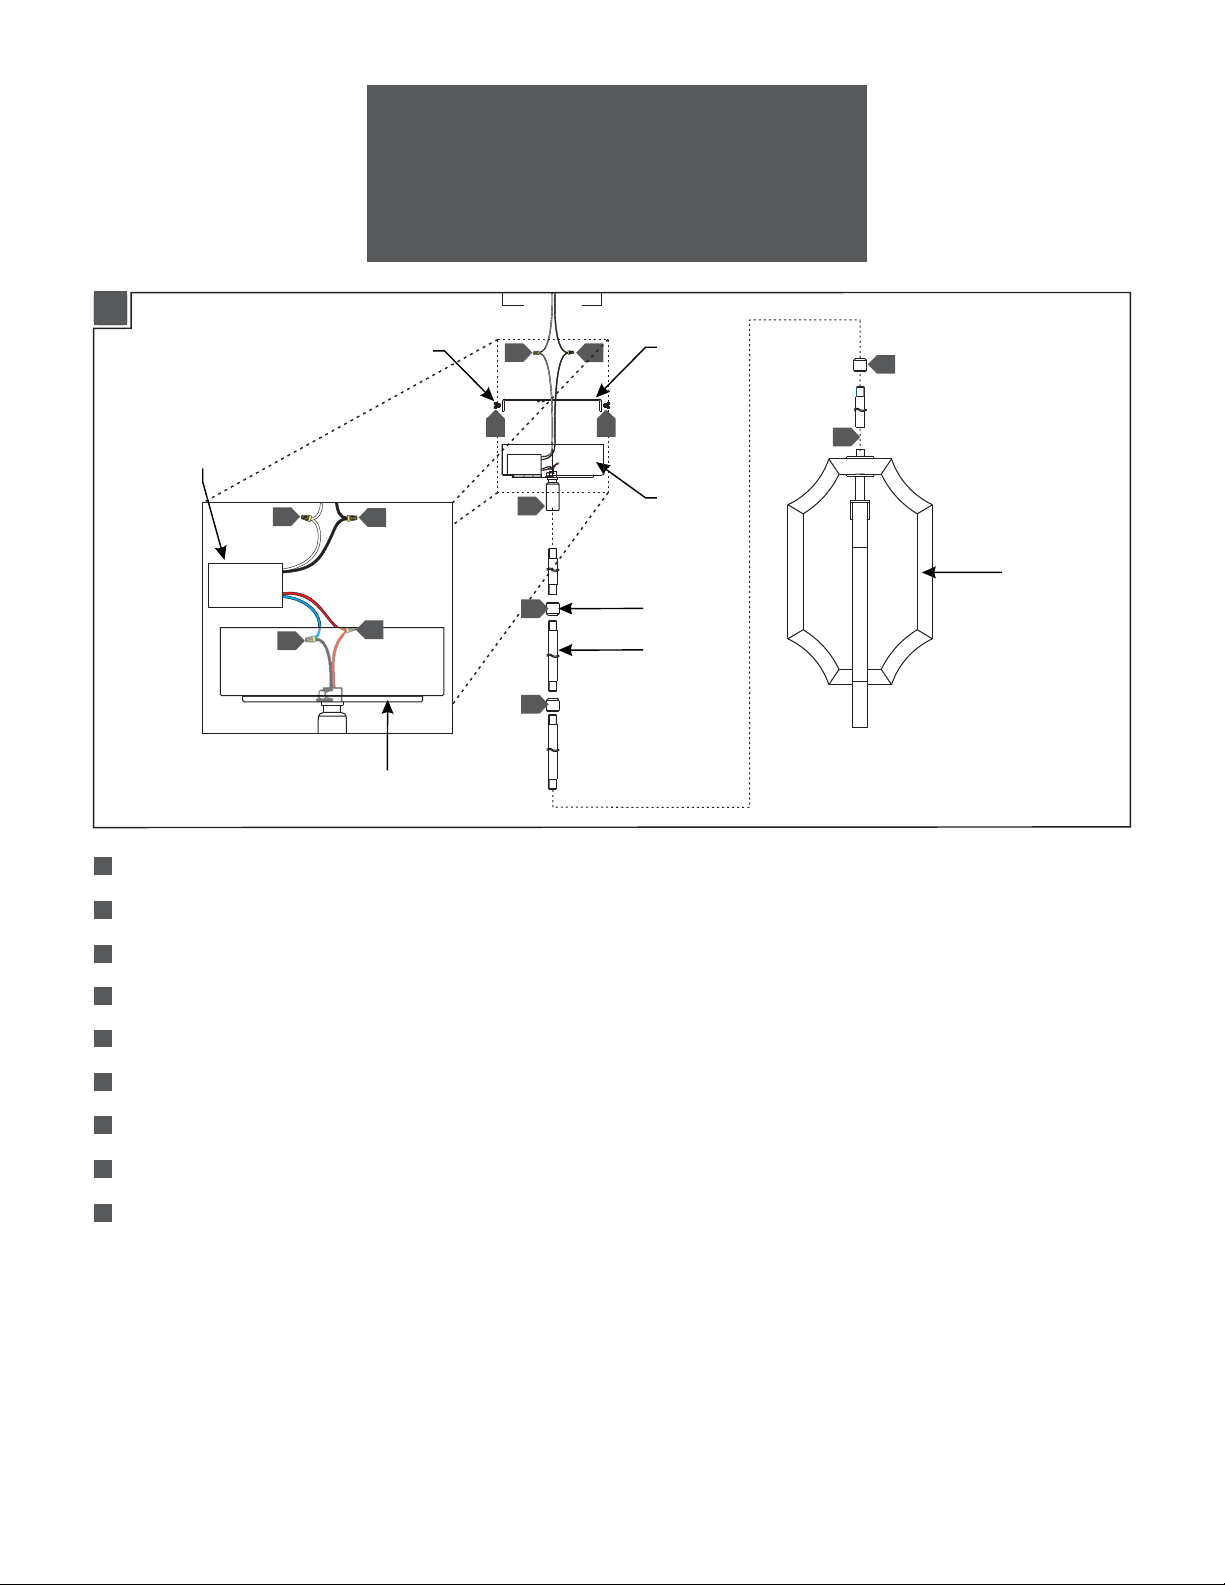
1A
Este producto debe instalarse de acuerdo con el
código de instalación aplicable por una persona
familiarizada con la construcción y operación del
TORNILLO DE
LA LÁMPARA
PRECAUCIÓN: RIESGO DE INCENDIO
producto y los riesgos que conllevan.
Utilizar conductores de suministro
mínimo 90° c.
8
9
PLACA DE
MONTAJE
1
99
CONDUCTOR
7
6
1
Determinar la altura de la lámpara con los tallos proporcionados y conectores, luego ensamblarlos atornillándolos juntos.
2
Fije la placa de montaje a la caja eléctrica con dos tornillos de la placa de montaje.
3
Pasar los cables de la lámpara a través de los tallos y atornille el tallo para el colgante.
4
Pasar los cables de la lámpara a través de el dosel y atornille el dosel en el ensamble de la tallo.
8
6
DOSEL
4
1
1
DOSEL
CONECTOR
TALLO
3
COLGANTE
5
Conectar la lámpara a una tierra apropiada de acuerdo a los códigos eléctricos locales.
6
Conecte los cables rojo y azul del conductor a los cables apropiado de la lámpara con tuercas de alambre.
7
Conecte el cable conductor blanco al cable neutro línea con una tuerca para hilos.
8
Conecte el cable conductor negro al cable de línea caliente potencia con una tuerca de alambre.
9
Cuidadosamente Coloque el conductor y los cables en la caja eléctrica o dosel, luego colocar el dosel en la placa de
montaje y asegúrelo en su lugar apretando los tornillos de la lámpara.
3
Page 4

SAVE THESE INSTRUCTIONS!
555 Theodore Fremd Ave Suite B101 Rye, NY 10580
800.969.3347
www.Feiss.com
© 2014 Feiss.All rights reserved.The "Feiss" graphic is a
registered trademark of Feiss. Feiss reserves the right to
change specifications for product improvements without notification.
A Generation Brands Company
4
 Loading...