

Page 1
Installation Instructions for
OL9208
Menlo Park 1 Light Outdoor Post Latern
Outdoor Post
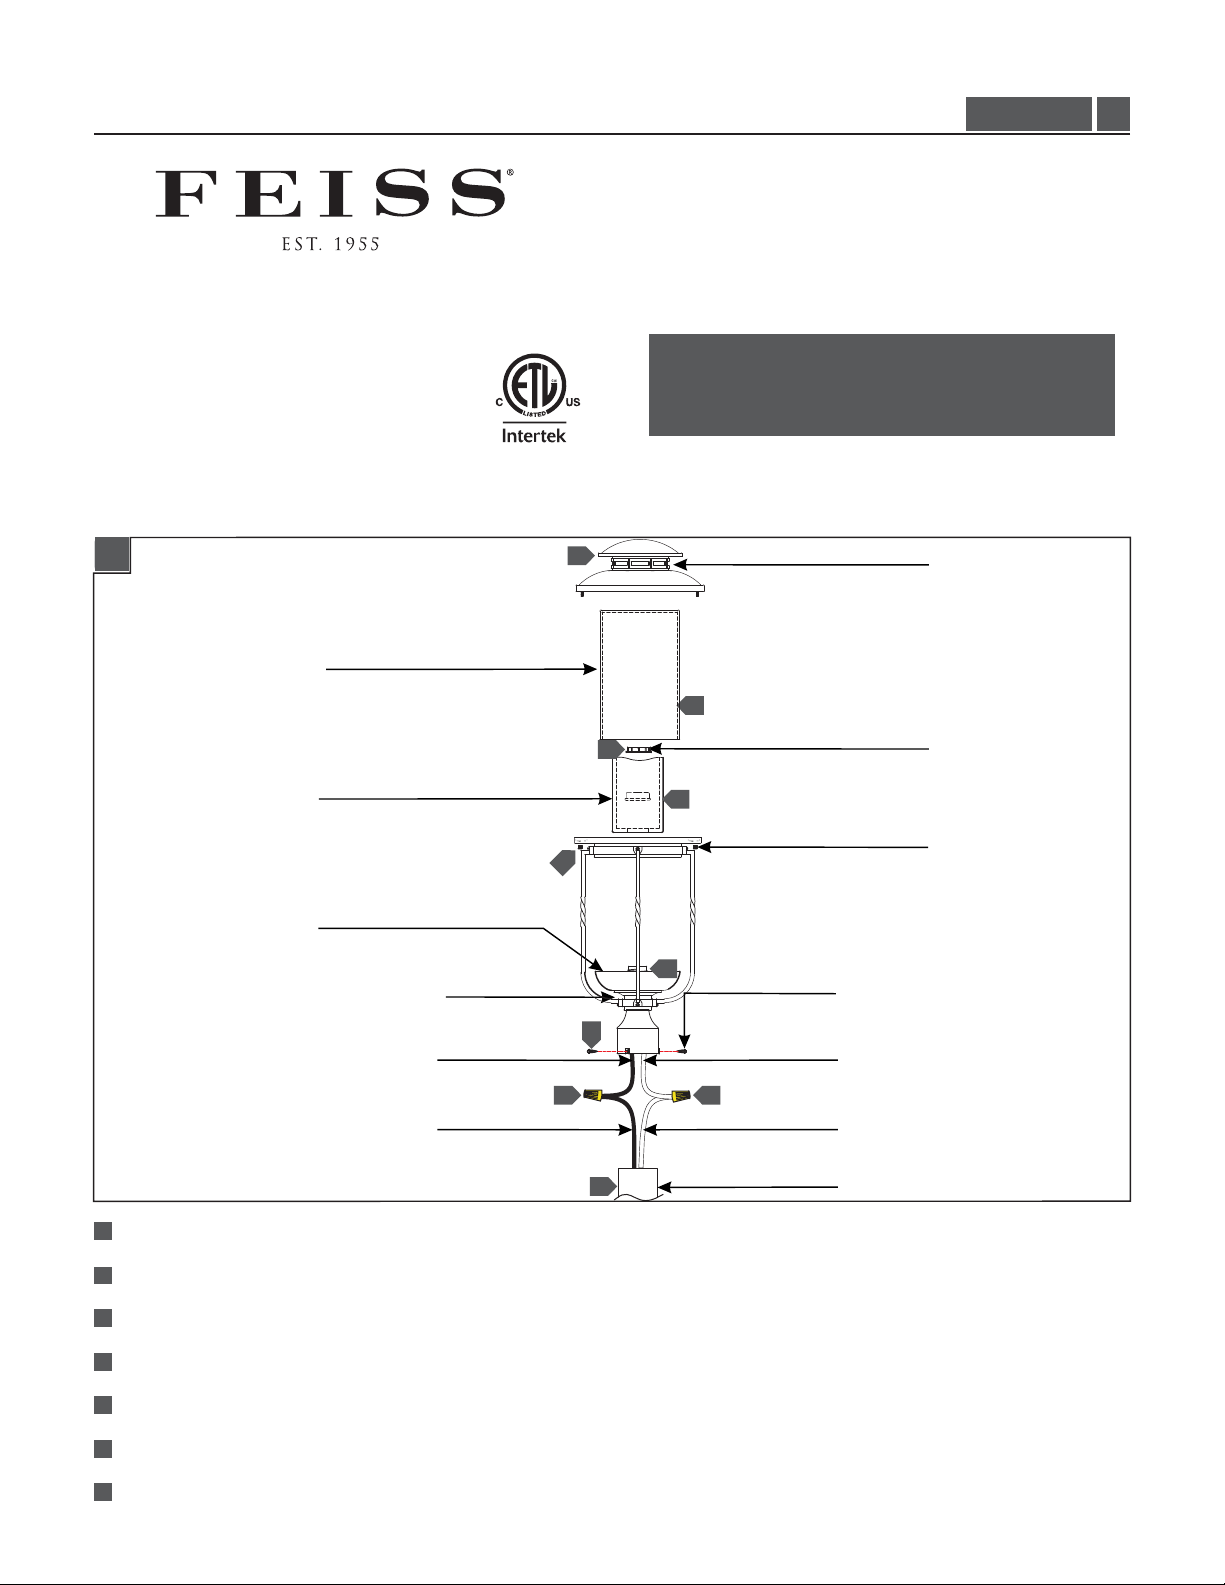
GP I :ENERAL RODUCT NFORMATION
This product requires installation by a qualified electrician.
Before installing be sure to read all instructions and
This product is suitable for wet locations.
This product may be dimmed with a standard incandescent dimmer.
This instruction shows a typical installation.
1A
OUTER SHADE
7
TURNTHE POWERTOTHE ELECTRICAL BOX OFF.
OL9208_
CAUTION - RISK OF FIRE
FIXTURE TOP
1.0
7
6
INNER SHADE
7
FIXTURE BASE
FIXTURE
4
BLACK WIRE
3
HOT WIRE
4
1
Connect the fixture to a suitable ground in accordance to local electrical codes.
2
Connect the white fixture wire to the neutral power line wire with a wire nut.
6
5
COUNTER RING
CAP NUT
POST SCREW
WHITE WIRE
2
NEUTRAL WIRE
POST
3
Connect the black fixture wire to the hot power line wire with a wire nut.
4
Secure the fixture to the post with post screws.
5
Screw the lamp into the socket. Refer to the label on the lamp socket for Max Wattage information.
6
Install the inner shade to the fixture base and secure it by tightening the counter ring.
7
Install the outer shade over the inner shade and secure it in place by installing the fixture top with cap nuts.
1
Page 2
Ce produit nécessite une installation par un électricien
ATTENTION – RISQUE D’INCENDIE
qualifié.Avant d'installer assurez-vous de lire toutes les
instructions etTOURNER LE POUVOIR DE LA BOITE
ELECTRIQUE OFF
1A
OMBRE EXTÉRIEURE
OMBRE INTERNE
L'APPAREIL BASE
FIL NOIR
FIL CHAUD
7
7
6
6
7
3
5
VIS DE POSTE
4
FIL BLANC
3
4
2
FIL NEUTRE
2
POSTE
HAUT DE L'APPAREIL
ANNEAU DE COMPTOIR
ÉCROU À CHAPEAU
1
Branchez l'appareil sur un sol adapté conformément aux codes électriques locaux.
2
Connecter le fil blanc au fil neutre puissance ligne avec un serre-fils.
3
Connecter le fil noir de l'appareil au fil de ligne électrique chaud avec un serre-fils.
4
Fixez le luminaire au poteau avec les vis de la poste.
5
Vissez l'ampoule dans la douille. Consulter l'étiquette sur la douille de lampe pour information Max Wattage.
6
Installer l'ombre interne à la base de l'appareil et le fixer en serrant la bague de compteur.
7
Installez l'ombre extérieure sur l'ombre intérieure et fixez-la en place en installant le haut de l'appareil avec les écrous
borgnes.
2
Page 3

PRECAUCION – RIESGO DE INCENDIO
Este producto requiere la instalación por un electricista
calificado.Antes de instalar,asegúrese de leer todas las
instrucciones y APAGUE EL PODER DE LA CAJA
ELÉCTRICA NO.
1A
1A
SOMBRA EXTERIOR
SOMBRA INTERIOR
BASE DE ACCESORIO
CABLE NEGRO
CABLE CALIENTE
7
7
6
6
7
5
TORNILLO DEL POSTE
4
CABLE BLANCO
3
2
CABLE NEUTRO
TAPA DEL ACCESORIO
ANILLO DE CONTADOR
TUERCA DE TAPA
4
1
Conectar el proyector a una tierra apropiada de acuerdo con los códigos eléctricos locales.
2
Conecte el cable blanco del luminario para el cable de la línea de alimentación neutro con una tuerca de alambre.
3
Conecte el cable negro al cable de línea de energía caliente con una tuerca de alambre.
4
Asegure el accesorio al poste con los tornillos del poste.
5
Enrosque la lámpara en el enchufe. Consulte la etiqueta en el zócalo de la lámpara para información sobre la Max
POSTE
Wattage.
6
Enrosque la lámpara en el enchufe. Consulte la etiqueta en el zócalo de la lámpara para información sobre la Max
Wattage.
7
Instale la persiana exterior sobre la sombra interior y fíjela en su lugar mediante la instalación de la tapa del accesorio con
las tuercas de la tapa.
3
Page 4

SAVETHESE INSTRUCTIONS!
555 Theodore Fremd Ave Suite B101 Rye, NY 10580
800.969.3347
www.Feiss.com
© 2012 Feiss.All rights reserved.The "Feiss" graphic is a
registered trademark of Feiss. Feiss reserves the right to
change specifications for product improvements without notification.
A Generation Brands Company
4
 Loading...