

Page 1
Installation Instructions for
O 11113L
Pediment 3 Light Outdoor Flush Mount
Outdoor
GP I :ENERAL RODUCT NFORMATION
These fixtures are intended to be installed utilizing NEC compliant
junction boxes.
This product is safety listed for damp locations.
This product may be dimmed with a standard incandescent dimmer.
This instruction shows a typical installation.
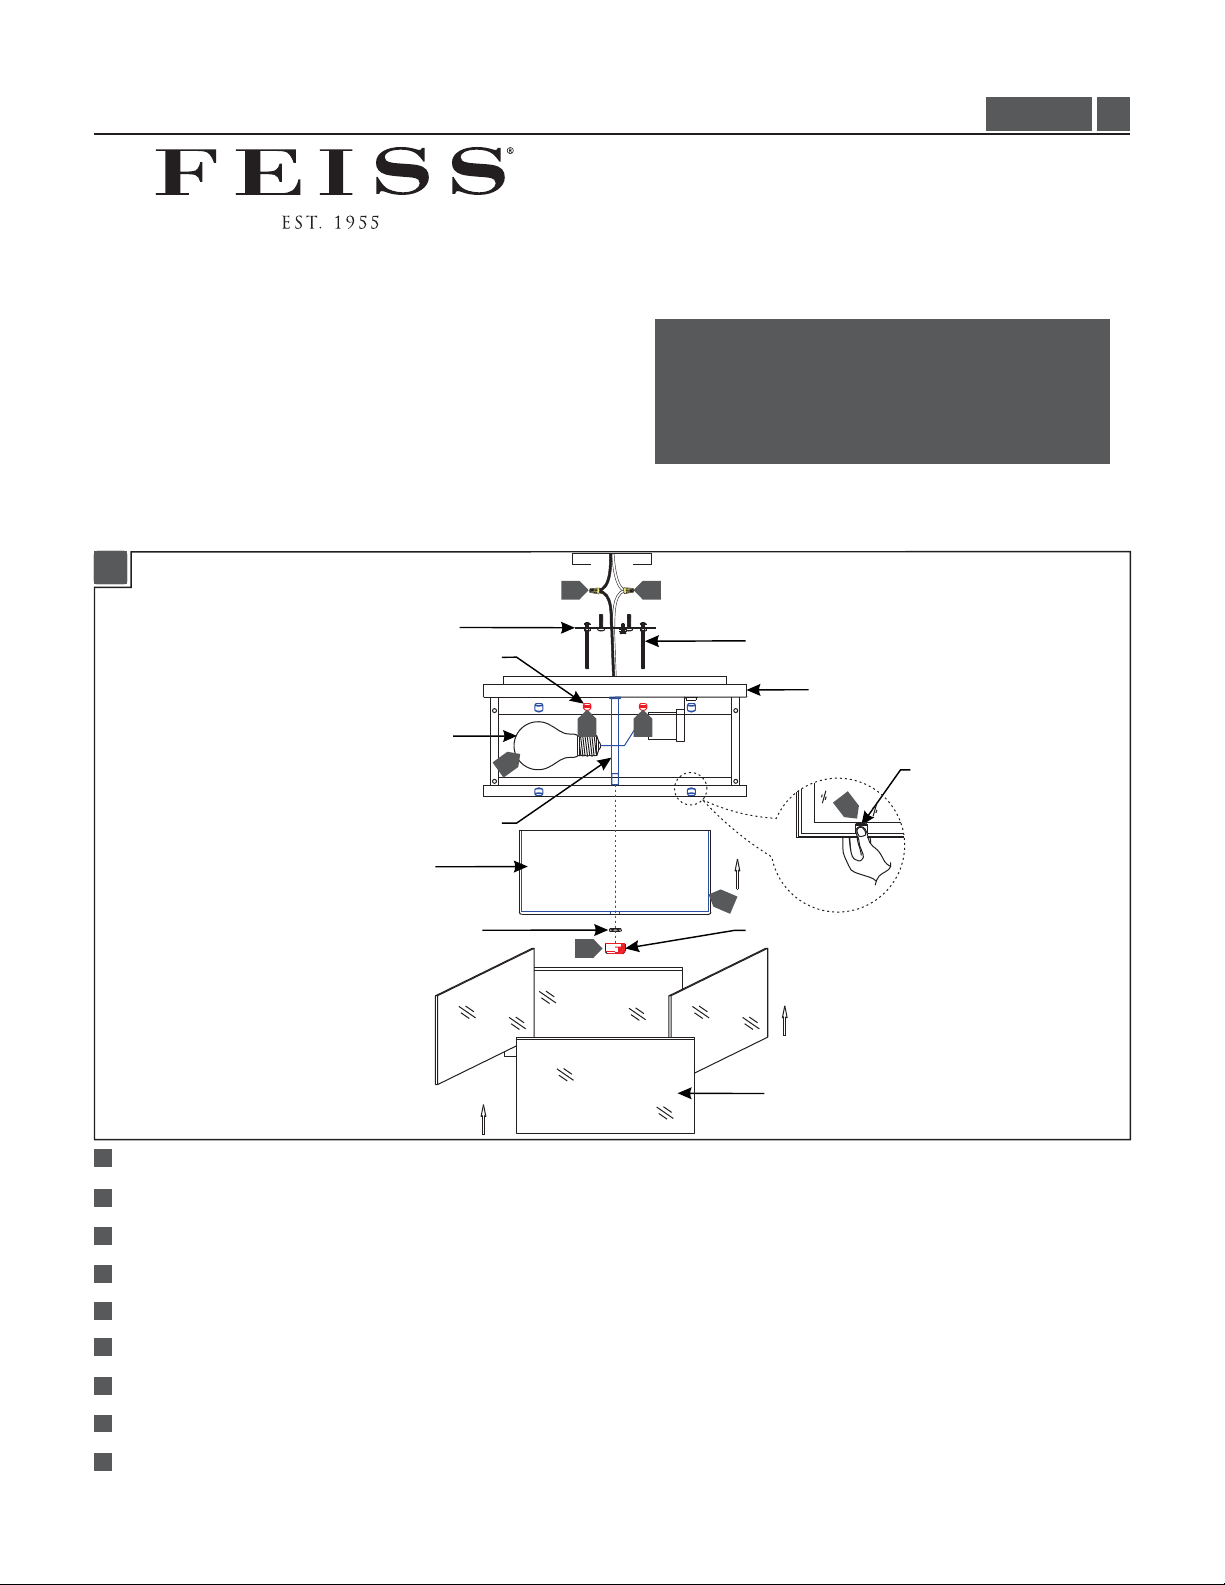
1A
5
MOUNTING PLATE
CAP NUT
This product must be installed in accordance with the
applicable installation code by a person familiar with the
construction and operation of the product and the hazards
involved.
Use minimum 90°c supply conductors.
4
CAUTION - RISK OF FIRE
MOUNTING PLATE STUD
FIXTURE BASE
O 11113L
1.1
LAMP
7
THREADED PIPE
SHADE
HEX NUT
1
1
Secure the mounting plate to the junction box.
2
Install the glass panels by carefully inserting them into the frame and securing them using the tabs.
3
Connect the fixture to a suitable ground in accordance to local electrical codes.
4
Connect the white fixture wire to the neutral power line wire with a wire nut.
6 6
2
8
FINIAL
9
GLASS PANEL
TAB
5
1
Connect the black fixture wire to the hot power line wire with a wire nut.
6
Place the fixture base onto the mounting plate studs and secure it in place by screwing the cap nuts onto the studs.
7
Screw the lamps into the sockets. Refer to the label on the lamp socket for Max Wattage information.
8
Place the shade onto the threaded pipe and secure it in place by screwing the hex nut onto the threaded pipe.
9
Screw the finial onto the threaded pipe.
1
Page 2
MISE EN GARDE - RISQUE D'INCENDIE
Ce produit doit être installé selon le code d’installation pertinent ,
par une personne qui connaÎt bien le produit et
son fonctionnement ainsi que les risques inhérents
Les fils d’alimentation doivent convenir pour 90°c.
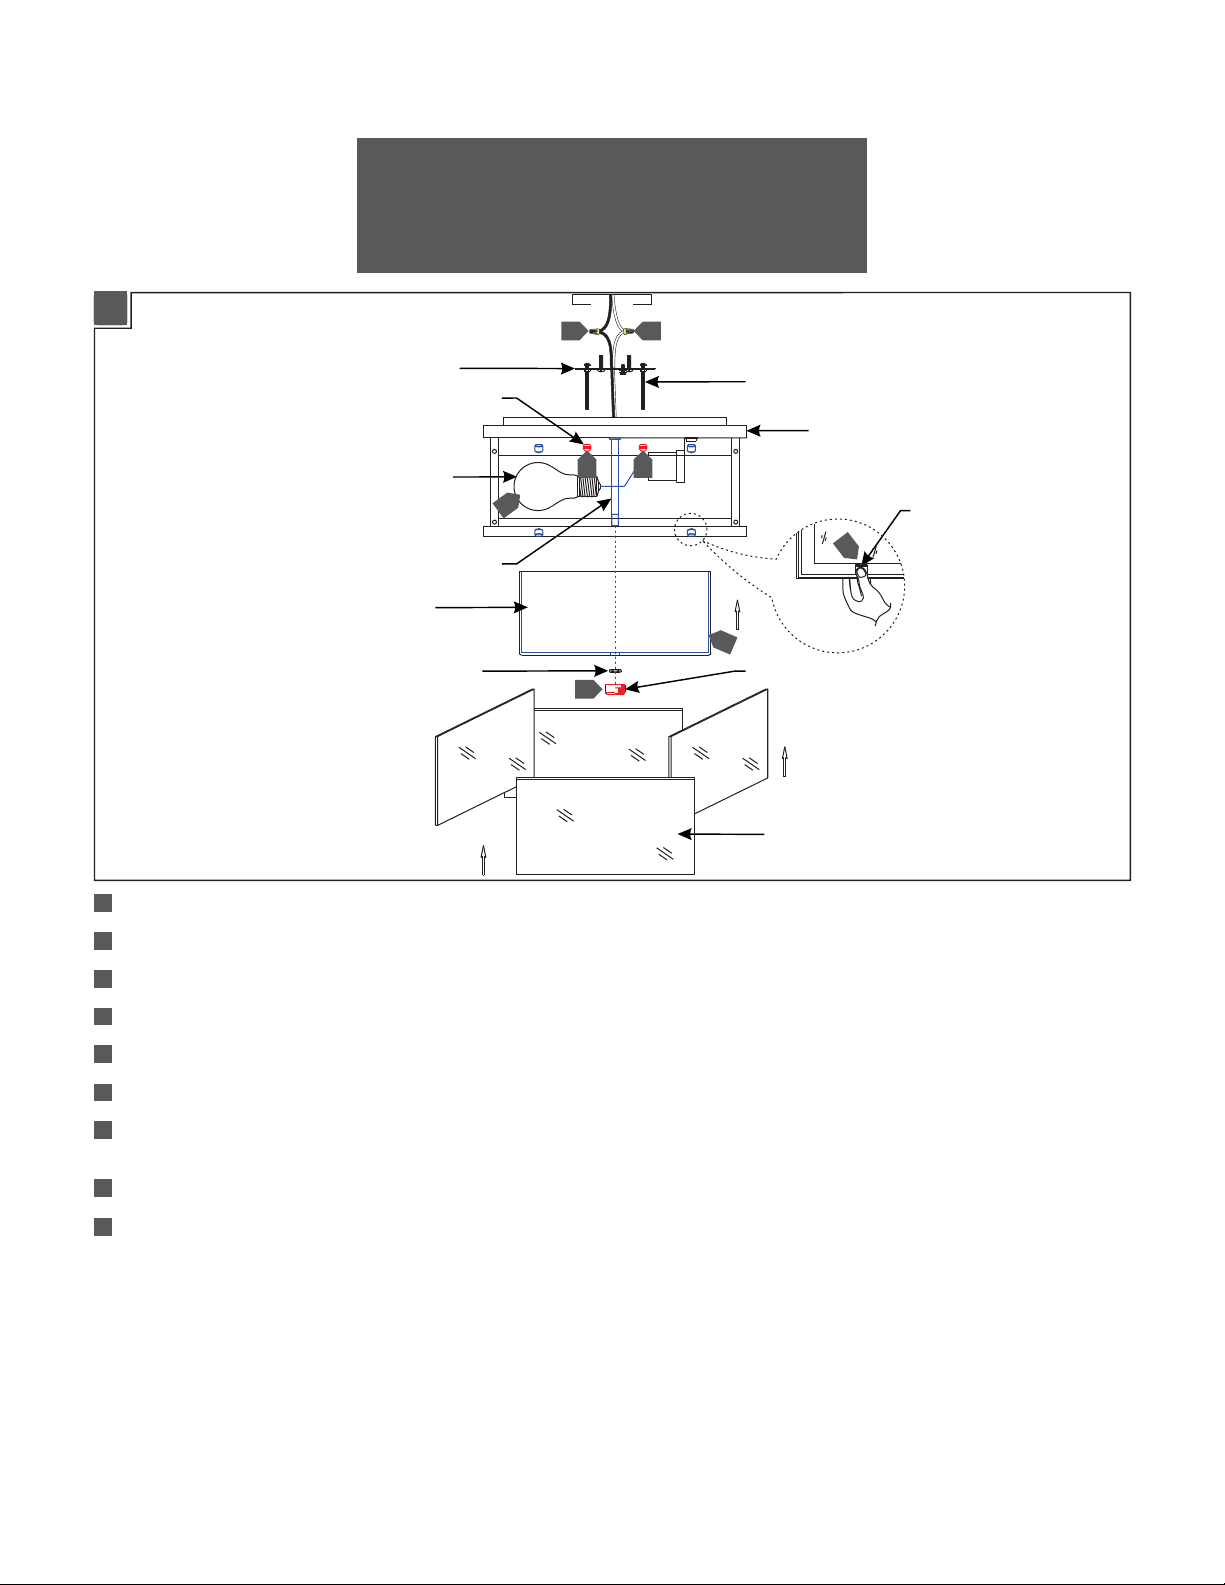
1A
PLAQUE DE MONTAGE
ÉCROU CAPUCHON
AMPOULE
TUYAU FILETÉ
ABAT-JOUR
ÉCROU HEX
5
6 6
7
9
4
GOUJON DE MONTAGE
BASE DE LUMINAIRE
LANGUETTE
2
8
FLEURON
PANNEAU DE VERRE
1
1
Fixer la plaque de montage sur le boîte de jonction.
2
Installez les panneaux de verre en les insérant avec précaution dans le cadre et les fixer à l'aide des languettes.
3
Connecter le luminaire à un terrain approprié conformément aux codes électriques locaux.
4
Connecter le fil blanc de luminaire pour le fil de ligne à neutre avec un écrou de fil.
5
1
Connecter le fil noir de luminaire au fil de la ligne d'alimentation hot avec un écrou de fil.
6
Placez la base de luminaire sur les goujons de montage et le fixer en vissant les écrous sur les goujons.
7
Visser l’ampoules dans les douilles. Reportez-vous à l'étiquette sur la douille de lampe pour obtenir des informations Max
Puissance.
8
Placez l'abat-jour sur le tuyau fileté et fixez-le en vissant l'écrou sur le tuyau fileté.
Vissez le fleuron sur le tuyau fileté.
9
2
Page 3

ADVERTENCIA - RIESGO DE INCENDIO
Este productor debe ser instalado segun el codigo de
instalacion aplicable por una persona que conozca la
constussion y el funcionamiento del producto y los riesgos
que supone.
Conductores de alimentacion 90°c Min.
1A
PLACA DE MONTAJE
TUERCA CAPUCHON
BOMBILLA
TUBO ROSCADO
PANTALLA
TUERCA HEX
5
6 6
7
9
4
ESPARRAGO DE MONTAJE
BASE DE LA LÁMPARA
LENGÜETA
2
8
FINIAL
PANEL DE VIDRIO
1
1
Fije la placa de montaje a la caja eléctrica con dos tornillos de montaje.
2
Instale los paneles de vidrio insertando cuidadosamente en el marco y asegurarlos utilizando las lengüetas.
3
Conecte la lámpara a una puesta a tierra adecuada de acuerdo a los códigos eléctricos locales.
4
Conecte el cable blanco de la lámpara al cable de la línea de alimentación neutra con una tuerca para cable.
5
Conecte el cable negro de la lámpara al cable de la línea eléctrica caliente con una tuerca para cable.
6
Coloque el base de la lámpara en los esparragos de montaje y segurarlo atornillando las tuercas en los esparragos.
7
Atornille las bombillas en los enchufes. Consulte la etiqueta del casquillo de la lámpara para obtener información Max
Potencia.
8
Coloque la pantalla sobre el tubo roscado y seguro en su lugar enroscando la tuerca hexagonal en el tubo roscado.
9
Atornille el finial firmemente en el tubo roscado.
3
Page 4

SAVETHESE INSTRUCTIONS!
7400 Linder Ave, Skokie, IL 60077
800.323.3226 - 847.626.6300
www.Feiss.com
© 2015 Feiss.All rights reserved.The "Feiss" graphic is a
registered trademark of Feiss.Feiss reserves the right to
change specifications for product improvements without notification.
A Generation Brands Company
4
 Loading...