

Page 1
Installation Instructions for
OL12813-LED
McHenry Outdoor Flush Mount (LED)
Outdoor
GP I :ENERAL RODUCT NFORMATION
These fixtures are intended to be installed utilizing compliantNEC
junction boxes.
This product is safety listed for damp locations.
For a complete list of dimmers, visit out website at www.Feiss.com
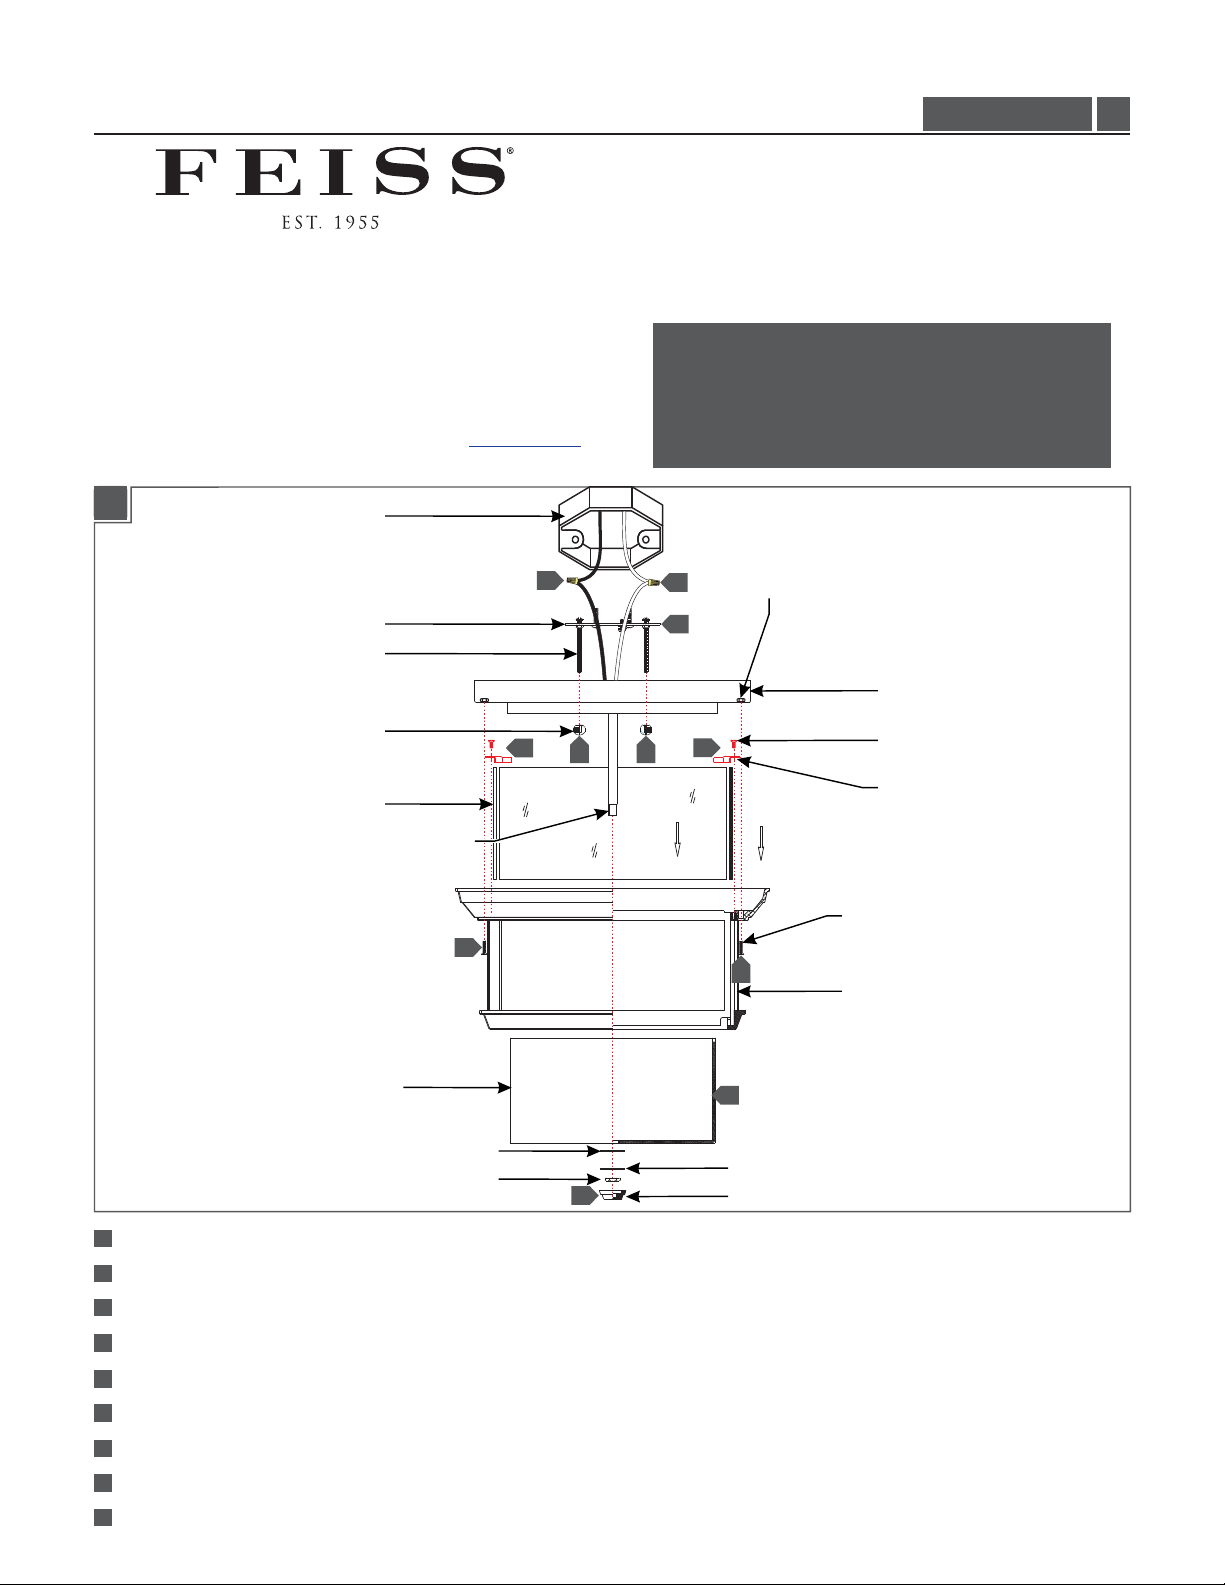
1A
MOUNTING PLATE STUD
JUNCTION BOX
4
MOUNTING PLATE
This product must be installed in accordance with the
applicable installation code by a person familiar with the
construction and operation of the product and the hazards
involved.
Use minimum 90°c supply conductors.
3
1
CAUTION RISK OF FIRE-
HEX NUT
OL12813-LED
FIXTURE BASE
1.0
CAP NUT
OUTER GLASS PANEL
THREADED PIPE
DIFFUSER
RUBBER WASHER
HEX NUT
1
1
Secure the mounting plate to the junction box.
2
Connect the fixture to a suitable ground in accordance with local electrical codes.
3
Connect the white fixture wire to the neutral power line wire with a wire nut.
6 6
5
7
5
9
BRACKET SCREW
BRACKET
FIXTURE SCREW
7
FIXTURE
8
1
STEEL WASHER
FINIAL
4
Connect the black fixture wire to the hot power line wire with a wire nut.
Place the fixture base onto the mounting plate studs and secure it with the two cap nuts.
5
6
Install the outer glass panels by inserting them into the fixture and securing them with the brackets and bracket screws.
7
Install the fixture to the fixture base by screwing the fixture screws into the hex nuts in the fixture base.
8
Place the diffuser, rubber washer, and steel washer onto the threaded pipe (in that order) and secure in place with the hex nut.
9
Screw the finial onto the threaded pipe.
1
Page 2
MISE EN GARDE RISQUE INCENDIE-D'
Ce produit doit être installé selon le code d’installation
pertinent , par une personne qui connaÎt bien le produit et
son fonctionnement ainsi que les risques inhérents
Les fils d’alimentation doivent
convenir pour 90°c.
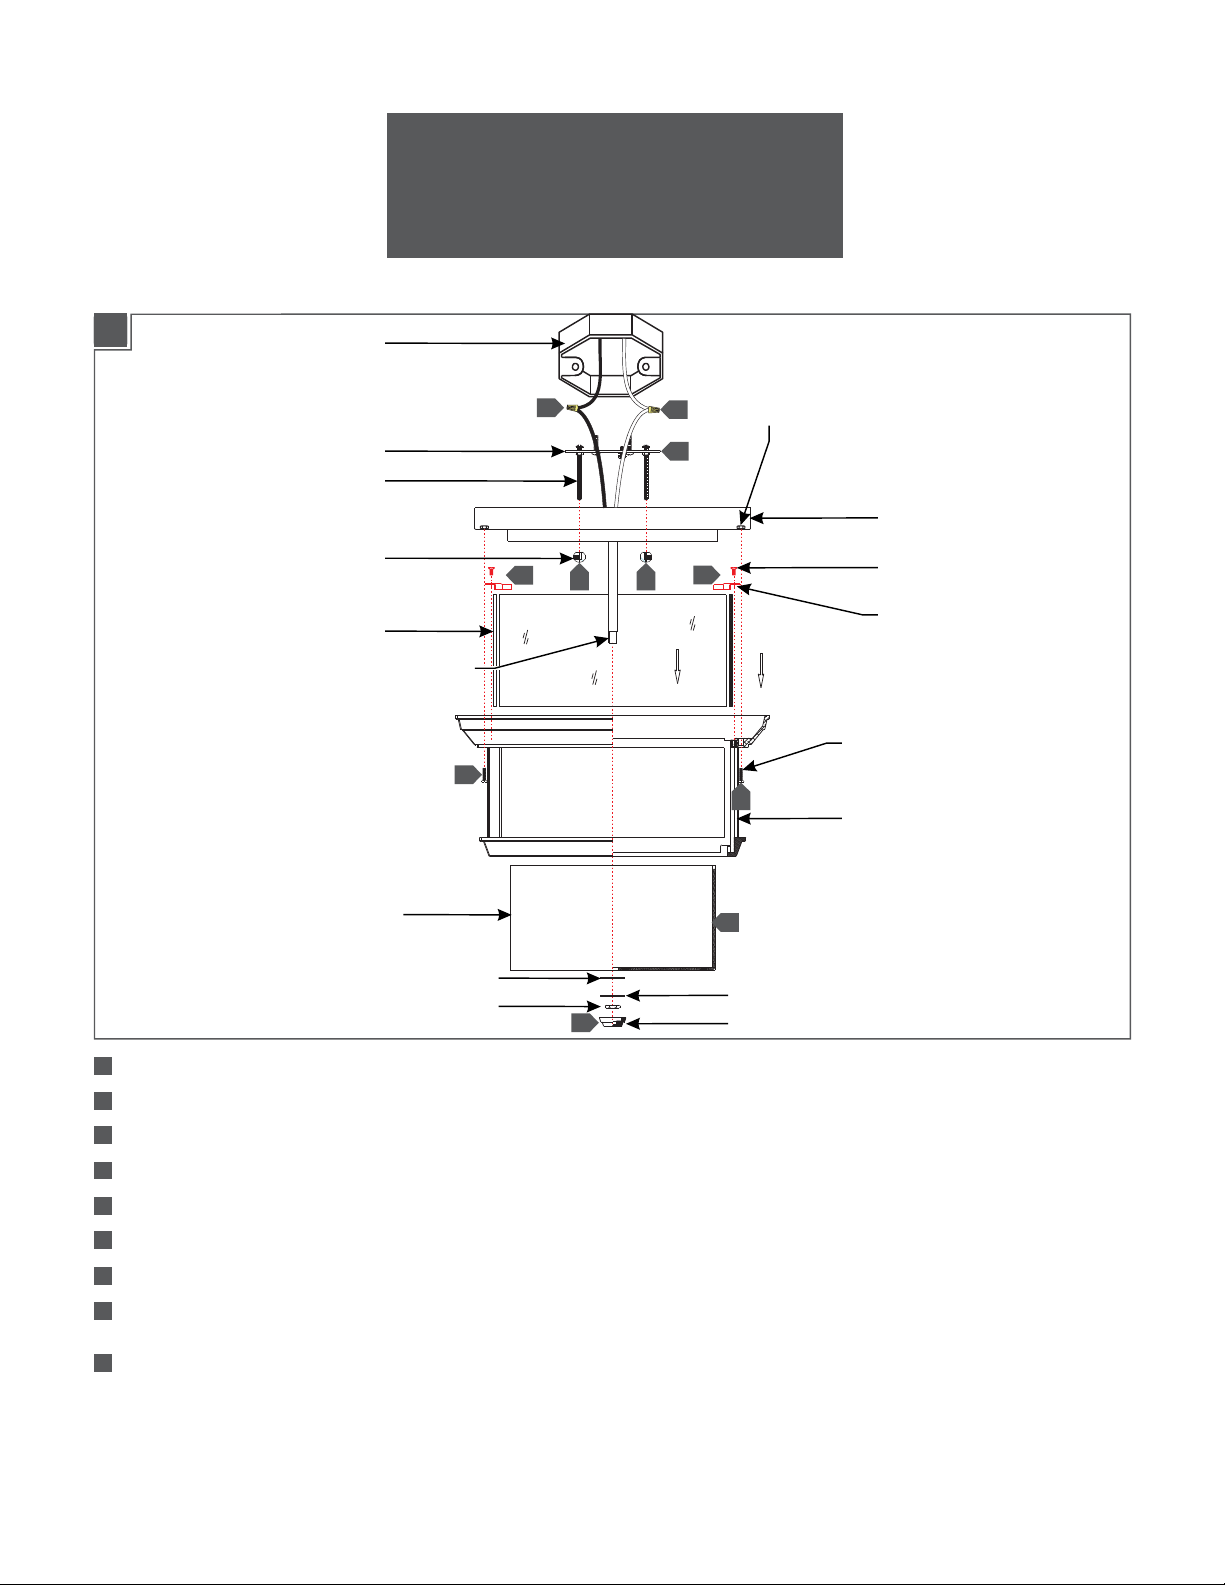
1A
PANNEAUX DE VERRE EXTÉRIEURE
BOÎTE DE JONCTION
PLAQUE DE MONTAGE
GOUJON DE MONTAGE
ECROU CAPUCHON
TUYAU FILETÉ
4
6 6
5
7
3
ECROU HEX
1
BASE DE LUMINAIRE
5
7
VIS DE SUPPORT
SUPPORT
VIS DE LUMINAIRE
LUMINAIRE
DIFFUSEUR
RONDELLE DE GOMME
ECROU HEX
1
1
Fixez la plaque de montage à la boîte de jonction.
2
Connectez le luminaire à un terrain approprié conformément avec les codes électriques locaux.
3
Connectez le fil blanc de luminaire au fil de la ligne d'alimentation neutre avec un écrou de fil.
4
Connectez le fil noir de luminaire au fil de la ligne d'alimentation chaude avec un écrou de fil.
Placez la base de luminaire sur les goujons de montage et le fixer avec les deux écrous capuchon.
5
6
Installez les panneaux de verre extérieures en les insérant dans le luminaire et les fixer avec les supports et les vis de support.
7
Installez le luminaire à la base de luminaire en vissant les vis de luminaire dans les écrous hexagonaux dans la base de luminaire.
8
Placez le diffuseur, la rondelle de gomme, et la rondelle d'acier sur le tuyau fileté (dans cet ordre) et le fixer en place avec l'écrou
9
8
1
RONDELLE D’ACIER
FLEURON
hexagonal.
9
Vissez le fleuron sur le tuyau fileté.
2
Page 3

ADVERTENCIA RIESGO DE INCENDIO-
Este productor debe ser instalado segun el codigo de
instalacion aplicable por una persona que conozca la
constussion y el funcionamiento del producto y los riesgos
que supone.
Conductores de alimentacion 90°c Min.
1A
CAJA DE CONEXIONES
PLACA DE MONTAJE
ESPARRAGO DE MONTAJE
TUERCA CAPUCHON
PANELE DE VIDRIO EXTERIOR
TUBO ROSCADO
4
6 6
5
7
3
TUERCA HEX
1
BASE DE LA LÁMPARA
5
7
TORNILLO DEL SOPORTE
SOPORTE
TORNILLO DE LA LÁMPARA
LÁMPARA
DIFUSOR
ARANDELA DE GOMA
TUERCA HEX
1
1
Fije la placa de montaje a la caja de conexiones.
2
Conecte la lámpara a una tierra adecuada, de acuerdo con los códigos eléctricos locales.
3
Conecte el cable blanco de la lámpara al cable de línea de energía neutra con una tuerca para cable.
4
Conecte el cable negro de la lámpara al cable de línea eléctrica caliente con una tuerca para cable.
Coloque la base de la lámpara en los esparragos de montaje y fijarlo con las dos tuercas capuchon.
5
6
Instale los paneles de vidrio exteriores insertándolos en la lámpara y asegurándolos con los soportes y tornillos del soporte.
7
Instale la lámpara a la base de la lámpara atornillando los tornillos de la lámpara en las tuercas hexagonales en la base de la
9
8
1
ARANDELA DE ACERO
FINIAL
lámpara.
8
Coloque el difusor, la arandela de goma y arandela de acero sobre el tubo roscado (en ese orden) y seguro en su lugar con la
tuerca hexagonal.
9
Atornille la finial firmemente en el tubo roscado.
3
Page 4

SAVETHESE INSTRUCTIONS!
7400 Linder Ave, Skokie, 60077IL
800.969.3347
www.Feiss.com
© 2016 Feiss.All rights reserved.The "Feiss" graphic is a
registered trademark of Feiss.Feiss reserves the right to
change specifications for product improvements without notification.
A Generation Brands Company
4
 Loading...