

Page 1
Installation Instructions for
F2817-10
Celebration 10 Light Chandelier
Chandelier
GP I :ENERAL RODUCT NFORMATION
This product is suitable for dry locations only.
This product may be dimmed with a standard incandescent dimmer.
This instruction shows a typical installation.
1A
ROD
HOT WIRE
ANCHOR SCREW
BLACK WIRE
2
8
5
67
2
1
1
NEUTRAL WIRE
WHITE WIRE
ANCHOR
MOUNTING PLATE
F2817_
CAUTION - RISK OF FIRE
This product requires installation by a qualified electrician.
Before installing be sure to read all instructions and
TURNTHE POWERTOTHE ELECTRICAL BOX OFF.
SHADE
LAMP
CANDLE TUBE
1.0
11
8
BALL NUT
STEM
ASSEMBLY
1
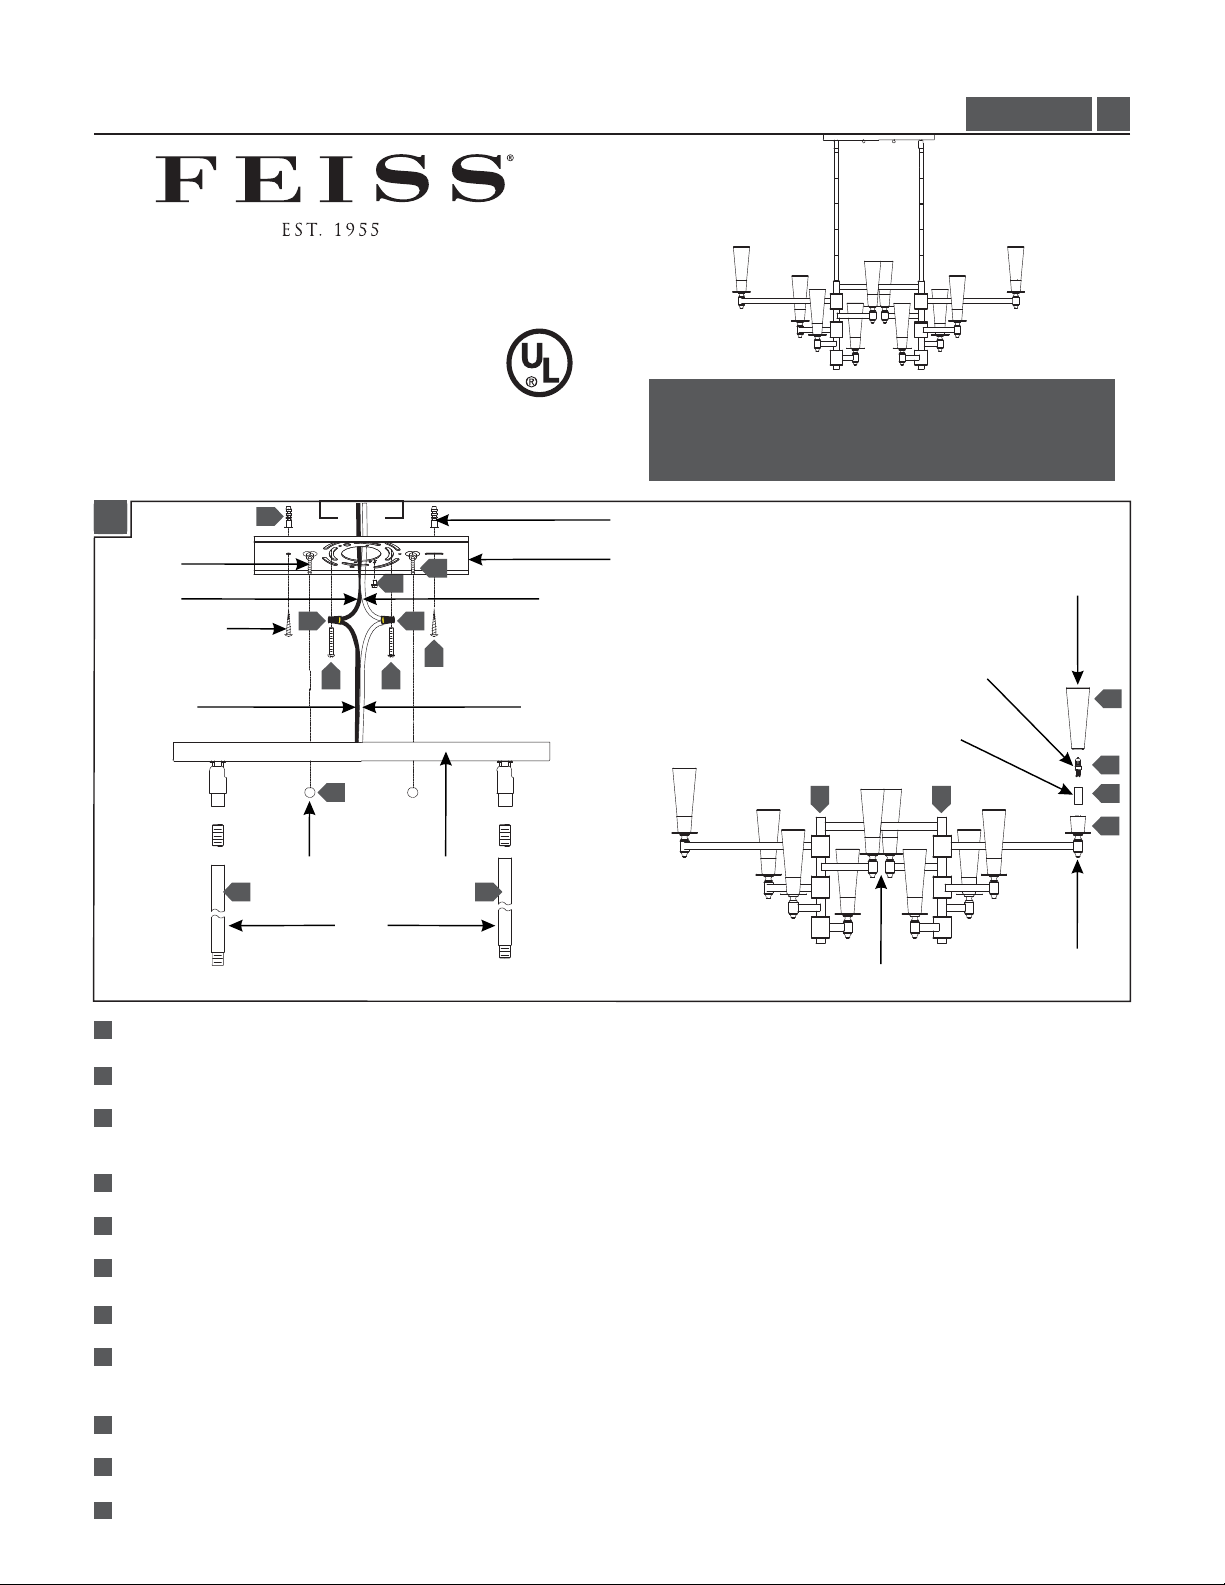
Secure the mounting plate to electrical box with the two provided mounting plate screws.
Install anchors to the ceiling and secure the mounting plate with the two provided anchor screws.
2
3
Determine the height of the fixture with provided stems and assemble them by screwing them together.
CANOPY
33
4 4
FIXTURE
NOTE: After stems have been screwed to canopy, ensure canopy hex nuts are tightened.
4
Mount and secure the fixture to the stems.
5
Connect the fixture ground wire to a suitable ground in accordance to local electrical codes.
6
Connect the white fixture wire to the neutral power line wire with a wire nut.
Connect the black fixture wire to the hot power line wire with a wire nut.
7
10
9
11
SHADE
HOLDER
8
Feed the fixture wires through the stem, then secure the canopy to the mounting plate rods with the provided ball nuts
(will need assistance).
9
Install candle tube by slipping through socket.
10
Insert the lamp into the socket. Refer to the label on the lamp socket for Max Wattage information.
11
Place and secure shade in shade holder.
1
Page 2

Ce produit nécessite une installation par un électricien
ATTENTION – RISQUE D’INCENDIE
qualifié.Avant d'installer assurez-vous de lire toutes les
instructions etTOURNER LE POUVOIR DE LA BOITE
ELECTRIQUE OFF
1A
BARRE
FIL CHAUD
VIS D'ANCRAGE
FIL NOIR
1
Fixez la plaque de montage à la boîte électrique avec les deux vis de la plaque de montage fournie.
Installez les ancrages au plafond et fixer la plaque de montage avec les deux vis d'ancrage fournies.
2
2
1
8
ÉCROU À BILLES
STEM
MONTAGE
8
5
67
2
1
BALDAQUIN
ANCRE
PLAQUE DE MONTAGE
FIL NEUTRE
FIL BLANC
4 4
33
LUMINAIRE
OMBRE
AMPOULE
11
TUBE BOUGIE
10
9
11
OMBRE
TITULAIRE
3
Déterminez la hauteur de l'appareil avec des tiges fournis et les assembler en les vissant ensemble.
REMARQUE : Une fois les tiges sont vissées à la canopée, assurez-écrous hexagonaux sont serrés la canopée.
4
Monter et fixer le luminaire sur les tiges.
5
Connectez le fil de terre du luminaire à un terrain approprié conformément aux codes électriques locaux.
6
Branchez le fil blanc au fil de ligne à neutre avec un écrou de fil.
7
Branchez le fil noir au fil ligne électrique chaud avec un serre-fils.
8
Faites passer les câbles à travers la tige de fixation, puis fixez le couvert aux tiges plaque de montage avec les écrous à
billes fournis (besoin d'aide).
9
Installer le tube bougie en se glissant à travers le socket.
10
Insérez la lampe dans la douille. Reportez-vous à l'étiquette sur la douille de lampe Puissance max pour plus d'informations.
11
Placez et fixez l'ombre dans l'ombre titulaire.
2
Page 3

PRECAUCION – RIESGO DE INCENDIO
Este producto requiere la instalación por un electricista
calificado.Antes de instalar,asegúrese de leer todas las
instrucciones y APAGUE EL PODER DE LA CAJA
ELÉCTRICA NO.
1A
BARRA
CABLE CALIENTE
ANCLAJE TORNILLO
CABLE NEGRO
1
Fije la placa de montaje a la caja eléctrica con los dos tornillos de la placa de montaje suministrado.
Instale los anclajes en el techo y fijar la placa de montaje con los dos tornillos de anclaje suministrados.
2
2
1
8
TUERCA DE BOLA
STEM
ASAMBLEA
8
5
67
2
1
BALDAQUIN
ANCLA
PLACA DE MONTAJE
CABLE NEUTRO
CABLE BLANCO
4 4
33
FIXTURE
SOMBRA
BOMBILLA
11
VELA DEL TUBO
10
9
11
SOMBRA
TITULAR
3
Determinar la altura del dispositivo de fijación con tallos proporcionados y ensamblarlos atornillándolos juntos.
NOTA: Después de los tallos se han atornillado a la cubierta, asegurar las tuercas hexagonales del dosel están apretados.
4
Montar y fijar el aparato a los tallos.
5
Conecte el cable de tierra a una tierra artefacto adecuado de acuerdo a los códigos eléctricos locales.
6
Conecte el cable blanco del portalámparas al cable de energía de la línea neutral con un tapón de alambre.
7
Conecte el cable negro del portalámparas al cable de alimentación de línea caliente con un tapón de alambre.
8
Pase los cables del aparato a través del tallo, a continuación, fije la cubierta a las varillas de la placa de montaje con las
tuercas de bolas suministrados (se necesita ayuda).
Instale el tubo vela por el deslizamiento a través de socket.
9
10
Coloque la lámpara en el zócalo. Consulte la etiqueta del casquillo de la lámpara para obtener información Potencia Max.
11
Colocar y fijar en el soporte de sombra sombra.
3
Page 4

SAVE THESE INSTRUCTIONS!
555 Theodore Fremd Ave Suite B101 Rye, NY 10580
800.969.3347
www.Feiss.com
© 2012 Feiss.All rights reserved.The "Feiss" graphic is a
registered trademark of Feiss. Feiss reserves the right to
change specifications for product improvements without notification.
A Generation Brands Company
4
 Loading...