

Page 1

Installation Instructions for
F2809-9
Maarid 9 Light Chandelier
Chandelier
GP I :ENERAL RODUCT NFORMATION
This product is suitable for dry locations only.
This product may be dimmed with a standard incandescent dimmer.
This instruction shows a typical installation.
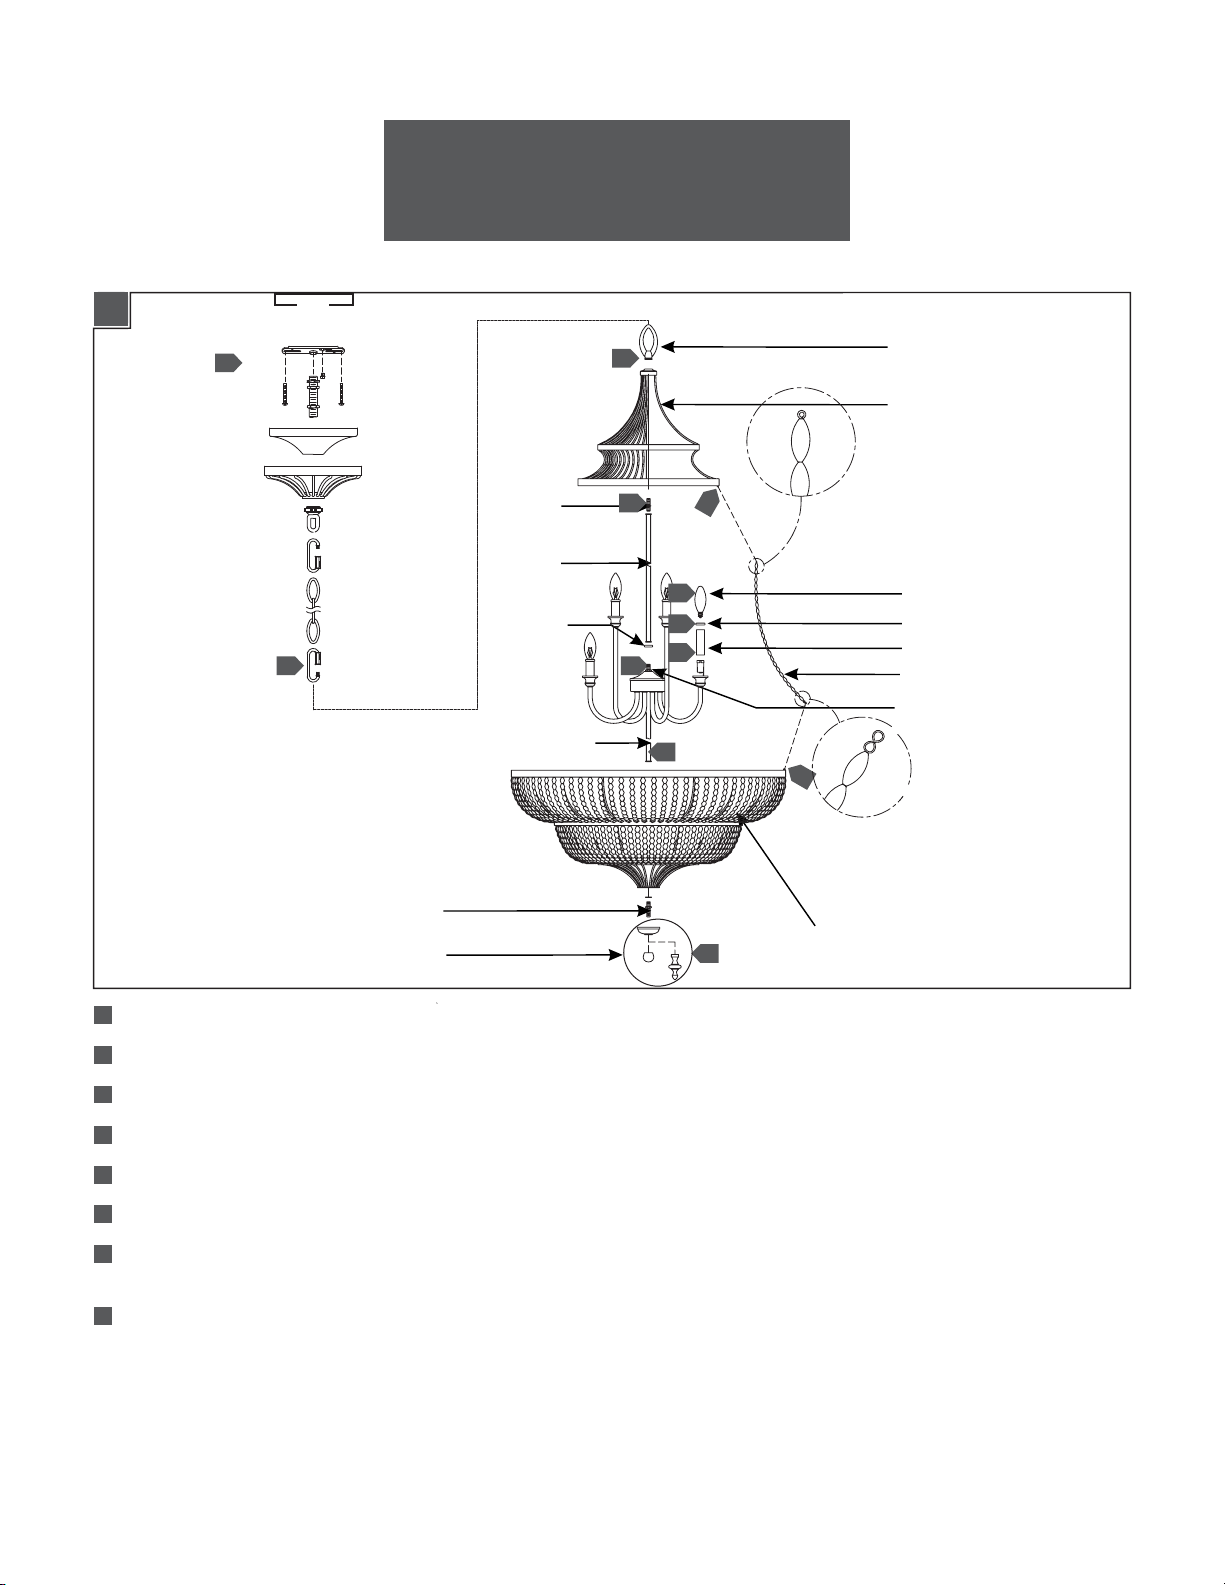
1A
1
UPPER
NIPPLE
STEM
F2809-9_
This product requires installation by a qualified electrician.
Before installing be sure to read all instructions and
TURNTHE POWERTOTHE ELECTRICAL BOX OFF.
8
7
5
CAUTION - RISK OF FIRE
FIXTURE LOOP
FIXTURE TOP
1.0
4
SPACER
8
FIXTURE BASE
BOTTOM NIPPLE
FINIAL SET
Follow enclosed supplement installation instructions for electrical and fixture installation onto house outlet box.
1
2
Install the candle tube by slipping through socket.
Install the candle follower onto the candle tube.
3
4
Install the lamp by screwing it into the socket. Refer to the label on the lamp socket for Max Wattage information.
5
Install and secure the string of beads by hooking them to the top and bottom of the fixture.
3
2
7
6
5
6
FIXTURE BOTTOM
LAMP
CANDLE FOLLOWER
CANDLE TUBE
STRING OF BEADS
MIDDLE NIPPLE
6
Install the fixture bottom to the fixture base by placing the fixture base through the fixture bottom and screwing the bottom nipple to the fixture
base, then tighten the finial at the bottom.
Install the fixture top to the fixture base by screwing the top nipple to the fixture loop and stem, then screw the stem and spacer to the middle
7
nipple.
Install the fixture to the chain by opening the bottom chain link and securing it to the fixture loop by closing the link.
8
1
Page 2
1A
Ce produit nécessite une installation par un électricien
ATTENTION – RISQUE D’INCENDIE
qualifié.Avant d'installer assurez-vous de lire toutes les
instructions etTOURNER LE POUVOIR DE LA BOITE
ELECTRIQUE OFF
1
8
MAMELON INFÉRIEURE
JEU DE FLEURON
MAMELON
SUPÉRIEUR
TIGE
ENTRETOISE
BAS DE FIXATION
8
7
7
5
4
3
2
6
5
6
FIXATION INFÉRIEUR
BOUCLE DE FIXATION
HAUT DE L'APPAREIL
AMPOULE
SUIVEUR BOUGIE
TUBE BOUGIE
CHAÎNE DE PERLES
MAMELON MILIEU
1
Suivez supplément ci-joint des instructions électriques et installation d'accessoires dans la boîte de prise de maison.
2
Installer le tube de la bougie en le glissant à travers le socket.
3
Installer le suiveur de bougie sur le tube de la bougie.
4
Installer et fixer la chaîne de perles en les accrochant au haut et au bas de l'appareil.
5
Déterminer finial désirée, puis installer le faîteau ensemble à la base de l'appareil en la vissant dans.
6
Installer la lampe en la vissant dans la douille. Consulter l'étiquette sur la douille de lampe pour information Max Wattage.
7
Installez la partie supérieure de l'appareil vers le bas de l'appareil en vissant la tige et l'entretoise sur le mamelon de fond, puis visser le
raccord supérieur à la boucle de tige et de l'appareil.
8
Installer l'appareil dans la chaîne en ouvrant le maillon inférieur et fixez-le à la boucle de l'appareil en fermant le lien.
2
Page 3

1A
PRECAUCION – RIESGO DE INCENDIO
Este producto requiere la instalación por un electricista
calificado.Antes de instalar,asegúrese de leer todas las
instrucciones y APAGUE EL PODER DE LA CAJA
ELÉCTRICA NO.
1
8
PEZÓN INFERIOR
CONJUNTO DE REMATE
PEZÓN
SUPERIOR
TALLO
ESPACIADOR
BAS DEL FIXTURE
8
7
7
5
4
3
2
6
5
FIXTURE INFERIOR
6
LAZO DE FIXTURE
FIXTURE SUPERIOR
BOMBILLA
SEGUIDOR DE VELA
TUBO DE VELA
CADENA DE PERLAS
MEDIO PEZÓN
1
Siga las instrucciones de instalación incluido suplemento para eléctricos e instalación del luminario en caja de salida de la casa.
2
Instale el tubo de vela por deslizarse a través de la toma de corriente.
3
Instale el seguidor de vela en el tubo de la vela.
4
Instale y asegure la cadena de perlas, les enganchando a la parte superior e inferior de la lámpara.
5
Determinar remate deseada, luego instale el remate conjunto a la base de la luminaria atornillándolo.
6
Instale la lámpara enroscándolo en la toma de corriente. Consulte la etiqueta en el zócalo de la lámpara para información sobre la
Max Wattage.
7
Instale la tapa del accesorio en la parte inferior de la luminaria por atornillar el vástago y el espaciador en el niple de la parte inferior y,
a continuación, enroscar el niple superior al bucle de tallo y accesorio.
8
Instalar la luminaria a la cadena abriendo el eslabón de la cadena de fondo y asegurar al bucle accesorio cerrando el enlace.
3
Page 4

SAVE THESE INSTRUCTIONS!
555 Theodore Fremd Ave Suite B101 Rye, NY 10580
800.969.3347
www.Feiss.com
© 2012 Feiss.All rights reserved.The "Feiss" graphic is a
registered trademark of Feiss. Feiss reserves the right to
change specifications for product improvements without notification.
A Generation Brands Company
4
 Loading...