

Page 1
Installation Instructions for
F2799-1
Maarid 1 Light Chandelier
Chandelier
GP I :ENERAL RODUCT NFORMATION
This product is suitable for dry locations only.
This product may be dimmed with a standard incandescent dimmer.
This instruction shows a typical installation.
1A
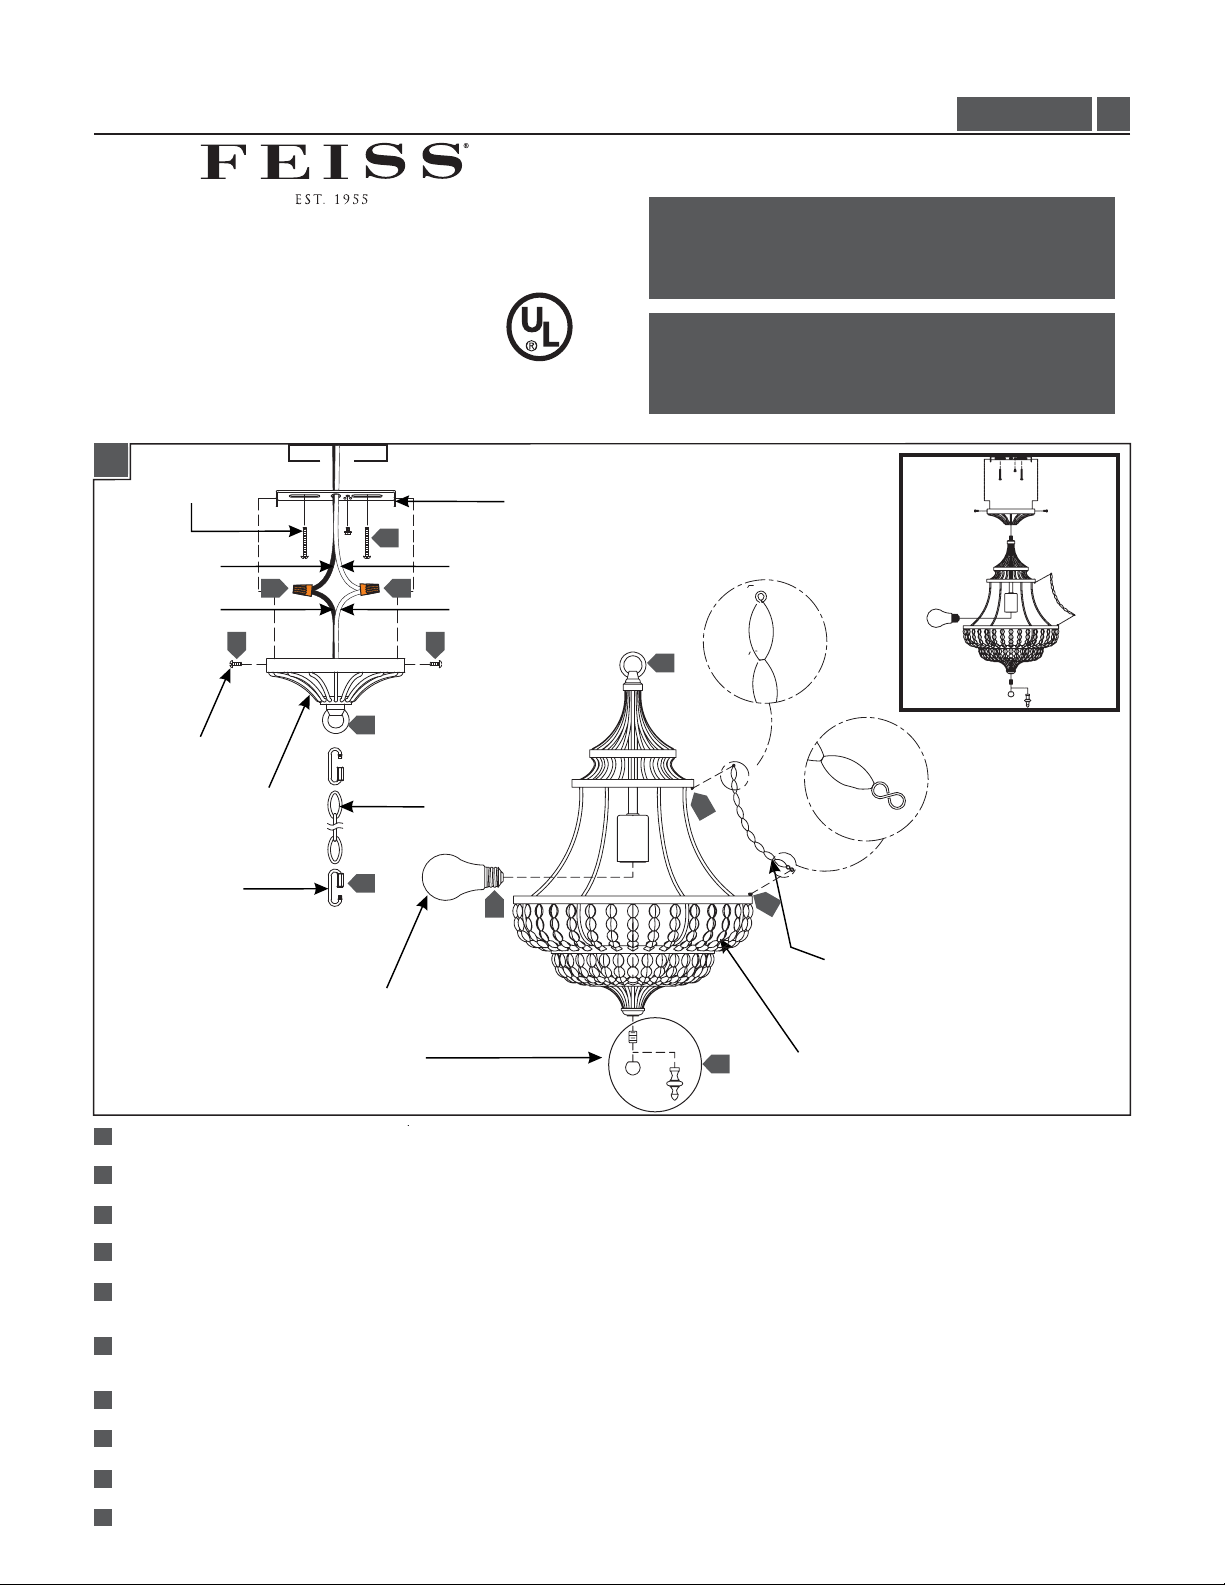
MOUNTING
PLATE SCREW
1
HOT WIRE
89
BLACK WIRE
1010
MOUNTING PLATE
NEUTRAL WIRE
WHITE WIRE
F2799-1_
CAUTION - RISK OF FIRE
This product requires installation by a qualified electrician.
Before installing be sure to read all instructions and
TURNTHE POWERTOTHE ELECTRICAL BOX OFF.
ASSISTANCE REQUIRED
This product may require assistance from another person
for installation and safety purposes.
5
1.0
5
CANOPY SCREW
CANOPY
QUICK LINK
1
Secure the mounting plate to the electrical box with two mounting plate screws.
2
Install the lamp by screwing it into the socket. Refer to the label on the lamp socket for Max Wattage information.
3
Install and secure the string of beads by hooking them to the top and bottom of the fixture.
4
Determine desired finial, then screw the finial set to the bottom of the fixture.
5
Determine the desired height of the fixture and remove a portion of the chain by opening a link and removing it, then install the chain to
the fixture and canopy by opening the quick link and securing it to the fixture loop by closing the link.
5
LAMP
FINIAL SET
CHAIN LINK
2
3
3
STRING OF BEADS
4
FIXTURE
SEMI-FLUSH MOUNT
INSTALLATION
6
Weave the cord through the chain (ensuring that the cord goes through the canopy) and trim the cord leaving enough to make electrical
connections.
7
Connect the fixture to a suitable ground in accordance to local electrical codes.
8
Connect the white fixture wire to the neutral power line with a wire nut.
9
Connect the black fixture wire to the hot power line wire with a wire nut.
10
Neatly place wires into the electrical box, then place the canopy onto the ceiling and secure it with canopy screws.
1
Page 2

Ce produit nécessite une installation par un électricien
ATTENTION – RISQUE D’INCENDIE
qualifié.Avant d'installer assurez-vous de lire toutes les
instructions etTOURNER LE POUVOIR DE LA BOITE
ELECTRIQUE OFF
1A
VIS DE PLAQUE
DE MONTAGE
1
FIL CHAUD
FIL NOIR
5
VIS DE CANOPÉE
FIL NEUTRE
89
FIL BLANC
1010
Ce produit peut nécessiter l'assistance d'une tierce
ASSISTANCE REQUISE
personne pour des raisons de sécurité et de l'installation.
PLAQUE DE MONTAGE
5
INSTALLATION DE
MONTAGE SEMI-ENCASTRÉ
CANOPÉE
MAILLON RAPIDE
AMPOULE
JEU DE FLEURON
1
Fixer la plaque de montage sur le boîtier électrique avec deux vis de plaque de montage.
2
Installer la lampe en la vissant dans la douille. Consulter l'étiquette sur la douille de lampe pour information Max Wattage.
3
Installer et fixer la chaîne de perles en les accrochant au haut et au bas de l'appareil.
4
Déterminer le fleuron désiré, puis visser l'embout établi au bas de l'appareil.
5
Déterminer la hauteur désirée de l'appareil et enlever une partie de la chaîne en ouvrant un lien et en supprimant, puis installer la chaîne
sur le luminaire et la canopée en ouvrant le lien rapide et fixez-le à la boucle de l'appareil en fermant le lien.
5
MAILLON
DE CHAÎNE
2
3
3
CHAÎNE DE PERLES
4
FIXATION
6
Tisser le cordon à travers la chaîne (s'assurer que le cordon va à travers la canopée) et couper le cordon laissant assez pour faire les
connexions électriques.
7
Branchez l'appareil sur un sol adapté conformément aux codes électriques locaux.
8
Connectez le fil blanc de l'appareil à la ligne neutre avec un serre-fils.
9
Connecter le fil noir de l'appareil au fil de ligne électrique chaud avec un serre-fils.
10
Parfaitement placer les fils dans la boîte électrique, puis placer la verrière sur le plafond et fixer avec les vis de la canopée.
2
Page 3

PRECAUCION – RIESGO DE INCENDIO
Este producto requiere la instalación por un electricista
calificado.Antes de instalar,asegúrese de leer todas las
instrucciones y APAGUE EL PODER DE LA CAJA
ELÉCTRICA NO.
TORNILLO DE LA
1A
PLACA DE MONTAJE
1
ALAMBRE CALIENTE
ALAMBRE NEGRA
5
TORNILLO
DEL DOSEL
DOSEL
ALAMBRE NEUTRO
89
ALAMBRE BLANCO
1010
ESLABÓN DE
LA CADENA
Este producto puede requerir asistencia de otra persona
ASISTENCIA REQUERIDA
para fines de seguridad y de instalación.
PLACA DE MONTAJE
5
INSTALACIÓN DE
SEMI-FLUSH MOUNT
3
BOMBILLA
5
2
3
CADENA DE PERLAS
4
FIXTURE
ESLABÓN RAPIDA
CONJUNTO DE REMATE
1
Fije la placa de montaje a la caja eléctrica con dos tornillos de la placa de montaje.
2
Instale la lámpara enroscándolo en la toma de corriente. Consulte la etiqueta en el zócalo de la lámpara para información sobre la Max
Wattage.
3
Instale y asegure la cadena de granos, les enganchando a la parte superior e inferior de la lámpara.
4
Determinar el remate deseada y, a continuación, atornille el remate en la parte inferior de la lámpara.
5
Determinar la altura deseada de la lámpara y quitar una parte de la cadena al abrir un enlace y eliminarlo, luego instale la cadena en el
accesorio y dosel abriendo el enlace rápido y asegurar al bucle accesorio cerrando el enlace.
6
El cable a través de la cadena (para asegurar que el cable pasa a través de la cubierta) de la armadura y recortar el cable dejando suficiente
para hacer las conexiones eléctricas.
7
Conectar el proyector a una tierra apropiada de acuerdo con los códigos eléctricos locales.
8
Conecte el cable blanco del luminario a la línea neutral con una tuerca de alambre.
9
Conecte el cable negro al cable de línea de energía caliente con una tuerca de alambre.
10
Cuidadosamente coloque los cables en la caja eléctrica, luego coloque la cubierta en el techo y fijarlo con los tornillos de la cubierta.
3
Page 4

SAVE THESE INSTRUCTIONS!
555 Theodore Fremd Ave Suite B101 Rye, NY 10580
800.969.3347
www.Feiss.com
© 2012 Feiss.All rights reserved.The "Feiss" graphic is a
registered trademark of Feiss. Feiss reserves the right to
change specifications for product improvements without notification.
A Generation Brands Company
4
 Loading...