

Page 1
FEIN Turbo Vac II
9-55-13
9-55-13PE
/
Operating Instructions
ATTENTION: READ BEFORE USING
• Make sure that the voltage nameplate of the device corresponds to the voltage of
your network. The plug has to be protected with a minimum of 15 Amps.
IMPORTANT! THE VACUUM CLEANER IS SUPPLIED FROM THE
FACTORY WITH A SUPPLY CABLE WITH A GROUNDED PLUG . IT
MUST ONLY BE CONNECTED TO AN APPROVED GROUNDED
SOCKET.
• Before performing any maintenance work, unplug the vacuum from the outlet.
• WARNING! EXPLOSION AND FIRE HAZARD! Never vacuum flammable
fluids or gas, oil, alcohol, solvents, etc. Do not operate near flammable fluids or
gas. Never vacuum warm fluids or materials at more than 140º Fahrenheit
(60º Celsius), such as burning cigarettes, ashes, glowing coals, etc.
• WARNING! DO NOT VACUUM HAZARDOUS/CARCINOGENIC DUST
UNLESS THE OPTIONAL HEPA FILTER IS INSTALLED.
• Do not pull the vac by the cable and do not damage the insulation on the cable.
If the cable is damaged, it must be replaced immediately.
• Always keep the filter cartridge clean so the vacuum cleaner operates properly .
Page 2
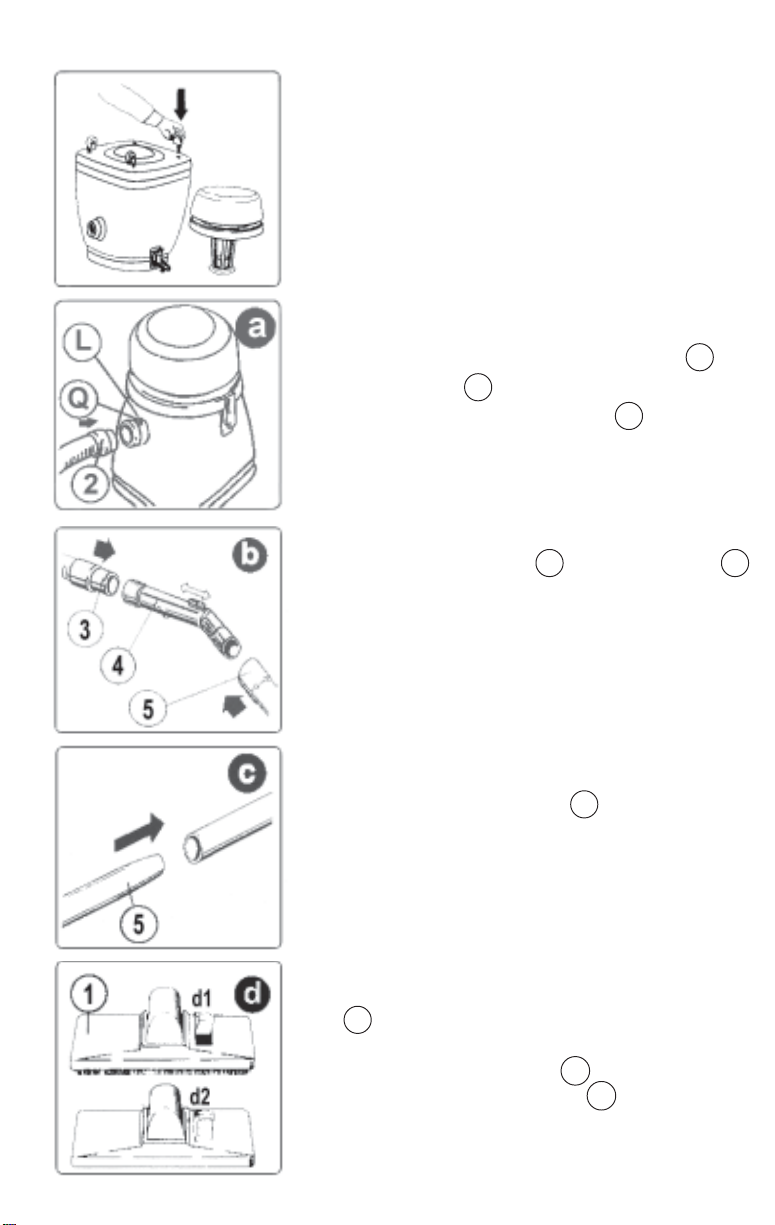
ASSEMBLY INSTRUCTIONS
T o attach the wheels, press the wheel posts
into the four holes provided.
a)
Connect the vacuum end of hose 2 to
the
receptacle Q by pressing in. In order to
remove the hose, press button L on receptacle and pull the hose out simultaneously .
b) Connect the handle 4 with the hose end 3
by pressing in. The handle is provided with a
suction force reducing device. Turn in the
direction of the arrow. In order to get full
suction pressure, keep the regulating device
closed.
c) Tube extension pieces 5 and accessories
can be connected by pressure. For disassembling, slightly turn both parts and draw apart.
d) T o use the optional combination attachment
1 for hard floors in PVC, linoleum, stone,
etc. press the switch button with your foot, so
that the bristles emerge d1. For carpets, the
bristles have to be retracted d2 .
1
Page 3
SUCTION OF DRY DUST AND DIRT
The cloth filter that came with your FEIN Turbo II will contain extracted dust 5.0
microns in size and larger . If picking up fine dust, you will need to use a pleated filter
cartridge and paper bag, which can be purchased as a (FBK) kit or a (FBK-HEPA)
kit for hazardous dust vacuuming. (see page 6 for kit contents).
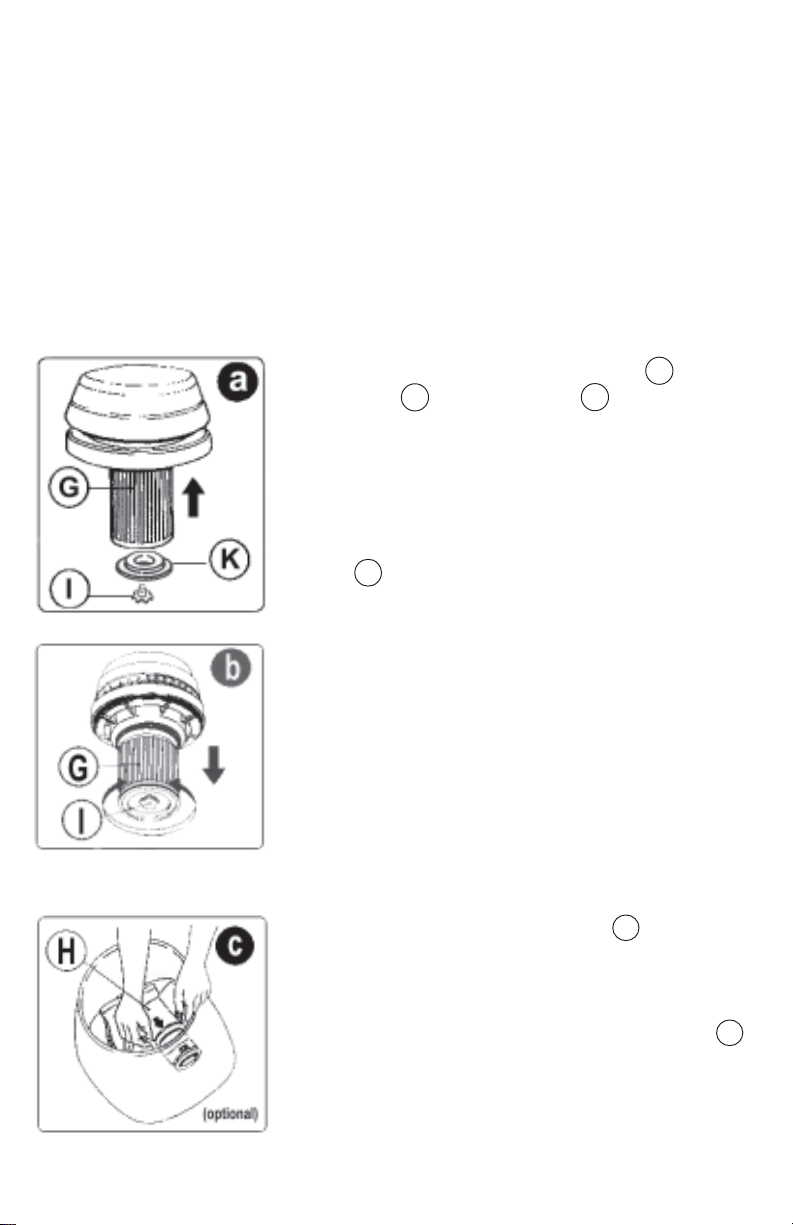
a) T o install the optional filter cartridge G place the
turn screw I inside the flange K . Place the filter
cartridge on the float cage then put the flange assembly on the bottom of the filter. Turn the screw quarter
turn to lock the filter on.
b) In order to remove the filter cartridge turn the
screw I quarter turn counterclockwise and pull out
the filter cartridge.
Do not use vacuum without a filter. Use the cloth
filter that came with your vacuum, or a pleated
filter. Do not use both at the same time. Failure to
use a filter when dry vacuum cleaning will damage
the motor. NEVER USE VACUUM CLEANER
WITH A WET FILTER CARTRIDGE FOR DRY
V ACUUM CLEANING. It quickly becomes clogged
and unusable.
c) Fix the optional paper dust bag H to the inner
side of the tube-connection in the receptacle: fig.c.
and d. When using this paper dust bag the dirt can
be removed more hygienically and the life of the filter
cartridge will be increased. The paper dust bag H
should be used with the filter cartridge; it should
NEVER be used by itself or with the cloth filter.
(continue on page 5)
2
Page 4

3
9-55-13 / 9-55-13PE TURBO II VAC
ITEM # DESCRIPTION PART NUMBER
11 POWER CORD SET 3-07-05-065-99-9
12 SCREW 901A11A89
13 CABLE CLAMP 101035K00
16 SCREW 901A19A89
17 WASHER 901D07AG87
18 TERMINAL BLOCK 905217000
35 SCREW 901A16A89
42 CABLE 905391000
44 BUNGEE 920056000
53 FACE PLATE 521006K13
57 RECEPTACLE COVER 905278K15
73 AUTO ST AR T SWITCH 905331R00
AUTO ST AR T SWITCH (9-55-13PE) 905490A000
107 SWITCH (ON/OFF) 905306000
111 RECEPTACLE 905398K13
112 SWITCH (MANUAL / AUT O)(WIDE) 905307A000
200 TOP HANDLE 521049AK50
201 COVER WITH HANDLE 521049B50
202 COVER GASKET 920021B00
203 COVER SOUNDPROOFING 902033000
205 COVER BAFFLE 521002K13
206 SIDE SOUNDPROOFING 902048000
209 MOTOR GASKET - 1 10 VOLT 920042000
210 CHAMBER MOTOR GASKET 920039000
211 MOTOR SOUNDPROOFING 902043000
212 MOT OR - 110 VOLT 918M5602U
213 CARBON BRUSHES (2) 905317G02
216 MOTOR SOUNDPROOFING 902036000
217 MOTOR COVER 521003K13
218 MO TOR FILTER 902032A00
219 GASKET - 1 10 VOLT 920038000
220 FLOAT 521010K00
222 FLOA T CAGE 521007K13
255 PLUG 920060000
280 PLUG 920065000
286 CONTAINER 521052K50
287 BUMPER 524301B15
412 LOCK LEVER 525002089
420 SWIVEL WHEELS 521047K41
427 HOSE RECEPT ACLE 521016A13
44 5 CLOTH FILTER 913064AGA6
500 16' HOSE 921049GN1
16' HOSE (9-55-13PE) 921159AK30
501 SLEEVE - VACUUM END 921047K13
502 SLEEVE - TOOL END 921048K13
504 CONNECTOR RING 919067K13
505 RING - HOSE 919066A13
710 PNEUMA TIC VALVE (9-55-13PE) 918V01A001
4
Page 5

SUCTION OF DRY DUST AND DIRT (continued)
A TTENTION: If suction pressure decreases, replace
the paper dust bag H with a new one. From time to
time the filter cartridge G should be cleaned with a
soft brush, ensuring longer life and higher performance.
SUCTION OF FLUIDS
a) First, remove any dirt and dust residue from
previous cleaning operations from the container.
Remove the cloth filter or the cartridge filter G and
replace it with the anti-foam filter R . DO NOT USE
THE CLOTH FIL TER, THE CAR TRIDGE FIL TER
OR THE PAPER DUST BAG DURING THE
SUCTION OF FLUIDS.
b) In order to guarantee enough air flow , it is recommended that accessories not be completely immersed
into the fluids.
c) When the fluids have reached the highest permitted
level in the tank, the float regulator F automatically
blocks suction and the motor gets noisier. Switch the
vacuum off IMMEDIATELY, pull out the plug,
remove the suction head from the tank and empty the
tank.
5
Page 6

9-55-13 / 9-55-13PE TURBO II VAC ACCESSORIES
Item Part Number Description
1 919036B94 Extension tube-chrome
2 921067A13 Handle
3 921069A13 Adaptor
4 921072K13 Step adaptor
5 919001A13 Brush
6 919003K13 Upholstery nozzle
7 919007K13 Crevice tool
8 921051A13 Wet brush
9 921056000 Rubber strip
10 919064B13 Floor brush with rollers
11 919043R14 Thread pick for brush
12 90204200 Anti-foam filter
13 TII1MCRN 1Micron filter
TIIHEPA Hepa filter 0.3 microns
14 TII3002 Flange filter
15 TII3001 Turn screw-filter
16 913064AGA6 Cloth filter
17 913036K01 Paper dust bag- 3 pack
18 921086AA13 Y connector with cap
19 921087AK13 Y cap
20 3916054A089 Hose cradle
21 526300AA13 Basket and strap
Kits: FBK TIIMCRN 1 Micron pleated filter
consists 913036A01 Paper dust bag
of 1 each TII3002 Filter flange
TII3001 Flange turn screw
FBK-HEPA TIIHEPA Hepa pleated filter
consists 913049A01 Hepa dust bag
of 1 each TII3002 Filter flange
TII3001 Flange turn screw
DW1 (2) 919036B94 Extension tube
consists 921067A13 Handle
of 1 each 919007K13 Crevice tool
902042000 Anti-foam filter
919001A13 Brush
921051A13 Wet floor brush
919003K13 Upholstery Nozzle
919064B13 Floor brush
6
Page 7

MAINTENANCE
After every use:
. Empty the tank (dirt, dust, and fluids).
. Never leave fluids in the tank. This could cause damage to the tank.
. After vacuuming fluids, it is necessary to dry extension pieces, tube
and motor parts by running the vacuum a few minutes, after having
emptied the tank.
. Always keep a reserve of paper dust bags and filter cartridges, so
that the vacuum is always ready for use.
FEIN Power Tools Inc.
1030 Alcon Street
Pittsburgh, PA 15220
(800) 441-9878
REV . 0 6-15-06
 Loading...