

Fein ASs 636-1 b, ASs 736-1 b, ASs 636-2 b, ASs 736-2 b Operating Instructions Manual

ASs
636-1
b
To be handed to the workshop
Operating instructions
for the
double insulated and interference-suppressed
Electric Screw-Driver Type
ASs 636-1 b
and
ASs 736-1 b
(42
Volts)
1.
Specifications
Type
of
current:
(single-phase
A.C.)
double
insulation
in
accordance
with
VDE 0740
Interference-suppress
ed
to
VDE 0875
Self
drilling
screws
Speed
rpm
Square
Net
weight
Ty
pe
up
to
Input
Watts
in.
I
mm
full
load
ASs
636-1 b
3f,6
4,2 2150
ASs
736-1 b
2.
Construction
This
screw-driver
is
an
electric
tool
of
Class
II
with
protective
insulation
without
earthing
con
ductor
and
is
in
accordance
with
the
VDE
regulations
0740.
The
protecti
ve
insulation
is
attained
by
the
shock-proofed
motor
housing
made
of
Polyamide
and
by
insulating
the
armature
against
the
pinion.
The
protective
insulation
is
tested
with
the
prescribed
test
voltage
of
4000 V.
The
machine
is
radio-screened
in
accordance
with
radio
inter-
ference
degree
N.
It
is
supplied
with a two-core
cab
le
without
earthing
cond
uctor
and
must
not
be
earthed.
Type
ASs
736-1 b
for
low
tension
(42 V)
is
of the
same
design,
but
without
double
insulation
and
not
radio-screened.
The
machine
is
provided
with a reversing
switch
for
clockwise
and
anticlockwise
rotation.
It
must
not
be
operated
when
the
machine
is
running.
To
prevent
the
overbridging
of
the
insulation
no
additional
marking
plates
and
signs
must
be
riveted
or
screw
ed
on
the
housin
g.
We
recommend
the
use
of
transfers
only.
3.
Connection
Before
plugging
in
the
tool
check
that
voltage
stated
on
the
rating
plate
is
in
accordance
with
the
voltage
of
the
mains
supply.
Switch
must
be
in
the
"Off"
position
when
connecting.
BE 370/e
XEW
10.12
Printed
in
Germany
drive
I
no
load
lbs. I kg
1/4,
3450
230
h
exagon
3,5 1,6
socket
4.
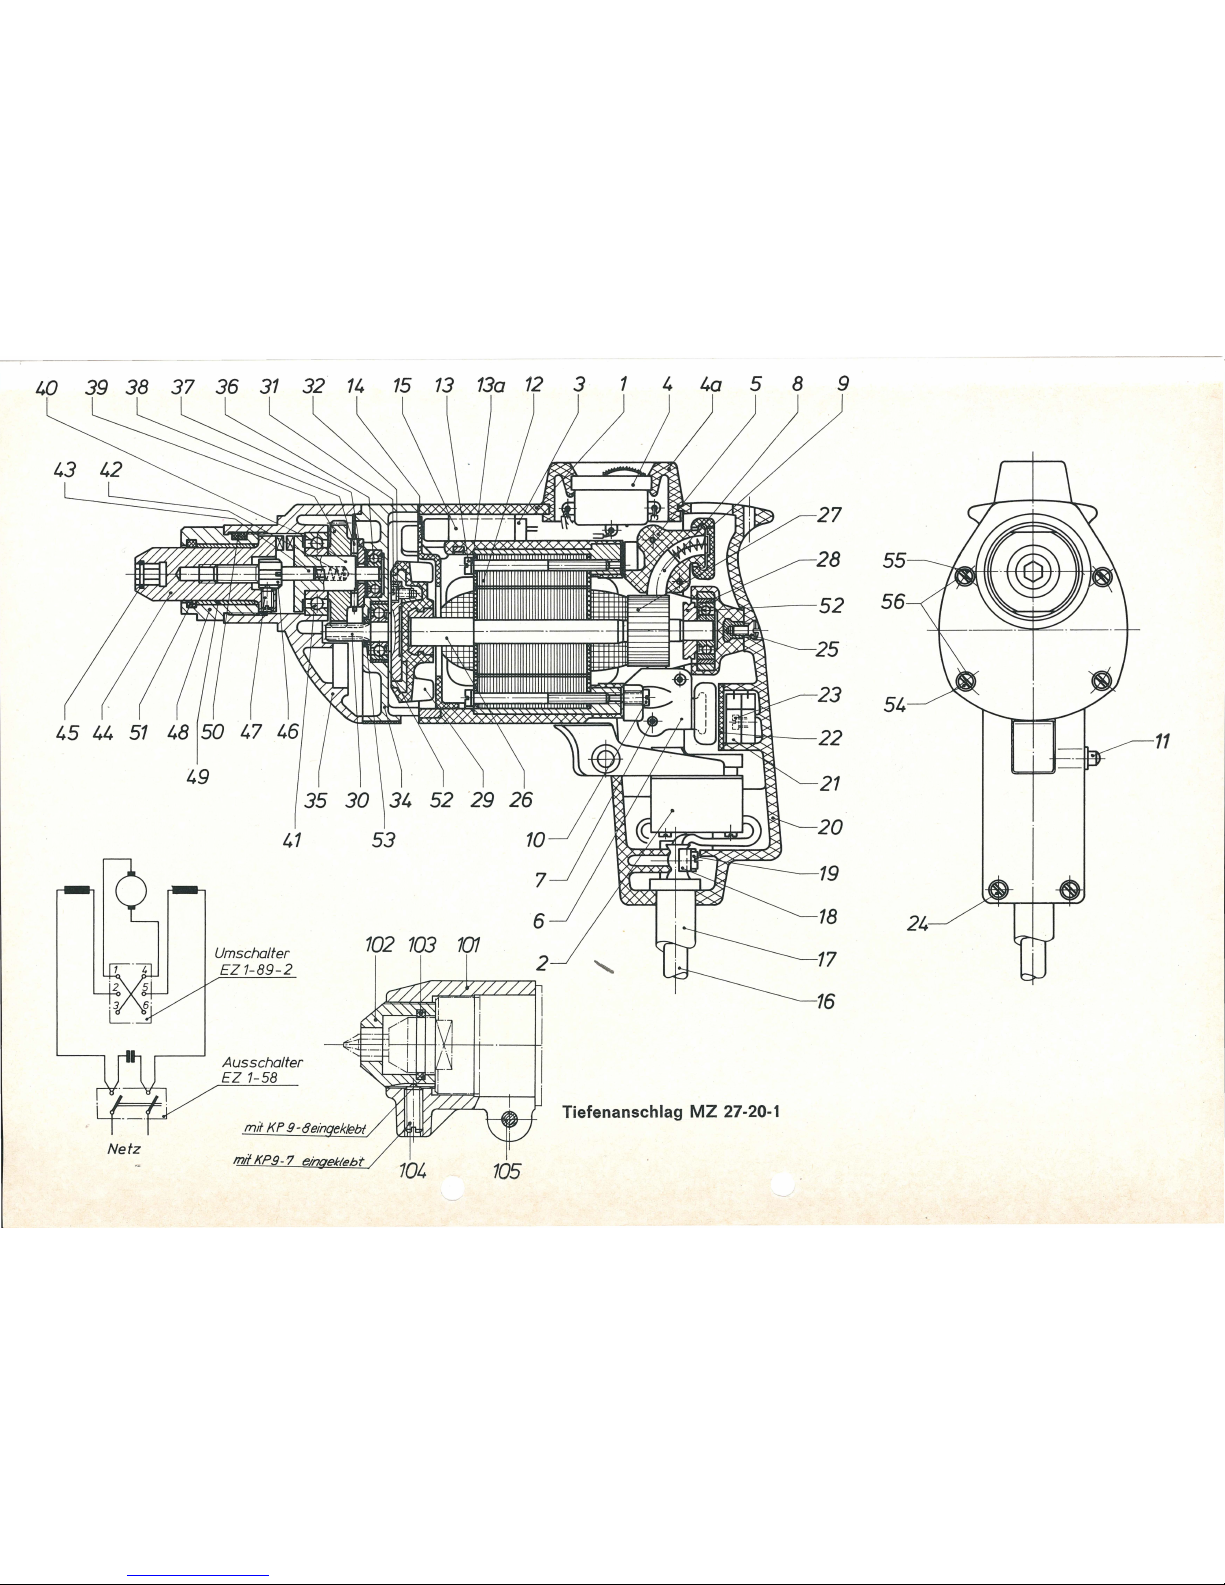
Adjustment
of
the
torque
The
machine
is
provided
with a positive
clutch.
The
torqu
e is
adjus
ted
by
changing
the
position
of
the
clutch
claws;
the
deeper
the
gripping
of
the
claws, the
high
er
the
torque.
In
order
to
adjust
the
claws,
turn
screw
(46)
after
having
screwed
off
bearing
sleeve
(48) and
loosed
grub
screw
(47)
.
Moreover, the
torque
is
dependent
on
the
pressure of
the
driver
against
the
screw.
5.
Setting
of
the
depth
stop
With adjusting
sleeve
(102)
you
can
set
in
the
screwing
depth.
A
turn
of
90 o
corresponds
of
25
mm
(1
")
screwing
depth
. A
deeper
stop
results
from
right
turning.
In
order
to
change
the
blades,
loosen
screw
(105), remove
depth
stop,
cha
nge
the
blade
and remove
plaster
dust.
Push
depth
stop
on the
machine up
to
striking
and
pull
on
screw
(105).
6.
Maintenance
Before
carrying
out
any
maintenance
work
always
remember
to
pull
out
the
plug.
To
guarantee
the
securi
ty
provided
by
the
double ins
ulation
clean
the
machine
regularly every
300
duty
hours. This
is
done
with a brush or
by
blowing
out
the
carbon
holders and
the
insulated
parts
with
dry
pneumatic
air.
Aft
er
checking
the
carbon
brushes
make
sure
to
ref
it
them
in
their
original
position
and
check
that
they move
easi
ly
in
their
hold
er.
40
Netz
---
·--
49
41
53
Umschalter
EZ1-89-2
Ausschalter
EZ
1-58
mil KP9- 7 einqektebt
102
103
101
704
105
3 1
8 9
27
28
~~
52
56
23
54
22
21
20
19
18
'
17
16
Tiefenanschlag
MZ
27-20-1
I
lli-~11
24
 Loading...