

Page 1
Drone Remote Controller
User Manual
V1.0
Printed in China
Page 2
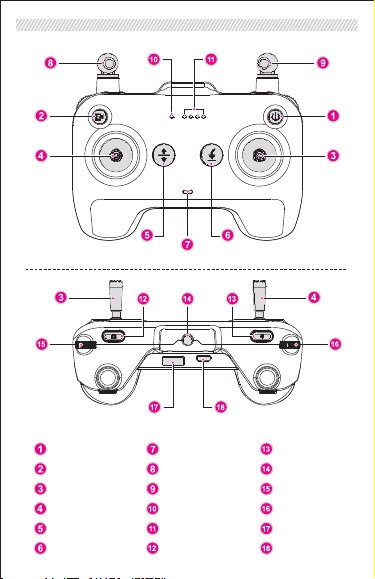
Part Name
Part Name
Power Button
Media Button
Right Joystick
Left Joystick
Takeoff/Landing Button
Auto Return Button
Status Indicator
Left Antenna
Right Antenna
Power Indicator
Battery Level Indicator
Shutter Button
Video Recording Button
Smartphone Locking
Screw Hole
Camera Settings Dial
Gimbal Dial
USB Port
Charging Port
Page 3
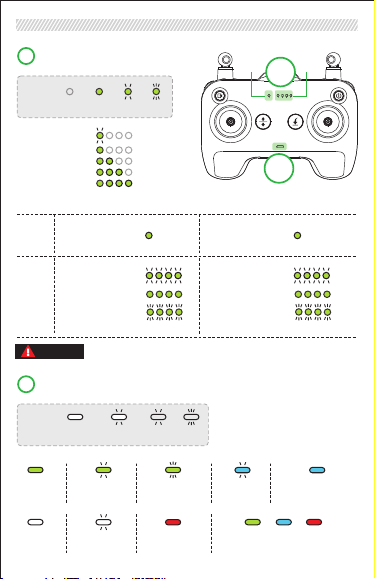
Indicator Description
Indicator Description
Power Indicator & Battery Level Indicator
A
Lead
Solid OnFlash
Off
Battery Level
Indication Rules
Motherboard Upgrading WiFi Module Upgrading
Power
Upgrade
preparation
Indicator
Upgrading
Battery
Upgrade
Level
successfully
Indicator
Upgrade
failed
Important!
Status Indicator
B
Lea d
Solid
White
Flas h
Slowly
Quic kly
<10 %
25%
50%
75%
100 %
solid on
flash
slowly
both on for
5 seconds
both flash
quickly
The buzzer will give sound alarming when the battery level is lower than 10%.
Make sure to charge the remote controller (RC) before using.
Flash
Slowly
Flash
Quickly
Slowly
Flashing White
Upgrade
preparation
Upgrading
Upgrade
successfully
Upgrade
failed
Power
solid on
both flash
slowly
both on for
5 seconds
both flash
quickly
Battery
Level
A
B
Strong Signal Weak Signal Poor Signal Aircraft
Motherboard
Upgrading
WiFi Upgrading
Disconnected
Scanning
Upgrade Completed (Either of the three)
Aircraft not Connected
with the RC
Page 4
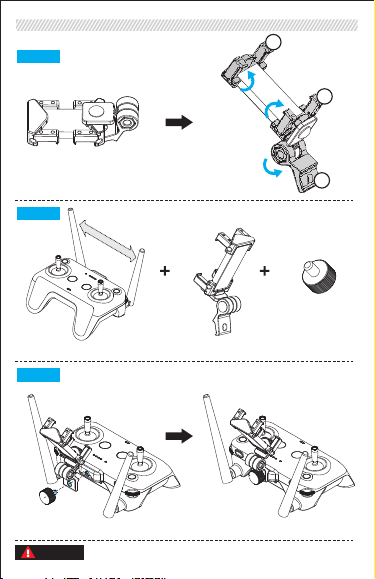
Mounting the Smartphone Holder
Mounting the Smartphone Holder
Ste p
1
1
2
Take the smarthphone holder kit out of the package and turn Part 1,
Part 2 and Part 3 to the right position as shown in the picture.
Step
2
Take out the body part and splay the antennas. Put aside the properly adjusted smarthphone
holder and the hand-twisted screw for later use.
Ste p
3
Mount the smarthphone holder to the body part with the hand-twisted screw as shown in the
picture.
Make sure to tighten the clamps on the RC to prevent the mobile device
Important!
from slipping.
3
Page 5
RC Preparation
RC Preparation
Charging the RC
Charging the RC
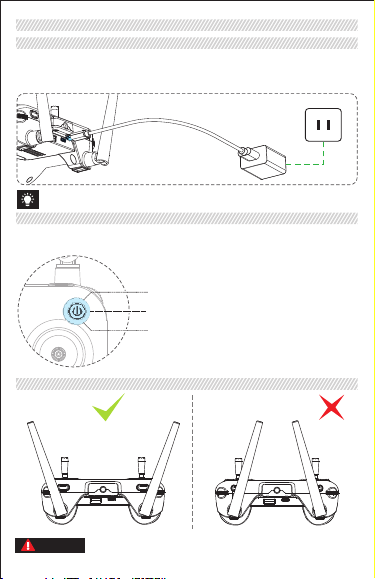
Connect the Type-C USB charging cable of the standard charger to the RC charging port as
shown in the following picture. The battery level indicator will be rolling to inform the user that
the RC is now charging. The 4 battery level indicators will go solid when fully charged.
220V
Make sure that the battery is fully charged prior to every flight. Recharge and
discharge the battery at least once every 3 months to maintain battery health.
Turni ng on/o ff the RC
Turni ng on/o ff the RC
The RC status indicator will show the battery level of the built-in rechargeable batteries.Take the
following steps to turn on the RC:
Press the button once to check the current battery level
1
Press the button once, then press and hold for 3 seconds
2
to turn on the RC
Provided that the RC is on, repeat Step 2 to turn off the
3
RC
Spl aying t he Ante nnas an d the Han dle
Spl aying t he Ante nnas an d the Han dle
The signal is the strongest when the antennas are splayed apart from each
Important!
other. Broken antennas will affect the performance of the RC, please get it
fixed as soon as possible.
Page 6
Con necti ng the Ai rcraf t to the RC
Con necti ng the Ai rcraf t to the RC
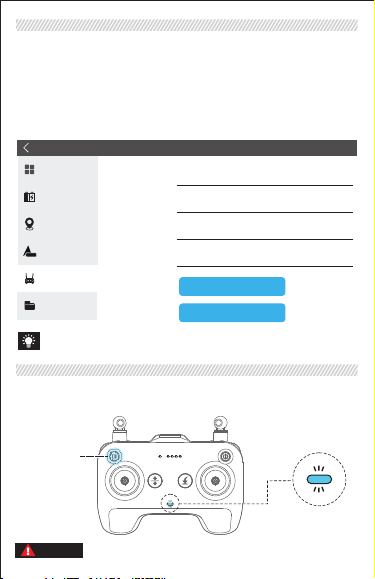
1. Turn on the aircraft to be connected.
2. Connect the smartphone to the WiFi of the RC: JME_RC_xxxx; Default password: jme12345
(case sensitive).
3. Launch the RC Setting page of the APP and enter the SSID and password (case sensitive) of
the aircraft to be connected. Save and select “Save Configuration and Restart WiFi” (see following
picture). The RC WiFi will now restart automatically (The power in dicator changes from flashing
slowly to solid on).
4. Wait for the RC WiFi to get res tarted (The powe r indicator ch anges from flash ing slowly to
on). The RC will now enter into the Drone Scanning Mode (The status indicator slowly
flashes blue) until s uccessfully connected to the aircr aft (The status indicator is sol id green). It
will take 1-2 minutes.
5. Re conne ct the sma rtpho ne to the R C WiFi an d laun ch the APP.
Gener al
Sma rt Batt ery
Fli ght Map
Dron e Wifi
WIFI
Remot e
Ver sion
Changing the Aircraft Connected to the RC
Changing the Aircraft Connected to the RC
1. Press and hold the Media Button (as shown in the following picture) for over 10 seconds until
the RC gets restarted (The RC Status Indicator goes solid).
2. Wait for the RC to get restarted (See above “Connecting the Aircraft to the RC” part ).
Press and Hold
the Media Button
Important!
RC SSI D
RC Pas swor d
Dron e SSID
Dron e Passw ord
The power indicator slowly flashes after RC WiFi gets restarted.
Once connected, there is no need to repeat the above procedures unless disconnected
manually.
Make sure to turn on the aircraft before turning on the RC.
Set tings
JME_R C_00 30
Save confi gurat ion
Restore defa ult configuratio n
jme1 2345
JME_1 504
jme1 2345
Quickly flashing blue:
Disconnected
Page 7
Cont ro lling t he A ircra ft
Cont ro lling t he A ircra ft
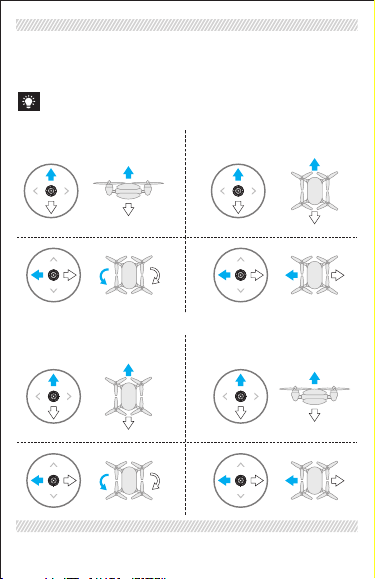
The factory default control method of the RC (including the virtual joystick) is “American Hand”.
The left joystick controls the altitude and direction of the aircraft. The right joystick controls the
forward, backward, left and right movements of the aircraft. The gimbal dial can control the tilt of
the gimbal.
Important! American Hand: The left joystick of the RC serves as the throttle;
Important! Japanese Hand: The right joystick of the RC serves as the throttle;
Note: Japanese Hand is available on J.ME Fly. Please see the following picture for the
American Hand and Japanese Hand control methods.
American Hand
Left Joystick Right Joystick
Ascent
Forward
Descent
Turn left Turn right Fly left
Backward
Japanese Hand
Left Joystick Right Joystick
Terms
Terms
RC Neutral/Mid-Point: The RC joysticks are in the middle position.
Joystick Deviation: To which extent the joysticks are deviated from the middle position.
Forward
Backward
Turn left Turn right
Ascent
Descent
Fly left Fly left
Fly left
Page 8
Controlling the Camera and the Gimbal
Controlling the Camera and the Gimbal
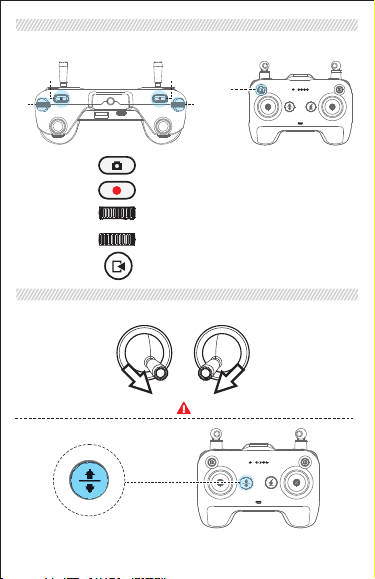
Use the RC “Shutter Button”, “Video Recording Button”, “Camera Settings Dial” and “Gimbal
Dali” to control the camera and browse photos or videos.
1
3
2
5
4
Shutter Button
1.
Video Recording
2.
Button
Camera Settings
3.
Dial
Gimbal Dial
4.
Media Button
5.
Stopping the Motors
Stopping the Motors
There are two methods to stop the motors:
Method 1:
Performing toe-in action on the RC will
shut down the motors instantly.
Method 2:
After the aircraft takes off, press the Takeoff/Landing Button, the aircraft will return to the ground
from the current altitude and the motors will shut down;
Single Shoot, Burst Shoot and Time Lapse Modes are available
via J.ME Fly.
Press the button to start recording and press again to stop
recording.
When using in combination with the J.ME Fly, turn the dial to
quickly adjust the camera settings. Check camera settings
with the dial.
The gimbal will rotate upwards when the gimbal is turned
clockwise. The gimbal will rotate downwards when the gimbal
is turned counterclockwise.
Press the Media Button to preview the existing photos and
videos.
Please be extra cautious and use this
feature only in emergency during the flight!
Page 9
Takeoff/Landing
Takeoff/Landing
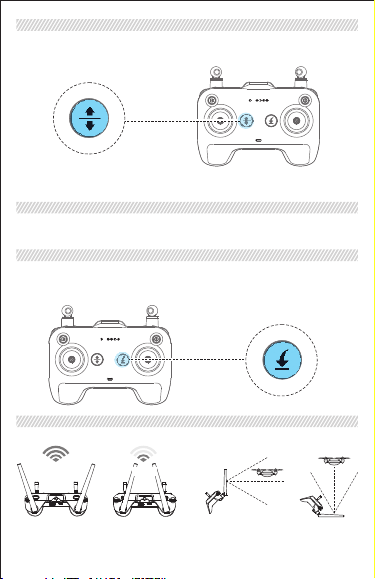
1. Takeoff/Landing Button: Press and hold the button for 3 seconds, the aircraft will take off vertically
from the current position to 1m and keep hovering. Press the button again, the aircraft will return
to the ground from the current altitude and the motors will then shut down;
2. Manual Landing (Continuously pull the throttle to the lowest position for 3 seconds at an altitude
of 1 meter, the aircraft will return to the ground automatically and the motors will shut down).
Calibrating the RC Compass
Calibrating the RC Compass
After the aircraft is turned on, press and hold the Shutter Button for 3 seconds. The aircraft enters
into the Compass Calibration Mode when the status indicator goes solid red. The user can now
calibrate the compass as stipulated.
Auto Return Button
Auto Return Button
Press and hold the button for 3 seconds until the buzzer gives sound alarming. The Auto Return
feature is now activated and will bring the aircraft to the latest recorded Home Point. The user can
control the position of the aircraft with the RC during this period. Press the button again to end
this procedure. The aircraft will keep hovering until the RC regains control over it.
RC Transmission Range
RC Transmission Range
Optimal Transmission Range
Strong Weak
Make sure that the aircraft is flying within the optimal transmission range. Adjust the antennas or
the distance between the operator and the aircraft timely to ensure excellent transmission
performance.
Page 10

Important
Important
When using the RC, keep away from magnetic substances (e.g. magnets or sound box) to avoid
interference. Keep space between the RC and the container to protect the joysticks from squeezing
deformation.
RC SpecificationRC Specification
Operating Frequency: 2.412—2.462GHz
Max Transmission Distance (Only possible when flying at an altitude of nearly 50 meters in an
open area with no electromagnet interference): Image Transmission Distance: 600 meters; Data
Transmission Distance: 600m
Operating Voltage 950mA
Charger
Voltage 5V
Rated Power 18W
@3.7V
FCC Statement:
15.21
Changes or modifications made to this equipment not expressly approved by Shen Zhen
Feima Robotics Co.,Ltd may void the FCC authorization to operate this equipment.
15.105
NOTE: This equipment has been tested and found to comply with the limits for a Class B
digital device, pursuant to Part 15 of the FCC Rules. These limits are designed to provide
reasonable protection against harmf interference in a residential installation. This equipment
generates, uses and can radiate radio frequency energy and, if not installed and used in
accordance with the instructions, may cause harmful interference to radio communications.
However, there is no guarantee that interference will not occur in a particular installation. If
this equipment does cause harmful interference to radio or television reception, which can be
determined by turning the equipment off and on, the user is encouraged to try to correct the
interference by one or more of the following measures:
Reorient or relocate the receiving antenna.
Increase the separation between the equipment and receiver.
Connect the equipment into an outlet on a circuit different from that to which the receiver
is connected.
Consult the dealer or an experienced radio/TV technician for help.
The SAR limit of USA (FCC) is 1.6 W/kg averaged over one gram of tissue. This model (FCC
ID: 2AK7UFM4000) has also been tested against this SAR limit. The highest SAR value
reported under this standard during product certification for properly worn on the body is
0.799 W/kg. This device was tested for typical body-worn operations with the back of the
EUT kept 0mm from the body. To maintain compliance with FCC RF exposure
requirements, use accessories that maintain a 0mm separation distance between the user's
body and the back of the EUT. The use of accessories that do not satisfy these requirements
may not comply with FCC RF exposure requirements, and should be avoided.
Page 11
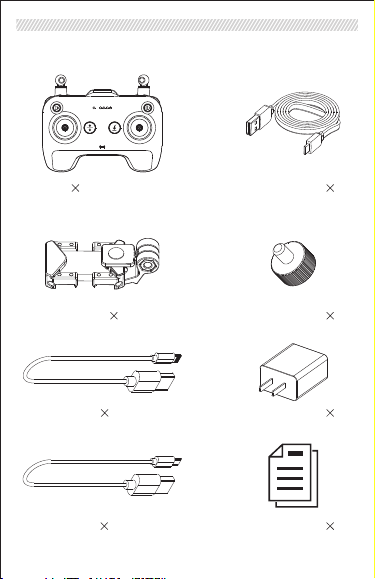
In the Box
In the Box
RC Body
1
Smartphone Holder
Apple Micro USB
Micro USB Cable
Charging Cable
1
1
1
Hand-twisted Screw
Power Adapter
User M anual
1
1
1
1
Page 12
Battery Safety Guidelines
Battery Safety Guidelines
Glossary
The following terms are used to indicate various levels of potential hazards caused by misoperation.
NTICE: Operating without properly following the guidelines may cause property losses or minor injuries.
CAUTION: Operating without properly following the guidelines may cause property losses or
serious injuries.
WARNING: Operating without properly following the guidelines may cause property losses, major accidents
or serious injuries.
WARNING!
Read the ENTIRE user manual to get familiar with the features of this product before operating. Failure
to operate this product properly can result in damages to the product or personal property and cause
serious injuries. This product is designed for use with drones. The use of this product is very
sophisticated. It must be operated with caution and common sense and will take some time to get
familiar with it. Lack of strong safety consciousness or misoperation can result in damages to the
product and other devices connected to the product and personal property, and even serious injuries.
This product is not intended for use by children. Make sure to strictly follow the instructions in the User
Manual. This Safety Guidelines contains instructions on safety, operation and maintenance. Make sure
to read and follow all of the instructions and warnings in the Safety Guidelines and the User Manual
before assembling, setting or using this product.
RC Bat tery Sa fety Gu ideli nes
WARNING: Failure to charge or store the battery properly can result in fire, property damage or
serious injuries. Make sure to use the battery in compliance with the following safety
1. Do not disassemble the battery by yourself. Removing the built-in battery is not allowed. Please
replace the battery at after-sales service offices.
2. The ambient temperature for battery should be 10-40°C. If the temperature is too high (higher than
60°C), the battery may catch fire and even explode. If the ambient temperature is too low (lower than
10°C), the battery life may be shortened.
3. Do not disassemble the battery in any way, or it may catch fire and even explode.
4. Battery electrolyte is highly corrosive. Keep away if there is a leak. If any electrolyte contacts your
skin or eyes, immediately wash affected areas with fresh running water for at least 15 minutes and see
a doctor immediately.
5. If there is a fire caused by improper use of the battery, we recommend you use solid fire extinguisher
in the following order: Water or mist water, sand, fire extinguisher blanket, powder and Co2
extinguishers.
6. Do not put the battery in a microwave oven or pressure cooker.
7. Do not put battery cells on any conductive surfaces.
8. Do not use wires or any other metal objects to short-circuit the positive and negative poles of the
battery.
9. Do not strike the battery. Do not place anything heavy on the battery or the charger.
10. Do not t hrow th e batte ry into t he fire o r place t he unus ed batt ery near h eat sou rces.
Othe rwise , the i nsula tion p rotec tion l ayer i n the b atter y will be melt ed and the sa fety v alve a nd
othe r struc tures w ill be de stroy ed. The b atter y will ov erhea t and may c atch fi re or eve n explo de.
11. Always use batteries recommended by Feima. Feima is not responsible for any battery-related
accidents or flight failures caused by using non-Feima batteries.
Charging
1. The charger is only applicable for specified product in accordance with certain instructions.
2. Always use Feima approved charger. Feima is not responsible for any consequences caused by
using non-Feima chargers.
3. When charging, put the RC and the charger on cement floor or other grounds where there is no
flammable objects. Take care and avoid any accidents.
4. Do not charge the battery when the ambient temperature is too high (≥45°C) or too low (≤0°C) The
ideal ambient temperature for charging (10-40°C) can greatly extend battery life.
5. Do not continue to charge the battery if it is not fully charged within the set time, or it may cause
overheat, fire or explosion.
6. Unp lug the charg er f orm the RC o nce it i s fu lly charg ed. Check and mai ntain the cha rger
regu larly. Do no t clea n the c harge r and t he batt ery wi th alc ohol o r any o ther f lamma ble
clea ners. D o not use d amage d charg er.
guidelines.
Page 13

Battery Safety Guidelines
Battery Safety Guidelines
Storage and Transportation
1. Keep the battery out of the reach of children. If the child swallows the components, seek emergency
medical assistance without any delay.
2. Do not leave the RC near heat sources such as in direct sunlight, in a furnace, heater or inside the
car in hot days. The ideal storage temperature is 22-28°C.
3. Keep the battery dry. Do not place the battery in water or where it may leak.
4. Do not strike, crush or impale the battery. Do not drop the battery or manually short-circuit the battery.
5. Do not storage or transport the battery together with glasses, watches, jewelry, hairpins and other
metal objects.
6. Do not transport damaged batteries. Discharge the battery to lower than 30% for air transportation.
7. Never put the battery in ESD protected areas beyond those defined by the manufacturer, or it may
damage the battery protection mechanism and result in overheat, explosion or fire.
8. All the batteries are up to certain specification during manufacturing and checking before delivery.
Return the battery to where it was purchased if you find anything abnormal regarding its smell,
Disposal
Dispose of end-of life batteries into specific recycling boxes only after they are fully discharged. Do not
simply dispose of batteries into regular garbage bins. The disposal and recycling of batteries is subject
to detailed local rules and regulations.
Maintenance
1. Never use the charger when the ambient temperature is too high or too low.
2. Never storage the battery where the temperature is higher than 60°C.
3. Fully charge the battery and keep it at appropriate temperatures before flying at low temperatures (-
10~5°C), or the battery capacity will be significantly reduced which may lead to much shorter flight time.
4. Never use the battery in environments with a temperature lower than 10°C.
5. When flying at low temperatures (-10~5°C), preheat the RC to higher than 5°C (higher than 20°C will
be better) before using.
Storage and Transportation
1. Discharge the battery to 60-75% if it will not be used for 10 days or more. This can extend the battery
life. Discharge fully charged batteries with the RC.
2. Do not store the battery for a long time after fully discharging it, for example, when the RC battery
runs out. Otherwise, you may risk over-discharging the battery which may lead to irreparable damage to
the battery cells.
3. Recharge the battery to 60-70% every 2 months, and make adjustments based on the actual storage
conditions and power consumption of the system.
4. The battery will enter hibernation mode if it has been depleted and idled a long period. Recharge the
battery to bring it out of hibernation.
5. Remove the battery from the aircraft for long-term storage.
Maintenance
1. Never overcharge the battery or it will do harm to the battery cells.
2. Keeping the battery idle for a long time will affect its performance.
It is recommended that the battery should be recharged and discharged at least once every
3 months to maintain battery health and extend the battery life.
Page 14
Pur chase I nform ation
Mai ntena nce Rec ords
This product is guaranteed for a period of 12 months for any product quality issues
caused by non-arbitrary damages or defects. Feima Robotics Co.,Ltd reserves all the
right for final explanation!
Ema il: J.M E_ser vice@ feima robot ics.c om
TEL : 40081 09891
 Loading...