

Page 1
Bedienungsanleitung
Instructions for use
Mode d’emploi
Gebruiksaanwijzing
Istruzioni per l’uso
Instrucciones de uso
open up
Bedienungsanleitung
Page 2

Index
Deutsch P Seite 3 - 6
English P Page 7 - 10
Page 3
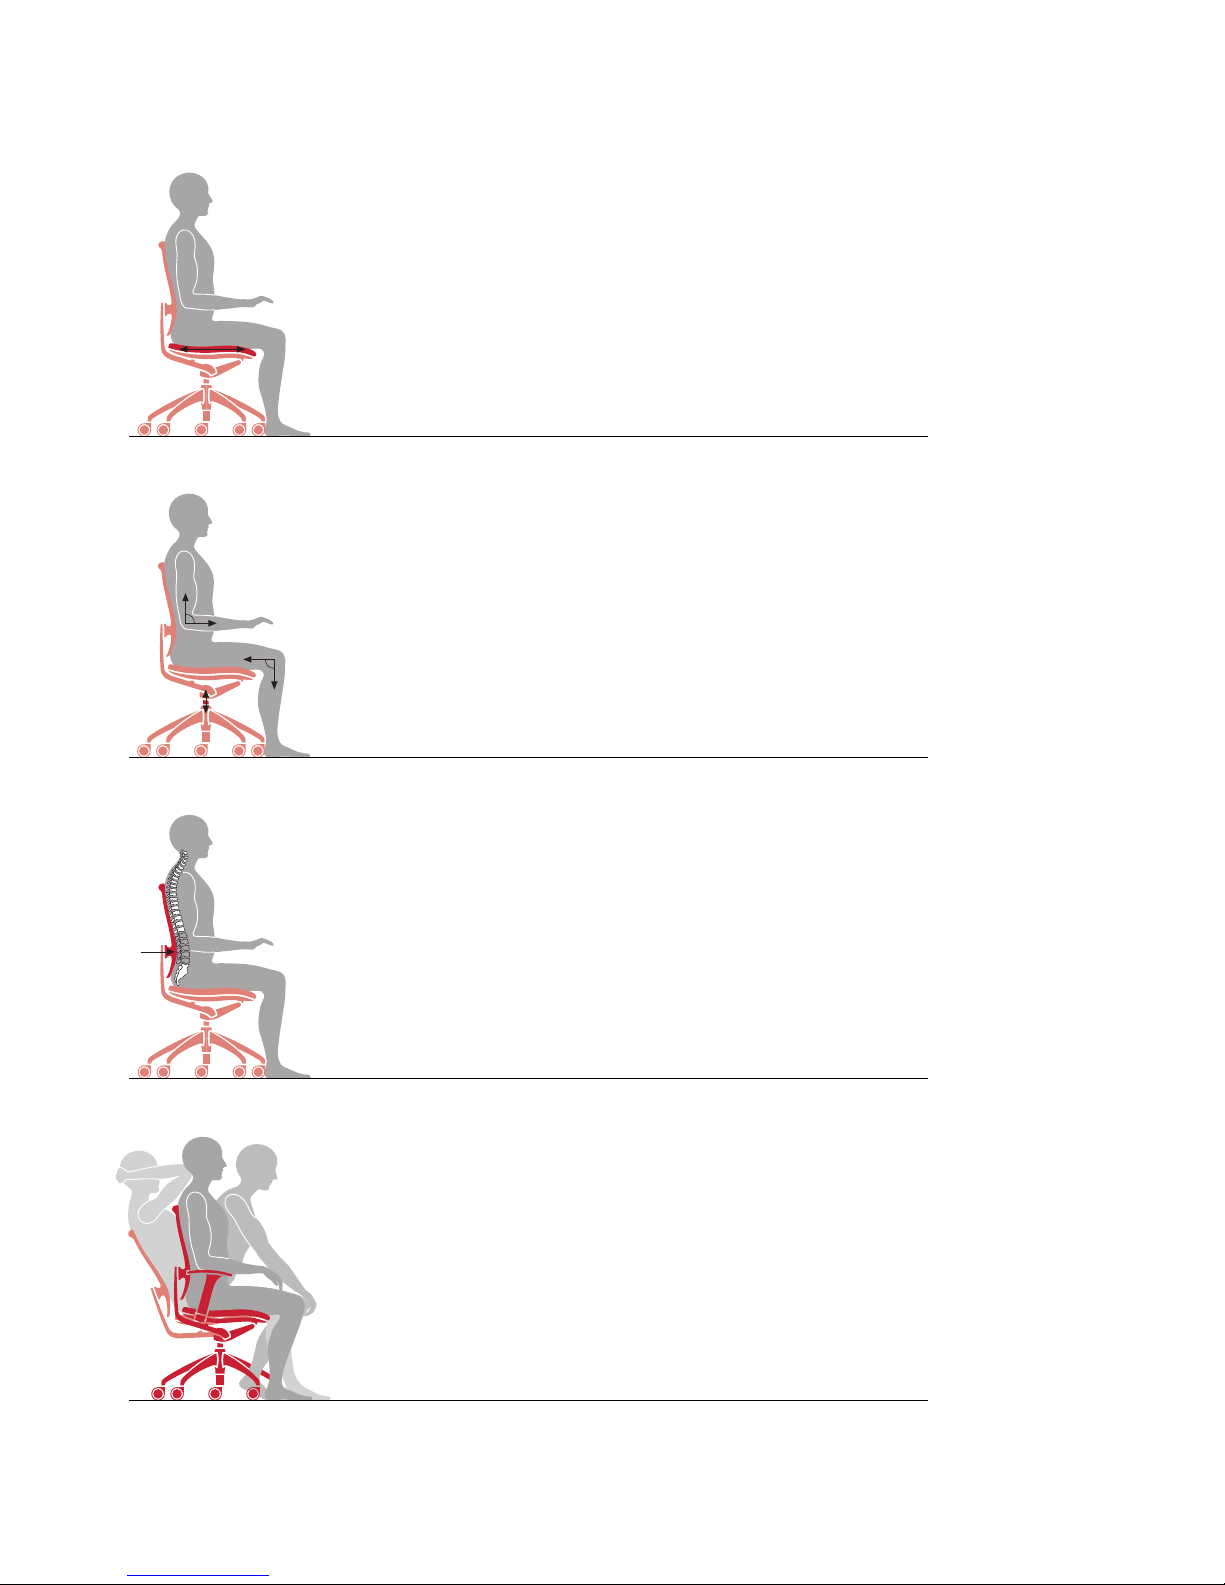
® Sitzfläche ganz ausnutzen
Die anatomisch geformte Sitzfläche soll vollständig
besessen werden. Nur so ist der Kontakt zur stützenden
Rückenlehne gewährleistet.
open up ist optional mit einer Sitzneigeverstellung
ausgestattet. Damit kann die Grundstellung des Sitzes
um 4°verändert werden.
® Sitzhöhe exakt einstellen
Die richtige Sitzhöhe bedeutet: Ein Winkel von ca. 90°
im Ellenbogengelenk, wenn die Unterarme waagerecht
auf der Arbeitsfläche liegen. Ca. 90° Winkel im Kniegelenk, wenn die Füße vollflächig den Boden berühren.
Wenn Ihre Arbeitsfläche zu hoch ist und nicht nach
unten korrigiert werden kann, benötigen Sie eine
höhen- und neigungsverstellbare Fußstütze.
® Rückenlehne einstellen
Stellen Sie die Höhe der Lordosenstütze so ein, dass
die Wölbung in der Rückenlehne die Wirbelsäule
im Bereich des 3. und 4. Lendenwirbels (Bereich der
größten Vorwölbung) abstützt. So wird die natürliche
S-Form der Wirbelsäule in jeder Sitzposition stabilisiert.
® Dynamisch sitzen
Dynamisch sitzen bedeutet, seine Sitzhaltung häufig
zu wechseln, das heißt, so oft wie möglich zwischen
der vorderen und hinteren Sitzhaltung zu variieren.
Stellen Sie die Rückenlehne deshalb dynamisch ein.
open up ist mit einer Similarmechanik ausgestattet –
Sie können den Anlehndruck der Rückenlehne individuell einstellen. So stützen Lehne und Sitz Ihren
Körper automatisch in jeder Sitz-/Liegeposition.
Gesundes Sitzen ist Einstellungssache
Deutsch 3
Page 4
D
B
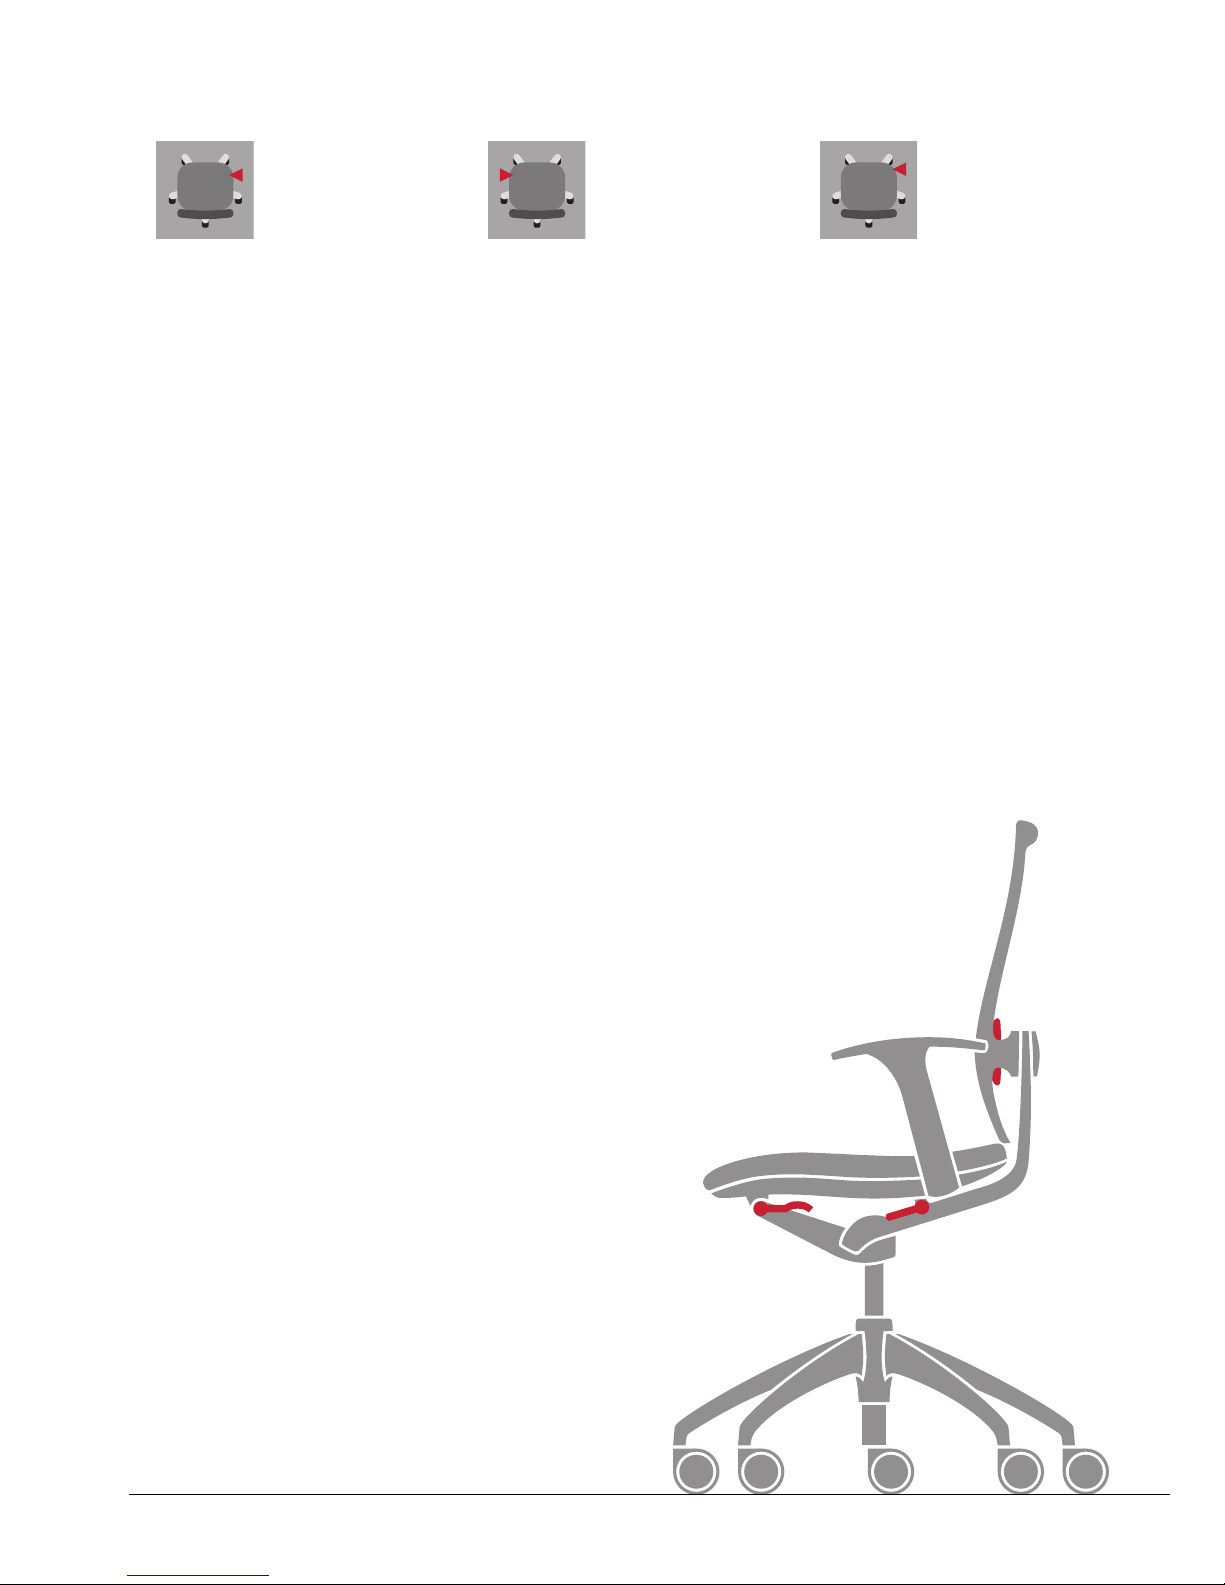
Höhe des Sitzes
® Sitz tiefer stellen:
1. Sitz belasten
2. Taste nach oben ziehen
(Sitz senkt sich langsam)
3. Taste in gewünschter Sitzhöhe
loslassen = arretieren
® Sitz höher stellen:
1. Sitz entlasten
2. Taste nach oben ziehen
(Sitz hebt sich langsam)
3. Taste in gewünschter Sitzhöhe
loslassen = arretieren
Stärke des Anlehndruckes
® Anlehndruck stärker einstellen:
1. Kurbel herausziehen
2. Drehknopf im Uhrzeigersinn
drehen
3. Kurbel wieder einschieben
® Anlehndruck schwächer
einstellen:
1. Kurbel herausziehen
2. Drehknopf gegen den Uhr-
zeigersinn drehen
3. Kurbel wieder einschieben
ABC
Neigung der Rückenlehne
® Rückenlehne dynamisch
einstellen:
1. Taste nach oben ziehen,
loslassen
2. Rückenlehne belasten
3. Arretierung löst sich auto-
matisch
® Rückenlehne arretieren:
1. Anlehnen bis gewünschte
Lehnenneigung erreicht ist
2. Taste nach unten drücken,
loslassen = arretieren
G
4 Deutsch
Funktionen des Drehstuhls
Page 5
A
C
F
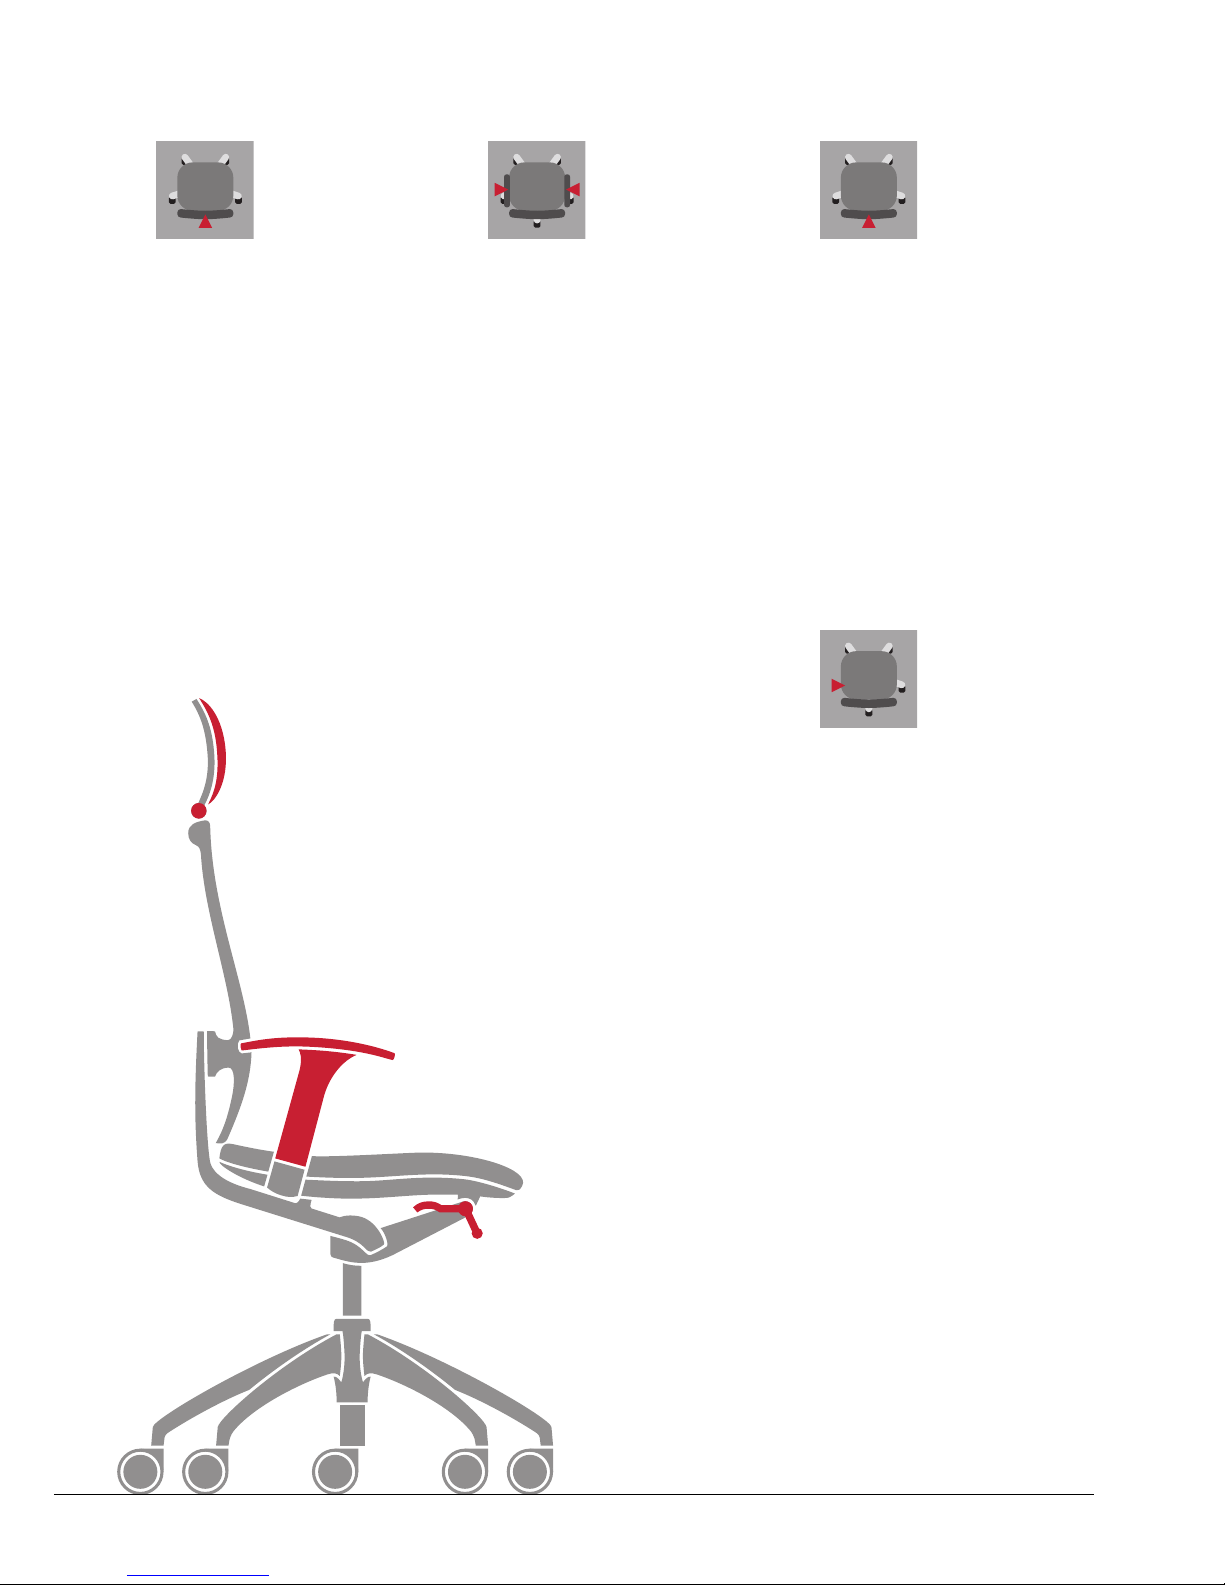
Höhe der Lordosenstütze
(optional)
® Höhe einstellen:
1. Lehne entlasten
2. Lordosenstütze verschieben
Bitte beachten Sie im Falle
einer nachträglichen Montage
die Benutzerhinweise in dieser
Anleitung.
Verstellung der Nackenstütze
(optional)
® Höhe der Nackenstütze
verstellen:
Nackenstütze in gewünschte
Höhe schieben (stufenlos
verstellbar)
® Nackenstütze neigen:
Nackenstütze in gewünschte
Neigeposition bringen
DF
Verstellung der 3-D Armlehnen
(optional)
® Höhe der Armlehnen verstellen:
1. Taste drücken, Armlehne
in gewünschte Höhe anheben
bzw. absenken
2. Taste loslassen, Armlehne
rastet ein
® Tiefe der Armlehnen verstellen:
Armauflage nach hinten oder
vorne schieben; Auflage rastet
automatisch ein
® Auflagefläche schwenken:
Armauflage nach links oder
rechts schwenken; Auflage
rastet automatisch ein
E
E
Neigung der Sitzfläche (optional)
® Sitz nach vorne neigen:
1. Sitz entlasten
2. Hebel unter dem Sitz um 180°
nach hinten schwenken, Sitz
neigt sich um 4° nach vorne
® Sitz waagerecht stellen:
1. Sitz entlasten
2. Hebel unter dem Sitz um 180°
nach vorne schwenken, Sitz neigt
sich wieder in die Null-Position
G
Deutsch 5
Page 6

Anwendung
Dieser Bürodrehsessel ist ausgelegt
für ein Benutzergewicht bis 120 kg
und darf nur bestimmungsgemäß
unter Beachtung der allgemeinen
Sorgfaltspflicht benutzt werden.
Bei unsachgemäßem Gebrauch
(z. B. als Aufstiegshilfe, Sitzen
auf den Armlehnen, extremen
einseitigen Belastungen) besteht
Unfallgefahr.
Rollen
Vor dem ersten Gebrauch bitte den
roten oder blauen Transportschutz
entfernen.
Für Ihre Sicherheit und für die
unterschiedlichen Bodenbeläge
gibt es, gemäß Sicherheitsvorschriften, verschiedene Rollen:
– Rollen mit hartem Belag für
textile Böden (serienmäßig),
– Rollen mit weichem Belag für
alle nicht textilen Böden.
Rollenwechsel: z. B. nach einem
Umzug oder nach Austauschen des
Bodenbelages – Rollen einfach
herausziehen bzw. einstecken;
zuvor Schwenkbolzen leicht einfetten.
Lordosenstütze
Für eine nachträgliche Montage
wird eine Seite der Lordosenstütze in die Führungsschiene des
Rückenlehnenrahmens eingehängt. Danach wird die andere
Seite der Lordosenstütze nach
entsprechender Dehnung in die
gegenüberliegende Führungsschiene eingehängt.
Armlehnen
Bei einigen Modellen können auf
Wunsch nachträglich Armlehnen
montiert bzw. ausgetauscht
werden.
Kunststoffteile
Zur Reinigung eignet sich eine
Seifenlösung. Bitte keine aggressiven Reinigungsmittel verwenden.
Polster/Membran
Bei leichten Verschmutzungen den
Bezugsstoff nur mit Feinwaschmittel reinigen oder mit dem von
Sedus angebotenen Reinigungsschaum.
Die Polsterteile und die Membranbespannung der Rückenlehne können nur werksseitig ausgetauscht
werden.
Leder
Leder ist ein Naturprodukt. Verwachsungen der Tierhaut geben
dem Material die unverwechselbare
Note. Leichte Verschmutzungen
mit weichem Wolllappen abreiben.
Bei stärkerer Verschmutzung nur
Pflegemittel für anilingefärbtes
Leder verwenden.
Semi-Anilinleder nicht der direkten
Sonneneinstrahlung aussetzen.
Sitzhöhenverstellung
Wir empfehlen die regelmäßige
Reinigung der Kolbenstange mit
einem Lappen. Sonstige Arbeiten
im Bereich der Gasfeder, wie z. B.
der Austausch, dürfen nur durch
eingewiesenes Fachpersonal ausgeführt werden.
Benutzerhinweise
6 Deutsch
Page 7
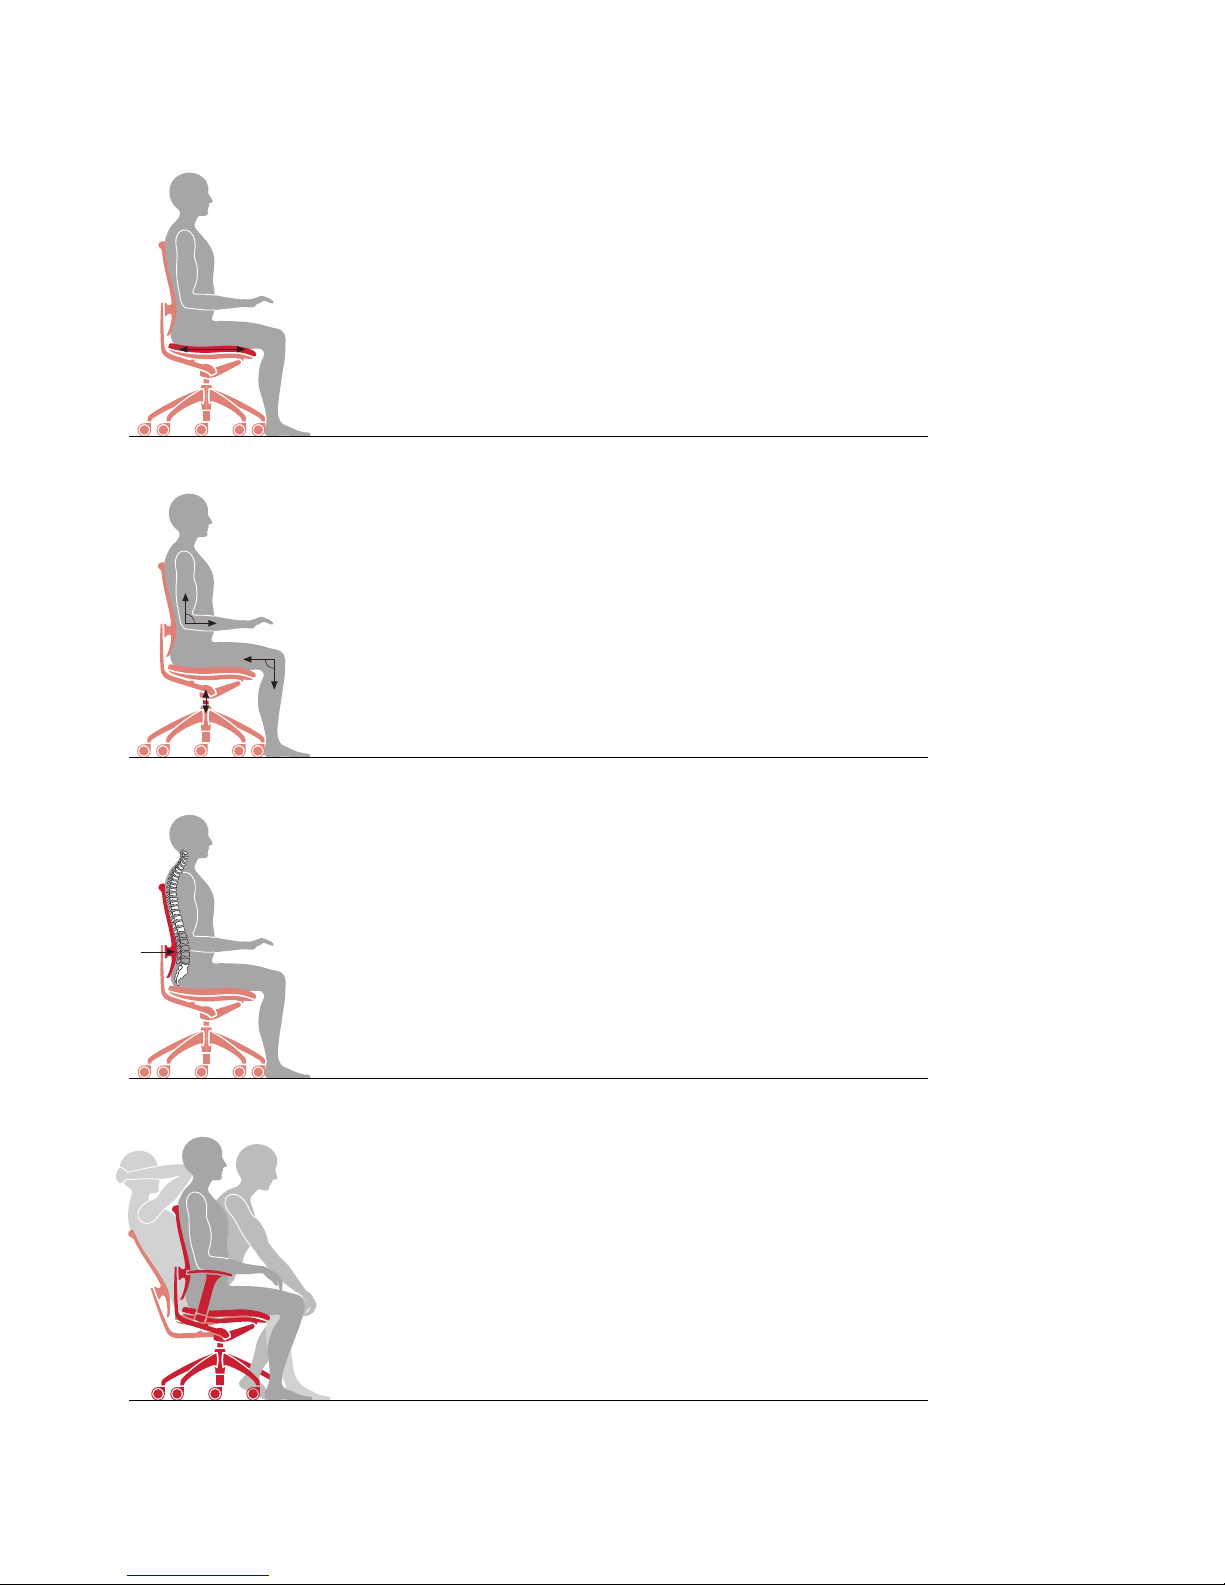
® Use the whole seat surface
The anatomically shaped seat should be fully occupied.
Only then is proper contact with the supporting backrest assured.
“open up” is also available with a seat tilt feature,
which allows the normal position of the seat to be
changed by 4°.
® Adjust the height of the seat precisely
The correct seat height means that the elbow joint
adopts an angle of about 90°when the forearms are
resting horizontally on the desktop. The knee joint
will also adopt an angle of about 90°when the feet
are flat on the floor. If your desktop is too high, and
cannot be lowered to a correct position, you need a
footrest with adjustable height and tilt.
® Adjust the backrest
Adjust the height of the lumbar support so that the
curvature of the backrest supports the spine in the
region of the third and fourth lumbar vertebrae (where
the forward curvature is greatest). This stabilises the
natural S-shape of the spine in every sitting position.
® Dynamic sitting
Dynamic sitting means changing your sitting posture
frequently, or in other words shifting as often as
possible between the front and rear sitting posture.
You should therefore adjust the backrest dynamically.
“open up” is equipped with a “Similar” mechanism,
allowing you to adjust the backrest pressure as best
suits you. This ensures that the backrest and seat
automatically give your body support in every sitting/
lying position.
Healthy sitting is a question of attitude
English 7
Page 8
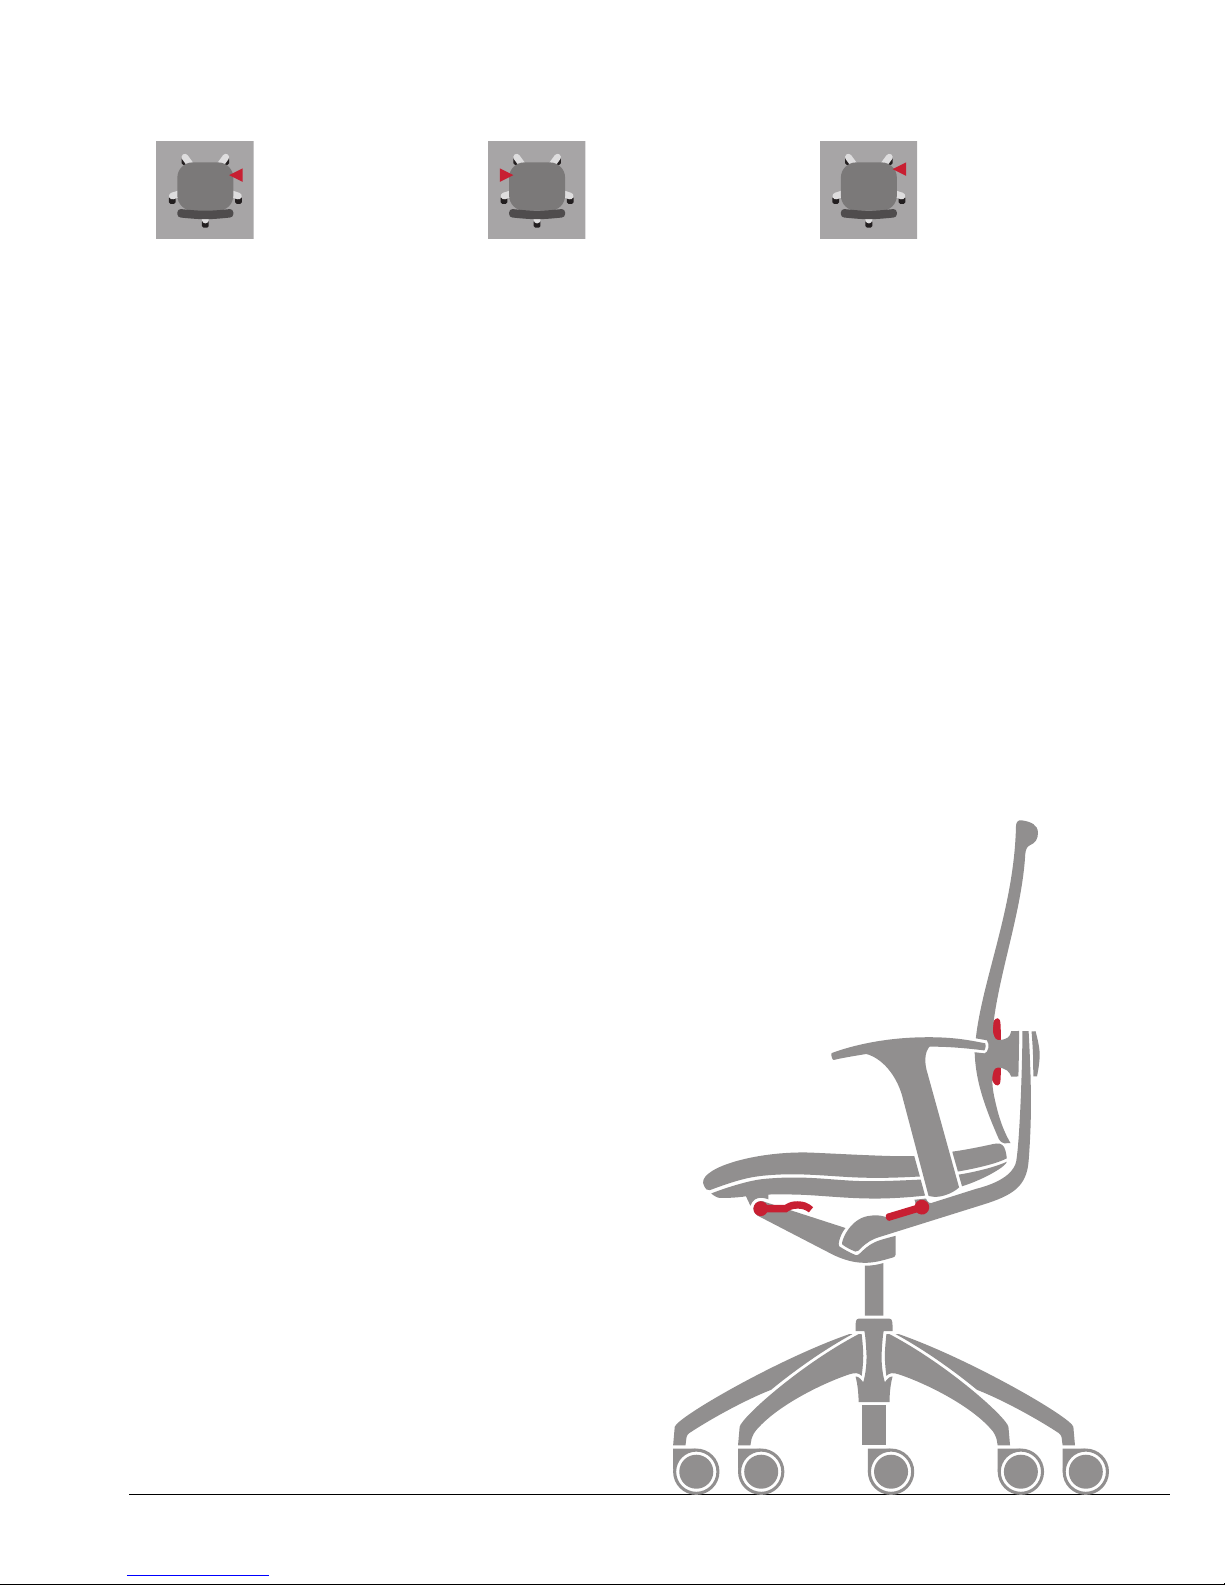
ABC
Height of the seat
® Lowering the seat:
1. Sit down on the seat
2. Pull the lever upwards
(the seat will drop slowly)
3. Releasing the lever at the
desired height will lock
the position
® Raising the seat:
1. Stand up
2. Pull the lever upwards
(the seat will rise slowly)
3. Releasing the lever at
the desired height will
lock the position
Strength of the backrest pressure
® Increasing the backrest pressure:
1. Pull out the handle
2. Crank the handle clockwise
(forwards)
3. Push the handle back in
® Reducing the backrest pressure:
1. Pull out the handle
2. Crank the handle anticlockwise
(backwards)
3. Push the handle back in
Angle of the backrest
® Adjusting the
backrest dynamically:
1. Pull the lever upwards
and release it
2. Lean against the backrest
3. The backrest is automatically
released
® Locking the backrest
into position:
1. Lean back until the backrest
reaches the desired angle
2. Press the lever down and
release it to lock the backrest
into position
The functions of the swivel chair
8 English
D
B
G
Page 9
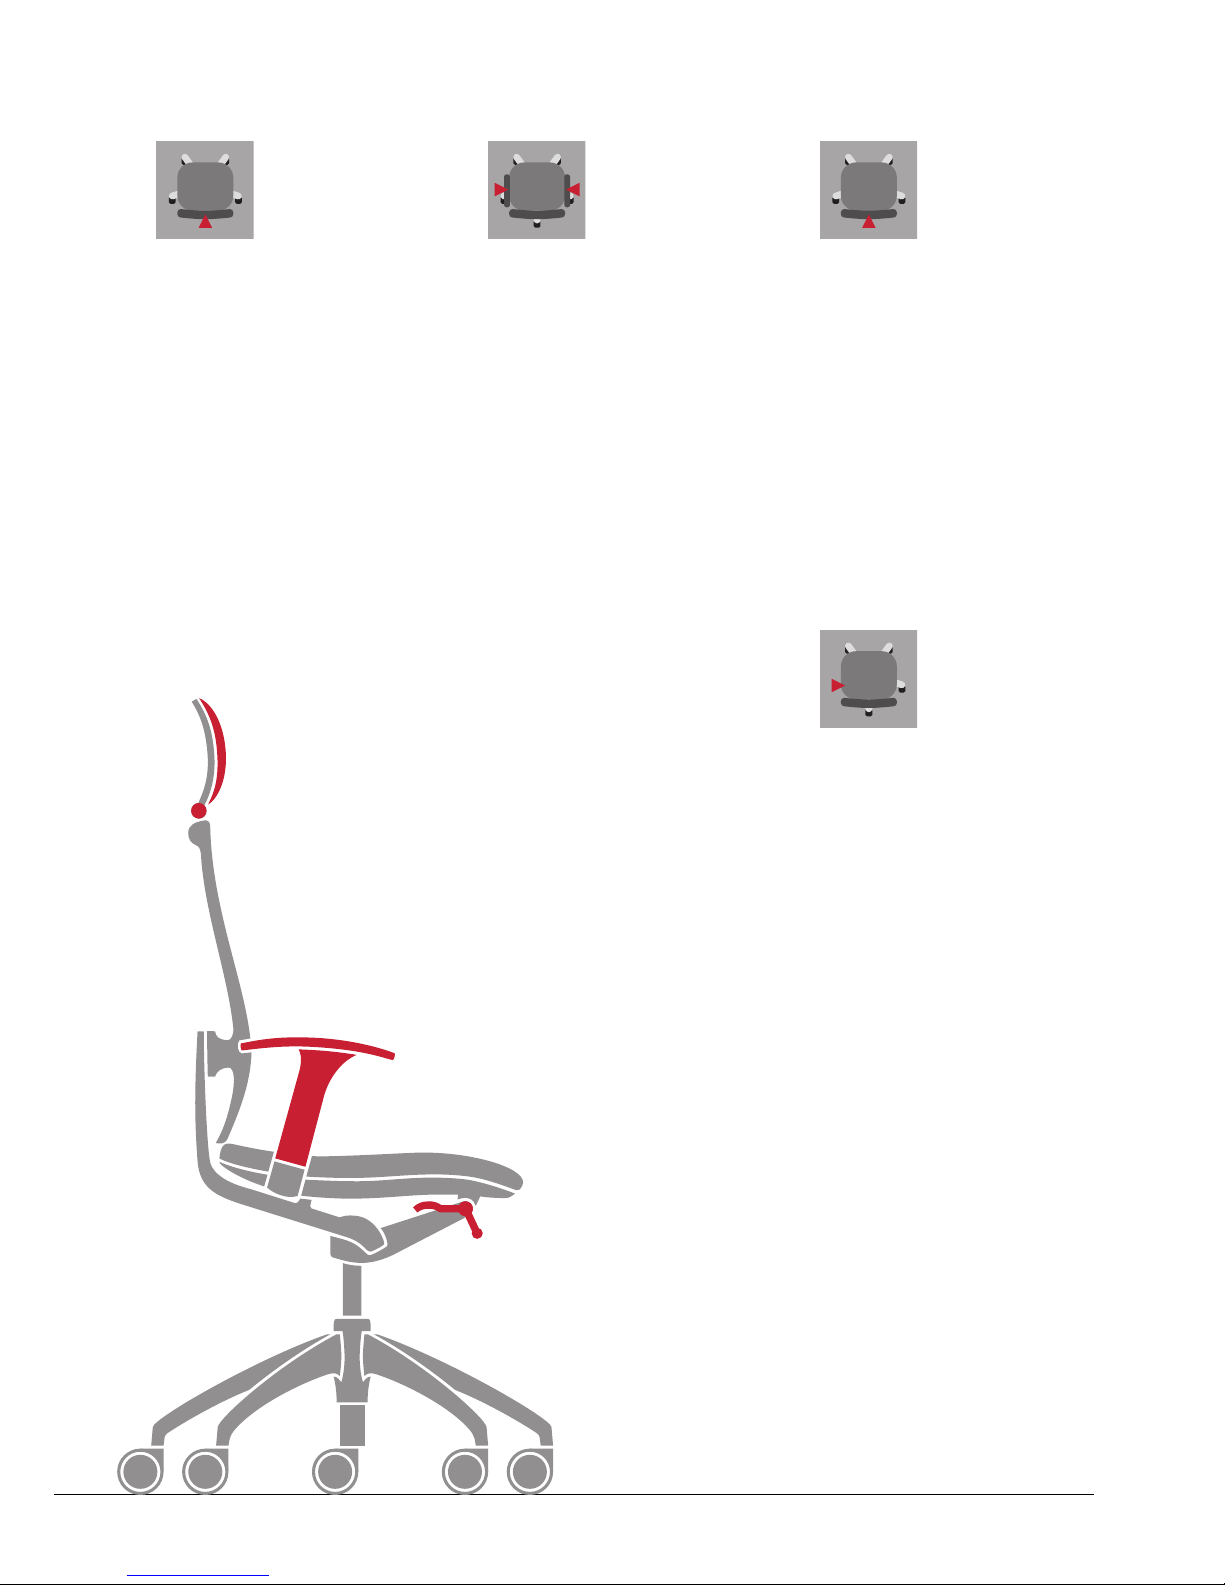
Height of the lumbar support
(optional)
® Adjusting the height:
1. Do not lean against the backrest
2. Sliding lumbar adjustment
For installation at a later date,
please observe the user notes
provided in these instructions.
Adjustment of the headrest
(optional)
® Adjusting the headrest height:
Push the headrest to the
desired height (it is continuously adjustable)
® Headrest angle:
Adjust the tilt of the
headrest as desired
DF
Adjusting the 3D armrests
(optional)
® Adjusting the armrest height:
1. Press the button on the inside
of the armrest and lift or lower
the armrest to the desired height
2. Release the button on the inside
of the armrest, and the armrest
will engage
® Adjusting the armrest depth:
Push the armrest backwards
or forwards; it will engage
automatically
® Swivelling the armrest:
Swivel the armrest clockwise
or anticlockwise; Armrest locks
into place automatically
E
Seat angle (optional)
® Tilting the seat forward:
1. Stand up
2. Twist the knob under the
seat backwards by 180°,
the seat will tilt forward by 4°
® Levelling the seat:
1. Stand up
2. Swivel the lever located under
the seat forwards through 180°.
The seat tilts back into the zero
position
G
English 9
A
C
F
E
Page 10

Correct use
This office swivel chair is designed
for a user weight of up to 120 kg
and may only be used for the purpose intended while exercising due
care and attention. Using it inappropriately (e.g. as a stepladder,
sitting on the armrests or placing
extreme weight on one side) could
result in accidents.
Castors
Please remove the red or blue
transport protection before using
the product for the first time.
A variety of castors are available,
for the sake of your safety and for
use on different types of flooring in
accordance with safety regulations:
– Hard castors for soft flooring
(standard)
– Soft castors for hard floors are
optional
Changing castors: this might be
necessary, for instance, after
moving office, or after the installation of a new floor covering –
simply pull out the castors and
push new ones in. The swivel pins
should first be lightly greased.
Lumbar support
The lumbar support can be fitted
retrospectively by placement in
the channels provided on either
side of the inside frame of the
backrest. Simply slide one side of
the lumbar support into position
and then stretch it across to locate
into the grooves on the other side.
Armrests
Armrests can be fitted later or
exchanged on some models.
Plastic parts
Soapy water is suitable for cleaning. Please do not use any
aggressive cleaning materials.
Upholstery/membrane
In the case of light damage or
soiling to the upholstery, please
only use suitable delicate cleansing
agents, or Sedus cleaning foam.
The upholstery and membrane
covering of the backrest can only
be changed at the factory.
Leather
Leather is a natural product.
The natural markings of the
animal skin gives the material
its unmistakable texture.
Rub off light soiling with a soft
woollen cloth. Heavier soiling
should only be treated with
cleaners designed for anilinedyed leather.
Do not expose semi-aniline
leather to direct sunshine.
Seat height adjustment
We recommend cleaning the
piston rod regularly with a cloth.
Other work on the gas spring,
e.g. replacement, may only be
carried out by trained staff.
Tips for users
10 English
 Loading...