

Page 1
MANUAL
Page 2

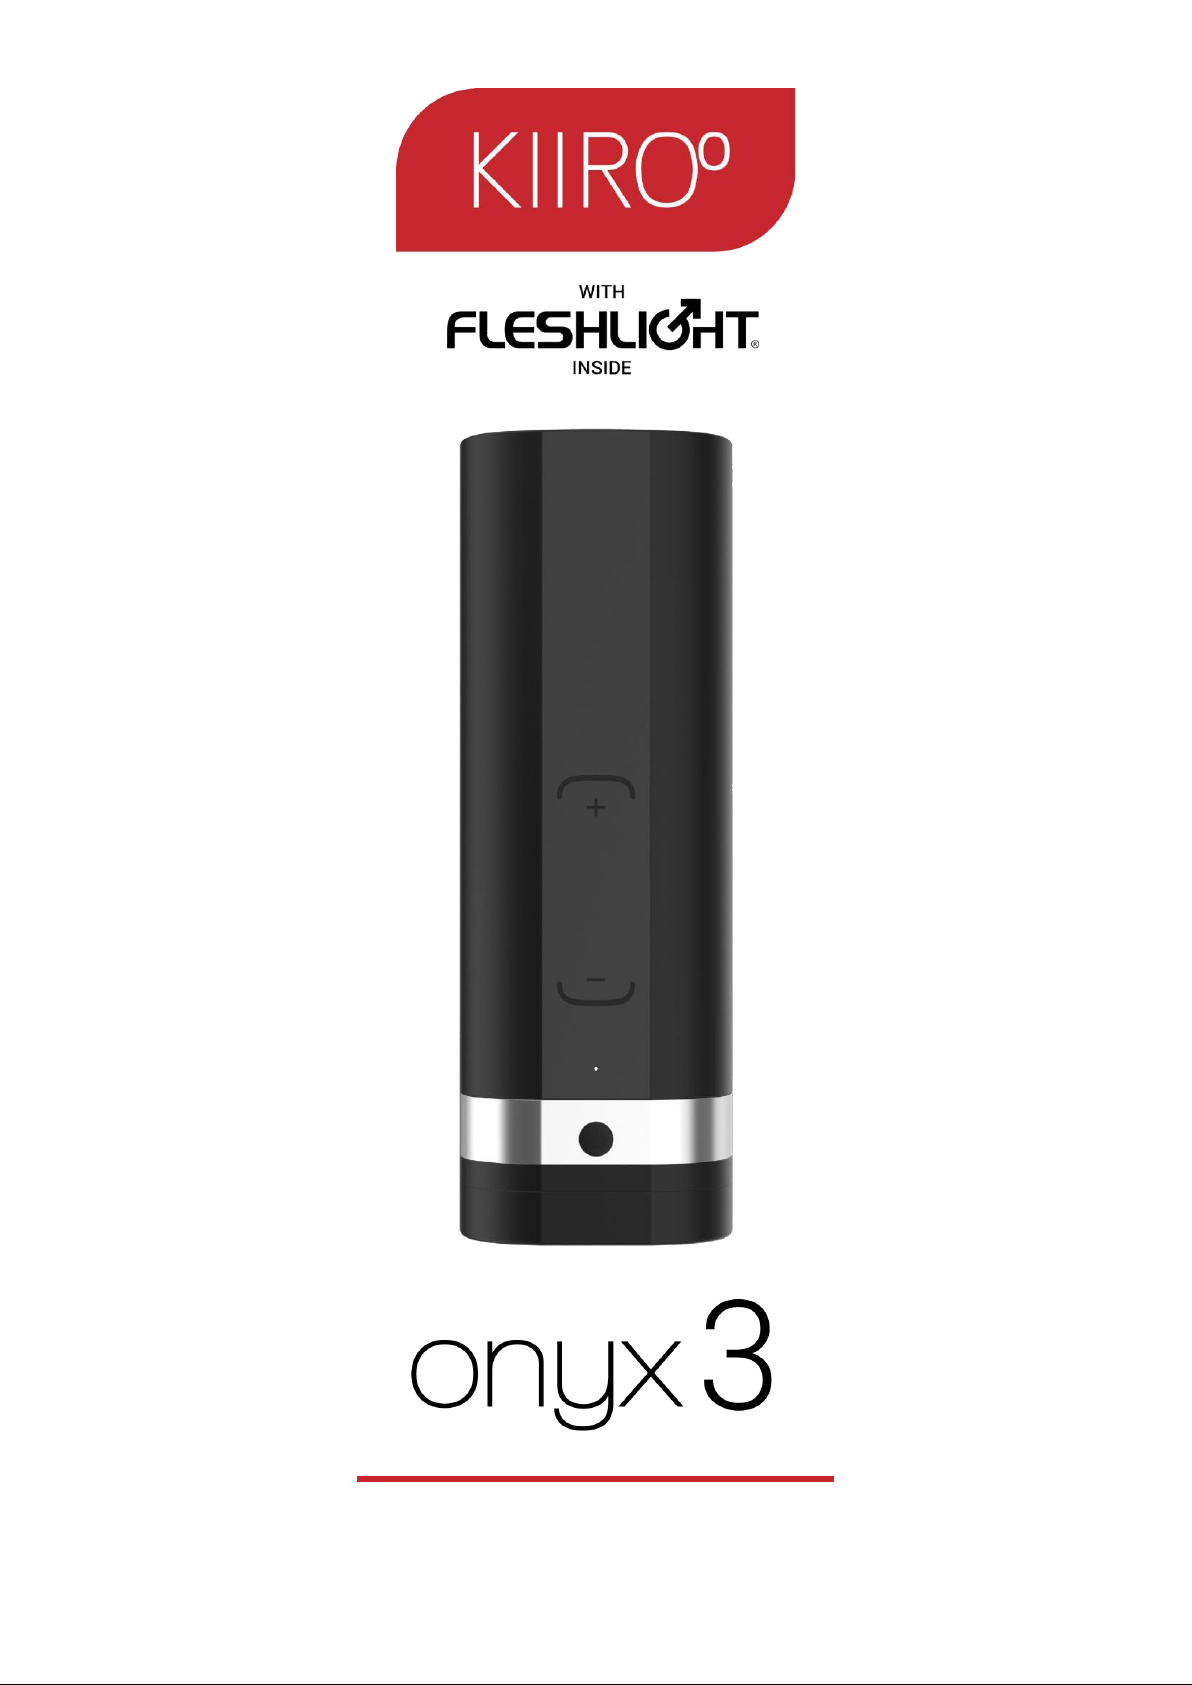
1
The Onyx3 is to be used with authorized Feel Apps only. These apps are:
FeelConnect, FeelPerformer and FeelVR. Please be advised that this list may be
updated in the future. Visit the following link for the most up-to-date list:
www.kiiroo.com/compatible-software
Downloading any third-party applications to control or interact with the Onyx3 that are
not mentioned above is done entirely at your own risk. In the event that a third-party
ap- plication is downloaded and it damages either the device software or hardware or
leads to personal injury, neither Kiiroo nor any of their partners will be held liable. In
the event that third party applications are downloaded, the device warranty will be
void.
Page 3

2
Table of Contents
1. Set up your device 3
2. Using your device 4
3. Download the FeelConnect App 5
4. Modes 6
4.1 Bluetooth Mode
4.2 Automatic Mode
5. Services 7
6. Charging and LED indicator 8
6.1 Charging your device
6.2 LED Indicators
7. Handling and Lubrication 9
8. Cleaning 10
9. Disclaimer and Warning 11
10. Disposal Specifications 12
10. Aftercare and Help 13
Page 4
3
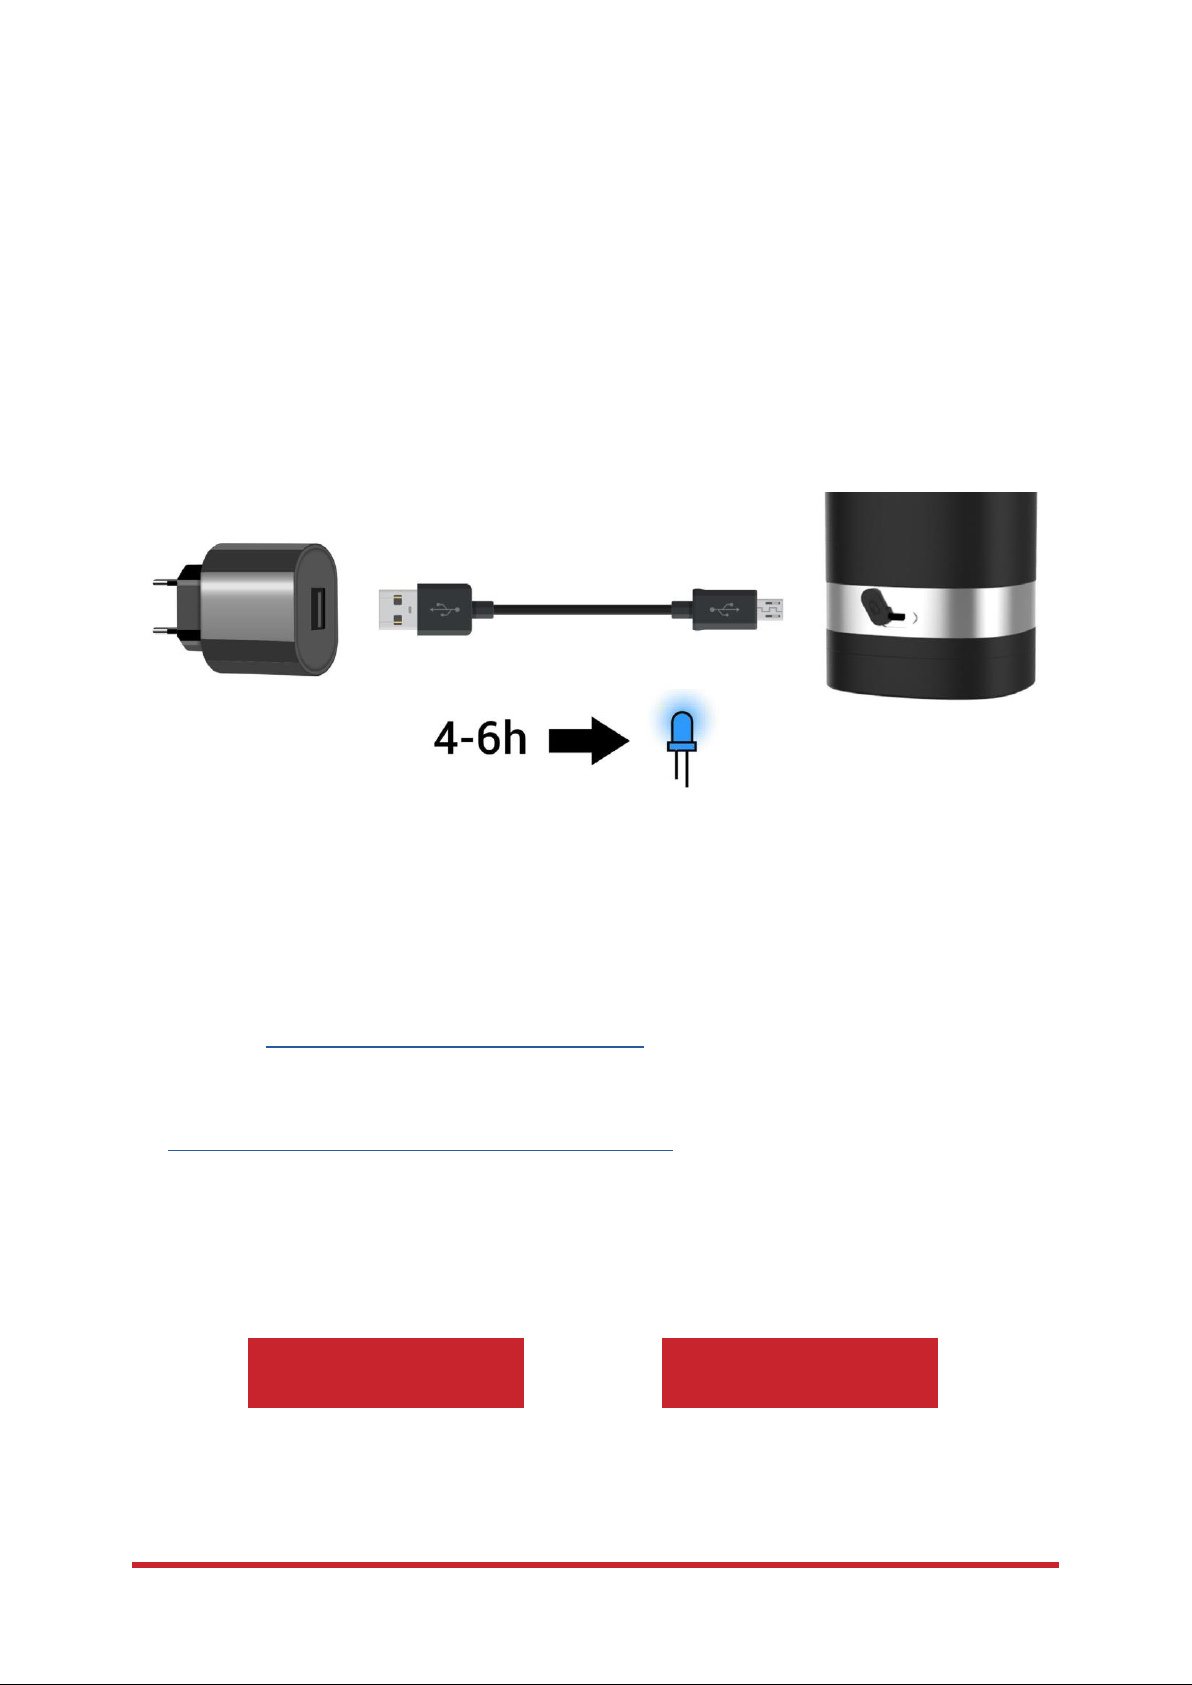
1. Set up your
1. Using the micro USB charger provided, charge your device until the light turns blue,
about 4-6 hours. We recommend charging the device fully prior to the first use.
-
The charging port can be found behind the Onyx3 under the rubber charging cover.
-
Insert the micro USB into the small hole at the back of the Onyx3.
2. Go to www.kiiroo.com to create your user
account. (https://www.kiiroo.com/my-account/)
3. Once you have created an account, please go to:
(https://www.kiiroo.com/pages/register-your-device/)
to register your device and activate your one (1) year warranty.
4. Download the FeelConnect App to pair your device with your mobile phone.
android
iphone
Page 5
4
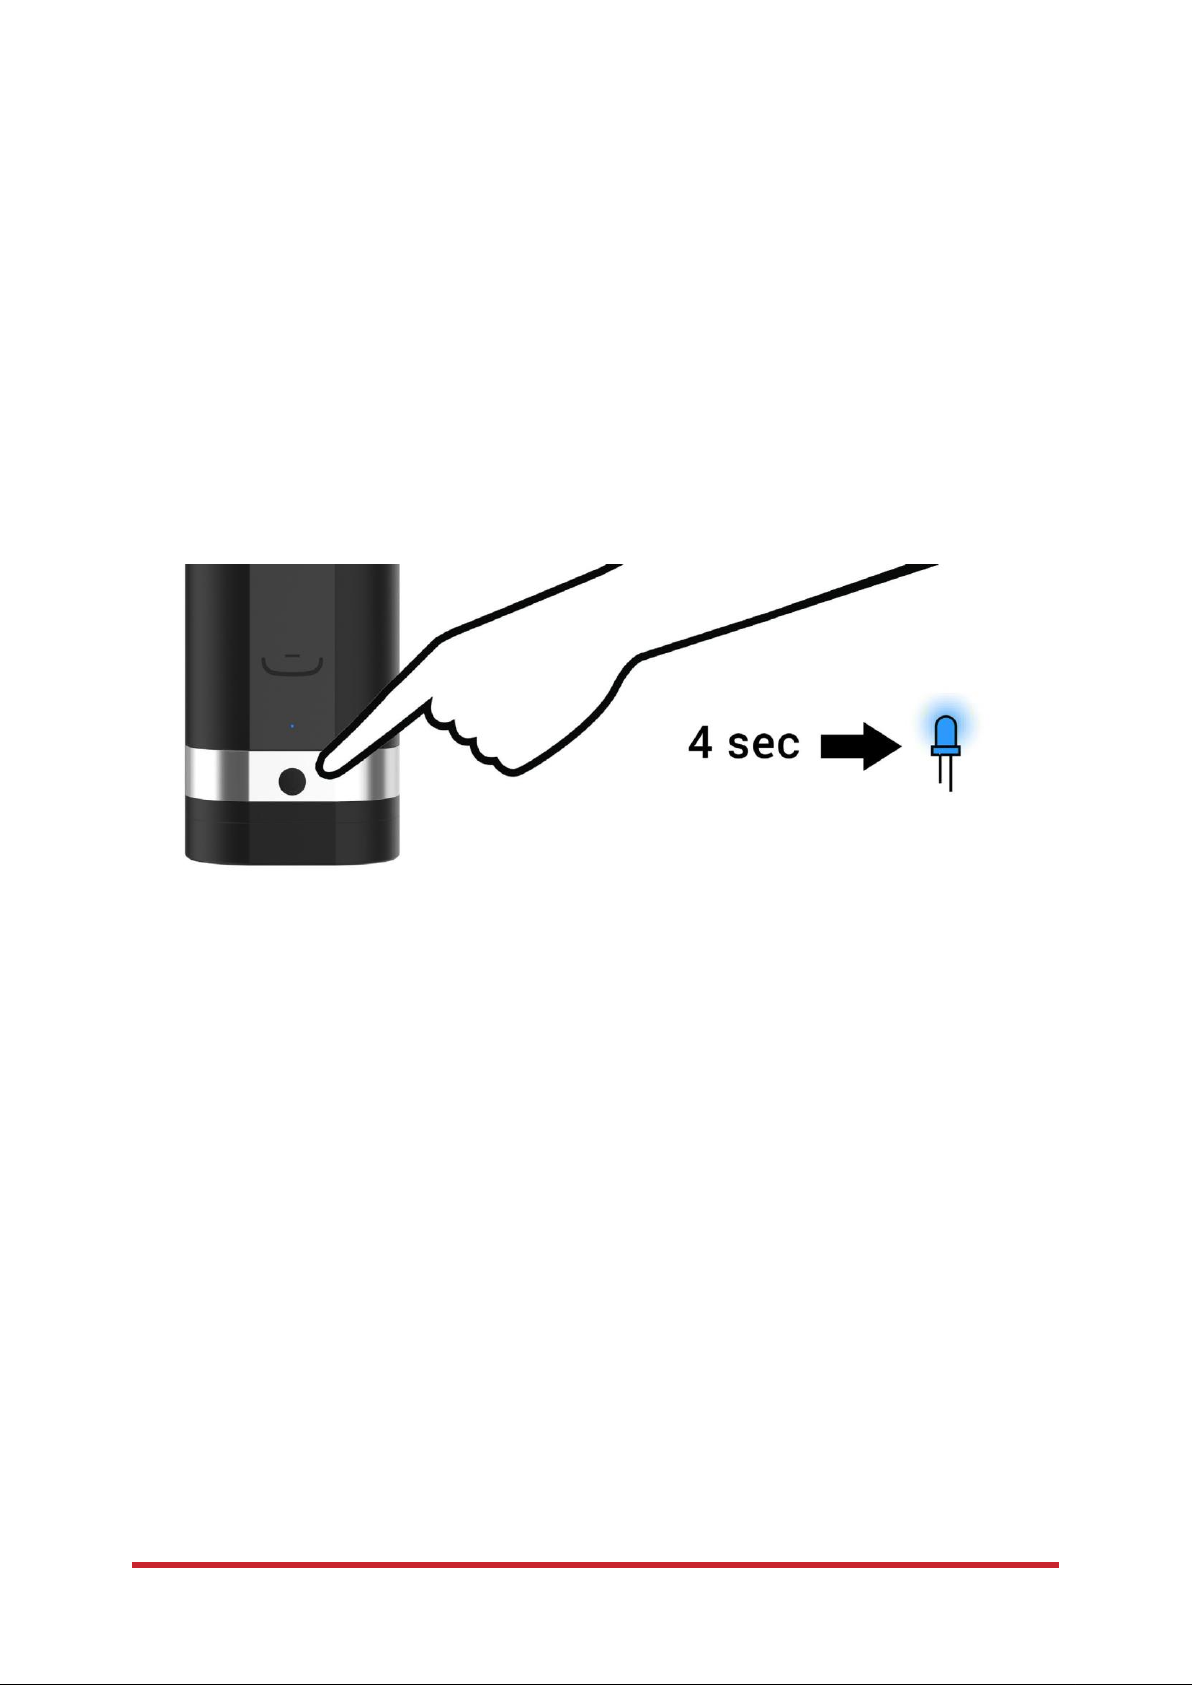
2. Using your
1. Power on by pressing the multifunctional button at the bottom of the device and
hold for approximately 4 seconds.
2. A solid blue color will show and the device is now in Bluetooth Mode (go to page 6).
3. Push the button once. The light will turn purple and now the device is in
Manual Mode (go to page 6).
4. To turn off the device, hold the multifunctional button for approximately 4 seconds
until the light goes off.
**Please note, Onyx3 is NOT waterproof.
Page 6

5
3. Download the FeelConnect
Please download the FeelConnect App on your mobile phone and follow the
instructions on how to pair your Onyx3 to the app.
android
iphone
The Onyx3 is to be used with authorized Feel Apps only. These apps are: FeelConnect,
FeelPerformer and FeelVR. Please be advised that this list may be updated in the
future. Visit the following link for the most up-to-date list:
Downloading any third-party applications to control or interact with the Onyx3 that are
not mentioned above is done entirely at your own risk. In the event that a third-party application is downloaded and it damages either the device software or hardware or leads
to personal injury, neither Kiiroo nor any of their partners will be held liable. In the event
that third party applications are downloaded, the device warranty will be void.
FeelRobotics and Kiiroo are constantly working to ensure their devices are as secure
as possible. We recommend updating your app and device every time there is an
update to the latest versions in order to ensure your safety.
Page 7

6
4.
Onyx3 has two main modes; Bluetooth Mode & Manual Mode. To cycle through each
mode, click the single multifunctional button until you reach the mode of your choice.
Onyx3s default mode is Bluetooth Mode.
4.1 Bluetooth Mode; Indicated by a blue light.
To pair Onyx3 with content, follow the instructions on the FeelConnect App.
Go to FeelMe.com, click on “My Devices” in the top right corner, and scan the QR code to
connect to the content of your choice.
4.2 Manual Mode; indicated by a purple light.
Once the device is in Manual Mode, you can control the speed of the stroke by using
the trackpad located on the front of the device.
Page 8

7
5.
Feel Your Lover
When paired online, the corresponding device(s) mimic intimacy in real-time from
The thrusting sensations of Onyx3 sync with the motions you see on the screen, making you feel like you are right there in the scene.
Feel Virtual Reality
Use Onyx3 in combination with VR glasses and Virtual Reality Porn. Experience highquality adult videos filmed in 180 and 360-degrees with 3D stereoscopic views.
Feel Webcam Models
Kiiroo’s webcam partners have a special interactive section on their website with
hot models ready to control your device.
Go to FeelMe.com to find a variety of interactive content.
anywhere in the
Feel
Page 9

8
6. Charging and LED
6.1 Charging
1. Insert the USB cable into the Onyx3s charging port. The charging port is located
at the back side of the Onyx3.
2. Insert the other end into a USB port. This can be in a computer or wall
adapter [Please note, wall adapter is NOT included in the box.]
3. Wait for the red LED light to blink slowly; this indicates that the Onyx3 is charging.
4. The LED light will glow solid blue when Onyx3 is fully charged.
5. When the battery is low, the LED indicator will prompt you to charge by flashing
red quickly. You will have approximately 5 minutes before Onyx3 disconnects from
Blueto- oth and turns off.
6. The LED indicator will blink blue-red-blue-red periodically if an update is available or
if something has gone wrong.
6.2 LED Indicator
(Blinking BLUE) Bluetooth mode; searching to connect.
(Solid BLUE) Bluetooth mode is connected.
(Solid PURPLE) Manual mode.
(solid BLUE) Fully charged.
(Blinking RED) Battery low.
(Blinking RED) When on charge.
(Blinking RED quickly) Battery is critically low- 5minutes until disconnect.
(Blinking BLUE/RED) Bootloader mode; Please update.
Page 10

9
7. Handling and
Kiiroo recommends removing the Fleshlight™ SuperSkin™ sleeve from Onyx3 to
apply lubricant. Apply a generous amount of water-based lubricant inside the sleeve
before use.
Recommended:
1. Always use Fleshlube™ or any other water-based lubricant.
2. Always use lubricant as it will prolong the lifespan of Onyx3s
Fleshlight™ SuperSkin™ sleeve and give you the most comfortable
experience.
Do not use:
1. Silicone or oil based lubricant as it will deteriorate the Fleshlight™
Super- Skin™ sleeve of the Onyx3.
Page 11

10
8. Cleaning
Always clean the Fleshlight SuperSkin™ thoroughly after each use.
Use warm water along with antibacterial soap, dish soap or a specialized
toy cleaner.
Wipe the Onyx3 exterior with cleansing wipes as Onyx3 is not waterproof.
Page 12

11
9. Disclaimer and
-
We, Kiiroo, make no medical claims with our devices.
-
Our devices are not to be used by or on minors (anyone under 18), or anyone who is
unable or unwilling to express consent.
-
Do not use Kiiroo devices on inflamed or irritated areas.
-
Follow all directions as set forth by the manual, and do not attempt to make any
tech- nical adjustments to your Kiiroo device at home.
-
Kiiroo will not be held responsible for any undesirable results of misuse.
Do NOT use your Onyx3:
-
If there are exposed electronic elements
-
If it is excessively hot to touch
-
If it has been exposed to liquid of any sort
-
Avoid leaving your Onyx3 in direct sunlight and NEVER expose it to extreme heat.
-
Never use cleansers containing alcohol, petrol or acetone.
-
Do not use heating appliances to dry the device.
-
Avoid using harsh soaps as they can damage the sleeve material.
-
Always store the device out of reach of children.
Page 13

12
10. Disposal
While Onyx3 is made of eco-conscious materials, you should not dispose of Onyx3 in
your waste bin. Like any electronic device with a rechargeable battery, there are
disposal regulations. These vary by city and local municipality. Please be aware of how
electroni- cs are disposed of where you live.
Kiiroo suggests asking your local council center. Also, consider that in your
locality, Onyx3 may be considered bio-waste because of its intimate nature.
Page 14

13
11. Aftercare and Help
Specifications:
Help:
If you have any further problems with setup and installation, or issues with using
your device, do not hesitate to contact our customer service team.
Our team is there for your support, to explain problems in detail, and to make sure
your online experience runs as smoothly as possible.
We try to answer all questions within 48 hours of receiving them.
For frequently asked questions visit:
www.kiiroo.com/faq
www.kiiroo.com
info@kiiroo.com
+31207371194
Opening hours:
Mon - Fri, 9AM - 5PM CET.
Materials: ABS, POM
Sleeve: Fleshlight™ SuperSkin™
Finish: Matte
Size: 8.9X7.9X26.3cm
Hole diameter: 4.5X4cm
Internal lenght: 16.5cm
Weight: 1,3kg for device + USB cable + Box
Battery: Lithium-ion Polymer 1000 mAh
Charging: 4 – 6 hours
User time: 1 hour
Page 15

14
Regulatory User
information
FCC Statement
This equipment has been tested and found to comply with the limits for a
Class B digital device, pursuant to Part 15 of the FCC Rules. These limits are
designed to provide reasonable protection against harmful interference in a
residential installation.
This equipment generates, uses and can radiate radio frequency energy and,
if not installed and used in accordance with the instructions, may cause
harmful interference to radio communications. However, there is no
guarantee that interference will not occur in a particular installation. If this
equipment does cause harmful interference to radio or television reception,
which can be determined by turning the equipment off and on, the user is
encouraged to try to correct the interference by one of the following
measures:
Reorient or relocate the receiving antenna.
Increase the separation between the equipment and receiver.
Connect the equipment into an outlet on a circuit different from that to
which the receiver is connected.
Consult the dealer or an experienced radio/TV technician for help.
To assure continued compliance, any changes or modifications not expressly
approved by the party responsible for compliance could void the user's
authority to operate this equipment. (Example - use only shielded interface
cables when connecting to computer or peripheral devices).
This device complies with Part 15 of the FCC Rules. Operation is subject to
the following two conditions:
(1) This device may not cause harmful interference, and
(2) This device must accept any interference received, including
interference that may cause undesired operation.
For Canada the following text has to be included in the user manual: (See
RSS-210 clause 5.11)
This device complies with Industry Canada license-exempt RSS standard(s).
Operation is subject to the following two conditions:
1) this device may not cause interference and
2) this device must accept any interference, including interference that may
cause undesired operation of the device
Le présent appareil est conforme aux CNR d'Industrie Canada applicables
aux appareils radio
exempts de licence.
L'exploitation est autorisée aux deux conditions suivantes :
(1) l'appareil ne doit pas produire de brouillage, et
(2) l'utilisateur de l'appareil doit accepter tout brouillage
radioélectrique subi, même si le brouillage est susceptible d'en
compromettre le fonctionnement.
 Loading...