

Feel-Maestro MR670 Owner's Manual
Owner’s manual. Electric shaver
Instrukcja obsługi. Elektryczna maszynka do golenia
Manualul proprietarului. Aparat de ras electric
Керівництво з експлуатації. Електрична бритва
Руководство по эксплуатации. Электрическая бритва
Model/Модель: MR670
Сerticated in Ukraine
Виріб сертифіковано в Україні
076
2 3
Pictures/ Rysunki/ Figurila/ Рисунки/ Малюнки
1
Dear customer, we thank you for purchase of goods
Functionality, design and conformity to the quality standards
guarantee to you reliability and convenience in use of this device.
Please read and comply with these original instructions prior to the
initial operation of your appliance and store them for later use of
subsequent owners.
The shaver is designed for beard dry shaving and sideboards
trimming.
The device is designed only for household use.
Under condition of observance of user regulations and a special-
purpose designation, a parts of appliance do not contain unhealthy
substances.
Technical specications
Model MR670
Electrical supply:
EN
1
2
3
6
7
4
5
Charger adaptor
Input: AC~ 100-240 V ; 50Hz
Output: DC =4,5В, 0,2А
Charger protective class II
Battery (2pcs)
Type NiMh
Rated voltage 1,2 V
Battery capacity 600 mAh
Full charge takes approximately 8 hours
4 5
Shaver protective class III
Protection class IPX0
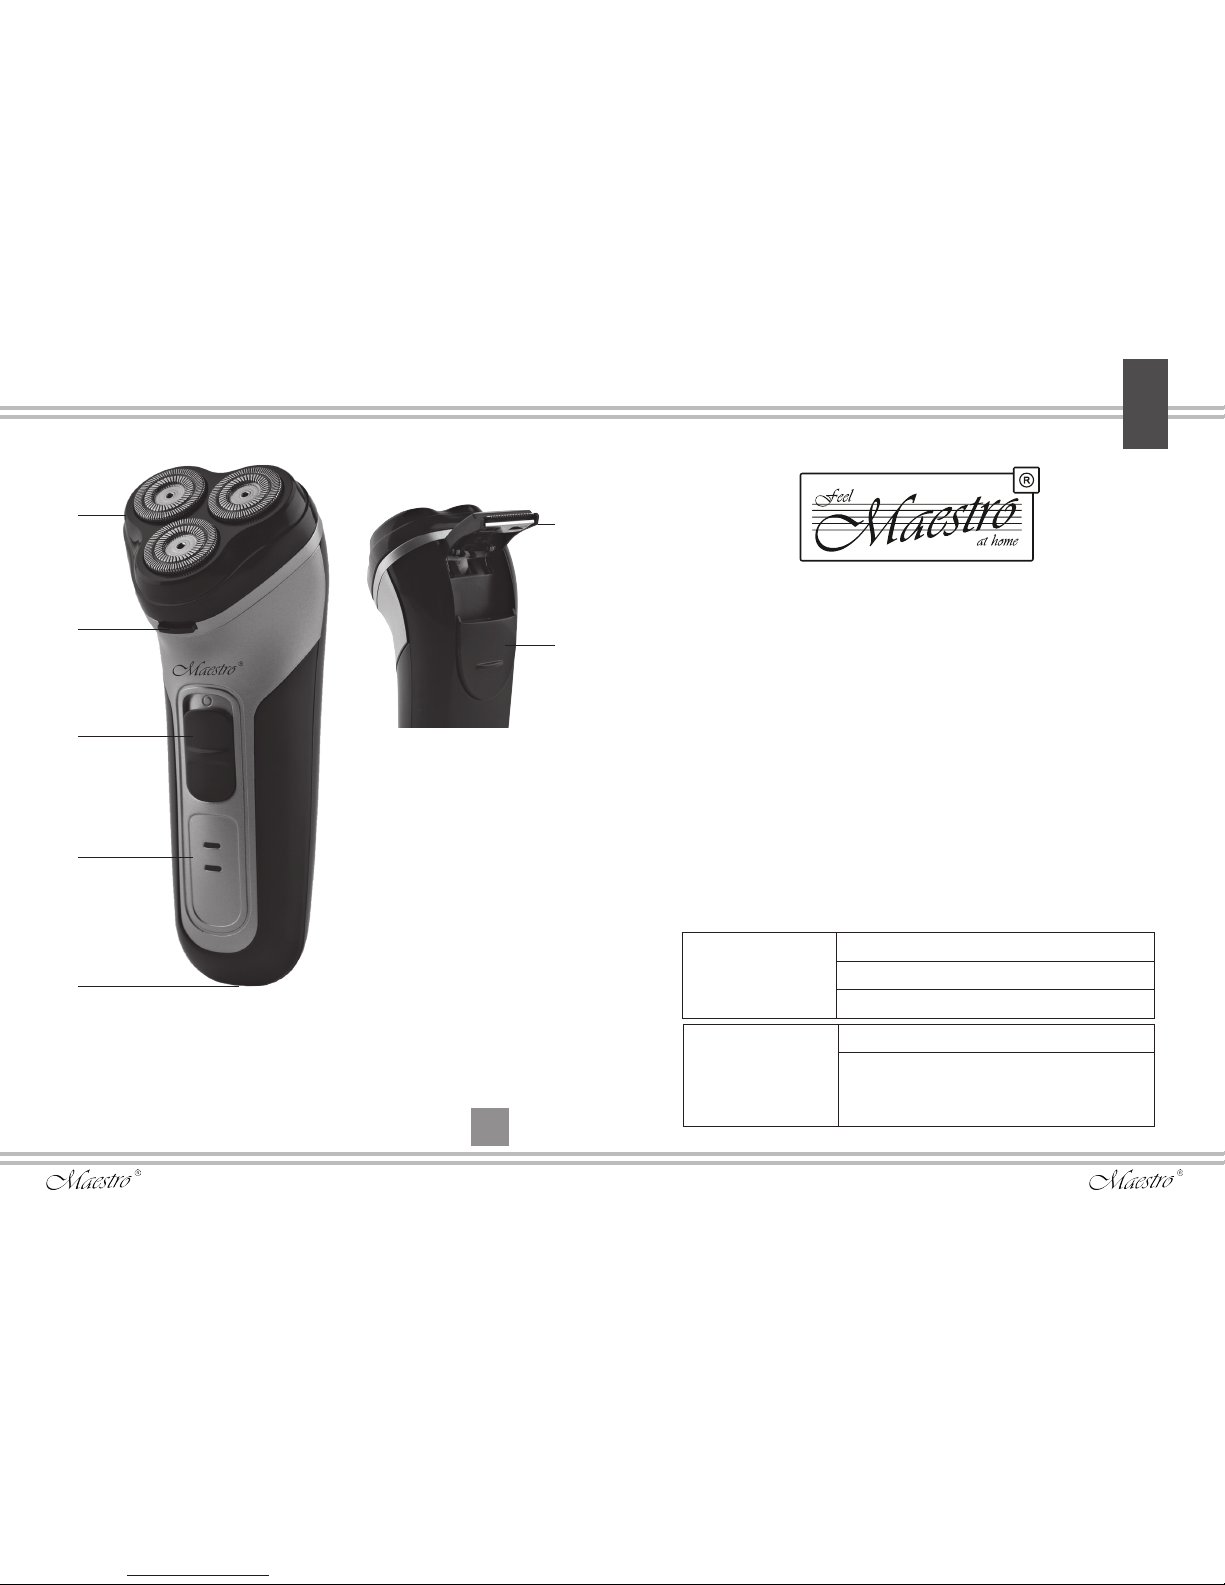
Description of the appliance
Picture1 (page 2)
1- Shaving head with three blades
2- Opening button for the shaving head housing
3- On/Off switch
4- Charge indicator
5- Socket for the power cable
6- Trimmer
7- Trimmer opening button
Safety instructions
Low voltage while in operation makes this shaver extremely
safe, however, it should be kept in mind that the device is
connected to high voltage mains for charging the accumulator
SPECIAL INSTRUCTIONS
WARNING!
DO not use or charge the appliance in the close vicinity of a bath/
shower or a sink lled with water.
NEVER immerse the appliance, cable or charger in any liquid.
DO NOT allow water and moisture on the electrical parts of the
device or charger.
NEVER touch the appliance or charger with wet or damp hands.
Otherwise, there is a risk to get an electric shock!
- DO NOT leave the appliance without supervision when it is
connected to the power supply.
- Always unplug from the plug socket when not in use and before
cleaning. The proximity of moisture presents a danger, even when
the appliance is switched off.
- If the device is nonetheless operated in the bathroom, it is
recommended to install a residual current device (RCD) to the
wiring of the bathroom as additional protection, having set the
actuation at the leakage current of not more than 30 mA. For more
details, address a specialized installation organization.
- Usage of low-quality electric power strips and plug adapters can
cause damage to the electric device and occurrence of re.
- Ensure that the rating of the local power supply tallies completely
with the details given on the rating plate of the charger.
- Close supervision is necessary when the appliance is used near
children.
- Always use the appliance on a dry, level surface.
- In the interest of safety, regular periodic close checks should be
carried out on the charging cord to ensure no damage is evident.
Should there be any signs that the cord is damaged in the slightest
degree, the entire appliance should be returned be authorized
service engineer.
- This appliance is not intended for use by persons (including
children) with reduced physical, sensory or mental capabilities, or
lack of experience and knowledge, unless they have been given
supervision or instruction concerning use of the appliance by a
person responsible for their safety.
- Children should be supervised to ensure that they do not play with
the appliance.
- Do not place or store appliance where it can fall or be pulled into a
bath or sink.
EN
6 7
- Never drop or insert any object into any opening on this appliance.
ATTENTION!
- Shaving foils of the shaver are very thin and sharp, easy to
damage upon non-careful use.
- Do not use the shaver with damaged blades or one of the teeth:
that can cause injury.
- Never use the device if the power cord or the plug is damaged, if
the device is not working appropriately, if the device is damaged or
fell into water. Do not repair the device on Your own, address the
nearest service center.
- Do not let the cord hang over the edge of a table or counter or
touch hot surfaces.
- Never drop or insert any object into any opening on this appliance.
- Do not press on protecting cover.
- Do not use it for commercial purpose.
Actions in extreme situations
- If your device has fallen into water or water has penetrated it,
immediately disconnect it from the mains without contacting the
device itself or the water.
- If there appears smoke, sparkling, strong smell of burning
isolation, immediately stop using or charging the device, disconnect
the device from the mains and apply to the nearest service center.
Operation
Before startup
- Remove all wrap materials and stickers
- Make sure that all the parts of appliance don’t have damages.
The shaver can be used both with battery and connected through
the charging device to the circuit.
Charging the accumulator
When using the shaver after purchasing or a long storage it must be
charged.
The temperature in the room must be from 5 to 40˚С.
Full capacity. Maximum battery capacity will only be reached after
3-4 charging/discharging cycles.
Warning!
Do not charge the battery when the temperature in the room is
below 0°C.
Do not charge the battery longer than 12 hours.
Avoid charge the battery under the direct sunlight or near the
source of heat.
- To charge the battery, switch the “Off” button (3/Picture 1) to the
position “OFF”-switched off, connect the power cord plug into the
connector on the shaver case.
- Insert the charger’s plug into power socket, the charge light
indicator will begin to light and start blinking. Full charge requires
approximately 8 hours. When the light indicator starts lighting green,
the battery is charged completely, charging is complete.
- When the charging ends, disconnect the charging device from the
power network, disconnect the cord from the shaver.
Note: during charging the cases of the shaver and the charger
become warm. This is normal.
Shaving
- Remove protecting cover.
- Turn the switcher (3/Picture 1) to the position “ON” – switched on
(towards the blades).
EN
8 9
WARNING!
Before cleaning, remove the plug of the Switching adaptor
from the mains power socket.
Never place it in water or any other liquid.
Cleaning (after each operation):
- Switch off the shaver with switcher and disconnect it from the
power network.
- Remove the protecting cover.
- Press the blades head xation button (Picture 3.1), the blades
head with the blades will move outwards the case (Picture 3.2),
access to the internal side and movable heads for cleaning will
appear.
- Touch the face skin with the shaver softly and move it against the
direction of hair growth smoothly. You can get better result if You
stretch the skin of your face and neck slightly.
- When shaving is over, turn the switcher to the position “OFF” –
switched off and then place the protecting cover.
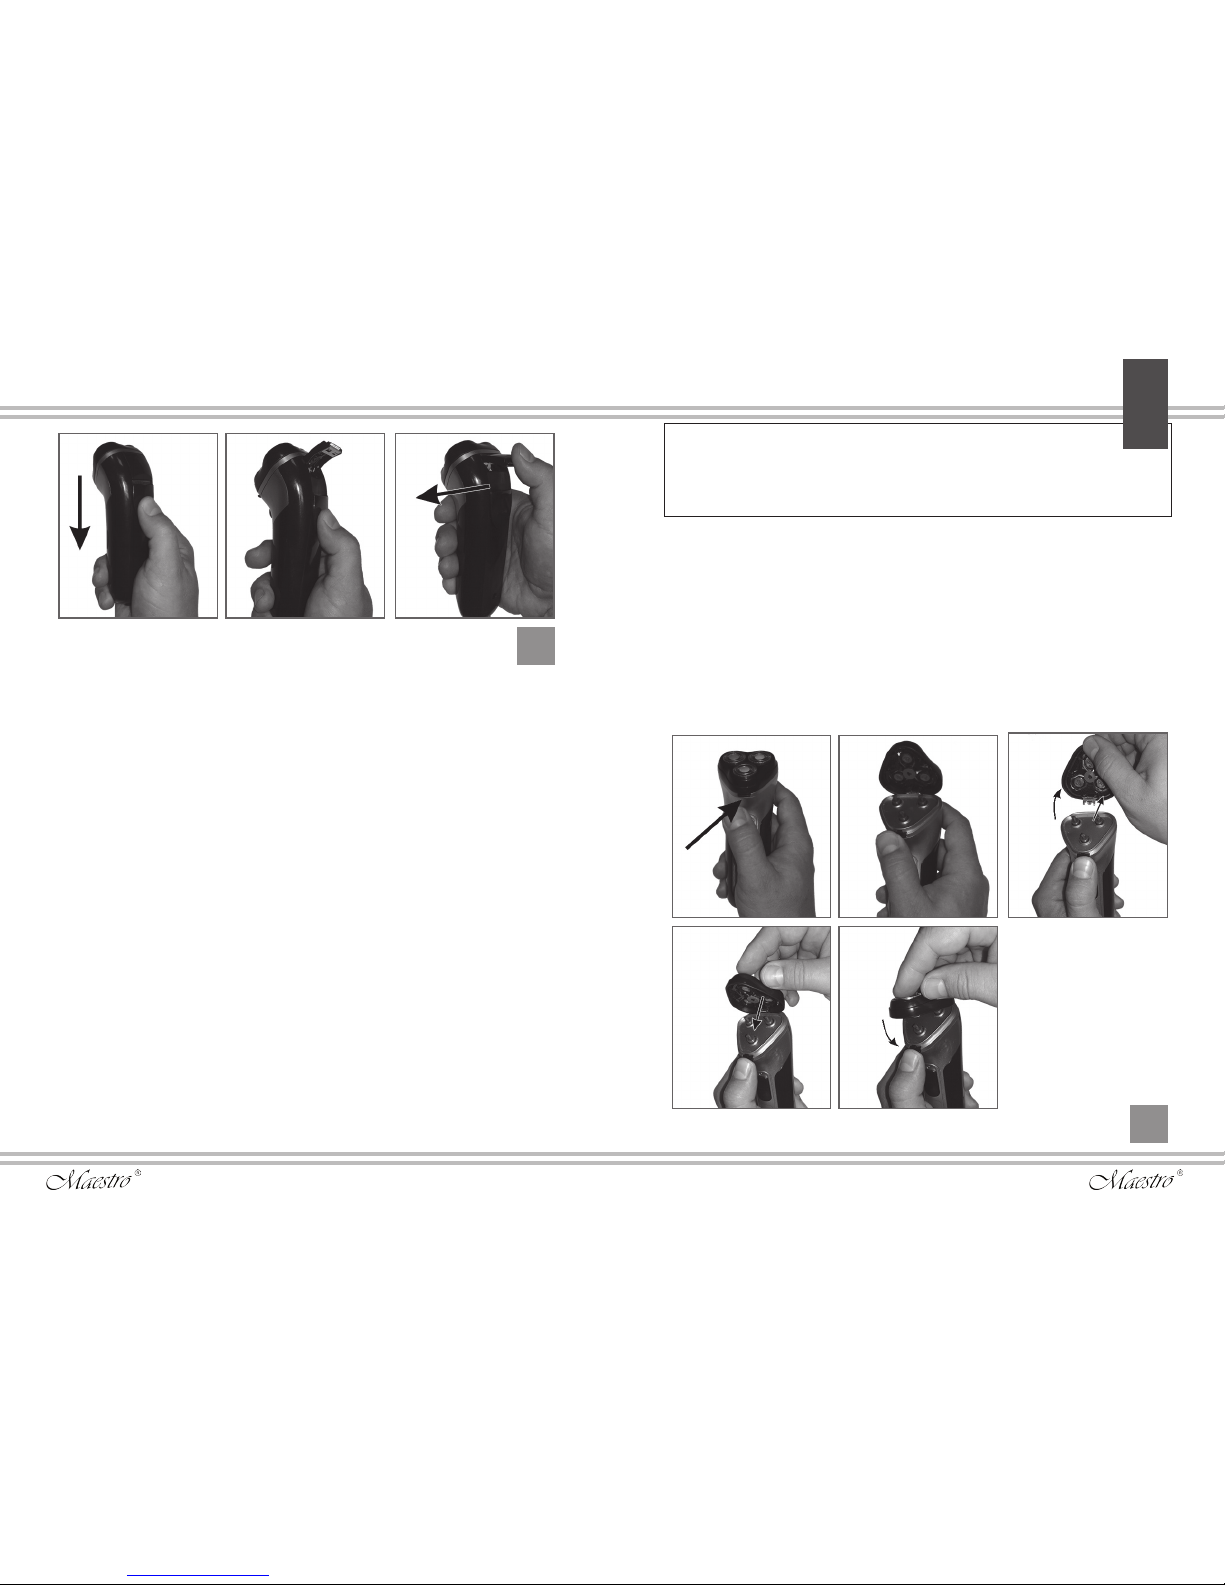
Using trimmer
- Press the trimmer button (7/Picture 1) backwards (from blades
Picture 2.1). Trimmer will switch on and automatically open in the
case (Picture 2.2).
- Switch on the shaver with the switcher (3/Picture 1).
- Touch Your beard and sideboards with the trimmer slightly and cut
them to the required form slowly.
- After operation, switch off the shaver with the switch.
- Manually close the trimmer in the case until click (Picture 2.3).
Maintenance and care
The shaver should be cleaned after each operation.
Picture
Picture
2
3
2.1
3.1
3.4
2.2
3.2
3.5
2.3
3.3
EN

10 11
- Carefully remove the beard hair from the internal and external
sides of blades with the help of the brush from the set.
- Open the trimmer and clean it, then close it up to the lock clicking
(Picture 3.5) .
- Place the protecting cover to the blades head before keeping.
Head complete dismantling, blades replacement
Head complete dismantling is required for blades replacement or
thorough cleaning, including under water stream.
- Press blades head xation button (Picture 3.1), the blades head
with the blades will move from the case (Picture 3.2). Blades head
can be disconnected from the case, for that purpose with Your free
hand disconnect it together with the rotating joint from the case
towards opening direction (Picture 3.3).
- You can wash the disconnected head together with blades under
the tap water steam. Before installation, it is necessary to dry the
head with the blades thoroughly.
- Install the head rotary joint lock into the hole in the shaver’s case
and x it by slightly pressing it until click (Picture 3.4).
- Close the installed head on the case until the lock clicks (Picture
3.5).
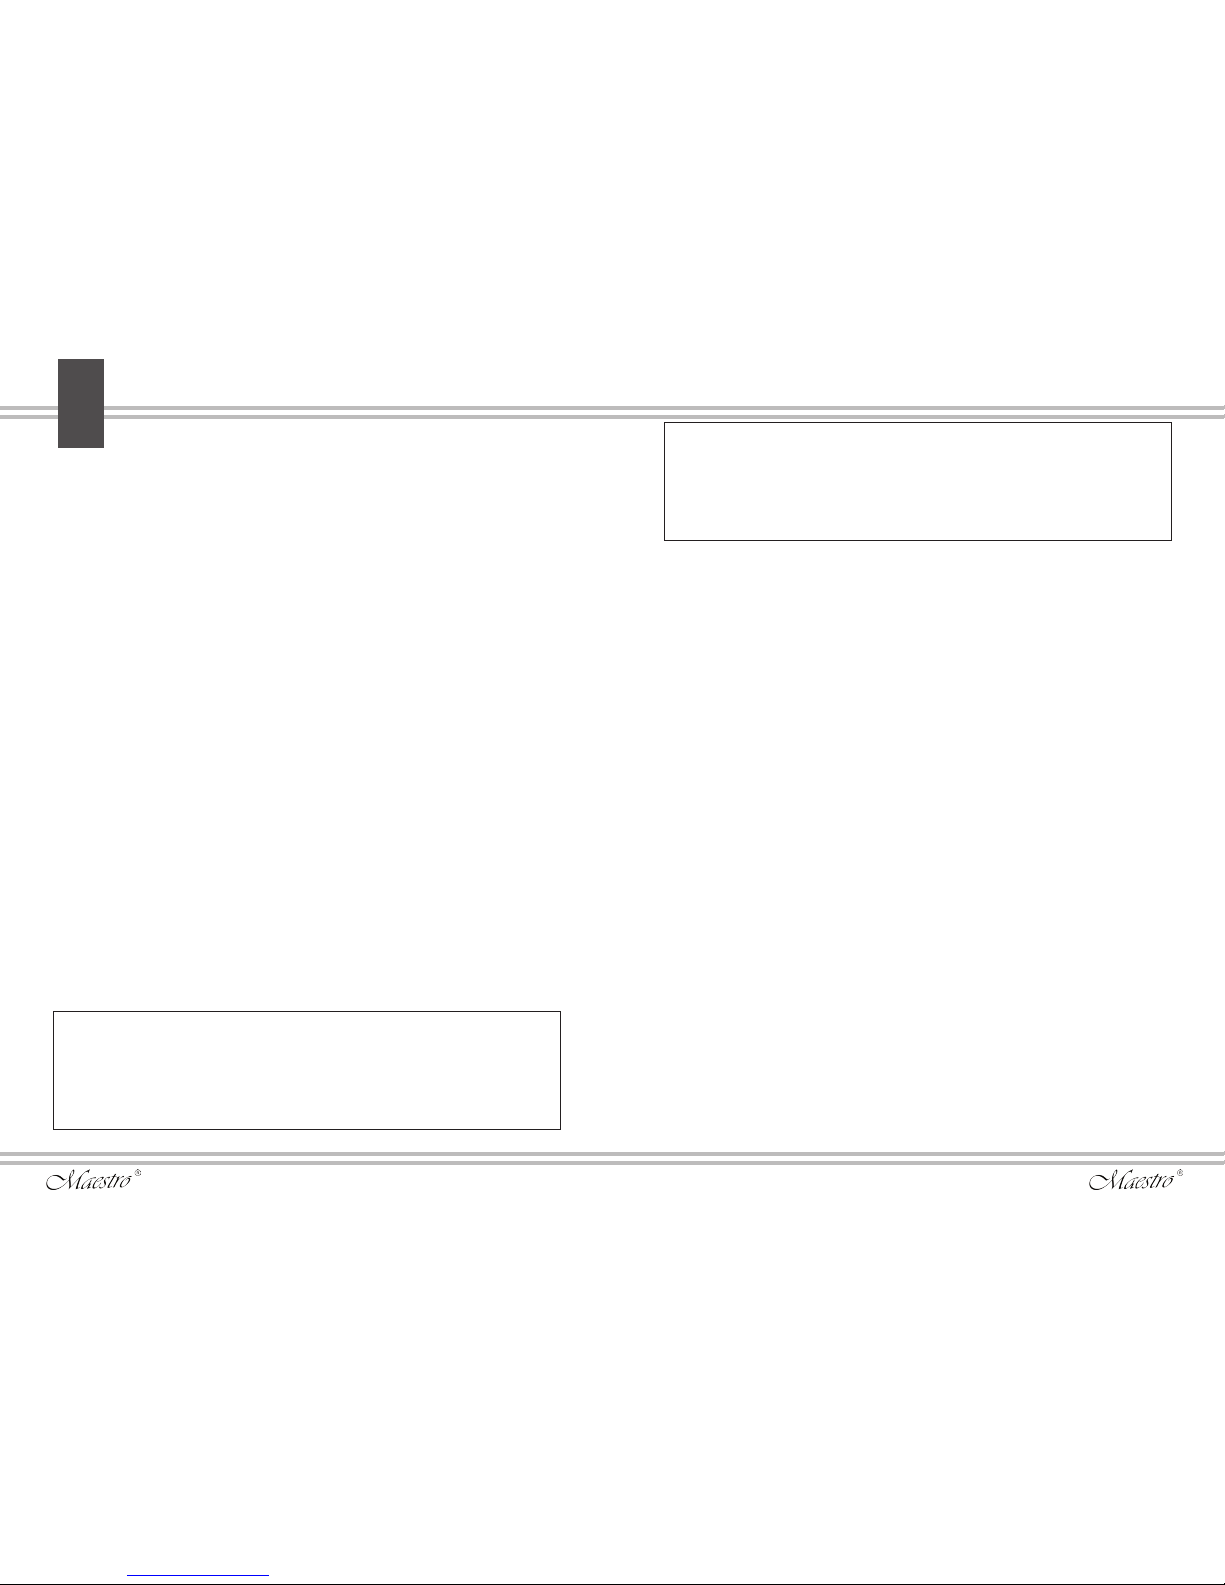
To replace blades
- Turn the blades support lock located in the center of head counterclockwise (Picture 4.1). The blades support will be released and the
access to the blades will be opened (Picture 4.2).
Attention! If it is necessary to dismantle the blades head for
replacement of complete cleaning, do not swap the shaving foils
and moving blades from different pairs. Moving blades are grind to
shaving foils, upon changing their places the shaving efciency will
decrease.
After replacement assemble the head in reverse sequence.
Storage
- Clean the blades and charge the battery before storage.
-Keep the appliance in cool dry place, away from children and
persons with reduced mental or physical abilities.
- Storage temperature 0 -+40°C
Environmental protection
Old appliances contain valuable materials that can be recycled.
Please arrange for the proper recycling of old appliances. Please
dispose your old appliances using appropriate collection systems.
Before dispose, discharge the battery completely.
Subject to technical modications!
Picture
4
4.1 4.2
EN

12 13
Dziękujemy za zakup produktów
Funkcjonalność i zgodność ze standardami jakości gwarantują wam
pewność i wygodę.
Proszę, uważnie przeczytać poniższą instrukcję i zachować ją w
charakterze materiału naukowego, przez cały czas eksploatacji
produktu.
Golarka przeznaczona jest do suchego golenia brody i skracania
bokobrodów w warunkach domowych.
Brak przewodu zasilającego czyni naszą urządzenie wygodnym
i bezpiecznym urządzeniem przydatnym w waszych domach.
Jeżeli urządzenie używane jest zgodnie z jego przeznaczeniem nie
wytwarza szkodliwych substancji.
Charakterystyka techniczna:
Model MR 670
Zasilanie elektryczne:
PL
Klasa ochrony golarki przed porażeniem prądem
elektrycznym III;
Wykonanie korpusu zapobiegające przedostawania się wilgoci,
odpowiada klasie IPX0;
Konstrukcja urządzenia
Rysunek 1 (strona 2)
1 – Głowica z ostrzami
2 – Przycisk blokady głowicy ostrzy
3 – Włącznik
4 – Wskaźnik naładowania
5 – Wtyczka ładowania
6 – Trymer
7 – Przycisk włączenia trymera
Środki bezpieczeństwa
Niskie napięcie podczas pracy, jest bardzo bezpieczne, lecz
należy pamiętać, że podczas ładowania urządzenie jest
podłączone do zasilania z wysokim napięciem!
UWAGA!
-Nie należy używać urządzeń elektrycznych w miejscach, gdzie
mogą być narażone na kontakt z wodą lub wilgocią.
-Nie wolno zanurzać urządzenia, jego ładowarki i przewodu w
wodzie lub innych cieczach.
-Nie należy podłączać ładowarki,do maszynki i do sieci mokrymi
rękami.
Przy nieprzestrzeganiu zasad istnieje niebezpieczeństwo porażenia
prądem!
- Nigdy nie pozostawiaj urządzenia bez kontroli!
Ładowarka Wejście ~ 100-240 V; 50 Hz
Wyjście prąd - stały, 4,5V 0,2A.
Klasa ochrony Ładowarki przed porażeniem
prądem elektrycznym II;
Akumulator (2szt) Typ NiMh
Napięcie nominalne 2,4 V
Nominalna pojemność 1000 mAh
Czas pełnego ładowania orientacyjnie 8 godzin
14 15
- Jeśli urządzenie jednak jest użytkowane w łazience,
w charakterze dodatkowej ochrony należy zainstalować
na instalację elektryczną łazienki urządzenie bezpiecznego
wyłączenia, z ustawieniem automatycznego reagowania na prąd
nominalny o wycieku nieprzekraczającym 30 mA. Po bardziej
szczegółową informację należy zwrócić się do specjalistycznej
organizacji montażowej.
- Zawsze należy wyjmować wtyczkę z gniazdka, nawet jeśli nie
korzystasz z urządzenia dosyć krótko, gdyż bliskość wody jest
potencjalnie niebezpieczna, nawet jeśli urządzenie jest odłączone
przełącznikiem.
- Przed użyciem ładowarki należy upewnij się, że napięcie podane
na urządzeniu jest zgodne z napięciem zasilania w Twoim domu.
- Wykorzystanie niskiej jakości przedłużaczy elektrycznych lub
adapterów może spowodować uszkodzenia urządzenia i ryzyko
powstania pożaru.
- To urządzenie nie jest przeznaczone do użytku przez dzieci i
osoby niepełnosprawne lub upośledzone umysłowo, lub ludzi którzy
nie mają wiedzy i doświadczenia w zakresie korzystania z urządzeń
gospodarstwa domowego. Zawsze muszą pozostać pod stałą
kontrolą rodzica lub opiekuna.
- Nie pozwalaj dzieciom bawić się opakowaniem produktu.
- Nie należy korzystać z urządzenia na zewnątrz.
- Nie należy używać akcesoriów które nie są zawarte w opakowaniu
produktu.
UWAGA!
- Ostrza golarki są bardzo cienkie i ostre, łatwo jest je uszkodzić
przy nieodpowiednim użytkowaniu.
- Nie należy korzystać z golarki z uszkodzonymi ostrzami lub
jednym z zębów - to może doprowadzić do urazu.
- Nie wolno używać urządzenia lub ładowarki z uszkodzonym
przewodem lub wtyczką, jeśli urządzenie nie działa prawidłowo,
jeśli urządzenie jest uszkodzone lub wpadło w wodę. Nie naprawiaj
urządzenia samodzielnie, skontaktuj się z najbliższym punktem
serwisowym.
- Przewód zasilający nie może dotykać do gorących powierzchni.
- Unikać silnego napięcia i skręcania przewodu zasilającego.
- Nie należy rzucać urządzeniem.
- Nie wolno ciągnąć lub podnosić urządzenia trzymając za przewód
podłączony podczas ładowania.
Działania w sytuacjach ekstremalnych
- Jeśli urządzenie wpadnie do wody, należy natychmiast odłączyć
ładowarkę od gniazdka sieci bez dotykania samego urządzenia lub
wody do której wpadło.
W przypadku pojawienia się dymu, iskrzenia, silnego zapachu
przypalonej izolacji, natychmiast przerwij wykorzystanie urządzenia,
wyjmij ładowarkę z rozetki i zwróć się do sprzedawcy.
Eksploatacja
- Należy usunąć opakowanie i naklejki reklamowe. Należy
szczegółowo obejrzeć urządzenie, przekonać się o braku
uszkodzeń mechanicznych części urządzenia, przewodu i
ładowarkę.
Golarka może być użytkowana jak z akumulatorem, tak i
podłączona kablem do sieci.
Ładowanie akumulatora
Przed rozpoczęciem korzystania z urządzenia po zakupie, lub po
długotrwałym nie stosowania urządzenia akumulator musi być
PL
 Loading...