

Page 1

FedEx Ship Manager® Server
The Network Shipping Solution
User Guide
Version 7.6
Page 2

Payment
You must remit payment in accordance with the FedEx Service Guide, tariff, service agreement or other
terms or instructions provided to you by FedEx from time to time. You may not withhold payment or any
shipments because of equipment failure or for the failure of FedEx to repair or replace any equipment.
Inaccurate Invoices
If you generate an inaccurate invoice, FedEx may bill or refund to you the difference according to the
FedEx Service Guide, tariff service agreement or other terms or instructions provided to you by FedEx
from time to time. A Request for refund on a FedEx shipment must be made in accordance with the
applicable Service Guide, or terms or instructions provided by FedEx from time to time. A shipment given
to FedEx with incorrect information is not eligible for refund under any FedEx money-back guarantees.
FedEx may suspend any applicable money-back guarantees in the event of equipment failure or if it
becomes inoperative.
The information contained in this User Guide is confidential and proprietary to FedEx Corporate Services,
Inc. and its affiliates (collectively “FedEx”). No part of this User Guide may be distributed or disclosed in
any form to any third party without written permission of FedEx. This User Guide is provided to you under
and its use is subject to the terms and conditions of the FedEx Automation Agreement. The information in
this document may be changed at any time without notice. Any conflict between this User Guide, the
FedEx Automation Agreement, and the FedEx Service Guide shall be governed by the FedEx Automation
Agreement and the FedEx Service Guide, in that order.
© 2005 FedEx. FedEx and the FedEx logo are registered service marks. All rights reserved. Unpublished.
Page 3

Table of Contents
Table of Contents
Introduction .................................................................................................................................................5
What’s New .................................................................................................................................................. 9
Referenced Documents............................................................................................................................19
Chapter One: Setting Up FSMS ...............................................................................................................21
Overview.................................................................................................................................................. 21
Installing FSMS....................................................................................................................................21
Pre-Installation Checklist .....................................................................................................................21
Performing a New FSMS Install........................................................................................................... 22
Upgrading from a Previous Version of FSMS...................................................................................... 33
Uninstalling FSMS v 7.6.......................................................................................................................35
Configuring FSMS ...................................................................................................................................37
Shipper Settings...................................................................................................................................37
Report Settings ....................................................................................................................................46
Label Settings ......................................................................................................................................52
Doc-Tab Settings .................................................................................................................................55
System Settings ................................................................................................................................... 60
IPD/IDF Settings ..................................................................................................................................62
Tracking Numbers Settings .................................................................................................................62
Meter Settings......................................................................................................................................64
Advanced Settings ............................................................................................................................... 70
Transactional Meter Configuration ..........................................................................................................72
Printer Set-Up..........................................................................................................................................73
Adding a Local Printer..........................................................................................................................73
Adding a Local TCP/IP Printer.............................................................................................................78
Printing to a Windows-Based Print Share Network .............................................................................83
Troubleshooting Your FSMS Application ................................................................................................86
Close Monitor.......................................................................................................................................86
Chapter Two: FSMS Transaction Coding ............................................................................................... 89
Overview.................................................................................................................................................. 89
FSMS Transaction Types .................................................................................................................... 89
Coding Guidelines ...................................................................................................................................92
Transaction Formatting........................................................................................................................92
Required Fields....................................................................................................................................92
Shipment Level vs. Package Level......................................................................................................94
Multiple Occurrence Fields .................................................................................................................. 95
Field Editing Guidelines .......................................................................................................................95
Batch Processing ................................................................................................................................. 97
Preparing a Shipping Transaction ........................................................................................................... 98
Basic FedEx Express Shipping Transaction (020) ..............................................................................98
Basic FedEx Ground Shipping Transaction (020) .............................................................................101
Basic FedEx International Shipping Transaction (020) .....................................................................101
Rating, Routing, and Time-in-Transit (020) .......................................................................................106
Pre-Ship Validation (020)................................................................................................................... 109
Multiple-Piece Shipment Transaction (020).......................................................................................111
Special Shipping Options ......................................................................................................................112
Alcohol Shipping ................................................................................................................................112
AutoPOD (FedEx Ground).................................................................................................................112
AOD (FedEx Ground) ........................................................................................................................112
B13A: Canada Export Shipping ......................................................................................................... 113
FedEx Ship Manager® Server User Guide, Version 7.6
1
Page 4

Table of Contents
Bill Recipient/Bill Third Party.............................................................................................................. 113
Collect On Delivery (COD)................................................................................................................. 113
Freight Shipping – FedEx Express ....................................................................................................115
Future Day Shipping ..........................................................................................................................116
Hold at Location (HAL).......................................................................................................................116
Inside Pickup and Delivery ................................................................................................................116
Broker Select Option (BSO)............................................................................................................... 116
Dangerous Goods (DG)/Hazardous Materials (HazMat)...................................................................117
Dry Ice Shipping................................................................................................................................. 119
FedEx InSight®...................................................................................................................................119
FedEx Priority Alert
SM
........................................................................................................................119
FedEx ShipAlertSM Delivery (POD) Notification .................................................................................119
Shipper’s Export Declaration (SED) ..................................................................................................120
Signature Services.............................................................................................................................121
Returns Shipping ...............................................................................................................................125
Global Delete Request/Reply (023/123)................................................................................................132
Pre-Assigning Tracking Number Request/Reply (004/104) .................................................................. 133
End-of-Day Close Request/Reply (007/107).........................................................................................133
Shipment Query Request/Reply (024/124) ...........................................................................................134
Meter Query Request/Reply (070/170) .................................................................................................134
Tracking Request/Reply (043/143)........................................................................................................ 135
Open Shipping.......................................................................................................................................139
Basic Open Ship Rules......................................................................................................................139
Setting Up Open Shipping .................................................................................................................139
Creating an Open Shipment ..............................................................................................................140
Adding or Editing Shipment-Level Data............................................................................................. 140
Receiving a Route or Time-in-Transit ................................................................................................ 140
Deleting the Open Shipment.............................................................................................................. 141
Rating the Open Shipment ................................................................................................................141
Adding a Piece to the Open Shipment...............................................................................................141
Editing Piece-Level Information ......................................................................................................... 142
Deleting a Piece.................................................................................................................................142
Confirming a Piece and Printing a Label ...........................................................................................142
Confirming a Shipment ......................................................................................................................143
Pre-Ship Validation for Open Ship.....................................................................................................143
Sample Open Ship Transactions ....................................................................................................... 143
Open Ship Table ................................................................................................................................146
Chapter Three: FSMS Shipping Labels.................................................................................................151
Overview................................................................................................................................................ 151
FSMS Label Formats.............................................................................................................................151
Thermal Labels ..................................................................................................................................152
Laser Labels ......................................................................................................................................152
*.PNG Labels .....................................................................................................................................152
Multi-Ply Air Waybills .........................................................................................................................152
Printing Labels to a File ..................................................................................................................... 153
Creating Custom Labels........................................................................................................................154
Submitting Custom Labels for FedEx Approval.................................................................................156
Doc-Tabs ...............................................................................................................................................156
Label Reprint .........................................................................................................................................157
2 FedEx Ship Manager® Server User Guide, Version 7.6
Page 5

Table of Contents
Chapter Four: FSMS Revenue Management ........................................................................................159
Overview................................................................................................................................................ 159
Revenue Options Set-Up.......................................................................................................................159
No Upload/No Ship (NUNS) ..............................................................................................................159
Force Close........................................................................................................................................ 160
Rates Management ...............................................................................................................................160
List/Base Rates for FedEx Express and FedEx Ground Shipping ....................................................160
Providing Dimensions for FedEx International Shipments ................................................................160
Dim Weight Calculations for Non-Rated Countries ...........................................................................161
International Courtesy Rating (FedEx Express Only)........................................................................162
Bundling Rules (FedEx Express Only) ..............................................................................................162
Multiweight Discounting (FedEx Ground Only).................................................................................. 162
Chapter Five: Using FSMS Utilities ....................................................................................................... 163
Overview................................................................................................................................................ 163
Demand Download Utility ......................................................................................................................163
Label Reprint Utility ...............................................................................................................................165
Ground EPDI File Reader Utility............................................................................................................ 166
Express Hourly Upload File Reader ...................................................................................................... 166
Ground Rates and Discounts Utility ......................................................................................................166
Retrieve, Retain, Restore (R3) .............................................................................................................. 176
Report Viewer Utility .............................................................................................................................. 182
FedEx Ship Manager Server Console...................................................................................................187
GoToAssistTM.........................................................................................................................................192
Chapter Six: FSMS Reports ................................................................................................................... 195
Overview................................................................................................................................................ 195
Producing FSMS Reports...................................................................................................................... 195
End-of-Day (EOD) Reports................................................................................................................196
FSMS Report Details............................................................................................................................. 196
FSMS Report Fields ..............................................................................................................................198
Domestic Courier Report - FedEx Express........................................................................................198
Domestic Shipment Report - FedEx Express ....................................................................................198
Domestic Invoice Report - FedEx Express........................................................................................ 199
Domestic EOD TransOut Report - FedEx Express ...........................................................................199
Dangerous Goods: Shipper’s Declaration Form (1421C) - FedEx Express ...................................... 199
Domestic Shipping History - FedEx Express.....................................................................................199
International Courier Report - FedEx Express................................................................................... 200
International Shipment Report - FedEx Express ...............................................................................200
International Invoice Report - FedEx Express ...................................................................................201
International EOD TransOut Report - FedEx Express....................................................................... 201
International Commercial Invoice (CI) - FedEx Express.................................................................... 201
International Shipping History - FedEx Express ................................................................................ 201
Express International Visa Manifest Report.......................................................................................201
International Dangerous Goods (4121C) - FedEx Express............................................................... 202
Ground Pickup Manifest.....................................................................................................................202
Multiweight Package Detail - FedEx Ground.....................................................................................203
Multiweight Shipment Detail by Postal Code - FedEx Ground ..........................................................203
Multiweight Shipment Detail by Zone - FedEx Ground...................................................................... 204
Multiweight Shipment COD Detail - FedEx Ground........................................................................... 204
Multiweight Shipment Declared Value Detail - FedEx Ground..........................................................204
Hazardous Materials Certification Report - FedEx Ground ...............................................................205
Ground COD Report ..........................................................................................................................205
Ground Commercial Invoice ..............................................................................................................205
Report Reproduction .............................................................................................................................206
Custom Reports..................................................................................................................................... 206
FedEx Ship Manager® Server User Guide, Version 7.6 3
Page 6

Table of Contents
Appendix A: Value Reference Tables ...................................................................................................207
Overview................................................................................................................................................ 207
Unit of Measure Code Table (Harmonized Tariff Schedule) .................................................................208
Currency Code Table ............................................................................................................................210
Country Code Table ..............................................................................................................................211
U.S. State Code Table...........................................................................................................................216
Canadian Province Table ......................................................................................................................217
Mexican State Codes ............................................................................................................................218
Maximum Allowable Weights ................................................................................................................219
Vague Commodity Descriptions ............................................................................................................ 220
Glossary...................................................................................................................................................223
Index .........................................................................................................................................................229
4 FedEx Ship Manager® Server User Guide, Version 7.6
Page 7

Introduction
Introduction
®
FedEx Ship Manager
to integrate FedEx Express and FedEx Ground shipping capabilities into their own shipping operation.
FSMS provides the following shipping functionalities:
• Shipping to and from any FedEx service location
• Tracking any packages shipped with FedEx including those shipped with FSMS or any other FedEx
automation solution as well as manual or pre-printed air waybills
• Routing using Universal Routing and Sorting Aid (URSA) for FedEx Express shipments and
ZIP/postal codes for FedEx Ground shipping
• Rating for any U.S. or Canada-based account number
FSMS is a transaction-based shipping solution, which means that FedEx supplies you with the
transactions you need to streamline your shipping operations and allows you to build your own user
interface that is customized to your business needs.
Server (FSMS) is a network shipping solution for high volume customers who want
Features of the User Guide
To help you use FSMS to automate your shipping operations, the following sections are provided as part
of this FSMS User Guide:
What’s New
The What’s New section describes the new features, transactions, and transaction fields that will be
required to take advantage of the new functionalities for this release. This section is NOT intended for use
as a coding reference nor as a detailed technical specification of the new features. Details will be
provided in the FedEx Ship Manager Server v 7.6 Transaction Coding Reference (FSMS TCR
Version 7.6).
Referenced Documents
The Referenced Documents section provides details about each document mentioned in this User
Guide.
Chapter One: Setting Up FSMS
Chapter One of this User Guide provides steps for:
• Entering configuration information to personalize FSMS for your operations
• Setting up printers
• Troubleshooting advice
Setting up your FSMS software correctly will provide shortcuts for shipping and will help make your FSMS
implementation seamless and efficient.
FedEx Ship Manager® Server User Guide, Version 7.6 5
Page 8

Introduction
Chapter Two: FSMS Transaction Coding
FSMS is a transaction-based shipping solution. Therefore, you can build your own transaction set based
on all of the transactions supported by FedEx in the FSMS software. In this section of the User Guide
you will find:
• FSMS Transactions Types
• Online vs. Offline
• FedEx Shipping Overview (FedEx Ground, FedEx Express, FedEx International, etc.)
• Transaction Editing Guidelines
• Transaction Coding Instructions
• Functionality for Coding Special Services and Open Shipping
Chapter Three: FSMS Shipping Labels
FSMS provides flexibility in creating both standard and custom labels. Chapter Three of the User Guide
includes instructions for producing accurate labels that can be scanned by FedEx to provide optimal
routing and shipping. In this chapter are:
• Label formats supported by FSMS
• Label creation and printing rules
• Information for custom label creation and obtaining approval by FedEx Operations
• Label Matrix providing information for the type of labels that are required for each FedEx shipping
service
Chapter Four: FSMS Revenue Management
FSMS offers powerful revenue upload and management functionality to provide accurate billing and
reporting of your shipping costs. In this section of the User Guide you will find:
• Revenue Options Set-up
• Rates Management
Chapter Five: Using FSMS Utilities
FSMS includes several utilities designed to facilitate management of tracking numbers, labels, invoices,
revenue, and reports. Chapter Five of the User Guide details the procedures for using the following
utilities:
• Demand Download Utility
• Label Reprint Utility
• Ground EPDI File Reader Utility
• Express Hourly Upload File Reader
• Ground Rates and Discounts Utility
• Retrieve, Retain, Restore (R3)
• Report Viewer Utility
• Ship Manager Server Console
6 FedEx Ship Manager® Server User Guide, Version 7.6
Page 9

Chapter Six: FSMS Reports
FSMS provides the option of producing, saving, and printing a variety of reports to assist in the
management of your shipping operations. In this chapter of the User Guide, we will review:
• Producing FSMS standard reports
• FSMS report field definitions
• Creating customized reports
Appendix A: Value Reference Tables
Appendix A contains several tables of FedEx shipping rules which are useful for creating shipping
transactions. These tables are:
• Unit of Measure Code Table – Harmonized Tariff Schedule (HTS)
• Currency Code Table
• Country Code Table
• U.S. State Code Table
• Canadian Province Code Table
• Mexican State Code Table
• Maximum Allowable Weights per Packaging/Service Table
• Vague Commodity Descriptions
Introduction
NOTE:
The reference tables provided in Appendix A are not a complete reference of all available
information. Complete FedEx Express and FedEx Ground business rules are contained in the
FedEx Service Reference Guide, which is available free of charge by contacting 1.800.Go.FedEx
(1.800.463.3339) or your FedEx Account Executive.
Glossary
This section provides the description of terms and acronyms used throughout this User Guide.
FedEx Ship Manager® Server User Guide, Version 7.6 7
Page 10

Page 11
What’s New
Feature Description
What’s New
Download Ground Discount
Rates
FedEx Express Returns FSMS has added more Return Service options. The Express Returns
Return Merchandise
Authorization (RMA)
Number
Online Returns Label In addition to providing the ability to directly create a return label, FSMS
Merge FSMS and FSM API In order to rapidly adopt and support increased online/real time
The download of Ground Discount Rates feature added in FSMS
v 7.2.3 has been enhanced so the download of Rate Request is
automated and is performed twice monthly at reconcile time. The ability
to download Ground Discount Rates was introduced in FSMS v 7.2.3
and the rates were only receivable via Demand Download.
feature adds FedEx Express service options to the existing FedEx
Ground Return service option introduced in FSMS v 6.8.
A new optional field, Return Merchandise Authorization Number (RMA
Number), has been added to support the Returns feature. This field is
available for use with both FedEx Express and FedEx Ground Returns
services.
v 7.6 has also added the ability to create a Return Label and send it via
e-mail to another party. Once the Return label transaction is processed,
an e-mail is sent to the returning party providing them with a URL they
can use to receive the return label. The online return label is a plain
paper label. This feature is limited to U.S. Domestic returns at this time.
New error codes have been added to support this feature. For more
information, see the FSMS Transaction Coding Reference (FSMS
TCR,) Version 7.6.
transactional capabilities, FSMS 7.6 has incorporated the FSM
API/Direct product. Any FSM API/Direct transaction that does not
require the use of a meter number is now supported via FSMS. The list
of supported transactions is as follows:
200/300 Dispatch Request/Reply Transaction
202/302 Cancel Dispatch Request/Reply Transaction
403/503 Tracking Request/Reply Transaction
410/510 Drop Off Locator Request/Reply Transaction
415/515 Address Verification Request/Reply Transaction
033/133 Cancel E-Mail Label Request/Reply Transaction
044/144 Ground Call Tag Request/Reply Transaction
045/145 Ground Call Tag Cancel Request/Reply Transaction
046/146 Express Call Tag Request/Reply Transaction
047/147 Express Call Tag Cancel Request/Reply Transaction
FSMS will not process these new transactions, but rather will act as a
communications link to the backend systems that process these
transactions.
FedEx Ship Manager® Server User Guide, Version 7.6 9
Page 12
What’s New
Feature Description
Allow Pre-Ship Validation
for FedEx Ground/FHD
Shipments
Shipment Query Request
Enhancements
Enhanced Meter Query
Request
Calculate & Pass
Dimensions
The current Pre-Ship Validation functionality that supports validation of
FedEx Express service availability to a selected destination has been
expanded to allow validation of FedEx Ground and FedEx Home
Delivery (FHD) service to a selected destination.
The Shipment Query transaction has been enhanced to allow for
increased search parameters, such as Ship Date, Service Type,
Recipient Name, Tracking Number, etc., as well as now supporting
queries for FedEx Ground and Transborder Distribution (TD).
The Enhanced Meter Query Request enhancement applies to the
existing "List Meter Information for Meter" Request code (Process
Request Code).
For FedEx International Express shipments, the dimensions used to
calculate the Dimensional Weight for a shipment can be passed in at the
package level or at the shipment level for standard FedEx International
shipments.
IPD/IDF and TD shipments dimensions, if provided, should only be
provided at the package level. Provision of dimensions is optional for all
non-Freight shipments.
This feature is valid for the following FedEx services:
• International Priority (IP)
• International Economy (IE)
• International First (IF)
• International Priority Freight (IPF)
• International Economy Freight (IEF)
• International Priority Distribution (IPD)
• International Distribution Freight (IDF)
• Transborder Canada (TD CA)
• Transborder Mexico (TD MX)
Note: Thermal ONLY for Master Label.
• International Economy Distribution (IED)
• Early Bird (FedEx Europe First)
New error codes have been added to support this feature. For more
information, see the FSMS TCR Version 7.6.
10 FedEx Ship Manager® Server User Guide, Version 7.6
Page 13

Feature Description
What’s New
Configuration Utility
Changes
In an effort to make the FSMS Configuration Utility easier to use and
more customer friendly, we have applied FedEx brand standards,
Common Look and Feel (CLF) standards, to the utility:
• The Advanced Settings, Meter Settings, Tracking Numbers, System
Settings, and IPD/IDF Settings tabs will be hidden, and the user will
only have visibility to the Shipper Settings, Doc-Tab, Report
Settings, and Label Settings tabs until the "view" password in
entered after clicking the Access Privileges button.
• After the "View" password is entered, the hidden tabs will be made
visible but not accessible for changes. To access hidden tabs, the
“View” password must be entered each time the FSMS
Configuration Utility is launched.
The IPD/IDF tabs will only be available for accounts that are
contracted IPD or IDF shippers. If the account is not an IPD or IDF
shipper, this tab will remain hidden so the FSMS Configuration Utility
doesn't show information that will not be used.
• Available configurable doc-tab options will be limited to the service
options available to the origin country. For example, if the origin
country is not an allowed origin country for FedEx Ground shipping,
the Ground option on the Doc-Tab tab of the FSMS Configuration
Utility will be unavailable for configuration. IPD doc-tabs will be
available only to contracted IPD customers.
• The additional labels options for FedEx International labels on the
Label Settings tab of the FSMS Configuration Utility have been
merged into a single 'Additional Laser and Thermal Labels' option.
The new headings are: International Copies, Distribution Master
Copies (for IPD/IDF/IED), and Distribution Overnight Letter Copies
(for IPD/IDF/IED).
• The color scheme of the FSMS Configuration Utility will be modified
in keeping with the CLF standards.
Canada International
Economy – Box Only
(maintenance)
FSMS will now return an error if attempting to ship FedEx International
Economy from CA with a FedEx Envelope or FedEx Pak packaging
type.
New error codes have been added to support this feature. For more
information, see the FSMS TCR Version 7.6.
IPD/IDF Configurable
Reports
FSMS v 7.6 has added the ability to request multiple copies of IPD/IDF
reports via the Reports Settings tab of the FSMS Configuration Utility
or via the Global Ship Request transaction. The two added fields can
also be used in the Configuration/Meter Query Request transaction to
configure the report copies in the Report Settings tab.
FedEx Ship Manager® Server User Guide, Version 7.6 11
Page 14

What’s New
Feature Description
FSMS Remote
Configuration
To enable centralized and/or remote configuration of the FSMS
application, the FSMS Configuration Utility has been created as an
independently installable component. This will allow remote
configuration of FSMS as long as the server being configured is on the
same network as the configuring computer.
To install just the FSMS Configuration Utility, select Remote
Configuration during the installation process. The FSMS Configuration
Utility is a Java-based application and will require the installation of the
Java Virtual Machine (JVM) prior to installation.
Update INCO Terms The Update INCO Terms feature relaxes the edits for International
commodity Terms of Sale to make processing FedEx International
shipments easier.
Declared Value and MPS
Edits – Canada
(maintenance)
The following restrictions will be enforced for CA origin shipments:
• The allowed currency for Declared Value for intra-CA shipments is
being limited to $CAD.
• Multiple-piece shipments (MPS) will not be allowed for the following
services: PO, FO, IP, IE, IF.
Align Transaction Formats
for Customs & Carriage
Values
In an effort to align the field lengths for Customs and Carriage Value,
Declared Value for Carriage has been reintroduced for use, and Total
Commodity Customs Value has been changed from a length of 11.2 to
14.2 to match the Customs Value length.
The Declared Value for Carriage will remain available for use at its
current length. This field has been added for use with the Global Ship
Request/Reply transactions and the Online Return Label Request/Reply
transactions.
Disable Express IntraCanada COD
(maintenance)
Allow Origin Loc-ID
Override at Field Level
(maintenance)
The FedEx Express COD service is being disabled for use in intraCanada shipments.
The purpose of this feature is to allow the user to override the LOC-ID
when a field level (or higher) password has activated the LOC-ID field in
the FSMS Configuration Utility. The LOC-ID is determined automatically
by FSMS upon entry of origin country and postal code. The LOC-ID is
determined by the Universal Routing and Sorting Aid (URSA) file for
postal aware countries and by the country.dat and cityinfo.txt files for
non-postal aware countries.
Label Reprint to Include
Single Transactions
The Label Reprint transaction has had all restrictions removed, and any
label may now be reprinted up to 24-48 hours from the original ship date
and time.
Future Day shipments may be reprinted up to their ship date. After the
ship date, the reprint rule above applies.
Label Reprint by Reference The Label Reprint transaction has been enhanced to allow labels to be
reprinted by Reference Number in addition to the currently supported
reprint by Tracking Number. This feature only applies to thermal and
laser labels. This feature only applies to package labels and does not
apply to Master Air Waybill (MAWB) labels.
12 FedEx Ship Manager® Server User Guide, Version 7.6
Page 15

Feature Description
What’s New
Remove Legacy Code from
FSMS
Support and code for legacy transactions has been removed. Customers
still using legacy transactions need to migrate these functions to the 020
transaction before upgrading to FSMS v 7.6.
The transactions that are no longer supported are:
001/101 – U.S. Domestic Shipping Request/Reply
002/102 – U.S. Domestic Rate Request/Reply (May need to map
function to 020)
003/103 – U.S, Domestic Delete Transaction Request/Reply
005/105 – U.S. Domestic Service Commitment Request/Reply
006/106 – U.S. Domestic Route Request/Reply
015/115 – U.S. Domestic COD MPS Transaction Request/Reply
051/151 – U.S. Export Shipping Request/Reply
052/152 – U.S. Export Rate Request/Reply
053/153 – International Delete Request/Reply
Remaining supported transactions are:
004/104 – Tracking Number Request/Reply
007/107 – End-of-Day Close Request/Reply
020/120 – Global Ship Request/Reply
023/123 – Global Delete Request/Reply
024/124 – Shipment Query Request/Reply
035/135 – Child Meter Registration Transaction
037/137 – Online Label Request/Reply
042/142 – Tracking Request/Reply (by Tracking Number,
Reference and MPS)
043/143 – Tracking Request/Reply (by Shipper, Recipient,
Exception and Door Tag)
070/170 – Meter Query/Configuration Update Transaction
095/195 – Label Reprint Transaction
Ground Oversized III (OS
III) Surcharge/Express
Oversize (OS)
New Postal Routing
Countries (maintenance)
Change the Country Code
for Serbia (maintenance)
FedEx Ship Manager® Server User Guide, Version 7.6 13
The support for Oversize III Ground shipments and Express Oversize
shipments was added in FSMS v 7.2, but the additional surcharges were
not. FSMS v 7.6 adds support for the Ground OS surcharges and the
Express surcharge with two new Reply fields. These fields will be
returned when any Oversize condition is met.
The following three countries are now considered postal aware and will
require entry of a correct postal code to complete routing and
successfully process the shipment:
• China
• India
• Greece
If the correct postal code is not provided, the shipment will fail, and an
error message will be provided indicating that the postal code is
incorrect.
The country code for Serbia has been changed from YU to CS and is
listed as Serbia and Montenegro.
Page 16

What’s New
Feature Description
Label Exceptions/Special
Movement CA
This feature affects CA-U.S. shipping only and is intended to make the
number of Consignee AWBs configurable. A new field, Suppress
Consignee Label, has been added to the Label Settings tab of the
FSMS Configuration Utility for Canadian origin meters only.
Rate All Services Request The Rate All Services transaction provides for the ability to receive rates
and service commitments for all available FedEx services in a single
Reply transaction. The transaction can be used to find a rate for all
available services given a range of parameters such as special services,
weight, dimensions, destination, etc.
A new transaction set has been provided for this feature. For more
information, see the FSMS TCR Version 7.6.
Rate Anywhere-ToAnywhere (U.S. Domestic
List)
The ability to receive a rate quote from any U.S. origin to any U.S.
destination will be available in the Service Availability Request, Global
Ship Request, and Rate All Services transactions. The minimum data
required to receive a rate is the origin and destination state and postal
code. Returned rates will be based on selected packaging type, service
type, and special services.
Return List Rates for Bill
Recipient and 3rd Party
Billing for FedEx Express
This feature removes a current inconsistency between FedEx Express
and FedEx Ground rating. Currently, a rate will be returned for any
FedEx Ground shipment regardless of Payer, but Express will only
return a rate for Bill Sender. This feature will correct this inconsistency
so that only List rates are returned for Bill Recipient or Bill Sender, and
discount rates are only returned with Bill Sender for both FedEx Express
and FedEx Ground.
Dynamic Surcharging In order to more quickly support new surcharges, a new surcharging
format is being adopted. The new surcharge format will be based on
multiple occurrence fields rather than specific fields for each surcharge.
To use the Dynamic Surcharge feature, a checkbox was added to the
System Settings tab of the FSMS Configuration Utility. Checking this
box will cause surcharges to be returned in the Dynamic format. The
current format is the default format.
Patches & Service Pack
Support
FSMS v 7.6 introduces a new utility, the FSMS Console, which provides
additional information about installed services including: Base Version,
Patch Version, and Patch Application Date.
Patches will be created on a TBD schedule from the production issue
database. Service Packs will be cumulative, i.e. each subsequent
Service Pack will contain the fix or fixes in the previous Service Pack
and may also contain new features in addition to bug fixes.
Database
Duplication/Backup/
Failover
The Database Duplication/Backup/Failover feature allows a backup
server to function as a true backup to the Primary Server by writing the
contents of the Primary Server 's database to the backup in ten-second
intervals. Thus, the same meter numbers and tracking numbers are
stored on both servers. The Primary Server will also ensure all updates
downloaded are passed to the Secondary Server: URSA, rates, software
updates, and table updates.
14 FedEx Ship Manager® Server User Guide, Version 7.6
Page 17

Feature Description
Full Postal Validation All FedEx Postal Aware countries will now require the use of valid
country postal codes for the following entries:
• Sender/Shipper
• Recipient
• Importer Postal Code
• Broker
• Alternate Return Address
Failure to use a valid postal code will result in an error, and the shipment
will not be processed.
See the FedEx Service Reference Guide for a list of Postal Aware
countries.
What’s New
Transactional Reprint of
FSMS Reports
Tunnel Client
Enhancements
Adoption of UV SDK
(maintenance)
New Installation,
InstallShield v 9.0
Dangerous Goods (DG)
Excepted Quantities for all
Shipments
This feature enhances the existing Label Reprint transaction to support
reprinting of FSMS produced reports. This transaction is now the Reprint
Transaction and supports printing both Ship Time and Close Time
reports.
Enhancements to the Tunnel Client will enable FSMS to detect and use
Internet proxy settings if a browser client (Internet Explorer or Netscape)
is installed and properly configured.
FSMS will replace the existing URSA Routing Service with a new URSA
Validate Software Development Kit (UV SDK). This is a maintenance
feature and transparent to the end user. Routing will continue to function
without change.
FSMS v 7.6 is upgrading to the use of InstallShield v 9.0 that will allow
for custom installation options. Any option not installed during the initial
installation may be installed at a later time.
This feature was first introduced in FSMS v 7.2 for use in Canadian
origin shipping only. It has been expanded in v 7.6 to allow any origin to
ship Dangerous Goods in Excepted Quantities. When shipping DG in
Excepted Quantities, no additional DG fields are required.
Refer to the International Air Transport Association (IATA) manual
for rules on qualifications for Excepted Quantities. No DG surcharges
will be assessed for Excepted Quantities shipments.
Dangerous Goods (DG)
Excepted Packages for
Radioactive Shipments
Support ShipAlert
E-mail Message
Child Meter Online
Registration Transaction
Enhancements
FedEx Ship Manager® Server User Guide, Version 7.6 15
This feature allows customers to ship certain Dangerous Goods, as
specified by the International Air Transport Association (IATA)
manual, without assessing a DG surcharge.
The ShipAlert e-mail functionality has been enhanced to allow for the
delivery of a customer specified message with the ShipAlert e-mail
notification. A new field has been added to support this feature
enhancement.
The 035/135 Child Meter Online Registration transactions have been
enhanced to allow for the following fields to be included in the Request
transaction: 1148, 1149, 9744, 9746, 1201, 1154, and 1590.
Page 18

What’s New
Feature Description
Addition of Shipper E-mail
Address to the Auto
Configuration Utility (ACU)
SIGNALS – FedEx Ground
Shipping Enhancements
A field has been added to the ACU meter Request utility to allow the
upload of the shipper e-mail address.
SIGNALS is a collection of FedEx Ground specific business rule
changes that includes the following:
1. Support for the following CA taxes for all intra-CA FedEx Ground
shipments.
These taxes are currently supported for intra-CA FedEx Express
shipments:
• Harmonized Sales Tax
• Quebec Sales Tax
• Goods and Services Sales Tax
The taxes, if applicable, will be returned in the 120, 119, and 125
Reply transactions as part of the Total Surcharges field.
2. Ground EPDI File Handling Modifications:
• FSMS will no longer create Ground Electronic Package Data
Interchange (EPDI) files to upload FedEx Ground package data.
The creation of the EPDI files will be managed by one of the
FedEx mainframe servers. FSMS will now upload a Ground
Hourly Upload file on the same time interval as the Express
Hourly Upload file, every 30-120 minutes.
• The FSMS level EPDI Code is no longer required and will be
removed from the Meter Settings tab of the FSMS
Configuration Utility.
• The existing No Upload/No Ship (NUNS) functionality will now
apply to FedEx Ground shipments. If the NUNS checkbox is
checked and Ground Hourly Update (HU) files have been
created and not uploaded within a 72-hour period, FSMS
shipping will be disabled.
• FedEx Ground account numbers will no longer be editable from
within the Meter Settings tab of the FSMS Configuration Utility.
The FedEx Ground account number is assigned when a new
meter is obtained or when an existing meter is reconfigured via
the Auto Configuration Utility.
• The existing Ground Cycle Count field will no longer apply to the
file extension of the FSMS created EPDI file but will now only
apply to the Pickup Number of the Ground Pickup Manifest.
• The existing Force Close Time checkbox on the Shipper
Settings tab of the FSMS Configuration Utility has been
renamed Express Force Close Time, and a separate checkbox
titled Ground Force Close Time has been added for FedEx
Ground. The default time upon installation is 23:55.
• A new field has been added to the Configuration/Meter Query
Request transaction to allow the Ground Force Close time to be
configured via this transaction.
16 FedEx Ship Manager® Server User Guide, Version 7.6
Page 19

Feature Description
What’s New
Revenue Interface Controls
(RIC)
The RIC initiative is FedEx’s response to the Sarbanes-Oxley Act
passed by Congress in 2004, and is designed to tighten various controls
on data transmitted to, received from, and managed by FedEx.
• Express tracking numbers will no longer be stored in the
C:\FedEx\FedEx_Airbill folder but will now be stored in the FSMS
database. A support-level password will be required to manually
change the tracking number range.
• FedEx Ground tracking numbers will no longer be stored in the
Registry but will now be stored in the FSMS database. A supportlevel password will be required to manually change the tracking
number range.
• Meter Configuration Impacts – a meter can only be added once the
support-level password has been entered. Upon clicking the Add
button, a popup box will be displayed. Upon entering all information,
FSMS will attempt to retrieve existing meter information from FedEx
mainframe systems. New meters may be requested and configured
by using the FSMS Meter Registration Utility launched from the
desktop. In the event a meter cannot be added automatically, meter
information may be entered manually.
• The first meter entered into the FSMS Configuration Utility is the
Master meter. All subsequent meters are Child meters. To change a
meter designation requires entry of the support-level password.
• Any manual changes to configuration information on the Shipper
Settings tab of the FSMS Configuration Utility will be uploaded to
FedEx and shall overwrite existing data for the meter/account.
• FSMS will verify each configured meter as they are entered by
communicating with FedEx systems. If communications are not
enabled during the configuration process, FSMS will attempt to
verify them when communications are established.
Advanced Regulatory
Information (ARI)
FSMS is asked to support the new Customs regulations in Canada and
the U.S. by capturing additional shipment information and applicable
edits in the Global Ship Request transaction. For more specific
information, see the FSMS TCR Version 7.6.
FedEx Ship Manager® Server User Guide, Version 7.6 17
Page 20

What’s New
Feature Description
Gilbraltar II This requirement is to remove the edit for Country of Ultimate
Destination as a required entry in the Global Ship Request transaction.
International Rules and Regulations:
Determine shipping choices based on rules and regulations of the
destination country.
Countries Available:
Support all countries in the Country of Manufacturer field, rather than
only those served by FedEx. All of the countries in the world will now be
valid countries for Country of Manufacture.
Country Specific Requirements include:
How the Commercial Invoice (CI) is required by the destination country,
i.e. hardcopy, letterhead, country-specific language, or Electronic
Commercial Invoice (ECI). There will be no change to the ECI logic or
the hardcopy CI logic.
FSMS introduces two new fields (CI Language Code and Destination
Country CI Indicator) in the Global Ship Request Reply in support of this
feature.
Support Country Name Aliases:
This feature displays the multiple countries in the country drop-down that
are identified with a single country code – i.e. Wales, Scotland, England
and Channel Islands all have a country code of GB. This new
functionality allows the user to easily determine the correct country code
based on the known country name.
18 FedEx Ship Manager® Server User Guide, Version 7.6
Page 21
Referenced Documents
Title Location
FedEx Service Reference Guide Contact your CIC.
Referenced Documents
FedEx Ship Manager Server Transaction
Contact your CIC.
Coding Reference (TCR), Version 7.6
FedEx Service Guide To download in .pdf format:
http://www.fedex.com/us/services/express/pdf.html.
To request a printed copy, please call 1.800.Go.FedEx
(1.800.463.3339).
FedEx Ship Manager
®
Server User Guide, Version 7.6 19
Page 22

Page 23

Chapter One: Setting Up FSMS
Chapter One: Setting Up FSMS
Overview
This chapter of the FSMS User Guide contains step-by-step instructions for configuring the FSMS
software on a server, including:
• Installing FSMS
• Configuring FSMS
• Setting Up Printers
• Retrieving URSA (Universal Routing and Sorting Aid), Rates, and Tracking Numbers
• Troubleshooting Steps
Installing FSMS
Important Notes for Installs, Upgrades, and Uninstalls
9 All applications MUST be closed before installation begins. These applications include Windows®
Explorer. Use the Windows Start>Run option to locate SETUP.EXE on the FSMS Installation CD.
9 Always select Yes if the installation script asks if a file should be overwritten at the Read Only File
Detected prompt.
9 Always reboot when prompted.
9 Before beginning an Upgrade, ensure that the shipping day has been Closed and that there are no
revenue files in the FedEx\FedEx_Admin\Close and/or FedEx\FedEx_admn\HourlyUpload files. If
revenue data exists in either of these files, you are prompted to upload all revenue files and Hourly
Upload files before continuing the upgrade.
NOTE:
If “live” revenue files exists on your server before you attempt an upgrade, you must upload
these files to FedEx before upgrading begins. If you have “test” revenue files on your
server, these files can be deleted.
9 If you are running FSMS Version 6.1.X or lower, you cannot upgrade. The previous version of FSMS
must be uninstalled from the system, and a new Install must be performed.
Pre-Installation Checklist
Before you install FSMS for the first time on your server, some basic system requirements must be met:
Before you can install FSMS software, an Administrator account must be established. The
Administrator account must be granted the “Log On as a Service” user right.
If you need additional information for creating an Administrator account on your server’s operating
system, please access the Microsoft Help option or access the Microsoft website at
www.microsoft.com.
If you need File Transfer Protocol (FTP) functionality (for transferring reporting data to another
system, for example), install Internet Information Service (IIS) before you install FSMS. IIS
download files are provided on the Microsoft website, or you may contact your FedEx Customer
Service Representative for assistance.
FedEx Ship Manager
®
Server User Guide, Version 7.6 21
Page 24
Chapter One: Setting Up FSMS
NOTE:
IIS should be installed ONLY if you need FTP functionality.
Set up your network connection with a static IP address. Instructions for setting up a static IP
address are provided as part of the Microsoft Help option. If you need additional assistance, access
the Microsoft website at www.microsoft.com.
Performing a New FSMS Install
To perform a new FSMS install, follow the steps provided below:
1. Insert the FSMS software CD in your CD drive, and select Run from the Windows Start menu.
2. Click the Browse button on the Run window to locate FSMS. The directory path is:
FXRS0XXX/Install_FXRS0XXX (“XXX” indicates the software version. For example: FXRS0720).
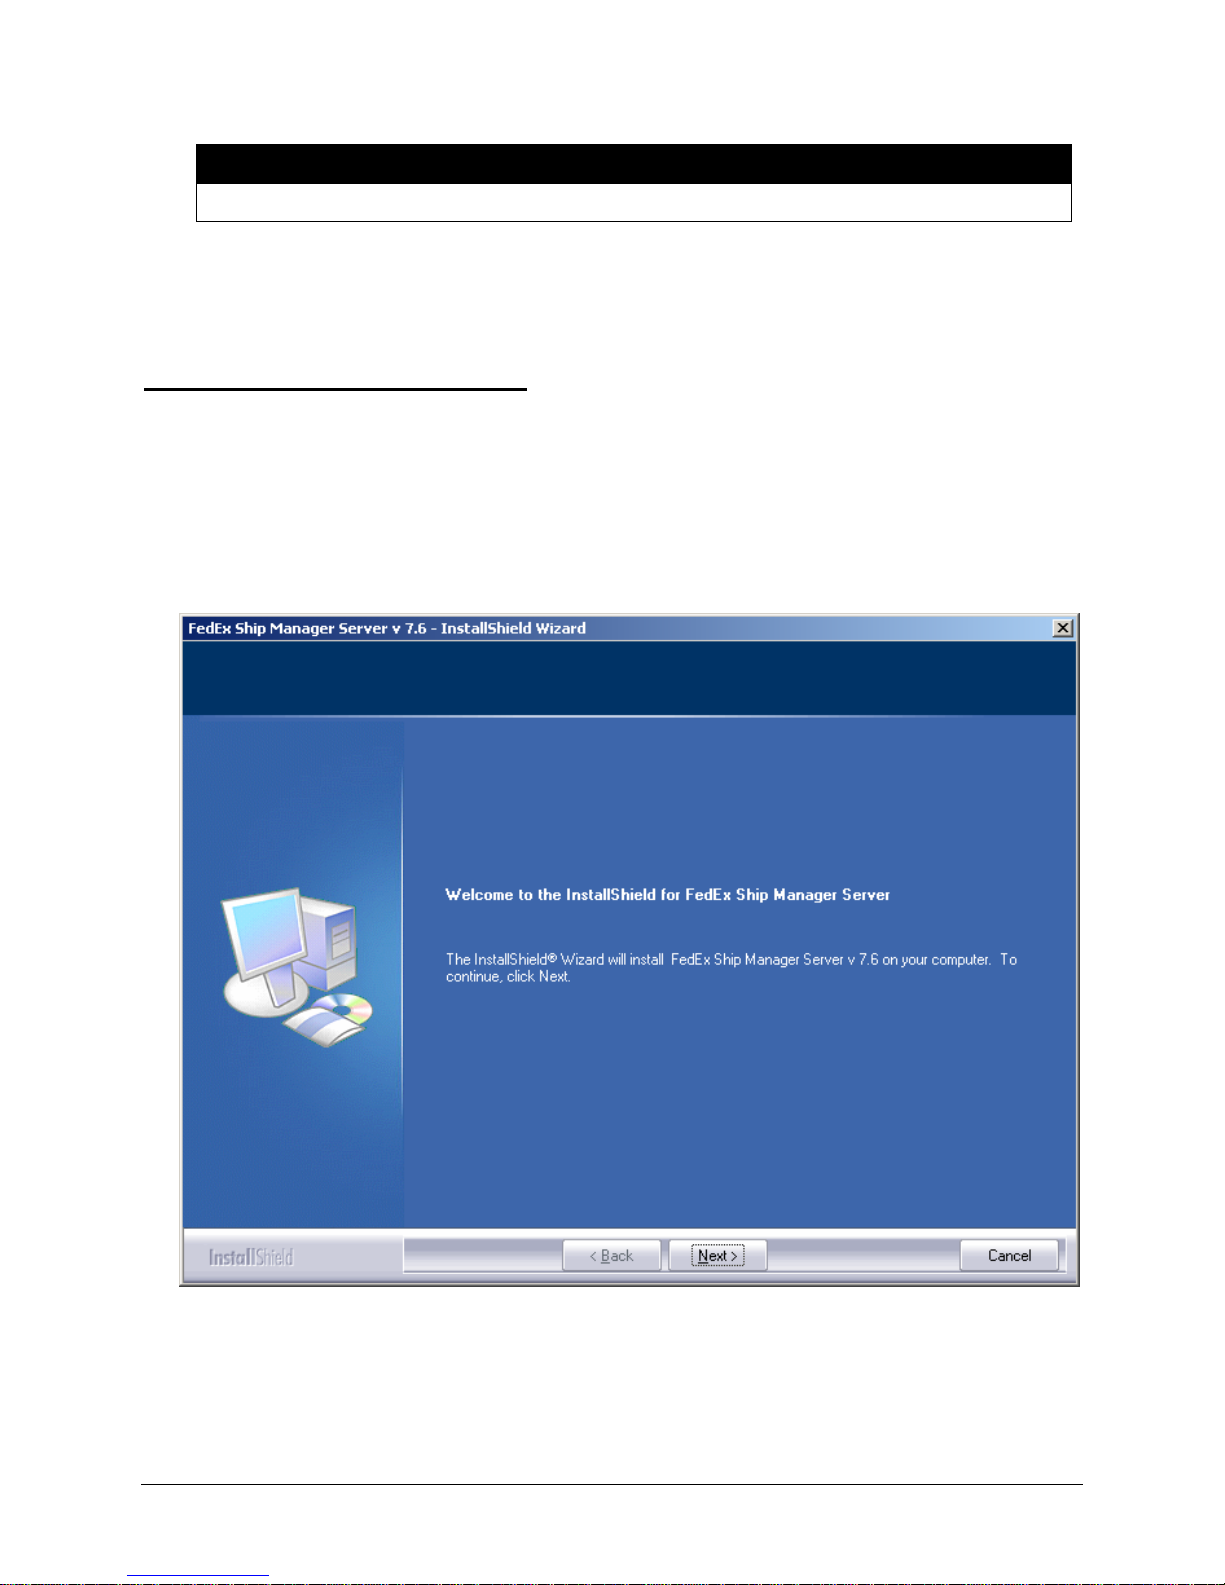
3. Double click the FSMS v 7.6 icon on the Run window to start the FSMS installation program. The
following screen displays:
4. Click Next to start the installation process. Your server will need to be rebooted once at the end of the
installation process.
22 FedEx Ship Manager® Server User Guide, Version 7.6
Page 25
Chapter One: Setting Up FSMS
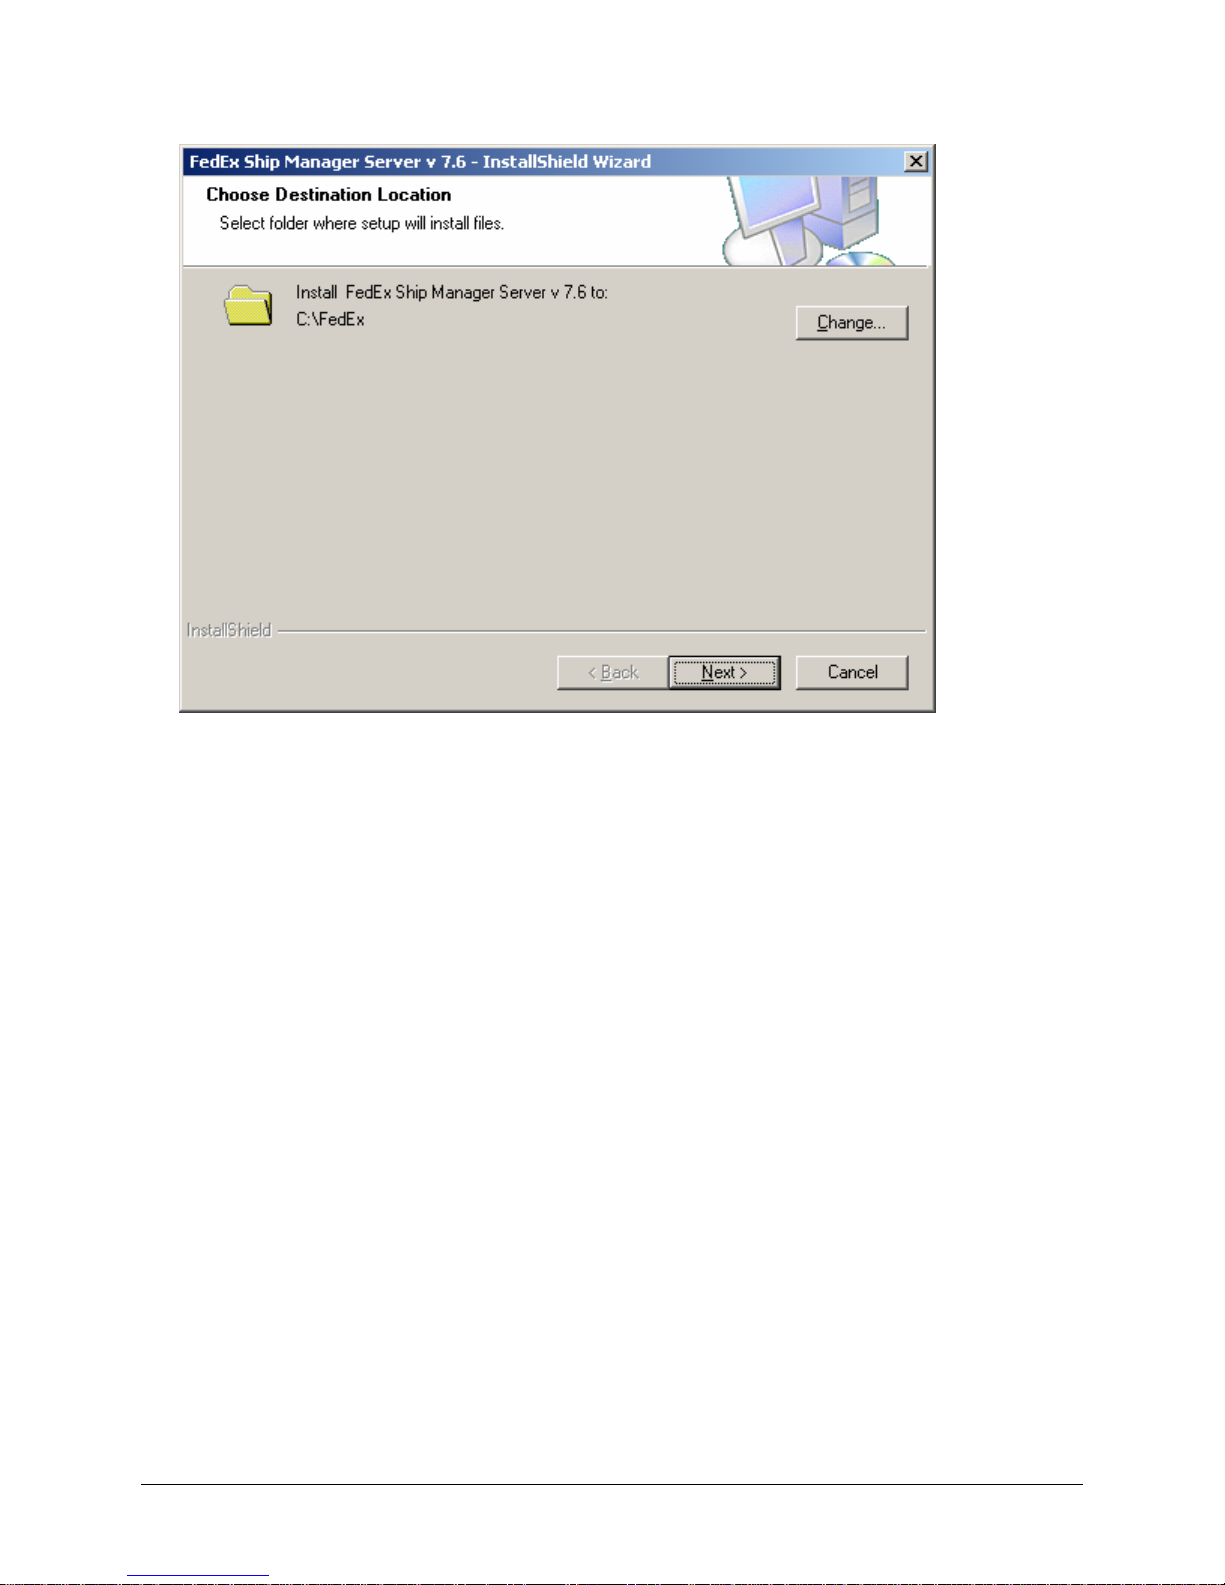
5. Select the folder or drive where FSMS will be installed. The default location is C:\FedEx. Click
Change to select an alternate folder or drive location. Click Next to continue.
FedEx Ship Manager® Server User Guide, Version 7.6 23
Page 26
Chapter One: Setting Up FSMS
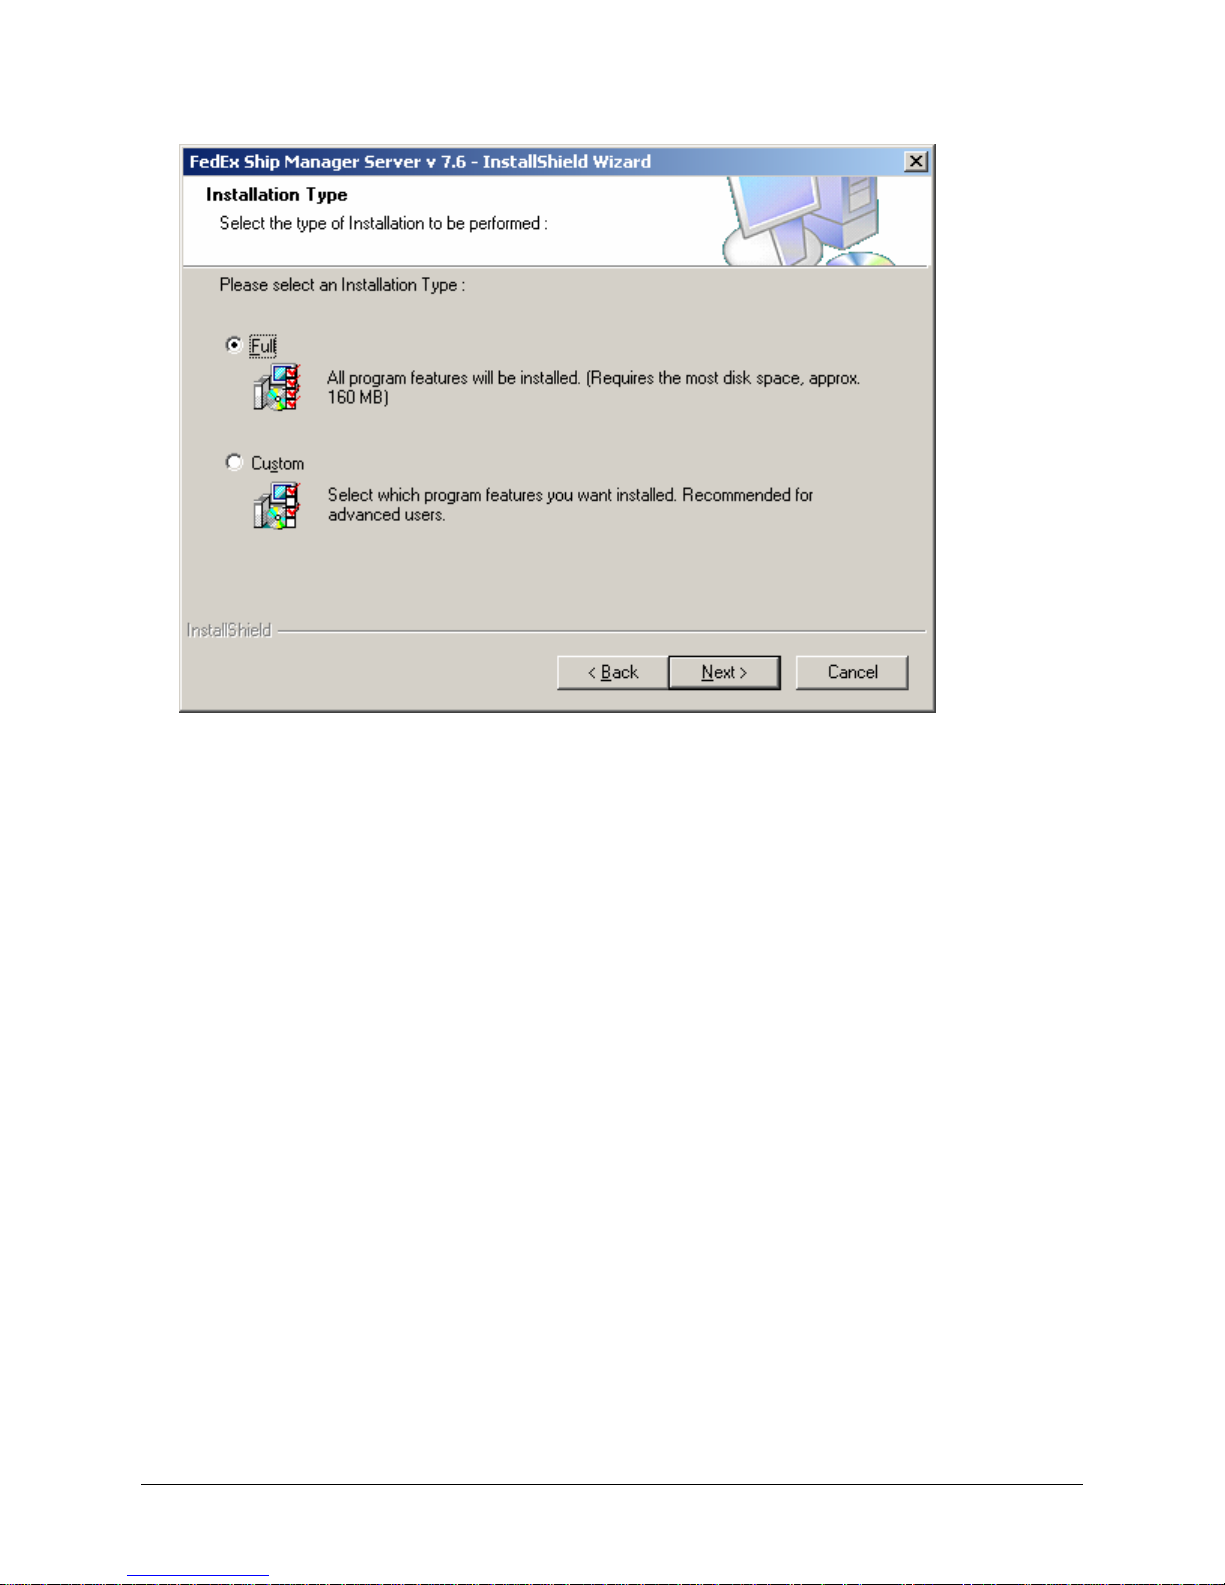
6. Select the type of installation to be performed.
Installation types:
• Full – select Full to install all FSMS shipping components and all FSMS utilities.
• Custom – select Custom to select which program features you want to install.
Click Next to continue.
24 FedEx Ship Manager® Server User Guide, Version 7.6
Page 27
Chapter One: Setting Up FSMS
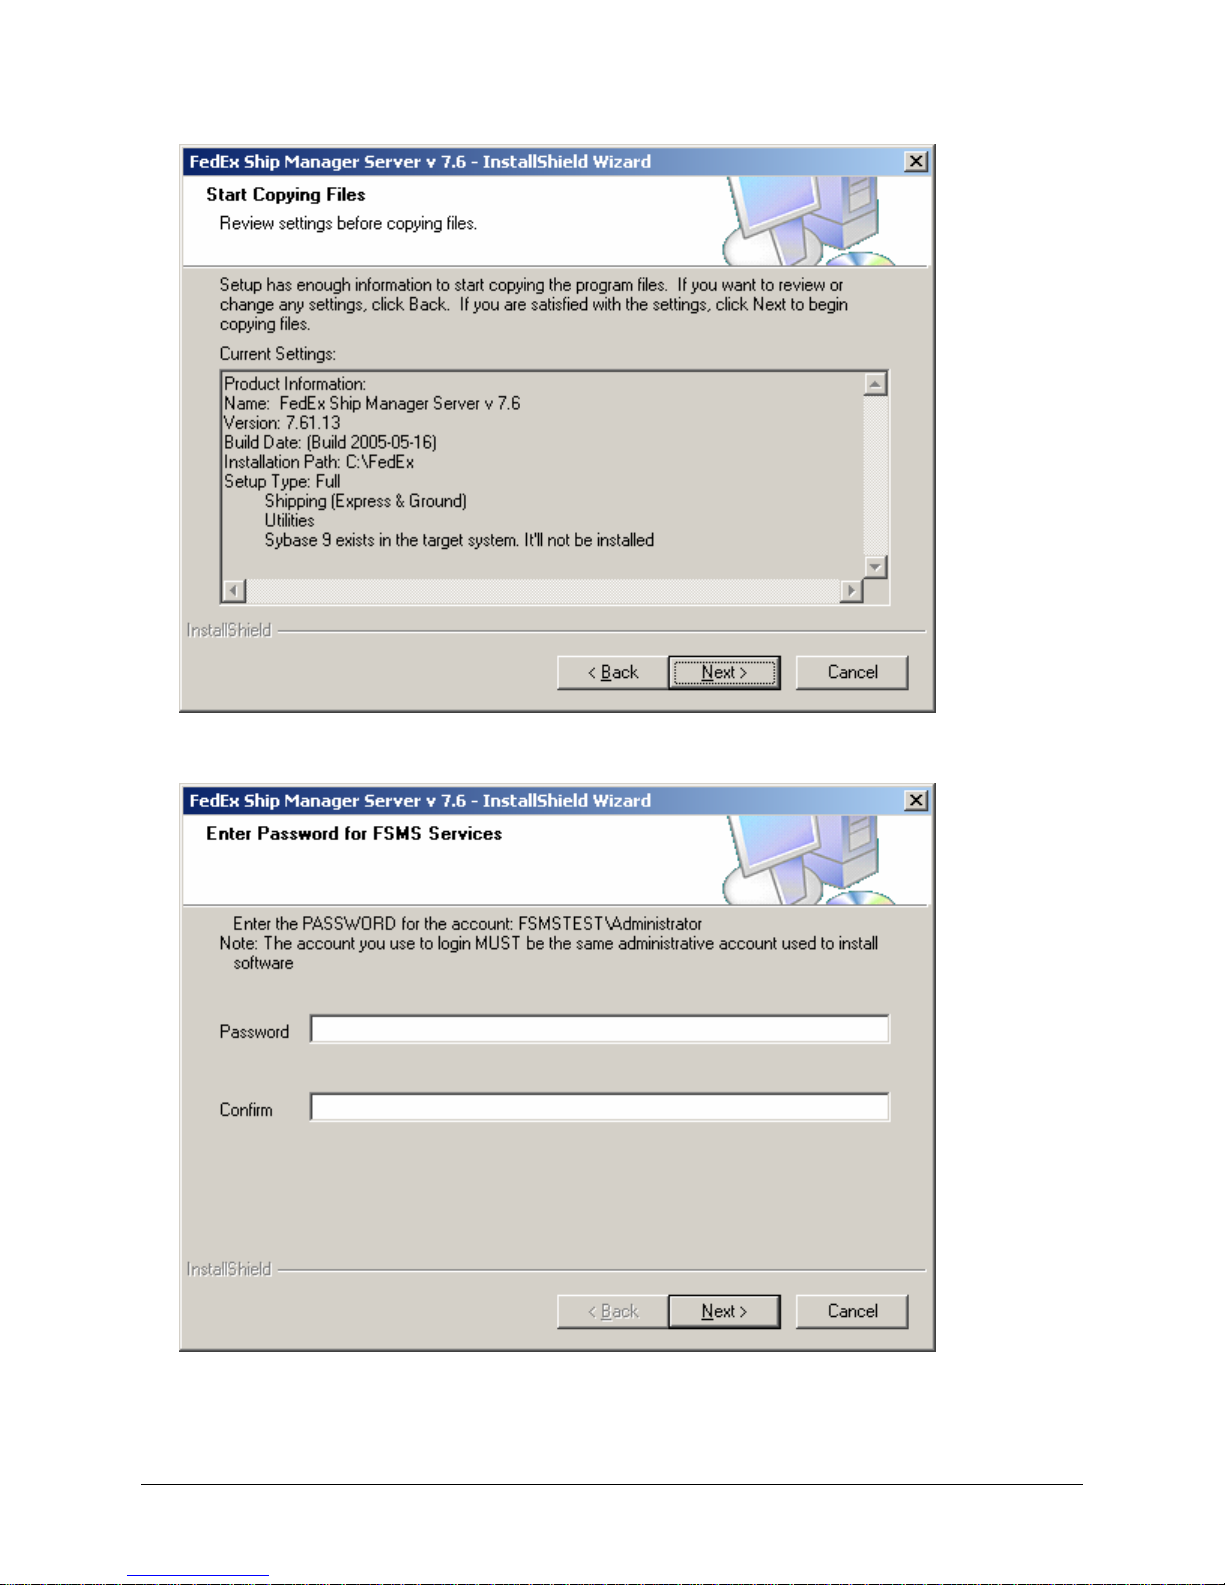
7. Review the installation selections. Click Next to proceed or Back to change.
8. Enter the account Password and Confirm.
Click Next to continue.
FedEx Ship Manager® Server User Guide, Version 7.6 25
Page 28
Chapter One: Setting Up FSMS
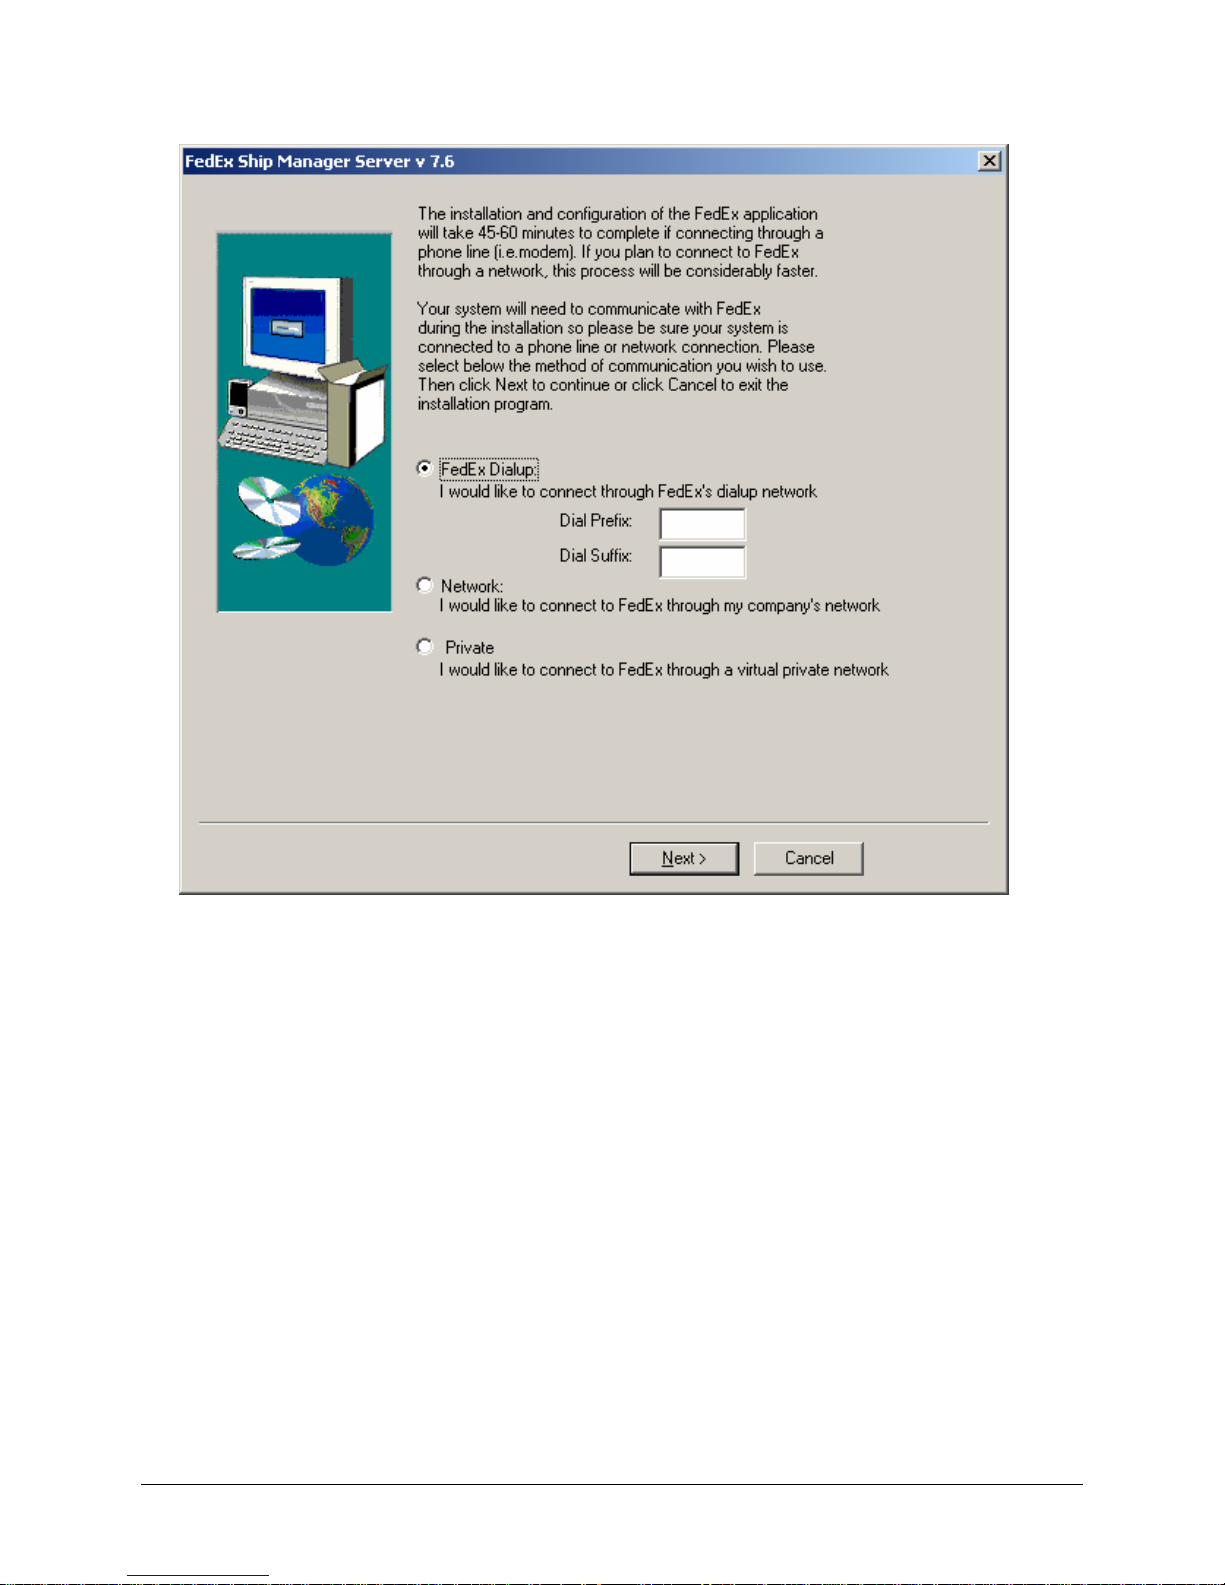
9. To configure a Modem Dialup:
a. Select FedEx Dialup.
b. Dial Prefix: If your location requires a number to be dialed to access an outside phone line,
enter this number in the Dial Prefix field.
c. Dial Suffix: If an access code is required by your location to be dialed after a phone number is
dialed, enter this number in the Dial Suffix field.
Click Next to continue.
26 FedEx Ship Manager® Server User Guide, Version 7.6
Page 29
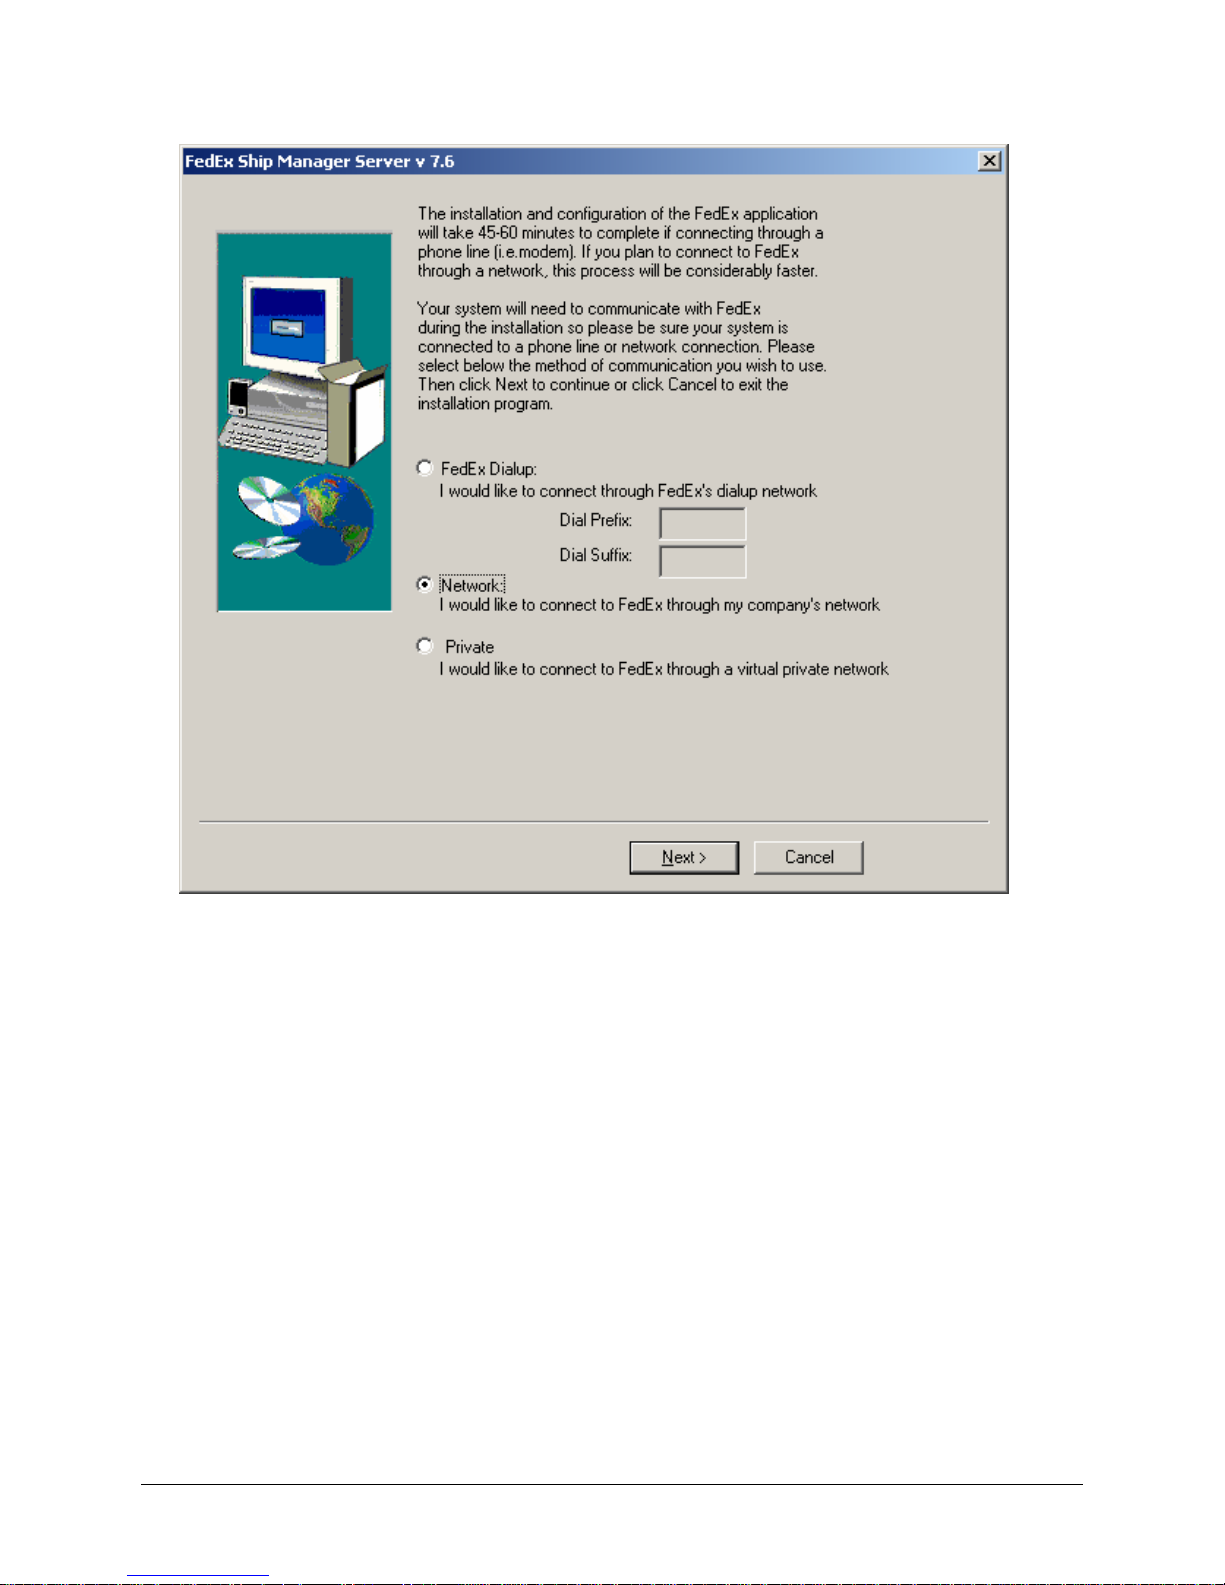
Chapter One: Setting Up FSMS
10. To configure a Network Connection through the public Internet, select Network.
Click Next to continue.
11. To configure a Network Connection through a virtual private network, select Private.
Click Next to continue.
FedEx Ship Manager® Server User Guide, Version 7.6 27
Page 30
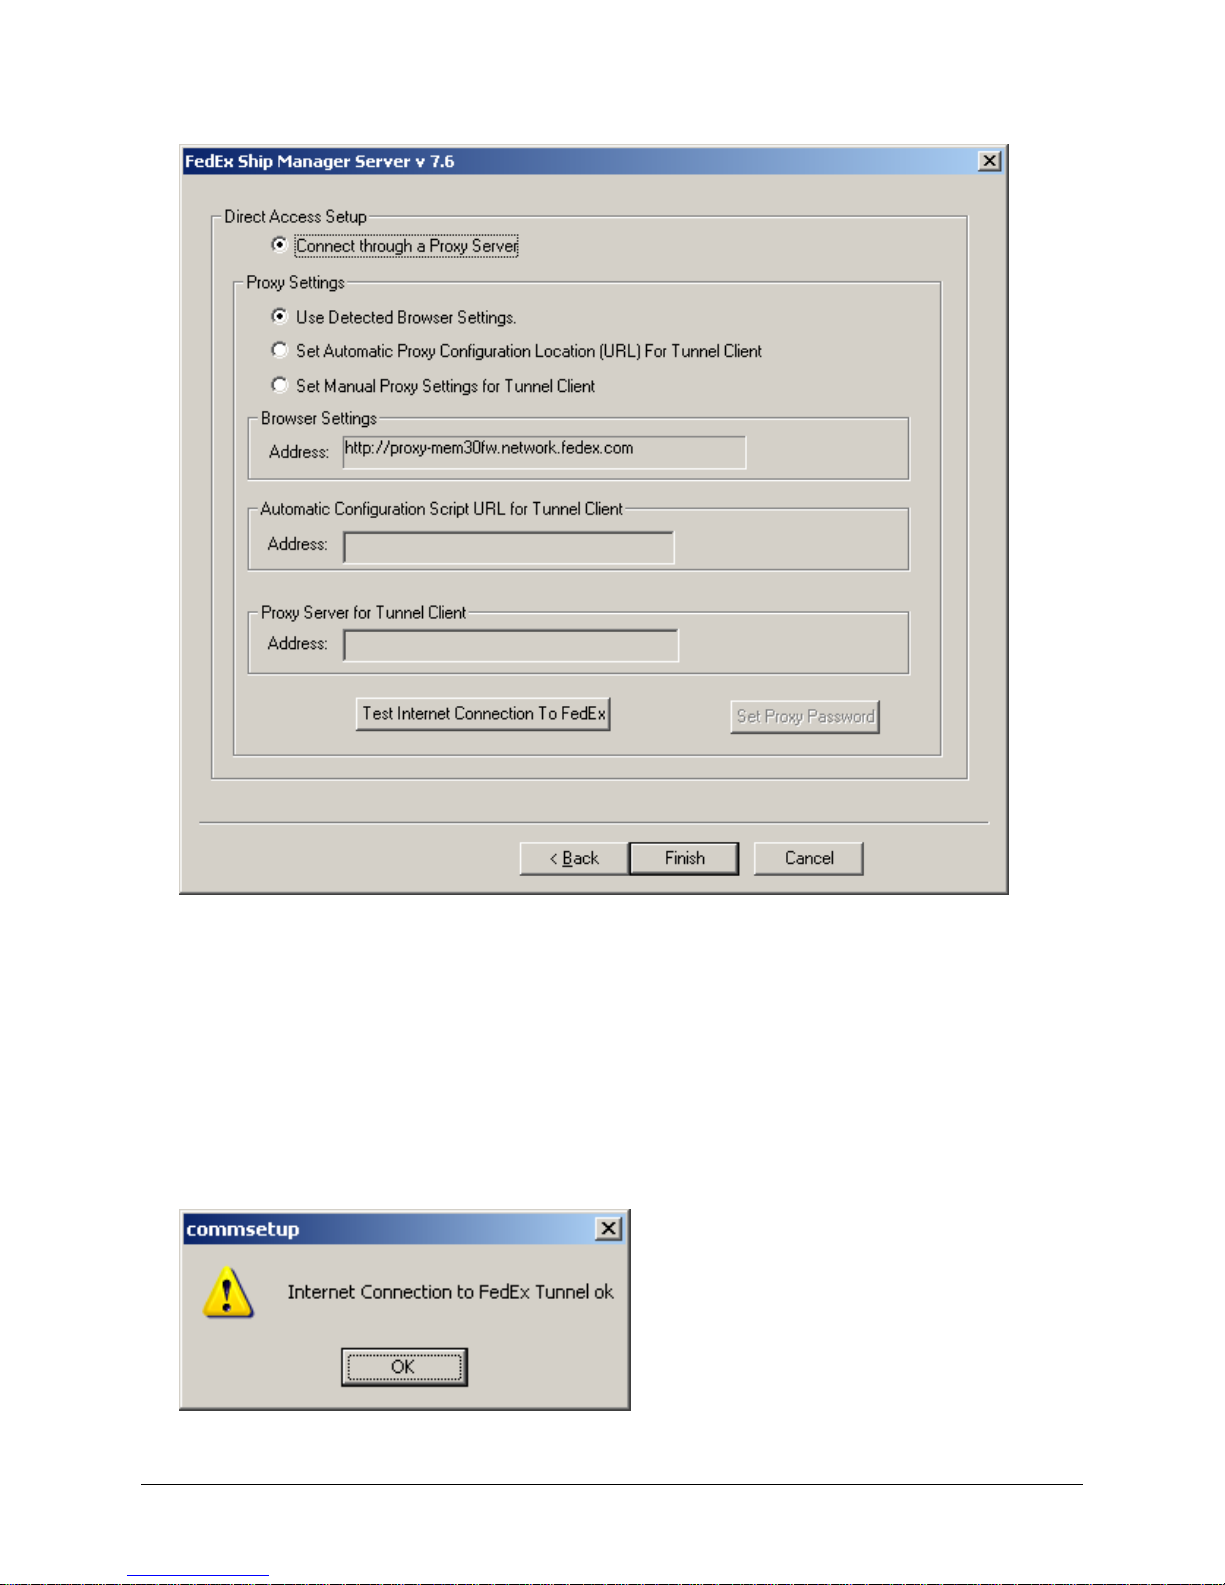
Chapter One: Setting Up FSMS
12. If you are not required to set a proxy to connect to networks outside your Company’s firewall, click
Next to continue installation.
13. If your Company’s network configuration requires that you use a proxy to access networks outside
your firewall:
a. Check Connect through a Proxy Server.
b. Enter the proxy Address for your network.
14. To check the connection to FedEx, click the Test Internet Connection to FedEx button. The
message below indicates successful communications with FedEx.
28 FedEx Ship Manager® Server User Guide, Version 7.6
Page 31
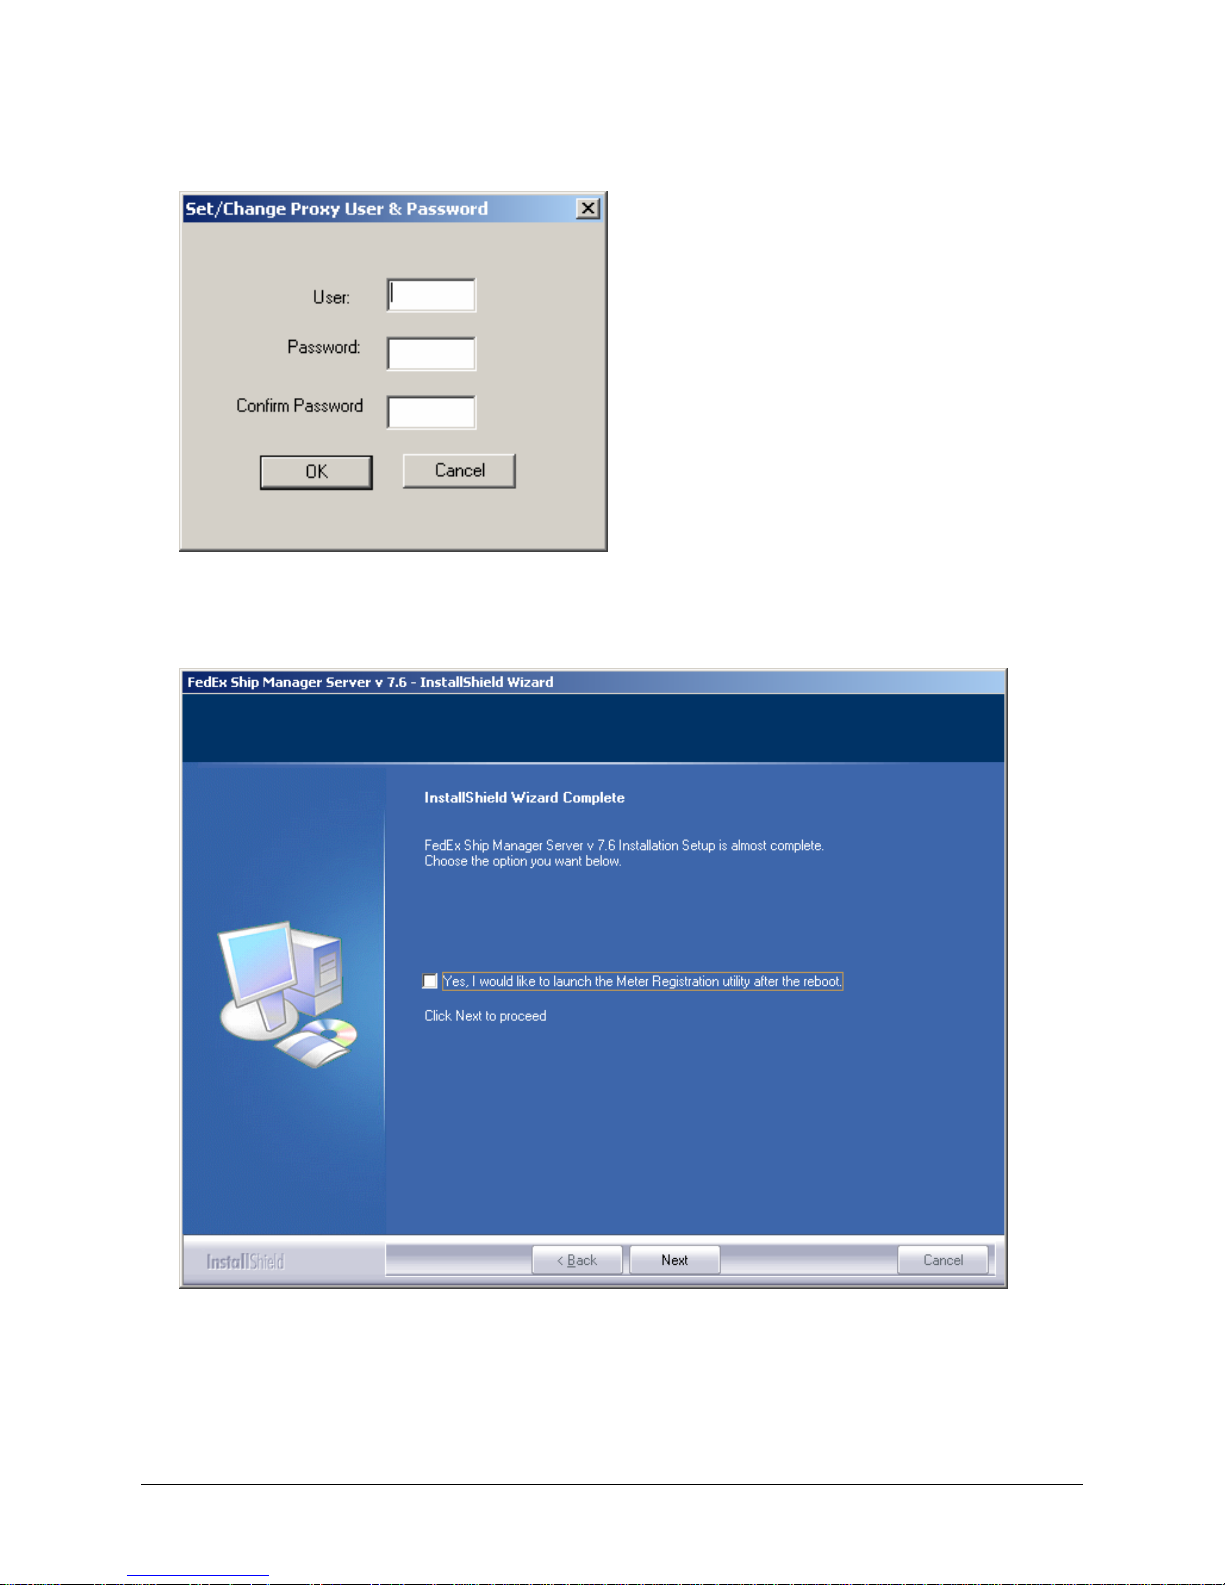
Chapter One: Setting Up FSMS
15. To set a Proxy password, click the Set Proxy Password button. Otherwise, click Finish.
16. Enter the required proxy information. Click OK.
17. Click Finish. This step completes the communication setup part of the installation.
18. To launch the Meter Registration Utility immediately after reboot to reconfigure existing meter(s),
check the Yes, I would like to launch Auto Configuration after the reboot checkbox, and click
Next to proceed.
FedEx Ship Manager® Server User Guide, Version 7.6 29
Page 32
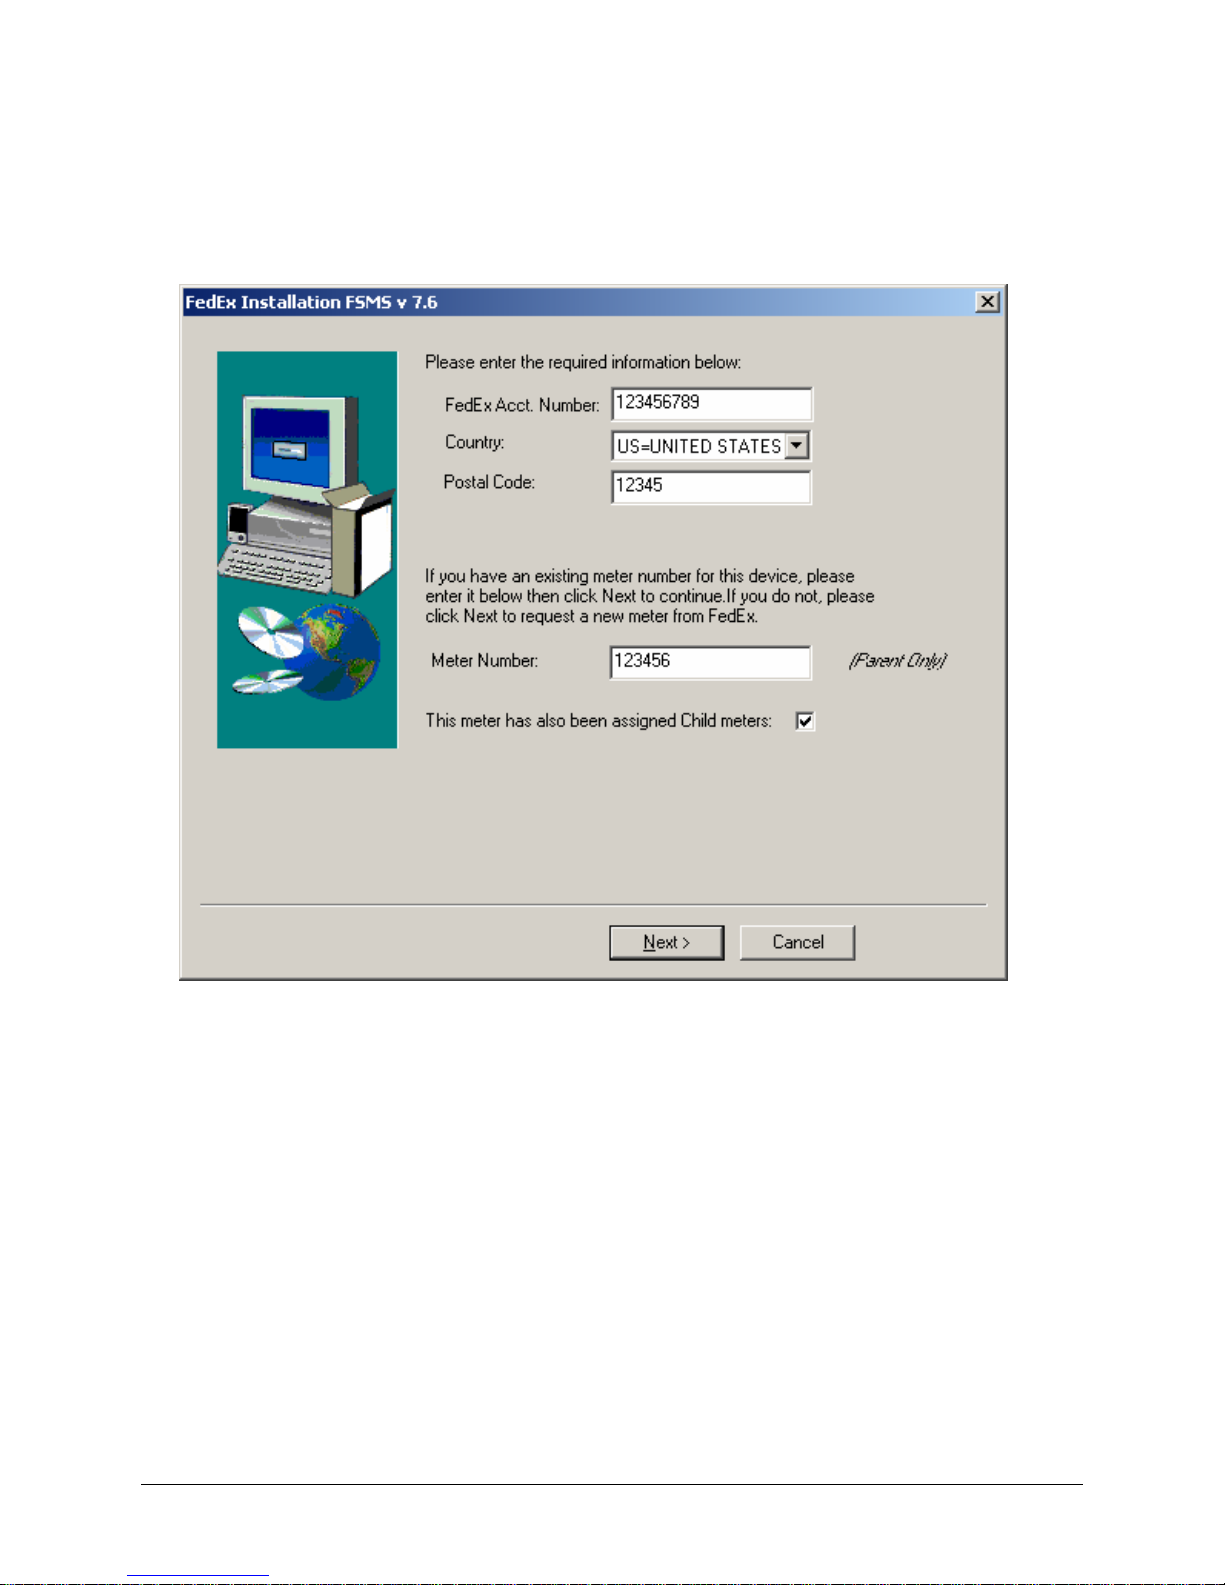
Chapter One: Setting Up FSMS
If the Meter Registration Utility is to be manually launched after the installation to obtain a new meter,
or to reconfigure existing meter(s), or if it will not be used, click Next and proceed to step 24.
19. Choosing to launch the Meter Registration Utility after the reboot will cause the following screen
to be presented:
20. Enter all information then click Next.
21. If Child meters are to be reconfigured, check the This meter has also been assigned Child meters
checkbox, then click Next.
30 FedEx Ship Manager® Server User Guide, Version 7.6
Page 33
Chapter One: Setting Up FSMS
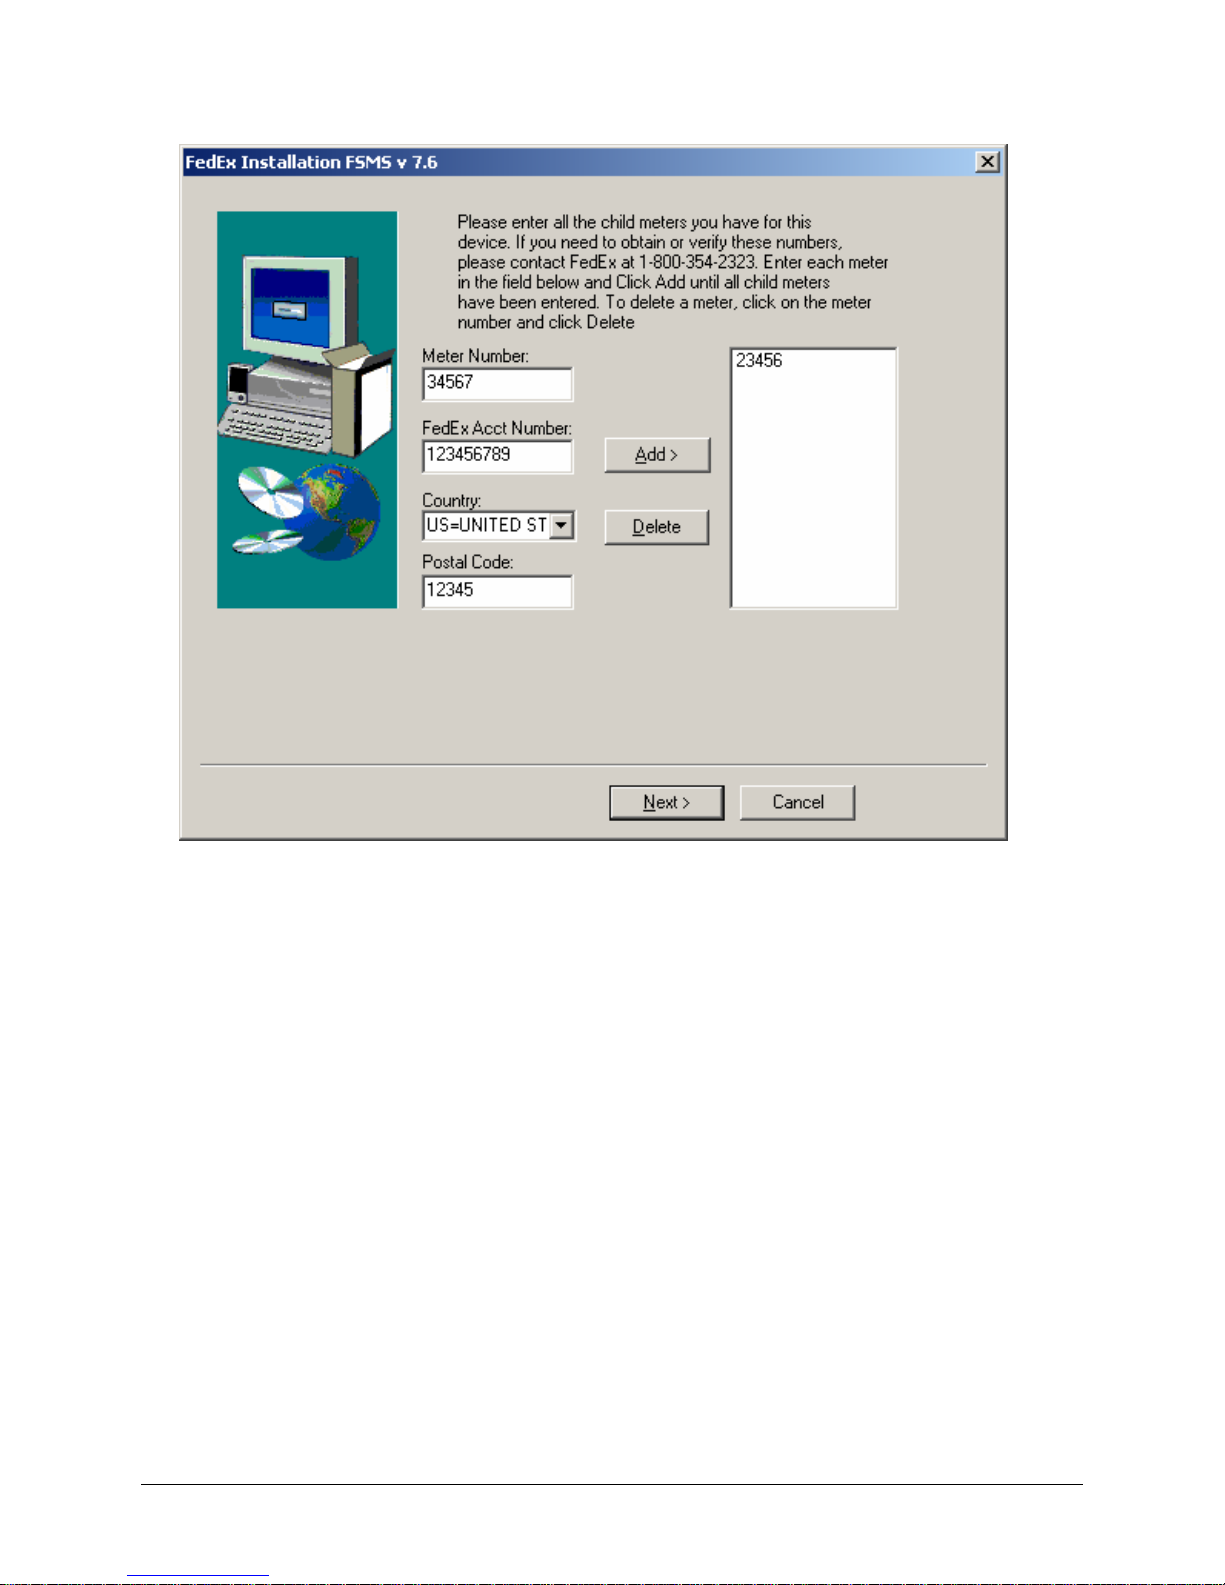
22. If the system has been assigned Child meters:
a. Enter the Child meter number in the Meter Number field.
b. Enter the associated FedEx Account Number for the Child meter. The Child meter and Master
meter are not required to have the same account number.
c. Select the Country location of the Child meter number. The default selection is US.
d. Enter the Postal Code for this meter number.
e. To save the Child meter number, click Add to move your entry to the list on the right side of the
window. If you enter a Child meter number in error, highlight the meter number in the list and
click Delete.
23. When entry is complete, click Next to continue.
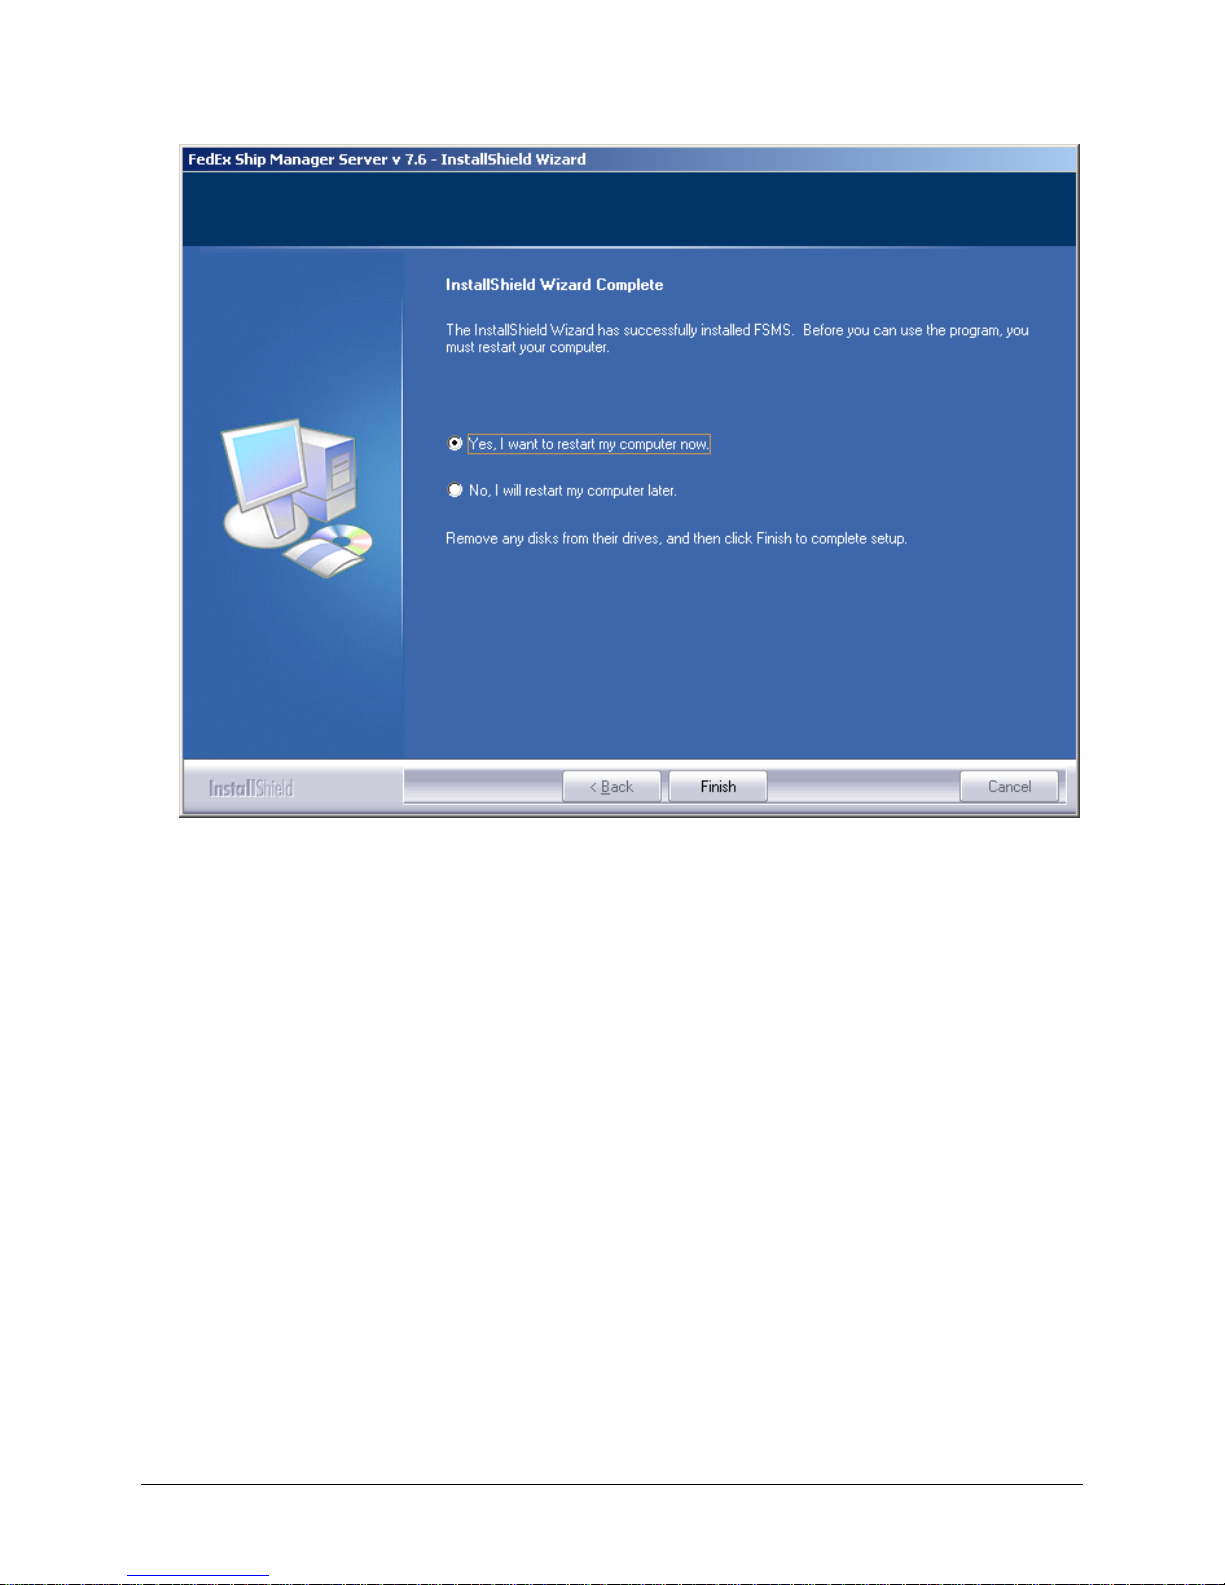
24. After your server reboots, FSMS resumes the install process. When the processing is completed, you
are asked to enter your Windows Admin password.
FedEx Ship Manager® Server User Guide, Version 7.6 31
Page 34
Chapter One: Setting Up FSMS
32 FedEx Ship Manager® Server User Guide, Version 7.6
Page 35
Chapter One: Setting Up FSMS
Upgrading from a Previous Version of FSMS
1. Insert the FSMS software CD in your CD drive, and select Run from the Windows Start menu.
2. Click the Browse button on the Run window to locate the FSMS install directory. The directory path
is: FXRS0XXX/Install_FXRS0XXX (“XXX indicates the software version; for example: FXRS0720).
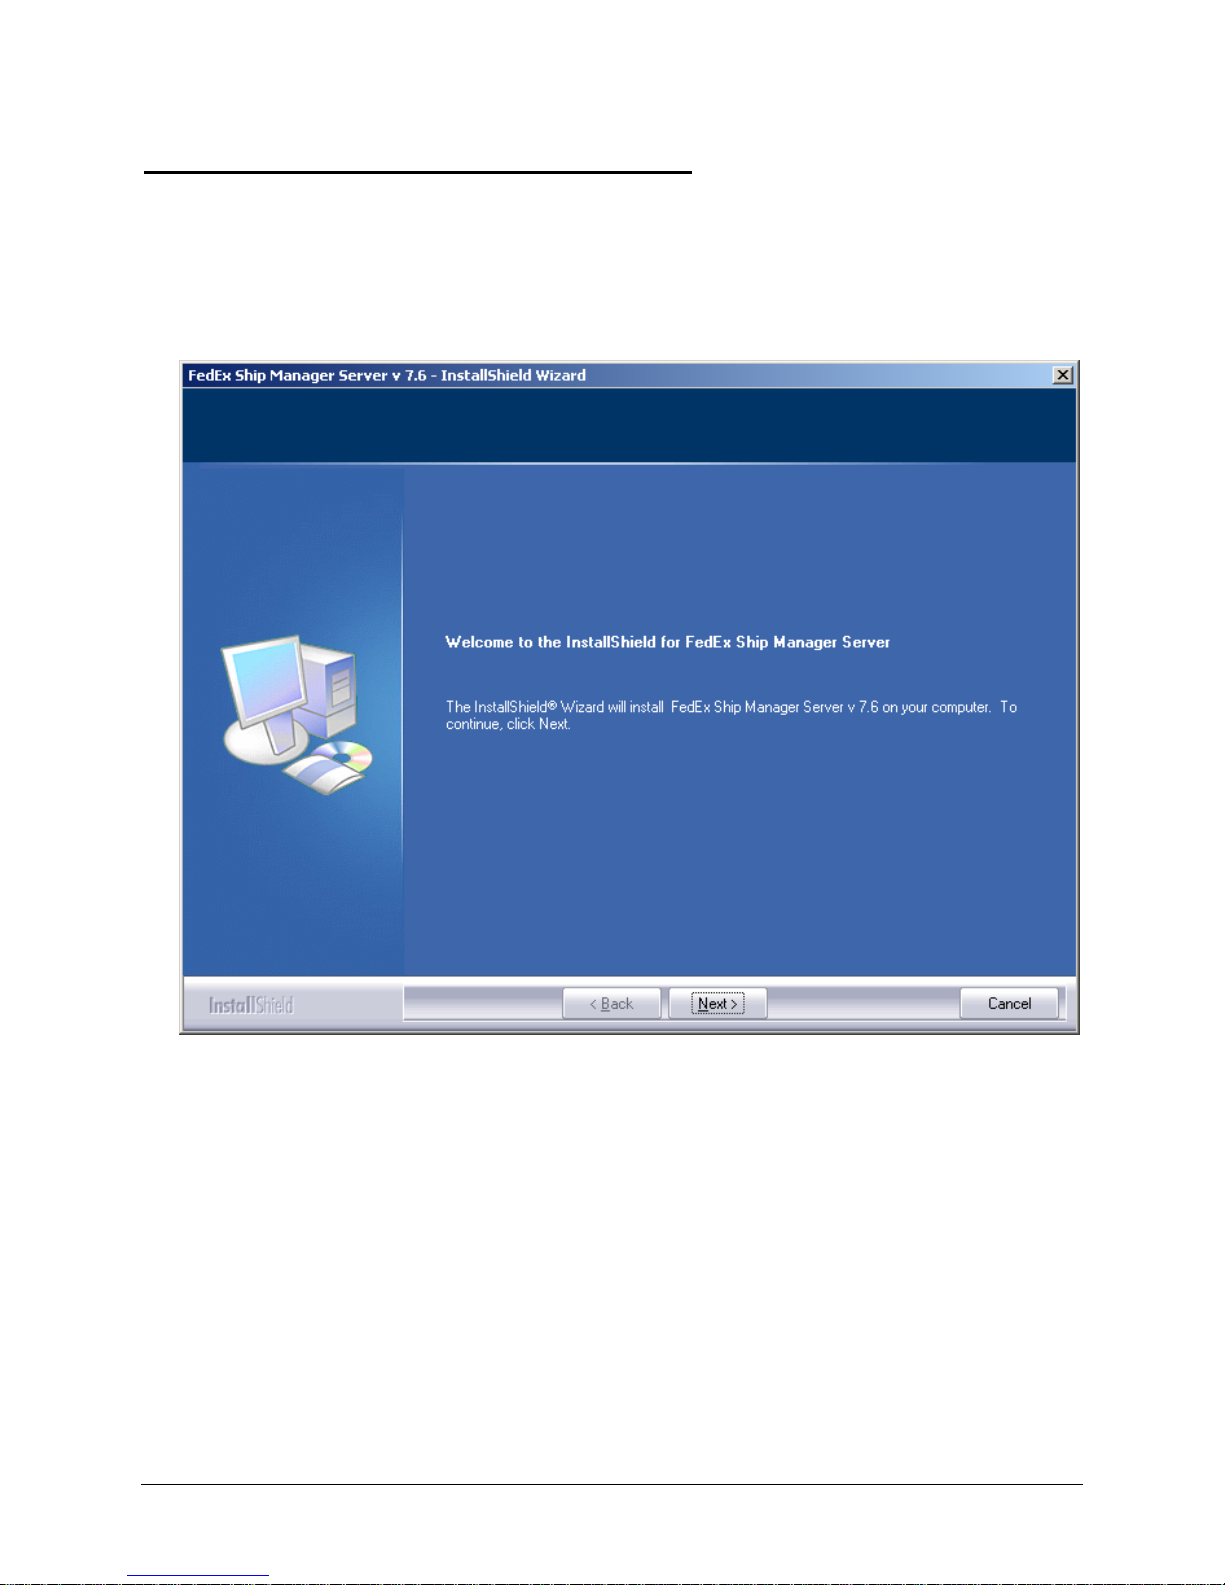
3. Double click the Setup icon. Click OK in the Run window to start the FSMS installation program. The
FSMS Installation Welcome window is displayed.
4. Click Next to start the upgrade process.
FedEx Ship Manager® Server User Guide, Version 7.6 33
Page 36
Chapter One: Setting Up FSMS
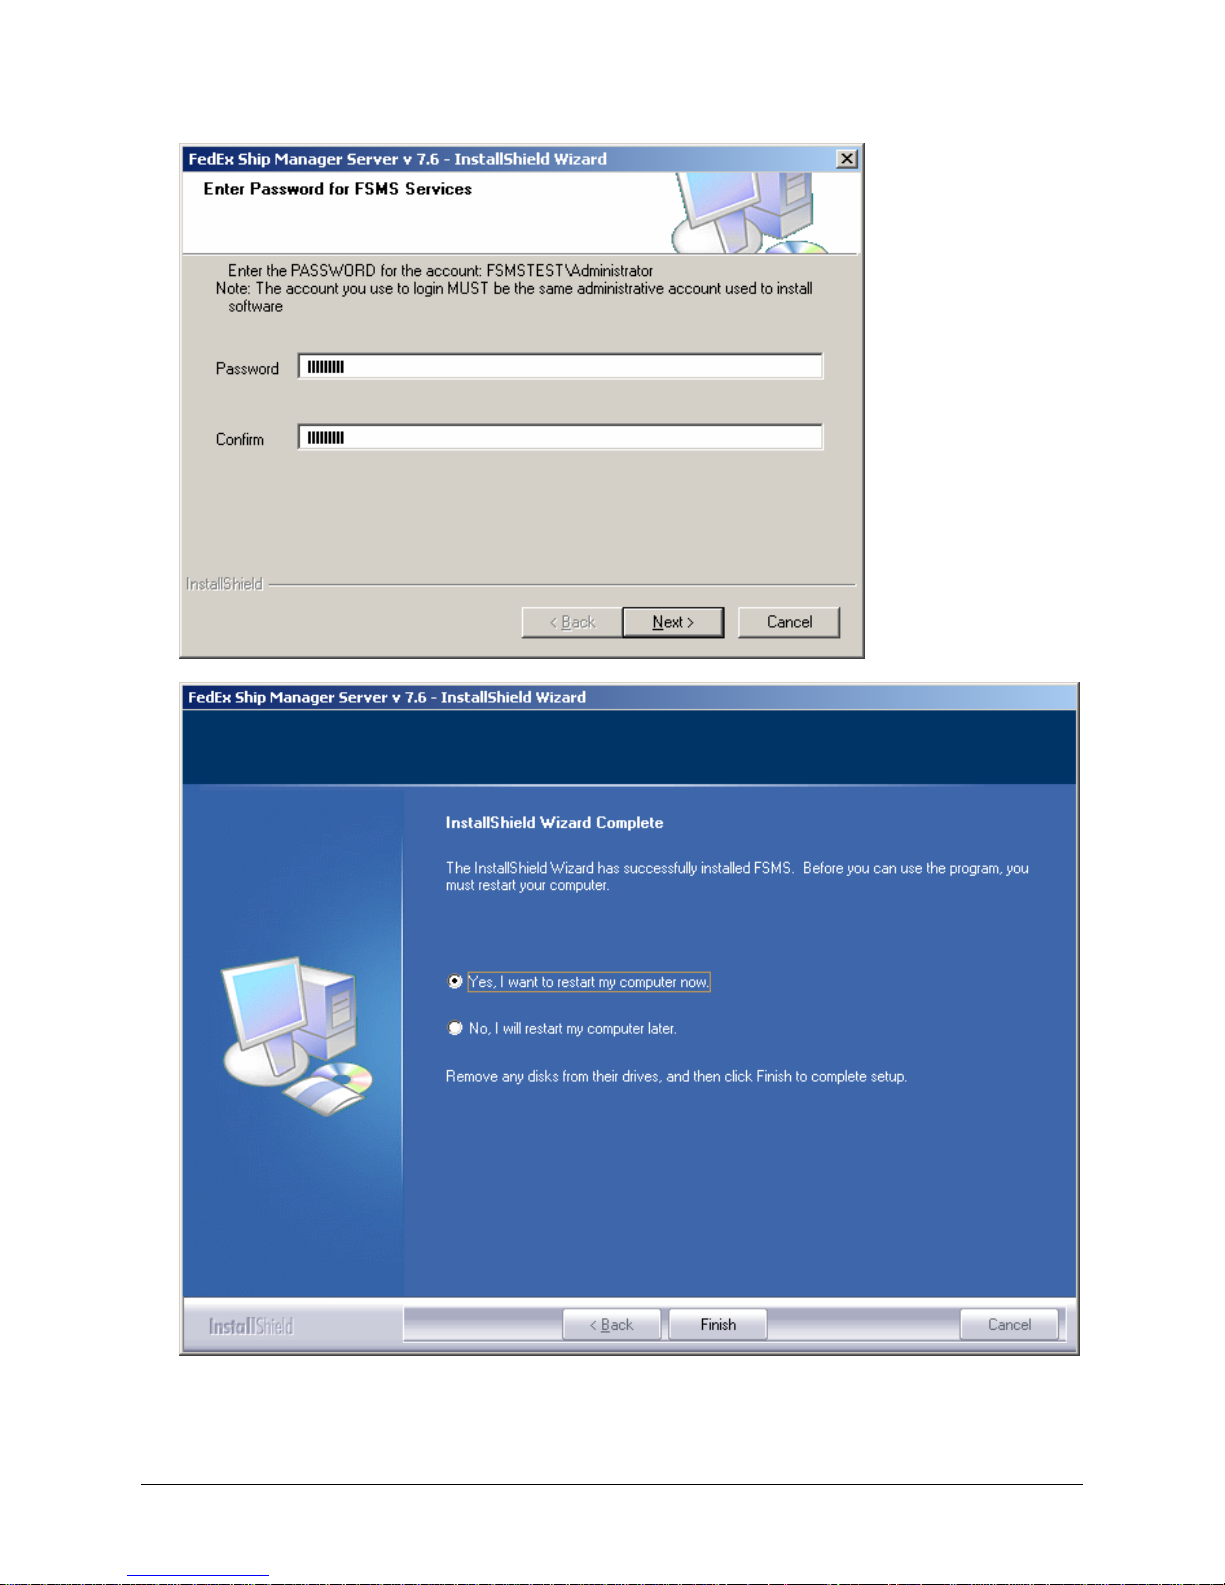
5. After the final reboot is completed, the system will initiate a Demand Download to retrieve any data
not retained during the upgrade.
34 FedEx Ship Manager® Server User Guide, Version 7.6
Page 37
Chapter One: Setting Up FSMS
Uninstalling FSMS v 7.6
Completely uninstalling FSMS v 7.6 will require two uninstalls: the uninstall of FSMS and the uninstall of
SQL Anywhere Studio 9, the FSMS database.
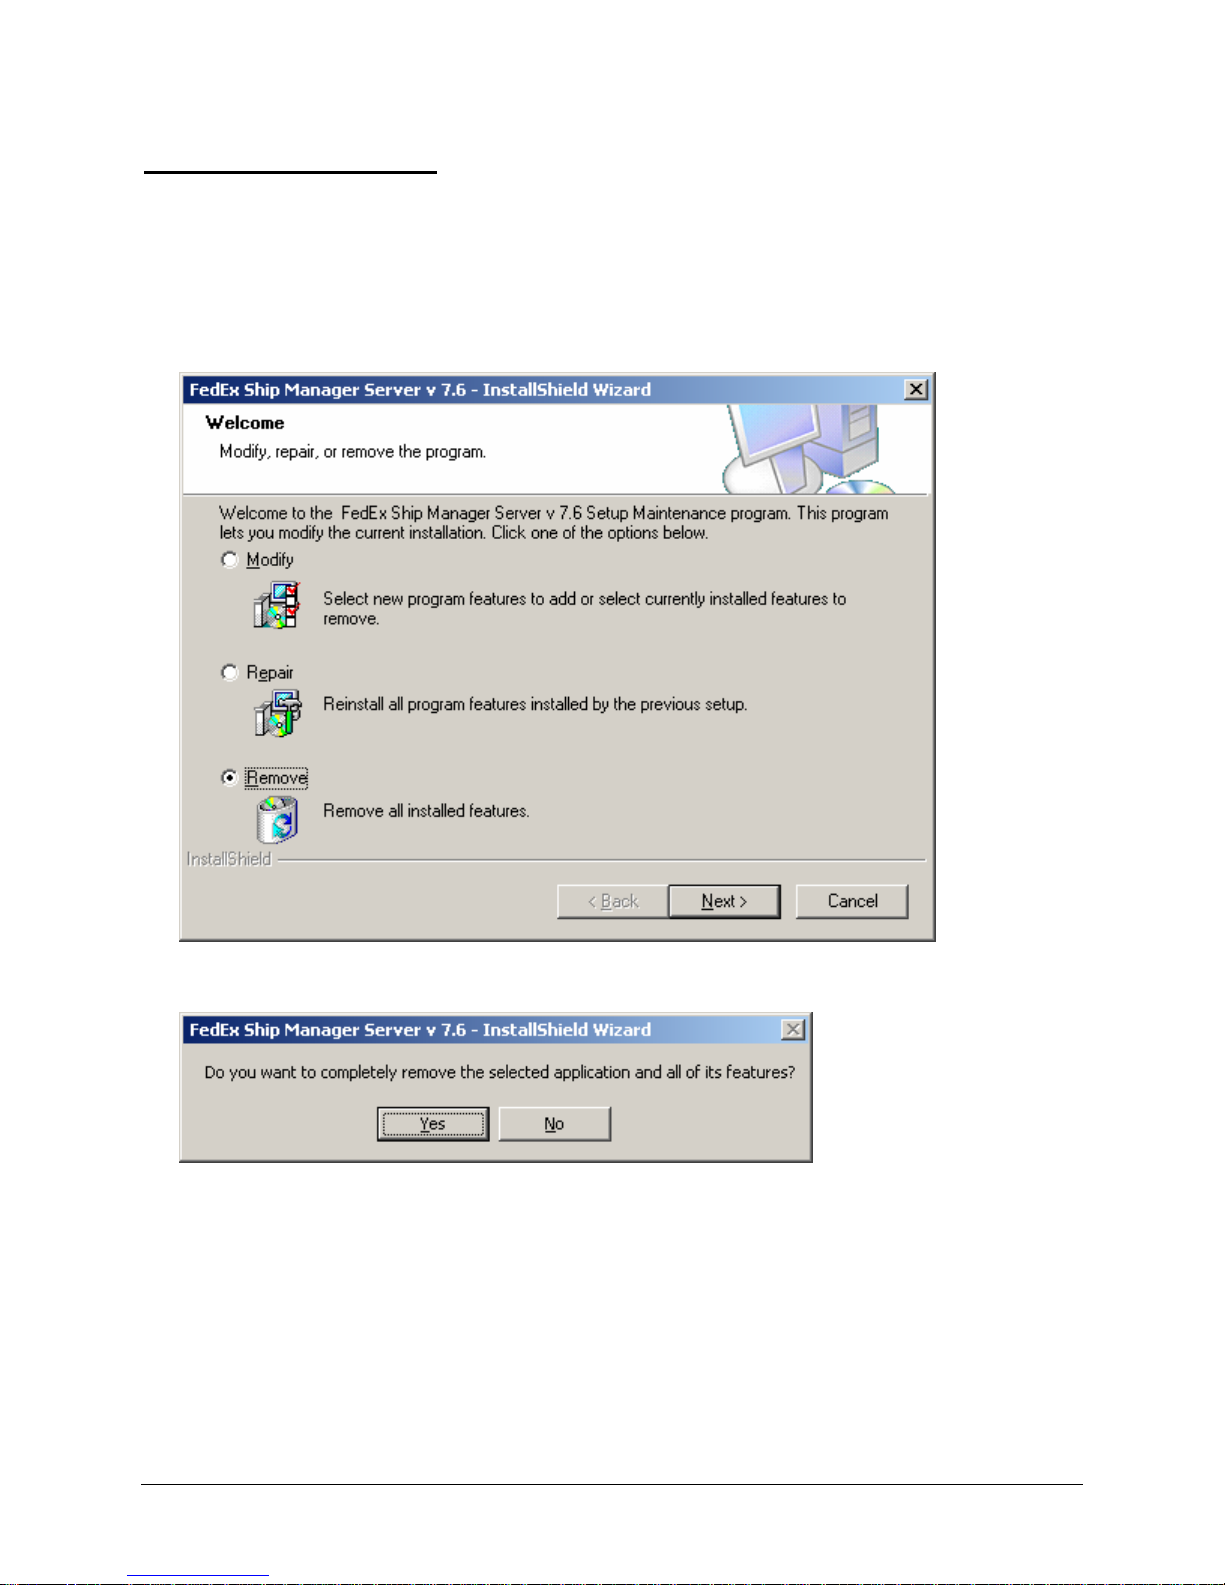
1. To uninstall FSMS v 7.6, use the Windows uninstaller accessed from the Control Panel menu.
2. Select FSMS from the Programs menu.
3. Select Remove.
4. Click Yes to remove FSMS.
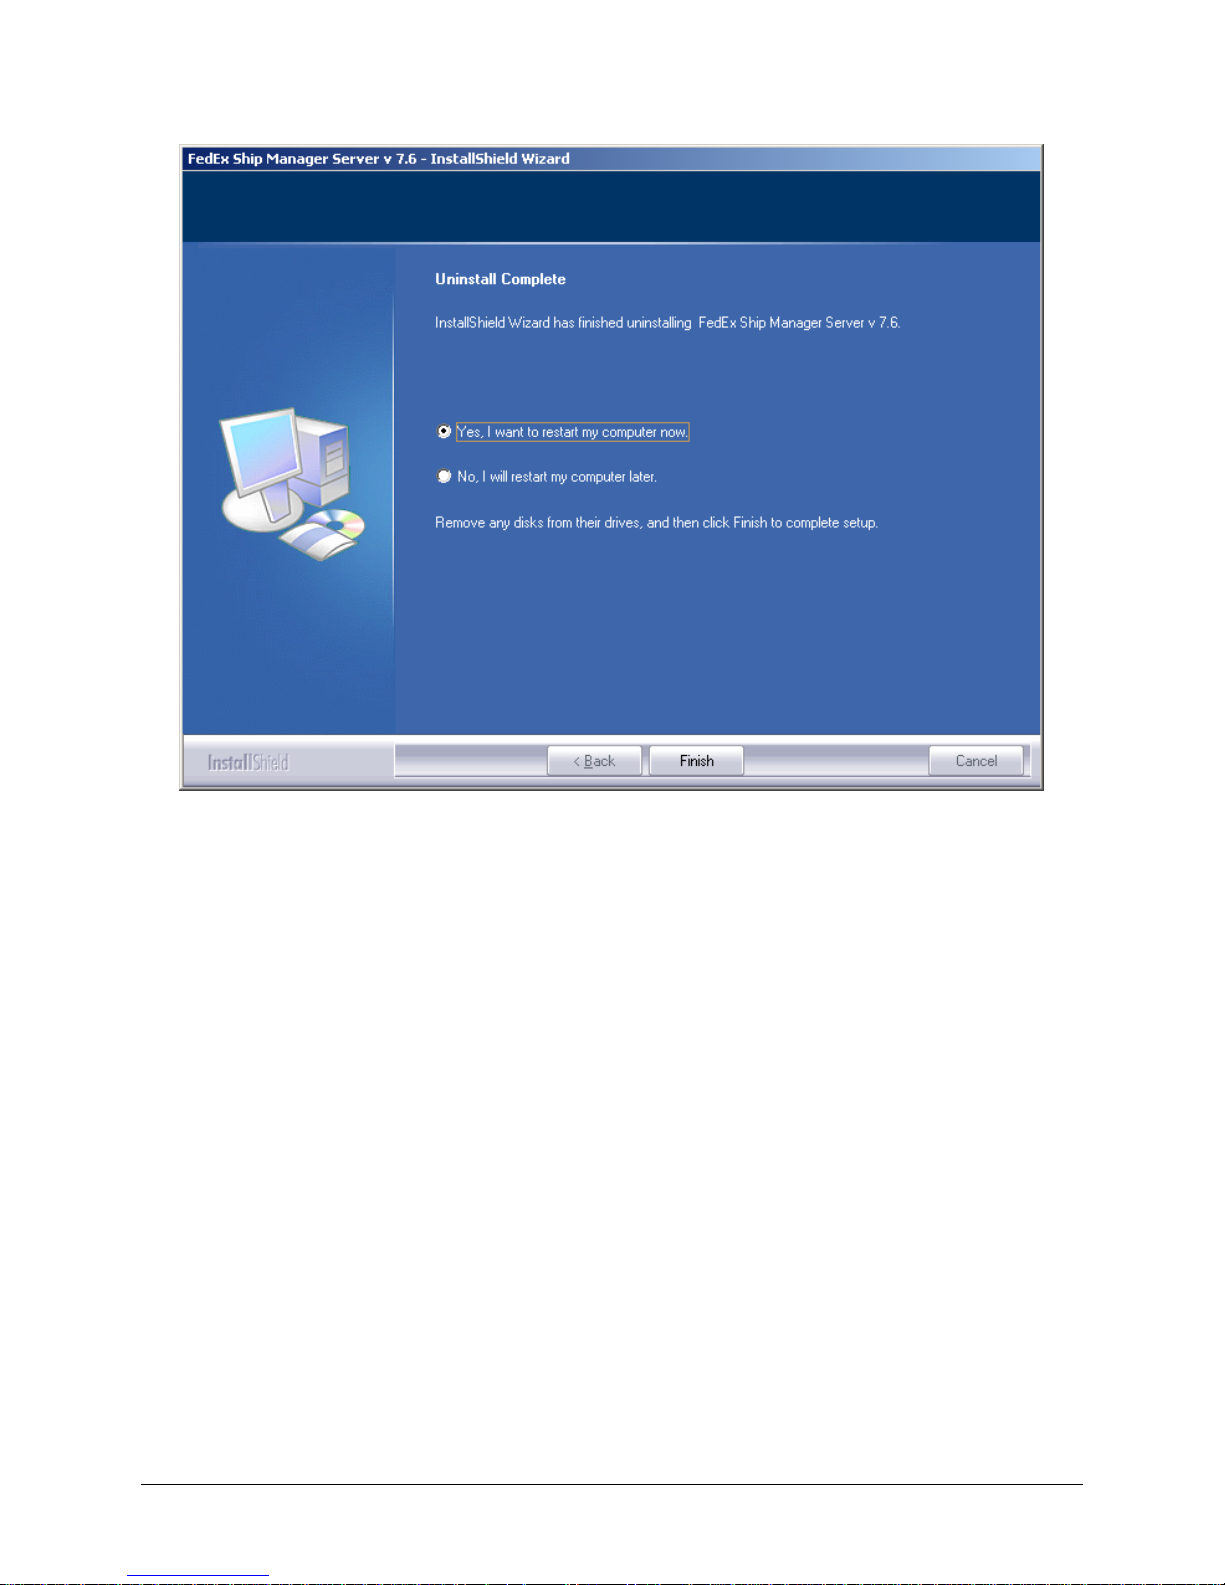
5. Click Finish to complete the uninstall and to reboot the server.
FedEx Ship Manager® Server User Guide, Version 7.6 35
Page 38
Chapter One: Setting Up FSMS
It is not required to remove Sybase if a reinstall of FSMS will be performed. FSMS cleans the database as
part of the FSMS uninstall. However, if Sybase is to be removed, repeat the above steps with SQL
Anywhere Studio 9 as the selected application.
36 FedEx Ship Manager® Server User Guide, Version 7.6
Page 39

Chapter One: Setting Up FSMS
Configuring FSMS
This section of the FSMS User Guide contains step-by-step instructions for configuring the FSMS
software on a server.
Before using FSMS, the application must be properly configured using the FSMS Configuration Utility,
which allows you to enter and store user and system specific data. The FSMS Configuration Utility has
nine tabs used to enter function level data:
• Shipper Settings
• Report Settings
• Label Settings
• Doc-Tab Settings
• System Settings
• IPD/IED/IDF Settings (International Priority Distribution Configuration)
• Tracking Numbers
• Meter Settings
• Advanced Settings
Before you begin configuration of your FSMS installation, the following entry tips are provided to make
input easy:
9 Always tab out of a text field on any of the Configuration windows. Otherwise, the function
buttons on the window may not be enabled.
9 If a text field is displayed in red prior to or after tabbing out of the field, an invalid field value has
been entered and should be corrected before exiting the window.
9 Holding the mouse cursor over a field introduces a Tip that provides the valid data entry for the
field, as well as the access level required to edit the field.
9 Closing the FSMS Configuration Utility by using the X will NOT save the data you entered. You
must click the Apply or the Apply & Exit button to save your entries.
9 If you are making configuration changes in an existing version of FSMS, you must be sure to
perform a Close before changing any information.
Shipper Settings
The Shipper Settings tab is used to enter information about the shipping origin location. FSMS supports
the configuration and use of an unlimited number of shipping locations. A unique meter number is needed
to establish and identify each shipping location. The unique meter number established and assigned to a
shipping location is used for many FSMS functions such as meter level report generation, revenue data
upload, and tracking number assignment. Meter numbers are unique to FedEx account numbers and may
not be used with any account number other than the one to which it has been assigned. However, a
single account number or a single location can be assigned many meter numbers.
Shipper settings should be configured before any other configuration information is added. The first meter
added to this configuration should be the Master meter; all subsequent meters to be added are Child
meters that are associated with the Master meter.
FedEx Ship Manager® Server User Guide, Version 7.6 37
Page 40
Chapter One: Setting Up FSMS
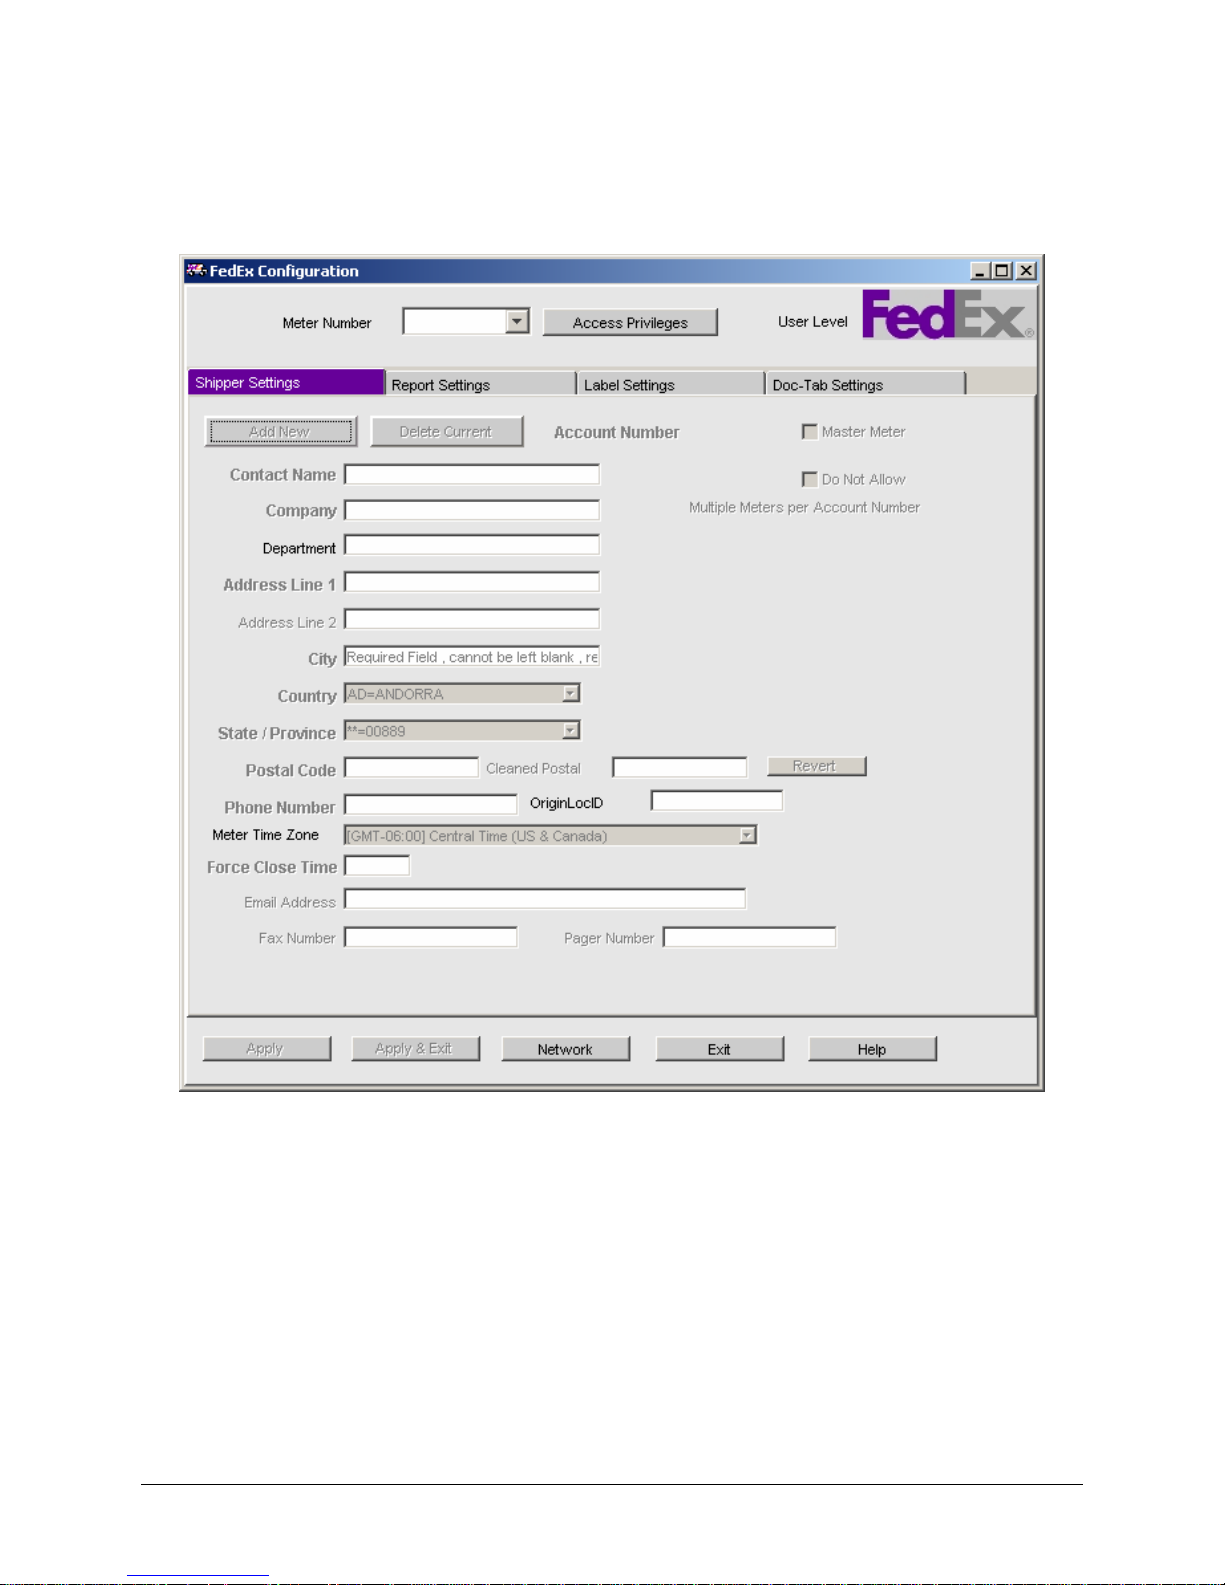
Adding a New Meter in the Shipper Settings window:
Select the Shipper Settings tab in the FSMS Configuration window. The following is a sample Shipper
Settings window:
All required information on the Shipper Settings window must be entered prior to configuring any other
information in the FSMS Configuration Utility. Required information is bolded. The Shipper Settings
window allows you to add meters (both Master and Child) for shipping from your specified locations. The
first meter to be entered in this window is the Master meter. All subsequent meters entered added to the
FSMS configuration are Child meters associated with the Master meter.
When the FSMS Configuration Utility is launched, only the tabs that can be edited without entering a
password into the Access Privileges box will be displayed. The remaining tabs can be viewed without
editing capabilities by clicking the Access Privileges button and typing “View” (capital V) into the
Access Privileges box. Editing information on the hidden tabs requires a higher level password. Contact
your FedEx Customer Service Representative for assistance if access to these tabs is required.
38 FedEx Ship Manager® Server User Guide, Version 7.6
Page 41
Chapter One: Setting Up FSMS
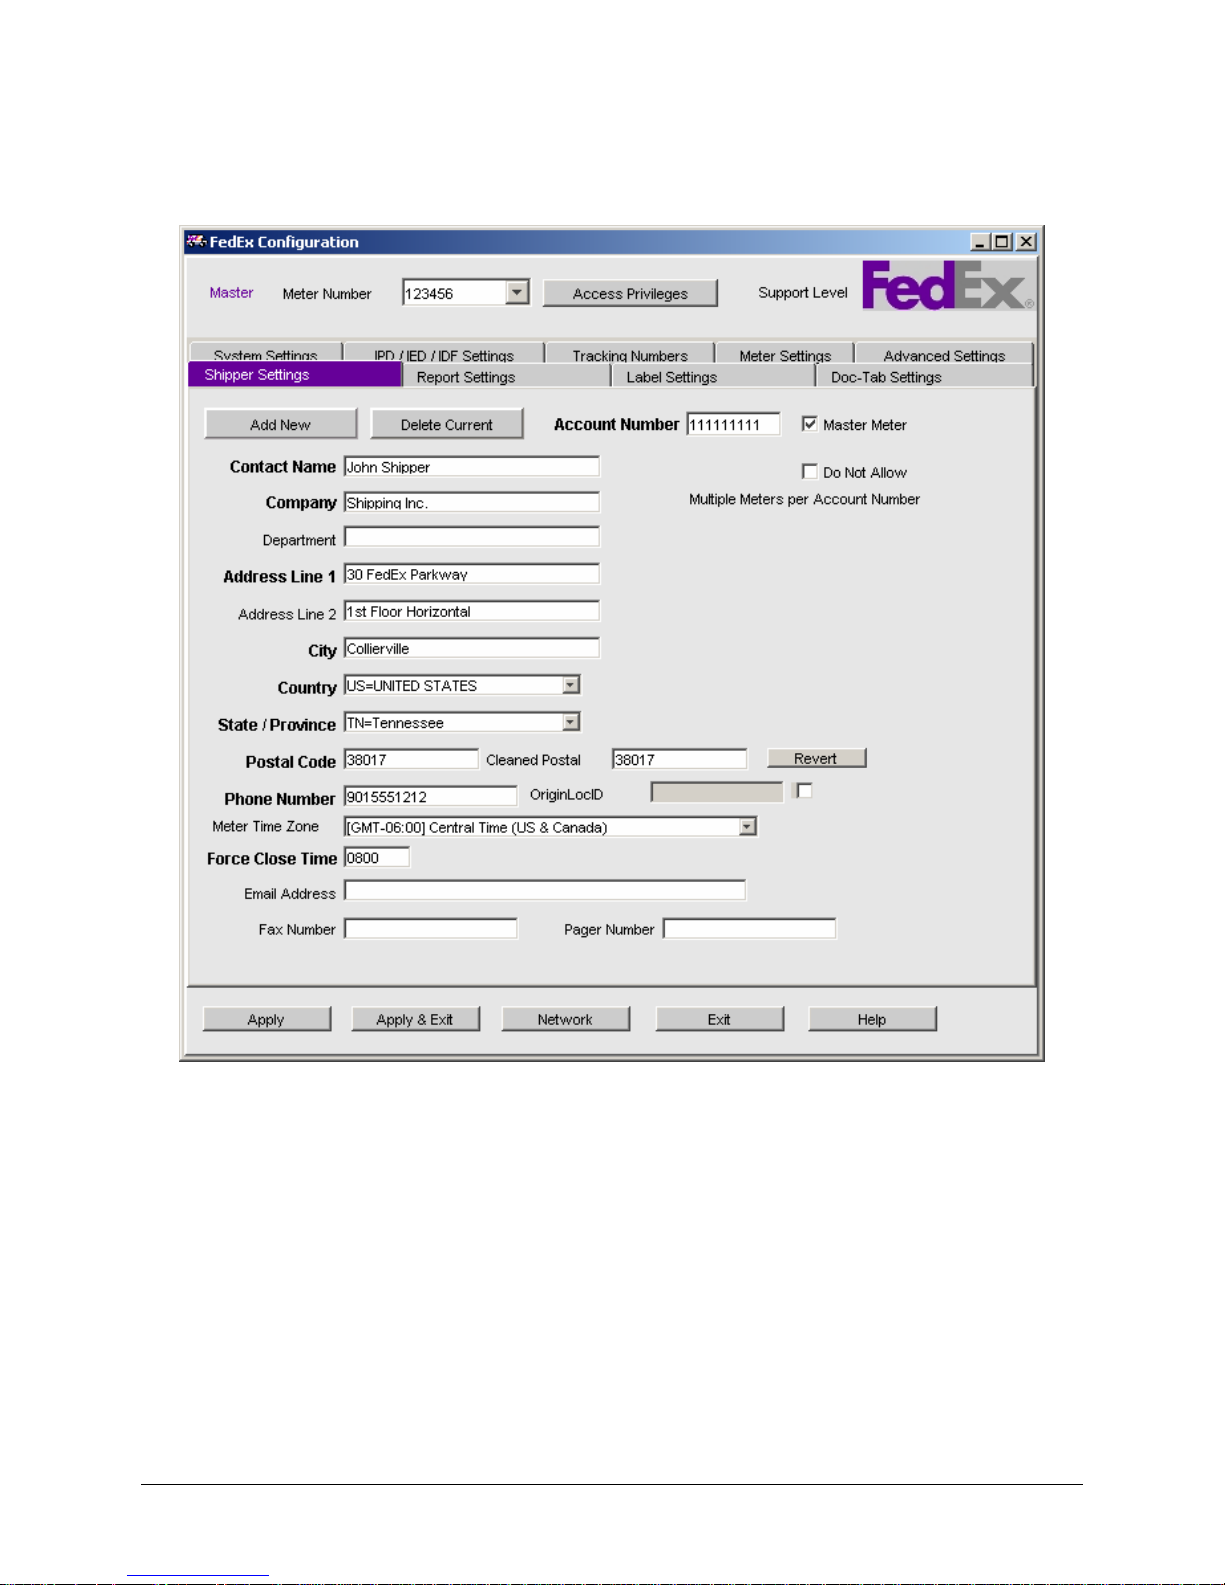
If a correct password is entered into the Access Privileges window, all available tabs will be displayed as
below:
FedEx Ship Manager® Server User Guide, Version 7.6 39
Page 42
Chapter One: Setting Up FSMS
Adding an Existing Meter to a new installation of FSMS:
NOTE:
This procedure is used to add existing meters to a new installation of FSMS via
communications with FedEx. New meters should be requested using the FSMS Meter
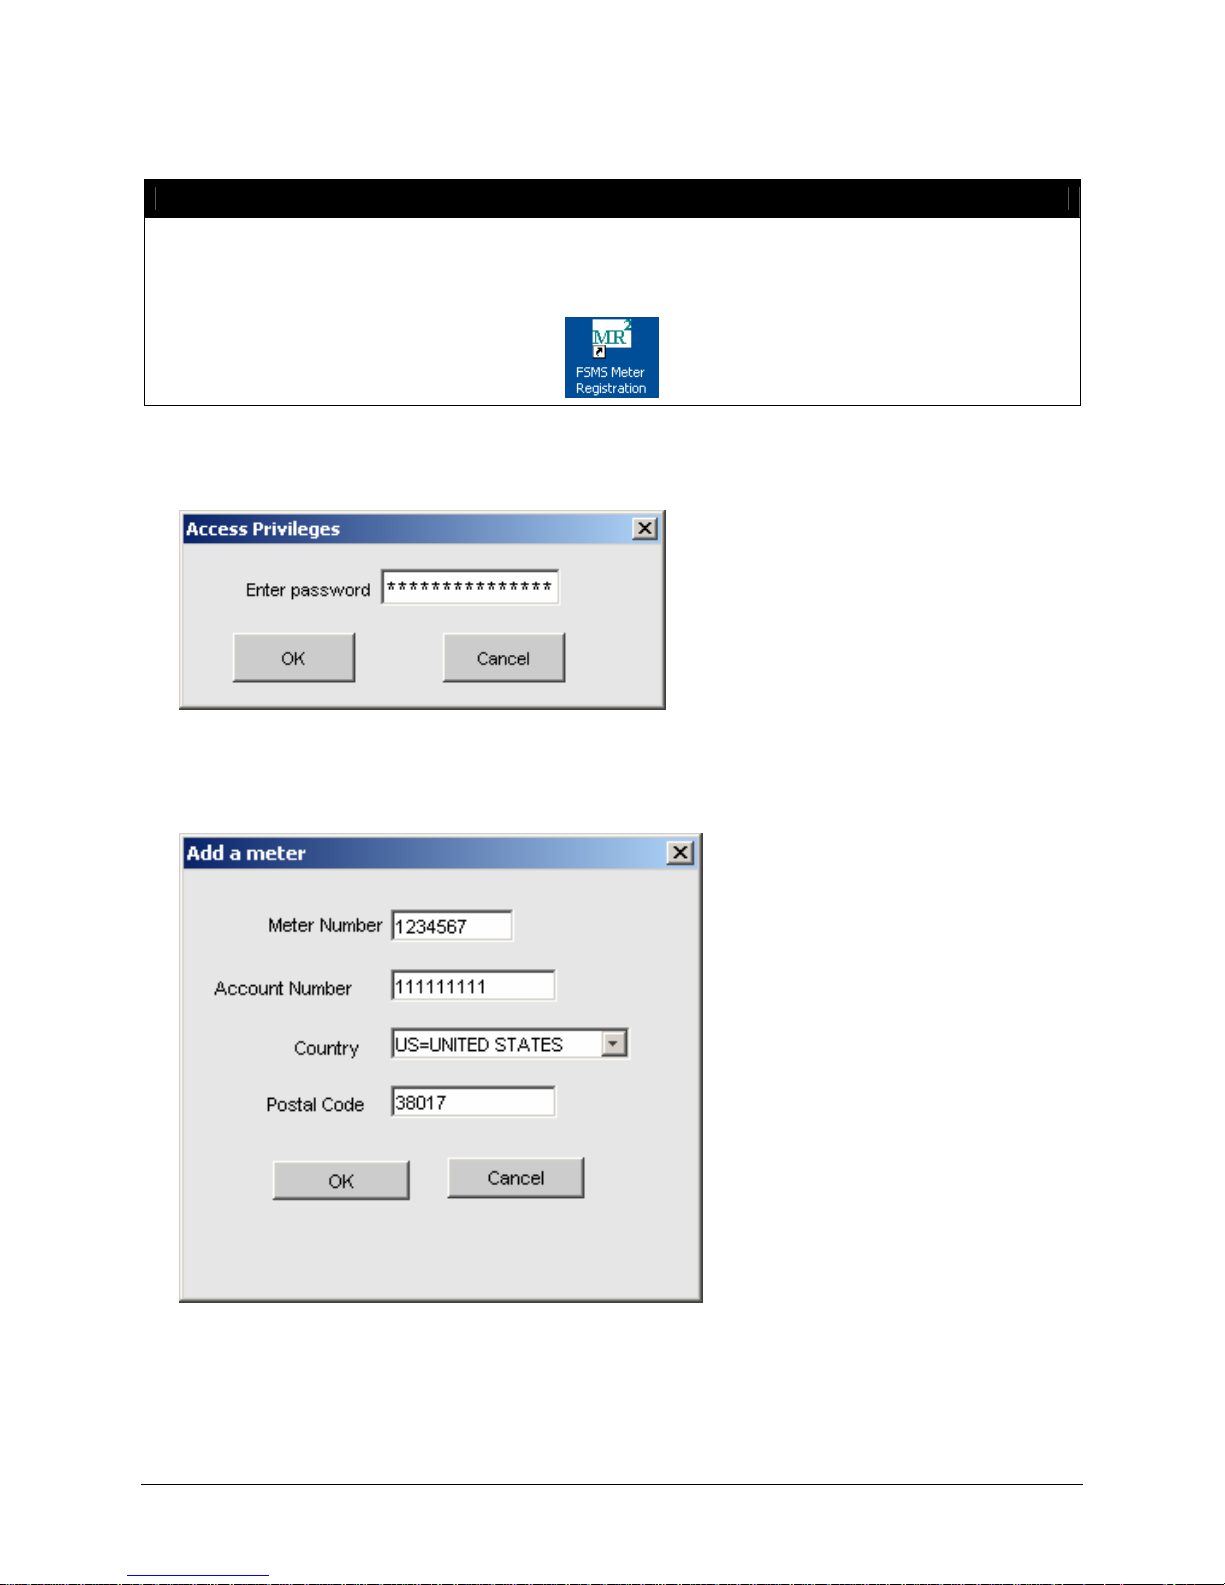
Registration utility accessed from the following desktop icon:
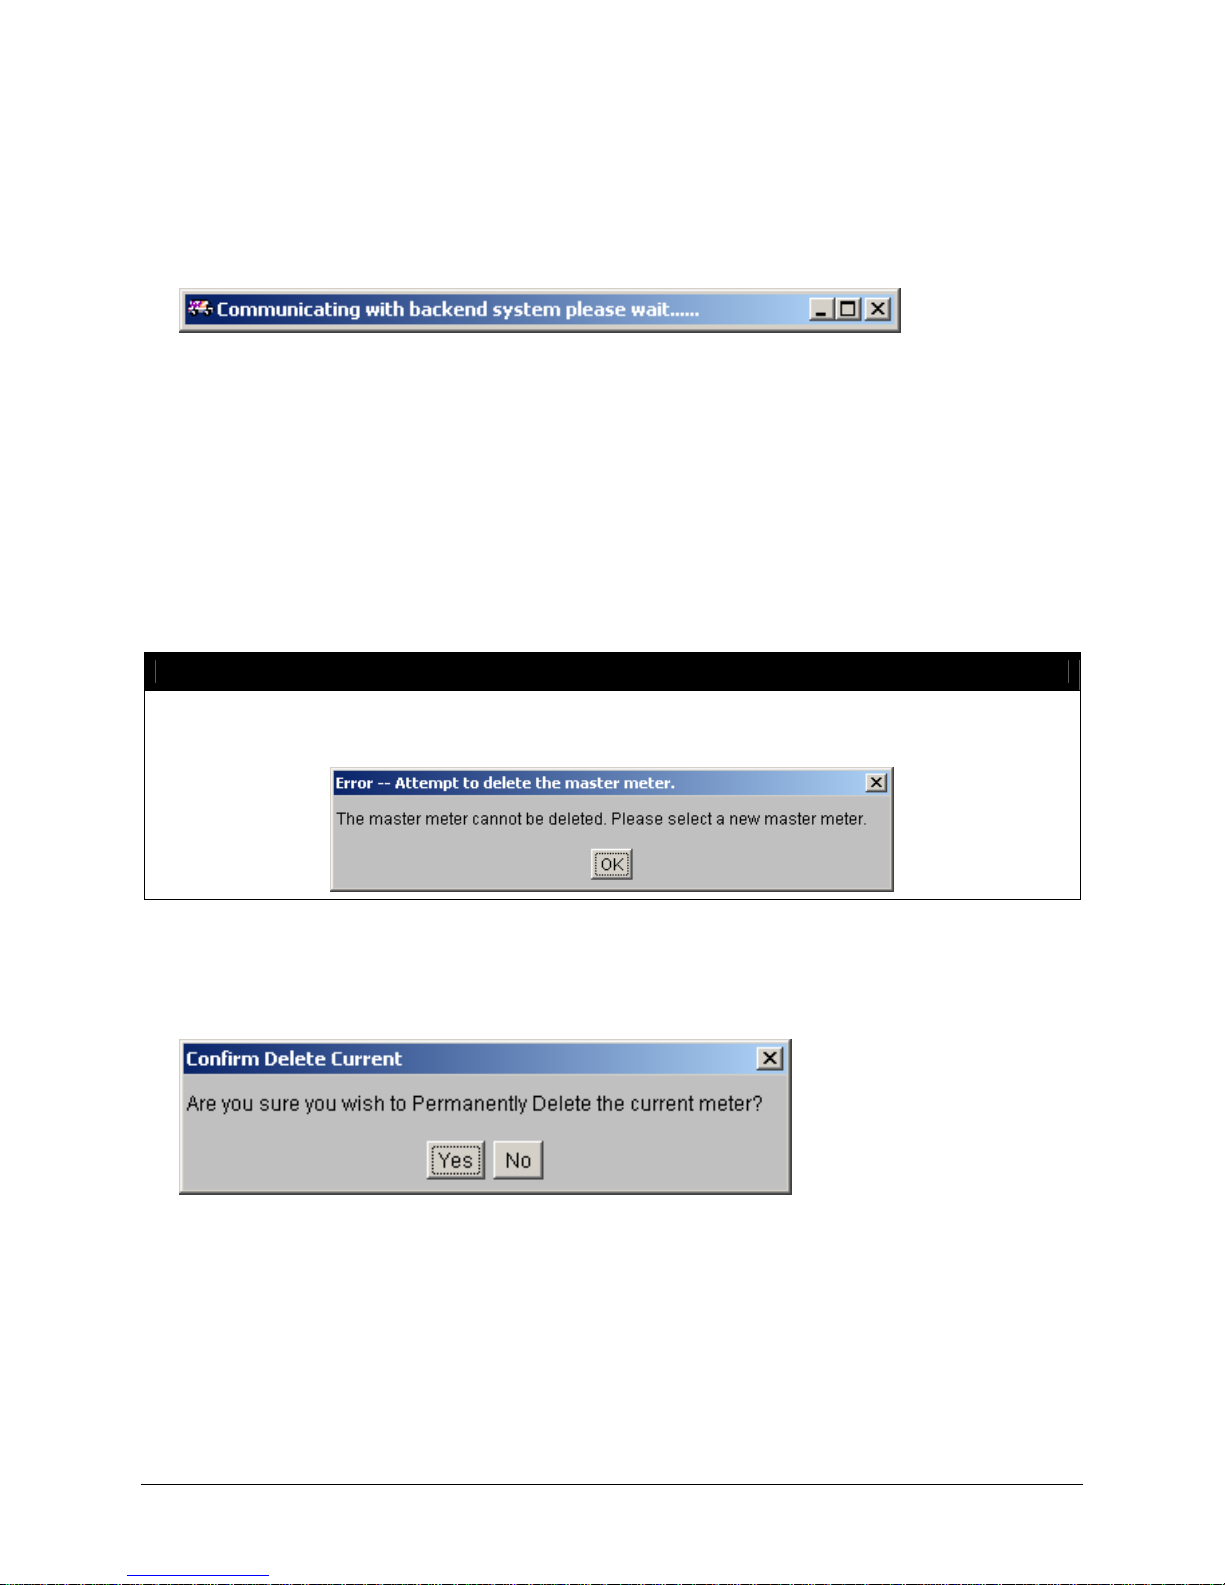
1. Click the Access Privileges button. The Access Privileges password window is displayed:
2. Enter the password provided by your FedEx Customer Support Representative.
3. Click the Add New button. The Add a Meter window is displayed:
4. Enter the Meter Number to be added.
5. Enter the Account Number of the associated meter number.
6. Select the origin Country for the meter number.
40 FedEx Ship Manager® Server User Guide, Version 7.6
Page 43
Chapter One: Setting Up FSMS
7. Enter the Postal Code for the meter number.
8. Click OK.
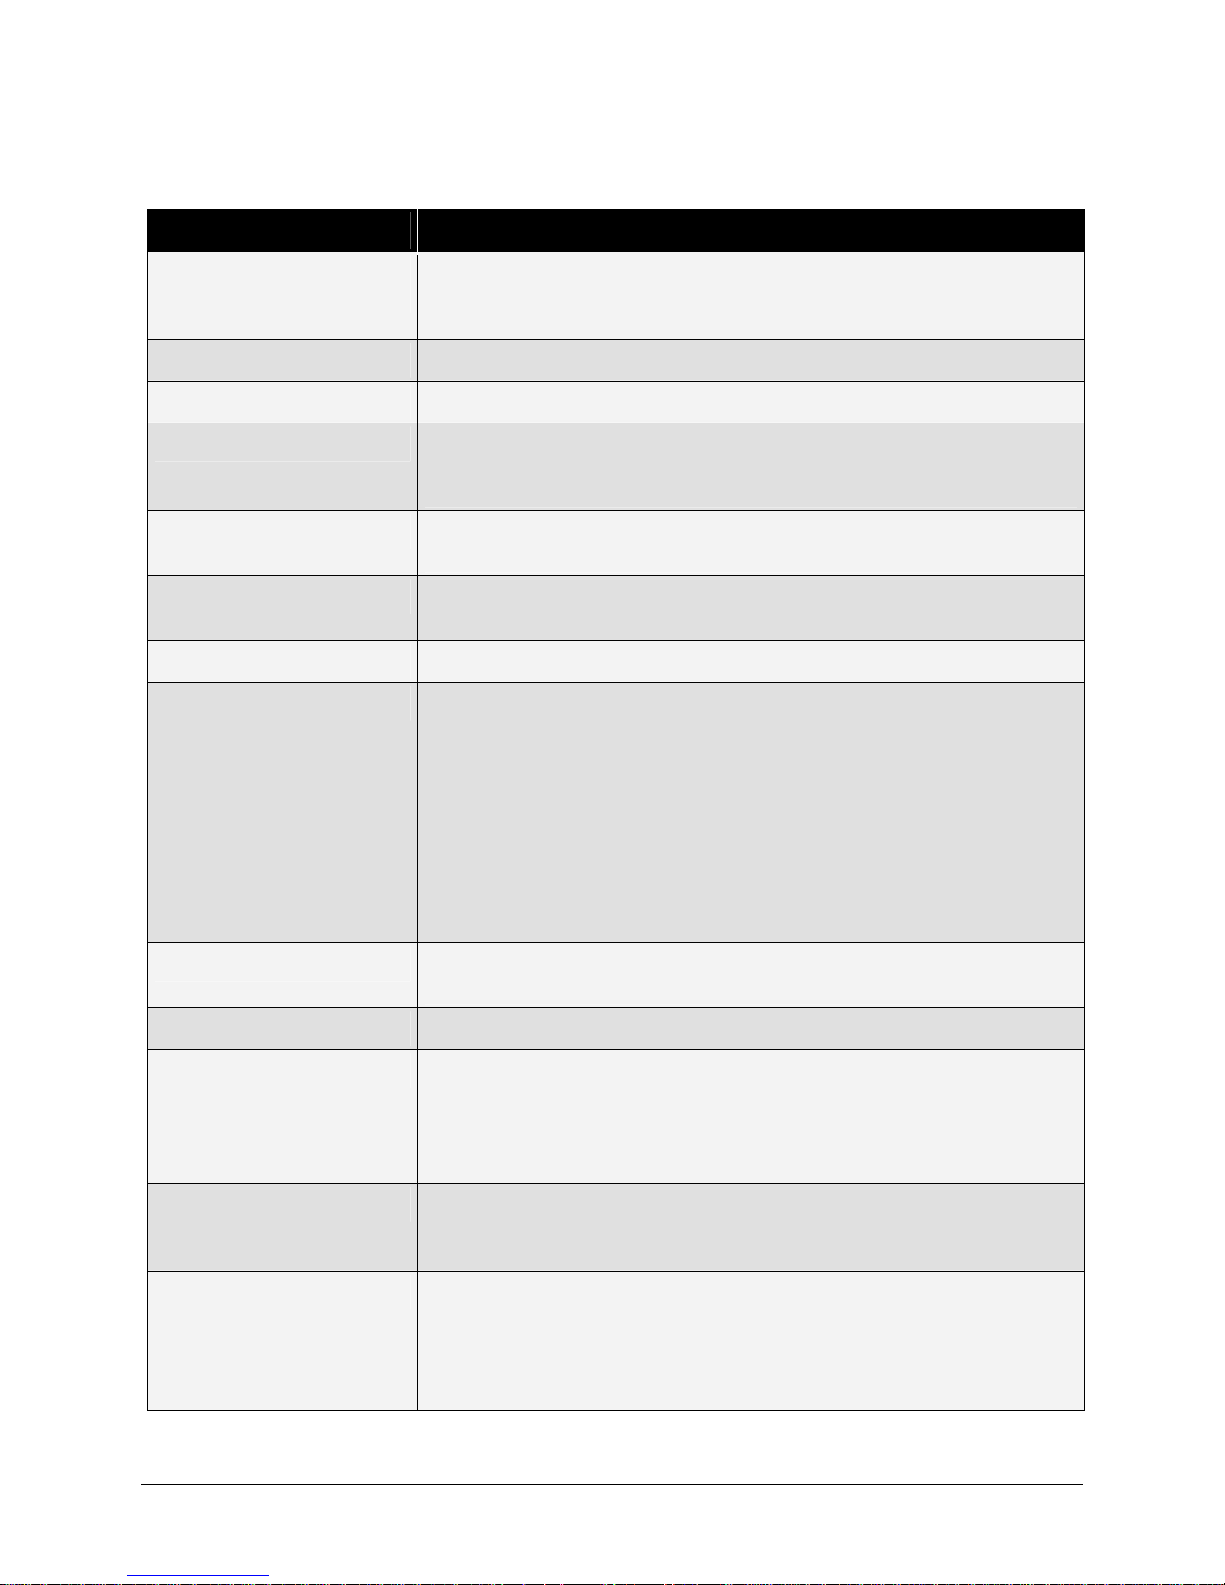
9. FSMS will attempt to retrieve meter information from FedEx systems. During this process, the
following message will be displayed:
10. If successful, the Shipper Settings and Meter Settings tabs of the FSMS Configuration Utility will be
populated with the correct information for FedEx systems.
11. If unsuccessful, an error will be returned and the user will be prompted to enter the information
manually.
Deleting a Meter:
You may also delete a Child meter from your FSMS Configuration by selecting the Child meter number
you want to remove from the Meter Number pull-down list at the top of the Shipper Settings window and
clicking Delete Current.
NOTE:
Only a Child meter may be deleted from the Shipper Settings window. The Master meter may
not be deleted. An attempt to delete the Master meter will result in the following error:
To delete a Master meter, another meter must first be designated as the Master. Contact your FedEx
Customer Support Representative if deletion of a Master meter is required.
If the meter selected for deletion is not the Master meter, the following window will be displayed:
FedEx Ship Manager® Server User Guide, Version 7.6 41
Page 44
Chapter One: Setting Up FSMS
All Bold fields on the Shipper Settings window are required to configure a meter. Below are the field
requirements for all fields:
Field Name Description
Do Not Allow Multiple
Meters per Account Number
Check this box to prevent multiple meters from using the same
9-digit FedEx account number. This will allow a Close Request
transaction using the account number only.
Contact Name* Enter the contact name. This can be a company name.
Company* Enter the company name.
Department* Enter the name of the department shipping from the assigned meter. This
entry will print in the Sender section of the label. The Department field
value can be overridden by using field 38 in the shipping transaction.
Address Line 1* Enter the primary address for your location. This address usually includes
the street name and number.
Address Line 2* Enter any secondary address information, such as Suite #, for your
location.
City* Enter the city name from which shipping will originate.
Country* FSMS defaults to US. To select another country, click on the pull-down
list and highlight the appropriate choice.
If your country is postal aware, this means that a verifiable postal/ZIP
code must be supplied as part of your shipper record. This designation is
supplied by FSMS after you select the country from which you are
shipping.
If shipping from a country that is not postal aware, the postal code you
enter is not validated and any routing information supplied on your
package label is determined from the FedEx location designated for your
country.
State/Province* If you are located in the U.S., Canada, or Puerto Rico, select your state
or province from the pull-down list.
Postal Code* Enter the postal code for your shipping origin location.
Cleaned Postal When you enter your shipper address, including your postal code, FSMS
checks the URSA file to ensure that the postal code is correct and
displays the matched postal code found. If you want to revert to your
original entry, click the Revert button. FSMS will change the postal code
back to your original entry.
Revert FSMS will attempt to provide a cleaned postal code for the entered postal
code. If there is no cleaned postal code, Revert can be used to use the
manually entered postal code.
OriginLocID The FedEx location identification (if your shipper address is postal aware,
which means that your address is supported in the FedEx URSA file) of
your shipping origin location. This information is not entered, but comes
from the URSA file located on your server.
The OriginLocID may be overridden with FedEx assistance.
42 FedEx Ship Manager® Server User Guide, Version 7.6
Page 45
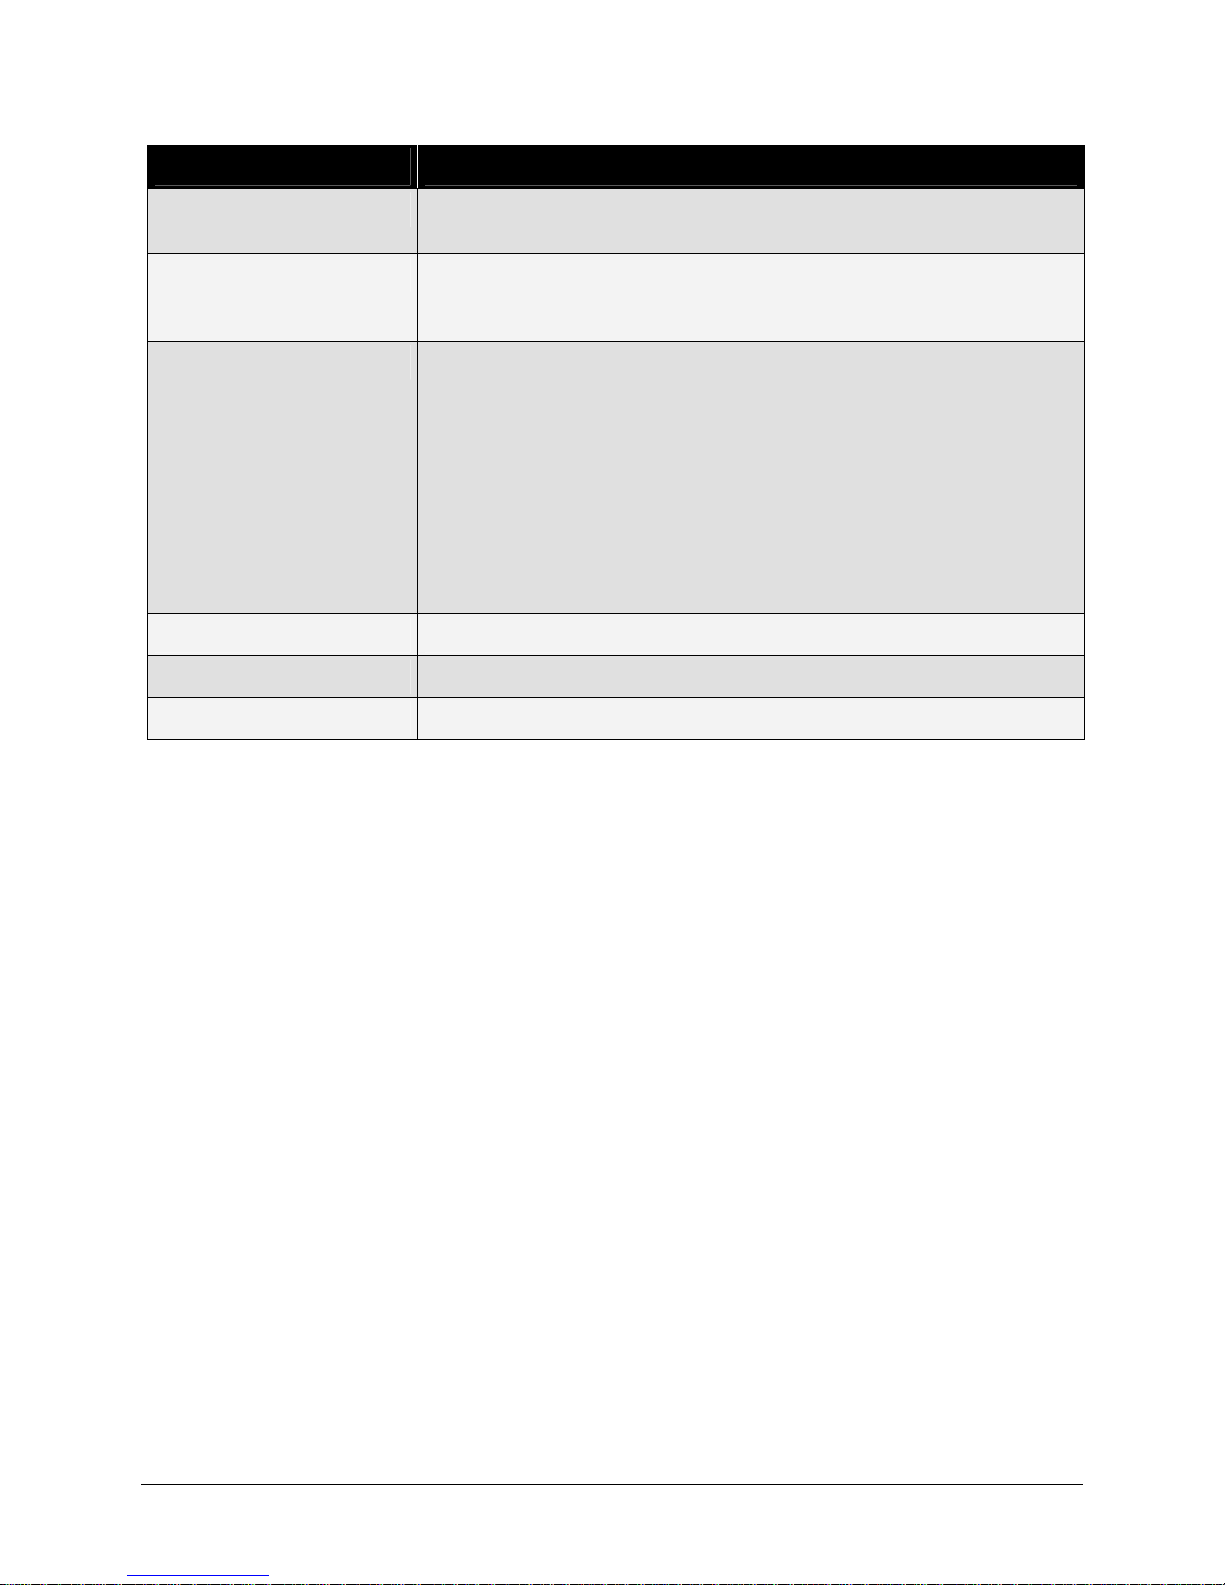
Chapter One: Setting Up FSMS
Field Name Description
Phone Number* Enter your company phone number. No special characters, such as
dashes, are allowed.
Meter Time Zone FSMS allows you to select a time zone for each meter (both Master and
Child) configured on your server. This functionality allows you to
designate Close Times, etc. for each meter by its specific time zone.
Force Close Time Enter the most convenient time for FSMS to close your shipping day.
Force Close is activated only if you have not closed your shipping day 24
hours before the Force Close Time entered.
The Force Close Time is entered in military time (for example: 1:00 PM =
1300).
Force Close Time is a meter level setting.
Force Close time is defaulted to the nearest hour at the time the Master
meter is added. For example, if a meter is added at 3:37 PM, the Force
Close Time will default to 1500.
Child meters will default to the same time as the Master meter.
Email Address Enter the e-mail address for the shipping contact in your company.
Fax Number Enter the fax number for the shipping contact in your company.
Pager Number Enter the pager number for the shipping contact in your company.
* These elements will be printed on the shipping label. See the FSMS Transaction Coding Reference
(FSMS TCR Version 7.6) for instructions on how to override the configured information.
To save changes to the FSMS Configuration Utility, click Apply to save changes without closing the
FSMS Configuration Utility, or click Apply & Exit to save changes and exit the FSMS Configuration
Utility.
To exit without saving any changes, click Exit.
Remote Configuration
The FSMS Configuration Utility can be installed independently of the FSMS application to allow for
remote network configuration of the FSMS application. To install the FSMS Configuration Utility, run the
FSMS installation, select Custom install and Configuration Utility from the install options menu.
By default, the FSMS Configuration Utility will attempt to connect to the local installation of FSMS
(IP 127.0.0.0) when launched. If the FSMS Configuration Utility was installed for remote use, no local
connection will be established.
To connect to the FSMS application on another server on the network, click the Network button at the
bottom of the FSMS Configuration Utility. The following window will be displayed:
FedEx Ship Manager® Server User Guide, Version 7.6 43
Page 46
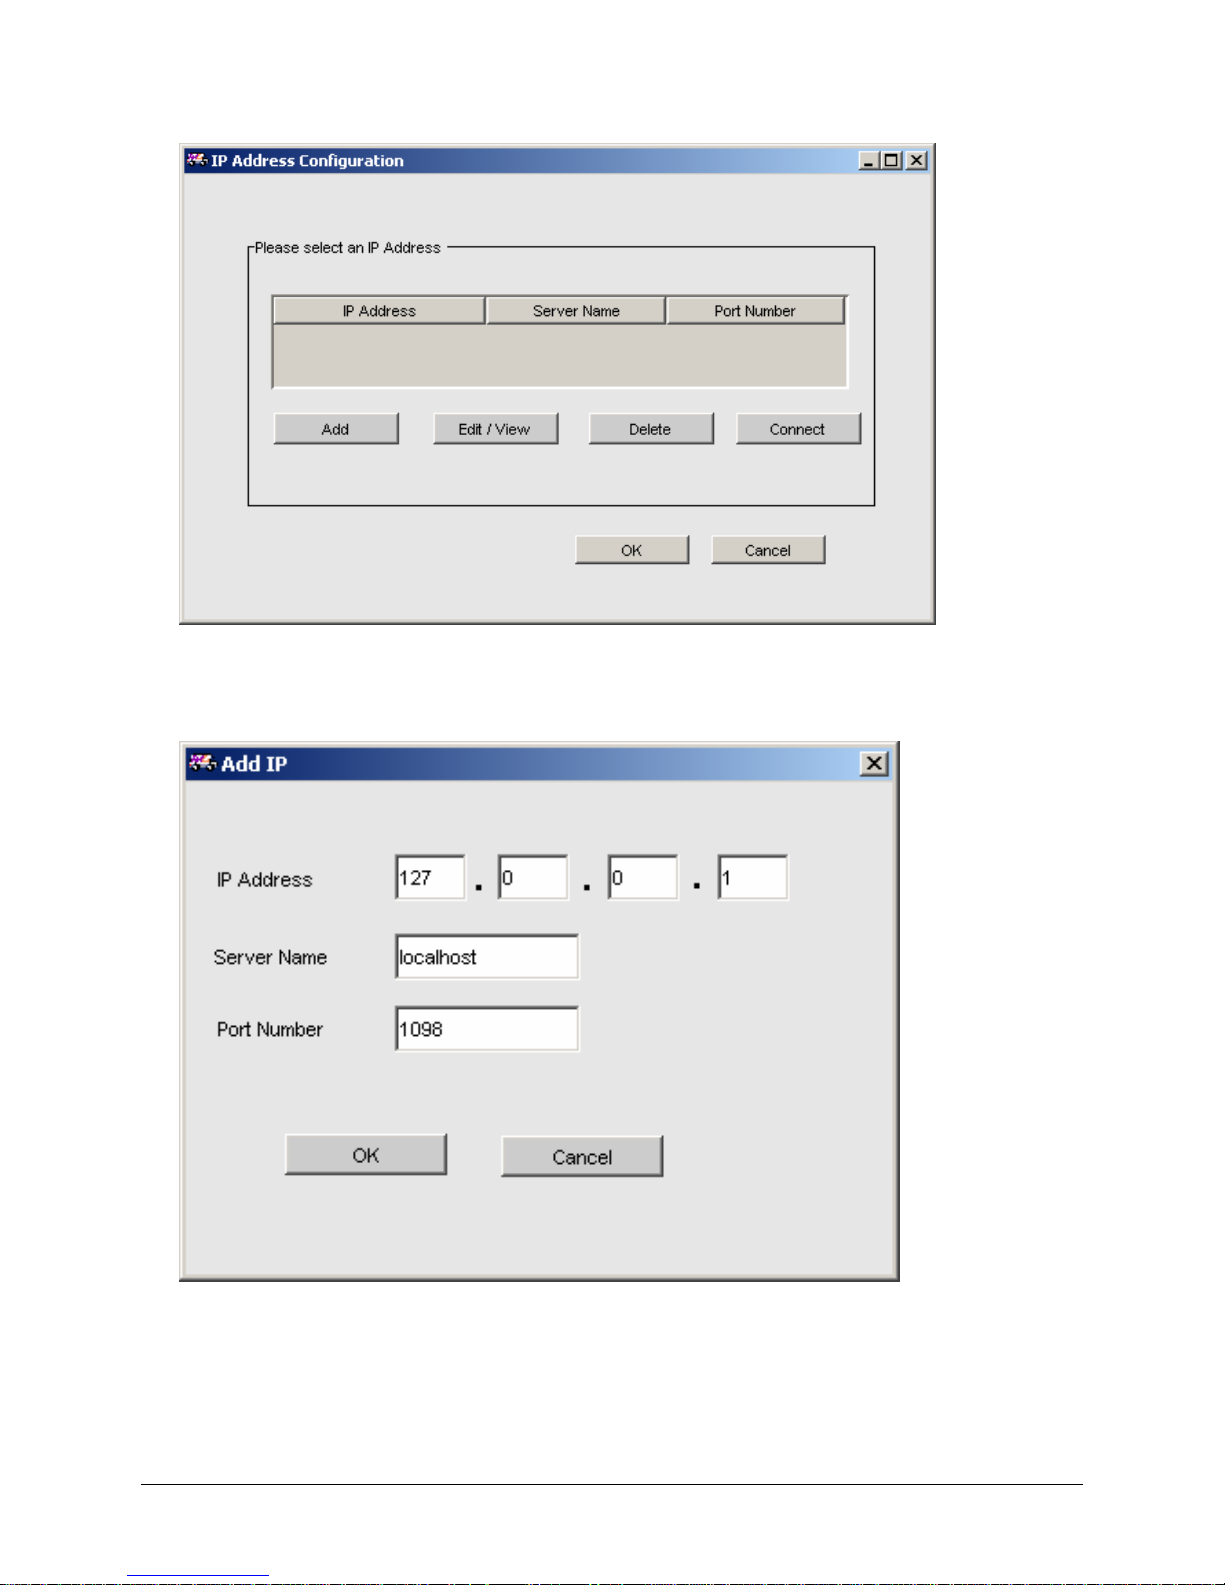
Chapter One: Setting Up FSMS
Adding an IP Address:
To add an IP address, click the Add button. The following window will be displayed:
1. Enter the IP Address of the FSMS server to be remotely configured.
2. Enter the system Server Name if available.
3. Enter the Port Number through which the FSMS server is to be accessed. Ensure this port is open
on the server to be remotely configured. FSMS defaults to port 1098.
44 FedEx Ship Manager® Server User Guide, Version 7.6
Page 47
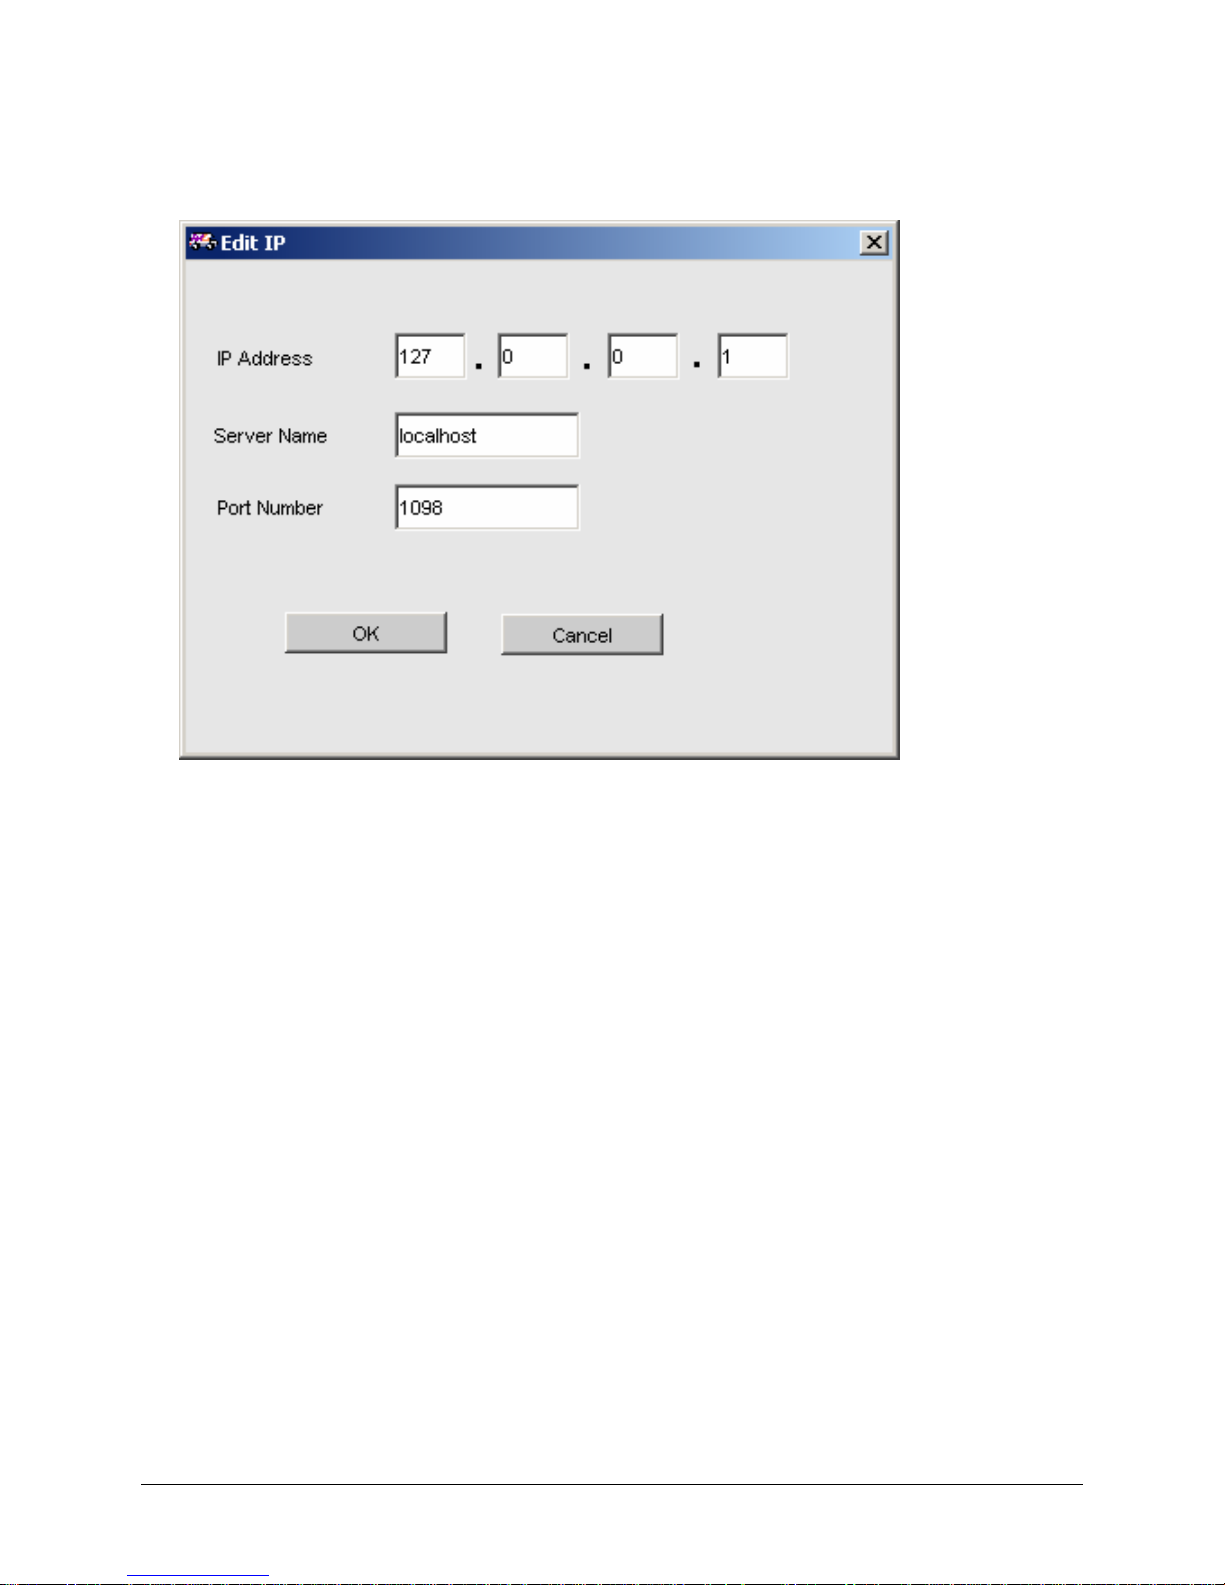
Chapter One: Setting Up FSMS
Editing an IP Address:
To edit an IP address, click the Edit/View button. The following window will be displayed:
1. Make desired changes.
2. Click OK to accept changes or Cancel to exit without saving or making any changes.
Deleting an IP Address:
1. Select the IP address to be deleted.
2. Click the Delete button.
Connecting to an IP Address:
1. Select an IP address in which to connect.
2. Click the Connect button.
3. The connection status will be displayed at the top of the FSMS Configuration Utility.
FedEx Ship Manager® Server User Guide, Version 7.6 45
Page 48
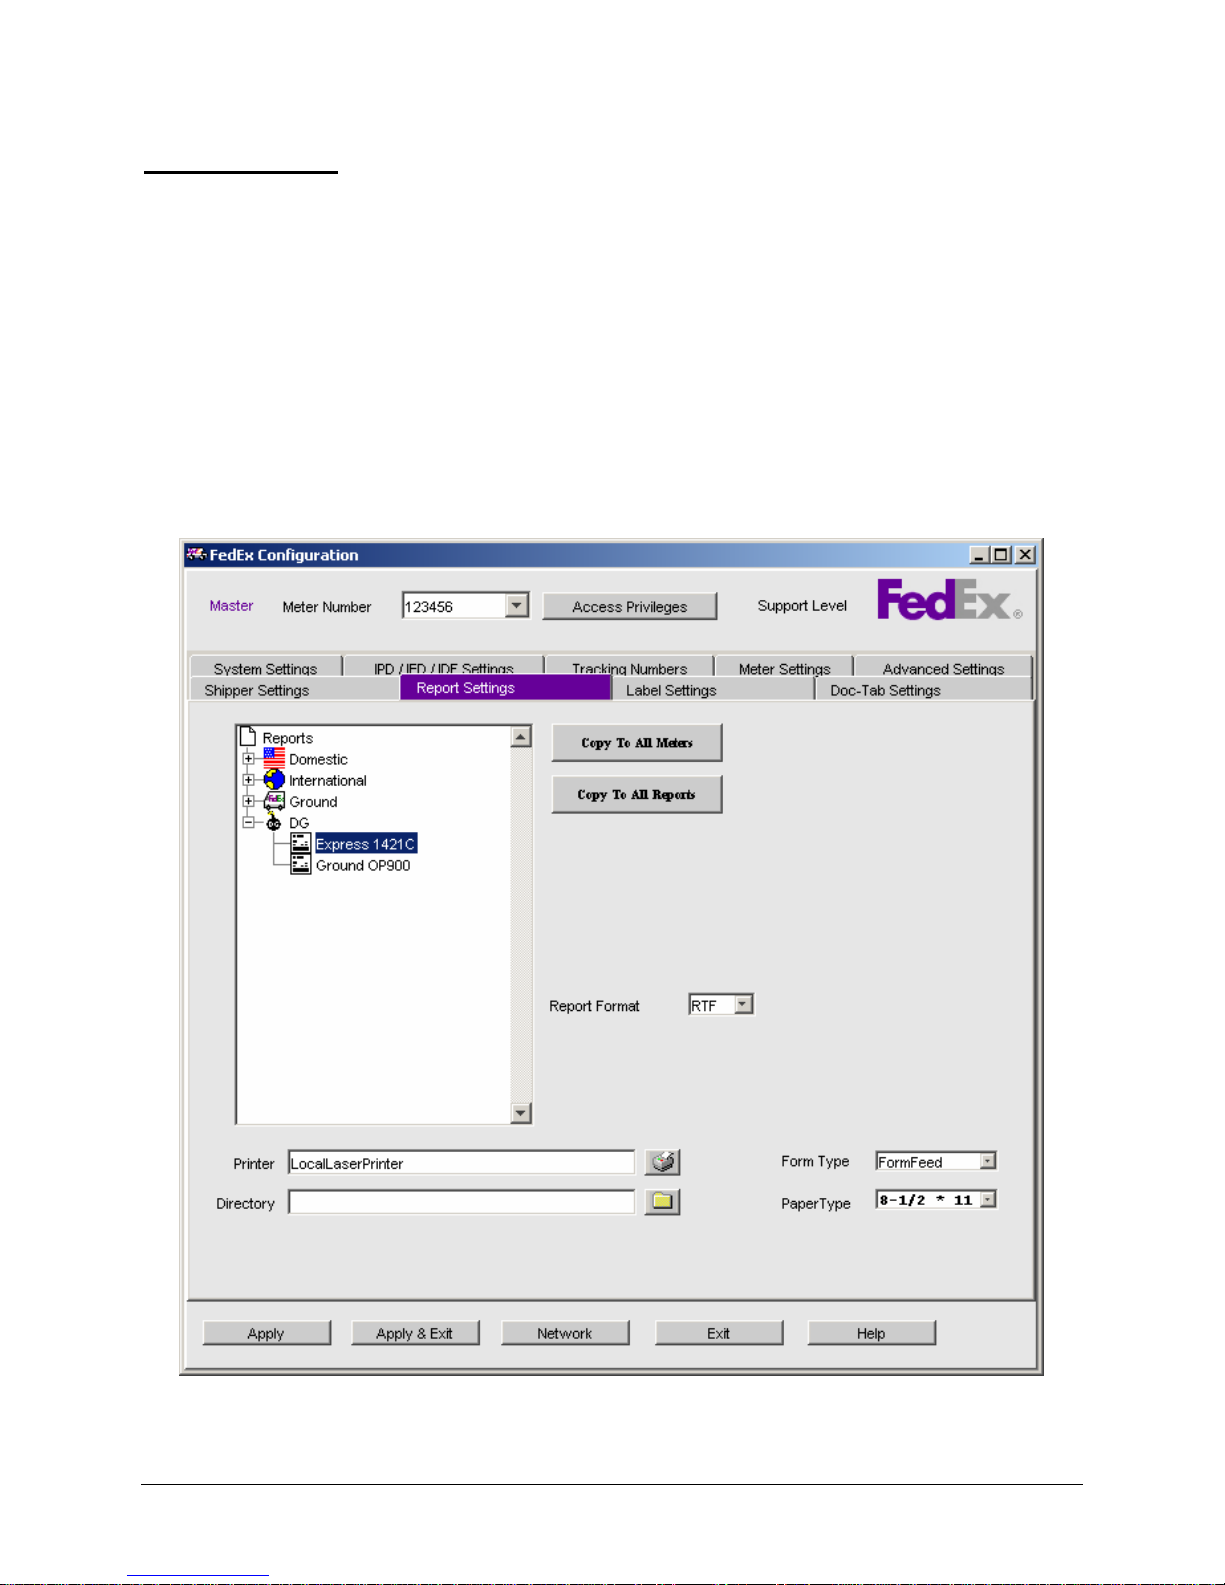
Chapter One: Setting Up FSMS
Report Settings
The Report Settings window is used to configure output for FSMS-supported reports.
• Choose the report format: PDF, DOC, RTF, TXT (do not use .txt for Ground or IED/IPD/IDF reports).
• The report format is a system level setting and will apply to all reports on all meters.
• Reports can be sent to a printer OR to a directory, but not both. If a printer and a directory are
configured, the reports will be saved to the specified directory.
• End-of-Day (EOD) reports cannot be printed and can only be saved to a directory.
• Multiple copies are available for selected International reports.
• The FedEx Express Dangerous Goods 1421C can be printed on multi-ply forms or on plain paper. If
printed on plain paper, the form can be printed on 8-1/2x11 or A4 paper.
• All International reports can be printed on 8-1/2x11 or A4 paper.
When you click the Report Settings tab, the following is displayed (ex. U.S. origin, all services enabled):
46 FedEx Ship Manager® Server User Guide, Version 7.6
Page 49
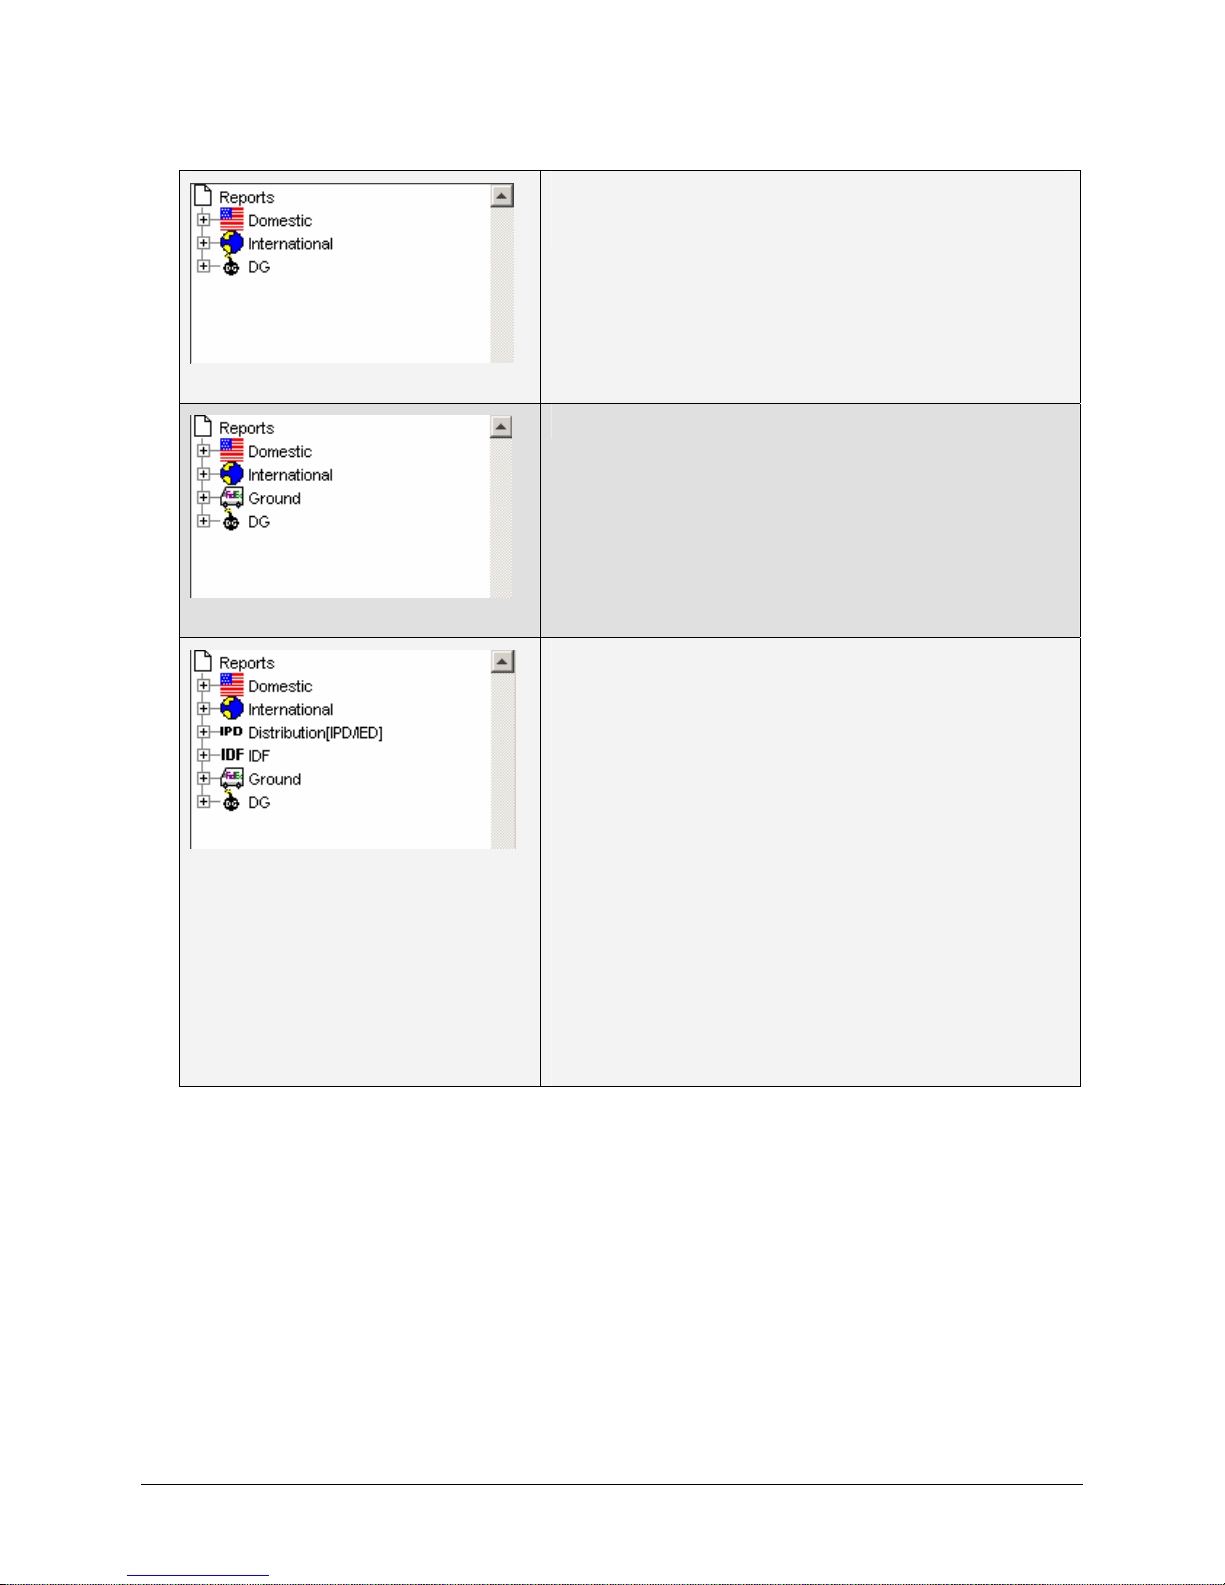
Chapter One: Setting Up FSMS
U.S. origin, FedEx Express only
U.S. origin, FedEx Express and FedEx Ground
U.S. origin, all services enabled
• FedEx Ground reports will be enabled when the
Ground checkbox on the Meter Settings tab is
checked. After enabling Ground, click the Apply
and Exit button, and then re-launch the FSMS
Configuration Utility to configure Ground reports.
• The IPD and IDF reports will be enabled when IPD is
manually configured or after a download of the rate
file if the account is a valid IPD or IDF account. If the
account is manually configured, click the Apply and
Exit button, and then re-launch the FSMS
Configuration Utility to configure IPD and/or IDF
reports.
• The Transborder Distribution (TD) reports, not
shown, will be enabled only if the account is a TD
qualified account. The TD flag that enables the TD
reports downloads as part of the Express rate
download.
FedEx Ship Manager® Server User Guide, Version 7.6 47
Page 50
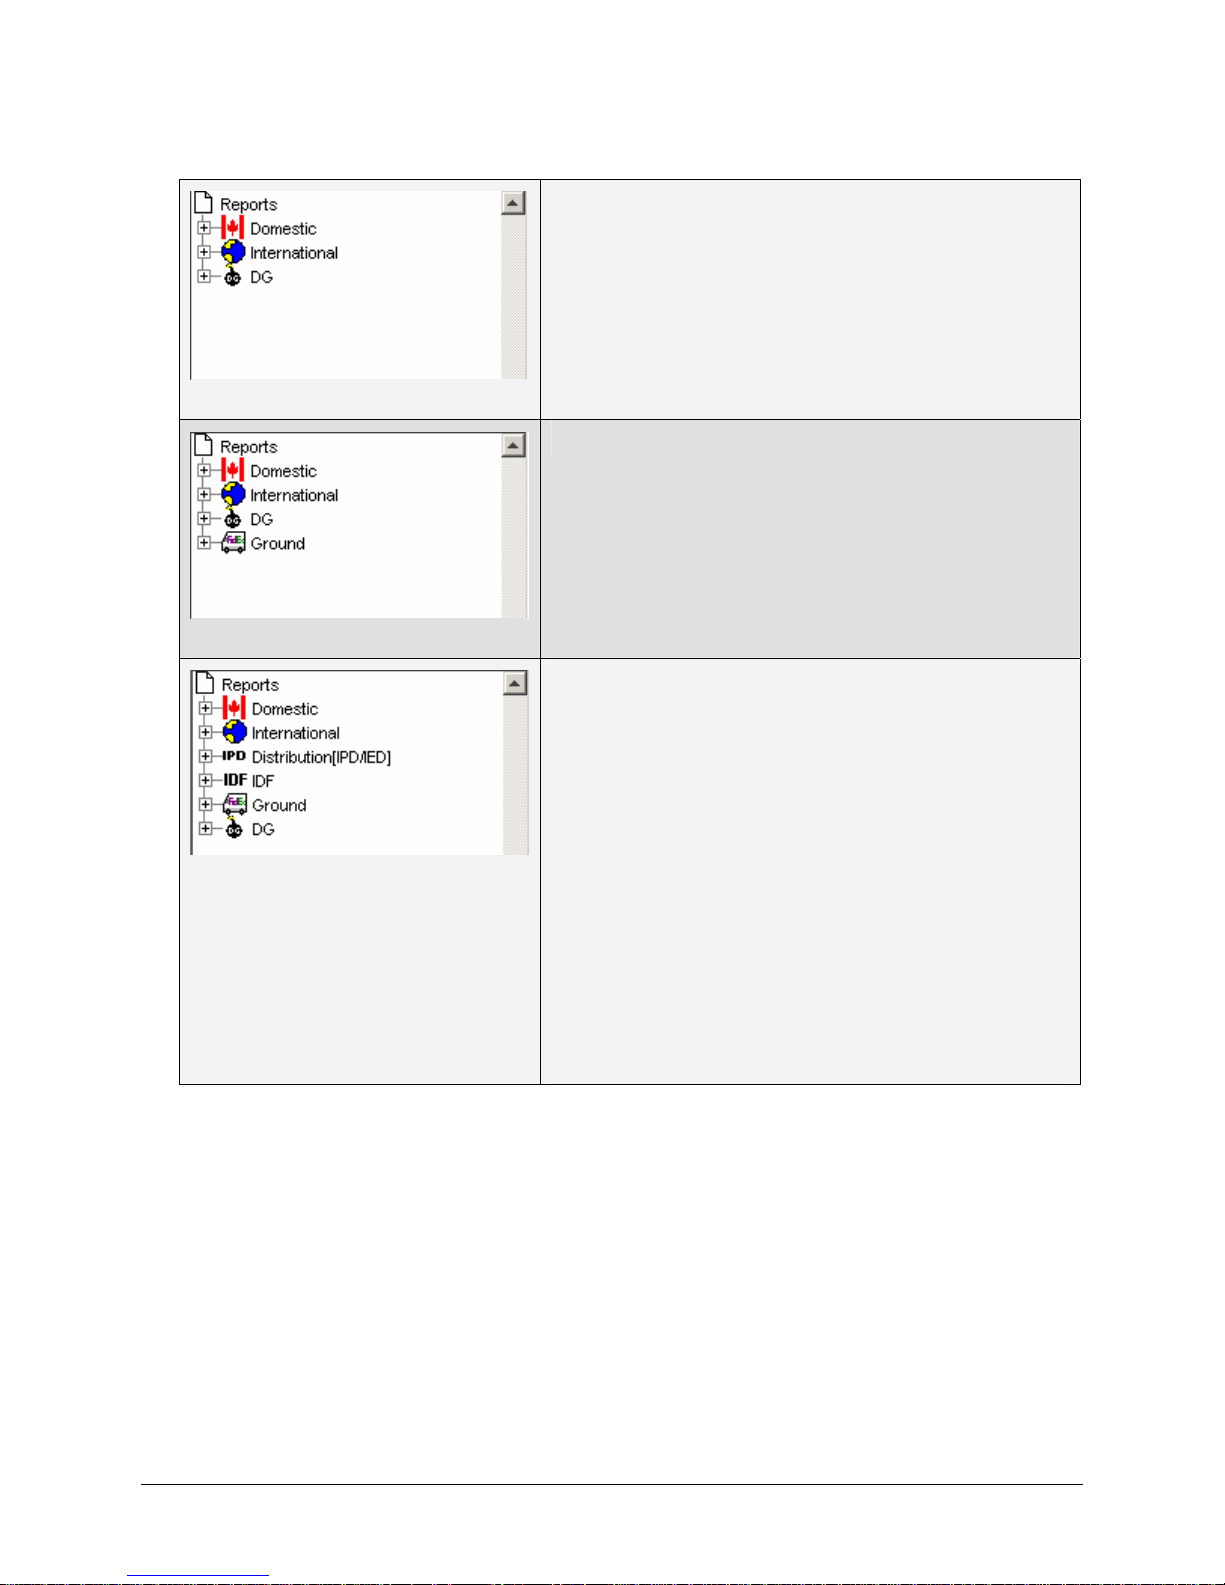
Chapter One: Setting Up FSMS
CA origin, FedEx Express only
CA origin, FedEx Express and FedEx Ground
CA origin, all services enabled
• FedEx Ground reports will be enabled when the
Ground checkbox on the Meter Settings tab is
checked. After enabling Ground, click the Apply
and Exit button and then re-launch the FSMS
Configuration Utility to configure Ground reports.
• The IPD and IDF reports will be enabled when IPD is
manually configured or after a download of the rate
file if the account is a valid IPD or IDF account. If the
account is manually configured, click the Apply and
Exit button and then re-launch the FSMS
Configuration Utility to configure IPD and/or IDF
reports.
• The TD reports, not shown, will be enabled only if
the account is a TD qualified account. The TD flag
that enables the TD reports downloads as part of the
Express rate download.
48 FedEx Ship Manager® Server User Guide, Version 7.6
Page 51
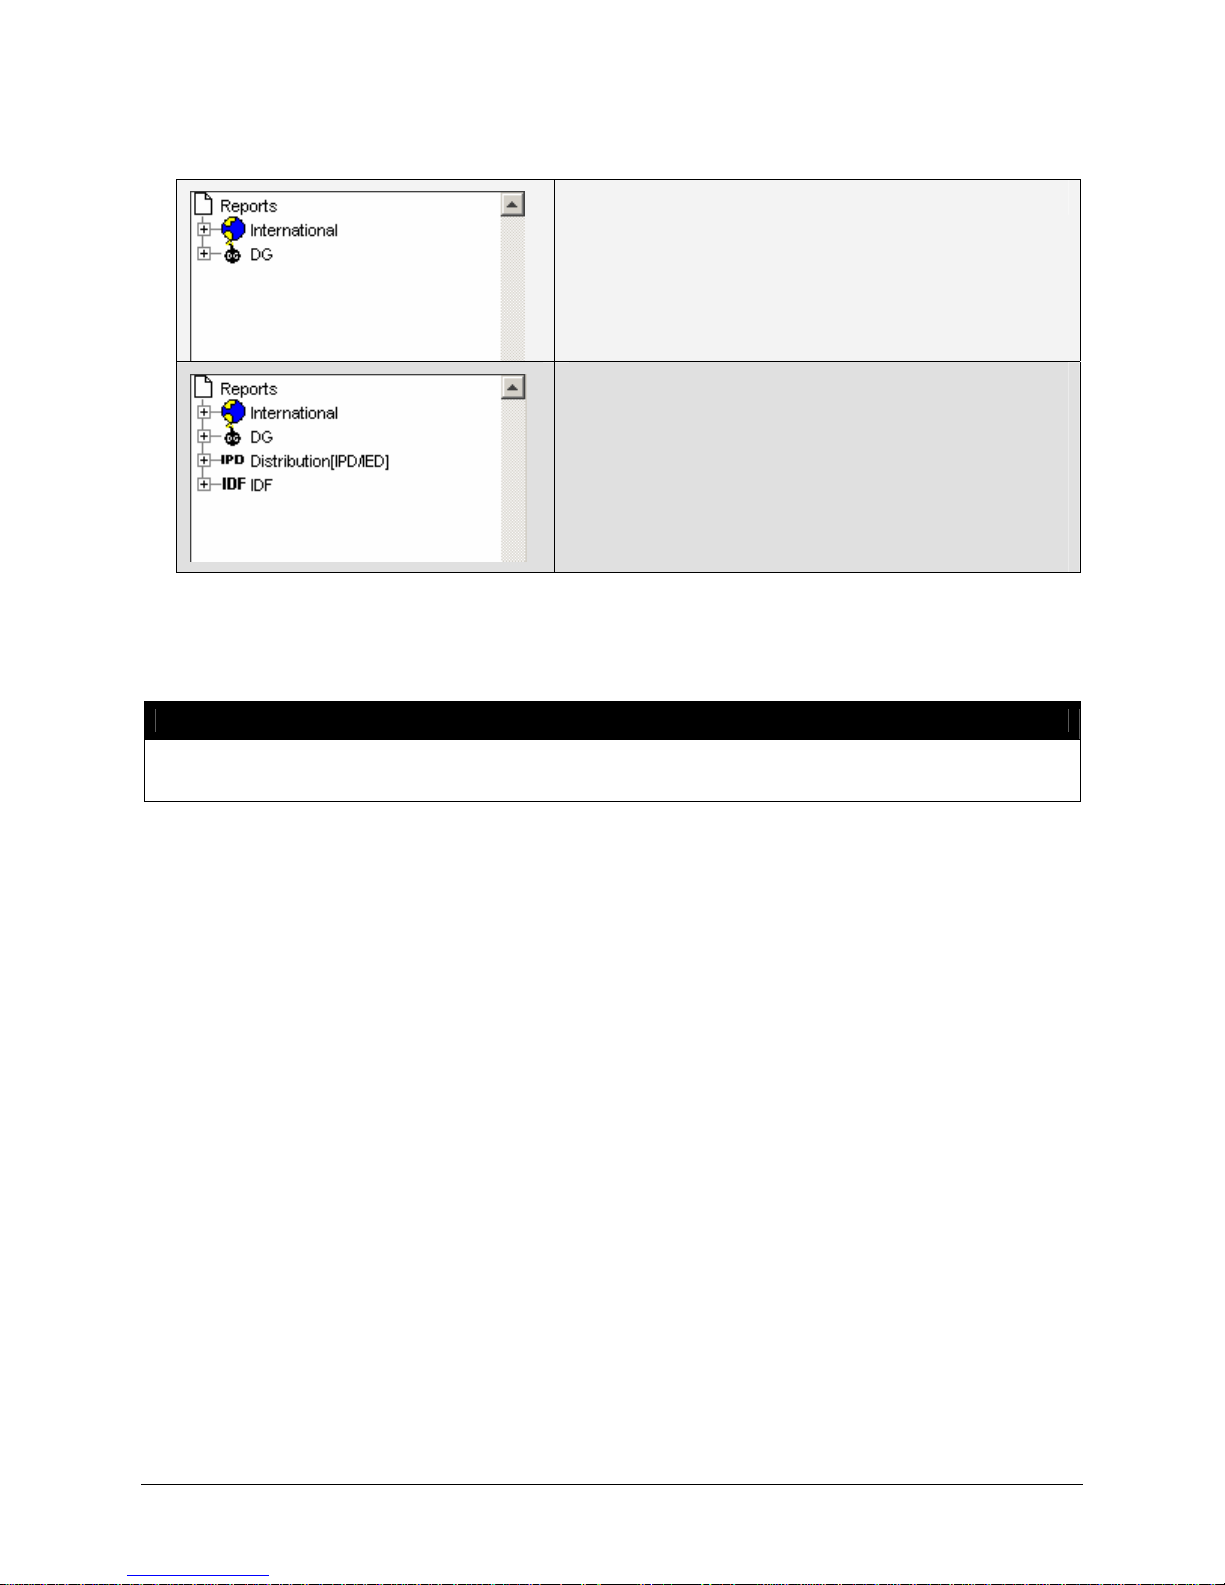
Chapter One: Setting Up FSMS
Non-U.S. or CA origin, FedEx Express only
Non-U.S. or CA origin, all services enabled
• The IPD and IDF reports will be enabled when IPD
is manually configured or after a download of the
rate file if the account is a valid IPD or IDF account.
If the account is manually configured, click the
Apply and Exit button and then re-launch the
FSMS Configuration Utility to configure IPD and/or
Detailed information regarding the configuration options for each FSMS report is provided in Chapter Six:
FSMS Reports in this User Guide.
IDF reports.
NOTE:
IPD/IDF and TD are contract services provided for FedEx International shipping. Please contact
your FedEx Account Executive for more information.
To Select a Printer for an FSMS Report:
1. Click on the + (plus) indicator next to the report type (Express, International, Ground, etc.) to expand
the report list.
2. Highlight the report for which you want to select a printer.
FedEx Ship Manager® Server User Guide, Version 7.6 49
Page 52
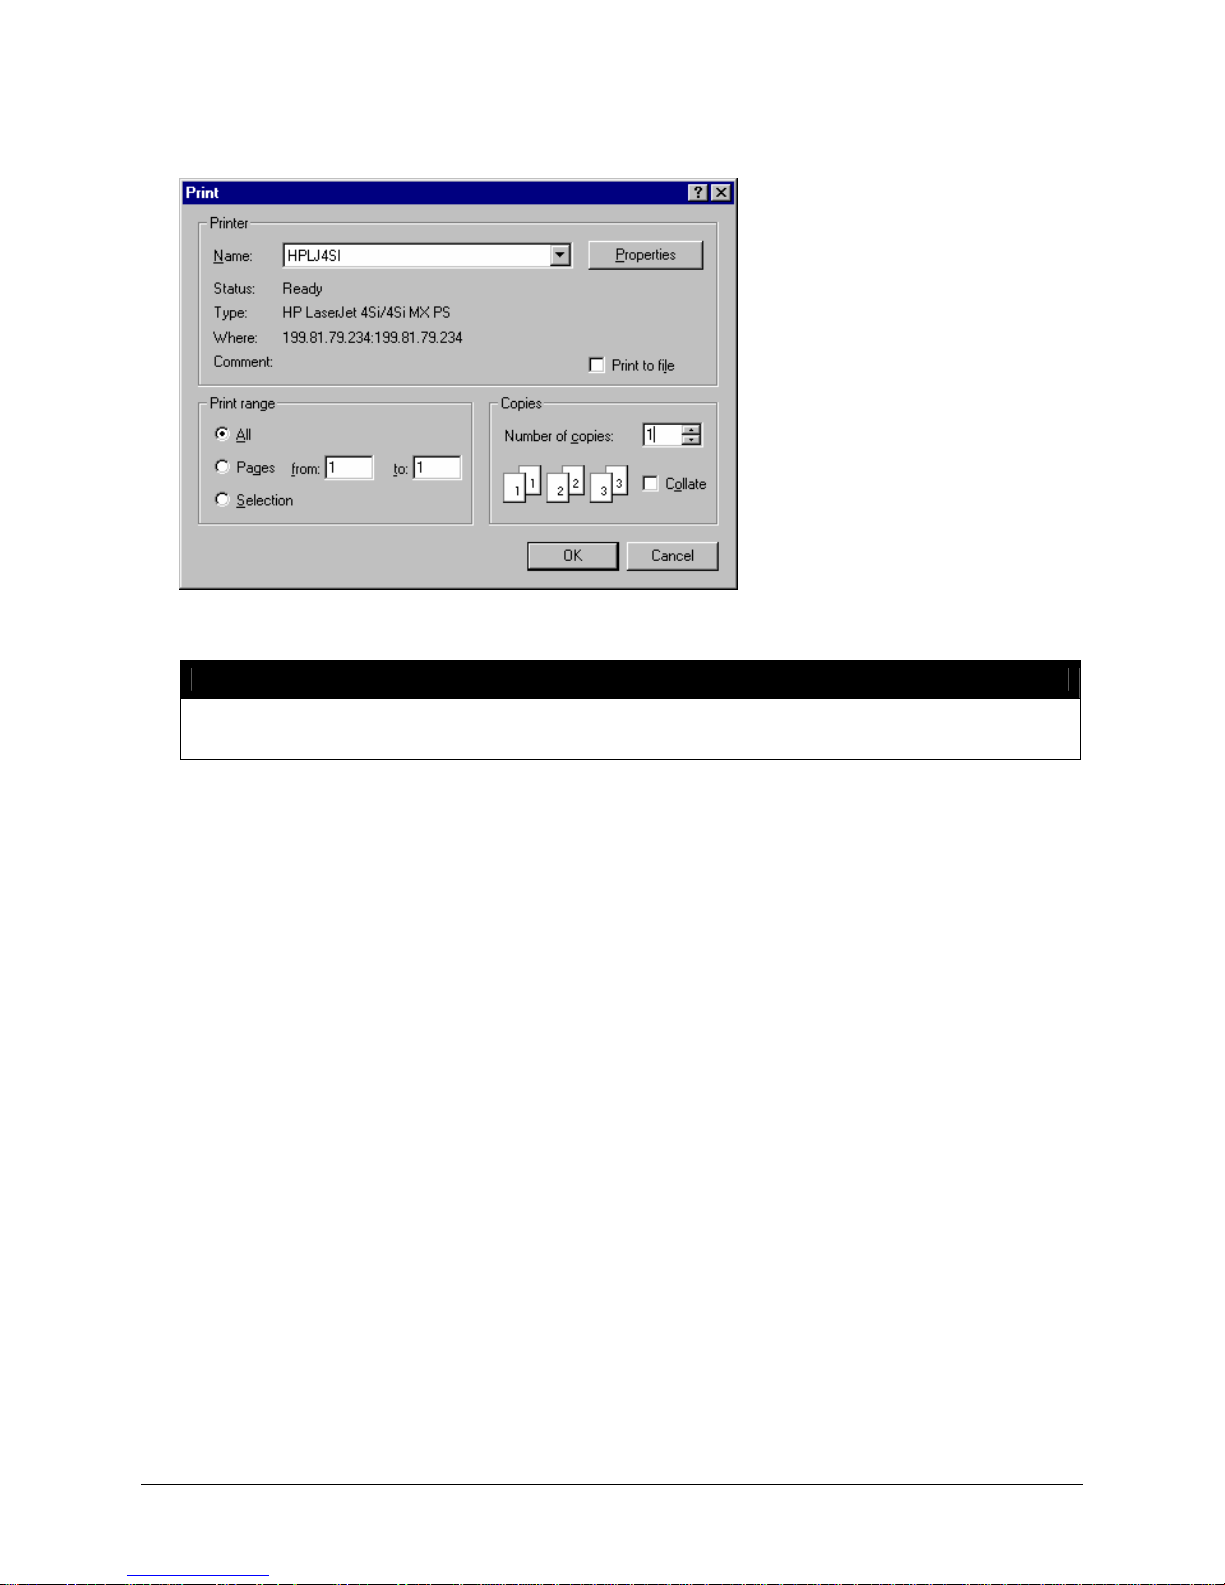
Chapter One: Setting Up FSMS
3. Click the Printer icon button in the Printer field. The Printer Selection window is displayed:
4. Choose the printer you have previously installed by choosing it from the Name drop-down list.
NOTE:
You must have the printer(s) you want to select for printing FSMS reports configured as
part of your operating system before making any selection in the Report Settings window.
5. Click OK to save the printer selection. You are returned to the Printer Settings window, and the
printer you chose is displayed in the Printer field.
To Select a Report Directory:
1. Click on the + (plus) indicator next to the report type (Express, International, Ground, etc.) to expand
the report list.
2. Highlight the report for which you want to select a directory.
3. Click the Directory icon button in the Directory field. The Directory Selection window is displayed:
50 FedEx Ship Manager® Server User Guide, Version 7.6
Page 53
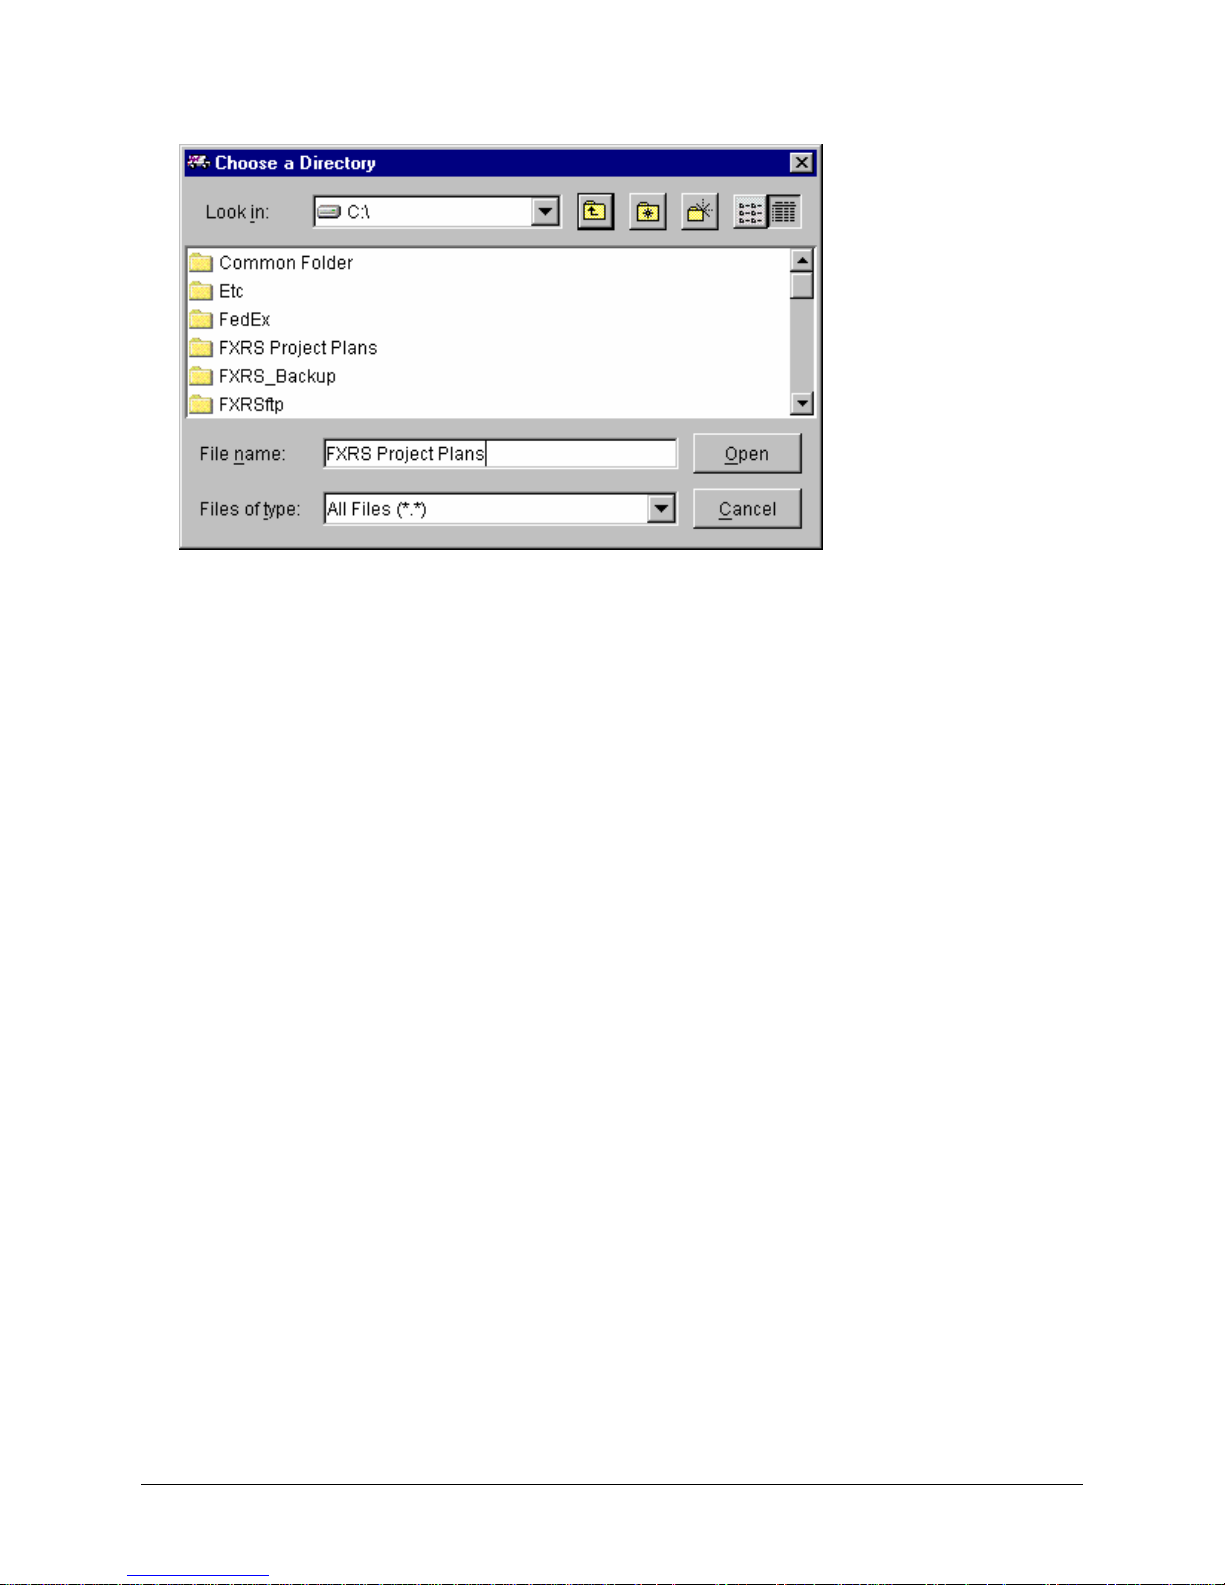
Chapter One: Setting Up FSMS
4. Select the report folder and click Open. You are returned to the Printer Settings window, and the
directory you chose is displayed in the Directory field.
Changing Paper Size and Number of Copies:
If you choose a report (for example, International Commercial Invoice), and the Paper Size and/or
Number of Copies field is displayed, you may change designations for these fields as follows:
• Paper Size is allowed for International reports only. You may select either 8-1/2” x 11” or A4 from the
pull-down list.
• Number of Copies is provided for select reports in the Reports list. This field is displayed by FSMS
when a report is selected that allows a variable number of printed copies to be chosen. For example,
if you select “Commercial Invoice” from the International reports list, FSMS allows you to choose up
to 9 copies of this document.
To Save Your Entries on the Printer Settings Tab:
1. Click Copy To All Reports to copy the printer or report path for a selected report to all reports within
the active meter. This will not copy any report information to any other meter. To copy report
information to other meters, use the Copy To All Meters button.
2. Click Copy To All Meters if you want to configure your printer settings for all of the meters configured
on your server. If you are configuring different printers for each meter (if you have more than one
meter assigned for your shipping operation), you must repeat the install procedures.
3. Click OK at the bottom of the Printer Settings window to save your selections.
FedEx Ship Manager® Server User Guide, Version 7.6 51
Page 54
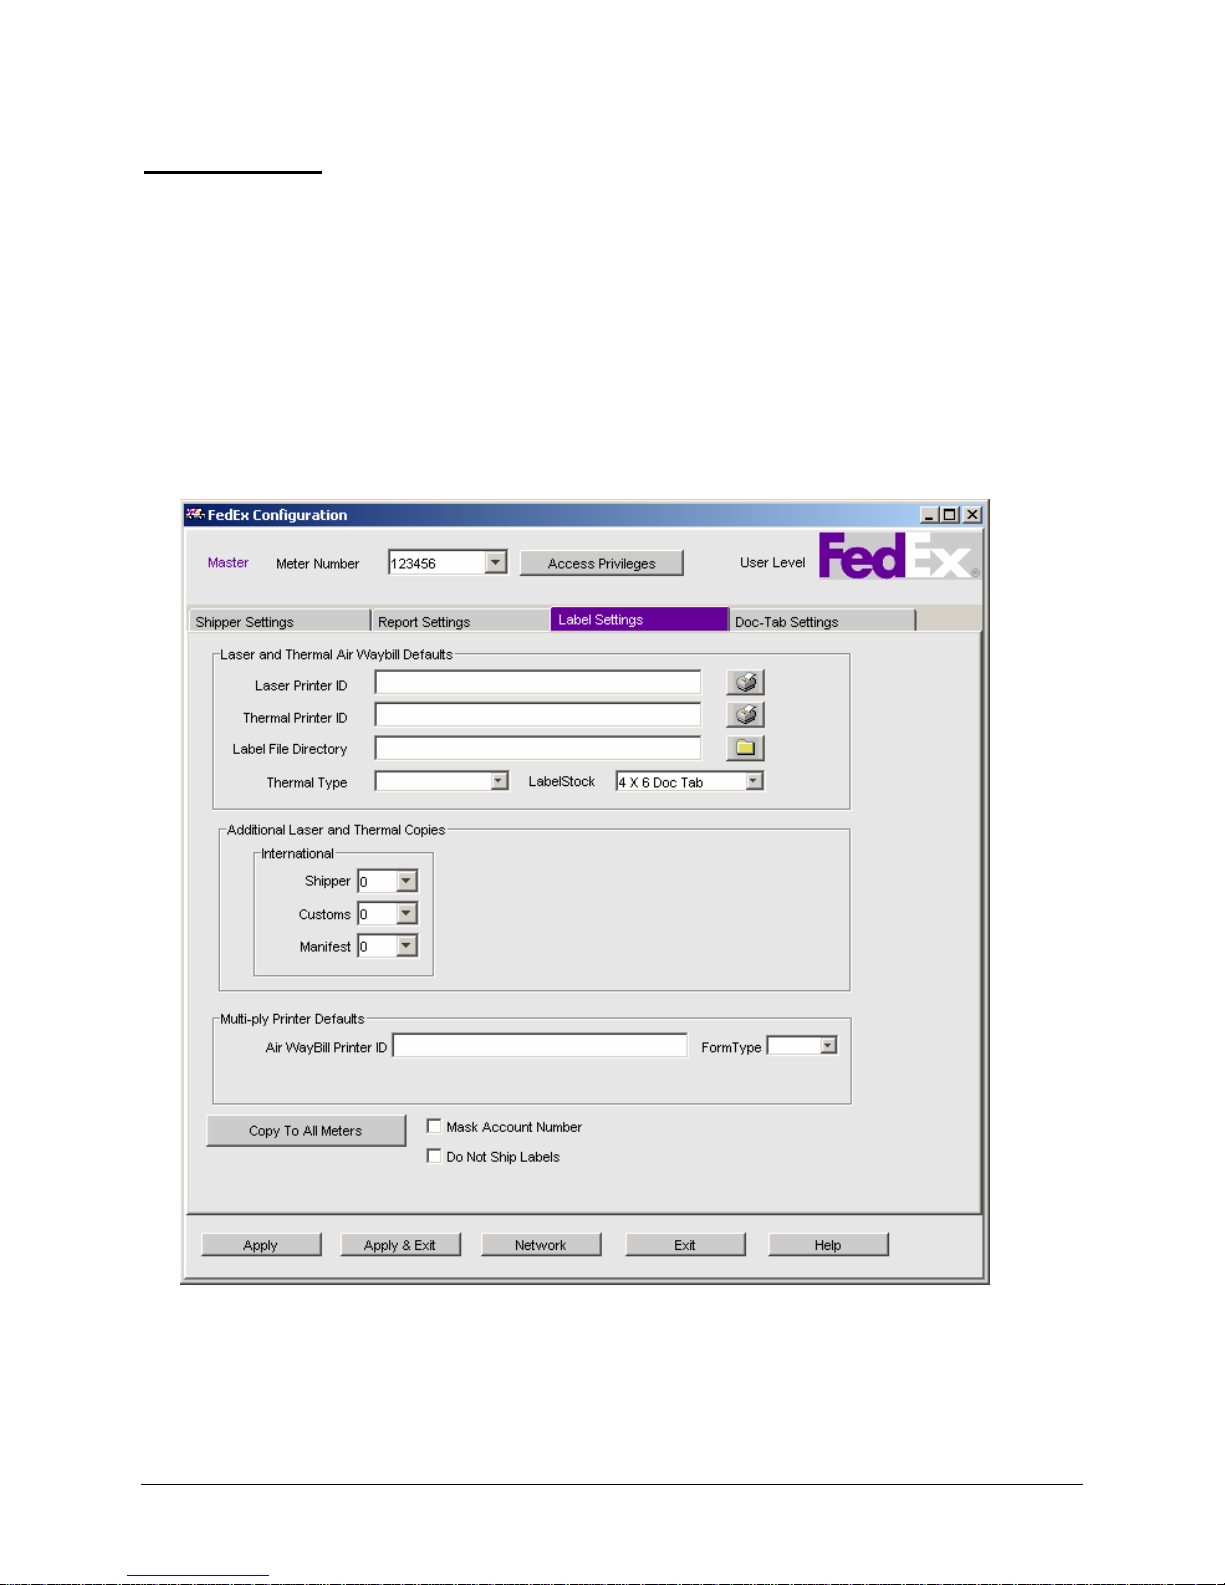
Chapter One: Setting Up FSMS
Label Settings
The Label Settings window is used to configure printers for printing laser and thermal shipping labels as
well as for multi-ply air waybills, Dangerous Goods (DG) forms (for FedEx Express shipping), and
Hazardous Materials (HazMat) forms (for FedEx Ground shipping). The Label Settings window is divided
into three sections:
1. Laser and Thermal Air Waybill Defaults
2. Additional Laser and Thermal Copies
3. Multi-ply Printer Defaults
The following Label Settings screen displays for non-CA origin:
52 FedEx Ship Manager® Server User Guide, Version 7.6
Page 55
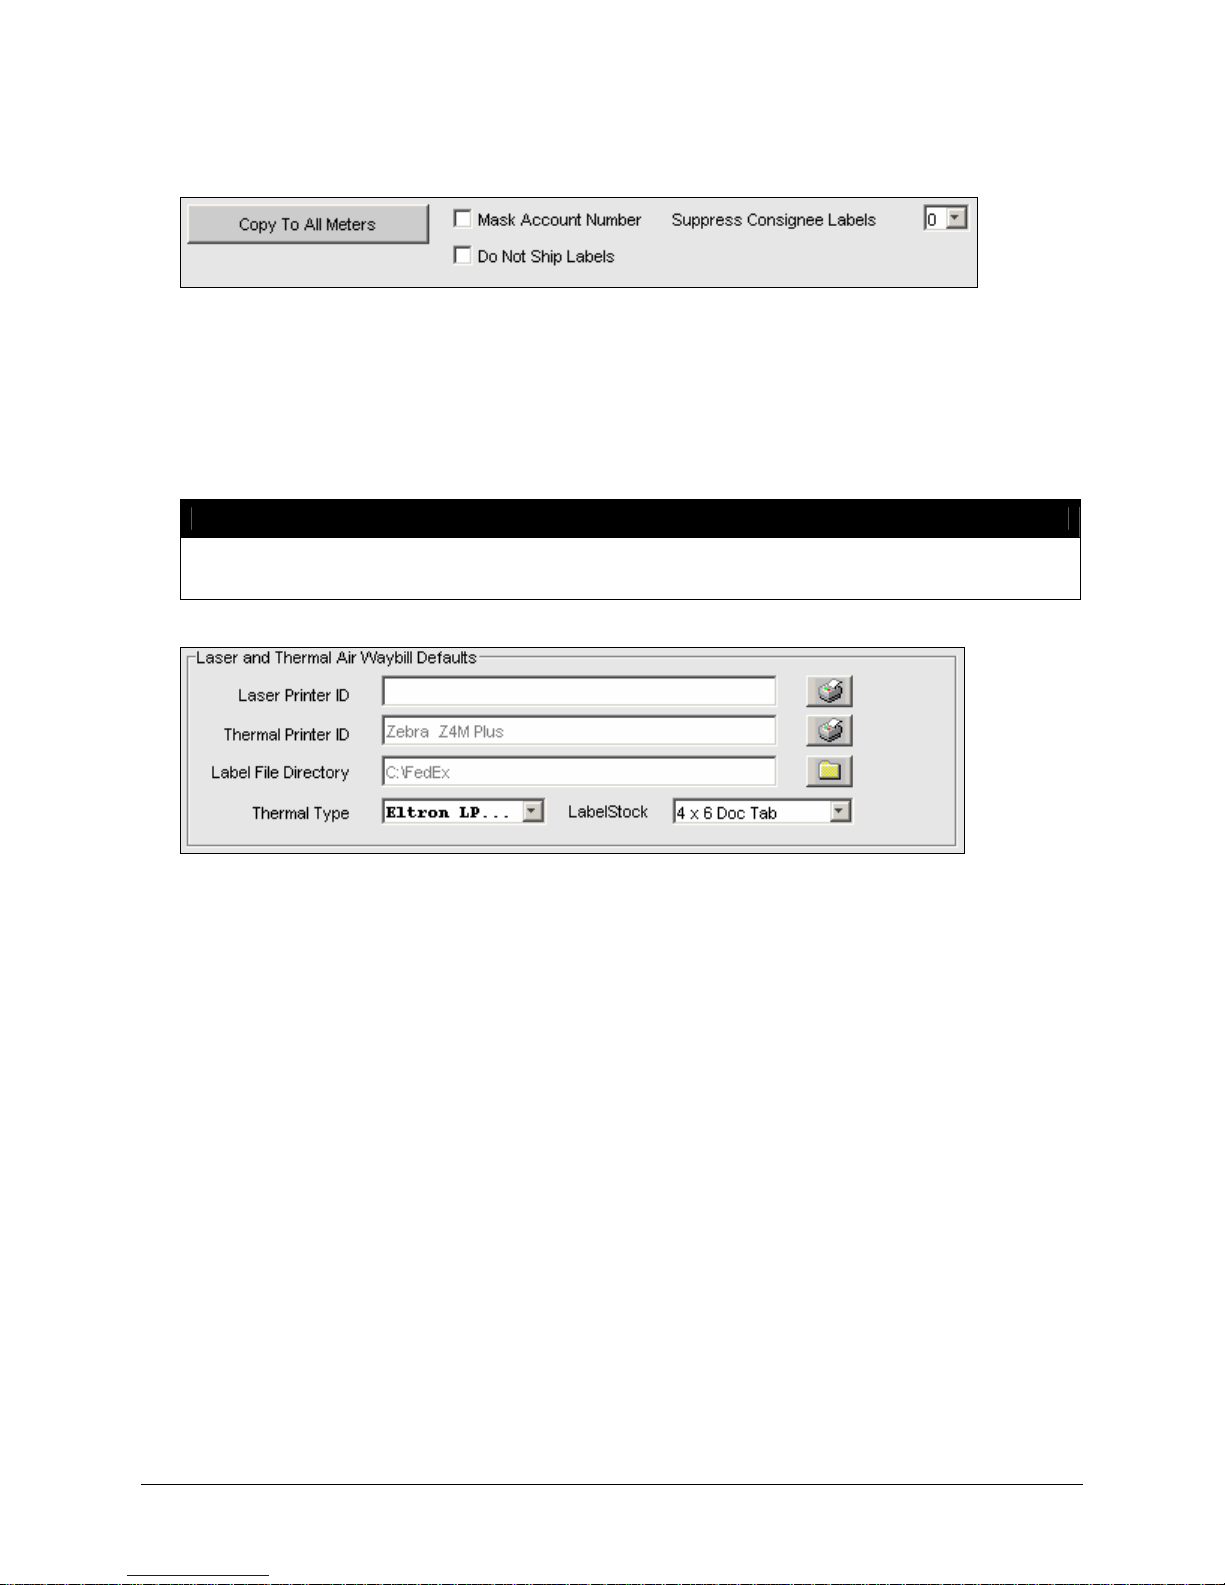
Chapter One: Setting Up FSMS
The following Copy To All Meters section appears on the Label Settings tab for CA origin:
Laser and Thermal Air Waybill Defaults
To designate printers to print laser and/or thermal air waybills:
1. In the Laser and Thermal Air Waybill Defaults section of the Label Settings window, click the
printer icon next to the label type you want to configure or the folder icon to specify the directory to
which thermal label buffers should be saved.
NOTE:
To configure a laser and/or thermal printer in the Label Settings window, you must first
install the printer in your operating system.
2. The Printer Selection window is displayed with the printer you have set as a default in your
operating system. If you want to select this printer as either your laser printer or thermal printer, click
OK. To select another printer that has been installed on your operating system, click Properties in
the Printer Selection window to display the list of printers from which you may choose.
3. When you click OK, the printer you selected is displayed in either the Laser Printer ID or Thermal
Printer ID fields (depending on the printer type you chose to configure).
4. If you select a thermal printer in the Thermal Printer ID field, you must also select the Thermal Type
and Label Stock. To choose entries in these fields, select the pull-down list for each field and
highlight the appropriate choice.
FedEx Ship Manager® Server User Guide, Version 7.6 53
Page 56
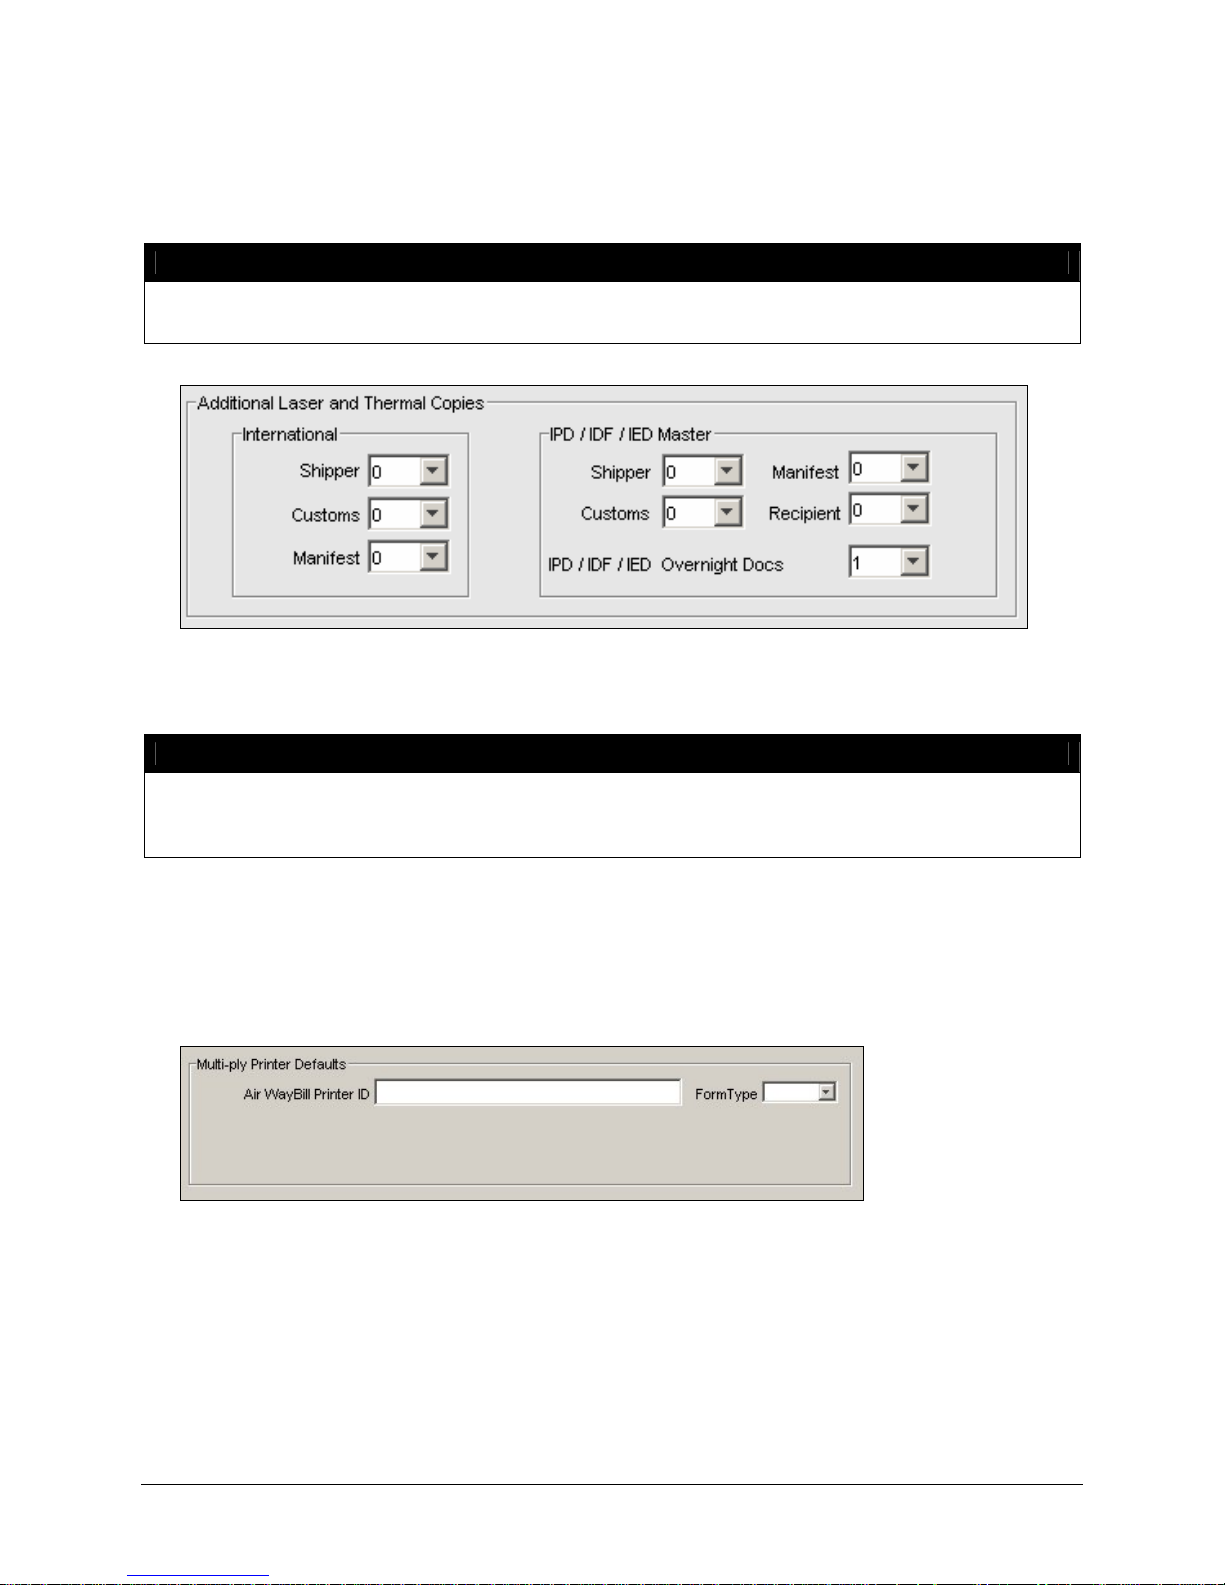
Chapter One: Setting Up FSMS
Additional Laser and Thermal Copies
In this section of the Label Settings window, you may select the number of labels to be printed for FedEx
International services.
NOTE:
The IPD/IDF/IED section will only be active if one of the Distribution services is enabled in the
IPD/IDF/IED tab.
If you ship internationally, select the number of labels to be printed for Shipper, Customs, and Manifest.
You may select to print up to 3 copies from the pull-down lists.
NOTE:
IPD (International Priority Direct Distribution) is a contract service offered by FedEx to
customers with specific FedEx International shipping requirements. For more information
regarding IPD, contact your FedEx Customer Support Representative.
Multi-Ply Printer Defaults
In the Multi-ply Printer Defaults section of the Label Settings window, you may select the pin-feed
printer for these forms by clicking the Printer icon and selecting the printer type from the Printer
Selection window.
If you choose to print multi-ply air waybills, you must select the form type associated with this label stock.
Valid form types are:
• 306: Form 306 is an International air waybill with a preprinted tracking number.
• 307: Form 307 is an International air waybill without a preprinted tracking number.
• 362: Form 362 is a French-language International air waybill without a preprinted tracking number.
54 FedEx Ship Manager® Server User Guide, Version 7.6
Page 57

Chapter One: Setting Up FSMS
NOTE:
Dangerous Goods and Hazardous Materials reports are configured under the Reports Settings
tab. More information regarding the configuration of FSMS reports are provided in the “Report
Settings” section earlier in this chapter.
After you have selected printers for the labels included as part of the Label Settings window, you may
make the following configuration choices before you save the information on this window:
• Mask Account Number: To prevent your shipper account number from printing on your shipping
labels, click the Mask Account Number checkbox.
• Do Not Ship Labels: Checking the Do Not Ship Labels checkbox causes labels with the text “Do
Not Ship” to print in the event that a shipping transaction fails. This feature is best used for batch
processing so label printing is not interrupted if a shipment transaction fails. This feature is not
available for single piece labels, but can be configured if you process multiple-piece shipments.
• Copy To All Meters: To copy the printer selections you entered to all meters configured on your
server, click the Copy To All Meters button. An action box is displayed which asks: “Do you want to
copy all of the label settings for this meter to all meters?” Click Yes to copy your input to all
configured meters. Click No to dismiss the action box.
To save your input in the Label Settings window, click Apply or Apply & Exit.
Doc-Tab Settings
FSMS allows for the printing of a Document Tab (Doc-Tab) on the 6” doc-tab label. Document Tabs allow
you to choose shipping information to be printed on a separate tab at the bottom of your labels that can
be removed and kept for your shipping records. Doc-Tabs can be configured for both FedEx Express and
FedEx Ground shipping. Below are steps for configuring Doc-Tabs for both of these shipping services.
Express Doc-Tab Configuration
To configure Express Doc-Tabs (both Domestic and FedEx International), click the Doc-Tab Settings tab
to display the following window:
FedEx Ship Manager® Server User Guide, Version 7.6 55
Page 58
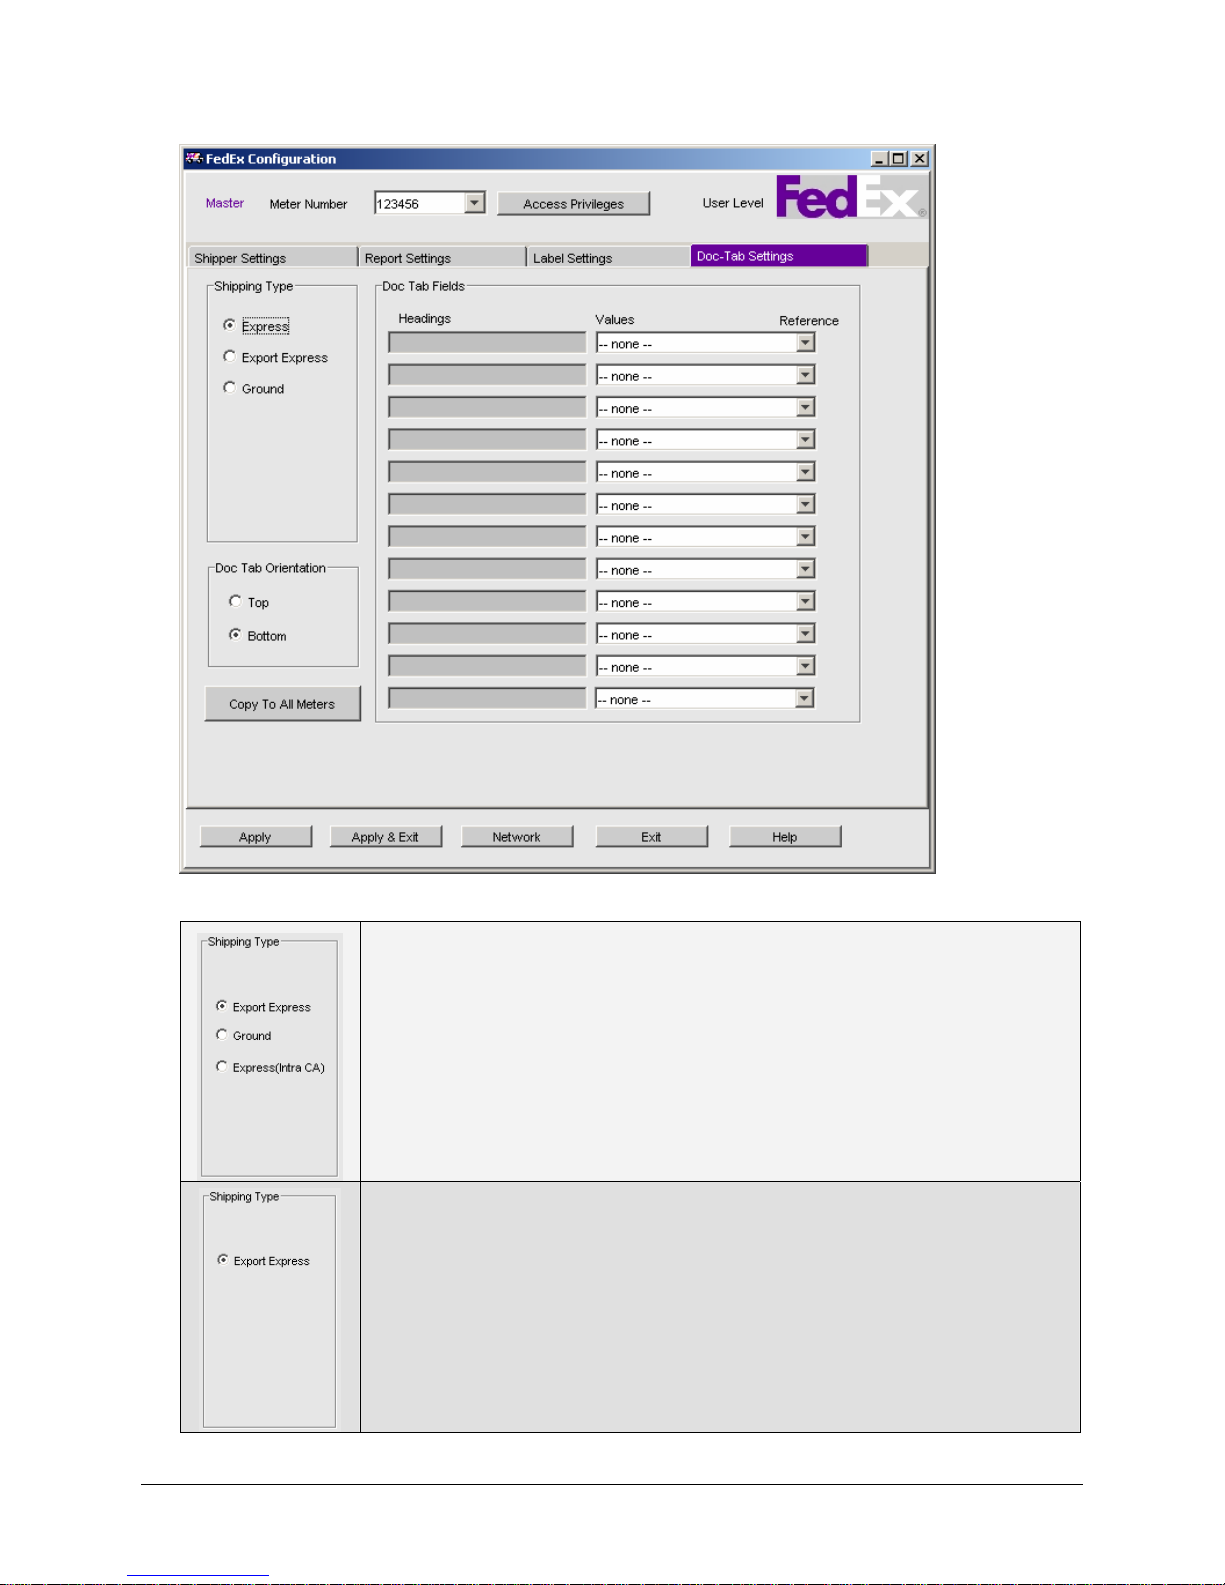
Chapter One: Setting Up FSMS
CA origin, FedEx Express and FedEx Ground
• Ground Doc-Tab options will be enabled when the Ground checkbox on
the Meter Settings tab is checked. After enabling Ground, click the
Apply and Exit button, and then re-launch the FSMS Configuration Utility
to configure Ground doc-tabs.
• The TD Doc-Tab options, not shown, will be enabled only if the account is
a TD qualified account.
Non-U.S. or CA origin
• For non-U.S. or CA origins, only the Export Express option will be
enabled.
56 FedEx Ship Manager® Server User Guide, Version 7.6
Page 59

Chapter One: Setting Up FSMS
1. In the Shipping Type section of the Doc-Tab Settings window, click the shipping type for which you
are configuring Doc-Tab settings. If you click Export Express, you will configure Doc-Tab settings for
FedEx International Express. Clicking Ground allows you to designate Doc-Tab items for FedEx
Ground shipping, both U.S. Domestic and FedEx International.
2. Depending on your printer and the label stock you are using, select either Top or Bottom to
designate how the Doc-Tab portion of the label exits the printer. Top means the Doc-Tab exits the
printer last, after the rest of the label has printed; Bottom means that the Doc-Tab exits the printer
first, before the rest of the label.
NOTE:
FSMS prints the Doc-Tab information at the bottom of the label regardless of the
orientation.
After you select the Doc-Tab Orientation, the setting applies to both FedEx Express and FedEx
Ground labels. These settings can be overridden in your shipping transaction by passing a value for
Top or Bottom in field 1370. For more information regarding FSMS shipping transactions, see
Chapter Two: FSMS Transaction Coding in this User Guide.
3. Shipping information to be printed on the Doc-Tab may be selected in two ways. You may:
• Choose from the list of pre-configured shipping information that can be accessed by clicking the
pull-down list of Values. The information for these pre-configured choices is supplied from your
shipping transaction. You may also choose to default to the configured Heading, or you may
override the heading by typing in your own text.
• Choose Custom Doc-Tab Field # to configure your own Doc-Tab information. This method of
configuring a Doc-Tab lets you enter your own Doc-Tab Heading and allows you to supply the
data you want to print in the Doc-Tab field for your shipping transaction.
To Select a Pre-Configured Doc-Tab Item:
a. Click the pull-down list under the Values column. Click the pre-configured Doc-Tab item in the
list.
b. The value you selected is displayed in the Values column. The corresponding heading for this
value is displayed in the Headings column. You may override this heading by typing in your
own text. Up to 12 characters (including spaces) will print on the doc-tab.
To Configure a Custom Doc-Tab Item:
a. Click the pull-down list under the Values column. You may select up to 12 custom Doc-Tab
values from this list. Click the custom Doc-Tab field value to select.
b. When you select a custom Doc-Tab field value, the corresponding Heading field becomes
active. In this field, enter the title for the custom Doc-Tab field you selected. Up to 12
characters (including spaces) will print on the doc-tab.
4. When you code your shipping transaction, you must enter the data you want to appear on the label
Doc-Tab for the custom Doc-Tab field you selected in the Doc-Tab Settings window. For example:
You selected Doc-Tab Field 1-Tag 581 from the Values pull-down list. You enter “Handling” as the
Heading. In your shipping transaction, you include field 581 and the value “5.00.” On the label DocTab, the item: “Handling: 5.00” is displayed.
FedEx Ship Manager® Server User Guide, Version 7.6 57
Page 60
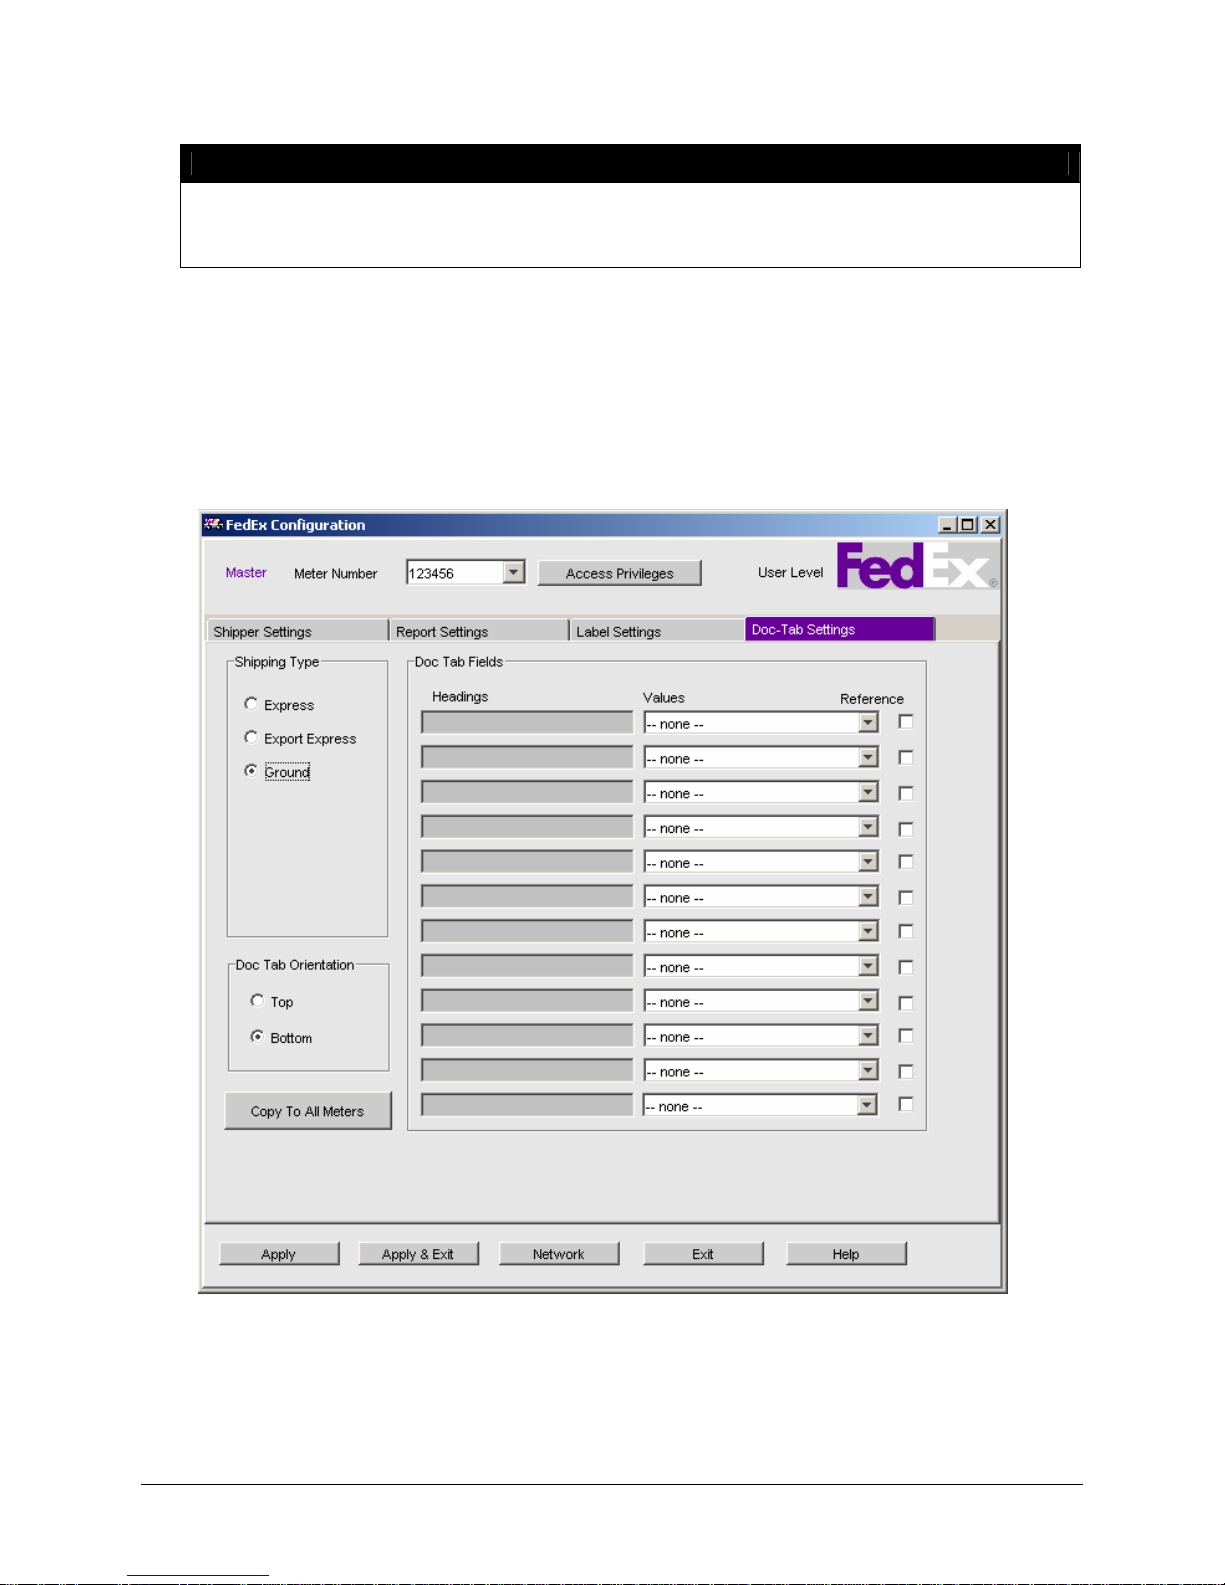
Chapter One: Setting Up FSMS
NOTE:
If you configure a Custom Doc-Tab value, you must provide the corresponding data to be
printed on the Doc-Tab label. Otherwise, the heading field you entered will print on the label
with no corresponding data.
5. Before you save your entries in the Doc-Tab Settings window, you may click Copy To All Meters to
copy your Doc-Tab configuration to all meters configured on your server.
6. To save your input, click OK.
Ground Doc-Tab Configuration
To configure Ground Doc-Tabs, click the Doc-Tab Settings tab to display the following window:
58 FedEx Ship Manager® Server User Guide, Version 7.6
Page 61

Chapter One: Setting Up FSMS
Doc-Tab Headings and Values are configured the same for FedEx Ground shipping as they are for
FedEx Express shipping. However, the Ground Doc-Tab configuration screen provides an additional field,
Reference. When you click the checkbox in the Reference field next to a Doc-Tab value, this value prints
on the FedEx Ground shipping label in the reference section of the label that is below the recipient
information. If no selections are made, the following default fields are displayed:
• Reference Fields 25 or 3003
• PO Number
• Fields 3056 or 3001
• Invoice Number Fields 3057 or 3002
• Department Field 38
This feature allows you to select up to four Doc-Tab fields to display additional shipment information to
your recipient on the FedEx Ground shipping label.
FedEx Ship Manager® Server User Guide, Version 7.6 59
Page 62
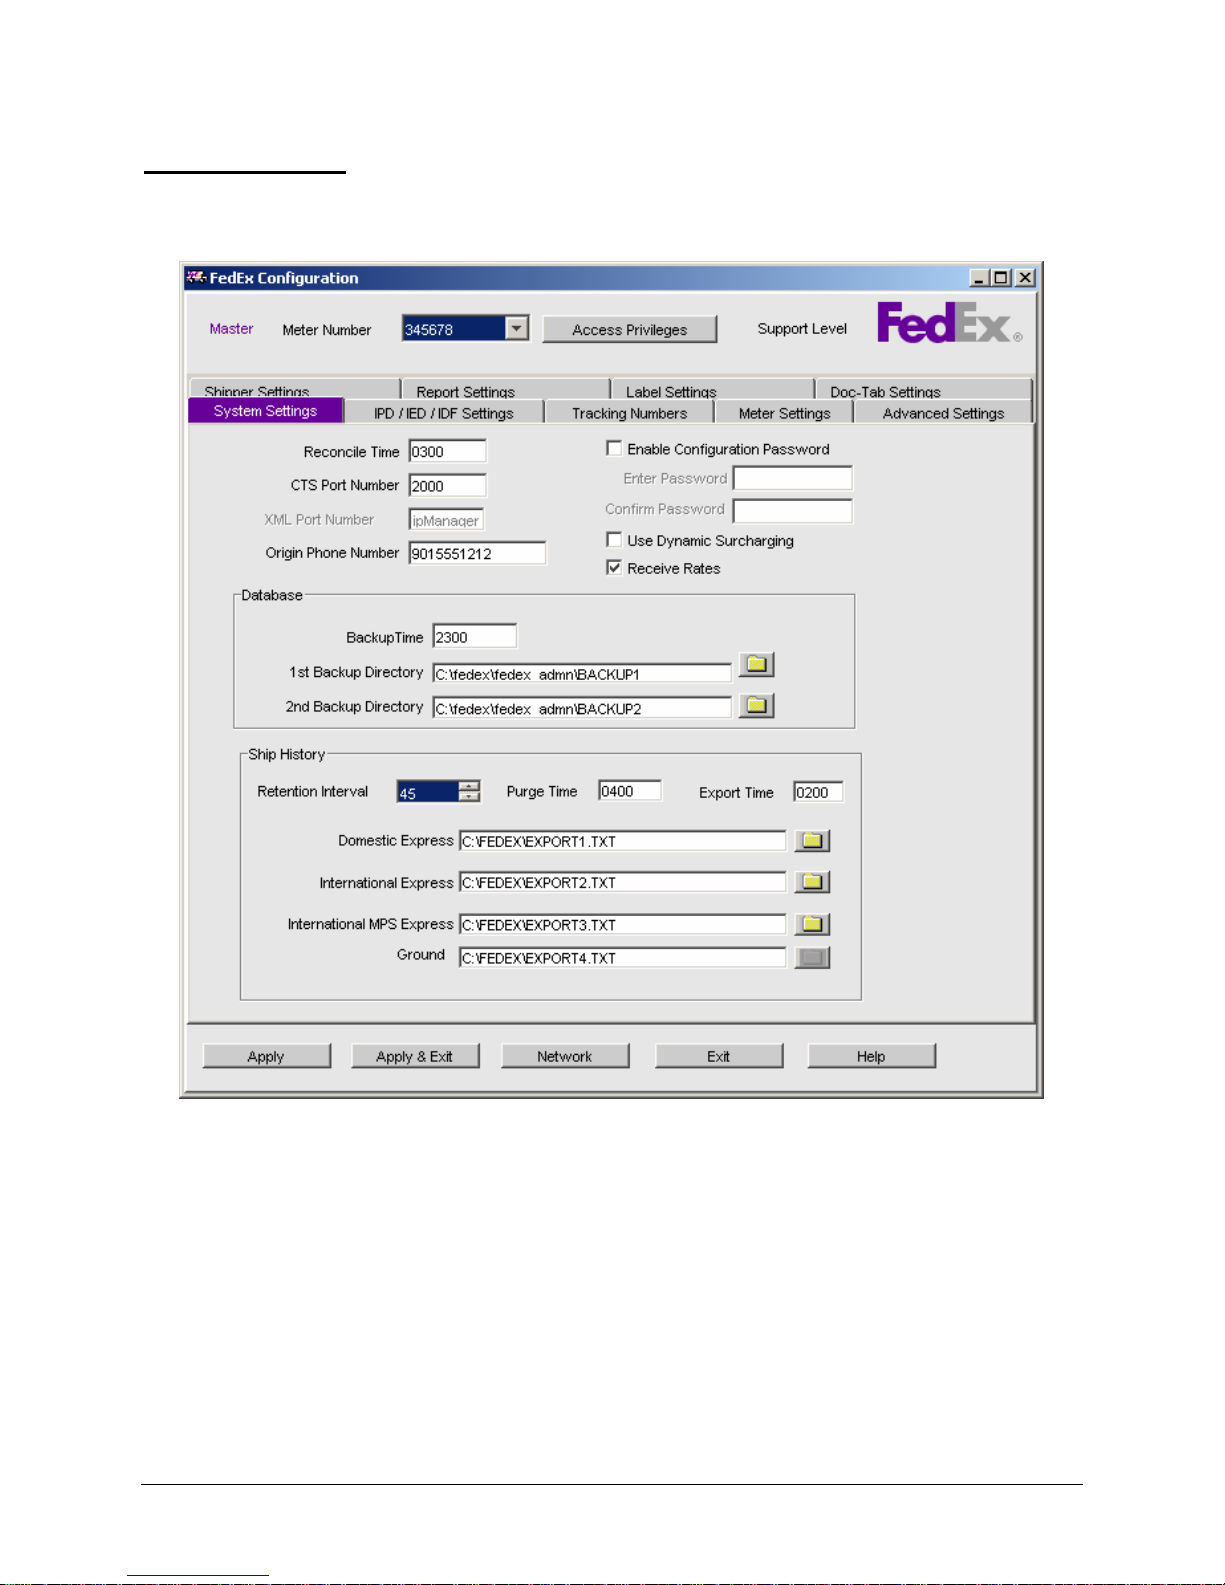
Chapter One: Setting Up FSMS
System Settings
The System Settings window is used to set important system level parameters. These settings are
global and apply to all meters on the server. The following is a sample System Settings window:
All fields on the System Settings window are password protected and can only be accessed by your
FedEx Representative. Although you cannot make changes to this window, provided below is a
description of each field to help you understand how your system is configured:
60 FedEx Ship Manager® Server User Guide, Version 7.6
Page 63
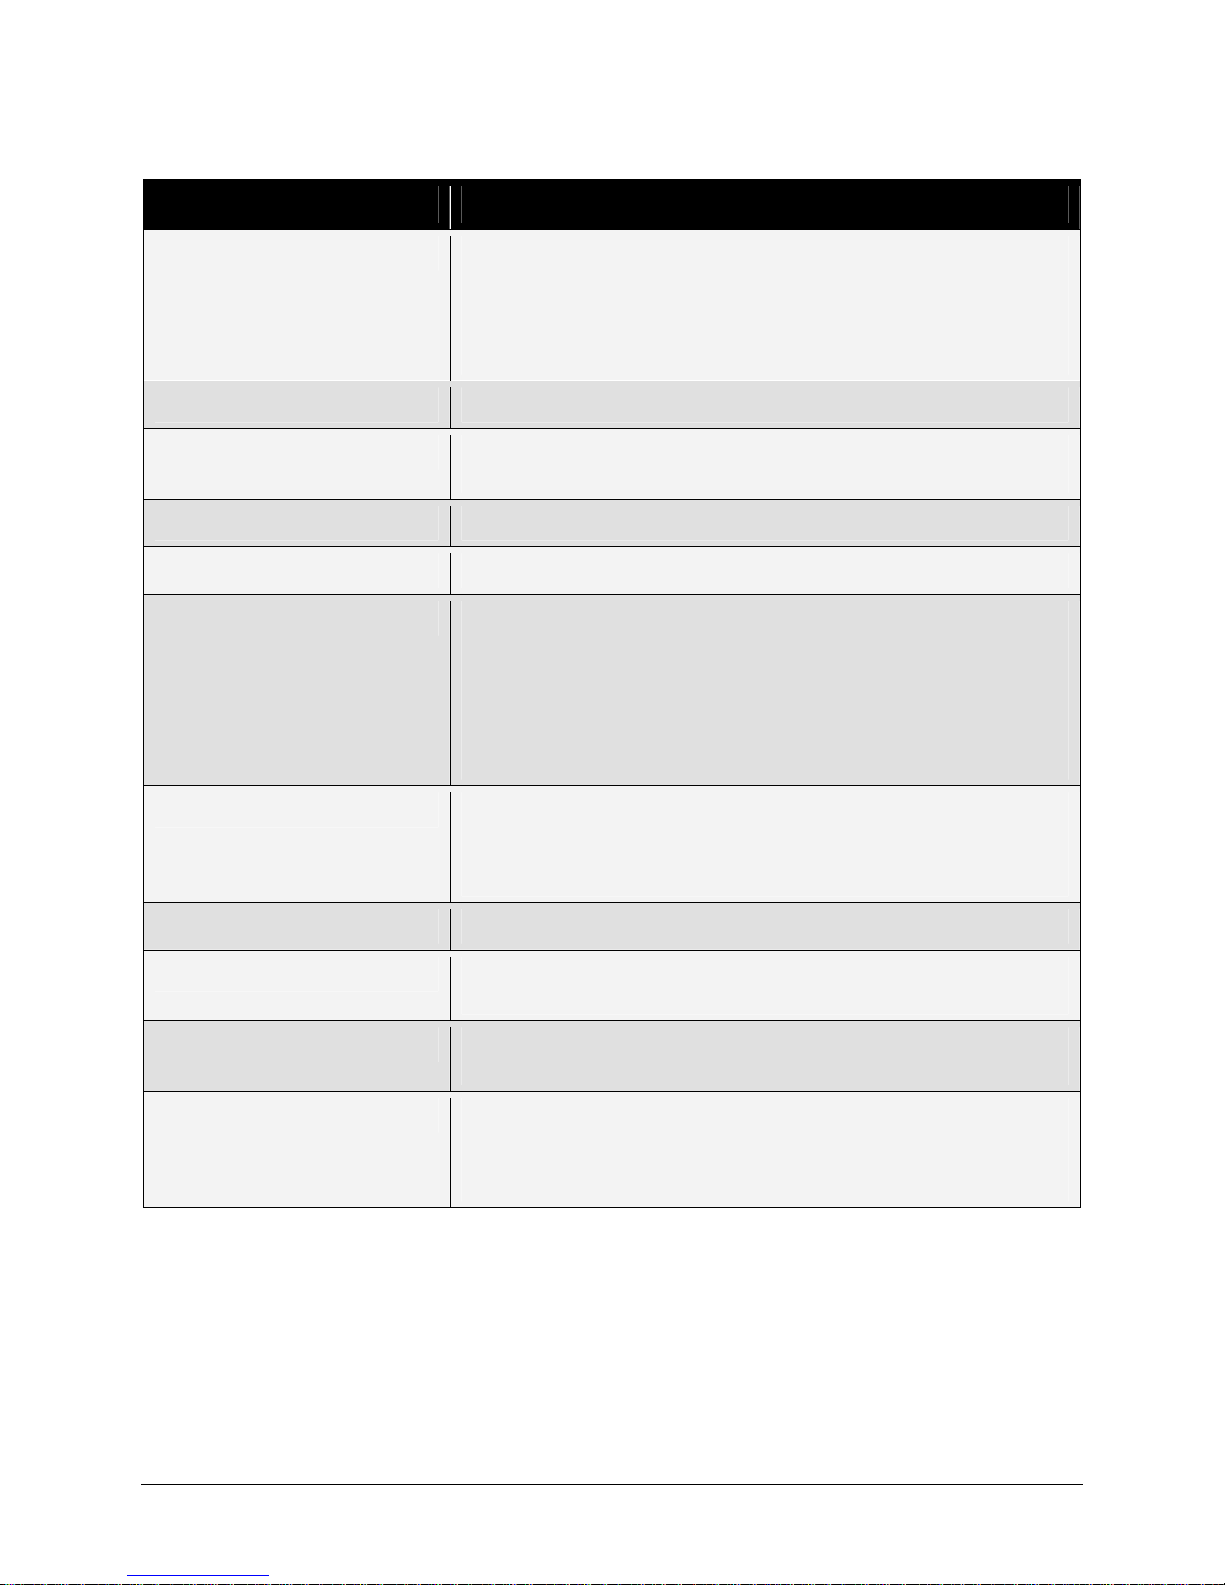
Chapter One: Setting Up FSMS
Field Name Description
Reconcile Time The time your server communicates with the FedEx mainframe
systems to download any new components (rates, URSA, etc.).
The Reconcile Time defaults to 0300.
Recommendation: Configure the reconcile time to a time when no
server activity is occurring.
CTS Port Number The port used to send standard FedEx transactions to FSMS.
XML Port Number The port used to send XML transactions to FSMS. Not yet
available.
Origin Phone Number Your system modem number.
Enable Configuration Password Used to set an administrative password for User level access tabs.
Use Dynamic Surcharging Check this box to use the Dynamic Surcharging feature. See the
“Rating, Routing, Time-In-Transit – Dynamic Surcharging” section in
Chapter Two: FSMS Transaction Coding in this User Guide for
details on Dynamic Surcharging.
Note: When switching between standard and dynamic surcharging,
the Open Shipping service must be stopped and then restarted for
the change to take effect.
Receive Rates Checking this will enable the download of non-U.S., CA, or PR origin
discount rates. This checkbox is a system level setting and will only
be visible and active for FedEx International (non-U.S. or CA)
Master meters.
Database Backup Time Time the FSMS database in backed up.
Ship History Retention Interval Length of time your Express shipping history information is stored by
FSMS. Up to 90 days may be selected.
Ship History Purge Time Time at which the Ship History files are purged after the retention
interval has elapsed.
Ship History Export Time Time at which Ship History files are exported to the files specified for
Domestic Express, International Express, and International
Multiple-Piece Shipment (MPS) Express, and Ground after the
retention interval has elapsed.
If you need to make changes to any of these settings, please contact your FedEx Customer Support
Representative.
FedEx Ship Manager® Server User Guide, Version 7.6 61
Page 64
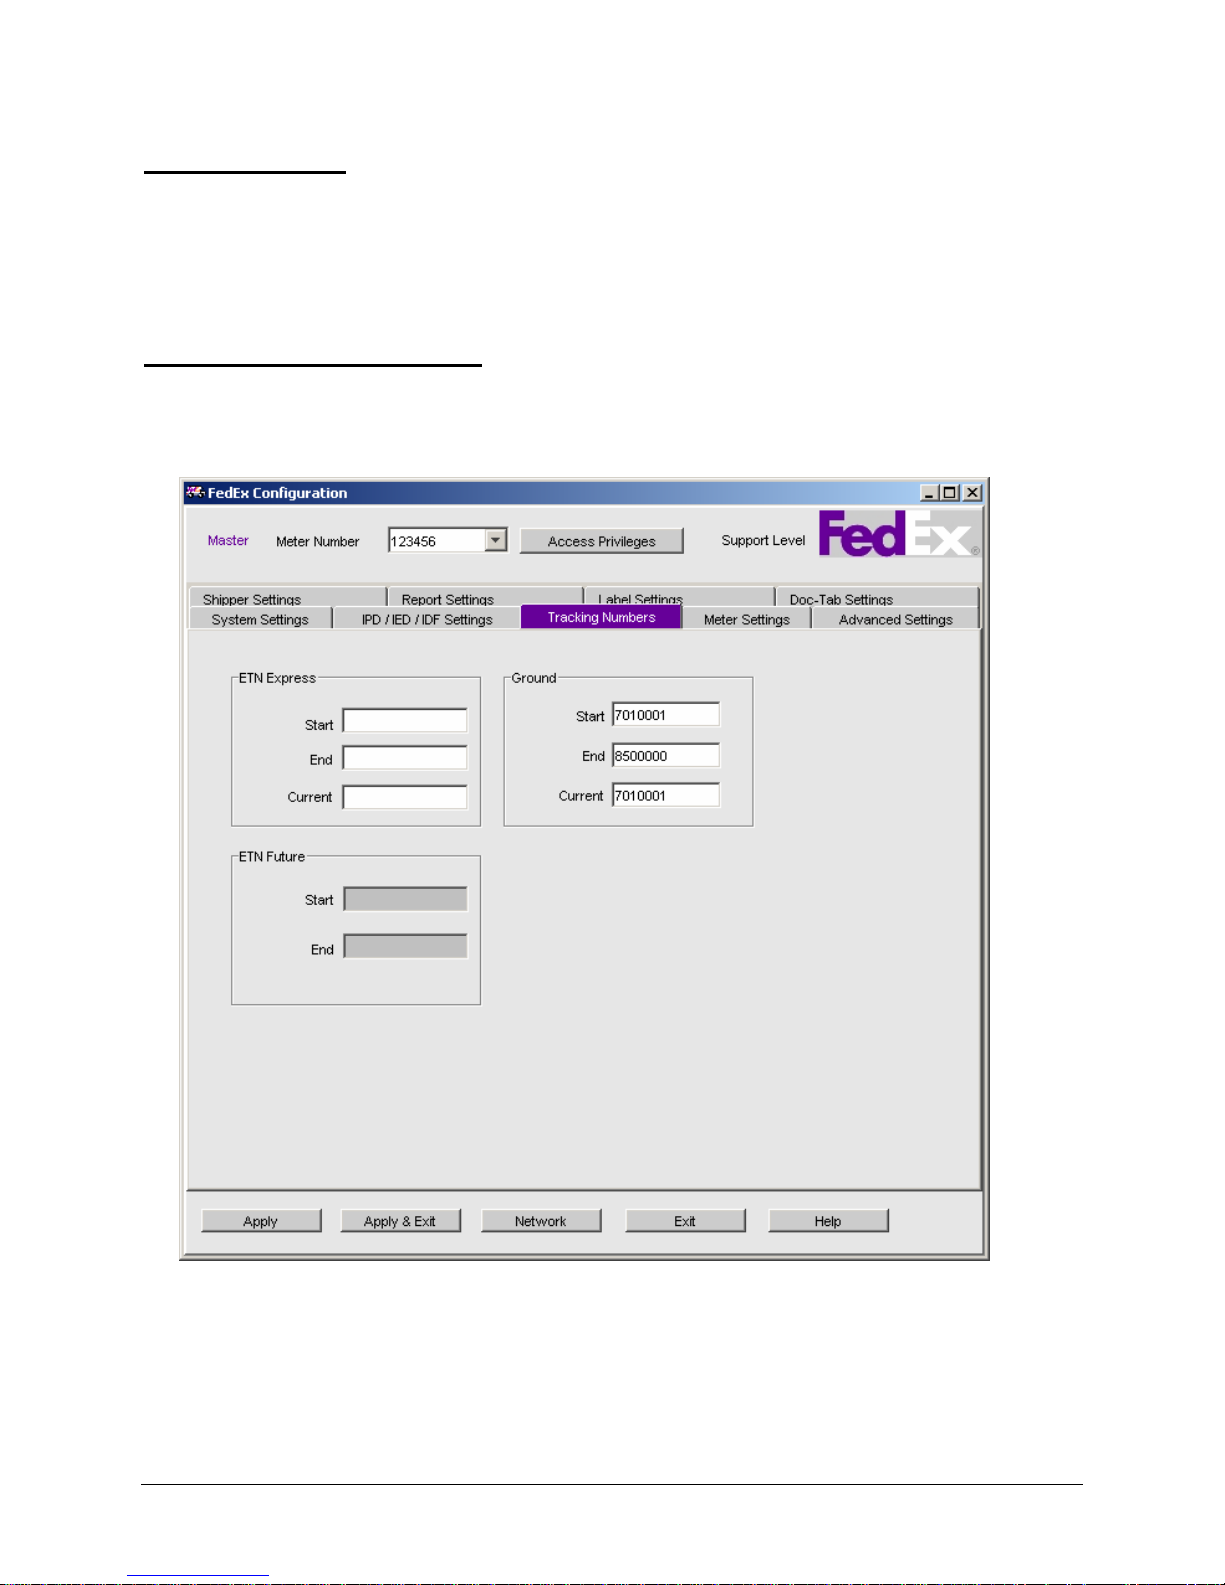
Chapter One: Setting Up FSMS
IPD/IDF Settings
IPD (International Priority Direct Distribution) and IDF (International Direct Distribution Freight) are
contract services offered by FedEx to customers with specific FedEx International shipping requirements.
For more information regarding IPD/IDF, please see the FSMS IPD/IDF User Guide provided by your
FedEx Customer Support Representative.
Tracking Numbers Settings
The Tracking Numbers window provides information for FedEx Express and FedEx Ground tracking
number management. No entries are required in this window. This tab is also password protected and
can only be accessed by your FedEx Customer Support Representative.
62 FedEx Ship Manager® Server User Guide, Version 7.6
Page 65

Chapter One: Setting Up FSMS
For a new installation of FSMS:
• FedEx Express tracking numbers require a Demand Download to acquire the initial range.
Subsequent tracking numbers are staged and automatically downloaded once the current range has
been depleted by 50%. This tracking number range is displayed in the ETN Future section of the
Tracking Numbers window. Once the current tracking number range has been used, the future
range is displayed in the ETN Express section of this window.
• FedEx Express tracking numbers will also be downloaded during the meter registration process if the
Meter Registration Utility is used.
• FedEx Express tracking numbers are stored in the FSMS database.
• When the FedEx Ground tracking number range is depleted, the range automatically rolls over and
begins again at 7010001. No customer or FedEx Customer Support action is necessary to download
FedEx Ground tracking numbers. The complete FedEx Ground tracking number is composed of three
parts: the customer's 7-digit FedEx Ground account number, the 7-digit 'tracking number' visible in
the Tracking Numbers tab above, and a check digit. This complete 15-digit number is the tracking
number used to track FedEx Ground packages.
FedEx Ship Manager® Server User Guide, Version 7.6 63
Page 66
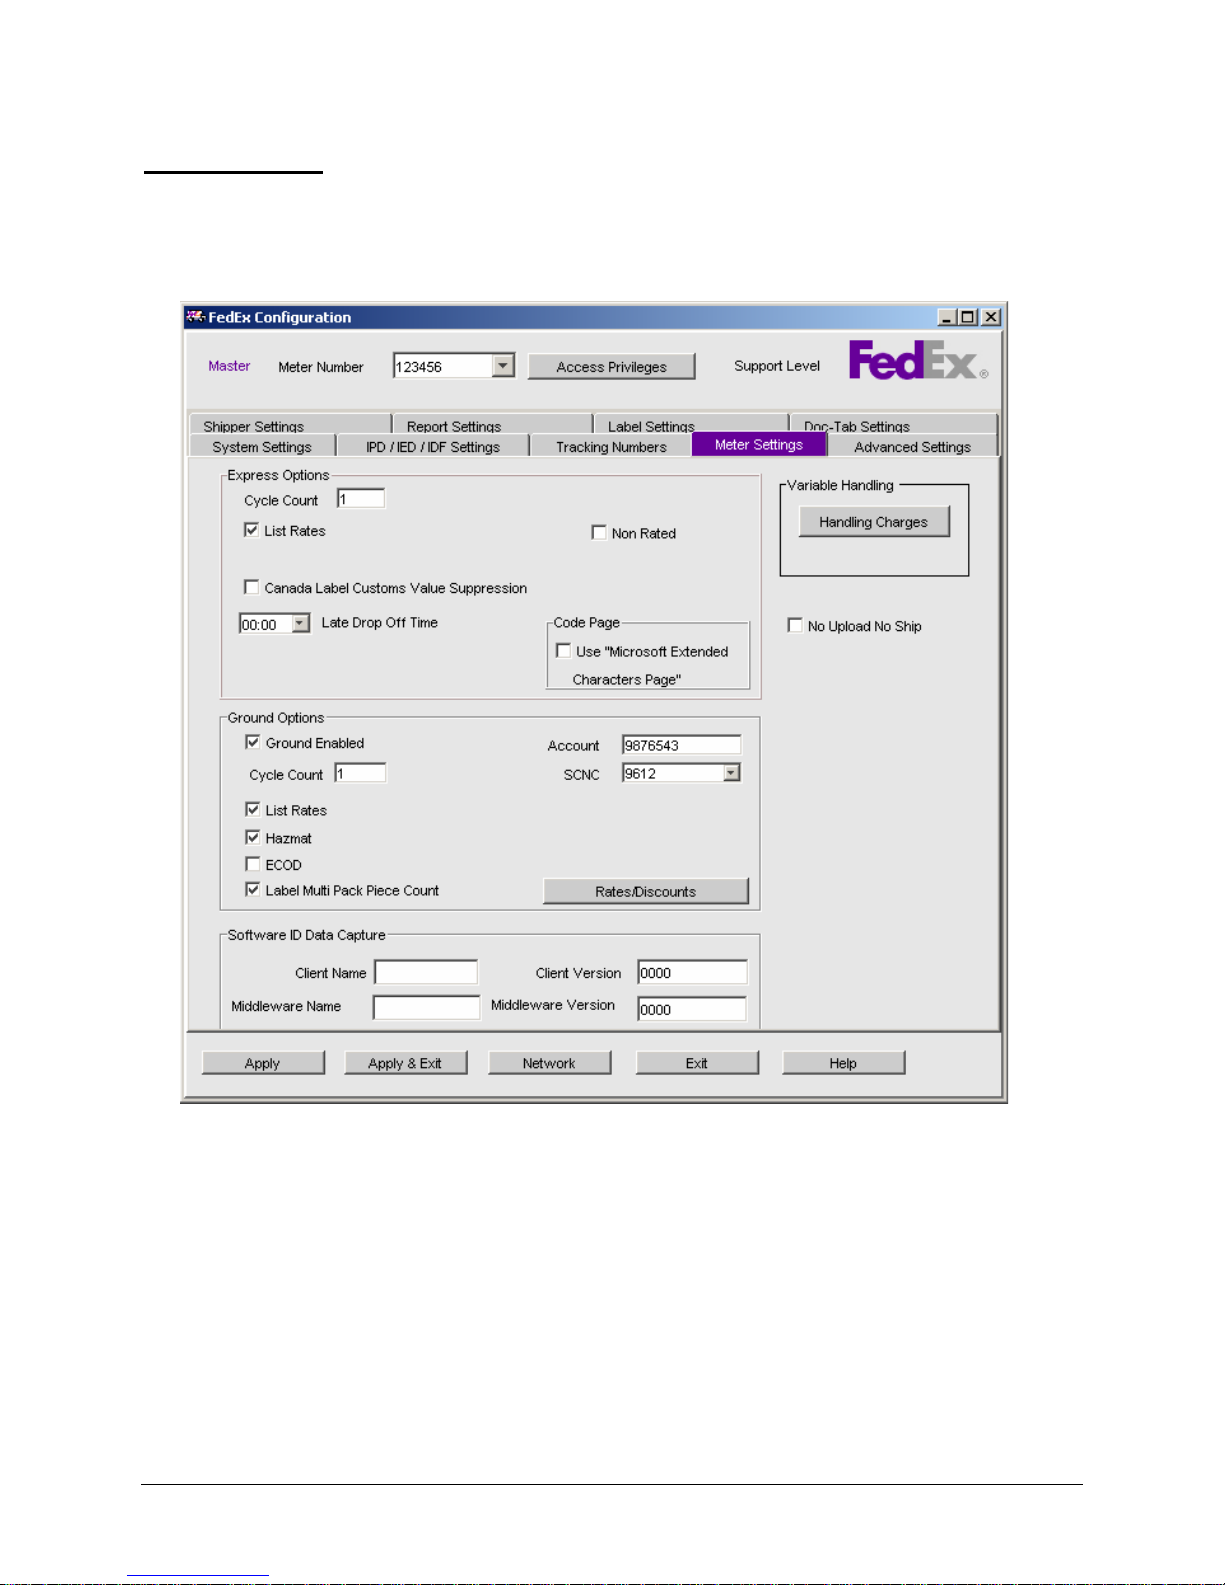
Chapter One: Setting Up FSMS
Meter Settings
The Meter Settings window is used to set special options for FedEx Express, FedEx International, and
FedEx Ground shipping. This window is password protected and can only be accessed by a FedEx
Customer Support Representative.
The following Meter Settings window is for U.S. origin:
64 FedEx Ship Manager® Server User Guide, Version 7.6
Page 67
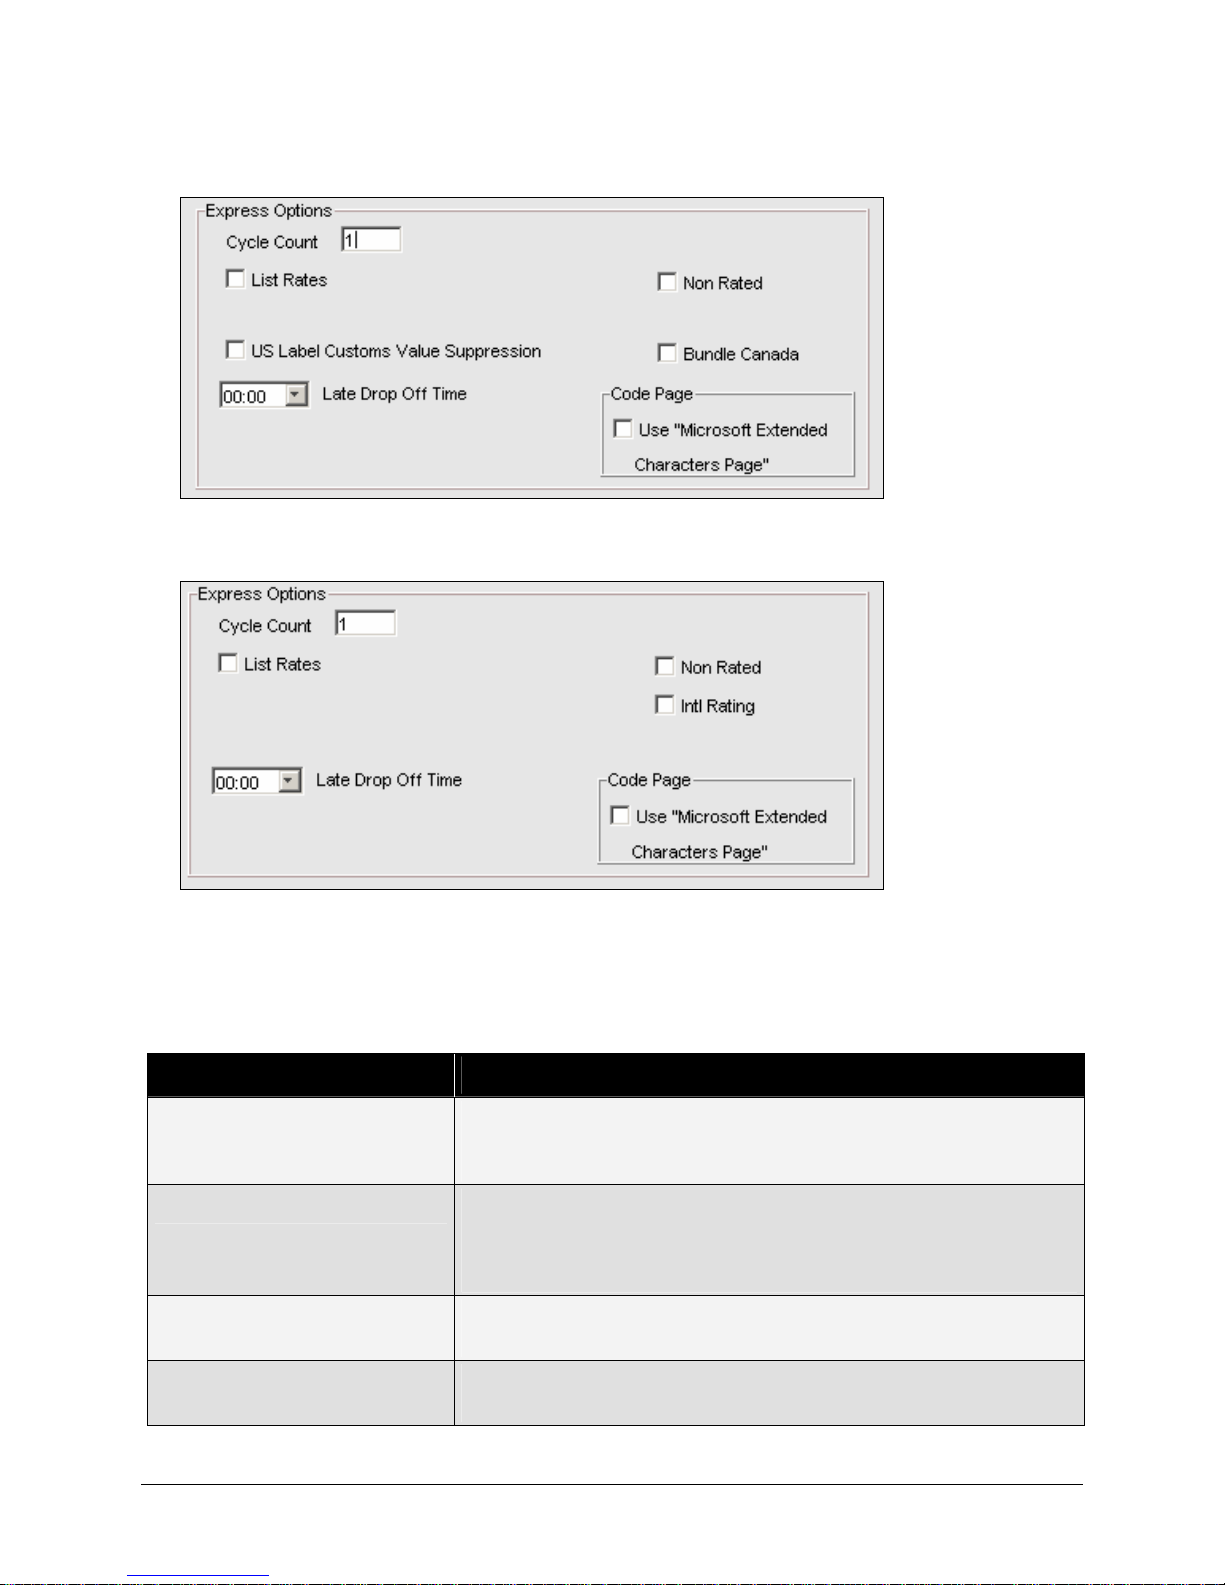
Chapter One: Setting Up FSMS
The following Express Options section of the Meter Settings window appears for CA origin:
The following Express Options section of the Meter Settings window appears for non-U.S. or CA origin:
Although you cannot make changes to the Meter Settings tab without the assistance of FedEx Customer
Support, provided below is a description of each field to help you understand how your system is
configured.
Express Options:
Field Name Description
Cycle Count Displays the current invoicing cycle count. This number is
incremented after each Close and is transmitted to the FedEx
revenue systems after the Close process is complete.
No Upload/No Ship (NUNS) If this option is checked, the system will not allow shipping to
continue if revenue files have not been uploaded for 72 hours. For
more information regarding NUNS, please see Chapter Four: FSMS
Revenue Management in this User Guide.
List Rates If List Rates is checked, List Rates are available for the meter(s) on
your server. U.S. origins only.
Non Rated If Non Rated is selected, FSMS will not a rate download Express
rates.
FedEx Ship Manager® Server User Guide, Version 7.6 65
Page 68
Chapter One: Setting Up FSMS
Field Name Description
Intl Rating This box must be checked to receive discounted rate quotes for non-
U.S. or CA origins.
Label Customs Value
Suppression to Canada
This option, if selected, prevents the customs value for a Canadaorigin FedEx International shipment from printing on the shipping
label.
Note: For CA origins, this field will be displayed as Label Customs
Value Suppression to US.
Late Drop Off Time If your shipping site has an extended shipping day agreement with
FedEx (for example: you have a late drop-off time of 1:00 AM), you
may set this parameter to have your shipping labels display the
extended day date instead of rolling to the next shipping day.
Code Page Selecting Use Microsoft Extended Chars Page allows you to enter
extended characters in the shipping transaction, specifically to
support International language requirements.
Ground Options:
Field Name Description
Ground Enabled If this box is checked, you are configured for FedEx Ground shipping.
List Rates If this box is checked, list rates are available to the meter(s) on your
server.
Account Your seven-digit FedEx Ground account number is displayed in this
field.
Home Delivery Home Delivery is enabled when Ground is enabled.
Cycle Count The current cycle count for FedEx Ground shipments is displayed in
this field. If you reinstall or clean load FSMS, this field will be reset to
zero. If a clean load is required ensure the number is reset to its
previous value.
HazMat If you have contracted to ship Hazardous Materials using FedEx
Ground, this box must be checked to process these shipments on
FSMS.
ECOD If you have contracted to ship Electronic Collect On Delivery (ECOD)
using FedEx Ground, this box must be checked to process these
shipments on FSMS.
EPDI Code Removed in FSMS v 7.6.
Label Multi Pack Piece Count Selecting this option causes the package piece count to appear on
FedEx Ground MPS labels in the 1/X, 2/X, and etc. format. The Label
Multi Pack Piece Count option is explained in detail in Chapter Three:
Shipping Labels of this User Guide.
66 FedEx Ship Manager® Server User Guide, Version 7.6
Page 69
Chapter One: Setting Up FSMS
Field Name Description
SCNC This pull-down list provides the Serial Container Numeric Code
(SCNC) formats for FedEx Ground Labels. The SCNC option is
explained in detail in Chapter Three: Shipping Labels of this User
Guide.
Rates/Discounts The Rates/Discounts button opens up a dialog box for entering
FedEx Ground discount rates. FedEx Ground discount rates must be
entered by your FedEx Customer Support Representative.
Downloading FedEx Ground discounts is the preferred method for
enabling FedEx Ground discounts.
Software ID Data Capture
The Software ID Data Capture section of the Meter Settings window contains further identification
information for CSP/SSP, middleware, and client software that is associated with your FSMS installation.
The following fields are included in this section of the Meter Settings window:
Field Name Description
Client Name This field is provided for the entry of a CSP interface or for customers
who use FedEx Ship Manager Enterprise with the FSMS server
application.
Client Version The software version associated with the Client Name is entered in
this field.
Middleware Name If you use a middleware application with the FSMS server, the
middleware identification is enter in this field.
Middleware Version The software version associated with the Middleware Name is
entered in this field.
Variable Handling Configuration
If your shipping operation charges handling fees in additional to shipping/insurance charges, FSMS
allows you to add these handling fees to your total shipment charge. The handling charges can be
configured using the following utility or can be included in the shipping. See the FSMS TCR Version 7.6
for transaction coding requirements if assessing handling charges in the transaction. These fees can also
be printed on the Doc-Tab portion of the “4x6” shipping label.
To display the Variable Handling Charges window, click the Handling Charges button on the FSMS
Configuration Utility Meter Settings screen:
FedEx Ship Manager® Server User Guide, Version 7.6 67
Page 70
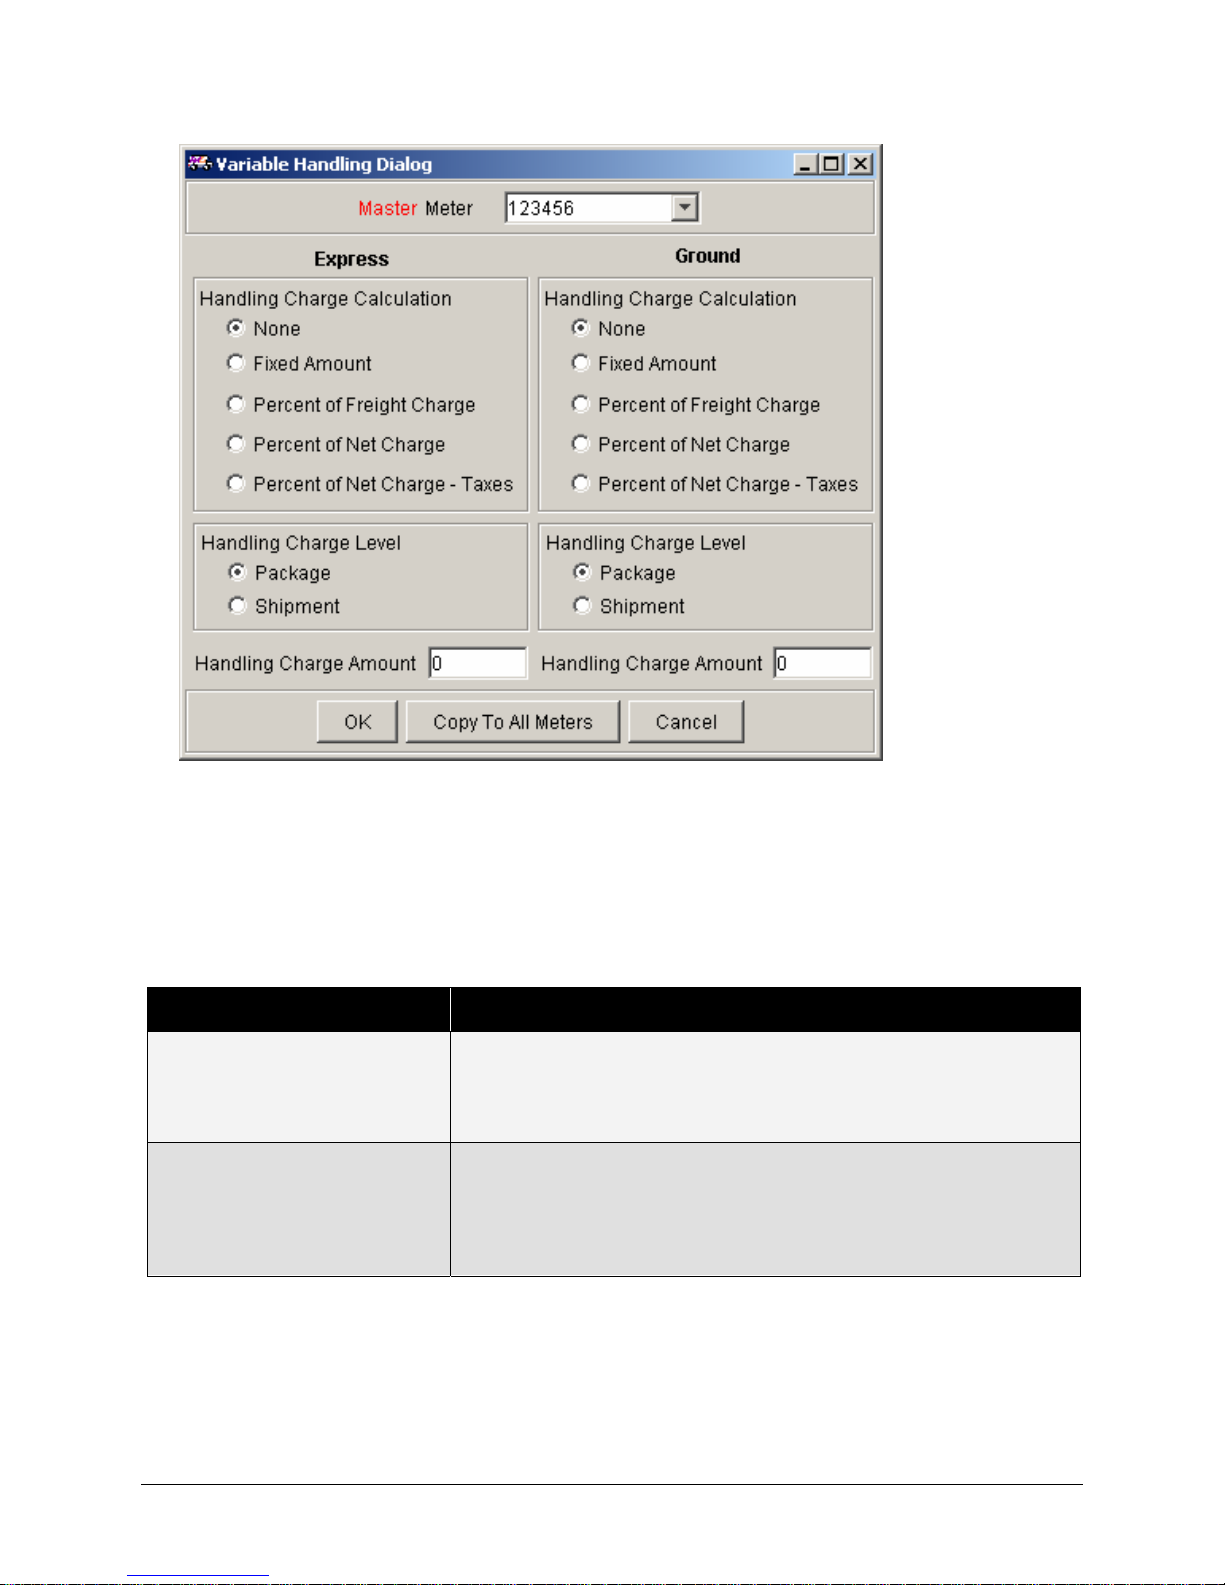
Chapter One: Setting Up FSMS
The Handling Charge screen consists of options for both FedEx Express and FedEx Ground shipping. If
you want to configure a handling charge for both shipping types, you must make entries in each section of
the screen. The Handling Charge Calculation section of the Handling Charge screen let you select the
type of handling charge to be configured. The fields required to designate a handling charge calculation
are defined as follows:
Handling Charge Calculation:
Field Name Description
Fixed Amount Click this selection to add a predetermined handling charge to each
package/shipment. For example, select Fixed Amount if you charge
$5.00 handling for all packages regardless of the package value or
shipping charge.
Percent of Freight Charge Click this selection if you want FSMS to calculate a fixed percentage
of the list rate (undiscounted) shipping charge to be applied as a
handling fee. For example, if you select this option, you may enter
3.00 (%) to be calculated from the shipping charge for the package to
be assessed as the handling charge for the shipment.
68 FedEx Ship Manager® Server User Guide, Version 7.6
Page 71
Chapter One: Setting Up FSMS
Field Name Description
Percent of Net Charge Click this selection if you want FSMS to calculate a fixed percentage
of the net freight charges (including discounts) to be applied as a
handling fee. For example, if you select this option, you may enter
3.00 (%) to be calculated from the discounted shipping charges for the
package to be assessed as the handling charge for the shipment.
Percent of Net Charge –
Taxes
This feature is available for Canadian customers shipping intraCanada packages only. If you choose this option, you may include
Canadian taxes as part of the net charge used to calculate a handling
charge. For example, your shipment price is $100.00 and Canadian
taxes are $5.00. If you configure 5.00 (%) for your handling fee, the
actual handling fee accessed the shipment is $5.25.
Handling Charge Level:
In addition to providing the ability to add handling charges via a transaction, FSMS also provides the
ability to set up handling charges within the configuration. Any handling charge provided via a transaction
will override the configured handling charges. The Handling Charge Level section of the Variable
Handling window allows you to select whether you want the handling charge calculated on the package
level or on the shipment level. This setting applies only if you are shipping FedEx Ground or FedEx
International Express packages.
If you select Package and configure a $5.00 handling charge, $5.00 will be applied to each package in a
multiple-piece shipment. Therefore, if you have 10 packages in a single multiple-piece shipment, the total
handling charge is $50.00. If you select Shipment and configure a $5.00 handling charge, the $5.00
handling charge is applied to the entire shipment. Therefore, if you have 10 packages in a single multiplepiece shipment, the total handling charge, in this scenario, is $5.00.
Handling Charge Amount:
The Handling Charge Amount field allows you to enter either the actual dollar amount (if you selected
Fixed Amount in the Handling Charge Calculation section) or the percent amount if you choose any
Percent option as a Handling Charge Calculation. Field entry requirements are as follows:
• Dollar amounts are entered in the Handling Charge Amount field as XXXXX.XX. For example, a
handling charge of five dollars is entered as 5.00.
• Percent amounts are entered in the Handling Charge Amount field as XXXXX.XX. For example, a
handling charge of ten percent is entered as 10.00.
Managing Your Handling Charge Entries:
The Variable Handling window allows you to enter handling charges for both FedEx Express and FedEx
Ground shipments for each meter number configured on your server. If you have a Master meter and
three Child meters, you may make up to four Express and four Ground Handling Charge configuration
settings by selecting the meter you want to configure from the Master Meter pull-down list at the top of
the Variable Handling window. If you configure the Master meter and want to save that configuration for
all meters on your server, click the Copy to All Meters button at the bottom of the Variable Handling
window.
To save your entries, click OK. The Variable Handling window is dismissed. If you want to exit this
window without saving your configuration entries, click Cancel.
FedEx Ship Manager® Server User Guide, Version 7.6 69
Page 72
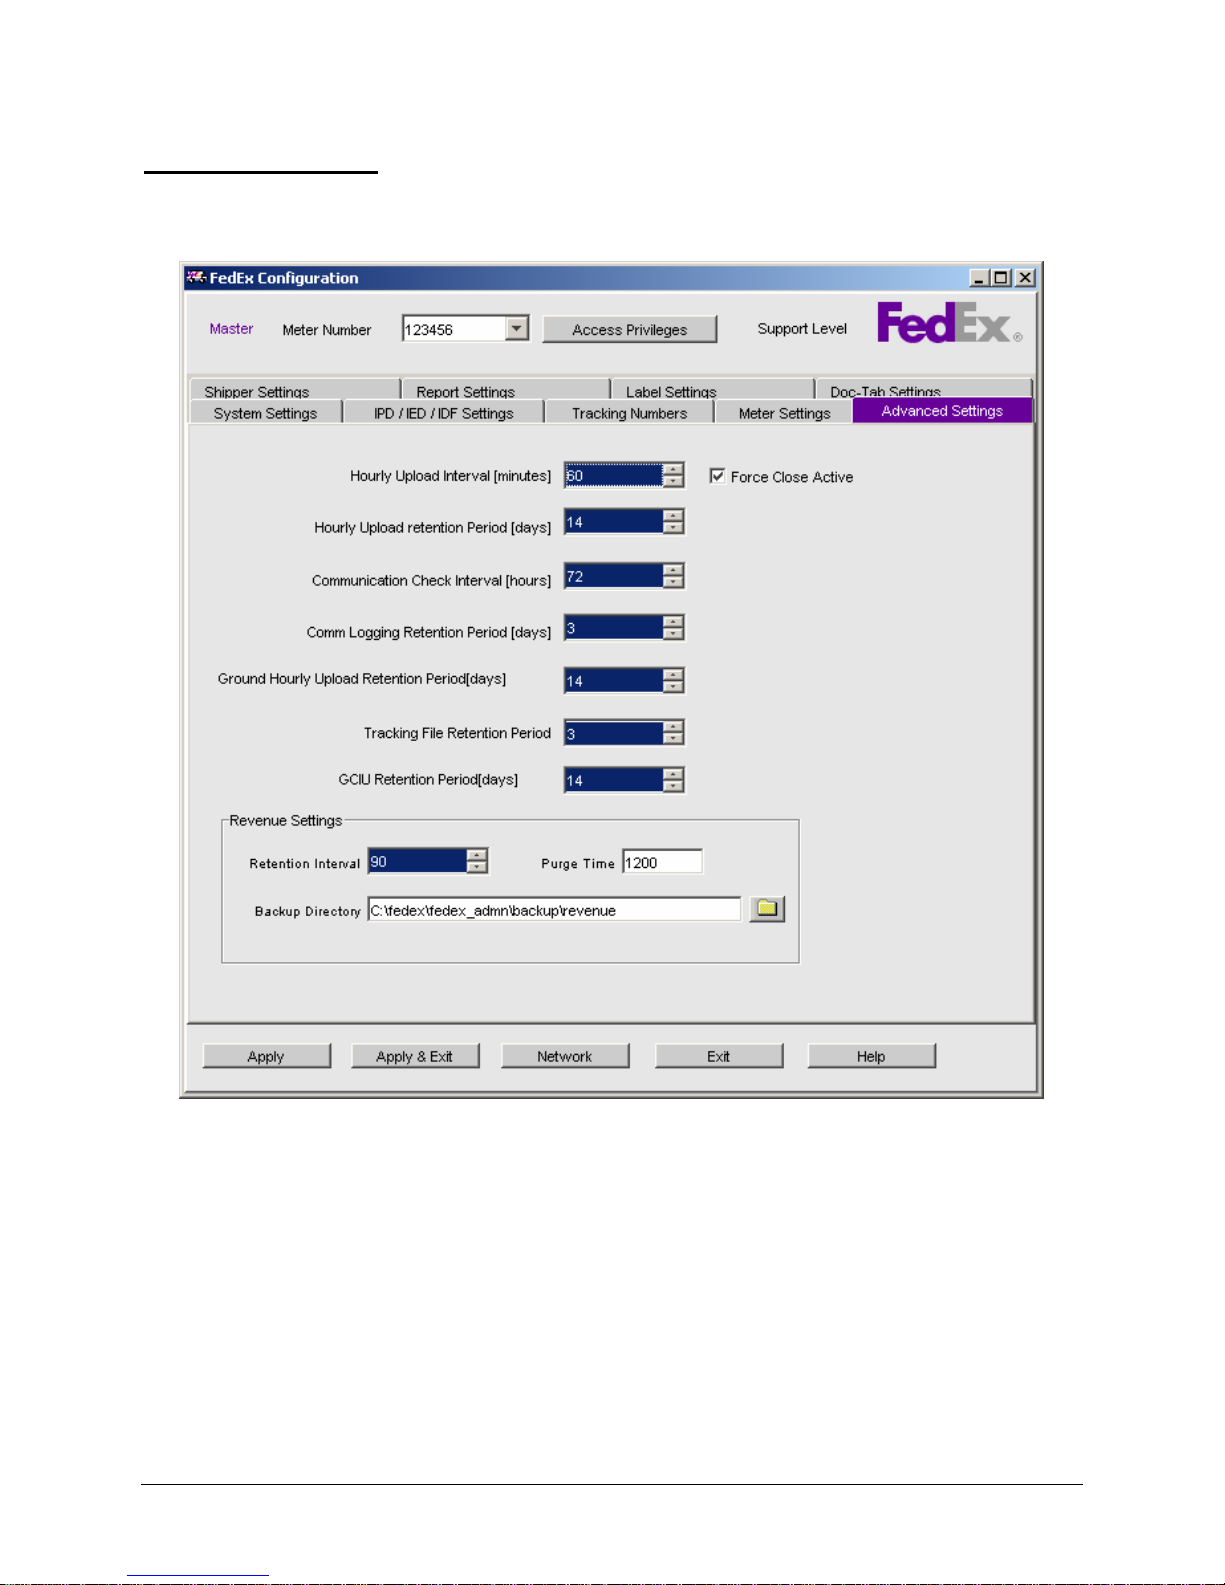
Chapter One: Setting Up FSMS
Advanced Settings
The Advanced Settings window is used to set communications and revenue parameters. This window is
password protected and can only be accessed by a FedEx Customer Support Representative.
70 FedEx Ship Manager® Server User Guide, Version 7.6
Page 73
Chapter One: Setting Up FSMS
Field Name Description
Force Close Active Checking this box will force each configured meter to close at
the time entered on the Shipper Settings tab. See the “Shipper
Settings” section previously in this chapter.
Note: This setting is system level, which means that each
meter configured on your server will undergo a Force Close at
the time specified for each meter on the Shipper Settings tab.
Hourly Upload (HU) Interval This field is used to set the frequency of the hourly upload of
Express package data to the FedEx backend systems and can
be set from 30-120 minutes. This applies to both FedEx
Express and Ground HU files.
Express Hourly Upload (HU)
Retention Period
Number of days the Express Hourly Upload data is retained.
Can be set from 7-14 days.
Communication Check Interval Can be set from 24-72 hours.
Communication Logging Retention
Number of days the communication log is retained.
Period
Ground Hourly Upload (HU) Retention
Period
Number of days the Ground Hourly Upload is retained. Can be
set from 7-14 days.
Tracking File Retention Period Number of days to retain the tracking results from an 043
tracking transaction.
GCIU Retention Period Number of days the Ground Commercial Invoice Upload (GCIU)
data is retained.
Revenue Retention Interval Can be set from 1-7 days.
Purge Time Sets the time the database will be purged at the end of the
retention interval.
Backup Directory Displays the directory to which backup revenue files are saved.
FedEx Ship Manager® Server User Guide, Version 7.6 71
Page 74

Chapter One: Setting Up FSMS
Transactional Meter Configuration
The FSMS 070 Meter Query Request transaction was enhanced in FSMS to allow configuration changes
to the FSMS Configuration Utility using a transaction. This feature reduces the need to access the FSMS
Configuration Utility directly and allows the ability to make changes remotely. The following business rules
apply:
• The new configuration transaction does not allow adding or deleting a meter.
• Each meter must send a separate 070 transaction for configuration. For example, if you have one
Parent/Master meter and three Child meters, then four separate 070 transactions must be entered to
make configuration changes for all meters.
• The following fields from the FSMS Configuration Utility can be configured using the 070 transaction:
• All fields on the Doc-Tab screen
• Express DG Printer ID
• Express DG Printer Form Type
• Ground Hazmat Printer ID
• Express/Ground Commercial Invoice
• Ground Hazardous Materials Certification
• Client Name
• Client Version
• Middleware Name
• Middleware Version
• Time Zone
• Late Drop-Off
• Sender E-mail ID
• Variable Handling Fields
For more information regarding Remote Configuration using the 070 transaction set, please see the
FSMS TCR Version 7.6.
72 FedEx Ship Manager® Server User Guide, Version 7.6
Page 75
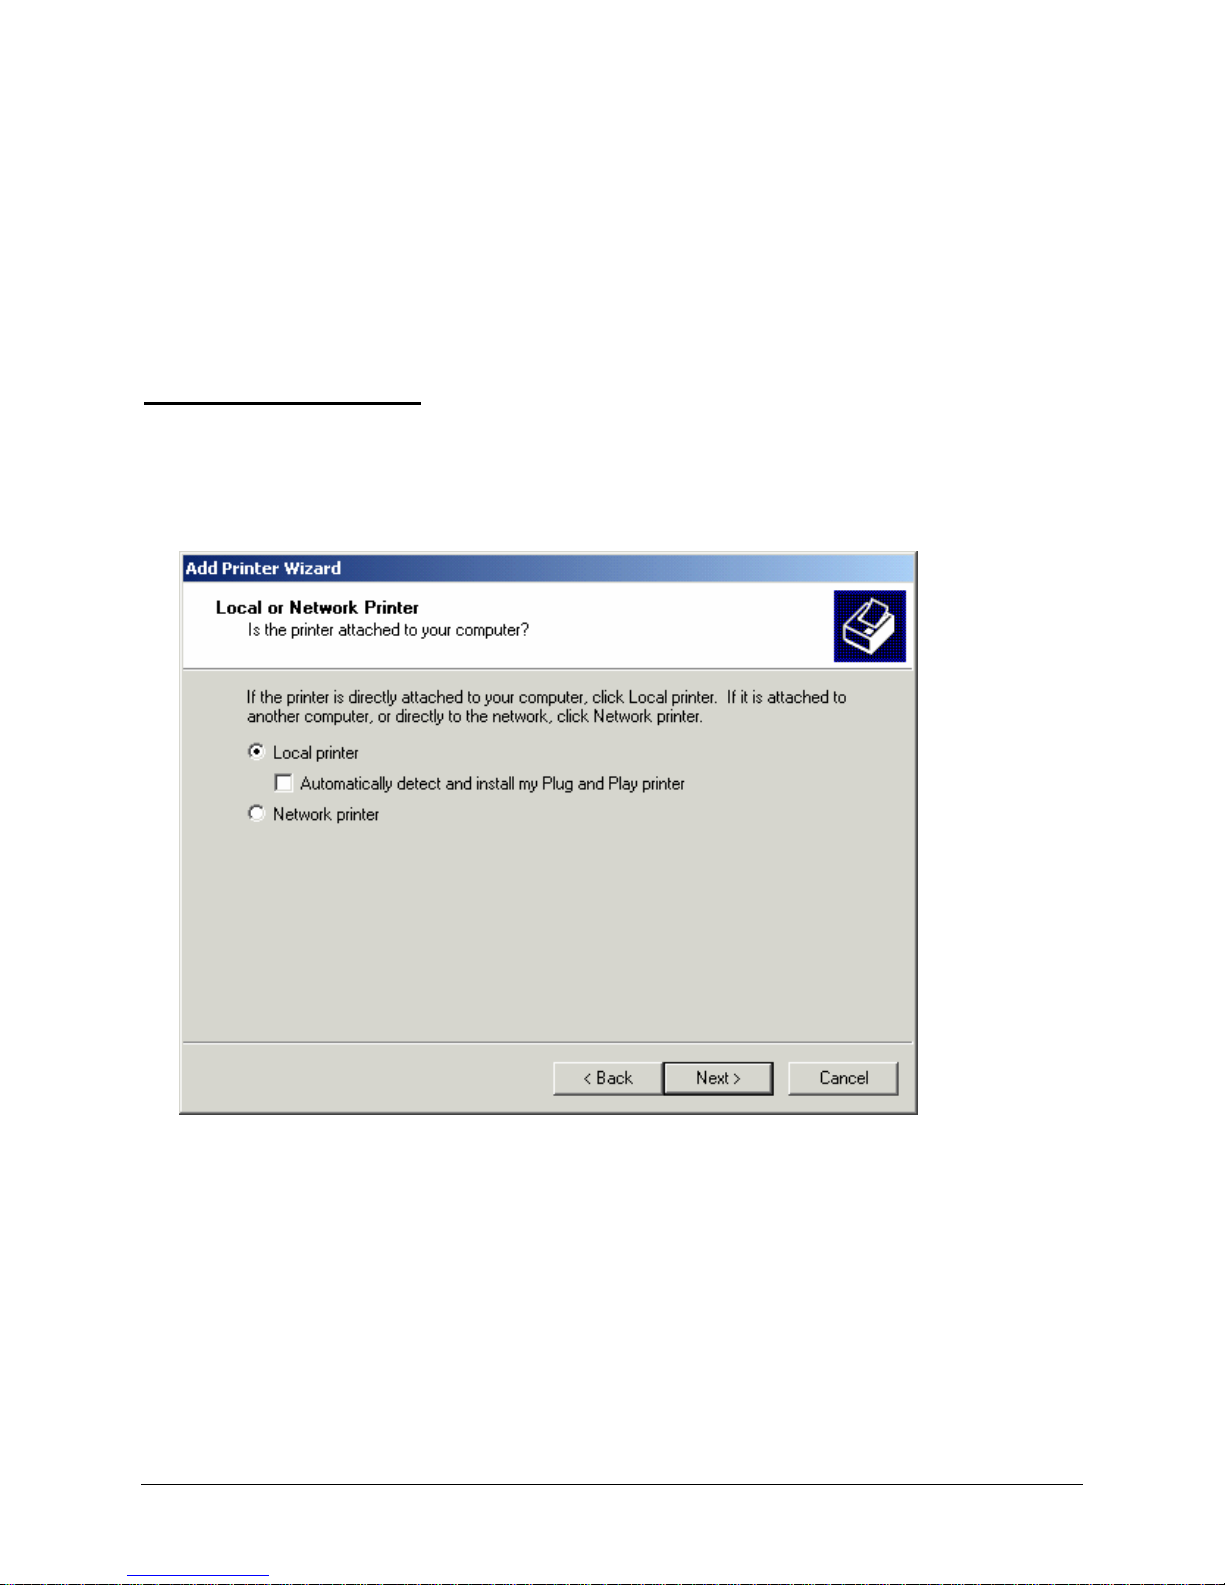
Chapter One: Setting Up FSMS
Printer Set-Up
FSMS allows you to set up printers for both label and report printing in three different ways:
1. Local Printer
2. Local TCP-IP Printer
3. Windows-based Print Share Network
Adding a Local Printer
To add a local printer, start up the Windows Add Printer Wizard. This wizard is usually located on the
Windows Start menu. The Windows Printer Wizard start-up window is displayed.
1. Click Next to start the Add Print Wizard function. The Local or Network Printer window is
displayed.
2. Local Printer is selected as the default in this window. Click Next to continue local printer installation.
The Select the Printer Port window is displayed.
FedEx Ship Manager® Server User Guide, Version 7.6 73
Page 76
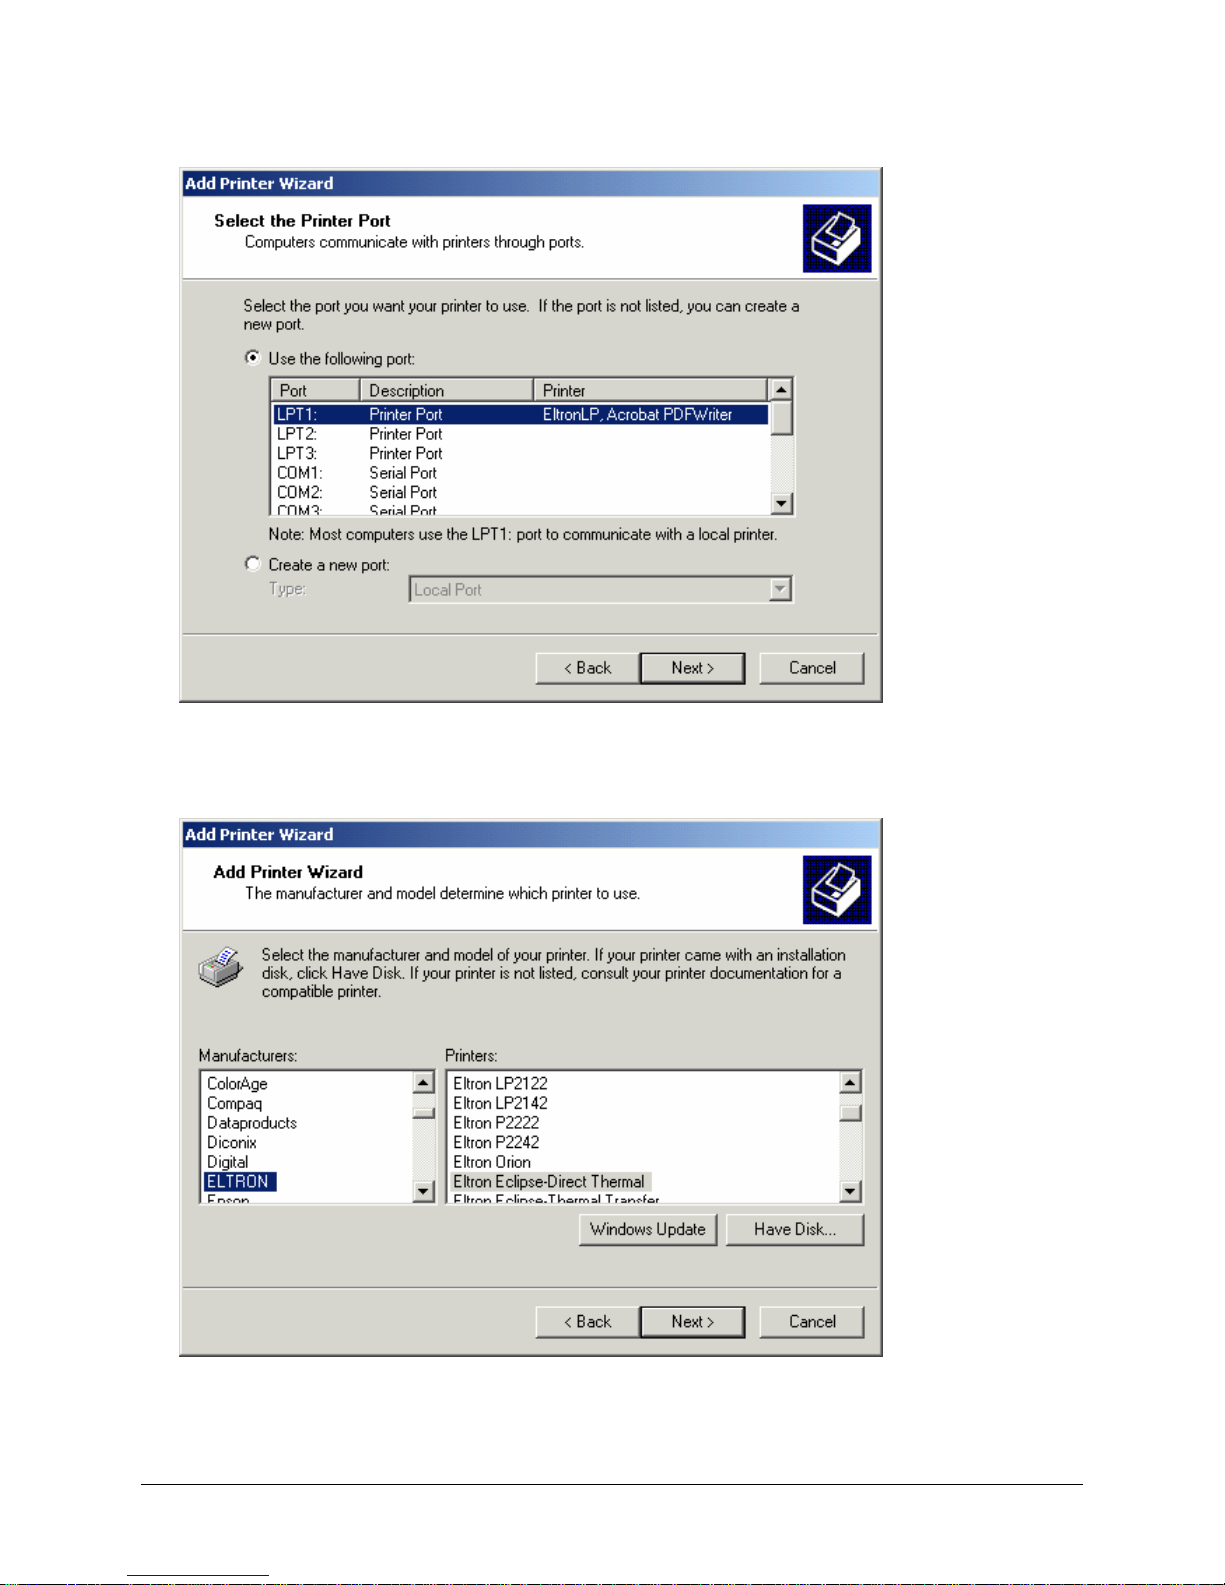
Chapter One: Setting Up FSMS
3. Select the printer port to which your printer is connected by scrolling through the Port list provided. In
the sample Select the Printer Port window, LPT1 (parallel port) is selected. Click Next to continue.
The Printer Model window is displayed:
4. Highlight the printer you are installing in the Manufacturers list. A list of available printers for that
manufacturer displays in the Printers list.
74 FedEx Ship Manager® Server User Guide, Version 7.6
Page 77
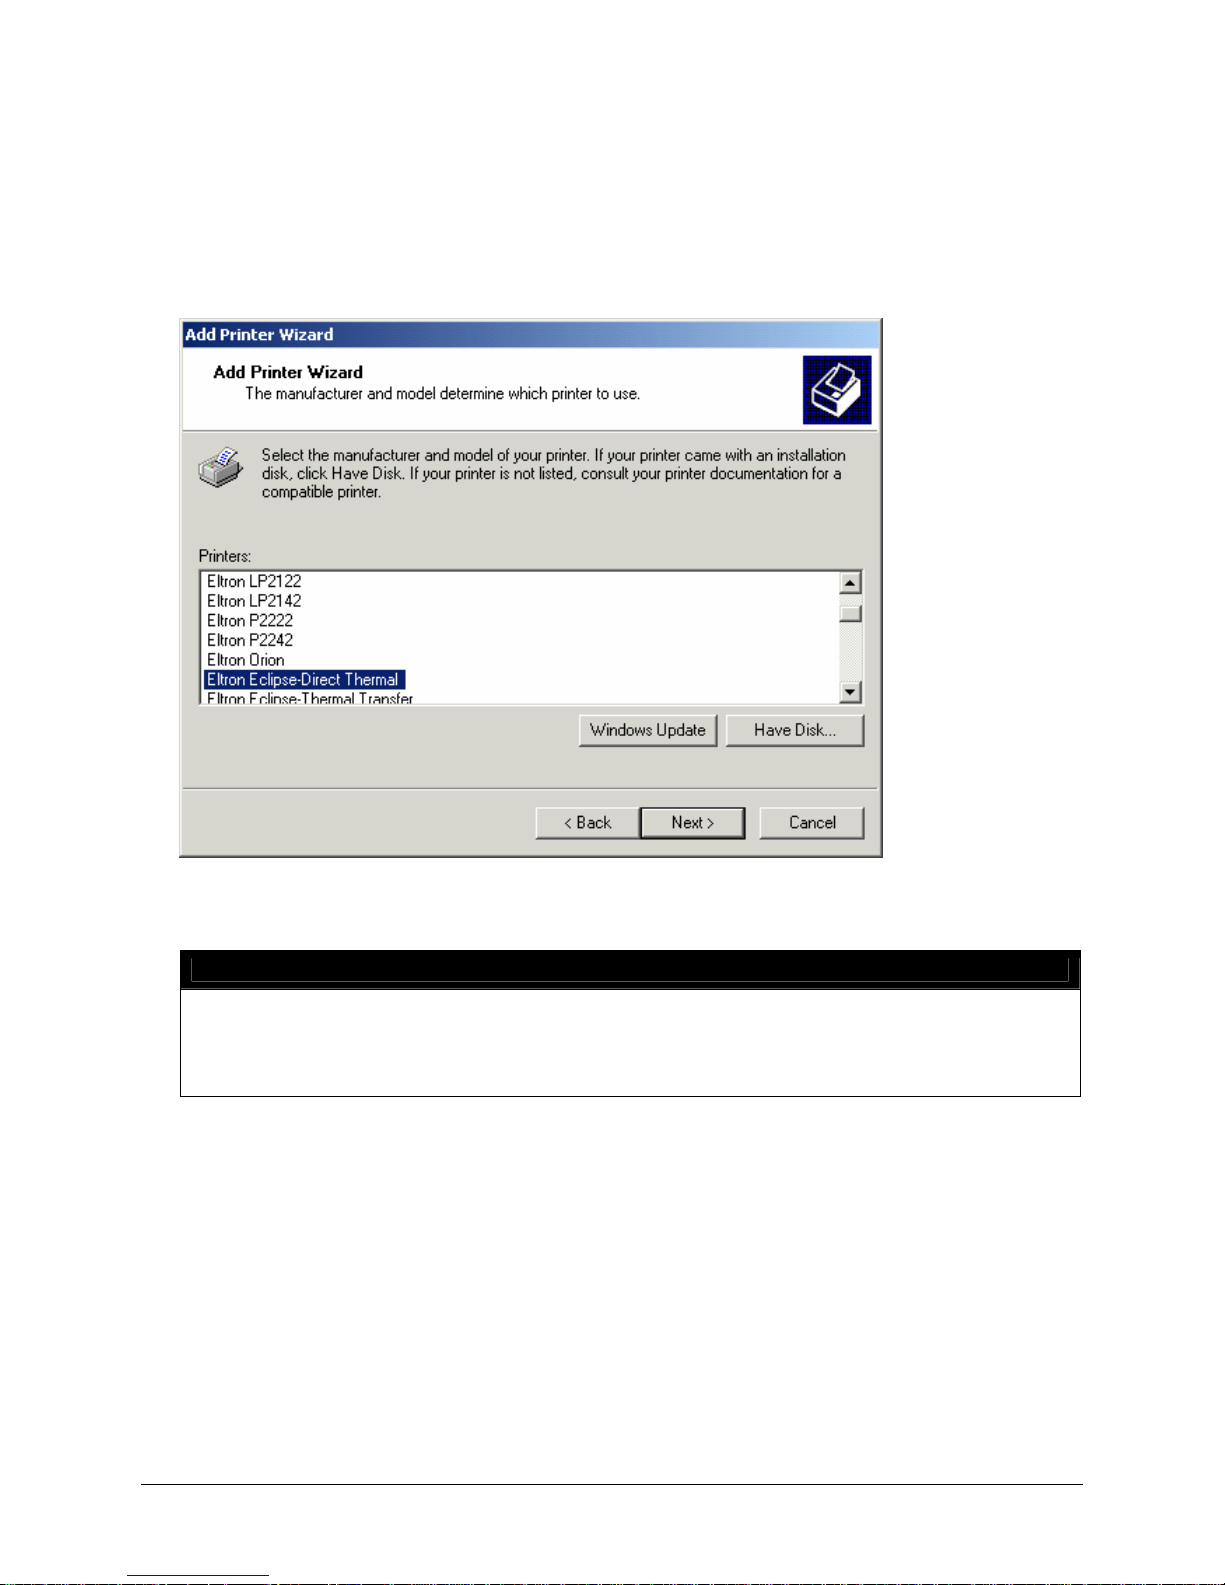
Chapter One: Setting Up FSMS
5. Highlight the appropriate printer and click Have Disk to install the printer driver for this printer
provided on the FSMS Installation CD. The Install From Disk window is displayed.
6. In the Install From Disk window, click Browse to locate the printer driver on the FSMS Installation
CD. After you have selected the driver, click OK to start installation.
7. Because FSMS includes printer drivers for a variety of supported printers, the Select Printer Model
window is displayed to allow you to choose the appropriate printer.
8. Highlight your printer from the Printers list in the Select Printer Model window. Click Next to
continue. The Name Your Printer window is displayed.
NOTE:
If the printer you are installing has already been installed on your server, and you are
attempting to reinstall the printer, a window may be displayed which asks if you want to use
the new driver or retain the existing driver. Always select Use New Driver. This entry
ensures that you are loading the most recent driver provided by FSMS.
FedEx Ship Manager® Server User Guide, Version 7.6 75
Page 78
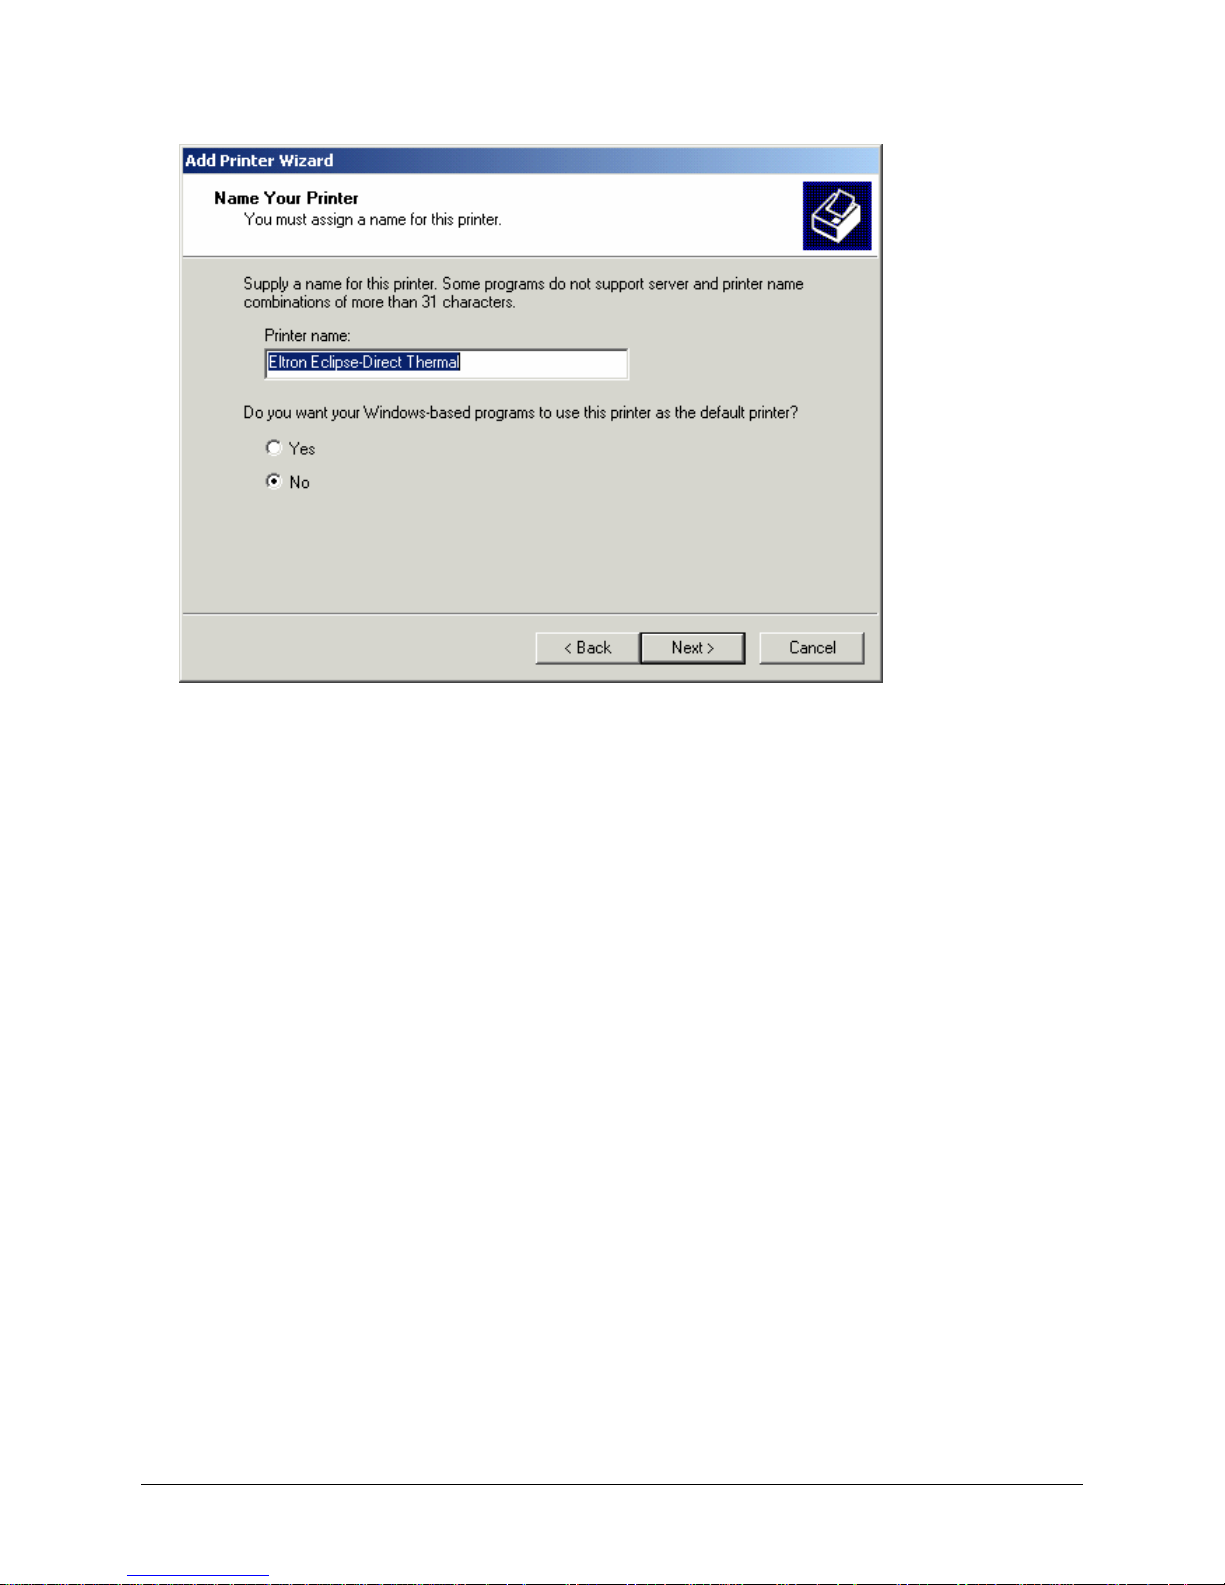
Chapter One: Setting Up FSMS
9. In the Name Your Printer window, type in the name of the printer you are installing. This will be the
printer name you will use to set up your Label and Report configurations and/or to enter in the 020
shipping transaction. If this printer is to be used by FSMS only, click No to make this printer
unavailable as the Windows default printer; otherwise, click Yes. Click Next to continue. The Printer
Sharing window is displayed.
76 FedEx Ship Manager® Server User Guide, Version 7.6
Page 79
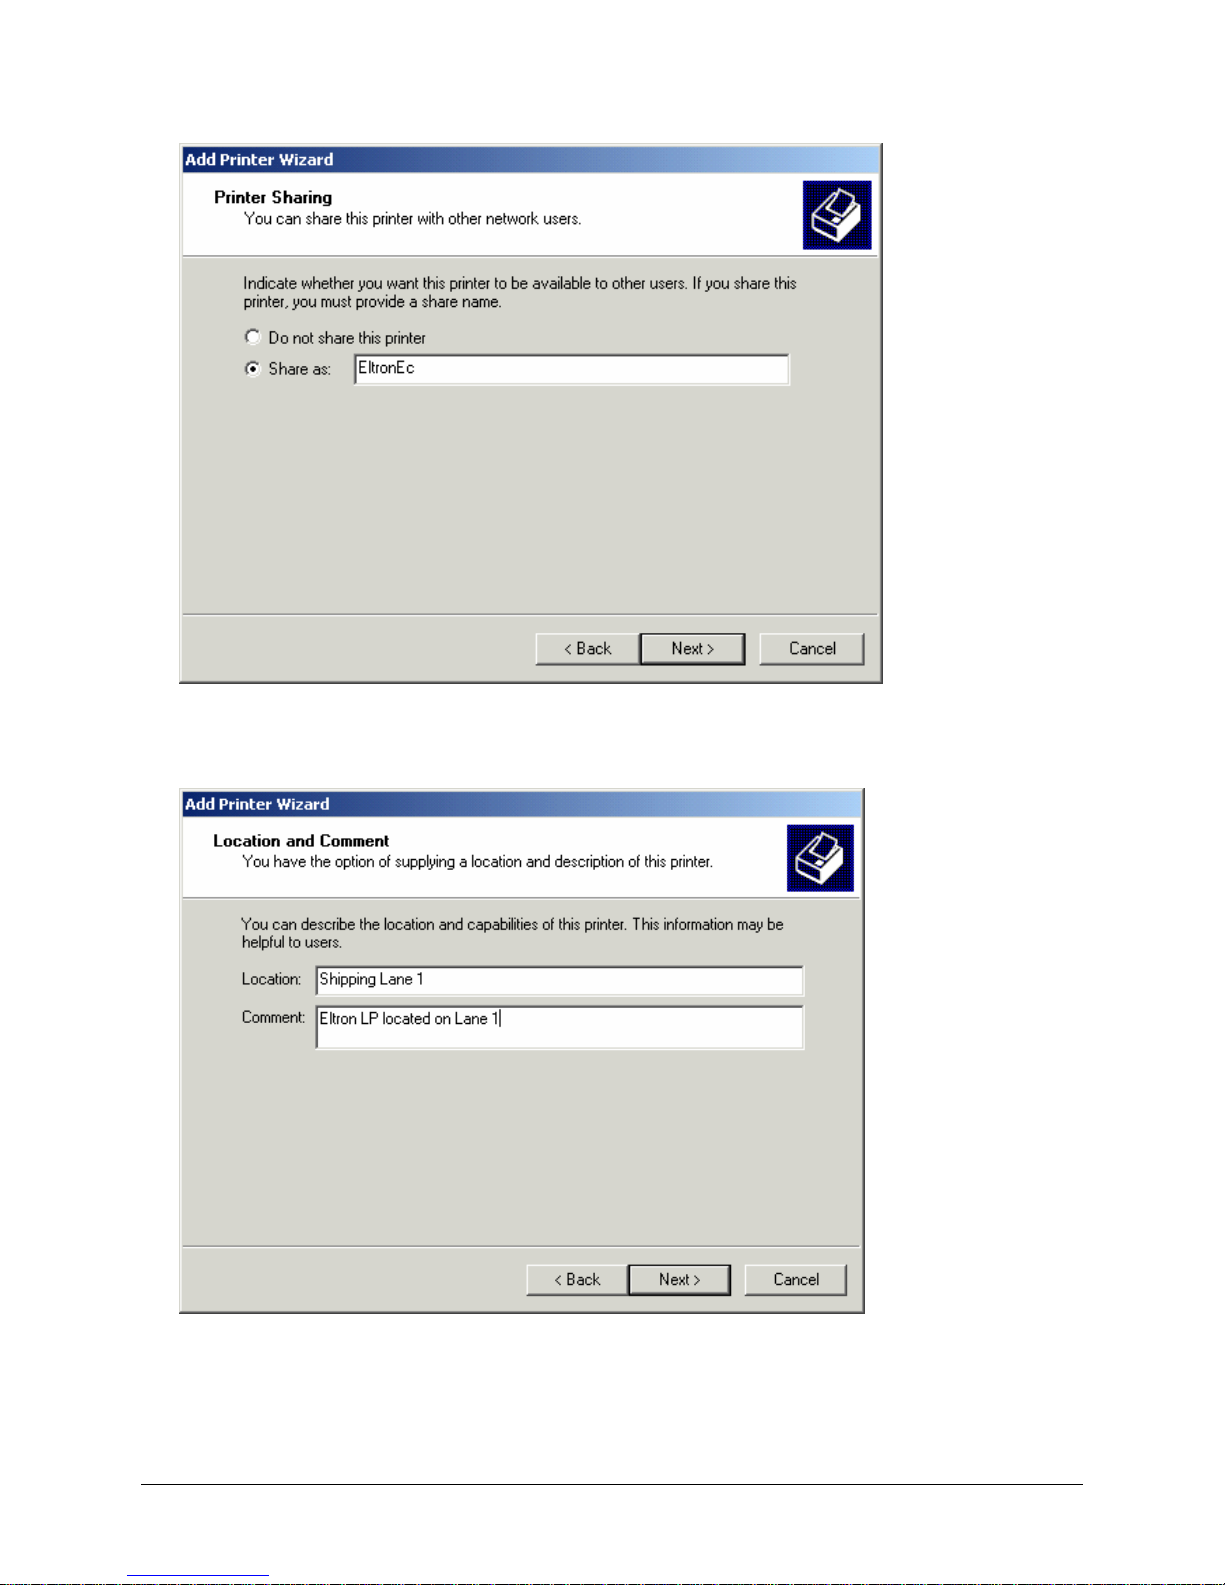
Chapter One: Setting Up FSMS
10. Select Share as to share your printer. The defaulted share name is the same as the printer name you
entered in the Name Your Printer window. Click Next to continue. The Location and Comment
window is displayed:
11. The Location and Comment window asks for information that is useful when trying to locate your
printer. In the sample window above, the printer is located on Shipping Lane 1 and is an Eltron LP
(label printer). This window can be left blank if you choose. Click Next to continue. The Print Test
Page window is displayed.
FedEx Ship Manager® Server User Guide, Version 7.6 77
Page 80
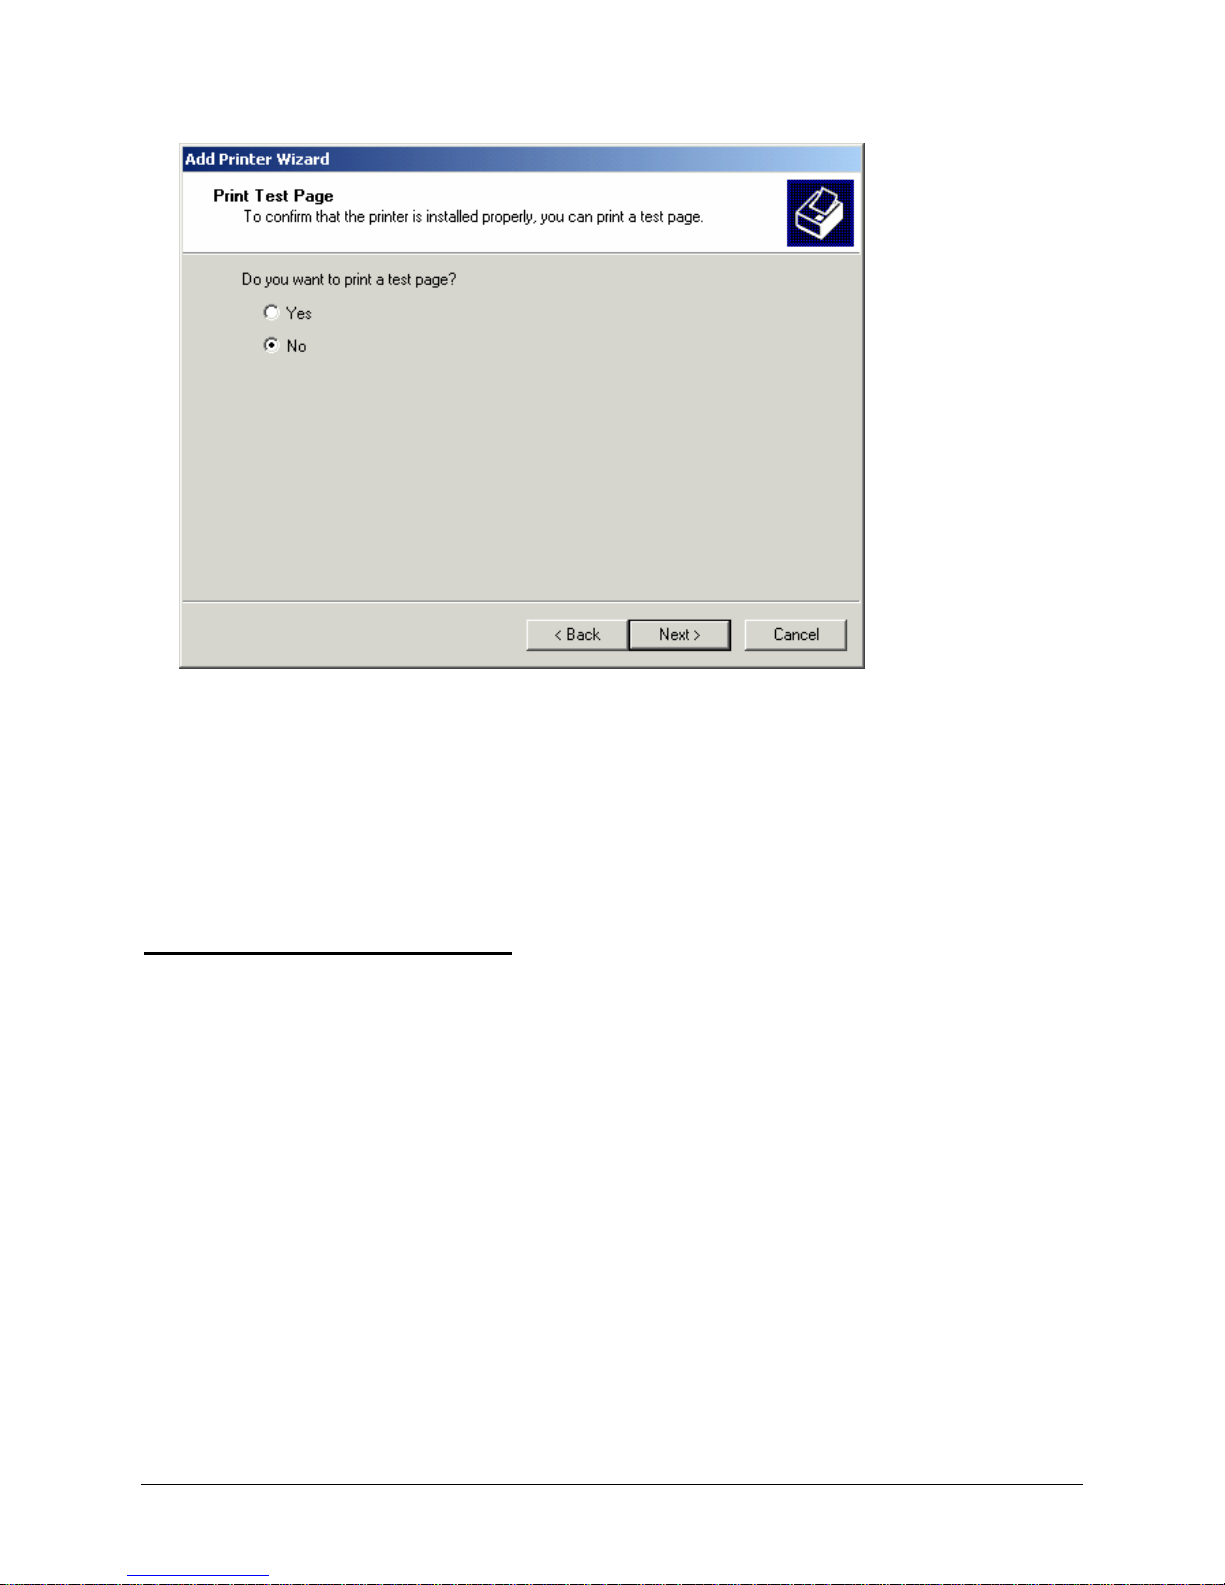
Chapter One: Setting Up FSMS
12. To print a test page, click Yes. Otherwise, select No. Click Next to continue. The Add Printer
Completed window is displayed.
13. In this window, the information you added during printer installation is recapped. If you want to make
changes to this configuration, click Back. To end printer installation, click Finish.
You may continue to add local printers using the steps described above. After you have installed printers
for all of your shipping applications (labels, reports, etc.), you are ready to start coding your shipping
transactions.
Adding a Local TCP/IP Printer
To add a local printer, start up the Windows Add Printer Wizard. This wizard is usually located on the
Windows Start menu. The Windows Printer Wizard start-up window is displayed.
1. Click Next to start the Add Printer Wizard function. The Local or Network Printer window is
displayed.
78 FedEx Ship Manager® Server User Guide, Version 7.6
Page 81
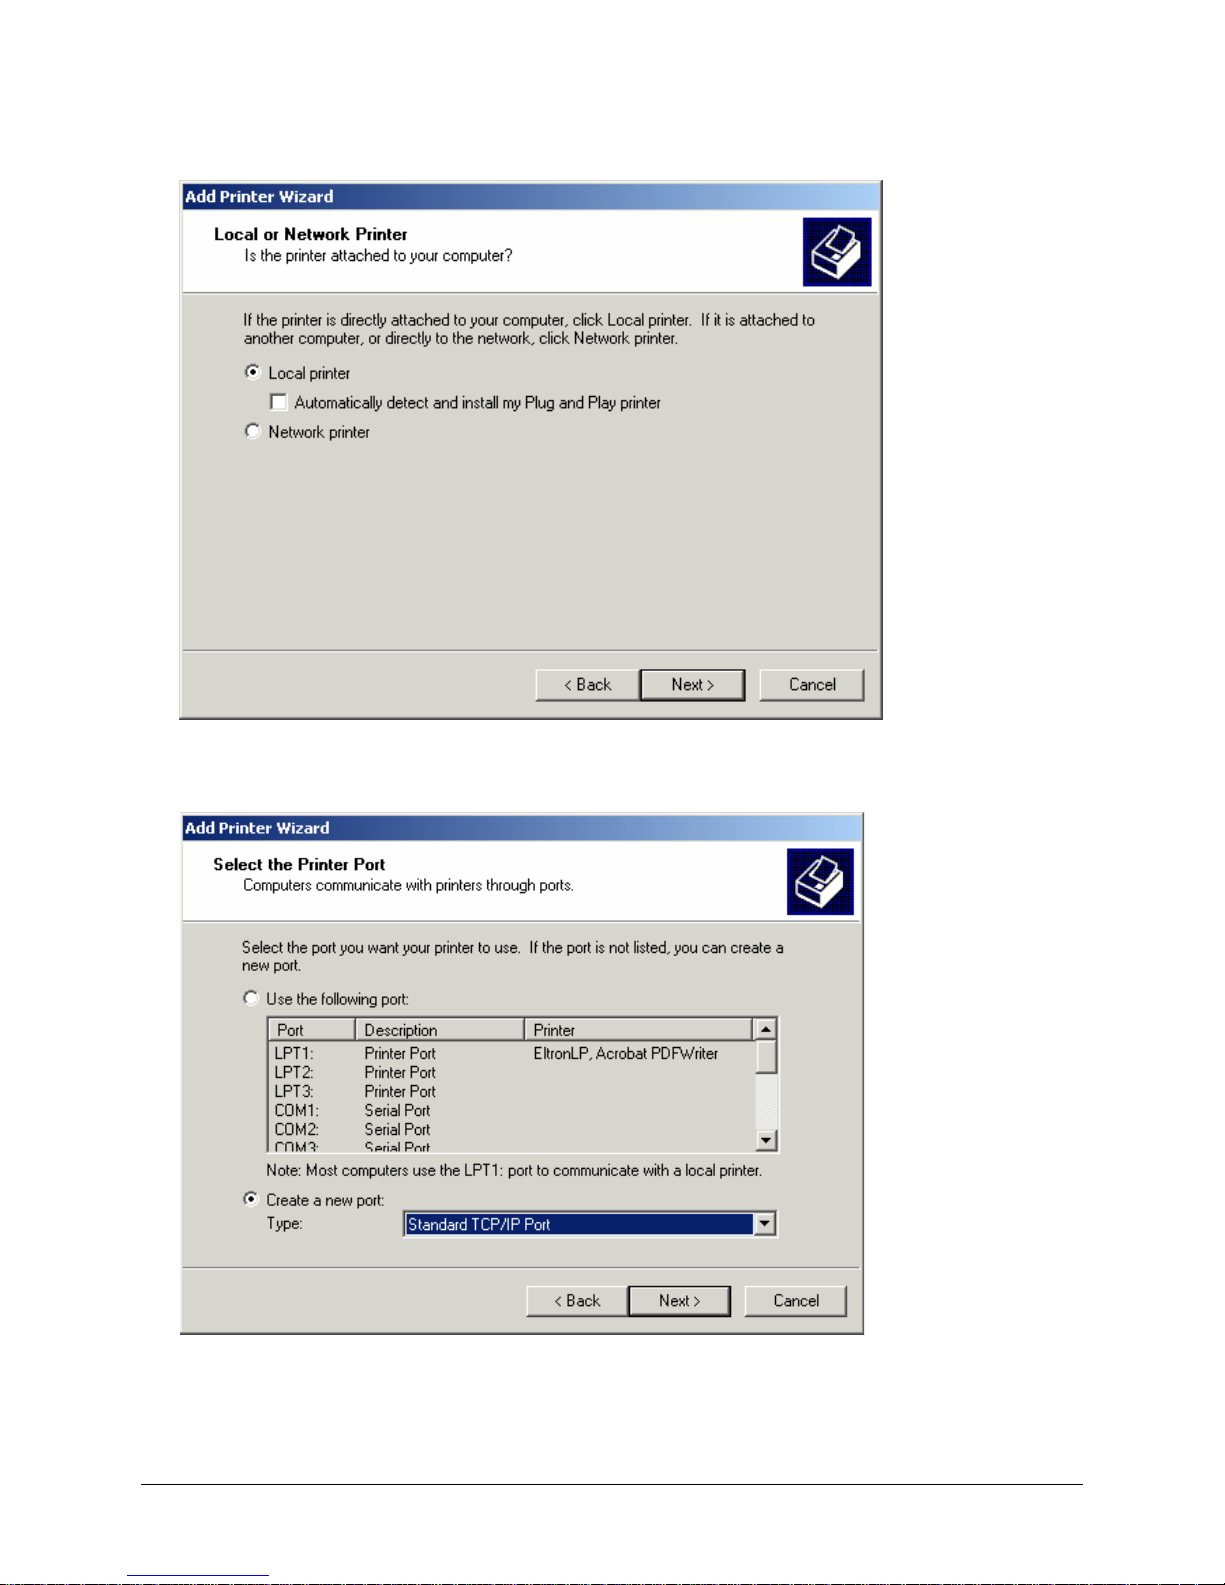
Chapter One: Setting Up FSMS
2. Local Printer is selected as the default in this window. Click Next to continue local printer installation.
The Select the Printer Port window is displayed.
3. To configure a TCP/IP port, click Create a new port and select Standard TCP/IP Port from the Port
Type list. Click Next. The Add Standard TCP/IP Printer Port Wizard start-up window is displayed.
FedEx Ship Manager® Server User Guide, Version 7.6 79
Page 82
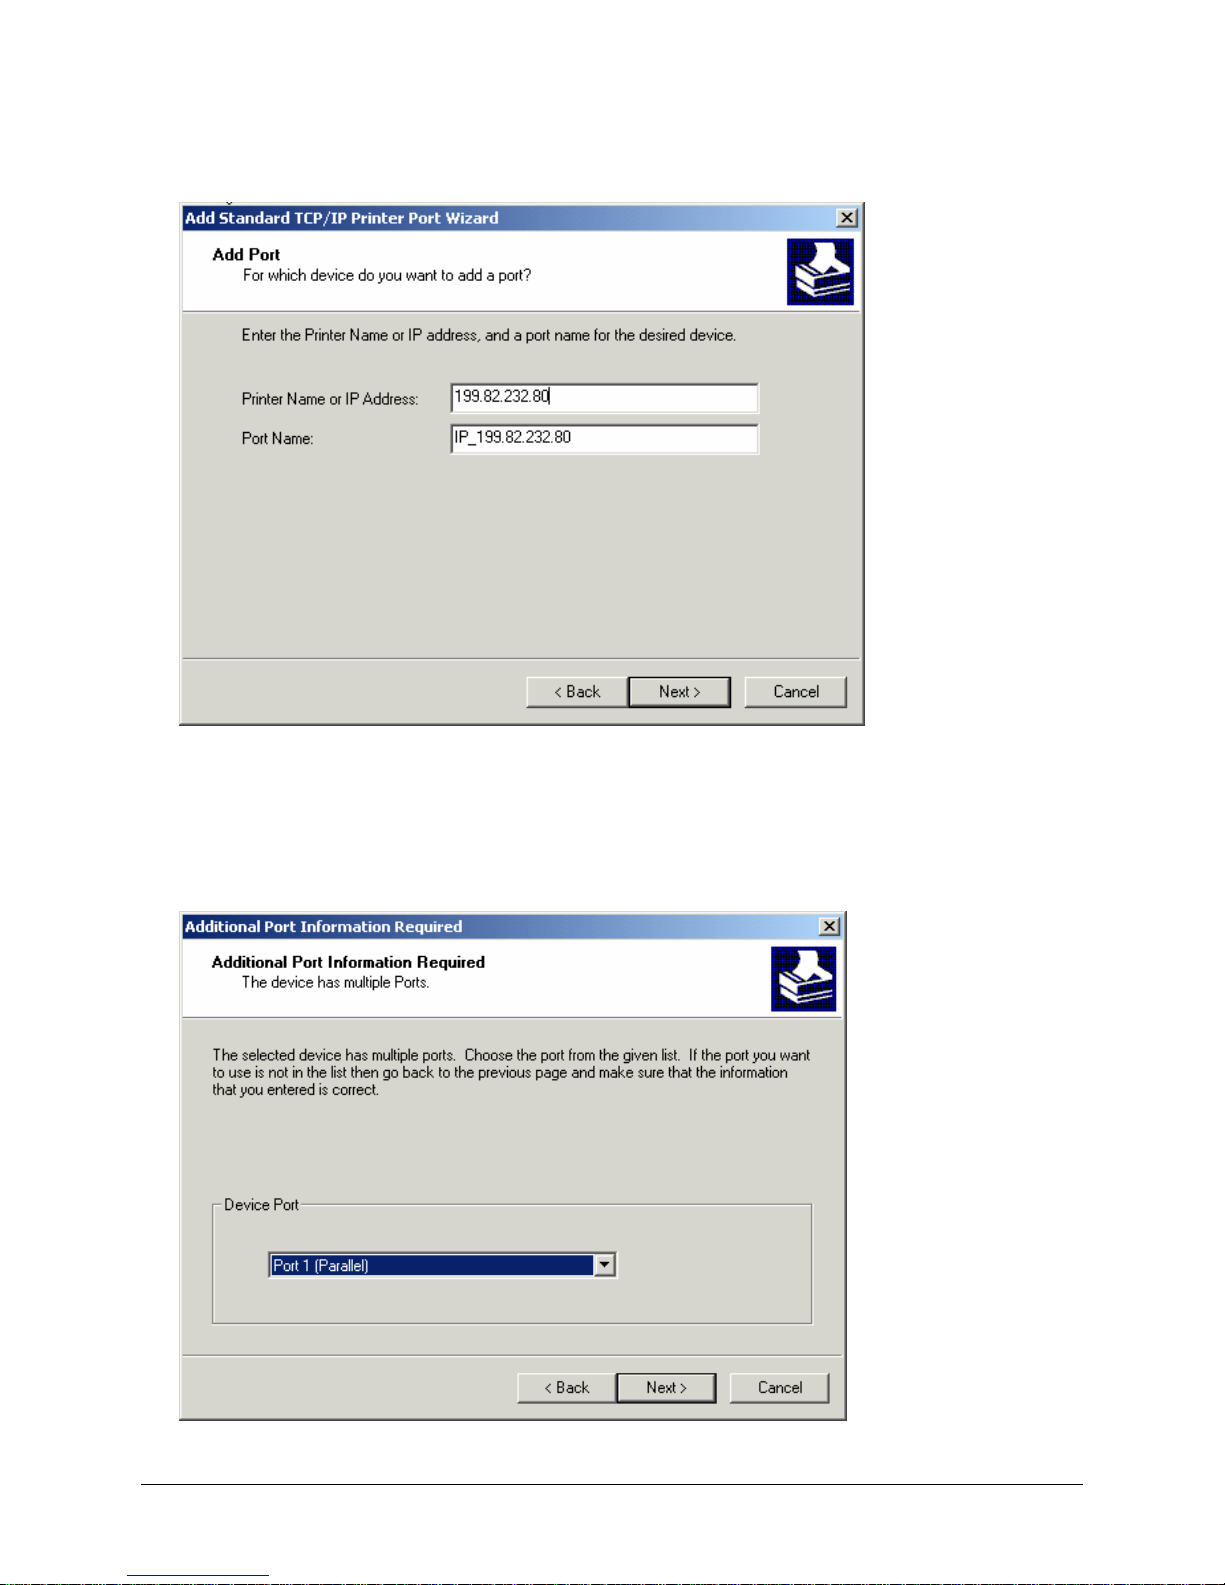
Chapter One: Setting Up FSMS
4. Confirm that the printer is turned on and you are connected to a configured network. To continue,
click Next. The Add Port window is displayed:
5. In the Add Port window, enter the name of the printer or the IP address for the printer you are adding
in the Printer Name or IP Address field.
6. Enter the Port Name for the printer port you are adding. The Port Name is the queue name for the
port your printer is connected to on the TCP/IP Print Server. Click Next to continue. The Additional
Port Information Required window is displayed.
80 FedEx Ship Manager® Server User Guide, Version 7.6
Page 83
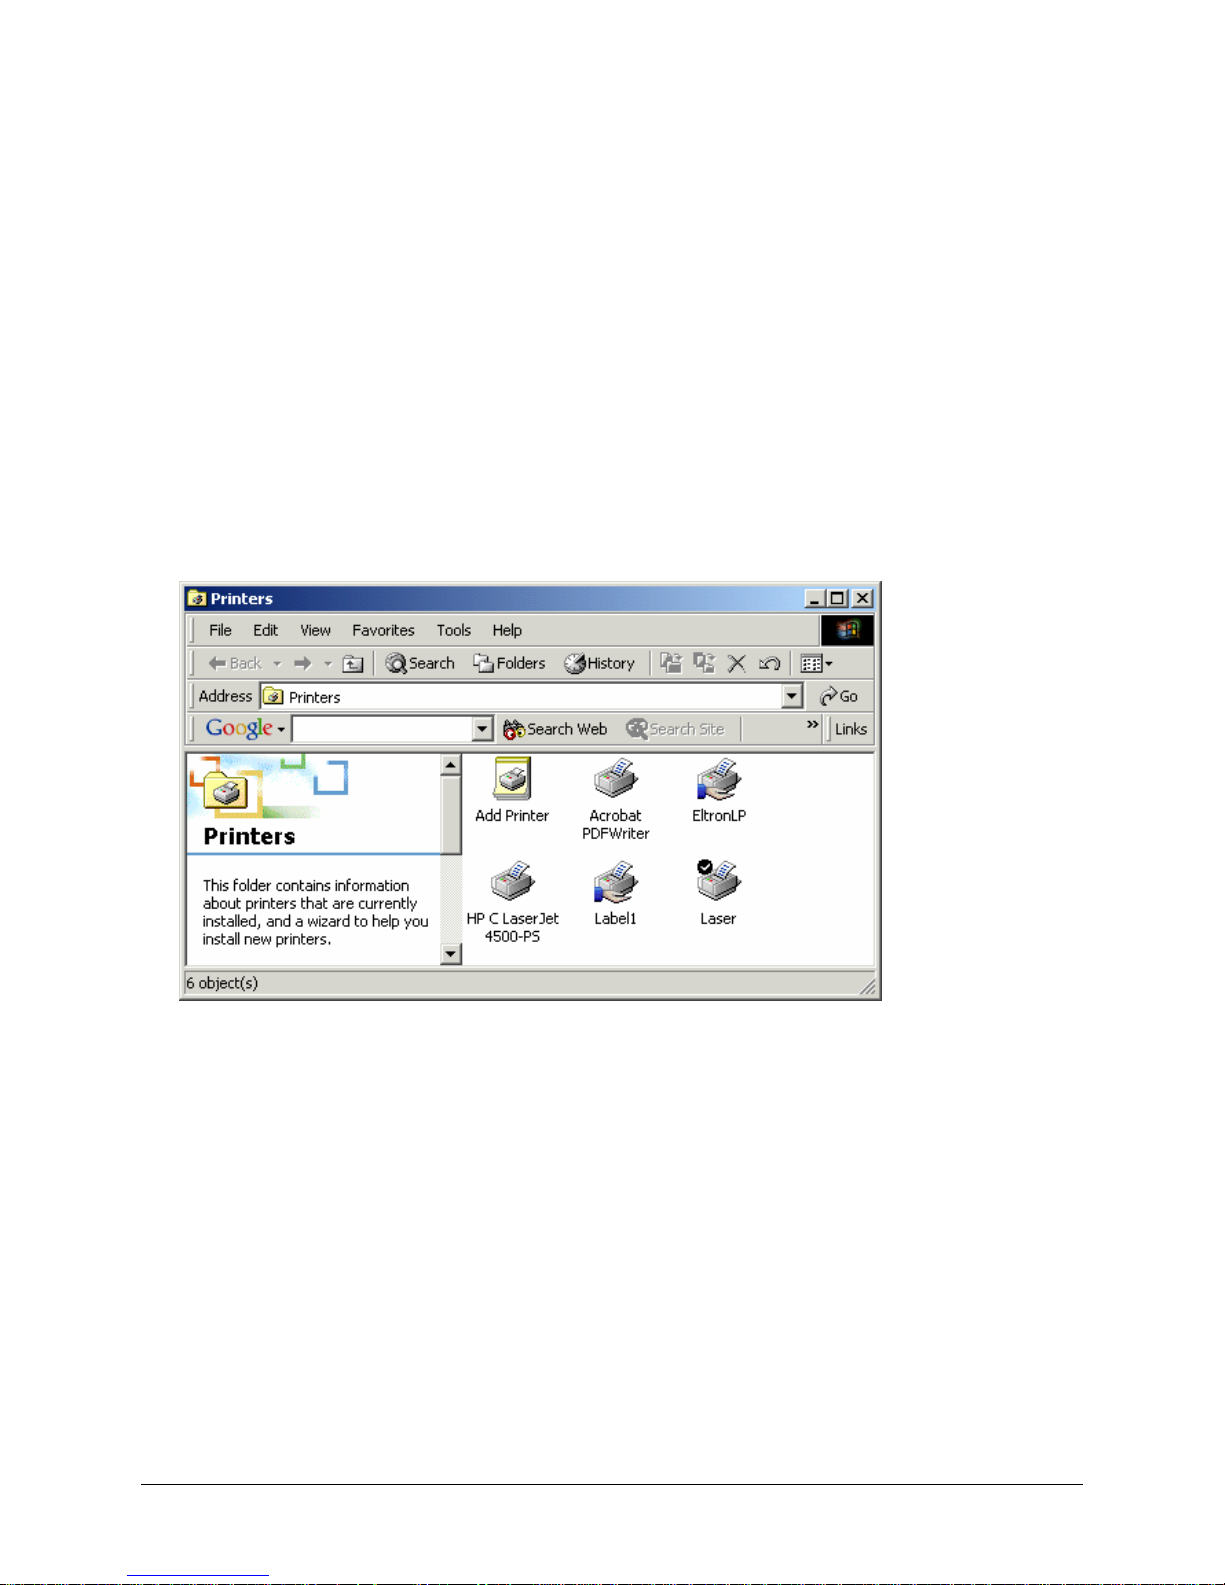
Chapter One: Setting Up FSMS
7. Select the port type from the Device Port pull-down list. For example, we have selected Port 1
(Parallel) as the sample port type. Click Next to continue. The Add Port Completed window is
displayed.
8. In the Add Port Completed window, the information you added during port installation is recapped. If
you want to make changes to this configuration, click Back. To accept the port installation as
displayed in this window, click Finish. The Select Printer Model window is displayed.
After you have successfully configured a TCP/IP port for printer installation, you may install a specific
printer for this port. Step-by-step instructions for installing a local printer are provided in the “Printer SetUp: Adding a Local Printer” section of this chapter.
Additional Installation Steps for Windows 2000
If you are running Windows 2000 as your operating system, you must switch the TCP/IP port to LPR after
the printer is added. To perform this action, select Printers from the Windows Start menu. The following
window is displayed:
1. Right click the printer icon of the TCP/IP printer you installed. Select Properties from the right-click
menu. The Printer Properties window for the printer you selected is displayed.
FedEx Ship Manager® Server User Guide, Version 7.6 81
Page 84
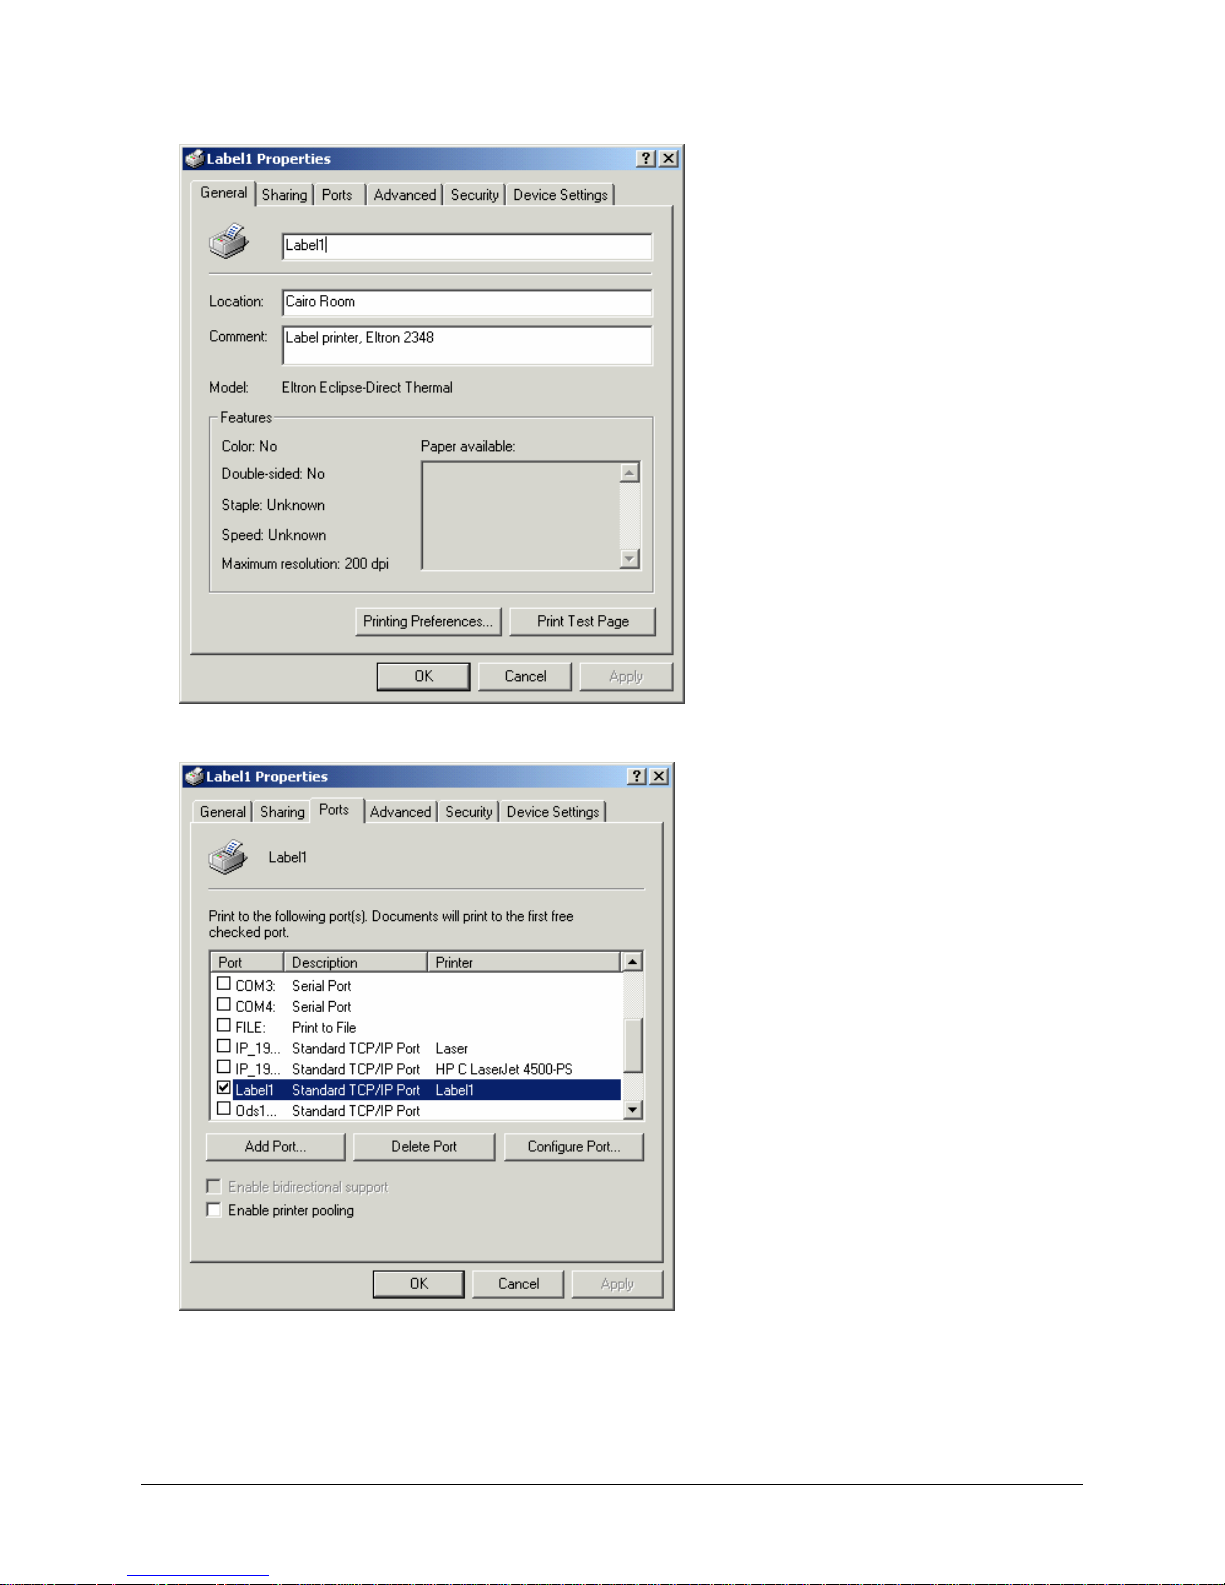
Chapter One: Setting Up FSMS
2. In the Printer Properties window, select the Ports tab. The following window is displayed:
3. In the Ports tab, the printer you installed is selected. Click Configure Port. The Port Settings
window is displayed.
82 FedEx Ship Manager® Server User Guide, Version 7.6
Page 85
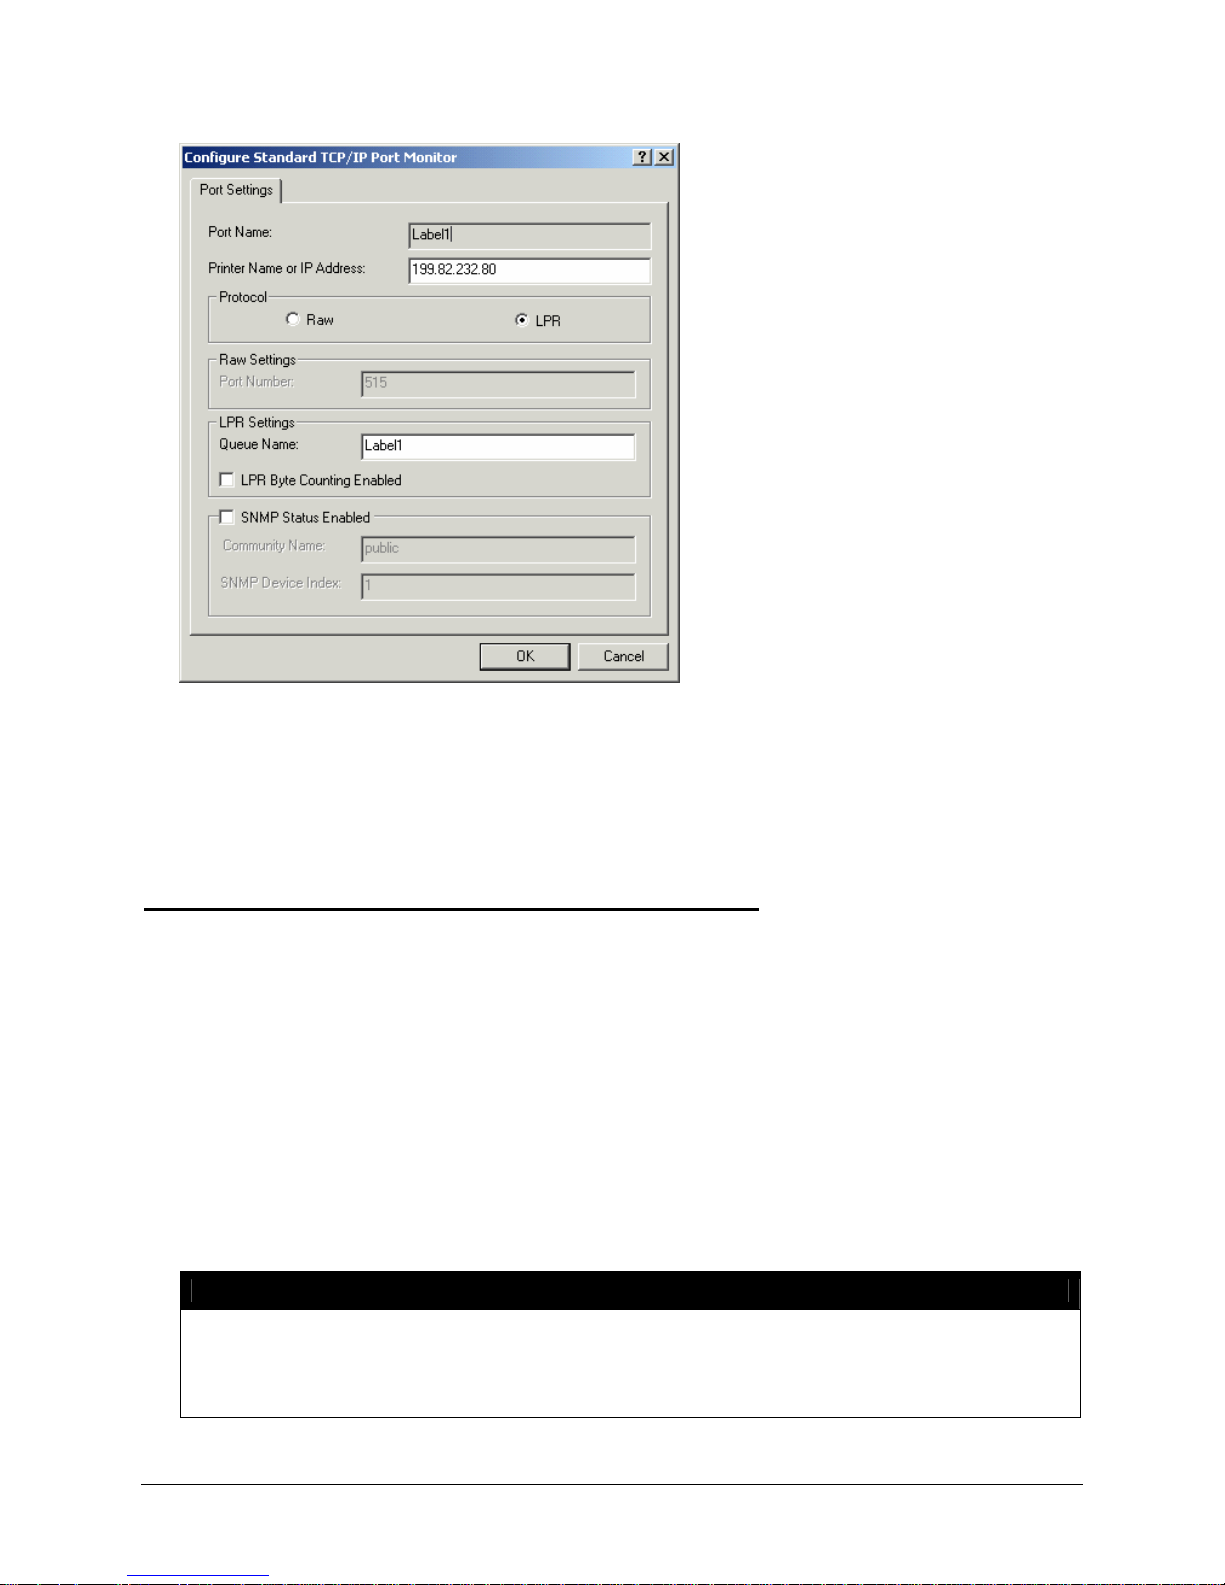
Chapter One: Setting Up FSMS
4. In the Port Settings window, select LPR in the Protocol section.
5. Enter the Queue Name in the LPR Settings section. Click OK to continue. You are returned to the
Printer Properties tab.
6. Click Close to save your entries. This action completes switching the printer to LPR.
Printing to a Windows-Based Print Share Network
If your label printer is connected to a Windows-based PC, you can print a label to the printer without
adding the printer driver to your FSMS server. This action will require a field to be added to your FSMS
transactions. Below are the steps for this print feature.
1. Connect the label printer to the Windows-based system.
2. Configure the printer using the standard Windows steps for printer configuration.
3. Share the printer.
4. If your server is running Windows NT, 2000, or XP, you will need to add the FEDEXUSER account to
this system. The password must be the same as it is on the FSMS Server.
5. Add the FEDEXUSER rights to this printer.
6. In the 020 shipping transaction, for either field 544 (Laser) or field 537 (Thermal), enter code as
follows: 5XX (indicates the printer type fields – either 544 or 537),
NOTE:
\\x.x.x.x\label3.
‘x.x.x.x’ is the IP address of the Windows-based system and ‘label 3’ is the share name for
this printer. Adding this field allows the labels to be sent over the network and printed on
the printer. Instructions for adding the FEDEXUSER account and access rights are provided
below.
FedEx Ship Manager® Server User Guide, Version 7.6 83
Page 86
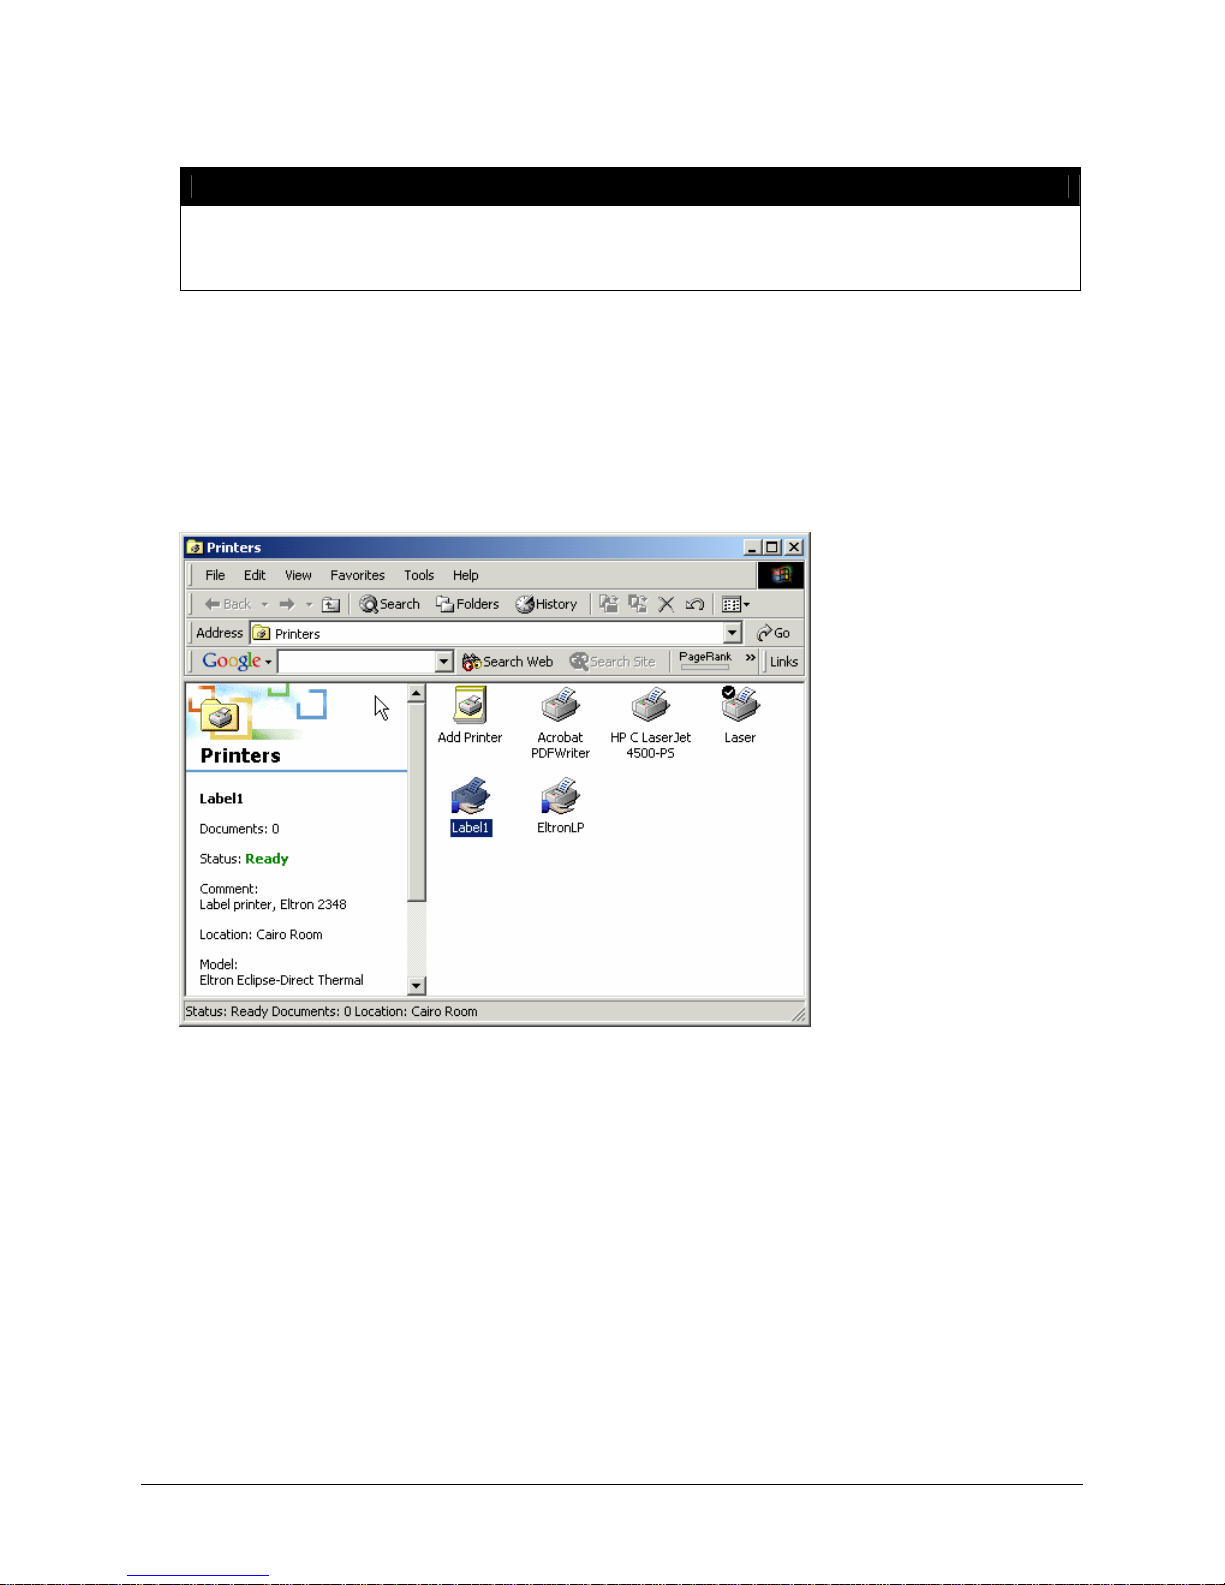
Chapter One: Setting Up FSMS
NOTE:
Each operating system (OS) is slightly different in their methods of adding a printer. If this
system is a Windows 2000 OS, follow the instructions for “Adding a Local Printer”
previously in this chapter.
After the printer is configured, follow the steps below to add the FEDEXUSER account and to allow the
FEDEXUSER print rights.
Adding the FEDEXUSER Account
To add the FEDEXUSER account to allow FEDEXUSER print rights, select the printer you have installed
for FSMS from the Windows Printers window.
1. Right click on the printer to be configured. From the right-click menu, select Properties.
2. In the Properties window, select the Security tab. The following window is displayed:
84 FedEx Ship Manager® Server User Guide, Version 7.6
Page 87
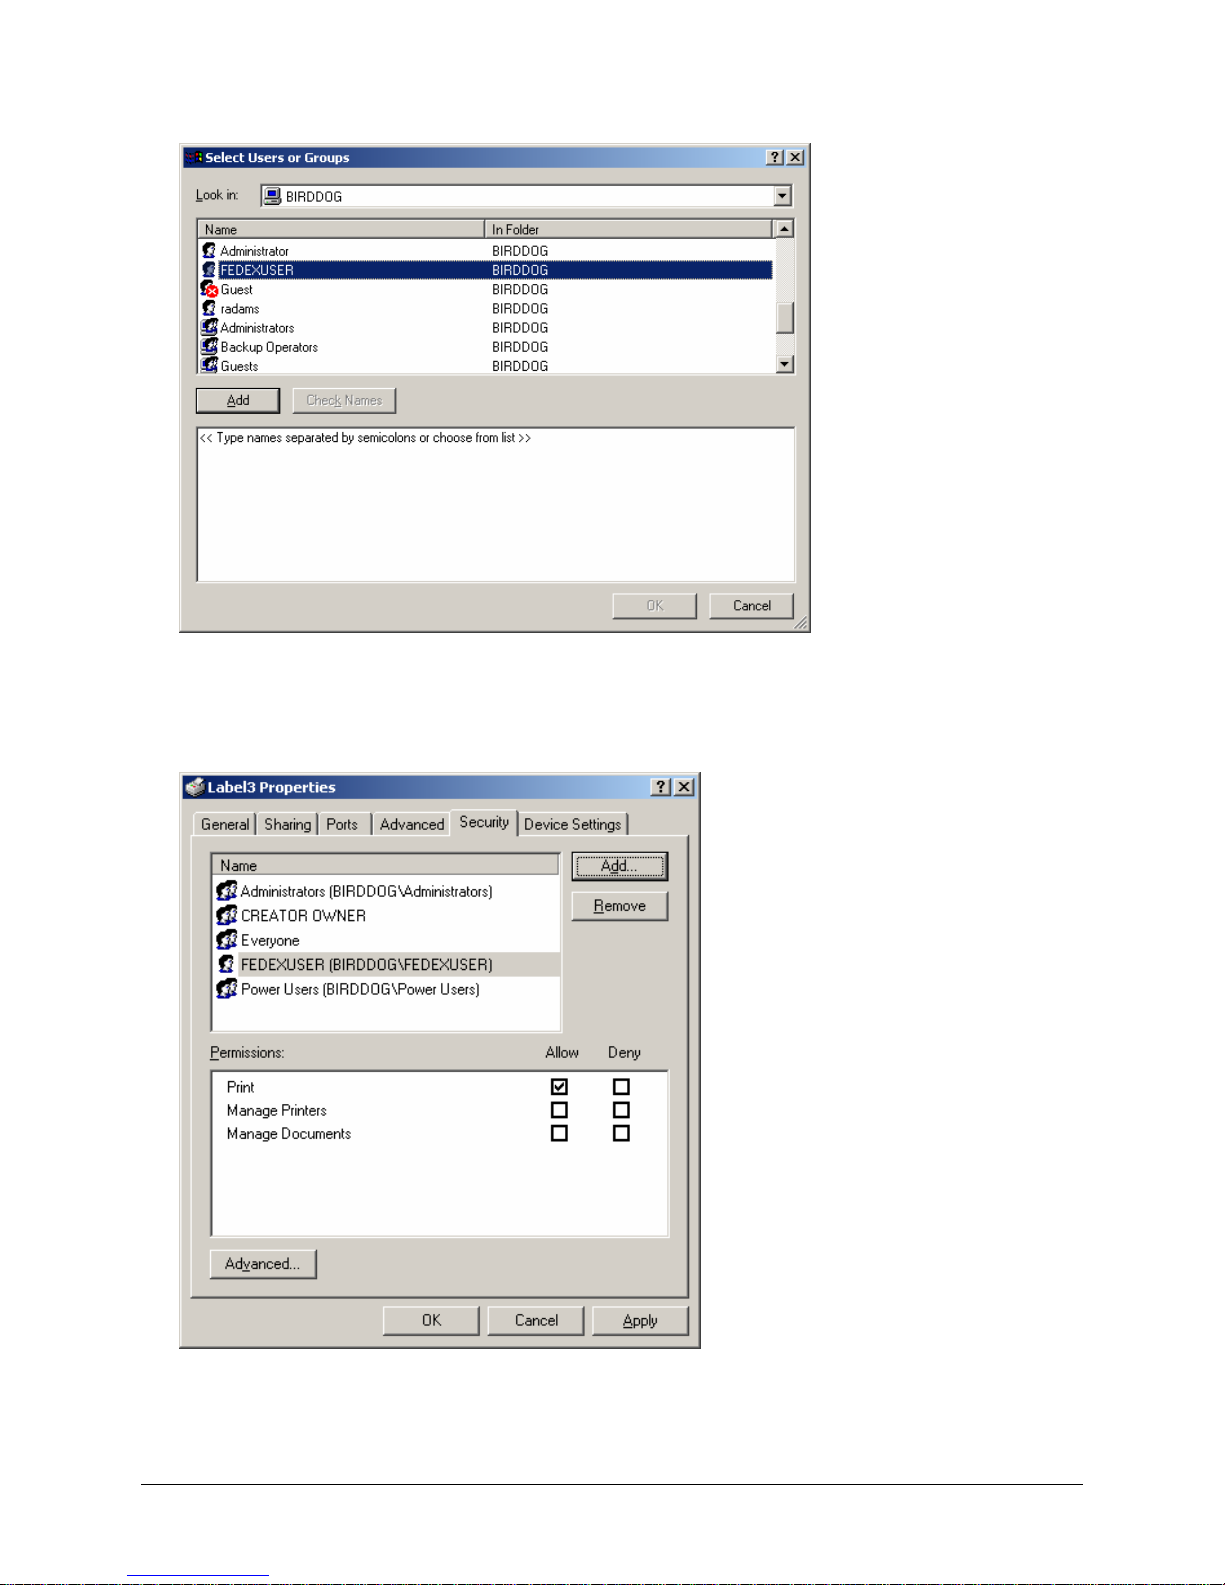
Chapter One: Setting Up FSMS
3. Select FEDEXUSER from the Select Users or Groups section of the window. Click Add to save
your selection. FEDEXUSER is displayed in the bottom portion of the window. Click OK to save your
selection.
4. Select the Security tab in the Printer Properties window. The Security window is displayed.
5. You will see that the FEDEXUSER account has been added to the Label Properties list. Click OK to
exit the Printer Properties window. You are now ready to print labels to this network printer.
FedEx Ship Manager® Server User Guide, Version 7.6 85
Page 88
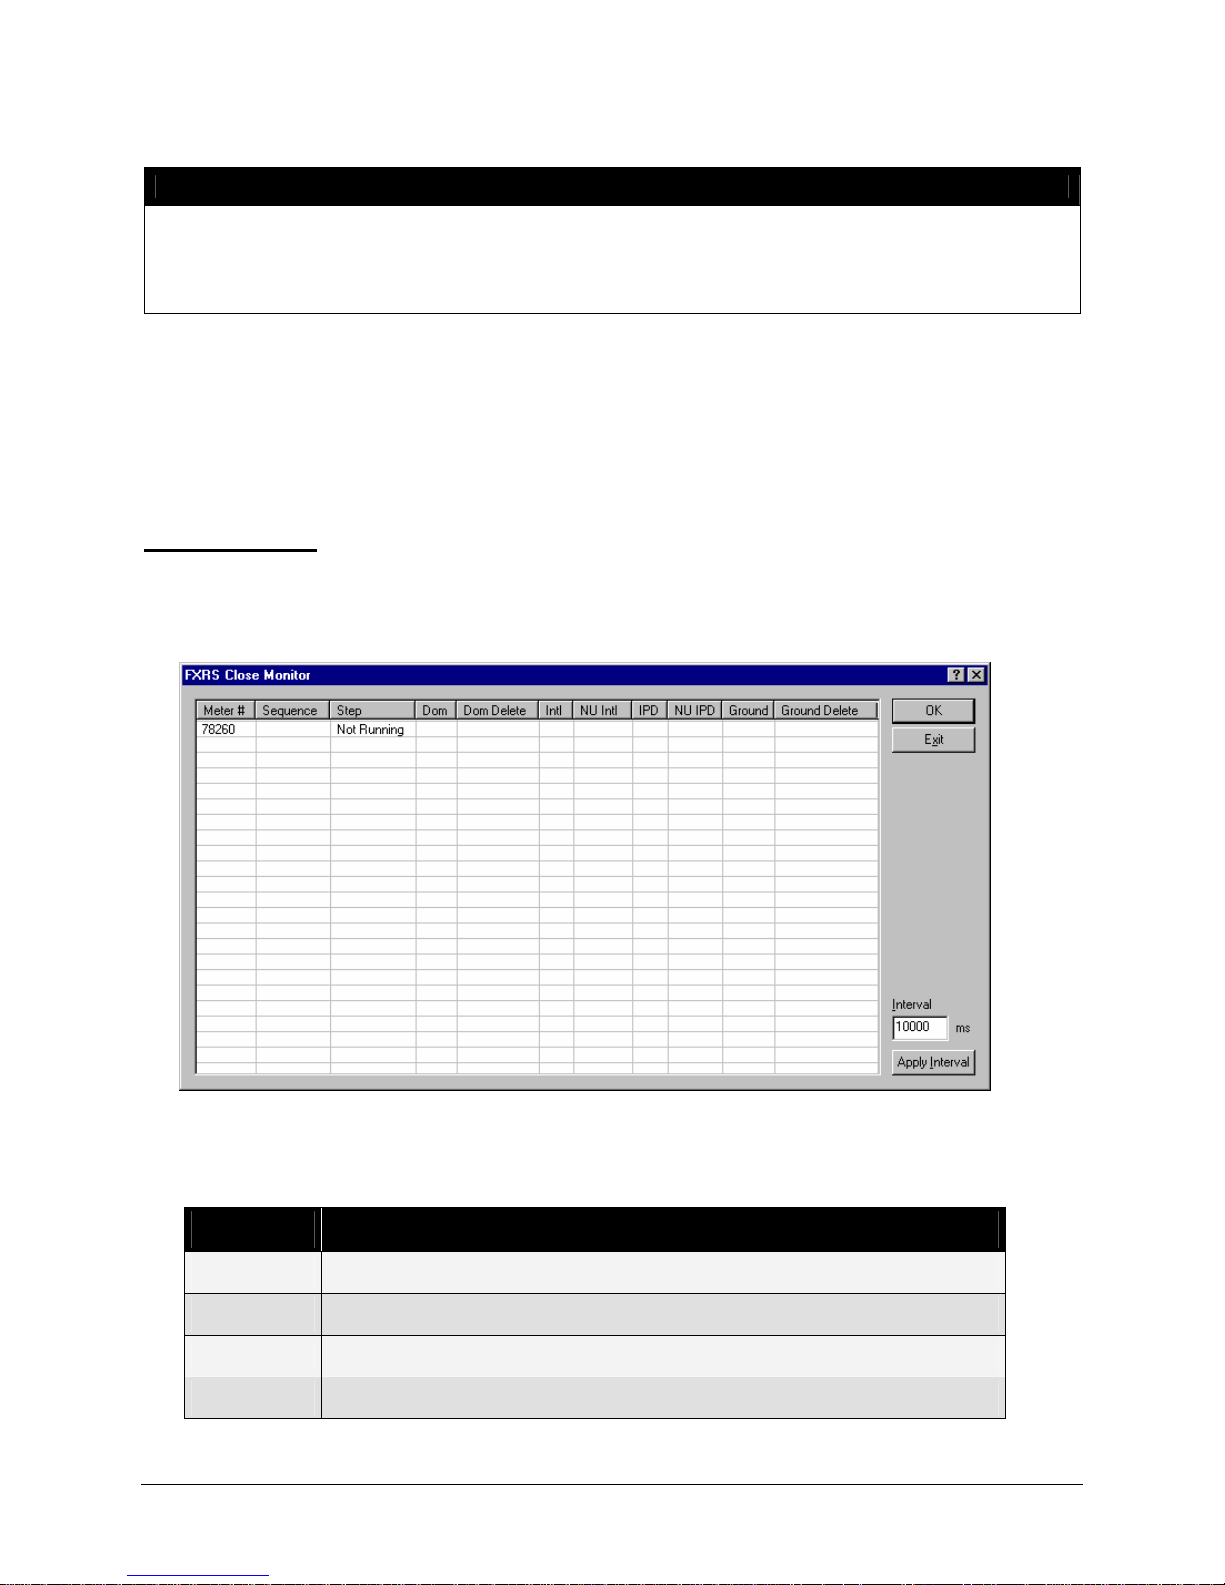
Chapter One: Setting Up FSMS
NOTE:
There may be some differences in the steps required to set permissions for network printers
depending on your operating system. The steps included above are for Windows NT 4.0. If you
have any questions regarding any printer functionality for your operating system, consult the
Windows Help option.
Troubleshooting Your FSMS Application
FSMS provides a tool, Close Monitor, for troubleshooting any problems with your FSMS application.
Close Monitor
The Close Monitor program is part of FSMS and monitors what step a meter is on during the Close
process. To access the Close Monitor, click the Start menu and select FedEx Ship Manager
Server>Utilities>Close Monitor. The Close Monitor window is displayed:
The Meter # field lists each meter configured on your server. The Step field lists the current step in the
Close process for that meter. Below is a list of each possible step in the Close process.
Step ID Description
-1 Idle
1 Move closing shipments from the ship tables to the ship close tables
2 Rate packages which have not been rated
3 Bundle packages
86 FedEx Ship Manager® Server User Guide, Version 7.6
Page 89
Chapter One: Setting Up FSMS
Step ID Description
4 Assign U.S. Domestic invoice numbers
5 Assign deleted invoice numbers
6 Assign International invoice numbers
7 Build U.S. Domestic Shipment Revenue File
8 Build Delete Shipment Revenue File (U.S. Domestic Only)
9 Build International Shipment Revenue File
10 Build Ground EPDI File
11 Move Closing shipments from the ship close table to the ship history table
12 Print Close Reports
The Polling Frequency field displays the time (in milliseconds) between the last and the next time the
Close process is polled for each meters’ status.
Polling of the Close process can be forced by clicking the Update Now button. Since polling is done on a
timed interval, some steps may appear to be skipped because they happen so quickly between polling
periods.
FedEx Ship Manager® Server User Guide, Version 7.6 87
Page 90

Page 91
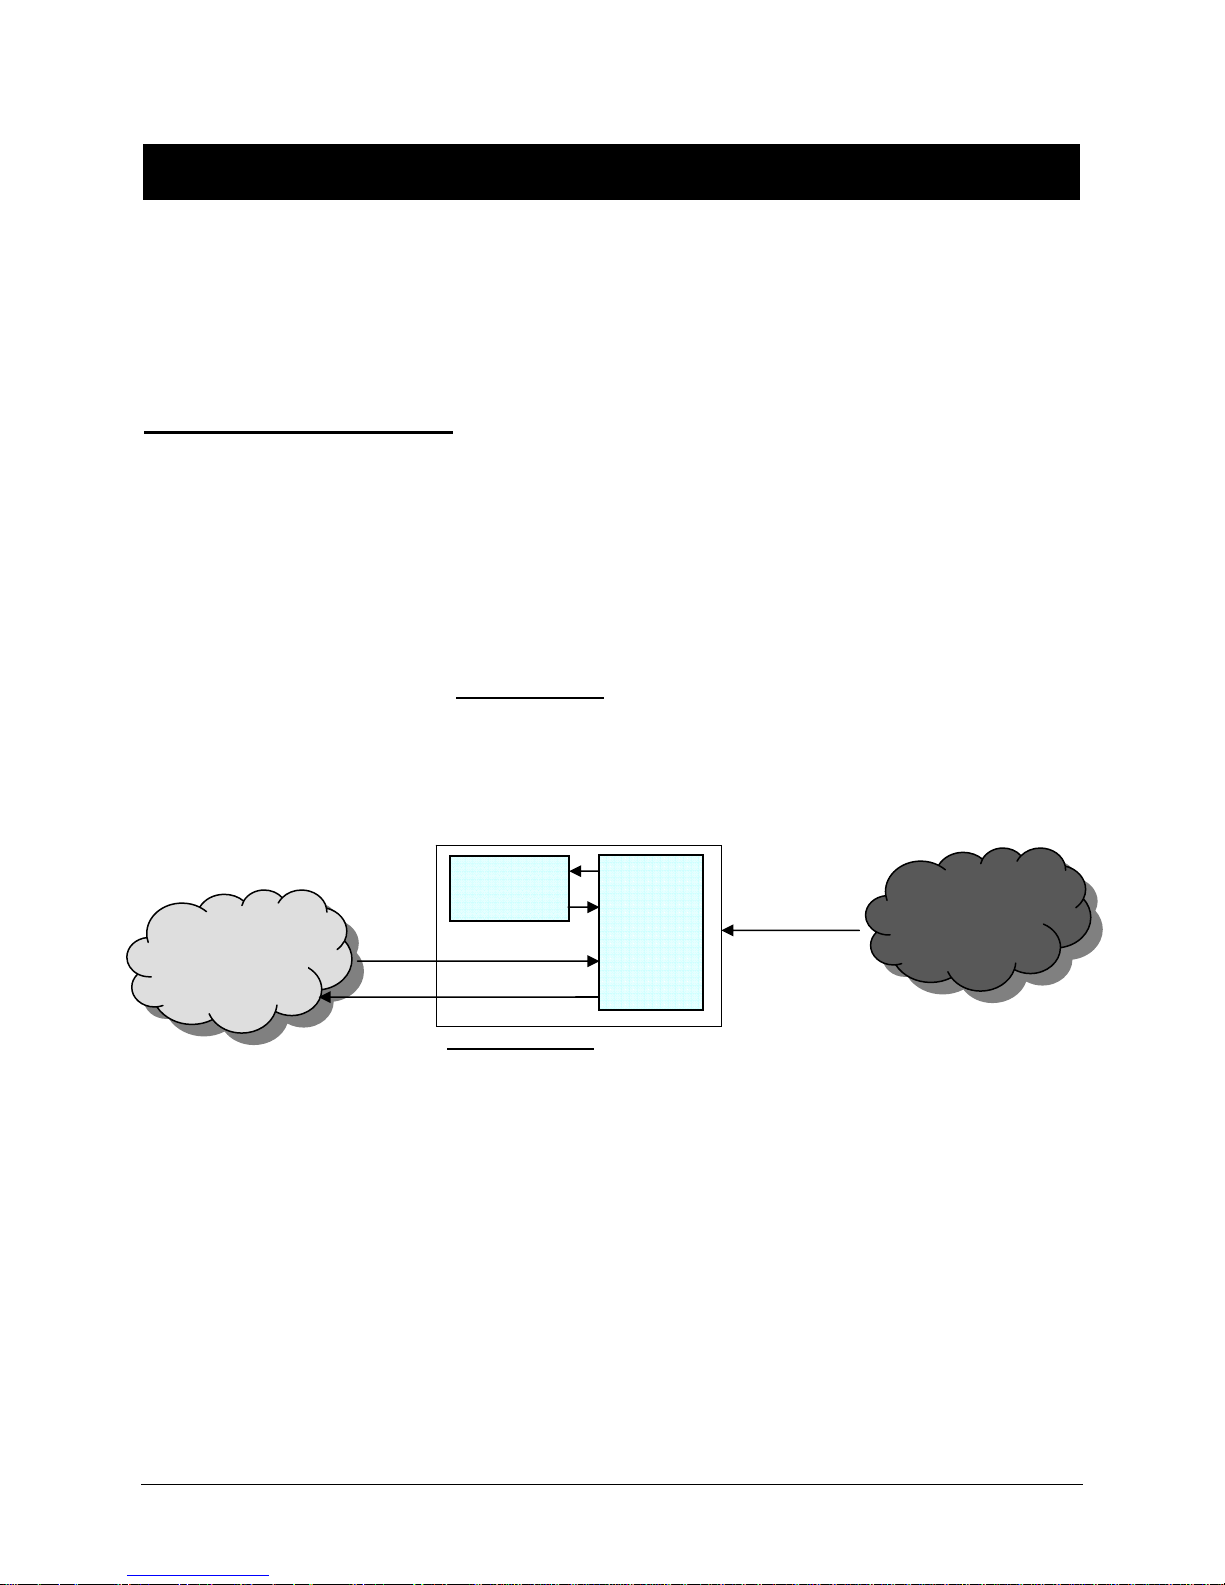
Chapter Two: FSMS Transaction Coding
T
Chapter Two: FSMS Transaction Coding
Overview
This chapter provides a brief description of the FSMS transactions used to complete all of your shipping
activities. In addition to standard FedEx Express, FedEx International, and FedEx Ground shipping
transactions, we will also provide instructions for performing Open Ship transactions.
FSMS Transaction Types
FSMS transactions are divided into two categories: Online and Offline.
Online transactions are passed through FSMS to FedEx backend systems for processing and require
constant network connectivity.
Offline transactions are processed locally within the FSMS application and require only periodic
connectivity with FedEx systems to obtain data required for shipping, such as routing files, rate files, and
tracking numbers. The exception to this is the 043/143 Tracking transaction. This transaction passes
through the offline system before processing by FedEx tracking servers.
Offline Functions
• Shipping
• Rating
• Routing
• Labeling
• Reporting
Transaction
Manager
ransactions
Customer
Systems
FedEx
Systems
Offline
Online Functions
• Address Verification
• Tracking
• Call Tags
• Dispatch
• Drop Off Locator
• Etc.
Each transaction is composed of a transaction pair – the Request transaction and the Reply transaction.
The Request transaction is used to make a Request to FSMS. The Reply is the response to the Request
and will indicate successful transaction processing or will contain error messages if processing problems
were encountered.
FedEx Ship Manager
®
Server User Guide, Version 7.6 89
Page 92

Chapter Two: FSMS Transaction Coding
Online Transactions
FSMS supports the following Online transactions:
1. 200/300 Dispatch Request/Reply: The 200 transaction is used to schedule pickups for FedEx
Express or FedEx Ground shipments for those customers without a scheduled pickup time.
upon request. Please contact your local Sales or Automation Representative.)
2. 202/302 Cancel Dispatch Request/Reply: Use this transaction when you need to cancel a
previously scheduled pickup for FedEx Express or FedEx Ground.
contact your local Sales or Automation Representative.)
(Available upon request. Please
3. 403/503 Tracking Request/Reply: The 403 transaction is used to obtain real time tracking
information for FedEx Express, FedEx Ground or FedEx Home Delivery. This transaction handles
tracking numbers individually. Batch tracking is not an option with this solution. You may also track by
using a reference number.
4. 410/510 Drop Off Locator Request/Reply: The 410 transaction is used to obtain the 4 nearest dropoff locations based on the origin address for both FedEx Express and FedEx Ground.
5. 415/515 Address Verification Request/Reply: The 415 transaction is used to validate an address
down to the street level. Results of this transaction are not guaranteed to be valid service areas for
FedEx Express or FedEx Ground.
Automation Representative.)
(Available upon request. Please contact your local Sales or
6. 033/133 Cancel E-Mail Label Request/Reply: This transaction cancels an E-mail Label Request.
This transaction will be invalid if the customer has already generated the label.
(Available
7. 044/144 Ground Call Tag Request/Reply: The 044 transaction is used for merchants that need to
schedule a FedEx Ground pickup from a return shipper. The information for this shipment is sent to
the local FedEx Ground station. The label is created at the station and sent with the courier to be
used at pickup time.
8. 045/145 Ground Call Tag Cancel Request/Reply: The 045 transaction is used when needing to
cancel a previous Ground Call Tag Request.
9. 046/146 Express Call Tag Request/Reply: The 046 transaction is used for merchants that need to
schedule a FedEx Express pickup from a return shipper. The information is sent directly to the FedEx
Express courier. The courier then has the ability to produce the label at the time of pickup.
10. 047/147 Express Call Tag Cancel Request/Reply: The 047 transaction is used to cancel a
previously scheduled Express Tag Request.
Offline Transactions
FSMS supports the following Offline or Local transactions:
1. 004/104 – Assign Next Tracking Number Request/Reply: FedEx Express, FedEx Ground, and
FedEx Home Delivery tracking numbers will be assigned by the server at the time a shipment
Request is submitted with the 020 transaction, or they can be requested in advance, if needed, using
the 004 transaction. The 004 transaction provides the ability to request and receive a tracking number
that can then be ‘pre-assigned’ in the 020 shipping transaction. This is useful if a tracking number
is needed prior to a shipment being prepared. The 104 Reply will contain the requested tracking
number and also the Form ID required for FedEx Express shipments.
2. 007/107 – End-of-Day Close Request/Reply: The 007 transaction is used to perform an End-of-Day
Close function or to Request the status of the Close. A Close Request will cause the server to upload
all package and revenue data to FedEx and will generate End-of-Day reports. A Close status Request
will return the status of the Close Request but will not cause a Close. A Close can be performed on
FedEx Express, FedEx Ground/Home Delivery or both simultaneously. This transaction is
REQUIRED to be performed daily.
90 FedEx Ship Manager
®
Server User Guide, Version 7.6
Page 93

Chapter Two: FSMS Transaction Coding
3. 020/120 – Global Ship Request/Reply: The 020 transaction is the primary server transaction. The
020 transaction is used to ship as well as to request FedEx Express, FedEx Ground/Home Delivery
rating (U.S. and Canada), FedEx Express routing, and FedEx Ground/Home Delivery Time-in-Transit
information for shipments.
4. 023/123 – Global Delete Request/Reply: The 023 transaction is used to delete a package or an
entire shipment.
5. 024/124 – Shipment Query Request/Reply: The 024 transaction is used to locate a package in the
server database. This feature is allowed for FedEx Express shipping only.
6. 035/135 – Child Meter Registration Request/Reply: The 035 transaction is used to request a new
Child meter via a transaction rather than via the Auto Configuration Utility (preferred method).
7. 037/137 – Online Return Label Request/Reply: The 037 transaction is used to request an online
Return label be provided to a customer returning goods. Access to the label is provided via a URL
sent in an e-mail message to the returning party.
8. 043/143 – Tracking Request/Reply: The 043 transaction is used to track FedEx Express, FedEx
Ground, and FedEx Home Delivery packages. FedEx Express shipments can be tracked by Tracking
Number or Reference Number. FedEx Ground and FedEx Home Delivery shipments can be tracked
by Tracking Number, PO Number, Invoice Number, or Customer Reference Number. This transaction
requires real time communication with FedEx mainframe systems and is most efficient if
communications with FedEx are via the Internet rather than via modem.
NOTE:
The 043/143 transaction is sent to the same tracking server used by the online 403/503
transaction set. It is recommended to use the 403/503 transaction set instead of the 043/143
set.
9. 070/170 – Meter Query Request/Reply or Meter Configuration: The 070 transaction is used to
determine all the meter numbers on the server for a given account number or to determine the sender
information for a given meter. FSMS has expanded the functionality of the 070 transaction to include
the ability to configure a meter via a transaction rather than via the FSMS Configuration Utility. See
the FSMS TCR Version 7.6 for more information.
10. 095/195 – Label Reprint Transaction Request/Reply: The 095 transaction is used to reprint any
label previously printed after a successful shipment transaction. The labels are available for reprint for
up to twenty-four hours after the shipment was processed.
FedEx Ship Manager
®
Server User Guide, Version 7.6 91
Page 94

Chapter Two: FSMS Transaction Coding
Coding Guidelines
To help you create your shipping transactions using FSMS, we have provided these coding guidelines for:
• Transaction formatting
• Required field numbers
• Shipment level vs. package level fields
• Multiple occurrence fields
• Field editing guidelines
• Reply transaction fields 2 and 3 (error code and error message text)
• Reply transaction fields 557, 558, and 559 (error type code, error code, and error message)
These guidelines should be reviewed before you begin any transaction coding.
Transaction Formatting
The transaction records are null terminated strings that do not contain carriage returns or line feeds. The
strings consist of field-related pairs separated by a comma. Each pair consists of the:
• Field ID number
• Field value enclosed in double quotation marks
For example, if you are coding field 15 (Recipient City) and you want to assign “Memphis” as the value,
the transaction string for this field is formatted as:
15,”Memphis”
Required Fields
Some fields are required in all transactions. Other fields are required under specific conditions, and still
others are optional. Required fields are denoted in the FSMS TCR in bold and are listed as Required.
Fields conditionally required are marked with an asterisk (*) next to the requirement field (for example:
Required*). Optional fields are listed as Optional.
The following is a sample table entry from the FSMS TCR for each of these field requirement types.
Field indicators:
• E = Express
• G = Ground
• A superscript S indicates the field is to be used at the shipment level for a single transaction MPS or
to be included in an Open Ship Create transaction.
• Required indicates a mandatory field.
• Required* indicates a ‘required if’ condition.
92 FedEx Ship Manager
®
Server User Guide, Version 7.6
Page 95
Chapter Two: FSMS Transaction Coding
Field
ID
13 Recipient Address 1S 32
14 Recipient Address 2S 35 Optional All E/G The second address line of the
17 Recipient Postal
In our sample table from the FSMS TCR:
• Field 13 is Required to process the shipment.
• Field 14 is Optional – a second recipient address line is used only if the recipient has an apartment
number, suite number, or any other type of identifier in addition to the primary address.
• Field 17 is Conditional – the recipient postal code is required only if you are shipping to a postal
aware country. Therefore, if you are shipping from the U.S to Canada, the postal code is required for
this field. If you are shipping from the U.S. to Brazil, no postal code is required.
Field Name
S
Code
Max
Length
10 Required* All E/G
Required/
Optional
Required
Valid
For
All E/G The first address line of the
Exp/
Gnd
Comments
recipient address.
recipient address.
Required for postal aware
countries.
See Note 9 in Appendix E of the
FSMS TCR Version 7.6 for a list
of Postal Aware Countries.
FedEx Ground/FHD does NOT
accept ZIP+4 and no postal
code validation is performed.
For every transaction, there are two fields which are always required:
1. The first field of any transaction is field 0 (Transaction Type). When creating a new transaction,
begin with 0,”2”
2. The last field of any transaction is field 99 (Transaction End). When creating a new transaction,
end the transaction with 99,””. There are no spaces between the quotation marks, and no information
is needed within the quotes.
These fields allow FSMS to recognize that a new transaction is to be processed and where the
transaction ends. A complete Request transaction, therefore, would be formatted as:
0,”2”1,”FedEx2”10,”197448300”16,”OH”17,”44907”21,”5”22,”1”99,””
FedEx Ship Manager
®
Server User Guide, Version 7.6 93
Page 96
Chapter Two: FSMS Transaction Coding
Shipment Level vs. Package Level
In the FSMS TCR, you will find fields that are marked with either an S or a P, which indicates that this
field is either a shipment level or package level field.
Shipment level means that if the field is used as part of an MPS shipment, the field affects all of the
packages in the shipment, and it isn’t necessary to repeat the field for each package in a single
transaction MPS shipment or to place the field in each Add transaction of an Open Shipment.
Package level means that if the field is used as part of an MPS shipment, the field’s value is specific to a
particular package, and the value must be repeated for subsequent packages in a single transaction MPS
shipment or included in each Add transaction of an Open Shipment.
Field indicators:
• E = Express
• G = Ground
• Required indicates a mandatory field
• Required* indicates a ‘required if’ condition
• A superscript S indicates the field is to be used at the shipment level for a single transaction MPS or
to be included in an Open Ship Create transaction.
• A superscript P indicates the field is to be used at the package level for a single transaction MPS or to
be included in an Open Ship Create for the first piece and in an Add for subsequent pieces.
Field
ID
1090 Rate CurrencyS 3
1273
As you can see in the sample table from the FSMS TCR, field 1090 is a shipment level field; field 1273 is
a package level field.
Field Name
Packaging TypeP
Max
Length
2
Required/
Optional
Required
Or
Defaulted
Required
Valid
For
Exp/
Gnd
All E Default for U.S. Domestic
shipping: USD
U.S. Export shipping requires
USD to be entered.
All E
Available for all:
FedEx International Only
(including U.S. export):
Comments
01 – Customer Packaging
02 – FedEx Pak
03 – FedEx Box
04 – FedEx Tube
06 – FedEx Envelope
15 – FedEx 10KG Box
25 – FedEx 25KG Box
94 FedEx Ship Manager
®
Server User Guide, Version 7.6
Page 97

Chapter Two: FSMS Transaction Coding
Multiple Occurrence Fields
Multiple occurrence fields may be used several times within a single transaction. Each occurrence may
have a different value. Using multiple occurrence fields eliminates the need to code the same field over
and over simply because the input values change.
The format for a multiple occurrence field is X-#. This format means that:
• X = The field number that is to be used multiple times
• – = Dash is used as a separator
• # = The number of the occurrence. The maximum number of field occurrences is 999 unless
otherwise noted within a specific transaction’s format. If you use more than 500 occurrences, please
contact your FedEx Customer Support Representative.
For example, field 1670 (Package Weight) is a multiple occurrence field. If the first package in an MPS
shipment weighs 2 pounds, the second weighs 3 pounds, and a third package weighs 5 pounds, field
1670 is used as follows:
1670-1,”200”1670-2,”300”1670-3,”500”
This entry allows three different packages to be entered using the same field number with an occurrence
indicator. You may choose to eliminate the dash and the number value for the first occurrence field in any
transaction. In the example above, the first package could have been represented as 1670, “200” or
1670-1, “200”.
NOTE:
Field 1670 has two implied decimals. In the above example, 200 is 2 pounds.
NOTE:
When coding a multiple occurrence field, do not use any leading zeros. For example, one
occurrence is coded as “X-1”; 25 occurrences of the field are coded as “X-25”; 999 occurrences
of the field are coded as “X-999”.
Field Editing Guidelines
When editing fields within an FSMS transaction, the following editing rules apply to all transaction types:
1. Field values must be left justified within double quotation marks (“”).
2. Blank spaces between fields are not allowed. For example, you may format field 12 (Recipient
Contact Name) as Bob Shipper, with a space. However, when you add field 13 (Recipient Address
1) to the transaction string, there must be no spaces between the end of field 12 and the beginning of
field 13.
In addition to these two global transaction rules, the following field types have specific editing rules:
• Date fields
• Numeric fields
• Alphanumeric fields
• Postal Codes
• Weights
• Printer ID fields
FedEx Ship Manager
®
Server User Guide, Version 7.6 95
Page 98

Chapter Two: FSMS Transaction Coding
Date Fields
Date fields should be eight digits in length, zero filled, in CCYYMMDD format.
For example: Format March 1, 2005 as “20050301”
Numeric Fields
Numeric fields must not contain commas, decimals, blanks, or other formatting characters. Field lengths
are displayed in the FSMS TCR as the total number of characters in the field plus any implied decimal
places. For example, field 119 (Total Customs Value) allows a field length of 14.2: “14” means that the
total field length is 14 numeric characters; “.2” means that two characters of the total 14 characters may
be designated as a decimal value. Therefore, Total Customs Value for a shipment may be entered as
99999999999.
Only significant digits need to be included; however, the value may have leading zeros. Blanks are not
allowed.
For example: If a field has 6.2 as the Max Length, you must enter 1234.56 as 123456.
If a field has a 6 as the Max Length, you must enter $1234 as either 001234 or 1234.
Alphanumeric Fields and Special Characters
Alphanumeric fields may allow letters, numbers, blank spaces, and most special characters. However,
you must remove all embedded quotes and single quotes/apostrophes from your data.
NOTE:
The accent key (usually located on the extreme left of the keyboard above the TAB key) may be
used as a substitute for words that requires an apostrophe.
For example: Bob O’Brien (with apostrophe) is coded as Bob O`Brien (with accent).
Postal Codes
Postal codes may be five, six, or ten alphanumeric characters, depending on the destination country, with
no formatting characters.
For example: L5N-5R6 is coded as L5N5R6.
38115-1096 is coded as 381151096.
NOTE:
All postal codes for postal aware countries will be validated prior to shipment confirmation. If
the postal code is invalid, an error will be returned.
96 FedEx Ship Manager
®
Server User Guide, Version 7.6
Page 99

Chapter Two: FSMS Transaction Coding
Weights
Previously, FSMS weights were entered in field 21 (Package/Shipment Weight) that required U.S. FedEx
Express and all FedEx Ground shipments to be entered in pounds with no decimal point (implied or
physical) and all FedEx International Express shipments to be entered in kilograms with a single implied
decimal.
FSMS has introduced a new weight field, field 1670, which allows for two implied decimals for all
shipments regardless of the weight type entered in field 75, LBS or KGS. Thus, 25 pounds and 25
kilograms are entered as 2500. Any fractional value, e.g. 25.5 pounds, will be rounded up to the next
highest whole pound, e.g. 26 pounds, or half kilogram for rating purposes.
U.S. origin shipments will default to a weight type of LBS for FedEx Express and FedEx Ground. NonU.S. origins will default to KGS for FedEx Express and FedEx Ground (CA and MX).
Printer ID Fields
Printer IDs (fields 537, 544, and 545) must not contain spaces. Underscores are allowed.
For example: A correct printer ID entry = FedEx_162\FSMS.
An incorrect printer ID entry = FedEx_162\FSMS Printer.
Batch Processing
To process batch files, follow these steps:
1. Edit the client.ini file (in the WINNT directory).
2. In the Transfile section, enter the full path name of the directory (for example: c:\batch\) in which the
transaction files will be stored. The actual name of the transaction file is not necessary, only the
directory path. The name of the transaction file that is placed in this directory can be any file name
designated by the customer, but MUST have an .in extension (for example: Trans.in). The input batch
file can reside either on the FSMS server or on any system you designate.
3. Save the changes made to the client.ini.
4. Edit the server.ini file.
5. In the DNLD section, change the value of the interval entry to 10000 (this value represents the
number of milliseconds the given directory is checked for *.in files).
6. Save the changes to the server.ini.
7. Stop and start the FedEx Admin Service in the Windows Control Panel/Services window.
Once these steps have been completed, the FedEx Admin service monitors the designated directory in
the client.ini every 10 seconds for any input transaction files (i.e. *.in) to be automatically processed.
When an input batch file is detected and processed, an output file is created in the same directory. The
output file name is *.out (for example: batch1.in → batch1.out) and the input file is renamed to *.old (for
example: batch1.in → batch1.old).
NOTE:
Make sure that the input files do not contain an extra line or space at the end of the
transactions. This will cause problems with processing. The last characters at the end of the
input file should be 99,“”.
To disable batch functionality, return to the server.ini and change the Interval entry in the DNLD section
back to 0000. Save the changes to the server.ini, then stop and start the ADMNSERVICE.
FedEx Ship Manager
®
Server User Guide, Version 7.6 97
Page 100

Chapter Two: FSMS Transaction Coding
NOTE:
Before you can use batch processing, you must add the following user account to your system:
• User ID: FEDEXUSER
• Password: Provided by your FedEx Customer Support Representative
• Writes/Permissions: Create, Write & Read
Preparing a Shipping Transaction
The 020 transaction set is the transaction format you will use for all of the shipping methods supported by
FedEx. In addition to Express, Ground, and International shipping fields, the 020 transaction also
provides functionality for:
• Rating FedEx Express and FedEx Ground/Home Delivery shipments
• Receiving a FedEx Express service commitment
• Retrieving FedEx Express package routing information
• Requesting a FedEx Ground/Home Delivery “Time-in-Transit” information
This section of the User Guide includes basic instructions for coding the 020 transactions. Once you
have a basic overview of how these transactions work, you may use the FSMS TCR Version 7.6 to
create transactions for your specific shipping requirements.
Basic FedEx Express Shipping Transaction (020)
After reviewing the “Field Editing Guidelines” section previously in this chapter, you are already familiar
with the basic coding format for the 020 transaction. In this section, we will review:
• The basic elements of an Express transaction
• Using the FSMS TCR to determine which fields you need
• Uploading FedEx Express shipping data to FedEx
Using the FSMS TCR
The FSMS Transaction Coding Reference (TCR) is a companion to the FSMS User Guide and
provides all of the transaction types and fields required for coding FSMS transactions. In the FSMS TCR,
you can easily identify the fields that can be used for FedEx Express, FedEx Ground, or FedEx
International shipping. The following table is a sample entry from the FSMS TCR:
98 FedEx Ship Manager
®
Server User Guide, Version 7.6
 Loading...