

Federal Process Corporation Noble Company FreeStyle Linear Drain Installation Instructions Manual
Simple Solutions... Proven Performance
Simple Solutions... Proven Performance Simple Solutions... Proven Performance
Simple Solutions... Proven Performance
Color Logo and Logo w/Slogan White and Color Logo and Logo w/Slogan White and Transparent Logo and Logo w/Slogan
Black Logo and Logo w/Slogan Solid White Logo and Logo w/Slogan
N
P
R
S
A
N
C
O
FreeStyle Linear Drain
™
with Full Mortar Bed Adapter Kit
U.S. Patent No. 8,474,068
Installation Instructions
Patents Pending: Canada & EP Publication No. 2354339
www.noblecompany.com
1. GENERAL INFORMATION
FreeStyle Linear Drain is a low-profile linear drain with flat base and internal slope constructed from one-piece of PVC or ABS.
A membrane clamping collar assures a watertight seal with Noble waterproofing sheet membrane. The FreeStyle Linear Drain
is available in 7 drain lengths and with 5 strainer options.
2. FULL MORTAR BED INSTALLATION
Complete the FreeStyle Linear Drain installation instructions up to step 4.2 and STOP. A Shower Pan Liner such as
Chloraloy® will be required to replace NobleSeal Flashing and is sold separately by Noble Company. Outside Corners are also
recommended and sold separately. Proceed with the Full Mortar Bed installation instructions outlined below once the flashing
has been installed securely to the drain.
2.1 RECOMMENDED TOOLS:
• Tape measure • Utility knife
• Caulking gun • Straight edge
• Small floor roller • V-notched trowel (1/8” x 1/8” or 1/4” x 1/4” )
• Margin trowel • Square-notched trowel (1/4” x 3/8” x 1/4”)
• PVC or ABS cement • Appropriate plastic pipe primer
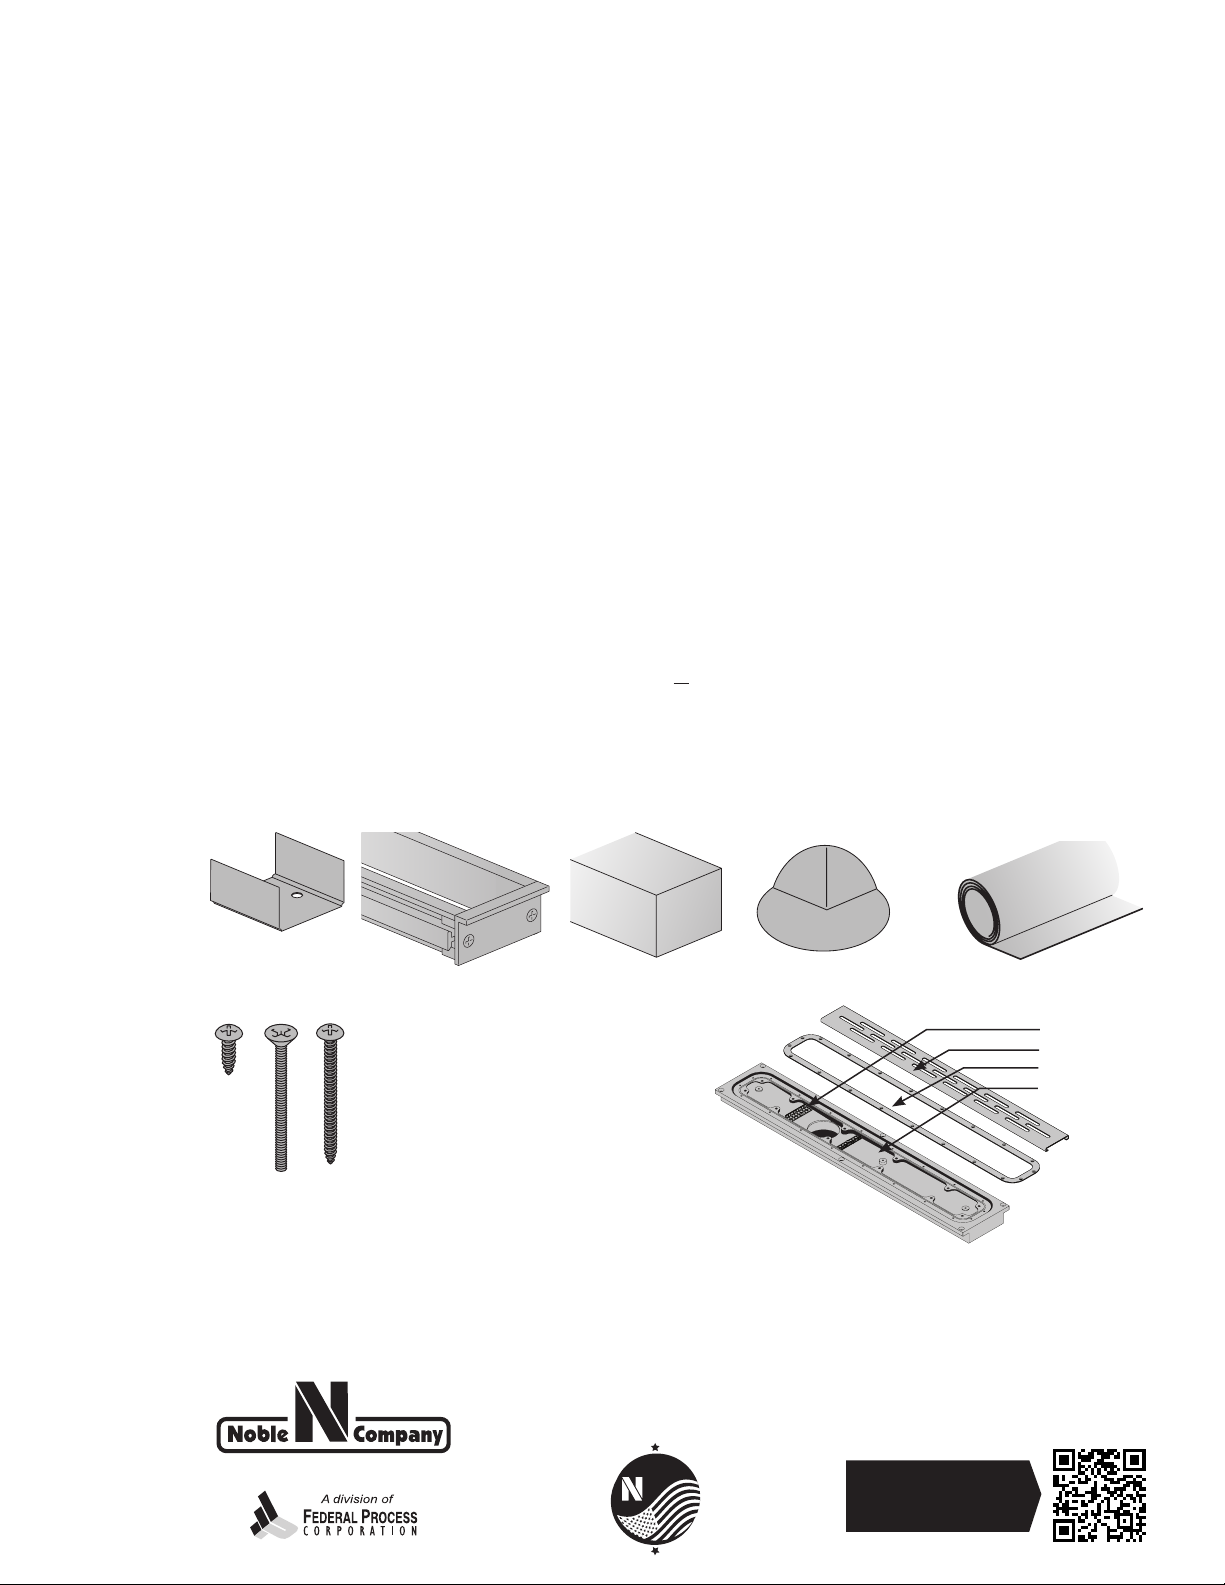
2.2 FULL MORTAR BED ADAPTER KIT HARDWARE AND MATERIALS: *Denotes items that are sold separately
Brackets
Additional Hardware Included:
A B C
Mortar Guard
A) Bracket Screw:
#8 1/2” Phillips Pan Head
B) Strainer Height Adjustment Screw:
#10 2-1/2” Phillips Flat Head
Note: Replaces Strainer Height Adjustment
screws from original FreeStyle Linear Drain Kit.
C) Strainer to Base Screw:
#6 2-1/4” Phillips Pan Head
Note: Replaces Strainer to Base screws from
original FreeStyle Linear Drain Kit.
Foam Block
PVC or CPE
Outside Corner*
Note: Replaces NobleSeal® Flashing
from FreeStyle Linear Drain.
Chloraloy*
Pre-Strainers
Strainer
Clamping Collar
Drain Base
A
Y
M
N
E
A
Simple Solutions... Proven Performance
P
M
C
I
R
E
R
I
C
A
O
D
U
C
T
M
A
VIEW MORE PRODUCT
DETAILS, VIDEOS, AND
DIAGRAMS ONLINE

5. FASTEN DRAIN BASE TO SUB FLOOR
5.1 FOR CONCRETE SUB-FLOOR:
5.1.A Mark for Anchors and dry fit drain base over waste pipe.
5.1.B Mark all holes in outside flange of drain base on concrete floor.
5.1.C Remove drain base and drill 1/4” holes, 1-1/2” deep where marked.
5.1.D Drive plastic anchors flush in all holes.
5.1.E Install Drain Base to Waste Pipe and Sub-Floor
5.2 FOR WOOD SUB-FLOOR:
5.2.A Install Drain Base to Waste Pipe and Sub-Floor.
5.2.B Mark Bed Slope and dheck drain base label to confirm.
5.2.C Apply appropriate plastic pipe cement and primer to drain and waste pipe following local plumbing codes and
manufacturer’s instructions.
5.2.D Fit and fully seat drain base onto waste pipe.
5.2.E Fasten drain base to sub-floor by screwing 2-1/2” deck screws through all holes in outside flange of drain base
into plastic anchors or directly into wood sub-floor. Do not over-tighten.
6. PRE-SLOPED BED INSTALLATION
6.1 Apply tape over entire top surface of drain base for protection.
6.2 Install Pre-Sloped Bed. Follow industry standards to complete pre-sloped bed installation. If using mortar, be certain
mortar completely fills void below drain base flange.
6.3 Allow to dry before proceeding.
7. PREPARE SHOWER PAN LINER
7.1 Shower Pan Liner must turn up the walls a minimum of 3” above finished shower curb and 6” above floor in showers
without curbs.
7.2 Measure width of shower floor across drain base.
7.3 Lay Shower Pan Liner flat and measure and mark Shower Pan Liner.
7.4 Fold and crease for upturns and create corners.
Folded Corners:
TUCKED CORNER (when space is available between studs): Fold and crease to size. Tuck flashing into space
between studs.
FOLDED CORNER: Fold and crease to size. Fold corners behind flashing.
NOTE: Do not secure Shower Pan Liner at this time.
8. SECURE SHOWER PAN LINER
8.1 Lift out Shower Pan Liner. Remove tape, leaving tape over drain hole only.
8.2 Apply a 1/8” continuous bead of NobleSealant 150 around chamfer on base flange and another bead in groove on
drain base.
8.3 Apply NobleSealant 150 to any pre-formed corners.
8.4 Press shower pan liner into sealant.
8.5 Align Shower Pan Liner, fit, or re-tuck corners and firmly press liner into sealant on drain base and any pre-formed
corners.
8.6 Fasten Shower Pan Liner. Nail through top 1” of Shower Pan Liner to studs and/or blocking.
9. INSTALL CLAMPING COLLAR
9.1 Align collar with drain base under Shower Pan Liner. Press firmly.
9.2 Starting at one end, insert 5/8” screw through collar, punch through Shower Pan Liner and screw into base.
Repeat for all screws. Do not over-tighten.
10. CUT OUT FLASHING
10.1 With a razor knife, carefully trim out Shower Pan Liner from center of collar.
10.1 Remove tape from drain hole. Caution: Do not puncture Shower Pan Liner outside of collar.
11. FLOOD TEST: Flood test in accordance with local plumbing code requirements.
2 FreeStyle Linear Drain Full Mortar Bed Installation Instructions
 Loading...