

Page 1
Wall-Mounted Smart Home Speaker Wall-Mounted Smart Home Speaker Wall-Mounted Smart Home Speaker Wall-Mounted Smart Home Speaker Wall-Mounted Smart Home Speaker Wall-Mounted Smart Home Speaker Wall-Mounted Smart Home Speaker Wall-Mounted Smart Home Speaker
The Best Wall Sound
User Guide Manual
Patented pro duct, counterfeiting.
Before use of th e speak er, please read user guide manual carefully.
The product pi cture s are only for reference, please refer to actual item.
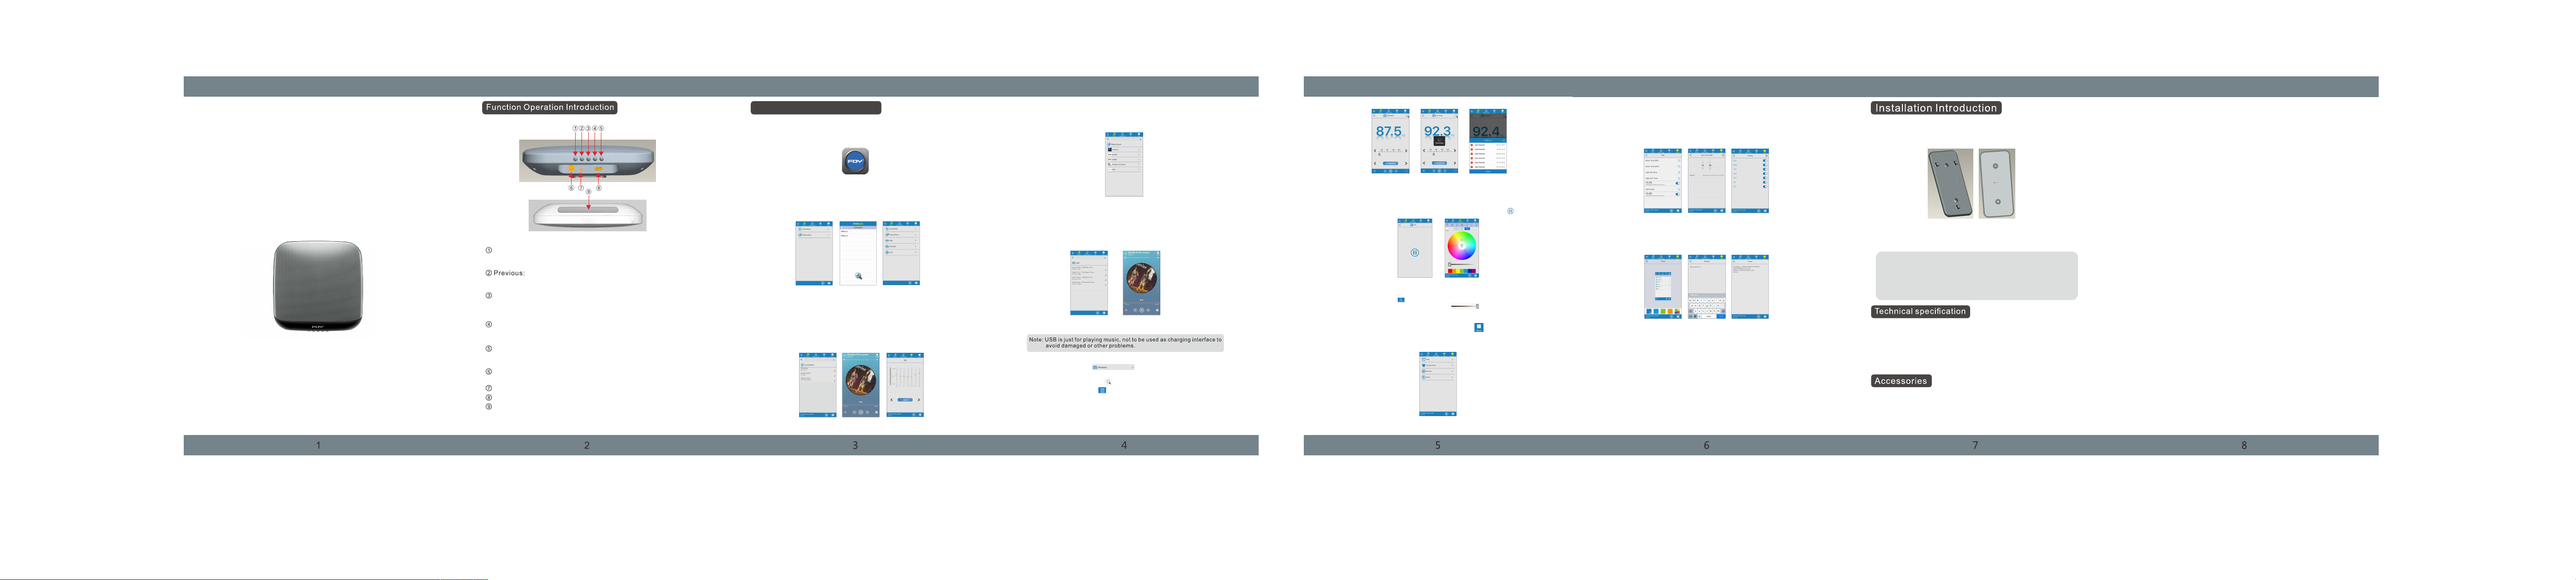
Function Key :
Short pr ess t he ke y to sh ift bluetooth,FM radio, USB & t he so und s our ce devi
ces alre ady c onn ect ed with the speaker.
Whe n pla y mus ic vi a blu etooth & USB, short press to pr evi ous s ong , In th e st
atus of FM , sho rt pr ess t he key to previous.
Play/Pause :
In th e sta tus o f pla yin g music, short press the key to p aus e or re sum e to pl ay
, in th e mod e of AUX , sho rt pr ess to muse, in the mode of bluet oot h ,lo ng pr e
ss to d isc onn ect a nd wa it for pairing.
Next Song:
In th e mod e of bl uet oot h,USB, short press it to next s ong , In th e mod e of FM
radio, l ong p res s it to i ncrease volume.
Nightlight s
Short pr ess i t to ad jus t its brightness ( three leve l aju stm ent ).L ong press it to
switch o ff the nightlights.
Power input in terfa ce, this interface just supports the 6 volta
ge adap ter mat ched wi th this product.
AUX IN
USB (optiona l).
Nightlight s window
APP Function Operation Guide
1.Installation & connection of APP
a.To downl oad " bwa lls " APP to smart phon e and i nst all i t fro m APPLE APP stor
e. Aft er n ish ing t he in stallation, The s mar tph one w ill show as the following
pic tur e:
b.F irs t, pl eas e ope n the bluetooth of smartpho ne, the n sea rch ing for the speak
er bl uet oot h nam e"b walls" to connect, After con nec tio n, ru n the i nstalled A
PP ,e nte r into functions of APP( Pictu re 1) ,Th en, click the upper left corner t o
con nec t the dev ice , to check the bluetooth data h as be en co nne cte d or not c
onn ect ed da ta sh ows a s picture 2, on the right , it will m ark "√" ).A ndr oid APP
wil l con nec t blu eto oth data automatically,F or IO S version APP, need t o con n
ect b y han d.
c.A fte r con nec tio n, APP will show li ke pi ctu re 3, a t thi s time, you can control th
e rel ati ve fu nct ion s of the speaker.
2.APP function operation
a.L oca l Mus ic
Click "L oca l Mus ic" t o play music in the smartphon e (pi ctu re 4) ,th en choose a
ny so ng to e nte r int o (Pi cture 5) interface to contr ol ev ery f unc tio n;Click the u
pper "So und E ffect" to enter into Pic tur e 6 int erf ace to adjust sound effe cts a
cco rdi ngl y (Th is fu nction als can work in the stat us of o the r sou nd so urce).
Pictur e 1
Pictur e 4 Pictur e 5 Pictur e 6
Pictur e 2
Pictur e 3
b.L ist en to m usi c on th e line
To ensure th at yo ur sm art phone are connecting with i ner net t o pla y & lis ten
to th e mus ic on t he li ne, play on the line as the followi ngs :(p ict ure 7 ).
Pictur e 7
c.U SB pl ay
Ins ert t he US B dis k whi ch saved songs to play music ,C lic k USB ,Th e spe ak
er will pr omp t the U SB ha s been inserted in, Relatve U SB co ntr ol in ter faces
are as fol low ing s:( picture 8,Picture 9).
Pictur e 8
d.F M Rad io
Click FM r adi o to en ter “ ” into FM radio interface a s pic tur e
10, the ra lat ive i nte rfaces are as picture 11, Pic ture 12;
Click th e upp er ri ght c orner “ ” to seach for radio stat ion s aut oma tic ally;
Click th e low er le ft co rner“ ”to check and choose th e sav ed st ati ons l ist;
It ca n cho ose s ome c oun tries' FM frequency.
Pictur e 9
Pictur e 10 Pictur e 11 Pic tur e 12
e.A UX IN P lay
Whe n you i nse rt Aux i n cab le into the speaker, APP wil l shi ft to AU X interfa
ce (p ict ure 1 3), The s peaker will give waring ton e of AUX _In ,At t he sa me ti
me, you ca n hea r the s wee t music from outside device . Cic k“ ”t o sto p m
usic pla yin g.
Pictur e 13 Pictur e 14
f.F unc tio ns of n igh tlights
To click the u ppe r“ ” Ico n to control night lights (Pi ctu re 14 ),B WALL S jus
t has nigh tli ght s,o ff,light and t he lo wer “ ”br ightness adjustment
fun cti ons .
g.M ore
Enter in to mo re fu nct ion to click the upper right“ ” Ico n (Pi ctu re 15).
Pictur e 15
h.H elp
Click" Hel p" to e nte r into the interface, Click " +" to a dd th e sta rti ng and endi
ng ti me, and d ate t hat y ou want to set up . Once the functi on is s et up , eve n
sma rtp hon e is sw itc hedoff, it sti ll ca n wor k , the r elative interfaces:(P ict ure
18, Pict ure 1 9,P ict ure 20,Picture 21).
Pictur e 16
i.T hem e Col our
Click "T hem e Col our " to choose the colors of backg rou nd yo ur li ke( Picture
19).
Pictur e 19 Pictur e 20 Picture 21
j.R ena me
Click "R ena me" t o com pile device name(Pictur e 20) .
k.A bou t
Click "A bou t" to s how AP P version(Pi ctu re 21 ).
Pictur e 17
Pictur e 18
a.Inst all ati on of b aseplate
If th e wal l is sm oot h and s trong enough, it can be paste d on th e wal lor t he
glass di rec tly b y the 3 M adhesive tape,if not, we su gge st to u se th e scr e
ws to e nsu re it xed .
Wall mounted basepla te
b.Inst all ati on of t he speaker
Insert t he sp eak er in to the xed baseplate then pu ll do wn th e spe ake r to e
nsure it xed t igh tly.
1. Wh en th e spe ake r is on t he wall, to insert USB or AUX in cab le ,
Note:
we su gge st th at yo u had b etter use one hand to buttres s the s pea k
er be cau se th e upp er po wer will cause the speaker of f the b asepla
te an d dam age t he sp eak er.
2. If y ou ne ed to d isc har ge the baseplate pasted on th e wal l by 3M
adh ens ive t ape , to av oid damage of the wall, we sugg est y ou us e
alc oho l to wa ter t he ta pe slowly then tear the tape li ght ly.
1. Ou tpu t pow er: 3W x 4
2. Sp eak er: Ø40 mm x 4+ (46 mm* 86m m) x 2
3. Fr equ enc y res pon se: 8 0-1 8kHz
4. S/ N Rat io: ≥85 dB
5. Di sto rti on de gre e: 1%
6. LED col our t emp era ture: 285 0K
7. Pr odu ct si ze: 220x 220 x50 mm(LxWxD)
1. Adapte r X1
2. Us er Gu ide M anu al X1
3. Wall-mounted base pla te X1 (3M a dhensive tape x2)
4.Scre ws X2
3M adhes ive t ape
FCC WARNING: This equipment may generate or use radio frequency
energy. Changes or modifications to this equipment may cause harmful
interference unless the modifications are expressly approved in the
instruction manual. The user could lose the authority to operate this
equipment if an unauthorized change or modification is made.
This device complies with part 15 of the FCC Rules. Operation is subject
to the following two conditions: (1) This device may not cause harmful
interference, and (2) this device must accept any interference received,
including interference that may cause undesired operation.
NOTE: This equipment has been tested and found to comply with the
limits for a Class B digital device, pursuant to part 15 of the FCC Rules.
These limits are designed to provide reasonable protection against harmful
interference in a residential installation. This equipment generates, uses
and can radiate radio frequency energy and, if not installed and used in
accordance with the instructions, may cause harmful interference to radio
communications. However, there is no guarantee that interference will
not occur in a particular installation. If this equipment does cause harmful
interference to radio or television reception, which can be determined by
turning the equipment off and on, the user is encouraged to try to correct
the interference by one or more of the following measures:
• Reorient or relocate the receiving antenna.
• Increase the separation between the equipment and receiver.
• Connect the equipment into an outlet on a circuit different from that to
which the receiver is connected.
• Consult the dealer or an experienced radio/TV technician for help.
• The rating information is located at the bottom of the unit.
INDUSTRY CANADA NOTICE:
This device complies with Industry Canada licence-exempt RSS standard(s).
Operation is subject to the following two conditions: (1) This device
may not cause interference, and (2) This device must accept any
interference, including interference that may cause undesired operation
of the device.
This equipment should be installed and operated with a minumum
distance of 20 cm between the radiator and your body.
 Loading...