

Page 1
FDT WIFI CAMERA
FD7902
QUICK START GUIDE
www.fdt.us
www.fdt.us
Watch what you love, anywhere.
Copyright © 2016 FDT Technologies. All rights reserved.
Designed by FDT in Texas. Assembled in China.
To contact our customer service team
email: [email protected]
visit: www.fdt.us/support
or call USA Direct: 713-955-7170
It’s our pleasure
TO HELP YOU!
Watch what you love, anywhere.
Page 2
1 2
We want to say
THANKS
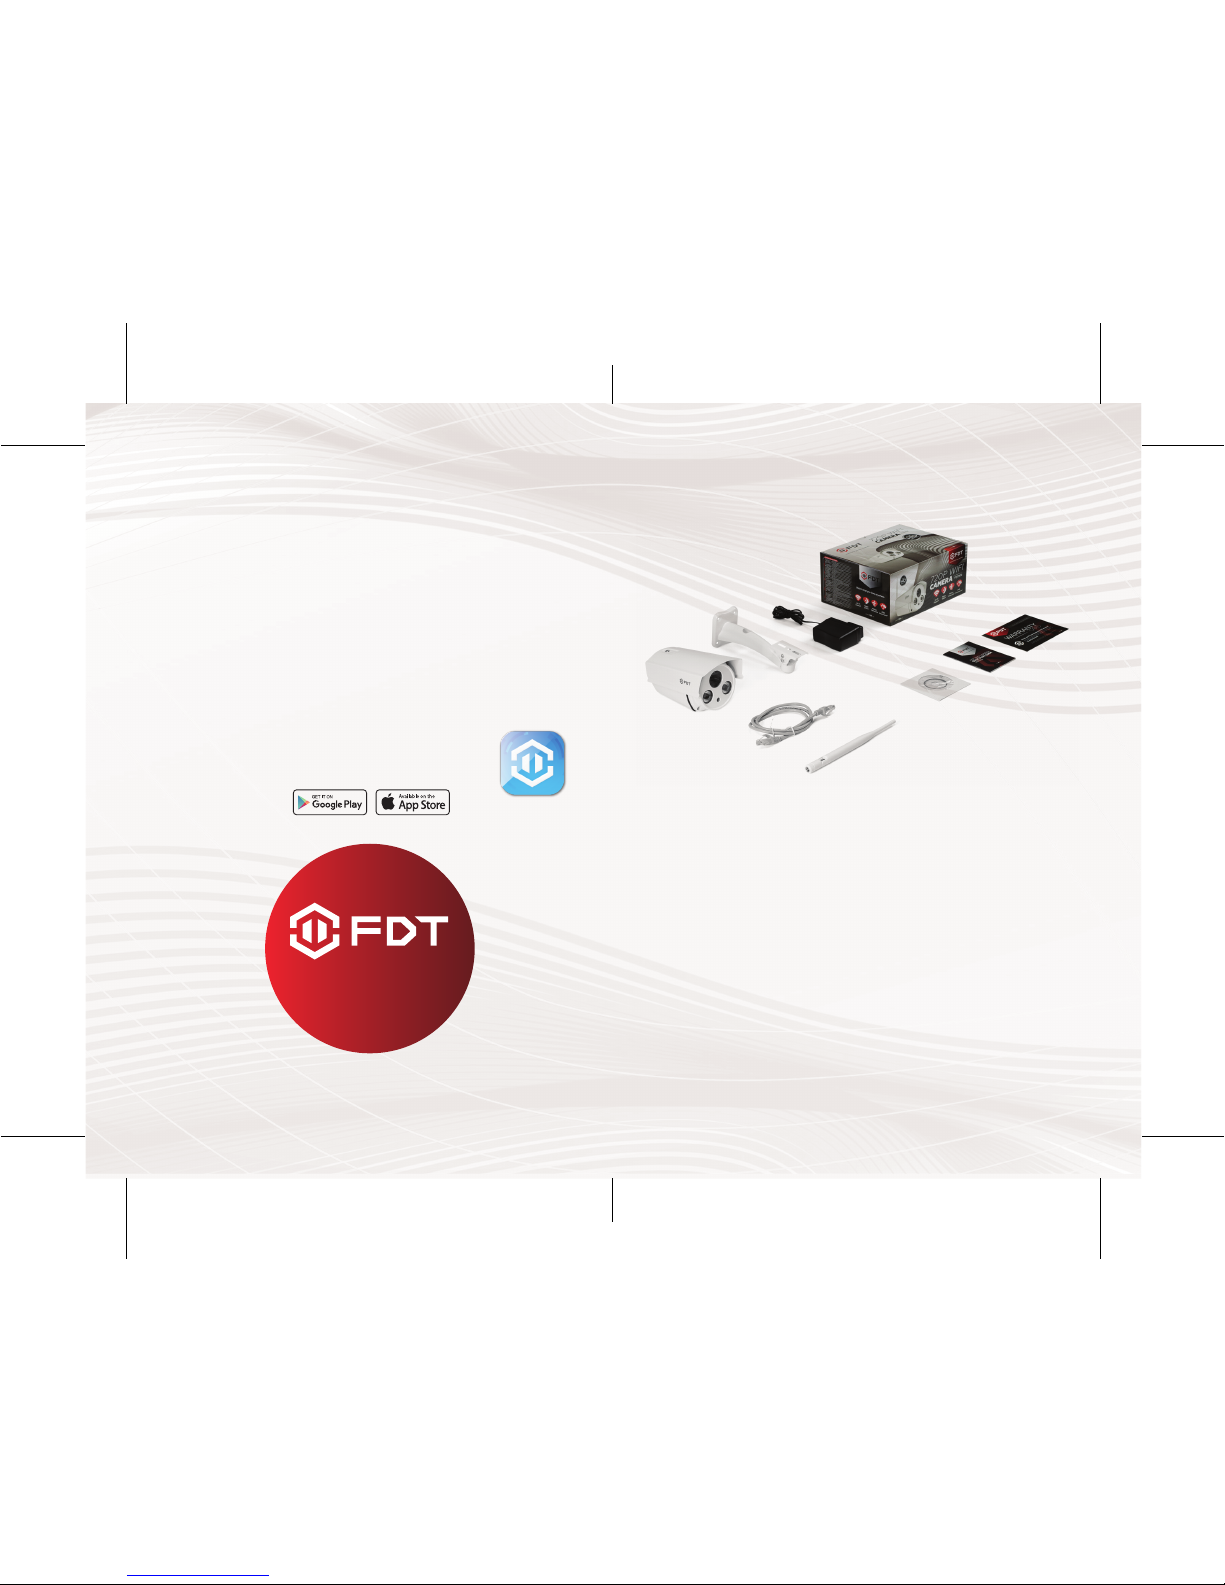
WHAT’S INSIDE THE BOX:
Thank you for purchasing an FDT camera! Please follow the
instructions on this Quick Start Guide in order to get your
camera set up so you can watch what you love, anywhere!
You’ll find instructions on how to set up your camera, as
well as instructions on how to configure different settings
on your camera such as motion detection and email alerts.
1- FDT Wireless IP Camera
2- Power Supply
3- Wall Mounting Bracket
4- Mounting Hardware
5- Installation CD Software
6- Wireless Antenna
7- Ethernet Cable
8- Quick Start Guide
9- Warranty
FAMILY
www.fdt.us
To get started, please download the FDT View
app from the App Store or Play Store.
1
2
3
4
6
7
5
8
9
Page 3
The FDT camera can be accessed through the web browser
on a computer or through the FDT View App on a smart
phone or tablet PC. There are two methods, wired and
wireless connection, to add IP camera via FDT View App.
You can choose either of them:
Connecting Your FDT WiFi Camera Through Wired Connection
1. Connect the camera to the power adapter. Wait a moment until
the camera restarts.
2. Connect the camera to the router by Ethernet cable.
3. Make sure your smartphone is connected to your wireless router.
4. Run the FDT View APP on your smartphone.
5. Follow the steps in this Quick Start Manual under the section
“New Camera Setup” to complete set up of your new camera.
NOTE: If you have added your IP camera successfully by wired
connection, do not add it again by wireless connection.
Connecting Your FDT WiFi Camera Through Wireless Connection
1. Make the antenna upright.
2. Connect the camera with power adapter. Wait a moment until
the camera restarts.
3. Make sure your smartphone is connected to your wireless router.
4. Run the FDT View APP on your smartphone.
5. Follow the steps in this Quick Start Manual under the section
“New Camera Setup” to complete set up of your new camera.
NOTE: Do not connect the camera with router via Ethernet cable.
Initial Camera Connection
QUICK START GUIDE
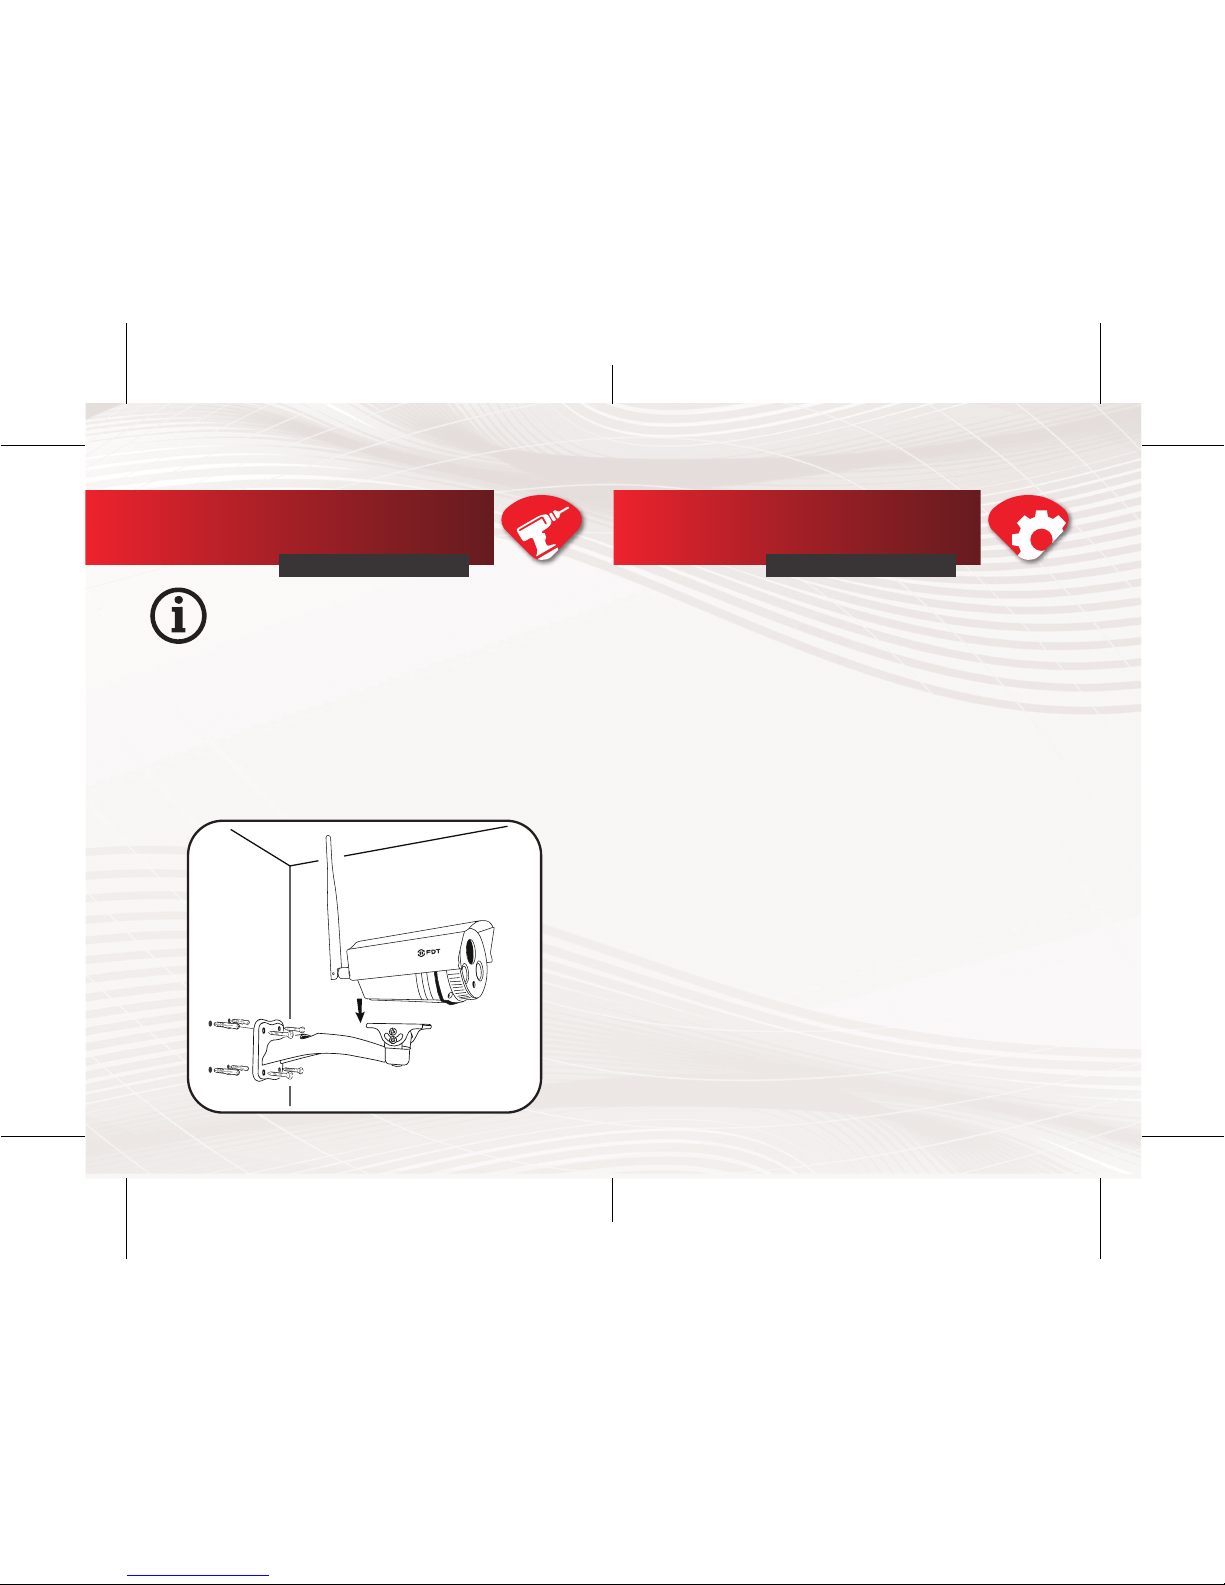
Prior to installation ensure that the installation
environment can support at least 3 times the
weight of the camera.
1. Drill pilot holes in the position that you wish the camera to be seated
using a 3/16 drill bit.
2. Seat the included drywall mounts in the pilot holes that you drilled.
3. Screw the mount on the drywall mounts with the four screws
provided.
4. Place the camera on the wall anchors and attach the camera via the
two shorter screws.
5. Position the camera to the area that you would like to surveil and
tighten the single screw at the bottom of the mount to finish securing.
Hardware Installation
QUICK START GUIDE
3 4
1
2
3
4
5
Page 4
5 6
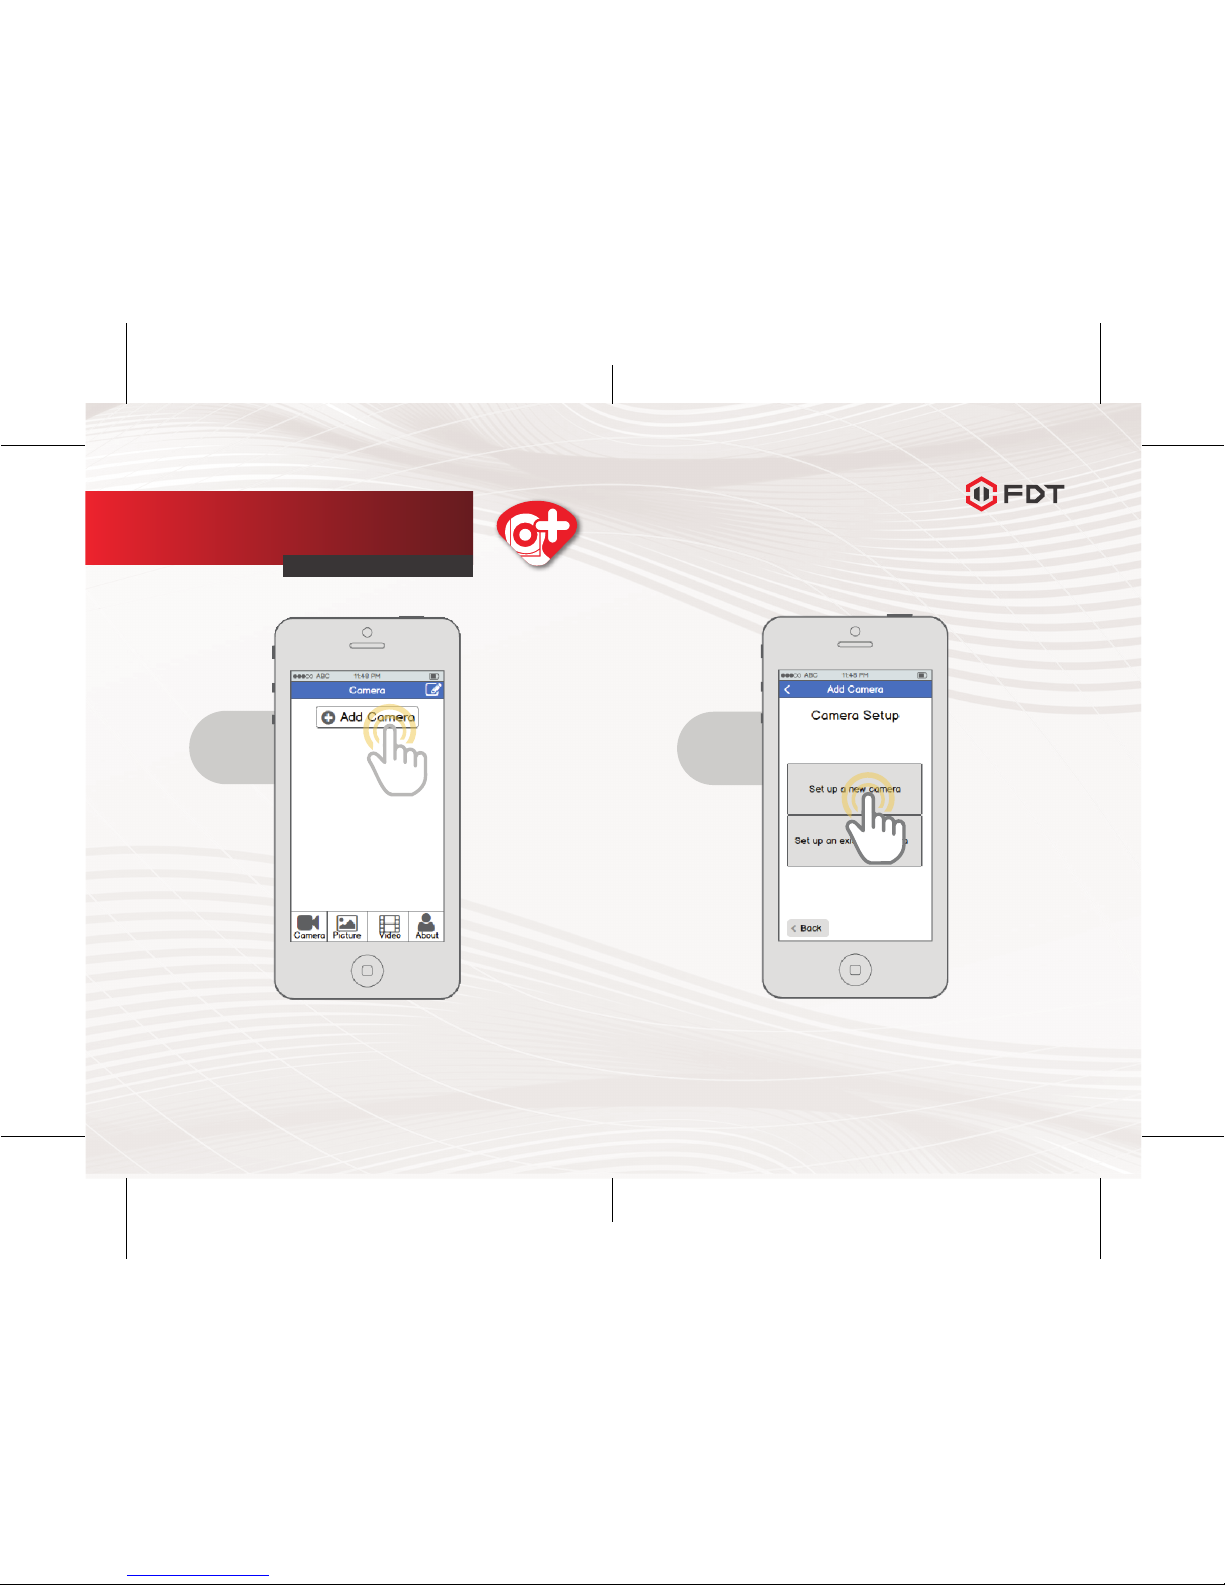
From the home screen, tap
the “Add Camera” button.
New Camera Setup
QUICK START GUIDE
1
Tap the “Set up a new camera” button.
2
Page 5
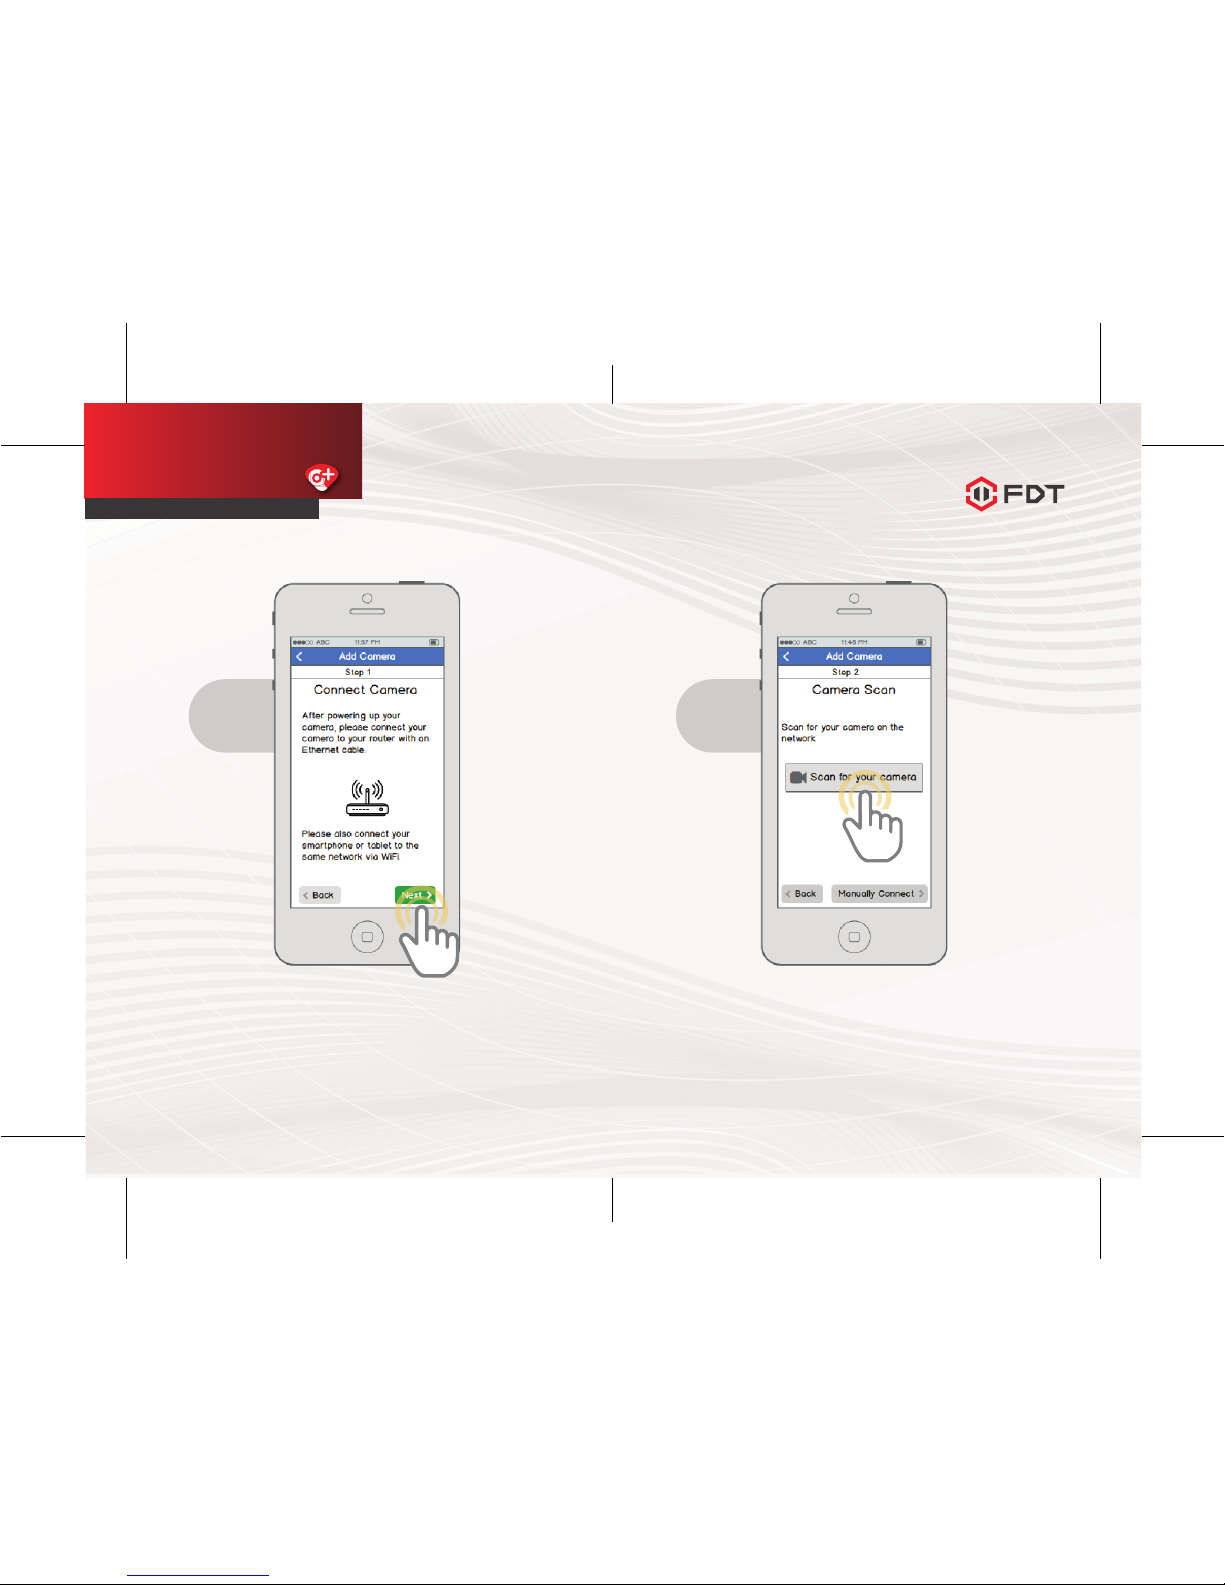
7 8
Connect your camera to power and to your
router with an Ethernet cable. Also connect
your smartphone or tablet to the same network
via WiFi. Please wait 1-2 minutes after plugging
in your camera before proceeding further.
3
New Camera Setup
QUICK START GUIDE
Tap the “Scan for your camera” button.
Alternatively, you can tap the “Manually
Connect” button to add the camera
manually.
4
Page 6
9 10
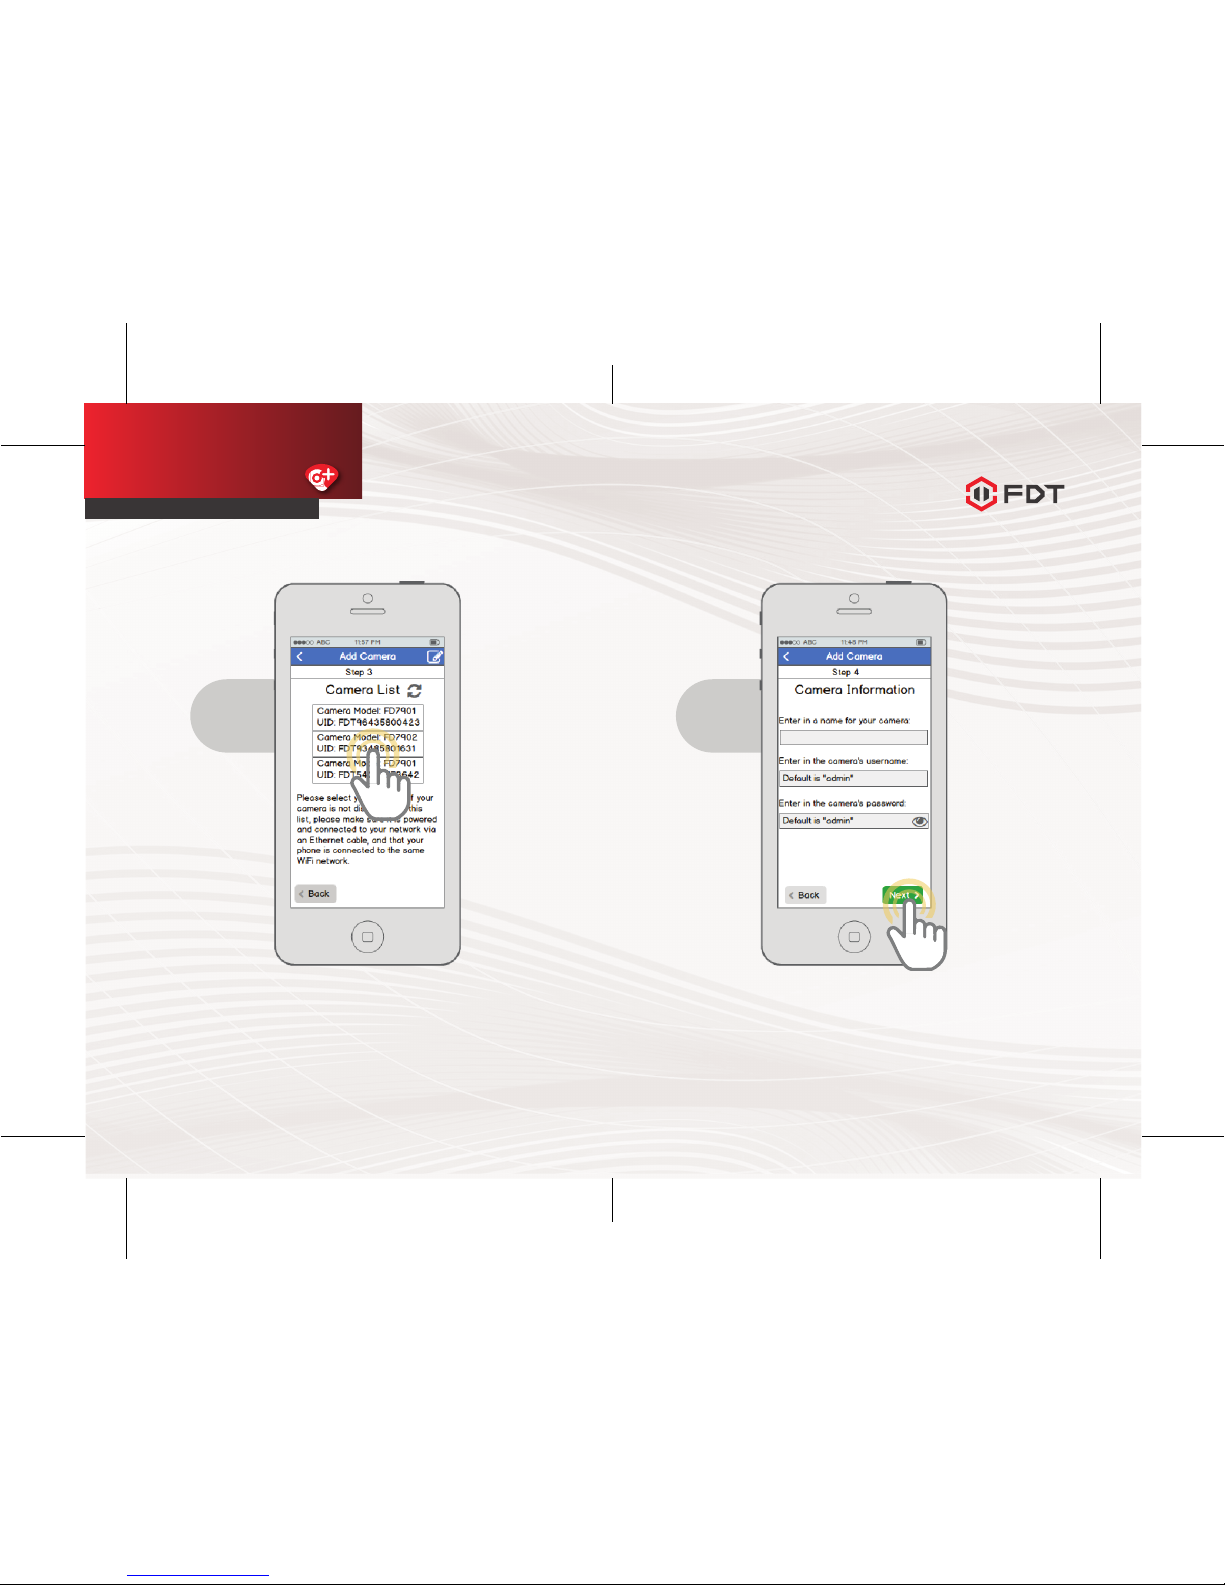
Select your camera from the list. If multiple
cameras are displayed, tap the option that
has the same UID number as the sticker on
your camera.
5
New Camera Setup
QUICK START GUIDE
Enter in a name for your camera, the camera’s
username, and the camera’s password then
tap Next. By default, the camera’s username
is admin and the password is admin.
6
Page 7
11 12
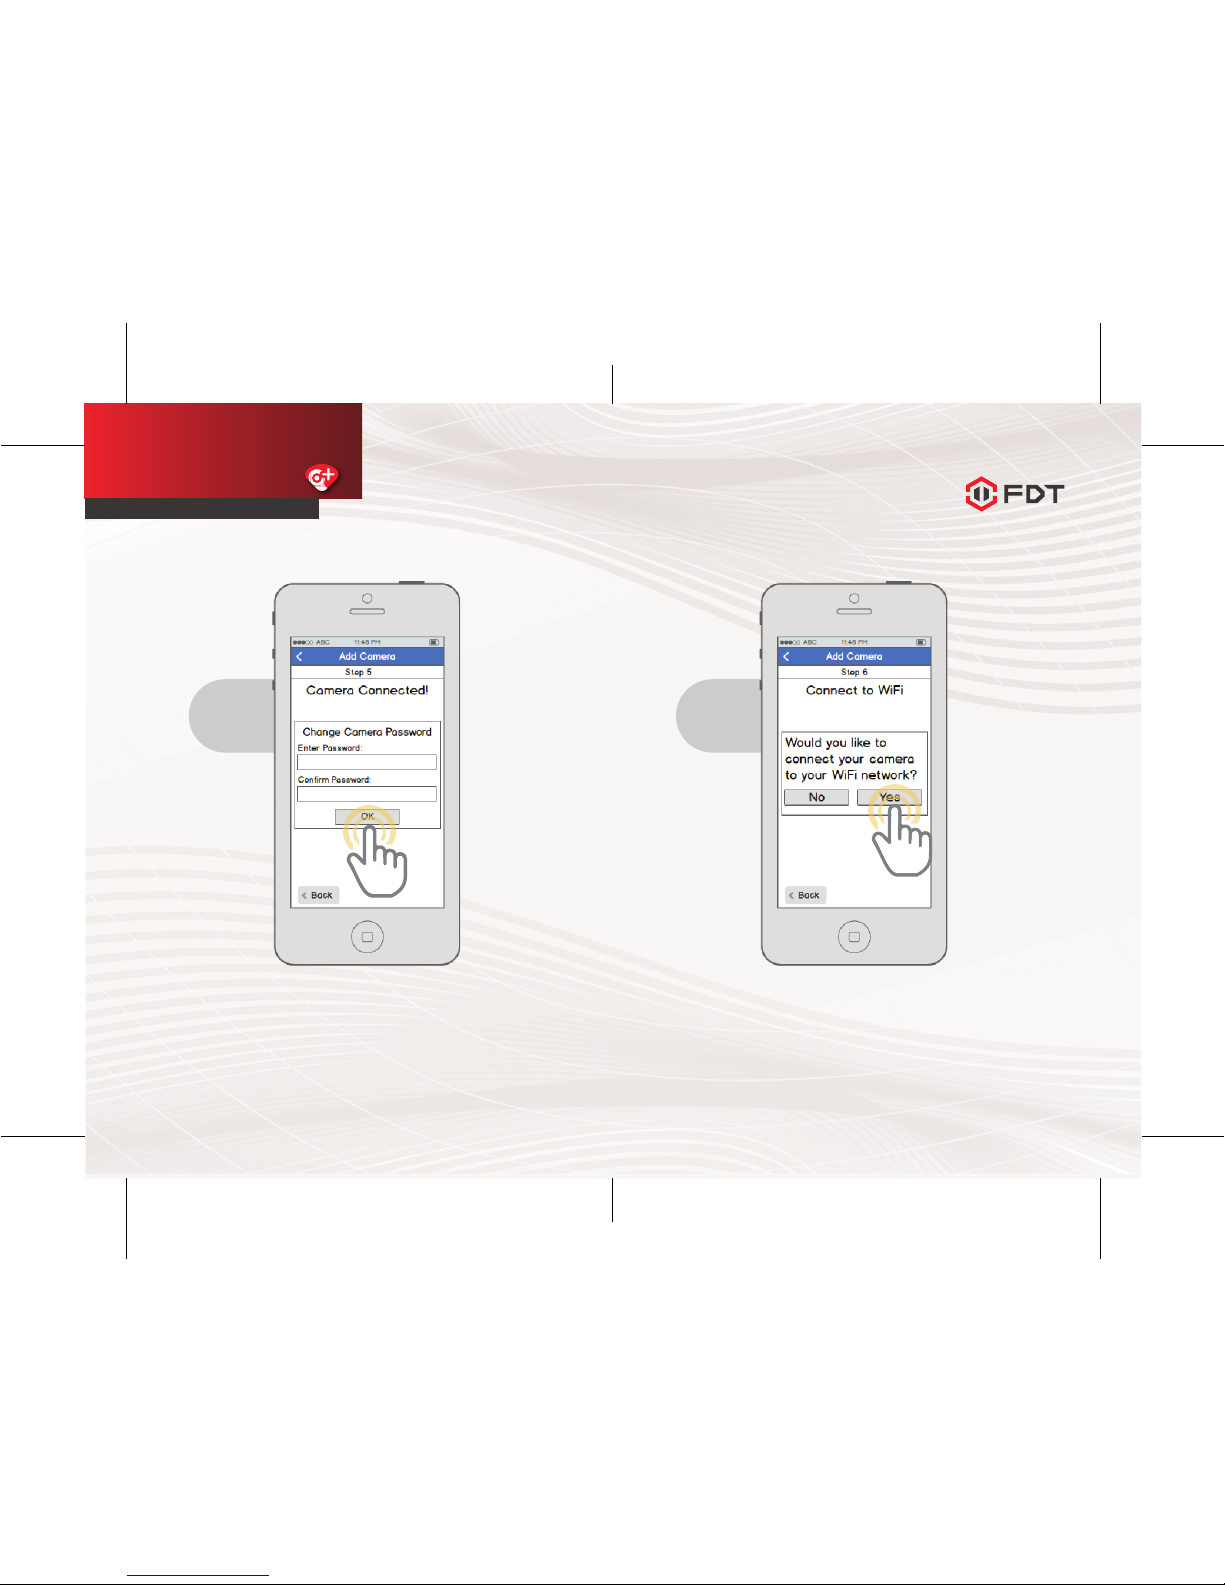
Change your camera’s password by entering
it in twice, then tapping OK.
7
New Camera Setup
QUICK START GUIDE
If you would like to connect your camera
to WiFi, tap Yes in the dialog box.
8
Page 8
13 14
New Camera Setup
QUICK START GUIDE
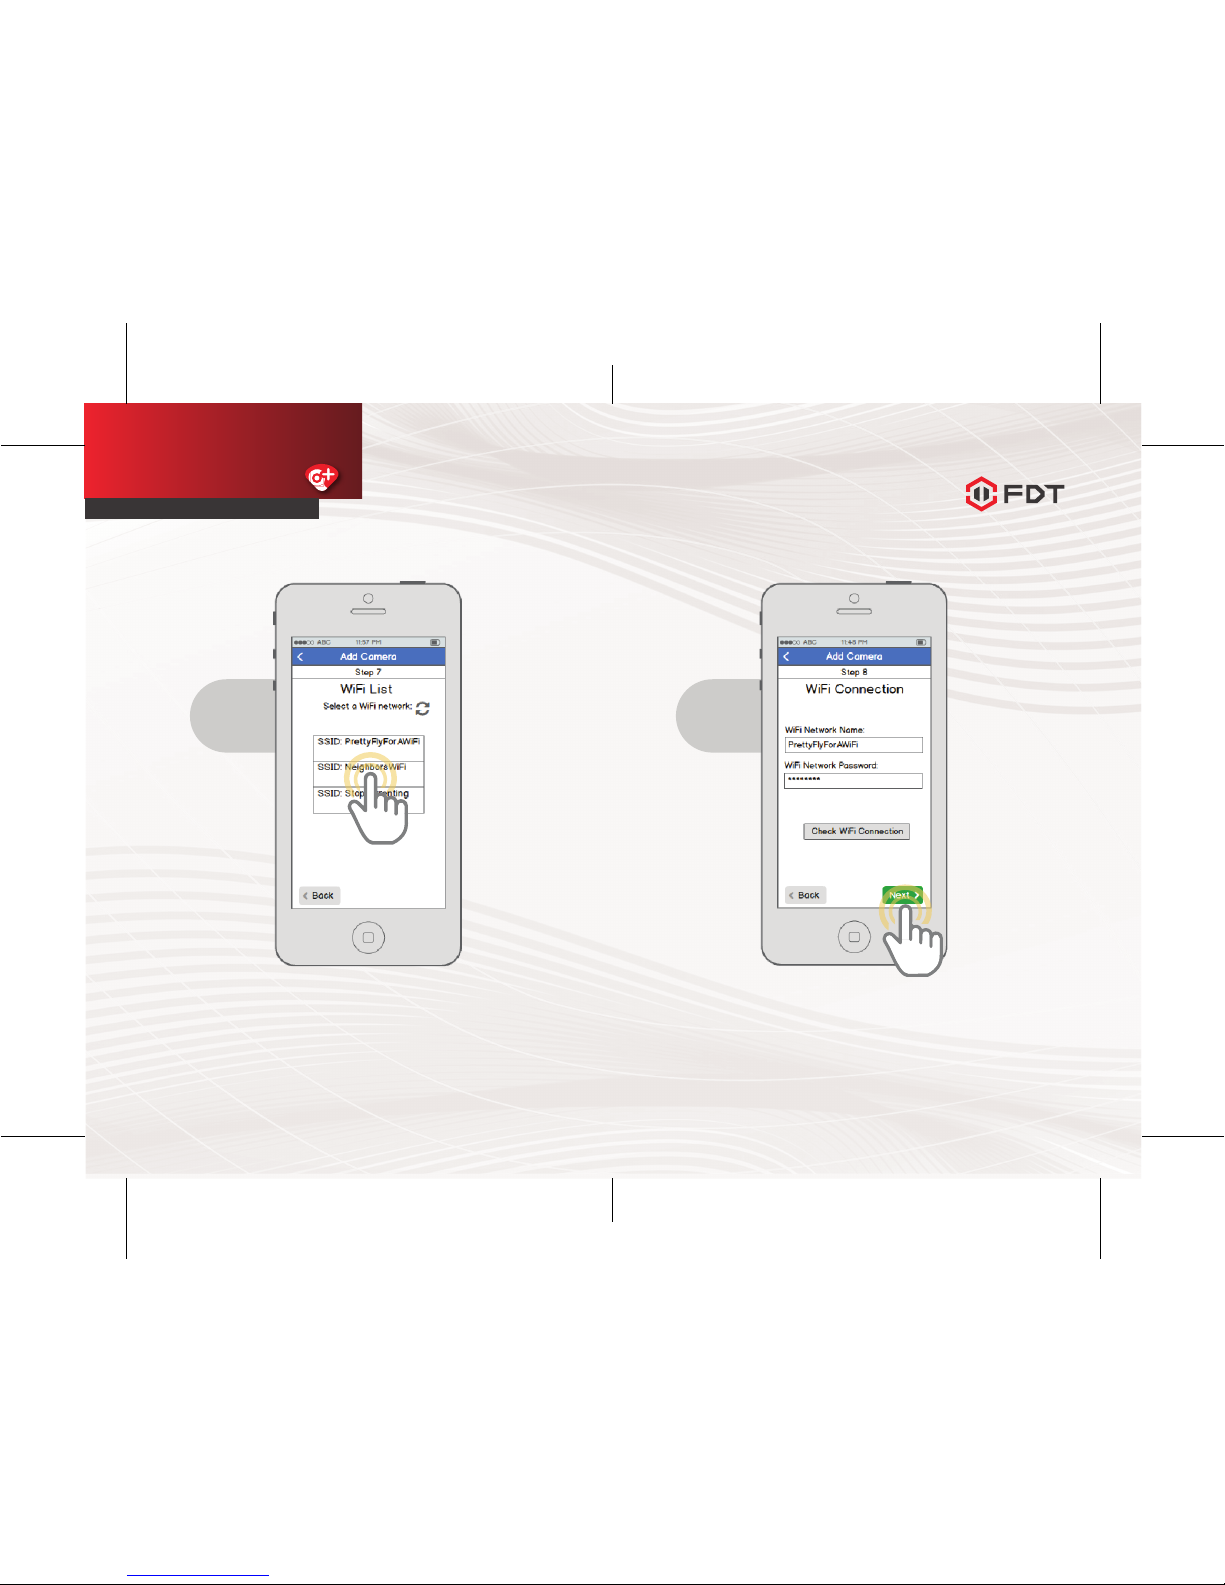
Select your WiFi network from the list."
9
Enter in your WiFi network’s password, then
tap the “Check WiFi Connection” button to
ensure that the connection will work. Once
you receive confirmation, then tap Next.
10
Page 9
15 16
Existing Camera Setup
QUICK START GUIDE
www.fdt.us
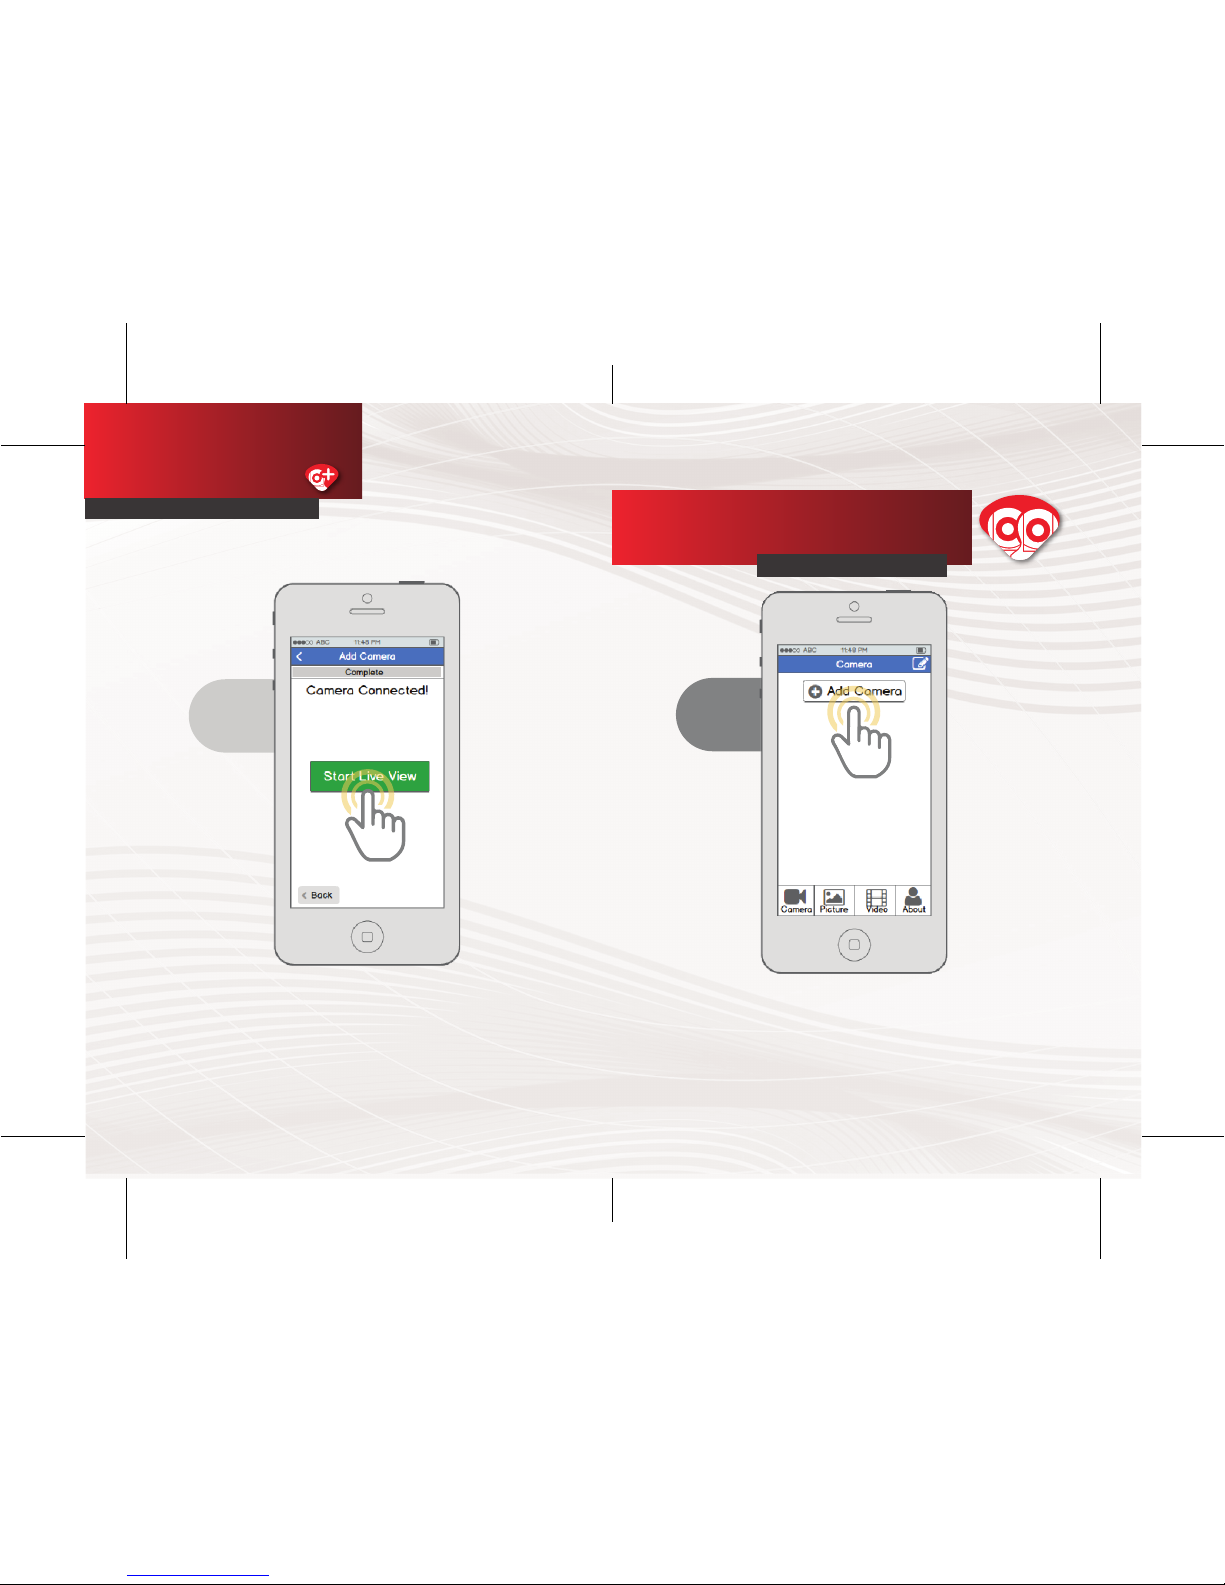
Your camera is now connected! Tap
the “Start Live View” button to being
using your camera!
11
New Camera Setup
QUICK START GUIDE
From the home screen, tap
the “Add Camera” button.
1
Page 10
17 18
Existing Camera Setup
QUICK START GUIDE
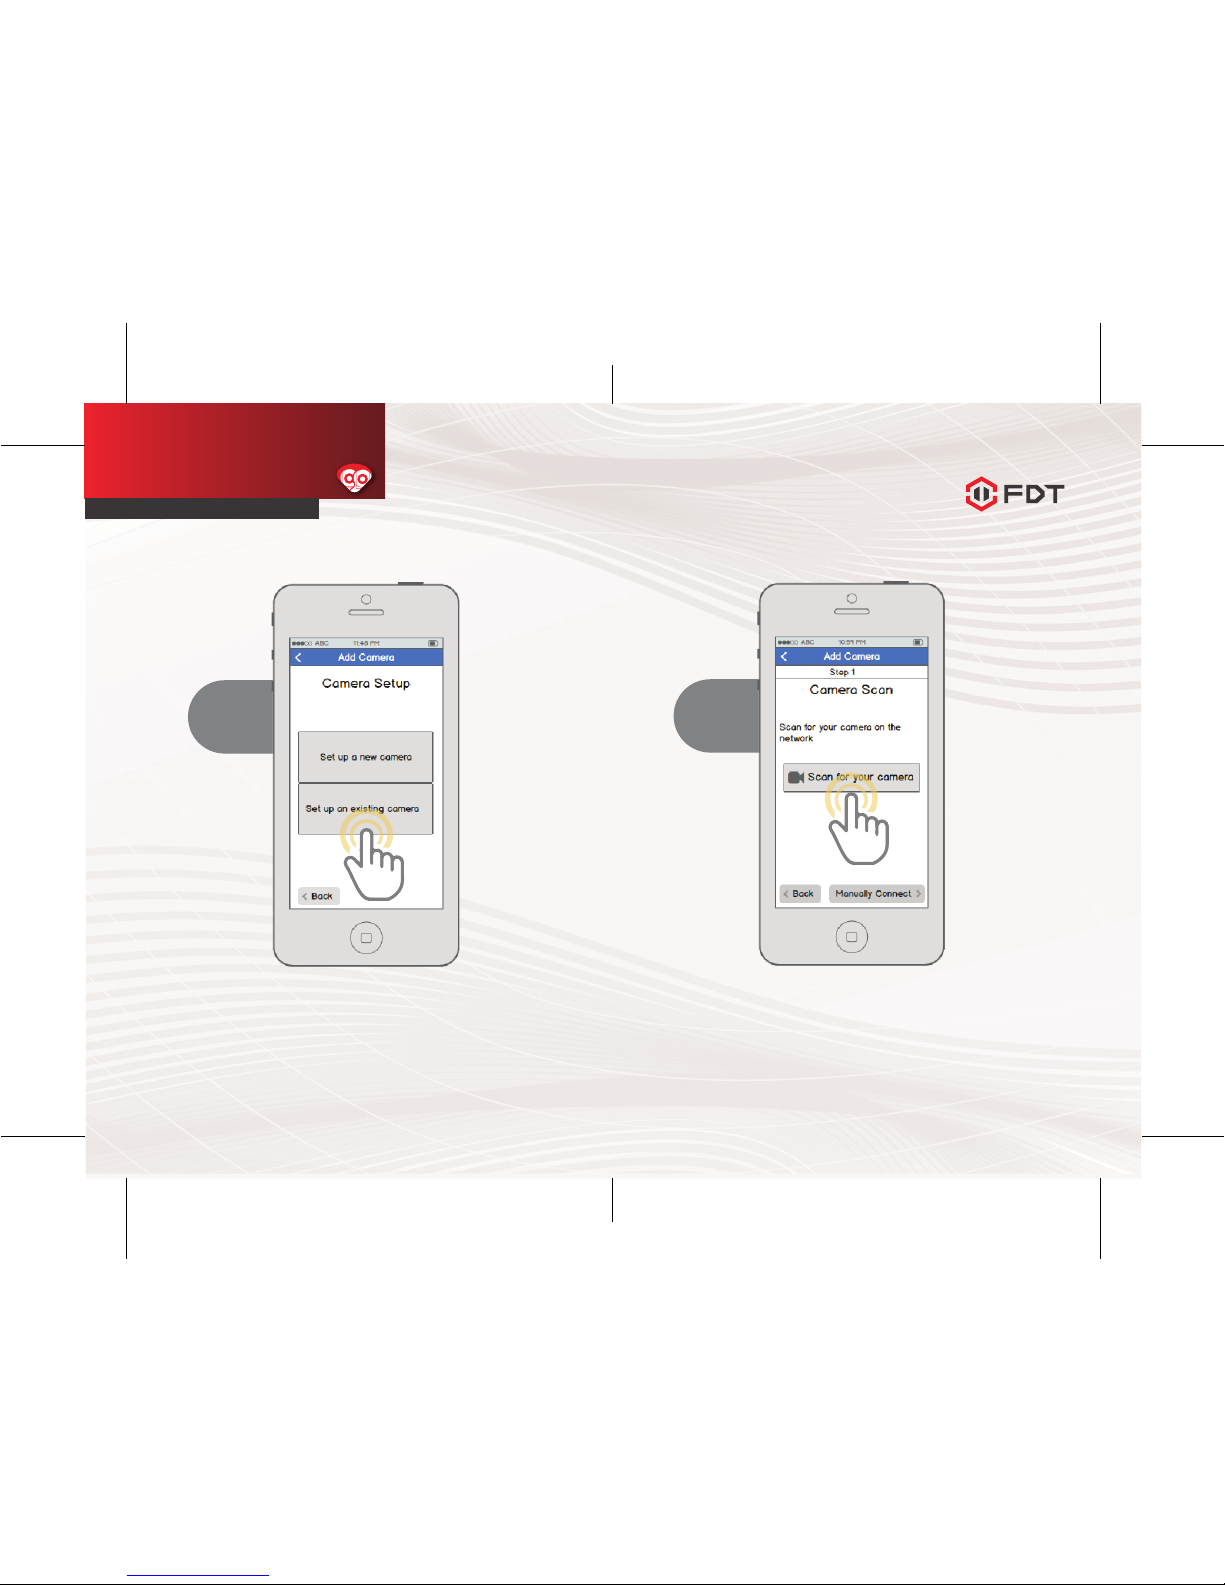
Ensure your camera is connected to power
and Internet (WiFi or Wired). Tap the “Scan for
your camera” button. Alternatively, you can
tap the “Manually Connect” button to add the
camera manually.
3
Tap the “Set up an existing
camera” button.
2
Page 11
19 20
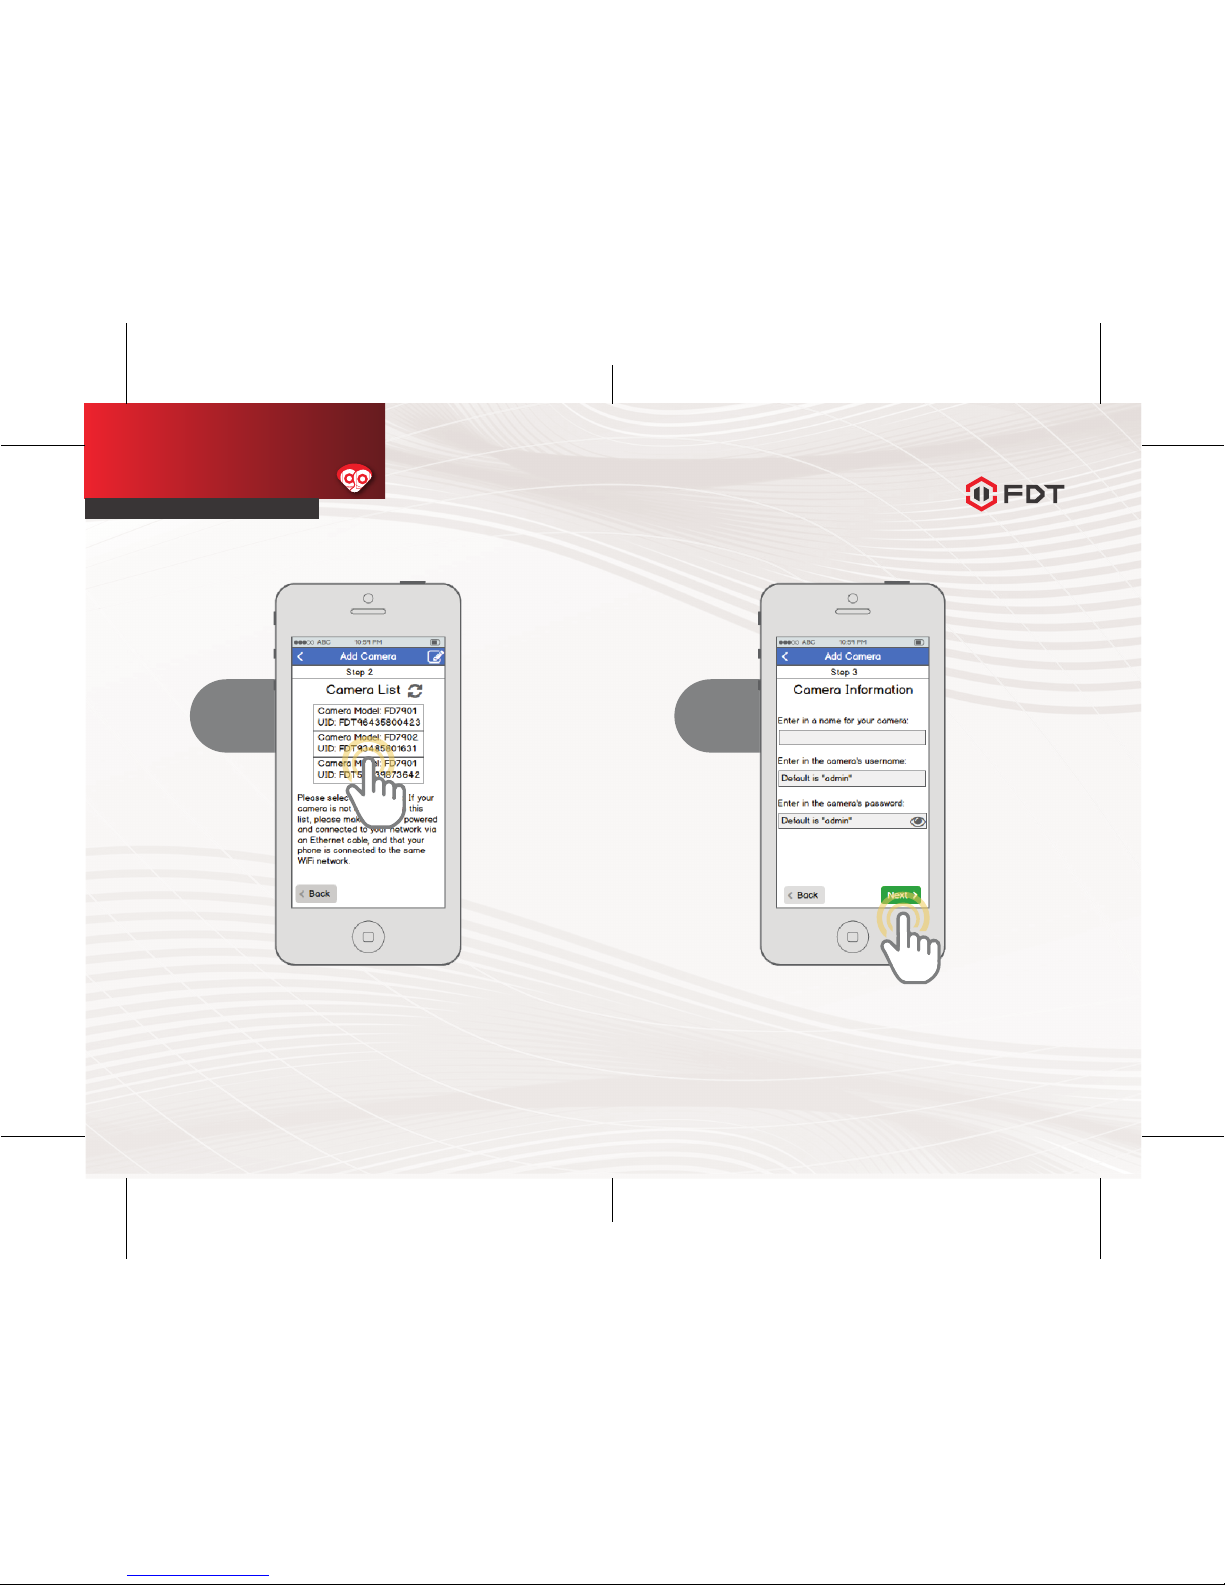
Select your camera from the list. If
multiple cameras are displayed, tap
the option that has the same UID
number as the sticker on your camera.
4
Existing Camera Setup
QUICK START GUIDE
Enter in a name for your camera, the camera’s
username, and the camera’s password then
tap Next. By default, the camera’s username
is admin and the password is admin.
5
Page 12
21 22
Existing Camera Setup
QUICK START GUIDE
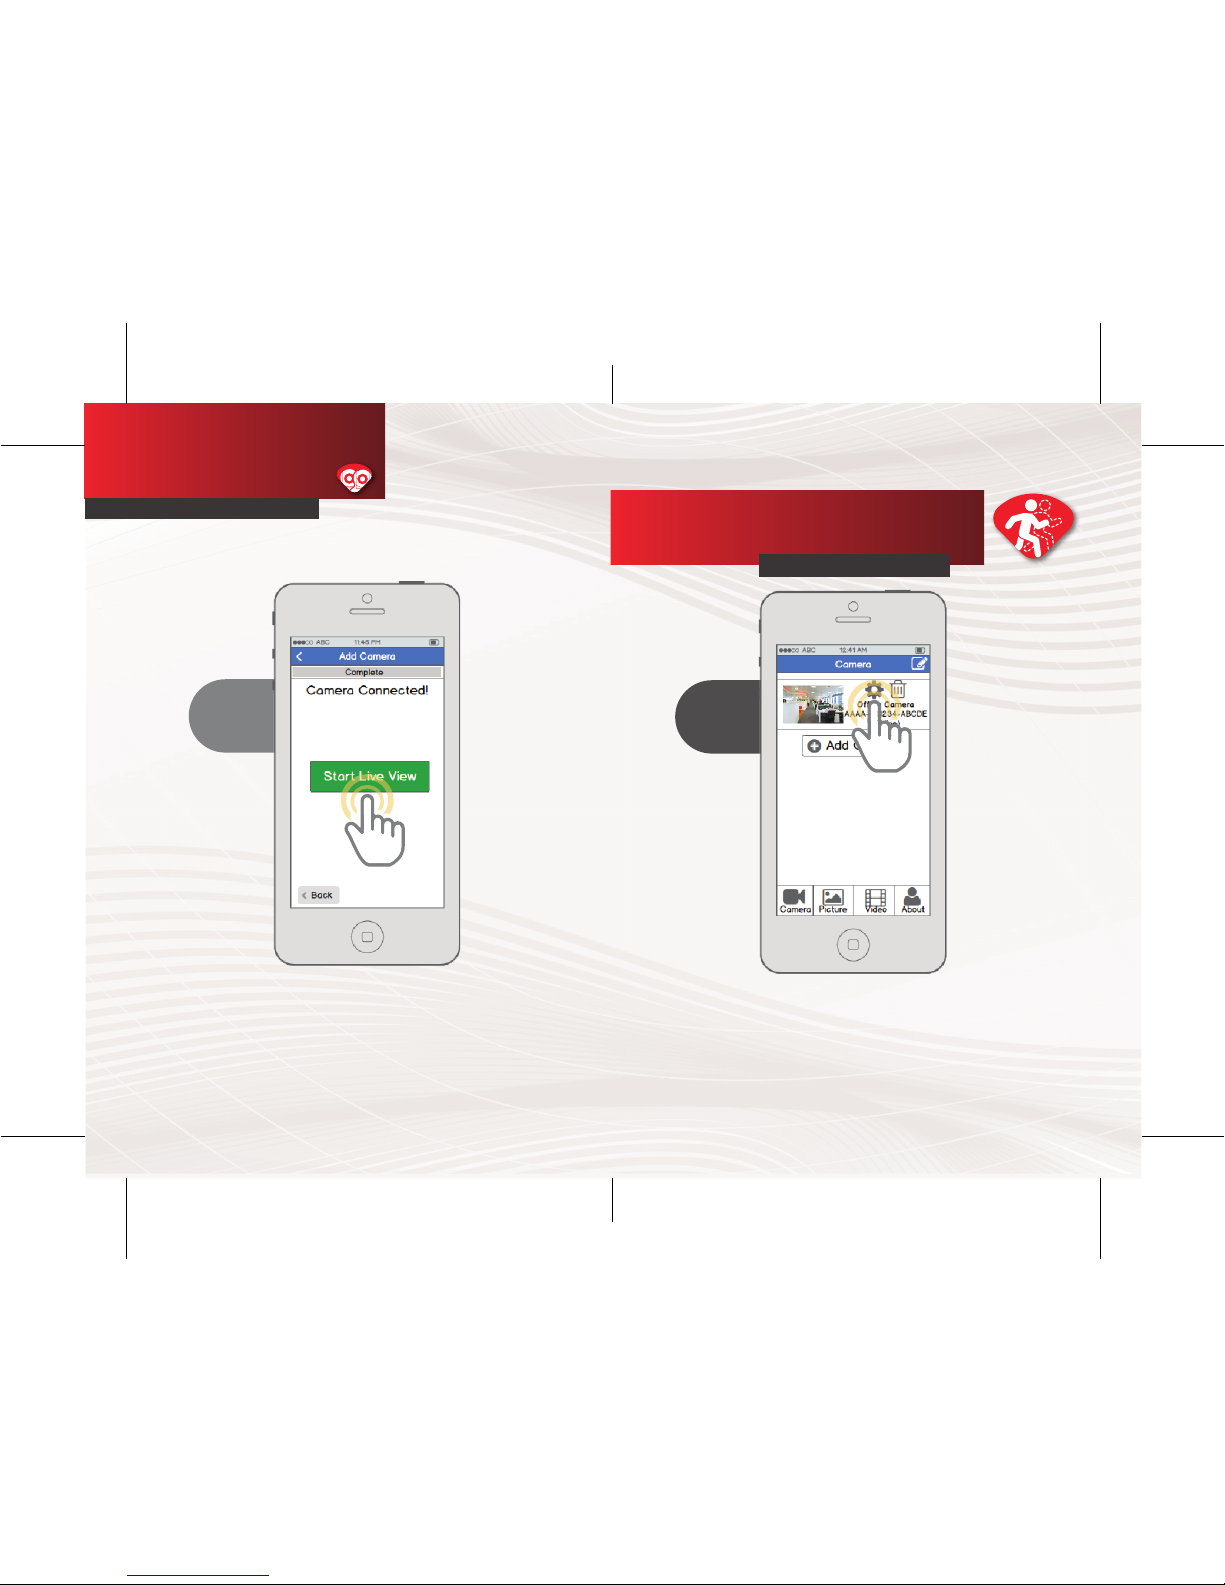
Your camera is now connected! Tap
the “Start Live View” button to begin
using your camera!
www.fdt.us
6
Motion Detection Setup
QUICK START GUIDE
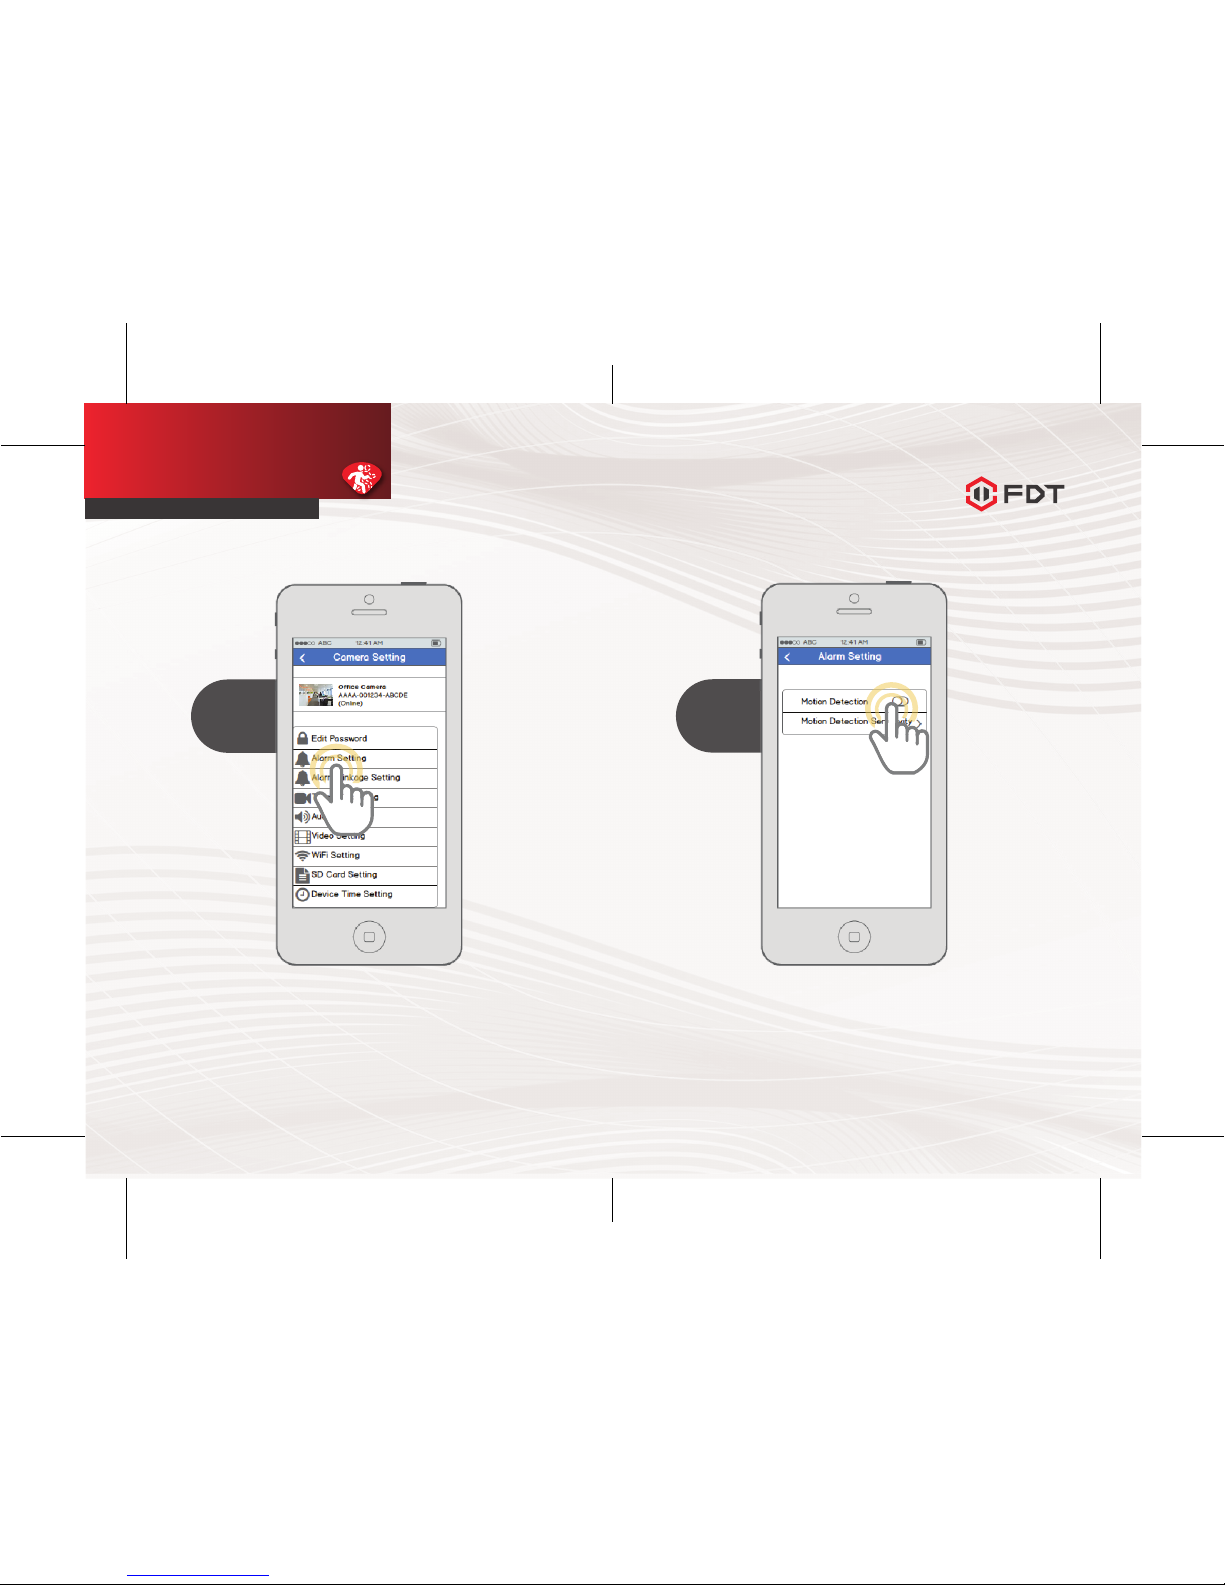
From the home screen, tap the gear-shaped
Settings icon to access the camera settings
menu.
1
Page 13
23 24
Motion Detection Setup
QUICK START GUIDE
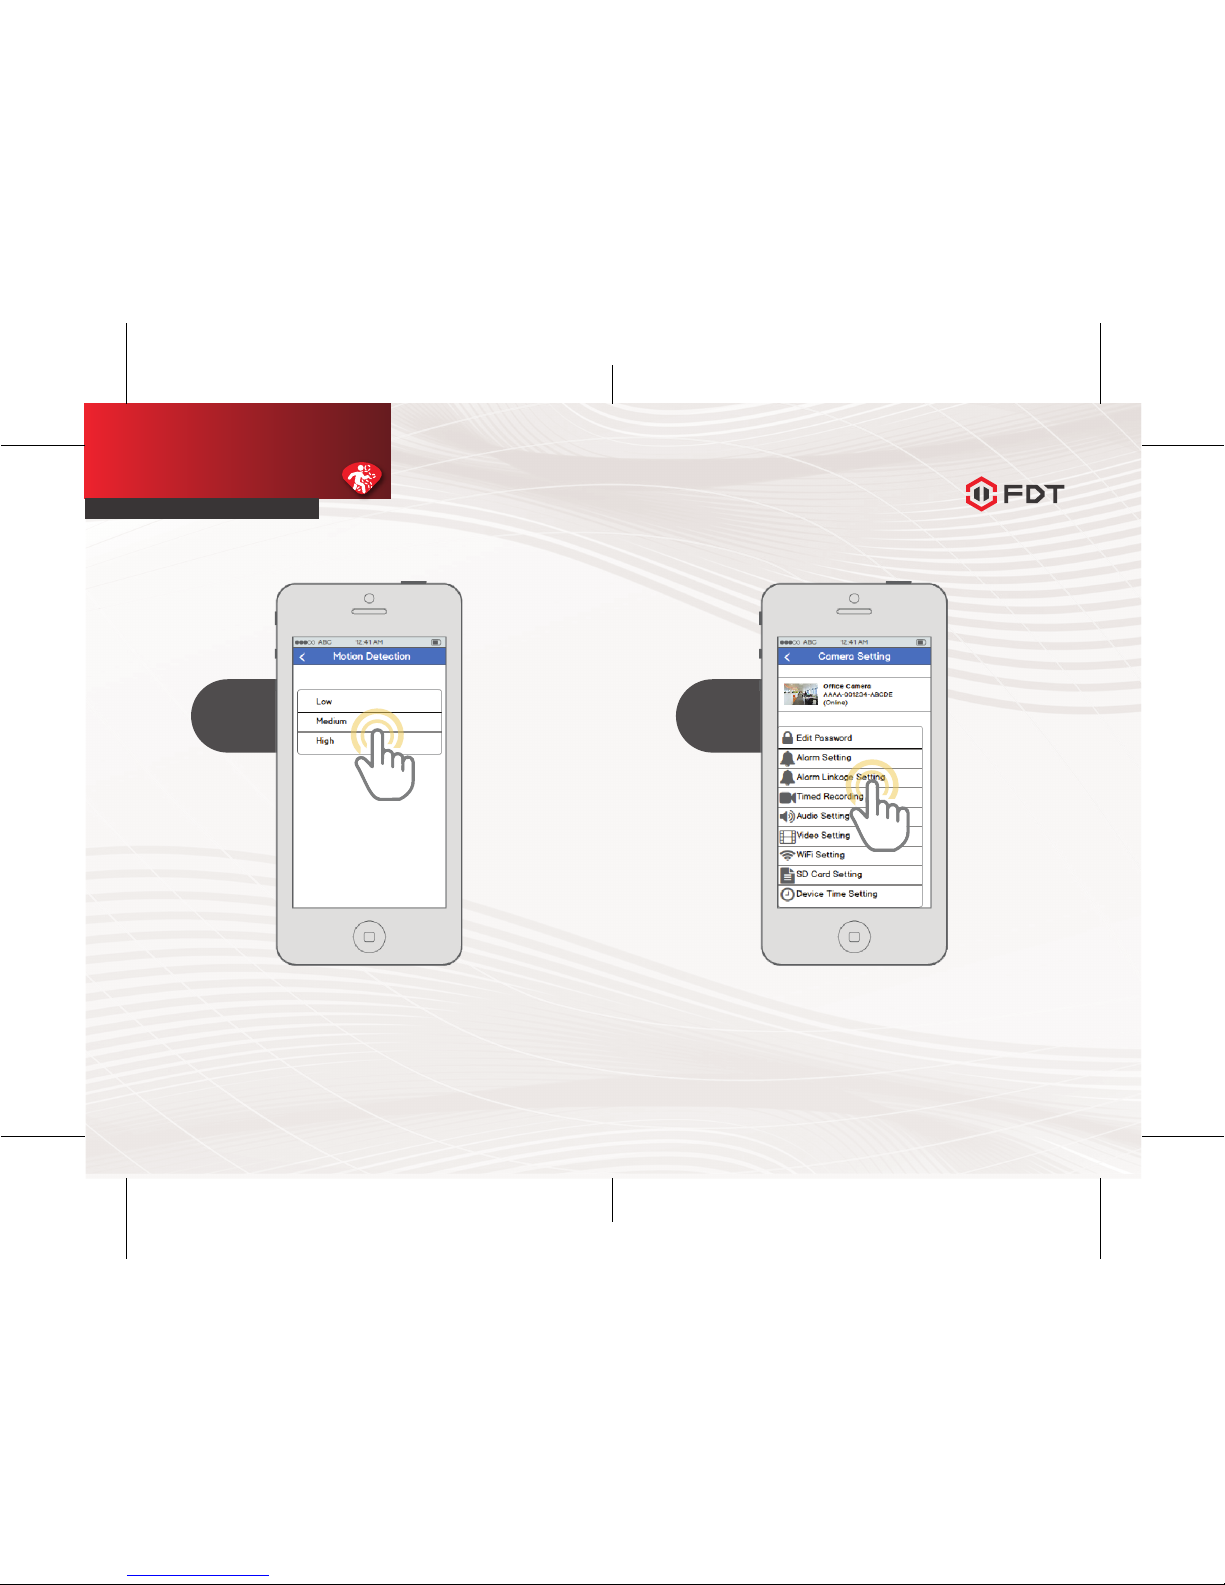
Tap the Motion Detection toggle switch to
enable or disable Motion Detection.
To configure motion detection sensitivity, tap
the Motion Detection Sensitivity menu item.
3
Tap Alarm Setting to enter
the motion detection menu.
2
Page 14
25 26
Motion Detection Setup
QUICK START GUIDE
Select a sensitivity for motion detection
then tap back to get back to the Alarm
Setting menu. The higher the sensitivity, the
easier the camera will pick up movement.
4
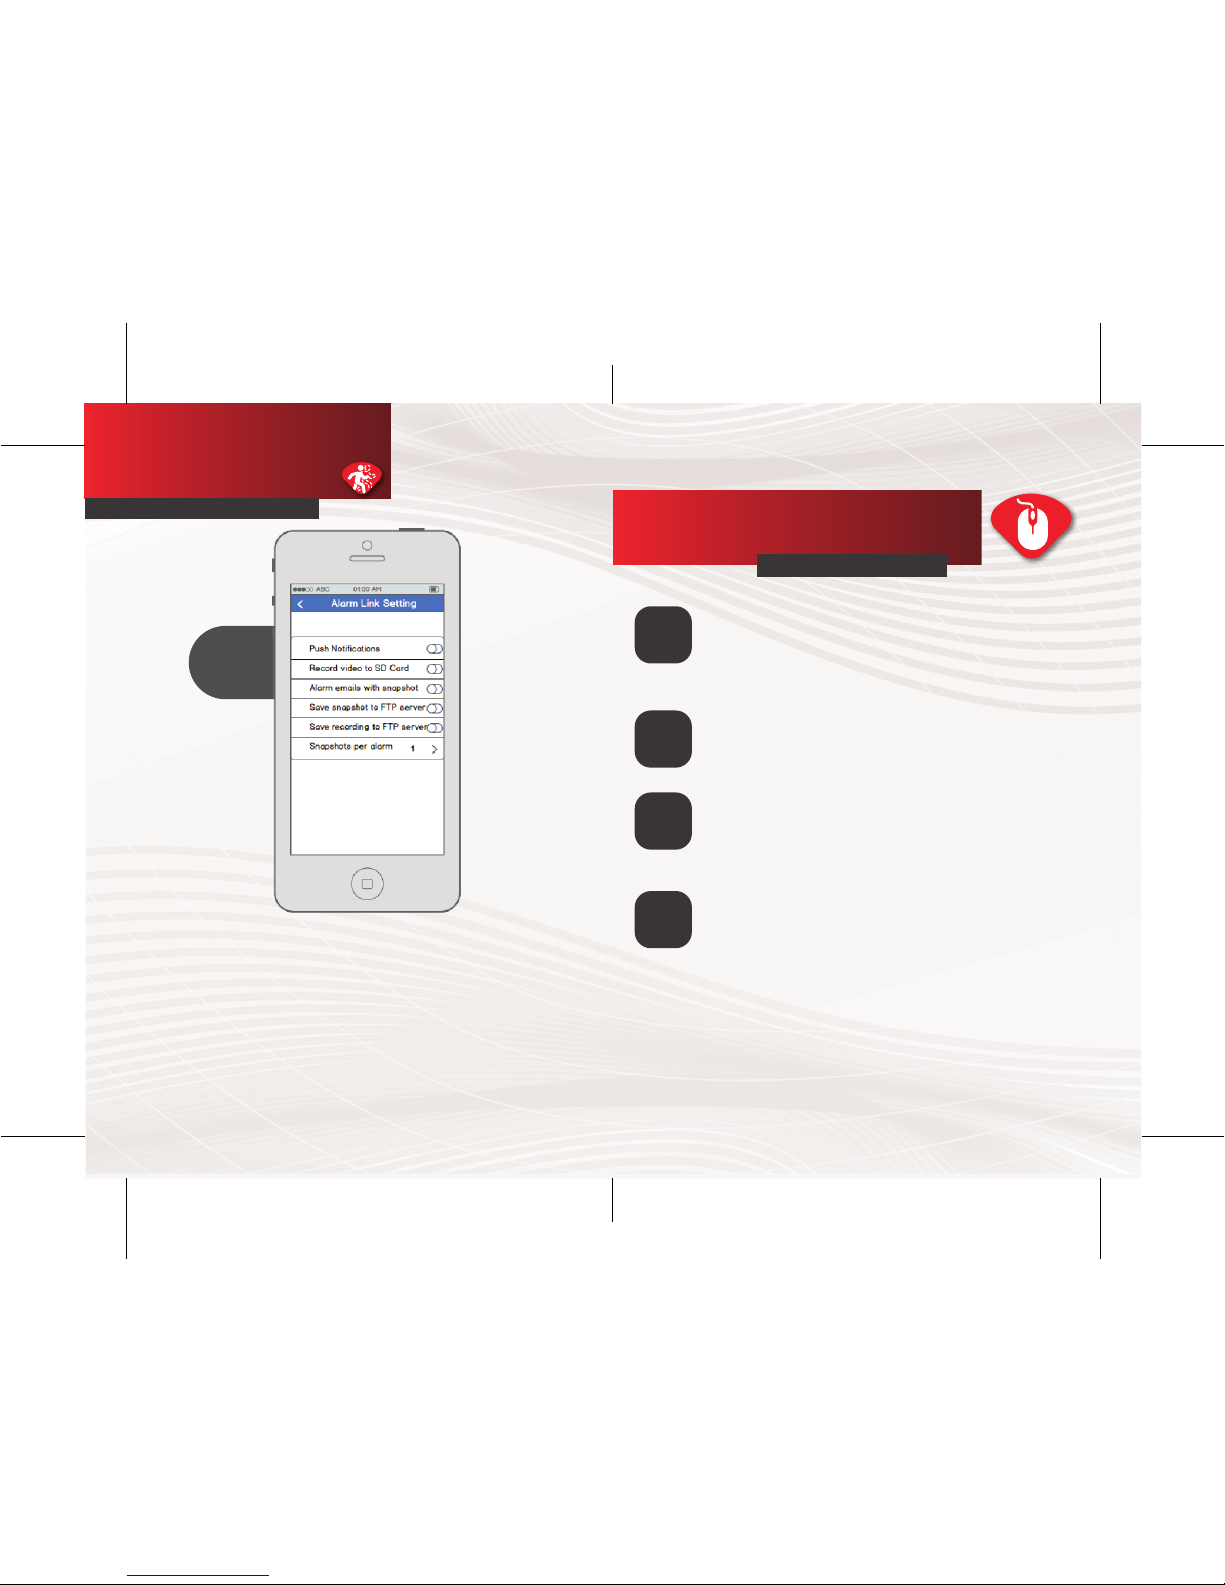
Now that the camera will pick up motion
detection, we have to tell it what to do in
response. From the Camera Setting page, tap
“Alarm Link Setting” to enter the Alarm Link
Setting menu.
5
Page 15
27 28
Motion Detection Setup
QUICK START GUIDE
On this screen, note the different alerts that motion
detection can trigger such as push notifications, SD
card recording, email alert snapshots, FTP snapshots,
or FTP recordings. You can also customize how many
snapshots to send per alarm. You can configure email
alerts by going to Settings -> Email Setting and
filling out the fields on that screen. You can configure
FTP alerts by going to Settings -> FTP Setting and
filling out the fields on that screen.
6
Using a PC or Mac, insert the included CD and
install the Search Tool. Alernatively, download the
Search Tool software from fdt.us/support.
Open the Search Tool interface and click “Next” to
continue. Select your camera’s IP address and
double click it. This will launch the FDT Web
Interface to your default browser.
Desktop Access Setup
QUICK START GUIDE
Connect the camera to a power over ethernet
(PoE) jack on your router or connect it to your
WiFi via the FDT View App. Wait 30 seconds for
the camera to start-up.
1
2
3
Launch the FDT Web Interface
Log into the the FDT Web Interface using the
default login credentials (default username and
password). If this is your first time logging in, you
will be prompted to chnage your pthe default
password. Please select a password that is at
least 8 characters long as well as a combination
of uppercase and lowercase letters, and numbers.
Click the “change pwd” when done. You will be
prompted to login with your new password.
4
Logging into the FDT Web Interface
Install the Search Tool
Connect the Camera
Page 16
29 30
Desktop Access Setup
QUICK START GUIDE
Your browser may prompt you to install and
run additional plugins. The plugins are necessary
so the FDT Web Interface functions properly.
The camera is now successfully set up for live
viewing, playback and configuration on the
FDT web interface!
5
Additional Plugins
Another way to access the FDT web
interface is by inputting the IP address of the
camera in the URL address bar on the web
browser. This enables you to access the FDT
web interface by HTTP protocols, HTTP://IP
Address.
Note the IP address of your camera in the
Search Tool.
Open the browser of your choice and input
the IP address in the URL address bar.
You will then be redirected into the FDT web
interface login portal.
The camera is now successfully set up for
live viewing, playback and configuration on
the FDT web interface!
6
Manual Logging into the Web Interface
As a security precaution, the FDT camera will lock
out any user who tries to log in with the wrong
password after a handful of consecutive attempts.
If you find that you accidentally locked yourself out,
you can wait 5 minutes to log back in, or you can
hard reset the camera by finding and pushing the
reset button (either on back of camera, or on a wire).
Frequently Asked
Questions
QUICK START GUIDE
I've locked myself out of camera accidentally /
I forgot my camera password
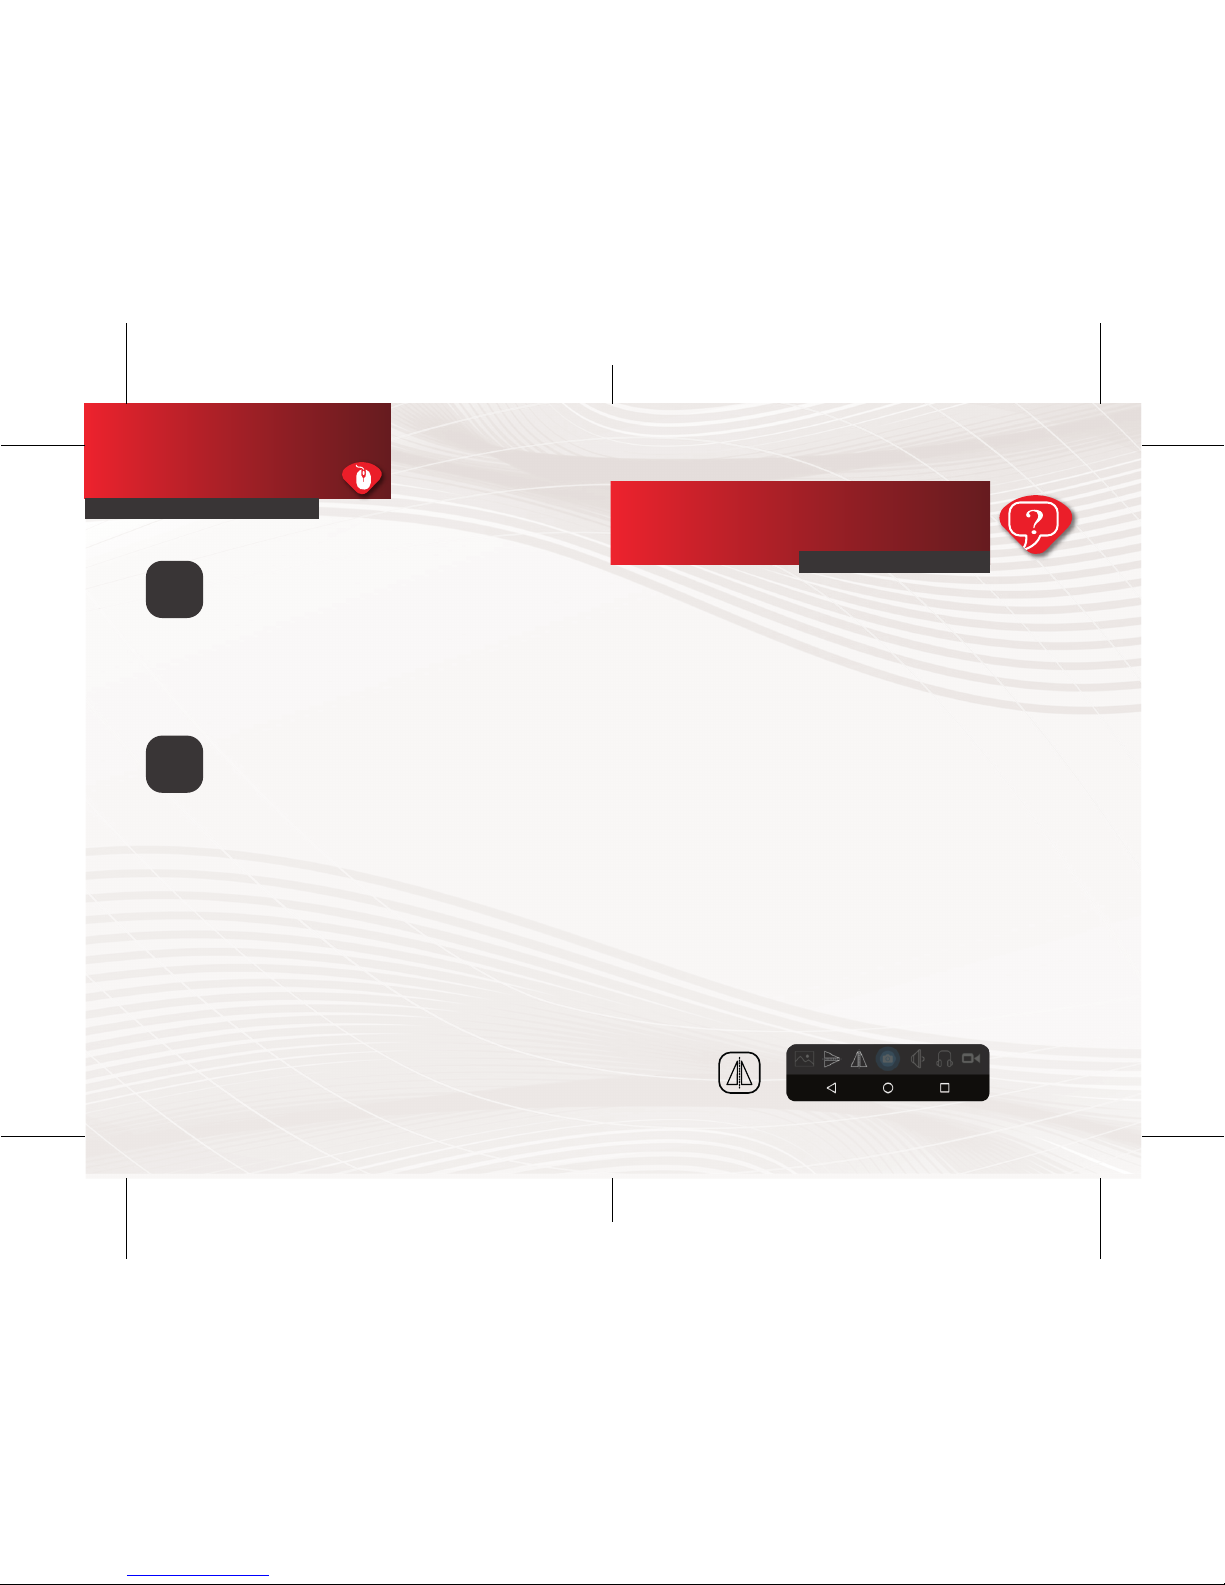
To make the image clearer, tap the landscape icon
from the live stream, and select “Clear”. This setting
makes the image higher quality, but may result in a
lower frame rate. You can also adjust recording quality
by going to Settings -> Video Setting and adjusting
the Quality setting.
How do I change my video
stream resolution?
To flip the camera’s video stream, enter the camera’s
live view, then tap the mirror and flip icons.
I mounted my camera upside down, how do I
flip and mirror my camera’s video stream?
 Loading...