

Page 1
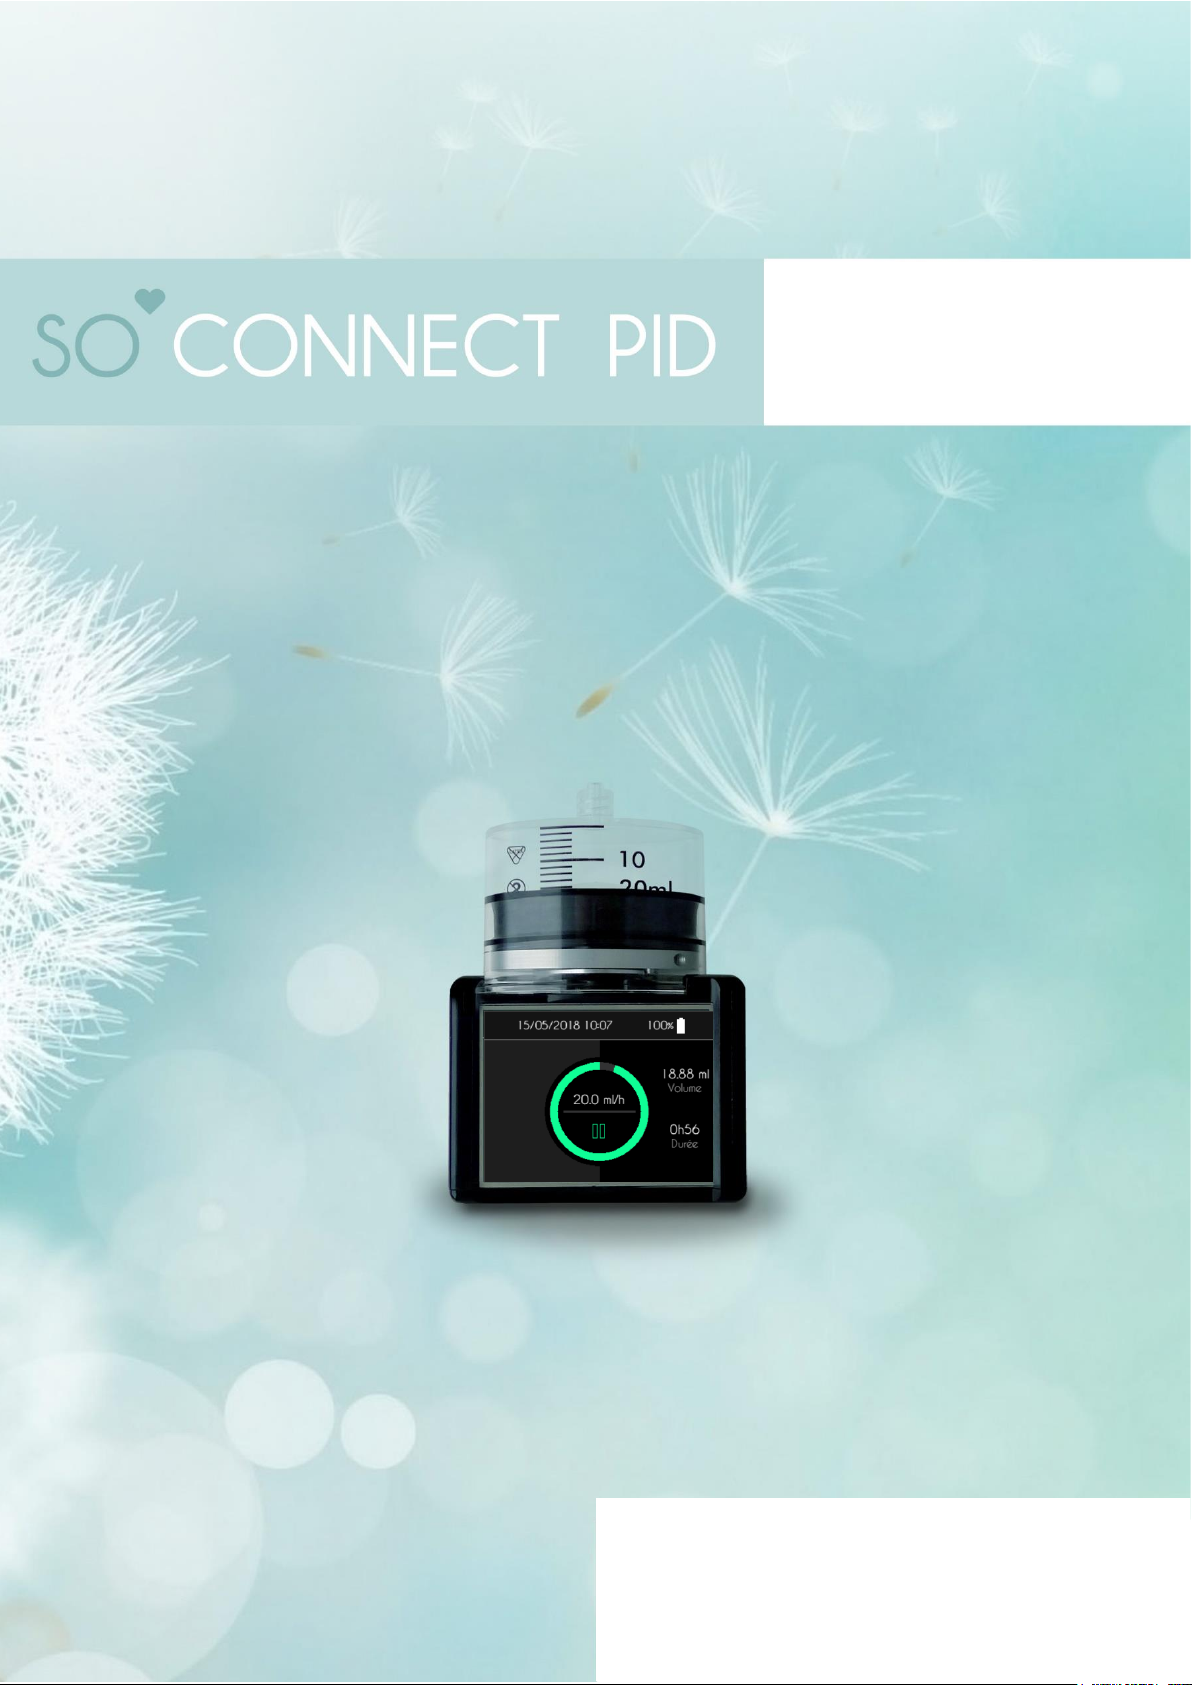
User’s manual (EN)
Ambulatory infusion pump
Page 2

2
Page 3

3
Table of contents
About this manual ................................................................................................................................................................................................................................................................ 5
Safety rules ......................................................................................................................................................................................................................................................................... 6
Part I – Description of pump and accessories ......................................................................................................................................................................................................... 8
Description of the pump............................................................................................................................................................................................................................................... 9
Contraindications ......................................................................................................................................................................................................................................................... 10
Symbols and labelling.................................................................................................................................................................................................................................................. 10
Compliance and classification................................................................................................................................................................................................................................. 12
Pump box .......................................................................................................................................................................................................................................................................... 13
Optional accessories ................................................................................................................................................................................................................................................... 14
Using the case ................................................................................................................................................................................................................................................................ 16
Pump component identification ............................................................................................................................................................................................................................ 17
Battery ............................................................................................................................................................................................................................................................................... 18
Battery charger ............................................................................................................................................................................................................................................................. 19
Part II – Starting the pump ............................................................................................................................................................................................................................................ 20
Battery charging ........................................................................................................................................................................................................................................................... 21
Inserting the battery ................................................................................................................................................................................................................................................... 22
Part III – Pump programming ....................................................................................................................................................................................................................................... 23
Password entry.............................................................................................................................................................................................................................................................. 24
Setting up the pump .................................................................................................................................................................................................................................................... 24
Setting up an infusion ................................................................................................................................................................................................................................................. 28
Pump initialization ........................................................................................................................................................................................................................................................ 35
Part IV – Syringe and infusion set .............................................................................................................................................................................................................................. 36
Syringe ............................................................................................................................................................................................................................................................................... 37
Infusion set ...................................................................................................................................................................................................................................................................... 40
Partie V – Infusion ............................................................................................................................................................................................................................................................. 42
Starting an infusion ...................................................................................................................................................................................................................................................... 43
Infusion control screen .............................................................................................................................................................................................................................................. 45
Infusion control menu ................................................................................................................................................................................................................................................ 45
Pausing the infusion .................................................................................................................................................................................................................................................... 46
Restarting the infusion ............................................................................................................................................................................................................................................... 47
Modifying the infusion rates – Function reserved to medical staff ....................................................................................................................................................... 48
End of infusion ............................................................................................................................................................................................................................................................... 50
Unwanted effects ......................................................................................................................................................................................................................................................... 51
Exporting clinical data –
Function reserved for medical staff
.................................................................................................................................................................. 52
Page 4

4
Visualization of the internal information of the pump –
Function reserved for medical staff
.................................................................................................. 52
Part VI – Alarms ................................................................................................................................................................................................................................................................. 54
Alarm system .................................................................................................................................................................................................................................................................. 55
Device failure alarm (high priority) ...................................................................................................................................................................................................................... 56
Syringe missing alarm (high priority) ................................................................................................................................................................................................................... 56
Infusion about to end alarm (low priority) ........................................................................................................................................................................................................ 56
End of infusion alarm (high priority) .................................................................................................................................................................................................................... 57
Occlusion alarm (high priority) ............................................................................................................................................................................................................................... 57
Battery low alarm (low priority) ............................................................................................................................................................................................................................. 57
Infusion in pause (low priority) ............................................................................................................................................................................................................................... 58
Part VII – general recommendations, maintenance, disposal, terms of guarantee and declaration of conformity ............................................................. 59
Cleaning and disinfection of the pump ............................................................................................................................................................................................................... 60
Pump inspection ............................................................................................................................................................................................................................................................ 61
Maintenance ................................................................................................................................................................................................................................................................... 61
Alarm system testing .................................................................................................................................................................................................................................................. 61
Pump damage in the event of a fall or impact .................................................................................................................................................................................................. 62
Pump coming in contact with water ..................................................................................................................................................................................................................... 63
Storing the pump .......................................................................................................................................................................................................................................................... 64
Disposal............................................................................................................................................................................................................................................................................. 64
Pump life ........................................................................................................................................................................................................................................................................... 64
Guarantee conditions ................................................................................................................................................................................................................................................. 65
Part VII – Technical specifications ............................................................................................................................................................................................................................. 66
Declaration of conformity ........................................................................................................................................................................................................................................ 67
Pump specifications ..................................................................................................................................................................................................................................................... 68
Pump precision .............................................................................................................................................................................................................................................................. 69
Niveau de pression ...................................................................................................................................................................................................................................................... 70
Temps nécessaire à la signalisation d’une occlusion .................................................................................................................................................................................... 70
Post-occlusion bolus ................................................................................................................................................................................................................................................... 71
Electromagnetic compatibility ............................................................................................................................................................................................................................... 71
Page 5
5
About this manual
This user’s manual is intended for you, who are a patient or a healthcare professional. It contains all the information required for the safe and
effective use of the SO♥CONNECT PID ambulatory infusion pump. Regardless of your experience of ambulatory infusion pumps, please read
the whole manual carefully before you begin to use the SO♥CONNECT PID pump.
This user’s manual should be kept available for future use. If in doubt or if any of the information in this manual is not cl ear, please contact user
support.
For the safe and correct use of the SO♥CONNECT PID pump, please pay attention to the following points in this user’s manual:
Warning
▪
A warning message contains safety information which, if ignored, may cause serious injury.
Precautions
▪
Precautions indicate instructions which, if ignored, may damage the
SO♥CONNECT PID
pump or compromise the quality of the
treatment.
Comments
▪
Remarks contain additional information for optimum and efficient operation of your
SO♥CONNECT PID
pump.
This user’s manual is made up of several parts:
▪ Part I (blue): description of pump and accessories.
▪ Part II (green): starting the pump
▪ Part III (brown): pump programming
▪ Part IV (yellow): SO
♥
FILL syringe
▪ Part V (orange): infusion
▪ Part VI (red): alarms
▪ Part VII (purple): general recommendations, maintenance, disposal, terms of guarantee and declaration of conformity
▪ Part VIII (grey): technical specifications
Page 6

6
Safety rules
This chapter contains important safety instructions that must be read before using the SO♥CONNECT PID pump.
For safety information regarding the individual functions of the SO♥CONNECT PID pump, refer to the corresponding section of the
Instructions for Use.
Warning
▪
This user’s manual for the
SO♥CONNECT PID
ambulatory infusion pump is provided subject to the conditions and restrictions
stated therein.
▪
The infusion pump should only be used by persons who have been instructed in the operation of the
SO♥CONNECT PID
pump.
▪
Before using the
SO♥CONNECT PID
pump, read the operating instructions and familiarize yourself with the device.
▪
Changing the basic settings, programming the pump and exporting the therapy information can only be done after entering the
password.
▪
Handle the password confidentially and pass it on only to trained persons.
▪
The
SO♥CONNECT PID
pump is designed for use under the responsibility or supervision of a physician and/or an approved
healthcare professional trained in the use of the pump and the administration of medicines. The instructions for use provided in this
manual may not in any event replace the medical care protocol in place for the patient.
▪
Incorrect programming may cause injury to the patient.
▪
The medical personnel, home care giver or clinician shall train those who use the
SO♥CONNECT PID
pump at home.
▪
The date and time must be entered correctly, as the therapy information is directly related to the time of the
SO♥CONNECT PID
pump. Care must also be taken to ensure the correct time when the flow rate programming or time zone has been changed.
▪
Do not vent the catheter while it is connected to the patient, as this may result in overdose of the drug.
▪
Before starting an infusion, check the catheter to avoid possible kinks, closed braces or other occlusions.
▪
To avoid damaging the infusion pump and its accessories, never leave the units unattended within reach of children and pets.
▪
To avoid damaging the pump, do not sterilize components of the infusion pump.
▪
If the infusion pump should fall or be shocked, make sure the pump is not damaged. Never use the infusion pump if it shows cracks
or other visible damage.
Page 7

7
Warning
▪
Avoid contact of the infusion pump with medication or hygiene items (for example antiseptics, antibiotic creams, soaps, perfumes,
deodorants, body lotions or other cosmetic products). These may cause discoloration of the infusion pump or damage the display.
▪
Keep the battery away from fire.
▪
Dispose of the packaging, infusion set, battery and all other electronic components properly to protect the environment.
▪
The infusion pump complies with the IEC 60601-1-2 Electromagnetic Compatibility standard and can therefore be used with other
medical devices that comply with this standard. However, to avoid pump malfunction, do not use the pump near strong sources of
electromagnetic interference.
▪
To avoid irreversible damage to the circuits, do not expose the
SO♥CONNECT PID
pump to therapeutic ion radiation. During
radiotherapy the pump should be switched off.
▪
Never use the
SO♥CONNECT PID
pump near a Magnetic Resonance Imaging (MRI) device as the magnetic fields may interfere
with the operation of the pump.
▪
The
SO♥CONNECT PID
pump is not suitable for use in the presence of flammable anaesthetics mixtures with air, oxygen or nitrous
oxide. Use of the
SO♥CONNECT PID
pump in the presence of such mixtures may cause an explosion or fire.
▪
The
SO♥CONNECT PID
pump can only be repaired by a qualified and trained technician.
▪
Unauthorized modifications may impair pump operation and result in injury or death to the patient or user.
Page 8

8
Part I – Description of pump and accessories
This part of the user’s manual contains the following information:
▪
pump description,
▪
contraindications,
▪
symbols and labelling,
▪
compliance and classification,
▪
emergency kit,
▪
pump box,
▪
optional accessories,
▪
using the case,
▪
pump component identification,
▪
battery,
▪
battery charger.
Page 9

Partie I – Description of pump and accessories
9
Description of the pump
The SO♥CONNECT PID pump is an ambulatory infusion pump that is intended for the controlled subcutaneous administration of :
▪ SCIg as part of the treatment of PIDs (Primary Immunodeficiency Disorders). It uses 20 ml, 30 ml or 50 ml SO
♥
FILL sterile single-use
reservoirs.
▪ DESFERAL in the treatment of primary haemochromatosis not curable by bleeding, hemosiderosis.
Those SO♥FILL reservoirs have been designed especially for use with the SO♥CONNECT PID pump.
The SO♥CONNECT PID pump has been designed for use by healthcare professionals in a clinical environment and by ambulatory users
(patients and healthcare professionals) in patients’ homes.
The features of the SO♥CONNECT PID pump have been designed to make treatment easier and keep the patient safe.
▪ Screen with resistive touch panel
The SO♥CONNECT PID pump has a screen with a resistive touch panel that makes configuration and infusion control easier.
▪ Programming the infusion rate or duration of the infusion
The infusion rate can be set from 0 to 60 ml/h in increments of 0.1 ml.
▪ Facility to adjust the infusion rate during infusion
The SO♥CONNECT PID pump makes it possible to adjust the infusion rate during infusion.
▪ Saving of infusion settings
The settings of the last infusion are saved automatically even if the battery is changed. They can be used to start an infusion rapidly.
▪ Locking of setup and configuration functions
The SO♥CONNECT PID pump setup and the settings of an infusion are only accessible after entering a password.
▪ Infusion precision
The feed mechanism (pusher) of the SO♥CONNECT PID pump directly controls the plunger of the SO♥FILL reservoir, which makes
for very precise administration of the medication. The SO♥CONNECT PID pump administers a dose dependent on the set infusion
rate every 18 seconds.
▪ Bluetooth Low Energy connection
A Bluetooth Low Energy connection is used to export the clinical data and control the infusion with a remote control.
Page 10
Partie I – Description of pump and accessories
10
Remark
▪
France Développement Electronique shall only be liable for the safety and proper working of the
SO♥CONNECT PID
pump if it is
used in accordance with these instructions and if any repairs or modifications have been carried out exclusively by France
Développement Electronique.
Contraindications
The SO♥CONNECT PID pump may not be used in case of severe cognitive impairment or psychotic symptoms and by persons who do not have
the physical capacity (paralysis, accident, malformation) or the necessary maturity (children) to use the SO♥CONNECT PID pump.
Adequate eyesight and hearing are necessary to identify the sound and visual alarms of the pump.
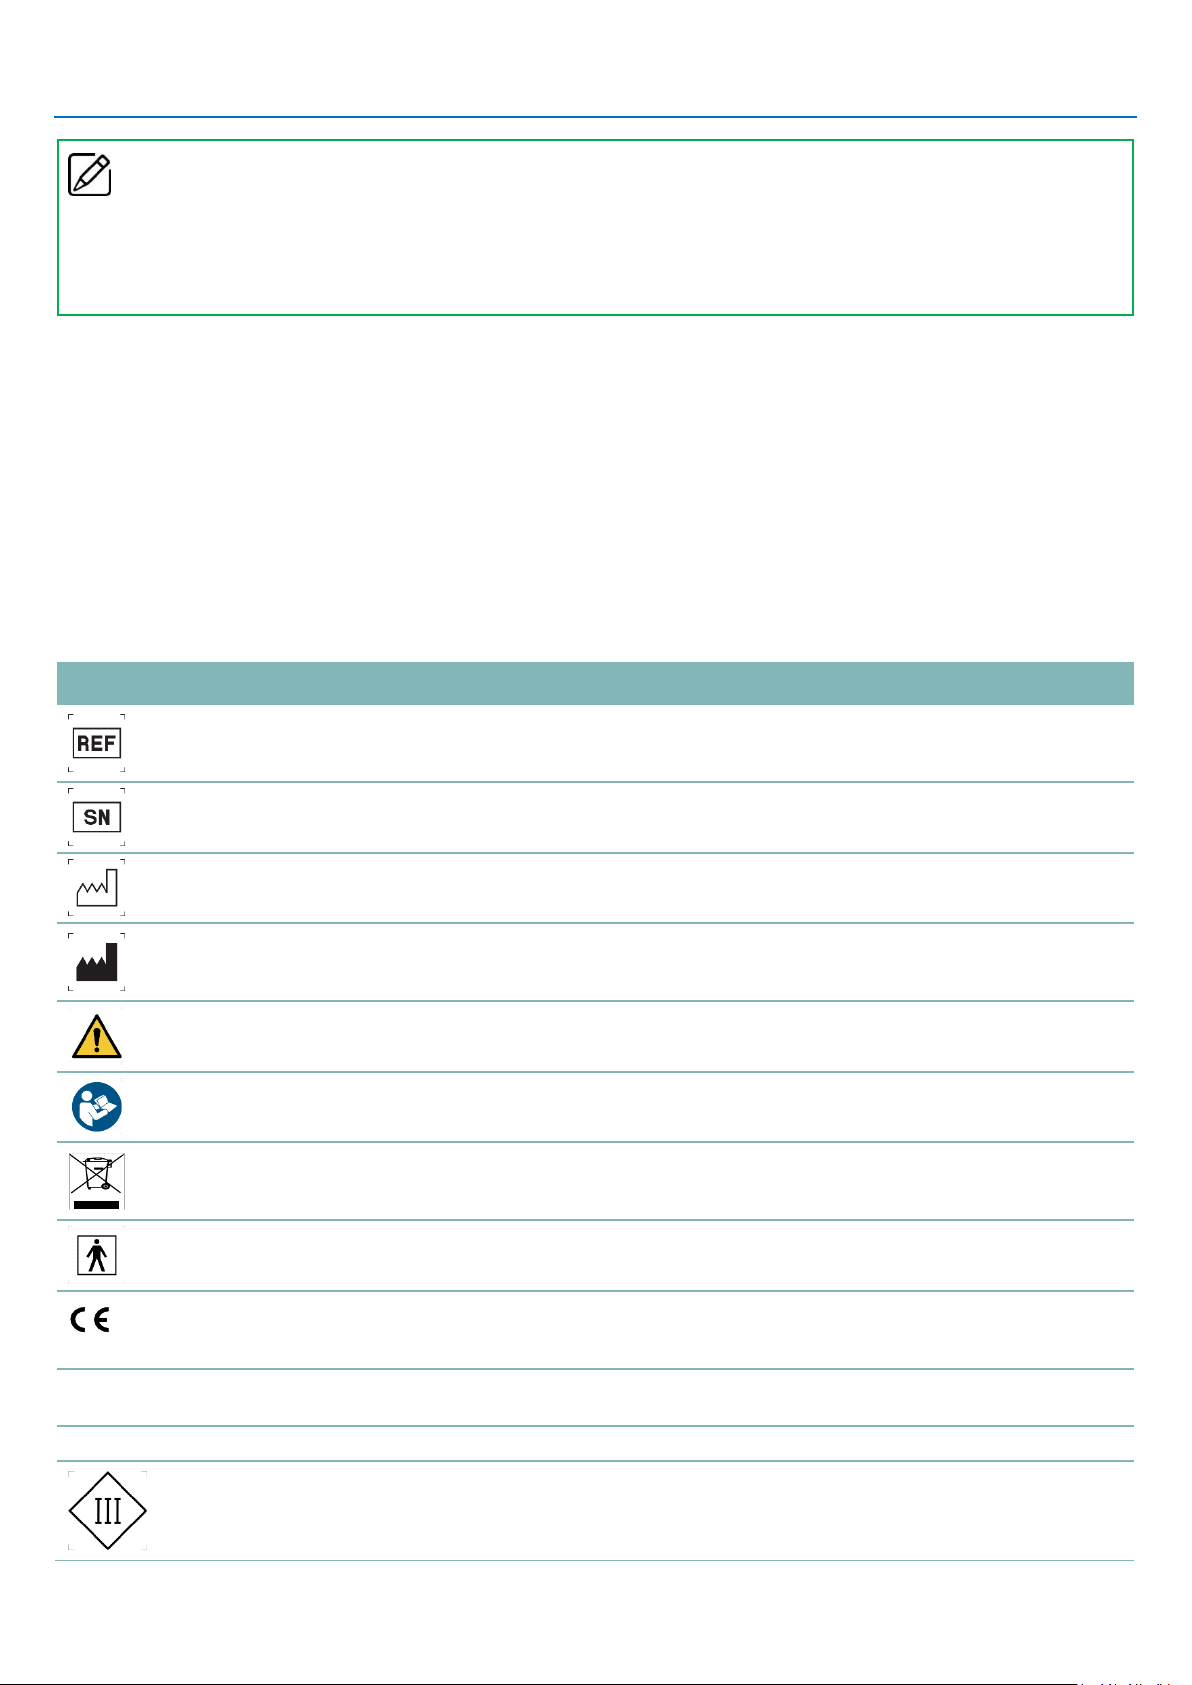
Symbols and labelling
The table below provides the meaning of the symbols present on the labels of the SO♥CONNECT PID pump and its accessories.
Symbol
Description
Location
Reference in the manufacturer’s catalogue.
- pump body
- pump packaging
- syringe packaging
Serial number.
- pump body
- pump packaging
Date of manufacture.
- pump body
- pump packaging
Manufacturer.
- pump body
- pump packaging
- syringe packaging
Caution! Refer to the accompanying documentation for safety instructions.
- pump body
- battery compartment
Refer the instructions for use.
- pump body
- battery compartment
Disposal of Waste Electrical and Electronic Equipment (WEEE). This symbol shows
that waste batteries and electronic equipment may not be disposed of with household
waste, but collected separately.
- pump body
Type BF medical device (insulated from the patient, not protected from
defibrillation).
- pump body
0459
CE mark.
- pump body
- pump packaging
- syringe packaging
RoHS
Product compliant with Directive 2002/95/EC aimed at limiting hazardous
substances.
- pump body
IPX2
Protection rating.
- pump body
Electric Class: III
Equipment designed to be powered with voltage that does not exceed the limits of
extra low voltage and comprises no internal or external circuit operating at voltage
above those limits.
- pump body
Page 11
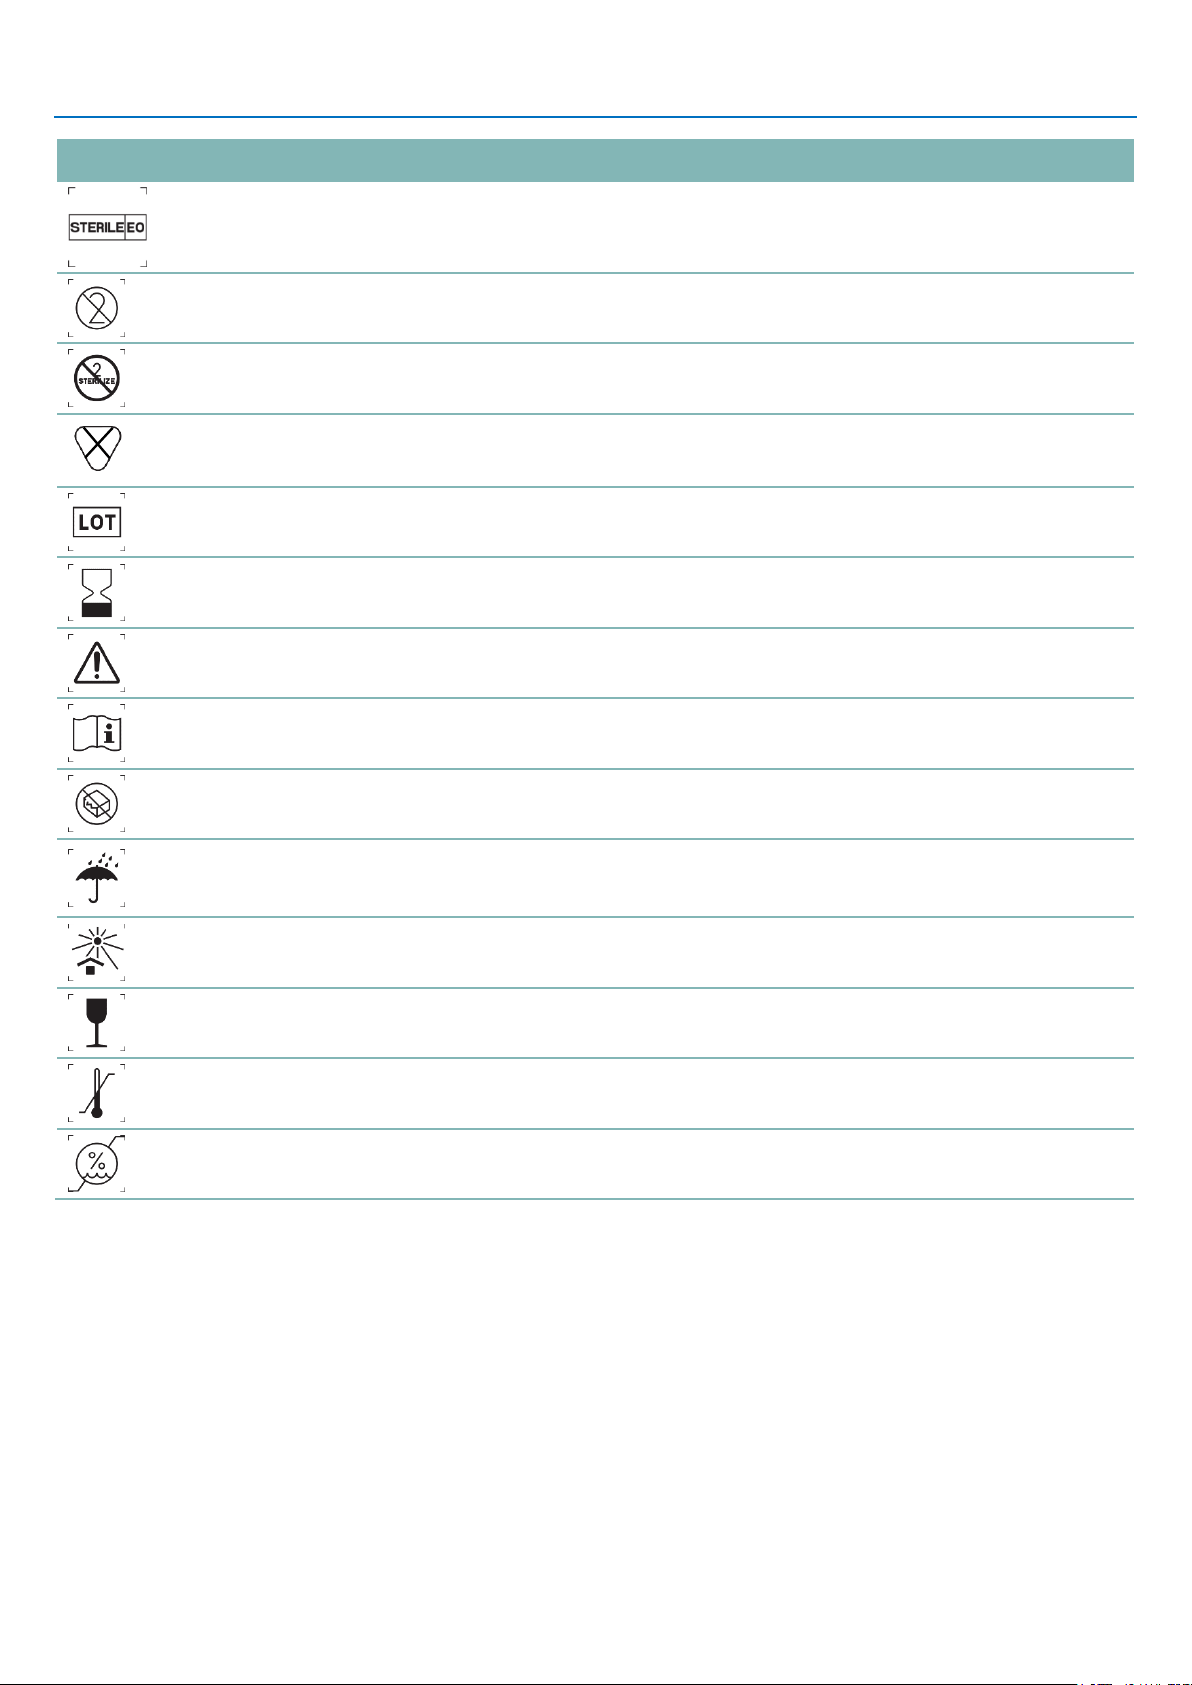
Partie I – Description of pump and accessories
11
Symbol
Description
Location
Sterilisation process (ethylene oxide).
- syringe packaging
Not to be reused.
- syringe packaging
Not to be sterilised again.
- syringe packaging
LATE
X
Does not contain latex.
- syringe packaging
Manufacturing batch identification (year, month).
- syringe packaging
Expiry date (year, month).
- syringe packaging
Caution! Refer to the accompanying documentation for safety instructions.
- syringe packaging
Refer the instructions for use.
- syringe packaging
Do not use if the packaging is damaged.
- syringe packaging
Store in a dry place, away from humidity.
- pump body
- pump packaging
- syringe packaging
Store away from sunlight.
- syringe packaging
Fragile.
- pump packaging
Storage temperature range.
- pump packaging
Storage humidity range.
- pump packaging
Page 12

Partie I – Description of pump and accessories
12
Compliance and classification
This manual has been prepared in accordance with the requirements of standard IEC 60601-2-24 relating to medical electrical equipment –
Part 2-24: Particular requirements for the safety of infusion pumps and controllers. The data stated in part VI - Technical specifications - are
based on the specific test conditions defined in that standard. Actual performance data may differ from the stated data depending on other
external factors, particularly variations in counter-pressure, temperature, use of the infusion kit, viscosity of the solution or a combination of
these factors.
The SO♥CONNECT PID pump is classified as follows:
▪ class IIb medical device,
▪ type BF applied part,
▪ classified for continuous operation.
The SO♥CONNECT PID pump has a protection rating of IPX2:
▪ no protection against solid objects,
▪ protected from dripping water when tilted at 15° maximum.
Page 13
Partie I – Description of pump and accessories
13
Pump box
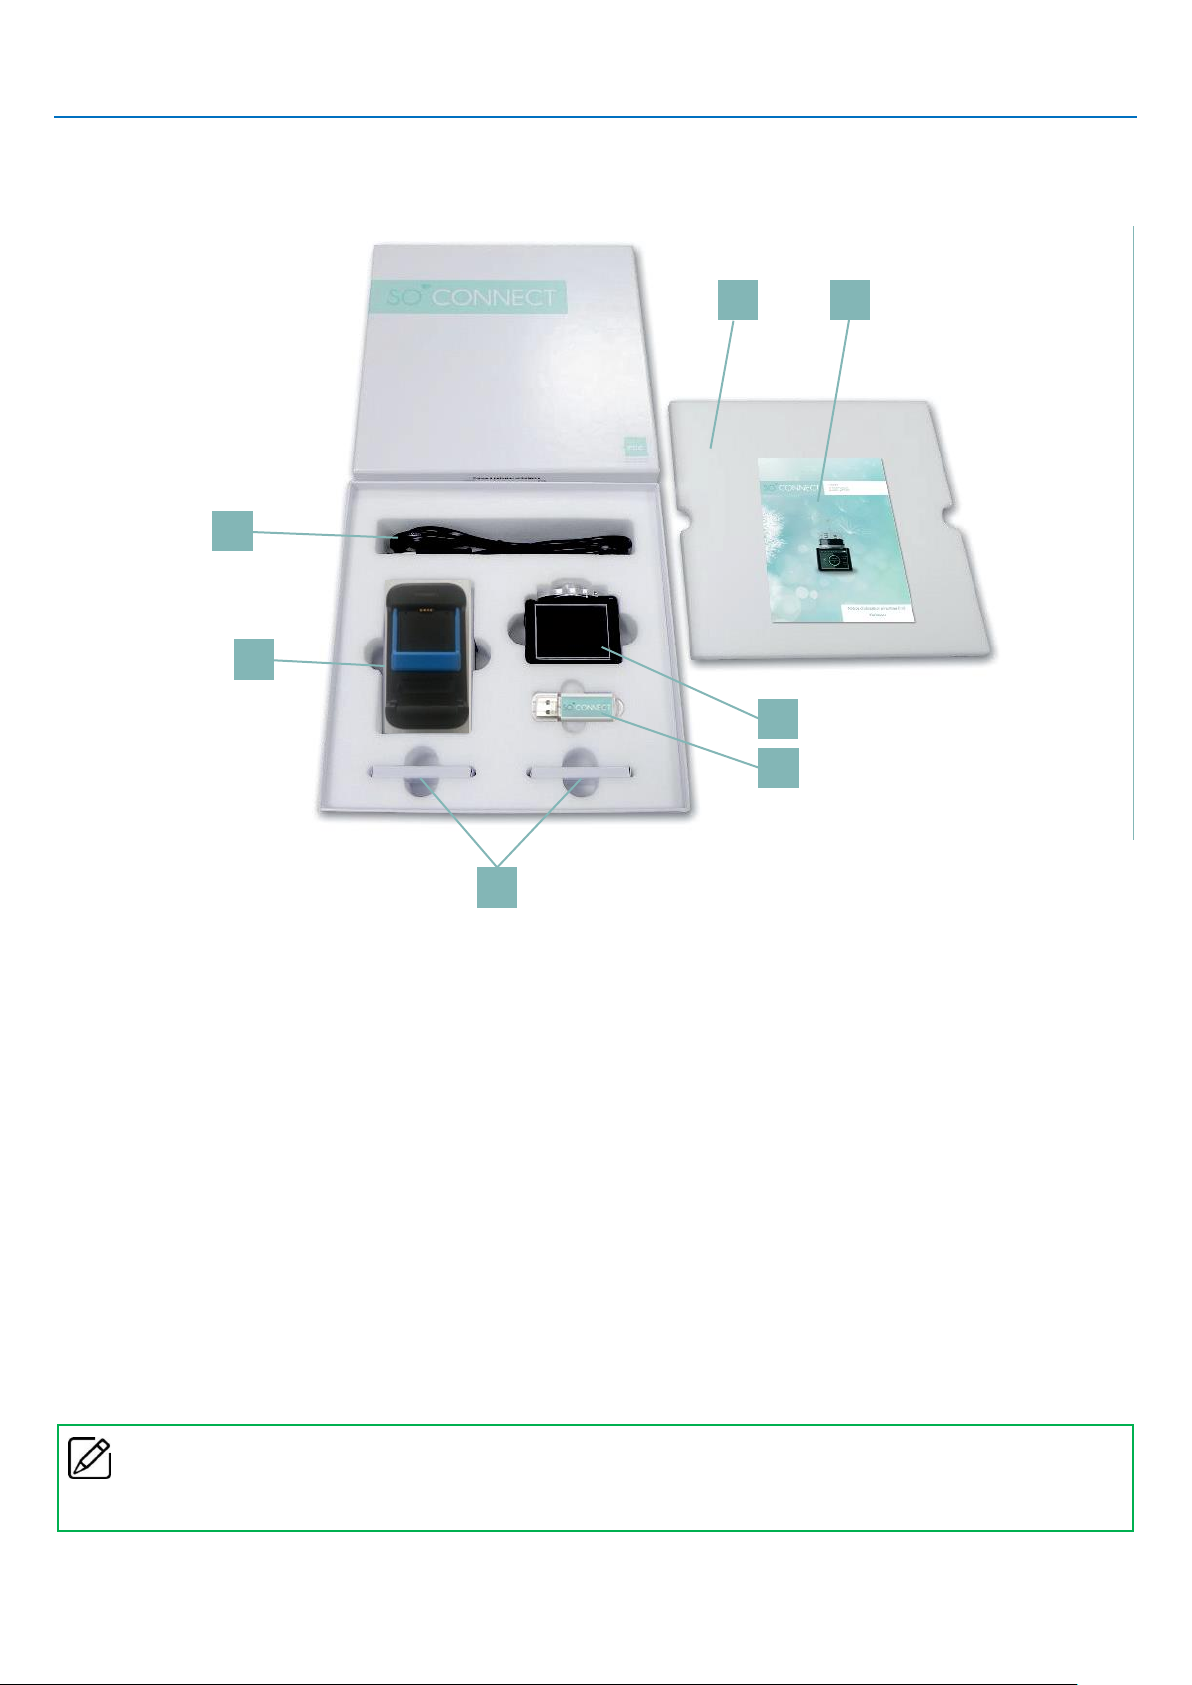
When you first open the box containing the SO♥CONNECT PID pump, please examine each component carefully for damage.
1. SO♥CONNECT PID pump (part: SO♥CONNECT PID)
2. 2 VARTA EZPack L batteries (part: SO♥BATTERY)
3. power cord for battery charger (part: SO♥POWER)
4. battery charger (part: SO♥CHARGER)
5. USB flash drive (part: SO♥KEY)
6. protective foam
7. simplified user's manual (Part: SO♥CONNECT PID Simplified user’s manual)
Remark
▪
These operating instruction is available in paper format upon request.
1 2 5 4 3 6 7
Page 14
Partie I – Description of pump and accessories
14
Optional accessories
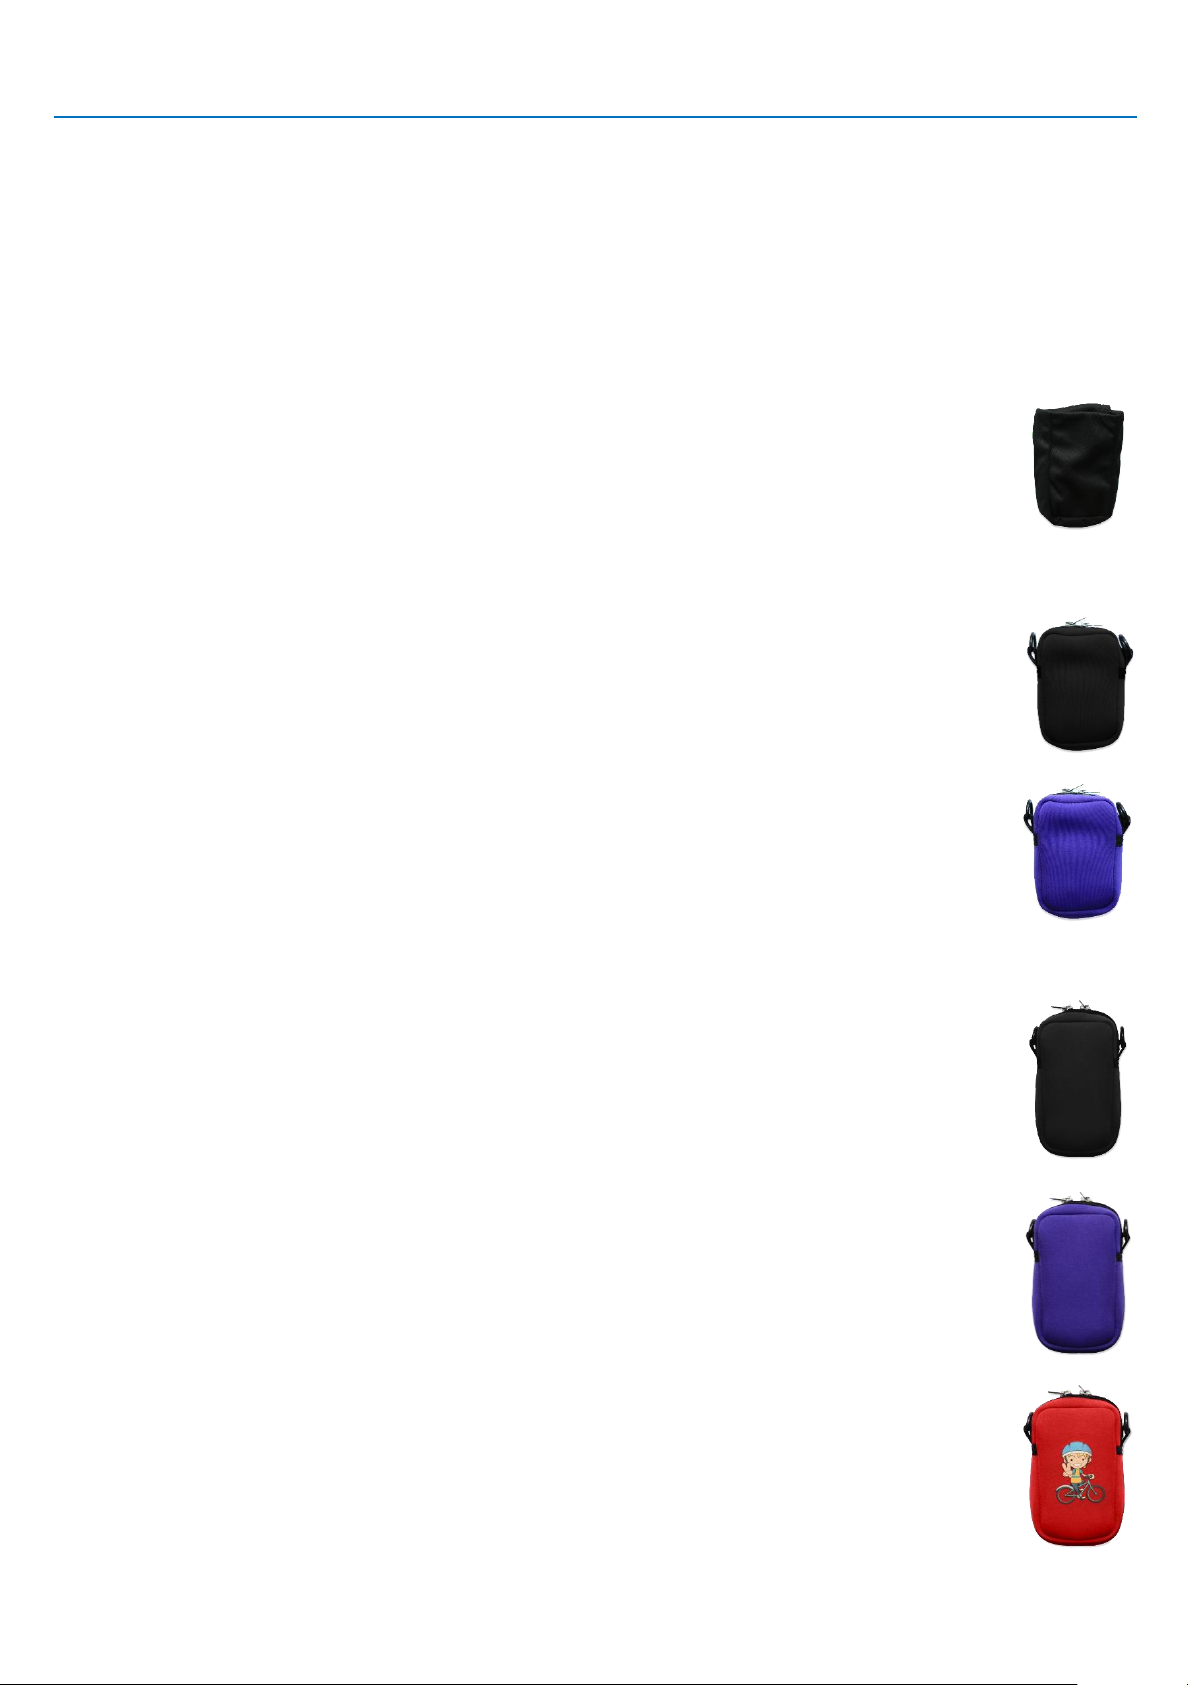
T-shirt
o Black Lycra Size XS/S part: TSSMALLBLACK
o Black Lycra Size M/L part: TSMEDIUMBLACK
Bra pouch
o Black Lycra part: POUCHUNDERWEAR
Neoprene case for 20 ml SO
♥
FILL syringe
o Black part: N20BLACK
o Purple part: N20PURPLE
Neoprene case for 30 ml or 50 ml SO
♥
FILL syringe
o Black part: N50BLACK
o Purple part: N50PURPLE
o Red (boy) part: N50REDB
Page 15
Partie I – Description of pump and accessories
15
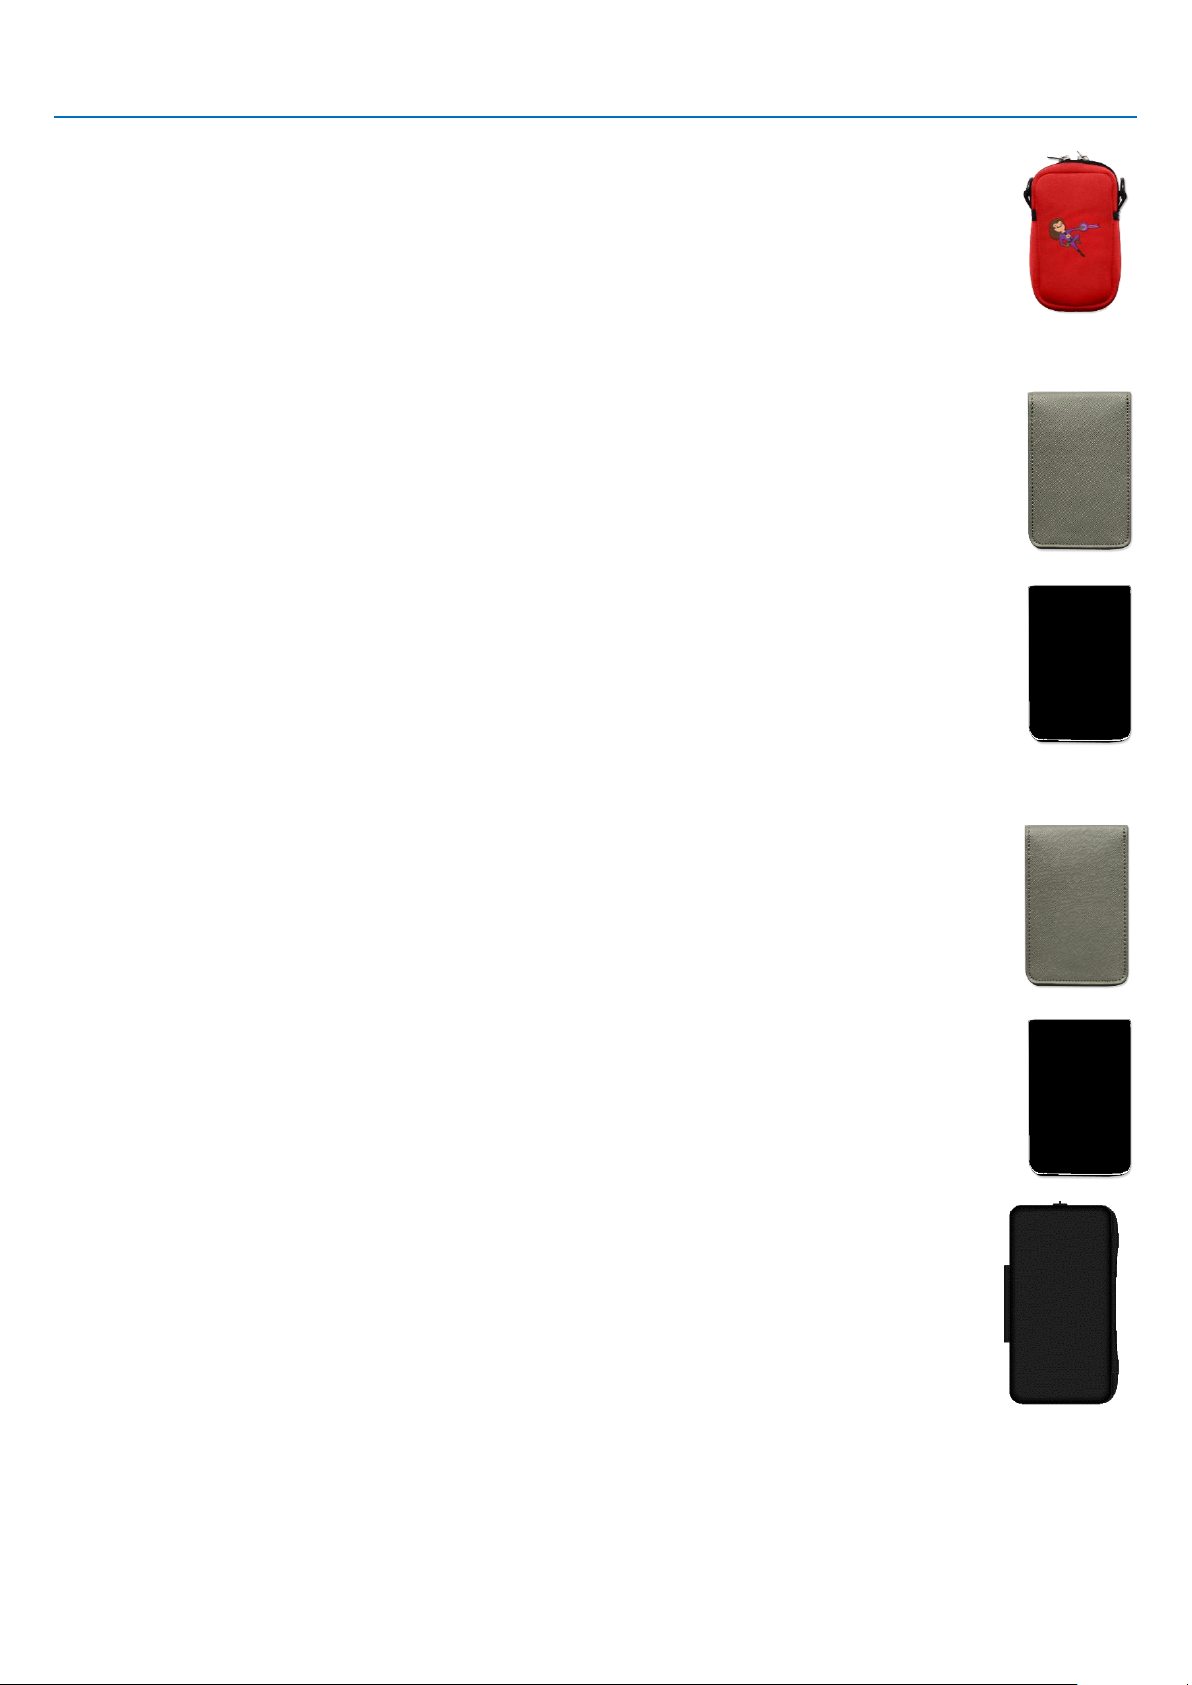
o Red (girl) part: N50REDG
Imitation leather case for 20 ml SO
♥
FILL syringe
o Anthracite grey part: L20WGREY
o Black part: L20WBLACK
Imitation leather case for 30 ml or 50 ml SO
♥
FILL syringe
o Anthracite grey part: L50WGREY
o Black part: L50WBLACK
o Black référence : SO-PROTECT
Page 16
Partie I – Description of pump and accessories
16
Using the case
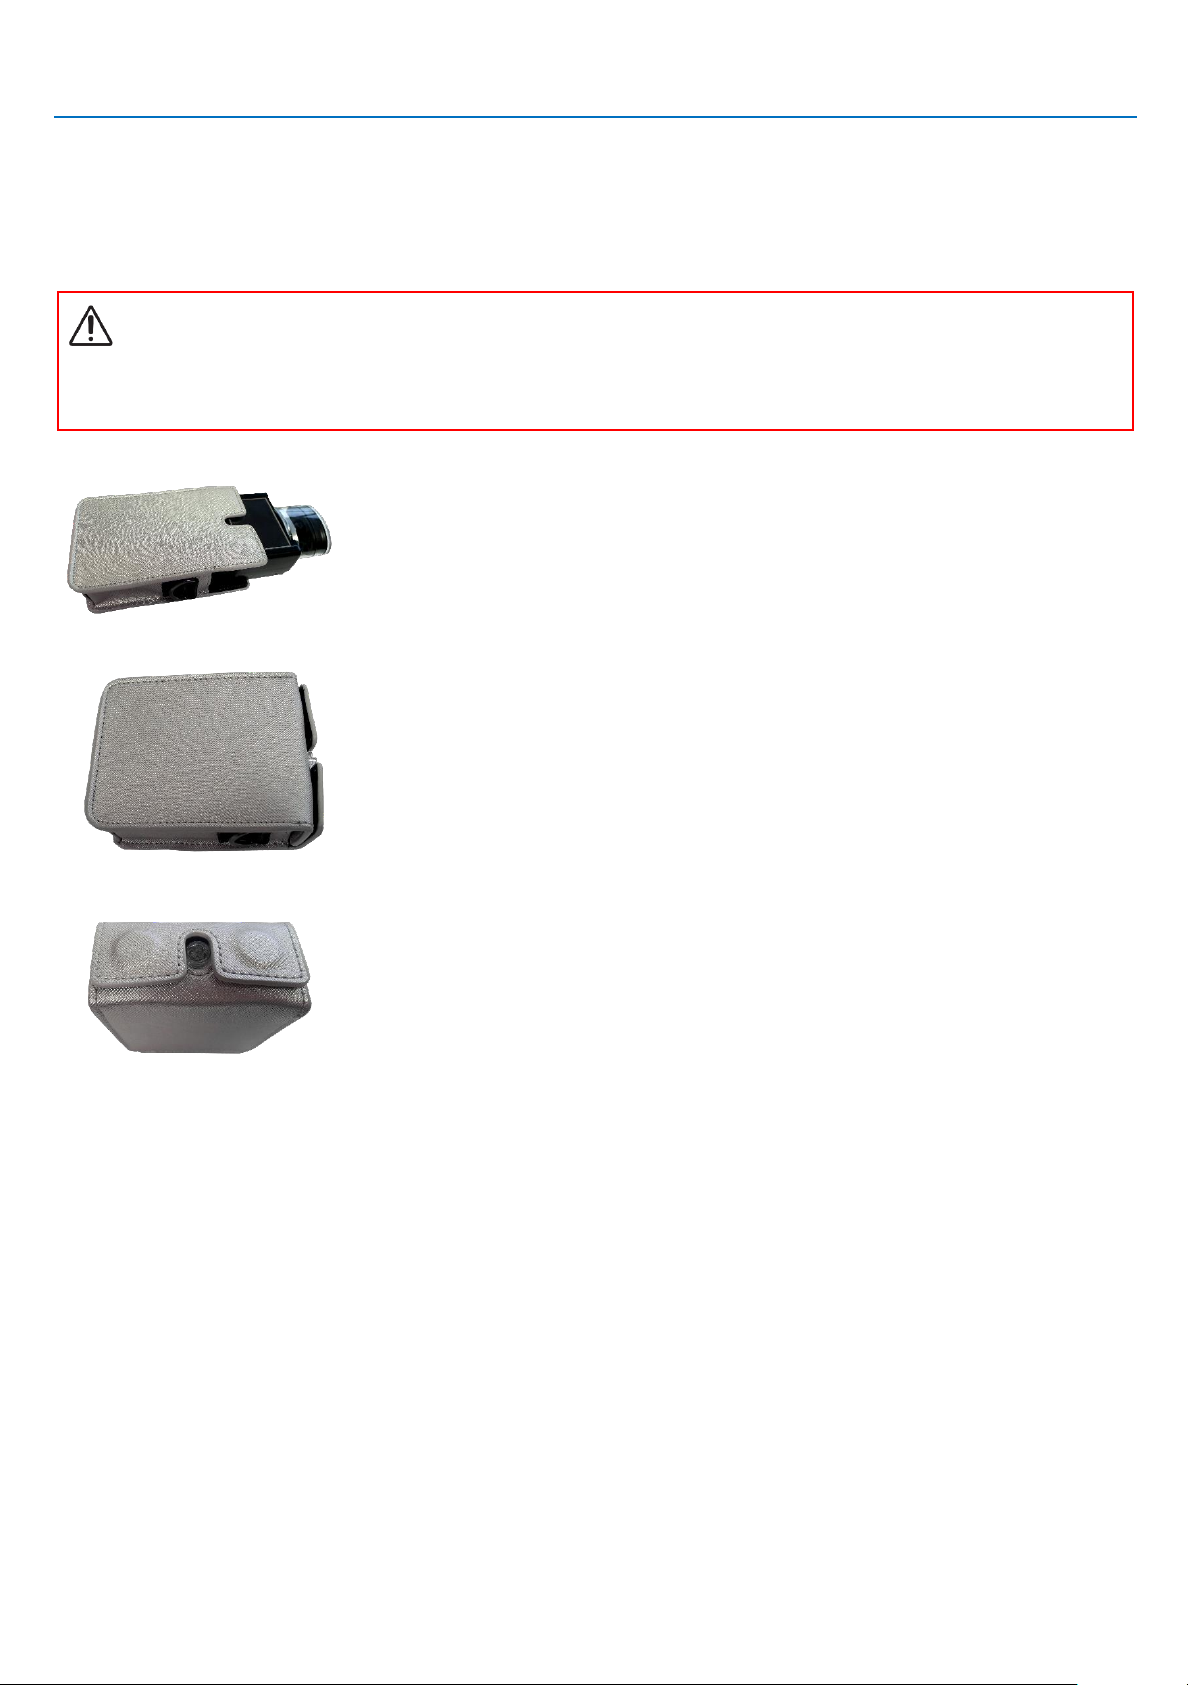
The protective case protects the SO♥CONNECT PID pump from splashing liquids and impacts when it is in use. It also protects the SO♥FILL
syringe.
Warning
▪
The materials used for the protective cases have not been tested for biocompatibility with the skin. Do not wear the protective case
against the body.
1) Insert the SO
♥
CONNECT PID pump into the protective case.
2) The SO
♥
CONNECT PID pump and SO♥FILL syringe must be inserted all the way into the
protective case.
3) Close the protective case.
Page 17
Partie I – Description of pump and accessories
17
Pump component identification
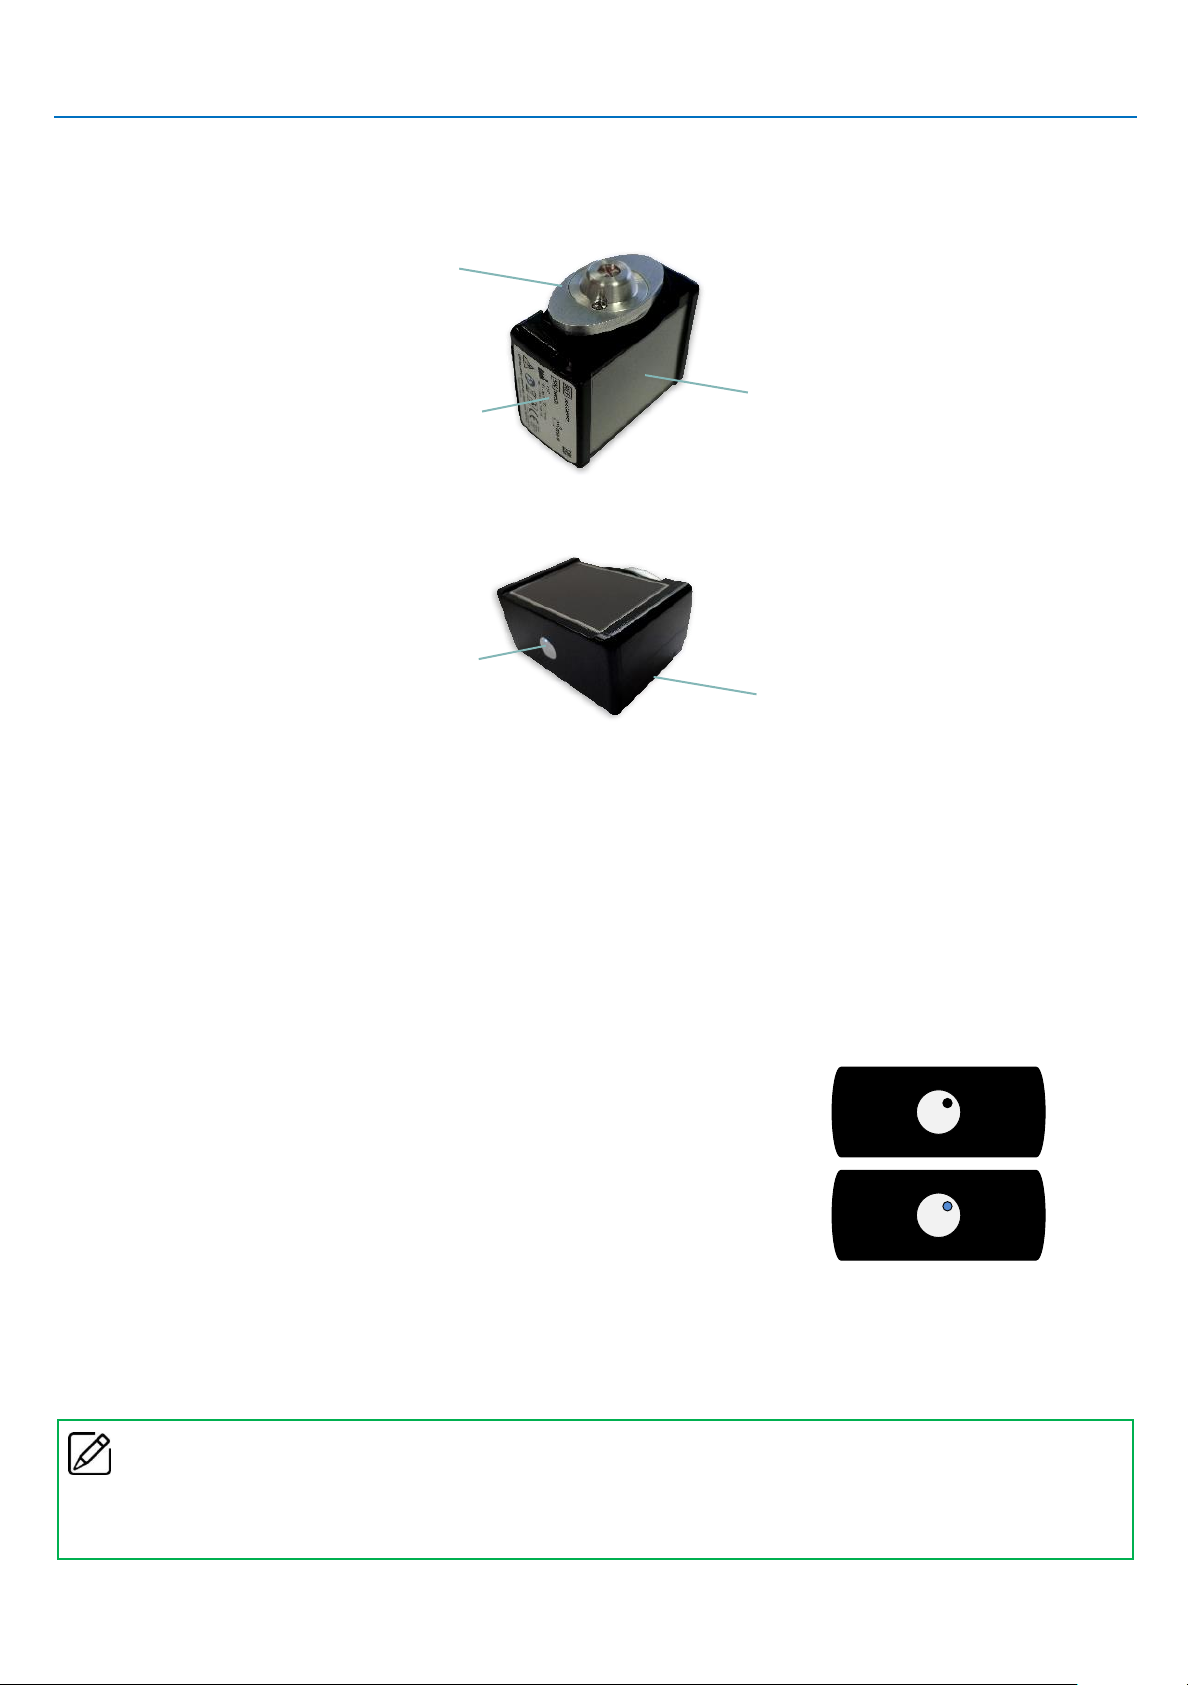
The images below show the most important components of the SO♥CONNECT PID pump.
▪ ON/OFF button
The ON/OFF button is used to switch the screen on and off.
▪ Pump status indicator
The ON/OFF button incorporates an indicator light that immediately shows the pump operating status.
o Light off: the SO
♥
CONNECT PID pump is on standby or not powered.
o Blue light: the SO
♥
CONNECT PID pump is active.
▪ Touchscreen
The touchscreen of the SO♥CONNECT PID pump allows you to set up and control the infusion. Also, the screen displays important
information about the status of the pump. If the screen is not pressed, it goes off automatically after 1 minute to save battery power.
Remark
▪
When you are not using the screen, you can press on the ON/OFF button to turn it off without waiting for it to turn off automatically
and thus save battery power.
Pusher
Identification label
Touchscreen
Cover of
battery
compartment
ON/OFF button
Page 18
Partie I – Description of pump and accessories
18
Warning
▪
If the screen displays incomplete characters, digits or symbols, remove the battery for a few seconds and put it back in place. If the
problem persists, please contact user support.
Battery
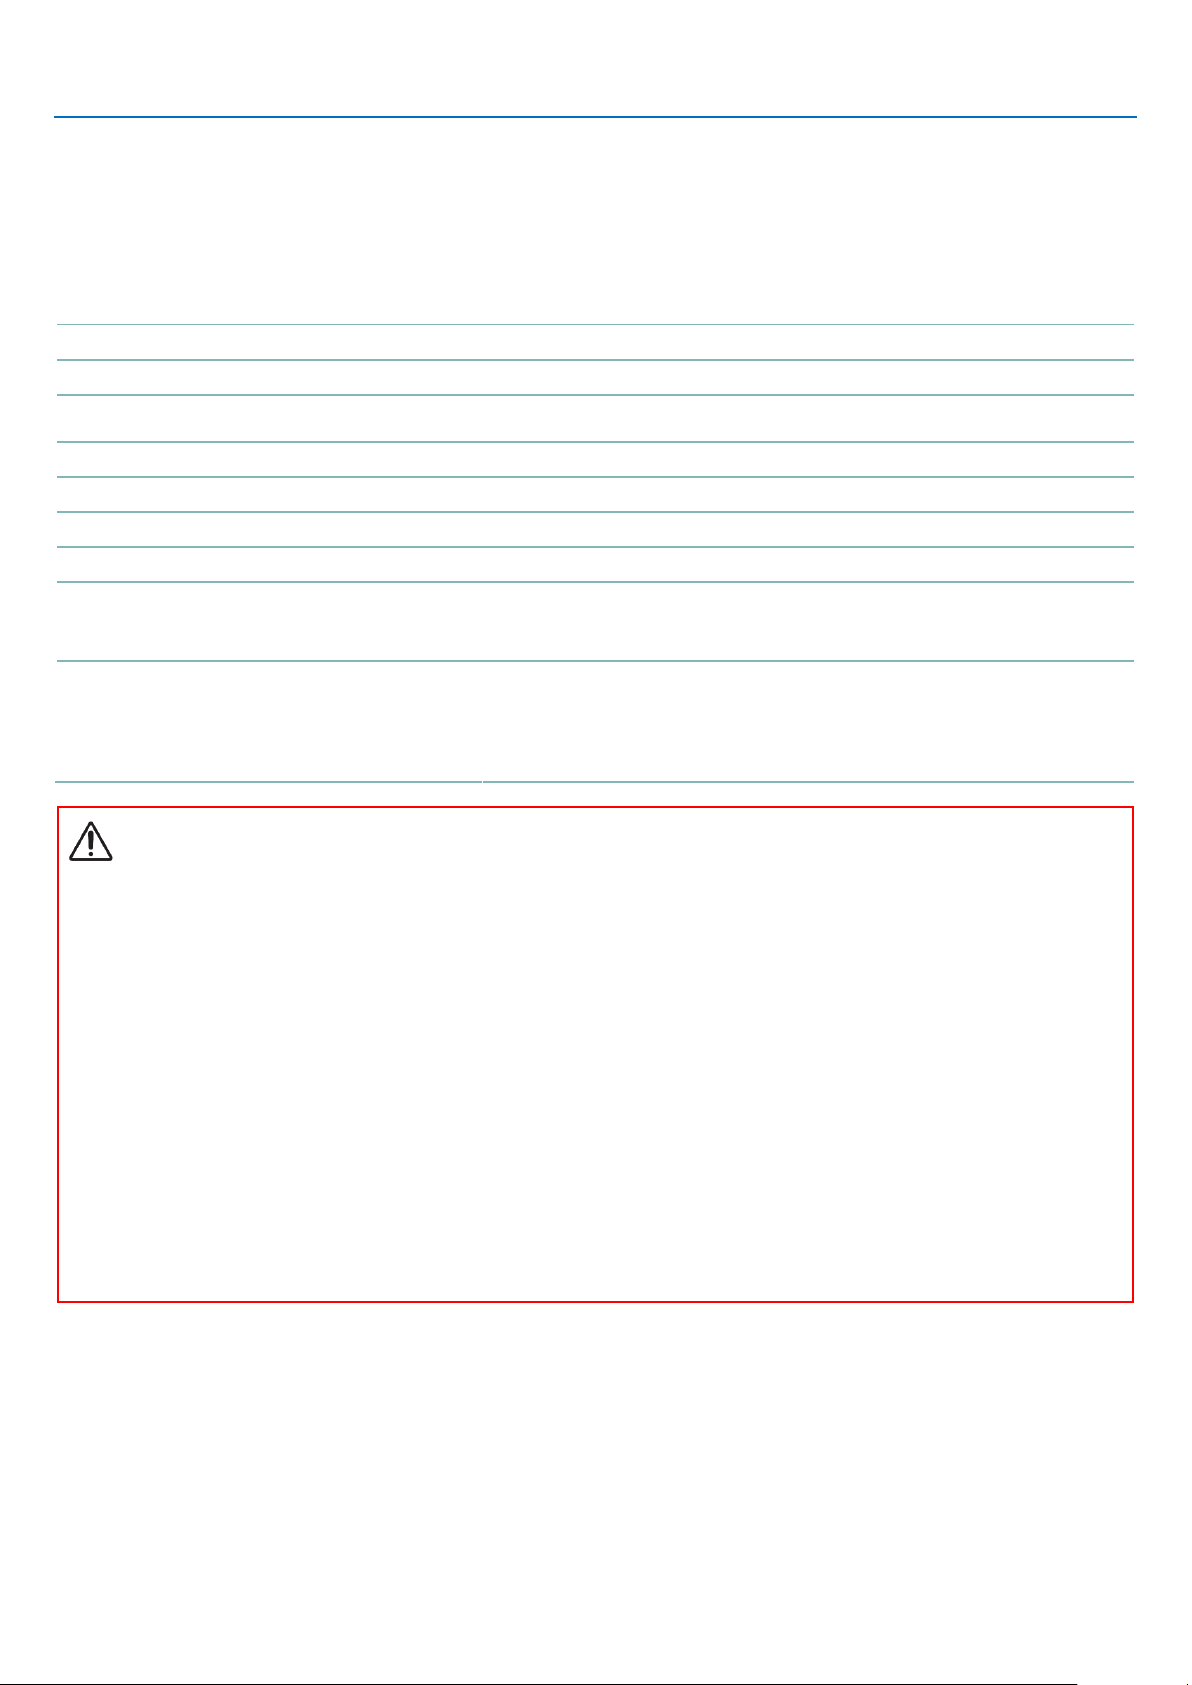
The SO♥CONNECT PID can only operate when it is powered by a VARTA EZPack L rechargeable
battery supplied with the pump, sourced from France Développement Electronique only. The
SO♥CONNECT PID pump is supplied with two batteries. As a result, you can always have a charged
spare battery that is ready for use.
The battery specifications are as follows:
Part
VARTA EZPACK L
Rated voltage
3.7 V
Capacity
1200 mAh typical
Watt hours
4.5 Wh
Number of cycles
> 500 cycles
Precautions
▪
Do not use any other batteries than the one supplied by France Développement Electronique. Using another type of battery may
damage the
SO♥CONNECT PID
pump.
▪
When a battery is not in use, store it in a clean dry place away from sunlight.
▪
The batteries are delivered uncharged. You must therefore charge them completely before using them.
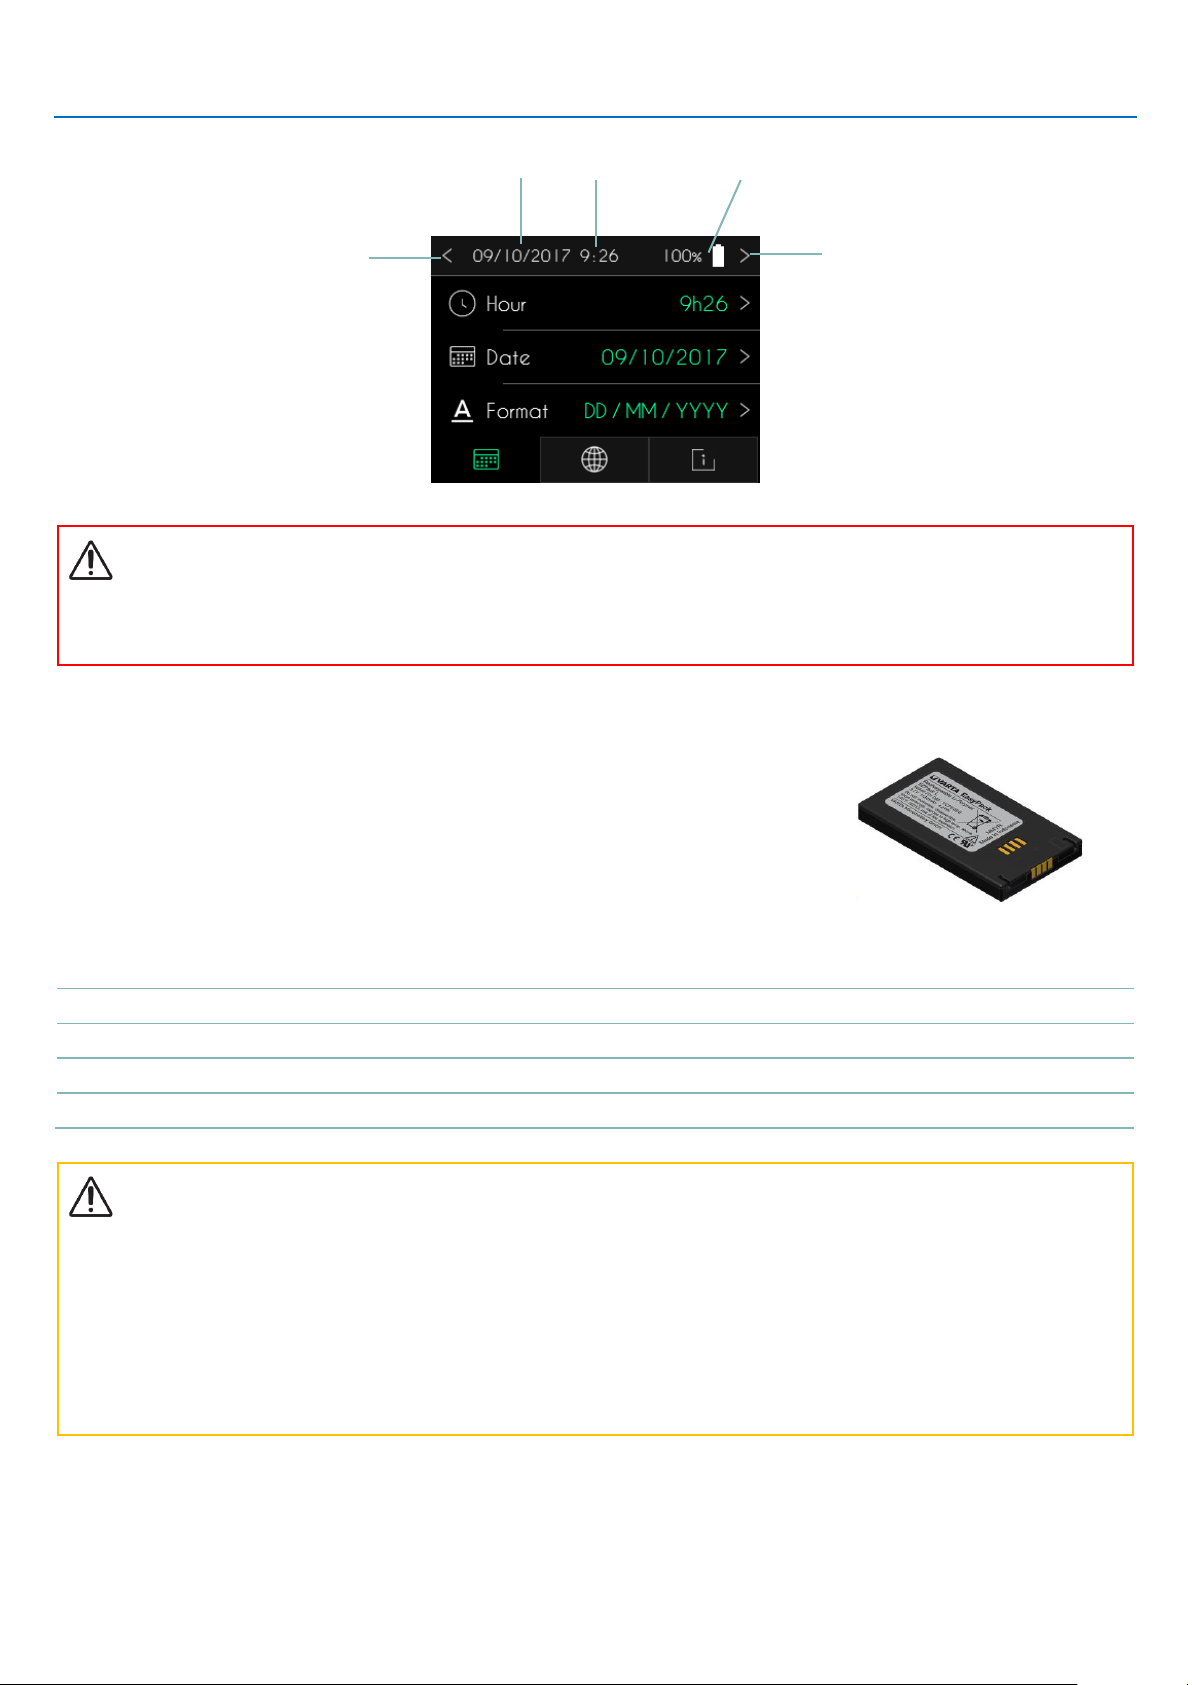
Date
Time
Battery level
Cancel and return
to previous screen
Confirm and go to
next screen
Page 19
Partie I – Description of pump and accessories
19
Battery charger
The battery charger supplied with the SO♥CONNECT PID pump can recharge the VARTA EZPack L batteries.
The battery charger specifications are as follows:
Model number
MASCOT Type 3745
Rated AC voltage
90 – 264 VAC 47/63 Hertz
Charge voltage
4.2 VDC
Charge intensity
1.5 A
Dimensions
115 x 56 x 35 mm
Weight
175 g
Conditions of use
-25°C à +40°C
Storage conditions
-25°C à +85°C
Electrical safety
EN/IEC/ANSI 60601-1 3ed
EN/IEC 60335-1 et 2-29
EN/IEC/UL 62368-1
Electromagnetic compatibility
EN 61000-6-1 et -3
EN 60601-1-2
EN 55014-1 et -2
EN 55022 et EN 55024
EN 55032
Warning
▪
Do not attempt to recharge cells or batteries other than those supplied by France Développement Electronique.
▪
Disconnect the charger from the power socket when you no longer intend to use it. To disconnect the power cord, hold it by the
plug inserted in the socket. Do not pull it directly.
▪
Do not use the charger if the cord is damaged or if the charger has been dropped or is damaged.
▪
Do not twist the power cord excessively and do not place any heavy objects on it. That could damage it and lead to a fire or electric
shock.
▪
Do not dismantle the charger.
▪
Protect the charger from impacts and falls.
Page 20

20
Part II – Starting the pump
This part of the user’s manual contains the following information:
▪
battery charging,
▪
inserting the battery.
Precautions
▪
The batteries are delivered uncharged. You must therefore charge them completely before using them.
Page 21
Partie II – Starting the pump
21
Battery charging
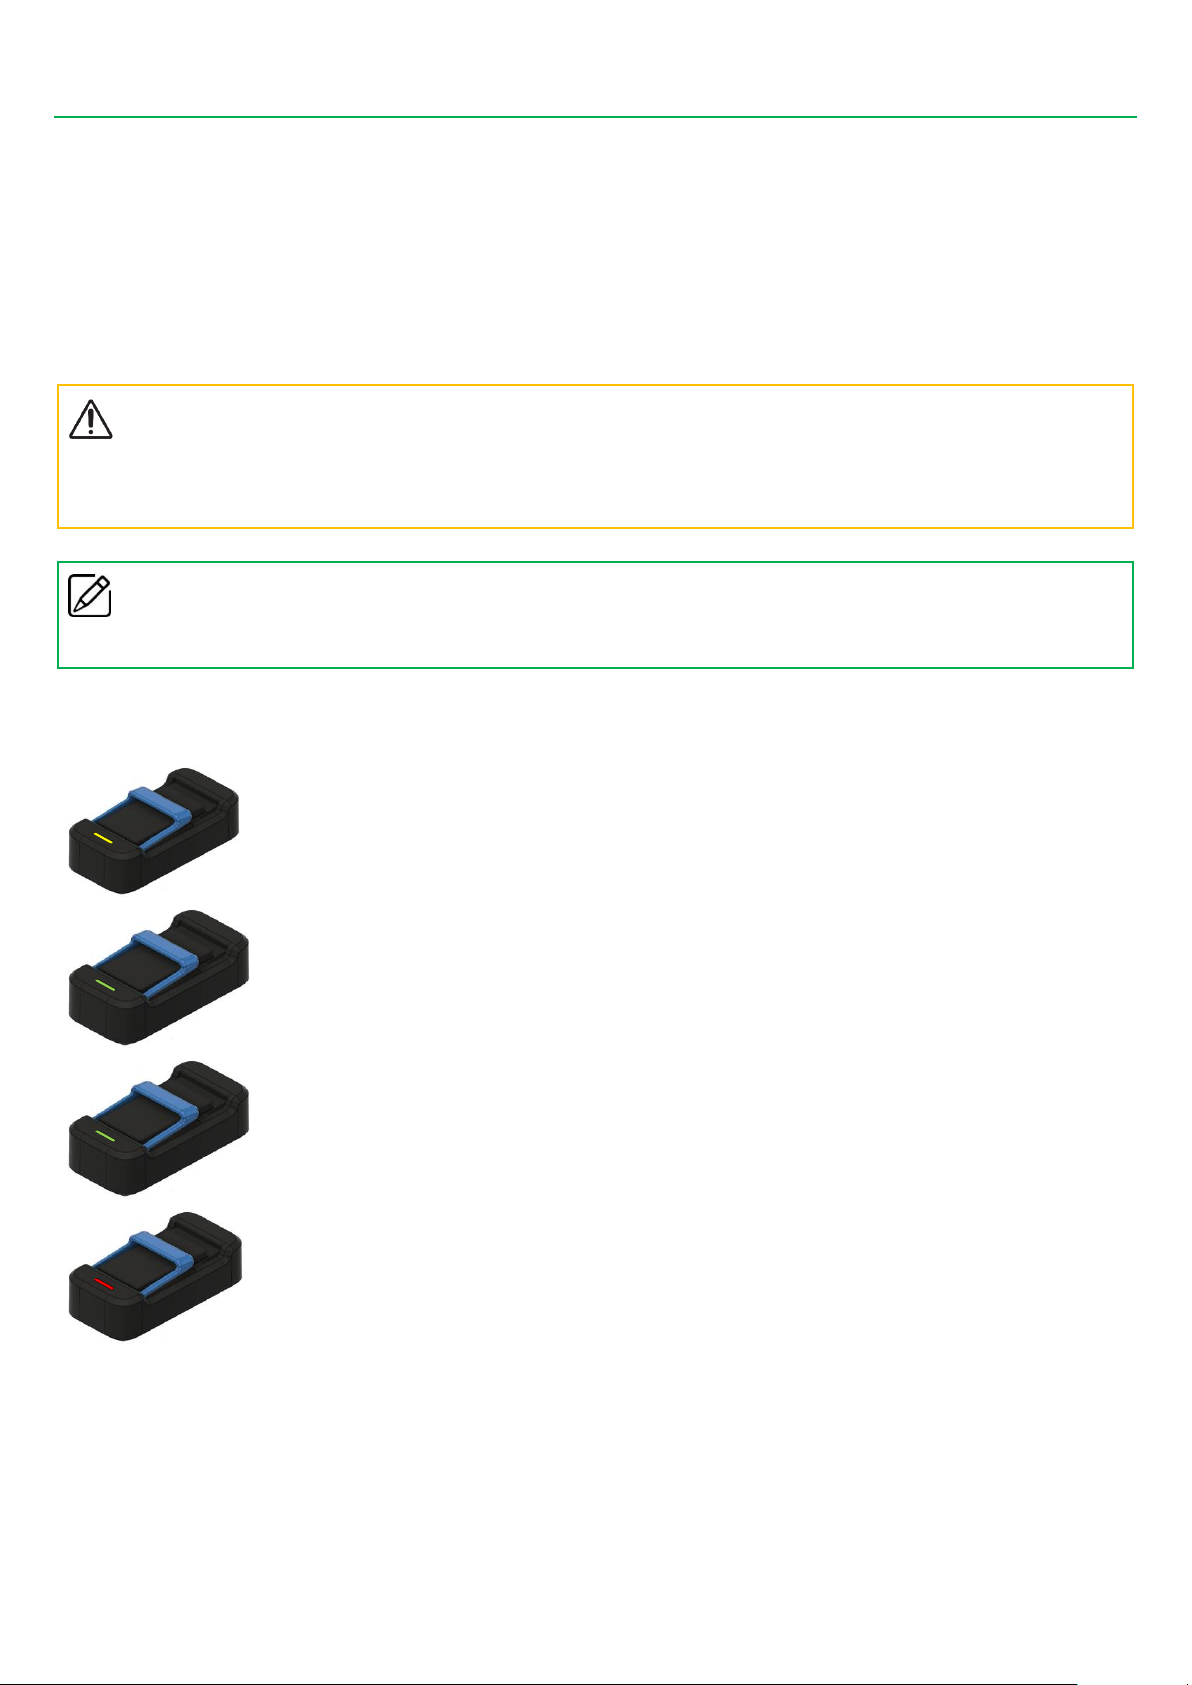
When you need to recharge a battery, please follow the instructions below:
▪ First connect the power cord to the charger, then to the power socket.
▪ Insert the battery in the charger. The battery label must be turned towards the front of the charger.
▪ If a problem occurs during charging, disconnect the charger from the wall socket immediately in order to stop the power supply.
▪ Do not place the charger in areas that are very hot or cold, dusty or dirty, humid or subject to heavy vibrations.
Precautions
▪
Make sure you always use the battery charger supplied with the
SO♥CONNECT PID
pump only. Using another type of charger
may damage the battery.
Comments
▪
The charger will heat up slightly while in use. This is not a sign of malfunctioning.
The light on the charger shows the battery charge status.
Flashing yellow or steady yellow: charging in progress.
Steady green light: battery fully charged
Flashing green light: battery not connected
Flashing red light: error
Page 22

Partie II – Starting the pump
22
Inserting the battery
Before using the SO♥CONNECT PID pump for the first time, you need to charge the battery.
The cover of the battery compartment holds the battery in position. Slide the cover by hand to remove it and put it back.
Precautions
▪
Do not use a knife, screwdriver or other pointed object to remove the battery compartment cover, as that could damage the
SO♥CONNECT PID
pump.
▪
In order to keep water out of the
SO♥CONNECT PID
pump housing, install or replace the battery in a dry place.
▪
Make sure that the battery compartment cover is not damaged or missing and that the battery has been installed correctly.
▪
Take care to insert the battery in the right direction. Inserting the battery in the wrong direction could damage the
SO♥CONNECT
PID
pump.
1) Slide the battery compartment cover from right to left until it comes completely out of the
groove.
2) Insert the battery in the compartment of the SO
♥
CONNECT PID pump. Take care to insert
the battery the right way: the + end of the battery must be at the + terminal of the pump, and
likewise for the – end.
The battery's label should be facing downwards, towards the bottom of the battery
compartment.
3) Insert the battery compartment cover back in the groove. And slide the cover back into place,
from left to right.
Page 23

23
Part III – Pump programming
This part of the user’s manual contains the following information:
▪
password entry,
▪
setting up the pump,
▪
setting up and infusion,
▪
pump initialization.
Page 24
Partie III – Pump programming
24
Password entry
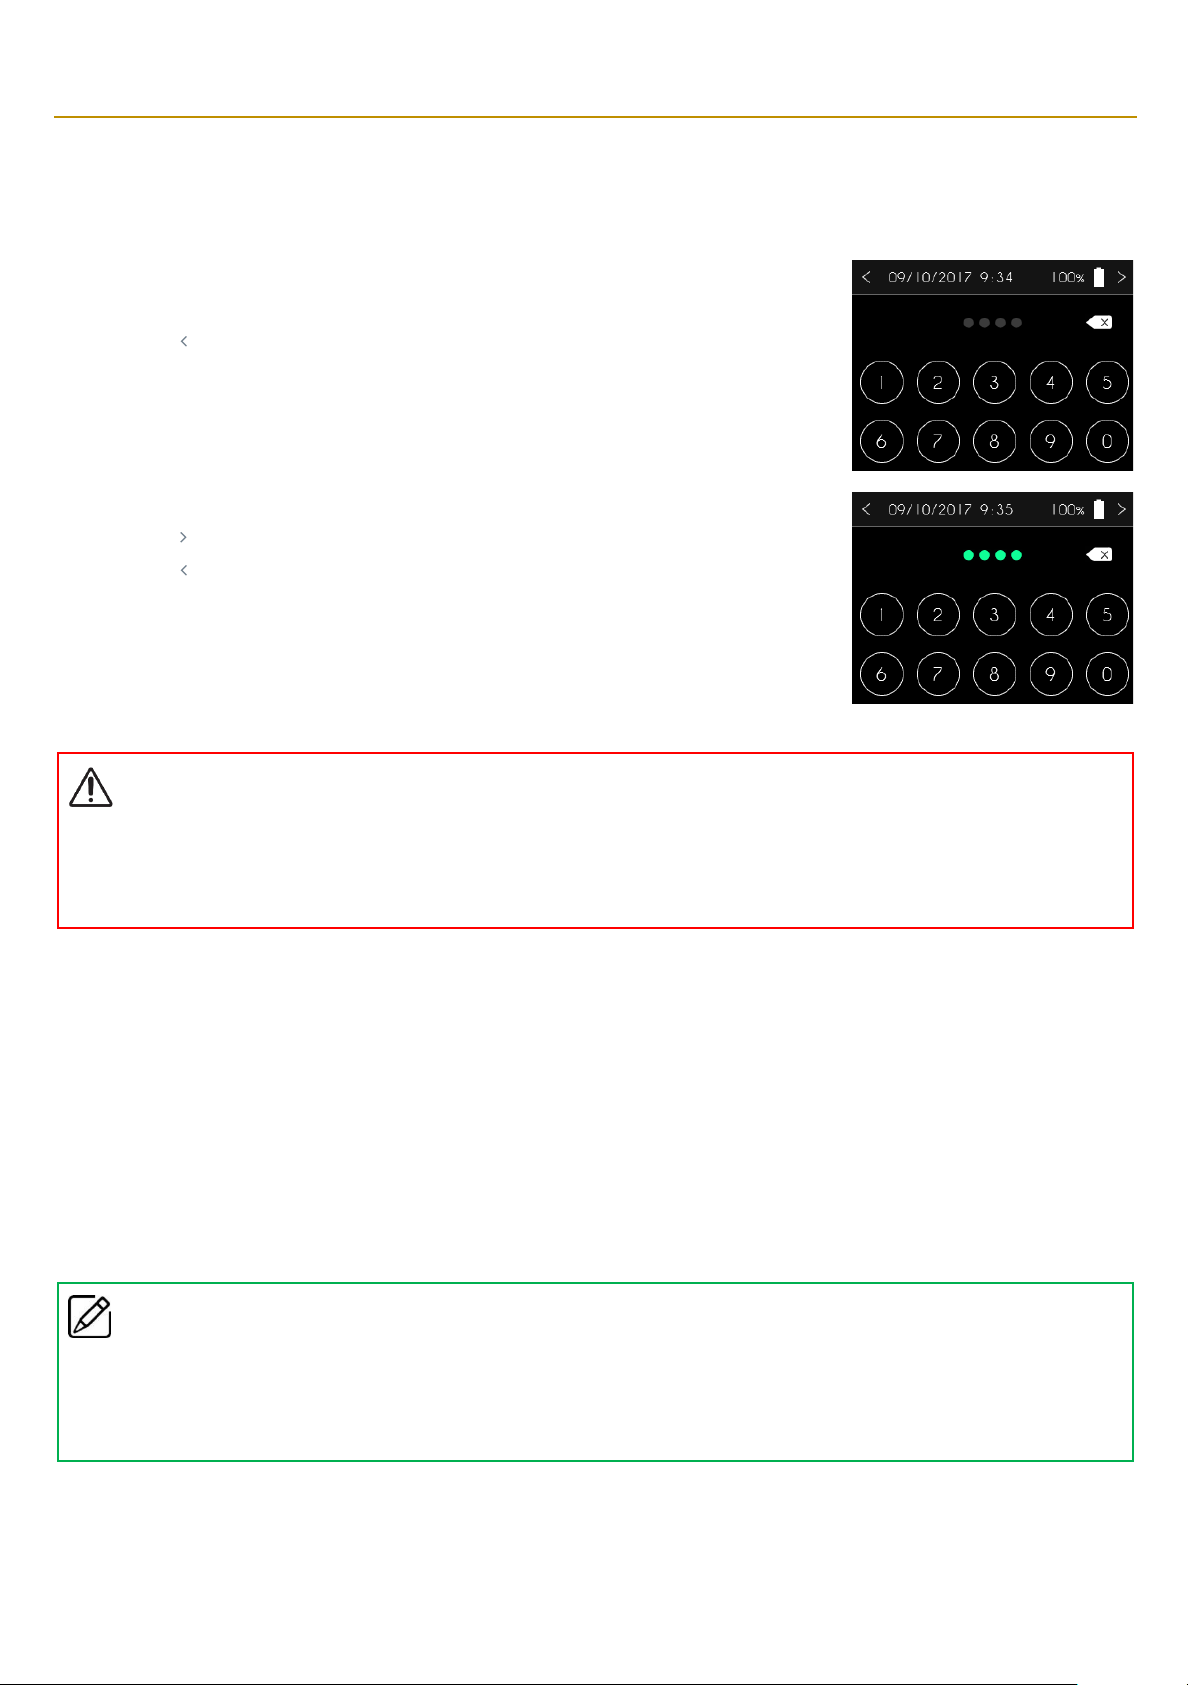
Access to the functions reserved for medical personnel is only possible after they enter a password.
The SO♥CONNECT PID pump displays the numeric keypad for entering the password.
▪ Press “ ” to return to the previous screen.
▪ If you make a mistake, you can use “” to erase the digits.
▪ Use the keypad to enter the password.
▪ Press “ ” to confirm and go to the next screen.
▪ Press “ ” to return to the previous screen.
Warning
▪
Healthcare professionals may not disclose to the patient the passwords or any other information likely to enable the patient to gain
access to the programming and configuration functions of the
SO♥CONNECT PID
pump. Incorrect programming may cause
serious injury to the patient.
Setting up the pump
The SO♥CONNECT PID pump gives you the possibility to make several settings:
▪ time,
▪ date,
▪ date display format,
▪ display language.
You can also view the version of the internal software of the SO♥CONNECT PID pump.
Comments
▪
The different settings of the
SO♥CONNECT PID
pump are not available during an infusion.
▪
A change to any of the settings is applied immediately by the
SO♥CONNECT PID
pump.
Page 25
Partie III – Pump programming
25
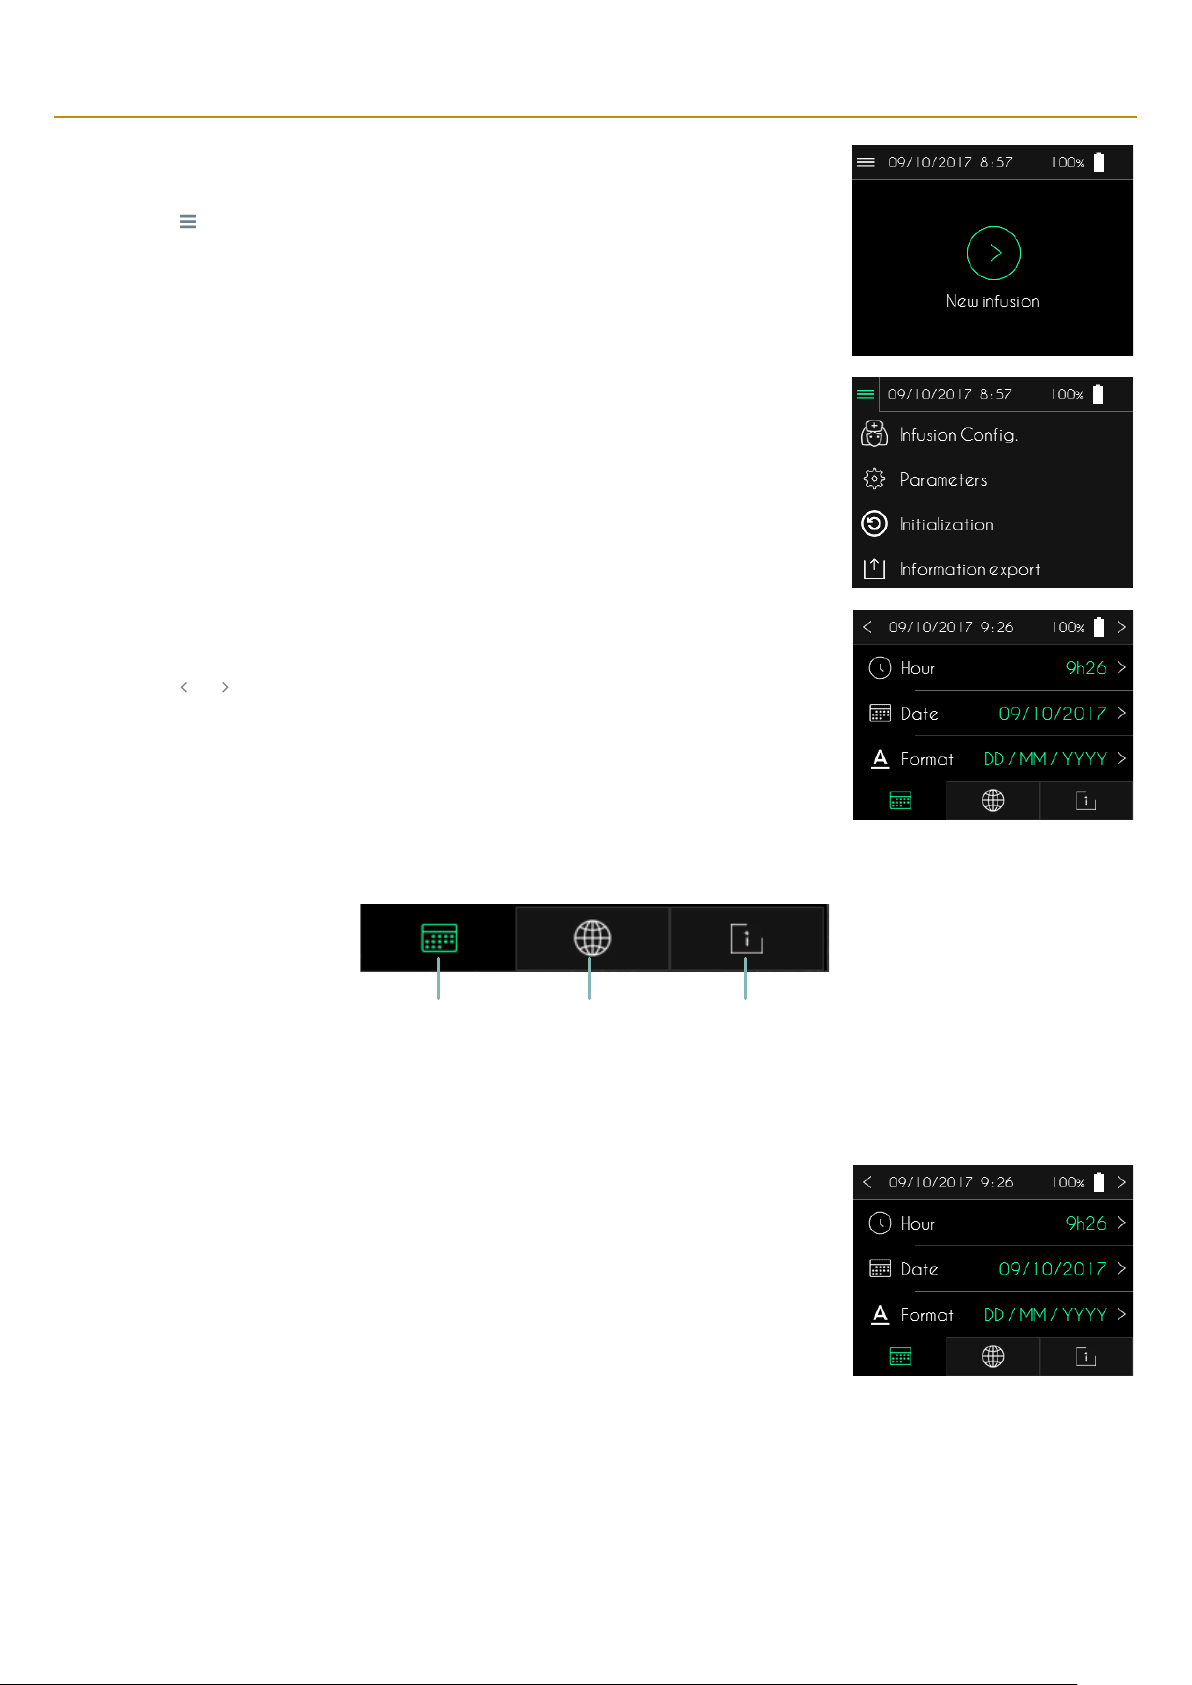
The pump setup (date, time, date format, language) is carried out from the main screen.
▪ Press “ ” to open the menu for additional functions.
▪ Press “Parameters”.
The pump will display the first setup tab (Time, Date and Date format).
▪ Press “ ” or “ ” to return to the main screen.
There are three tabs for accessing the different settings.
Time, Date
and Date
format
Language Version
Setting the time
When the SO♥CONNECT PID pump displays the time, date and date format setting tab, press the
time to modify it.
Page 26
Partie III – Pump programming
26
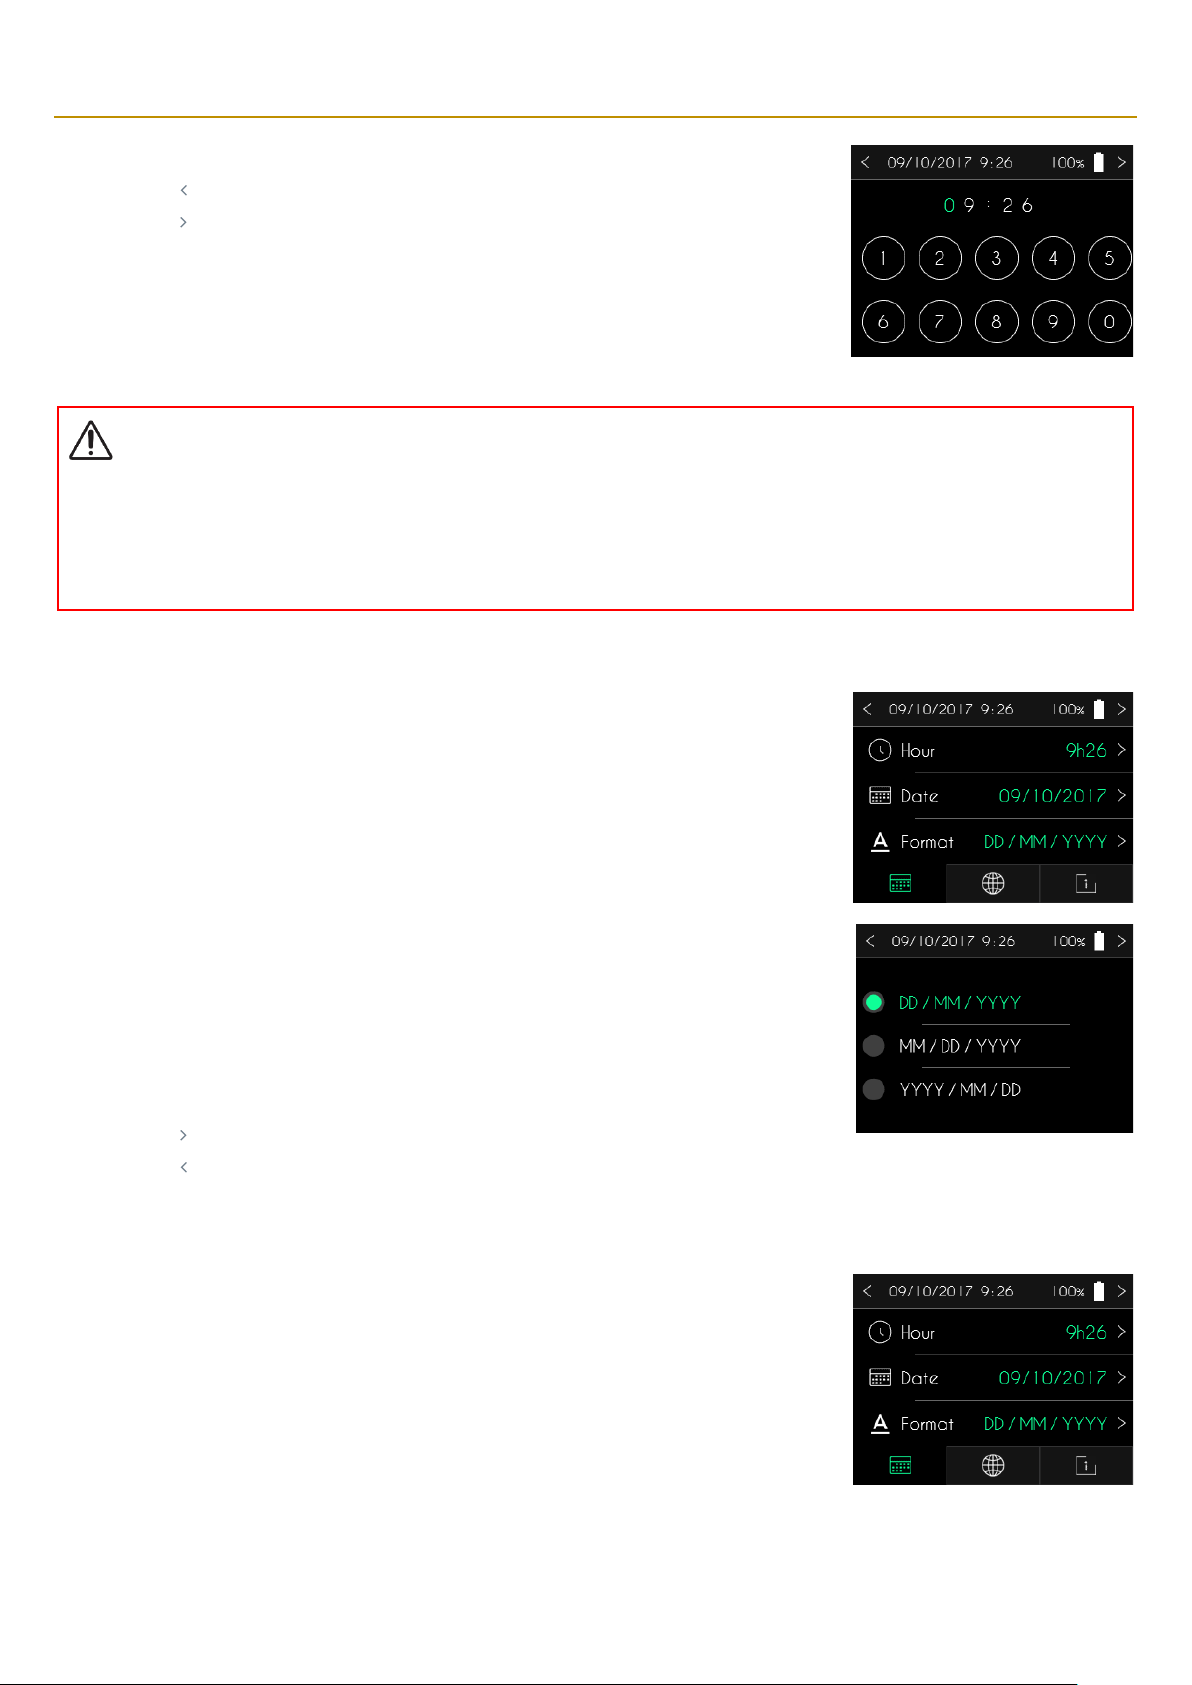
▪ Use the keypad for entering the new time.
▪ Press “ ” to cancel and return to the previous screen.
▪ Press “ ” to confirm the new time and return to the previous screen.
Warning
▪
It is crucial to set the correct time. That information is required for managing infusion rates and clinical data. Setting the time
incorrectly can result in the incorrect administration of apomorphine.
▪
If the time zone is changed or if there is a time change, make sure the time setting is changed accordingly.
Date format setting
When the SO♥CONNECT PID pump displays the time, date and date format setting tab, press the
date format to modify it.
The SO♥CONNECT PID pump offers a choice between three formats for displaying the date:
▪
day / month / year,
▪
month / day / year,
▪
year / month / day
▪ Press the format you wish to use. The selected format is displayed in green.
▪ Press “ ” to confirm the date format and return to the previous screen.
▪ Press “ ” to cancel and return to the previous screen.
Setting the date
When the SO♥CONNECT PID pump displays the time, date and date format setting tab, press the
date to modify it.
Page 27
Partie III – Pump programming
27
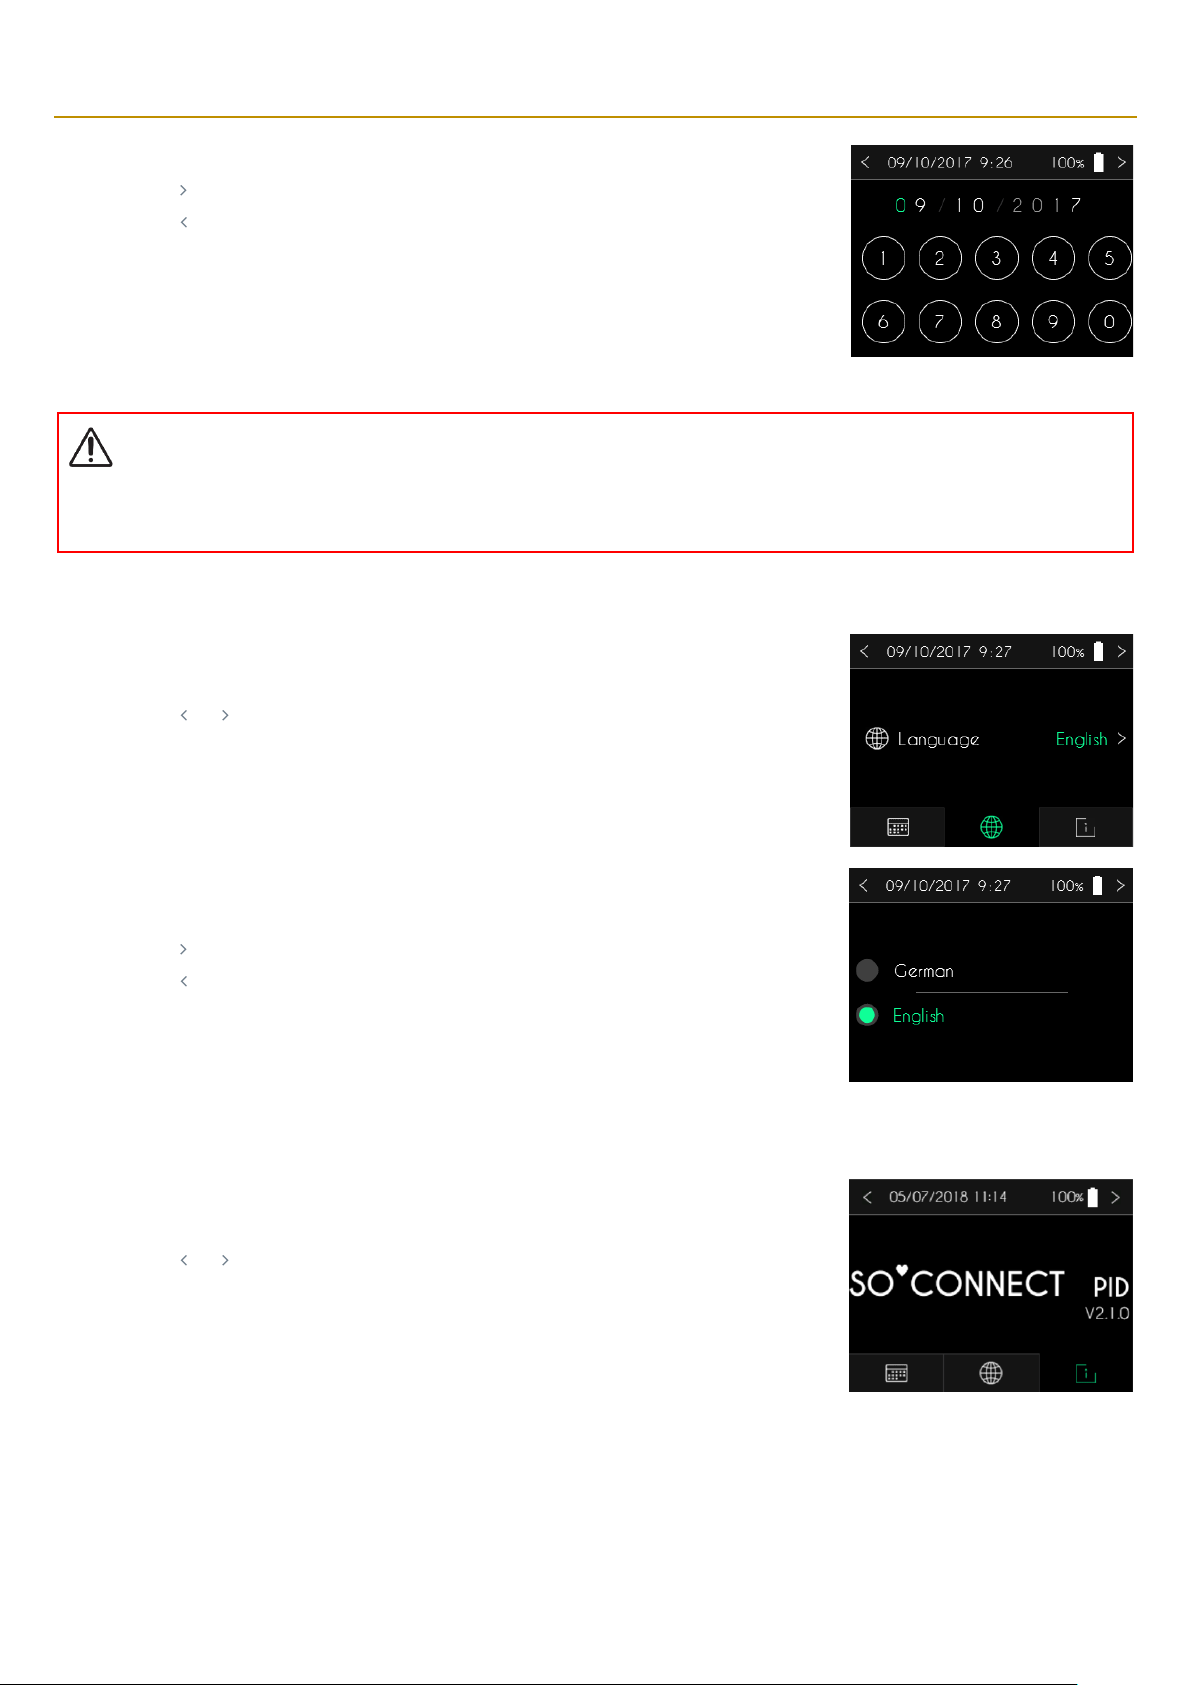
▪ Use the keypad for entering the date.
▪ Press “ ” to confirm and return to the previous screen.
▪ Press “ ” to cancel and return to the previous screen.
Warning
▪
Setting the correct date is crucial. Clinical data management is dependent on this setting. If the time zone is changed, make sure the
date setting is changed accordingly.
Language setting
When the SO♥CONNECT PID pump displays the language setting tab.
▪ Press the language to modify it.
▪ Press “ ” or “ ” to return to the main screen.
The SO♥CONNECT PID pump will display the list of available languages.
▪ Select the language you want to use for the display.
▪ Press “ ” to confirm and return to the previous screen.
▪ Press “ ” to cancel and return to the previous screen.
Software version display
When the SO♥CONNECT PID pump displays the information tab, you can view the version and type
of the internal software of the pump.
▪ Press “ ” or “ ” to return to the main screen.
Page 28
Partie III – Pump programming
28
Setting up an infusion
Warning
▪
Before setting up a new infusion, check that the date and time are correct. The infusion rates and clinical data are saved based on
this information. Incorrect date and time settings can result in the incorrect administration of apomorphine.
Comments
▪
To simplify the process of setting up a new infusion, the
SO♥CONNECT PID
pump always displays the setup of the previous
infusion.
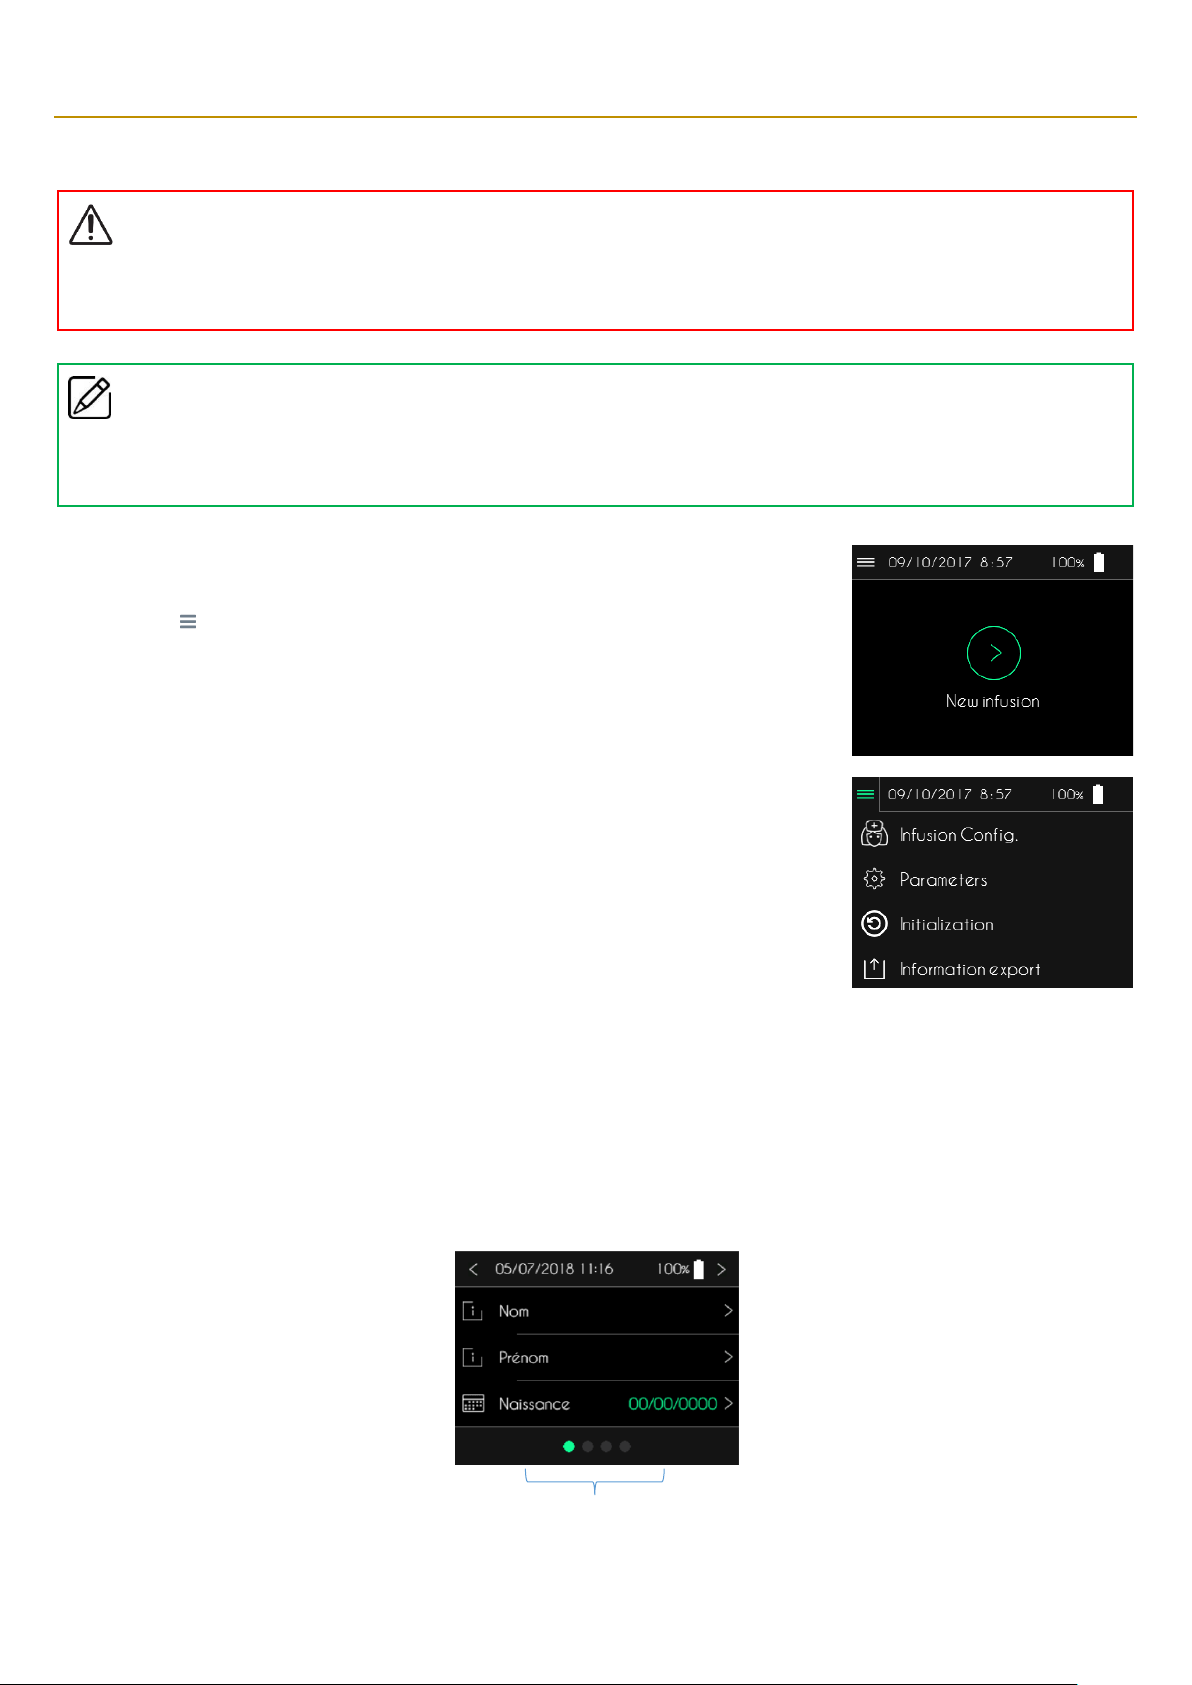
The infusion setup is carried out from the main screen.
▪ Press “ ” to open the menu for additional functions.
▪ Press “Infusion Config.”
After entering and validating the password, the configuration of an infusion is done in 3 steps:
▪ Step 1: enter patient information.
▪ Step 2: select the type of syringe and enter the volume to be infused.
▪ Step 3: enter the flow rate or the duration of the infusion.
At the bottom of each configuration screen, a banner shows the progression.
Visualization of the steps of the configuration
Page 29
Partie III – Pump programming
29
Comments
▪
To simplify the process of setting up a new infusion, the
SO♥CONNECT PID
pump always displays the setup of the previous
infusion.
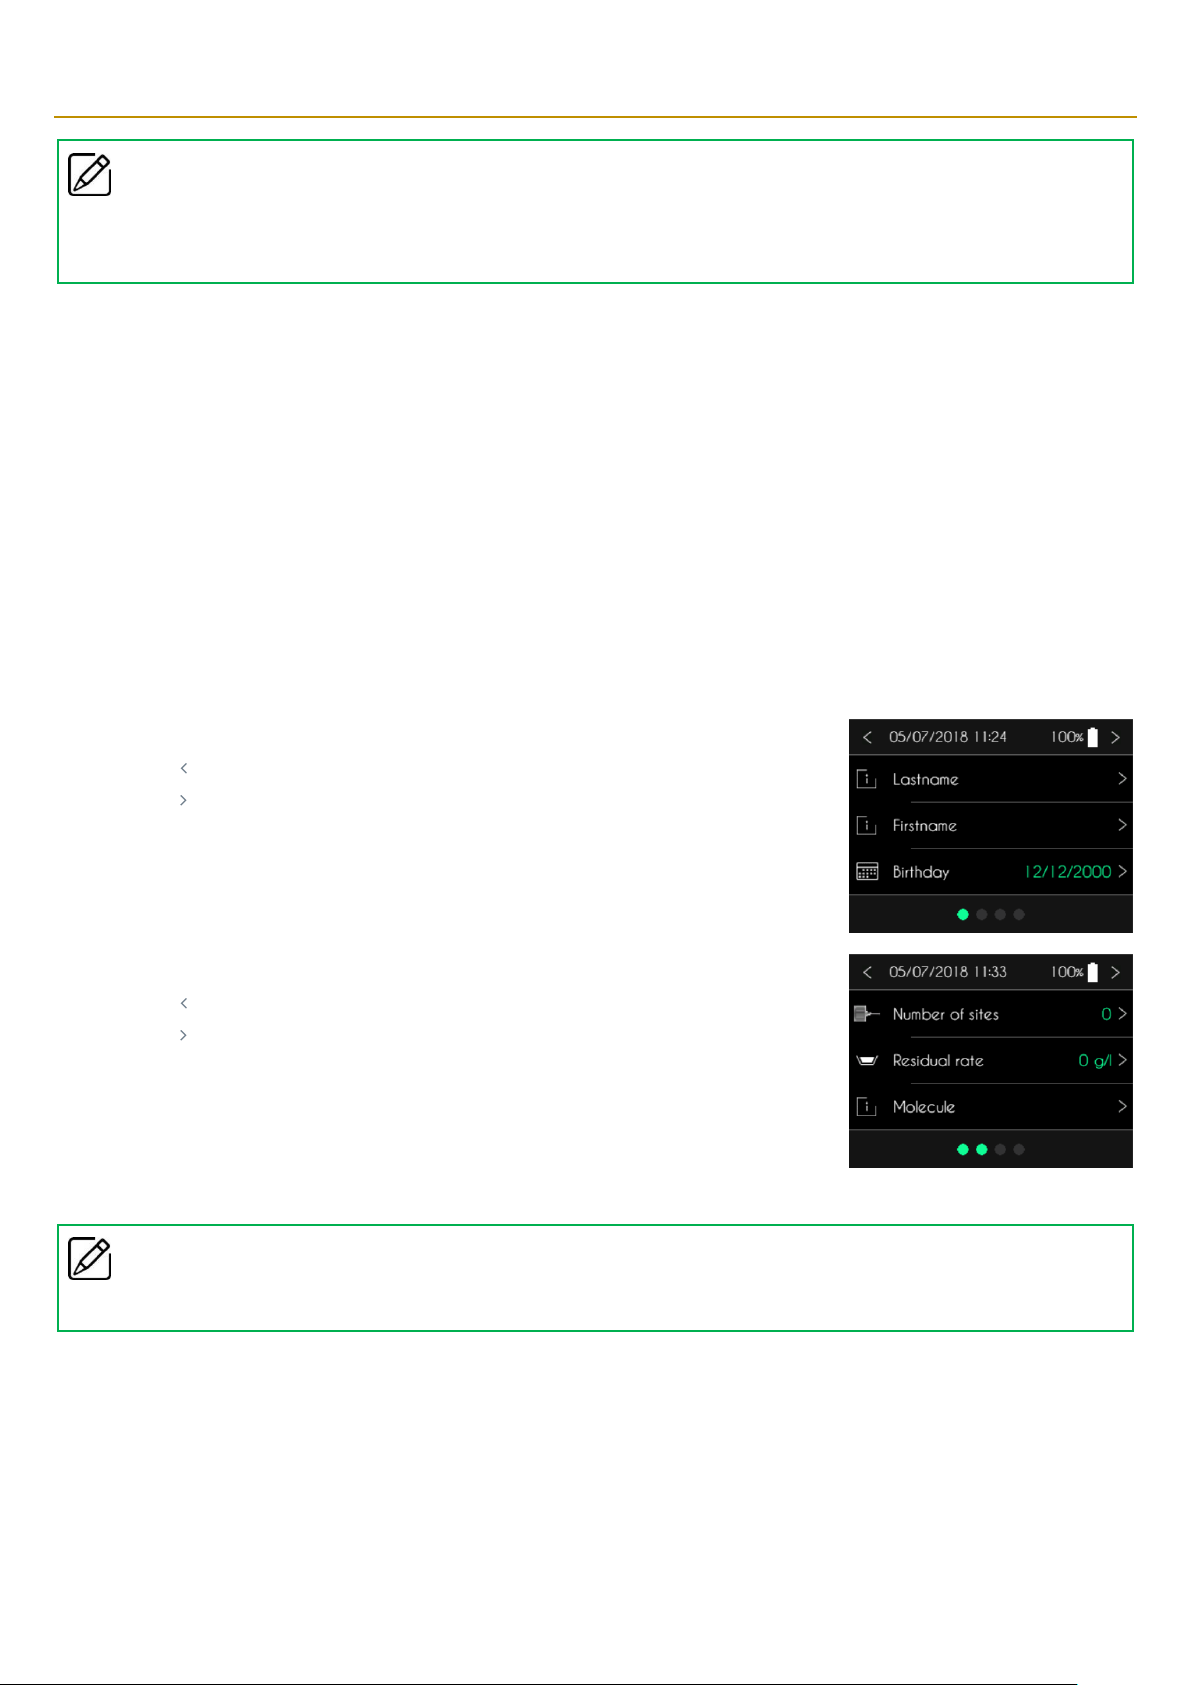
Step 1 : patient information
The SO♥CONNECT PID pump has a function for saving patient information. That information is used while exporting clinical data to the
SO♥UP program.
The patient information to enter is:
▪ surname,
▪ first name,
▪ date of birth,
▪ number of infusion sites,
▪ the residual rate,
▪ name of the medication used for the treatment.
The SO♥CONNECT PID pump displays the first patient information screen.
▪ Press “ ”to return to the main screen.
▪ Press “ ” to go to the next screen.
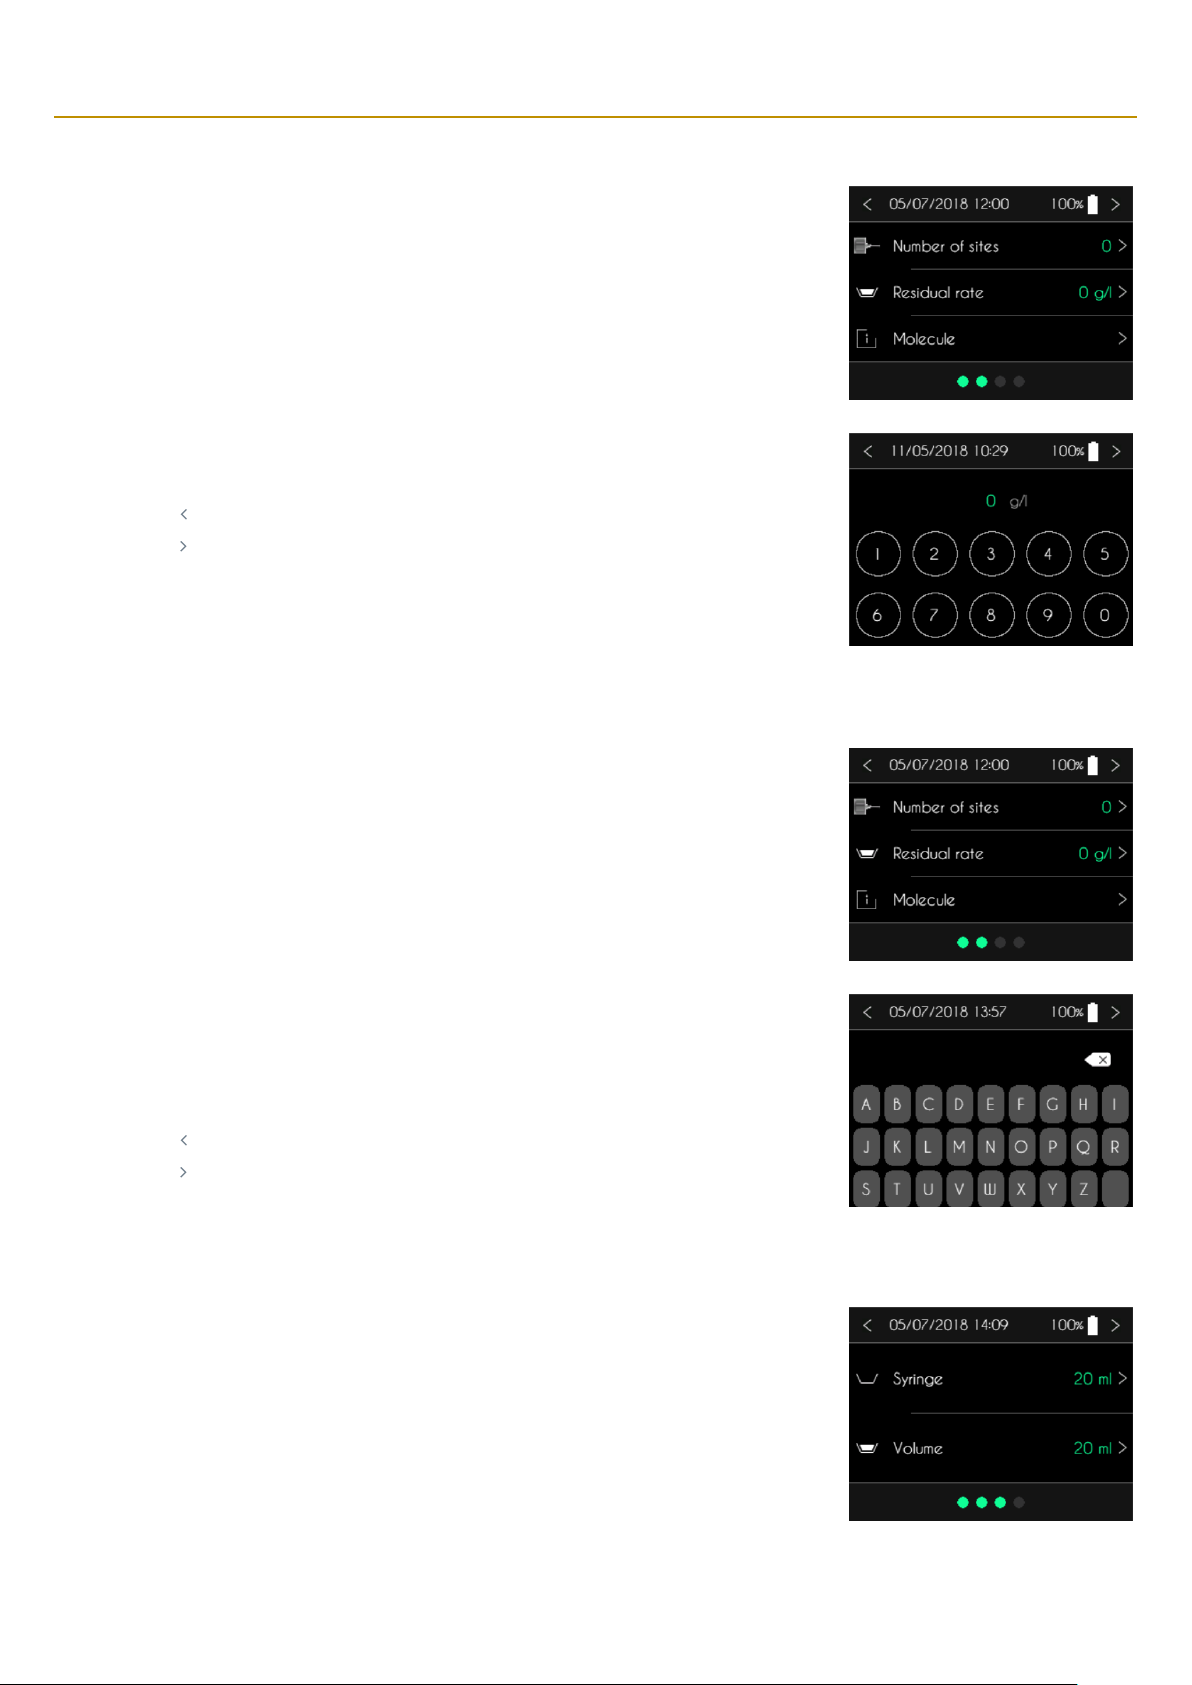
By default, the surname, first name and name of the medication are empty. The date of birth is
000/00/0000.
The SO♥CONNECT PID pump displays the second patient information screen.
▪ Press “ ”to return to the main screen.
▪ Press “ ” to go to the next screen.
By default, number of sites and the residual rate are 0 and the name of the medication is empty.
Comments
▪
To continue configuring an infusion, you must, at a minimum, enter the date of birth of the patient.
Page 30
Partie III – Pump programming
30
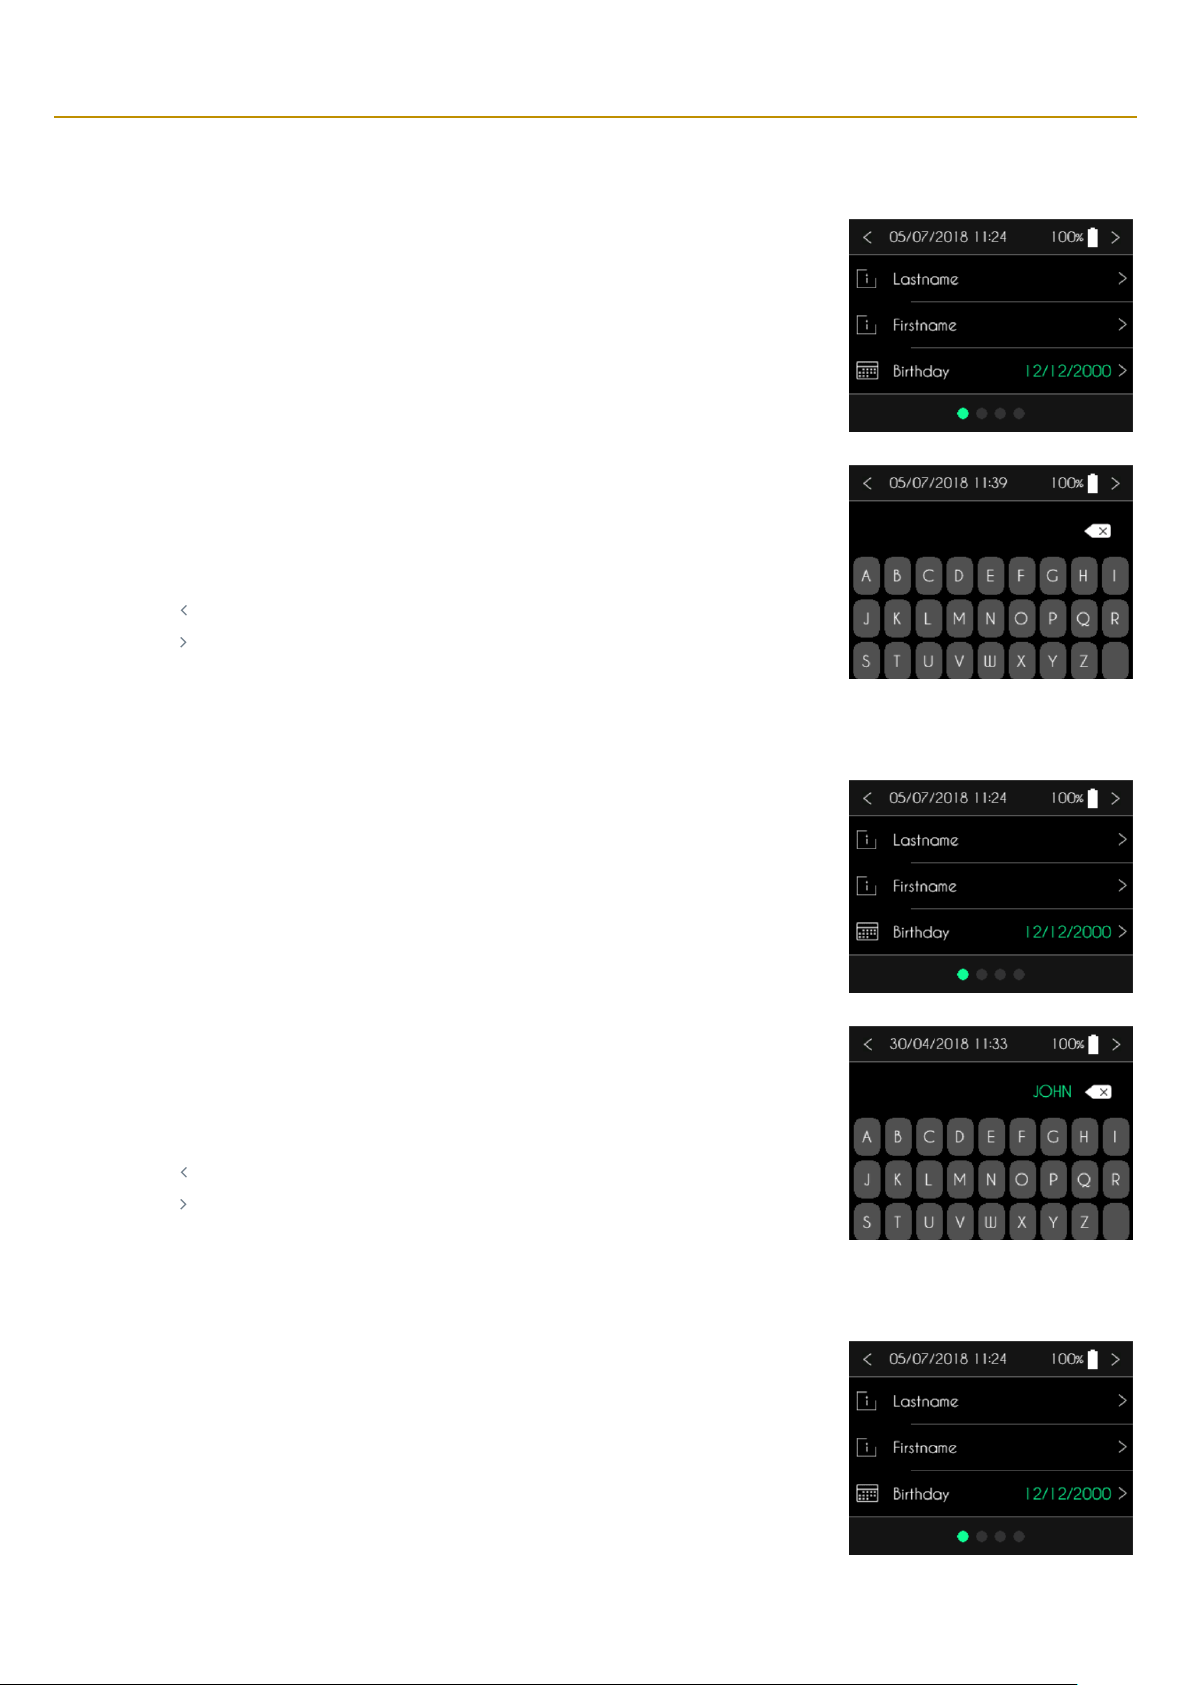
Entering the surname
When the pump displays the patient information screen, press the surname to modify it.
SO♥CONNECT PID wil display the alphabetical keypad for intering the patient’s surname. It may
have no more than 16 characters.
▪ Use the keypad to enter the surname.
▪ Press “” to delete the characters entered.
▪ Press “ ” to cancel and return to the previous screen.
▪ Press “ ” to confirm and return to the previous screen.
Entering the first name
SO♥CONNECT PID pump displays the patient information screen, press the surname to modify it.
SO♥CONNECT PID wil display the alphabetical keypad for entering the patient’s surname. It may
have no more than 16 characters.
▪ Use the keypad to enter the surname.
▪ Press “” to delete the characters entered.
▪ Press “ ” to cancel and return to the previous screen.
▪ Press “ ” to confirm and return to the previous screen.
Entering the date of birth
SO♥CONNECT PID pump displays the patient information screen, press the date of birth to modify
it.
Page 31
Partie III – Pump programming
31
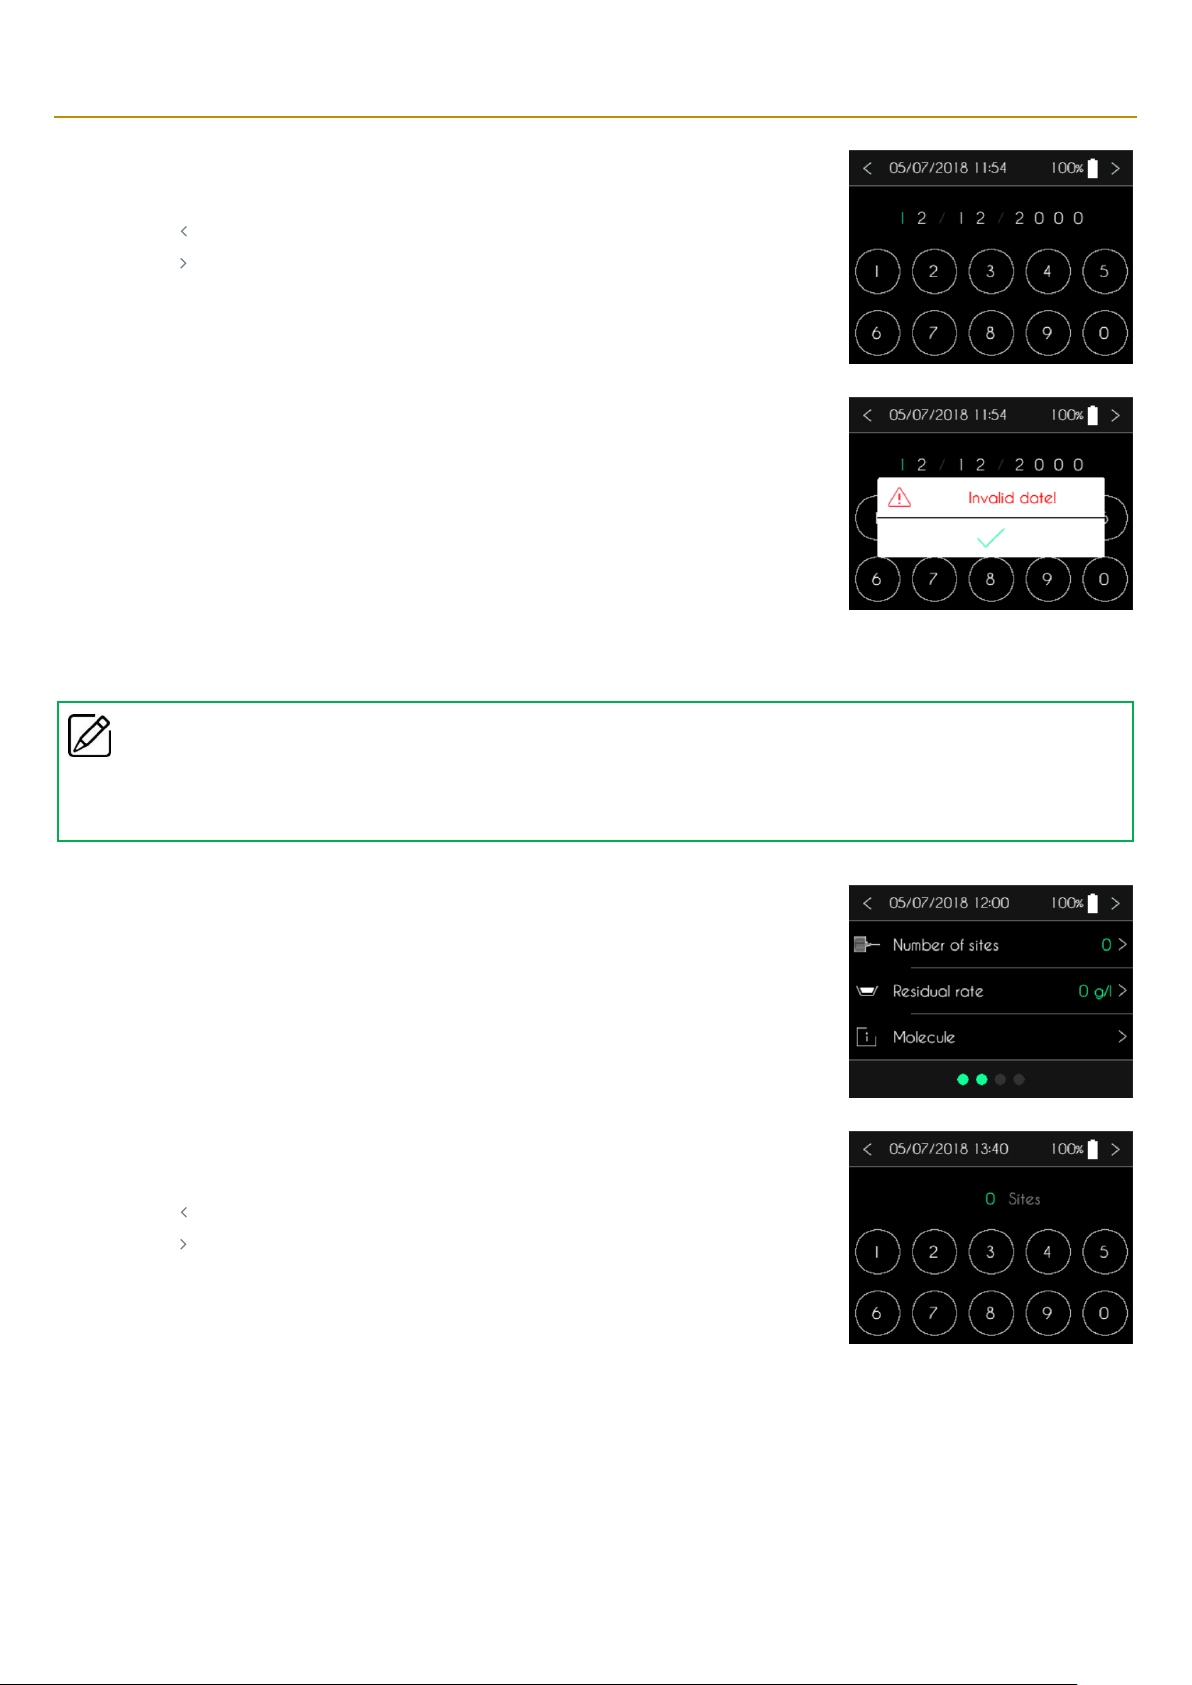
SO♥CONNECT PID pump will display a numeric keypad for entering the patient’s date of birth.
▪ Use the keypad to enter the date of birth.
▪ Press “ ” to cancel and return to the previous screen.
▪ Press “ ” to confirm and return to the previous screen.
If the date is invalid, the pump displays a message.
▪ Press “✓” to acknowledge the message.
Entering the number of sites
Comments
▪
The number of sites is only used as an indication for clinical follow-up. This date is not taken into account for the calculation of the
infusion rate.
SO♥CONNECT PID displays the patient information screen. Press the number of sites to modify it.
SO♥CONNECT PID will display a numeric keypad to enter the number of sites.
▪ Use the keypad to enter the number of sites.
▪ Press “ ” to cancel and return to the previous screen.
▪ Press “ ” to confirm and return to the previous screen.
Page 32
Partie III – Pump programming
32
Entering the residual rate
SO♥CONNECT PID displays the patient information screen. Press the residual rate to modify it.
SO♥CONNECT PID pump will display a numeric keypad to enter the residual rate.
▪ Use the keypad to enter the residual rate.
▪ Press “ ” to cancel and return to the previous screen.
▪ Press “ ” to confirm and return to the previous screen.
Entering the name of the medication
SO♥CONNECT PID pump displays the patient information screen. Press the name of the medication
to modify it.
SO♥CONNECT PID wil display the alphabetical keypad for entering the name of the medication. It
may have no more than 16 characters.
▪ Use the keypad to enter the surname.
▪ Press “” to delete the characters entered.
▪ Press “ ” to cancel and return to the previous screen.
▪ Press “ ” to confirm and return to the previous screen.
Step 2 : selecting the type of syringe and the volume to infuse
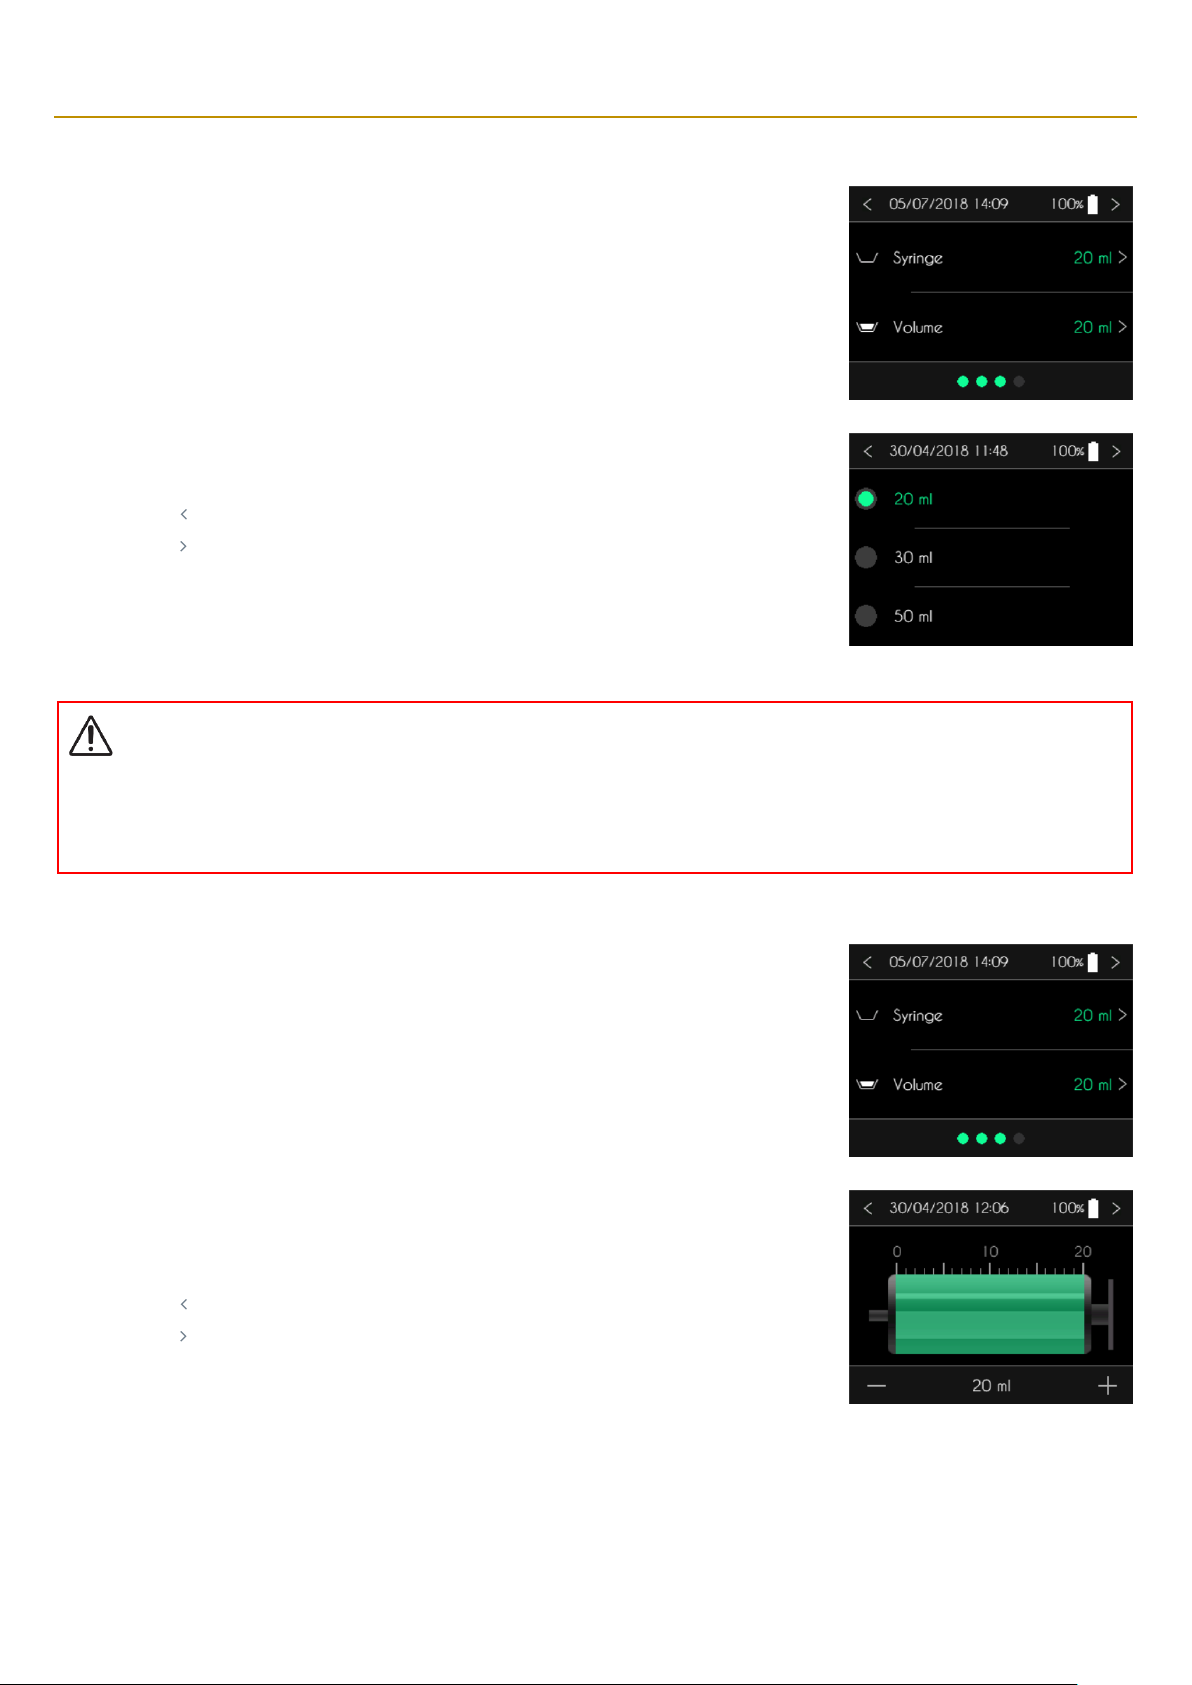
After the patient information is confirmed, the SO♥CONNECT PID pump displays the type of syringe
and the volume to infuse.
Page 33
Partie III – Pump programming
33
Selecting the type of syringe
SO♥CONNECT PID pump displays the screen for the type of syringe and the volume to infuse.
SO♥CONNECT PID displays the list of compatible syringes.
▪ Press the type of syringe used for the infusion.
▪ Press “ ” to cancel and return to the previous screen.
▪ Press “ ” to confirm and return to the previous screen.
Warning
▪
Always make sure to select the correct type of syringe corresponding to the one you are going to use for the infusion. The
movements of the pusher of the pump are calibrated to match the type of syringe. Selecting the wrong type of syringe can prevent
the infusion from progressing properly.
Entering the volume to infuse
SO♥CONNECT PID displays the screen to select the type of syringe and the volume to infuse. Press
on the volume to modify it.
SO♥CONNECT PID pump displays the screen to enter the volume to infuse.
▪ Set the volume by pressing the image of a syringe.
▪ Adjust the value by pressing “+” or “-“.
▪ Press “ ” to cancel and return to the previous screen.
▪ Press “ ” to confirm and return to the previous screen.
Page 34
Partie III – Pump programming
34
Step 3 : entering the flow rate or the duration of the infusion
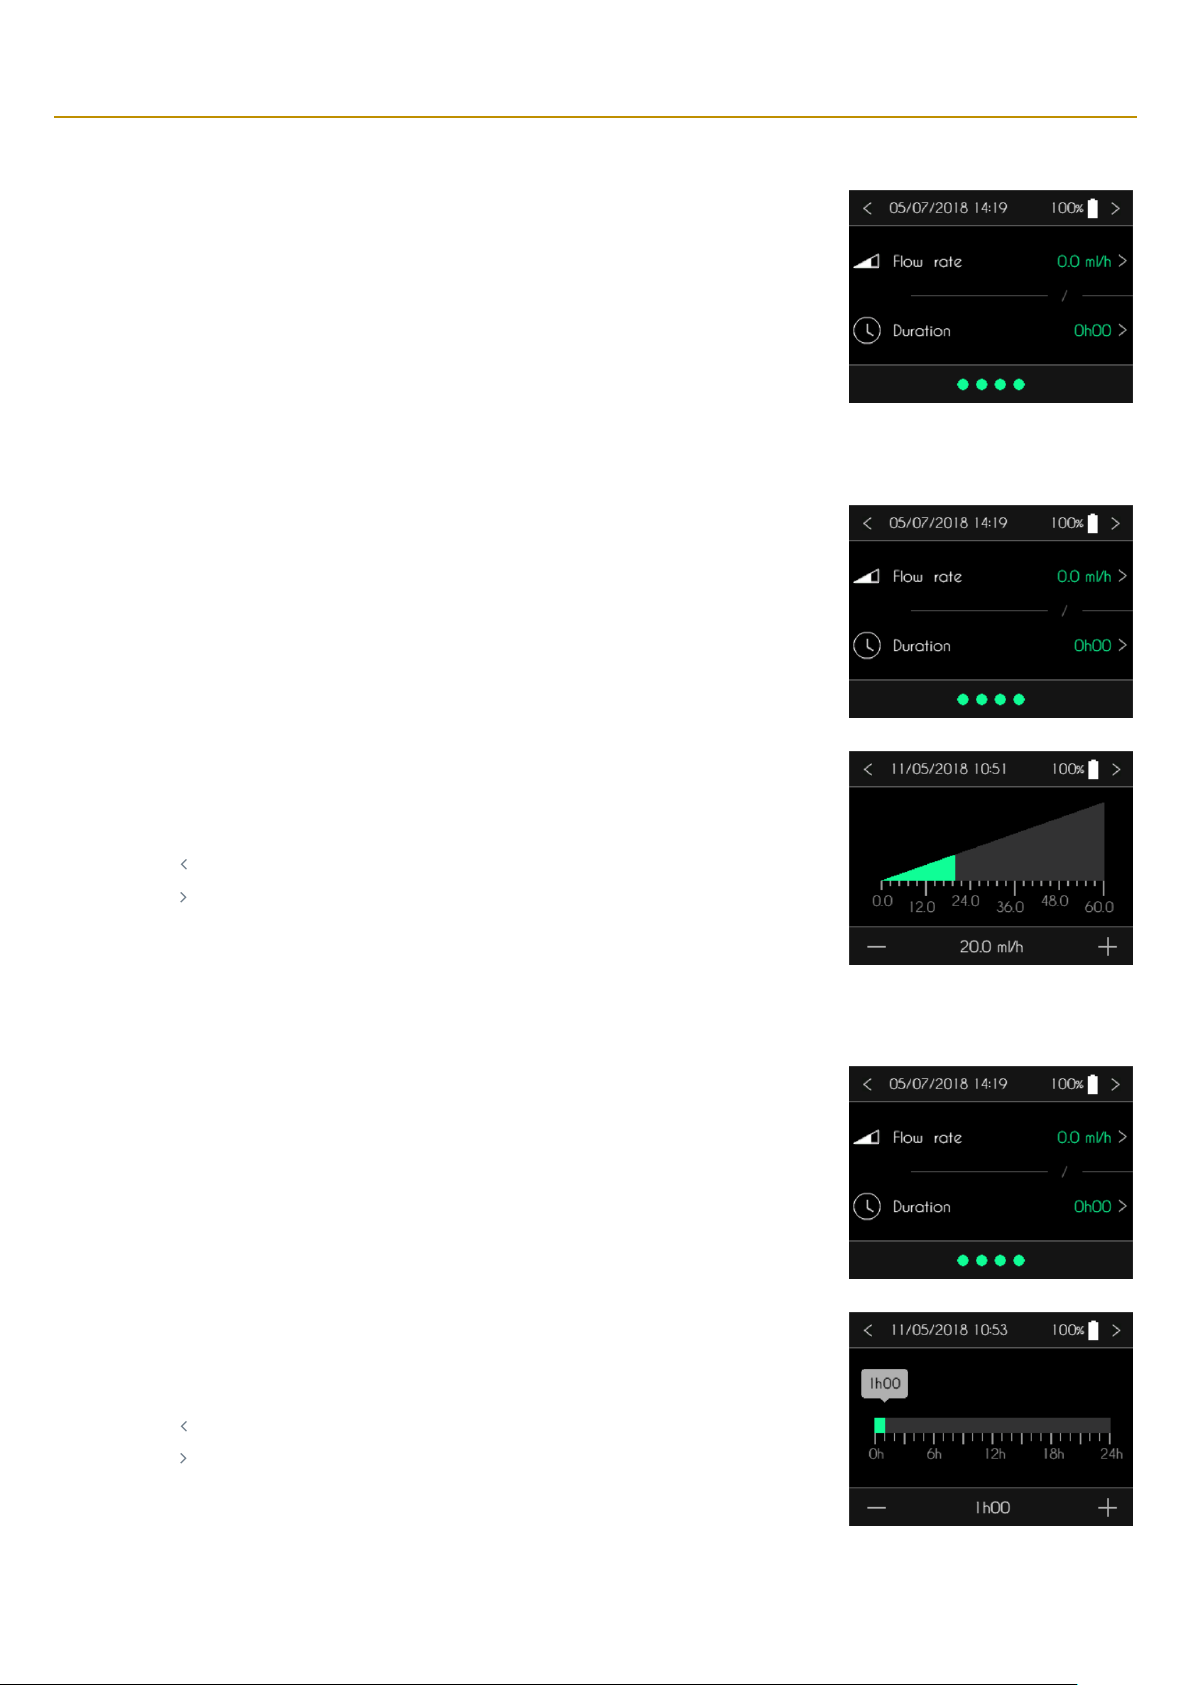
SO♥CONNECT PID pump displays the screen of the flow rate and the duration of the infusion. Press
on the flow rate to modify it.
Entering the flow rate.
SO♥CONNECT PID pump displays the screen of the flow rate and the duration. Press the flow rate
to modify it.
SO♥CONNECT PID pump displays the screen to enter the flow rate.
▪ Press the graph to select the infusion rate.
▪ Adjust the value with “+” and “-“.
▪ Press “ ” to cancel and return to the previous screen.
▪ Press “ ” to confirm and return to the previous screen.
Entering the duration of the infusion
The SO♥CONNECT PID pump displays the screen of the flow rate and duration. Press the duration
to modify it.
The SO♥CONNECT PID pump displays the screen to enter the duration of the infusion.
▪ Press the graph to select the duration.
▪ Adjust the value with “+” and “-“.
▪ Press “ ” to cancel and return to the previous screen.
▪ Press “ ” to confirm and return to the previous screen.
Page 35
Partie III – Pump programming
35
Pump initialization
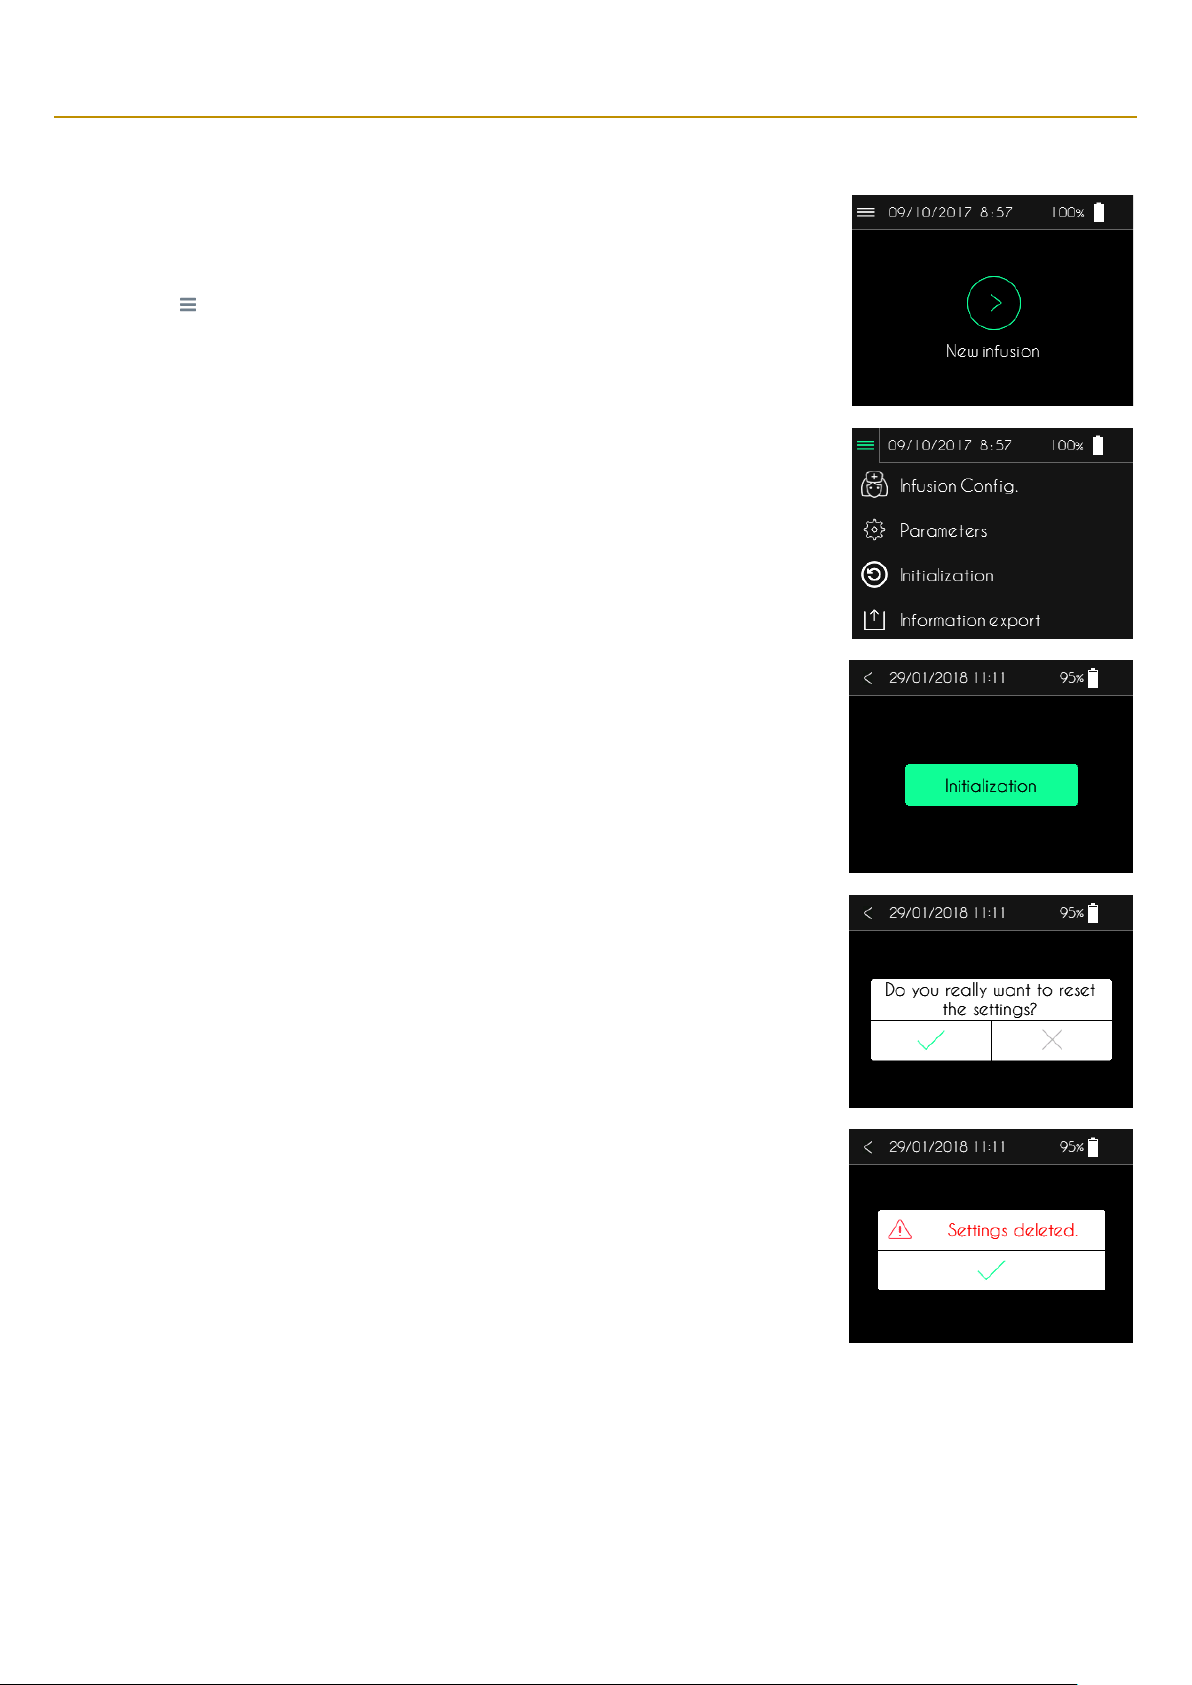
The patient information as well as the infusion parameters can be deleted by using the initialization
function.
▪ Press “ ” to open the menu for additional functions.
▪ Press “Initialization”.
The pump will display the first setup tab (Time, Date and Date format).
▪ Press “Initialization” to initialize patient information and infusion parameters.
▪ Press “<” to return the main screen.
After pressing Initialization, the pump displays a confirmation request.
▪ Press “✓” to confirm the initialization.
▪ Press “X” to cancel the initialization.
After initialization, the pump displays a confirmation message.
▪ Press “✓” to return to the main screen.
Page 36

36
Part IV – Syringe and infusion set
This part of the user’s manual contains the following information:
▪ SO
♥
FILL syringes
,
▪
infusion set.
Page 37
Partie IV – Syringe and infusion set
37
Syringe
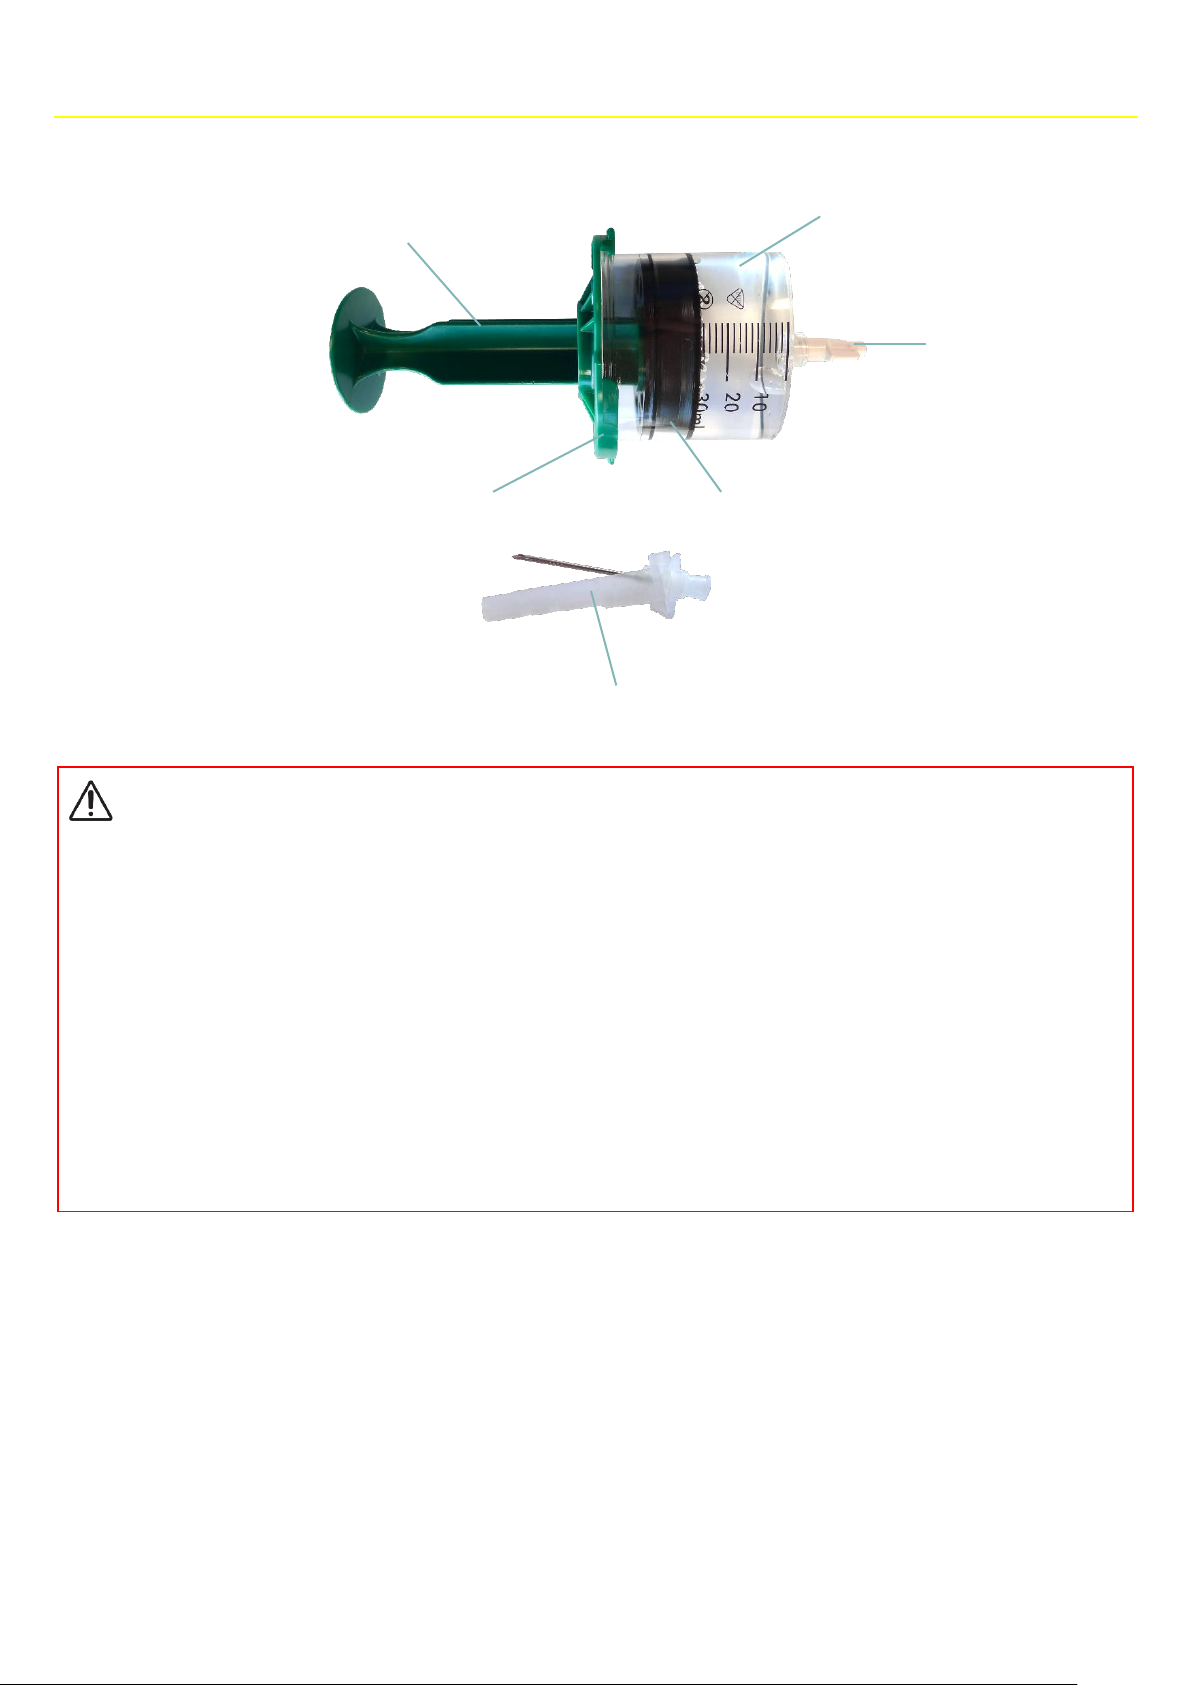
Warning
▪
Only use
SO♥FILL syringes
. Using other
syringes
may damage the
SO♥CONNECT PAR
®
pump and cause serious injury to the
patient.
▪
Do not use the
SO♥FILL syringes
if the packaging is damaged.
▪
The
SO♥FILL syringes are supplied in a sterile condition and can only be used once.
▪ SO
♥
FILL syringes
may not be re-sterilised.
▪
While handling the
syringe
, take care to use the Luer-Lock fitting or place a clamp on the infusion set to stop the apomorphine from
flowing out.
Plunger
Body of the syringe
Luer-Lock fitting
Guide
Seal
Safety needle
Page 38
Partie IV – Syringe and infusion set
38
Filling the syringe
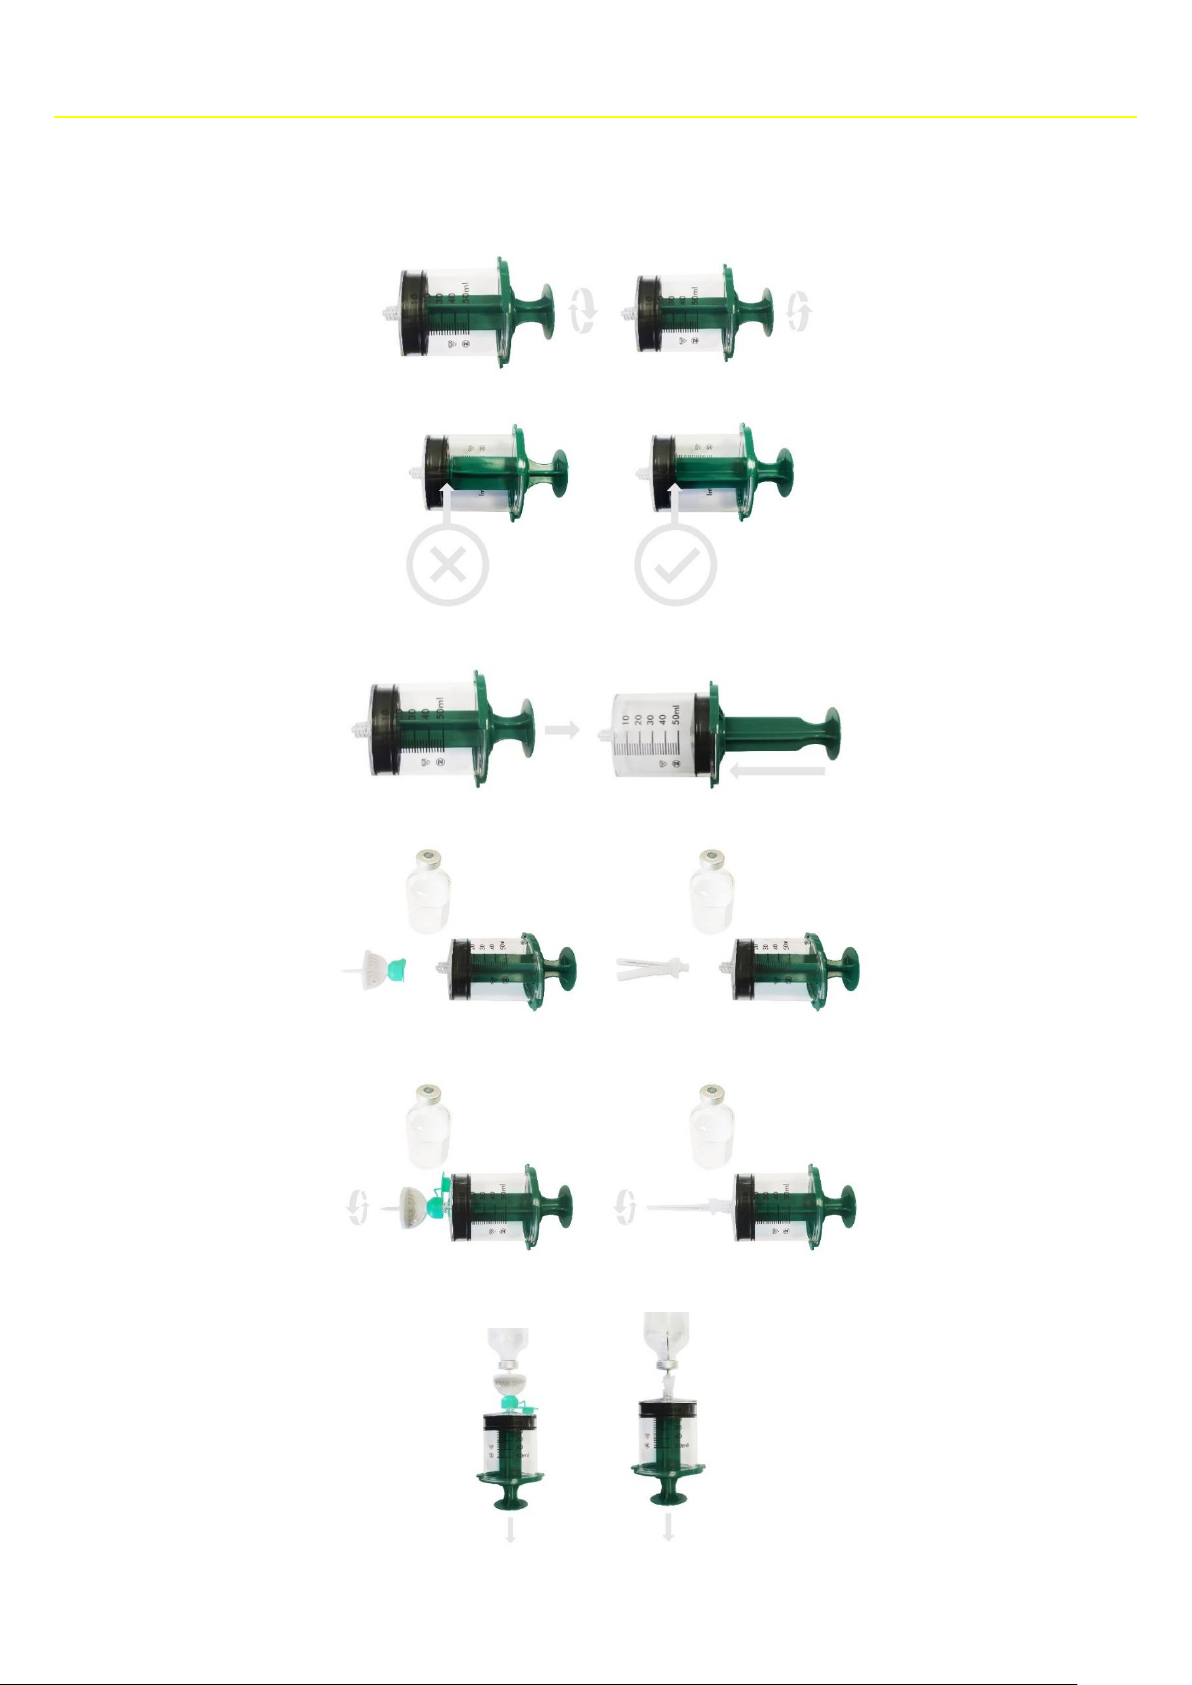
To fill the SO♥FILL syringe, please follow the steps below:
1. Unscrew and screw the plunger so that it can be unscrewed easily after filling the syringe.
2. Check the correct “tightening” between the plunger and the piston.
3. Push the plunger back and forth to uniformly lubricate the silicone inside the body of the SO
♥
FILL syringe.
4. To fill the SO
♥
FILL syringe, you can use the safety needle or a spike.
5. Screw the safety needle or the spike on the SO
♥
FILL syringe clockwise.
6. Fill the SO
♥
FILL syringe by sucking up the liquid slowly.
Page 39
Partie IV – Syringe and infusion set
39
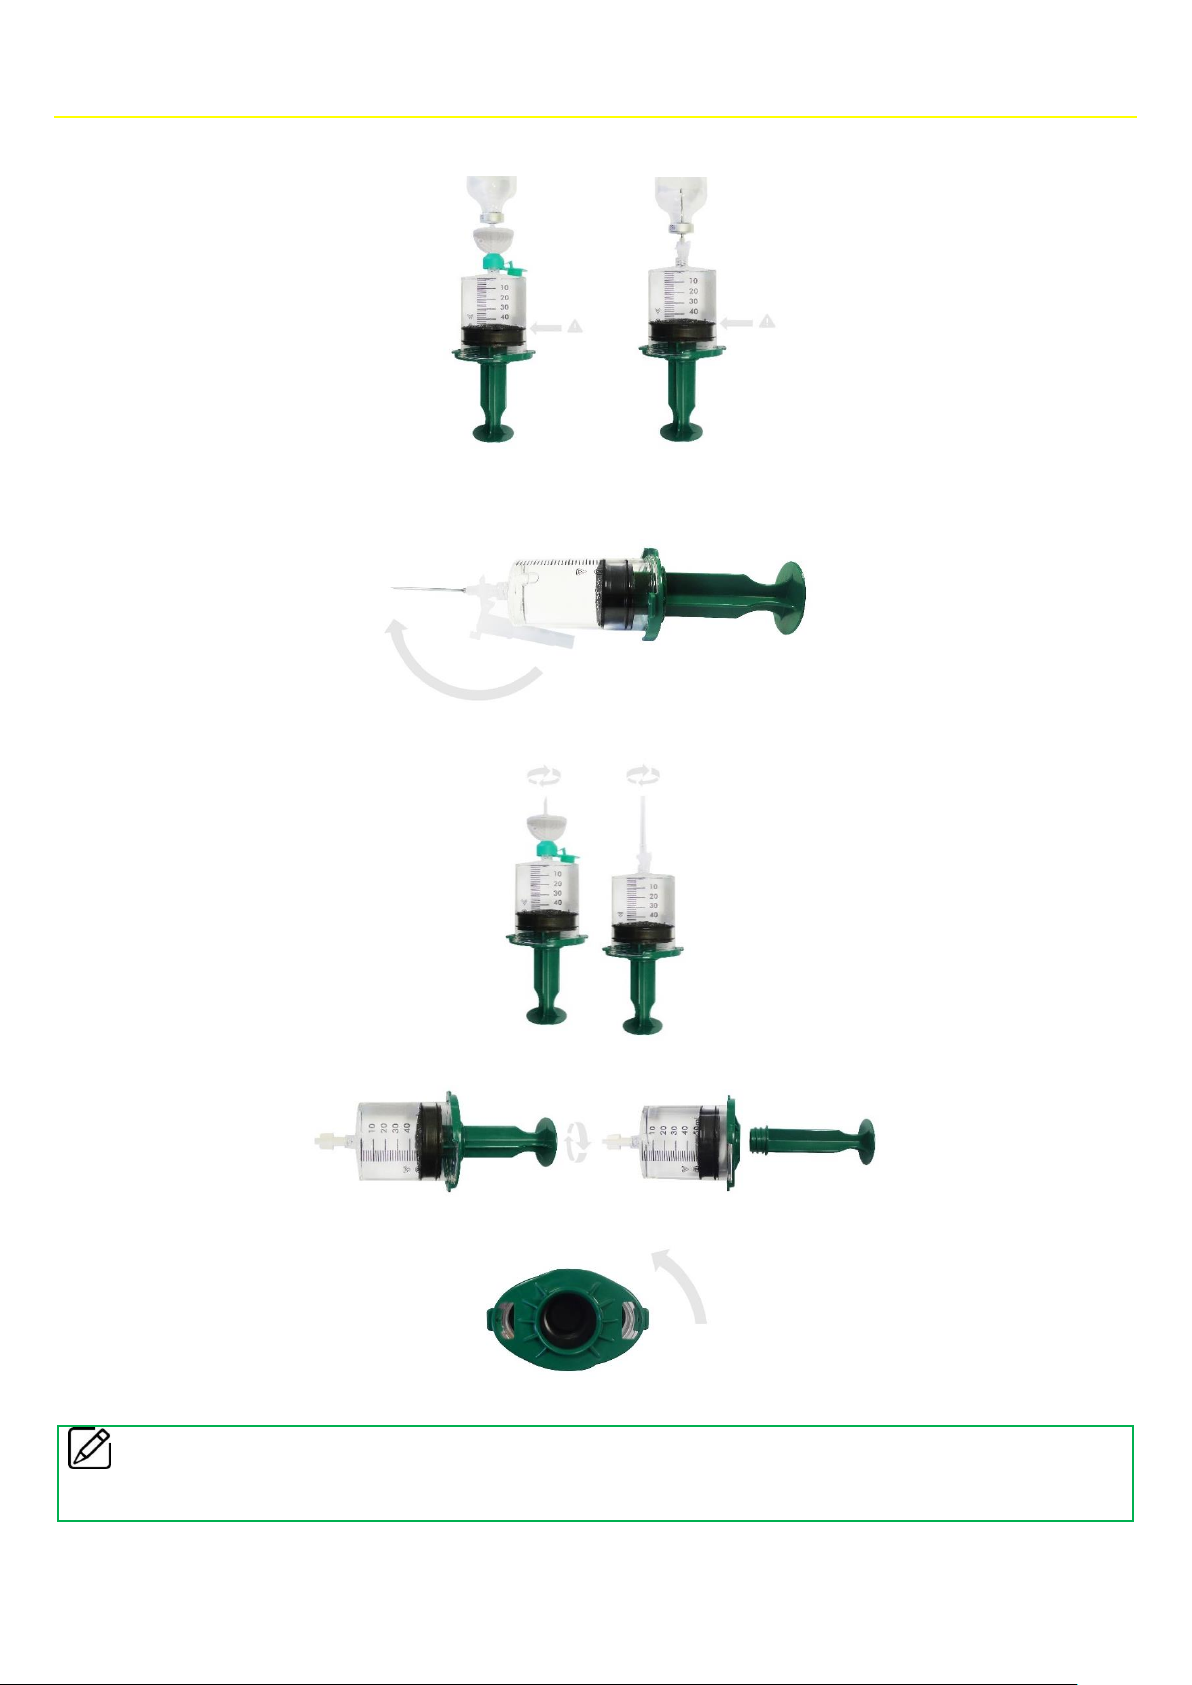
7. Verify that the quantity of liquid does not exceed the capacity of the SO
♥
FILL syringe or the defined volume.
8. If you used the safety needle, after filling the SO
♥
FILL syringe, clip the protective cap to avoid injury.
9. Unscrew the safety needle or the spike from the SO
♥
FILL syringe counterclockwise.
10. Unscrew the plunger counterclockwise.
11. Remove the flange for plunger by turning it counterclockwise.
Comments
▪
In order to avoid the formation of bubbles, make sure that the
SO♥FILL syringe
is at ambient temperature before use.
Page 40
Partie IV – Syringe and infusion set
40
Connecting the syringe to the pump
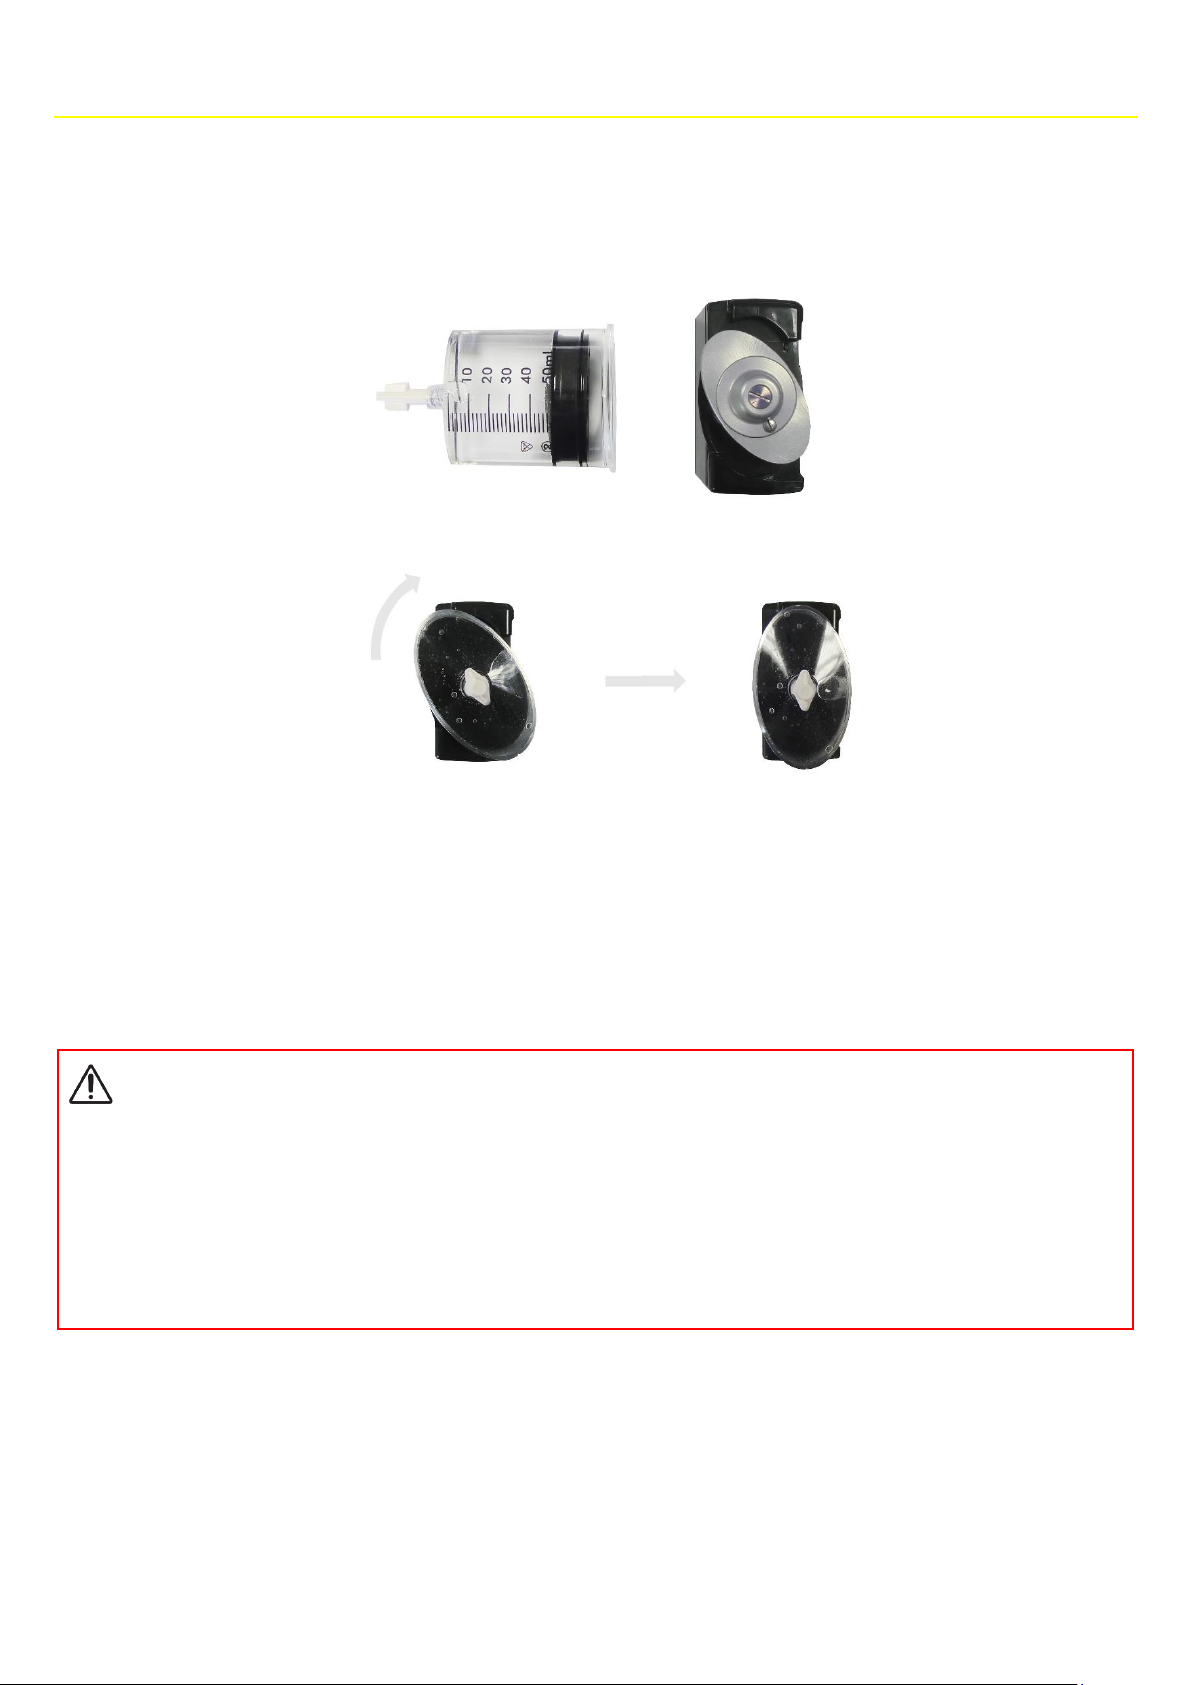
To connect the SO♥FILL syringe to the SO♥CONNECT PAR® pump, please follow the steps below:
1. Turn the head of the pusher on the SO
♥
CONNECT PAR® pump
2. Place the SO♥FILL syringe on the SO
♥
CONNECT PAR® pump and turn it clockwise.
Infusion set
Infusion sets with the characteristics below should be used with the SO♥CONNECT PID pump and SO♥FILL syringes:
▪ small internal tube volume (optimum 0.1 ml, maximum 0.62 ml),
▪ tube that does not exceed 90 cm length,
▪ anti-throttle tube.
Warning
▪
The use of an unsuitable infusion set may make the
SO♥CONNECT PAR
®
pump malfunction, e.g. it may take longer to report an
occlusion.
▪
Before using patient tubing accessories or connecting the
SO♥CONNECT PAR
®
pump to other infusion systems, please contact
user support to identify the procedure to apply. Connecting the
SO♥CONNECT PAR
®
pump to other infusion systems may make
the infusion rate inaccurate.
Page 41
Partie IV – Syringe and infusion set
41
Putting in place the infusion set
The infusion set is to be put in place as follows:
1) Remove the adhesive tape.
2) Remove the needle guard.
3) Pinch the skin with one hand and insert the infusion set vertically.
4) Press the adhesive to fix the infusion set on the skin.
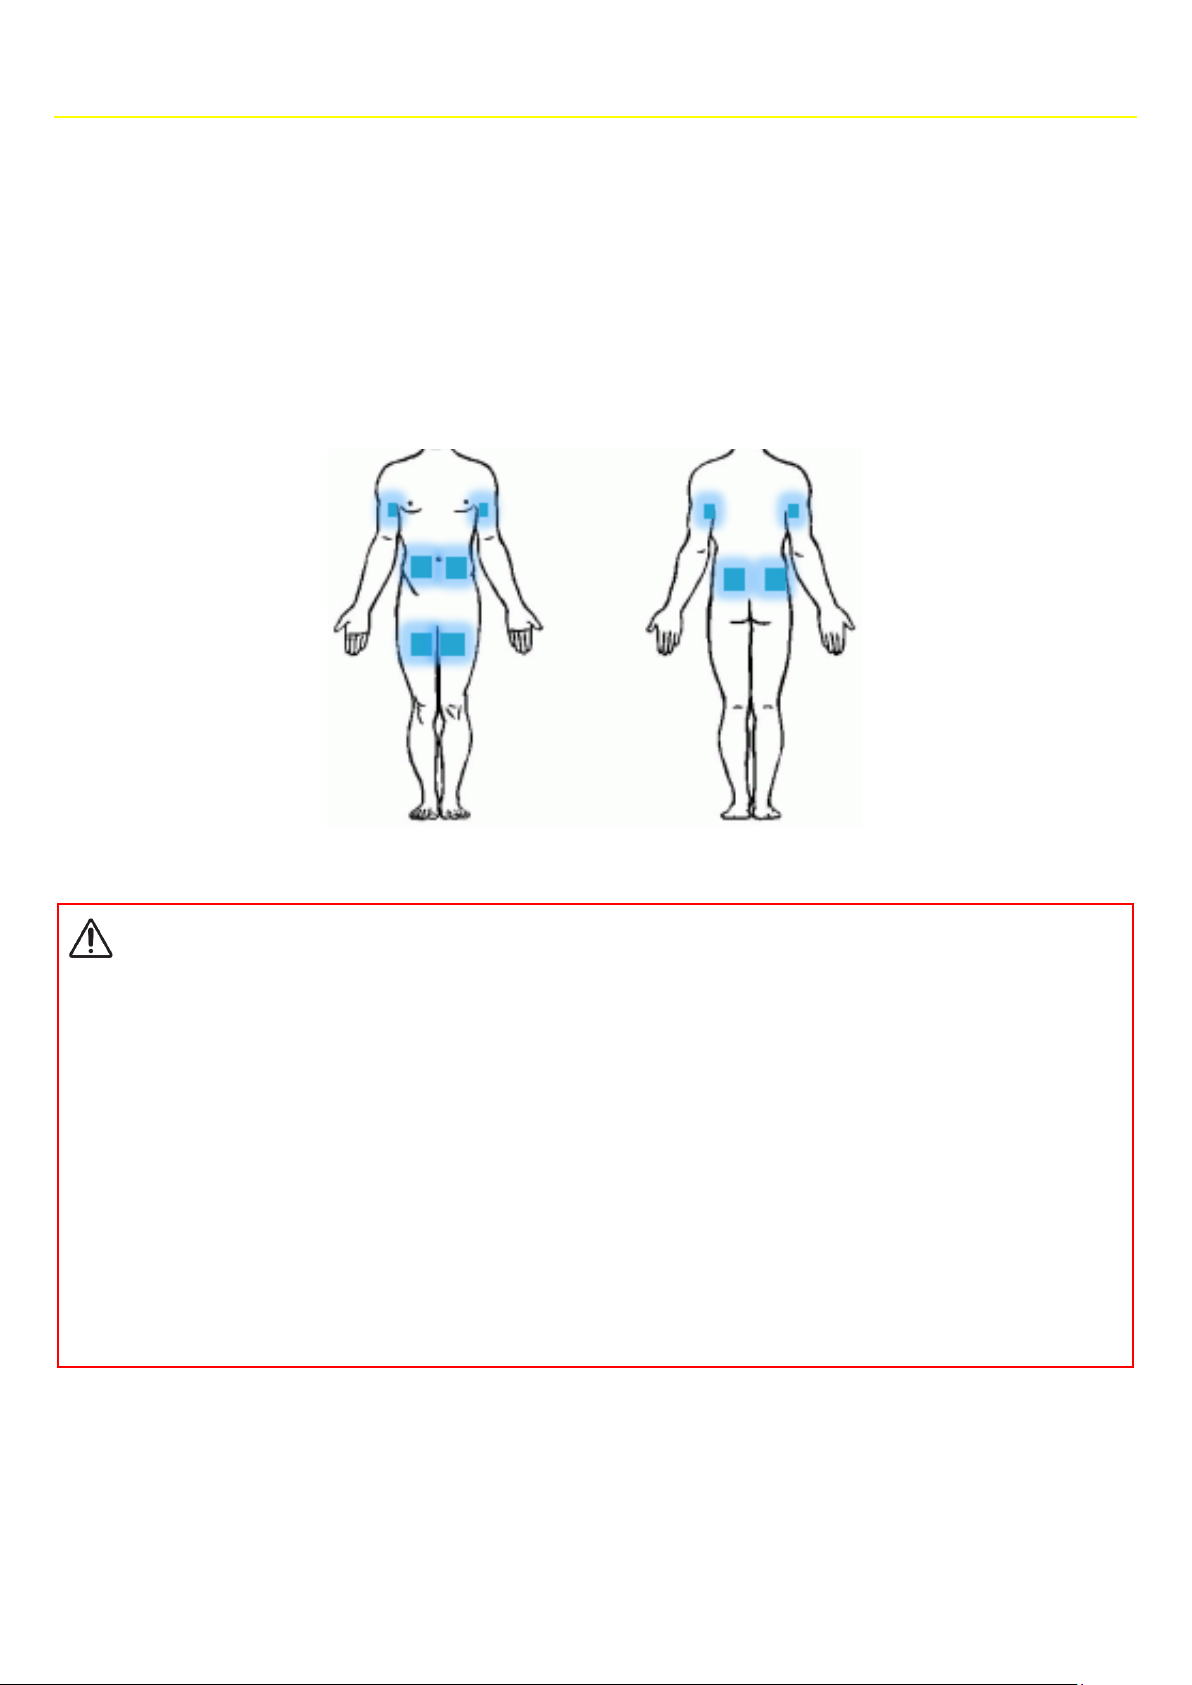
Infusion sites
The images below show the recommended infusion sites.
The injection site should be changed after each infusion to avoid irritation.
Warning
▪
Always work in aseptic conditions in order to minimise the risk of infection.
▪
Caution! Apomorphine will stain clothes and other items.
▪
Before selecting an infusion site, please consult the patient first to see which side he wants to carry the pump to.
▪
Oedematous areas, swollen tissue are not appropriate because absorption of the drug may not be effective.
▪
Avoid the upper arm in bedridden patients who need to turn frequently.
▪
Check the injection site regularly to make sure skin tissue does not have inflammatory or infectious reactions. If this occur s, a new
infusion set should be used with the needle positioned at least 3 cm from the site.
Page 42

42
Partie V – Infusion
This part of the user’s manual contains the following information:
▪ starting an infusion
▪ infusion control screen
▪ infusion control menu
▪ pausing the infusion
▪ restarting the infusion
▪ modifying the flow rate or the duration of the infusion
▪ End of infusion
▪ Unwanted events
▪ Exporting clinical datas
▪ Viewing internal informations
Page 43
Partie V – Infusion
43
Starting an infusion
Warning
▪
Before starting an infusion, check that the date and time are correct. The clinical datas are saved based on this information.
Precautions
▪
Do not position the syringe on the pump until it invites you to do so. This could cause the pump to malfunction and trigger an
occlusion alarm.
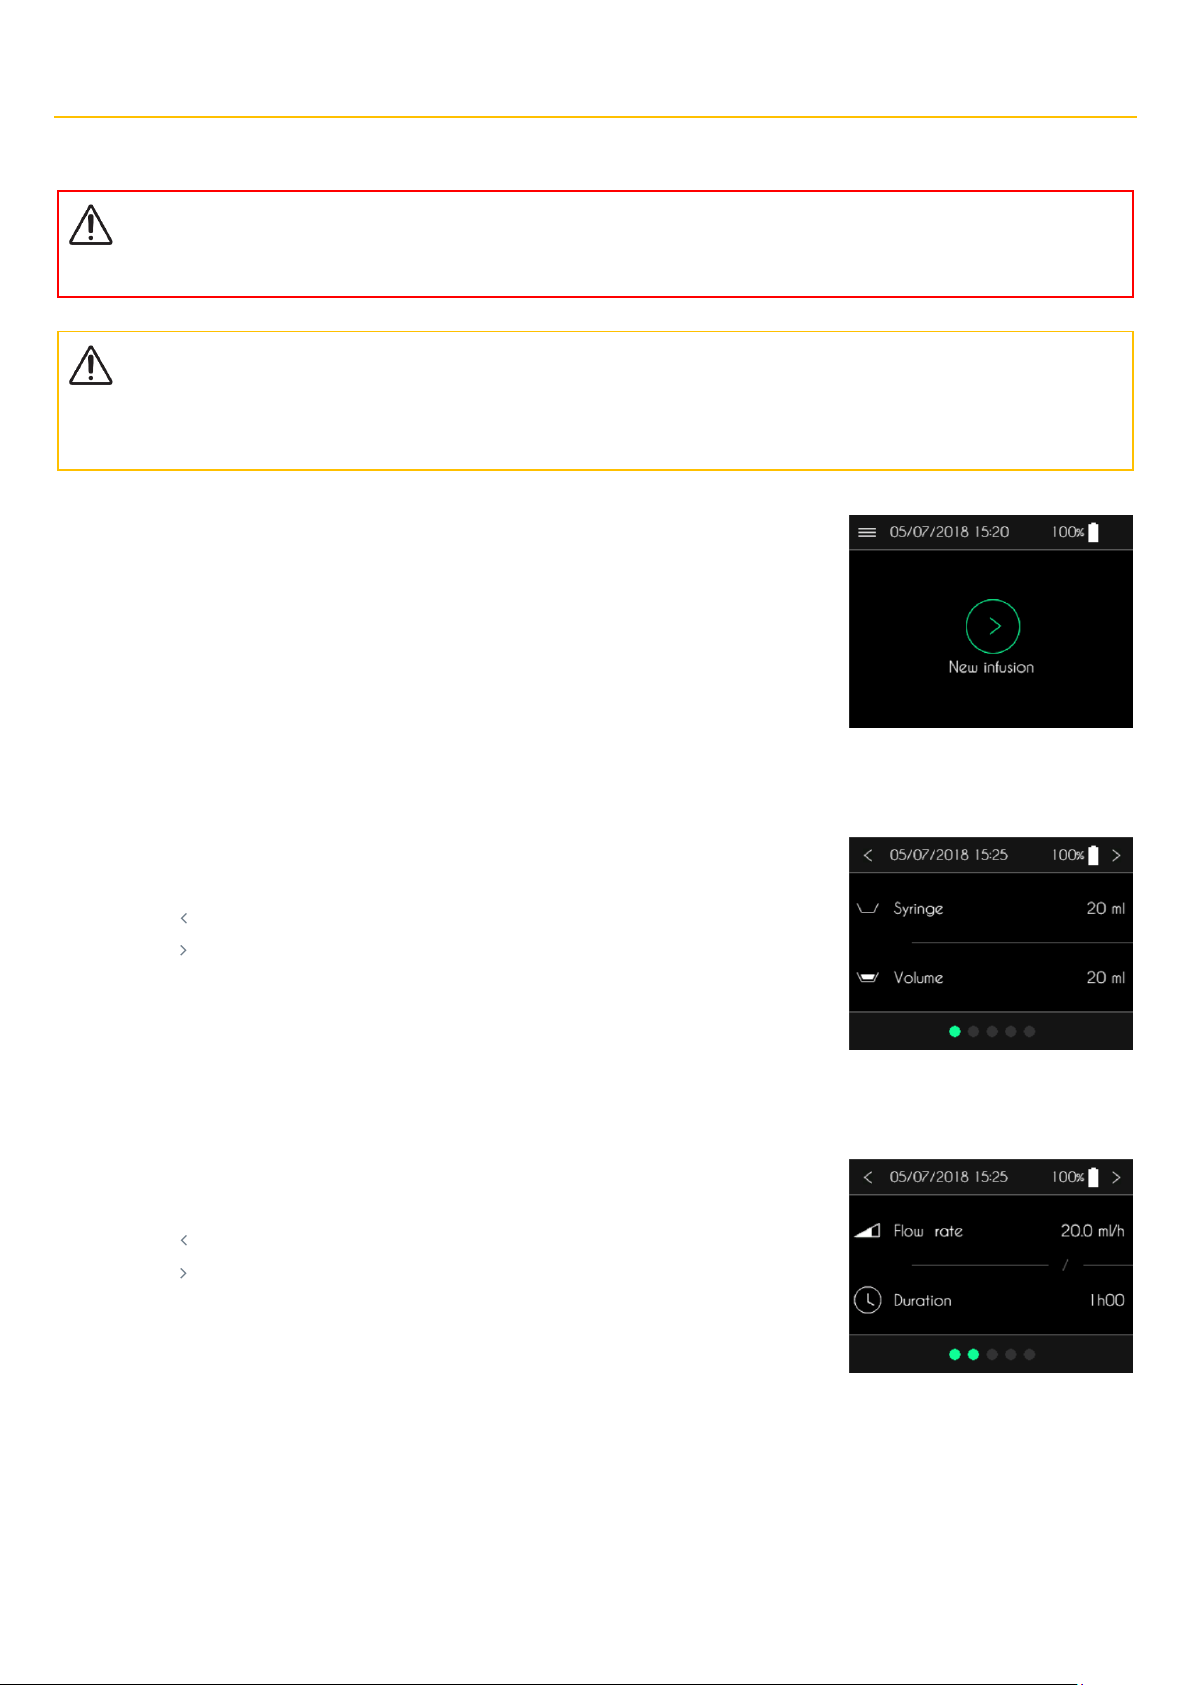
The infusion start is carried out from the main screen.
▪ Appuyez sur le bouton Nouvelle perfusion pour démarrer la perfusion.
Step 1 : syringe type and volume checking
After pressing the New infusion button, the SO♥CONNECT PID pump displays the syringe type and
the unit.
▪ Press “ ”to return to the main screen.
▪ Press “ ” to go to the next screen.
Step 2: flow rate or duration checking
After confirming the patient information, the SO♥CONNECT PID pump displays the flow rate and
the duration of the infusion.
▪ Press “ ”to return to the previous screen.
▪ Press “ ” to go to the next screen.
Page 44
Partie V – Infusion
44
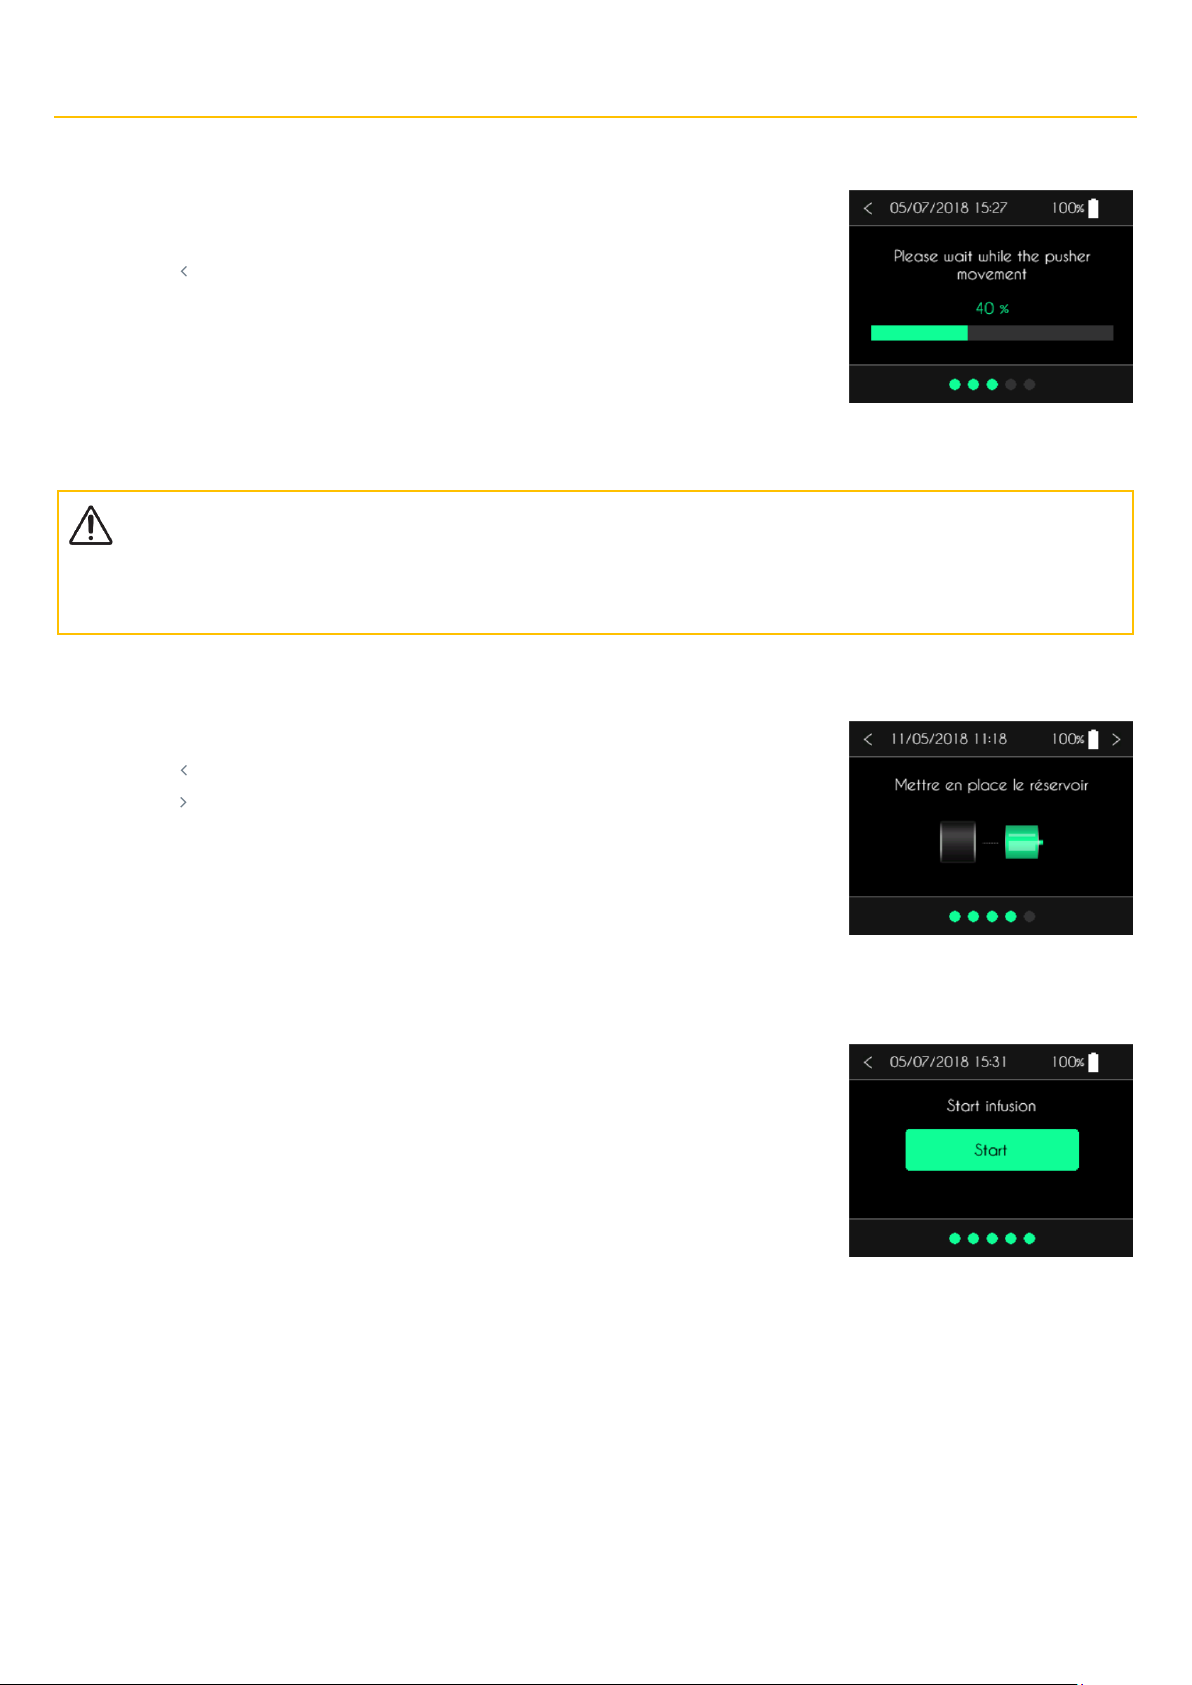
Step 3: positioning the pusher
After confirming the flow rate or the duration of the infusion, SO♥CONNECT PID pump positions the
pusher automatically. This operation can take several minutes.
▪ Press “ ”to return to the previous screen.
Précautions
▪
Do not block the movement of the pusher. That could cause the
SO♥CONNECT PID pump to malfunction and activate an occlusion
alarm.
Step 4: installing the syringe
After filling the SO♥FILL syringe, you can put it in place.
▪ Press “ ”to return to the previous screen.
▪ Press “ ” to go to the next screen.
Step 5: Starting the infusion
Press the Start button to start the infusion.
Page 45
Partie V – Infusion
45
Infusion control screen
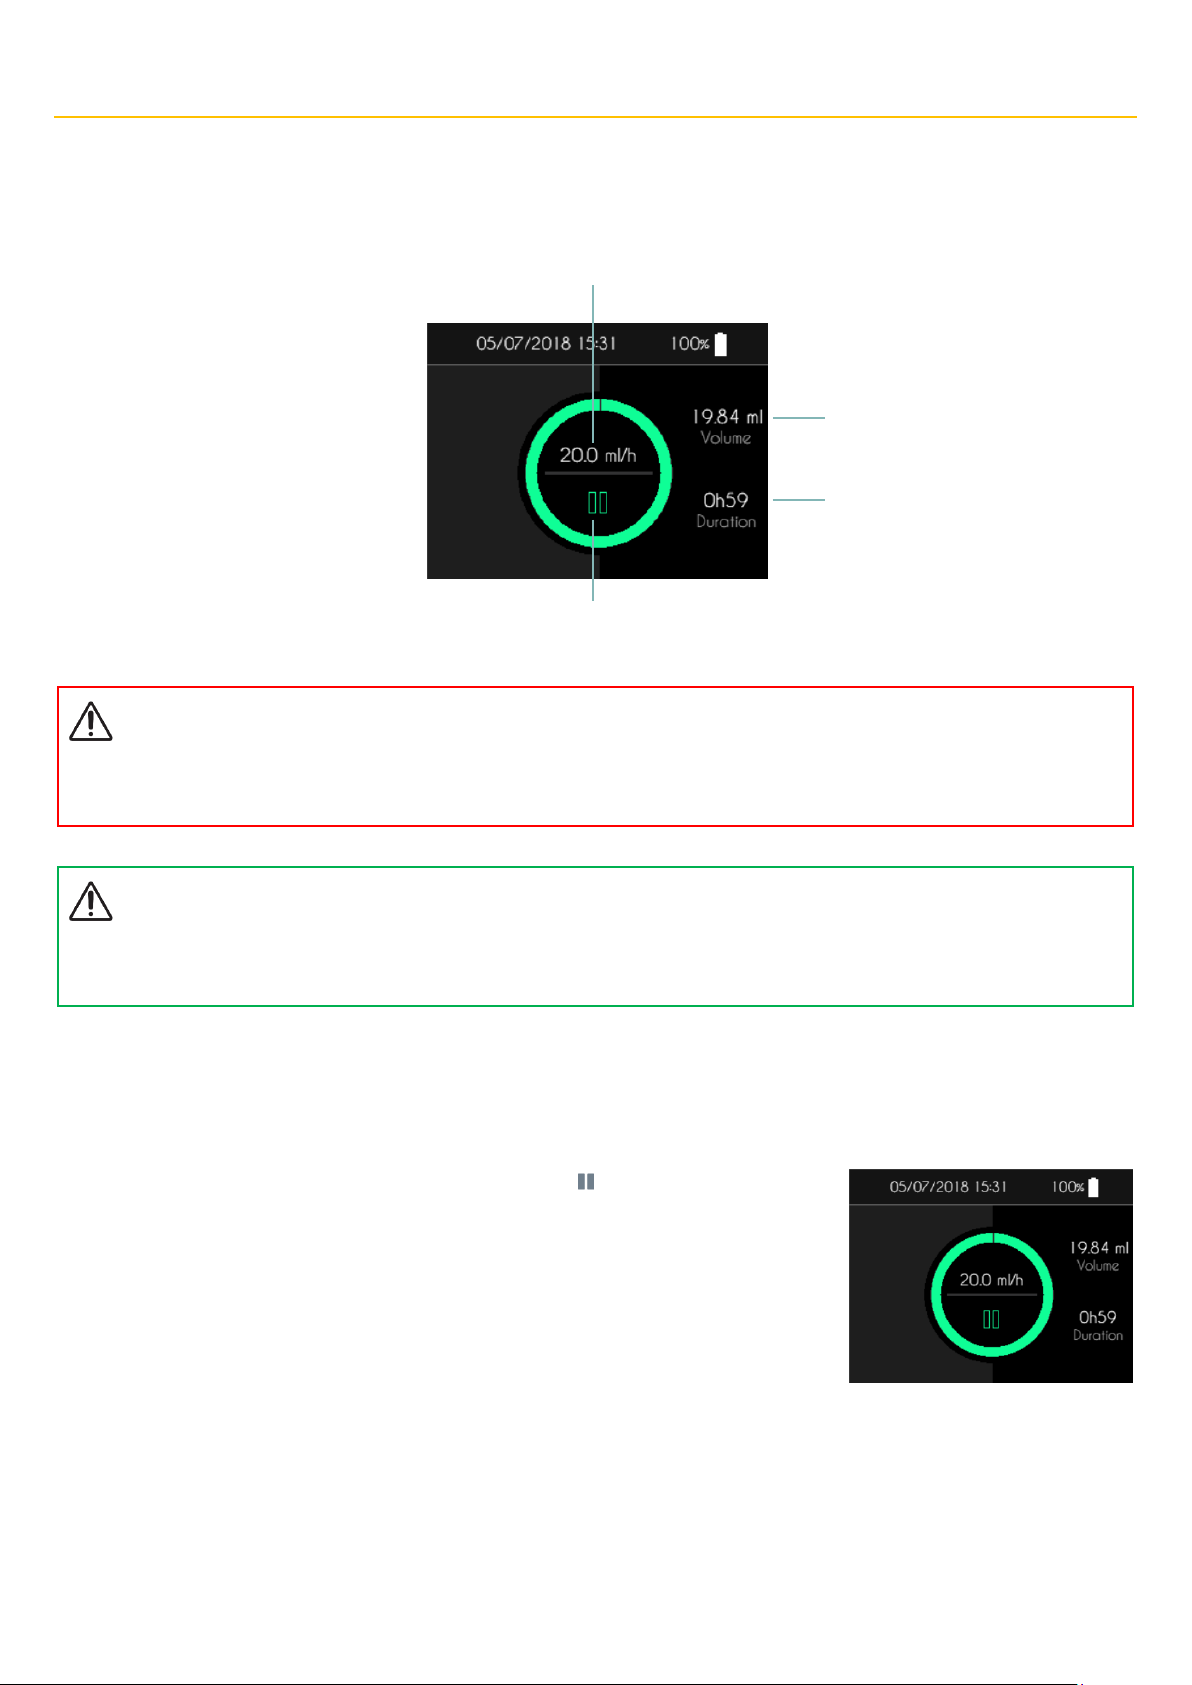
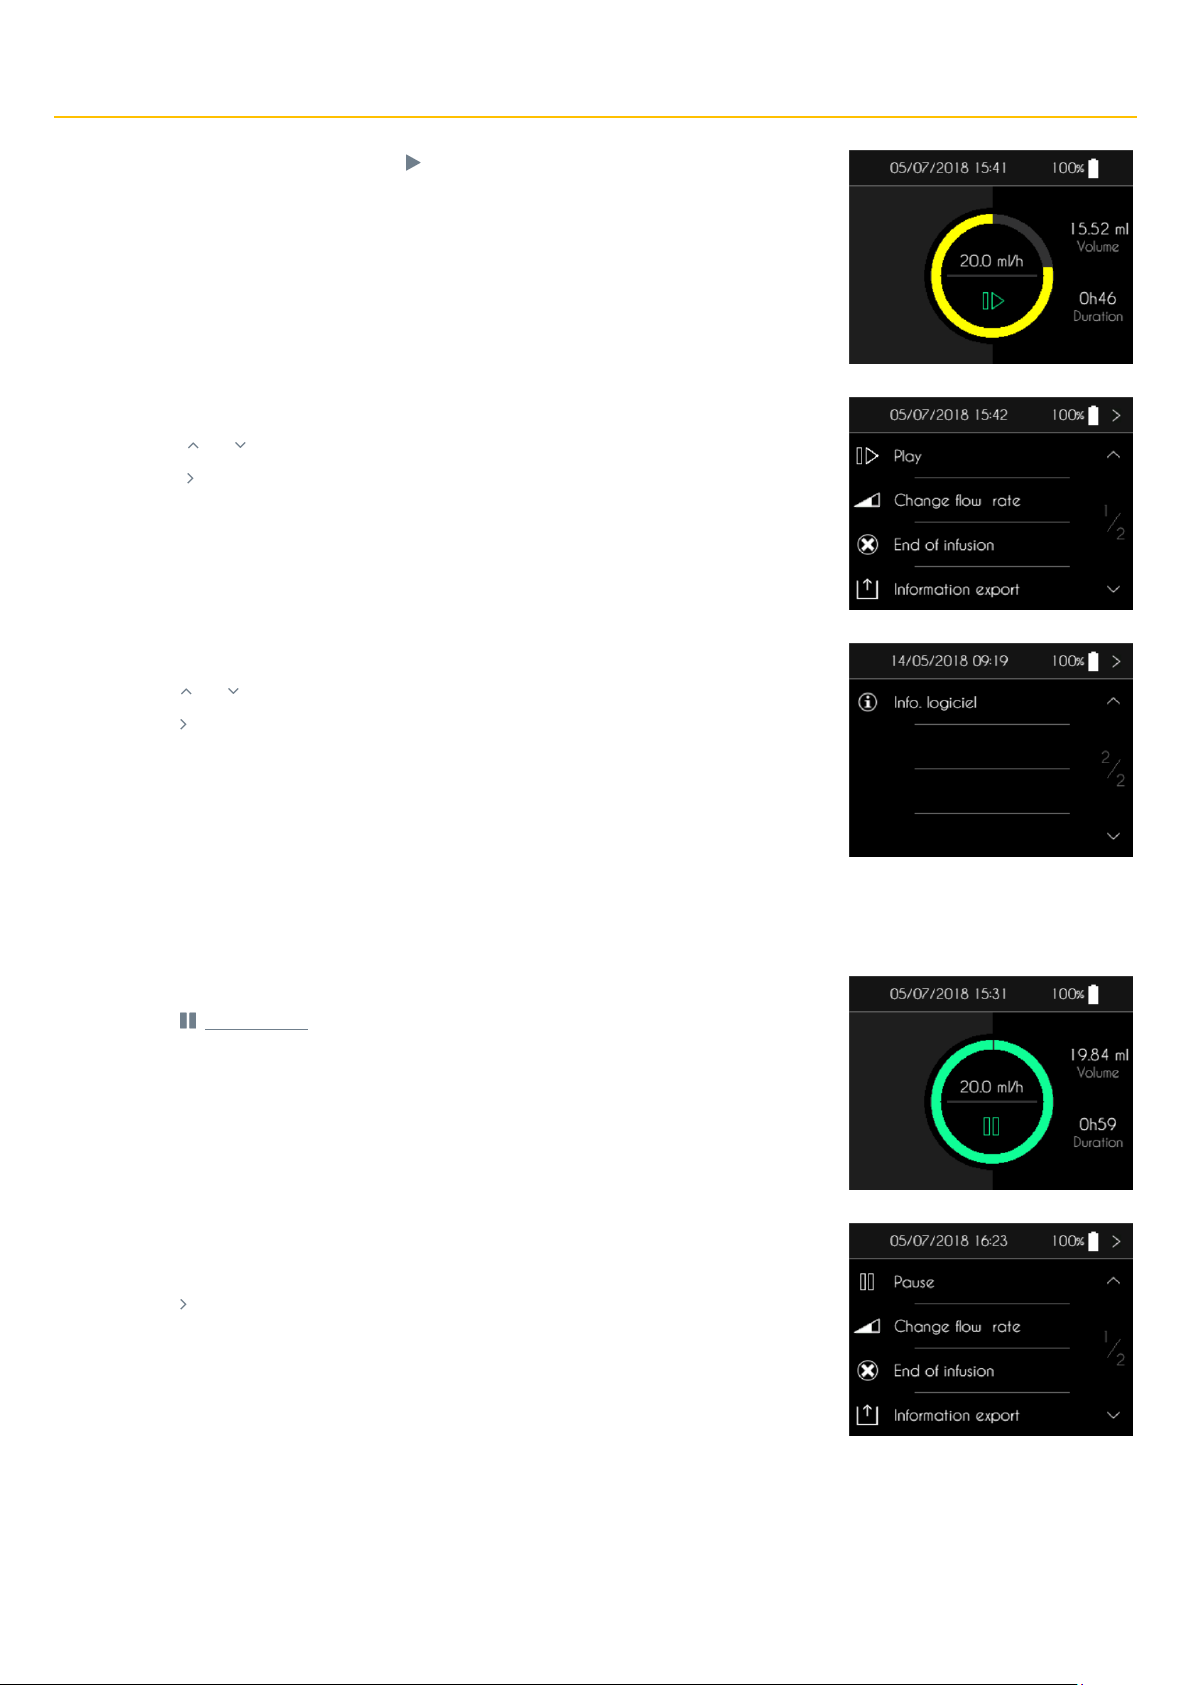
During the infusion, the SO♥CONNECT PID pump displays information about its status.
Warning
▪
During the infusion, check the working of the pump from time to time. If you observe any malfunctioning or poor performance,
pause the infusion and contact user support.
Comments
▪
In order to secure the use of the pump during an infusion, the supports on the various buttons must be maintained for 2 seconds
to be taken into account.
Infusion control menu
From the infusion control screen, you can access various functions grouped in an infusion control menu.
▪ When the infusion is under way, you can pause it. Press “ ” to open the infusion control
menu.
Current infusion rate
Infusion control menu
Remaining volume
Remaining time
Page 46
Partie V – Infusion
46
▪ When the infusion is paused, press “ ” to access to the infusion control menu.
The SO♥CONNECT PID pump displays the first page of the infusion control menu.
▪ Press “ ” or “ ” to display the second page of the infusion control menu.
▪ Press “ ” to return to the infusion control screen.
The SO♥CONNECT PID pump displays the second page of the infusion control menu.
▪ Press “ ” or “ ” to display the first page of the infusion control menu.
▪ Press “ ” to return to the infusion control screen.
Pausing the infusion
While the infusion is under way, you can pause it.
▪ Press “ ” for 2 seconds.
The SO♥CONNECT PID pump displays the first page of the infusion control menu.
▪ Press “Pause” for 2 seconds.
▪ Press “ ” to cancel and return to the infusion control screen.
Page 47
Partie V – Infusion
47
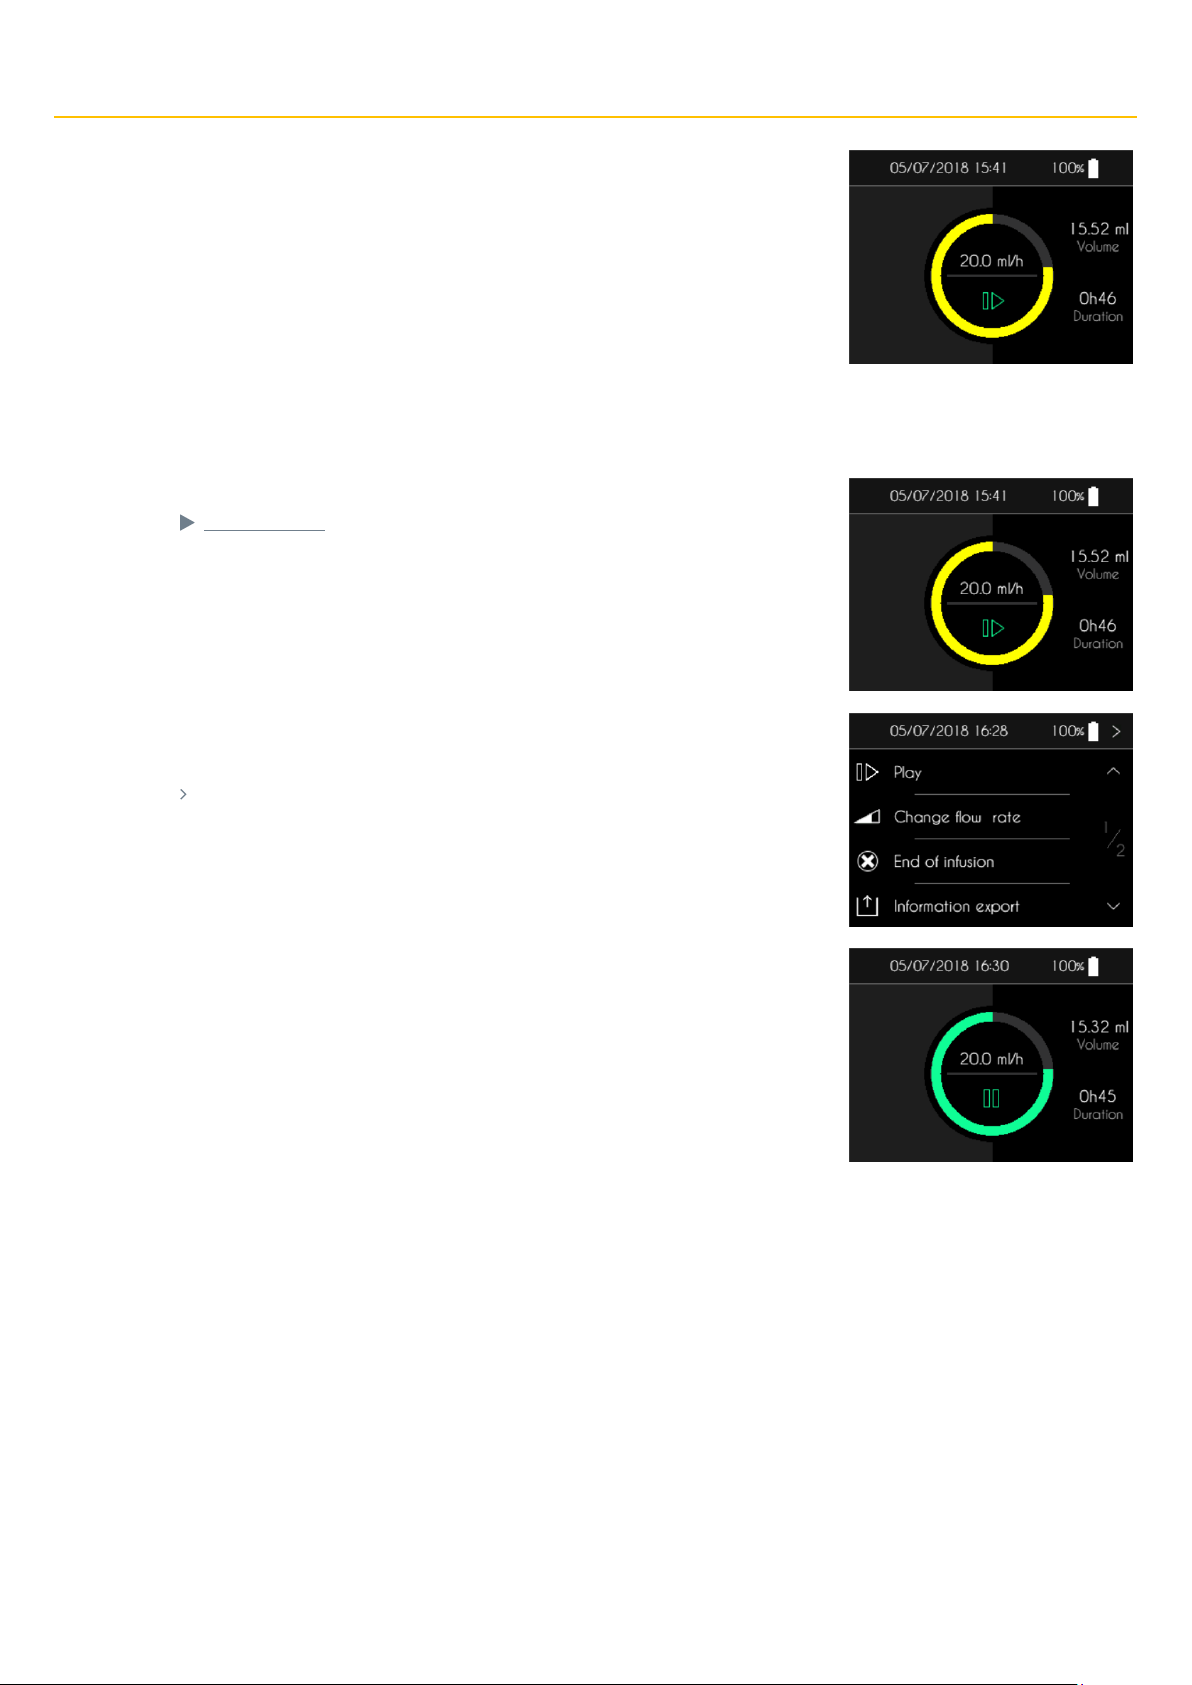
The SO♥CONNECT PID pump will pause the infusion.
When the infusion is paused, the circle flashes green / yellow.
Restarting the infusion
You can restart a paused infusion.
▪ Press “ ” for two seconds.
The SO♥CONNECT PID pump displays the first page of the infusion control menu.
▪ Press “Play” for 2 seconds.
▪ Press “ ” to cancel and return to the infusion control screen.
The SO♥CONNECT PID pump will resume the infusion.
Page 48
Partie V – Infusion
48
Modifying the infusion rates – Function reserved to medical staff
Warning
▪
The functions described in this chapter should only be used by trained medical personnel when using the pump. The use of these
functions by an untrained user can cause serious injury to the patient.
The SO♥CONNECT PID pump makes it possible to adjust the infusion rate during infusion.
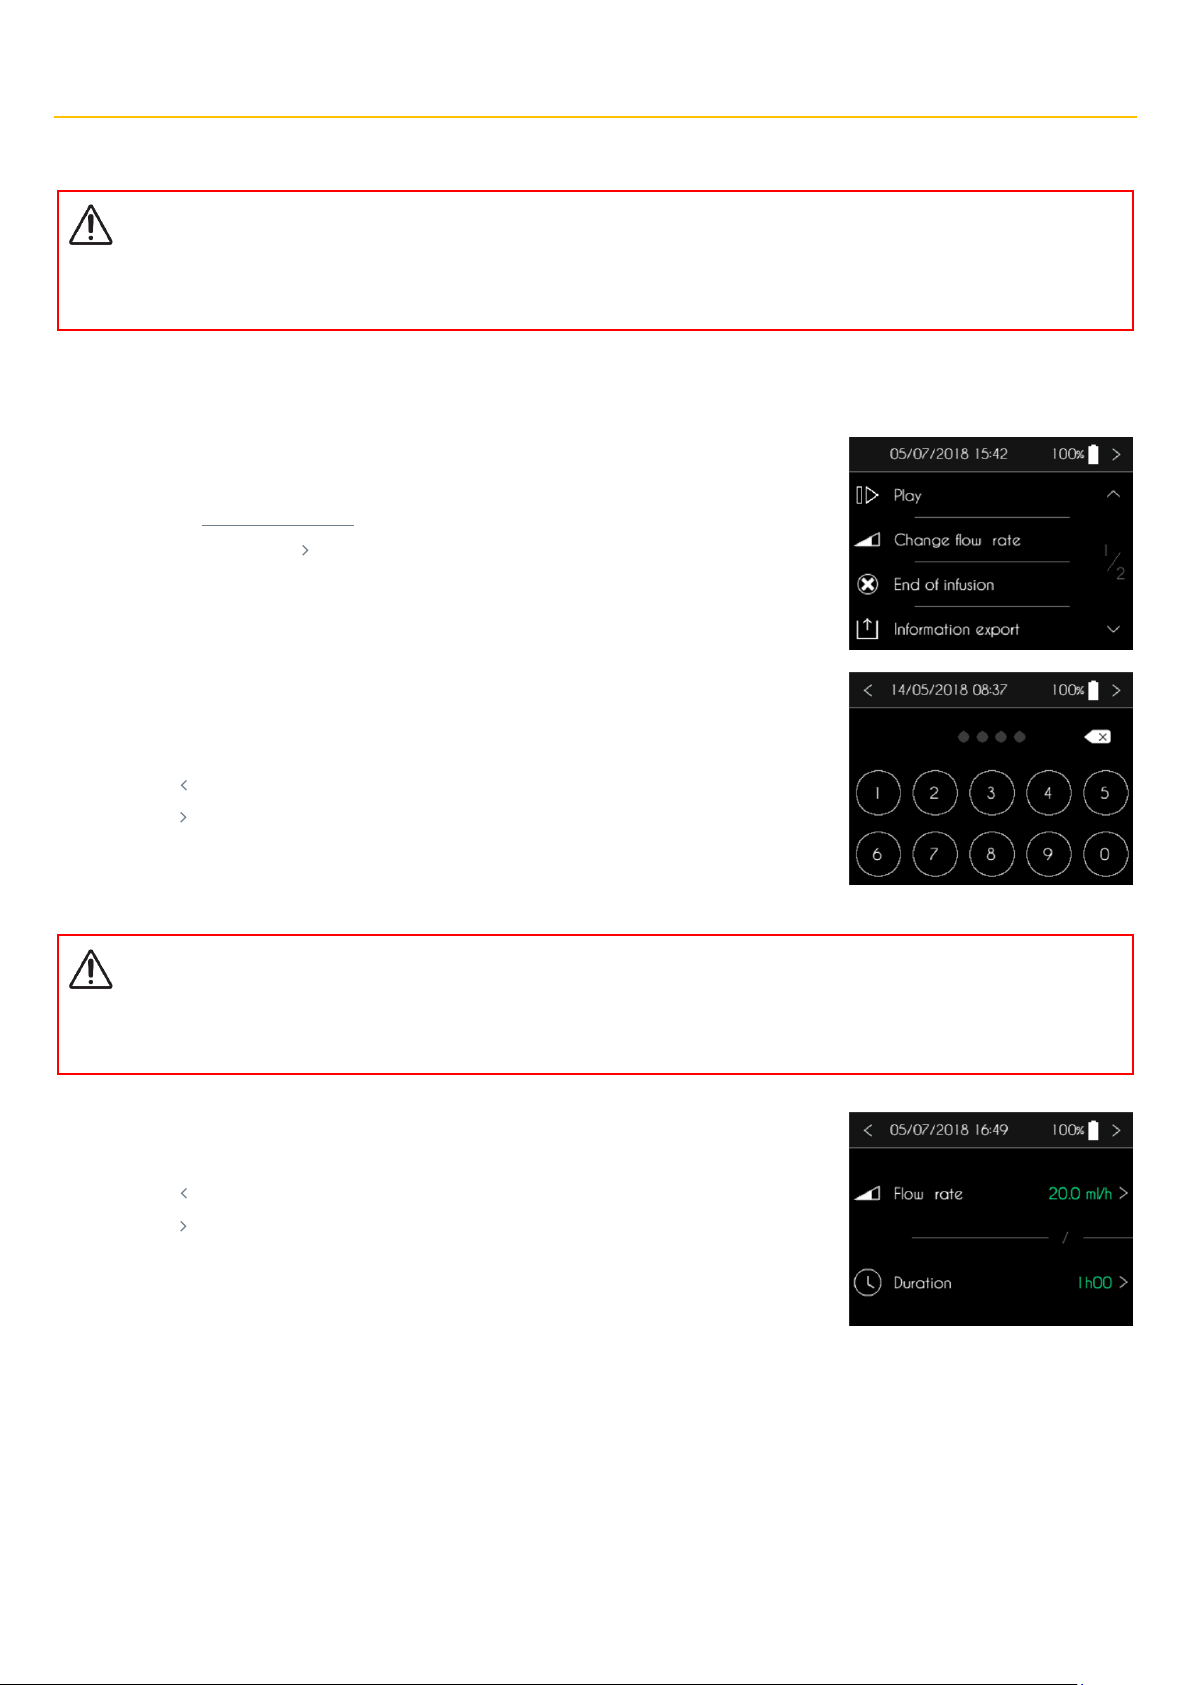
SO♥CONNECT PID affiche la page 1/2 du menu de contrôle de la perfusion.
▪ Appuyez, pendant 2 secondes, sur Modifier débits.
▪ Appuyez sur le bouton pour revenir à l’écran de perfusion.
The SO♥CONNECT PID pump displays a numeric keypad to enter the password.
▪ Use the keypad to enter the password.
▪ Press “” to delete entered characters.
▪ Press “ ” to cancel and return to the infusion control screen.
▪ Press “ ” to confirm and access to the flow rate and duration screen.
Warning
▪
After entering and validating the password, the infusion is automatically paused. At the end of the flow rate modification, remember
to restart the infusion.
The SO♥CONNECT PID pump displays the screen to modify the flow rate or the duration of the
infusion.
▪ Press “ ” to cancel and return to the infusion control screen.
▪ Press “ ” to confirm and return to the infusion control screen.
Page 49
Partie V – Infusion
49
Modifying the flow rate
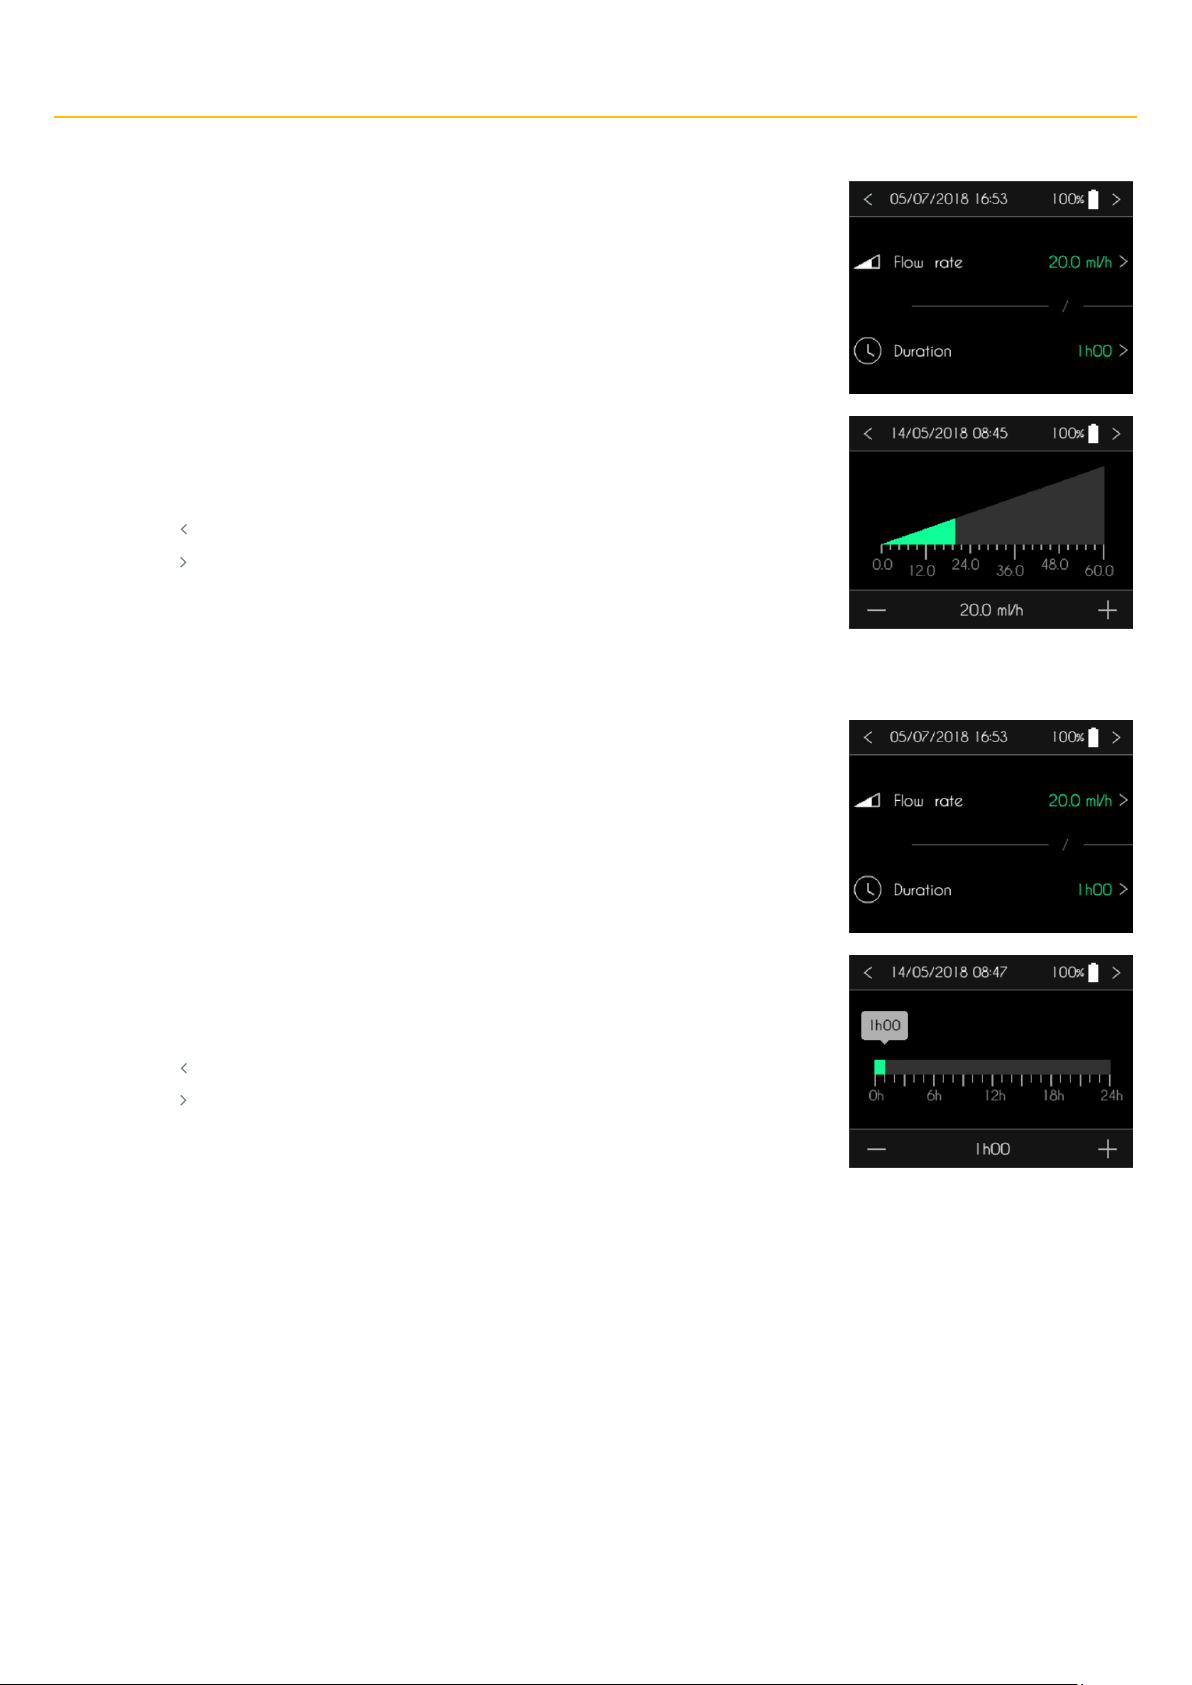
The SO♥CONNECT PID pump displays the screen to modify the flow rate or the duration of the
infusion. Press the flow rate to modify it.
The SO♥CONNECT PID pump displays the screen to enter the flow rate.
▪ Press the graph to select the infusion rate.
▪ Adjust the value with “+” and “-“.
▪ Press “ ” to cancel and return to the previous screen.
▪ Press “ ” to confirm and return to the previous screen.
Modifying the duration of the infusion
The SO♥CONNECT PID pump displays the screen to modify the flow rate or the duration of the
infusion. Press the duration to modify it.
The SO♥CONNECT PID pump displays the screen to enter the duration of the infusion.
▪ Press the graph to select the duration.
▪ Adjust the value with “+” and “-“.
▪ Press “ ” to cancel and return to the previous screen.
▪ Press “ ” to confirm and return to the previous screen.
Page 50
Partie V – Infusion
50
End of infusion
Stopping the infusion
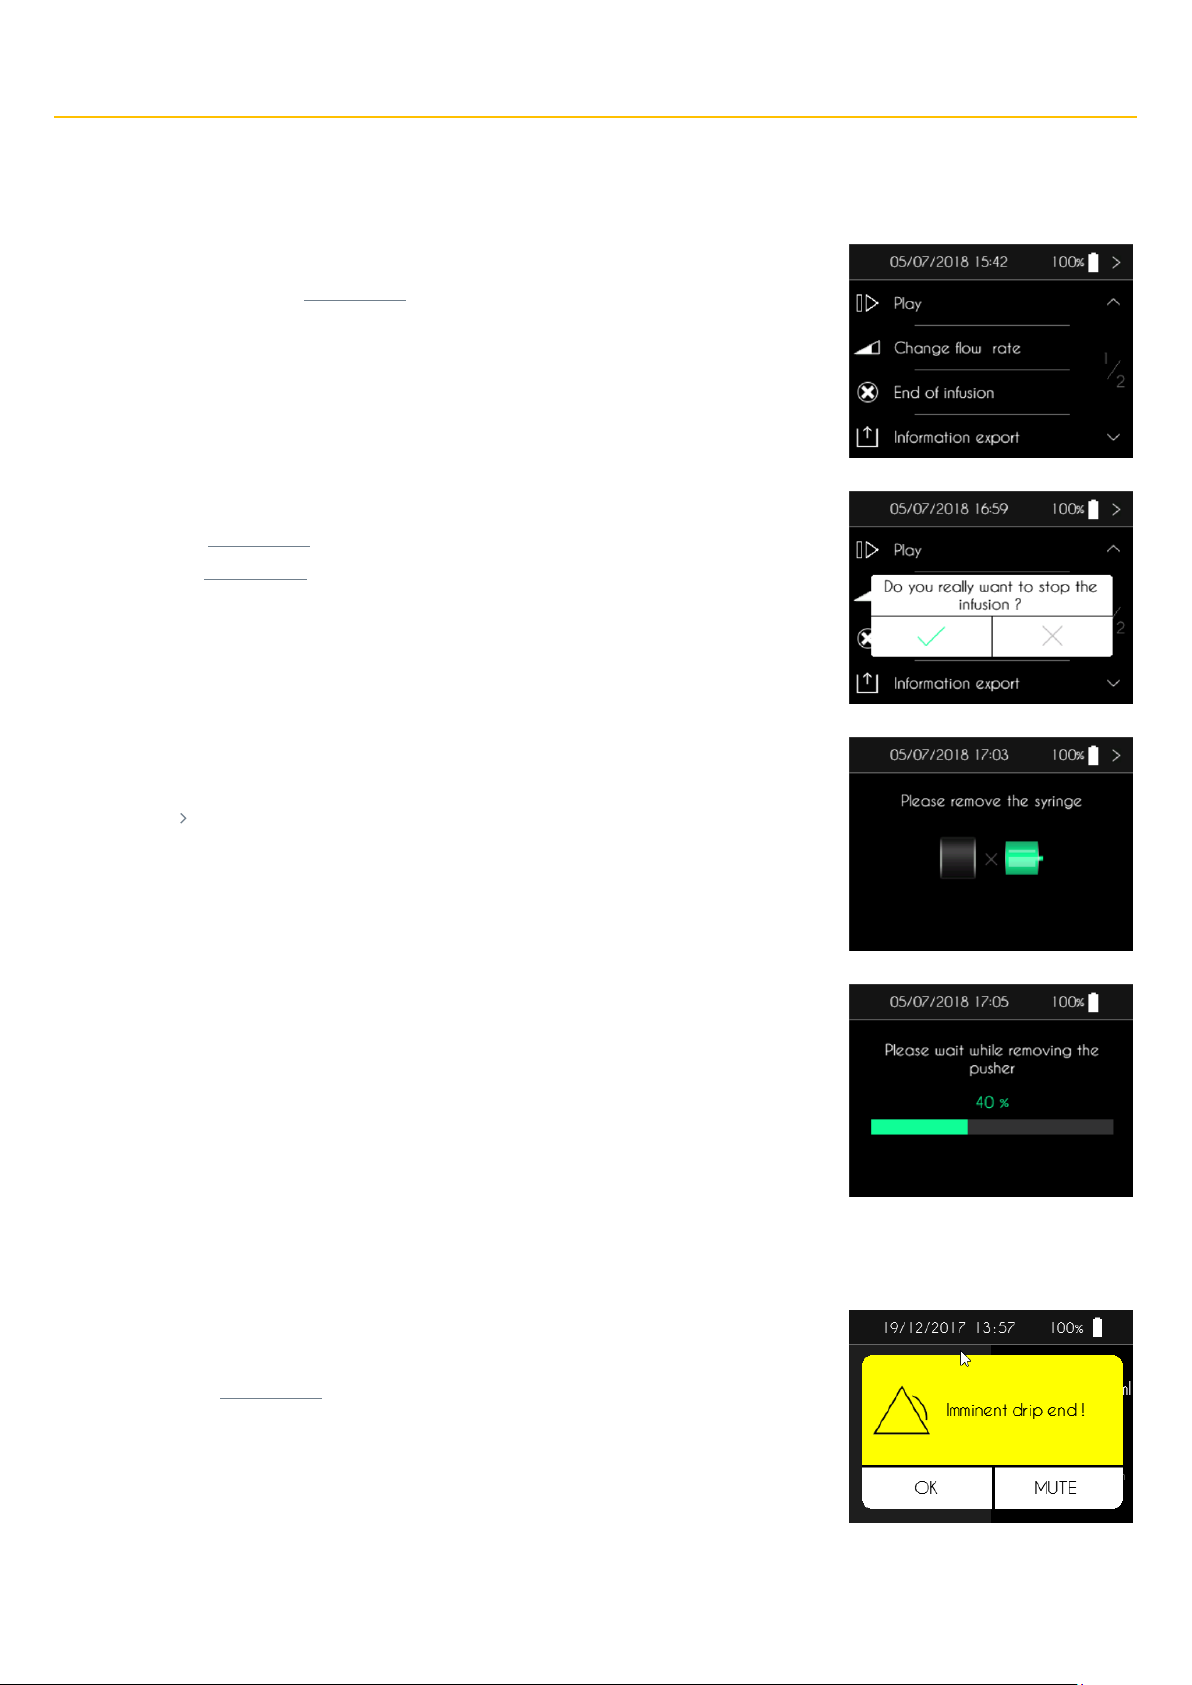
The SO♥CONNECT PID pump displays the first screen of the infusion control menu.
▪ Press “End of infusion” for 2 seconds.
The SO♥CONNECT PID pump displays a confirmation message.
▪ Press “✓” , for 2 seconds, to validate the end of infusion.
▪ Press “X” , for 2 seconds, to cancel.
After confirmation, the SO♥CONNECT PID pump displays the screen requesting removal of the
syringe.
▪ Press “ ” once the syringe is removed.
The SO♥CONNECT PID pump retracts the pusher. This operation can take several minutes.
Automatic end of infusion
Infusion about to end
The SO♥CONNECT PID pump generates an alarm approximately 5 minutes before the end of the
infusion. The infusion is not stopped when this alarm is generated.
▪ Press “OK”, for 2 seconds, to acknowledge the alarm.
Page 51
Partie V – Infusion
51
End of infusion
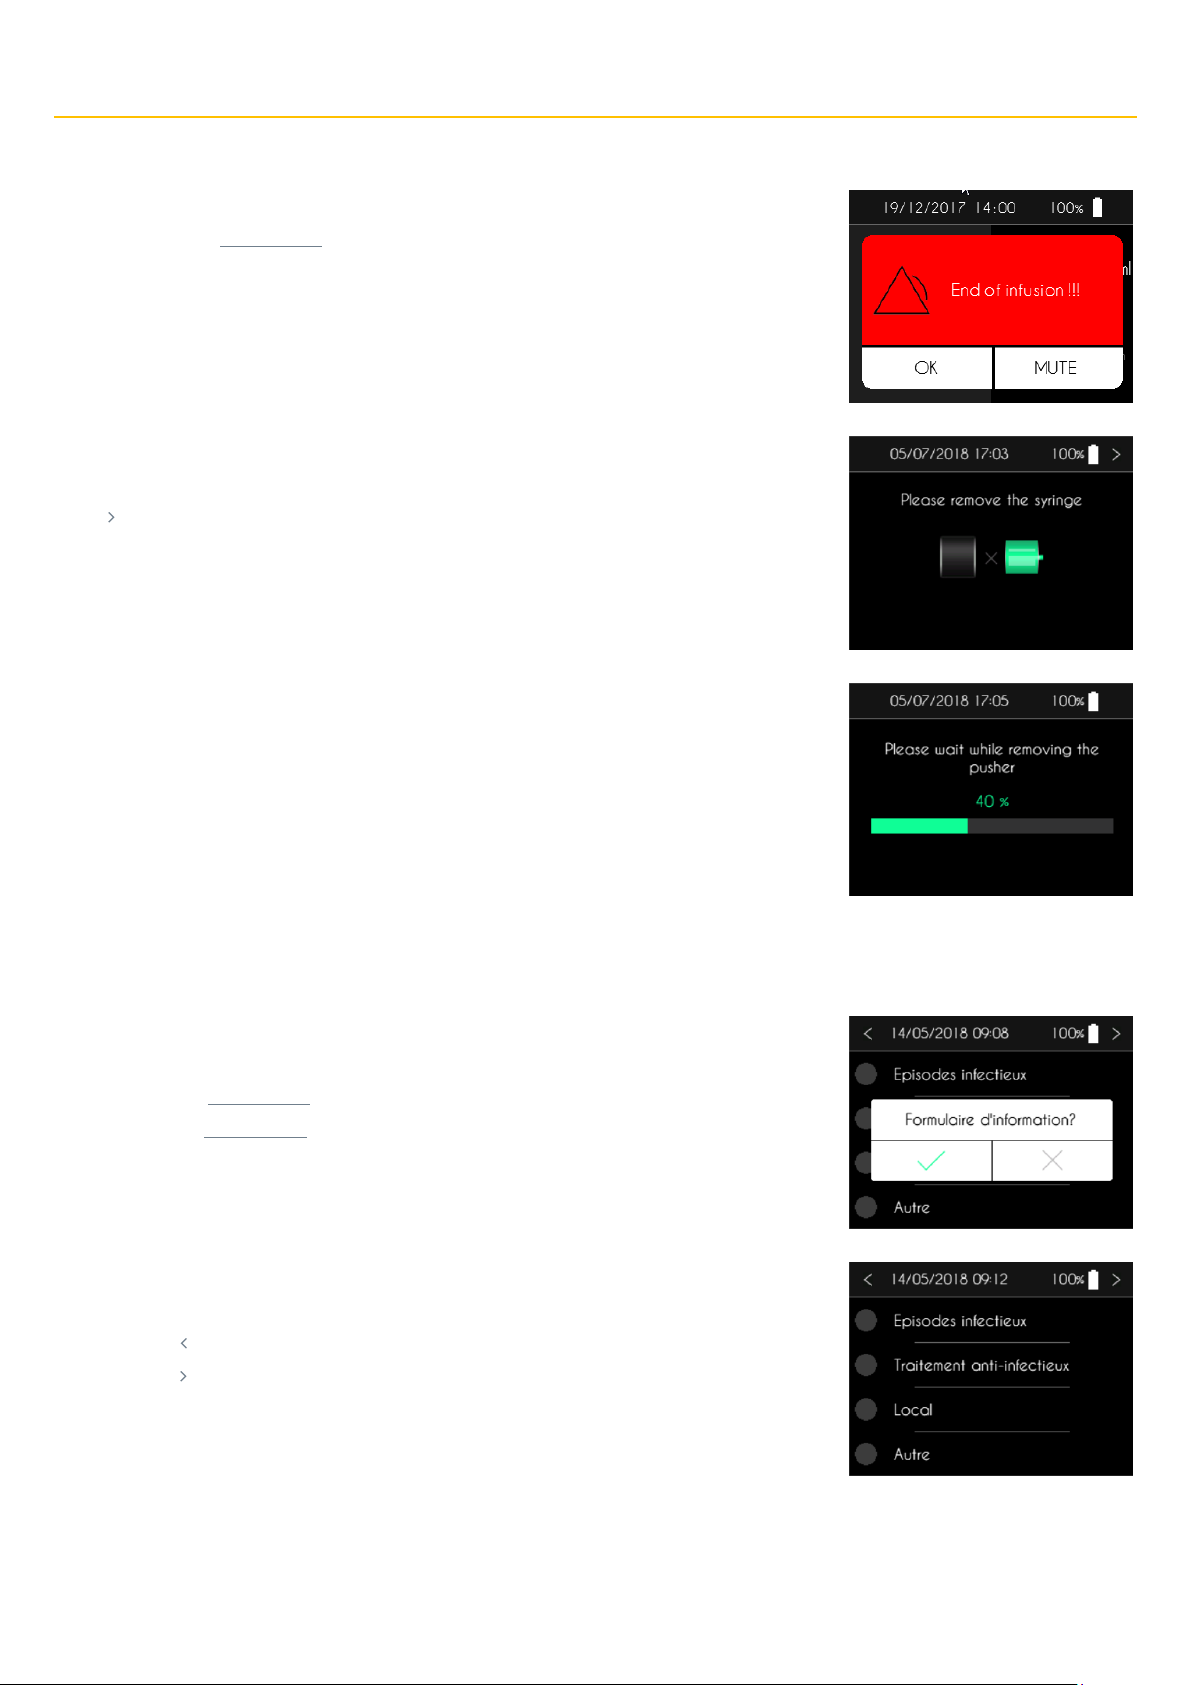
At the end of the infusion, the SO♥CONNECT PID pump generates an alarm.
▪ Press “OK”, for 2 seconds, to acknowledge the alarm.
After acknowledgment, the SO♥CONNECT PID pump displays the screen requesting removal of the
syringe.
Press “ ” once the syringe is removed.
The SO♥CONNECT PID pump retracts the pusher. This operation can take several minutes.
Unwanted effects
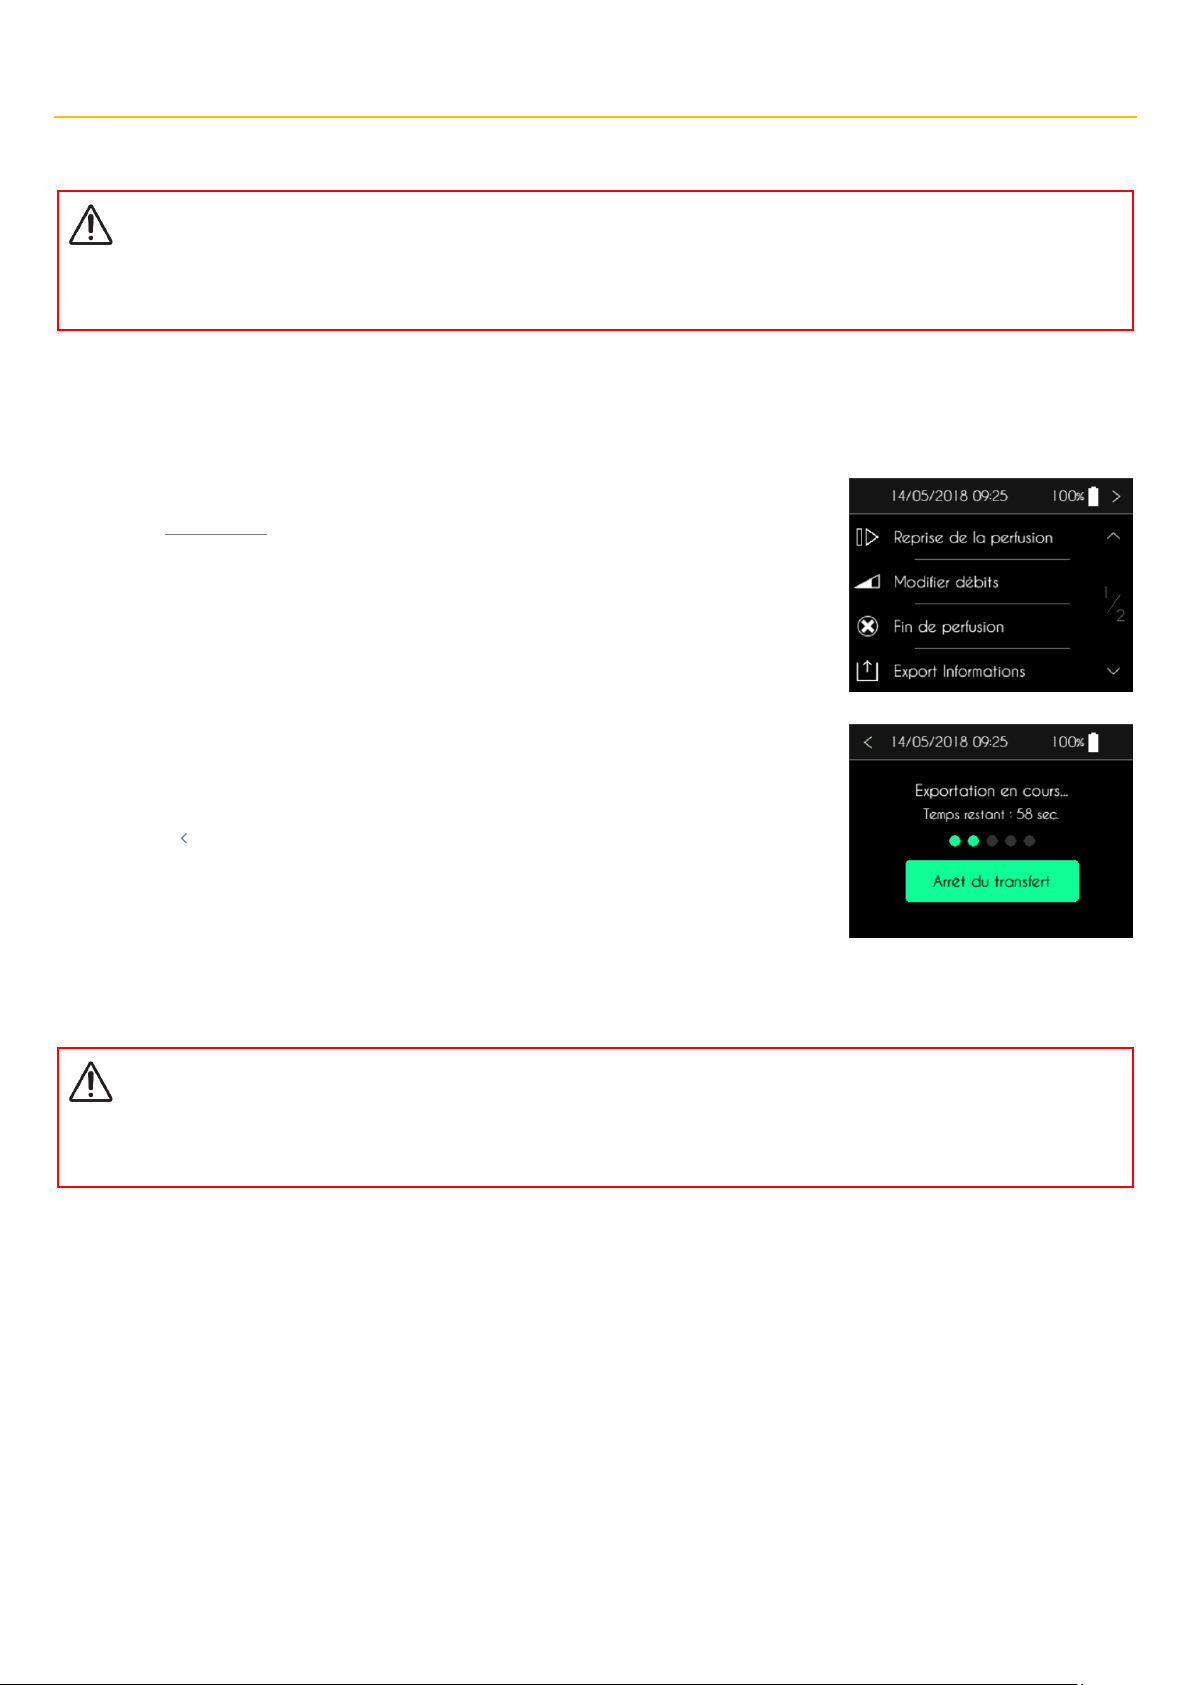
After the retract of the pusher, the SO♥CONNECT PID pump offers you, if you wish, to fill out the
form of the end of infusion.
▪ Press “✓” , for 2 seconds, to access to the form of the end of infusion.
▪ Press “X” , for 2 seconds, to return to the main screen..
The SO♥CONNECT PID pump displays the form of the end of infusion.
▪ Select the event(s) that occurred during the infusion.
▪ Press “ ” to cancel and return to the main screen.
▪ Press “ ” to confirm and return to the main screen.
Page 52
Partie V – Infusion
52
Exporting clinical data –
Function reserved for medical staff
Warning
▪
The functions described in this chapter should only be used by trained medical personnel when using the pump. The use of these
functions by an untrained user can cause serious injury to the patient.
The SO♥CONNECT PID pump provides the ability to export clinical data even while an infusion is in progress. This data can be exported to a
computer equipped with SO♥UP software using the Bluetooth Low Energy interface integrated in the SO♥CONNECT PID pump. This function
is accessible from the infusion control menu.
The SO♥CONNECT PID pump displays the first page of the infusion control menu. Press “Export
Informations” for 2 seconds.
After entering the password, the SO♥CONNECT pump displays the screen for exporting clinical
data..
▪ Press “Stop Transfer” to end the data transfer.
▪ Press “ ” to stop the data transfer and return to the infusion screen.
Visualization of the internal information of the pump –
Function reserved for medical staff
Warning
▪
The functions described in this chapter should only be used by trained medical personnel when using the pump. The use of these
functions by an untrained user can cause serious injury to the patient.
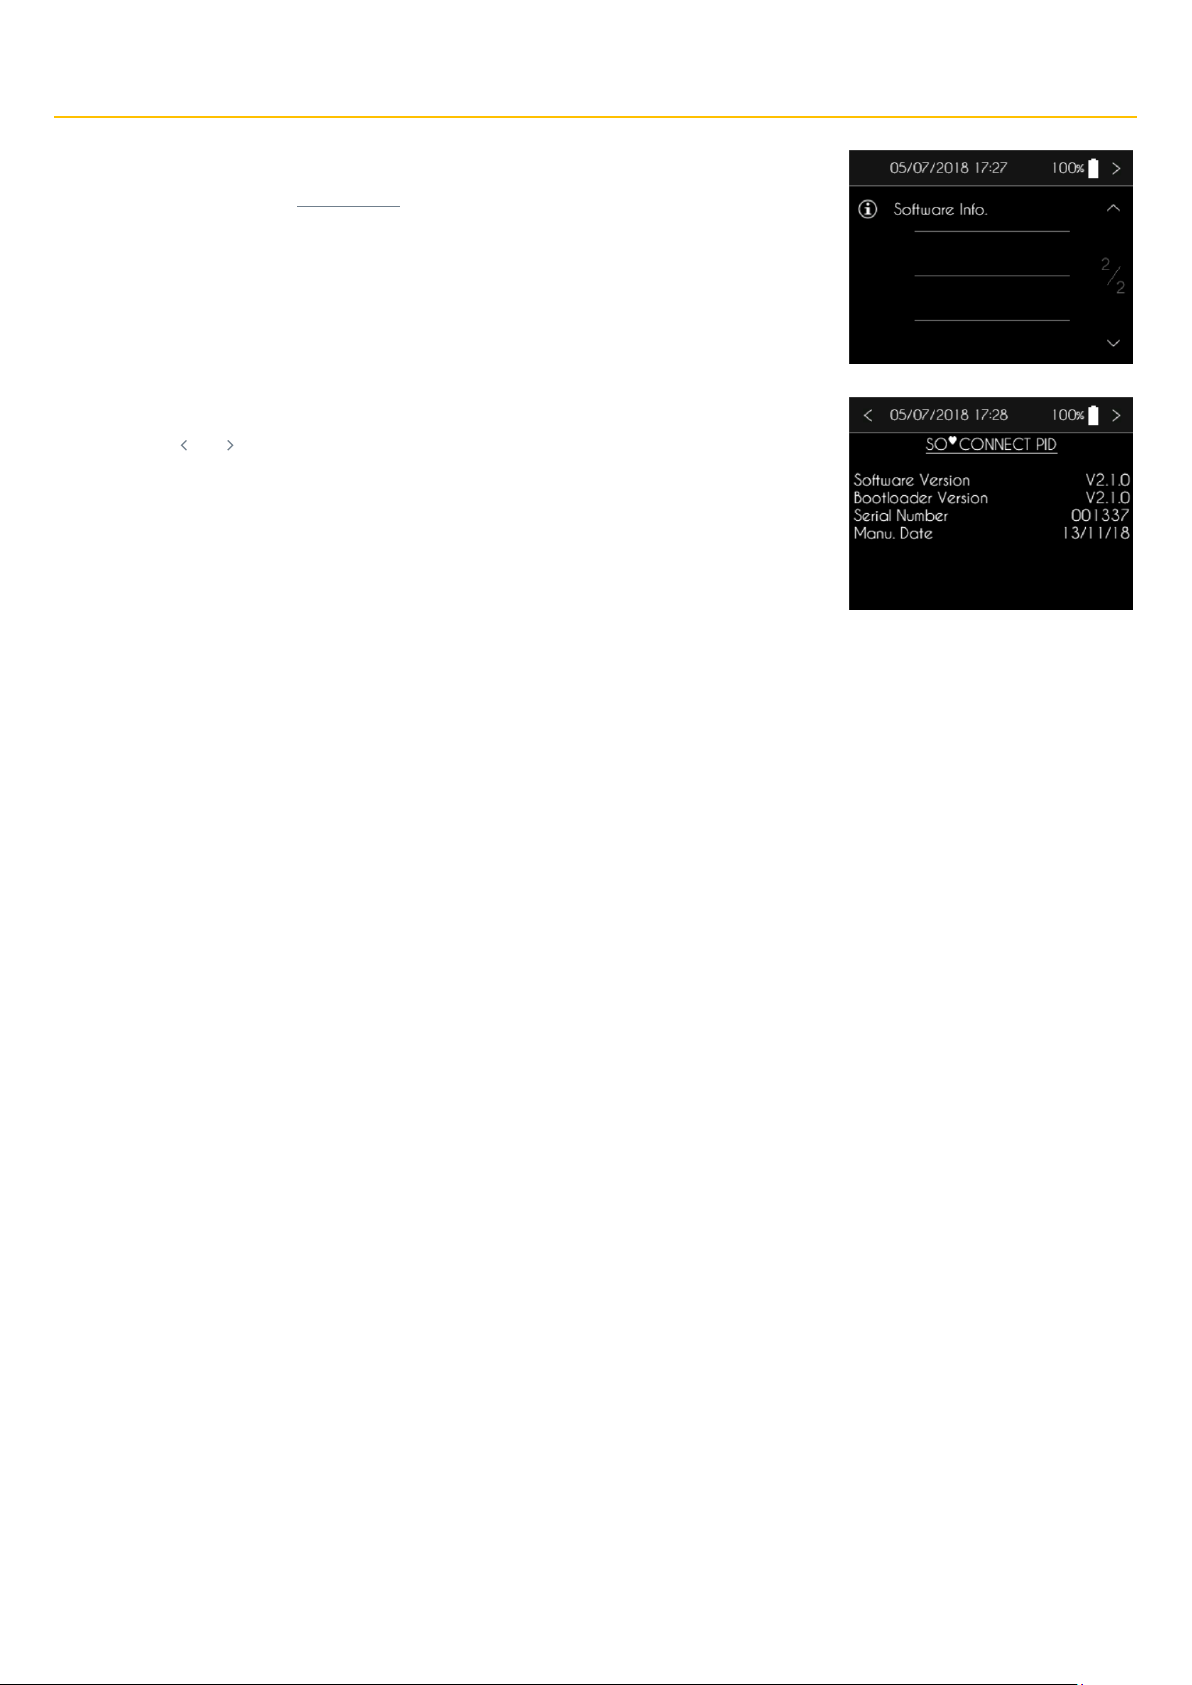
The SO♥CONNECT PID pump allows, during the infusion, to display the internal information of the pump:
▪ Version number of the internal software of the pump
▪ Version number of the bootloader
▪ The serial number of the pump
▪ The date of manufacture of the pump
This information may be required when contacting the help desk.
Access to this function is via the infusion control menu.
Page 53
Partie V – Infusion
53
The SO♥CONNECT PID pump displays the second page of the infusion control menu.
▪ Press “Software Info.” for 2 seconds.
The SO♥CONNECT PID pump displays the internal information screen.
▪ Press “ ” Or “ ” to return to the infusion control screen.
Page 54

54
Part VI – Alarms
This part of the user’s manual contains the description of the different alarms emitted by the
SO♥CONNECT PID
pump;
▪
alarm system,
▪
device failure alarm,
▪ syringe
missing alarm,
▪
infusion about to end alarm,
▪
end of infusion alarm,
▪
occlusion alarm,
▪
battery low alarm,
▪
infusion in pause alarm.
Page 55
Titre VI – Alarmes
55
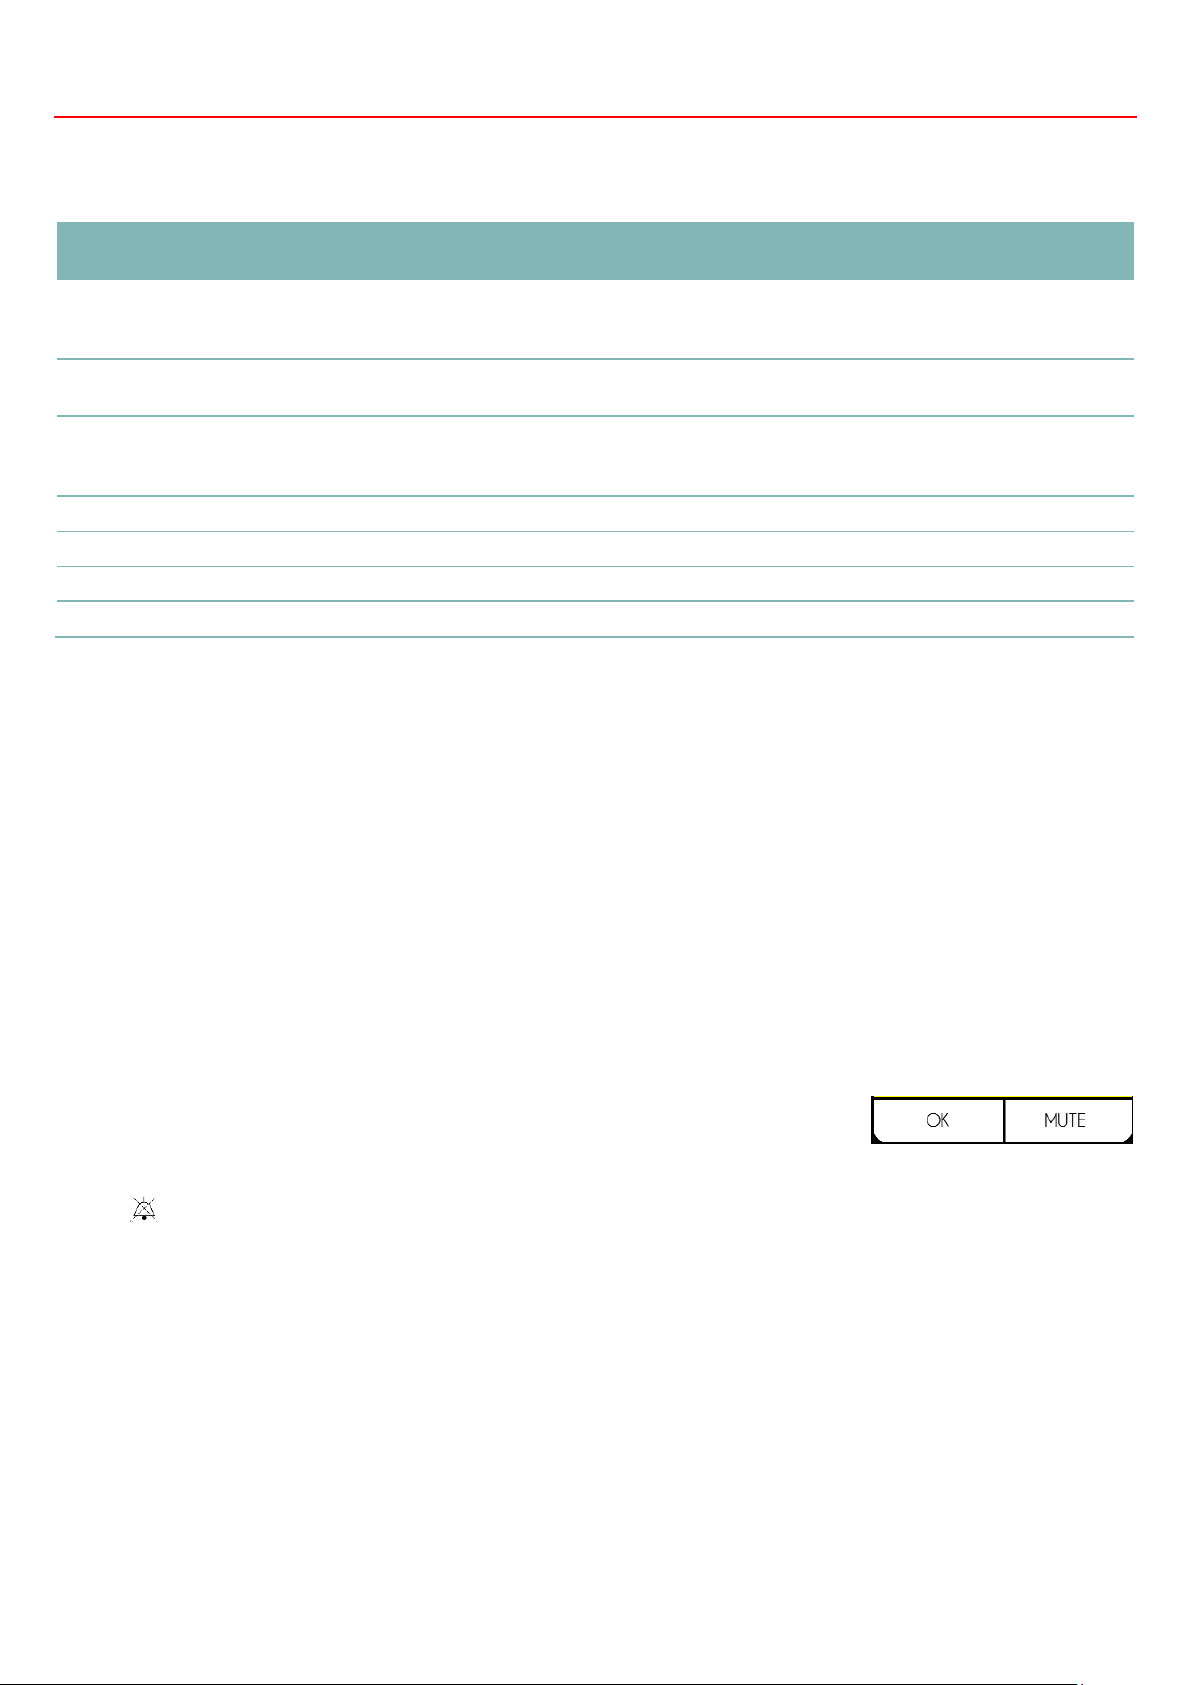
Alarm system
The table below summarises all the conditions in which the different alarms are generated.
Alarm
Priority
Conditions of triggering
Triggering period
Device failure
High
Failure of a printed circuit board component detected
by the internal software of the SO♥CONNECT PID
pump
1 min. and 30 sec.
Occlusion
High
Motor blocked during infusion, due to excessively high
pressure in the tubing.
See section “Time required for
indicating an occlusion”
Syringe missing
High
Syringe not detected during the infusion by the internal
software of the SO♥CONNECT PID pump with each
injection.
18 sec.
End of infusion
High
End of the infusion.
Immediate
Low battery
Low
Remaining battery life less than 30 minutes.
1 minute
Infusion about to end
Low
The infusion will end in less than 5 minutes.
Immediate
Infusion in pause
Low
The infusion has been paused for more than 5 minutes
Immediate
When two or more alarm conditions are met, the alarms are generated in the following order of priority:
▪ device failure,
▪ occlusion,
▪ syringe missing,
▪ end of infusion,
▪ battery low,
▪ infusion about to end,
▪ infusion in pause
High priority alarms are indicated by a message displayed on a flashing red background and a sound signal made up of 10 beeps every 10 seconds.
Low priority alarms are indicated by a message displayed on a steady yellow background and a sound signal made up of 2 beeps every 20 seconds.
The alarm screens offer two buttons:
▪ press the OK button for 2 seconds to acknowledge the alarm,
▪ press the MUTE button for 2 seconds to switch off the sound alarm for 2 minutes. The icon
is displayed in the bar at the top of the screen.
Page 56
Titre VI – Alarmes
56
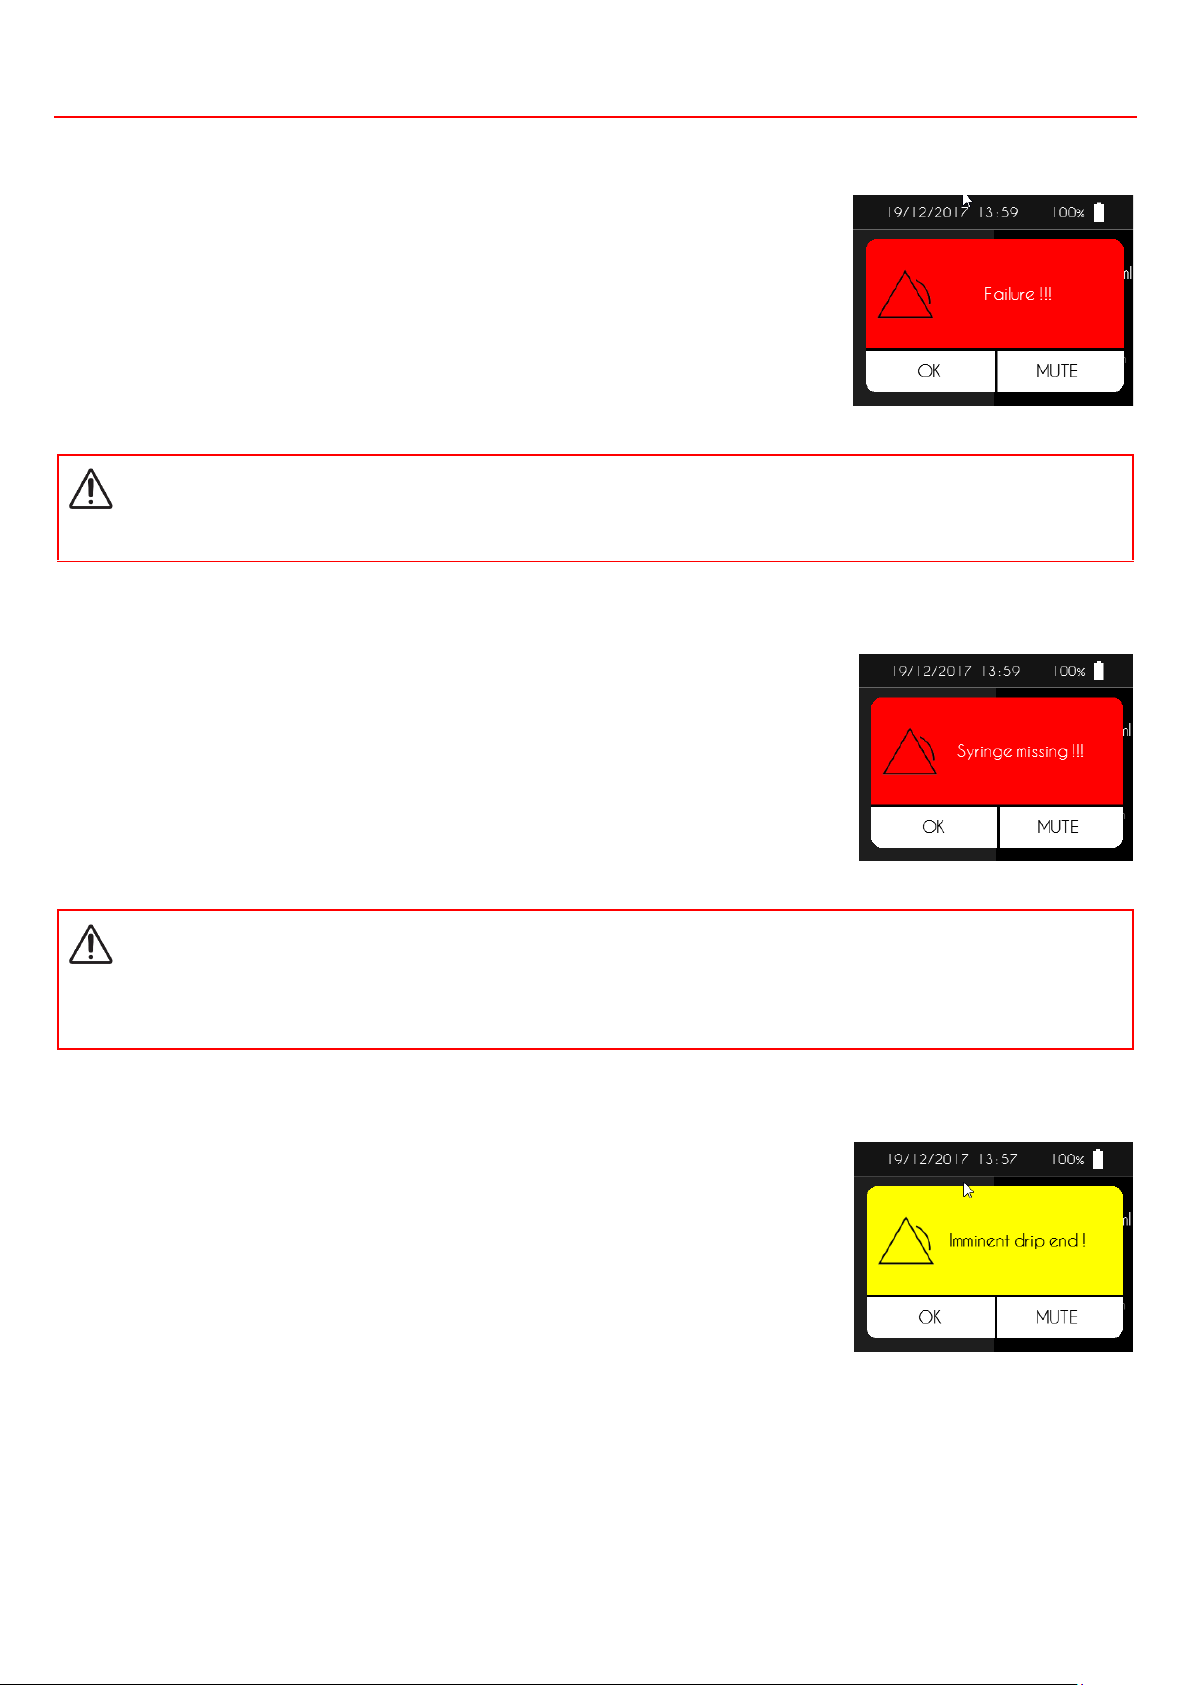
Device failure alarm (high priority)
The SO♥CONNECT PID pump regularly checks if it is operating correctly. If a fault is found in any of
its components, the SO♥CONNECT PID pump generates a device failure alarm.
When this alarm occurs, the infusion is paused automatically.
Warning
▪
If the device fault alarm occurs, remove the battery and contact user support.
Syringe missing alarm (high priority)
The SO♥CONNECT PID pump regularly checks if the SO♥FILL syringe is present. When it detects
that the SO♥FILL syringe is missing, the SO♥CONNECT PID pump generates the syringe missing
alarm.
When this alarm occurs, the infusion is paused automatically.
Warning
▪
If the
syringe
missing alarm is triggered, you need to contact the medical personnel in charge of your treatment to know the
measures that need to be taken to restart infusion.
Infusion about to end alarm (low priority)
The SO♥CONNECT PID pump generates the infusion about to end alarm approximately 5 minutes
before the end of the infusion.
The infusion is not stopped when this alarm is generated.
Page 57
Titre VI – Alarmes
57
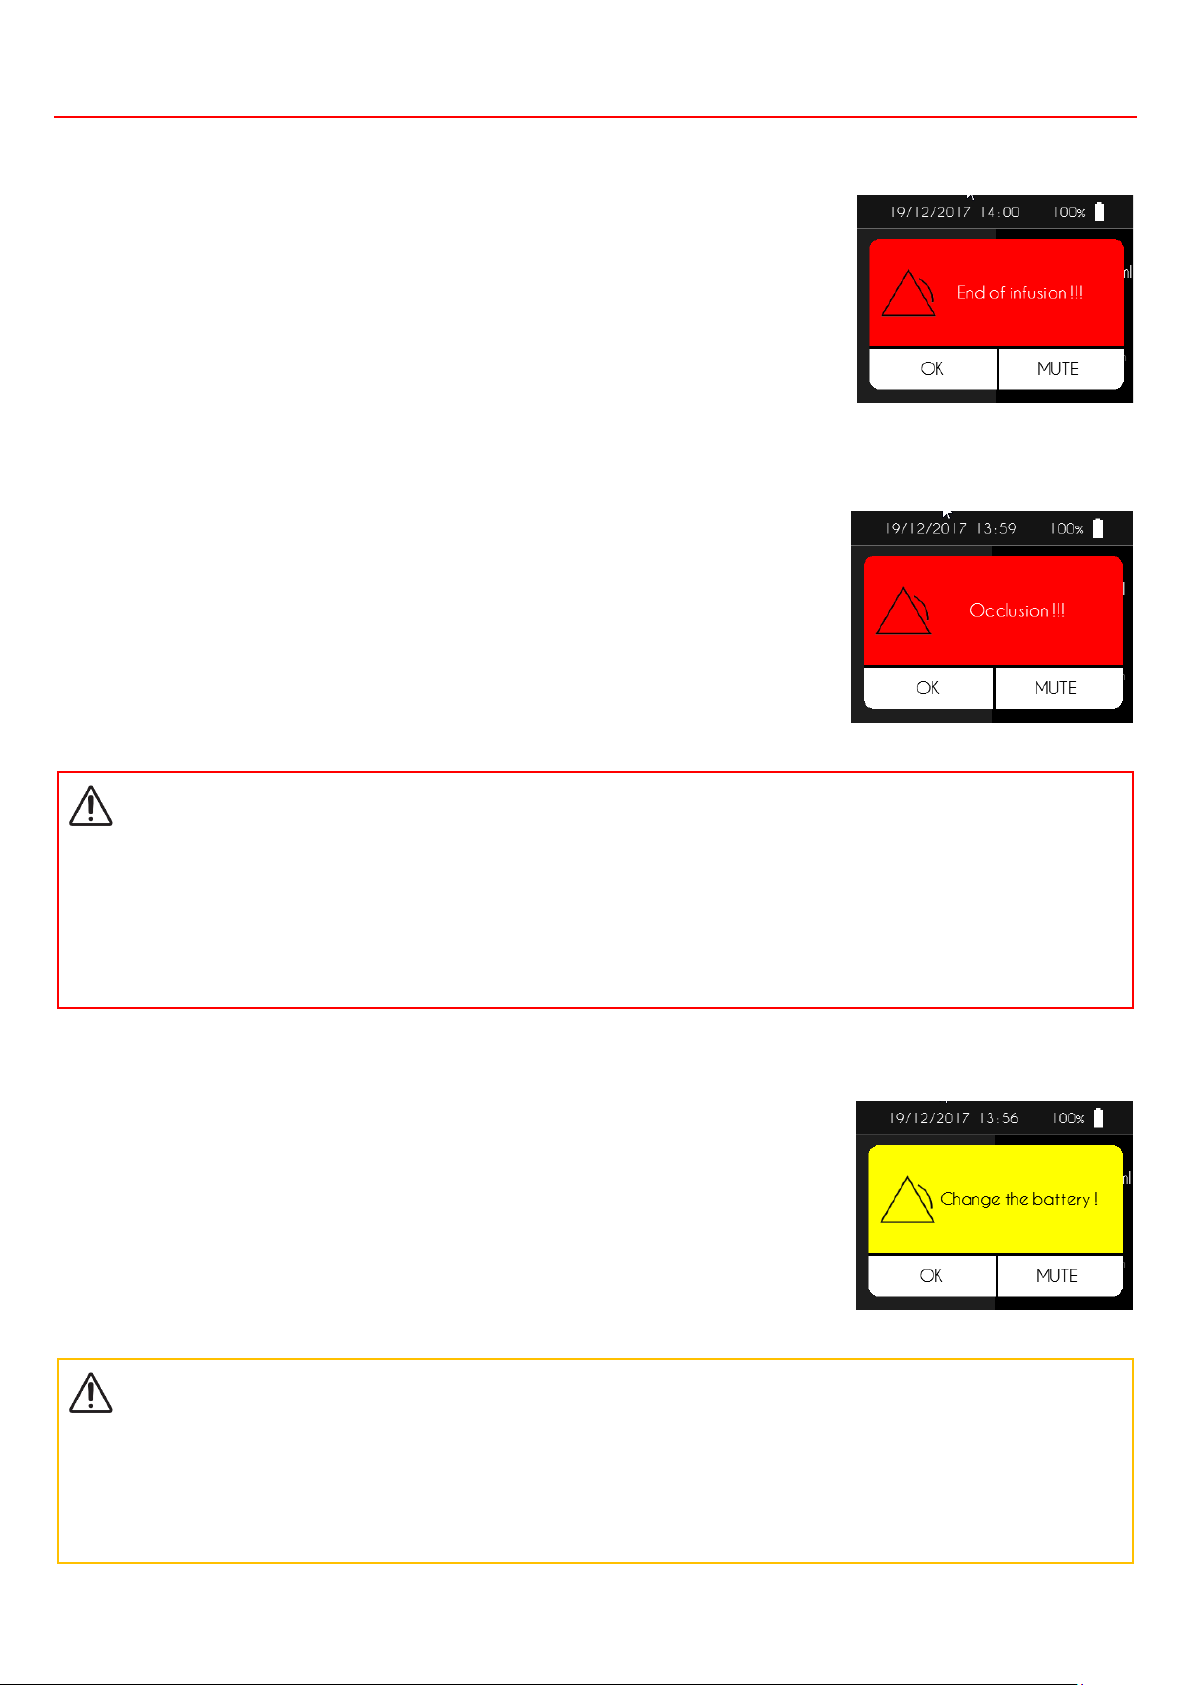
End of infusion alarm (high priority)
At the end of the infusion, the SO♥CONNECT PID pump generates an alarm.
Occlusion alarm (high priority)
The SO♥CONNECT PID pump generates an occlusion alarm when it detects excess pressure in the
infusion line.
When this alarm occurs, the infusion is paused automatically.
Warning
▪
The occlusion alarm activates when the pump detects high pressure in the infusion line. This high pressure must be eliminated to
prevent the administration of a post-occlusion bolus, which could cause serious injury.
▪
If the occlusion alarm is triggered, you need to contact the medical personnel in charge of your treatment to know the measures
that need to be taken.
Battery low alarm (low priority)
The SO♥CONNECT PID pump generates a battery low alarm when the battery life is below 30
minutes.
The infusion is not stopped when this alarm is generated.
Precautions
▪
Replace the battery as soon as the low battery alarm occurs
▪
After the battery has been changed, the infusion does not resume automatically. Refer to Part II – infusion control to restart the
infusion.
Page 58
Titre VI – Alarmes
58
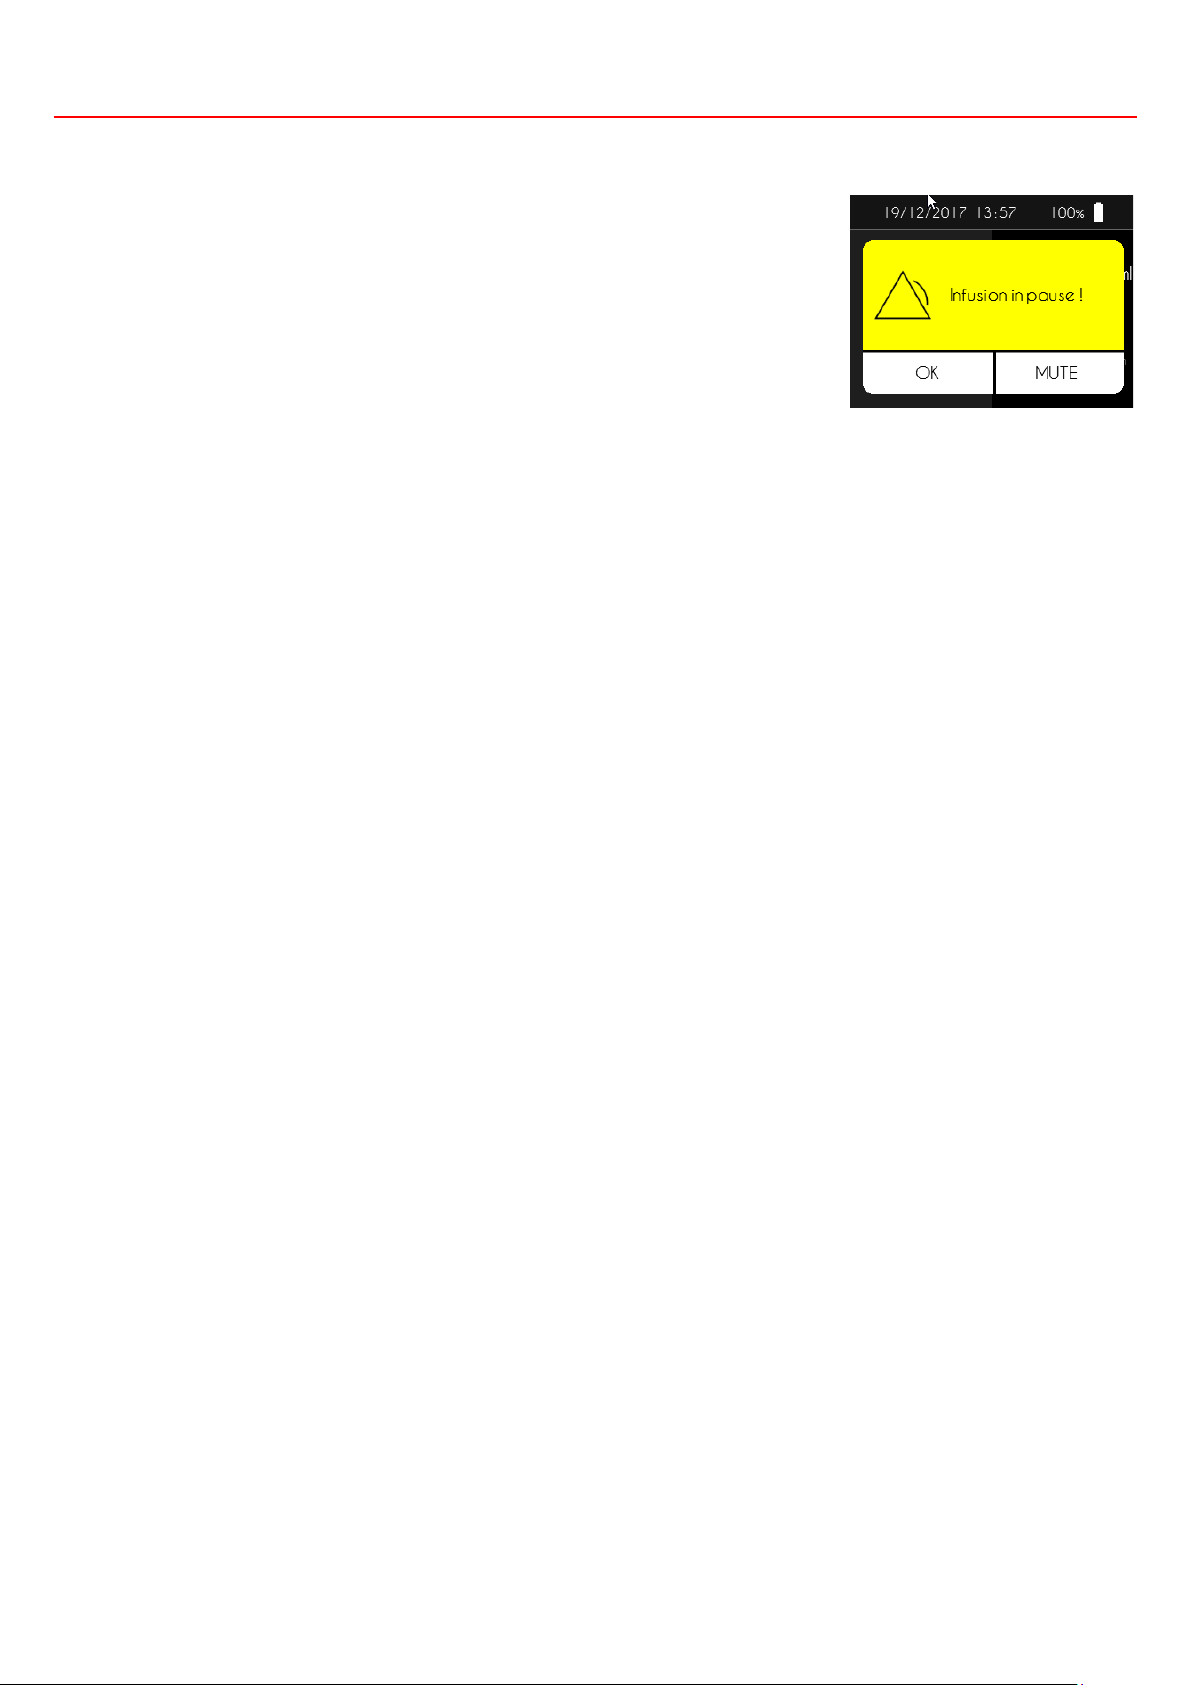
Infusion in pause (low priority)
The SO♥CONNECT PID pump has a function for reminding the patient that the infusion has been
paused for more than 5 minutes.
The infusion is not stopped when this alarm is generated.
Page 59

59
Part VII – general recommendations, maintenance, disposal, terms of guarantee
and declaration of conformity
This part contains information about the following:
▪
Cleaning and disinfection of the pump,
▪
pump inspection,
▪
maintenance,
▪
alarm system testing,
▪
pump damage in the event of a fall or impact,
▪
pump coming in contact with water,
▪
pump storage,
▪
disposal,
▪
pump life,
▪
terms of guarantee.
Page 60
Partie VII – Entretien, maintenance, élimination, garantie
60
Cleaning and disinfection of the pump
Take the opportunity of a replacement of the SO♥FILL, for example, to clean the SO♥CONNECT PID pump. To do so, use a soft dry cloth to
clean the outside of the pump.
Disinfection of the SO♥CONNECT PID pump is to achieve as follows:
▪ Make sure that no SO
♥
FILL syringe is connected to the pump. If necessary, remove it.
▪ Clean coarse dirt with a damp cloth.
▪ Turn on the screen.
▪ Set up a new infusion with e 50 ml SO
♥
FILL syringe and a volume of 1 ml.
▪ Wait for the pusher to come into place.
▪ Once the pusher is in position, remove the battery.
▪ Disinfect the pusher, the pump housing, the battery compartment and its cover with a cloth moistened with Mikrozid AF or Puresept
AF.
▪ Wait until the disinfectant solution has dried completely before handling the SO
♥
CONNECT PID pump.
Warning
▪
Never clean your
SO♥CONNECT PID
pump during an infusion. Cleaning could lead to a manipulating error and cause serious
injury.
Precautions
▪
Do not use household or industrial cleaners, chemicals, solvents, bleach, scouring pads or sharp instruments to clean the
SO♥CONNECT PID
pump.
▪
Never put your
SO♥CONNECT PID
pump in the dishwasher.
▪
Always remove the
SO♥FILL syringe
and remove the battery while cleaning.
▪
Take care not to press too hard on the screen of the
SO♥CONNECT PID
pump while cleaning it, so as to avoid damaging it.
▪
The
SO♥CONNECT PID
pump must not be sterilised.
▪
Do not use cleaning and disinfecting products other than those recommended in this support. Non-recommended products may
damage the pump.
Page 61
Partie VII – Entretien, maintenance, élimination, garantie
61
Pump inspection
It is crucial for the SO♥CONNECT PID pump to be in good working order to guarantee correct administration of medication. Check the pump
screen at regular intervals during the day and when you go to bed, especially if you are unable to hear the sound signals for any reason.
Check your pump every day:
▪ Make sure that the pump housing, screen and the SO
♥
FILL syringe do not show any damage or cracks and that the screen does not
display incomplete or abnormal letters or symbols. If that does happen, contact user support.
▪ Inspect the SO
♥
FILL syringe carefully. Check that the actual quantity of fluid to inject in the syringe is indeed the quantity displayed
on the screen.
▪ Inspect every component of the pump and the infusion device at regular intervals during the day and before you go to bed. If you detect
any leakage of fluid, replace the component responsible for the leak immediately.
▪ Check that the battery cover is fastened and correctly positioned, that is to say level with the pump housing.
▪ Make sure that the infusion system is primed, free from air bubbles and correctly connected.
▪ Check that the infusion device is inserted according to the instructions for use. The infusion site must be safe, not lead to any
discomfort and not show any signs of irritation or infection.
▪ Check that the time and date are correct.
Maintenance
The SO♥CONNECT PID pump does not require any special maintenance. In case of malfunctioning, please contact user support.
Warning
▪
The
SO♥CONNECT PID
pump may not be modified by personnel who are not approved by France Développement Electronique.
▪
The pump can only be repaired by a qualified and trained technician.
▪
Unauthorized modifications may impair the pump's operation and result in injury or death to the patient or user.
Alarm system testing
The alarm activation system should be tested at least once a month.
Warning
▪
Before you test the alarm system, take care to disconnect the pump from the patient.
The alarm system is tested with the occlusion alarm. To do so, follow the procedure below:
1. Start an infusion with an infusion rate of 5 ml/h.
2. While the pump is running, place a clamp on the tubing.
3. This should activate an occlusion alarm.
Page 62
Partie VII – Entretien, maintenance, élimination, garantie
62
Warning
▪
If no alarm is activated, contact user support.
Pump damage in the event of a fall or impact
The pump may be damaged in the event of a fall or impact. Remember to use the case that has been designed especially for the SO♥CONNECT
PID pump, which will help avoid falls and protect it from impacts.
Warning
▪
Inspect the pump immediately in the event of a fall or impact.
▪
Do not use the
SO♥CONNECT PID
pump if you see any cracks or other signs of damage. Water, dust, infusion fluid or other foreign
material could enter into the pump and lead to malfunctioning.
▪
If you have any queries or are in doubt about possible damage to the pump, contact user support.
Page 63
Partie VII – Entretien, maintenance, élimination, garantie
63
Pump coming in contact with water
Precautions
▪
The
SO♥CONNECT PID
pump is not sealed. Use the case supplied with your pump to protect it from accidental splashing with
water.
▪
Avoid all contact with water. Remember to disconnect and remove it before you have a bath or a shower, enter a Jacuzzi or go
swimming.
▪
Avoid excess humidity (e.g. sauna), which could damage the
SO♥CONNECT PID
pump.
If your SO♥CONNECT PID pump comes in contact with water, please follow the instructions below:
▪ Pause the infusion, disconnect the SO
♥
CONNECT PID pump and inspect it.
▪ Wipe the outside of the pump with a soft, dry cloth and check to see if any water has entered the battery compartment or the
compartment of the SO♥FILL syringe. If the battery or SO♥FILL syringe compartment is wet, turn the SO♥CONNECT PID pump
over to let the water drain out, and leave it to dry.
▪ Do not use hot air to dry the SO
♥
CONNECT PID pump. For example, do not use a hair dryer. That could damage the pump housing.
▪ Do not put back the battery or the SO
♥
FILL syringe before the compartments are fully dry.
It is crucial to verify the pump immediately if it comes in contact with other liquids or chemicals, such as:
▪ cleaners,
▪ alcohol,
▪ beverages,
▪ oil or grease.
Clean your pump immediately if it has come into contact with such materials.
Precautions
▪
Avoid putting the
SO♥CONNECT PID
pump in contact with medicines or hygiene products (e.g. antiseptic, antibiotic cream, soap,
scent, deodorant, body lotion or any other cosmetics). Such substances could discolour the
SO♥CONNECT PID
pump or damage
the screen.
Page 64
Partie VII – Entretien, maintenance, élimination, garantie
64
Storing the pump
If you do not intend to use the SO♥CONNECT PID pump for a long period of time, store it in an appropriate manner so as to avoid any
subsequent malfunctioning.
To store the pump:
▪ remove the battery to conserve it,
▪ put the cover back on the battery compartment,
▪ store the pump in its original box.
Precautions
▪
A battery leak could damage your
SO♥CONNECT PID
pump. That is why the battery must be removed if the
SO♥CONNECT PID
pump will not be used for a long period.
Disposal
When it is in use, the SO♥CONNECT PID pump is liable to come in contact with blood, and could thus be a risk of infection. As a result, it is not
within the scope of the European Directive 2002/96/EC and cannot be disposed of with other electronic devices. If necessary, return the
SO♥CONNECT PID pump to France Développement Electronique for disposal.
Under international regulations, medical devices such as infusion pumps require controlled destruction. Please act in compliance with local rules.
Take care not to dispose of batteries with household waste and recycle them at the existing collection points.
Pump life
The SO♥CONNECT PID pump has a life of 5 years from the date of purchase. For safety reasons, it may not be used after that time.
Page 65

Partie VII – Entretien, maintenance, élimination, garantie
65
Guarantee conditions
France Développement Electronique hereby guarantees that the product is free from all material or workmanship defects for a period of 2 (two)
years from the date of purchase.
If any material or workmanship defects are found during said guarantee period, France Développement Electronique shall be responsible for
repairing or replacing the defective components on the terms and within the time frame stated below, without charging for labour or spare parts;
the customer shall pay the cost of sending the device to the After Sales Service department of France Développement Electronique.
Conditions:
1. The guarantee shall only come into effect if the defect found is reported within the time provided in the guarantee.
2. This guarantee does not cover costs and/or defects resulting from product modifications or adjustments made without the prior
written permission of France Développement Electronique.
France Développement Electronique shall not be liable towards the buyer or any other party for any injury or damage that may be
sustained due to the improper use of the product, use in a manner for which it is not designed, or if any of the instructions are not
followed.
The buyer particularly agrees that France Développement Electronique shall have no liability in respect of third party claims relating
to the above.
3. This guarantee may be voided if the model or serial number stated on the product have been modified, erased, removed or made
illegible in any way.
4. The guarantee does not cover:
a. damage due to improper use, including but not only:
i. power supply errors,
ii. use of the product for purposes other than those intended,
iii. repairs by unapproved personnel or the customer,
b. fortuitous and accidental events such as falls, entry of liquid,
c. natural events and fraudulent or deliberate acts,
d. accessories supplied with the pump.
5. France Développement Electronique agrees to repair the device for a period that does not exceed 5 (five) years from the date of
purchase.
After said period, France Développement Electronique shall have no responsibility for repairs. France Développement Electronique
shall not be liable towards the buyer or to any other party for damage resulting from the use of the device 5 (five) years after the date
of purchase.
6. After the expiry of the guarantee period, any support from France Développement Electronique shall be charged, including the cost of
replacement parts, labour and transport calculated on the basis of applicable rates.
7. France Développement Electronique shall not be liable towards the patient and/or any third party for any health problem and/or
inconvenience relating to the period for which the device is under repairs.
8. France Développement Electronique shall not be liable towards the patient or any party for any problem and/or delay relating to the
shipment of the device.
Page 66

66
Part VII – Technical specifications
The information contained in this part is intended for all users: patients and medical personnel.
This part contains information about the following:
▪
declaration of conformity,
▪
pump specifications,
▪
pump precision,
▪
pressure level,
▪
time required for reporting an occlusion,
▪
post-occlusion bolus,
▪
electromagnetic compatibility.
Page 67
Partie VIII – Caractéristiques techniques
67
Declaration of conformity
Page 68

Partie VIII – Caractéristiques techniques
68
Pump specifications
Pump dimensions
70.5 x 65 x 34.5 mm
Pump weight
146 g (battery included)
Battery
VARTA EZPack L 3.7V 1200 mAh 4.5 Wh
Battery life
2 infusions
(1)
Battery lifespan
> 500 cycles (>70% of initial capacity)
Disposable syringe
SO♥FILL 20 ml / SO♥FILL 30 ml / SO♥FILL 50 ml
Volumes that can be administered
Programmable from 1 ml to 50 ml in increments of 1 ml.
Infusion rates
Programmable from 0 to 60 ml/h, in increments of 0.1 ml/h.
Infusion rate precision
5%
Occlusion pressure
1.5 bar
Occlusion reporting time
See the appendix on the Time required for reporting an occlusion.
Post-occlusion bolus
0.5 ml
Memory
The infusion parameters are saved, even if the battery is removed.
Screen
TFT 2.4’’ RGB 320 x 240 pixels with resistive touchscreen
Motor
Stepping motor with magnetic encoder
Locking of reserved functions
Via password entry.
Protection rating
IPX2
Pump operating condition
0°C / +40°C
5% / 90% relative humidity without condensation
700 hPA / 1060 hPA
Pump storage condition
0°C / 50°C
5% / 90% relative humidity without condensation
700 hPa/1060 hPA
Acoustic range of sound alarm
44 dB(A) for high-priority alarms
38 dB(A) for low-priority alarms
Maximum volume infused in first fault condition
0.5% of the infusion rate/hour
Page 69
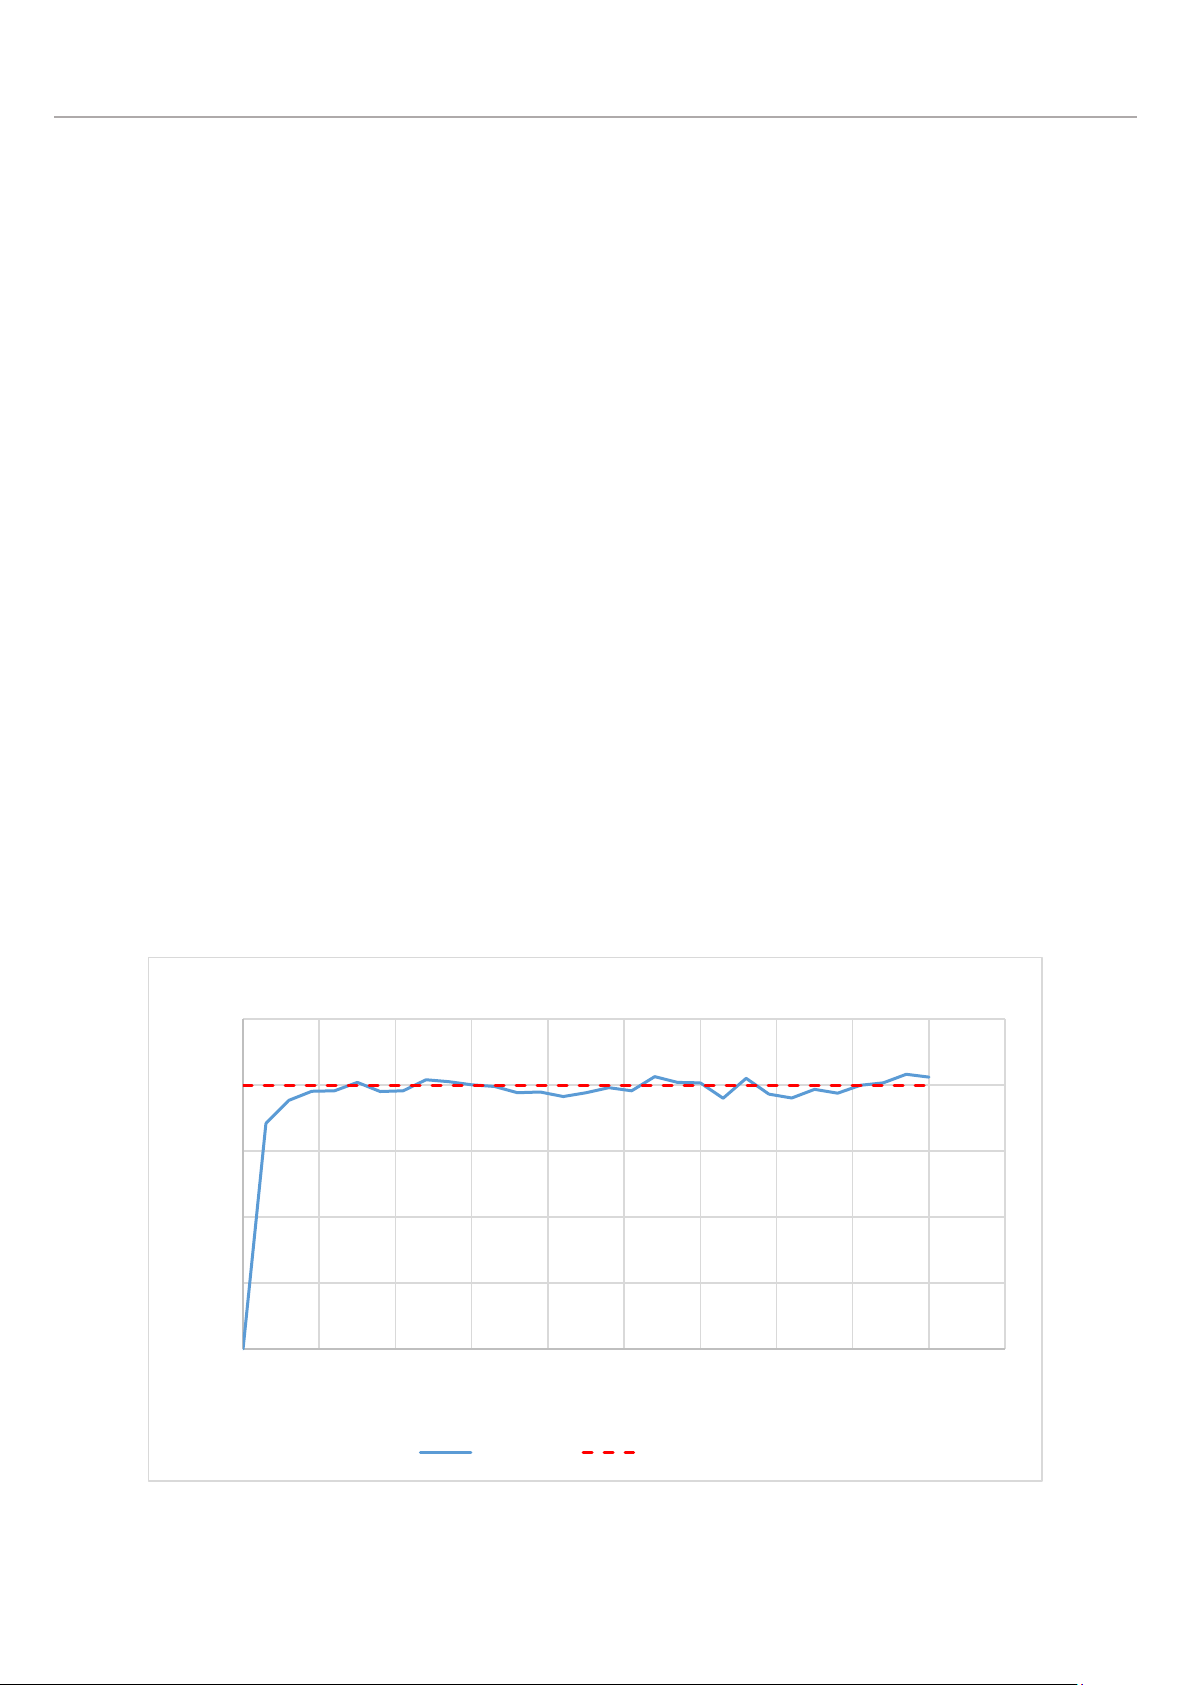
Partie VIII – Caractéristiques techniques
69
(1) Battery life has been verified in the laboratory under the following operating conditions:
▪ 50 ml infusion at a flow rate of 20 ml / h
▪ 50 ml infusion at a flow rate of 5 ml / h
Pump precision
The graphs and curves below have been calculated from the pump precision verification procedures described in standard IEC 60601-2-24.
The tests were conducted in normal ambient temperature conditions (25°C) using a SO♥CONNECT PID pump, a 20 ml SO♥FILL syringe and
an infusion set (part: Neria™ from Unomedical).
The normal conditions for optimum precision are:
▪ no counter-pressure due to the size of the catheter or a height difference between the pump and the infusion site,
▪ ambient temperature (25°C),
▪ atmospheric pressure at sea level,
▪ medication with liquids with characteristics similar to water.
In the SO♥CONNECT PID pump, external factors can lead to fluctuations in the precision of the infusion rate. These factors are particularly:
▪ liquids with characteristics different from those of water, namely density, viscosity and homogeneity,
▪ ambient temperature above or below 25°C,
▪ atmospheric pressure above or below 101 kPA.
Starting infusion rate
Programmed infusion rate: 2 ml/h
0
0,5
1
1,5
2
2,5
0 50 100 150 200 250 300 350 400 450 500
Débit (en ml/h)
Durée (min)
Débit au démarrage
Débit réel Débit programmé
Page 70
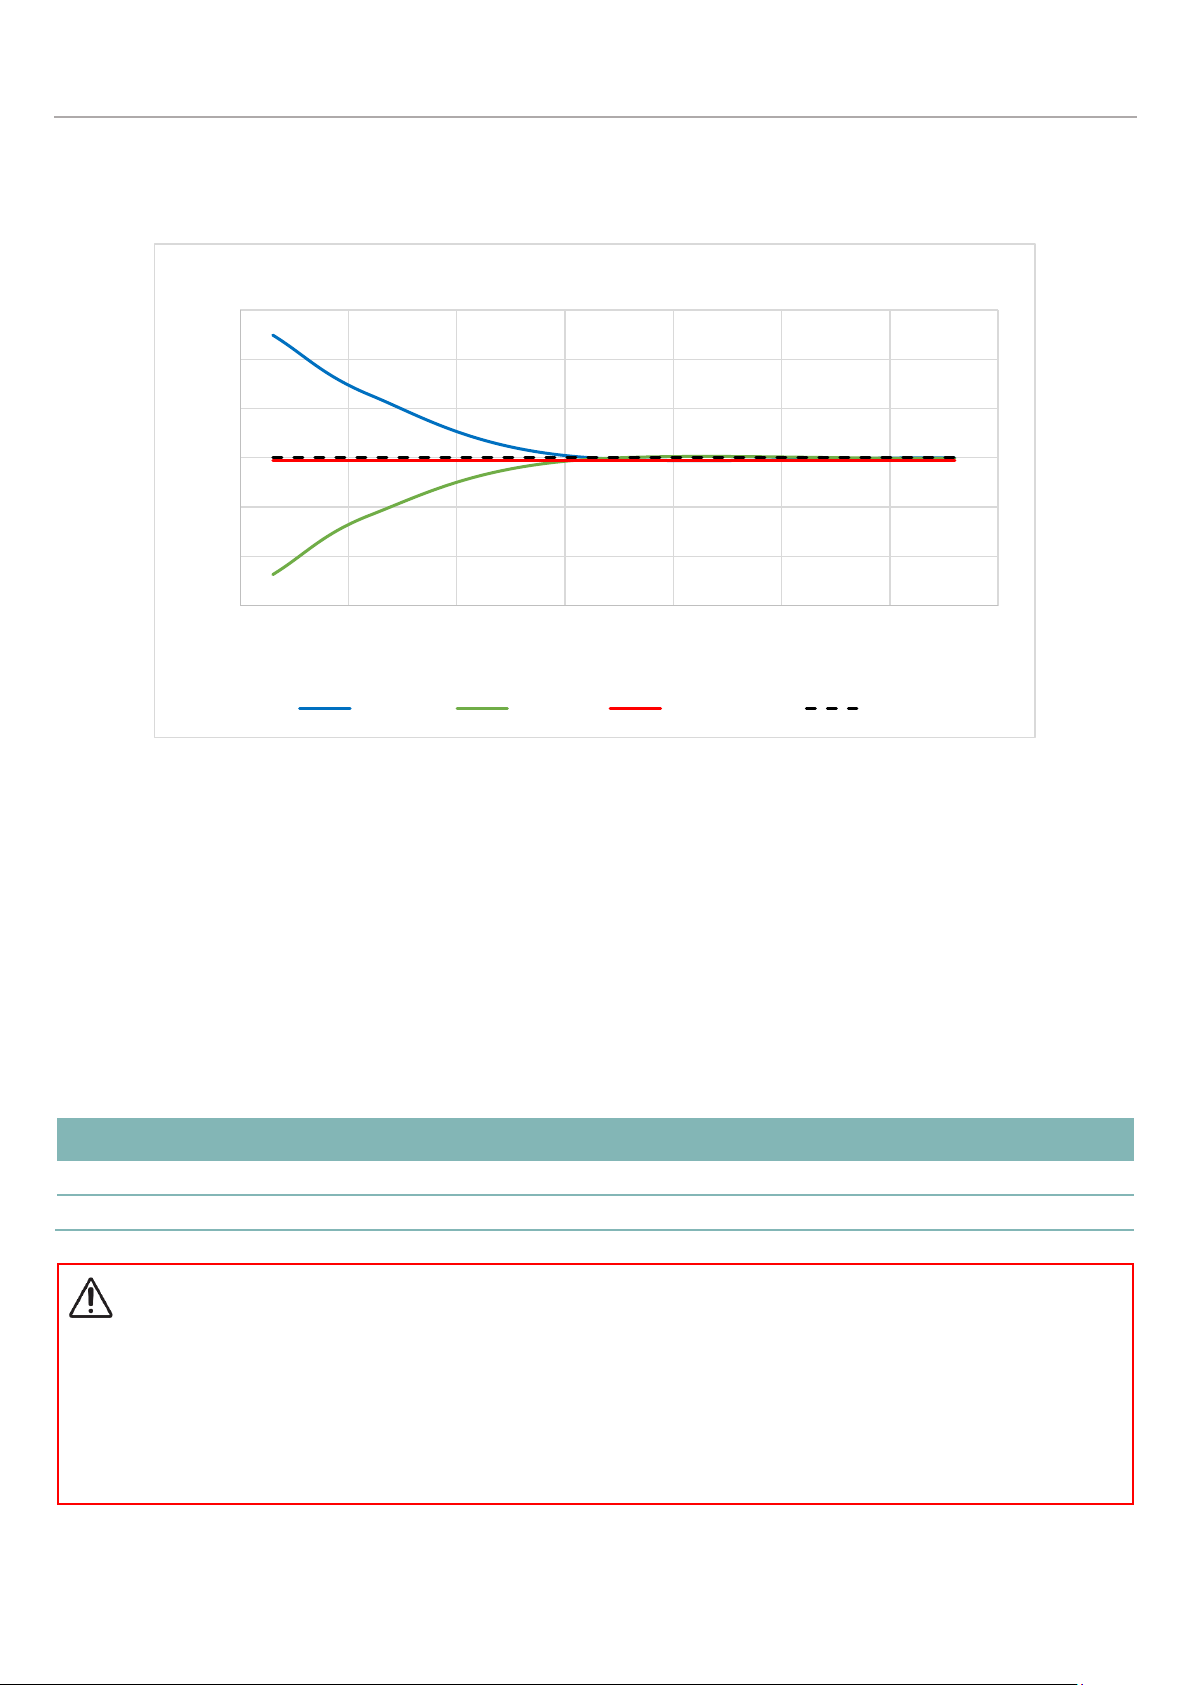
Partie VIII – Caractéristiques techniques
70
Infusion rate error (trumpet curve)
Programmed infusion rate: 2 ml/h
Niveau de pression
Le niveau de pression d’occlusion est de 1,5 bar.
Temps nécessaire à la signalisation d’une occlusion
Le temps nécessaire à la signalisation d’une occlusion est l’intervalle de temps s’écoulant entre le début de l’occlusion et la détection de cet état
par la pompe. Cette valeur dépend du débit.
Le tableau suivant donne le temps nécessaire à la signalisation d’une occlusion en fonction du débit.
Infusion rate
Time required for reporting an occlusion
25 ml/h
4 minutes et 30 secondes
50 ml/h
2 minutes et 30 secondes
Warning
▪
The time for activating the occlusion alarm depends on the infusion rate. The lower the infusion rate, the longer the
SO♥CONNECT PID
pump will take to activate an occlusion alarm.
▪
The precision and the time required for reporting an occlusion may vary from the values indicated in this user’s manual depending
on the components that make up the infusion line.
-6
-4
-2
0
2
4
6
0 50 100 150 200 250 300 350
Pourcentage d'erreur du débit
Fenêtre d'observation (en min)
Erreur de débit
Ep(max.) Ep(min.) Erreur globale Zéro
Page 71
Partie VIII – Caractéristiques techniques
71
Post-occlusion bolus
The occlusion alarm is activated when the SO♥CONNECT PID pump detects high pressure in the infusion line. The high pressure must be
eliminated to prevent the accidental administration of a post-occlusion bolus to the patient, which may cause serious injury.
The volume of the post-occlusion bolus of the SO♥CONNECT PID pump is: 0.5 ml
Warning
▪
The volume of the post-occlusion bolus administered after an occlusion can increase depending on the components that make up
the infusion line
Electromagnetic compatibility
The information contained in this section is provided as recommendations for the proper operating of the SO♥CONNECT PID pump in respect
of electromagnetic compatibility. The tables presented in this section refer to the criteria of the standard IEC 60601-1-2.
Warning
▪
Mobile and RF communication devices are likely to affect the working of devices such as the
SO♥CONNECT PID
pump. Thus, the
SO♥CONNECT PID
pump must not be placed close to other devices. If that is not possible, monitor the pump to make sure that it
is operating correctly.
▪
The use of non-recommended accessories is liable to give rise to higher EM emissions or lower EM immunity of the
SO♥CONNECT
PID
pump. Please refer to the list of accessories.
Advice and declaration of the manufacturer: electromagnetic emissions
The SO♥CONNECT PID pump is intended for use in the electromagnetic environment specified below. The user of the SO♥CONNECT PID
pump must make sure that it is used in such an environment.
Emission test
Compliance
Electromagnetic environment - Tips
RF emissions
CISPR 11
Group 1
The SO♥CONNECT PID only uses RF energy for its internal working. As a result, its
RF emissions are very low and not liable to interfere with electrical equipment in the
vicinity.
RF emissions
CISPR 11
Class B
The SO♥CONNECT PID pump is suitable for use in all establishments, including
homes.
Harmonic emissions
IEC 61000-3-2
Not applicable
Voltage fluctuations and
flicker
IEC 61000-3-3
Not applicable
Page 72

Partie VIII – Caractéristiques techniques
72
Page 73

Partie VIII – Caractéristiques techniques
73
Advice and declaration of the manufacturer: electromagnetic immunity
The SO♥CONNECT PID pump is designed for use in the electromagnetic environment specified below. The user of the SO♥CONNECT PID
pump must make sure that it is used in such an environment.
Immunity test
IEC 60601 Test level
Compliance level
Electromagnetic environment - Tips
Electrostatic
discharge (ESD)
IEC 61000-4-2
±6 kV (contact)
±8 kV (in the air)
± 8 kV contact
± 15kV air
Floors finished in wood, concrete or tiles. If the
floors are in synthetic material, the relative
humidity must be at least 30%.
Electrical fast
transient/
burst
IEC 61000-4-4
± 2kV for supply
lines
± 2kV for supply
lines
Not applicable
Transient
surge
IEC 61000-4-5
± 1kV differential
mode
± 2kV differential
mode
Not applicable
Supply
lines
(50/60 Hz)
magnetic field
IEC 61000-4-8
3 A/m
Not applicable
Conducted RF
IEC 61000-4-6
3 Vrms from
150 kHz to
80 MHz outside
ISM bands
Not applicable
Radiated RF
IEC 61000-4-3
3V/m from 80MHz
to 2.5GHz
10V/m
Note (1)
Note (1): Portable and mobile RF communication devices may not be used at a distance from the components of the SO♥CONNECT PID pump
that is below the recommended distance, calculated on the basis of the equation applicable to the frequency of the emitter.
Recommended distance:
▪ d = (3/3.5)√P
▪ d = (3/3.5)√P from 80MHz to 800MHz
▪ d = (7/10)√P from 800 MHz to 2.5 GHz
where P is the maximum rated output power of the emitter, in watts (W) as indicated by the emitter manufacturer and d is the recommended
distance in metres.
The intensities of the fields from fixed RF emitters as determined by the electromagnetic reading on the site must be below the compliance level
in each reference range. Interference may occur close to equipment bearing the symbol:
Recommended separation distances from mobile/portable RF communication equipment
The SO♥CONNECT PID pump has been designed for use in an electromagnetic environment where the emitted RF interference is controlled.
Page 74

Partie VIII – Caractéristiques techniques
74
The user of the SO♥CONNECT PID pump can limit the electromagnetic interference by keeping a minimum distance between the
SO♥CONNECT PID pump and mobile and portable RF communication equipment as recommended below, depending on the maximum power
of the emitting equipment.
Maximum rated power of the
emitter (W)
Separating distance in metres (m) depending on the emitter frequency
150 KHz to 80 MHz
d = 1,2√p
80 MHz to 800 MHz
d = 1,2√p
800 MHz to 2.5 GHz
d = 2,1√p
0.01
0.12
0.12
0.21
0.1
0.38
0.38
0.66
1
1.2
1.2
2.1
10
3.8
3.8
6.64
100
12
12
21
If the maximum output power of the transmitter is not indicated in the table, the recommended separating distance d in metres (m) may be
calculated with the help of the equation applicable to the frequency of the transmitter, where p is the maximum output power in watts (W)
according to the emitter manufacturer.
At 80 MHz and 800 MHz, the distance is applied to the highest frequency range.
These indications are not universal. Absorption and reflection by structures, objects and individuals affect electromagnetic propagation.
Page 75

France Développement Electronique
46 Rue du Zornhoff
67700 MONSWILLER
FRANCE
SO-CONNECT PID user’s manual v2.01 (EN)
0459
Rev. 2.0
1 – 09/08/2018
 Loading...