

Page 1
Page 2

INTRODUCTION
LEGEND Users Manual
Congratulations on your decision to protect your home or
business with the LEGEND Security System. The system has been
designed with reliability and ease of operation in mind.
Please take a few minutes to review the contents of this manual.
In order to realize the full potential of this system it is important that
you feel comfortable with its operation. The following pages will
familiarize you with the procedures for operating the LEGEND
Security System.
Thank You,
FIRE BURGLARY INSTRUMENTS
Table of Contents
Introduction
Keypad Layout
System Operation
User Definition
Glossary
.............................................
Arming
...........................................
Stay
Instant
Instant-Stay
Bypass......................................
Forced Arming
Unbypass
Disarming.................................
Keypad Emergency Conditions..
..................................................
1
.......................................
...................................
.......................................
........................................
...............................
..........................
.................................
........................................
3
6
7
8
9
9
10
11
11
12
13
15
17
Owners Information
About the
Additional Notes
Manufacturer
.....................................
................................
........................
19
21
24
2
Page 3
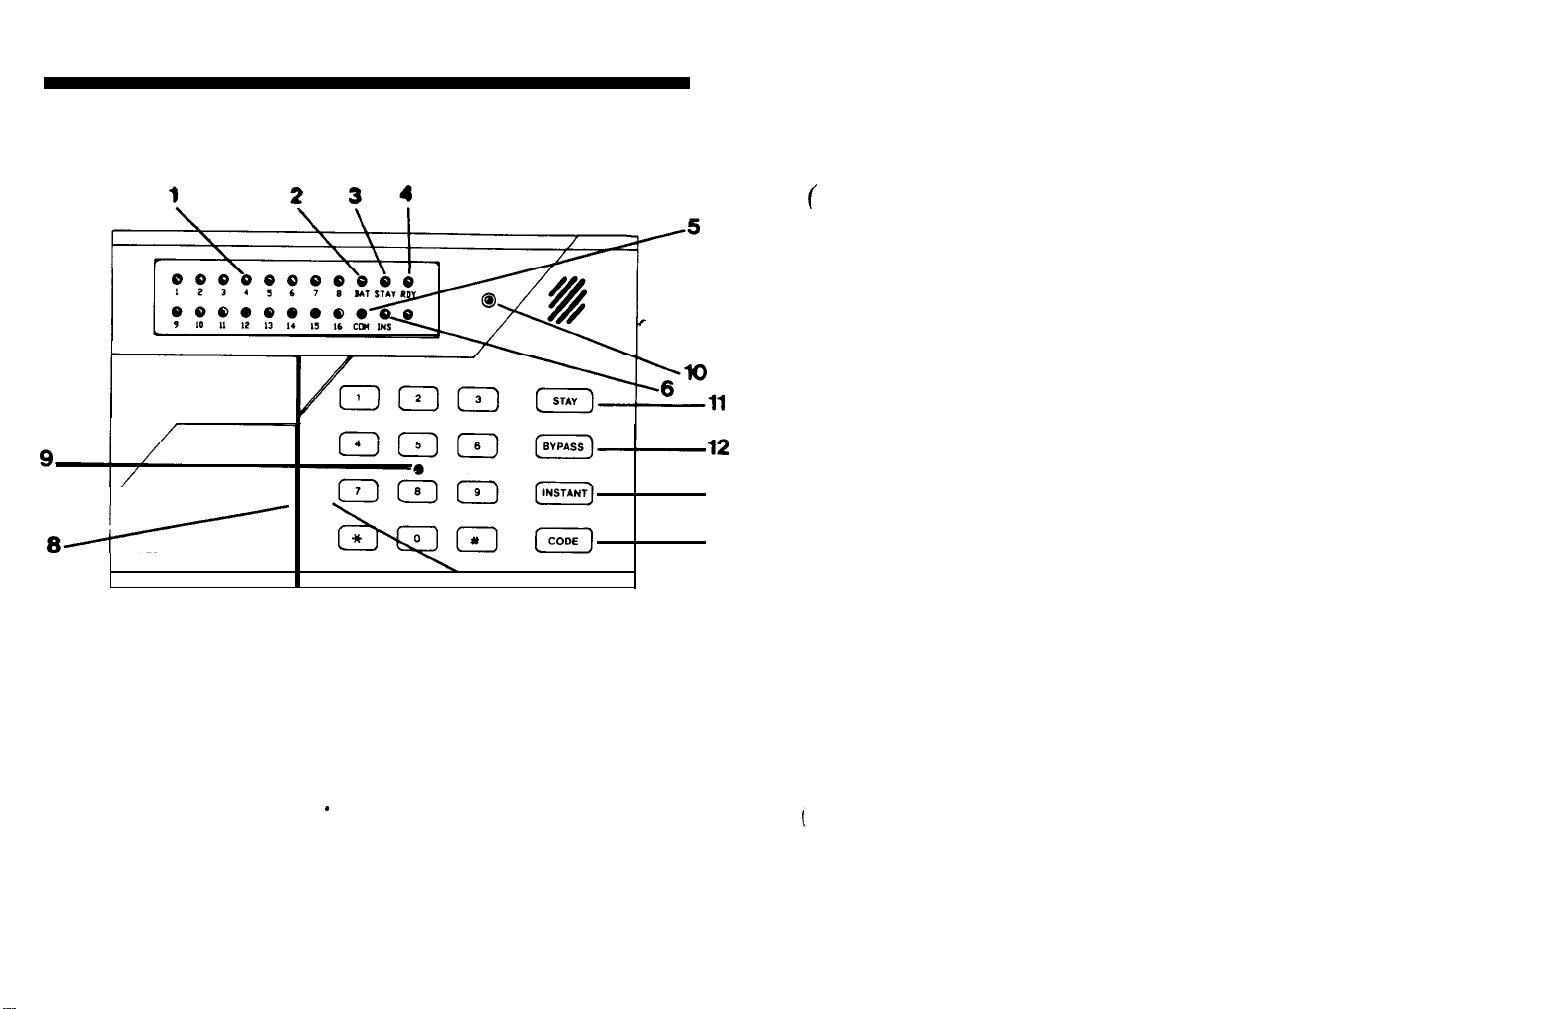
KEYPAD OPERATION
2- LOW BATTERY
The keypad contains everything necessary to operate your
LEGEND Security System. The keypad has the following
appearance;
r5
*-/
1
- ZONE STATUS
LED KEYPAD LAYOUT
The indicator lights marked 1-16 display the current status of
the zones connected to your LEGEND Security System. The lights
show whether any zones are currently in alarm, bypassed, in
trouble or faulted status. Note: If your system contains eight zones
then only the zones
The status of each zone is represented as follows;
Each light will only reflect one condition at a time. If a zone
contains multiple conditions at the same time the highest priority
status from the above list will appear.
labelled
ALARM
TROUBLE
BYPASSED
NOT READY
1-6 will be active.
Fast Blinking
’
Slow Pulse
Slow low Intensity blinking
Solid ON
The BAT indicator indicates that the backup battery within the
system is low.
3- STAY
The STAY light will be ON when the system has been armed in
the stay mode which means that the system has been activated
with the exception of interior zones.
4- READY INDICATOR
The light marked RDY shows whether the system is ready fo be
armed. If the light is off then a condition exists within at least one
of the zones which prevents the system from being armed.
5- COMMUNICATIONS FAILURE
13
14
\
6- INSTANT
7
If the COM light is ON then there has been a communications
error with the Central Station.
The INS indicator will be ON when the system has been armed
in the INSTANT mode. This means that the system has been
activated and the entry delay has been eliminated.
7- NUMERICAL SECTION
The numerical section of the keypad operates similar to a
calculator or typewriter. The digits 0 - 9 are clearly marked and are
used to enter your access code to control the Security System.
8- PULL OPEN DOOR
The front of the keypad contains a door which pulls open.
Behind this door is a card which can be filled out to describe the
areas protected (zones) of your
Security
System.
4
Page 4

9- AC INDICATOR
SYSTEM OPERATION
This light indicates that AC power is connected to the Security
System. Battery backup exists to operate the system in the event
of a power failure.
10- ARM/DISARM INDICATOR
This light indicates whether the system is currently ARMED
(ON) or DISARMED (OFF). In addition to this constant visual
indication, the zone indicator lights will provide additional
information concerning the current zone status. This light will also
blink if there is a visual alarm condition present.
11- STAY Key
The STAY key is used to activate (arm) the system with the
exception of interior protection. This will provide exterior protection
of your location while allowing full access through the location. This
mode would be used when arming the system and you might be
walking through protected interior zones.
12--BYPASS Key
The BYPASS key will be used to temporarily turn off protection
of a portion of your burglary protection. This could be performed,
for example, to ignore an open window which would prevent the
arming of your system.
Throughout the users manual the following notation will be used
to describe actions taken at the LEGEND-100 keypad;
BY PASS
INSTANT
STAY
CODE
[USER]
*
Key
#
+
Function key
Function key
Function key
Function key
Entry of your four digit user code
Key
Indicates the simultaneous
entry of two keys. For example,
# + 3, indicates that the # and 3
keys should be pressed at the
same time.
labelled *
labelled
labelled
labelled
labelled
(to the left of 0)
# (to the right of 0)
labelled
BYPASS
INSTANT
STAY
CODE
13- INSTANT Key
The INSTANT key is used to activate (arm) the system and
eliminates the entry delay. This would cause an immediate alarm if
someone came through an exit/entry zone.
14- CODE Key
Function key used when entering or changing the User access
codes of your system.
5
6
Page 5

ARMING THE SYSTEM
ARMING the system will activate all portions of your
System. Arming can only be performed if all zones are READY. For
example, if a protected door is open the system cannot be armed.
Security
To arm the system in this situation one of the following actions
are necessary;
-
Make the zone(s) ready. Determine which zones are not ready
and perform what is necessary to ready the zone(s) (example,
close the door or window, etc),
or
SYSTEM READY
The system is ready to be armed if the READY indicator light
located in the display portion of the keypad is ON. If the system is
ready, ARMING can be
ARMING PROCEDURE
1. Enter your four digit user code into the keypad:
The ARMED indicator light will now be lit and if you are leaving
the home you may exit through a door designated by your installer
as an exit/entry zone for a fixed time period known as the exit delay.
SYSTEM NOT READY
If the system is not ready to be armed the READY indicator will
be OFF. The zone indicator lights will display the zones which are
currently not ready. The condition of each zone indicator reflects
what the status of each zone as follows;
ALARM
BYPASS Slow blinking
TROUBLE Slow pulse
NOT READY
In order to make the system ready ready determine which zones
are not ready by observing the zone indicator lights. From the zone
number you can find out which area of protection is not ready.
For example, assume the the zone 3 indicator light is ON. This
means zone 3 is not ready. Typically this might mean that a
protected door or window is open.
>>
7
Once the problems with each zone has been resolved the
READY light will appear and the system can be armed.
[USER]
performed
Fast blinking
as follows;
Solid ON
low intensity.
performed if the zone cannot be made ready or intentionally will
remain not ready. Remember, zones that are bypassed are
protected when the system is armed.
STAY
remain in the location. The STAY mode will deactivate any interior
protection zones which means that you will be free to walk
throughout your location without activating the alarm system.
(see previous description).
STAY PROCEDURE:
will be lit. In the STAY mode only the external or perimeter burglary
protection is active. You are free to walk around the residence
without activating any of the interior protection zones.
>>
system is disarmed.
-
Bypass the zone(s) not ready. Bypassing should only be
not
The STAY mode
In order to enter the STAY mode, the system must be READY.
STAY [USER]
Depress the STAY key followed by your user code.
After a
sucessful
Remember, you must DISARM the system to when you
to leave the premise.
Note: The STAY
is another way to ARM your system while you
STAY arming the ARMED and STAY indicator
want
option will automatically be reset after the
8
Page 6

INSTANT
The INSTANT mode arms the system and eliminates the entry
time delay interval. If anyone enters through an
alarm system will instantly activate.
The system must be ready to select the INSTANT option.
INSTANT PROCEDURE
INSTANT [USER]
Depress the INSTANT key followed by your user code.
Upon sucessful INSTANT ARMING of the system the ARMED
and INSTANT indicators will be lit.
Note: The INSTANT option will automatically be reset after the
system is disarmed.
INSTANT - STAY
entry/exit
zone the
BYPASS
Bypasses are performed to eliminate burglary zones that are
not ready or faulty from activating the security
BYPASS PROCEDURE:
Depress the
digit zone number to be bypassed.
The zone number to be bypassed is shown as ZN. For example,
to bypass zone number 2 enter;
Multiple zones may be bypassed by repeating the sequence for
the desired number of zones within a fifteen second
follows;
The sequence displayed above would have bypassed zones 2,
4 and 12.
BYPASS [USER]
BYPASS
BYPASS [USER] 02
EXAMPLE: BYPASS [USER] 02 BYPASS 04 BYPASS 12
key followed by your user code and the two
ZN
System.
interval, as
The INSTANT STAY mode will arm the system with the
characteristics of both the INSTANT and STAY modes. The system
will be armed with the interior portions bypassed and the entry
delay will be suspended.
The system must be READY in order to enter this mode.
PROCEDURE
INSTANT
STAY INSTANT [USER]
Depress the INSTANT and STAY keys in any order followed by
your user code.
After a sucessful INSTANT STAY arming the ARMED, INSTANT
and STAY indicators will be lit.
9
STAY [USER]
>>
Zones can be bypassed if the user performing the bypass is
authorized to perform bypasses and the zone has been defined by
your installer as bypassable.
If the zone has already been bypassed, the sequence will
unbypass the zone except if the system is armed and the
unbypassed zone is still not ready. Unbypass means that the zone
returns as an active burglary zone.
After the bypass (or unbypass) command has been accepted
the unit will emit a continuous beep and zone or zones that have
been bypassed will appear in a slow blinking mode in the zone
status area.
Note: Bypassing can be performed either while the system is
armed or disarmed.
10
Page 7

To immediately arm the system enter
bypass.
FORCED ARMING
Forced Arming is a method that will automatically bypass all
zones that are not
ready
and ARM the system.
[USER]
after the last zone
DISARMING
Disarming the security system will deactivate the burglary
portions of the system.
DISARM PROCEDURE:
FORCED ARMING PROCEDURE;
Depress the BYPASS key followed by your user code and the
BYPASS key.
If any of the zones currently
the command will not succeed, and a long interrupted beep will
follow.
Following a
be lit.
If you are leaving the premise, you may exit through an
exit/entry door for the duration known as the exit entry delay.
>>
Note: You have just ARMED the system and the bypassed
portions of your system re main unprotected.
UNBYPASS
The UNBYPASS function removes an existing bypass from a
currently bypassed zone. After
indication will be removed from that zone.
BYPASS [USER] BYPASS
faulted
are not bypassable, then
sucessful
forced arming the ARMED indicator will
UNBYPASSING
a zone, the bypass
[USER]
Enter your user code.
IF NO
ALARMS HAVE TAKEN PLACE
Upon disarming the ARMING indicator will go off.
The system display will reflect the current status.
IF
ALARMS HAVE TAKEN PLACE
If alarms or other conditions such as system troubles have
taken place since the initial system arming, they will appear on the
display. The conditions that have occurred appear in the zone
display section of the keypad. Each indicator light reflects the
status of each zone as follows;
until the premisis has been secured!!!.
ALARM
TROUBLE
BY PASS
NOT READY
If an intrusion has taken place while you were away, do not enter
’
Fast blinking
Slow pulse
Slow low lntenslty blinking
Solid ON
11
The procedure is similar to a bypass.
UNBYPASS PROCEDURE
BYPASS [USER] ZN See bypass
description.
>>
To clear the display of the alarm or trouble conditions and
silence the audible signal enter [USER] again.
12
Page 8

KEYPAD EMERGENCY CONDITIONS
In addition to individual zone alarms various conditions can be
transmitted directly through the keypad. These conditions are
initiated through the simultaneous depression of two keys, as
shown below;
LED KEYPAD LAYOUT
The keypad emergency conditions
be used for conditions such as PANIC, FIRE, or MEDICAL
Emergency. These conditions can be programmed by your installer
to suit your needs. The keypad emergency conditions are active 24
hours a day, whether the system is armed or disarmed.
I
Reset
\
Keypad
Condition 1
are programmable and can
/
/
Keypad
Condition 2
i
The DURESS signal is meant to disarm the system and transmit
an emergency signal to the Central Station indicating that there is
a problem.
The DURESS capability must be enabled by your installer and
can be initiated in one of two methods;
-
either by entry of user code
or
- entry of a valid user code with the last digit altered by one. For
example, if there is a valid user code of 1234 then duress codes of
1233 or 1232 exist for that user.
Upon entry of the duress code, the system will disarm in a
normal fashion and optionally transmit the duress signal to the
Central Station.
NOTE: The DURESS capability is
your installer. Please contact your installer to determine whether
duress has been activated and the method used.
#16
only
available if activated by
13
For example if keypad emergency condition 1 has been defined
by your installer as a PANIC
be sent by hitting the * and # keys at the same time.
The RESET
conditions such as alarms and troubles at the keypad if the reset
function has been enabled by your installer.
(3+1)
,
then an emergency panic signal can
command can be used to acknowledge
14
Page 9

USER DEFINITION
USER DEFINITION PROCEDURE:
Users can be entered or modified directly through the keypad.
The LEGEND Security system can maintain up to sixteen
users. The capability to modify user information is initially
programmed by your alarm installer. If there are any questions
regarding this feature, please contact your installation company.
Each of the users have the following features;
USER NUMBER
Sequence number identifying the user being modified or
entered. User number 1 is considered the highest level user
capable of performing all functions. The user numbers range from
01 to 16.
USER ID
Four digit code (0000 - 9999) entered at the keypad to
use the Security System. Each separate user must be assigned a
unique user code. The user ID has been displayed as [USER]
throughout this manual.
AUTHORIZATION LEVEL
The LEGEND control panel contains authorization levels to
control the users permitted to perform various system functions.
This allows users to be restricted to certain functions. The levels
are shown below;
LEVEL1-ARM, DISARM, BYPASS, PROGRAM USERS
LEVEL2-ARM, DISARM, BYPASS
LEVEL3-ARM
LEVEL4-DISARM
For example, a maid or babysitter can be assigned a
temporary access code that would only permit them to arm or
disarm the system (level 3 or level
(01-16).
only (temporary user)
4). User
sequence number
different
>>
>>
CODE
Note: The user information is entered twice for validation purposes.
Example,
a user level of 2 enter;
[USER][US#][US#][USlD][USlD][LEV][LEV]
where;
[USER]
[US#]
[
USID]
[LEV]
USER DEFINITION CAN ONLY BE PERFORMED BY A
USER WITH A LEVEL ONE AUTHORITY.
To create user number 3, with a user access code of 4567, and
CODE
Any error detected during the USER definition process will
cause the keypad to beep rapidly four times. If an error is
detected retry the entire command.
[USER]
Is your four digit user code.
User sequence number (01-16).
-
New user ID (0000
Authorlzatlon
03034667
4567
9999).
level (l-4).
22
15
1616
 Loading...