


INHALTSVERZEICHN I S
Garantie ........................................................................................................................ 5
Fehler vermeiden! ........................................................................................................ 5
Allgemeiner Warnhinweis ............................................................................................ 5
Aktualitäts-Hinweis ...................................................................................................... 5
Lieferumfang .................................................................................................................... 7
Anschluss des Displays ..................................................................................................... 9
Anschluss Signalquelle ................................................................................................. 9
Anschluss an Stromquelle ............................................................................................ 9
Nutzung Touch-Funktion ............................................................................................. 9
Bedienung Display ........................................................................................................... 9
OSD-Menü-Bedienung ................................................................................................. 9
Installation Touch-Display unter Windows .................................................................... 12
Einstellen der faytech Touch - Software ........................................................................ 14
Fehler vermeiden / Fehler beheben ............................................................................... 19
Beim Anschluss: .......................................................................................................... 19
Bei der Inbetriebnahme: ............................................................................................. 19
Technische Daten ............................................................................................................ 21
15 Inch Touch Monitor ................................................................................................ 21
17 Inch Touch Monitor ................................................................................................ 22
19 Inch Touch Monitor ................................................................................................ 23
22 Inch Touch Monitor ............................................................................................... 24
Kontakt ........................................................................................................................... 46
2

INDEX
Warranty ..................................................................................................................... 26
General warning ......................................................................................................... 28
Trouble-shooting ........................................................................................................ 28
Ongoing changes ....................................................................................................... 28
Components ................................................................................................................... 29
Display Connection ......................................................................................................... 31
To connect the signal source ...................................................................................... 31
Connect to power ....................................................................................................... 31
Using the touch function ............................................................................................ 31
Display Operation ........................................................................................................... 31
OSD-Menu-Operation ................................................................................................. 31
Installation of the Touch-Driver under Windows .......................................................... 34
Setting up the faytech Touch software ........................................................................ 35
Troubleshooting............................................................................................................. 40
Physical Setup ............................................................................................................ 40
Startup ........................................................................................................................ 40
Technical Data ................................................................................................................ 42
15 inch touch monitor ................................................................................................ 42
17 inch touch monitor ................................................................................................ 43
19 inch touch monitor ................................................................................................ 44
22 inch touch monitor ................................................................................................ 45
Contact ........................................................................................................................... 47
3

Deutsch
4

GARANTIE
Das Gerät wurde nach den modernsten
Produktionsverfahren hergestellt und
geprüft. Ausgesuchte Komponenten
und eine sorgfältige Produktion sorgen
für eine einwandfreie Funktion und
lange Lebensdauer. Sollte Ihr Gerät
dennoch einen Defekt innerhalb der
Garantiezeit aufweisen, wenden sie sich
bitte direkt an faytech. Die Garantiezeit
beträgt 24 Monate, gerechnet von dem
Tag des Kaufes, zu nachfolgenden
Bedingungen:
gemacht werden. Der Nachweis des
Garantieanspruches ist durch eine ordnungsgemäße Kaufbestätigung (Quittung oder Rechnung) zu erbringen.
FEHLER VERM E I D EN!
Am Ende der Anleitung finden sie eine
Übersicht über mögliche Anschluss- oder
Bedienungsfehler. Bitte prüfen sie im
Bedarfsfall zuerst diese Liste.
ALLGEMEINER WARNHIN W EIS
Der Garantieanspruch erlischt bei Eingriffen durch den Käufer oder durch
Dritte. Schäden, die durch unsachgemäße Behandlung oder Bedienung,
durch falsches Aufstellen oder Aufbewahren, durch unsachgemäßen Anschluss, sowie höhere Gewalt oder
sonstige äußere Einflüsse entstehen,
fallen nicht unter die Garantieleistung.
Wir behalten uns vor, bei Reklamationen
die defekten Komponenten zu ersetzen
oder das Gerät auszutauschen.
Ausgetauschte Komponenten oder
ausgetauschte Geräte gehen in unser
Eigentum über.
Schadensersatzansprüche sind ausgeschlossen, soweit sie nicht auf Vorsatz
oder grober Fahrlässigkeit des Herstellers beruhen.
Im Garantiefall nach diesen Bestimmungen wenden sie sich bitte an faytech.
Kontaktdaten gibt es am Ende der
Bedienungsanleitung oder aktuell unter
www.faytech.com
Nach Ablauf der Garantiezeit können
keine Garantieansprüche mehr geltend
Das Gerät auf keinen Fall mit Schmutz,
Öl, Staub oder Wasser in Verbindung
bringen. Niemals das Gerät öffnen, nicht
fallen lassen. Wenn sie einen verbrannten Geruch wahrnehmen oder das Gerät
Geräusche macht trennen sie es sofort
vom Stromnetz. Zur Reinigung des
Gerätes schalten sie es aus und nutzen
sie ein trockenes, weiches Tuch mit
leichtem Druck. Nutzen sie das Gerät zu
Ihrer eigenen Sicherheit nicht während
der Autofahrt.
AKTUALITÄT S-HINWEIS
faytech produziert seine Displays in
China mit deutschem EntwicklungsKnow-how und deutschem Qualitätsmanagement vor Ort. Ihr Feedback fließt
direkt in die Weiterentwicklung unserer
Produkte mit ein. Die stetige Produktions- und Produktverbesserung ist unser
oberstes Ziel. Aus diesem Grund kann es
in unseren Produkten bereits Verbesserungen geben, die noch nicht in den
jeweiligen Bedienungsanleitungen
enthalten sind. Abweichungen Ihres
Produktes zu dieser Bedienungsanleitung bedeuten in der Regel Spezifikati-

ons- und Produktverbesserungen.
Wenden Sie sich bei Fragen bezgl. Abweichungen bitte an unseren Support
oder besuchen Sie unsere Internetseite
unter www.faytech.com.
6

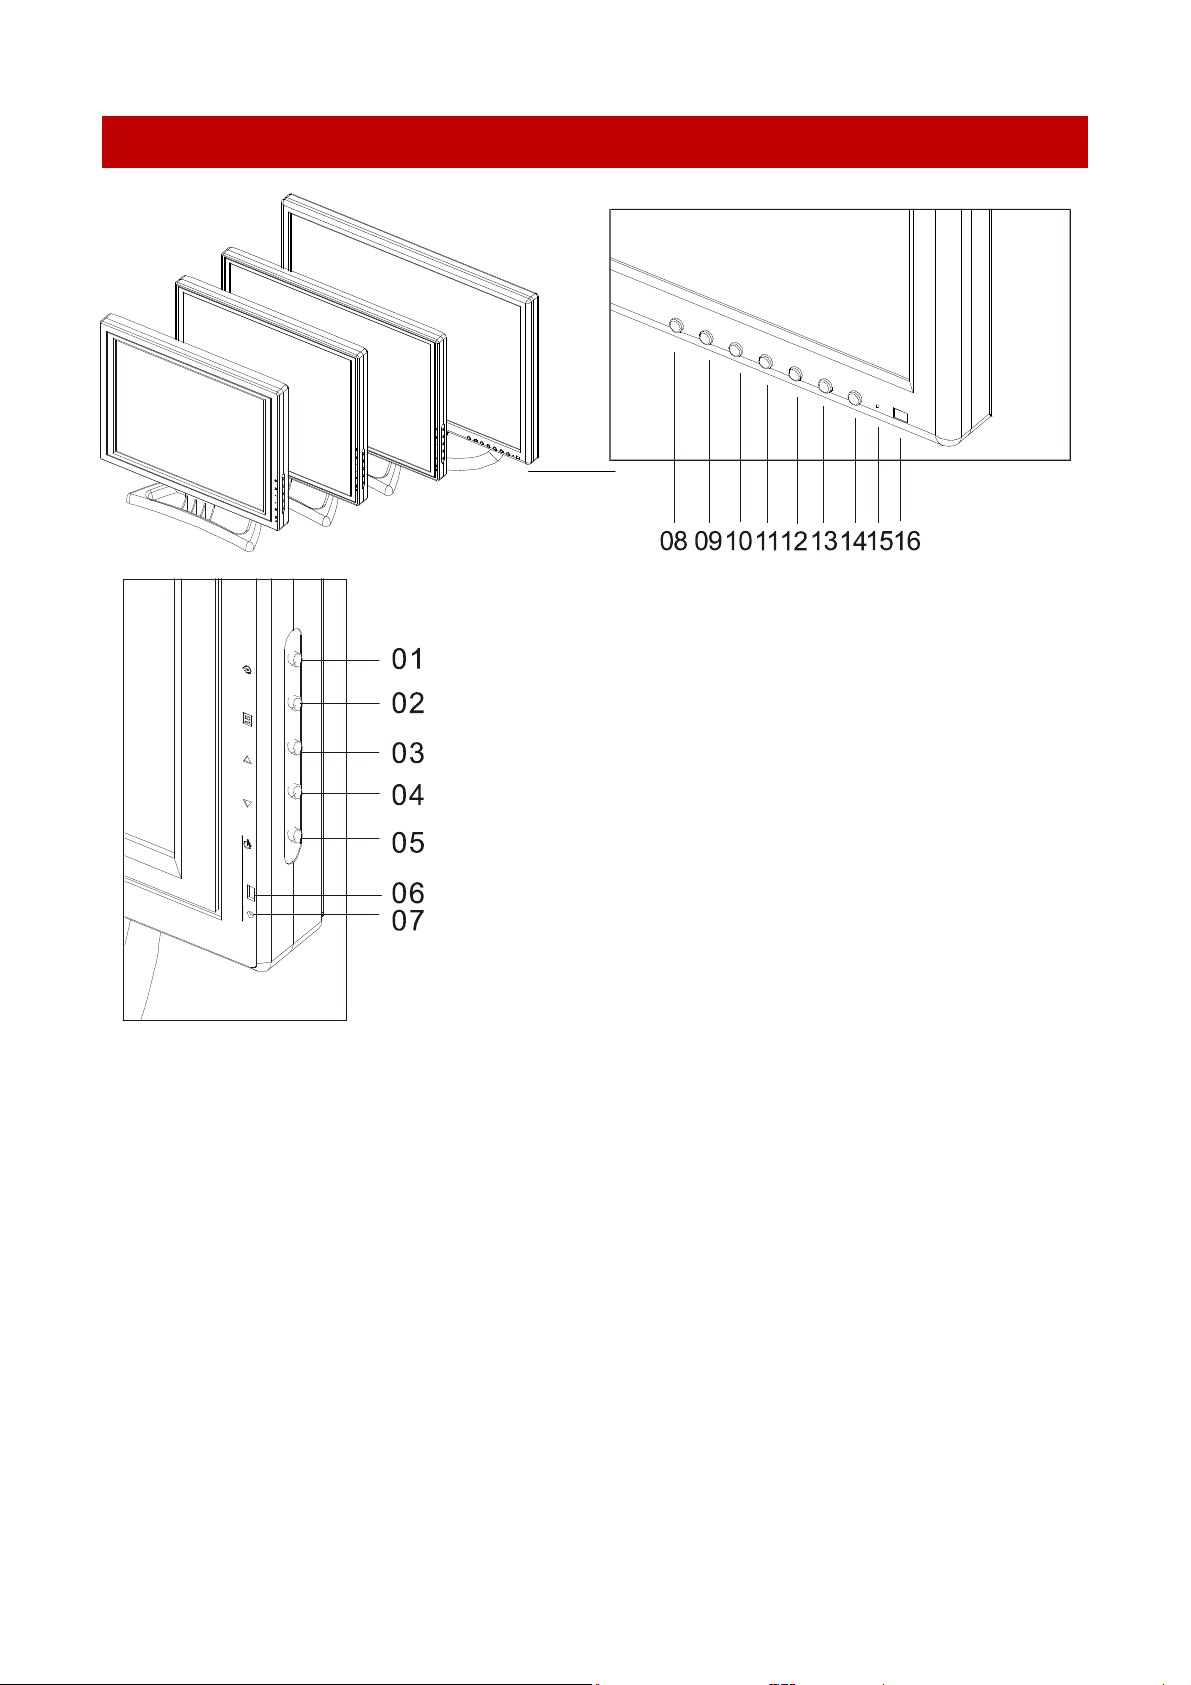
LIEFERUMFAN G
07. LED
Betriebslampe
22 Inch Touch Monitor:
15 Inch bis 19 Inch Touch Monitore:
15 Inch bis 19 Inch Touch Monitore:
01. Auto-Display-Einstellung: Stellt das
Display automatisch optimal auf die
aktuelle Auflösung Ihrer Grafikkarte ein
02. MENU: öffnet das Menü, bestätigt
Vorgänge im OSD-Menü
22 Inch Touch Monitor:
08. INPUT: schaltet die Eingangssignale
VGA, DVI, HDMI, AV1, AV2 durch – bitte
stellen Sie unbedingt den richtigen Kanal
ein, sonst haben Sie kein Signal!
09. VOL-: verringert die Lautstärke
10. VOL+: erhöht die Lautstärke
11. CH- :markiert Werte und ändert Werte im
OSD-Menü
03. +: erhöht die Lautstärke und ändert
die Werte im OSD-Menü bei Markierung
04. -: verringert die Lautstärke und ändert
die Werte im OSD-Menü bei Markierung
05. POWER: Display Ein/Aus
06. Infrarotempfänger
12. CH+:markiert Werte und ändert
Werte im OSD-Menü
13. MENU: öffnet das Menü, bestätigt
Vorgänge im OSD-Menü
14. POWER: Display Ein/Aus
15. LED Betriebslampe
16. Infrarotempfänger
7

26. Audio-In für Video
27. Kopfhörer
28. 220V Netzteil
29. USB Kabel
30. VGA Kabel
31. 3,5mm-3,5mm Audio Kabel
32. Touchstift
33. Treiber- CD für Touchfunktion mit
Bedienungsanleitung
17. USB Kabelanschluss (für Touchfunktion)
18. 12V DCIN Stromversorgung
19. VGA Kabelanschluss
20. Audio-PC-IN
21. COM für seriellen Touch-Anschluss
22. HDMI-Anschluss
23. DVI-Anschluss
24. S-Video-In
25. Video-In
8

ANSCHLUSS DES D ISPLAYS
Vorgehen bei Anschluss an eine andere
12V-Quelle
Um Ihr faytech Display ordnungsgemäß
in Betrieb zu nehmen müssen Sie es mit
mindestens einer
Stromversorgung
der Touchfunktion optional mit dem
USB-Port
ANSCHLUSS SIGNALQUELLE
Sie haben folgende Möglichkeiten:
An PC: Verbinden Sie das VGA- Kabel
Ihres faytech-Monitors mit dem VGAAusgang ihrer PC-Grafikkarte.
An PC: haben Sie nur einen
DVI-Ausgang an Ihrem PC erwerben Sie
bitte einen DVI-auf VGA-Adapter und
schließen Sie über diesen das Display per
VGA an Ihren PC an.
22 Inch: hier haben Sie zusätzlich DVI,
HDMI und Videoeingänge zum Anschluss
des Bildsignals. Bitte achten Sie darauf,
dass Sie auf dem richtigen Kanal sind
(Kanalwahl über INPUT)
Ihres PCs verbinden.
Signalquelle
und für den Gebrauch
, einer
Gerne können Sie das Display auch
über eine andere 12V-Quelle betreiben.
Bitte achten Sie darauf, dass die Polung
richtig ist (+ Innen) und das Netzteil
ausreichend dimensioniert ist (2,5A).
NUTZUNG TOU CH -FUNKTION
Verbinden Sie das USB- Kabel mit dem
USB- Anschluss Ihres PCs (
bei der Software-Installation dazu aufgefordert wurden).
Die Touch-Monitorserie unterstützt auch
die Touch-Nutzung über den seriellen
Port (15" bis 19"). Bitte verbinden Sie
den seriellen Port des Touch-Monitors
mit Ihrem PC. Ein entsprechendes Kabel
ist nicht im Lieferumfang enthalten.
nachdem
Sie
BEDIENUNG DISPLAY
Daneben hat das Display einen Stereo-Audio-Eingang (3,5mm Klinke, Unterseite Display, Audio-In). Der Ton über
die Lautsprecher wird nur ausgegeben,
wenn auch jeweils ein Bildsignal anliegt.
ANSCHLUSS AN ST ROM Q UEL LE
Per Steckverbinder können Sie Ihr faytech Display an das mitgelieferte 220V
Netzteil anschließen, bitte nutzen Sie
dafür die an der unteren Seite des Displays angebrachte Buchse die mit DCIN
+12V beschriftet ist.
OSD-ME N Ü -BEDIENUNG
Die Menü-Bedienung Ihres faytech-Displays ist einfach und logisch. Sie
haben drei Bedienknöpfe. MENU, +/ -.
Mit MENU rufen Sie das OSD-Menü auf,
mit +/ – navigieren Sie durch die jeweiligen Menüpunkte, ins Untermenü gelangen Sie wieder über das Drücken von
MENU. Einen Wert ändern Sie, in dem
Sie Ihn mit +/- ansteuern und dann
MENU zur Änderung des Wertes drücken. Der angesteuerte Menüpunkt
erhält nun eine neue Farbmarkierung,
über +/ – verändern Sie nun seinen Wert.
Drücken Sie erneut MENU werden die
9

Änderungen gespeichert und Sie navigieren mit +/- wieder innerhalb der
Registerkarte. Kehren Sie zum Hauptmenüpunkt zurück in dem Sie jeweils
den Punkt EXIT im Untermenü an navigieren und MENU drücken.
Tipp: Bevor Sie das Menü nutzen
stellen Sie am besten zuerst die
Deutsche Sprache wie folgt ein:
Drücken Sie 1x die Taste MENU,
dann 2x +, wieder 2x MENU, 1x +,
es wird „Deutsch“ angezeigt.
Speichern Sie mit MENU und navigieren Sie weiter gem. folgender
Anleitung.
Farbeinstellungen
Auto Display Einstellung:
Stellt das Display automatisch optimal
auf die aktuelle Auflösung Ihrer Grafikkarte ein. Sind Sie mit der Auto -Einstellung nicht zufrieden optimieren Sie
bitte manuell.
Auto Farbeinstellung:
Optimiert automatisch die Farbtemperatur Ihres faytech Displays. Gerne
ändern Sie auf Wunsch die Farbwerte
des Displays manuell.
Helligkeit:
Erhöht oder senkt den Helligkeitswert
Ihres Displays. Kontrast: Erhöht oder
senkt den Kontrastwert Ihres Displays.
Farbtemperatur:
Hier können Sie aus drei vorgegeben
Farbtemperaturräumen wählen oder
selber einen Farbtemperaturraum für
die Grundfarben Rot, Grün, Blau festlegen Sättigung: (Nur im AV-Mode) Erhöht
Farbsättigung (stärkere Farben) oder
verringert Farbsättigung.
Exit:
Sie können hier ins Haupt- oder
Submenü zurückkehren.
10

Bildeinstellungen
Menü Einstellungen
Horiz. Position:
Verschieben Sie die Position des Displaybildes nach links (-) oder rechts (+).
Vertik.Position:
Verschieben Sie die Position des Displaybildes nach unten (-) oder oben (+).
Sprache
Ändern Sie hier die Sprache des
OSD-Menüs.
OSD Horiz. Position:
Verschieben Sie die Position des
OSD-Menüs nach links (-) o. rechts (+).
Phase:
Lässt Sie die Halbbilddarstellung im
Videobereich optimieren.
Horiz. Grösse:
Verkleinern o. vergrößern Sie das Displaybild Ihres faytech Monitors mit -/ +.
Exit:
Sie können hier ins Haupt- oder
Submenü zurückkehren.
OSD Vertik-Position:
Verschieben Sie die Position des OSDMenüs nach unten (-) o. nach oben (+).
OSD auto.Ausschalten:
Hier stellen Sie die Zeit ein, nach deren
Ablauf das OSD-Menü automatisch
beendet wird.
Durchsichtigkeit:
Hier können Sie verschiedene Durchsichtigkeitsstufen für Ihr OSD-Menü auswählen.
Exit:
Sie können hier ins Haupt- oder
Submenü zurückkehren.
11

Soundeinstellungen
Lautstärke:
Verändern Sie die Lautstärke der eingebauten Lautsprecher. Mit - verringern
Sie die Lautstärke, mit + erhöhen Sie
diese.
Exit:
Sie können hier ins Haupt- oder
Submenü zurückkehren.
Exit
Schalten Sie hier das OSD Menü aus.
Stumm:
Schalten Sie die Lautstärke an/aus.
Exit:
Sie können hier ins Haupt- oder
Submenü zurückkehren.
Einstellungen
Werkseinstellungen:
ktivieren Sie diese Einstellung wird das
Display zurück auf die Werkseinstellungen esetzt, alle Änderungen, die Sie
gemacht haben, werden gelöscht.
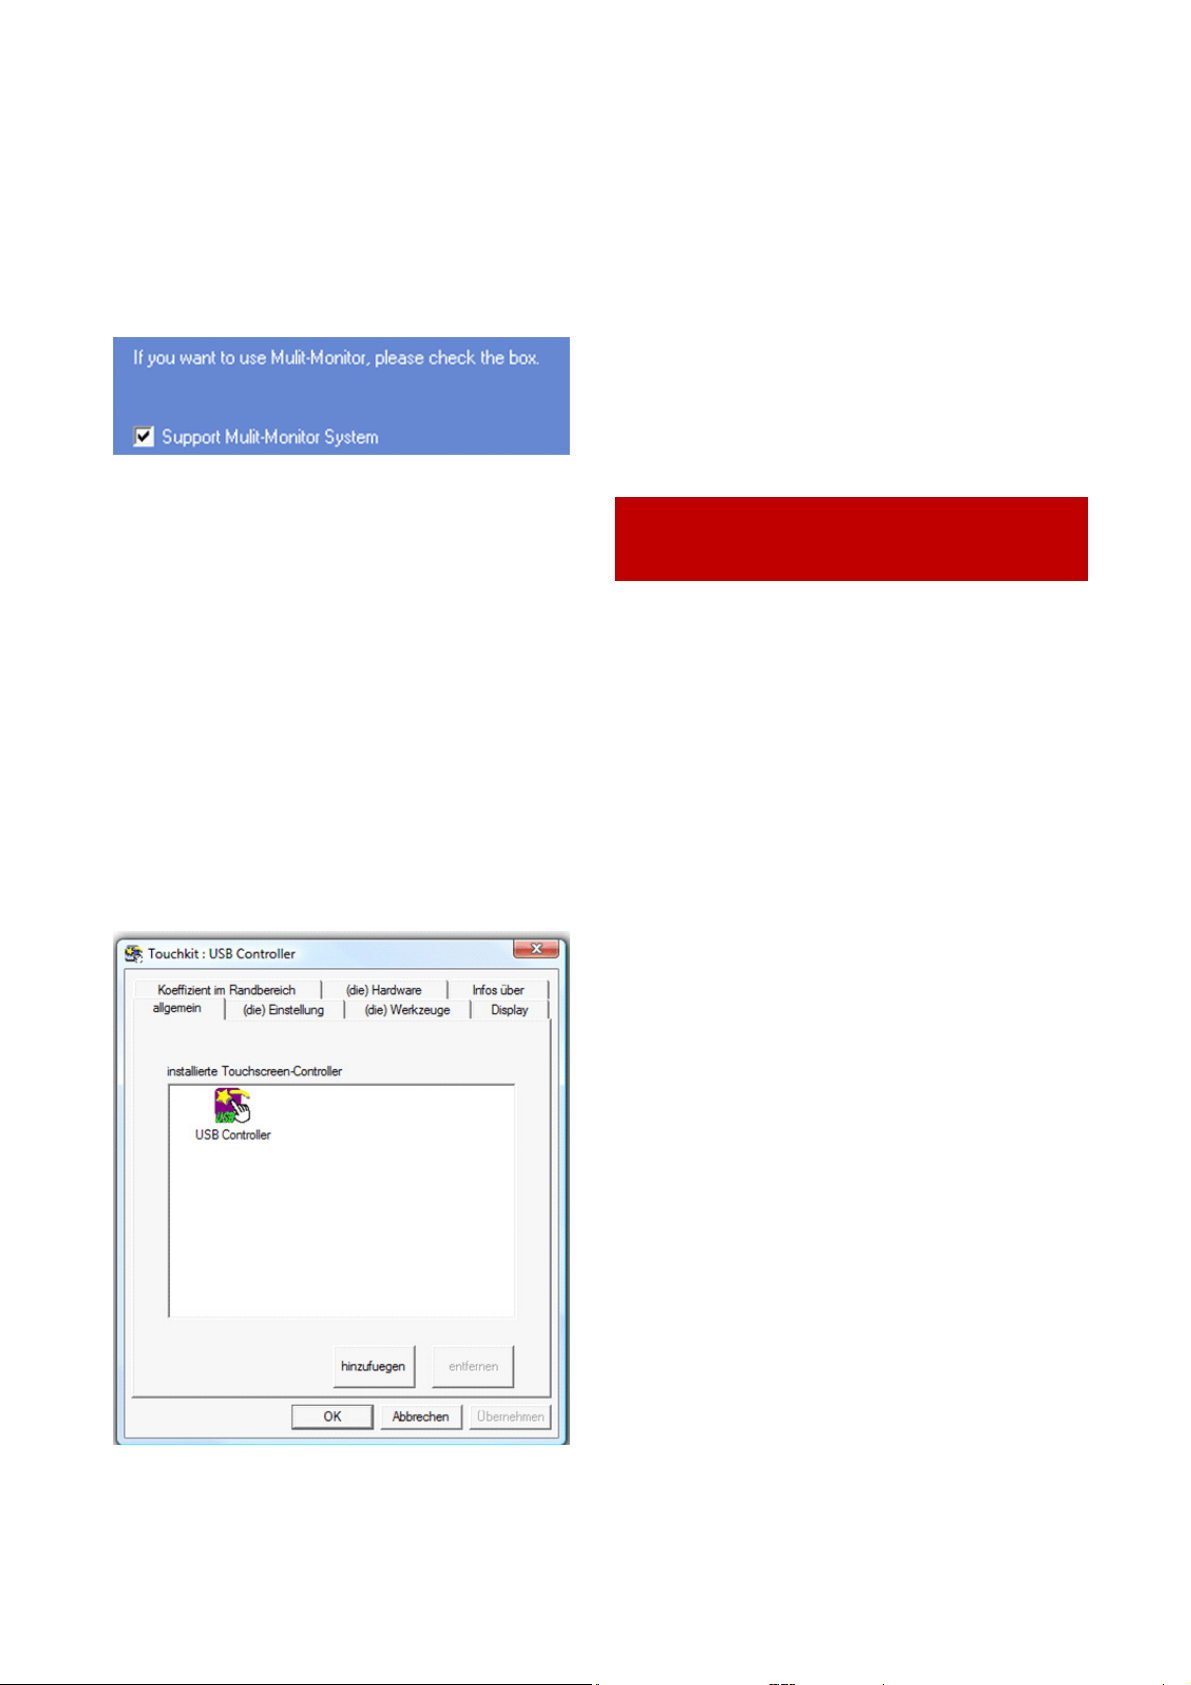
INSTALLATION T OUCH-DISPLAY
UNTER WINDOWS
1. Legen Sie die mitgelieferte CD in Ihr
CD-Laufwerk ein.
2. Wechseln Sie über den Explorer auf
der CD in das passende Unterverzeichnis
(Touch-Driver, dann das richtige Betriebssystem) und öffnen Sie dort die
Installations-Datei setup.exe. Sie sollten
nun folgenden Bildschirm sehen:
Um die Installation mit allen Standardoptionen abzuschließen, können Sie bei
allen folgenden Dialogen einfach
„Next >“ drücken. Dieses Vorgehen
empfehlen wir ausdrücklich! Über
„Cancel“ können Sie die Installation
jederzeit abbrechen, über „<
Back“ können Sie jeweils zum vorherigen Dialog zurück wechseln.
12

Bitte beachten Sie! Der Installationsvorgang ist auf Englisch, im späteren Programm wird die Sprache aber automatisch auf Ihre gewählte Landessprache
eingestellt.
3.„Welcome to the InstallShield Wizard
for TouchKit“: Drücken sie „Next“ wenn
sie das Programm installieren möchten,
beenden sie nach Möglichkeit alle anderen Programme.
bleibt, ist dieses Vorgehen unnötig. Bei
der Aktivierung des Kästchens „Next
system boot up“ wird die Kalibrierung
beim nächsten Systemneustart durchgeführt. Sie können jederzeit eine Kalibrierung im später installierten
TouchKit-Programm durchführen, siehe
auch
Einstellen der Touch-Software
.
Drücken Sie dann „Next“.
6.„TouchKit - InstallShield Wizard“:
4.„Setup Type“:
Aktivieren Sie das Kästchen nur, wenn
Sie auch die PS/2-Treiber mit installieren
wollen. Ihr Display ist in der Regel ein
USB-Touch-Display, entsprechend sollten Sie diese Option NICHT wählen. Der
PS/2-Treiber funktioniert reibungslos mit
PS/2-Mäusen zusammen, mit anderen
Geräten am PS/2-Port können Kompatibilitätsprobleme auftreten.
5.„Setup Type“:
Wir empfehlen die
Einstellung
„None“.
„Every
system boot
up“ führt
eine Kalibrierung bei jedem Systemstart
durch. Da die Kalibrierung in der Regel
über einen langen Zeitraum konstant
Schließen Sie jetzt das USB-Kabel an und
drücken Sie „OK“. Falls sich der „Neue
Hardware gefunden“ Dialog von Windows öffnet, beenden Sie diesen bitte
wieder.
7. „Setup Type“:
Verwenden Sie mehrere Monitore aktivieren Sie dieses Kontrollkästchen, siehe
auch Einstellen der Touch-Software.
8.„Choose Destination Location“: Wählen Sie ein Installationsverzeichnis über
„Browse“ oder drücken Sie „Next“.
9.„Select Program Folder“: Geben Sie
dem Programm einen Namen oder
nutzen Sie die Standardeinstellung und
drücken Sie „Next“.
13

10.„Setup Status“: Die Installation wird
automatisch mit den ausgewählten
Einstellungen durchgeführt. Warten Sie
einfach die Fertigstellung ab.
11. Die Installation ist erfolgreich abgeschlossen wenn folgendes Fenster
erscheint: Wird kein USB Controller
angezeigt, ziehen Sie bitte einmal das
USB-Kabel aus Ihrem PC und verbinden
Sie es erneut, ggfls. müssen Sie den PC
neu starten. Weitere Hilfe gibt es sonst
in der Rubrik
beheben
Fehler vermeiden/Fehler
.
EINSTELL EN DER FAYTECH
TOUCH - SOF TWARE
Wird nach der ersten Installation kein
Touch-Controller angezeigt (entgegen
der Abbildung unter
Display unter Windows
bitte einmal den USB-Stecker von Ihrem
PC ab und verbinden Sie die Geräte
erneut.
2.(die) Einstellung
In den Einstellungen können Sie zunächst unter (der) Signalton die Toneinstellungen des Touch-Panels vornehmen.
Über (die) Frequenz und (die) Dauer
ändern Sie die Tonhöhe und Länge des
Signaltons. Die Änderungen werden
nach
einem。klick auf „überneh-
men“ wirksam.
Installation Touch
), ziehen Sie
Sie starten das Verwaltungsprogramm
über Start, Programme, TouchKit und
dann Configure Utility.
Die Touch-Software besitzt sieben
Registerflächen die im Folgenden kurz
erklärt werden.
1.Allgemein
Das Startfenster „allgemein“ gibt Information darüber, ob ein oder mehrere
Touch-Controller gefunden bzw. installiert wurden.
Unter
Häufigkeit der Linearisierungspunkte
unter (die) Werkzeuge, Linearisierung
festlegen. Bei einer 25-Punkte
Linearisierung ist die Abweichung des
Panels vom Druckpunkt geringer als bei
einer 9-Punkte Linearisierung. In der
Regel sind faytech Displays von Fabrik
aus richtig eingestellt und sollten nicht
linearisiert werden müssen.
Über die
stellen Sie ein, wie schnell Sie hintereinander auf das gleiche Objekt klicken
müssen, um einen Doppelklick auszulösen. Je
sen Sie drücken, je
mehr Zeit können Sie zwischen Ihren
beiden Klicks vergehen lassen, um einen
Doppelklick auszulösen.
Linearisierung Art
Doppelklick-Geschwindigkeit
kuerzer<<
, desto schneller müs-
>>laenger
können Sie die
, desto
Entsprechendes gilt auch für die
Doppelklick-Position
ner<<
chen Doppelklick die gleiche Fläche zwei
Mal sehr genau treffen, wählen
, müssen Sie für einen erfolgrei-
. Wählen Sie
klei-
14

Sie
>>groesser
wird auch ein Doppelklick
ausgeführt, wenn Sie beim zweiten Klick
nicht ganz genau die gleiche Fläche
treffen wie beim ersten Berühren.
Druckpunkt ein Klick erzeugt, der
Mauszeiger folgt der Finger /Stiftbewegung nicht.
Klick beim Loslassen ohne den
zeiger zu bewegen
: Der Mauszeiger
folgt der Berührung nicht, beim loslassen des Touch-Panels wird an dieser
Stelle ein Klick erzeugt.
Rechts von den Maus-Modi gibt es die
Schaltfläche
Option
. Folgende Einstellmöglichkeiten gibt es für Ihr faytech
Display in diesem Untermenü:
Rechts vom Maussymbol können Sie die
unterschiedlichen Maus-Modi einstellen.
Die intuitive Touch-Bedienung entspricht
dem Normal-Modus.
Normal-Modus
: In diesem Modus verhält sich das Touchpanel wie eine gedrückte Maus, wenn Sie es mit Stift oder
Finger berühren.
Klick bei Berührung
: Es wird nur beim
ersten Berühren ein Klick erzeugt, danach folgt der Mauszeiger der Fingerbewegung. Für einen neuen Mausklick
muss das Display losgelassen und neu
gedrückt werden.
Klick beim Loslassen
: Konträr zur Funktion Klick bei Berührung wird ein Klick
beim Loslassen des Displays erzeugt.
(die) Funktion
Aktiviert die constant Touch-Funktion
reduziert Systemlast durch das Zusammenfassen mehrerer Touch-Panel Berührungen (Druckabweichungen) zu
einem Mausklick.
:
Klick bei Berührung ohne den Mauszeiger zu bewegen
: Es wird auf den ersten
15

Aktiviert die automatische right KlickFunktion
: schaltet den automatischen
Doppelklick bei längerem Drücken des
Displays ein.
Aktiviert die Touch-Funktion
: schaltet
die Touch-Funktion an/aus ACHTUNG!
Die Touchfunktion funktioniert nach
dem Ausschalten nicht mehr!
Aktiviert die Mauszeiger- Stabilisierung
filtert Druckabweichungen bei der
Bedienung des Displays heraus und führt
so zu einer ruhigeren und saubereren
Mauszeigerbewegung.
Mit
Dauer-Touch kleiner<<
bzw.
>>groesser
verändern Sie die
Größe der Touchfläche, innerhalb derer
die Funktion „rechte Maustaste gedrückt“ aufgerufen wird oder nicht. Je
kleiner der Wert ist, desto weniger
dürfen Sie Ihren Finger während dem
Drücken des Touch-Panels bewegen, um
das Drücken der rechten Maustaste zu
simulieren.
können sie sich mit der Nutzung des
Touchscreens vertraut machen und die
Funktionalität überprüfen.
Drücken Sie die Funktion
4-Punkte-Kalibrierung wird die Fläche
des Touch-Monitors weiß, folgende
Informationen werden eingeblendet:
Drücken Sie jeweils auf das rot-grün
:
blinkende Fadenkreuz mit Finger oder
Stift, bis es aufhört zu blinken. Haben Sie
lange genug auf das Fadenkreuz gedrückt, werden insgesamt drei weitere
Fadenkreuze eingeblendet. Unterhalb
des Fadenkreuzes läuft ein Fortschrittsbalken mit. Bitte drücken Sie auf das
Fadenkreuz bevor der gelbe Balken
durchgelaufen ist, sonst wird die Kalibrierung abgebrochen.
Bei der nächsten Funktion stellen Sie mit
kuerzer<<
bzw.
>>laenger
das Intervall
in ms (Millisekunden) ein, nachdem die
Funktion „rechte Maustaste gedrückt“ ausgeführt wird, wenn Sie mit
dem Finger oder einem Stift auf die
Touchfläche drücken.
3.(die) Werkzeuge
In dieser Registerkarte können Sie Ihr
faytech Touch-Panel erneut mit den
Funktionen 4-Punkte-Kalibrierung,
Loeschen und Kalibrieren, Linearisierung
und Zeichen-Test einstellen. In der Regel
reicht bei Inbetriebnahme, wenn überhaupt nötig, die 4-Punkte- Kalibrierung
aus. Mit der Applikation Zeichentest
Die Funktionen
ren
und
Linearisierung
Loeschen und Kalibrie-
arbeiten nach
dem gleichen Prinzip. Führen Sie diese
beiden Funktionen bitte nur durch,
wenn Sie trotz 4-Punkte-Kalibrierung
und Optimierung im Register „
zient im Randbereich
“ kein zufrieden-
Koeffi-
stellendes Ergebnis hinsichtlich der
Genauigkeit Ihres faytech
Touch-Displays erzielen. Mit der
25-Punkte- Linearisierung stellen Sie
Ihren Touch-Monitor mit der größtmöglichen Genauigkeit ein. Unter Einstellung,
Linearisierung Art können Sie im Programm festlegen, ob Sie eine
25-Punkte-Linearisierung oder eine 9Punkte-Linearisierung an dieser Stelle
durchführen möchten.
16

Mit Hilfe der Applikation
Zeichen-Test
können Sie sich mit der Nutzung des
Touchscreens vertraut machen. Drücken
Sie auf das linke, blaue Kästchen Löschen Sie Ihre Touchscreen-Eingaben,
mit einem Klick auf das rechte blaue
Kästchen beenden Sie das Zeichenprogramm.
4. Display Multi-Monitor-Einstellungen
Die Registerkarte Display ist für Sie
wichtig, wenn Sie mehrere Displays
gleichzeitig nutzen. Sie können bis zu
vier faytech Touch-Displays gleichzeitig
verwenden, zum Beispiel aber auch ein
(Nichttouch-) Display und ein
Touchdisplay nutzen, wie es im folgenden Bild zu sehen ist. Im Beispiel ist der
Touch-Monitor das Display „1“, das
zweite Display „2“ ist ein normaler
Monitor. Beide haben die gleiche Auflösung, das Touchdisplay ist der primäre
Monitor.
Ist die Mehrfach-Monitor-Funktion
NICHT aktiviert, wird stets der primäre
Monitor als Touch-Screen-Monitor
gesetzt. Aktivieren Sie die Funktion,
können Sie einen der angeschlossenen
Monitore als Touch-Screen-Monitor
auswählen. Drücken Sie dafür per Doppelklick auf den gewünschten Monitor
und bejahen Sie die Frage im PopUp-Fenster:
Nach Bestätigung werden Touch- Panel-Berührungen auf dem gewählten
Monitor als Mausklicke simuliert.
Ist die Funktion „
Den Touch-Sensor
immer an das Haupt-System anpassen
“ aktiviert, schaltet das Programm
die Touch-Funktion automatisch auf den
primären Monitor, wenn nur ein Monitor
angeschlossen wird.
17

Über die
Funktions-Modus
Einstellungen
können Sie die Größe der Touch- Fläche
auf Ihrem faytech Touch-Monitor einstellen bzw. begrenzen. Wählen Sie z.B.
die Funktion „rechter Bildschirm“ aus
funktioniert nach einer neuen Kalibrierung nur noch die rechte Seite als
Touchfläche. Unter „anders“ und dann
auf ->> können Sie weitere Modi einstellen oder individuell eine Touch- Fläche
definieren.
5.Koeffizient im Randbereich Feinjustierung der Touchfläche
Über dieses Register können Sie Ihre
Touch-Fläche feinjustieren. Dies ist sehr
nützlich, wenn Sie z.B. Probleme haben,
den Rand des Touch-Displays sauber zu
treffen.
6.Registerkarten (die) Hardware, Infos
über:
Im Beispielbild sehen Sie, dass die
Grenzwerte in der oberen Bildschirmhälfte und der unteren Bildschirmhälfte
korrigiert wurden.
Wenn Sie z.B. im oberen, rechten Bereich Probleme haben, einen Punkt
genau zu treffen, vergrößern Sie die
oberen und rechten Grenzwerte
(
>>groesser
). Übernehmen Sie die
Änderung und testen Sie am besten
unter (die) Werkzeuge, Zeichen-Test, ob
Sie den Punkt nun besser treffen. Genau
so können Sie die X-Achse und die
Y-Achse über die beiden Versatz-
Optionen verschieben und so den
Touch-Punkt/den Mauszeiger verschieben.
Die Funktion „Unterstütze Kantenausgleich“ optimiert softwaregesteuert
die Touch-Erkennung in den Eck- bereichen Ihres faytech Touch-Panels. Sie
sollten diese Funktion aktivieren.
Die beiden letzten Registerkarten stellen
lediglich informative Inhalte zur Verfügung, Einstellmöglichkeiten gibt es in
diesen Registern keine.
Registerkarte
(die) Hardware
informiert
über die Bauart des faytech Touchdisplays und die verwendete Firmware.
Die Registerkarte Infos über zeigt die
Treiberversion und Informationen zum
Programmierer der Software an.
7.Touchkit-Programm in der Taskleiste
Über das TouchKit-Symbol in der Taskleiste können Sie mit dem rechten
Mausklick folgende Schnell-Änderungen
an den Touch-Kit-Einstellungen vornehmen. Die einzelnen Funktionen sind
bereits in diesem Kapitel beschrieben
worden.
18

Zusätzlich können Sie mit der Funktion
„Schalter anzeigen“ eine Maus in der
rechten, unteren Bildschirmhälfte einblenden. Die rote Markierung zeigt,
welcher Mausknopf beim Berühren des
Touch-Displays simuliert wird.
Mit einem Klick auf den linken oder
rechten Mauszeiger der Animation
verändern Sie entsprechend das
Klick-Verhalten des Touch-Panels bei
Berührung. Blenden Sie diese Funktion
ein, wenn Sie einfach zwischen rechtem
und linken Mauszeiger hin- und herwechseln möchten.
FEHLER VERMEIDEN / FEHLER
BEHEBEN
Durch die vielen Anschluss- und Einsatzmöglichkeiten des Displays besteht
die Gefahr, dass es bei der Inbetriebnahme zu Problemen kommt. Im Folgenden stellen wir die häufigsten Fehlerursachen und Fehlerlösungen dar:
BEIM ANS CH LUSS
Gehen Sie beim Anschluss der Kabel
bitte vorsichtig vor und achten Sie
darauf, dass Sie die richtigen Stecker in
der richtigen Ausrichtung nutzen. Bildfehler oder Nichtfunktionen werden
häufig durch
Stellen Sie einen Fehler fest trennen Sie
Steckfehler
ausgelöst.
das Display vom Strom und überprüfen
Sie die einzelnen Stifte in den Kabeln auf
Unversehrtheit. Gerne tauschen wir
ihnen ein defektes Kabel aus, schicken
Sie deswegen nicht das Display zurück.
vermeiden Sie unbedingt Kurzschlüs-
se! Achten Sie penibel darauf, dass nach
Anschluss der Stromquelle keine Kabel
frei rumliegen. Wechseln Sie Steckverbindungen nur, wenn kein Strom anliegt.
Versorgen Sie das Display ausschließ-
lich mit 12V DC-Strom. Eine höhere oder
geringere Voltzahl beschädigt das Display unwiderruflich! Achten Sie auf die
richtige Verpolung!
BEI DER INBET RI EBNAHME
Bitte beachten Sie, dass Sie zunächst
den Power-Knopf drücken um den
Touch-Monitor einzuschalten. Ist zunächst keine Signalquelle angeschlossen
meldet das Display „kein Signal“ und
geht nach einer kurzen Zeit automatisch
aus.
Display bleibt schwarz:
Anschlussfehler: Bitte überprüfen Sie
zunächst noch mal, ob alle Signalquellen
richtig angeschlossen sind.
Auflösungs/Ansteuerungsfehler: Bei
der Ansteuerung der Displays gibt es die
häufigsten Probleme. Das Display unterstützt die unter den Technischen Daten
angegebenen Bildformate. Gerade beim
gleichzeitigen Betrieb von zwei Displays
an einem PC oder dem Anschluss von
einem zusätzlichen Display an ein Notebook entstehen häufig Komplikationen,
19

die in der Hard- und Software des PCs
begründet sind. Schließen Sie das Display am besten immer zunächst einzeln
bei einer Auflösung von 1024x768 bei
60Hz an. Testen Sie von dieser Auflösung ausgehend die für Sie beste Konfiguration. Beachten Sie, dass erweiterte
Desktops zunächst häufig schwarz sind –
entsprechend ist auch das Display zunächst schwarz, wenn Sie es als erweiterten Desktop konfigurieren.
Tipp: Nutzen Sie das 15 Inch
Display am besten bei einer
Auflösung von 1024x768, das
17 Inch Display mit 1280x1024,
das 19Inch Display mit
1440x99 und das 22" Inch Display mit 1680x1050 jeweils bei
60Hz.
Netzteil-Fehler: Reagiert das Display
auf keine Eingaben, kann es einen Fehler
bei der Stromversorgung geben. Bitte
überprüfen Sie zunächst ihre Anschlüsse
und eine andere Stromquelle, bevor Sie
das Display einschicken. Gerne tauschen
wir ihnen unkompliziert ein defektes
Netzteil aus.
Streifen/Fehler im Bild
Pixelfehler: Die Displays werden
ausführlich getestet und ohne Pixelfehler ausgeliefert. Hat ihr Display trotzdem
einen Pixelfehler wenden Sie sich bitte
an unseren Support.
Schrift ist etwas schwer zu lesen, Bild
sieht unscharf aus: Das Display-Bild ist
bei der Panelauflösung (siehe
Tipp/technische Daten) klar und deutlich
zu lesen. Bei höheren Auflösungen
interpoliert das Display. Dies führt zu
Ungenauigkeiten in der Darstellung und
Pixelschwingungen.
Streifen/Fehler im Bild: Beim An-
schluss des Displays über z.B. ein PCNetzteil entstehen häufig leichte Flackereffekte. Dies liegt an den Störströmungen, die das Netzteil mit aussendet.
Bitte prüfen Sie alternative Stromquellen oder achten Sie auf Störquellen, um
das Bild zu verbessern.
20

TECHNISCHE DAT EN
Änderungen im Sinne des technischen Fortschritts vorbehalten
15 INCH TOU C H MONITOR
Displaygehäuse (cm): 37,1x28,7x3,0
Bildschirmdiagonale (inch /cm): 15/38,1
Display (cm): 30,5 x 23
Befestigung:
Brutto-Gewicht (inkl. Verpackung, kg): 4,6
Netto-Display-Gewicht (kg): 3,1
Seitenverhältnis: 4:3
Physikalische Auflösung: 1024x768
Maximal darstellbare Auflösung: 1920x1200
Anzahl darstellbare Farben: 16.200.000
Helligkeit (cd/m2): 250
Kontrast: 500:1
Typische Reaktionszeit Tr/Tf (ms): 2/6
Betrachtungswinkel horizontal, vertikal (°): 150;130
Betriebsspannung (V): 11,5-13
Stromverbrauch (W): 20
Stand-By-Verbrauch (W): 1
Betriebstemperatur (°C): 0-60
Touch-Panel: 4-wire resistive
Touch-Anschluss: USB, Serieller Port
Touch-Panel-Treiber: Windows, Linux, Apple
Lebensdauer Touch-Panel (Berührungen): > 10 000 000
Reaktionszeit Touch-Panel (ms): < 10
Oberflächenhärtegrad: 3H
Druckstärke (g): 20 ~ 150
Anschlüsse, Bild: 1x VGA
Anschlüsse, Audio:
Stromversorgung (im Lieferumfang): 230V, 12V
Weitere Eigenschaften: OSD-Menü, Lautsprecher, Touchstift
Dot Clock
Analog Scanning Frequency (H, V) 37.9~74.6KHZ, 60~85HZ
Unterstützte VGA-Auflösungen:
800*600 60~85HZ 1440*900 60~75HZ
1024*768 60~85HZ (&) 1680*1050 60~75HZ
1280*768 60~75HZ 1600*1200 60HZ
1280*1024 60~75HZ 1920*1080 60HZ
1400*1050 60~75HZ 1920*1200 60HZ
&:empfohlene Auflösung
:
Standfuß(Befestigung über Schiene auf Rückseite)
VESA-100
1x Audio-In
45~82MHZ

17 INCH TOU C H MONITOR
Displaygehäuse (cm): 38x30,9x2,5
Bildschirmdiagonale (inch /cm): 17/43,18
Display (cm): 33,8x 27
Befestigung:
Brutto-Gewicht (inkl. Verpackung, kg): 5,2
Netto-Display-Gewicht (kg): 3,7
Seitenverhältnis: 4:3
Physikalische Auflösung: 1280x1024
Maximal darstellbare Auflösung: 1920x1200
Anzahl darstellbare Farben: 16.700.000
Helligkeit (cd/m2): 250
Kontrast: 1000:1
Typische Reaktionszeit Tr/Tf (ms): 1,3/3,7
Betrachtungswinkel horizontal, vertikal (°): 170;160
Betriebsspannung (V): 11,5-13
Stromverbrauch (W): 24
Stand-By-Verbrauch (W): 1
Betriebstemperatur (°C): 0-60
Touch-Panel: 4-wire resistive
Touch-Anschluss: USB, Serieller Port
Touch-Panel-Treiber: Windows, Linux, Apple
Lebensdauer Touch-Panel (Berührungen): > 10 000 000
Reaktionszeit Touch-Panel (ms): < 10
Oberflächenhärtegrad: 3H
Druckstärke (g): 20 ~ 150
Anschlüsse, Bild: 1x VGA
Anschlüsse, Audio:
Stromversorgung (im Lieferumfang): 230V, 12V
Weitere Eigenschaften: OSD-Menü, Lautsprecher, Touchstift
Dot Clock
Analog Scanning Frequency (H, V) 37.9~74.6KHZ, 60~85HZ
Unterstützte VGA-Auflösungen:
800*600 60~85HZ 1440*900 60~75HZ
1024*768 60~85HZ 1680*1050 60~75HZ
1280*768 60~75HZ 1600*1200 60HZ
1280*1024 60~75HZ (&) 1920*1080 60HZ
1400*1050 60~75HZ 1920*1200 60HZ
&:empfohlene Auflösung
:
VESA-100 Bohrungen, Standfuß (Befestigung über
Schiene auf Rückseite)
1x Audio-In
40~69.3MHZ
22

19 INCH TOU C H MONITOR
Displaygehäuse (cm): 44,8x29x5,2
Bildschirmdiagonale (inch /cm): 19/48,26
Display (cm): 41,04x25,65
Befestigung:
Brutto-Gewicht (inkl. Verpackung, kg): 6,1
Netto-Display-Gewicht (kg): 4,06
Seitenverhältnis: 16:10
Physikalische Auflösung: 1440x900
Maximal darstellbare Auflösung: 1920x1200
Anzahl darstellbare Farben: 16.700.000
Helligkeit (cd/m2): 250
Kontrast: 850:1
Typische Reaktionszeit Tr/Tf (ms): 1,5/3,5
Betrachtungswinkel horizontal, vertikal (°): 170/160
Betriebsspannung (V): 11,5-13
Stromverbrauch (W): 25
Stand-By-Verbrauch (W): 1
Betriebstemperatur (°C): 0-60
Touch-Panel: 4-wire resistive
Touch-Anschluss: USB, Serieller Port
Touch-Panel-Treiber: Windows, Linux, Apple
Lebensdauer Touch-Panel (Berührungen): > 10 000 000
Reaktionszeit Touch-Panel (ms): < 10
Oberflächenhärtegrad: 3H
Druckstärke (g): 20 ~ 150
Anschlüsse, Bild: 1x VGA
Anschlüsse, Audio:
Stromversorgung (im Lieferumfang): 230V, 12V
Weitere Eigenschaften: OSD-Menü, Lautsprecher, Touchstift
Dot Clock
Analog Scanning Frequency (H, V) 37.9~74.6KHZ, 60~85HZ
Unterstützte VGA-Auflösungen:
800*600 60~85HZ 1440*900 60~75HZ (&)
1024*768 60~85HZ 1680*1050 60~75HZ
1280*768 60~75HZ 1600*1200 60HZ
1280*1024 60~75HZ 1920*1080 60HZ
1400*1050 60~75HZ 1920*1200 60HZ
&:empfohlene Auflösung
:
Standfuß(Befestigung über Schiene auf Rückseite)
VESA-100
1x Audio-In
34.8~75.6MHZ
23

22 INCH TOU C H MONITOR
Displaygehäuse (cm): 51,5x34,4x6,5
Bildschirmdiagonale (inch /cm): 22/55,88
Display (cm): 47,6x29,6
Befestigung:
Brutto-Gewicht (inkl. Verpackung, kg): 7,6
Netto-Display-Gewicht (kg): 5,4
Seitenverhältnis: 16:10
Physikalische Auflösung: 1650x1080
Maximal darstellbare Auflösung: 1920x1200
Anzahl darstellbare Farben: 16.200.000
Helligkeit (cd/m2): 300
Kontrast: 1000 : 1
Typische Reaktionszeit Tr/Tf (ms): 1,3/3,7
Betrachtungswinkel horizontal, vertikal (°): 170; 174
Betriebsspannung (V): 11,5-13
Stromverbrauch (W): 28
Stand-By-Verbrauch (W): 1
Betriebstemperatur (°C): 0-60
Touch-Panel: 5-wire resistive
Touch-Anschluss: USB
Touch-Panel-Treiber: Windows, Linux, Apple
Lebensdauer Touch-Panel (Berührungen): > 10 000 000
Reaktionszeit Touch-Panel (ms): < 10
Oberflächenhärtegrad: 3H
Druckstärke (g): 20 ~ 150
Anschlüsse, Bild: 1x VGA, 1x DVI, 2x Video-In,1xHDMI
Anschlüsse, Audio:
Stromversorgung (im Lieferumfang): 230V, 12V
Weitere Eigenschaften: OSD-Menü, Lautsprecher, Touchstift
Dot Clock 50~82MHZ
Analog Scanning Frequency (H, V) 37.9~74.6KHZ, 60~85HZ
Digital Scanning Frequency (H, V) 31~45kHZ, 59~61HZ
Unterstützte VGA-Auflösungen:
800*600 60~85HZ 1440*900 60~75HZ
1024*768 60~85HZ 1680*1050 60~75HZ (&)
1280*768 60~75HZ 1600*1200 60HZ
1280*1024 60~75HZ 1920*1080 60HZ
1400*1050 60~75HZ 1920*1200 60HZ
&:empfohlene Auflösung
Standfuß(Befestigung über Schiene auf Rückseite)
VESA-100
2x Audio-In, 1x Headset out
24

English

WARRANT Y
faytech touch displays are produced
following the most modern production
and test processes. Carefully selected
components and accurate production
ensure reliable operation and long life.
faytech warrants to the original purchaser that each faytech touch display
delivered shall be free from defects in
material or workmanship at time of
shipment, and that each such module
delivered will meet the published specifications for a period of 24 months as
measured from the date of original
shipment. faytech's obligation under the
Warranty contained herein is limited to
the repair or replacement of any faytech
touch monitor that does not meet the
specifications, provided that said product is returned to faytech, transportation charges pre-paid, and provided that
upon faytech's examination, the product,
when tested within the specified ratings
and in accordance with good engineering practice, does not meet the specifications as defined. THIS WARRANTY IS
IN LIEU OF ALL OTHER WARRANTIES,
EXPRESSED OR IMPLIED, INCLUDING
WITHOUT LIMITATION THE WARRANTY
OF MERCHANTABILITY AND THE WARRANTY OF FITNESS FOR A PARTICULAR
PURPOSE.
All claims under warranty must be made
promptly after occurrence of circumstances giving rise thereto and must be
received within the applicable warranty
period by faytech or its authorized
representative. Such claims should
include the Product type and serial
numbers and a full description of the
circumstances giving rise to the claim.
Before any Products are returned for
repair and/or adjustment, written authorization from faytech or its authorized
representative for the return and instructions as to how and where these
Products should be shipped must be
obtained. Any product returned to
faytech for examination shall be sent
prepaid via the means of transportation
indicated as acceptable by faytech.
faytech reserves the right to reject any
warranty claim not promptly reported
and any warranty claim on any item that
has been altered or has been shipped by
non-acceptable means of transportation.
When any Product is returned for examination and inspection, or for any
other reason, Customer will be responsible for all damage resulting from
improper packing or handling and for
loss in transit, notwithstanding any
defect or nonconformity in the Product.
In all cases faytech has sole responsibility for determining the cause and nature
of failure, and faytech's determination
with regard thereto shall be final. If it is
found that faytech's Product has been
returned without cause and is still serviceable, Customer will be notified and
the Product returned at Customer's
expense. In addition, a charge for testing and examination may, in faytech's
sole discretion, be made on Products so
returned.
SELLER'S LIABILITY FOR DAMAGES
SHALL NOT EXCEED THE PAYMENT, IF
ANY, RECEIVED BY SELLER FOR THE
UNIT OF PRODUCT OR SERVICE FUR-
26

NISHED OR TO BE FURNISHED AS THE
CASE MAY BE WHICH IS THE SUBJECT
OF CLAIM OR DISPUTE. IN NO EVENT
SHALL SELLER BE LIABLE FOR INCIDENTAL, CONSEQUENTIAL OR SPECIAL
DAMAGES. LIABILITY TO THIRD PARTIES,
FOR BODILY INJURY INCLUDING DEATH,
RESULTING FROM SELLER'S PERFORMANCE SHALL BE DETERMINED IN
ACCORDANCE WITH APPLICABLE LAW
AND THE TOTAL LIABILITY LIMITATION
STATED ABOVE SHALL NOT BE CONSTRUED AS A LIMITATION ON SELLER
FOR DAMAGES FOR ANY SUCH BODILY
INJURY, INCLUDING DEATH.
WARRANTY FOR ITEMS REPLACED
UNDER WARRANTY Whenever a failed
module is replaced under Warranty, the
greater of the balance of the original
Warranty Period or 90 days will constitute the remaining warranty period. The
replaced unit does not carry a new
Warranty.
LIFE SUPPORT POLICY "WARNING: DO
NOT USE IN LIFE SUPPORT" SELLER'S
PRODUCTS ARE NOT AUTHORIZED FOR
USE AS CRITICAL COMPONENTS IN LIFE
SUPPORT DEVICES OR SYSTEMS WITHOUT THE EXPRESS PRIOR WRITTEN
APPROVAL OF THE PRESIDENT OF
FAYTECH.
As used herein, “Life Support Devices or
Systems” are devices which support or
sustain life and whose failure to perform
when properly used in accordance with
instructions for use provided in the
labeling can be reasonably expected to
result in a significant injury to the user. A
“Critical Component” is any component
in a life support device or system whose
failure to perform can be reasonably
expected to cause the failure of the life
support device or system or to affect its
safety or effectiveness.
If your device does have a defect within
the warranty period, please contact
faytech directly. The warranty period is
24 months from the date of purchase
under the following conditions:
All warranties are void if the unit has
been opened or disassembled without
faytech's prior approval.
Damage caused by improper handling
or operation, by incorrect installation or
storage, through improper connections,
as well as due to force majeure or other
external influences are not covered by
the warranty.
For warranty claim, we reserve the
right to replace the defective components or to exchange the device.
Exchanged components or devices
become the property of faytech.
Claims for damages are excluded in so
far as they are not based on intent or
gross negligence of the manufacturer.
After expiration of the warranty
period, warranty claims can no longer be
pursued.
Any warranty claim must be accom-
panied by proof of purchase (receipt or
invoice).
27

GENERAL WA R NI NG
ONGOING CH ANGES
Avoid all contact with dirt, oil, dust or
water. Never open the unit. Do not drop
the unit. If you notice a burning smell or
hear the device making unusual sounds,
please disconnect it immediately from
the power source. To clean the unit,
please turn off the device first, then
clean it very gently with a dry, soft cloth.
For your own safety, please do not use
the device during driving.
TROUBLE-S HOOTING
Please follow all instructions carefully.
At the end of this guide there is an
overview of possible connection or
other types of operation errors.
faytech produces its displays in China
with German know-how and quality
management. Your feedback is the most
valuable information for the improvement of our products. Continuous production and product improvement is our
primary goal. For this reason, there may
be improvements in our products which
are not yet included in this user's guide.
Differences between your product and
this user's guide are generally related to
specification changes and product
improvements. If you have any questions or suggestions, please contact our
support team or visit our website at
www.faytech.com
28
COMPONENTS
15 Inch to 19 Inch Touch Monitors:
22 Inch Touch Monitor:
05. PWR: turn the display on or off
06. Infrared receiver
07. LED power indicator
15 Inch to 19 Inch touch monitors:
01. Auto-display setting: the display is
automatically adjusted to the current resolution of your graphics card
02. MENU: open the OSD menu –orconfirm selection in the OSD menu
03. +: increase volume –or- navigate in
the OSD menu or change the
high-lighted values in the menu
04. -: decrease volume –or- navigate in
the OSD menu –or- change the highlighted values in the menu
22 Inch Touch Monitor:
08.INPUT: switches the input signal
sequentially from VGA to DVI to HDMI
to AV1 to AV2. Make sure the input
source is correct or you will not see any
image on your screen.
09. VOL-: decrease volume –or- navigate in the OSD menu
10. VOL+: increase volume –or- navigate
in the OSD
11. CH-: change the highlighted values in
the menu
12. CH+: change the highlighted values
in the menu
13. MENU: open the OSD menu or
confirm selection in the OSD menu
14. PWR: turn the display on or off
15. LED power indicator
16. Infrared receiver

17. USB interface for touch connection
18. 12V DCIN
19. VGA cable connector
20. Audio-PC-IN
21. COM for serial touch connection
22. HDMI interface
23. DVI interface
24. S-Video-In
25. Video-In
26. Audio-In for Video
27. Headset
28. 220V power supply
29. USB cable
30. VGA cable
31. 3.5mm-3.5mm Audio cable
32. Touch pen
33. Driver CD with User's guide
30

DISPLAY CONNECTI O N
USING THE TOU CH FUNCTION
To operate your faytech display properly,
there must be at least one signal source
and a power source connected. To use
the touch function please connect the
USB cable to your PC.
TO CONN ECT THE SIGNAL
SOURCE
you have the following options:
On a PC: Connect the VGA cable from
the faytech monitor to the VGA output
of your PC graphics card.
On a PC: you have only one DVI
output on your PC, please purchase a
DVI-VGA adapter and connect the display via VGA to your PC.
22": you also have DVI, HDMI and
video inputs to connect the image signal,
please ensure that you are on the right
channel (channel-switch through INPUT)
In addition, the display has one stereo
audio input (3.5mm Audio-IN). The
sound through the speakers is output
only if an image signal is there.
CONNECT TO POWER
You can connect the faytech display
with the included 110V/220V power
adapter, please put it into the mounted
socket on the underside of the display
which is labeled with +12 V DC IN.
Connect the USB cable to the USB port
on your PC (after you have been asked
within the software installation
process).
The touch-screen series also supports
the use of touch through the serial port
(15" to 19" touch-monitors). Please
connect a serial cable (not included in
delivery) to use the serial touch function.
DISPLAY OPERAT ION
OSD-ME N U - OPERATION
The Menu operation of the faytech
display is simple and logical. You have
three control buttons. MENU, +/ -.
Pressing MENU brings up the OSD menu;
with +/- you can navigate through the
main menu. By pressing MENU again
you switch to the submenu. Use +/- to
select the appropriate item in the submenu. The selected item will be marked
in red. To change the value of an item
please use +/ –. Press MENU again to
save the changes and you can then
navigate again with the + and - buttons.
To return to the main menu, select EXIT
and press MENU.
Approach to connect to another 12V
source: Please note to use a power
supply with min. 2.5A and ensure that
the polarity is right (+ on the inside
pole).
31

Color settings
Picture Settings
Horizontal position:
Move the position of the image on the
display to the left (-) or the right (+).
Vertical position:
Move the position of the image on the
display down (+) or up (- ).
Auto calibration:
The display is automatically adjusted to
the current resolution of your graphics
card. If you are not satisfied with the
auto setting, you can optimize it manually.
Auto color:
This function will optimize the color of
the faytech displays. You can always
change the color of the display manually.
Brightness:
This allows you to increase or decrease
the brightness of the faytech display.
Phase:
Change visual distortion when viewing
the screen from different angles. Use +/ to find the best display effect.
Horizontal size:
To reduce (-) or enlarge (+) the horizontal size of the image on the faytech
display.
Contrast:
This allows you to increase or decrease
the contrast of your display.
Color temperature:
You can choose predefined color settings (cool, warm, medium, SRGB) or
make your own color setting (User).
Exit:
Return to the main menu or submenu.
Exit:
Return to the main menu or submenu.
32

Menu settings
Sound settings
Volume:
To adjust the volume of the built-in
speakers. Use - to reduce the volume
and use + to increase it.
Mute:
Turn the speakers on /off.
Language:
To change the language of the menu.
Menu H. Position:
To move the position of the menu to the
left (-) or the right (+).
Menu V. Position:
To move the position of the menu up (-)
or down (+).
Menu Timeout:
Determines how many seconds the OSD
menu is displayed before it is automatically switched off, if there are no more
operations. You can also select “off” to
remove the OSD menu from the screen.
Exit:
Return to the main menu or submenu.
Settings
Reset:
This option will return the display back to the
factory settings. All changes you have made
are deleted.
Transparency:
You can choose various levels of transparency for the OSD-Menu.
Exit:
Return to the main menu or submenu.
Exit:
Return to the main menu or submenu.
Exit
To quit the OSD-Menu.
33

INSTALLATION OF THE
TOUCH-DRIVER UNDER WINDOWS
1. Put the CD into your CD- ROM.
2. Use the Explorer on the CD and select
the appropriate subdirectory (Touch
Driver, then the right operation system)
to open the installation file setup.exe
directly. Now you will see the following
window:
Select the Windows driver
2000/XP/Vista/Windows7 in the upper
right. If a security warning pops up, click
“Run”,“Continue” or "Execute". Under
Vista you must confirm the UserAccount
Control with "Continue". Some further
warnings may be given depending on
installed security programs. Always click
the button to continue the operation.
To complete the installation with all
default options, click “Next” on each of
the following dialog boxes. You can
cancel at any time. To switch back to a
previous step, click the “<back” button.
Please note! The installation process is in
English. Later on you can choose the
language for the OSD.
3."Welcome to the InstallShield Wizard
for TouchKit":Press "Next" if you to
continue the installation.It's advisable to
close all other programs before beginning this installation.
Check the box only if you want to install
the PS/2-Driver. Usually for a USB-touch
display, you should NOT select this
option. The PS/2-Driver works smoothly
with a PS / 2 mouse but if you do not
have a PS / 2 mouse you should leave
this box unchecked to avoid compatibility problems.
5."Setup Type"
We recommend "None" (see the picture
upper right) for the calibration setting. A
calibration will be performed every time
your PC starts up if you choose "Every
system boot up”. If you choose “Next
system boot up” a calibration will be
performed on the next system reboot.
You can carry out a calibration at any
time after the TouchKit program is
installed. (See “Setting up the faytech
Touch software”.) After making your
selection on this screen, click “Next”.
6."TouchKit - InstallShield Wizard":
4."Setup Type":
34
Connect the USB cable now and press
"OK". If the "New Hardware Found"
dialog of Windows opens, please cancel
it.
7. "Setup Type":
If you plan to use multiple monitors,
please choose this box. (See “Setting up
the faytech Touch software”.)
8."Choose Destination Location": Accept the default destination or choose
your own then press "Next".
9. "Select Program Folder": Give the
program a name or use the default
setting and press "Next".
The installation will be started automatically with the selected settings.
11.The installation is successfully completed when the following window
appears:
If the USB controller icon is not showing,
please disconnect the USB cable from
your PC and connect it again. For more
help, Please go to the “
section.
Troubleshooting
SETTING UP THE FAYTECH
TOUCH SOFTWARE
Start the administration program by
going to “Start - Programs -TouchKit –
Configure Utility”. (If you accepted all
the defaults the program may be at
“Start – Programs – Accessories –
Touchkit – Configure Utility”.) Or you
can find this program in the system tray
section of your task bar.
”
10."Setup Status":
General tab
Gives information on whether one or
more touch controllers are found and
installed.
After the initial installation, if no touch
controller shows up on this tab, please
pull out the USB connector on your PC
and connect the device again.
Setting tab
When you touch the touch panel there is
a beep if you select the first checkbox.
You can change the frequency and
duration of the beep. The changes will
be saved after you click on "OK".
Under
number of linearization points under the
linearization
, you can choose the
35

Tools - linearization setting
. On a
25-point linearization the deviation of a
touched point will be less than on a
9-point linearization. In general, the
faytech displays have been set correctly
and should not be linearized.
Double Click Time
. You can set how fast
you need to click on the same object to
make a double click. If you choose
Shorter <<
If you choose
, then you need to tap faster.
>> Longer
, then you can
tap the screen more slowly..
Normal-Mode: Allows the user to select
an object or drag an object with the
touch pen or a finger. This is the best
mode to use for most applications.
Click on touch: The “click” is recognized
when the screen is touched. To initiate
a new mouse-click, the display must be
released and re-pressed.
Click on release: Contrary to the click
function in touch
, it is generated a click
when the display is released.
The same applies to
you choose
Smaller <<
Double Click Area
, your taps must
. If
be in a relatively small area in order for a
double click to be recognized.
>> Larger
enables you to make a successful
double- click within a larger area.
To the right of the mouse icon are options to set different mouse-like modes.
Normal mode offers the most intuitive
touch-operation.
Click on touch without moving cursor:
The first touch point generates a click.
The cursor follows the finger / pen
movement. For a better understanding
of this setting, try it with the Draw Test
application under the Tools tab.
Click on release without moving cursor:
The cursor does not move to the touch
position except at the lift-off point. For a
better understanding of this setting, try
it with the
Draw Test
application under
the Tools tab.
On the far right of the mouse icon, there
is an
Option
button. The following
options are available for the faytech
display in this submenu:
Enable Constant Touch: is the function
to check to enable the driver to determine if the most recent touched position
is the same as the previously touched
point. If the difference is smaller than
the defined area, the driver does not
generate any mouse movement which
helps reduce system load.
36

Enable Auto Right Click: If the touch
screen is touched for a specified time,
the driver will generate a mouse right
button click if this function is enabled.
Enable Touch: Be careful! If you don't
check this box, the touch function will
not work!
Enable Cursor Stablization: A software
filter exists inside the driver to filter
some noise to stabilize and smooth the
touch points. When activated, the user
will experience a more stable cursor.
Tools tab:
You can adjust the faytech touch panel
calibration with the functions called
4
Points Calibration, Clear and Calibrate,
Linearization and Draw Test.
Start by
performing the 4 points calibration. By
using the application drawing test, you
can test the touch panel to determine if
further setting changes are desirable.
When you press the 4 Points Calibration
button, the surface of the monitor
shows the following image:
You can adjust the parameter for the
Constant Touch Area function. This is a
criterion to judge if the most recent
touched point is the same as the previously touched point. If the difference
between the two points is within this
area, it will be recognized as the same
touch point and the driver does not
generate a new mouse event for this
touch point.
You can adjust the
Auto Right Click
Time
function. If the touch screen is touched
and held for this period of time, the
driver generates a right mouse click.
Press blinking X symbol until stop blinking Touch and hold each of the blinking
X symbols in the calibration window
until it stops blinking to make sure that
the utility can gather enough data for
computation. In addition, a progress bar
is shown at the bottom of the window
to indicate time elapsed. If the touch
screen is not touched before the
progress bar gets to the far right, the
calibration task will be terminated automatically.
The Clear and Calibrate button will clear
all calibration and linearization settings.
It will then automatically take you
through a 4 Points Calibration.
The Linearization ( 25 or 9 points calibration ) function is used to compensate
the touch screen linearity. It will require
you to press and hold on 9 or 25 targets
on the screen so it can compensate for
the curvature (if any) of the display.
37

After linearization is completed, the
linearity of the touch screen will be
shown in the Linearity curve window.
The Draw Test function is used for
accuracy and performance checking.
Press this button and a new pop up
window will be popped up on the monitor . Touch or drag your touch pen or
finger on this grid to gauge the effectiveness of the settings and calibrations
that you have made. If you are using
your finger, you may have to press firmly
to draw continuous lines. Press the Clear
button to clear the window. Press the
Quit button to terminate this draw test.
Display-Multi-Monitor
Setting
tab:
If you selected “Support Multi-Monitor
System” when you installed the Touch
driver, you will see a Display tab when
you run the Touchkit Configure utility. If
you did not select this option, you will
not see a Display tab.
You can have up to four faytech
touch-screens connected simultaneously.
You can also use a (non-touch) display
and a touch screen. In the example
below, the touch-screen is display "1",
while the second display "2" is a normal
monitor. Both have the same resolution,
but the touch screen is the primary
monitor.
Enable multiple-monitors: When this
function is disabled, the touch screen
will be mapped to the primary monitor
automatically. When this function is
enabled, you can double click on the
monitor area in the monitor geometry
window to assign the monitor area
where the touch screen will be mapped.
Double-tap on the desired monitor and
answer the question in the pop-up
window with
Yes
.
After confirmation, your touches on the
selected touch monitor will be simulated
as mouse clicks.
38

If the function "
The touch sensor is
automatically connected to the main
system"
is activated, the program automatically puts the touch function on
the primary monitor, if only one monitor
is connected.
The
Operation mode
settings allow you
to set the size of the touch area on your
faytech touch-screen. E.g. if you select
the "right screen“, after a new calibration only the right side of the monitor
will work as a touch area. If you select
"other" and then click on the ->> button,
you can set more modes or set an individually touch-defined area.
Edge Compensation tab: fine adjustment
of the touch area
right area, just increase the upper and
right limit (
>> Bigger
). Confirm the
change and try the new settings with
the
Draw Test
. You can also use the
X-axis and Y-axis displacement options
to compensate if your touch always
seems to be off the same amount in the
X and/or Y directions.
The "
Support Edge Compensation
"
option optimizes the touch detection in
the corners of your faytech touch panels.
This option should always be enabled.
Hardware and About tabs:
The last two tabs are for information
only - there are no options to select on
these tabs.
On this tab you can finely adjust the
touch area. This is very useful when you
have problems touching at the edges of
the touch screen. In the following image
you can see that the limits for all edges
of the screen were corrected (to 110%).
E.g. if you have problems in the upper
The
Hardware
tab gives information
about the design of the faytech touch
display and the firmware used.
The
About
tab gives information about
the touch driver version as well as information about the developer of the
software.
Touchkit program in the taskbar
With the Touch Kit icon in the taskbar,
you can use a right mouse click to make
quick changes in many of the Touch Kit
settings. The individual functions have
already been described in this chapter.
39

On the context menu, if you select the
option Display Button, you will see a
mouse animation displayed in the lower
right half of the screen. The red mark
indicates which mouse button will be
simulated the next time you touch the
screen. By clicking on the left or right
pointer of the animation you change the
behavior of the touch panel accordingly.
TROUBLESHOOTIN G
ranty. Also take care that you do not mix
polarity (+ is on the inner pole!).
STARTUP:
Please note: When you press the Power
button, the display will look for the right
VGA-signal in order to receive a picture.
If there is no signal source connected,
the display will go off automatically after
a short period of time.
If you are having trouble getting your
touch monitor to work correctly, please
look through this list of common problems:
PHYSICAL SE T UP:
Cable connections. Care should be
taken when connecting the cables.
Make sure the cables are connected to
the right connectors at each end and
make sure the cables are attached firmly
to their respective connectors. Lack of
an image or poor quality images are
often caused by the wrong connection.
Turn off the display and check each pin
of the cable separately. If you think you
have a defective cable, we are happy to
exchange it for you - you do not have to
send the display back.
Avoid short circuits! Please be careful
before connecting power to the display
that there are no cables that have not
yet been connected at both ends. If the
monitor does not power up, try another
outlet or another power source.
Provide the display with a 12V DC
power supply only. Higher or lower
voltage can permanently damage the
display and is not covered under war-
Display remains black
Connection error: Please check again
to make sure that all cables are properly
connected.
Resolution / activation errors: Using
the right resolution and activating the
display is a common problem that is
often not the fault of the display itself.
The monitor supports the resolutions
given in the technical data. Sometimes
during simultaneous operation of two
displays on a PC or the connection of an
additional display to a notebook complications can arise. Usually these
problems need to be resolved in the
hardware and software of the PC. It is
always best to use the display initially as
a single display with the original panel
resolution (see technical specification).
Try to start with this resolution then
experiment with other resolutions and
other combinations of displays to see
which work best for you.
Please note that extended desktops
often are black in the beginning. In this
situation your display may be black at
first if you configure it as an extended
desktop.
40

Tipp It is best to use the 15”display
at a resolution of 1024x768, the 17”
display at 1280x1024, the 19" display at 1440x900, the 22" at
1680x1050 at 60Hz.
Power supply error: If the display has
no signal input, there might be an error
with the power supply. First please
check the connection with another
power supply before you return the
display. We're happy to exchange the
defective power supply if necessary.
Stripes / errors in the image
Pixel error: Each faytech display has
been thoroughly tested and sold with no
pixel defects. If there is a pixel error at
your display, please contact us for Support.
Scripture is a little bit hard to read,
picture looks fuzzy: The display screen is
clear to read with original panel resolution. At higher resolutions the display
interpolates. This leads to inaccuracies in
the representation and pixel vibrations.
41

TECHNICAL DATA
Changes in the sense of technical progress reserved.
15 INCH TOU C H MONITOR
Display case (cm): 37.1x28.7x3.0
Screen diagonal (Inch/cm): 15/38.1
Display (cm): 30.5 x 23
Mounting: pedestal(included) VESA-100 holes on back
Gross weight (inclusive cartonage, kg): 4.6
Net display weight (kg): 3.1
Aspect ratio: 4:3
Physical resolution: 1024x768
Maximum showable resolution: 1920x1200
Colours displayed: 16,200,000
Brightness (cd/m2): 250
Contrast: 500:1
Typical reaction time Tr/ Tf (ms): 2/6
Visual Angle horizontal, vertical (°): 150;130
Working power (V): 11.5-13
Power consumption (W): 20
Stand-By-Consumption (W): 1
Operating temperature (°C): 0-60
Touch-panel: 4-wire resistive
Touch-connector: USB, Serial Port
Touch-panel-driver: Windows, Linux, Apple
Touch life (contacts): > 10 000 000
Response time touch-panel (ms): < 10
Surface hardness: 3H
Input force (g): 20 ~ 150
Connectors, video: 1x VGA
Connectors, audio:
Power-supply (included in delivery): 230V, 12V
Additional features OSD-menu, loudspeaker, touchpen
Dot Clock
Analog Scanning Frequency (H, V): 37.9~74.6KHZ, 60~85HZ
support input resolution:
800*600 60~85HZ 1440*900 60~75HZ
1024*768 60~85HZ (&) 1680*1050 60~75HZ
1280*768 60~75HZ 1600*1200 60HZ
1280*1024 60~75HZ 1920*1080 60HZ
1400*1050 60~75HZ 1920*1200 60HZ
&:recommended resolution
:
1x Audio-In
45~82MHZ

17 INCH TOU C H MONITOR
Display case (cm): 38x30.9x2.5
Screen diagonal (Inch/cm): 17/43.18
Display (cm): 33.8x 27
Mounting: Pedestal(included), VESA-100 holes on back
Gross weight (inclusive cartonage, kg): 5.2
Net display weight (kg): 3.7
Aspect ratio: 4:3
Physical resolution: 1280x1024
Maximum showable resolution: 1920x1200
Colours displayed: 16,700,000
Brightness (cd/m2): 250
Contrast: 1000:1
Typical reaction time Tr/ Tf (ms): 1.3/3.7
Visual Angle horizontal, vertical (°): 170;160
Working power (V): 11.5-13
Power consumption (W): 24
Stand-By-Consumption (W): 1
Operating temperature (°C): 0-60
Touch-panel: 4-wire resistive
Touch-connector: USB, Serial Port
Touch-panel-driver: Windows, Linux, Apple
Touch life (contacts): > 10 000 000
Response time touch-panel (ms): < 10
Surface hardness: 3H
Input force (g): 20 ~ 150
Connectors, video: 1x VGA
Connectors, audio:
Power-supply (included in delivery): 230V, 12V
Additional features OSD-menu, loudspeaker, touchpen
Dot Clock
Analog Scanning Frequency (H, V): 37.9~74.6KHZ, 60~85HZ
support input resolution:
800*600 60~85HZ 1440*900 60~75HZ
1024*768 60~85HZ 1680*1050 60~75HZ
1280*768 60~75HZ 1600*1200 60HZ
1280*1024 60~75HZ (&) 1920*1080 60HZ
1400*1050 60~75HZ 1920*1200 60HZ
&:recommended resolution
:
1x Audio-In
40~69.3MHZ
43

19 INCH TOU C H MONITOR
Display case (cm): 44.8x29x5.2
Screen diagonal (Inch/cm): 19/48.26
Display (cm): 41.04x25.65
Mounting: pedestal(included) VESA-100 holes on back
Gross weight (inclusive cartonage, kg): 6.1
Net display weight (kg): 4.06
Aspect ratio: 16:10
Physical resolution: 1440x900
Maximum showable resolution: 1920x1200
Colours displayed: 16,700,000
Brightness (cd/m2): 250
Contrast: 850:1
Typical reaction time Tr/ Tf (ms): 1.5/3.5
Visual Angle horizontal, vertical (°): 170/160
Working power (V): 11.5-13
Power consumption (W): 25
Stand-By-Consumption (W): 1
Operating temperature (°C): 0-60
Touch-panel: 4-wire resistive
Touch-connector: USB, Serial Port
Touch-panel-driver: Windows, Linux, Apple
Touch life (contacts): > 10 000 000
Response time touch-panel (ms): < 10
Surface hardness: 3H
Input force (g): 20 ~ 150
Connectors, video: 1x VGA
Connectors, audio:
Power-supply (included in delivery): 230V, 12V
Additional features OSD-menu, loudspeaker, touch stift
Dot Clock
Analog Scanning Frequency (H, V): 37.9~74.6KHZ, 60~85HZ
support input resolution:
800*600 60~85HZ 1440*900 60~75HZ (&)
1024*768 60~85HZ 1680*1050 60~75HZ
1280*768 60~75HZ 1600*1200 60HZ
1280*1024 60~75HZ 1920*1080 60HZ
1400*1050 60~75HZ 1920*1200 60HZ
&:recommended resolution
:
1x Audio-In
34.8~75.6MHZ
44

22 INCH TOU C H MONITOR
Display case (cm): 51.5x34.4x6.5
Screen diagonal (Inch/cm): 22/55.88
Display (cm): 47.6x29.6
Mounting: pedestal(included) VESA-100 holes on back
Gross weight (inclusive cartonage, kg): 7.6
Net display weight (kg): 5.4
Aspect ratio: 16:10
Physical resolution: 1650x1080
Maximum showable resolution: 1920x1200
Colours displayed: 16,200,000
Brightness (cd/m2): 300
Contrast: 1000 : 1
Typical reaction time Tr/ Tf (ms): 1.3/3.7
Visual Angle horizontal, vertical (°): 170; 174
Working power (V): 11.5-13
Power consumption (W): 28
Stand-By-Consumption (W): 1
Operating temperature (°C): 0-60
Touch-panel: 5-wire resistive
Touch-connector: USB
Touch-panel-driver: Windows, Linux, Apple
Touch life (contacts): > 10 000 000
Response time touch-panel (ms): < 10
Surface hardness: 3H
Input force (g): 20 ~ 150
Connectors, video: 1x VGA, 1x DVI, 2x Video-In, 1xHDMI
Connectors, audio:
Power-supply (included in delivery): 230V, 12V
Additional features OSD-menu, loudspeaker, touchpen
Dot Clock 50~82MHZ
Analog Scanning Frequency (H, V) 37.9~74.6KHZ, 60~85HZ
Digital Scanning Frequency (H, V) 31~45kHZ, 59~61HZ
support input resolution:
800*600 60~85HZ 1440*900 60~75HZ
1024*768 60~85HZ 1680*1050 60~75HZ (&)
1280*768 60~75HZ 1600*1200 60HZ
1280*1024 60~75HZ 1920*1080 60HZ
1400*1050 60~75HZ 1920*1200 60HZ
&:recommended resolution
2x Audio-In, 1x Headset out
45

KONTAKT
Kontaktdaten, RMA-Bearbeitung
Support-Nummer: +49 211 9954 8956
Support-E-Mail: support@faytech.com
Hersteller-Internetseite: www.faytech.com
Europäisches Support- und Versandlager: Faytech Display Support
Hans-Böckler Str. 10a, 37079 Göttingen, Germany
RMA-Bearbeitung
Wenden Sie sich bei einem mutmaßlichen Defekt bitte immer zunächst an uns. Unsere ausgebildeten Fachkräfte helfen Ihnen
gerne weiter. Liegt tatsächlich ein Defekt vor erhalten Sie über
support@faytech.de eine RMA-Nr. (Return Merchandise
Authorization). Senden Sie das defekte Teil mit deutlicher Anbringung der RMA-Nr. an obige Adresse ein. Zubehörteile wie
Kabel, Adapter oder Netzteile tauschen wir in der Regel unkompliziert vorab aus.
Bitte senden Sie die Ware immer frei an uns. Unfreie Ware (Kosten zahlt der Empfänger) nehmen wir nicht an. In den ersten 30
Tagen nach Erstkauf übernehmen wir sämtliche Transportkosten
für Sie. Dafür senden wir ihnen per E-Mail mit der RMA- Nr. Einen
Rücksendeschein zu. In der restlichen Garantiezeit tragen wir die
Rücksendegebühren.

C ONTACT
Contact, RMA service (in English):
Support-Number: +1 720 251 4158
Support-E-Mai: support@faytech.com
Home page: www.faytech.com
U.S.A. Warehouse: Faytech Display Support
121 Varick Street, 3rd floor, New York, NY 10013
RMA-service:
If you think your faytech product has a defect please always contact us directly. Our trained after sales service specialists can help
you resolve your problems. Please check the manual and our frequently asked questions before contacting us – you will usually
find an answer to your question. If there is a defect you can request an RMA number (Return Merchandise Authorization) at
support@faytech.de or via fax at +86-20- 82803134 (Chinese
fax-number). Please attach in the contact e-mail/fax your invoice
and what problems you are experiencing. In reply, you will receive
an e-mail/fax with your RMA number and additional information.
For accessories like cables, adaptors or power supplies which are
not working, we can usually send you a replacement before receiving the damaged goods. For a defective product, we try to
check and solve the problem within 3 days after receipt. Make
sure that shipping has been paid before sending goods back to us.
We do not accept postage due packages at our service centers.
Anything received with postage due will be returned to you
without any testing or resolution. Within the first 30 days after
you buy a new faytech product, we will refund your shipping costs
for returned products. For the rest of the warranty period, we will
pay the shipping costs for any repaired or replaced items that we
ship back to you.
47
 Loading...