

FAVI RioHD-LED-4S User Manual
RioHD-LED-4S
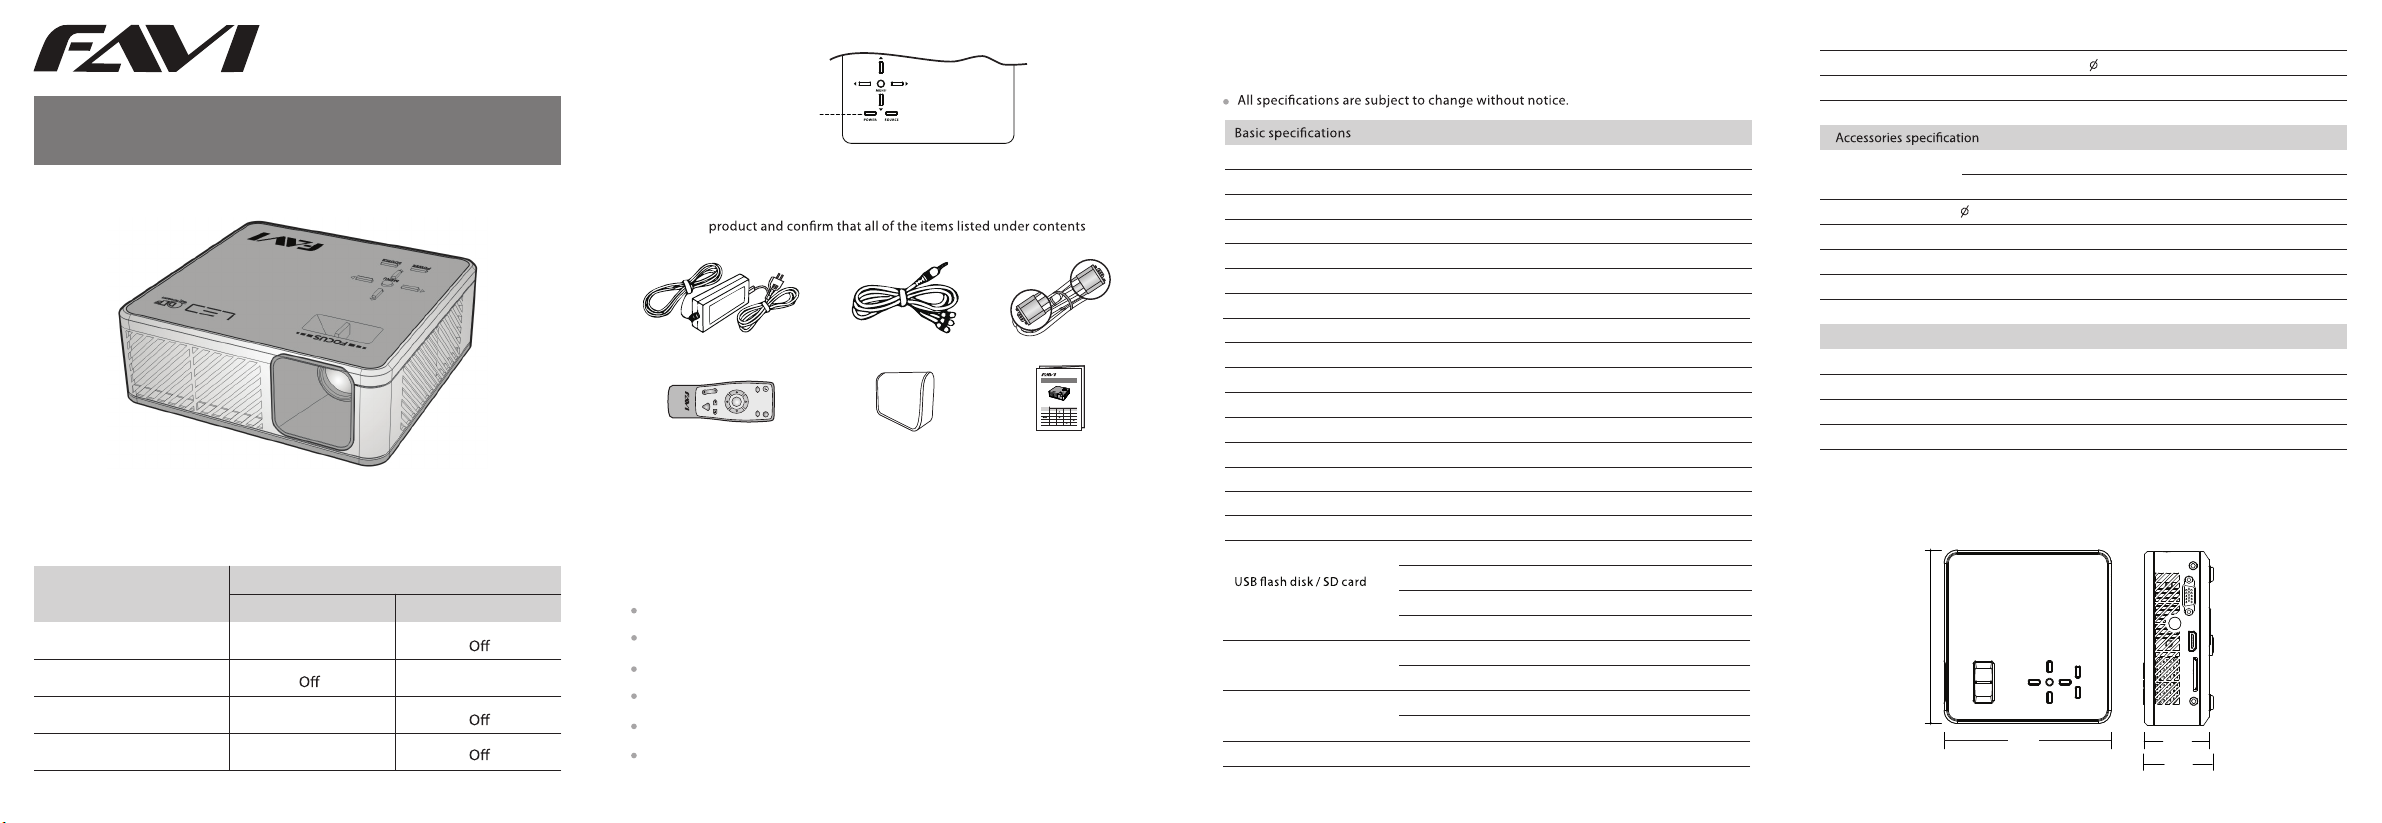
1 POWER INDICATIONS
Status/symptoms
Sta ndby
Powe r ON
Fan Fai lure
Temperatu re Failure
Red
Bli nk ing
Bli nk ing
LED Indicators
On
User Guide
SOURCE
POWER
MENU
Green
On
Power Indicator
2 PACKAGE CONTENTS
Unpack the
have been included.
Power adapter
Left
BrightnessVolume
Down
Enter
Up
Mute
Right
Remote control
Power
Flip
Menu
Esc
AV cable
Proj ector c arry ing bag
VGA cable
RioHD-LED-4S
1POWER INDICATIONS
ラエフャ/ホハフ?
オ釀エ
コ?ォ
クユイ衙マオ釀エ
コ?ォ
エサ?
ツフノォ
キ酲ネケハユマ
コ?ォノチヒク
ホツカネケハユマ
コ?ォノチヒク
User manual
3 PRODUCT FEATURES
The LED-4S integrates high-performance, optical projection technoloy with
a user-friendly design. The LED-4S features include:
Three picture modes with various application options
Digital keystone correction with auto-adjust feature
16.77 million color display
Multi-language On-Screen Display (OSD) menu
Over 30,000 hours of lamp life
Brightness of 150 ANSI lumens
4 SPECIFICATIONS
Aud io
Men u guide
Saf e mode
Model
Dimension ( L x W x H )
Weight
Display system
Light source technology
Brightness
Native resolution
Contrast ratio
UserGuide
LED
ヨクハセオニ
ーエシ?
キ酲ネアィセッ
ホツカネアィセッ
ケリアユ
ケリアユ
ケリアユ
ケリアユ
ケリアユ
ケリアユ
ケリアユ
ケリアユ
ケリアユ
ケリアユ
ケリアユ
Scr een siz e
Proj ection di stanc e
Asp ect rat io
Focu s
Key stone
Por ts
Powe r consu mptio n
LED l ife spa n
RioHD-LED-4S
5.3 x 5.1 x 1.9 in
Approximately 1.4 lb
DLP projection technology
RGB LED
150 ANSI lumens
858 × 600
2000:1
15" -100"
0.5 m-5m
16: 9/4:3
Man ual
Man ual/A uto
Inp ut: DC/ AV/VGA /HDMI /USB/ SD; Out put: Aud io
MAX: 8 5W, Stan dard: 45 W
30, 000 hou rs
Powe r adapt or
AV cab le
Rem ote con trol
VGA c able
AC pow er cabl e 220 V/6A, L ength o f the cab le: 1.3 m
Bat tery
Environmental requirement
Ope ratin g temperat ure
Sto rage tempe rature
Ope ratin g humid ity
Sto rage humid ity
5 INTRODUCTIONS
5.1 Dimension ( L x W x H ): 5.3 x 5.1 x 1.9 in
Sup ports aud io inpu t, 3.5m m audio o utput
Key bord/ Remote con trol
Ove rheat p rotec tion
Inp ut: AC1 00~24 0V 1.5A / 50-60Hz; o utput : DC19V 4 .74A
Max imum ou tput po wer: 90 W; Lengt h of the ca ble: 1. 8 m
3.5 m m, Leng th: 0.4 m, Com posite : AC cabl e
121 x 4 6 x 22 mm, Co lor: Si lver gre y
PVC b lack 50 P, Len gth: 1. 5 m
Rem ote con trol: AA A alka line batte ry
0°C ~40°C ( 32°F~ 104°F )
-20 °C~45 °C (-4° F~113 °F)
10% RH~80 %RH
5%R H~95% RH
Aud io: MP3 , WM A
Pic ture: JPG, J PEG
Vid eo: MPEG2, M PEG4, R MVB, VOB, M P4
VGA i nput
AV inp ut
HDM I input
Max imum re solut ion: 80 0 x 480
Bes t resol ution : 800 x 600, 60H z
Max imum re solut ion: 12 80 x 720, 6 0Hz
Sta ndard: NTS C/PAL/S ECAM
Max imum re solut ion: 72 0p
Max imum re solut ion: 19 20 x 1080 , 60Hz
5.3
5.1
1.9
2.1
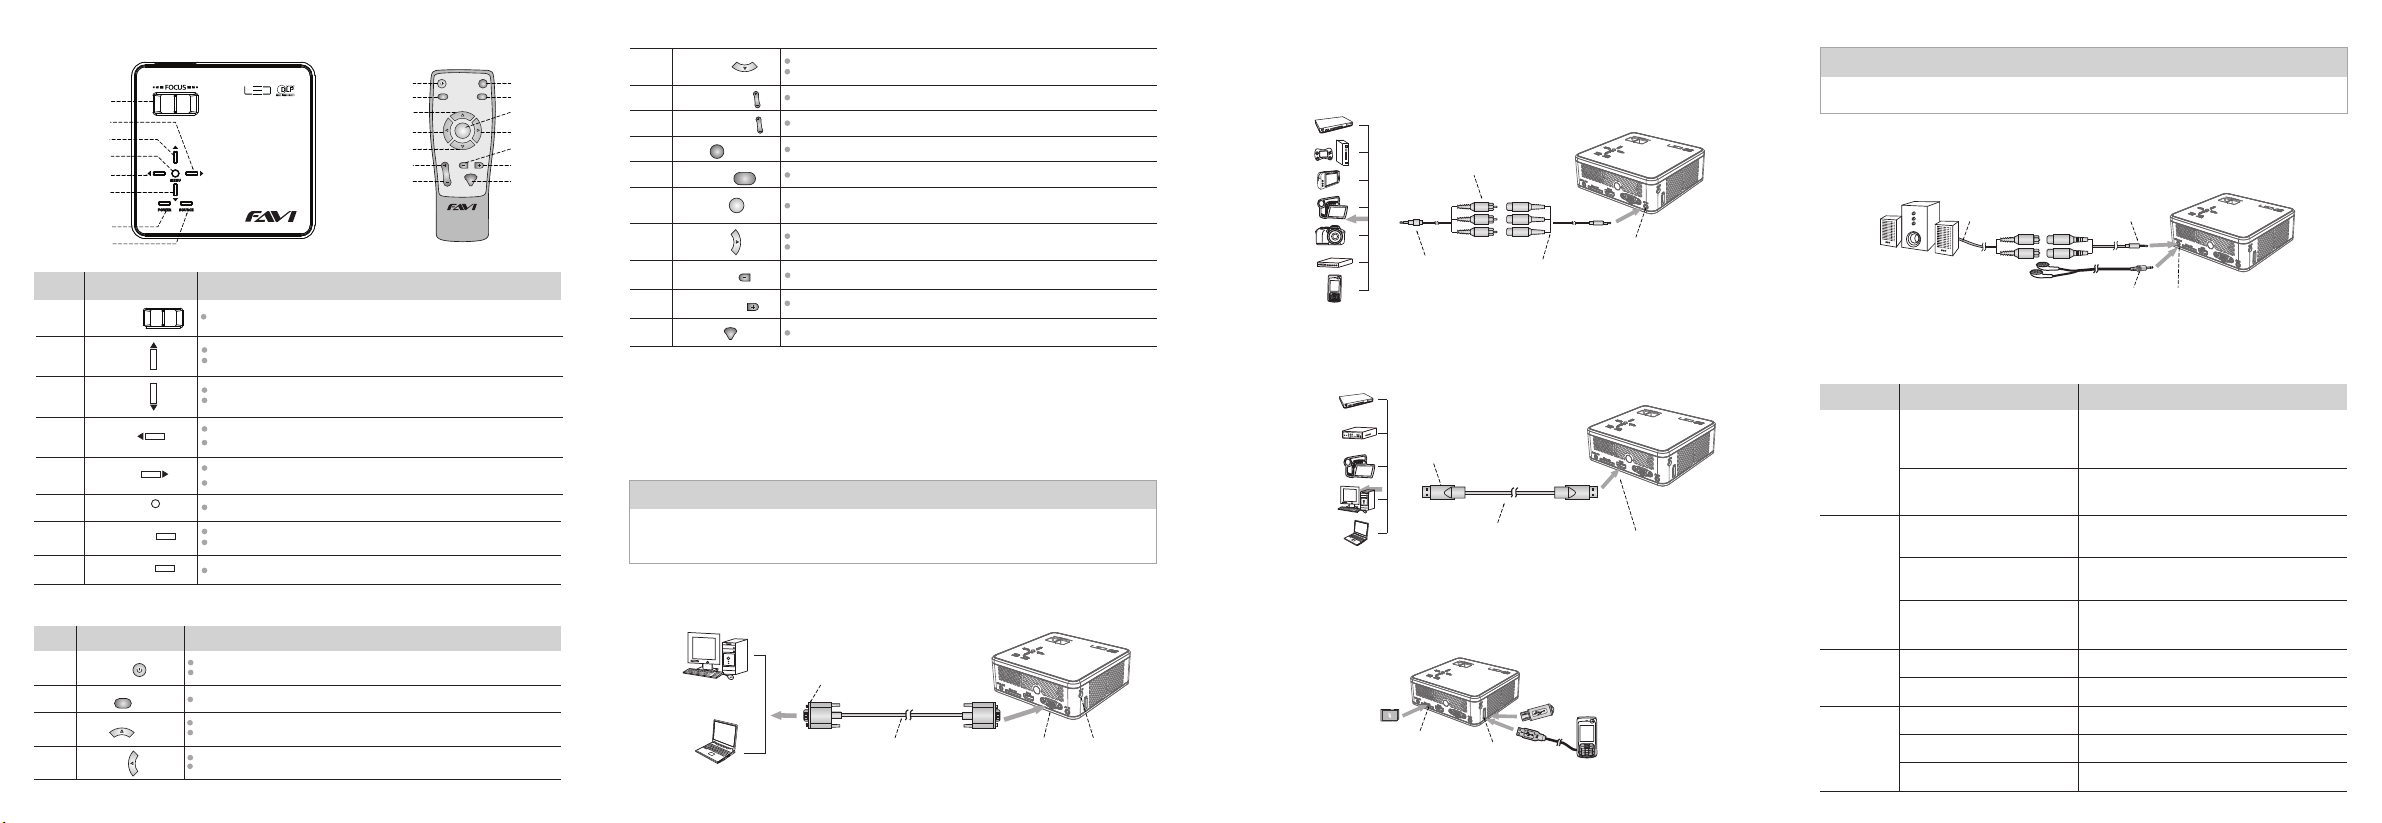
5.2 Control buttons
Focu s Wheel
Rig ht
Up
Men u
Lef t
Dow n
Power
Sou rce
Item
Focus
1
wheel
" "
Up " "
2
3
Down " "
Left " "
4
5
Right " "
MENU " "
6
POWER " "
7
SOURCE
8
5.3 Remote Control
Item
1
2
3
4
Key
Power " "
Flip
Flip " "
Up
Up " "
Left
Left " "
Key
Power
1 8
2 9
3 10
4 11
5 12
6 13
7 14
Functions
Adjust the focus and projected image.
When in Menu, scroll the les up.
MENU
POWER
" "
SOURCE
When playing videos, fast forward
When in Menu, scroll the les dow n,
when playing videos, rewi nd.
When in Menu move to previous option.
When playing music photos or videos, move to previous le.
When in Menu, move to next option.
When playing music, photos or video, move to next le.
When in Menu, conr m the selected opt ion.
Press to turn on the projector (green light).
Long press to turn o the projector (red light).
Exit a nd go back t o main menu
.
.
Functions
Power ON/OFF
Shift the projector between standby and operation mode.
Rotate the screen image
When in Menu, scroll the les up.
When pl aying video s, fast forward.
When in Menu, move to previous option.
When playing music, photos or video, move to previous le.
.
Power Esc
Flip
Up
Left
Enter
Down
Brightness Volume
Down
5
Menu
Right
6
7
8
Mute
9 Menu
10
11
12
13
14
6
The LED-4S works with a variety of digital devices, such as PCs, laptops, TV
set-up boxes, DVD, game consoles, digital cameras, digital camcorders, PMP,
smart phones that output video signals, and etc. Supports USB, SD card
and audio on the projector. Please follow the instructions for setup.
" "
Brightness " "
Brightness " "
Esc
Esc " "
" "
Enter
Enter " "
Right " "
Volume
Volume " "
Volume " "
Mute
Mute " "
CONNECTION SETUP
When in Menu, scroll the le down.
Down
When playing videos, rewind.
Brightness
Select to increase the brightness.
Brightness
Select to decrease the brightness.
Exit and go back to upper menu.
Menu
Exit and go back to main menu.
When in Menu, conrm the selected option.
When in Menu, move to next option.
Right
When playing music photos or videos, move to next le.
Decrease volume
Volume
Increase volume
Mute
NOTICE
When connecting signal source to the projector, be sure to:
1. Turn all equipment o before making any connections.
2. Use the correct signal cables for each source.
6.1 Connecting to a VGA device
Connect the VGA cable to the PC/laptop and the VGA input on the projector.
PC
Laptops
Connect to the VGA port
on the computer
VGA cable
VGA port
DC in
6.2 Connecting to an AV device
Connect the AV cable to the device and the AV input on the projector.
DVD
Game
consoles
MP3/MP4
Digital
camcorder
AV out
Digital camera
TV set-up box
Connection type
may vary
AV cable
AV input
Mobile phone
6.3 Connecting to an HDMI device
Connect the HDMI cable to the device and the HDMI input on the projector.
blu -ray DV D
HD pl ayer
HD digi tal
camcor der
Connect to the HDMI
port on the device
PC
Laptop
HDMI cable
HDMI port
6.4 Inserting a SD card or USB memory
1. Inset a
Micro-SD
card into the Micro-SD slot on the projector.
2. Insert the USB ash drive into the USB port on the projector.
Micro-SD card
Micro-SD slot
USB port
USB ash drive
MOLEX
Mobile phone
NOTICE
Mobile phones with USB port are supported (USB drive software installation is unnecessary).
6.5 Connecting to an external speaker or earphone
Connect an audio cable from an external speaker system/earphone to the headphone
output on the projector.
External speaker system
Audio in cable
Audio out cable
Earphone cable
Headphone output
7 TROUBLE SHOOTING
Symptoms
Projector
does not
turn on
No picture
Blurred image
Remote
control
does not
work
There is no power from the
power cable.
Attempting to turn the
projector onagain during the
cooling process.
The video source is not turned
on or connected correctly.
The projector is not correctly
connected to the input signal
device.
The input signal has not been
correctly selected.
The projector lens is not
correctly focused.
The projector and screen are
not aligned properly
The battery is out of power
There is an obstacle between the
remote control and the projector.
You are too far away from the
projector.
Cause
Remedy
Plug the power cord into the DC in jack on the
projector and plug the power cord into the
power outlet.
Wait until the cooling down process has
completed.
Turn the video source on and check that the
signal cable is connected correctly.
Check the connection.
Select the corrected input signal with the Source
key on the projector or Menu key on the remote
control
.
Adjust the focus of the lens using the focus wheel.
Adjust the projector angle and the height.
Replace the battery with a new battery.
Remove the obstacle.
Stand within 25ft of the projector.
 Loading...