

Page 1
0259-0 902A _Rev14
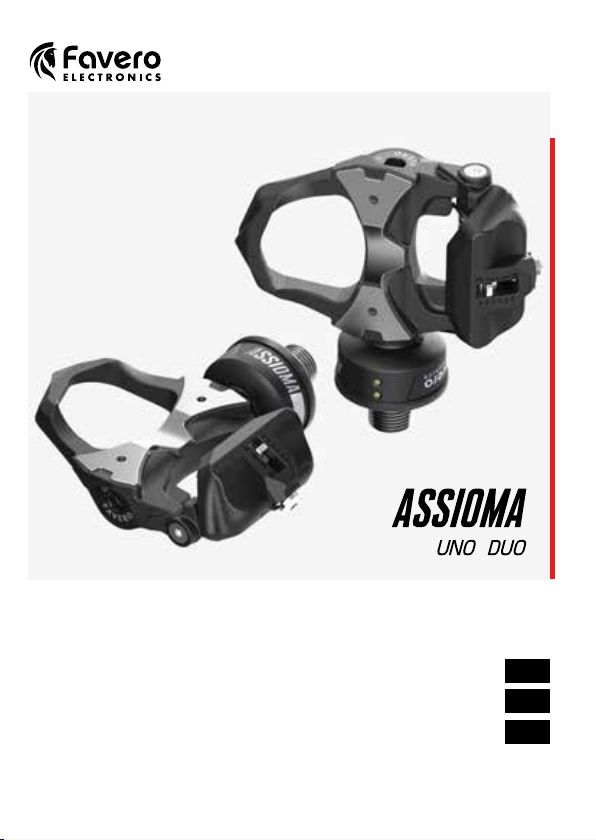
Art . 772-01 ASSIOM A UNO cycling p ower meter
Art . 772-02 ASSIOMA D UO cycling po wer meter
1. User Manual 1 EN
Page 2

Page 3
ENGLISH - USER MANUAL
Quick start
1. Switching on Assioma (Chap. 5).
2. Activating Assioma (Chap. 6).
3. Fixing t he pedals to the crank-arms (Chap. 7).
4. Cleat xing, shoe position check and cleat release force adjustment (Chap. 8).
5. Bike computer conguration (Chap. 9).
• Pairing Assioma to the bike computer (C hap. 9.1).
• Congur ation of power elds (Chap. 9.2).
• Crank-arm length (Chap. 9.3).
6. Manual zero of fse t (Chap. 10). V ERY I MPO RTA N T
7. Using Assioma for t he rs t time on road or rollers (Chap. 11).
It is essential to perf orm a manual zero off set adjustment any time the pedal s
are reinstalled, other wise the data may not b e displayed cor rectly. For maximum
precision, rep eat the operation before every use.
ENGLISH
FAVERO Elec tronics - 0259-0 902A Assioma us er manual _Rev16C - EN-IT-DE
1
Page 4

ENGLISH
Contents
1. Versions 2
2. Package content 3
3. Product description 3
4. Warnings 4
5. Switching on Assioma 4
6. Activating Assioma 4
7. Fixin g the pe dals to the crank-arms 5
8. Cleat xing, shoe position check and cleat release force adjustment 6
9. Bike computer congura tion 8
10. Manual zero offset 9
11. Using Assioma for the rst time on road or rollers 10
12. Battery charge 10
13. Transfor ming Assioma UNO into A ssioma DUO 12
14. Removing the pedals 12
15. Reinstalling the pedals (on an other bicycle) 12
16. Compatible bike computers 12
17. App compatibility 13
18. LEDs behavior 13
19. Inspection and maintenance 13
20. Spare part s 14
21. Produc t troubleshooting 14
22. Copyright 15
23. Warranty 15
24. Technical features 15
25. Exploded view of the components 17
1. Versions
Assioma UNO
Assioma DUO
left p edal with power sensor,
right pe dal without power sensor
Left a nd right pedal s with power sen sor
Art .
772-0 1
Art .
772-02
2
FAVERO Elec tronics - 0259-0 902A Assioma us er manual _Rev16C - EN-IT-DE
Page 5
ENGLISH
2. Package content
• Assioma pair of pedals with sensor (1 sensor fo r Assioma UNO, 2 sensor s for Assioma DUO).
1 battery charger with EU, US, UK, AU pl ug adaptors ( IEC Typ es C, A, G ,I ).
•
• 2 m USB/micro USB cable (1 cable f or Assioma UNO, 2 cable s for Assioma DUO).
• Magnetic charging connector (1 connector for Assioma UNO, 2 connectors for Assioma DUO).
• 2 red cleat s (6° oat), 1 8 mm hexagonal wrench, 4 washers.
• User manual, Safety instructions, Warranty information.
3. Product description
Assioma is a pedal for racing bic ycles with a quick clip system, provided with power
sensor to measure the force applied to t he pedal during the pedal stroke.
This pedal includes the func tion of c adence meter and can c alcul ate th e power of a
single leg in real time, sending it to the bike computer.
It is provided with a 50 hour rechargeable battery and is designed to guaran tee many
years of use. Therefore, there are no openings with gaskets for the replacement of the
battery.
Assioma is ful ly sealed (IP67) thank s to it s case without openings and all its internal
components are immersed in a special lling resin.
For radio communication, Assioma is compatible with the ANT+ standard an d
Bluetooth v4.0 standard, or la ter ver sion. T he use of Bluetooth v4.0 in
smar tphones st arted in 2011 - 2012.
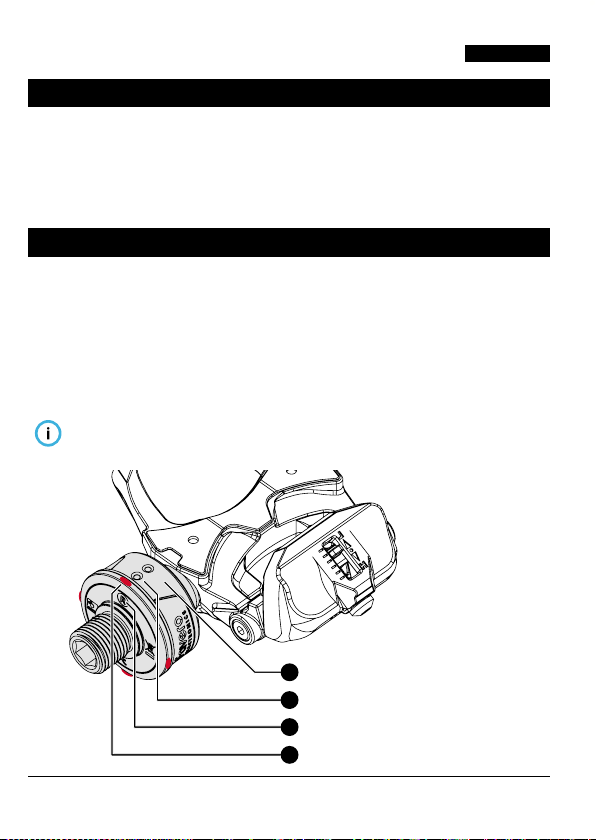
Sensor
a
Connector for battery charging
b
Left p edal (L) or righ t pedal (R) indication
c
4 LEDs, o ne every 90°
d
FAVERO Elec tronics - 0259-0 902A Assioma us er manual _Rev16C - EN-IT-DE
3
Page 6
ENGLISH
4. Warnings
Please c aref ully read this manual and the safety instr uctions before installing
the product. An incorrect install ation may lead to accidents and possible
damage to things and/or injury to people.
If you have any doub ts about your abilit y to ins tall the product , we recommend
you to ask f or the assist ance of a specialized mechanic. An incorrec t inst allation
may cause or result in irreparable damage to the product which shall not be
covered by the warran ty. Before s tar ting to ride, check that the force necessary
to release your shoe from the pedal is suitable.
Visit th e YouTube channel: Favero Cycling to see the d etailed video instal lation.
https://www.youtube.com/Favero_cycling
5. Switching on Assioma
Assioma will automa tically switch on by turning the pedals or star ting to ride and will
automatically switch of f after 5 minutes of inactivity.
When using Assioma for the rst time, connect it to the supplied b attery charger
for a few seconds to switch it on. Follow the same procedure if “Tr av el mo de”
has been activated from the Favero A ssioma app.
If the LEDs do not blink, charge the batter y as indicated in Chap. 12.
For LED behavior read Chap. 18.
6. Activating Assioma
Assioma mus t be activated to measure the power and cadence. If it is not ac tivated,
such measuring will not be performed. The activation also determines t he st art of the
warranty p eriod , allow s updating the software and sending diagnostic report s to
check the correct operation of the product.
Activation is obtained with the specic “Fave ro Assioma
and Android. The app can be downloaded free of charge.
Make sure that your smar tphone is compatible with the Bluetooth v4.0
standard or l ater versions, and that your inter net connections is active.
Open the app and follow the instr uctions to perform the search, the connection to your
device an d the activation. If Assioma does no t appear in the search section, make sure
that it is not already connected via Bluetooth to another device (e.g. bike computer).
For more information, read t he FAQs on the website: cycling.favero.com.
” app, available both for iOS
4
FAVERO Elec tronics - 0259-0 902A Assioma us er manual _Rev16C - EN-IT-DE
Page 7
ENGLISH
7. Fixing the pedal s to the cr ank-arms
7.1 . Washer use
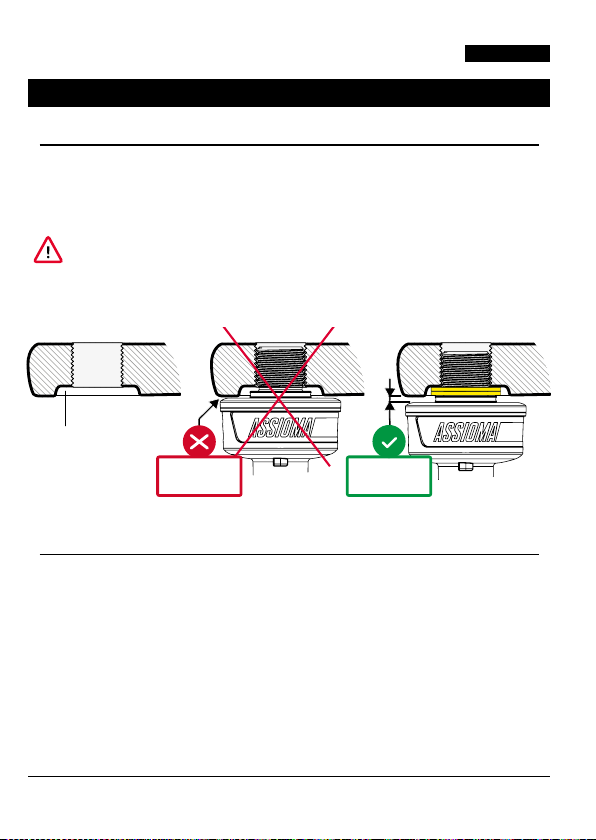
The washers supplie d are only necess ary in the following cases:
• The crank-arm producer requires t he use of a washer.
• The crank-arm has a recessed seat and one or t wo washers must be used to ensure a
free space between sensor and crank-arm.
Pressing the sensor against the crank-arm when tightening the pedal may damage
it. This operation would invalidate the warranty. If necessary, use 1 or 2 washers
to ensure a free space of at leas t 1 mm bet ween the sensor and crank-arm.
If a cadence sensor is tted near the pedal, remove it to avoid any contact with the Assioma sensor.
Crank-arm
with recessed seat
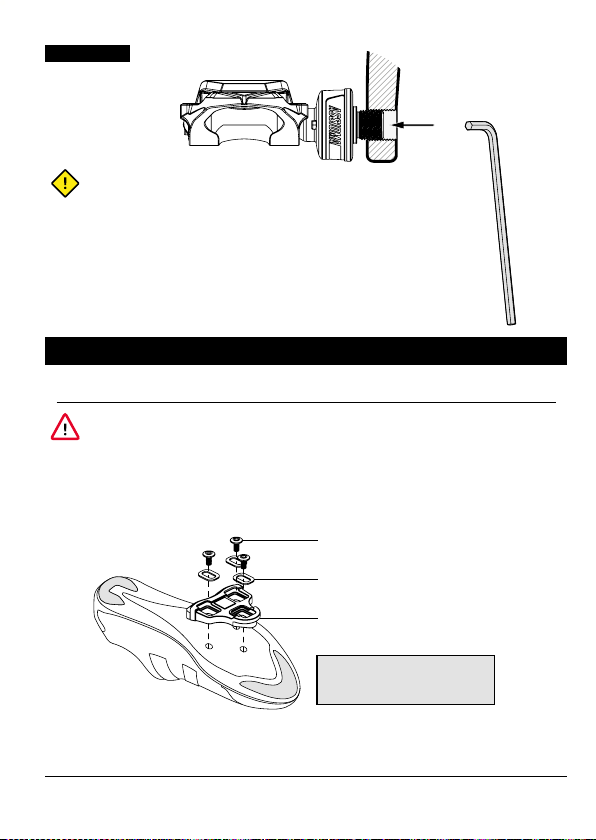
7.2 . Tightening th e pedal s
Before tightening the pedals, apply a thin layer of grease to the pe dal axle thread.
Tighten the pedal to the crank-arm using the supplied 8 mm hexagonal wrench at a
tightening torque of ab out 35-40 Nm (25-30 ft lb), a standard torque for the tightening
of many pedals . If the crank-arm producer species a different tightening torque,
apply it .
0 mm
≥ 1 mm
FAVERO Elec tronics - 0259-0 902A Assioma us er manual _Rev16C - EN-IT-DE
5
Page 8
ENGLISH
Pay attention to the rotation direction:
• Tighten the lef t pedal
counter-clockwise
(facin g the pedal).
• Tighten the right p edal
clockwise
(facin g the pedal).
8. Cleat xing, shoe posi tion check and cl eat rel ease fo rce adju stme nt
8.1. Cleat xing
Use only the supplied cleats (red cleat s, oat 6°) or original LO OK Kéo cleats.
The use of non-original LOOK Kéo compatible cleats may be unsuitable and any
damage to the product will not be covered by the warranty.
To x the cleats, use the supplied screw s and washers.
Align the cleat in the preferred position and tighten the screws with a tightening force
of 4÷6 Nm (3÷4.5 ft l b), as for most of the cleats on t he market.
Fixing screws
Washers
Cleat
Black cleats
(oat 0°), Ar t. 771-40.
are also available for separate purchase
6
Tightening torque:
4÷6 Nm (3÷4 .5 ft lb)
FAVERO Elec tronics - 0259-0 902A Assioma us er manual _Rev16C - EN-IT-DE
Page 9
ENGLISH
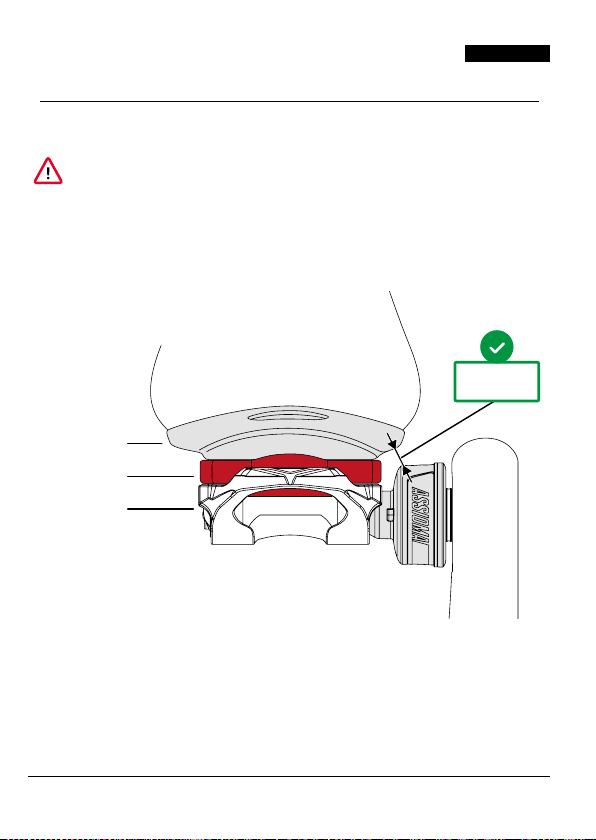
8.2. Shoe position check
Thank s to its reduced dimensions, the sensor never comes into con tac t with the shoe
even when large size or at-soled foot wear is worn.
Before starting to ride, check that the distance be tween the sh oe and the sensor
is at leas t 2 mm. Do not use t he product if the sensor is in contac t with the sho e,
the shoe cover or t he clea t, as it can be damaged and this would invalidate the
warranty.
If the dis tance between the sensor and the shoe is l ess than 2 mm, move the cleat to
the mos t appropriate position or insert spacer A rt .771-45 bet ween t he clea t and the
shoe sole.
≥ 2 mm
Shoe
Cleat
Assioma
FAVERO Elec tronics - 0259-0 902A Assioma us er manual _Rev16C - EN-IT-DE
7
Page 10
ENGLISH
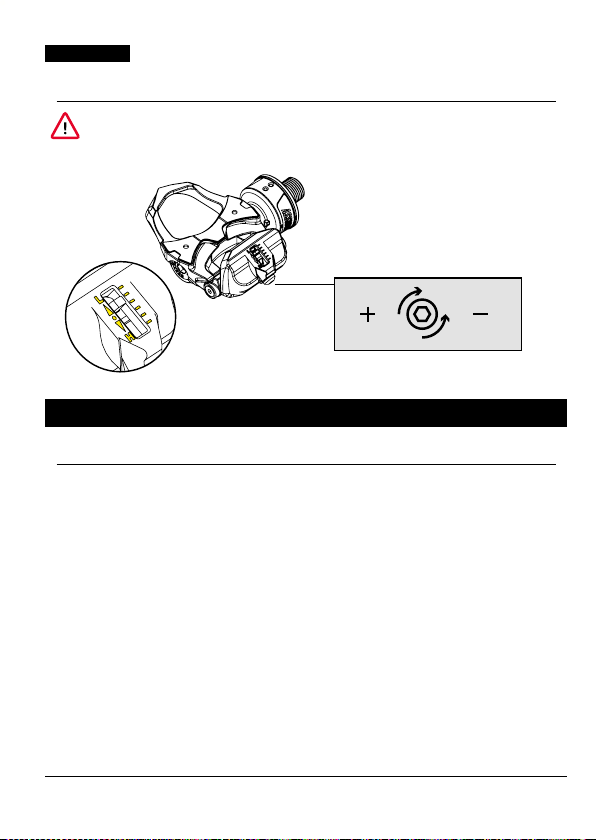
8.3. Cleat r elease force adjust ment
Before starting to ride, try to release the shoe several times and make sure that
the release force is suitable.
The correct direction to unclip is external to the bike.
The spring tension can be adjuste d using the
screw shown in the picture. To increa se the
tension turn clockwise;
to decrease the tension, turn counter-clockwise.
Use a 3 mm wrench (not s upplied).
Increase
Adjust the tension
of the spring depending
on your needs.
9. Bike computer conguration
9.1. Pairing A ssioma t o the bike computer
The pairing procedure associates Assioma to the bike compu ter to star t the radio
communication bet ween the two devices.
Please read the bike computer manual to learn how i t performs the search and pairing
of a power sensor. Make sure that Assioma is switched on b efore proceeding (Chap. 5).
Each Assioma has a unique 5-digit identication number (ANT+ ID) writ ten on the
packaging. This number identies A ssioma in the list of devices which can be paired
with the bike computer.
Bike computers require that only the le ft pedal be paired. T he lef t pedal will transmit
also the data collected by the ass ociated right pedal .
On Blue tooth bike computers and other devices with Cycling Power Prole (CPP), the
left pedal can be recognized by an L that follows the identication number.
8
FAVERO Elec tronics - 0259-0 902A Assioma us er manual _Rev16C - EN-IT-DE
Decrease
Page 11
ENGLISH
Impor tan t warnings to avoid communication problems during pairing:
• Make sure th ere are no other power meter s switched on nearby (10 m).
• The bike computer must be within 2 m from Assioma.
• For Bluetooth devices only: make sure Assioma has not already been paired
or conne cted via Blue toot h to another device or app.
• If you set A ssioma DUO in “D ual channel L /R” mode, the right pedal sensor
can be recognized by the R ID identication number written on the ou tside
of the box. For more information, see Chap. 17.
9.2. Conguration of power elds
Once the pairing procedure has been completed (Chap. 9.1), it is p ossible to congure
the bike computer so that it displ ays the power data in t he preferred way: please refer
to the bike computer manual.
It is recommended to at least se t the following parameters: 3 second power, 30 second
power, cadence, 30 second average bal ance.
9.3. Crank-arm length
The crank-arm le ngth affec ts power calculation: Assioma must know this length. An
incorrect value will lead to incorre ct power values.
Please refer to the bike computer manual to learn how to se t the crank-arm lengt h.
If the crank-arm length cannot be set on the bike computer, set this parameter using
the Favero Assioma App.
Do not se t the crank-arm length v ia the Favero Assioma App if the bike computer
alread y allow s this operation; the s et value would be over written .
10. Manual zero of fse t
Each Assioma sensor is factory calibr ated to ensure its guaranteed precision under any
opera ting conditions, including ambient temperature varia tions , for which automatic
compensation from -10°C to +60°C is active.
No return to the Manuf acturer is therefore necessary for periodic calibration.
However, it is important to periodically per for m a “manual zero of fse t” on your bike
computer or app; to eliminate any measurement variations which may have occurred
over time, due to mechanical adjustments or impac ts.
The zero offset function takes a few seconds and is of ten specied in the bike
computer with the term “calibration”.
Perf orm a manual zero offset adjustm ent any time the p edals are reinstal led.
For maximum precision, repeat the operation before every use.
FAVERO Elec tronics - 0259-0 902A Assioma us er manual _Rev16C - EN-IT-DE
9
Page 12

ENGLISH
How to perfor m a manua l zero of fse t:
• Switch on Assioma.
• Turn on the bike computer or start an app (this f unction will be availa ble also on the
Assiom a App fro m September 2018). If Assioma is not de tected, make sure it is not
alread y connected via Blue toot h to another device.
• Release the shoes from the pedal s and make sure that they are not in contact with
anything.
• Place the bike ver tically (not tilted) keeping it as still as possible. Other wise, it will
not be possible to complete the Zeroing. Reposition your bike be fore trying again.
• Place the crank-ar ms in the vert ical position .
• Read the bike computer manual to learn how to:
• Open the power sensor menu.
• Press the “Calibration” or “Zero Of fse t” button .
• Make sure that the zero offset adjustment was successf ul; usually the
display shows a conrmation m essage or a 0 (zero).
• Repeat the operation if an error occurs.
Sometimes the zero offset is slowed dow n or prevented if other ANT+ sensors
(e.g. cardio ban d, cadence sensor) are enabled but switched of f on the bike
computer, as the bike compu ter searches t hem but cannot nd them. In this case,
it is necessar y to switch th em on, or disable them temporarily on the bike
computer.
11. Usin g Assioma for t he rst time on road or rollers
On the rst ins tallation, Assioma will not send any power data to the bike computer
until it has completed t he internal self-calibration. Assioma self-calibra tes while
cycling by making a few tens of complete pedal s trokes. To speed up the procedure, it
is advis able to c ycle seated , at a unif orm pace and on a leveled road. S elf-calibration
can be considered completed once Assioma sen ds the power data to th e bike
computer.
12. Battery charge
Assioma has an internal rechargeable lithium bat ter y, with an approximately 50
hour life span . The capacit y of each battery is tested during the manufac turing
process.
The batter y life is very long thanks to the low number of bat ter y charges required.
If you use Assioma for 15 hours a week, it is sufcient to charge it once e very 3 weeks.
The batter y can also be charged when it is only par tially discharged: this will further
increase its life span.
10
FAVERO Elec tronics - 0259-0 902A Assioma us er manual _Rev16C - EN-IT-DE
Page 13
ENGLISH
If the product is not used for long periods of time, charge the battery anyw ay at
least every 3 months in order to avoid the risk of irret rievably damaging the
product.
When the bat ter y of a pedal runs low, the bike computer will display a w arning. The
remaining bat tery life, after a low batter y war ning, will be of about 8 hours.
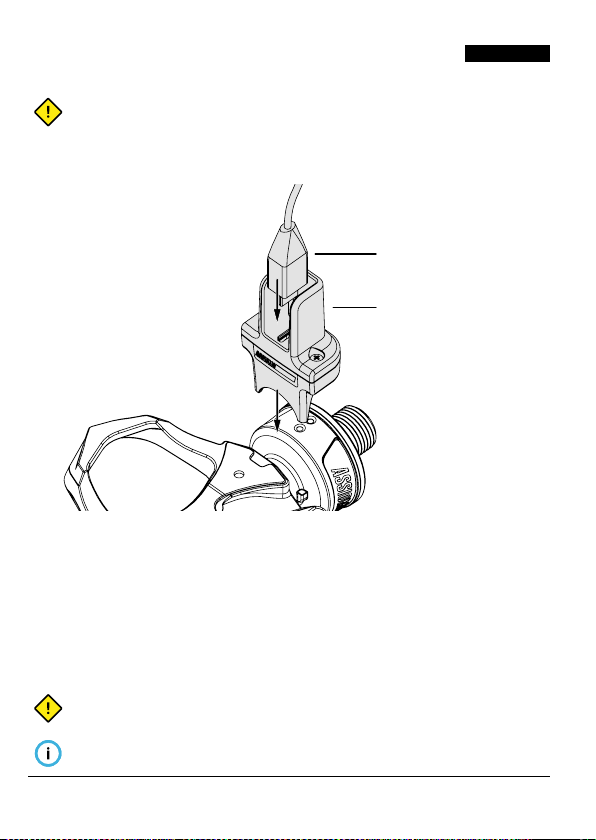
Micro USB connector
Magnetic charging
connector
To charge the batteries, f ollow the procedure below for each se nsor:
• Connect the battery charger supplied to an elec tric al socket.
• Connect the USB cable supplied to the ba ttery charger.
• Insert the micro USB connector into the magnetic connector (see the pic ture).
• If the sensor contact s are we t or dir ty, dr y or clean them with a dr y cloth.
• Connect the magnetic connector to the pedal as indicated in the pic ture: t he LEDs
switch on and remain switched on during the entire recharging. Once recharging has
been completed, the LEDS will blink every 0 .5 seconds.
Recharging a completely discharged battery takes abou t 6 hours.
Recharge at a temperature ranging between 5°C and 4 0°C. Beyond this range,
recharging is blocked to protect batter y functionalit y.
If necessary, Assioma can also be charged with a common smartphone battery
FAVERO Elec tronics - 0259-0 902A Assioma us er manual _Rev16C - EN-IT-DE
11
Page 14

ENGLISH
charger, instead of using t he one supplie d.
When a socket for batter y charger is not available, a common “power bank” can be used.
To charge two sensors at the same time, use a model with 2 USB por ts. Some models are
not able to fully charge the bat ter y as their minimum charge current is higher than 50 mA.
13. Transfo rming A ssiom a UNO int o Assio ma DUO
Assioma UNO measures the power only on the left pedal. It is possible to buy the right
pedal with the sensor (art . 772-51) at a later date an d therefore pass to a s ystem equal
to Assioma DUO. The lef t pedal must be paired to the ne w right pedal using the Favero
Assioma app.
14. Remov ing the p edals
To remove the pedal , use th e supplied 8 mm hexagonal wrench:
• Unscrew t he LEF T pedal CLOCKWISE (facing it).
• Unscrew t he RIGHT pedal COUNTER-CLOCKWISE (facing it).
15. Reinstalling the pedals (on another bicycl e)
Any time the pedals are moved f rom one bicycl e to another, a manual offset must be
performed (Chap. 10).
Once the pedal s are reinstalled, the power and cadence data displayed on the bike
computer are no longer reliable until A ssioma per forms an internal self-calibration.
Assioma self-calibr ates w hile cycling by making a f ew tens of pedal turns . To speed up
the procedure, it is advisable to ride seated , at a uniform pace and on a leveled road.
16. Compatible bike computers
Assioma is compatible with any ANT+ bike computers with Bike Power (PWR) prole.
For the co mplete list of t he ANT+ certie d products , visit the website:
http://w ww.thisisant.com/directory/ (select “Bike Com puters” in the C ategories men u).
It is advisable to install the latest rmware version av ailable from t he bike
computer manufacturer.
If you buy a new bike computer, we suggest the purchase of a mo del having a
“CT” (Crank Torque) ANT+ prole, which ensures a be tter stability of the power
being displayed.
12
FAVERO Elec tronics - 0259-0 902A Assioma us er manual _Rev16C - EN-IT-DE
Page 15
ENGLISH
17. App compatibilit y
Assioma is preset in a “Unied channel L” mode that ensures t he grea test possible
compatibilit y with apps that manage data transmitted by power meters.
A small se t of Bluetooth bike computers and apps might require a change in the
prese t “Compatibility with oth er apps” parameter f rom the Favero A ssioma app.
Before changing the “ Unied channel L” setting to “Dual chann el L/ R”, we
recomm end con tacting your cycling app Suppor t to nd out what the best
solution is.
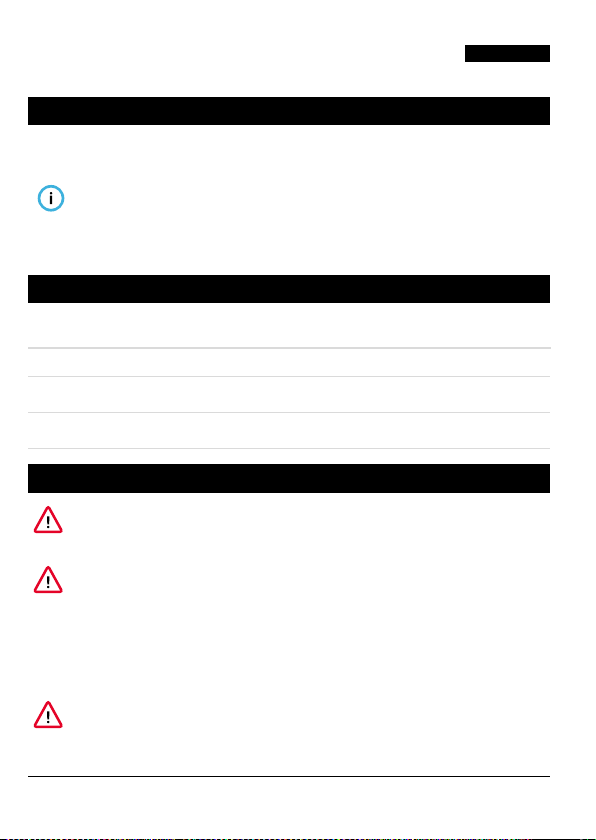
18. LEDs behavior
Fast and continuous blinking for 3
seconds
Shor t blinking every 3 seconds • indicates that A ssioma is switched on.
Fixed light • indicates that t he bat ter y is being
Shor t blinking every 0.5 s econds • indicates that t he bat ter y charging has
19. Inspection and maintenance
Caref ully inspect the product before starting a cycling session; check all parts
for damage, cracks , loose parts and signs of wear. Do not use the product unless
you have c arefully checked and replaced any worn or damaged part s.
If the product is not in perfect conditions, it s use may be the cause of accidents,
damage to things and/or injuries to people, as well as the cause of early
degradation of the produc t and it s per formance.
Clean Assioma with a damp clot h.
Do not use aggressive chemicals such as: gasoline, gas oil and petrol by-product s in
general, alcohol, indus trial or all-pur pose degreasers, etc. Do not use high pressure
cleaners.
Periodically check that the end cap (Chap. 25) is correctly tightened. Before each
cycling session, check tha t the pe dals and cleats are properly working. If the
cleat s are wor n out, they may cause accidents.
• indicates that A ssioma is being switched
on.
charged.
been completed.
FAVERO Elec tronics - 0259-0 902A Assioma us er manual _Rev16C - EN-IT-DE
13
Page 16

ENGLISH
Do not attempt to open or disassemble the sensor as you may damage it and
invalidate the warr anty. Assis tance must be carried out only by a specialized
technician, au thorized by Favero Elec tronics.
20. Spare parts
For more information on spare parts, visit the website cycling.favero.com.
21. Product troubleshooting
Over- or underrated p ower
• Perform a zero offs et wit h the bike computer (Chap. 10).
• Check if there is any contact between the shoe, or sh oe cover, and the sensor
(Chap. 8.2).
• Check the setting of the crank-arm len gth (Chap. 9.3).
Faulty l eft /righ t balancing
• Perform a zero offs et wit h the bike computer (Chap. 10).
• Check if there is any contact between the shoe, or sh oe cover, and the sensor
(Chap. 8.2).
Cadence and pow er are no t displ ayed
• Activate the product (Chap. 6).
• Congure the bike computer (Chap. 9).
• Perform a zero offs et wit h the bike computer (Chap. 10).
• Ride uniformly to allow self-calibration (Chap. 11).
The LED s do not s witch on
• Fully charge the product (Chap. 12).
• Make sure that the battery charger and the cables supplied are correctly
working (Chap. 12) or use a common smar tphone bat ter y charger.
There is no conne ction t o the Favero Assioma app
14
FAVERO Elec tronics - 0259-0 902A Assioma us er manual _Rev16C - EN-IT-DE
Page 17

ENGLISH
• Enable the Bluetooth connec tion on your smartphone.
• Make sure that the smartphone is compatible with the Bluetooth v4.0
standard or later versions.
• Disable an d again enable the Bluetooth connection on your smartphone.
The for ce necessar y to enga ge and re lease t he shoe f rom the pedal is n ot the one
wanted
• Adjust the tension of the springs using the adjusting screw (Chap. 8.3).
For more i nformation , read the FAQs on th e website: cycling.favero.com.
22. Copyright
Copyright 2017. All rights reserved.
It is forbidden to reproduce this manual in full or in part unless explicit writ ten
consen t is obtained from Favero Electronics.
The manufac turer reser ves the right to improve or modify the product and this manual
without any obligation of prior notice to private users or organizations. Assioma® is a
registered trademark of Favero Elec tronics. LOOK and Kéo trademarks belong to LOOK
Cycle International. All other trademar ks and registered trademarks are the proper ty
of their corresponding owners.
23. Warranty
All the information related to the product warranty are contained in the “Warrant y”
leae t supplied wit h Assioma or which can also be downloaded from the
cycling.favero.com website.
24. Technical features
Product name: Assioma UNO (art. 772-01),
Radio protocol: ANT+ PWR (C T + PO) prole, Blueto oth v4.0
power se nsor installed only on the lef t pedal
Assioma DUO (art. 772-02),
power se nsor installed on both pedal s
2.4GHz ISM band, RF power m ax 4dBm, GFSK modul ation
FAVERO Elec tronics - 0259-0 902A Assioma us er manual _Rev16C - EN-IT-DE
15
Page 18
ENGLISH
Transmitted data: power (w att), caden ce (rpm),
L/R b alance % (only for Assioma DUO),
torque e ffective ness (TE), pedal sm oothness (P S)
Minimum and maxim um power: 0 - 2000 W
L/R b alance: 0-100% (only for Assioma DUO)
Minimum - m aximum cadence: 30 - 180 rpm
Power measuring accuracy: ± 1%
Cadence sensor: internal, built-in
Internal battery: rechar geable lithium battery with a 50 hour l ife
chargin g: 5Vdc max 100mA
USB Charger see charger s pecicatio n
Total peda l weight with sensor: 152.4 g
Pedal weight wit hout sensor: 128 g
Pedal axle material: AISI 630 H90 0 stainless s teel
Pedal ax le threading: 9/16"-20 TPI
Bearings: no.3 sealed cartridge bearings
Operating temperature: -10 / +60 °C
Battery charging temperature: +5 / +40 °C
Protection degree: IP67
Certications: CE, FCC, RoHS, ANT+, BLE
Reference standards: EN14781, EN60950
Compatible cleats: FAVERO red cleat s (art. 771-42), black clea ts (art. 771-40 ),
Max cyclist weight: 120 Kg
LOOK Kéo cl eats (only original).
1
Warranty: 2 years
1
This pro duct has been de signed for weigh ts no higher tha n those clearly specied.
A perso n exceeding the wei ght limit herein sp ecied will use this pro duct at his/h er own risk.
This pro duct is ANT+ cert ied and compli es with the ANT+ spe cications:
www.thisisant.com /directory
This pro duct is certi ed to be a Blueto oth low energy technol ogy product.
16
FAVERO Elec tronics - 0259-0 902A Assioma us er manual _Rev16C - EN-IT-DE
Page 19
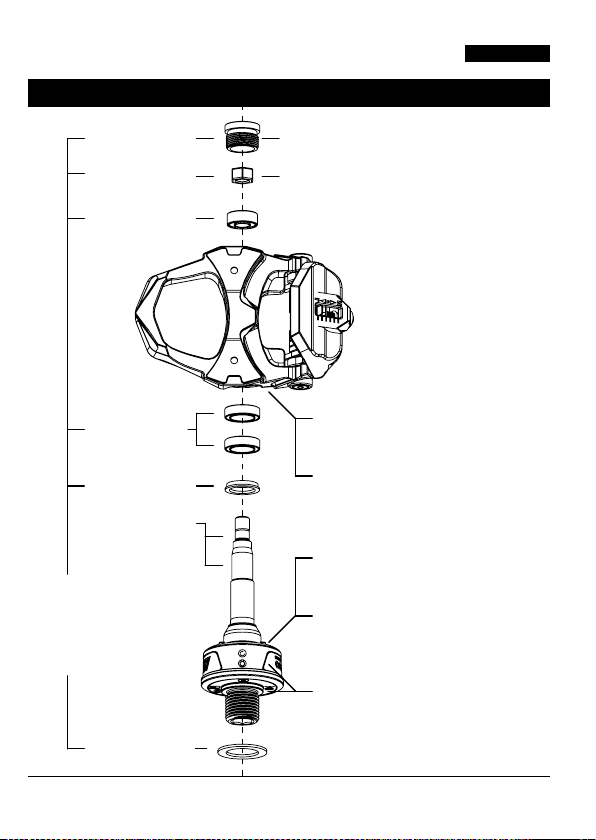
25. Exploded view of the components
End cap (2-3 Nm)
M6 nut (8-10 Nm)
6/13 bearin g
ENGLISH
• Tighte ning torque 2-3 Nm.
• Clock wise closing dir ection both f or right and lef t
pedal
• Tighte ning torque 8-10 Nm.
• Clock wise closing dir ection for left ped al.
• Counter-clockwise closing direction for right pedal.
• Use a 9 mm soc ket wrench (CH9 ) with max. 13 mm
outer diameter
10/15 bearin g
Oil reta iner
Grease the axle
with lithium grease
Bearin g set, M6 nuts,
oil seal , end caps, wash ers
Art. 772-72
14x20x1 wash er
FAVERO Elec tronics - 0259-0 902A Assioma us er manual _Rev16C - EN-IT-DE
Left p edal body
Ar t. 772- 62
Right pedal body
Ar t. 772- 63
Assiom a sensor on lef t axle
Ar t. 772- 64
Assioma sensor on right axle
Ar t. 772- 65
Set of ad hesive label s
Ar t. 772-94
17
Page 20
ENGLISH
1. FCC Statement
This device complies with par t 15 of the FCC Rules. Operation is subjec t to the
following two conditions:
(1) This device may not cause harmful interference,
(2) this device must accept any in terferen ce received, including inter ference that may
cause undesired operation.
This equipment has been tested and fo und to comply wit h the limits for a Class B
digital device, pursuant to part 15 of the FCC Rules. These limits are designed to
provide reasonable protection against harmful interference in a residential
installation. This equipment generates, uses and can radiate radio frequenc y energy
and, if not installed and used in accordance with the instr uctions, may cause harmf ul
inter ference to radio communications. However, there is no guarantee that
inter ference will not occur in a par ticul ar installation . If this equipment does cause
harmf ul interference to radio or television reception , which c an be determined by
turning the equipmen t off and on, the user is encouraged to try to correct the
inter ference by one or more of the following measures:
• Reorient or relocate the receiving antenna.
• Increase the separation between the equipment and receiver.
• Connect the equipmen t into an outlet on a circuit different from that to which the
receiver is connected.
• Consult the dealer or an experienced radio/TV technician for help.
Because of Assioma limited size, the FCC ID label is placed in this manual and on the
packaging or on a r emova ble label at tach ed to the device .
Model name: Assioma
FCC ID: 2ATKD-ASSIOMA
18
FAVERO Elec tronics - 0259-0 902A Assioma us er manual _Rev16C - EN-IT-DE
Page 21
cycling.favero.com
FAVERO ELEC TRONICS SRL
Via R. Lombardi, 64 - 31030 Arcade ( TV) - Italy
 Loading...