

Page 1
Fat Toad| 11408 Hwy 64 W, Tyler, TX 75704 |
info@fattoadpro.com | www.FattoadPro.com
www.FattoadPro.com www.FattoadPro.com
www.FattoadPro.com
Fat Toad™ stands and accessories are
manufactured in several innovative factories
responsible for developing products that address
the newest needs and trends of the current
market. We take pride in the Fat Toad™ brand and
endeavor to be on the forefront of the musical
stands and musical andlighting accessories market.
Performance Issue, Uneven or Unstable- Make
sure all nuts and bolts are tight on the product. If they
are, then loosen all nuts and bolts 1 full turn counterclockwise, then go back and tighten each bolt only ½
turn tight. Then do a final tighten turn for another ½
turn tight. Next, Make sure there are not any missing
nuts or bolts. Third, ensure all parts on the product
are not broken or defective. Finally, Re-read the
assembly instructions or watch the product
demonstration video to ensure you have correctly
assembled or are using the product properly with
factory specifications.
Missing Parts- The pictures, videos and images
shown in this manual might have changed style or
count due to the product being redesigned. So in rare
cases the part may no longer be included or of a
different style. However, if you think you are missing
a part that is necessary to the assembly and use of
your product, then first carefully double check all
packaging for any parts you think are missing. Some
parts might be hiding in the packaging or loose in an
inner box.
User Manual
For current product specifications, please to go
www.FattoadPro.com and type the model number into
the search bar. Locate the product listing to view the
current factory specifications.
Thank you for purchasing the Fat Toad Double Laptop
Stand. Your product comes with a 1-year factory
warranty from purchase date. Please read all
assembly instructions prior to assembling your new
stand. Pictures that may aid in assembly can be found
by going to www.Fattoadpro.com and typing LS21D
into the search bar.
Page 2
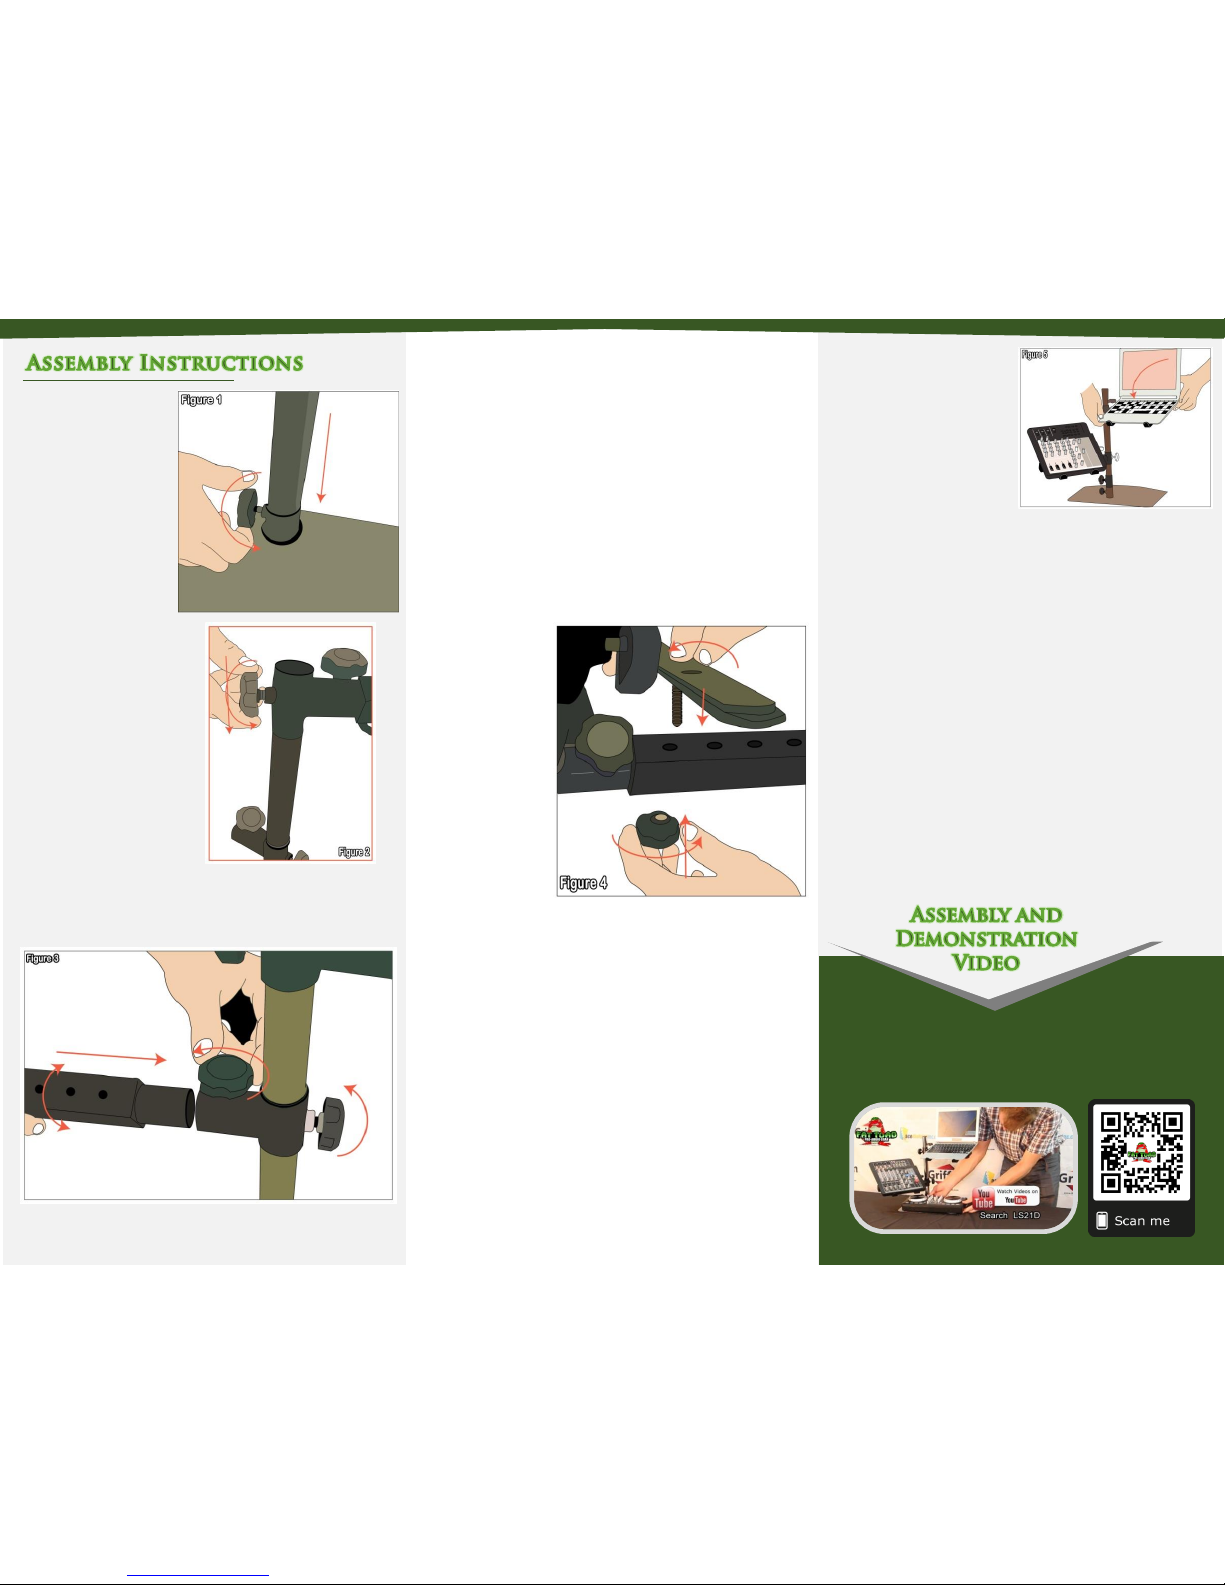
Step 3 – Get the horizontal pipe and insert the circular
part to the T-connector and tighten the knob, refer to
Figure 3.
Step 1 – Lay the black
plate down and loosen
the knob. Make sure to
loosen all the way and
insert the long chrome
pipe fully at the base
and tighten the knob
to secure (See Figure
1).
Please scan the QR Code below for the product
demonstration video. Or go to the URL shown here and find
the product video. www.FattoadPro.com/Videos
Step 2 – Take the T-
connectors and insert in
the chrome pipe and
tighten the knob to secure
in place as shown in
Figure 2. These T-
connectors should be
facing the opposite
directions.
Step 4 – Shown in Figure 4 is how to place the support
arms. Take the support arms and slide the bolt in your
preferred hole and insert the screw to one of the holes of
the horizontal pipe. Place the knob at the bottom and
turn to tighten the arms in place. The knobs should be
pointing down. The width between the plates depends
on what size equipment you are using. You can adjust the
position of each side by loosening the appropriate swing
arm knob and moving the swing arm. Just be sure to
tighten the set screw knob before letting go. Also note
that placing these plates either too far forward or back
could cause an imbalance causing the stand to fall over
Step 5 – Round
rubber felts are
placed at the
bottom of the black
plate and longer
ones are to be
placed on the
support arms to
keep a comfort
position for your
equipment.
Step 6 – For safety reasons, please always make sure to
test the stability and safety of the product before use.
Double check all nuts and bolts, knobs and connectors,
make sure that these are tight and securely fastened
before use of your product. Test the product under light
use or light loads the first time to confirm assembly and
structure of the product is correct.
Tilt angle of the horizontal pipe can be adjusted to your
preference as well as the width capacity of the support
arms, depending on how you place the arms close or far to
each other.
Please note that hardware
bolts to assemble the stand
maybe screwed into the
parts themselves. So, for
example, if you are missing
a bolt that goes into the
bottom base support tube,
then look at the end of the bottom base support tube and
you will see that hardware bolt is already screwed into
the stand. All you need to do is unscrew that bolt and
then screw it back in to assemble the two parts that
connect on that end. If the stand is wobbly loosen up
each bolt on the stand slightly. Then tighten up 1 bolt all
the way as much as it will tighten. After that start on the
next bolt that is completely opposite of the 1st bolt that
you tightened. For example, if you first tightened up the
bolt in the top right of the stand, then next start to
tighten up the bolt on the bottom left. Keep going in
order of the opposite bolt that you tightened up last.
Once you are done, repeat the process of going through
and tightening up the bolts onemore time.
 Loading...