

Page 1
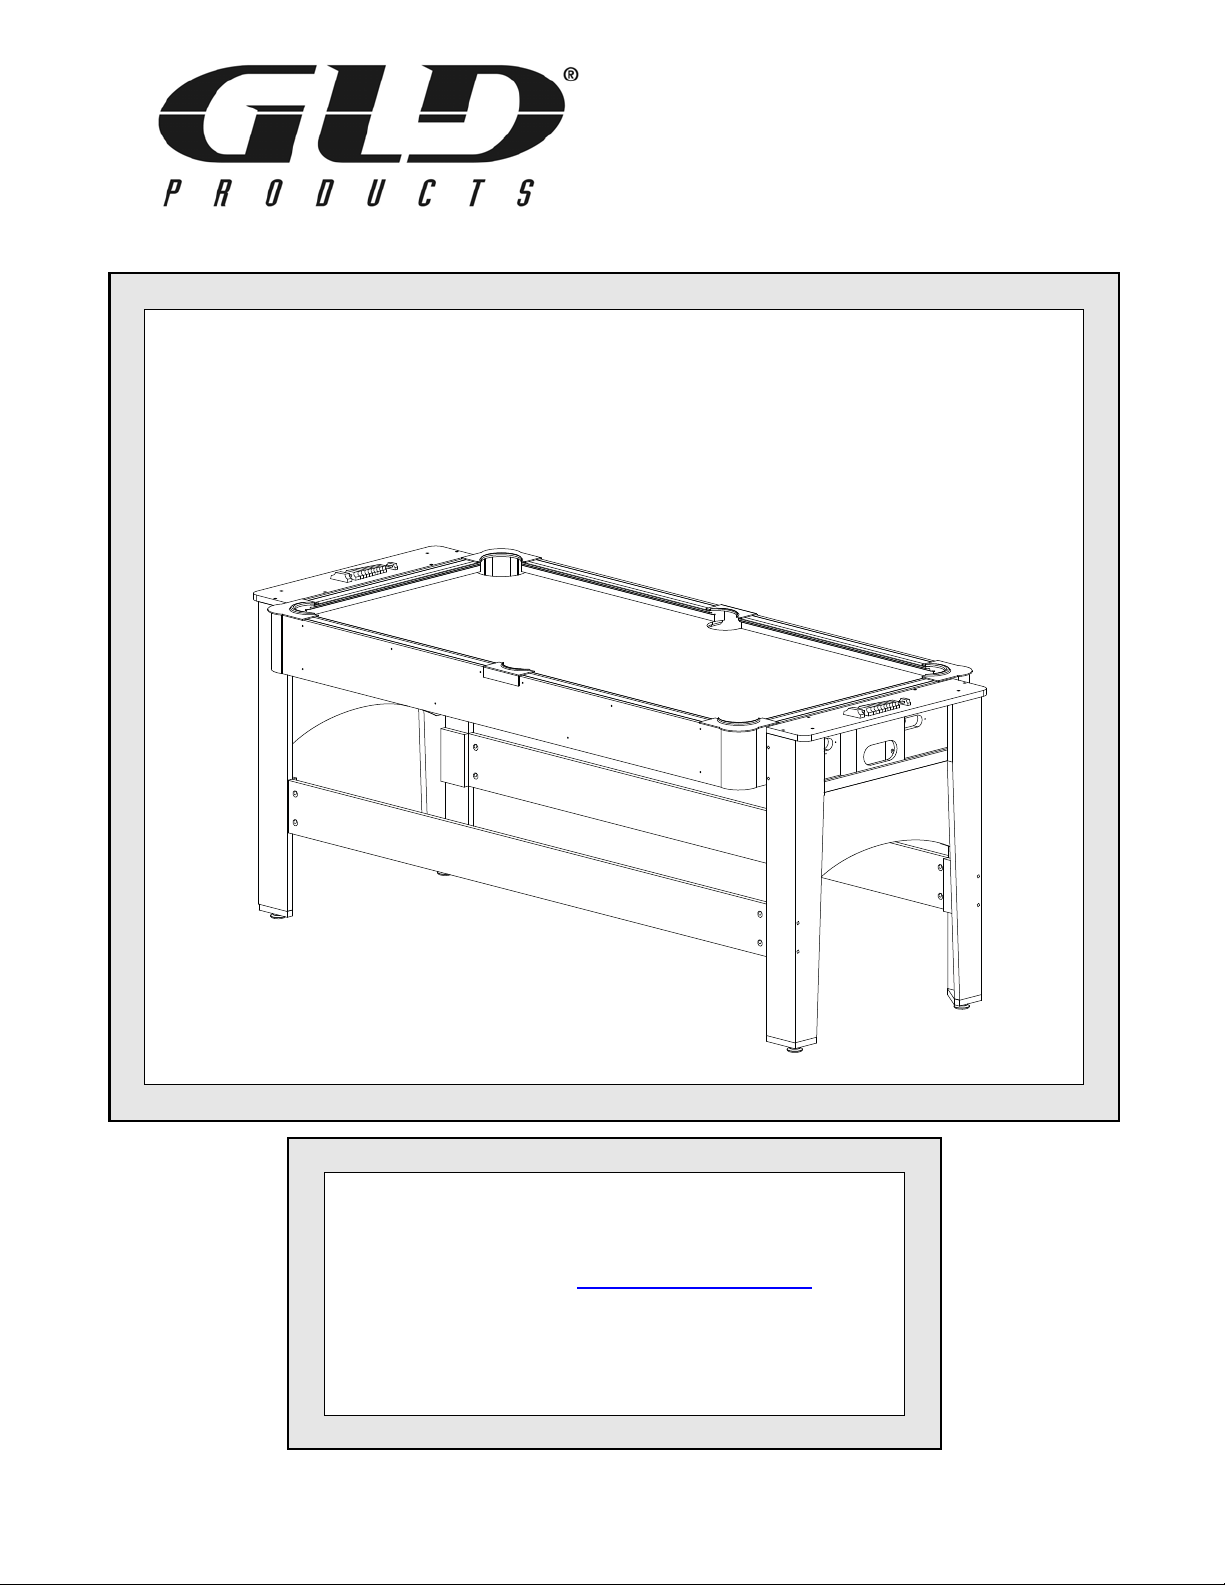
GLD Products 3 in 1 Game Table
Item 64-1049
3 IN 1 GAME TABLE
Replacement Parts
Order direct at www.gldproducts.com
or call our Customer Service department at
(800) 225-7593
8 am to 4:30 pm Central Standard Time
Item 64-1049
January 2014 UPC Code 7-19265-51778-8
Page 2
GLD Products 3 in 1 Game Table
Item 64-1049
Staple your receipt here.
Important: A copy of your receipt will be needed to activate your warranty (see page 18).
Page 3
GLD Products 3 in 1 Game Table
Item 64-1049
Congratulations and THANK YOU for purchasing the
3 in 1 Game Table. You have chosen a product that
should provide years of entertainment. To assist you
with customer service and warranty claims, staple
your receipt to the inside cover, then keep this manual
in a safe place for future reference.
GLD Products
S84 W19093 Enterprise Drive
Muskego, WI 53150 USA
1-800-225-7593
Fax: 1-800-841-6944
Email: [email protected]
Web: www.gldproducts.com
This manual may have been updated. For the latest manual visit the GLD Products website.
Place your package near the location where it will be used. Carefully unpack
all components and verify you have all the correct pieces.
If you notice missing or defective parts, please call us at:
1-800-225-7593 ext 113.
Please read and understand all instructions before beginning assembly.
This assembly will require 2 adults.
This product is not for use by children without adult supervision.
3 1-800-225-7593
www.gldproducts.com
Page 4
GLD Products 3 in 1 Game Table
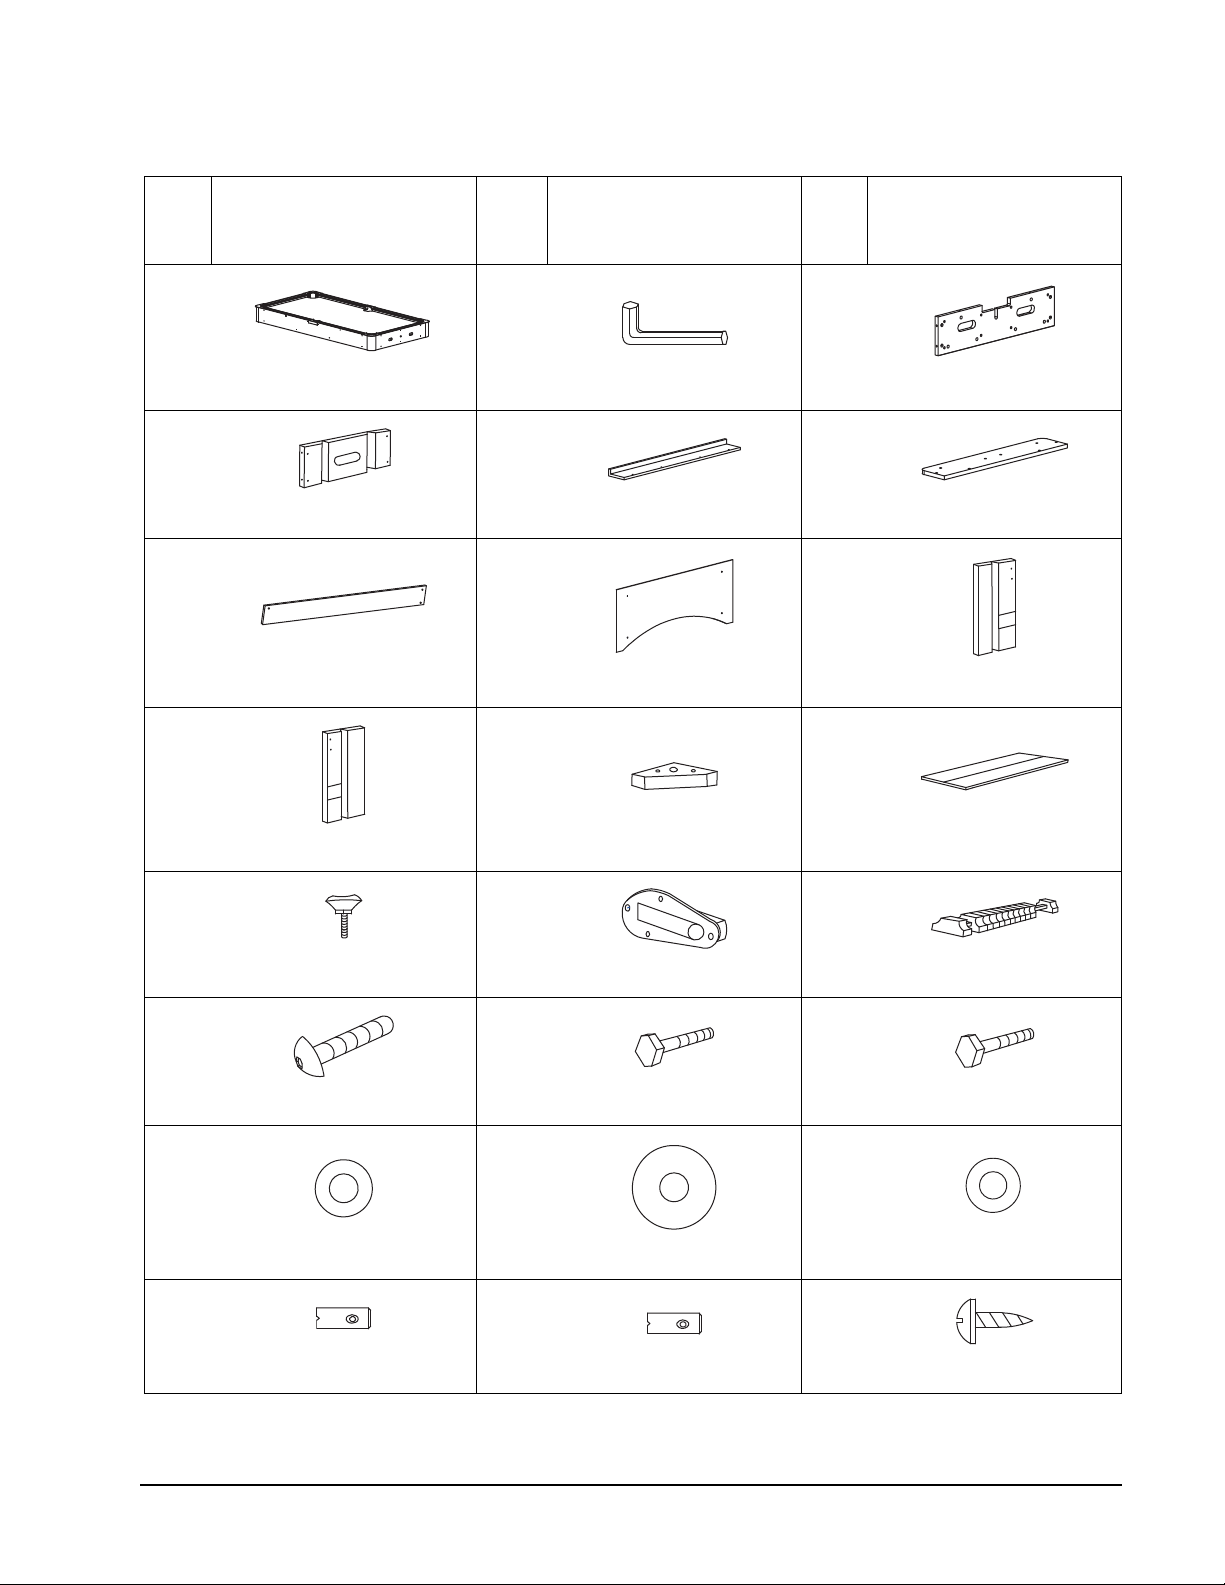
Parts Identifier Item 64-1049
Parts Identifier
Part
No./
Qty
Illustration/
Order Number
Part
No./
Qty
Illustration/
Order Number
Part
No./
Qty
Illustration/
Order Number
1
Qty.
1
4
Qty.
2
7
Qty.
2
10
Qty.
2
Cabinet
Order No. 2-256
Catcher Box
Order No. 2-258
Leg Brace
Order No. 2-261
Right Leg
Order No. 2-264
2
Qty.
5
Qty.
8
Qty.
11
Qty.
3
Qty.
1
Allen Wrench
Order No. 2-116
2
End Panel
Order No. 2-257
6
2
Ball Return Board
Order No. 2-259
Qty.
2
Top End Panel
Order No. 2-260
9
Qty.
2
Leg Panel
Order No. 2-262
2
Left Leg
Order No. 2-263
12
Qty.
4
Leg Base
Order No. 2-265
1
Table Tennis Surface
Order No. 2-267
13
Qty.
4
16
Qty.
8
19
Qty.
2
22
Qty.
8
Leg Leveler
Order No. 2-268
1/4" x 1-3/4" Allen Key Bolt
Order No. 2-270
1/2" Washer
Order No. 2-107
1/4" Barrel Nut
Order No. 2-12
14
Qty.
17
Qty.
20
Qty.
23
Qty.
15
4
Lock Pin
Order No. 2-266
Qty.
2
Slide Scorer
Order No. 2-269
18
8
5/16" x 5-1/2" Hex Bolt
Order No. 2-271
Qty.
2
1/2" Hex Bolt
Order No. 2-117
21
Qty.
2
1/2" Plastic Washer
Order No. 2-272
8
5/16" Washer
Order No. 2-273
24
5/16" Barrel Nut
8
Order No. 2-179
Qty.
10
T4 x 1/2" Screw
Order No. 2-31
4 1-800-225-7593
www.gldproducts.com
Page 5
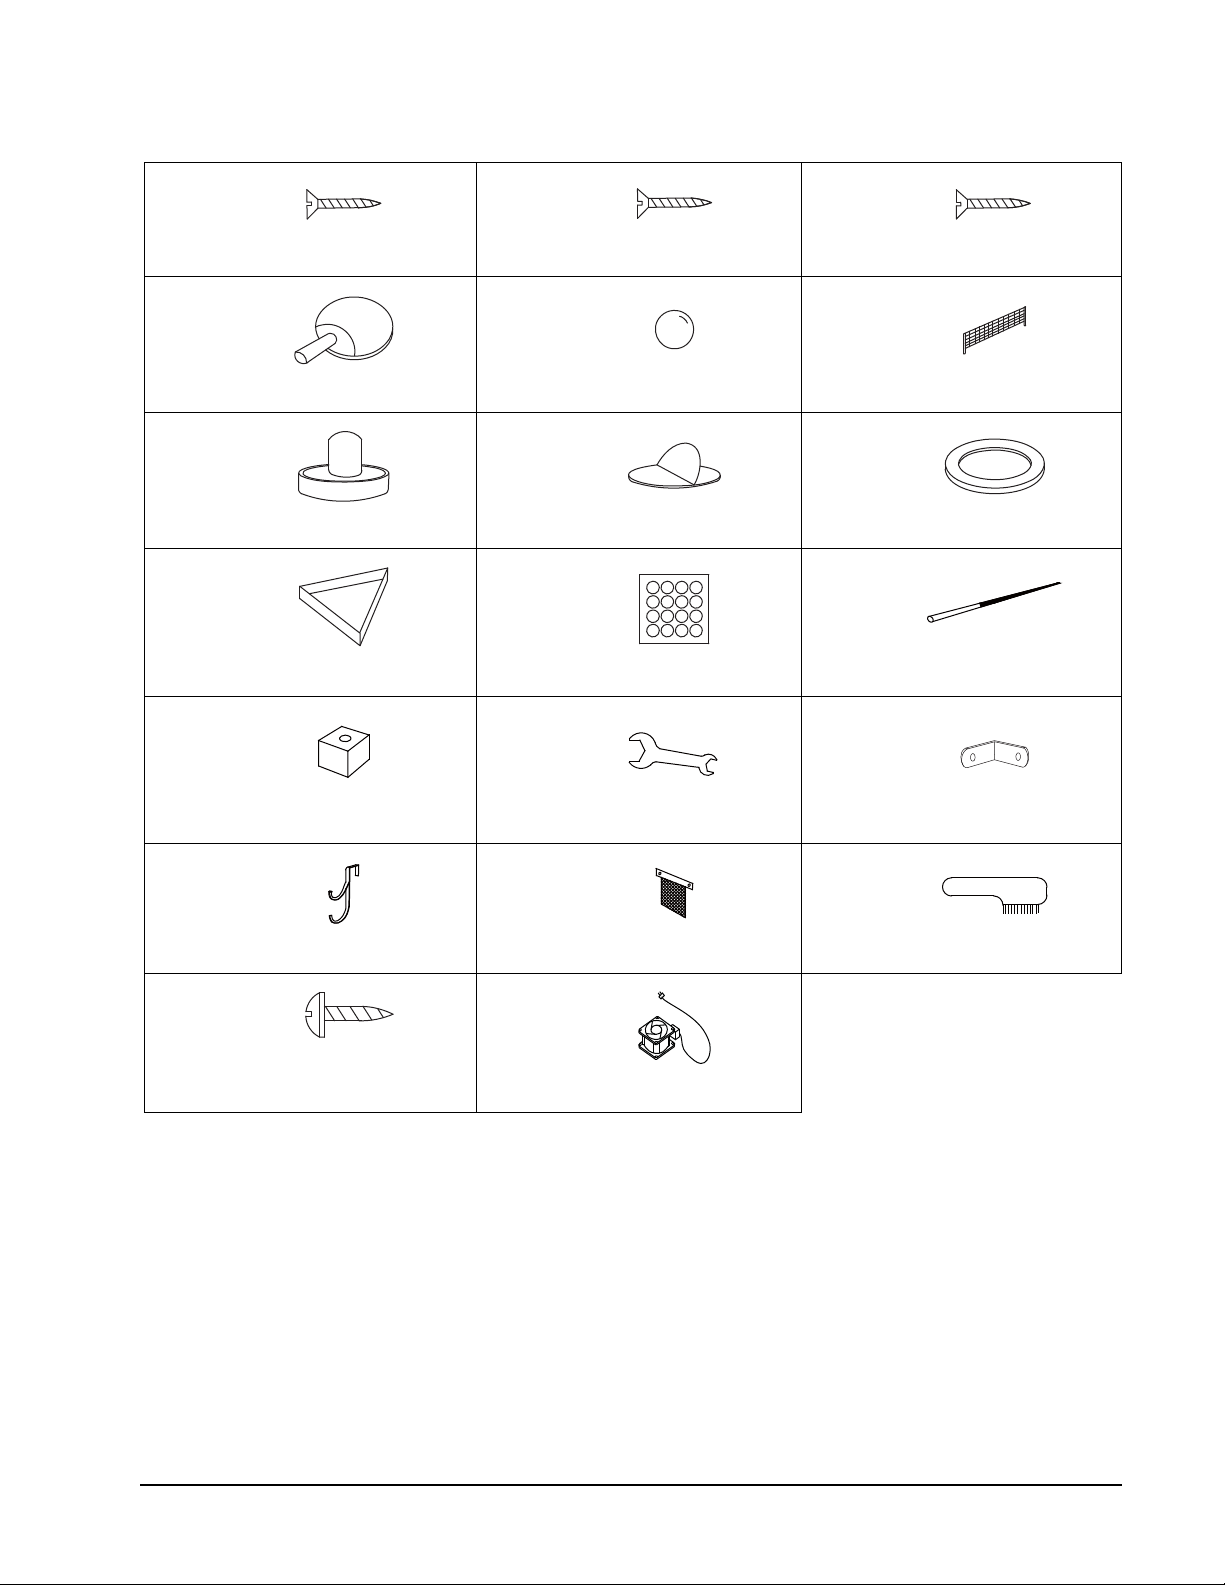
GLD Products 3 in 1 Game Table
Parts Identifier Item 64-1049
25
Qty.
44
F4 x 2" Screw
Order No. 2-274
28
Qty.
2 Table Tennis Paddle
Order No. 2-275
31
Qty.
2
Hockey Pusher
Order No. 2-18
34
Qty.
1
Triangle
Order No. 2-278
37
26
Qty.
29
Qty.
32
Qty.
35
Qty.
38
27
F4 x 1" Screw
4
Order No. 2-134
Qty.
16
F3 x 1/2" Screw
Order No. 4-124
30
Qty.
2
Table Tennis Ball
Order No. 2-276
1 Table Tennis Net with Posts
Order No. 2-277
33
Qty.
2
Hockey Felt
Order No. 2-19
2
Hockey Puck
Order No. 2-20
36
Qty.
1
Billiard Balls
Order No. 2-279
2
Cue Stick
Order No. 2-66
39
Qty.
2
40
Qty.
2
43
Qty.
24
Parts Identifier
Chalk
Order No. 2-24
Cue Holder
Order No. 2-282
T4 x 5/8" Screw
Order No. 3-224
Qty.
41
Qty.
44
Qty.
Qty.
1
Wrench
Order No. 2-280
12
L Steel Bracket
Order No. 2-281
42
1
1
Storage Organizer
Order No. 2-283
Preassembled Fan
Order No.2-285
Qty.
1
Brush
Order No. 2-284
5 1-800-225-7593
www.gldproducts.com
Page 6

GLD Products 3 in 1 Game Table
Item 64-1049
IF YOU HAVE A WARRANTY CLAIM, CALL US FIRST
Please see page 18.
GLD Products
Available 8 am to 4:30 pm Central Standard Time
S84 W19093 Enterprise Drive
Muskego, WI 53150 USA
1-800-225-7593
Fax: 1-800-841-6944
Email: [email protected]
Web: www.gldproducts.com
For all claims, please have your receipt and item number when you call. The
product item number can be found on the front cover.
If you are instructed to return the product for service, you are
responsible for shipping the unit at your expense.
PRODUCT REGISTRATION
Important: The product registration form on page 19 and a copy of your
receipt must be completed and returned within 10 days of purchase to
validate your warranty.
Preparing for Assembly
• Be sure to unpack all of the parts included in this package. Check
inside any tubes or sleeves. Save all packing material until the
product is fully assembled and functional.
• Compare the parts in your package with the Parts Identifier
description on page 4 and page 5.
• After unpacking large products, some disassembly may be required
prior to beginning the assembly.
Tools Required
• Open End Wrench (#38)
• Allen Wrench (#2)
• Phillips Screwdriver (not included)
• Level (not included)
• Electric screwdriver may be helpful. CAUTION: You must set at
LOW TORQUE and use extreme caution because you could
overtighten the hardware, strip the screws, or damage the table.
6 1-800-225-7593
www.gldproducts.com
Page 7

GLD Products 3 in 1 Game Table
Item 64-1049
Assembly Tips
Make sure you understand the following before you begin to assemble your game table.
1. READ THIS MANUAL all the way through before beginning assembly.
2. When installing parts that have more than one bolt, start ALL bolts in that part by hand
before tightening anything.
3. Some drawings or images in this manual may not look exactly like your product.
4. You may need a second adult to assist with this assembly.
Note: Save all packing materials until the parts have been inspected and the table is
assembled.
Unpack the Pieces
• Lay the box on a flat surface (floor). You may want this near your
area of assembly.
• Unpack the boxes and part bags. Inspect and count the parts. The
Parts Identifier page can be used to record your results.
• If any parts are damaged or missing, contact GLD Customer
Service.
• Missing fasteners may be purchased at a hardware store using the
descriptions on the Parts Identifier pages.
Games
This game table includes the equipment and game pieces for Air Hockey, Pool and Table
Tennis. The rules for these games are not discussed in this manual.
7 1-800-225-7593
www.gldproducts.com
Page 8
GLD Products 3 in 1 Game Table
The nut side must
be facing upwards
43
39
9
Item 64-1049
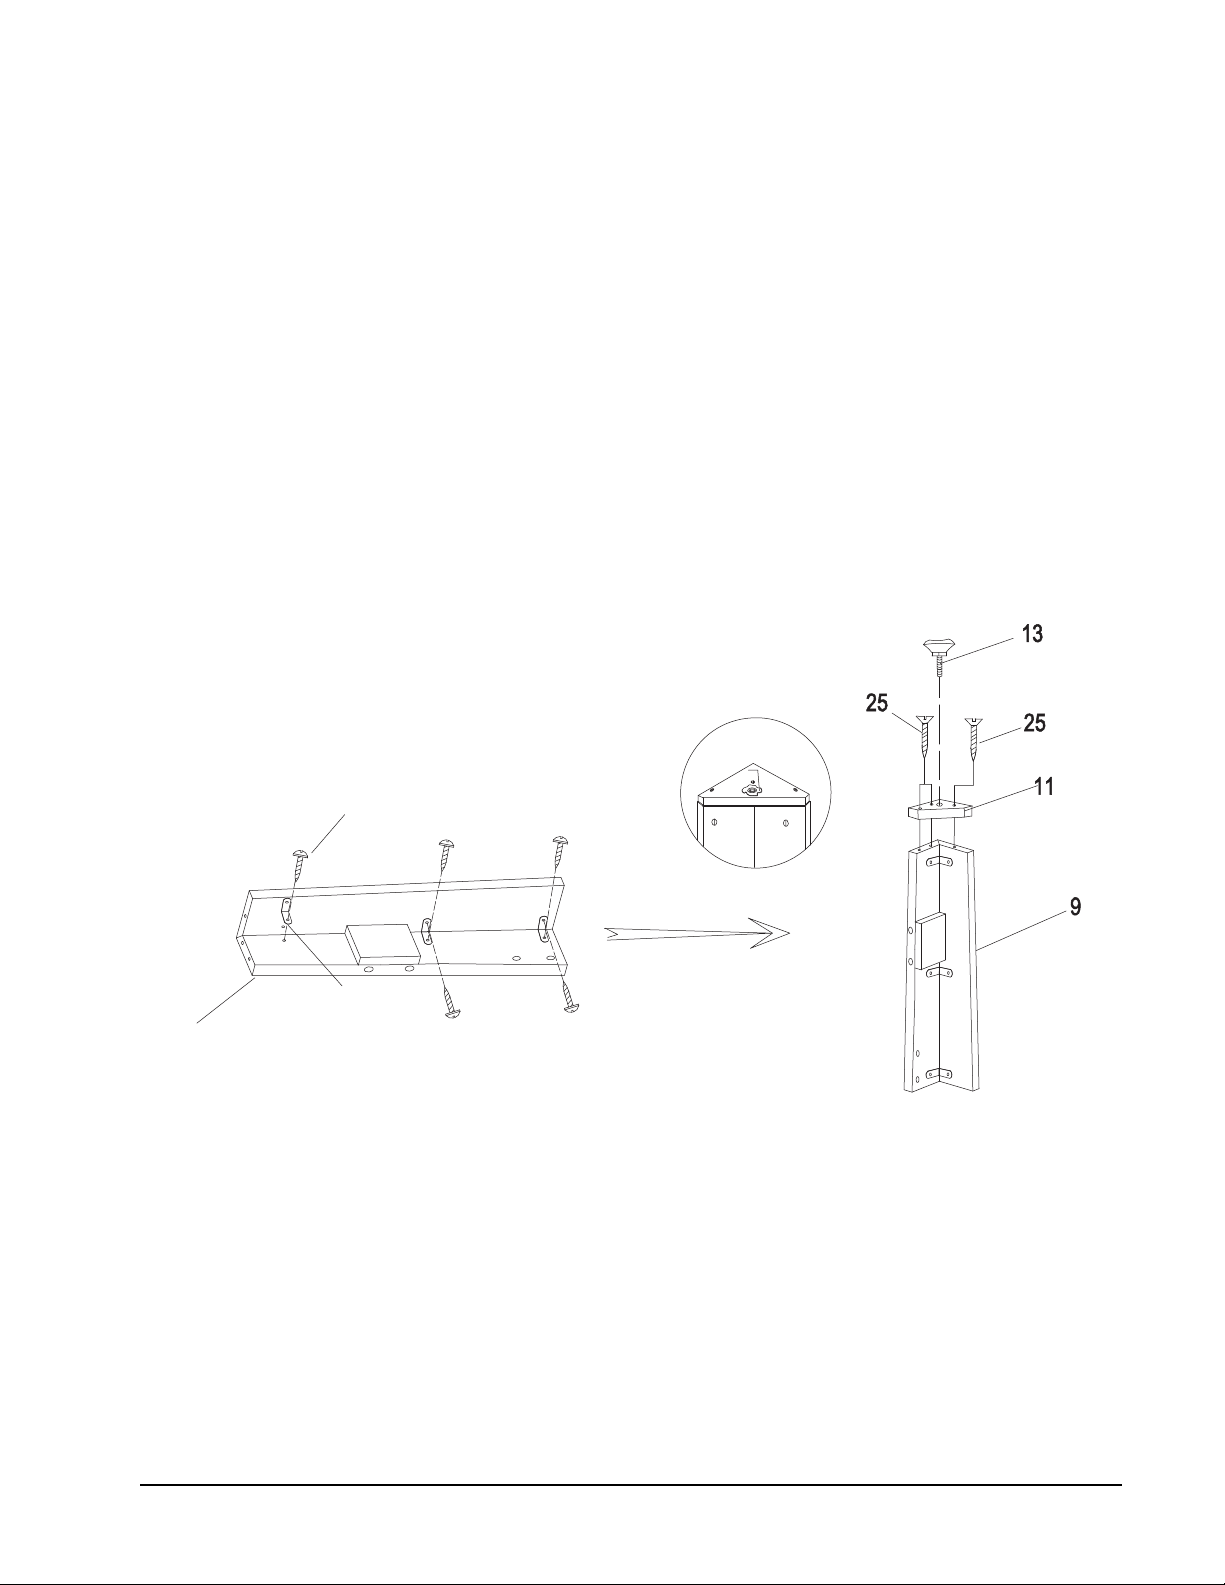
STEP 1 - ASSEMBLE THE LEGS
1. Select one of the leg pieces (#9 or #10) and lay it flat on the floor. Do not bend the hinge
in the leg backwards. Damage to the outer surface will occur.
2. Position three of the “L” shaped steel brackets (#39) on one side of the leg. Use three
screws (#43) to attach the brackets to the leg. Close (fold) the leg and use three screws
(#43) to secure the brackets. Tighten the screws.
3. Place a leg base (#11) at the bottom and insert three screws (#25) into the holes. The
pressed in nut must be facing out away from the leg.
4. Tighten the screws.
5. Screw a leg leveler (#13) half way into the leg base.
6. Repeat for the remaining three legs.
43
39
The nut side must
be facing upwards
8 1-800-225-7593
www.gldproducts.com
Page 9
GLD Products 3 in 1 Game Table
Item 64-1049
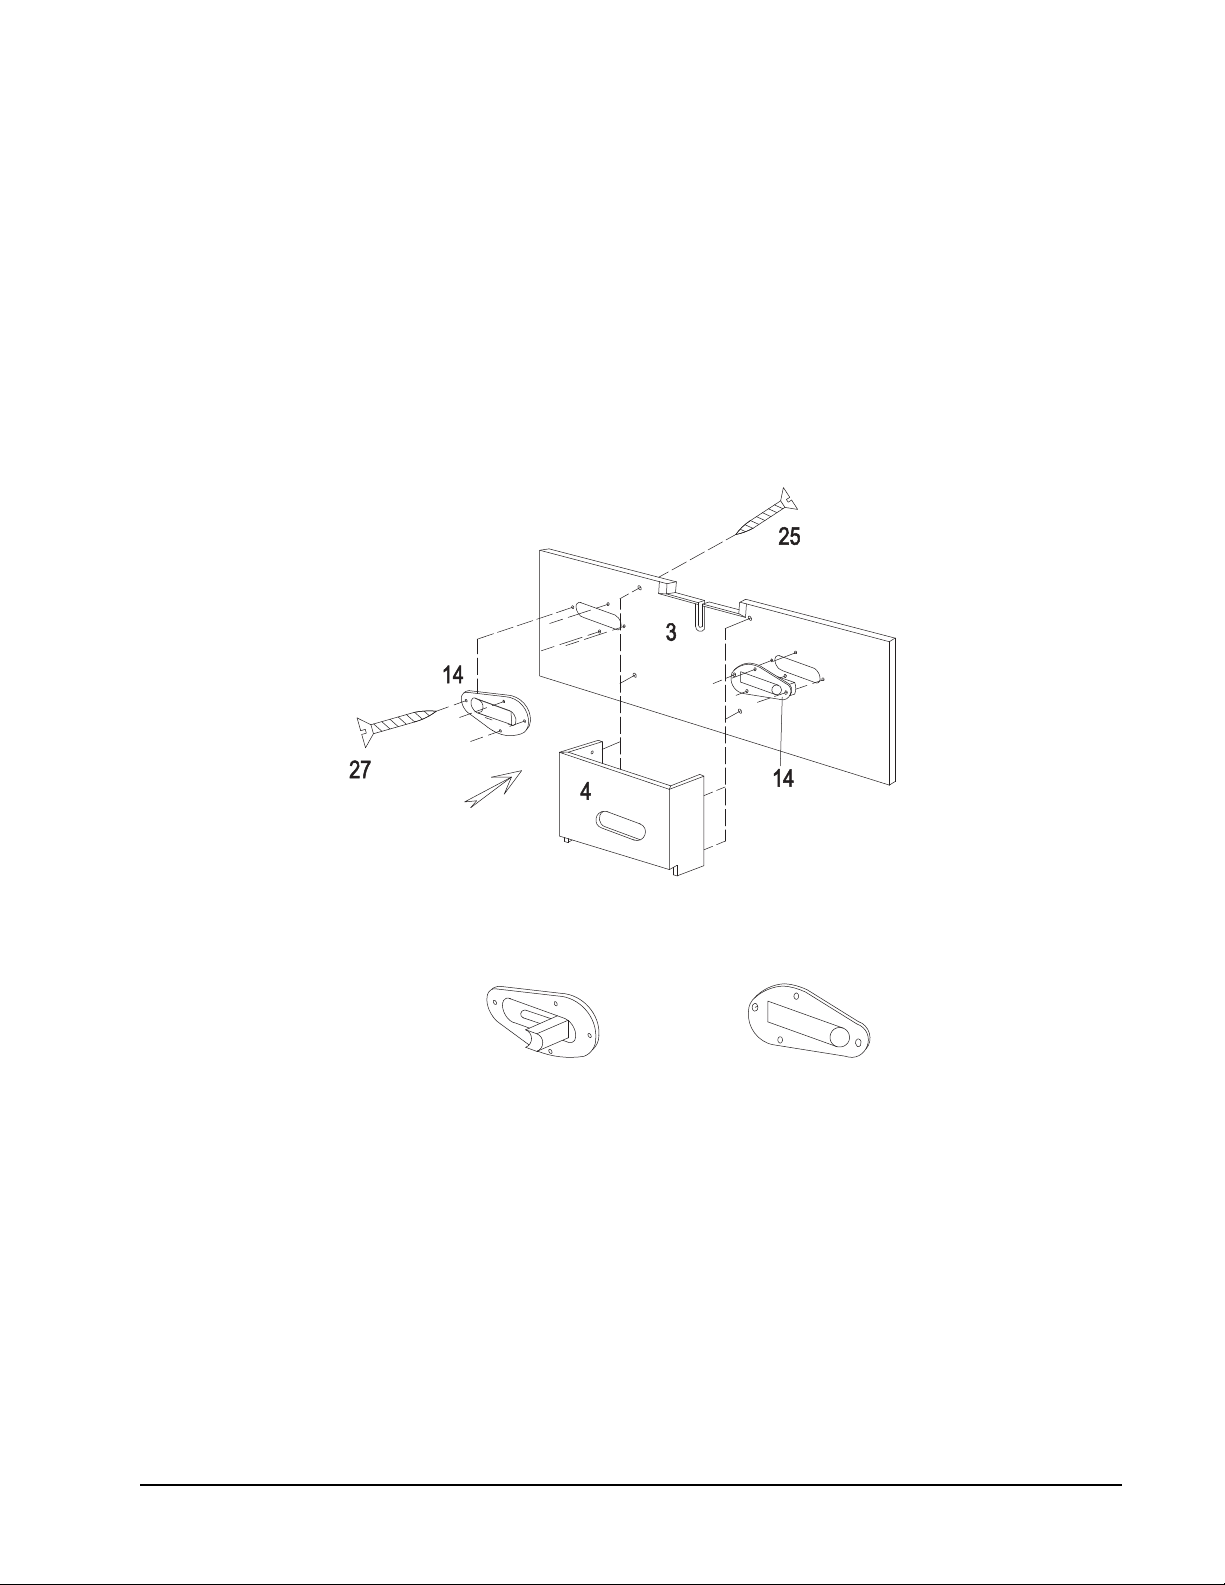
STEP 2 - ATTACH THE TABLE LOCKS AND CATCH BOX
1. Insert the table locks (#14) into the end panel (#3). Use four screws (#27) to secure each
one.
2. Hold the catch box (#4) in position. Insert four screws (#25) from the back side of the end
panel.
3. Tighten the screws.
4. Repeat for second end panel
Open (unlocked) Closed (locked)
9 1-800-225-7593
www.gldproducts.com
Page 10
GLD Products 3 in 1 Game Table
Item 64-1049
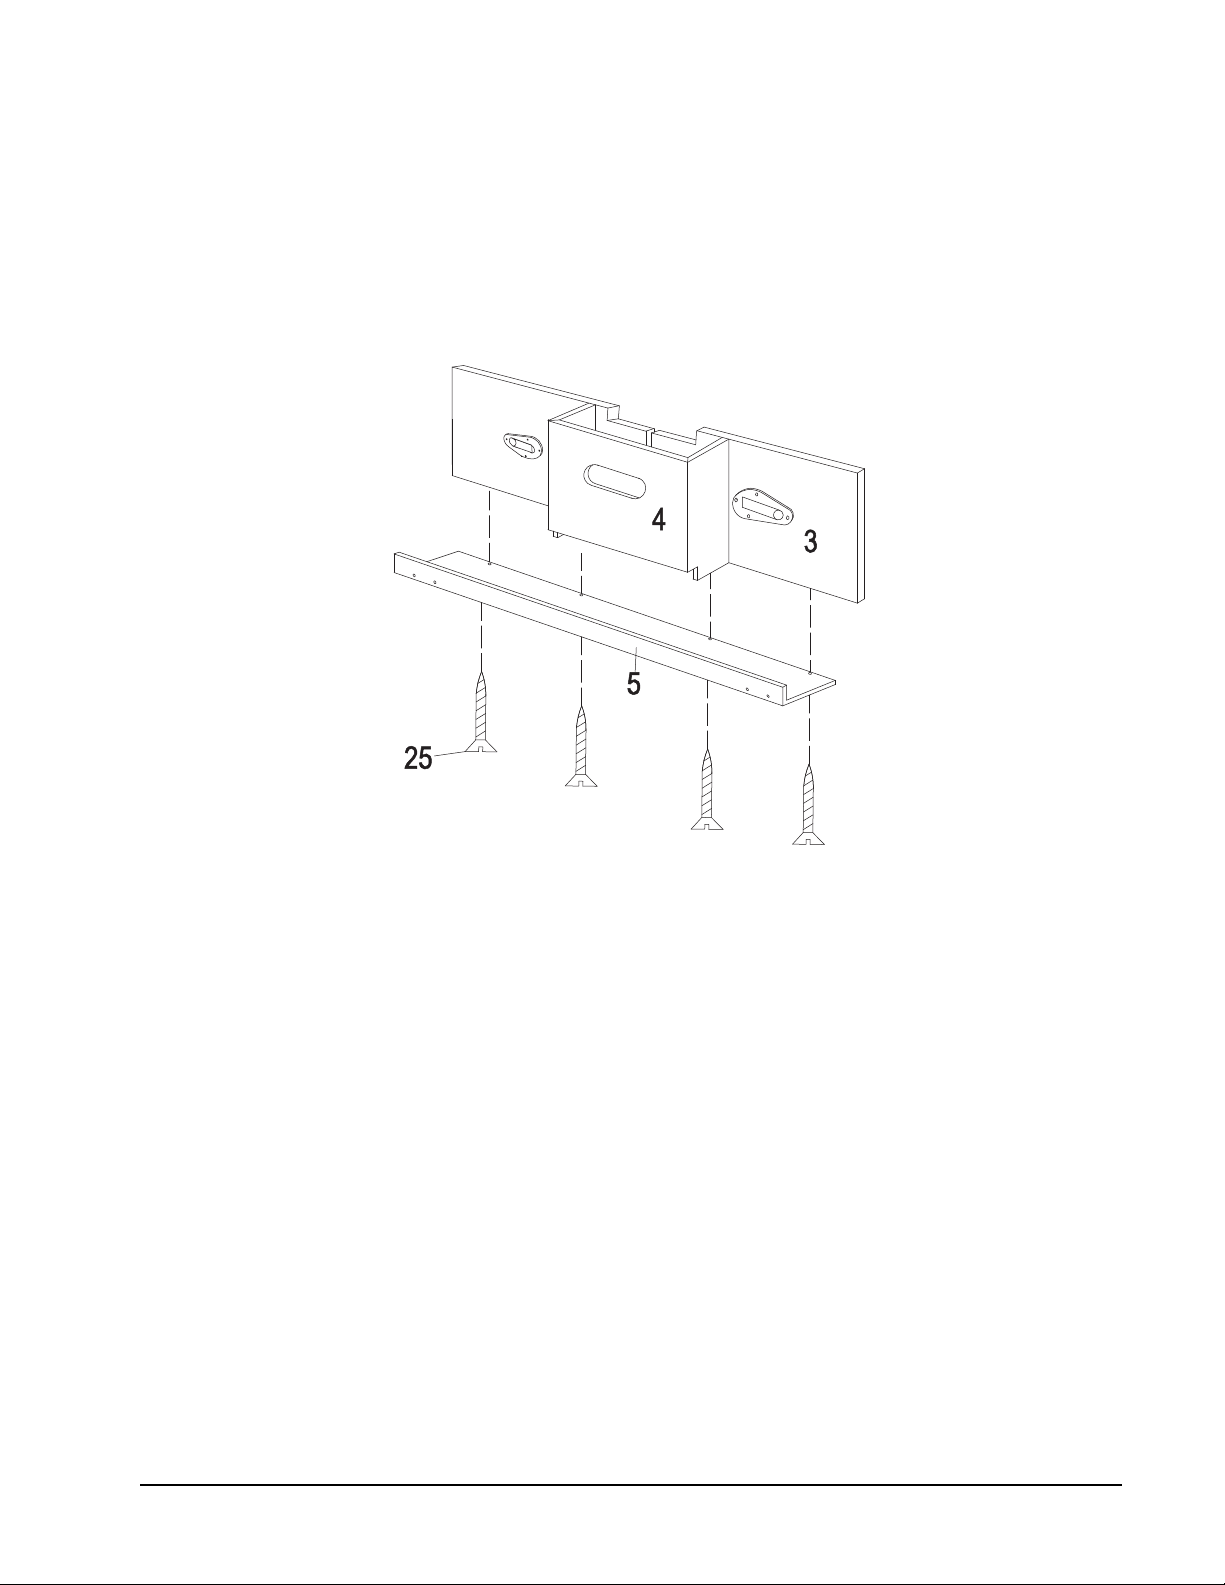
STEP 3 - ASSEMBLE BALL RETURN BOARD
1. Attach the ball return boards (#5) to the bottom of the end panels (#3). Use four screws
(#25) per ball return board.
2. Tighten the screws.
10 1-800-225-7593
www.gldproducts.com
Page 11
GLD Products 3 in 1 Game Table
Item 64-1049
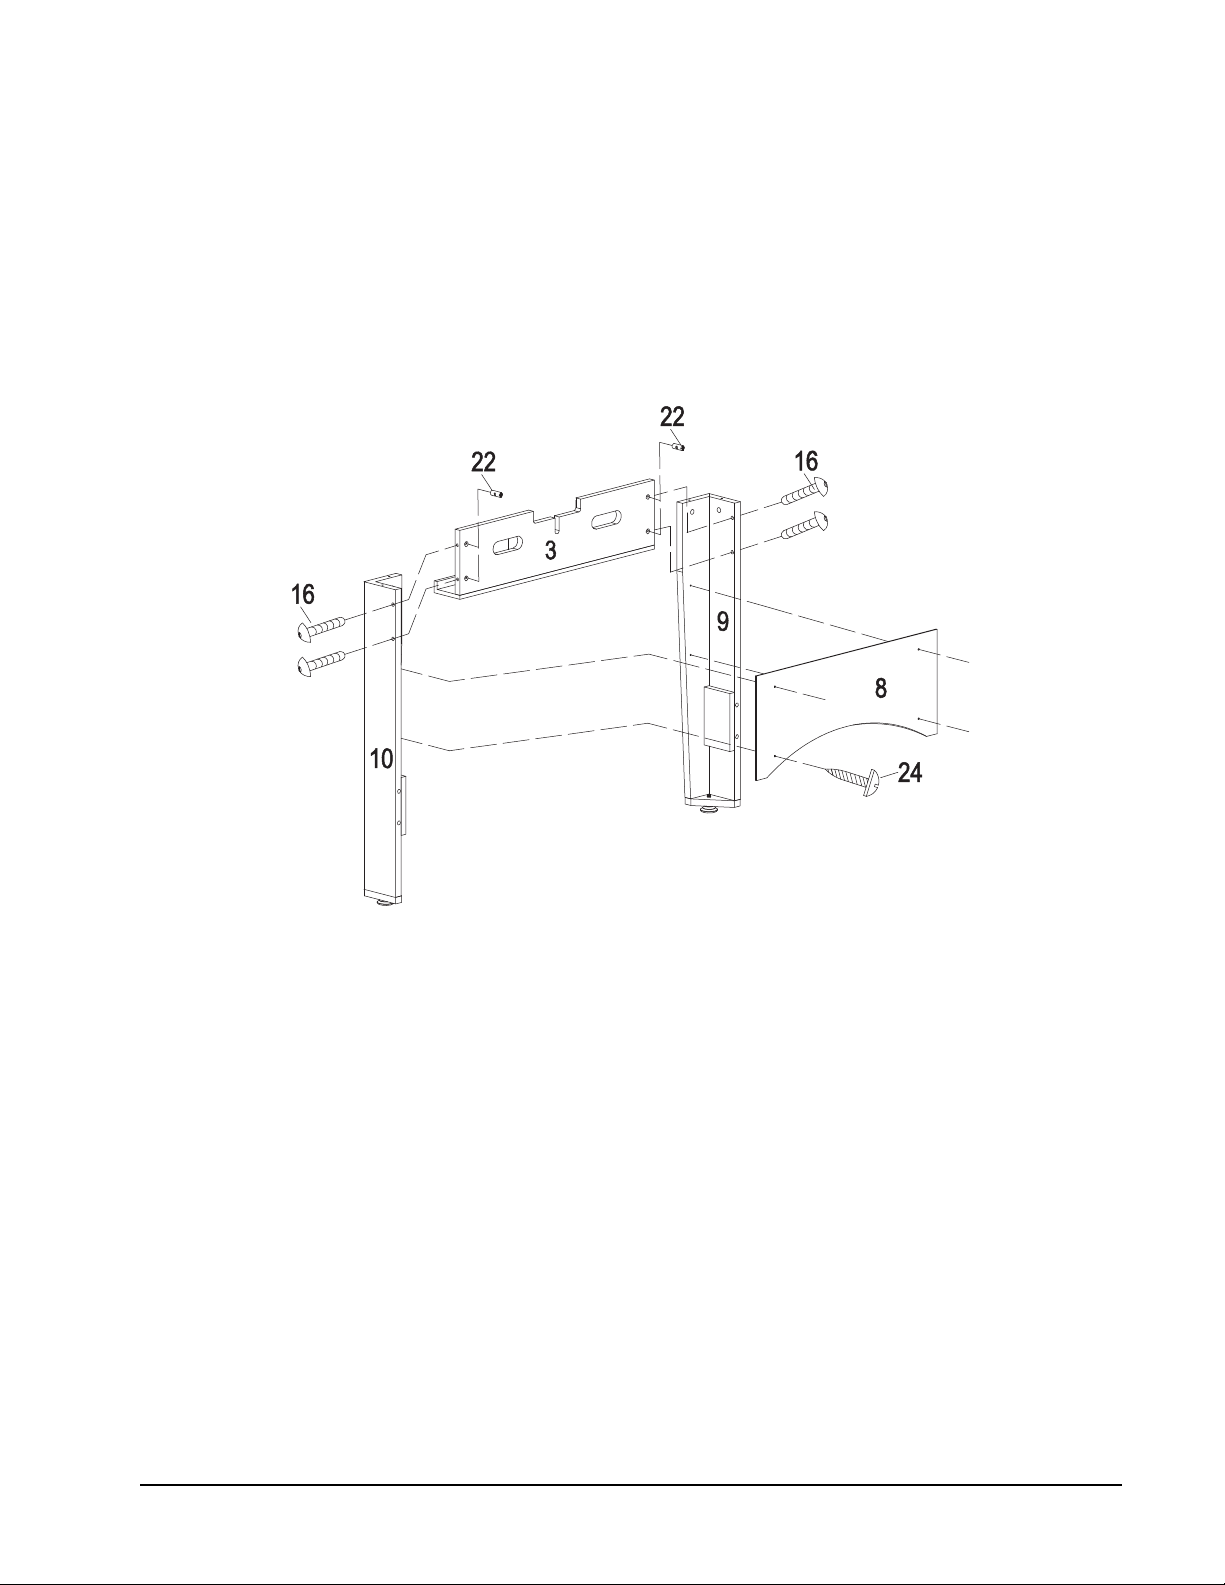
STEP 4 - ASSEMBLE LEGS TO END PANELS
1. Insert four barrel nuts (#22) into the left and right holes of an end panel (#3). Attach a left
leg (#9) and a right leg (#10) to an end panel (#3) using two bolts (#16) per leg.
2. Attach a leg panel (#8) to the legs and secure it using four screws (#24) per leg panel.
3. Repeat steps 1 and 2 to assemble the other apron and legs.
11 1-800-225-7593
www.gldproducts.com
Page 12
GLD Products 3 in 1 Game Table
1010
NoteNote:MAKE SURE THAT ALL CONNECTIONS MAKE SURE THAT ALL CONNECTIONS
ARE PROPERLY ASSEMBLED ARE PROPERLY ASSEMBLED
9
9
1010
Item 64-1049
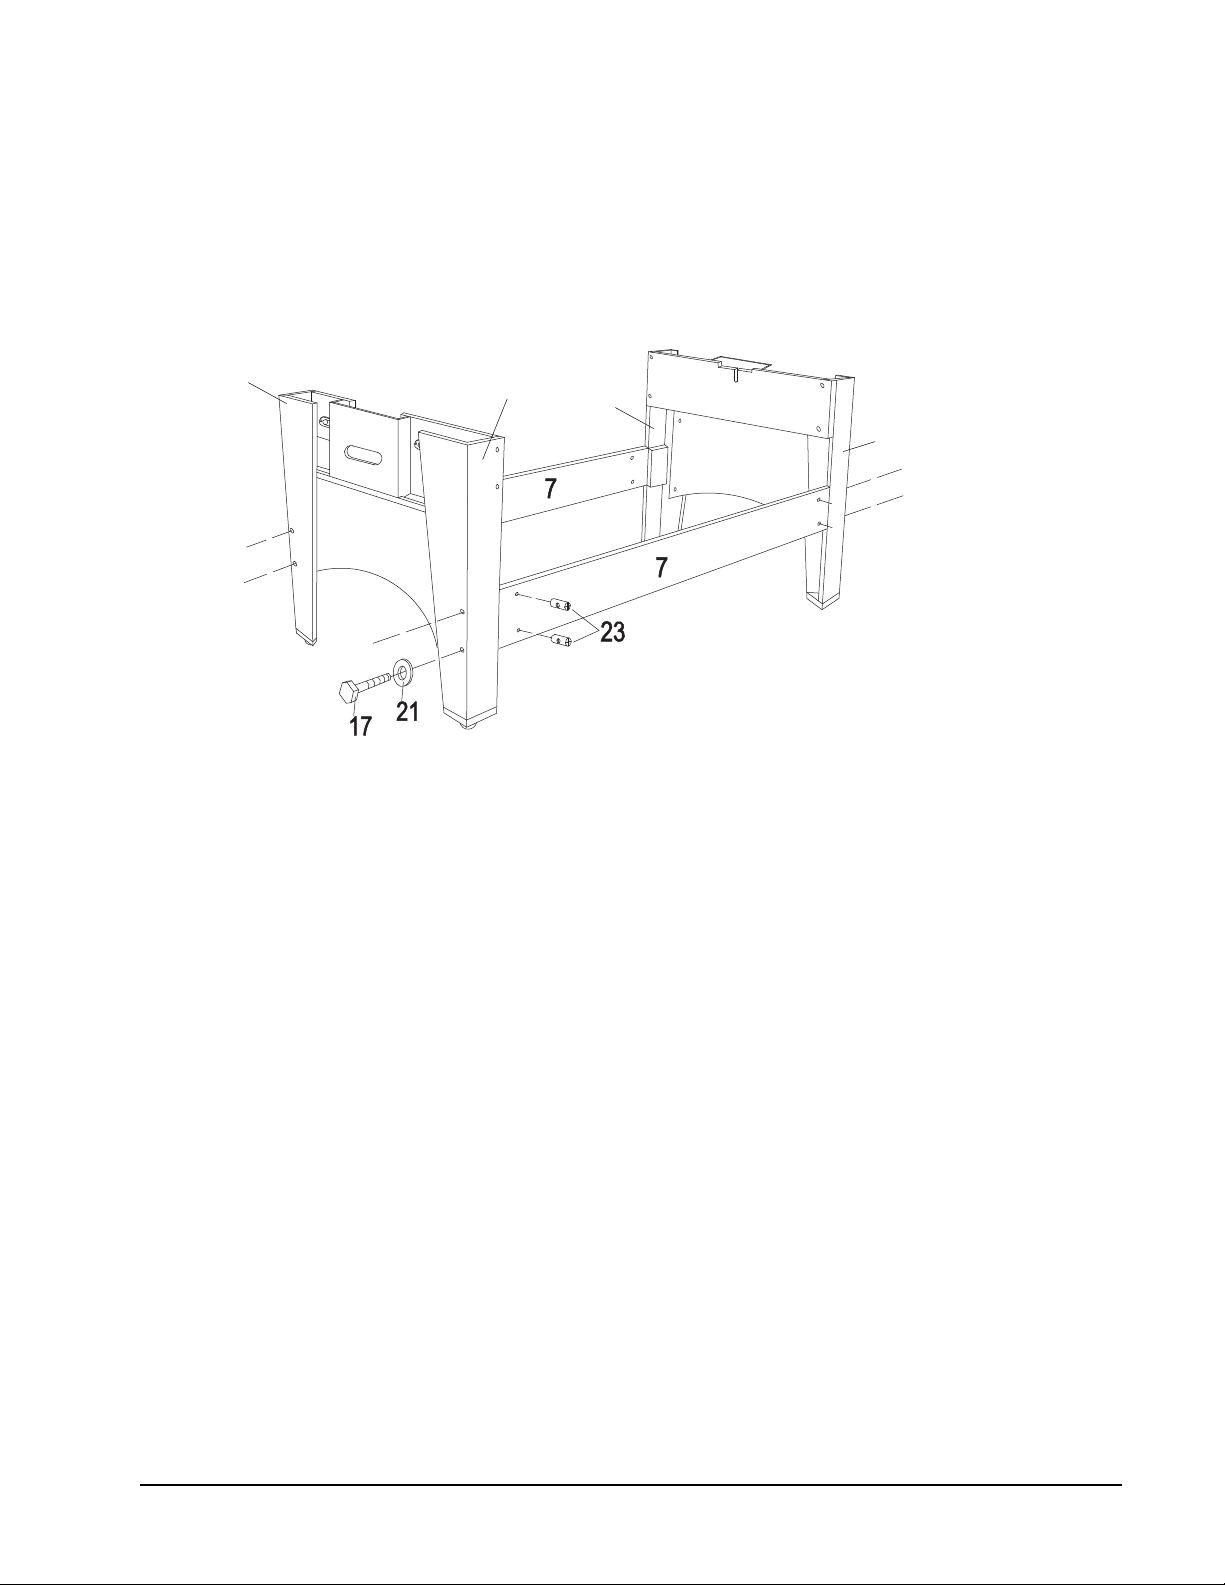
STEP 5 - ATTACH LEG BRACES
1. Insert four barrel nuts (#23) into the holes of the leg braces (#7) as shown. Attach the leg
braces (#7) between the assembled legs using four washers (#21) and four bolts (#17)
per leg brace.
12 1-800-225-7593
www.gldproducts.com
Page 13
GLD Products 3 in 1 Game Table
Item 64-1049
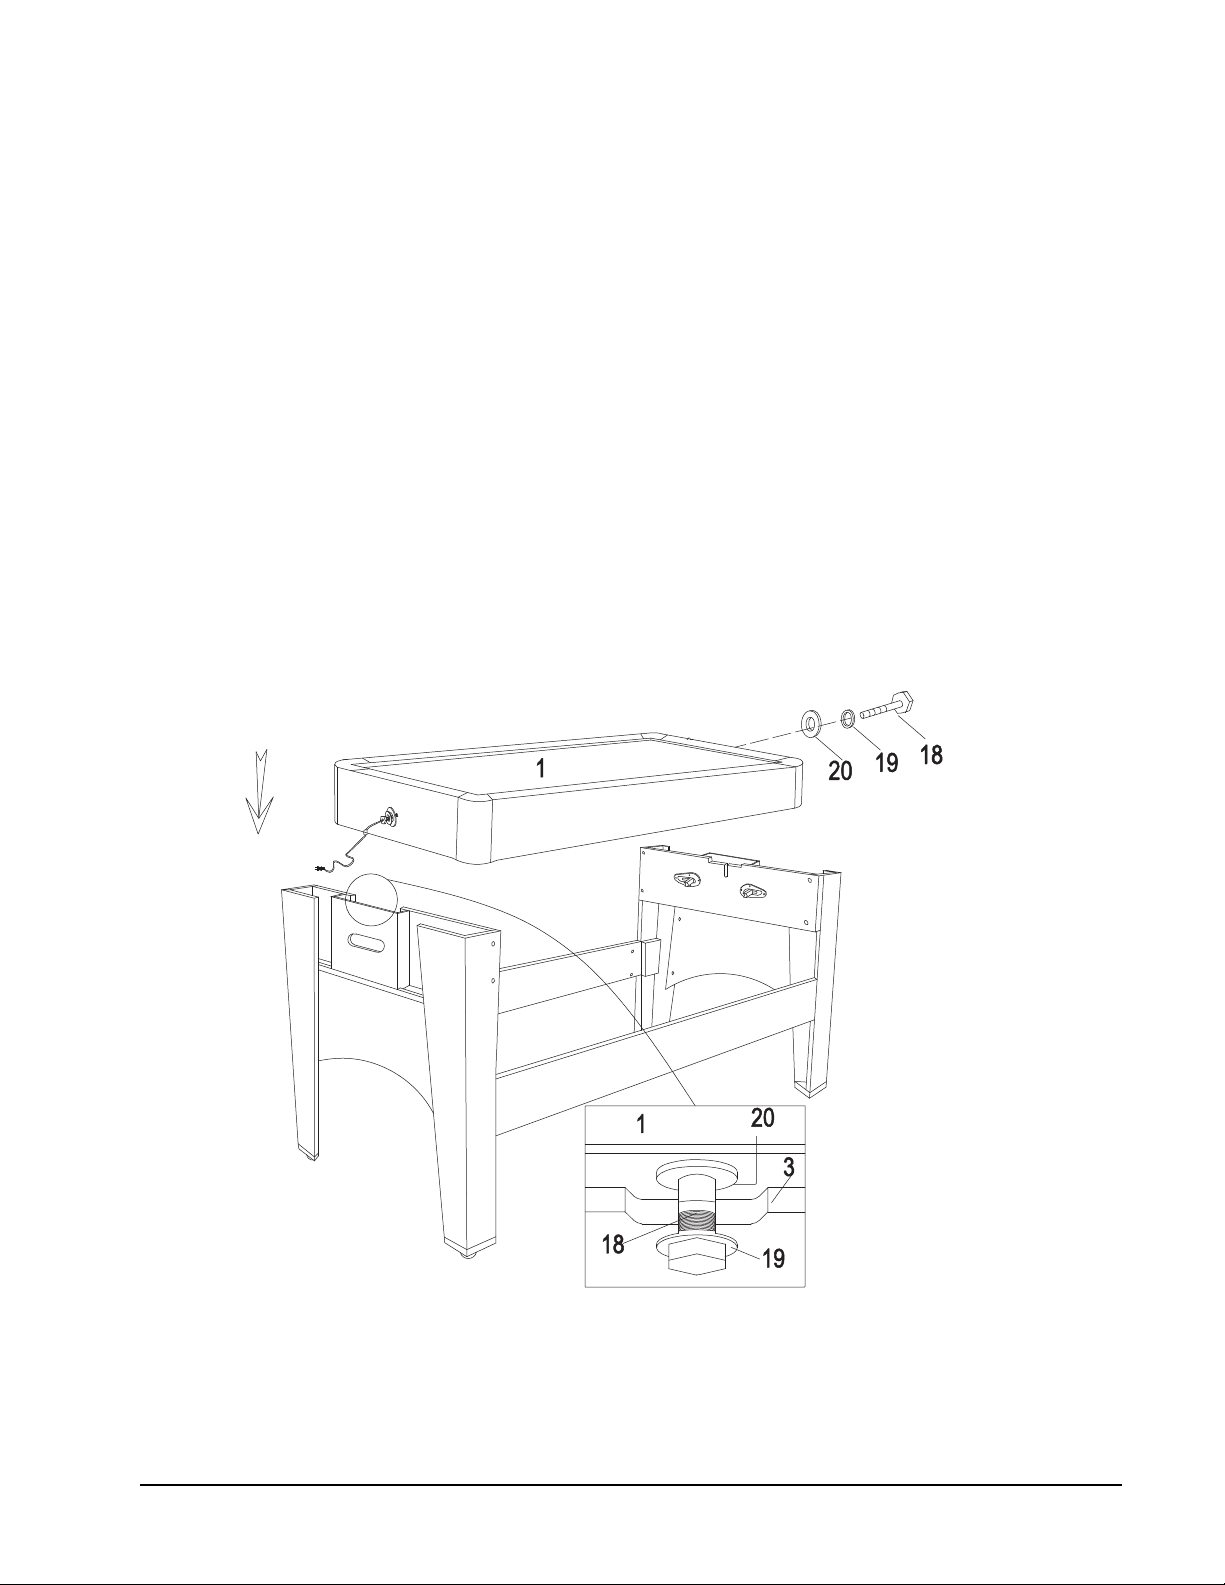
STEP 6 - ASSEMBLE CABINET (TABLE TOP) TO LEGS
All bolts and screws from previous steps must be tight. Two adults are recommended for this
step.
1. Engage all four table locks.
2. Locate the two large bolts (#18). Place a washer (#19) onto each bolt.
3. Place a second washer (#20) onto the bolts.
4. Finger start a bolt into each end of the cabinet (#1).
5. Place the cabinet into position. The bolts will drop into the slots at each end. The smaller
washer must be outside the end panel and the plastic washer must be between the end
panel and the cabinet.
NOTE: The electrical cord must be loose.
6. Open the table locks. Tighten the bolts until they are snug and the cabinet can rotate
smoothly.
13 1-800-225-7593
www.gldproducts.com
Page 14
GLD Products 3 in 1 Game Table
3
Item 64-1049
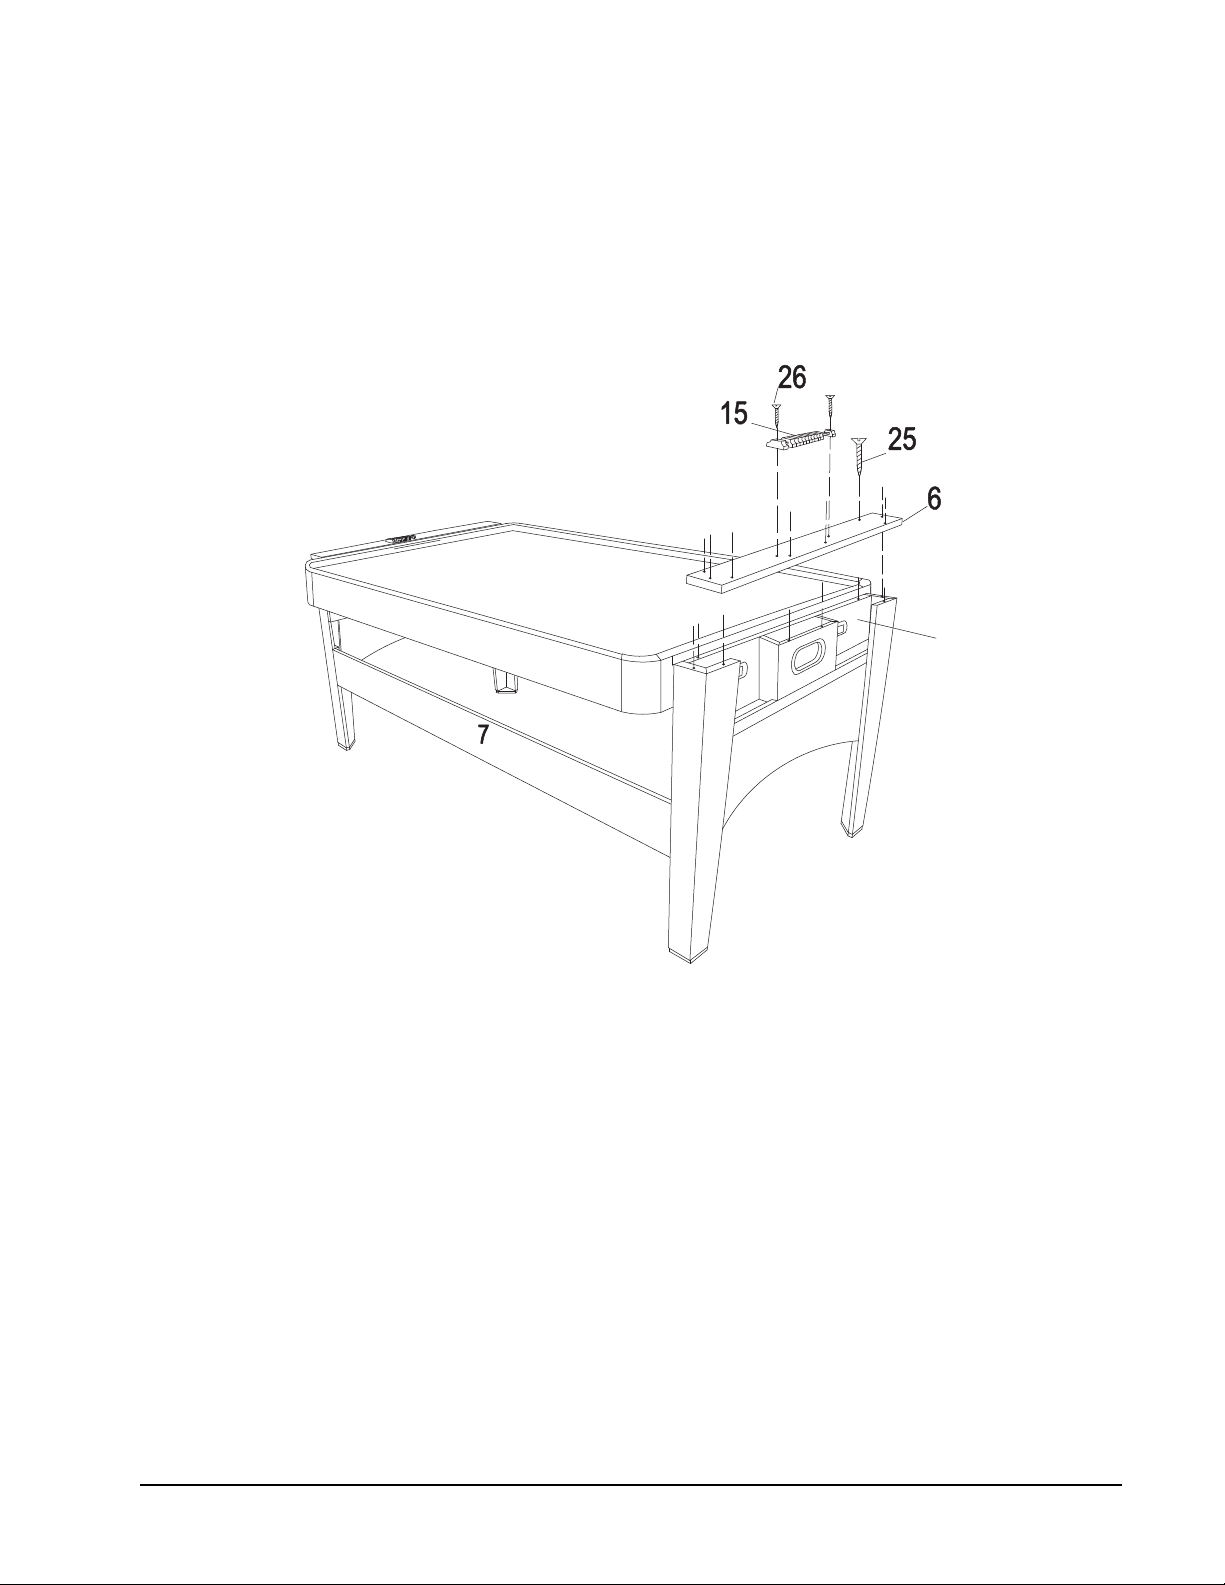
STEP 7 - ASSEMBLE TOP SIDE PANELS AND SLIDE SCORERS
1. Attach the two top end panels (#6) to the top of the end panels (#3) using eight screws
(#25) for each top end panel.
2. Attach the slide scorers (#15) to the top end panels (#6) using two screws (#26).
14 1-800-225-7593
www.gldproducts.com
Page 15
GLD Products 3 in 1 Game Table
40
40
24
7
7
41
24
Item 64-1049
STEP 8 - ADJUST THE LEVELERS
1. With the help of another person, lock the table in position. Turn each leg leveler until the
table rests level.
2. Check with a carpenters level placed cross-wise and length wise on the table top.
3. Re-adjust leg levelers as necessary.
NOTE: Rolling a billiard ball slowly on the game table surface will help to determine level.
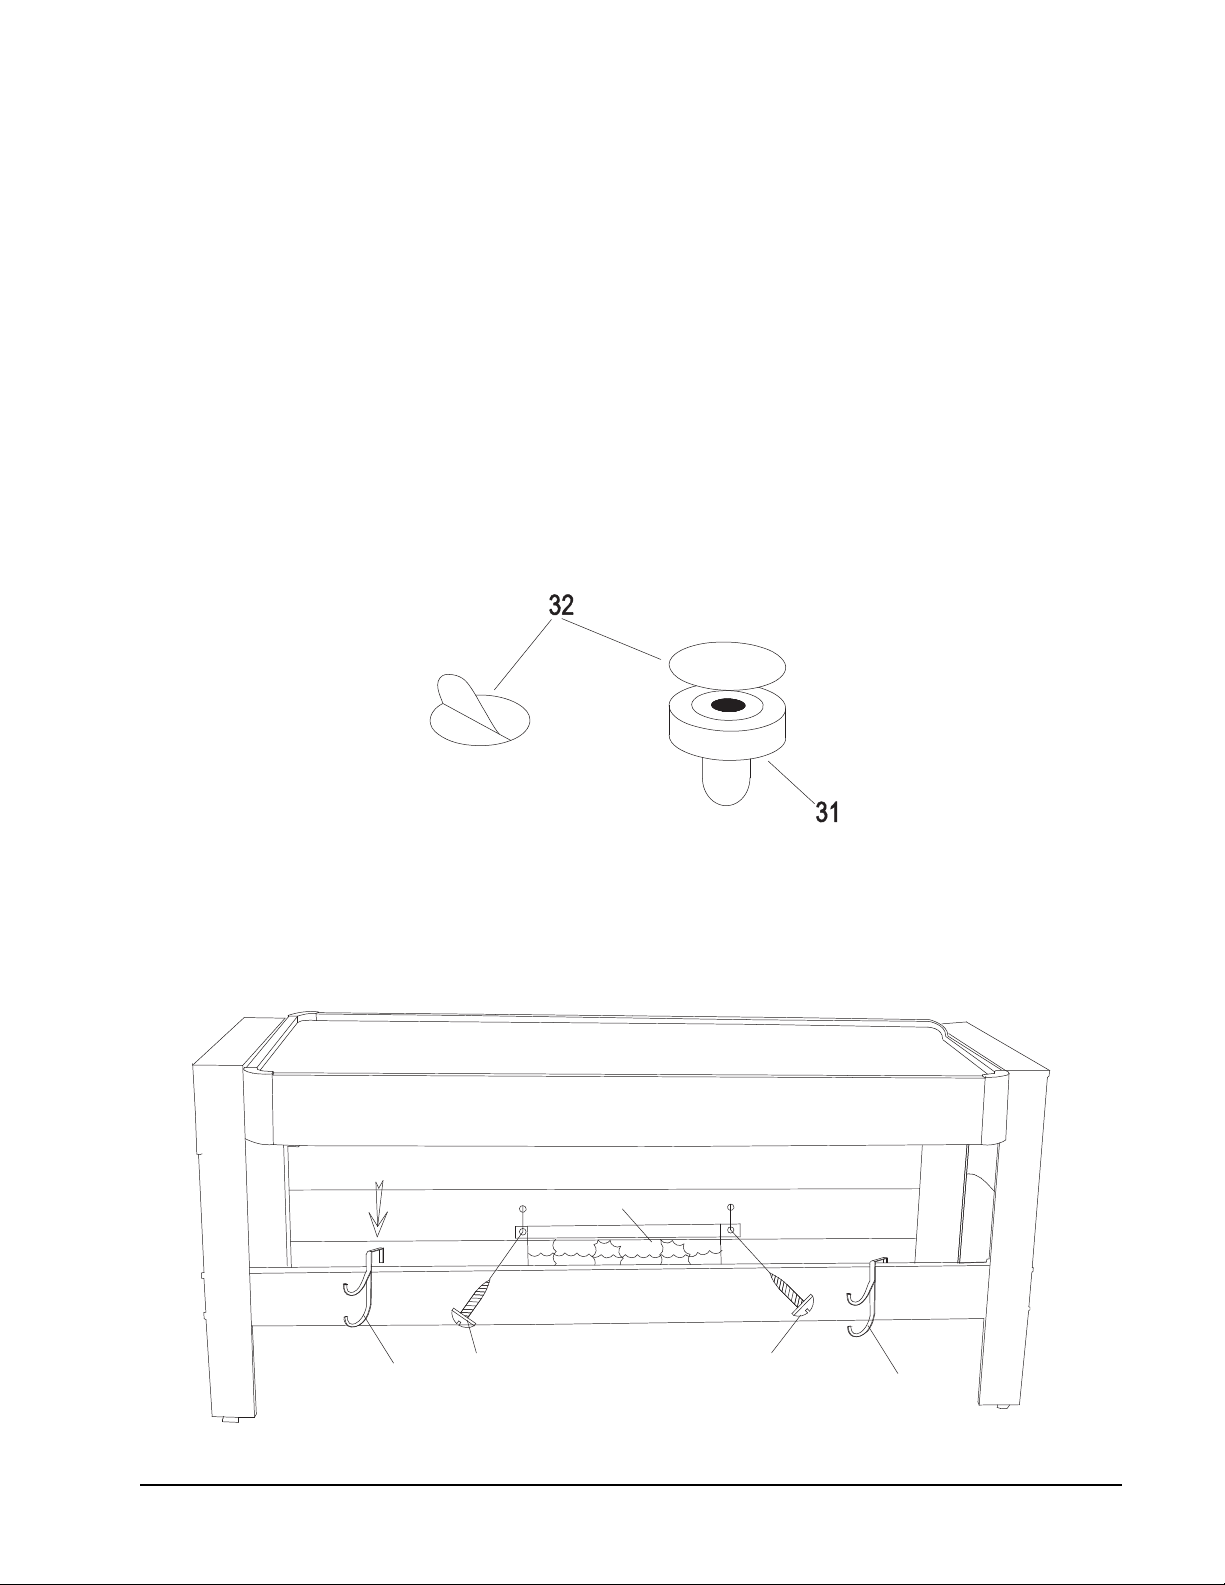
STEP 9 - ASSEMBLE PUSHERS
1. Peel paper from one of the hockey felt pieces (#32).
2. Attach the felt to the bottom of the pusher (#31).
STEP 10 - ACCESSORIES
1. Clip the cue holders (#40) in place over a leg brace.
2. Secure the storage organizer (#41) to a leg brace using two screws (#24).
41
24
40
24
40
15 1-800-225-7593
www.gldproducts.com
Page 16
GLD Products 3 in 1 Game Table
12
Item 64-1049
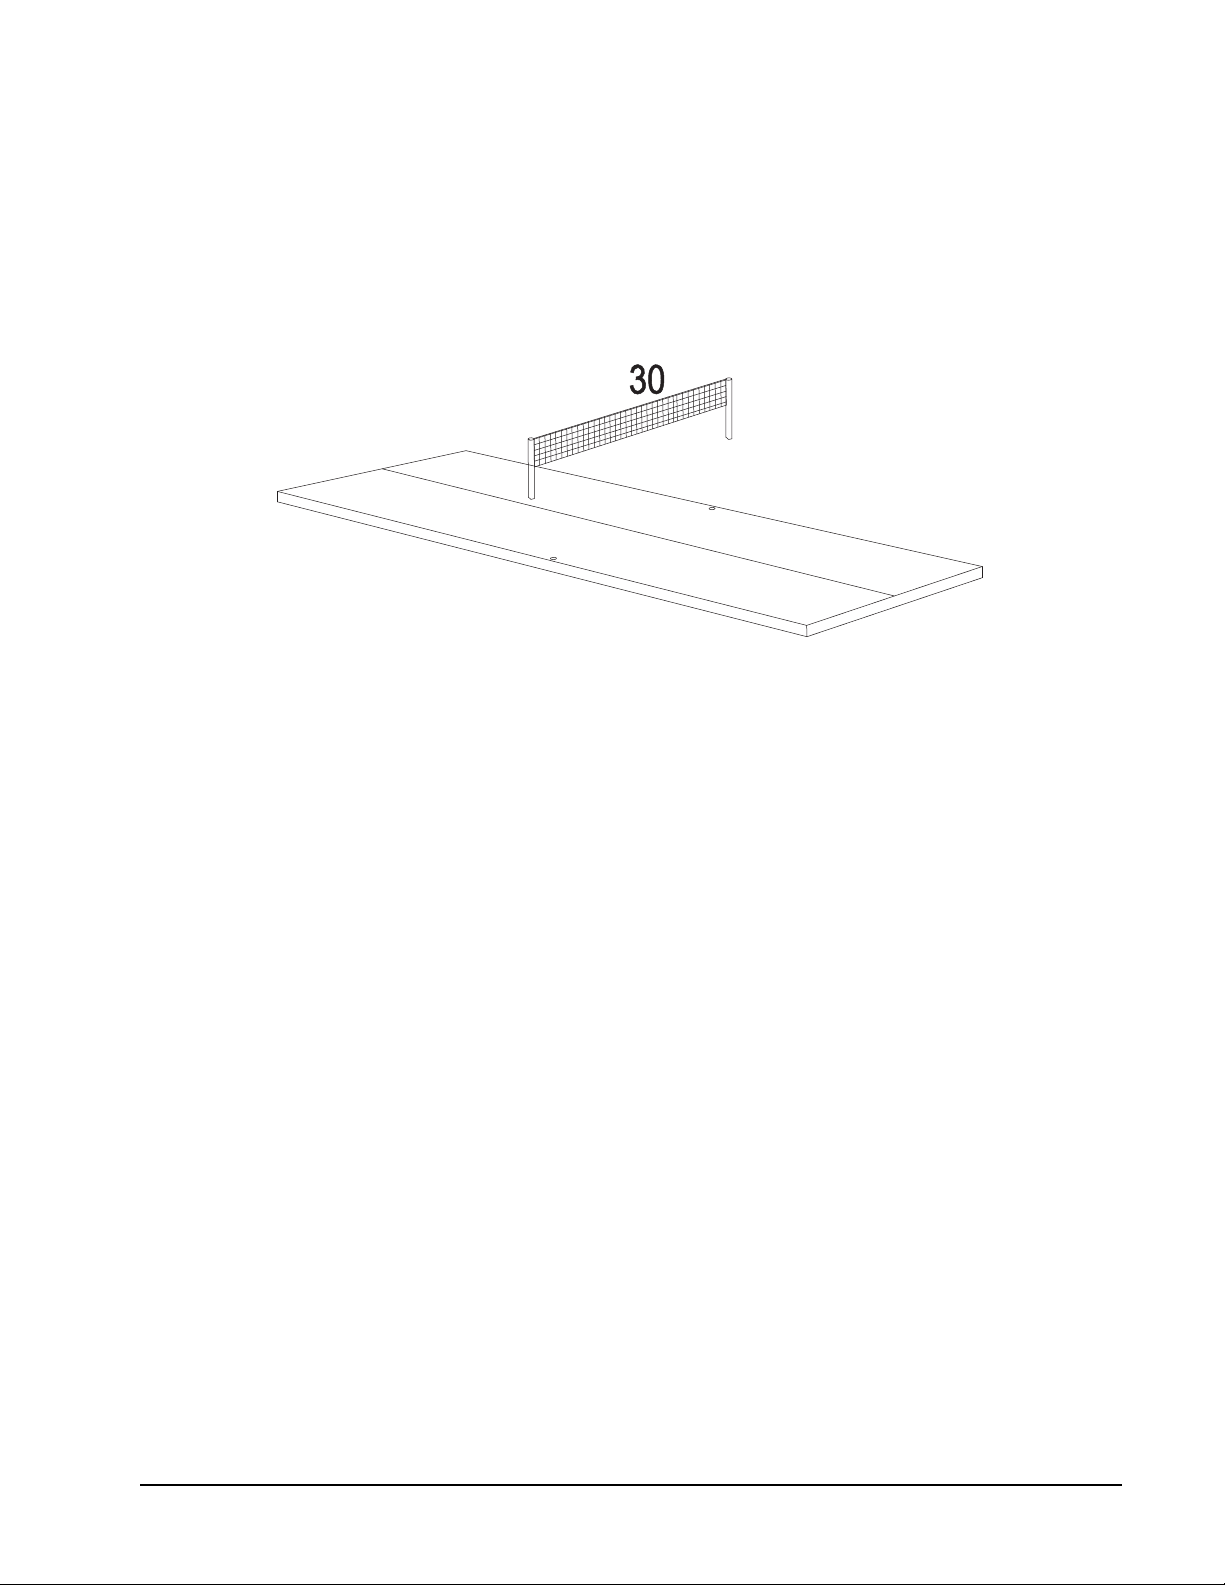
STEP 11 - TABLE TENNIS NET WITH POSTS ASSEMBLY
1. When you want to play table tennis, put the tennis surface (#12) carefully on top of the
game table.
2. Insert the table tennis net with posts (#30) into the holes of the table tennis surface (#12).
12
To rotate the table:
CAUTION: This should be performed by an adult. The rotating table may pinch body parts.
• Before you rotate the table, remove the pool balls.
• Pull out two table locks on one end.
• On the other end, pull out the two table locks.
• Slowly rotate the table.
• Push in the table locks.
If the fan does not go on:
• Unplug from electrical outlet.
• The fan is located between the two table tops.
• Inspect wiring for proper connection.
If the fan works but the table has dead spots:
• Use a small drill bit and clear the holes by hand. DO NOT use an
electric drill. Manually push the drill bit into the holes to clear.
• Polish the air hockey table by spraying a furniture polish onto a rag
and wipe onto the table. Do not spray directly onto the table top.
16 1-800-225-7593
www.gldproducts.com
Page 17

GLD Products 3 in 1 Game Table
Item 64-1049
Care and Use of your Table
• This product is intended for INDOOR use only.
• DO NOT sit, climb, or lean on the table.
• DO NOT drag the table when moving it. This will damage the legs.
• Keep your table covered. The pool table playing surface can be
brushed to keep clean.
• To clean the hard surfaces spray a cloth with a mild cleaner and
wipe.
• Pucks that fly off the table may have chipped edges. Inspect the
puck and replace if needed.
17 1-800-225-7593
www.gldproducts.com
Page 18

GLD Products 3 in 1 Game Table
Item 64-1049
90-DAY LIMITED WARRANTY
The Manufacturer warrants to the original retail purchaser that this product is free from
defects in material and workmanship under normal use and conditions for a period of ninety
(90) days from the date of original purchase. The Manufacturer’s liability is limited to the
repair or replacement, at its option, of any defective product and shall not include any liability
for indirect, incidental or consequential damages of any kind. Should this product become
defective due to material or workmanship within the warranty period, contact our Customer
Service Department. This warranty is not transferable and does not cover normal wear and
tear or damage caused by improper usage, negligence, misuse, abuse, transportation
damage, acts of nature, or accident (including failure to follow the instructions in this
manual). It does not cover expendable items such as batteries, light bulbs, fuses,
accessories, cosmetic parts and other items that wear out due to normal usage, including
felt covered areas of the playing surface. This warranty is also void if the product is
disassembled and reassembled, damaged, modified from its original state, or used for other
than indoor personal residential use (no commercial or rental applications).
This warranty gives you specific legal rights, and you may have other rights which vary from
state to state.
IF YOU HAVE A WARRANTY CLAIM, CALL US FIRST (8 - 4:30 CST)
Please have your receipt and item number (found on the front cover) when you call.
GLD Products
S84 W19093 Enterprise Drive
Muskego, WI 53150 USA
1-800-225-7593
Fax: 1-800-841-6944
Email: [email protected]
Web: www.gldproducts.com
If you are instructed to return the product for service, you are responsible for
shipping the unit at your expense to the above address in packaging that will protect
against further damage. All warranty or repair requests require a Return
Authorization Number prior to returning the item.
PRODUCT REGISTRATION
Important: The product registration form on page 19 must be completed and returned
along with a copy of your receipt within 10 days of purchase to validate your warranty.
Online registration is also available. Go to www.gldproducts.com/index.php/registration
click on this link. Follow the online instructions.
18 1-800-225-7593
www.gldproducts.com
or
Page 19
REGISTER YOUR PRODUCT Place postage here
www.gldproducts.com
GAME TABLES HOME CASINO
GAMES AND ACCESSORIES BILLIARD CUES
BILLIARD ACCESSORIES DARTBOARDS
SOFT-TIP DARTS STEEL-TIP DARTS
FLIGHTS AND SHAFTS DART CASES AND ACCESSORIES
Complete this form, include a copy of your receipt, fold, tape (do
not staple) and return within 10 days of purchase. This protects
your warranty and will help us develop new products!
GLD Products
Warranty Department
Cut here.
Fold here second.
S84 W19093 Enterprise Drive
Muskego, WI 53150 USA
Fold here first.
Name Date of Purchase
Address Phone-Day
City Phone-Evening
State Zip Email
Item:
Purchase Price:
64-1049 3 in 1 Game Table
Store Name:
Remember to attach a copy of your receipt.
Page 20

Page 21
Mail To: GLD Products
S84 W19093 Enterprise Drive
Muskego, WI 53150 USA
1-800-225-7593
Email: gl[email protected]
Web Site: www.gldproducts.com
· FAX 800-841-6944
3 in 1 Game Table
Item 64-1049
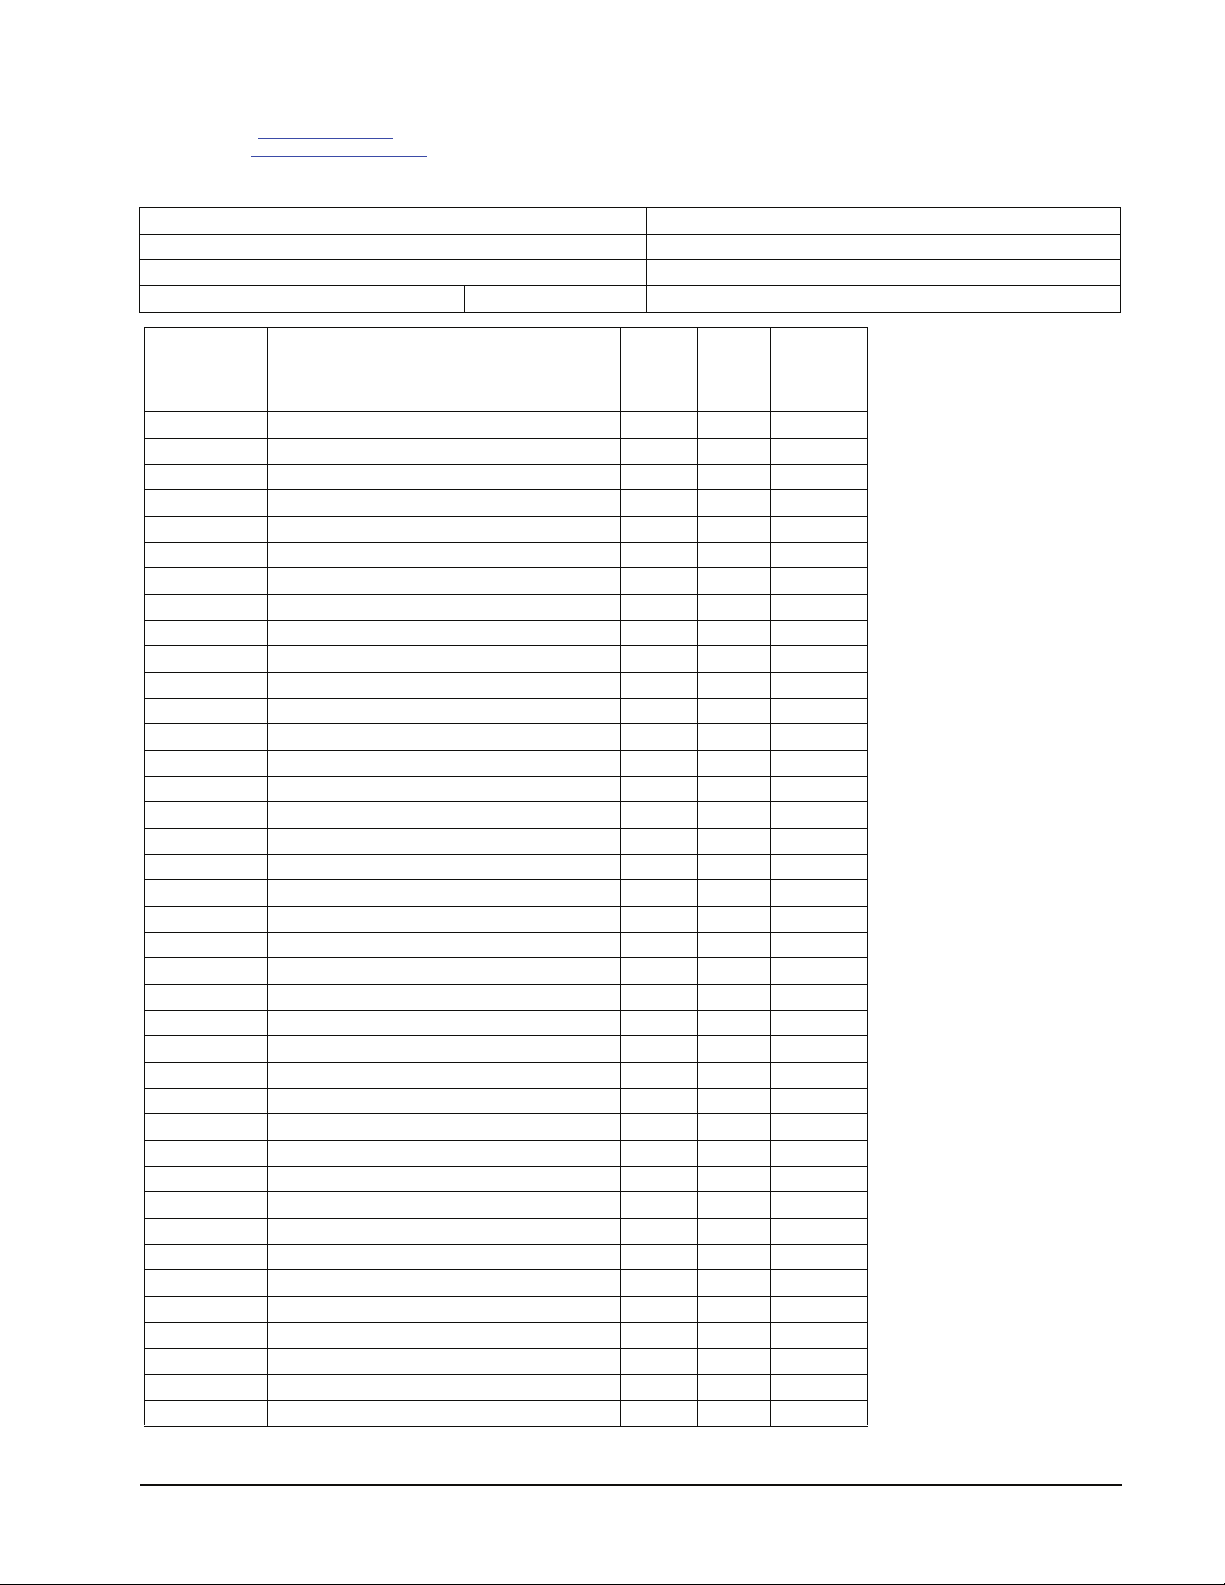
Parts Re-Order Form
etaDemaN
yaD-enohPsserddA
gninevE-enohPytiC
liamEpiZetatS
Unit
Order No. Description
Price
(each)
edilS962-2
2-270 1/4" x 1-3/4" Allen Key Bolt 2.00
2-179
2-277 Table Tennis Net with Posts 15.00
1-2
tuN lerraB "61/5
Qty.
00.052tenibaC652-2
00.1hcnerW nellA611-2
00.51lenaP dnE752-2
00.51xoB rehctaC852-2
00.01draoB nruteR llaB952-2
00.01lenaP dnE poT062-2
00.01ecarB geL162-2
00.51lenaP geL262-2
00.01geL tfeL362-2
00.01geL thgiR462-2
00.5esaB geL562-2
00.03ecafruS sinneT elbaT762-2
00.01releveL geL862-2
00.01niP kcoL662-2
00.01rerocS
00.2tloB xeH "2/1-5 x "61/5172-2
00.1tloB xeH "2/1711-2
52.0rehsaW "2/1701-2
52.0rehsaW citsalP "2/1272-2
52.0rehsaW "61/5372-2
52.0tuN lerraB "4/121-2
52.0
02.0wercS "2/1 x 4T13-2
02.0wercS "2 x 4F472-2
02.0wercS "1 x 4F431-2
02.0wercS "2/1 x 3F421-4
00.6elddaP sinneT elbaT572-2
00.1llaB sinneT elbaT672-2
00.6rehsuP yekcoH8
00.1tleF yekcoH91-2
05.1kcuP yekcoH02-2
00.5elgnairT872-2
00.02sllaB drailliB972-2
00.21kcitS euC66-2
00.2klahC42-2
00.1hcnerW082-2
00.5tekcarB leetS L182-2
Total
Amount
www.gldproducts.com
3957-522-008-112
Page 22
GLD Products 3 in 1 Game Table
Item 64-1049
3-224 T4 x 5/8" Screw 0.20
2-282 Cue Holder 10.00
2-283 Storage Organizer 10.00
2-289 Brush 5.00
2-285 Preassembled Fan 15.00
Subtotal
Shipping will be added. If paid by Check or Money Order, call for quote.
5.1% Waukesha Wisconsin tax will apply (subject to change).
Method of Payment
_________Check or Money Order
_________ Credit Card
_____ Visa _____ MasterCard _____ Discover _____ American Express
Card #________________________________________________________
Security Code #__________________Billing Address Zip code____________
Signature______________________________________Exp. Date________
Shipping Address
Name___________________________________________________________________________________
Address___________________________________________Phone_________________________________
City______________________________________________State________________Zip________________
S/H
Tax
Total
1-800-225-7593 22
www.gldproducts.com
Page 23

www.gldproducts.com
GAME TABLES
HOME CASINO
GAMES AND ACCESSORIES
BILLIARD CUES
BILLIARD ACCESSORIES
DARTBOARDS
SOFT-TIP DARTS
STEEL-TIP DARTS
FLIGHTS AND SHAFTS
DART CASES AND ACCESSORIES
Page 24

PROUD MANUFACTURER OF
S84 W19093 Enterprise Drive Muskego, WI 53150 USA
262.679.8730 or 1.800.225.7593 tele
262.679.8738 or 1.800.841.6944 fax
262.679.8739 international fax
Email: [email protected]
www.gldproducts.com
 Loading...