

Page 1
Version 1.1
User Manual
Copyright © 2014-2015, LibRaw LLC, www.libraw.com
Page 2

FastRawViewer – user manual
1
How FastRawViewer Helps You
FastRawViewer (FRV) is the only solution for those who:
Shoot in RAW and are tired of wasting hours or days on browsing through piles of shots and
sorting them
Tired of rendering all those RAWs into JPEGs so that you can quickly browse through them
with your client, CMO, senior designer, editor in chief; or show them to your friends and
family members.
Are in constant need of very quick viewing, visually and technically analyzing, sorting
through hundreds or thousands of RAW shots, and selecting the apt ones for further
processing
Want to shoot in RAW, but don’t, fearing to get mired in sorting RAW files
Are forced to use JPEG format, because your previous experiences tell you that it is
impossible to quickly select and show your client the images taken in RAW
Are in need of tools to instantly adjust white balance and exposure (brightness) right while
browsing through the shot
FastRawViewer is the first and the only dedicated application with the purpose of extremely fast
culling and pre-processing of RAW images: i.e. display, visual and technical analysis, applying basic
corrections, sorting and setting aside or directly transferring the selected ones for further
processing.
FastRawViewer Strengths:
Display of the actual RAW as well as the actual RAW histogram
For the first time, a comfortable speed of RAW file viewing (together with histograms),
provided by FastRawViewer using the power of modern processors and video cards to process
RAW images,
o 6-8 frames per second on a modern notebook or desktop computer for files from modern
photo cameras (16-36 Mpix, testing was conducted on a mix of shots from recent cameras,
SSD or RAID recommended for peak performance)
o 24-30 frames per second for CinemaDNG 2.5k on the same equipment (we used
Blackmagic Pocket Cinema files for testing)
Support of almost every single existing RAW format (that is, almost every known digital
camera)1, including native out-of-camera DNG files as well as the files converted to DNG.
View JPEGs (including embedded JPEG thumbnails) – and also display the histograms.
With only one significant exception: Foveon cameras are not supported.
Page 2 of 127 Copyright © 2014-2015, LibRaw LLC, www.libraw.com
Page 3

FastRawViewer – user manual
The convenience of working with the shots taken in the RAW + JPEG mode, with two files being
paired:
a) While listing through files, you have the option to ignore the second file in the pair
b) JPEGs (including embedded thumbnails) are considered to be “additional images” and are
immediately accessible for viewing
c) When you move a file from the RAW + JPEG pair to another folder, the other file follows
d) And, of course, you can always switch this mode off, if you so choose, and treat the files as
separate.
Instant display of RAW files directly from any memory card or other file storage - without
customary delays for importing, creating catalogues, libraries, and temporary databases.
The possibility of doing a quick visual and technical analysis by:
a) Examining the real RAW histogram
b) Assessing the exposure based on:
i. Spotlighting of over- and underexposed areas on the shot
ii. Over- and underexposure statistics
c) Outlining the in-focus and highly detailed areas on the shot
d) Assessing per-channel exposure and acutance
e) Assessing the noise level in the shadows
Time-saver: exposure and white balance adjustments can be made while browsing RAW files
and are saved in XMP files so that they can be automatically applied when you open that shot
in Adobe Lightroom or Adobe Camera Raw
Time-saver for series, including panoramas: propagation of white balance, exposure, and image
orientation adjustments from one shot to the entire series.
Highly compatible system of assigning labels and ratings to images, including the user-defined
labels. Ratings and labels are written into XMP files and are read by Adobe software (and
others which acknowledge XMP sidecar files).
Moving the selected shots into folders chosen by the user.
Moving the rejected shots into a special folder, which can be reviewed again later.
Support for black and white RAW, including shots from cameras converted to b/w by removing
the color filter array.
Warnings when FastRawViewer comes across a damaged RAW file.
Monitor color profile support, without the loss of image rendering speed.
Modifying settings to suite your workflow
a) You can set your own keyboard (or keyboard+mouse) shortcuts for every action.
b) The settings panel allows you to turn off the ones you don’t need, and change the others to
your preferences.
Page 3 of 127 Copyright © 2014-2015, LibRaw LLC, www.libraw.com
Page 4

FastRawViewer – user manual
Table of Contents
How FastRawViewer Helps You ............................................................................................................ 2
System Requirements ........................................................................................................................... 7
Windows ....................................................................................................................................... 7
Mac ............................................................................................................................................... 7
Software Installation ............................................................................................................................ 8
Windows ........................................................................................................................................... 8
Choice of Version: OpenGL or DirectX.......................................................................................... 8
Installation .................................................................................................................................... 8
Mac OS X ......................................................................................................................................... 12
Program Activation ............................................................................................................................. 13
Activation of the License you’ve purchased ................................................................................... 15
Manual Activation .......................................................................................................................... 16
Using FastRawViewer ......................................................................................................................... 18
Conventions in this Manual ............................................................................................................ 18
Launching FastRawViewer .............................................................................................................. 18
Main Screen .................................................................................................................................... 19
Workspace .................................................................................................................................. 21
Changing the Settings ..................................................................................................................... 24
Help with the keyboard Shortcuts .................................................................................................. 25
Working with the files .................................................................................................................... 26
Folder Navigation ....................................................................................................................... 26
Working with removable media (flash cards, etc.) .................................................................... 27
Folder file navigation .................................................................................................................. 28
Additional methods of navigating folder files ............................................................................ 29
Opening a file/folder using the menu ........................................................................................ 30
FastRawViewer Start-up Modes ................................................................................................. 31
Starting without a filename ........................................................................................................ 31
Creating and reading XMP files .................................................................................................. 32
Compatibility with RawPhotoProcessor (.rpps files) .................................................................. 33
Page 4 of 127 Copyright © 2014-2015, LibRaw LLC, www.libraw.com
Page 5

FastRawViewer – user manual
Copy and Move operations ........................................................................................................ 33
«Close» File ................................................................................................................................ 35
Displaying the Image ...................................................................................................................... 36
Embedded and External JPEG ..................................................................................................... 37
Zooming and Panning ................................................................................................................. 38
Changing Image Orientation ....................................................................................................... 38
Viewing file channels, viewing in black and white mode ........................................................... 39
Boosting the shadows ................................................................................................................ 40
Tonal Curve ................................................................................................................................. 41
Support for Cameras Modified to Black and White ................................................................... 42
Customizing Display Modes ........................................................................................................ 42
Using Monitor Profile For Display .............................................................................................. 44
Working with Exposure .................................................................................................................. 45
Histogram ................................................................................................................................... 45
Exposure statistics ...................................................................................................................... 46
Spotlighting the Areas of Over- and Underexposure ................................................................. 48
Automatic exposure correction .................................................................................................. 50
Manual Exposure Correction ...................................................................................................... 51
Recording of the exposure correction to XMP files: Interaction with Adobe Programs ........... 51
Exposure Adjustment when browsing to the next file ............................................................... 52
White Balance ................................................................................................................................. 52
Indication of the white balance .................................................................................................. 52
White balance Presets ................................................................................................................ 54
Controlling which White Balance will be used when opening a file .......................................... 55
Setting White Balance by “click-gray” method .......................................................................... 55
Manually setting the color temperature .................................................................................... 56
Outlining In-Focus and Highly Detailed Areas ................................................................................ 56
Ratings and Labels .......................................................................................................................... 59
Title and description ....................................................................................................................... 60
Page 5 of 127 Copyright © 2014-2015, LibRaw LLC, www.libraw.com
Page 6

FastRawViewer – user manual
Integration with External Programs ............................................................................................... 61
Performance Settings ..................................................................................................................... 62
Hard Disk Drives (HDD) ............................................................................................................... 62
Flash cards and network volumes .............................................................................................. 63
Video Card Processing Settings .................................................................................................. 63
Troubleshooting ................................................................................................................................. 64
OpenGL error warning when starting the application ................................................................... 64
Black Screen in Image Display Window .......................................................................................... 65
Screen does not fully update .......................................................................................................... 65
Other problems .............................................................................................................................. 65
Debug Information (Debug log) ...................................................................................................... 65
Program Settings ................................................................................................................................ 67
File Handling ................................................................................................................................... 67
Removable Media ....................................................................................................................... 70
RAW+JPEG ...................................................................................................................................... 72
XMP ................................................................................................................................................. 73
Interface.......................................................................................................................................... 75
Zoom ........................................................................................................................................... 77
Image Display .................................................................................................................................. 78
White Balance ................................................................................................................................. 81
Color Management ......................................................................................................................... 83
GPU Processing ............................................................................................................................... 84
External Programs .......................................................................................................................... 86
Performance ................................................................................................................................... 87
Other ............................................................................................................................................... 89
Informational panel settings .............................................................................................................. 90
Folders Panel .................................................................................................................................. 91
Filmstrip/Thumbnails Panel ............................................................................................................ 92
EXIF Panel ....................................................................................................................................... 92
Page 6 of 127 Copyright © 2014-2015, LibRaw LLC, www.libraw.com
Page 7

FastRawViewer – user manual
XMP Metadata Panel ...................................................................................................................... 94
Exposure statistics panel ................................................................................................................ 94
Customizing the Status Bar ................................................................................................................. 95
Setting the keyboard shortcuts .......................................................................................................... 97
Settings for Apple Magic Mouse/Trackpad .................................................................................... 99
Standard FastRawViewer Keyboard Shortcuts ............................................................................ 100
List of Supported Cameras (RAW formats) ...................................................................................... 106
Copyrights and Acknowledgements ................................................................................................. 125
System Requirements
Windows
Recommended system: Windows 7 – Windows 8.1, 64-bit.
32-bit versions Windows: Windows Vista – Windows 8.1
Windows XP is supported in a separate “Legacy” version of FastRawViewer.
Processor with SSE3 support or later (meaning released 2005+):
o Intel: Pentium 4 Prescott or later; Celeron D or later, any Core processor, Intel Atom
o AMD: Athlon 64 or later
o The complete list of supported processors is available on Wikipedia
Video card with DirectX 9.0 support or later, or with OpenGL 2.1 or later (see below Choice
of version: OpenGL or DirectX).
FastRawViewer will work with practically any video card with 3D acceleration support,
released 2006+ (users of older cards may experience some problems).
Mac
Intel-based Mac
Processor with 64-bit support (that’s every Intel Mac, excluding Mac Mini 2005)
Mac OS X 10.6 or later
We recommend a video card with OpenGL 2.1 support (that’s every native Mac video card,
that works with OS X 10.6). An OpenGL emulator will be used if such a video card is not
present in the system; some of the advanced features of FastRawViewer will take
significant time to render.
Page 7 of 127 Copyright © 2014-2015, LibRaw LLC, www.libraw.com
Page 8
FastRawViewer – user manual
Software Installation
Windows
Choice of Version: OpenGL or DirectX
FastRawViewer for Windows is available in two versions:
1. Graphics based on Microsoft DirectX – this version will work with any video card that supports
DirectX 9.0 and higher (DirectX 9.0c support or later is recommended).
This version is recommended for the majority of users: DirectX drivers are supported by the
manufacturers better, and the program will run smoothly as soon as the equipment is
compatible (most cases, it is).
2. Graphics based on OpenGL – requires a video card with at least OpenGL 2.1 support and
(usually) the most current drivers are recommended.
We suggest OpenGL version be used with the following video cards:
a. Nvidia: GTX4xx and newer, and the corresponding versions of Nvidia Quattro.
b. ATI/AMD: Radeon HD5xxx and newer.
Installation
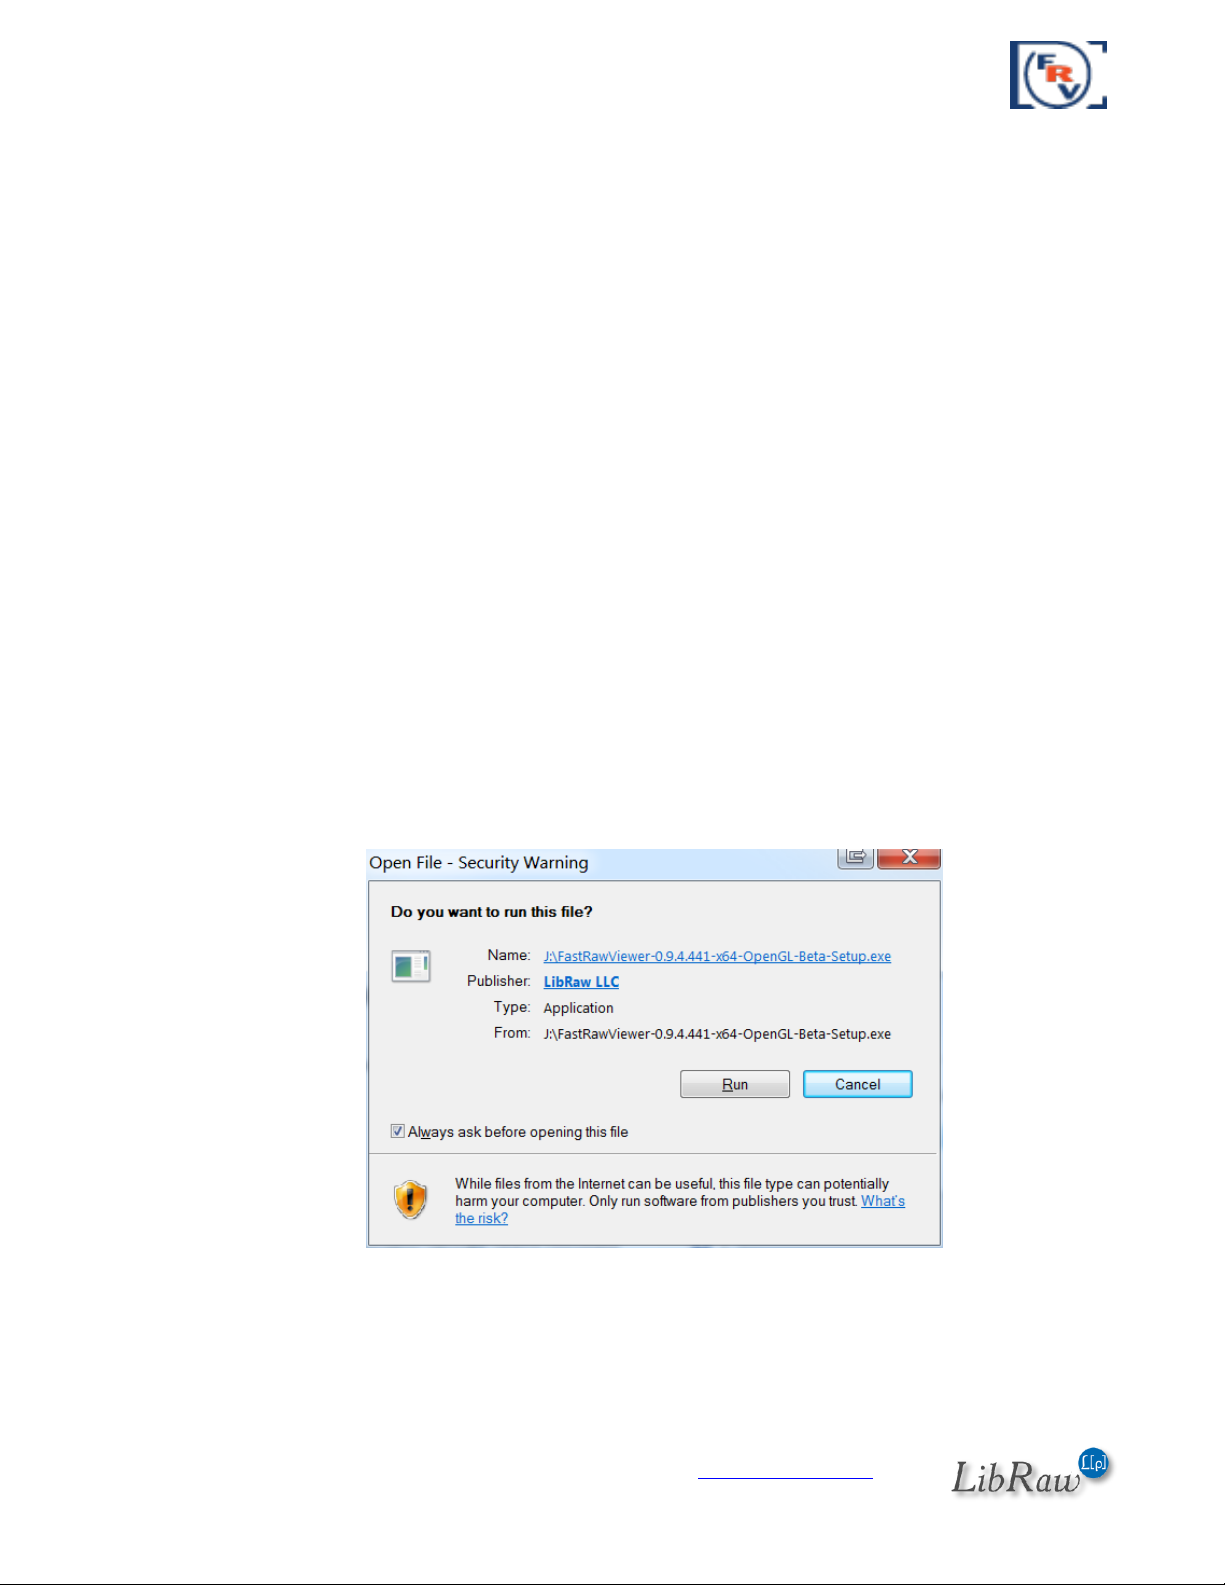
The program is installed by running the executable file of the distribution package
(FastRawViewer-1.1.0.xxx--Setup.exe)
If you downloaded FastRawViewer from our site on the first program launch, current versions of
Windows will display the following security warning:
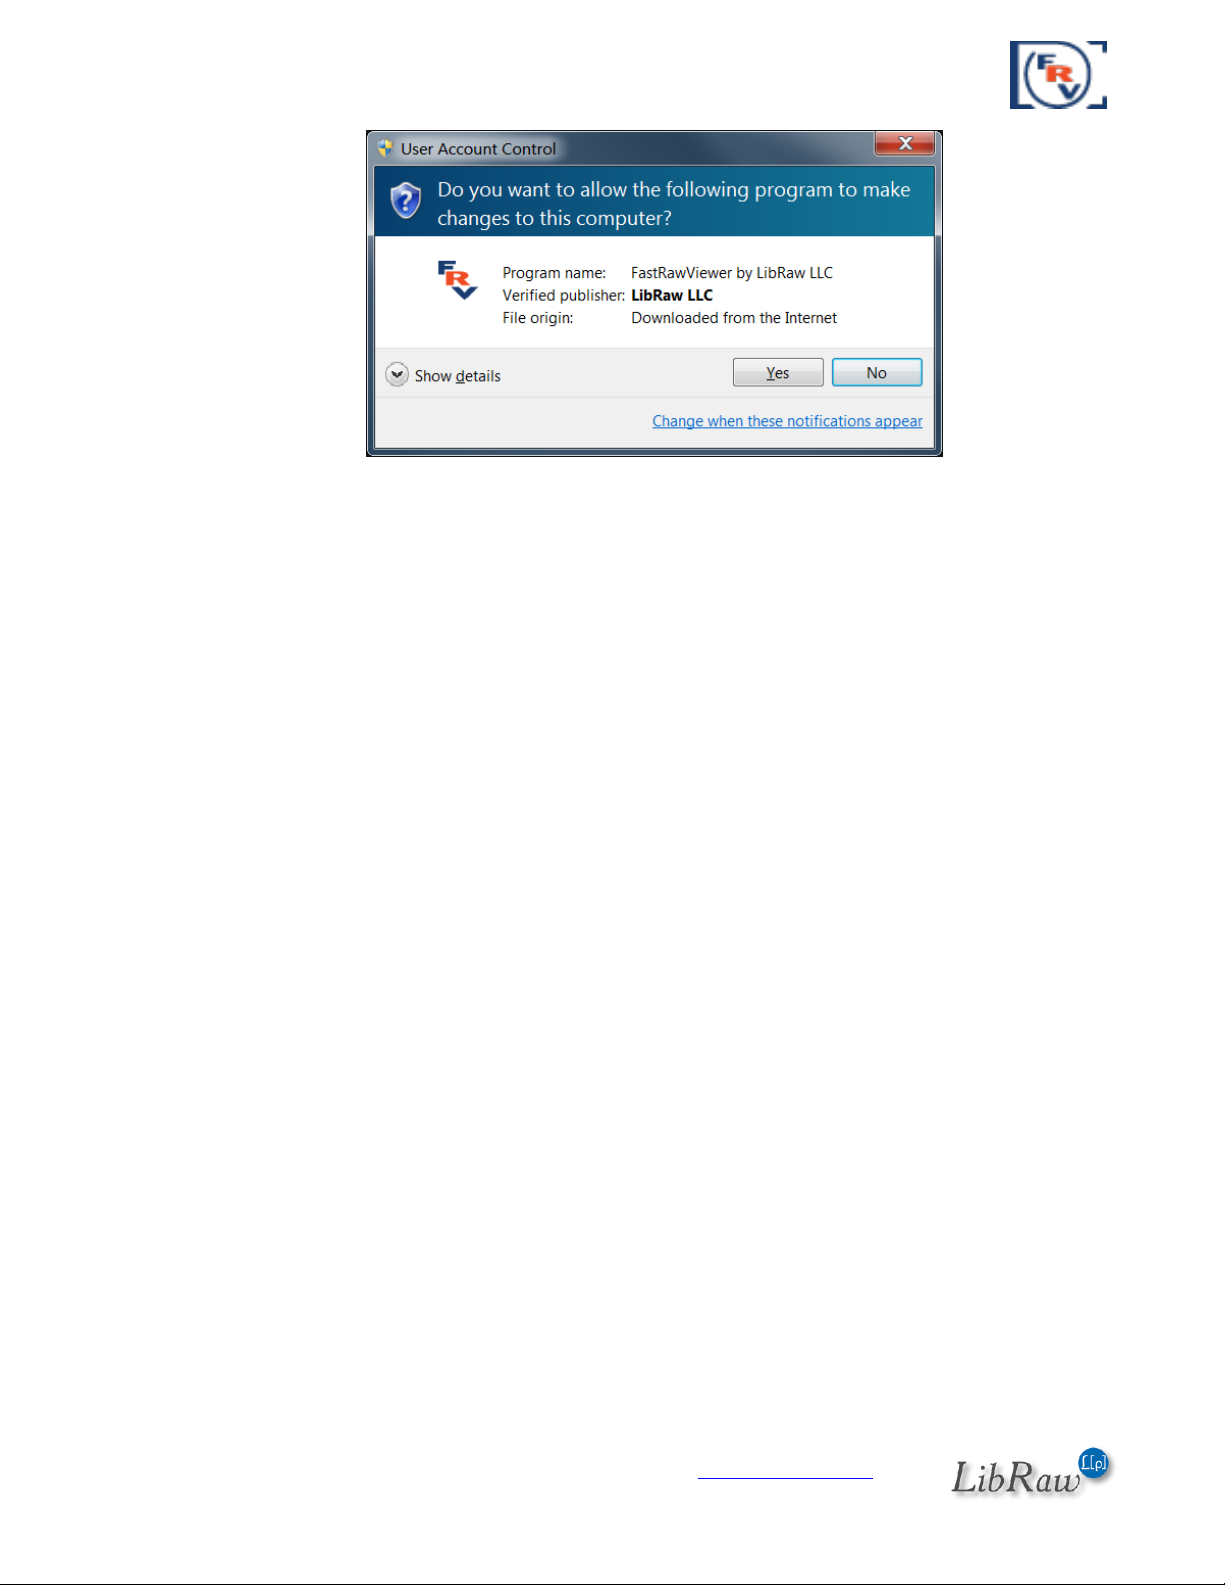
After the “Run” button is pressed, the UAC (Windows User Access Control) system will display a
warning once again:
Page 8 of 127 Copyright © 2014-2015, LibRaw LLC, www.libraw.com
Page 9
FastRawViewer – user manual
Both dialogs allow you to verify that the setup program is signed with unique LibRaw LLC electronic
signature.
Page 9 of 127 Copyright © 2014-2015, LibRaw LLC, www.libraw.com
Page 10
FastRawViewer – user manual
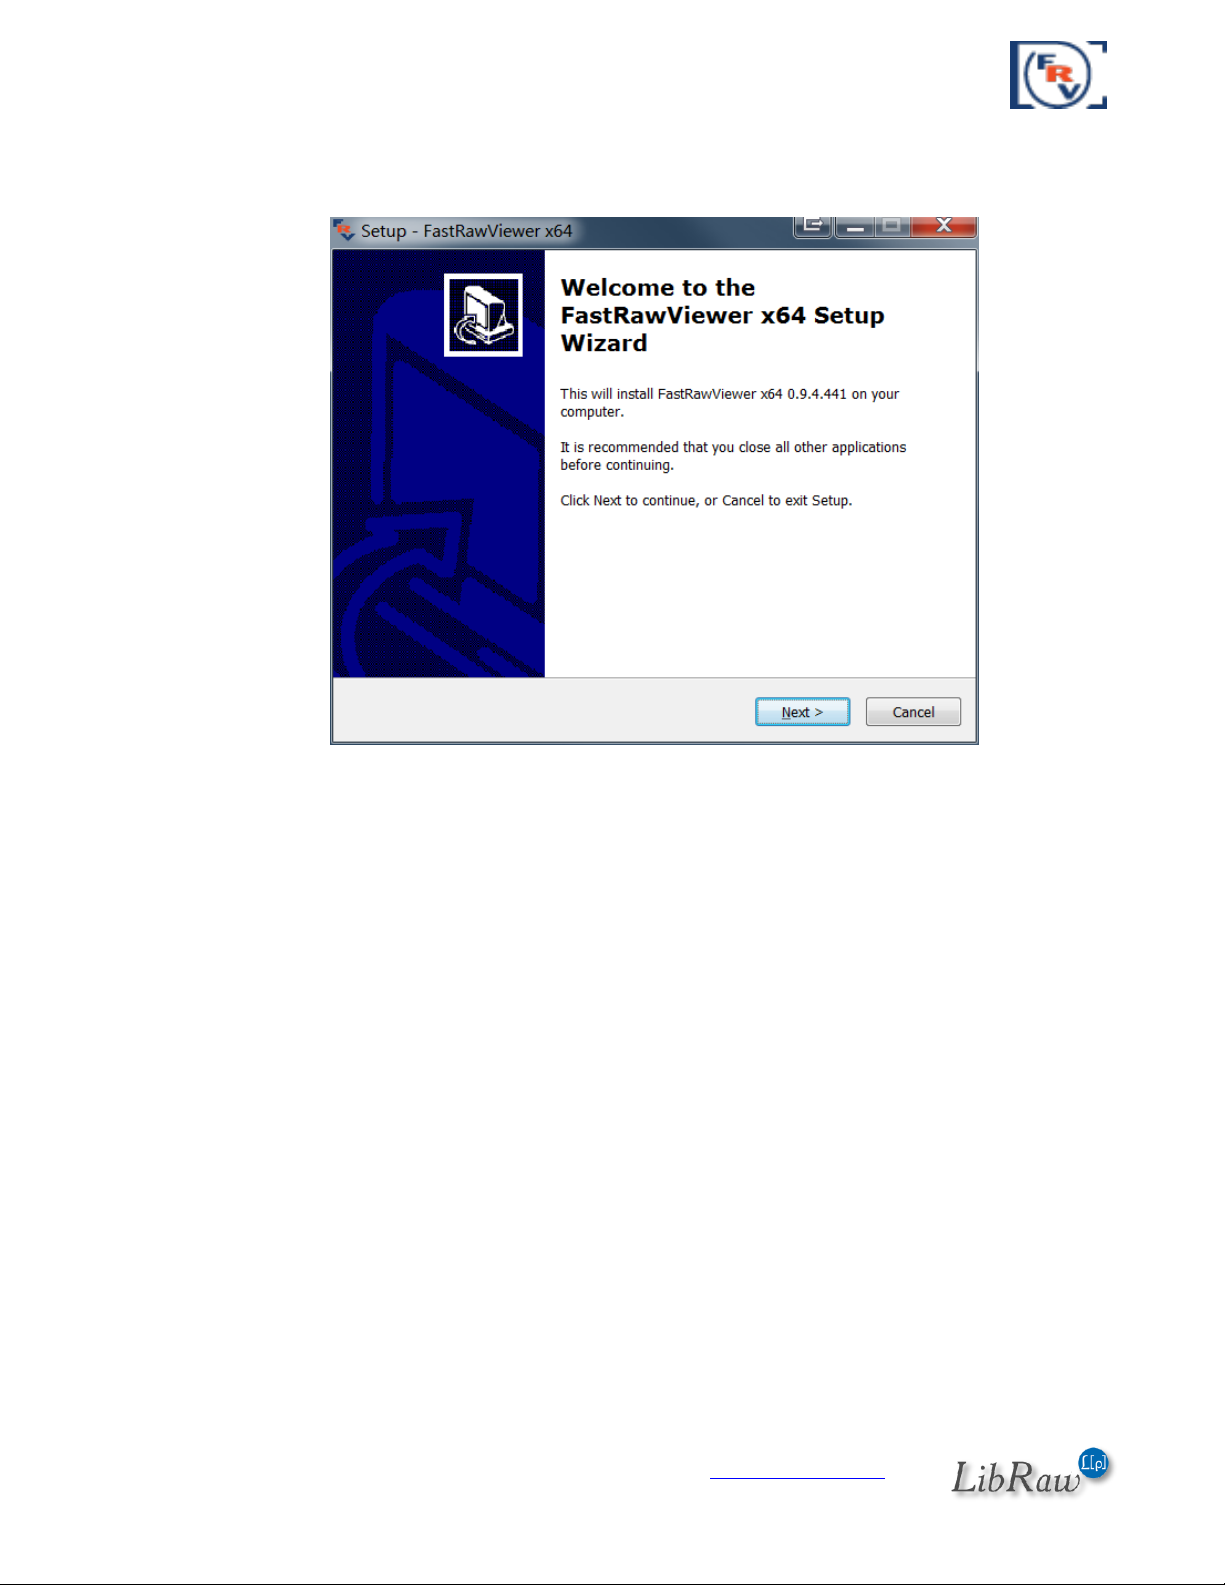
To proceed with the installation, you must agree to the dialog above, and the usual Setup Wizard
will be launched:
At the next screens of Setup Wizard:
1. The User License is displayed
2. An installation folder is suggested; a different folder may be selected by the user
3. Creating a Group in the Programs menu is suggested
Page 10 of 127 Copyright © 2014-2015, LibRaw LLC, www.libraw.com
Page 11
FastRawViewer – user manual
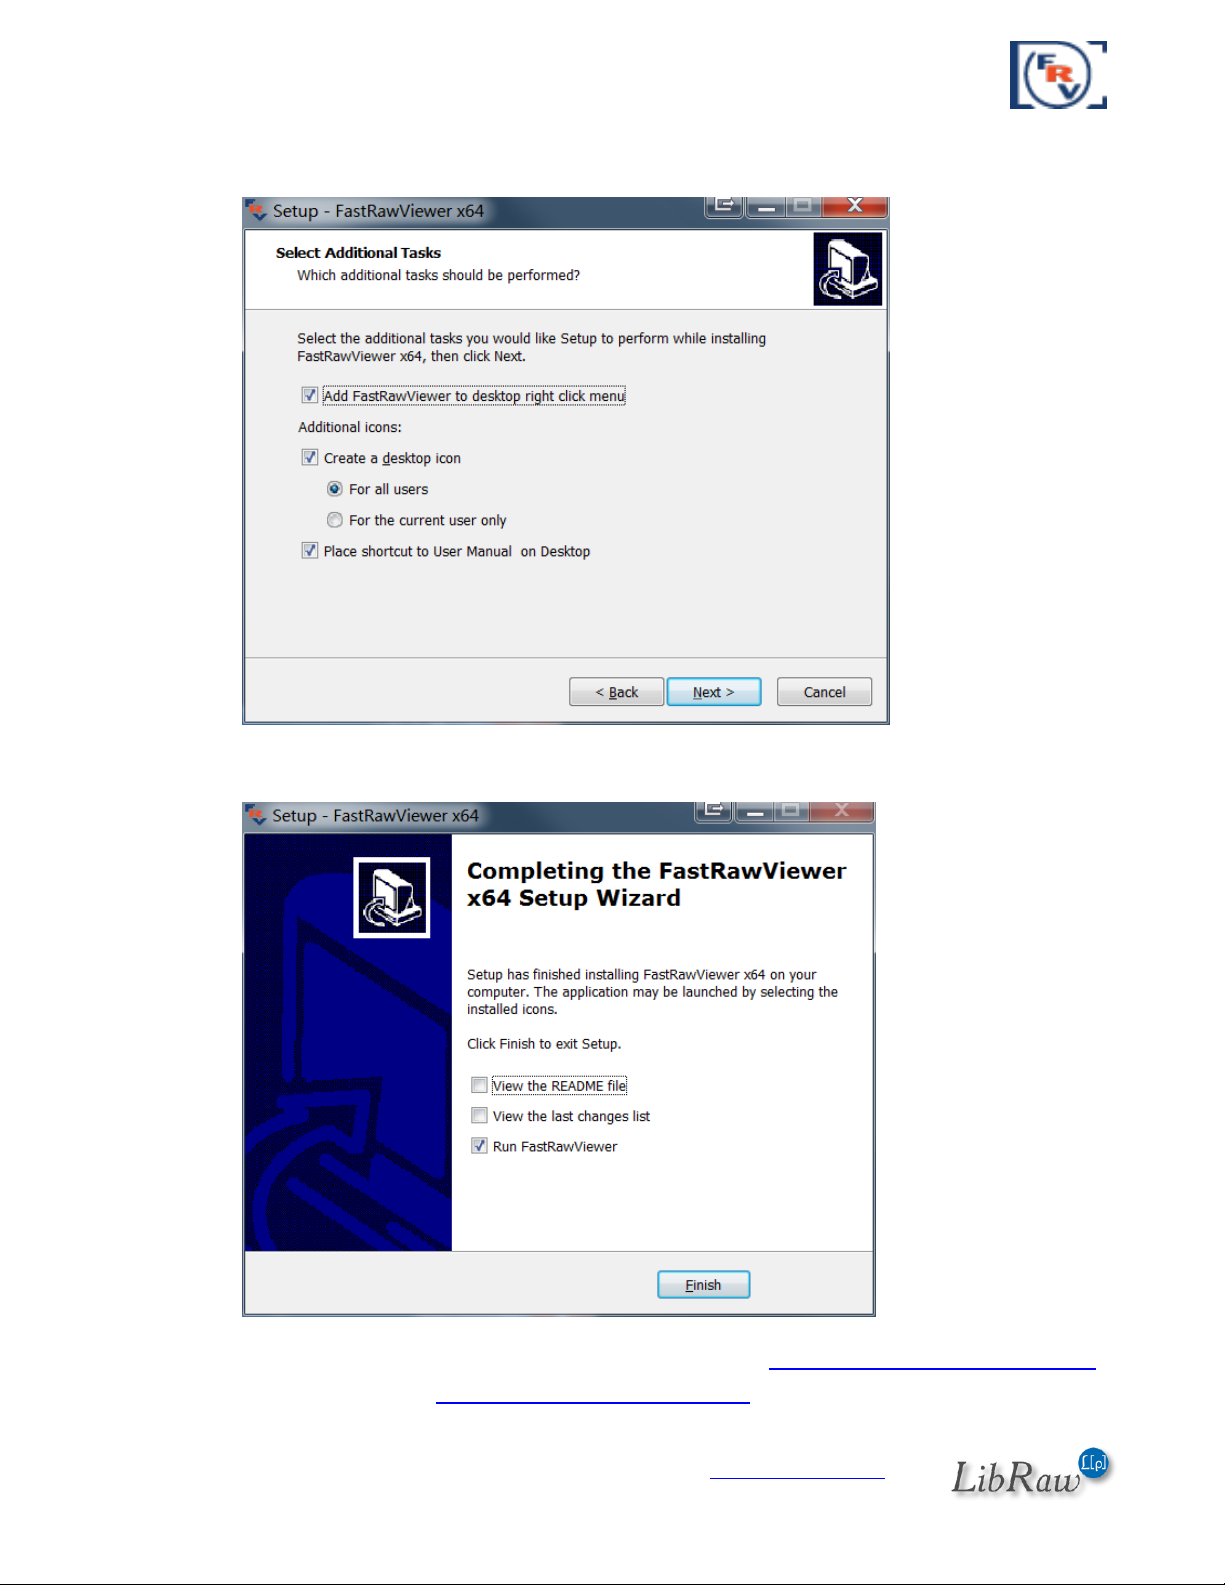
4. A list of possible additional actions is shown: add FastRawViewer to desktop right-click
menu, add icon to the desktop, add icon to the Quick Launch menu
Afterwards, the installation takes place. Upon completion, the following screen appears:
In case of any errors during installation, please contact us via www.fastrawviewer.com/contact or
technical support forum at www.fastrawviewer.com/forum.
Page 11 of 127 Copyright © 2014-2015, LibRaw LLC, www.libraw.com
Page 12
FastRawViewer – user manual
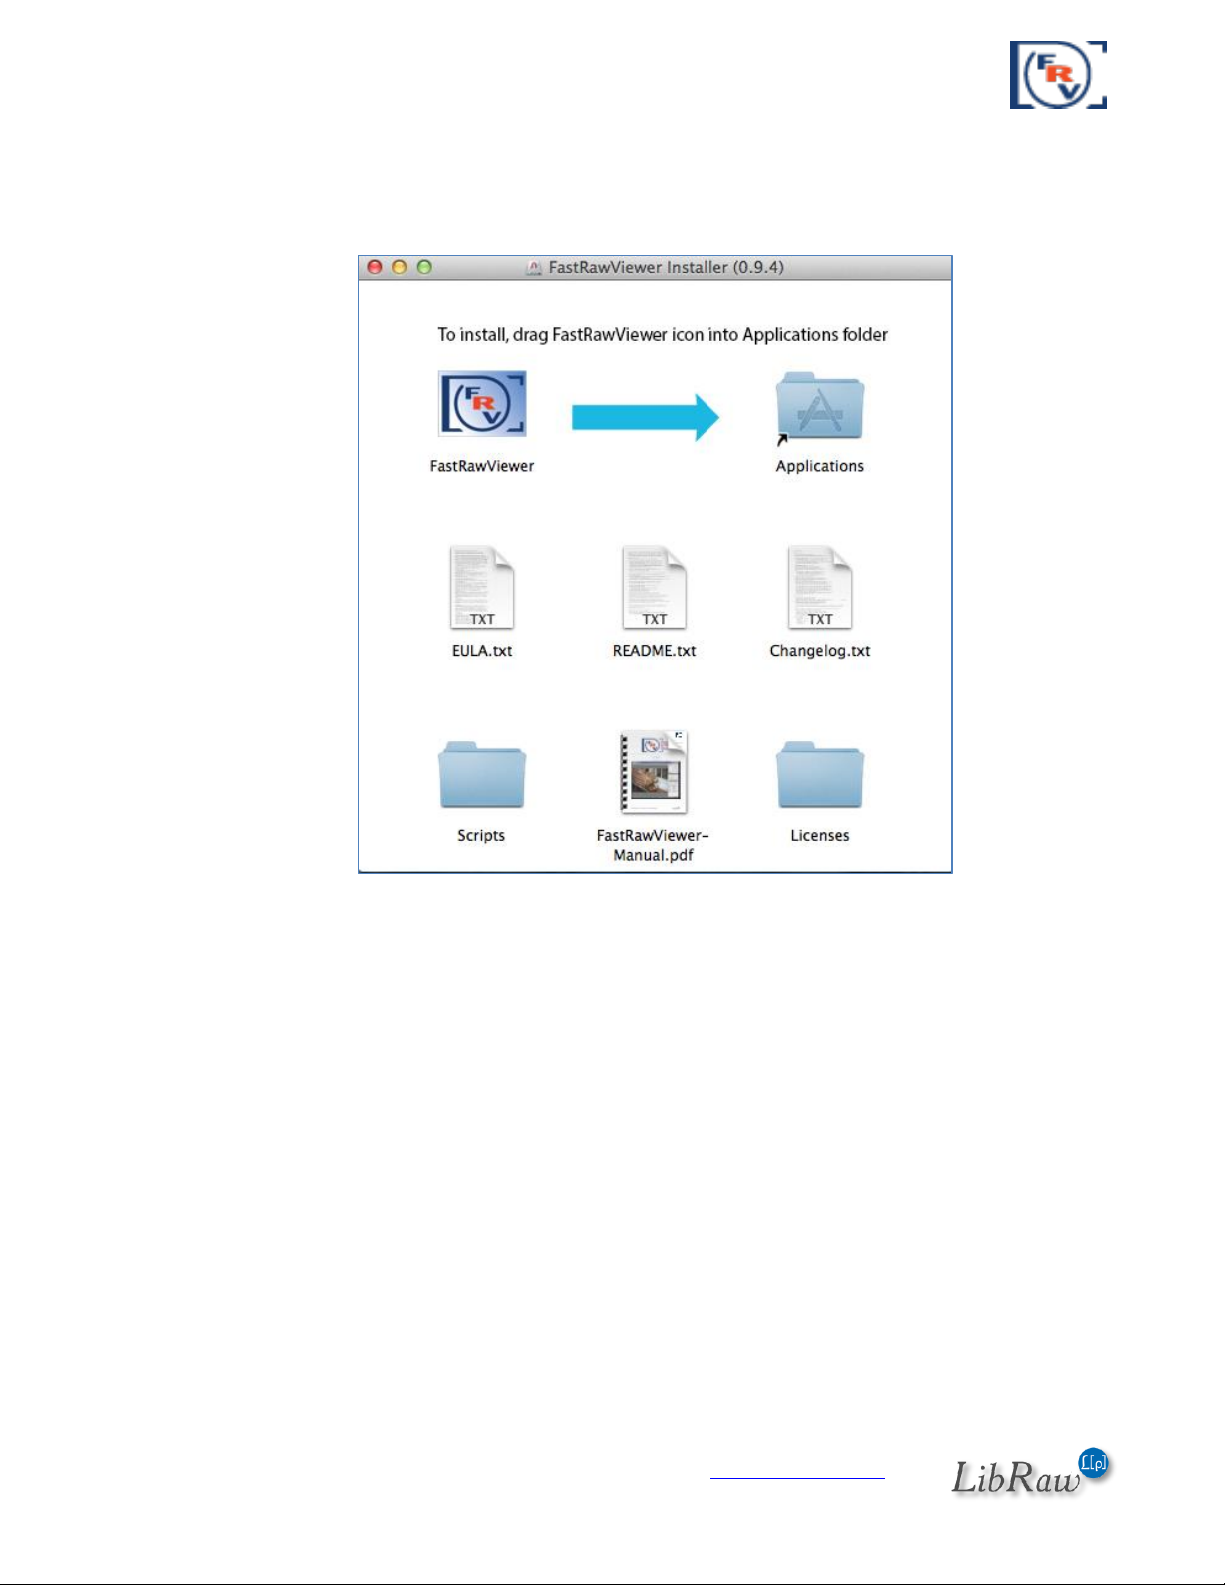
Mac OS X
Double click on FastRawViewer-1.x.x.dmg to mount the FastRawViewer disk image you've
downloaded. The content of the disk image will appear like this:
Drag FastRawViewer icon onto the Applications icon. The program will be copied to Applications
folder and ready to run.
Other items contained in the disk image are:
FastRawViewer Manual (FastRawViewer-manual.pdf)
Brief description (README.txt) and Changelog (Changelog.txt)
End-User License Agreement (EULA.txt), Copyright Information (Copyrights.txt)
Licenses and Copyrights for libraries and components used in FastRawViewer (Licenses
folder).
Page 12 of 127 Copyright © 2014-2015, LibRaw LLC, www.libraw.com
Page 13
FastRawViewer – user manual
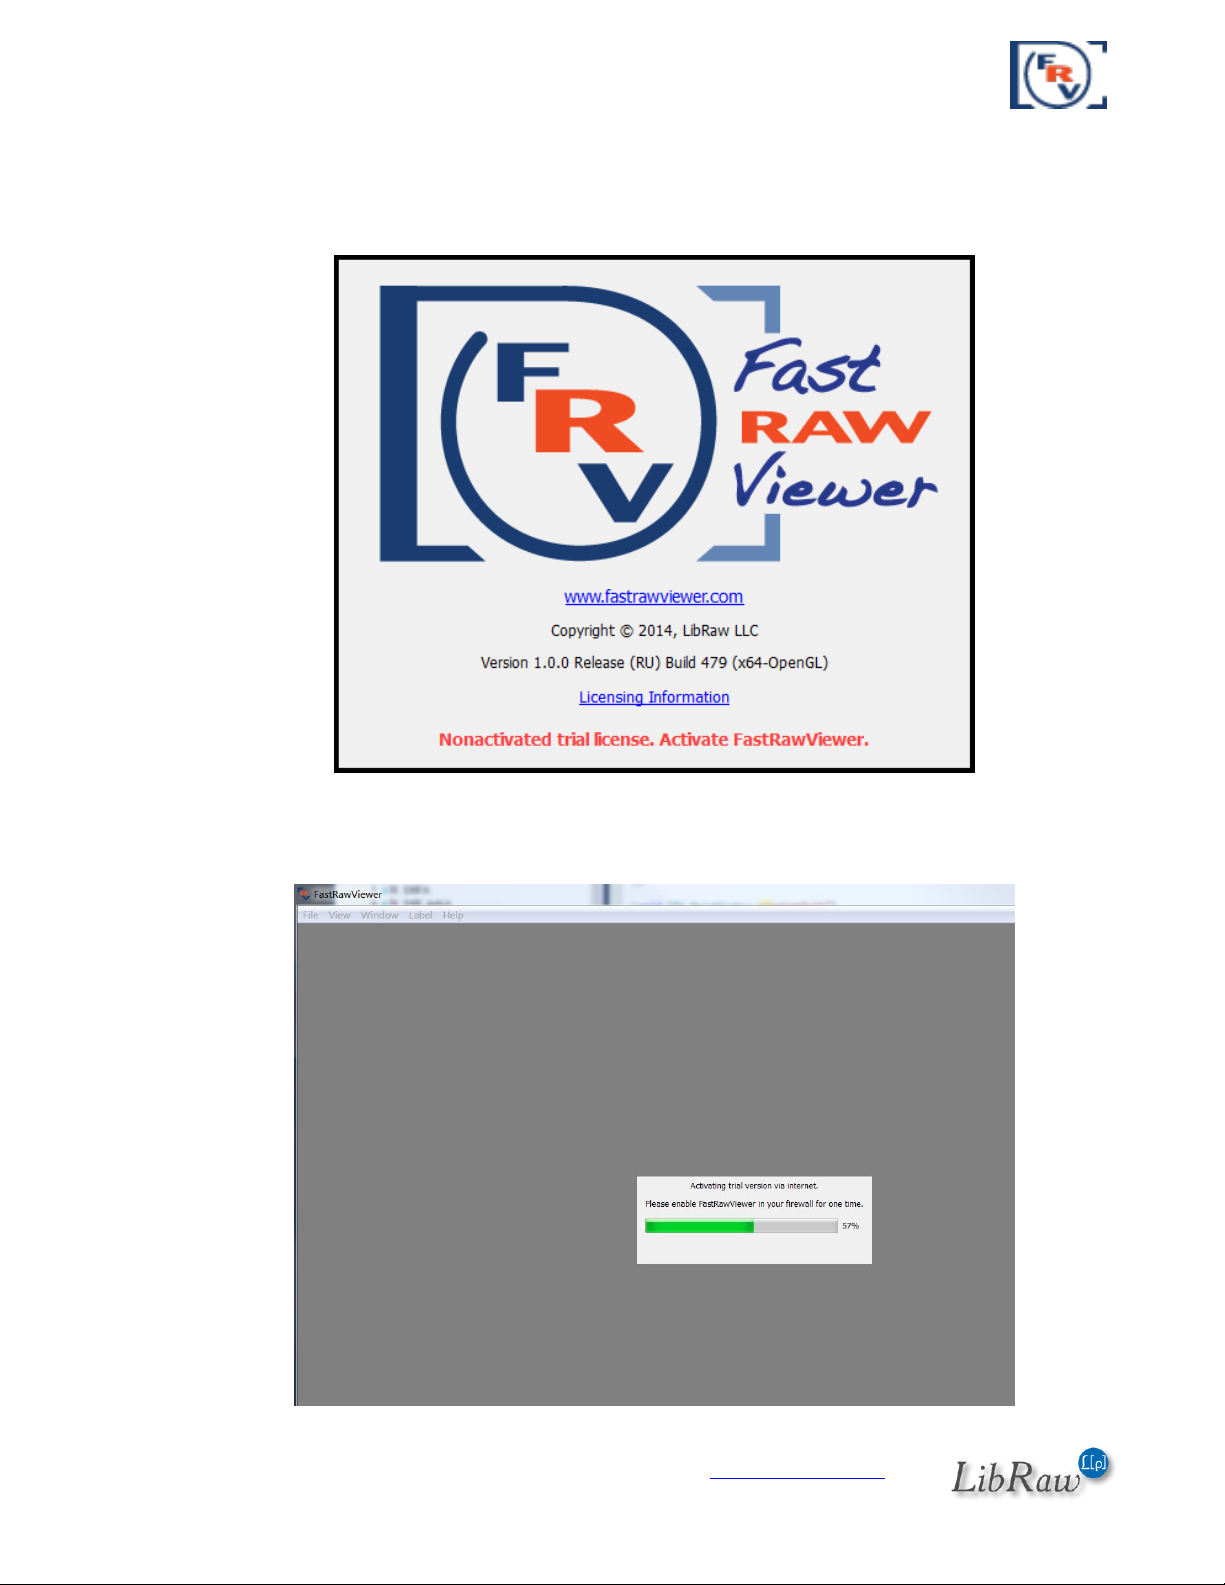
Program Activation
During the first launch FastRawViewer will display a splash screen suggesting the activation of the
trial version
Immediately after that, with the main program screen being opened, FastRawViewer will try to
connect to Internet to activate the trial version:
Page 13 of 127 Copyright © 2014-2015, LibRaw LLC, www.libraw.com
Page 14
FastRawViewer – user manual
No private data is transferred during the activation process; the only data that is passed through
the Internet is FastRawViewer version number and unique non-reversible 64-bit hash code
identifying your computer; this code can’t be decoded to extract any private or personal data.
After the successful automatic activation the trial period begins; the trial time left is indicated in
Help-About window and on the splash screen that pops up when FastRawViewer is started.
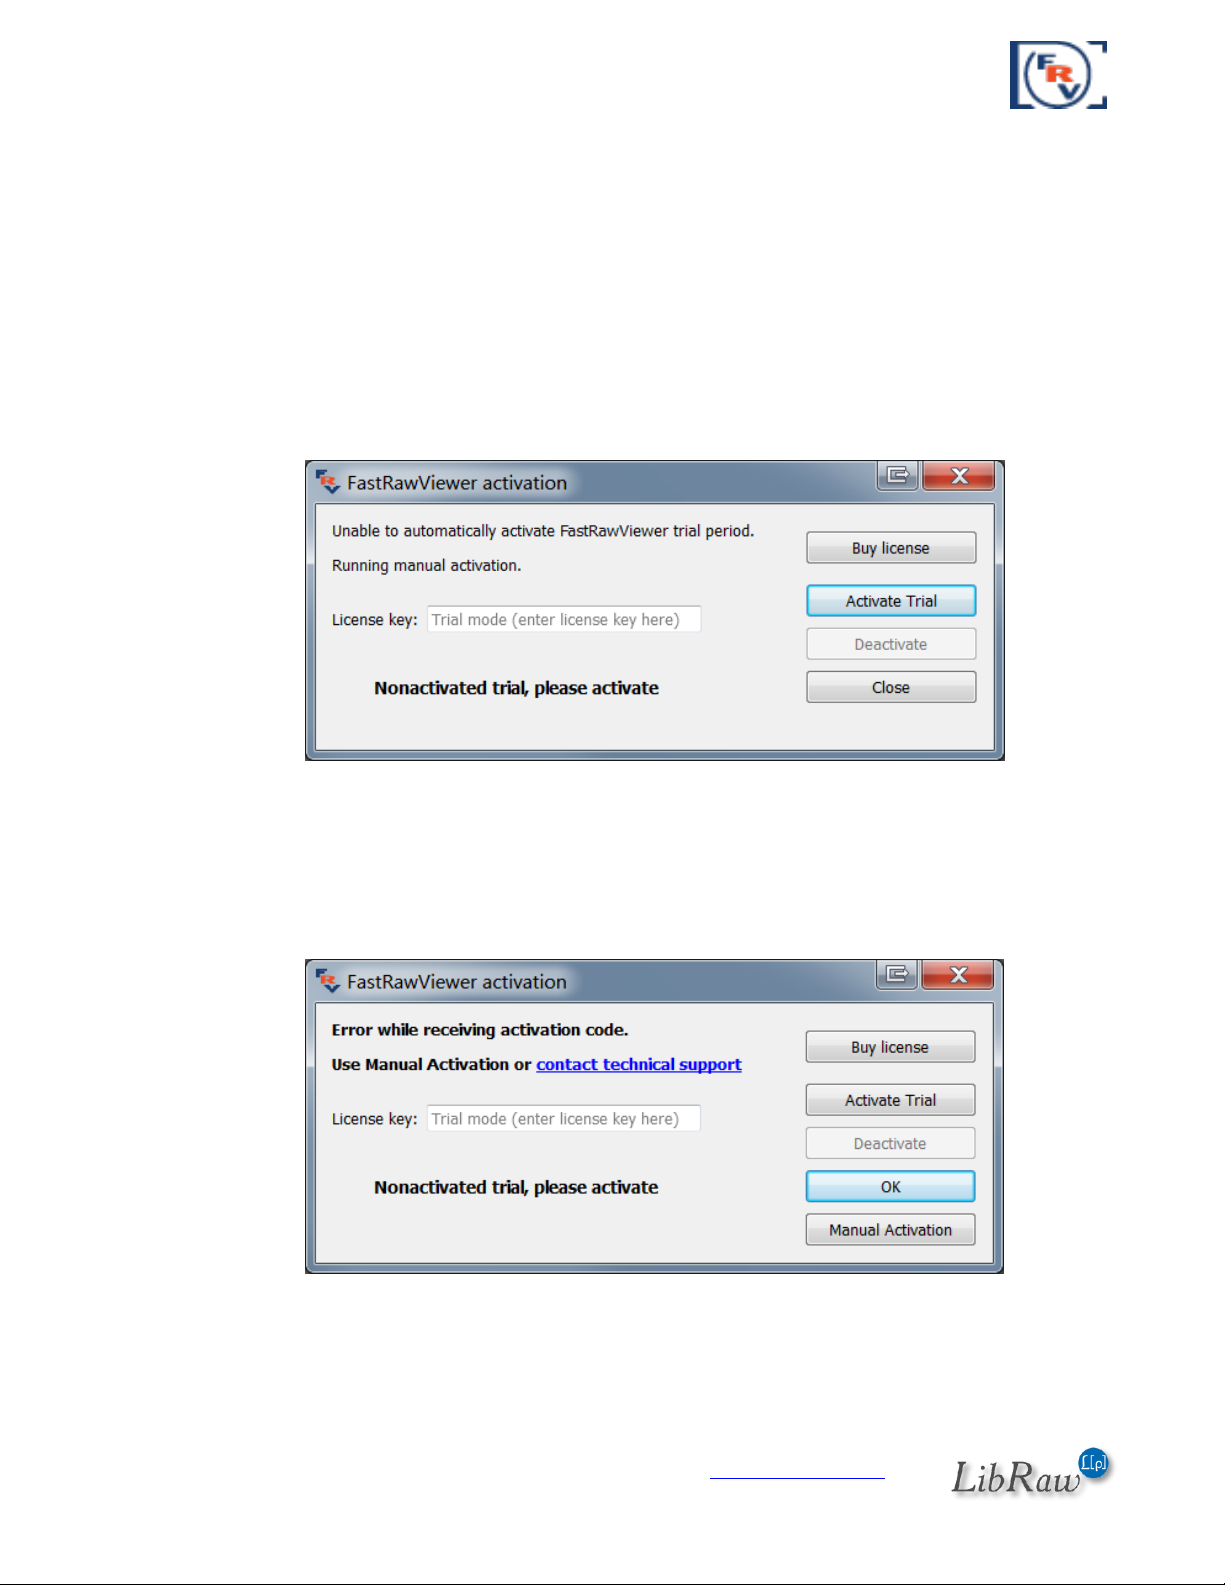
In case the automatic activation was impossible for some reason (no Internet access, or
FastRawViewer was blocked by firewall) you will be presented with the screen for manual
activation:
Here you can allow FastRawViewer a one-time Internet access and press Activate Trial button to
start 30-day free trial period.
If after pressing Activate Trial button FastRawViewer still can’t access activation server an
additional button for Manual Activation will appear:
Pressing this Manual Activation button will take you to manual activation dialogue (for more
details, please see below, in “Manual Activation” section)
Page 14 of 127 Copyright © 2014-2015, LibRaw LLC, www.libraw.com
Page 15
FastRawViewer – user manual
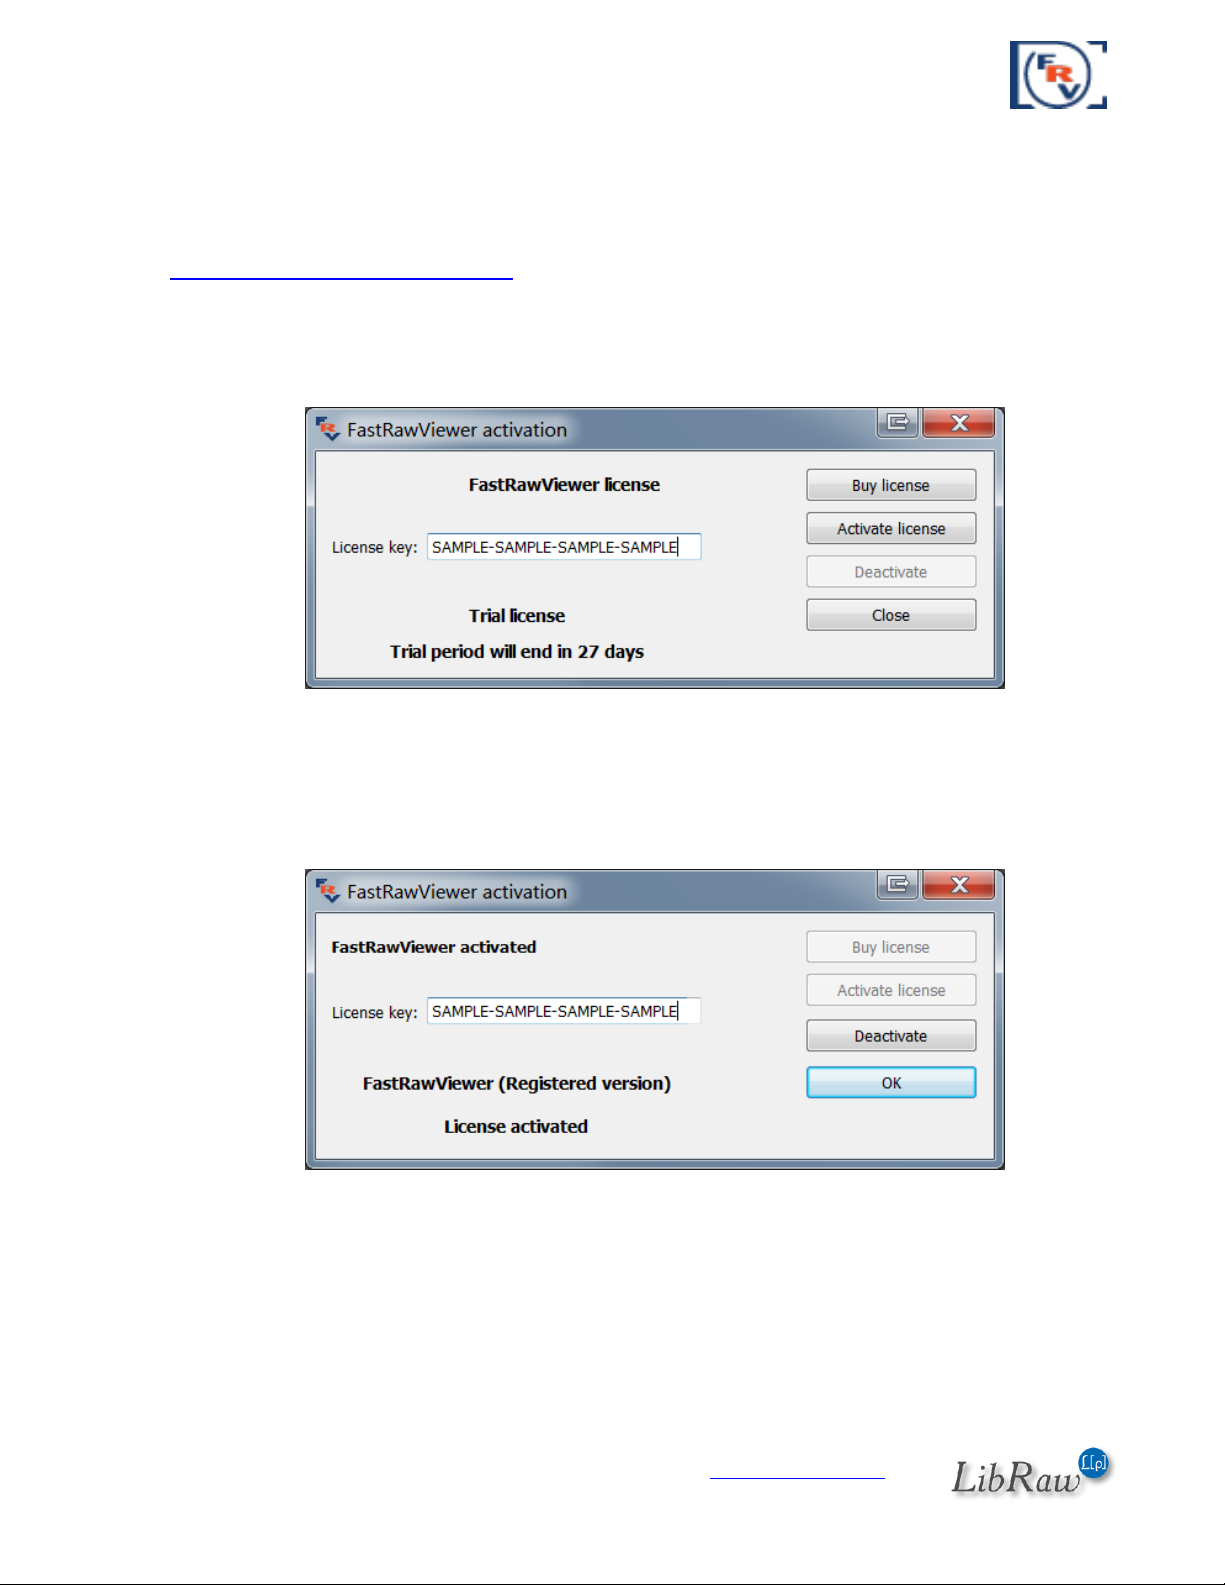
Activation of the License you’ve purchased
To use FastRawViewer after the trial period, the user will need to obtain a full license.
To obtain the license, please click the “Buy License” button or open
www.fastrawviewer.com/purchase in your browser. As a result of the transaction, you will be
provided with the license key (online and as a separate email). This license key should be entered
into the License Key field of the activation dialog, which is also available through Menu-Help-
Purchase/Activate):
After the license key is entered, please click Activate license button. The license will be activated
and you will be able to continue using the program.
The Help-Purchase/Activate menu item will now be renamed to Help-Registration data, and the
respective dialog will show your registration data:
To complete the activation (of both the trial and the fully licensed version) the program needs a
one-time access to the Internet. If you cannot grant the appropriate Internet access permissions,
you can activate the program manually.
Page 15 of 127 Copyright © 2014-2015, LibRaw LLC, www.libraw.com
Page 16
FastRawViewer – user manual
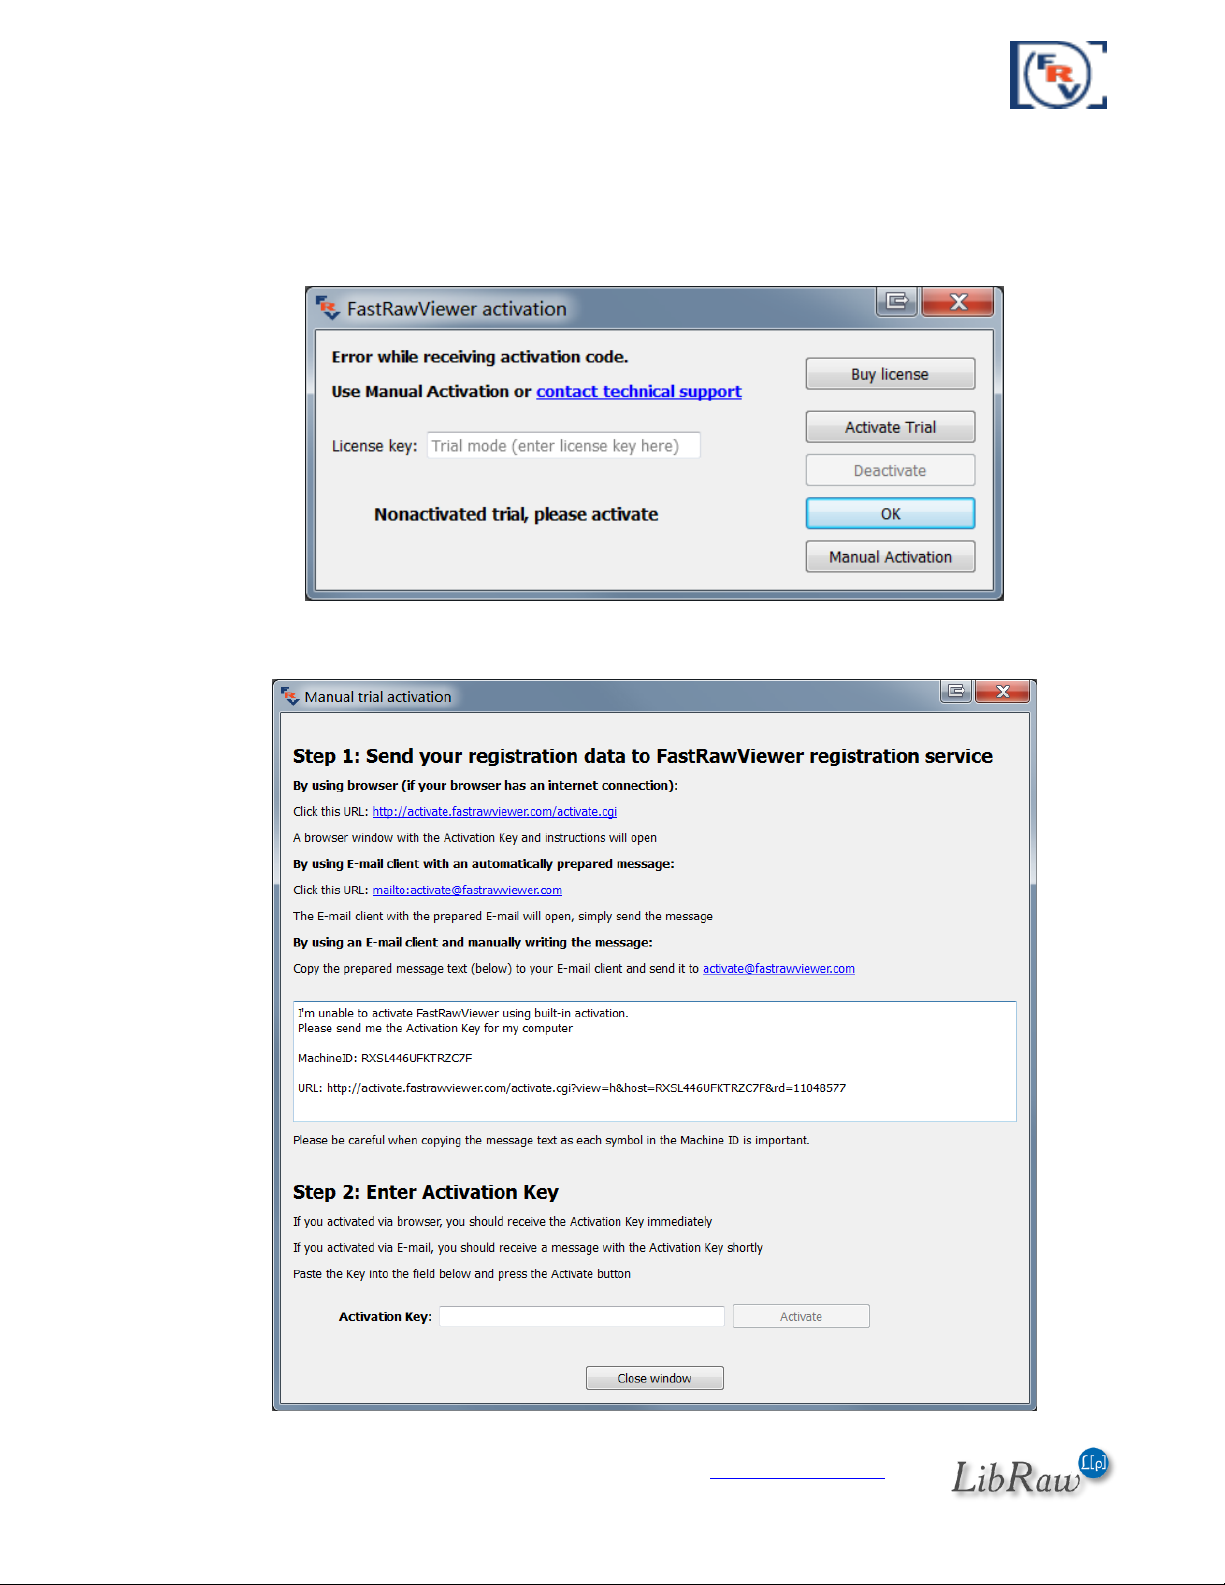
Manual Activation
If the program fails to connect with the activation server (one-minute timeout happens), you will
see a pop up alert, with a «Manual Activation» button on the bottom right of the notification
window.
After clicking the «Manual Activation» button, a «Manual Trial Activation» window will pop up:
Page 16 of 127 Copyright © 2014-2015, LibRaw LLC, www.libraw.com
Page 17
FastRawViewer – user manual
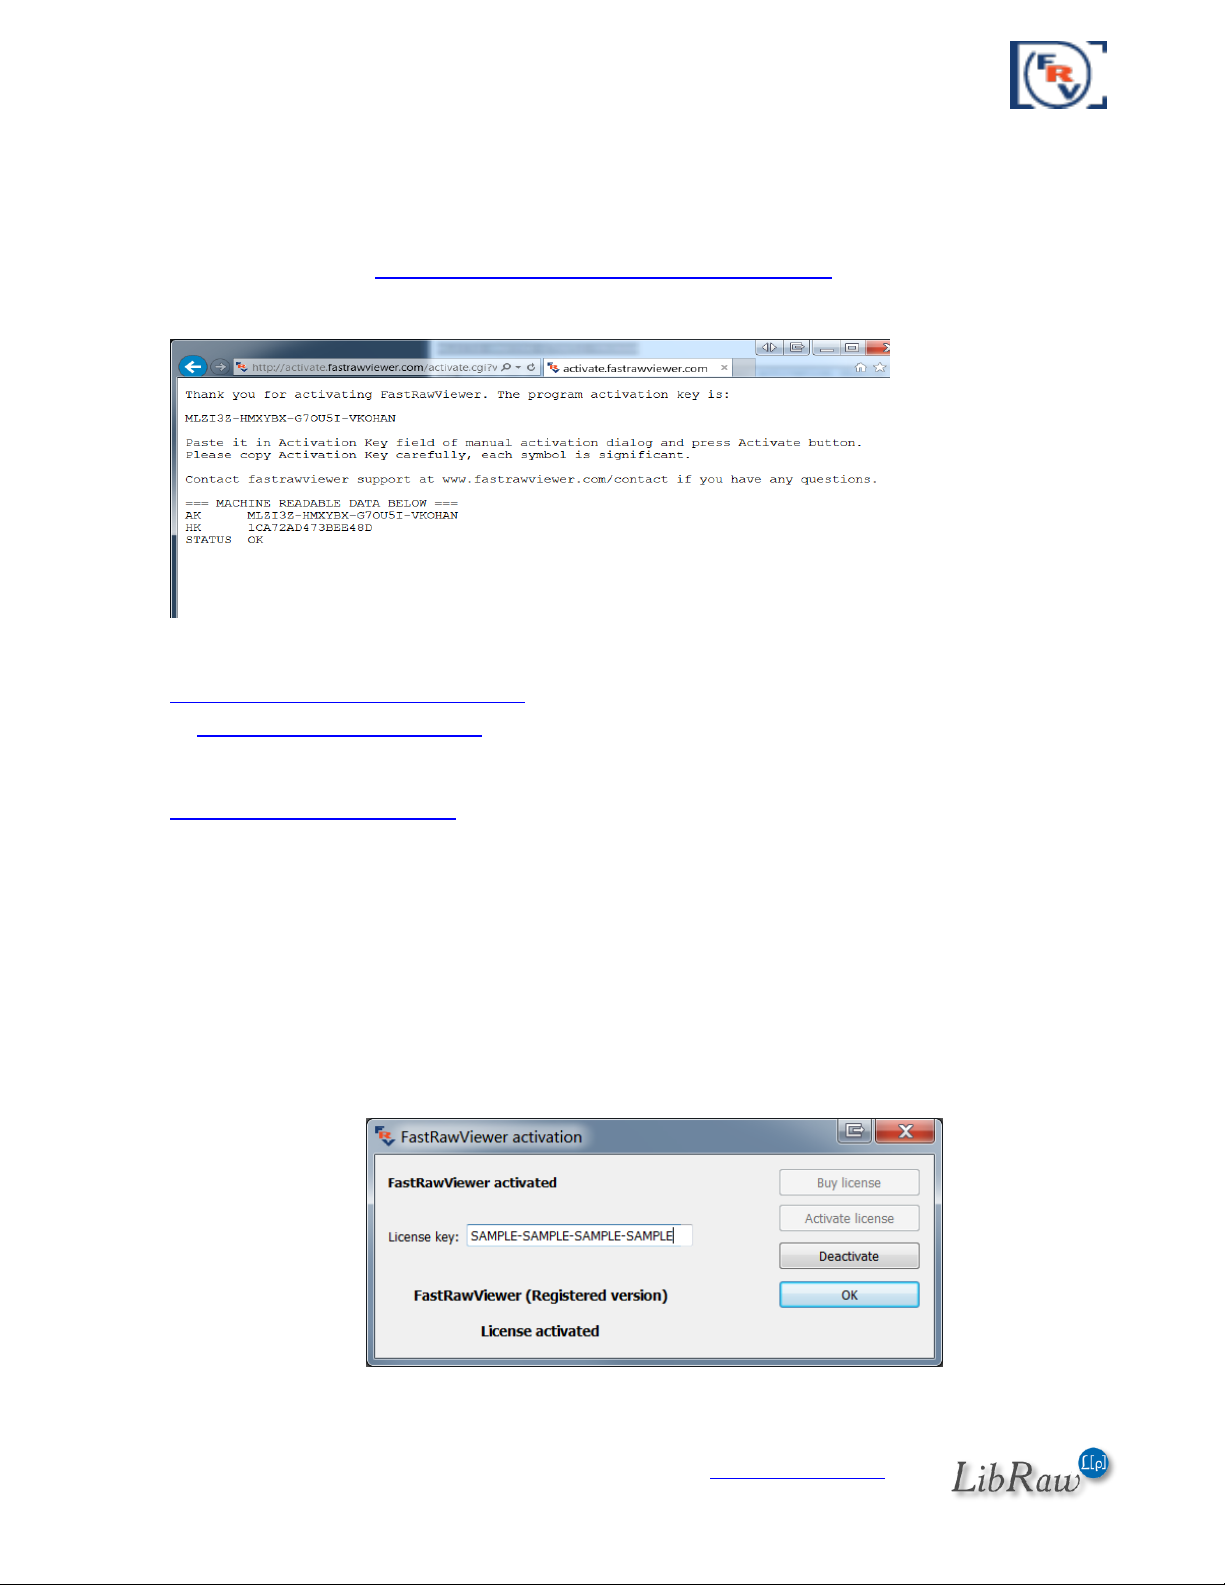
Depending on your Internet access, you can use one of the 3 ways to obtain the activation code:
By using browser (if your browser has an internet connection) – use this if your browser can
connect to the Internet.
Simply click this link: http://activate.fastrawviewer.com/activate.cgi and you will see a browser
window pop up with your unique activation key:
By using E-mail client with an automatically prepared message – click the
mailto:activate@fastrawviewer.com link and your mail client will create a new pre-populated email
to activate@fastrawviewer.com You will only need to click send.
By using an E-mail client and manually writing the message – you can send an email to
activate@fastrawviewer.com using the text in the window below (I'm unable to activate…»
If you choose to obtain the activation key via email, you will receive a reply email with the text
identical to that which you would see in the web browser (the activation key, however, will be
different.)
You can then use the Activation Key (from the browser or email) and enter it into the Activation
Key field (it is best to use Copy-Paste, as every character of the key is important) and press
«Activate.»
After clicking the «Close window» button, the window will close and the FastRawViewer activation
window will display the registration status.
Page 17 of 127 Copyright © 2014-2015, LibRaw LLC, www.libraw.com
Page 18

FastRawViewer – user manual
Using FastRawViewer
Conventions in this Manual
The user manual is the same for Windows and Mac versions of FastRawViewer.
All of the standard keyboard shortcuts are given in Windows notation (for example, Ctrl-O).
For OS X please use the following substitutions:
Ctrl on Windows – is Command on Mac
Alt on Windows – is Option on Mac.
All keyboard shortcuts are fully customizable (see below, the “Keyboard Shortcut Settings”).
Throughout this text we will be using default program settings for keyboard / mouse shortcuts.
Launching FastRawViewer
To launch the program:
Start it up the usual way (Double-click the icon)
Or drag any RAW or JPEG file onto the icon, then the program will open and display that
file.
Or drag a folder (catalogue) onto the icon - the program will start and will open the first
RAW file in the folder.
After start-up you will be presented with the program’s main screen.
Page 18 of 127 Copyright © 2014-2015, LibRaw LLC, www.libraw.com
Page 19
FastRawViewer – user manual
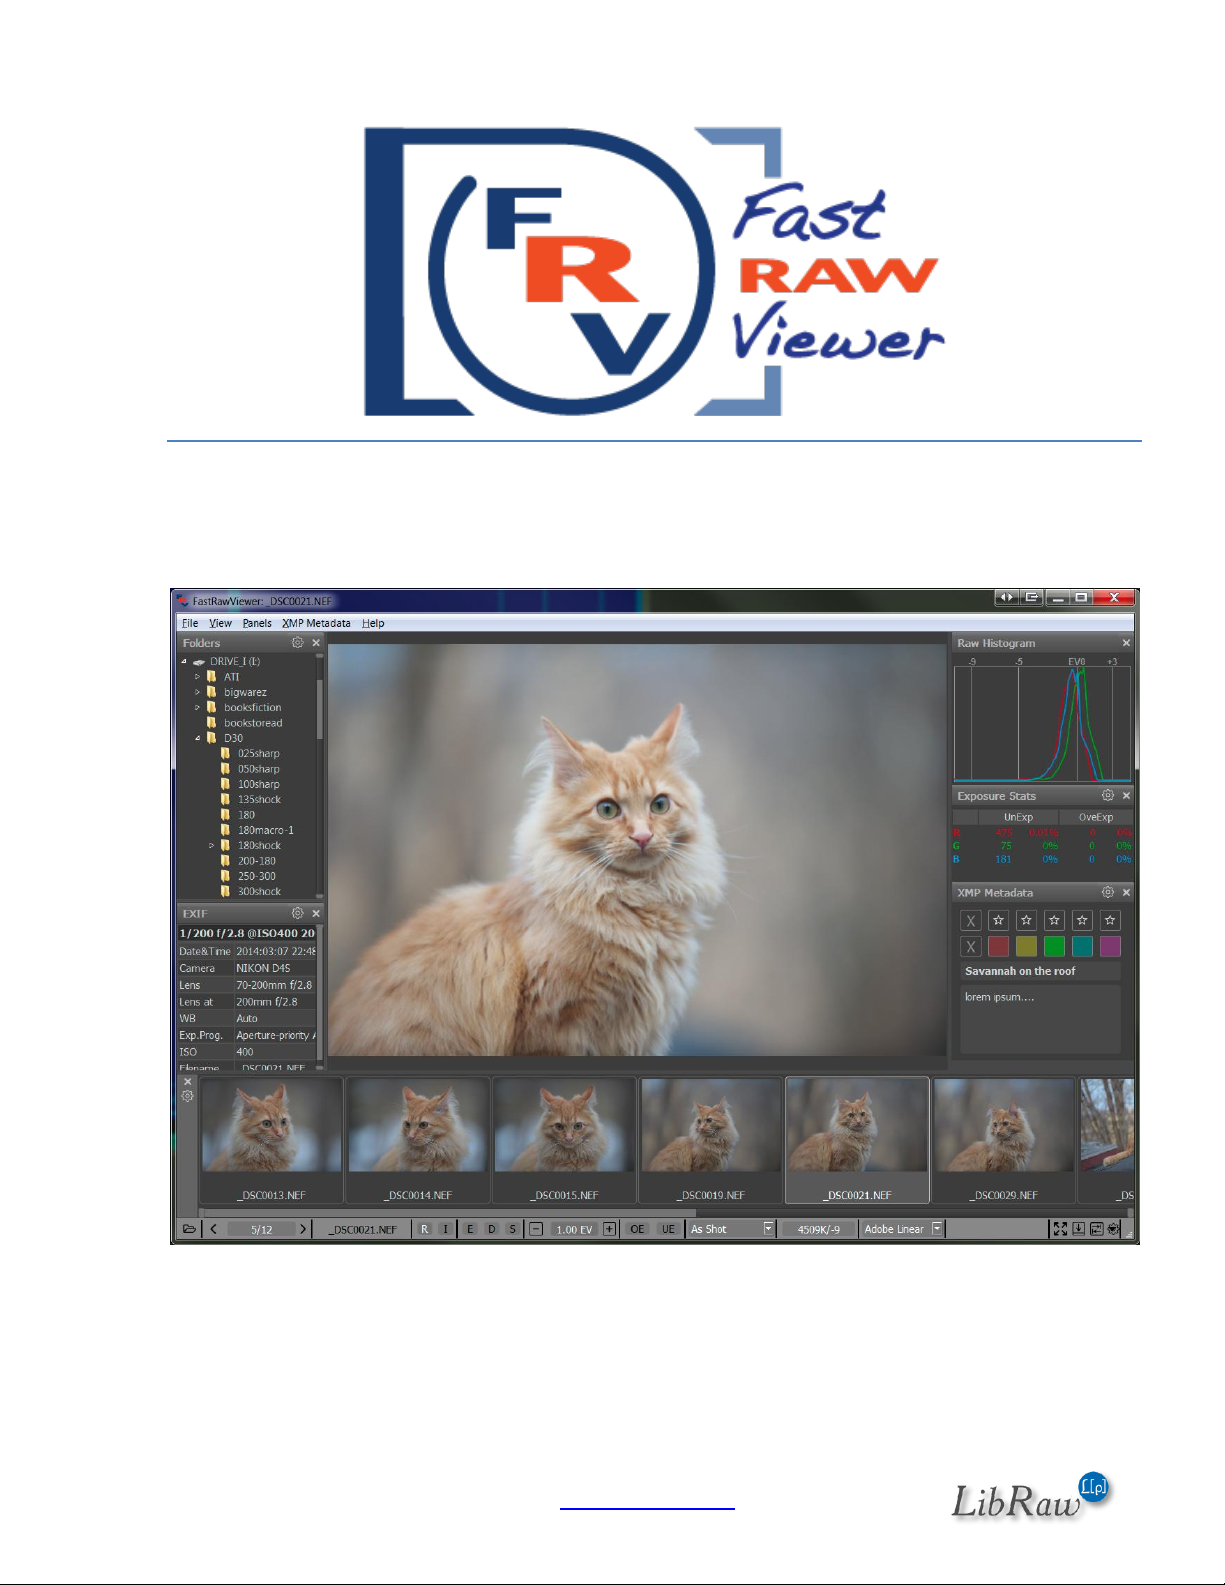
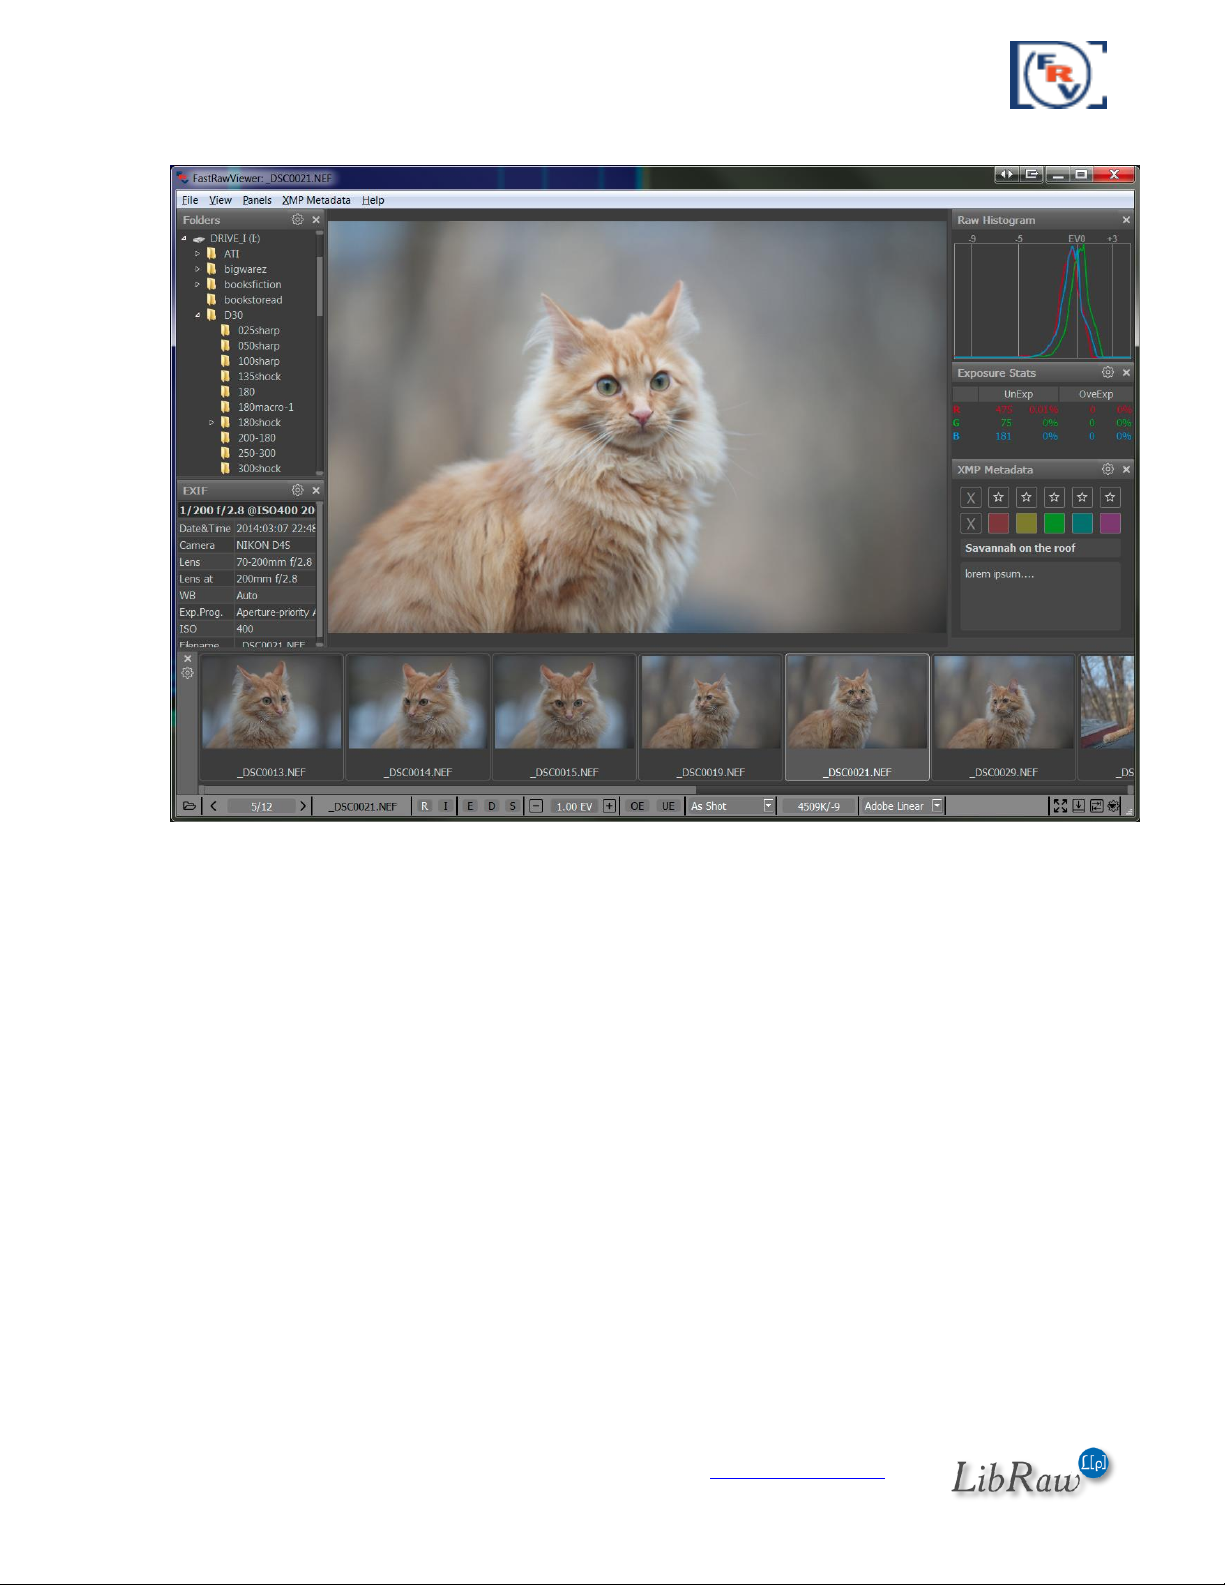
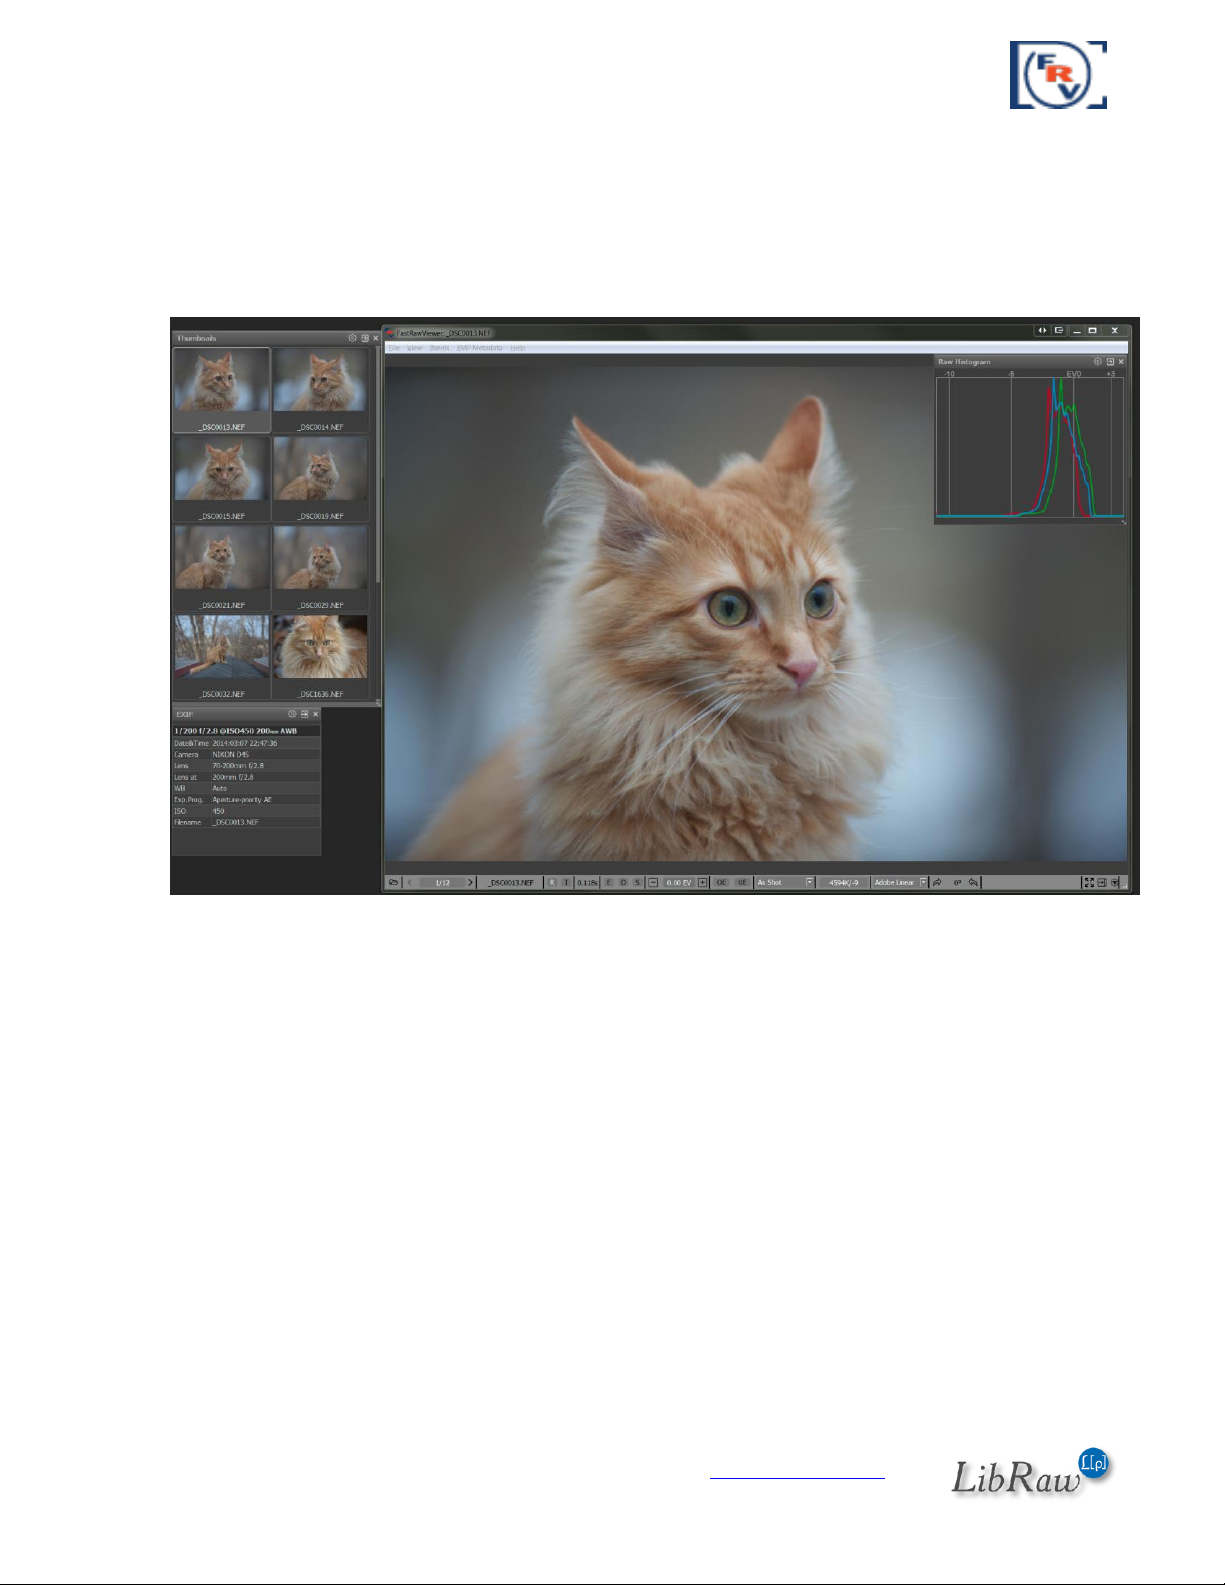
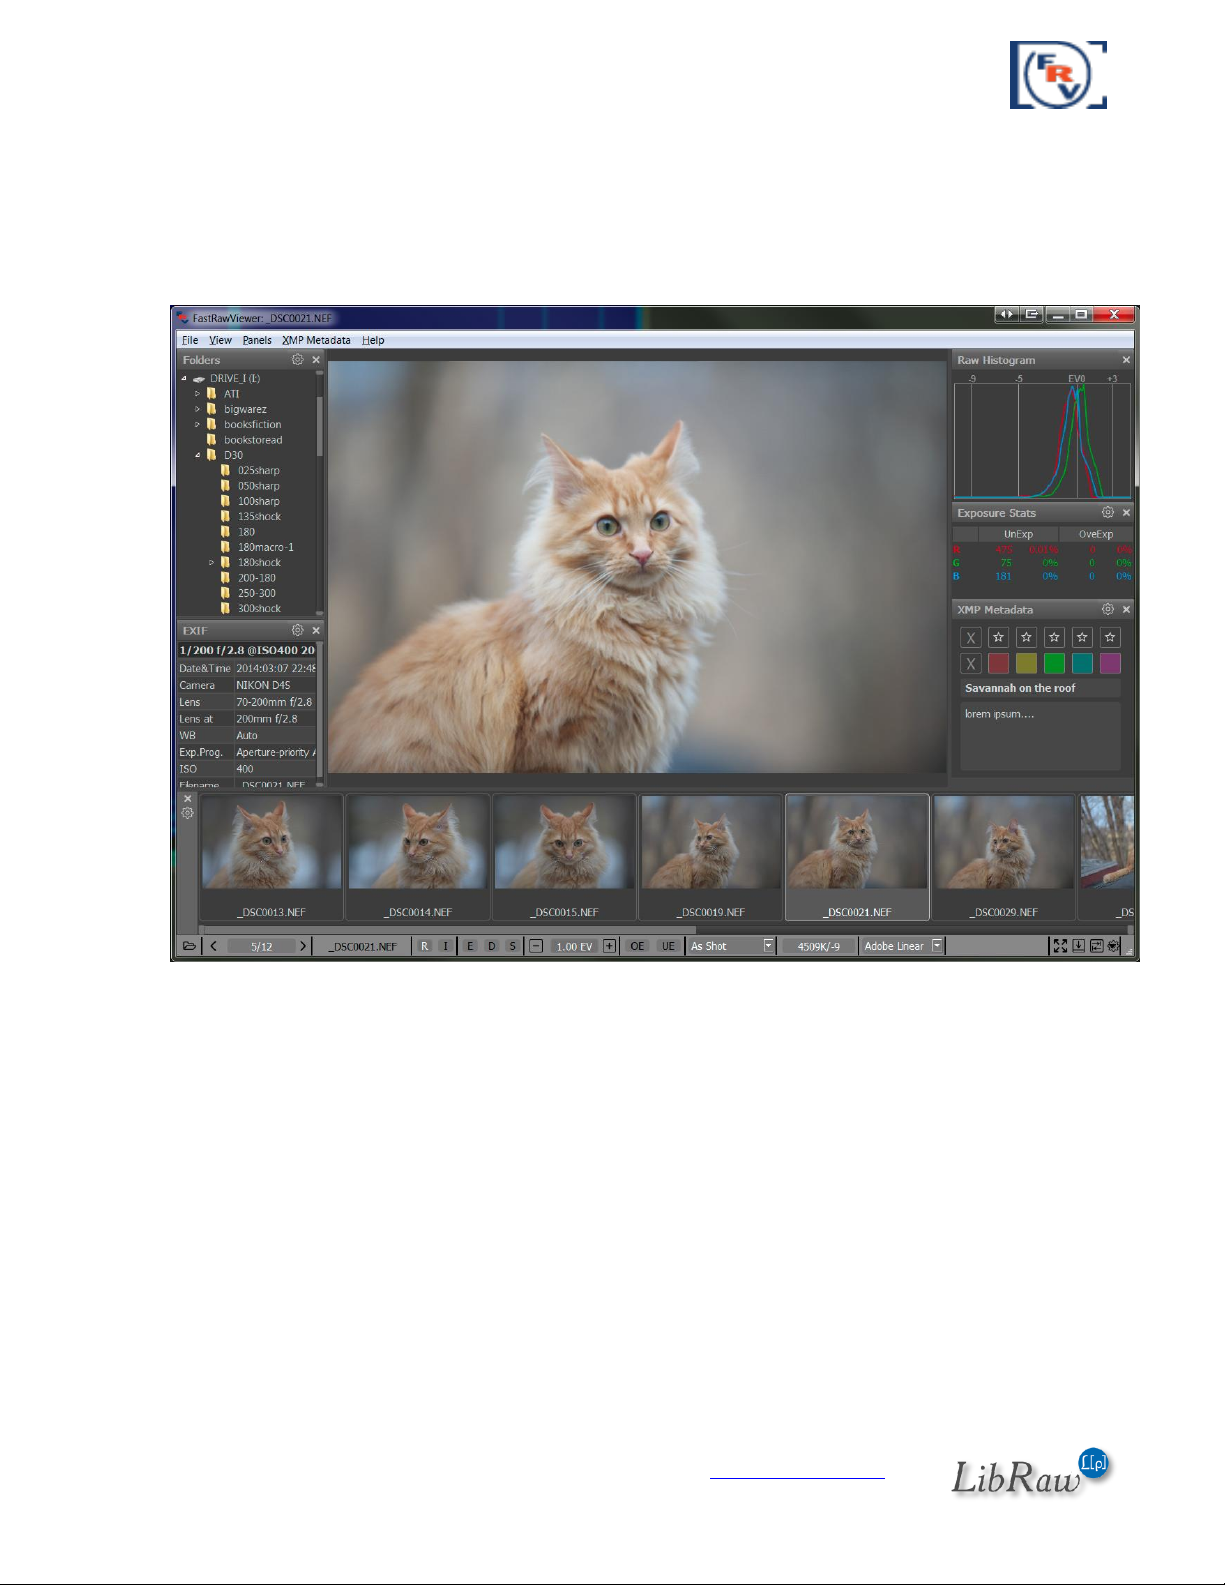
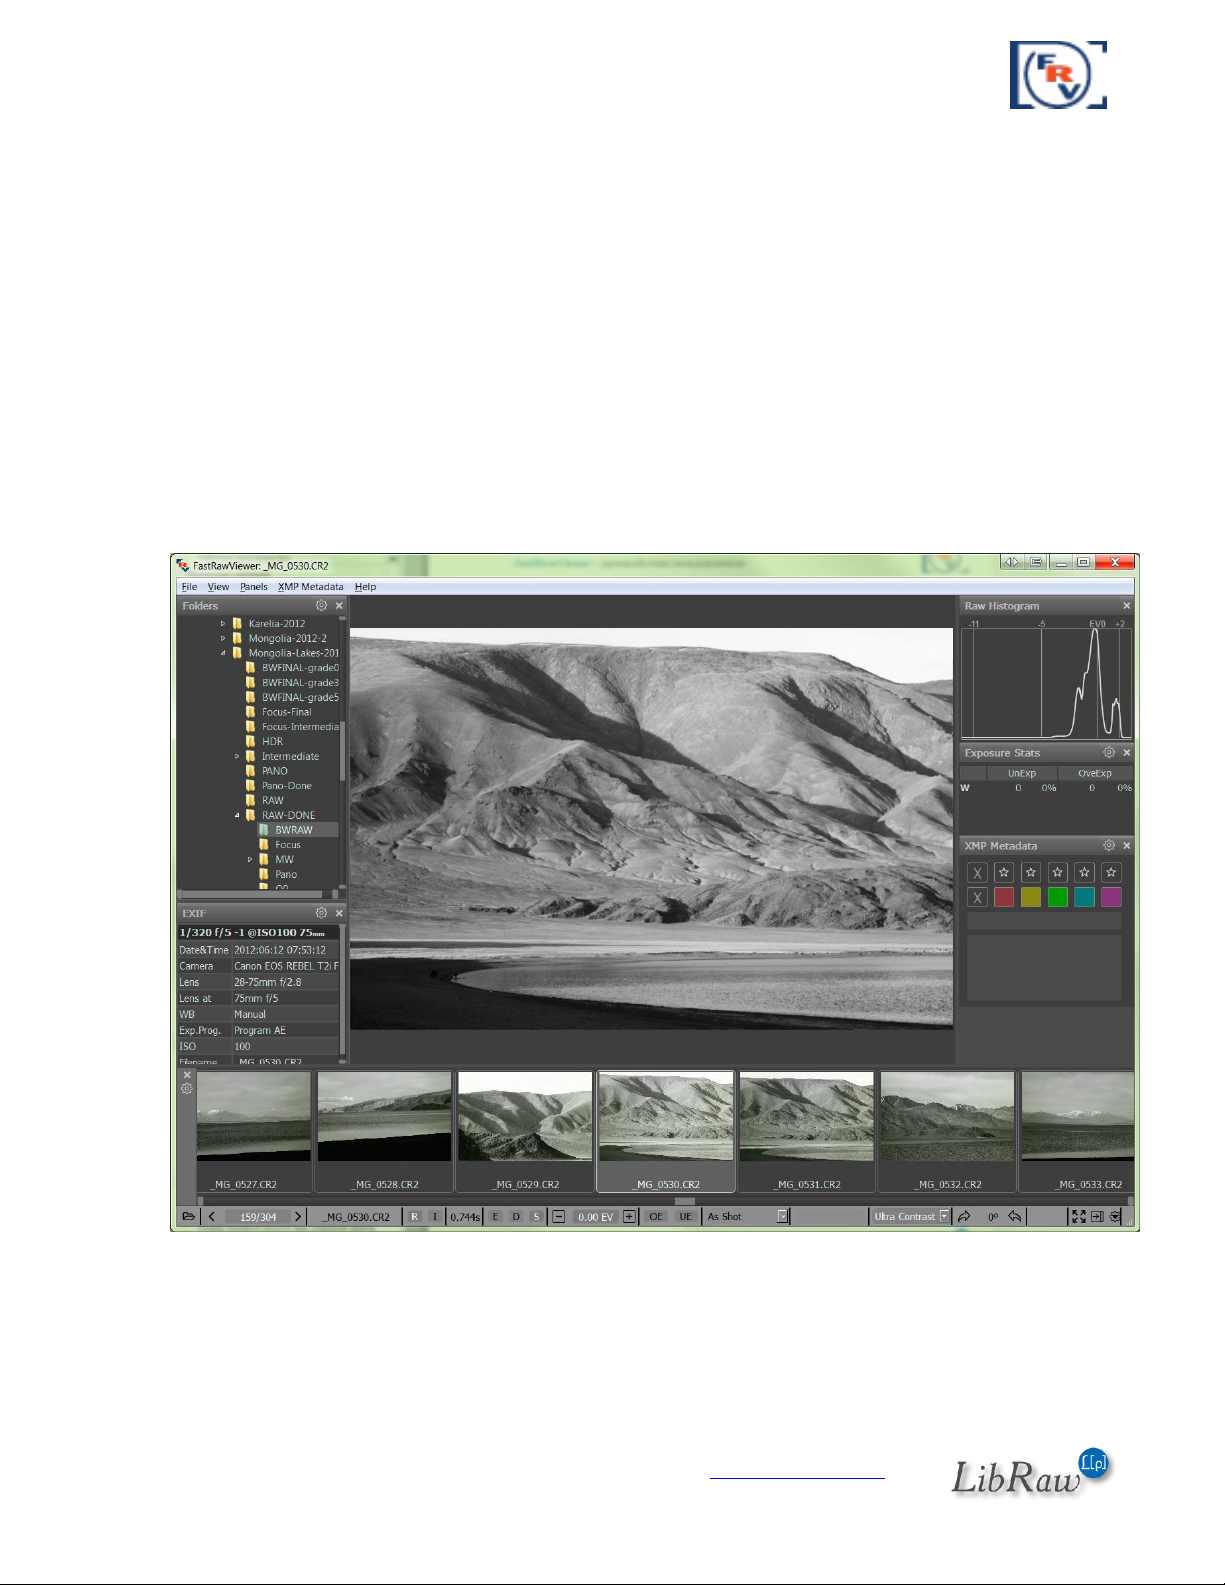
Main Screen
On the program main screen:
On top, as usual, there is the menu that allows access to almost all features, excluding those
actions, which can only be performed with the mouse.
o File – navigating through the files (opening files and folders, moving to the next file,
moving files to different folders, sending the currently displayed file to an external
program / raw converter).
o View – controls image display mode (full-color or per-channel viewing; image
orientation; outline the highly detailed areas and areas containing high-contrast edges
(focus peaking), perform various adjustments to the image, etc.)
o Window – controls the visibility and layout of information panes; on the above
screenshot, those panes are located to the right of the image.
o Label – allows to choose XMP Ratings / XMP Labels
o Help – the name says it.
The currently displayed RAW file is in the center of the window.
To the left, the following panels are displayed:
o Folder tree
o EXIF data
The following panes are located to the right:
Page 19 of 127 Copyright © 2014-2015, LibRaw LLC, www.libraw.com
Page 20

FastRawViewer – user manual
o Histogram (RAW for RAW files, JPEG – for JPEG display)
o Over/Underexposure statistics
o XMP Rating and XMP Label
The Filmstrip/Thumbnails panel is placed below the window, showing the file previews for the
current folder.
Additional information and operational elements are placed in the bottom (status) bar.
Default elements:
o File open icon
o Buttons for navigating through the current folder: previous file, number of file in the file
list and the length of the list, next file.
o Buttons for switching between RAW-JPEG-external JPEG
o Buttons for turning on Focus Peaking and Shadow Boost
o Exposure correction control button.
o Overexposed and Underexposed area display buttons.
o Preset white balance choices drop-down menu.
o Buttons for quick control: Fullscreen, hide/show Filmstrip panel/all panels, display and
edit settings call-up.
Aside from the aforementioned, if the window is wide enough, the following buttons will be
displayed:
o File name
o Brief EXIF data for the shot (Exposure settings, ISO setting, applied exposure
compensation, use of flash, lens's focal length).
o Manual white balance customization button.
o Contrast curve selection menu.
o Image orientation indicator and rotation buttons.
Additionally, the following settings can be indicated if desired:
o The name of the current folder
o Current image zoom factor and the control buttons.
o Time spent on the loading and decoding of the current file.
o Per-channel display (R-G-B) button and simulated conversion to a black and white
version.
o XMP rating and label control buttons.
The elements shown in the bottom status bar can be customized according to your needs. For this,
press the “Customize FastRawViewer” button on the lower right corner of the screen, choose
“Customize bottom bar” and select the necessary display mode for each possible element. For
more detail, see below in the “Customizing the status bar” section.
Page 20 of 127 Copyright © 2014-2015, LibRaw LLC, www.libraw.com
Page 21
FastRawViewer – user manual
Workspace
The informational panels (Histogram, EXIF, Folders etc.) can be dragged from the main window of
the program to the side (for instance, to a second monitor) and be made “floating”. Panels can be
turned on/off through the Panel menu (or the F2-F7 hotkeys), the statistics and XMP-data panels
are fixed in size, but the sizes of the other panels can be changed.
Any floating panel can be made semi-transparent and placed in the workspace, above the image.
Setting Preferences – Interface – Disable transparency for panels outside of main window makes
a floating panel completely non-transparent when it is placed outside the main program window.
Page 21 of 127 Copyright © 2014-2015, LibRaw LLC, www.libraw.com
Page 22
FastRawViewer – user manual
The other panel settings are individualized, and are described in the Preferences – Informational
Panel Preferences.
Informational panels can be closed (‘x’ on the upper right corner of the panel or corresponding
item in Menu – Panels), and re-opened through Menu – Panels. The same menu has the option
Move all panels to dock, which will restore the standard layout of the program workspace.
Page 22 of 127 Copyright © 2014-2015, LibRaw LLC, www.libraw.com
Page 23
FastRawViewer – user manual
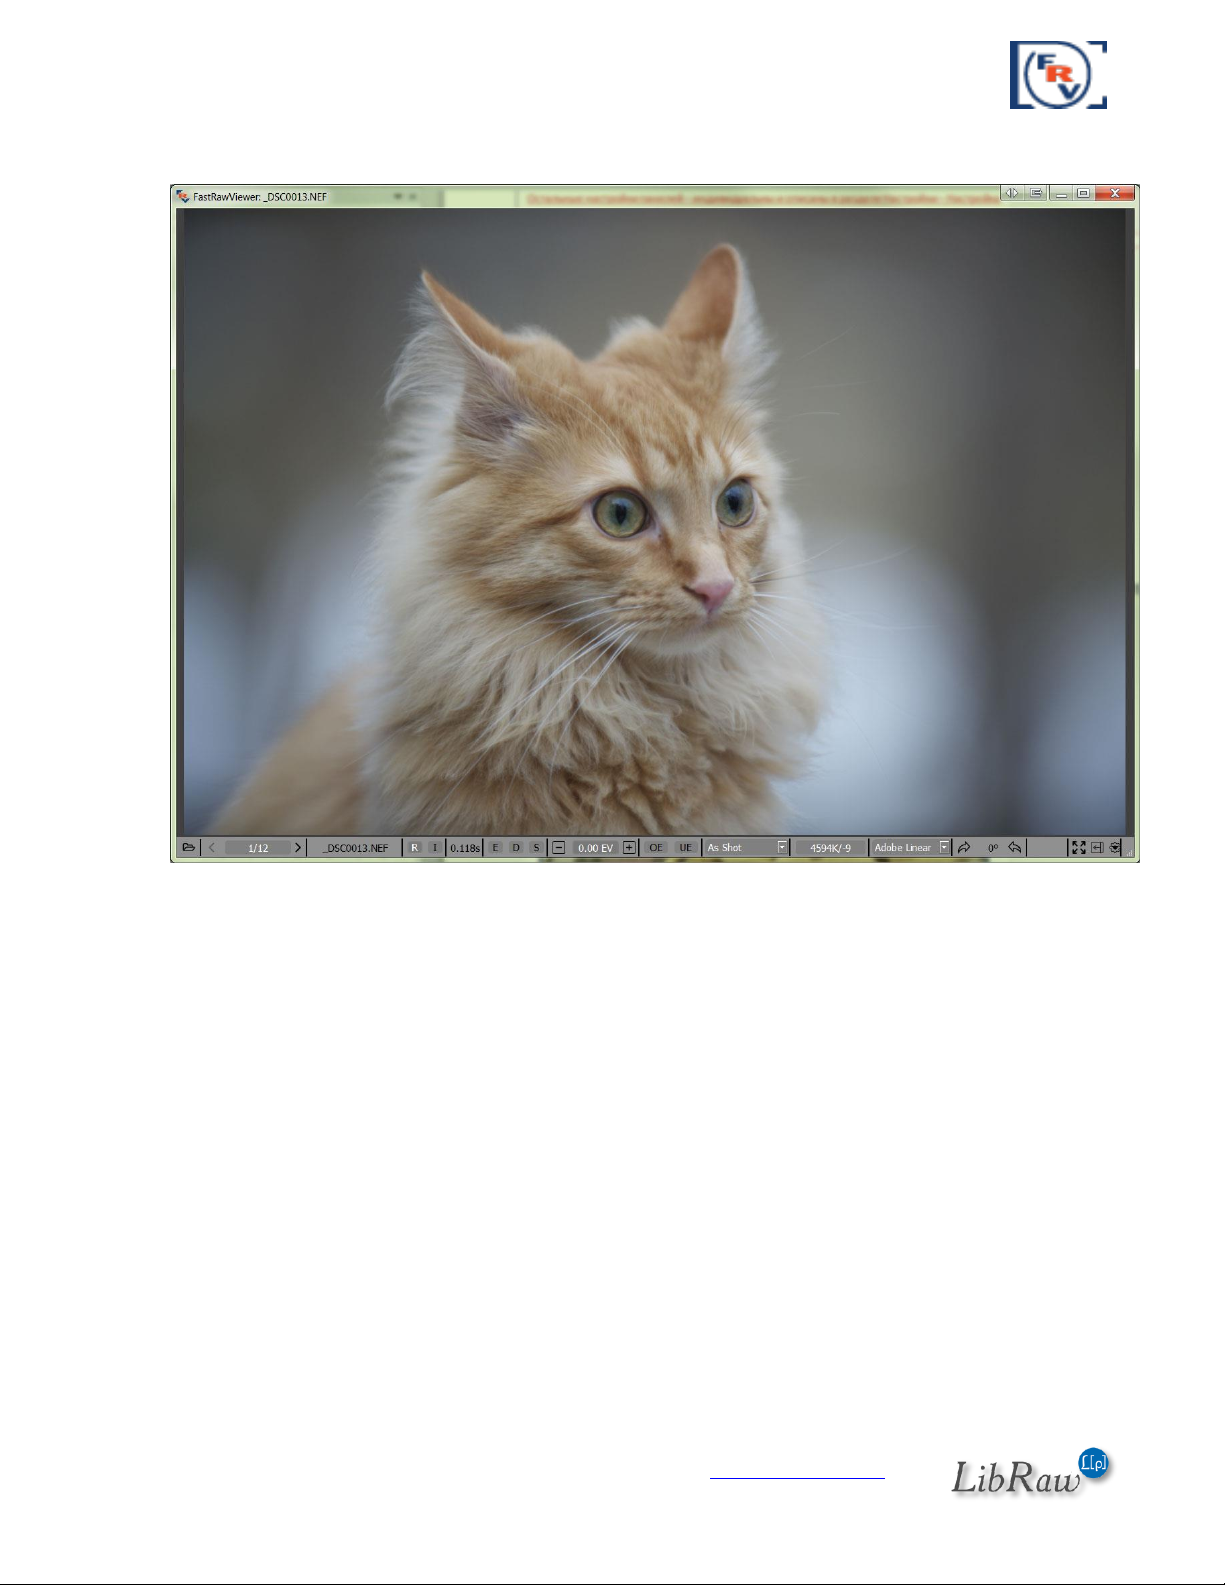
Menu–Panels–Hide all panels (or, press Tab) – hides all informational panels:
With this, the top menu bar is hidden as well (this can turned off through Preferences – Interface –
Hide menu bar when hiding information panels). You may, also, hide bottom information bar
(status bar) by setting Preferences – Interface – Hide bottom window bar when hiding
information panels.
Pressing Tab the second time returns everything to the way it was.
You can disable the hiding of informational panels that are outside the program window. This is
useful when, for instance, you have moved them to a second monitor: Preferences – Interface –
Do not hide panels outside of main window.
Menu – View – Fullscreen (or the F key, or Fullscreen button on the bottom bar) switches the full
screen mode on/off. Choosing this item again or second press of the F key escapes from full screen
mode (for Mac OS X 10.6 we have no true full screen mode, instead the main program window will
be maximized).
Page 23 of 127 Copyright © 2014-2015, LibRaw LLC, www.libraw.com
Page 24
FastRawViewer – user manual
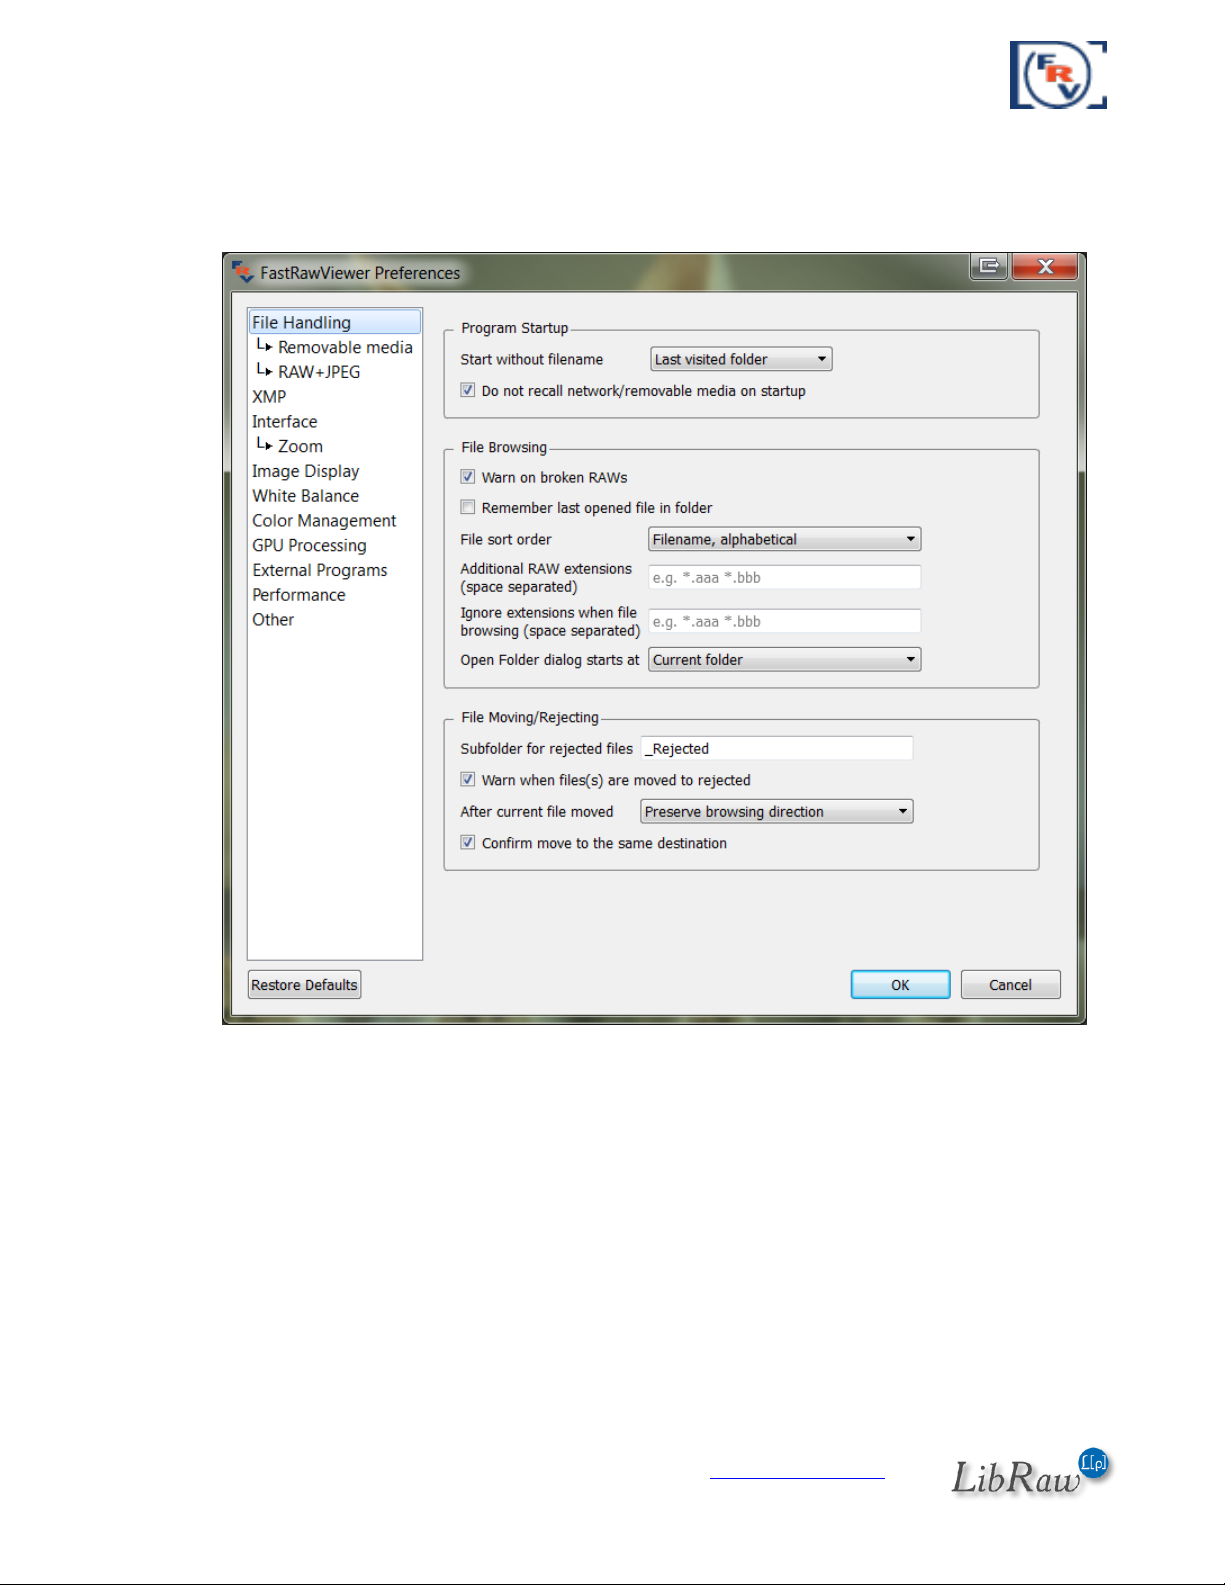
Changing the Settings
To bring up the settings control window, use Menu–File–Preferences /Ctrl-P on Windows, Cmdcomma (,) on Mac/. You will be presented with the following:
Further in the text, this settings control menu (Preferences) is mentioned many times, each time
we refer to particular aspects and features of FastRawViewer. Furthermore, everything is
described again in the Program Settings section.
Page 24 of 127 Copyright © 2014-2015, LibRaw LLC, www.libraw.com
Page 25
FastRawViewer – user manual
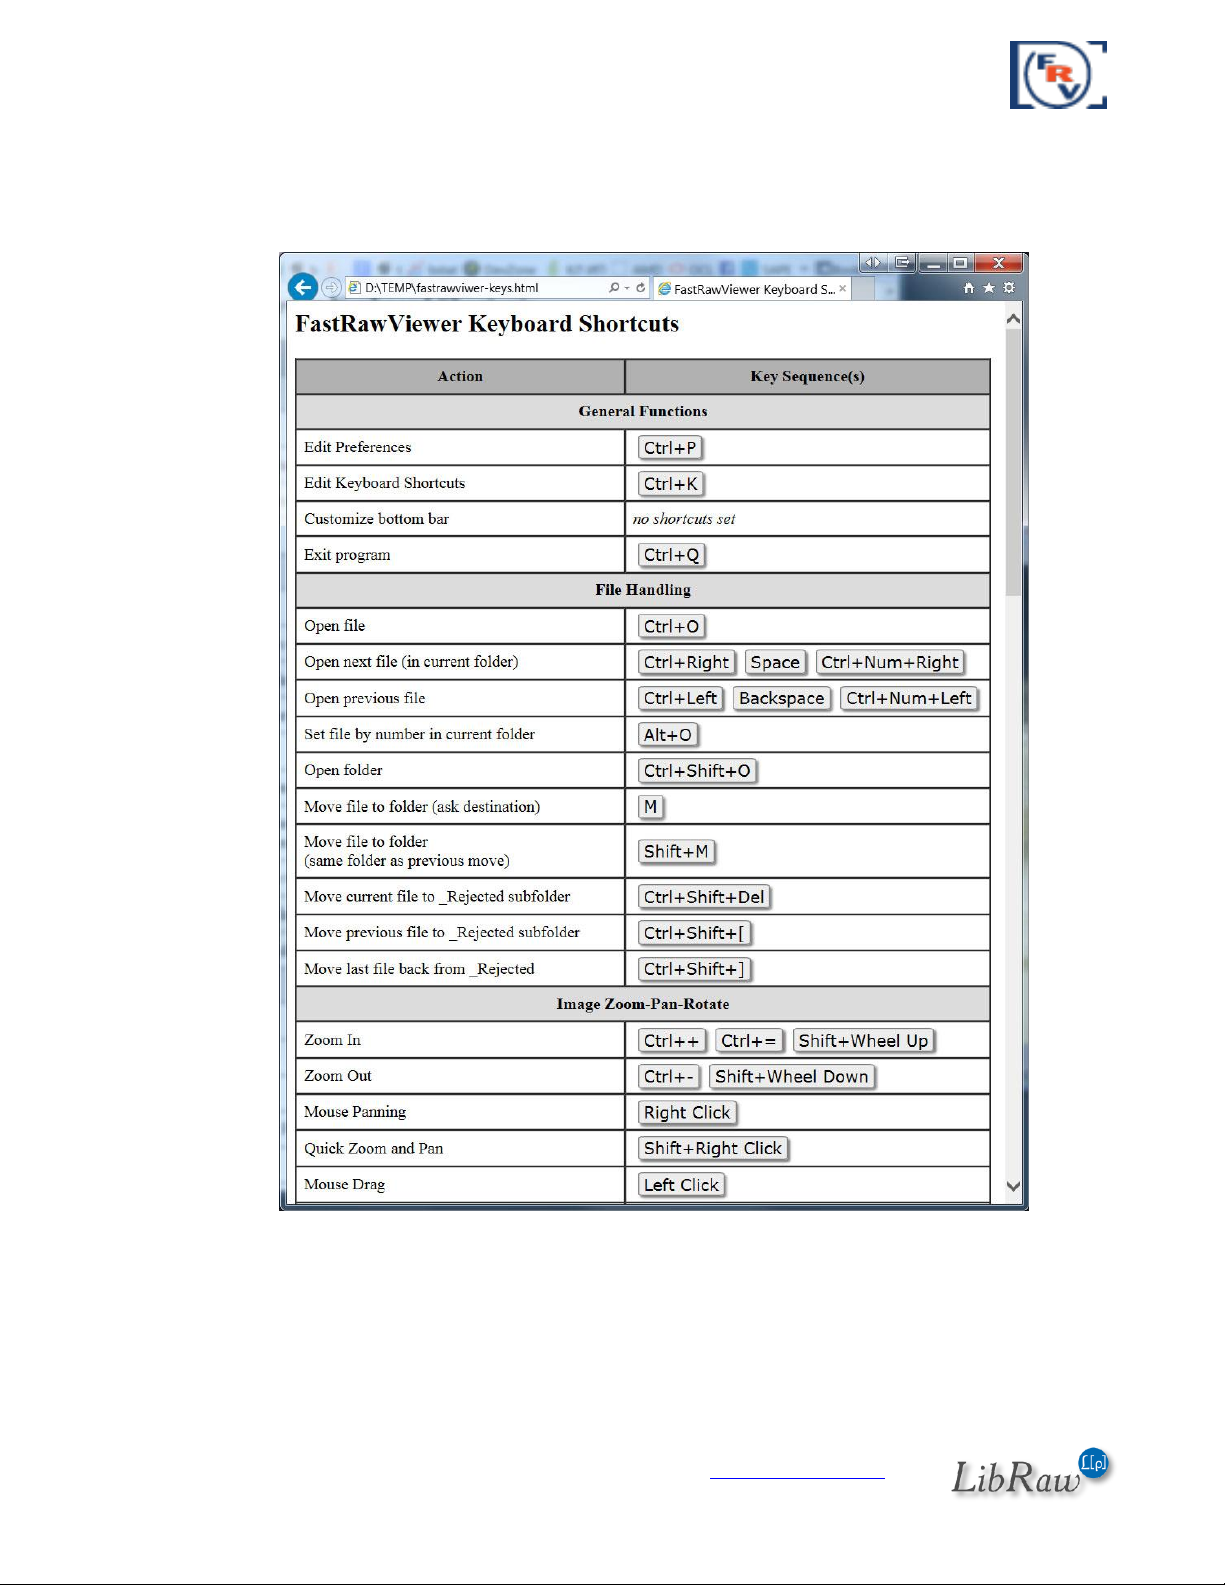
Help with the keyboard Shortcuts
Every keyboard action can be seen in the Keyboard Shortcuts Help window, which can be reached
by pressing F1 function key or through Menu–Help:
All keyboard shortcuts can be changed and tuned to your taste. The instructions on how to do this
are in the “Adjusting the Keyboard Shortcuts” section below. If the keyboard shortcuts are
changed, the help window will show their current state.
The standard list of keyboard macros is given in the «Standard FastRawViewer Keyboard
Shortcuts» (at the end of the document
Page 25 of 127 Copyright © 2014-2015, LibRaw LLC, www.libraw.com
Page 26
FastRawViewer – user manual
Working with the files
Folder Navigation
Folders can be navigated via the Folders panel, the standard location of which is to the left of the
main program window:
The folders can be navigated with the:
1. Mouse:
a. Clicking on the triangle to the left of the folder name opens the subfolder tree. A
second click on the triangle closes the subfolder tree.
b. Clicking once on the folder name loads the first preview in the Filmstrip panel.
c. A double-clock on the folder name loads the first preview and opens the first file of
the folder in the main program window.
2. Keyboard:
a. The up/down arrows, PgUp/PgDn keys, and Home-End moves across the list while
loading the previews into the Filmstrip.
b. Right/Left arrows open/close subfolders.
c. Enter loads previews and opens the first file in the folder.
Page 26 of 127 Copyright © 2014-2015, LibRaw LLC, www.libraw.com
Page 27
FastRawViewer – user manual
Working with removable media (flash cards, etc.)
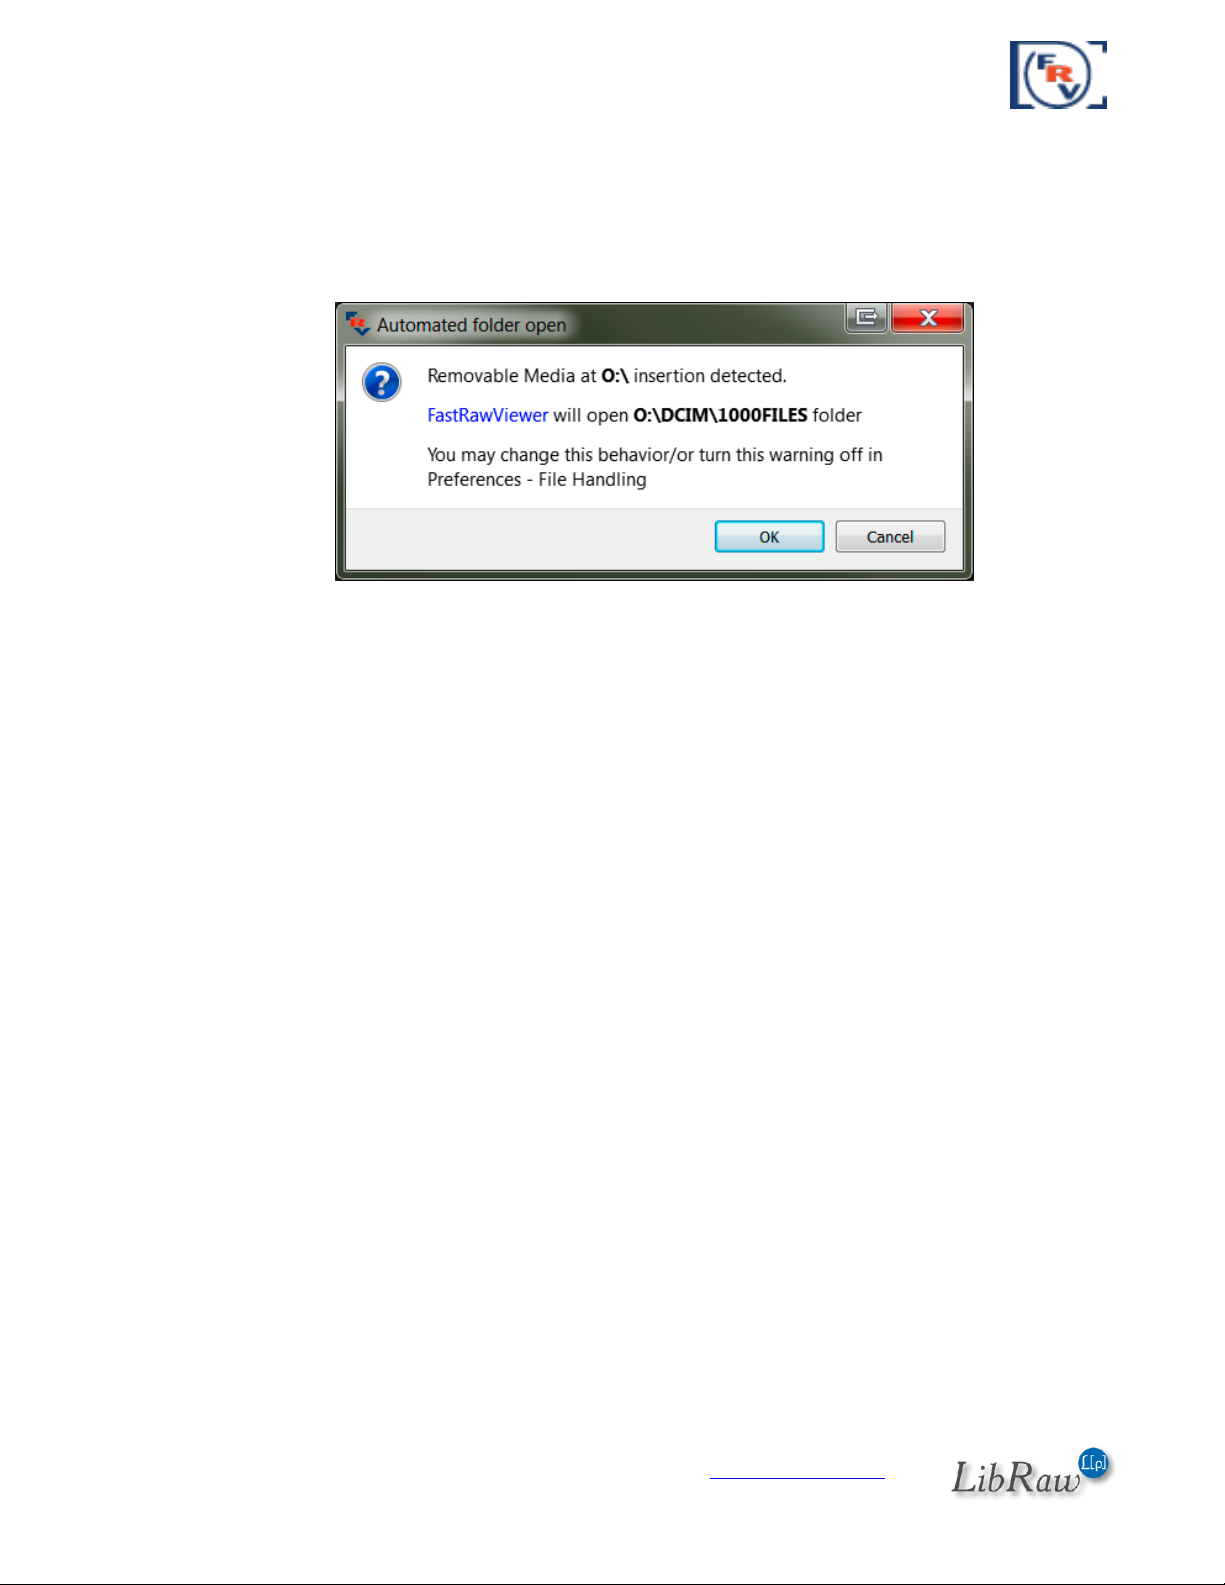
Automatic recognition of inserted media
Under default settings, FastRawViewer recognizes the removable media (memory card, USB flash
drive), and, having recognized it, shows the following dialog:
“Removable Media insertion detected, FastRawViewer will open the newest folder found on it
under the DCIM folder”.
The action resulting from detecting removable media can be changed in Preferences – Removable
Media to one of the following variants:
Do nothing (Do nothing)
Open predetermined folder (by default, \DCIM)
Opens the most recent (by date of modification) folder in the predetermined folder.
You can also turn off the above-shown warning in the same Preferences section.
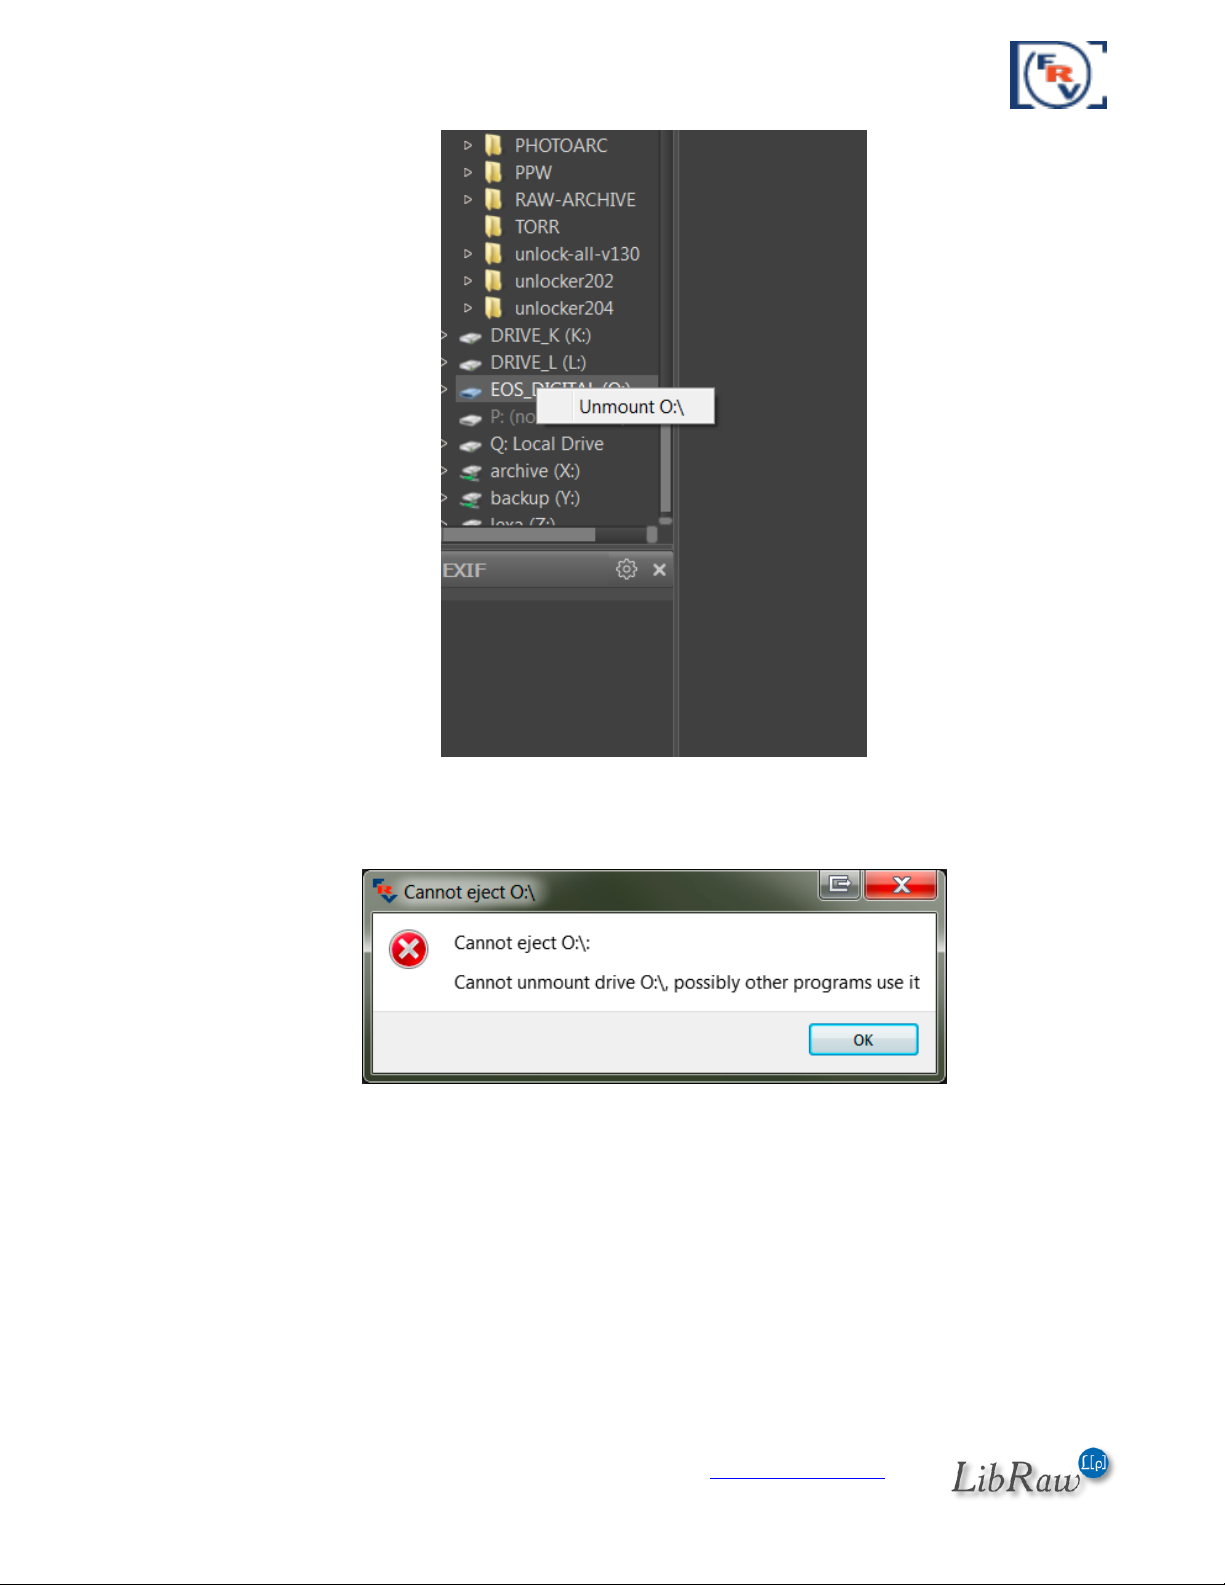
Unmounting (ejecting) removable media
If the removable media doesn’t use any application except FastRawViewer, then it can be ejected
without closing the program.
For this, one needs to right-click the respective media icon in the Folders panel and to select in the
context menu the (only) item, Unmount MediaName:
Page 27 of 127 Copyright © 2014-2015, LibRaw LLC, www.libraw.com
Page 28
FastRawViewer – user manual
After a successful unmount, the media will be freed up without additional messages. If there are
any problems, then the following error message will be displayed:
This message means that the removable media is in use by some other program as well, and
FastRawViewer cannot safely unmount it.
Folder file navigation
Navigation via the Filmstrip/Thumbnails panel:
Choosing a file in the Filmstrip/Thumbnails panel leads to it loading in the main program window.
The Filmstrip/Thumbnails panel can be navigated via:
1. Mouse:
Page 28 of 127 Copyright © 2014-2015, LibRaw LLC, www.libraw.com
Page 29
FastRawViewer – user manual
a. Rotating the mouse wheel (if it exists) or using the Scrollbar - scroll through the list.
b. Single or double-click on a preview chooses the file.
2. Keyboard: arrows, PgUp/PgDn, and Home/End navigate through the list, the chosen
element loads automatically.
When moving to the next file, zoom is set according to the preferences - Preferences – Image
Display – Image zoom on next file:
Keep zoom ratio – maintains the current zoom size
Keep image width – maintains the image width
Fit to screen – Turns on the Fit to screen mode.
Additional methods of navigating folder files
FastRawViewer creates a list of files in the folder, including the following file types:
Files with standard RAW files extensions (the list is pre-defined in the program)
JPEG files (with .JPG, .JPEG extensions)
Files with other extensions, as defined in Preferences – File Handling – Additional RAW
extensions.
If the RAW+JPEG mode is switched on (Preferences – RAW+JPEG – Handle RAW+JPEG together),
the .RAW and .JPG files with identical names will be considered as one “virtual” file with several
representations (RAW, embedded JPEG, external JPEG).
Within the above-described alphabetized list, you can navigate:
Forward (from AAAAA.RAW to ZZZZZ.RAW): through Menu–File–Next File (standard
keyboard shortcuts: Spacebar, Ctrl-Right Arrow)
Backwards: Menu–File–Previous File (Backspace, Ctrl-Left Arrow)
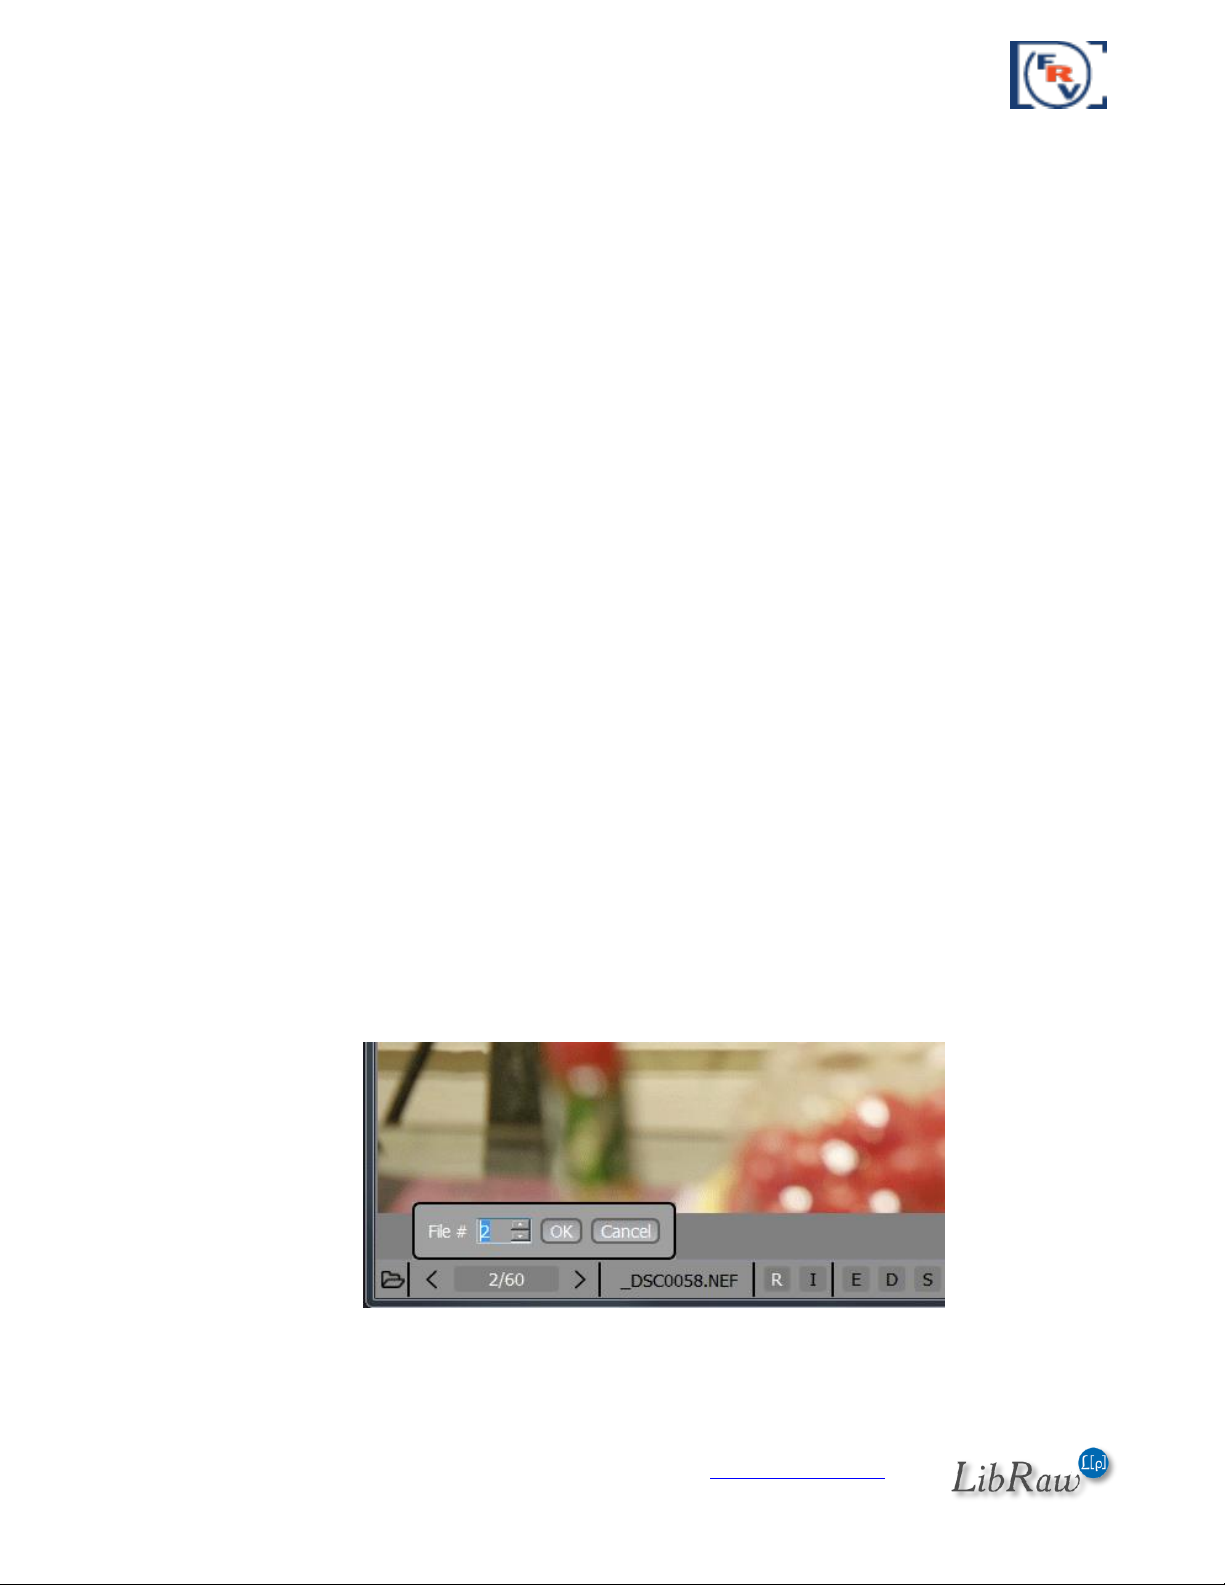
Setting an arbitrary number in the list: clicking on the file number in the list (the leftmost
button in the bottom bar of the program) or Alt-O opens a dialogue to input the file
number:
Page 29 of 127 Copyright © 2014-2015, LibRaw LLC, www.libraw.com
Page 30

FastRawViewer – user manual
You can enter the number you need in this dialogue (the up-down arrows and PgUp/PgDn
allow you to quickly change it with a large/small step) and go to that file by hitting Enter or the OK
button.
When moving to the next file, the zoom factor is determined in accordance with the setting in
Preferences – Image Display – Image zoom on next file:
Keep zoom ratio – maintains the zoom factor
Keep image width – maintains the width of the image
Fit to screen – turns on the Fit to screen mode.
Opening a file/folder using the menu
To open a file, you can use one of the following:
Menu – File – Open (or Ctrl-O)
Through the list of recently opened files (Menu – File – Recent Files)
Drag-n-Drop the file onto the program icon
Drag-n-Drop the file onto the program window.
A folder (catalogue) can be opened in similar ways:
Menu – File – Open Folder (Ctrl-Shift-O).
Menu – File – Recent Folders – a list of recently visited folders.
Drag-n-Drop folders onto the icon of the program.
Drag-n-Drop folders onto the program window.
When opening a folder:
With default settings the first (in alphabetical order) RAW or JPEG file in the folder is
displayed
If the Preferences – File Handling – Remember last opened file in folder setting is on, and
the given folder was opened earlier, the file which was viewed last in the folder will be
opened first.
Drag and Drop
Files and Folders can be “dropped” onto the window of the program, as well as on the icon on the
desktop or the OS X Dock. If so:
1. If you dropped several files, then the first one opens (the order is follows the order of the
file selection in the file manager). All others will be ignored.
2. If you dropped several folders, then the first one opens. The others will either be ignored,
or remembered for future browsing (see below for the “Navigating through several
folders” section).
Page 30 of 127 Copyright © 2014-2015, LibRaw LLC, www.libraw.com
Page 31

FastRawViewer – user manual
3. If you dropped a mix of files and folders, then the first folder will be opened, while the
separate files will be ignored.
Mac OS X: it is recommended that files/folders (if there are a lot of them) be dropped on the
opened window, rather than the icon; this way it works a lot faster.
FastRawViewer Start-up Modes
Mac OS X: a single instance of the program is started. Second click on the icon in Applications, or
drag-n-drop of the file or folder on the application icon activates the already started instance of
the application.
You can start a second instance of FastRawViewer through the Terminal Utility with the command
/Applications/FastRawViewer.app/Contents/MacOS/FastRawViewer
Windows: Several instances of the program can be started by (double-)clicking the icon or
performing a drag-n-drop operation. With the start of each instance, a new window (displaying a
new file, if started with a drag-n-drop operation) will be opened.
If you prefer to use “single instance” mode in Windows, you may do so by switching on
Preferences – File Handling – Run single program instance setting. While this setting is on: clicking
on a file, which is associated with FastRawViewer, will result in displaying the file in the existing
program window.
Starting without a filename
If FastRawViewer is started without a filename to view (like with double-clicking on the program
icon) and the settings under Preferences – File Handling – Start without filename are at defaults
no RAW file will be initially opened. To change this default behavior, please go to Preferences –
File Handling – Start without filename:
Empty Screen – FastRawViewer starts up "without file".
Last opened file – opens the top (last) file from the Recent Files list
Last visited folder – opens the folder from the list of Recent Folders (from this folder opens
either the first file, corresponding to the current file sorting settings, or the last opened, if
the 'Remember last opened file in folder' is set)
Specified folder – allows you to set a "start folder".
In the case of FastRawViewer being started up over a particular file (through any method; drag-ndrop on the icon, clicking on the file, associated with FastRawViewer), this setting is, of course,
ignored
This setting is also ignored in the Single instance mode, if the second FastRawViewer copy is
started up without selecting the name of a file/folder, then nothing happens.
Page 31 of 127 Copyright © 2014-2015, LibRaw LLC, www.libraw.com
Page 32

FastRawViewer – user manual
Under default settings, FastRawViewer doesn’t “recall” files/folders from portable and network
media. This behavior can be changed by unchecking Preferences – File Handling – Do not recall
removable media on startup.
Creating and reading XMP files
FastRawViewer records all “changes” into separate sidecar XMP files (analogous to Adobe Bridge).
The following can be saved/is read from these files
Image orientation (see below, the “Changing Image Orientation” section).
White Balance in FastRawViewer and Adobe formats (see below “White Balance”).
Exposure adjustment in the FastRawViewer Adobe formats (see below, “Working with
Exposure”).
Ratings and marks (please see below).
Title (title) and description (description) image (see below).
XMP files are read for RAW and JPEG files, but written only for RAW files. Recording XMP ratings
and marks for JPEG is not possible, because in the “RAW separate from JPEG” (RAW+JPEG mode
turned off), the recording of XMP files for JPEG would delete XMP files for RAW.
If the default settings are in use:
XMP files are always read; if there is no XMP file, we attempt to read the XMP block if it is
present in the RAW file (XMP blocks can be present in DNG and several others types of
RAW files).
Only manual changes are recorded into XMP files (for instance, image orientation or
exposure are changed from automatic to something else).
This behavior can be changed with the following settings:
Preferences – XMP – Use XMP for RAW Files – turning off these settings leads to a
complete disregard of XMP files: they are not read, written, and not moved together with
RAW files.
Preferences – XMP – Read Only XMP – blocks any recording of XMP files. Data (ratings,
labels, white balance, exposure correction) will be read and used for display, but any
changes to it will not be saved.
Preferences – XMP – Force XMP file creation – turns on the creation of XMP files, even if
nothing was changed manually. The parameters which were (automatically) set up when
opening the file will be set as the parameters in the XMP file
Exposure compensation and white balance are written to XMP files according to the setting of
Adobe Process Version in Preferences – XMP – Adobe process version for newly created XMP
files.
Page 32 of 127 Copyright © 2014-2015, LibRaw LLC, www.libraw.com
Page 33

FastRawViewer – user manual
To set color labeling scheme to be compatible with CaptureOne, set Preferences – XMP – Write
photoshop:Urgency tag with color labels (for PhaseOne C1). This setting turns on the recording of
the XMP-tag photoshop:Urgency, which is used by CaptureOne to recognize and set color labels.
Compatibility with RawPhotoProcessor (.rpps files)
FastRawViewer can create basic .rpps files (those contain conversion settings for
RawPhotoProcessor).
The following parameters are recorded:
Exposure compensation
White balance
This option is controlled through Preferences – Other – Write RPPS files checkbox. Another
checkbox, Preferences – Other – Force RPPS files creation, forces the creation of .rpps files
immediately after a RAW file is opened in FastRawViewer, with automatic exposure compensation
and current white balance recorded as initial settings.
To import such .rpps files for further use, while in RawPhotoProcessor navigate to Menu - Settings
- Import Multiple settings and select both RAW and .rpps files in the folder that you wish to
process. The settings in .rpps files will be imported into RawPhotoProcessor History and the
corresponding RAW files will be opened using the parameters you've set in .rpps files.
Copy and Move operations
FastRawViewer offers two types of file operations:
Relocating the file into _Rejected subfolder created automatically in the current folder (instead
of deleting the file, it is moved from the current folder to a subfolder) – for rejected files.
Copying and relocating the file into a folder you choose (for those “chosen” files).
Moving to _Rejected and restoring from _Rejected
Menu – File – Move file to _Rejected subfolder (or Ctrl-Shift-Del)– moves the current file
to _Rejected subfolder created automatically in the current folder, and FastRawViewer will
display the next file in the list, following “the direction you were going” (if you were going
“backwards” through the files, then after the current file is rejected FastRawViewer will
continue going “backwards”). The direction of the movement can be changed through
Preferences – File Handling – After current file moved.
By default the program will ask you if you actually want to move the file. This question can
be turned off in Preferences – File Handling – Warn when file(s) are moved to rejected.
The name of the _Rejected folder can be changed in Preferences – File Handling –
Subfolder for rejected files.
Page 33 of 127 Copyright © 2014-2015, LibRaw LLC, www.libraw.com
Page 34

FastRawViewer – user manual
The corresponding JPEG file will be also moved if the RAW+JPEG mode is on; so will be the
accompanying XMP file (if it exists).
Menu – File – Move previous file to _Rejected (Ctrl-Shift-[).
The file that is moved into _Rejected is not the currently open file, but the one that was
displayed before the current one.
Menu – File – Move back from _Rejected (Ctrl-Shift-])
Restores the last file moved to _Rejected by moving it back to the current folder.
This procedure can be repeated many times while you are staying in the current folder.
When you go to a different folder, the list of “recently _Rejected” files is reset.
The _Rejected folder can be set as global, for that one needs to set in Preferences - File Handling –
Subfolder for rejected files:
Windows: the path starts from drive letter, followed by colon (e.g., C:) for local folders; the
path starts with \\ for network paths not mounted using drive letters.
OS X: the path starts with /
Clearing out the _Rejected folder
To delete the contents of the _Rejected folder, use Menu – File – Clear _Rejected folder.
Clearing the folder with rejected files is irreversible, so
You cannot set a hotkey for the Clear _Rejected action
When choosing this action, an additional, un-turn-off-able warning will be displayed:
The OK button will only be accessible after checking Yes, I’m sure checkbox.
The additional Delete read-only files too checkmark allows one to delete files with the Read-Only
attribute; if this checkmark is not set then those files will be ignored and will remain in _Rejected.
Page 34 of 127 Copyright © 2014-2015, LibRaw LLC, www.libraw.com
Page 35

FastRawViewer – user manual
Attention: Mac OS X does not support the Read-Only attribute on the FAT/exFAT systems, so
on OS X the Read-Only checkmark will only work on local and network drives, but will not
work (i.e. checked on) on removable media (memory cards).
Copying and Moving files to an arbitrary folder
Menu – File – Move to folder (ask destination) (or M) – a standard system dialogue box for
selecting directory appears allowing you to choose the destination folder, and the file is
moved into the selected folder.
Menu – File – Move to folder (same destination) (or Shift-M) – moves the current file to
the same folder as last time.
By default, the program asks for confirmation, and this request can be turned off through
Preferences – File Handling – Confirm move to the same destination.
Menu – File – Copy to folder (ask destination) (or С) – will ask for destination folder and
perform the requested copy operation (copy includes associated XMP/JPEG files).
Menu – File – Copy to folder (same destination) (or Shift-С) – will perform the file copy
operation similar to the above; however, the destination folder will be the same as the one
used for the previous copy operation.
Both copy and move operations use the same folder in the “same destination” mode.
«Close» File
FastRawViewer background process scans files and receives system signals upon folder updates.
This prevents safe ejecting of removable media, including flash memory cards and cameras
connected to the computer via a cable.
Menu – File – Close File (or Ctrl-U) «closes» the currently opened file:
All background processes are stopped as fast as possible.
The monitoring of the current folder is cancelled.
The current file display is cancelled.
The current / working folder is changed to %HOME%/Pictures, or, if that one is not present,
to %HOME%
Upon the completion of the Close File command the removable media can be safely un-
mounted and ejected, as usual.
Unmounting a portable media through the context menu in the folder panel automatically
preforms the Close File action
Page 35 of 127 Copyright © 2014-2015, LibRaw LLC, www.libraw.com
Page 36

FastRawViewer – user manual
Displaying the Image
After a file is opened, the program displays the image stored in the file, as well as its metadata
(EXIF, size, rating and label) and the histogram.
Page 36 of 127 Copyright © 2014-2015, LibRaw LLC, www.libraw.com
Page 37

FastRawViewer – user manual
Embedded and External JPEG
For every file, there can be up to three “representations”:
RAW file
Embedded JPEG preview (Internal JPEG)
External JPEG file with the same name (if the setting Preferences – RAW+JPEG – Handle
RAW+JPEG together is on)
The existence of representation is displayed in the status (lower) bar of the program, between the
file dimensions in pixels and the EXIF data:
R I – denotes the existence of RAW and Internal JPEG
R I E – RAW, Internal JPEG, External JPEG
J – only JPEG, without a RAW-file
A capital letter indicates that the representation is available for viewing. Lowercase means that it
exists, but is unavailable for viewing for one of the following reasons:
o i – the internal JPEG is not shown. This is a default setting for when there is an internal
JPEG file and the RAW+JPEG mode is on (Can be changed in settings: Preferences –
RAW+JPEG – Do not show internal JPEG if external JPEG is present)
o r – RAW representation is not shown. This happens for unsupported RAW formats (Sigma
Foveon) or for too large RAW files (limits can be changed in Preferences – Other – Do not
decode RAW files larger than NN Mpix).
o File representation is damaged (errors while decoding of JPEG or RAW data).
To switch between representation use Menu – View – Switch RAW/intJPEG/extJPEG or press the J
key on the keyboard. The representation that is currently displayed is denoted with letter indicator
going white.
Tuning the behavior of the program in regards to the display of embedded/external JPEG files is
done through Preferences – RAW+JPEG section
Handle RAW+JPEG together – turns on the pairing of the RAW file and JPEG of the same
name. If you turn off this setting, the pairing won’t happen – the files will be shown
separately and treated as separate.
o Do not show internal JPEG if external JPEG is present – disables decoding and
displaying of an embedded JPEG when there is an external one
Page 37 of 127 Copyright © 2014-2015, LibRaw LLC, www.libraw.com
Page 38

FastRawViewer – user manual
o Do not show external JPEGs – disables the decoding and displaying of external
JPEGs (still, both RAW and JPEG files will be relocated with a move operation).
Ignore internal JPEGs – disables any processing of embedded JPEGs in all Handle
RAW+JPEG modes
Default image to Display (same as Previous/RAW/internal JPEG/external JPEG) – controls
what representation will be used for display when opening the next file.
Zooming and Panning
Menu – View – Zoom In or Ctrl-+ - magnifies the image on the display
Menu – View – Zoom Out or Ctrl—(Ctrl-Minus) – zooms out
Menu – View – Fit to Window or Ctrl-0 – changes the zoom factor in such a manner that
the image fits into the current size of the window (and when changing the size of the
window, the magnification factor will follow)
Menu – View – Actual Pixels (100%) or Ctrl-1 – set the image scale to “100%” (each image
pixel is displayed as one monitor pixel)
If the image does not completely fit into the window:
Pressing and holding the left mouse button turns on the Drag mode: the image moves with
the mouse cursor.
Pressing and holding the right mouse button turns on the fast panning mode: the program
window becomes ‘Navigation Pane’, moving the mouse, for instance, to the top-right
corner of the window will show you the top-right region of the image.
Furthermore, the fast combined zoom+panning modes are available as well:
Left mouse button + Shift – turns on temporary zoom and Drag mode.
Right mouse button + Shift – turns on temporary zoom and panning mode.
The zoom factor for these modes is set in the Preferences-Interface section:
Interface – ‘Zoom and Drag’ zoom to
Interface – ‘Zoom and Pan’ zoom to
Changing Image Orientation
When you open the image, its orientation is calculated from the XMP file (if it exists), or from the
EXIF data and the image is rotated accordingly.
Menu – View – Rotate 90
Menu – View – Rotate 90
0
CCW (or Ctrl-7) Turns the image 90 degrees counter-clockwise.
0
CW (or Ctrl-9) Turns the image 90 degrees clockwise.
Processing files for the cameras that lack orientation sensors
There is a mode in FastRawViewer you can use with the cameras that do not feature an
orientation sensor. It is turned on through Menu – View – Ignore EXIF Rotation data (or Ctrl-8). As
the name suggests, in this mode the orientation data coming from EXIF is ignored (but
Page 38 of 127 Copyright © 2014-2015, LibRaw LLC, www.libraw.com
Page 39

FastRawViewer – user manual
acknowledged if coming from XMP) and the file is displayed in the same orientation as the previous
file.
Together with the Preferences – XMP – Force create XMP files mode (see above the XMP section)
this setting allows one to quickly set the orientation for a series or vertical shots, taken by a
camera without an orientation sensor:
Manually set the correct orientation for the first file in the series
Turn on the Ignore EXIF Rotation data and Force create XMP files settings
Go through the whole series – on all of the following files, the orientation will be copied
from the first file where it was set manually through Ctrl-7 / Ctrl-9
An XMP file will be created for each of the looked-at files, and the necessary (vertical)
orientation tag will be put into that XMP file.
When the rotation mode is “on” the color of the rotation indicator on the bottom bar is set to:
Red – propagation mode: both Ignore EXIF Rotation data and Force create XMP files
modes are turned on.
White – the Ignore EXIF Rotation data mode is turned on.
Green – the Force create XMP files mode is turned on.
Black – both modes are turned off.
Viewing file channels, viewing in black and white mode
Menu – View – R channel (Ctrl-3) Red channel is displayed
Menu – View – G channel (Ctrl-4) Green channel is displayed
Menu – View – B channel (Ctrl-5) Blue channel is displayed
These modes work with internal RGB image (after demosaicking, exposure adjustment, white
balance setting).
In these modes, the RAW and JPEG histograms are shown only for the displayed channel. If the
RAW file is not RGB, then the histogram will be for the 1st, 2nd, and 3rd channels respectively.
Menu – View – RGB full color (Ctrl-2) – back to RGB display mode
Menu – View – BW-conversion full color (Ctrl-6) – will show the black and white variant” of
the image (conversion from RGB is performed using the brightness channel formula, same
as the one used while coding JPEG).
Page 39 of 127 Copyright © 2014-2015, LibRaw LLC, www.libraw.com
Page 40

FastRawViewer – user manual
Boosting the shadows
The Boost Shadows mode is intended to assess the quality of the shadows in the RAW: it opens up
the shadows at the expense of companding the highlights:
For the image above: on the left part the shadow boost mode is on, on the right, it is off. When the
mode is on the indicating S in the EDS group on the bottom bar turns bright white.
You can turn the boost on/off through Menu - View – Boost Shadows (or by pressing Shift-S on the
keyboard).
Setting the amount of boost: Preferences – Image Display – Boost Shadows Amount controls the
additional gamma adjustment, the range is 0.2 to 2.0.
Page 40 of 127 Copyright © 2014-2015, LibRaw LLC, www.libraw.com
Page 41

FastRawViewer – user manual
Tonal Curve
Contrast in FastRawViewer is adjusted through the tone (contrast) curve, which you can change by:
Through Contrast Curve Selector in the Status Bar (See Customizing the Status Bar section)
Through Preferences – Image Display – Contrast curve.
Both settings change the exact same parameter, changing it through different methods doesn’t
change the effect.
Contrast curves are built into the program; their parameters cannot be changed, and are as
follows:
Gamma 1.8, Gamma 2.2, sRGB, L* - - sets one of those typical tone curves used for image
processing.
Adobe Linear – a relatively close match to the tone curve in Adobe Camera Raw/Lightroom.
BW Movie, Monochrome, Landscape, Portrait, Vivid – more contrasty tone curves, that
can be used for a quick demonstration of the unprocessed images closer to the final image.
High Contrast, Ultra Contrast – curves that raise the contrast sharply, intended for viewing
photos taken in a specific setting (such as viewing the results of an underwater shoot,
where the image contrast is very low).
Page 41 of 127 Copyright © 2014-2015, LibRaw LLC, www.libraw.com
Page 42
FastRawViewer – user manual
Support for Cameras Modified to Black and White
FastRawViewer supports black and white cameras that are made from color cameras by removing
the color filter array (CFA) from the sensor.
This mode is turned on through Preferences – Image Display – Force Black-White mode for Bayer
images
In this mode:
Demosaicking (de-Bayerization) is skipped
Per-channel viewing is turned off
White balance preferences are turned off
RAW histogram and exposure statistics are for one channel
The image is black and white:
This mode is not applicable to JPEG images; they stay colored.
Customizing Display Modes
FastRawViewer uses the advanced features of modern video cards to display images. In particular,
zooming in and out is performed using video card processor, GPU. Depending on the particular set
Page 42 of 127 Copyright © 2014-2015, LibRaw LLC, www.libraw.com
Page 43

FastRawViewer – user manual
of features and performance of your video card, you may wish to tune the settings controlling the
display:
Preferences – GPU Processing – Image Resampling method sets the method to be used for
calculating zoom-in (going above 100% view):
o No resampling – for large zoom factors, the image will look as if it is constituted of
small square tiles
o Bilinear resampling – fast, mid-quality method
o Bicubic resampling – high-quality method, a relatively fast vast video card is
recommended
Preferences – GPU Processing – Downsampling options – sets the method for zoom-out
calculations:
o None – no additional processing is involved
o Generate low resolution previews – most compatible method, but relatively slow.
o Suppress downsampling artifacts – we recommend turning this on when you are
viewing a noisy image (high ISO, underexposure, deep shadows bumped, etc.)
Not all of the above-listed modes are available on all video cards. If you have an older video-card,
Bicubic and artifact suppression may not be available at all.
In some cases (older video cards, buggy drivers) you may encounter equipment compatibility
problems. In this case, you may need to use the compatibility options under the Preferences – GPU
Processing – GPU Compatibility settings section:
o Synchronous GPU Operations turns on a slower but more stable mode operation for
the misbehaving video cards.
o Force Window refresh by slight resize –the screen refresh is implemented through the
slight resize of the window. You may want to turn this mode on if the images on the
screen are not redrawn properly.
o Exit program on OS Sleep/suspend – some versions of Windows XP video card drivers
perform an incorrect wake up and FastRawViewer crashes when the computer wakes
up after Sleep/Suspend. In this case, you will need to use this mode and start
FastRawViewer again each time the computer wakes up.
Page 43 of 127 Copyright © 2014-2015, LibRaw LLC, www.libraw.com
Page 44

FastRawViewer – user manual
Using Monitor Profile For Display
FastRawViewer supports “Color Management” when showing RAW and JPEG files, however this
mode is turned off by default for the following reasons:
o The majority of modern monitors are sRGB (or close to it) and using sRGB as a workspace
when displaying RAW gives very acceptable results.
o Furthermore, in many cases supplied monitor profiles are inadequate, and they have a
negative impact on the image appearance.
o Moreover, a noticeable number of users have optimized their video settings for computer
games, manually turning on the anisotropic filtration of textures. This mode is incompatible
with the Color Management function of FastRawViewer.
Color Management can be turned on through Preferences - Color Management - Enable Color
management. Further color management settings are described in the “Settings – Color
Management” section below. If the system profile of the monitor is set up properly, then further
tuning of settings will, most likely, not be needed.
Page 44 of 127 Copyright © 2014-2015, LibRaw LLC, www.libraw.com
Page 45
FastRawViewer – user manual
Working with Exposure
FastRawViewer offers several tools to analyze the exposure on a photograph, recommend
exposure adjustments during a shooting session, and select exposure adjustment during RAW
conversion:
RAW-histogram
Over/Underexposure statistics
Showing the areas of over- and underexposure on the image.
Automatic setting of positive (lightening) exposure adjustment
Manual Exposure adjustment setting.
Histogram
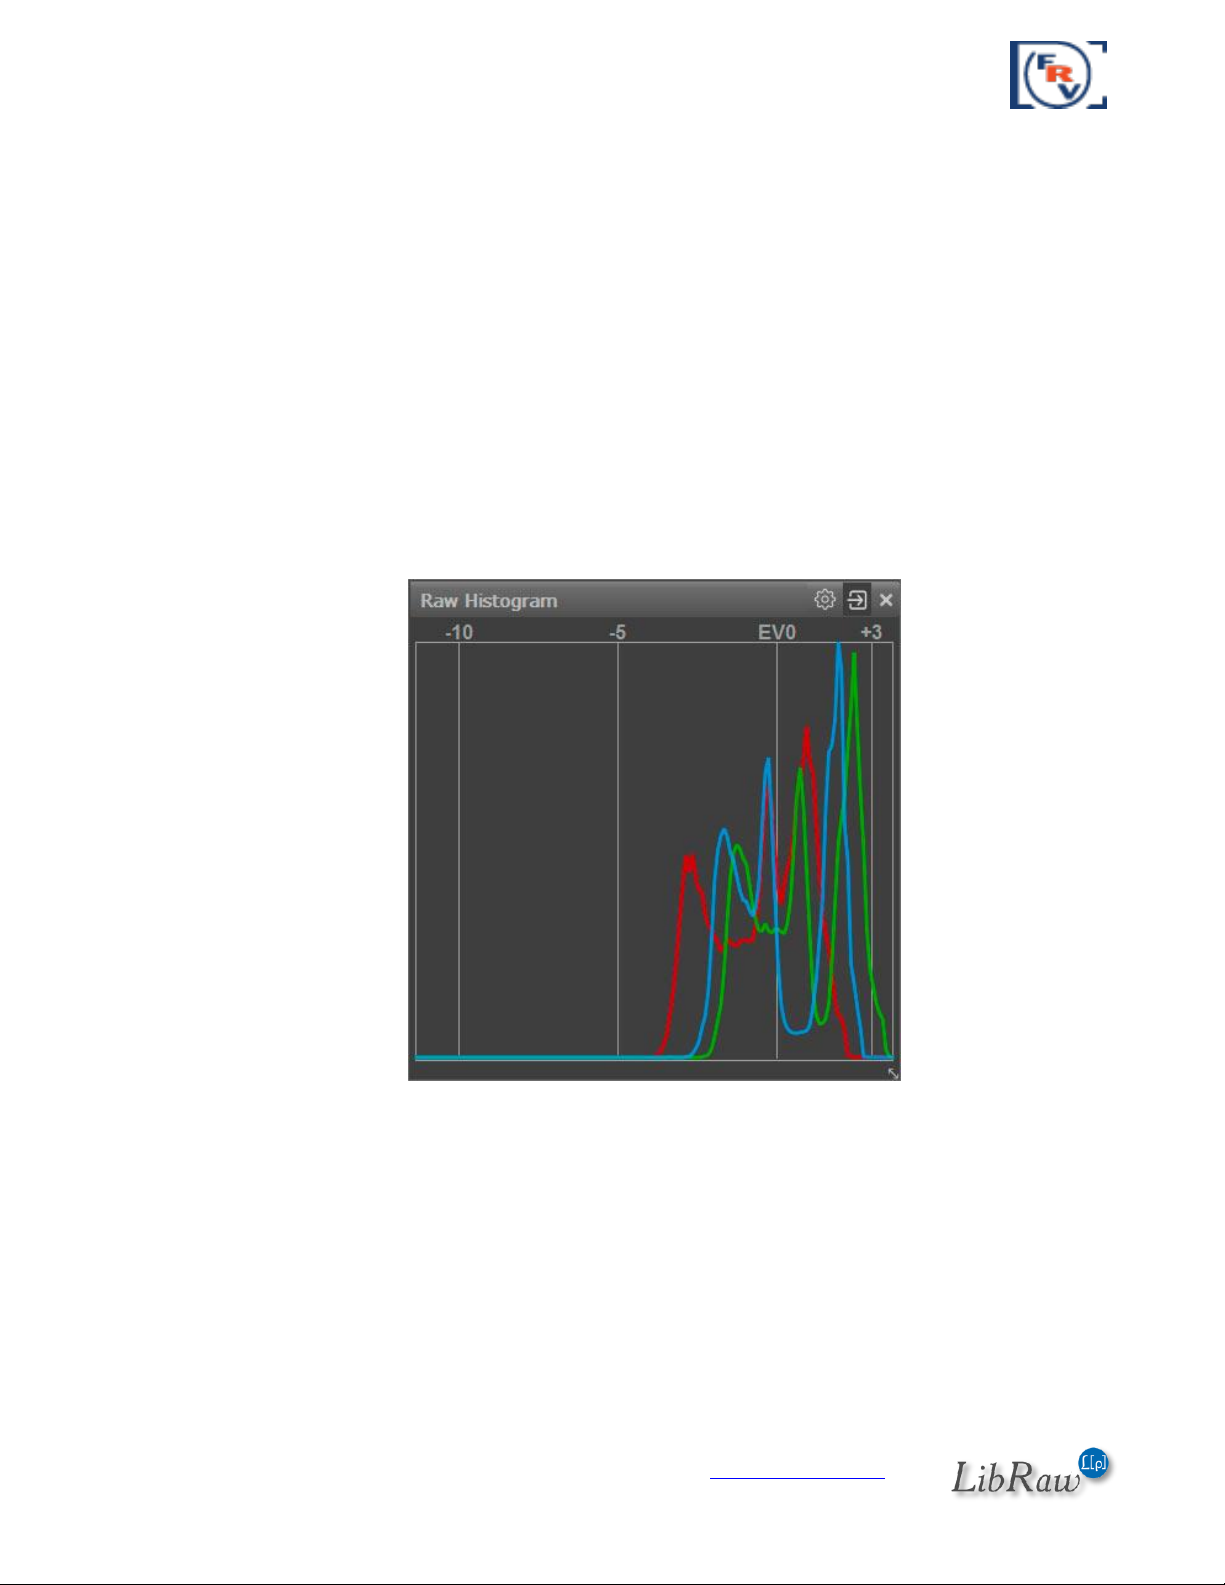
The RAW-data histogram is created based on the unmodified (disregarding any exposure
adjustments metadata) RAW data from the file:
Horizontal Scale:
EV0 – the level that corresponds to the middle gray. If exposure adjustment has not been
applied, it’s set to 3 photographic stops below the saturation level of a camera.
-5 – the level that corresponds to normal clean easily workable shadows for the majority of
modern cameras.
+3 (when exposure adjustment is turned on it can be +2 or +1) – extreme highlights.
The leftmost mark of the scale is the level that corresponds to the value of “1” in the RAW
data.
Page 45 of 127 Copyright © 2014-2015, LibRaw LLC, www.libraw.com
Page 46
FastRawViewer – user manual
The histogram step on the horizontal axis is 0.1EV, so there will always be a “comb” in the
shadows, as there are less possible levels than 10 levels per stop.
When applying exposure adjustment (see below) the histogram itself does not change – instead
the horizontal axis shifts. During a positive exposure adjustment, the EV0 level shifts in the
direction of the shadows (because the shadow sections shifts to brighter ones – closer to middle
gray), correspondingly the other vertical marks move as well (and if needed, the numbers for the
marks change as well). During a negative exposure adjustment, the axis shift is in the opposite
direction.
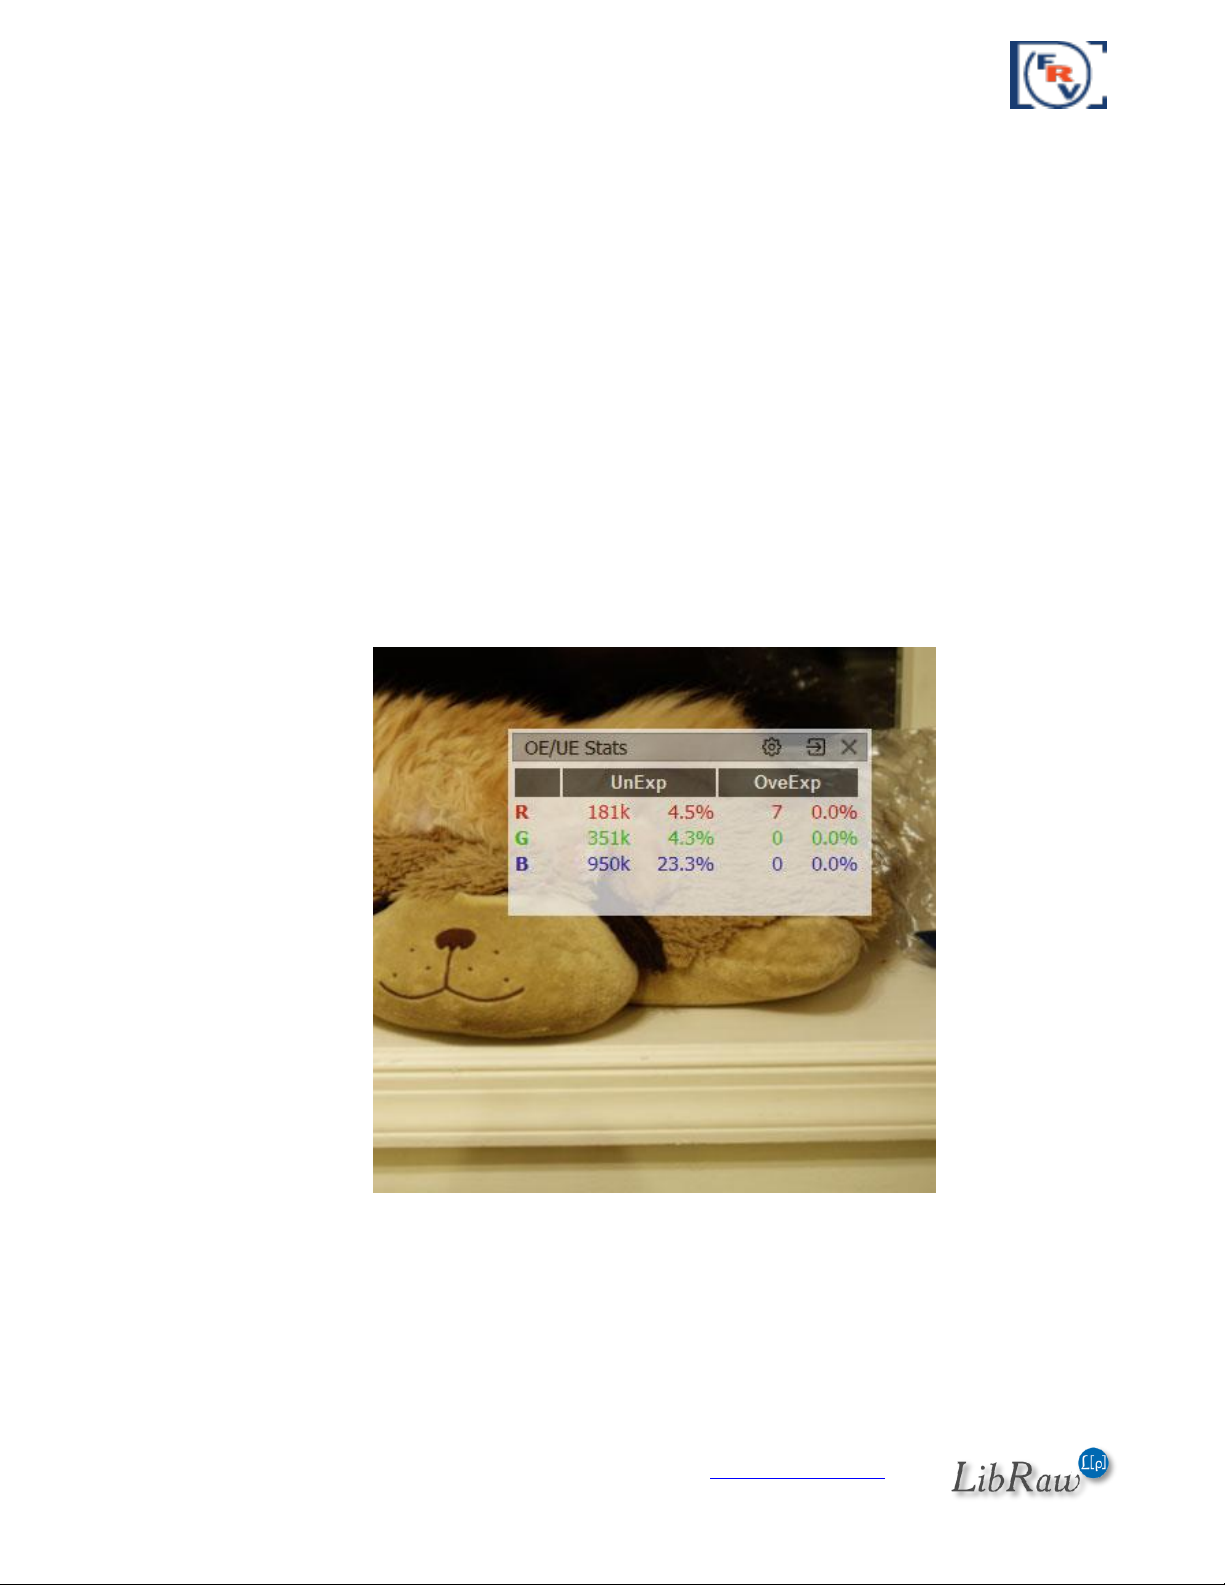
Exposure statistics
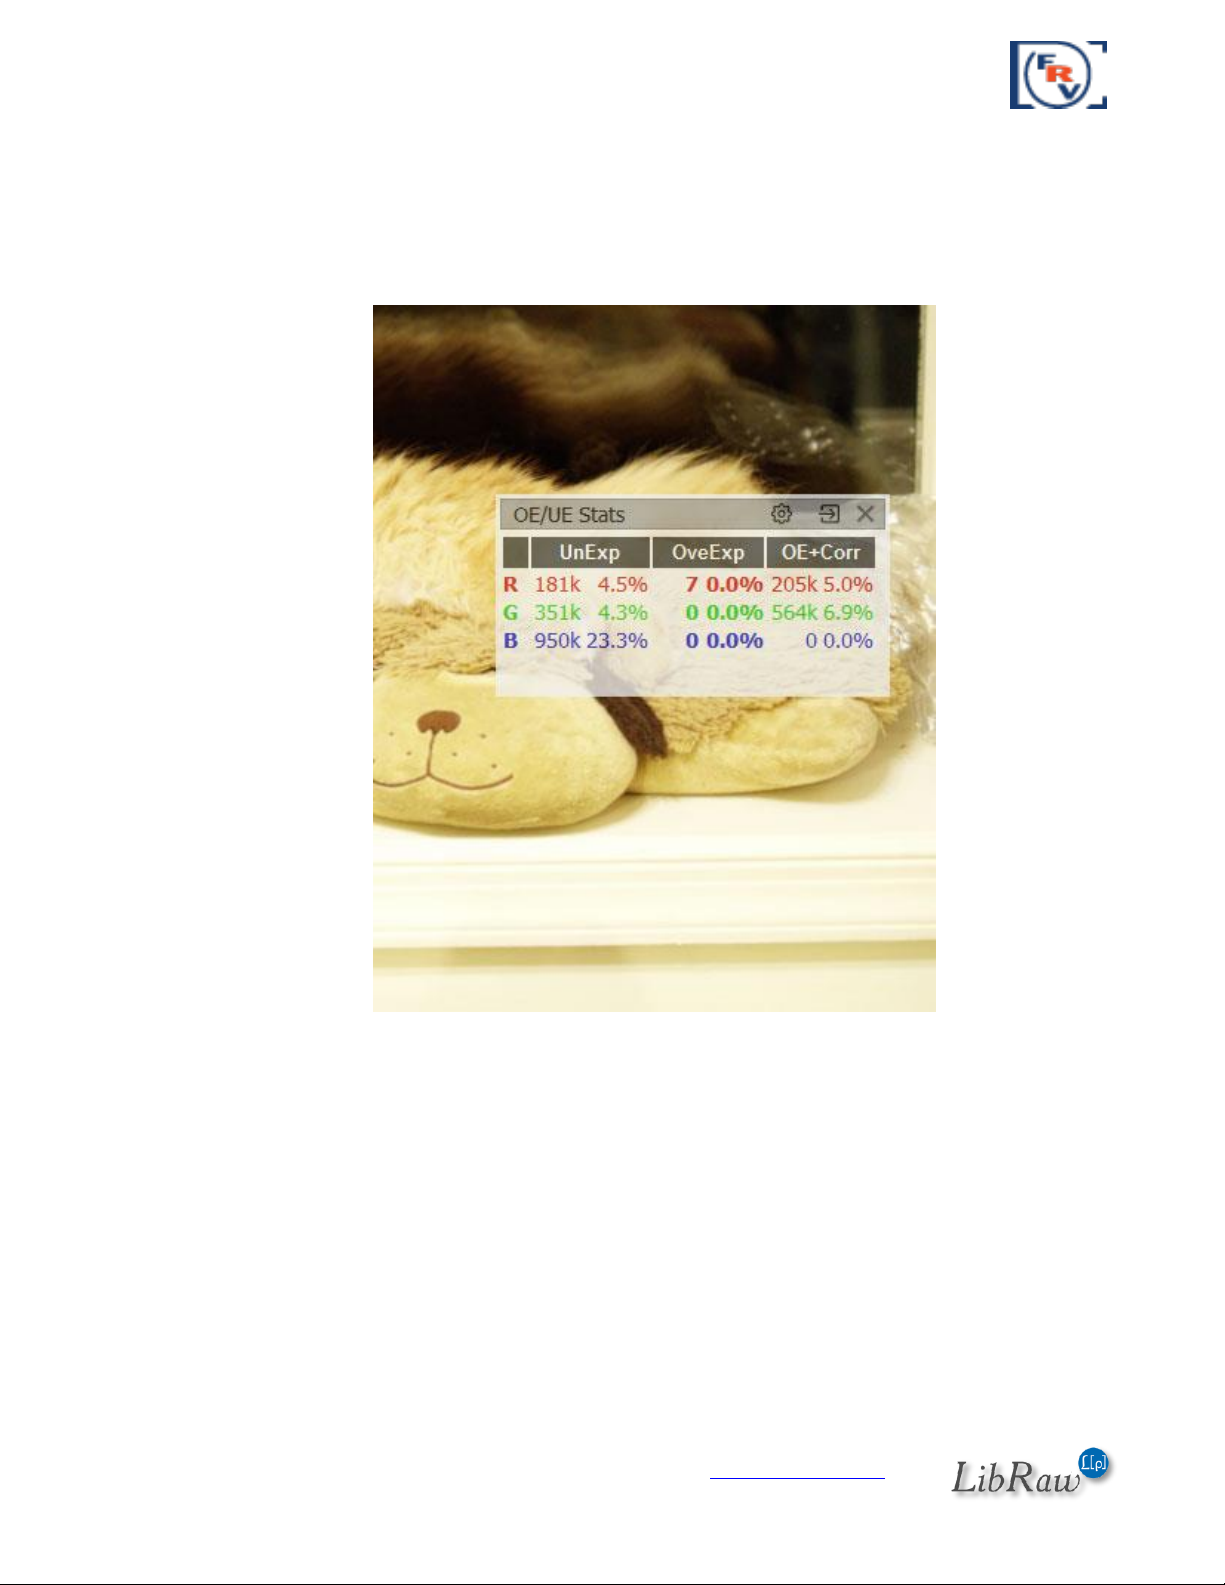
Exposure statistics is calculated for RAW data. It is displayed in the OE/EU Stats table, which by
default is in the right part of the program window.
If positive exposure adjustment was not applied to the file, this table will have 3 columns (channel
name, pixel overexposure statistics, pixel underexposure statistics):
On the shot above:
1. UnExp (underexposure) column: 4.5% of pixels in the red and green channels and 23% of
pixels in the blue are in the underexposure zone meaning 8EV below the saturation point of
the camera.
2. OveExp (Overexposure): there is practically no overexposure (7 pixels in the red channels
don’t really count)
Page 46 of 127 Copyright © 2014-2015, LibRaw LLC, www.libraw.com
Page 47
FastRawViewer – user manual
8EV is a default value for the “camera dynamic range”, you can change it to the value you prefer
through Preferences – Image Display – Underexposure detection limit.
If positive exposure adjustment was applied to the file, yet another column appears in the table,
OE+Corr: showing how many pixels will be blown out after the linear correction.
On the image above, about 5-7% of red and green pixels ended up overexposed (more than likely,
the attempted correction is too drastic).
When quickly looking through a large number of files, it may be useful to force the OE+Corr column
on (so as to make sure that attention is not distracted by the change of table size). This can be
done through the statistics panel gear button.
Page 47 of 127 Copyright © 2014-2015, LibRaw LLC, www.libraw.com
Page 48

FastRawViewer – user manual
Spotlighting the Areas of Over- and Underexposure
The over/underexposure areas can be identified using a colored overlay.
Spotlighting the overexposure zones can be turned on and off through Menu–View–
Overexposure Display (or by pressing the O key on the keyboard):
If some pixels of a channel hit the overexposure limit the values for such pixels are clipped.
FastRawViewer is using the following color scheme to spotlight the areas of overexposure:
Magenta – areas where the green channel is clipped
Cyan – areas where only the red channel is clipped
Yellow – areas where only the blue channel is clipped
Blue – areas where both green and red channels are clipped
Green – areas where both blue and red channels are clipped
Red – areas where both blue and green channels are clipped
Black – areas where all 3 channels are clipped.
For this image, we see the blown-out green channel on almost the entire sky over the sand dune;
while on the central portion of the sky the blue and green are both blown out. More likely than
not, recovering the sky’s tone normally via Highlight recover won’t be possible.
Page 48 of 127 Copyright © 2014-2015, LibRaw LLC, www.libraw.com
Page 49

FastRawViewer – user manual
With standard settings, the positive exposure adjustment has the effect on the overexposure area
display: the areas shown are the ones that would be overexposed, if we had taken the shot with
this exposure compensation on the camera). This behavior can be changed by turning off the
setting Preferences –Image Display – Exposure adjustments affects OverExposure display, in this
case only those areas that are overexposed (clipped) in the RAW file itself will be shown as the
overexposed areas (obviously, the exposure adjustment in FastRawViewer has no effect on the
content of RAW files).
Viewing the underexposure zone can be turned on and off through Menu–View–Underexposure
Display (or by pressing the U key on the keyboard):
Like in the previous, the underexposed pixels are spotlighted with saturated colors:
Blue – where the blue channel is underexposed
Red – where the red channel is underexposed
Green – where the green channel is underexposed
Magenta – where both red and blue channels are underexposed
Cyan – where both green and blue channels are underexposed
Yellow – where both green and red channels are underexposed
Page 49 of 127 Copyright © 2014-2015, LibRaw LLC, www.libraw.com
Page 50

FastRawViewer – user manual
White – where all three channels are underexposed.
Exposure adjustments do not affect the display of underexposure areas (or underexposure
statistics).
For this shot, part of the foreground is underexposed; also, one can see areas with the red channel
underexposed (red), and, also areas where both red and blue channels are underexposed
(magenta).
Unlike for overexposure, which is determined fairly unambiguously in digital cameras (by the
“blowout” of one or more channels, the channel histogram pressed to the right edge and having a
characteristic spike), the limit of the unacceptable underexposure area cannot be exactly
determined, because it depends on
Planned print size
Planned shadow boost in the current shot.
In FastRawViewer, the limit that controls the underexposure warning is set by the user themself in
the preferences (Preferences-Image Display – Underexposure detection limit). The default value
(8EV) is fairly conservative, and works pretty well for low ISO settings, 100-800 ISO. In the case of
using high ISO, or strict demands to the image quality, this parameter may to be set lower (to 67EV, and sometimes even lower), according to the technical requirements for the resulting image.
Automatic exposure correction
Adobe 'hidden’ exposure correction
By default, an exposure correction equal to the one that is automatically applied by Adobe
converters is also applied when a RAW file is opened in FastRawViewer (for more details, please
see https://photographylife.com/adobes-silent-exposure-compensation ).
As a result, the overall brightness of the rendition on the screen is a close match to a JPEG preview;
and, given the contrast curve in Preferences is set to 'Adobe Linear' or 'Standard Tone', it also
matches the rendition in Adobe converters with all the sliders there being set to '0'.
The application of this standard exposure offset can be switched off via Preferences – Image
Display – Apply Adobe hidden exposure correction.
Automatic exposure correction
If Shift-A is pressed, or Menu – View – Auto Exposure Correction is enabled, FastRawViewer
calculates and applies automatic exposure correction in such a way, that 1% of the total amount of
pixels in the image are pushed to saturation (receive the value of 255 on the 8-bit scale).
The following settings for the automatic exposure correction are user-adjustable:
Page 50 of 127 Copyright © 2014-2015, LibRaw LLC, www.libraw.com
Page 51

FastRawViewer – user manual
Mode:
a. Fixed shift by the given amount of stops (EV), the value is controlled through
Preferences – Image Display – Auto Exposure – Fixed Exposure shift
b. Automatic calculation of the exposure compensation to shift the histogram ‘to the
right’, controlled through Preferences – Image Display – Auto Exposure – ETTR-style
autoexposure (shift histogram to the right)
Fine-tuning of the automatic exposure compensation
a. Saturate up to NN% pixels – controls the per cent of the pixels that will reach the
saturation as the result of the automatic exposure correction
b. Exposure shift limits
i. Unlimited – no limit, goes all the way to the setting for Saturate up to NN%
pixels
ii. Hard limit – no more than the number of stops set in this field.
iii. Virtual ISO – the limit depends on the ISO setting that was used to take the shot:
If the shot was taken at ISO in-camera setting higher that this limit, the
maximum exposure correction is 0.
For the shots taken at lower than this limit ISO setting in camera, the
maximum value for the exposure correction is equal to the difference (in
stops, EV) between the ISO setting in the camera and the limit set (for
example, if the limit is set to ISO 6400, and the shot was taken at ISO
1600, the maximum amount of exposure correction is 2EV).
To switch off the exposure correction, making it 0 (or, if Apply Adobe hidden exposure correction is
ON, making it equal to that value of hidden correction), press the ‘A’ key on the keyboard. Second
press of ‘A’ will restore the previous correction.
Manual Exposure Correction
Increase exposure adjustment: Menu – View – Increase Exposure (Alt-Plus key) or the +
button in the lower bar of the window.
Decrease exposure adjustment: Menu – View – Decrease Exposure (Alt-Minus key) or -
button in the lower bar of the window.
The amount of exposure adjustment change per click / key press can be set through Preferences –
Image Display – Manual Exposure step size.
Recording of the exposure correction to XMP files: Interaction with Adobe Programs
Exposure adjustment is recorded in XMP-file in the FastRawViewer format (if reading/recording
XMP is on).
Moreover, exposure adjustment in a format that is compatible with Adobe (Bridge, Camera Raw,
Lightroom) is recorded in XMP as well. This recording can be turned off through Preferences –
Adobe Compatible Exposure and White Balance.
Page 51 of 127 Copyright © 2014-2015, LibRaw LLC, www.libraw.com
Page 52

FastRawViewer – user manual
Exposure Adjustment when browsing to the next file
If the value of the exposure correction can be read from an XMP file (the priority is given to the
value recorded in FastRawViewer format, and if it is not found, we take the value from the record
in Adobe format), it will be applied when the file is displayed.
If XMP file does not exist, or the exposure correction records are absent in it, exposure correction
will not be applied (however, if Apply Adobe hidden exposure correction is ON, it will still be
applied). This behavior can be altered through the setting
Preferences – Image Display – Exposure correction on file open:
No correction (default) – exposure correction is not applied.
Autoexposure – Automatic exposure correction will be applied, according to the respective
settings for this type of correction.
Keep from prev. file – same value of the exposure correction, as it was set for the previous
file is applied. If the file is the first one opened during this session, no exposure correction is
applied.
White Balance
FastRawViewer offers several methods of setting white balance
Choose one of the standard presets (As Shot/Auto/Daylight/Tungsten)
Set it by clicking on the known neutral gray area of the image
Set it by choosing the color temperature/tint value.
Indication of the white balance
The white balance is displayed:
1. As the name of one of the presets (or Custom) in the drop-down list of white balance
presets (see the next picture).
2. As the values shown on the button for manual editing of white balance (to the right of the
drop-down list of available white balance presets).
The available white balance indication modes are chosen through Preferences – White
Balance – White balance display mode
a. Color Temperature/Tint – a mode commonly used in RAW converters
b. Mired/Tint – instead of correlated color temperatures, the value indicated is in
Mired.
c. WB Coefficients – the per-channel coefficients (factors) of white balance are shown.
The calculation of color temperature/tint is not possible for all the cameras. It is also not possible
for extreme white balance coefficients. Here are the limitations:
1. FastRawViewer must have the color data for the camera (for the vast majority of modern
cameras, it does).
2. The camera has to be RGB and tricolor. CMYG, RGBE, and other non-RGB cameras are not
supported.
Page 52 of 127 Copyright © 2014-2015, LibRaw LLC, www.libraw.com
Page 53

FastRawViewer – user manual
3. A range of color temperatures from 1667 to 25000K is supported. If you set the manual
balance (see below) from a deep blue or a dark red area, then calculating the temperature
may be impossible.
For those cases where the calculation of color temperature is impossible, the indication of CCT/Tint
or Mired/Tint values is changed to “---/--“.
Page 53 of 127 Copyright © 2014-2015, LibRaw LLC, www.libraw.com
Page 54

FastRawViewer – user manual
White balance Presets
For the majority of modern cameras, FastRawViewer contains a large amount of standard presets
(settings) of white balance.
Choosing a preset can be done via the drop-down list menu in the lower bar of the program
window:
Virtually everything is in this menu:
As Shot (excluding a small amount of old cameras, which don’t record white balance in
RAW)
Daylight
Auto
UniWB (sets all coefficients of white balance to 1.0)
Page 54 of 127 Copyright © 2014-2015, LibRaw LLC, www.libraw.com
Page 55

FastRawViewer – user manual
The other modes in this drop-down correspond to those individual camera presets, and those vary
depending on camera manufacturer and camera model.
Standard white balance modes (As Shot, Daylight, Auto, Custom) can be cycled through using
Menu–View–Toggle White Balance (or by pressing W key on the keyboard).
Controlling which White Balance will be used when opening a file
When opening the next file the White Balance is set in accordance to the settings in Preferences–
White Balance:
White Balance for next file (same camera) – sets the white balance mode when opening a
file coming from the same camera model as the current file is. Choices here are: Same as
previous, As Shot, Daylight, Auto, and Tungsten.
White Balance for next file (another camera) – sets the white balance mode when opening
a file coming from a different camera model. The choice of “Same as previous” normally
does not fit here – all other choices are the same as for the previous.
Keep Custom WB for next file (same camera) – instructs FastRawViewer if the current
white balance coefficients should be applied to the next file coming from the same camera
model).
Setting White Balance by “click-gray” method
To set the white balance using an arbitrary area of the image as a reference, use Alt-left mouse
click.
The size of the area which is evaluated to calculate the white balance can be set through
Preferences – White Balance – WB Sampler size
Coefficients will be calculated for the chosen area so as to make whatever is “clicked” gray. The
image will change its look (automatically calculated exposure adjustment may change as well).
If the correct color temperature can be calculated with the given coefficients, then it will be
displayed on the button for the manual white balance adjustment.
Page 55 of 127 Copyright © 2014-2015, LibRaw LLC, www.libraw.com
Page 56

FastRawViewer – user manual
Manually setting the color temperature
When pressing the button with the values of color temperature/shades (to the right of the dropdown list with white balance presets) the manual white balance adjustment dialogue appears:
The changes made in this dialogue are applied to the image on the screen on the screen with a
slight delay (up to 200ms). If the changes you’ve made satisfy you, hit OK. If not, continue
adjusting, or hit Cancel to disregard any changes.
Outlining In-Focus and Highly Detailed Areas
FastRawViewer can help identifying if the sharp areas are indeed where you wanted them to be on
the image. This is accomplished through outlining the following:
Page 56 of 127 Copyright © 2014-2015, LibRaw LLC, www.libraw.com
Page 57

FastRawViewer – user manual
Bold high contrast edges
Areas containing small (“pixel-level”) sharp details
Additionally, you can turn on the simultaneous display of both types of outlines (not
possible for some video cards).
You can cycle through these modes using Menu–View–Toggle Focus Peaking (or by pressing the P
key on the keyboard), like following: Everything off – High contrast edges – Fine details – Both
filters – everything off.
Unnecessary/unused modes can be turned off through Preferences – GPU Processing – Focus
Peaking mode.
The High contrast filter shows contrasting, but not necessarily very sharp areas of the image:
When this filter is on the letter E in the EDS group on the bottom bar takes the same color that is
used for the outline (green by default).
Page 57 of 127 Copyright © 2014-2015, LibRaw LLC, www.libraw.com
Page 58

FastRawViewer – user manual
The Fine detail filter outlines small, acute, but not necessarily contrasting details:
When this filter is on the letter D in the EDS group on the bottom bar takes the same color that is
used for the outline (red by default).
The colors that are used outlines for both filters, as well as the opacity of the filter overlay are
controlled through the settings in the Preferences – GPU Processing – Focus Peaking mode
section.
Page 58 of 127 Copyright © 2014-2015, LibRaw LLC, www.libraw.com
Page 59

FastRawViewer – user manual
Ratings and Labels
FastRawViewer can set XMP ratings and XMP labels that are compatible with Adobe products (and
other programs which support XMP).
Ratings are set as a number from 1 to 5. The setting is changed via Menu– XMP Metadata or by
pressing the 1…5 buttons in the XMP Metadata panel.
To clear the rating, please press [X] button in the upper row of the XMP Metadata panel, or you
can also use Menu – XMP Metadata – No Rating.
For the compatibility with Adobe Bridge FastRawViewer supports Reject rating (-1). To enable this,
set Preferences – XMP – Use XMP Reject rating to ON (this is also switched on automatically if
XML Label style: Adobe Bridge is selected).
As the result, the button [R] is displayed in the row for setting the rating, and the action Reject
appears in the Label menu.
Labels are named with text, and 4 styles of labels are supported:
1. Adobe Bridge style (Select, Second, Approved, Review, To Do)
2. Adobe Lightroom style, color marks (Red, Yellow, Green, Blue, Purple)
3. Adobe Lightroom ‘Review Status’ style (To Delete, Color Correction Needed, Good to Use,
Retouching Needed, To Print)
4. Custom user labels.
You can select the appropriate label style through Preferences–XMP–XMP Label Style section. For
the Custom style you can also edit the names for the labels.
Setting and changing the label for the image is performed through Menu– XMP Metadata or by
pressing the colored squares in the XMP Metadata panel. To delete the label, press the [X] button
in the row for setting the label, or use Menu – XMP Metadata – Clear Label.
When turning on the Read Only XMP mode, labels are read from XMP files, but the program
prevents any changes to them.
Page 59 of 127 Copyright © 2014-2015, LibRaw LLC, www.libraw.com
Page 60
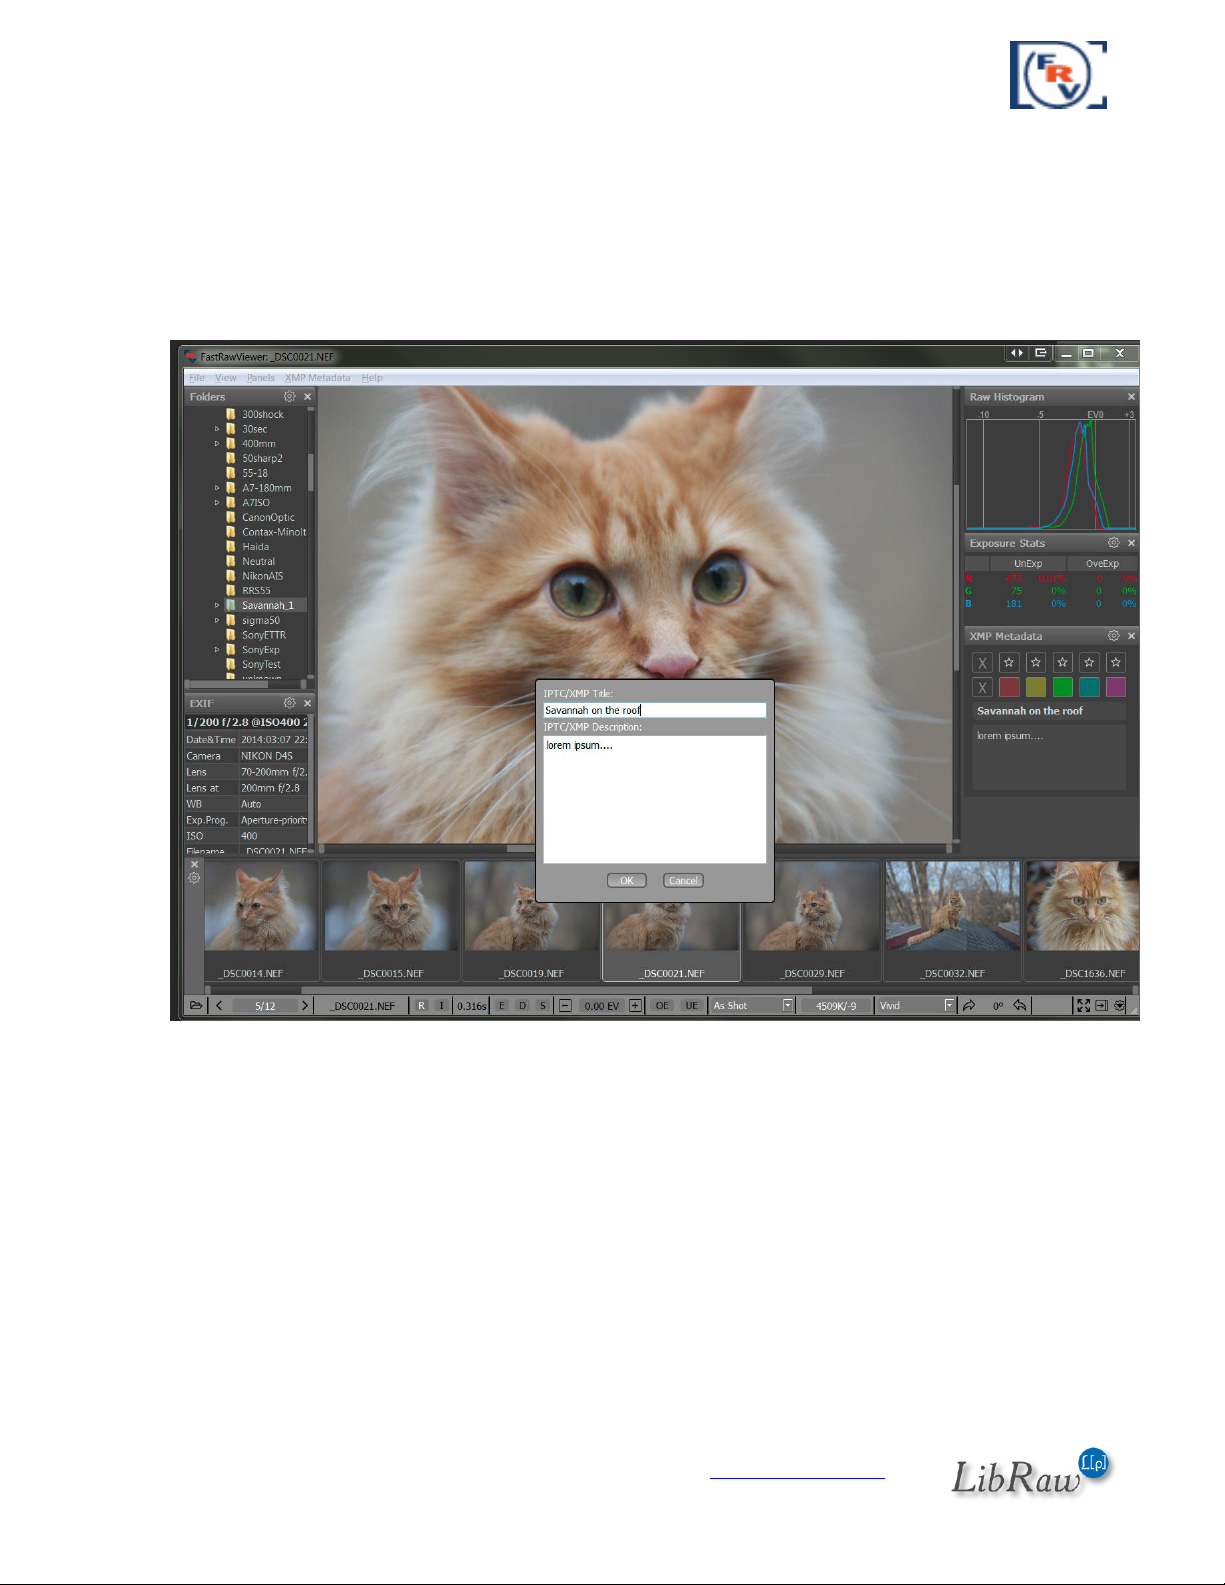
FastRawViewer – user manual
Title and description
FastRawViewer can record the title and description of the image in XMP files.
To call up the editing dialog, use Menu – Metadata – Edit Title/Description or the corresponding
macro (Alt-D), or double-click on the title or description field in the XMP Metadata panel; this
summons the editing dialog:
Page 60 of 127 Copyright © 2014-2015, LibRaw LLC, www.libraw.com
Page 61
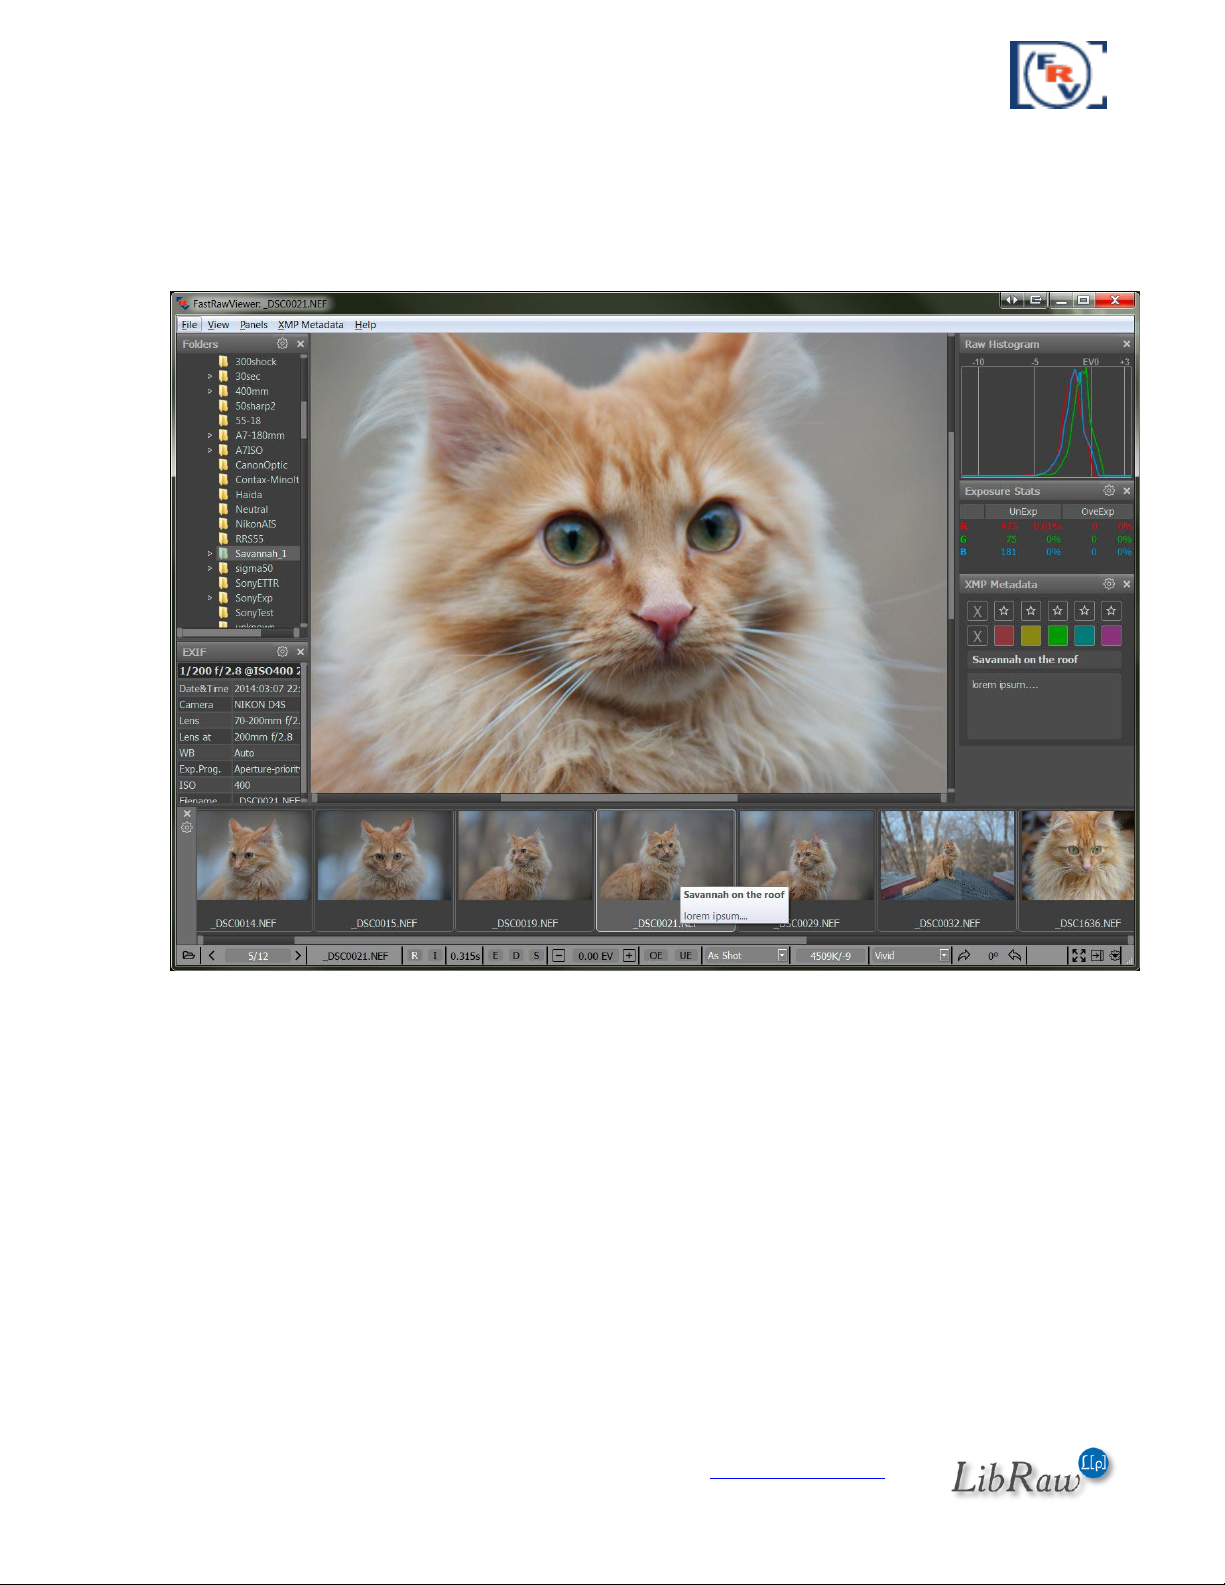
FastRawViewer – user manual
After editing the name and description they are shown in:
1. The floating tooltip in the Filmstrip/Thumbnails panel
2. The XMP Metadata panel:
Integration with External Programs
FastRawViewer can start external programs (up to three different ones), passing them the current
RAW file as a parameter.
This way any program that takes the file name as a command line parameter can be launched, be it
a RAW convertor, different image viewer, or whatever program you may need.
On the first run, FastRawViewer performs a search and automatically configures itself to use three
of the following programs:
RawDigger
Adobe Photoshop
Adobe Lightroom
Page 61 of 127 Copyright © 2014-2015, LibRaw LLC, www.libraw.com
Page 62

FastRawViewer – user manual
Raw Photo Processor
Capture One
DXO Optics Pro
If, on the first run, FastRawViewer was unable to find the program you need, it can be added to
the list of external programs manually through Preferences – External Programs.
To launch an external program to process the currently displayed image you can use Menu – File –
Run – necessary program or with press one of R for the first external program, Alt-R for the
second, and Ctrl-R for the third.
Display of the current file in Windows Explorer (on Windows) /Finder (on Mac) can be done
through Menu – File – Show in Windows Explorer / - Reveal in Finder. Default keyboard
combination – Ctrl-F.
Performance Settings
Depending on the characteristics of your computer, the most important ones being
Amount of RAM
Number of processors and cores per processors
Type and performance of the video card
You may need to tune the performance settings of FastRawViewer to be more comfortable.
FastRawViewer is optimized for work with files on modern high-speed storage devices: SSD drives,
disk arrays (RAIDs), fast flash cards (UHS-I and similar in fast USB3 readers).
When using slower media, additional optimization of FastRawViewer may be necessary, because
the default settings will not be optimal
Hard Disk Drives (HDD)
Hard disk drives, cannot read the data from multiple locations at once: the delays are caused by
the time spent on the positioning of magnetic heads.
Accordingly, when using HDDs for optimal performance of FastRawViewer it is necessary to
decrease the amount of parallel reads:
1. Preferences - Performance - Memory usage and performance - Number of simultaneous
RAW decode threads
recommended values for HDD: 2-3
2. Preferences - Performance - Thumbnail cache - Thumbnail decoder thread count.
Set 1-3 for HDD (the higher, the more priority will be given to the preview generation over
the other functionality of FRV).
Preferences - Performance - Thumbnail cache - Thumbnail prefetch depth
This parameter can be lowered (down to zero), which will lessen the load on the HDD.
Page 62 of 127 Copyright © 2014-2015, LibRaw LLC, www.libraw.com
Page 63

FastRawViewer – user manual
Flash cards and network volumes
Like HDDs, portable media and network volumes work slower than modern SSD storage devices.
FastRawViewer can additionally limit the parallel functionality when working with such devices.
Default preferences are intended for work with today’s typical storage media: Gigabit Ethernet
network and flash cards of “average speed” in USB3 readers; for slower devices the default settings
ought to be changed:
For Network volumes:
When using a WiFi-network:
Lower the preferences values
Preferences – Removable Media – Prefetch depth on network volumes
to 2-3
When using fast network/NAS (1Gb/s and faster, in NAS with 4 and more disks in RAID):
Raise the preferences values
Preferences – Removable Media – Prefetch depth on network volumes
to 6-8
For Flash cards:
Slow cards (USB2 readers, Class 6 cards and slower):
Lower the preferences values
Preferences – Removable Media – Prefetch depth on removable media
to 2-3
Fast cards (USB3/SATA readers, UHS-I/CFast cards):
Raise the preferences values
Preferences – Removable Media – Prefetch depth on removable media
to 6-8
Video Card Processing Settings
Zooming in and out, rotation, focus peaking, over- and underexposure overlays are all computed
using video card GPU.
Default settings are optimized for low performance (older) video cards, but if you happen to have
one of modern cards (including those based on Intel HD2xxx and higher), we recommend changing
the settings in the following way:
1. Turn on Preferences – GPU Processing – Image resampling method – bicubic
2. Set Preferences – GPU Processing – Image downsampling to None or to Suppress
downsampling artifacts.
Page 63 of 127 Copyright © 2014-2015, LibRaw LLC, www.libraw.com
Page 64

FastRawViewer – user manual
In this case, the amount of the data transferred into the video card is minimized, and the image
display is faster.
Troubleshooting
OpenGL error warning when starting the application
During the first start-up, FastRawViewer may warn the user of an error with the graphics
subsystem, showing the following dialog window:
This window indicates that the graphics driver cannot process those sub-routines that
FastRawViewer needs to execute on the video card.
Possible solutions:
1. Try uninstalling the OpenGL version of FastRawViewer and installing the DirectX version.
2. Update the driver of your video card to the newest version.
If neither of the above-listed helped you, copy the error message using the ‘Save to file’ or ‘Copy to
clipboard’ buttons and send it to our tech support at
http://www.fastrawviewer.com/contact/Technical-support or support@fastrawviewer.com
Page 64 of 127 Copyright © 2014-2015, LibRaw LLC, www.libraw.com
Page 65

FastRawViewer – user manual
Black Screen in Image Display Window
When opening a file, a black screen is shown instead of the image.
This problem is due to some incompatibility between FastRawViewer and the installed graphics
drivers.
Possible solutions:
1. If you are using the OpenGL version of FastRawViewer, try uninstalling it and installing the
DirectX version.
2. Update the driver of your video card to the newest version.
If neither of the above-listed helped you, turn on the debug log (see below «Debug Information»),
restart the program, open a RAW file, and send the debug log to tech support at
http://www.fastrawviewer.com/contact/Technical-support or support@fastrawviewer.com
Screen does not fully update
When moving to the next file, or when changing the white balance or the contrast curve, the
screen does not fully update, and square-shaped areas filled with the previous image remain.
This problem only happens for Windows XP, and only for old Intel graphics cards. (845G and the
like)
Solutions:
1. Turn on GPU Processing – GPU Compatibility settings – Force window refresh by slight
resize in the Preferences
When turning on this setting, the application window will twitch by one pixel for each
image redraw.
2. Upgrade to Windows 7 – Intel graphics drivers for Windows 7 do not have this problem.
Other problems
If your problem is not listed above, then, to make troubleshooting faster, please turn on your
Debug Log, (see below) and when contacting support please attach a copy of the debug
information.
Debug Information (Debug log)
To turn on the output of debug information, turn on Other – Enable FastRawViewer debug log in
the Preferences and restart the application.
After turning it on, the Debug log appears in the Help menu, and pressing it will display a window
with the debug info:
Page 65 of 127 Copyright © 2014-2015, LibRaw LLC, www.libraw.com
Page 66

FastRawViewer – user manual
The contents of the window:
can be saved in a text file (the Save to file button)
can be copied as text into the clipboard (for applications which expect text in the clipboard:
most email applications).
can be copied as HTML into the clipboard (for applications which expect 'rich text' in the
clipboard, like text processors).
When turning to tech support, please remember to attach the debug log.
Page 66 of 127 Copyright © 2014-2015, LibRaw LLC, www.libraw.com
Page 67

FastRawViewer – user manual
Program Settings
File Handling
This group of settings controls the file processing rules
Program startup group:
Start without filename – to set the behavior if FastRawViewer was started without passing
a filename to view:
o Empty Screen – FastRawViewer starts up "without file".
o Last opened file – opens the top (last) file from the Recent Files list
o Last visited folder – opens the folder from the list of Recent Folders (from this
folder opens either the first file, corresponding to the current file sorting settings, or
the last opened, if the 'Remember last opened file in folder' is set)
o Specified folder – allows you to set a "start folder".
Do not recall network/removable media – forbids the automatic display of files/folders
from network volumes and removable media.
Page 67 of 127 Copyright © 2014-2015, LibRaw LLC, www.libraw.com
Page 68

FastRawViewer – user manual
File Browsing group
Warn on broken RAWs – turns on the warning if a damaged RAW file is encountered
Remember last opened file in folder – turns on the setting to memorize the last opened file
in the folder. A small .fastrawviewer.ini file is created in the folder; this file contains the
name of the last opened file. It is safe to delete this file.
File sort order – sets the order of file selection when browsing through the files:
o Filename, alphabetical – by filename, in alphabetical order, without accounting for
letter case, accounting the current localization settings (like with previous
FastRawViewer versions)
o Filename, reversed – the order is opposite to the previous.
o Modification time, newest to oldest – sorts the files by date of creation/last
modification of the files, new files in the top of the list
o Modification time, oldest to newest – the order is opposite to the previous.
o File type (extension) – files are sorted by extension; files with the same extension
are sorted alphabetically.
Additional RAW extensions – additional extensions for the RAW files FastRawViewer
should process (appended to the built-in extension list).
Ignore extensions when file browsing – this setting allows the user to supply a list of file
extensions. Files having the extensions listed here:
- will be ignored during file browsing;
- not displayed in the "Open file" dialogue window.
Open folder dialog starts at – sets the folder at which the “Open Folder” dialog starts:
o Current folder – Current folder
o One level up – One level up
o Specified folder – the folder specified by the user, always the same (until a different
folder is specified here).
File Moving/Rejecting group
Subfolder for rejected files – the name of the subfolder to store the rejected files.
This field can contain:
o Relative path (for example, _Rejected). In this case the rejected file subfolder will be
created in the current folder.
o Absolute path (global _Rejected folder):
Windows: the folder address starts with L: (any drive letter can be used
instead of L) or with \\ (for network paths)
OS X: the folder address starts with /
Warn when file(s) are moved to rejected – turns on the warning when moving files into the
_Rejected sub-folder
After current file moved – determines what file will be the next to display after moving the
currently displayed file to a different folder:
Page 68 of 127 Copyright © 2014-2015, LibRaw LLC, www.libraw.com
Page 69

FastRawViewer – user manual
o Preserve browsing direction – keeps the “direction of movement”: if you were
“going forward”, the direction will be forward. If you were going backwards, then
backwards.
o Always browse forward – the direction will always be “forward” (from AAAA.RAW
to ZZZZ.RAW).
Confirm move to the same destination – turns on the moving to the “same folder as last
time” warning.
Page 69 of 127 Copyright © 2014-2015, LibRaw LLC, www.libraw.com
Page 70

FastRawViewer – user manual
Removable Media
This group of settings sets the specifics of work with removable media and network volumes.
On removable media arrive – what to do when removable media is detected:
o Open most recent subfolder in – opens the most recent (by date of modification)
subfolder in the selected folder (/DCIM by default).
o Open folder – opens the selected folder.
o Do nothing – Do Nothing
Warn before automatically open folder on removable media – dispay a warning before
automatically opening a folder on removable media.
Disable A: and B: floppy access – prevents any access to the A: and B: drives, as well as
monitoring of changing media for those drives (Windows only).. This preference is intended
for the (fairly common in our day) case of a computer having a floppy drive controller, and
one or two drives being “visible” to the system, though they’re not actually present.
Preferences - Removable Media - Show unmounted network volumes in Folders panel –
this setting will switch on the display of the contents of the current un-mounted volume in
Page 70 of 127 Copyright © 2014-2015, LibRaw LLC, www.libraw.com
Page 71

FastRawViewer – user manual
this panel (if this setting is Off, the network devices that do not have a drive letter assigned
will not be displayed).
Monitor folder changes on removable media/network volumes – Monitor changes in
removable media/network volume folders, updating the Folders and Filmstrip panels when
new subfolders and files are added.
Prefetch depth on removable media/network volumes – sets how many files to decode
before moving to the next file.
Page 71 of 127 Copyright © 2014-2015, LibRaw LLC, www.libraw.com
Page 72

FastRawViewer – user manual
RAW+JPEG
Handle RAW+JPEG together – turns on the pairing of RAW and JPEG of the same name:
displaying them as different representations of the same image, and treating them as a
single unit for move operations, so that both are relocated to a different folder when a
move operation is invoked.
o Do not show internal JPEG if external JPEG is present – removes the embedded
JPEG from the list of available representations if there is an external JPEG (which,
usually, has better resolution).
o Decode and show external JPEGs – enables the decoding and the display of external
JPEG files
Ignore internal JPEGs – unconditionally disables decoding of embedded JPEG previews.
Automatically turns on and disables changing of Do not show internal JPEG if external JPEG
is present setting.
Default image to display – which representation to display when switching to the next file:
o Same as previous – the same as for the current file.
o RAW, internal JPEG, external JPEG – explicit designation of the representation.
Page 72 of 127 Copyright © 2014-2015, LibRaw LLC, www.libraw.com
Page 73

FastRawViewer – user manual
XMP
This group of settings controls the processing of XMP files
Use XMP for RAW files – turns on/off the use of XMP files.
Read Only XMP – turns on the mode, where XMP files are read, but not changed.
Force XMP file creation – turns on the unconditional creation of XMP files, even if no
adjustments were changed manually while viewing the RAW file (those adjustments are
orientation, white balance, exposure adjustment, labels and ratings). Useful for automatic
propagation of adjustments to the next file
XMP rating and labels Section:
o Use XMP Reject Rating – turns on the possibility of setting the rating to -1. This
rating is supported in Adobe Bridge. The setting is turned on automatically when
selecting XMP Label Style: Adobe Bridge.
o XMP Label Style – sets the label format in XMP files:
Adobe Bridge: Select, Second, Approved, Review, To Do
Color labels/Adobe Lightroom: Red, Yellow, Green, Blue, Purple
Page 73 of 127 Copyright © 2014-2015, LibRaw LLC, www.libraw.com
Page 74

FastRawViewer – user manual
Review status/Adobe Lightroom: To Delete, Color Correction Needed, Good
to Use, Retouching Needed, To Print
Custom – user labels (any text you choose)
o Write photoshop:Urgency tag with color labels (for PhaseOne C1) – Turns on the
recording of the XMP-tag photoshop:Urgency, which is used by CaptureOne to
recognize and set color labels. The setting is activated only if the mode XMP labels is
set in 'Color Labels' (this is the default). In other modes, the XMP Labels
photoshop:Urgency tag is not modified: if it was in the XMP file, it stays unchanged.
Adobe compatible Exposure and White Balance – turns on reading and recording into XMP
files exposure compensation and white balance in Adobe format:
o Read XMP data embedded into RAW files – allows the reading of Adobe-
compatible data from XMP blocks built into RAW files (priority being given to the
block contained in DNG).
o Adobe process version for newly created XMP files. Default: 2012, can be set to
2010 or 2003.
Features:
If the tag crs:ProcessVersion is set already in XMP file, the version doesn't
change and the exposure is written according to the version.
If the crs:ProcessVersion tag isn't present in XMP file, then it's added in
accordance to the setting (this way, XMP-files created in older versions of
FastRawViewer and then not changed by ACR/LR will be "upgraded");
For 2012 process, Exposure2012 (equal to expo correction in FastRawViewer
plus Adobe Shift) and the tags Contrast2012, Whites2012, Blacks2012 (set to
0, if these tags are not present in the file) are recorded
For the 2003/2010 processes the tags crs:Exposure, crs:Brightness, and
crs:Contrast are recorded (if the file already had the values for those tags,
they are preserved, otherwise they are set to 0).
Page 74 of 127 Copyright © 2014-2015, LibRaw LLC, www.libraw.com
Page 75

FastRawViewer – user manual
Interface
The group of settings to control the user interface.
Panels group
Panel’s font size: sets the font size in the informational panels.
Panels color scheme – sets the brightness of the panel background
Hide Menu bar when hiding information panels – for the hide informational panels mode
(Tab), controls if the menu bar should be hidden too.
Hide bottom window bar when hiding information panels – hide main program window
status bar in ‘hide information panels’ (Tab key) mode.
Do not hide panels outside of main window – for the hide informational panels mode
(Tab), controls if the panels that are placed completely outside the main program window
should be hidden too.
Disable transparency for panels outside of main window – allows disabling transparency
for informational panels that are placed completely outside the main program window.
Page 75 of 127 Copyright © 2014-2015, LibRaw LLC, www.libraw.com
Page 76

FastRawViewer – user manual
Further Settings
Bottom bar font size – controls bottom bar font size (Small – Extra Large on Windows and
Normal – Extra Large on OS X).
Background Gray level allows you set the brightness of the main program window
background.
Ignore successive wheel events for NN msec – this setting is designed to tame the stream
of events generated by mouse wheel, Apple Magic Mouse, or trackpad
Alternate keyboard handler (Windows only) – turns on the alternative keyboard shortcuts
processing mode. Turn on only if there are problems with the processing of keyboard
shortcuts (this happens when using utterly non-standard keyboard layouts, for instance
when switching between Qwerty и Dvorak).
Restore last View settings on program start – when closing the program the following
image display parameters are saved (independent of the status of the settings):
Display mode (RGB, per-channel, BW Conversion)
Focus Peaking mode
Boost Shadows mode
Exposure correction on/off
If 'Restore last View settings' is turned on, then during the next start-up of the program, the
above-listed parameters will be in effect.
Use built-in drive/folder icons in Folders panel – show icons built-in into FRV in the Folders
panel (in several cases, using the system’s icon can lead to problems).
Use system Open file/Open folder dialogs – switches between standard and smaller
dialogs when opening files/folders.
o Use built-in file/folder icons in Open File/Open Folder dialogs – when using non-
system dialogs for opening files/folders – use built-in icons.
Disable splash screen – switches off the display of logo at FastRawViewer start.
Page 76 of 127 Copyright © 2014-2015, LibRaw LLC, www.libraw.com
Page 77
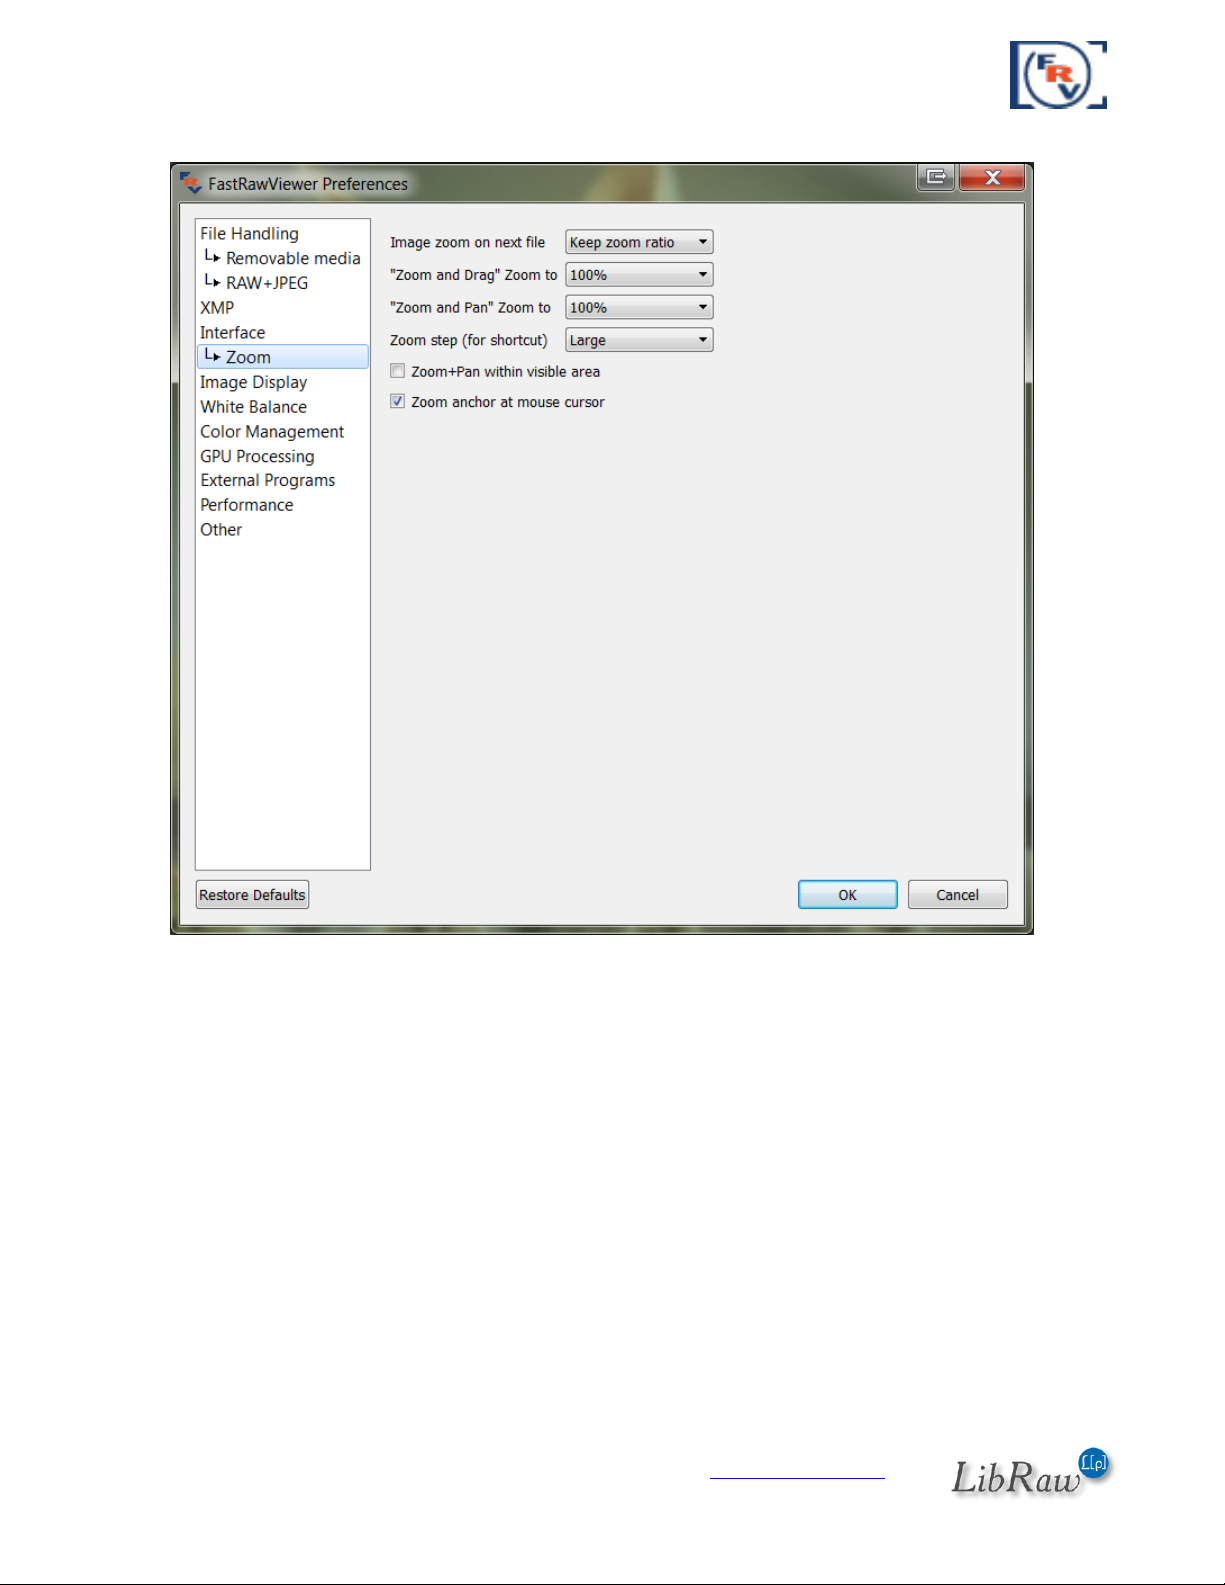
FastRawViewer – user manual
Zoom
Image zoom on next file – sets the zoom factor to be used when displaying the next file:
o Keep zoom ratio – will keep the zoom factor
o Keep image width – will keep the visible width of the image
o Fit to window – the Fit to screen mode will be turned on.
Zoom and Drag Zoom to – sets zoom factor to use in the Zoom and Drag mode (Shift – left
mouse click)
Zoom and Pan Zoom to – sets zoom factor to use in the Zoom and Pan mode (Shift – right
mouse click)
Zoom step (for shortcut) – controls the zoom step for keyboard (and mouse) shortcuts:
o Large – fixed zoom step value of about 50%, to be used for keyboard control.
o Medium – zoom step is set to 20%
o Small – zoom step is set to 5%
the last two settings are designed to be used while zooming with the Mouse Wheel
or trackpad.
Page 77 of 127 Copyright © 2014-2015, LibRaw LLC, www.libraw.com
Page 78
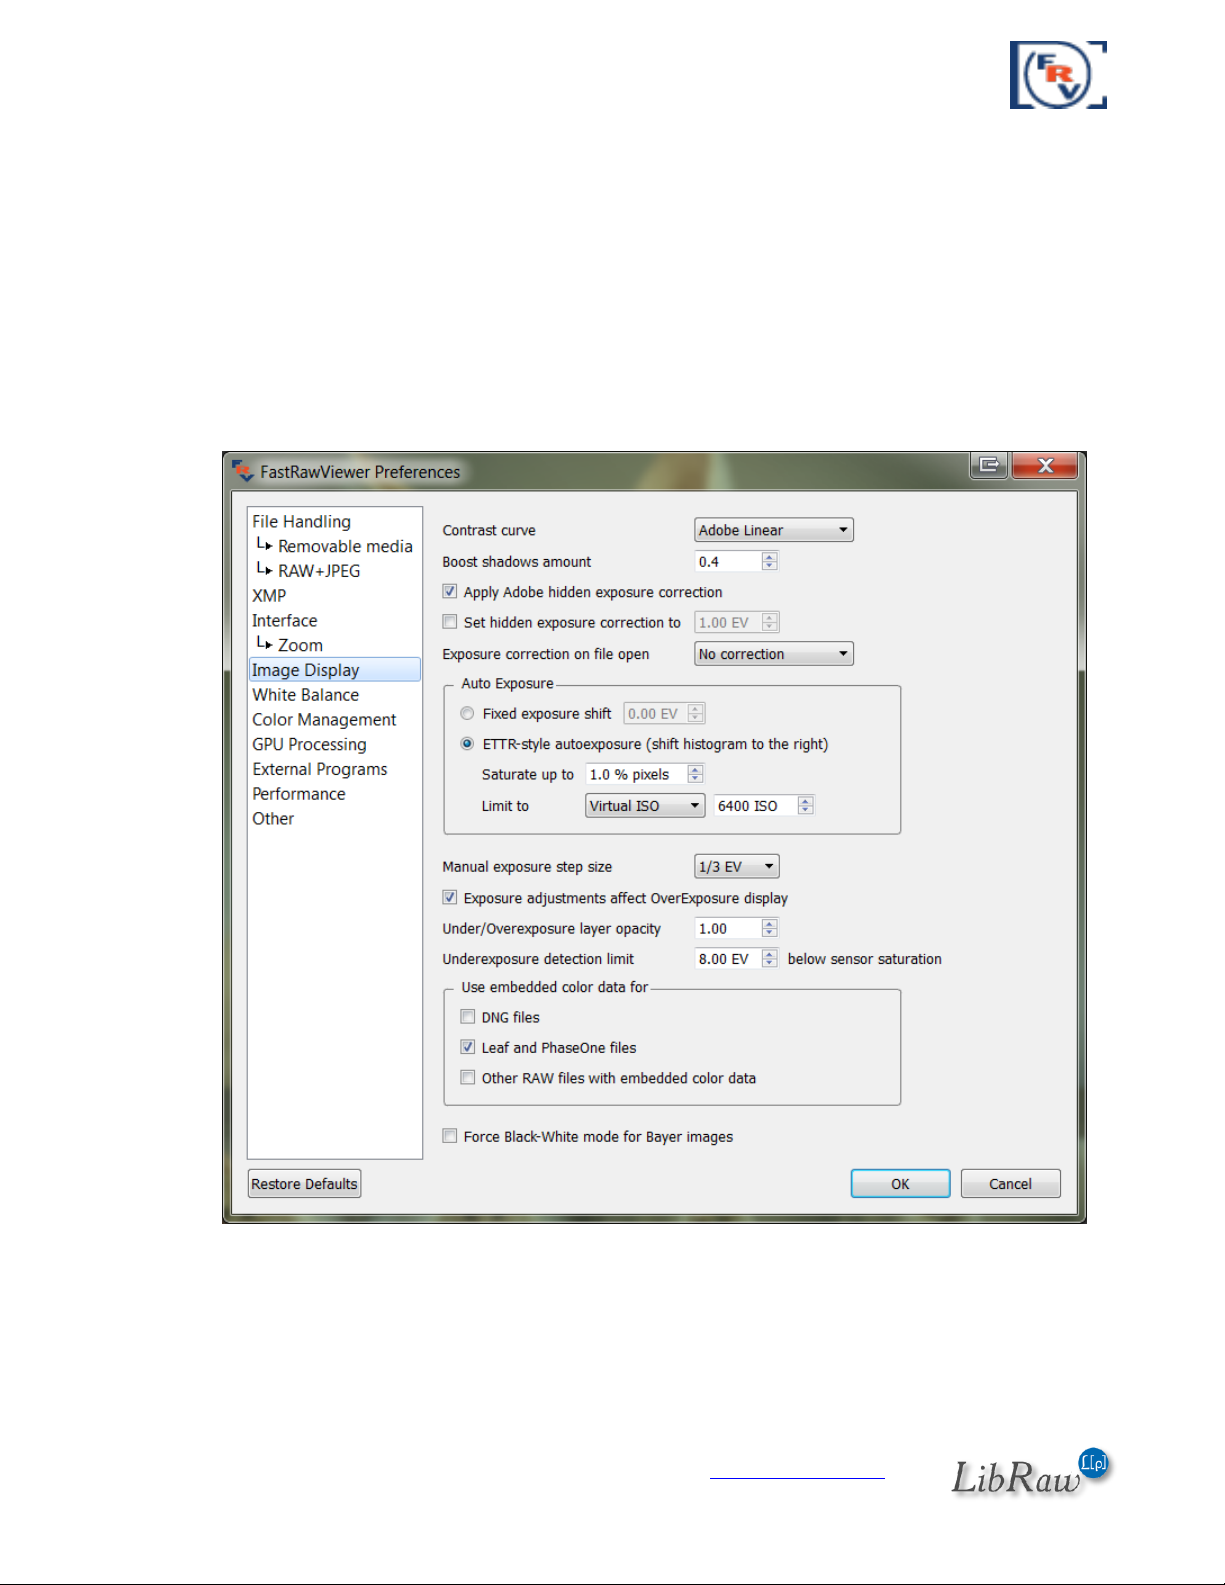
FastRawViewer – user manual
Zoom+Pan within visible area – if this setting is on, then the panning will take place inside
the area visible before the start of the panning. If it is off, then the panning will be over the
entire image
Zoom anchor at mouse cursor – zooming will happen taking the position of the mouse
cursor into account; the point underneath it will retain its position respective of the
window during zooming.
Image Display
The settings in this group control the processing and the display of the images (except for white
balancing, as the WB settings are in a separate group)
Contrast curve – sets the tone curve to be used when displaying the image:
o Gamma 1.8, Gamma 2.2, sRGB, L* - sets one of the standard tone curves, typically
used in image editing.
o Adobe Linear – corresponds to the linear tone curve in Adobe Camera
Raw/Lightroom
Page 78 of 127 Copyright © 2014-2015, LibRaw LLC, www.libraw.com
Page 79

FastRawViewer – user manual
o BW Movie, Monochrome, Landscape, Portrait, Vivid – more punchy tone curves,
may be useful for a quick demonstration of unedited images, adding to a more
finished look.
Boost shadows amount – controls the additional gamma adjustment while in Boost
Shadows mode, the range is 0.2 to 2.0.
Apply Adobe hidden exposure correction – switches ON the automatic exposure correction
similar to the one used by Adobe RAW converters, such as Camera Raw and Lightroom.
With this correction ON, same values in exposure correction will result in overall image
brightness being similar between Adobe converters and FastRawViewer.
Set hidden exposure correction to – allows setting a user-defined value for the hidden
automatic exposure correction. Often this is not necessary, as FastRawViewer already
comes with the corrections for all cameras supported in Adobe converters.
Exposure correction on file open:
o No correction – no additional exposure correction (apart from the Adobe-style one,
if it is ON) is applied when a file is opened, unless the correction is found in the
accompanying XMP sidecar file.
o Autoexposure – automatic exposure correction is applied, according to the settings
listed below.
o Keep from prev. file – the new file will be opened with the same exposure
correction that was set for the previous file (it does not matter here how that
exposure correction was set, manually or automatically).
Auto Exposure – controls the automatic exposure correction (the one that is applied when
‘automatic correction’ action is performed)
o Fixed Exposure Shift – the exposure is shifted by the fixed value.
o ETTR-style autoexposure (shift histogram to the right) – positive exposure
correction that forces the saturation of the given percentage of pixels (those
saturated pixels are having value of 255 on the 8-bit scale); the percentage is
controlled through Saturate up to %NN of pixels setting.
The amount of the positive exposure correction shift is limited by the ‘Limit to’
setting:
Unlimited – no limit
Hard limit – the limit is set to the given amount.
Virtual ISO – limits the automatic exposure correction, taking into account
the ISO setting in the camera. For example, if the current shot is taken at ISO
400 setting in the camera, while auto limit is set to ISO 6400 (the default
value), the positive exposure correction is limited to (6400/400 =) 16 times,
or, in photographic units, to 4EV
Manual exposure step size – sets the step of manual exposure adjustment change.
Exposure adjustments affect OverExposure display – when turning on this setting the
change in exposure adjustment (both automatic and manual) will affect the display of
overexposed areas.
Under/Overexposure layer opacity – controls the perceived contrast of the highlighting for
over- and underexposed areas.
Page 79 of 127 Copyright © 2014-2015, LibRaw LLC, www.libraw.com
Page 80

FastRawViewer – user manual
Underexposure detection limit NN EV below sensor saturation – sets the “usable dynamic
range” of the camera. Everything below this limit will be displayed as underexposed.
Use embedded color data for – controls the use of color data embedded into RAW files and
allows using that data instead of data that comes with FastRawViewer.
Force Black-White mode for Bayer images – turns on the black’n’white mode for color
cameras. This mode is intended for modified cameras, where the color filter array is
removed.
Page 80 of 127 Copyright © 2014-2015, LibRaw LLC, www.libraw.com
Page 81

FastRawViewer – user manual
White Balance
This group contains all the white balance processing controls:
White Balance Sampler size – for “click-on-gray” (Alt-Click) method, sets the size of the
area used to evaluate the white balance
White Balance for next file (same camera) – sets the white balance mode when opening a
file coming from the same camera model as the current file. Choices here are:
o Same as previous – keep the current white balance choice
o All others – the respective white balance mode will be in effect
White Balance for next file (another camera) – sets the white balance mode when opening
a file coming from a different camera model
White Balance display mode:
o Color Temperature/Tint – a mode commonly used in many RAW converters,
including those by Adobe
o Mired/Tint – instead of correlated color temperatures, the value indicated is in
Mired. Useful for selecting color filters to be used on the lens and on studio lights.
Page 81 of 127 Copyright © 2014-2015, LibRaw LLC, www.libraw.com
Page 82

FastRawViewer – user manual
o WB Coefficients – the per-channel multipliers for white balance are indicated.
Keep Custom WB for next file (same camera) – instructs FastRawViewer if the current
white balance coefficients should be applied to the next file coming from the same camera
model).
Page 82 of 127 Copyright © 2014-2015, LibRaw LLC, www.libraw.com
Page 83
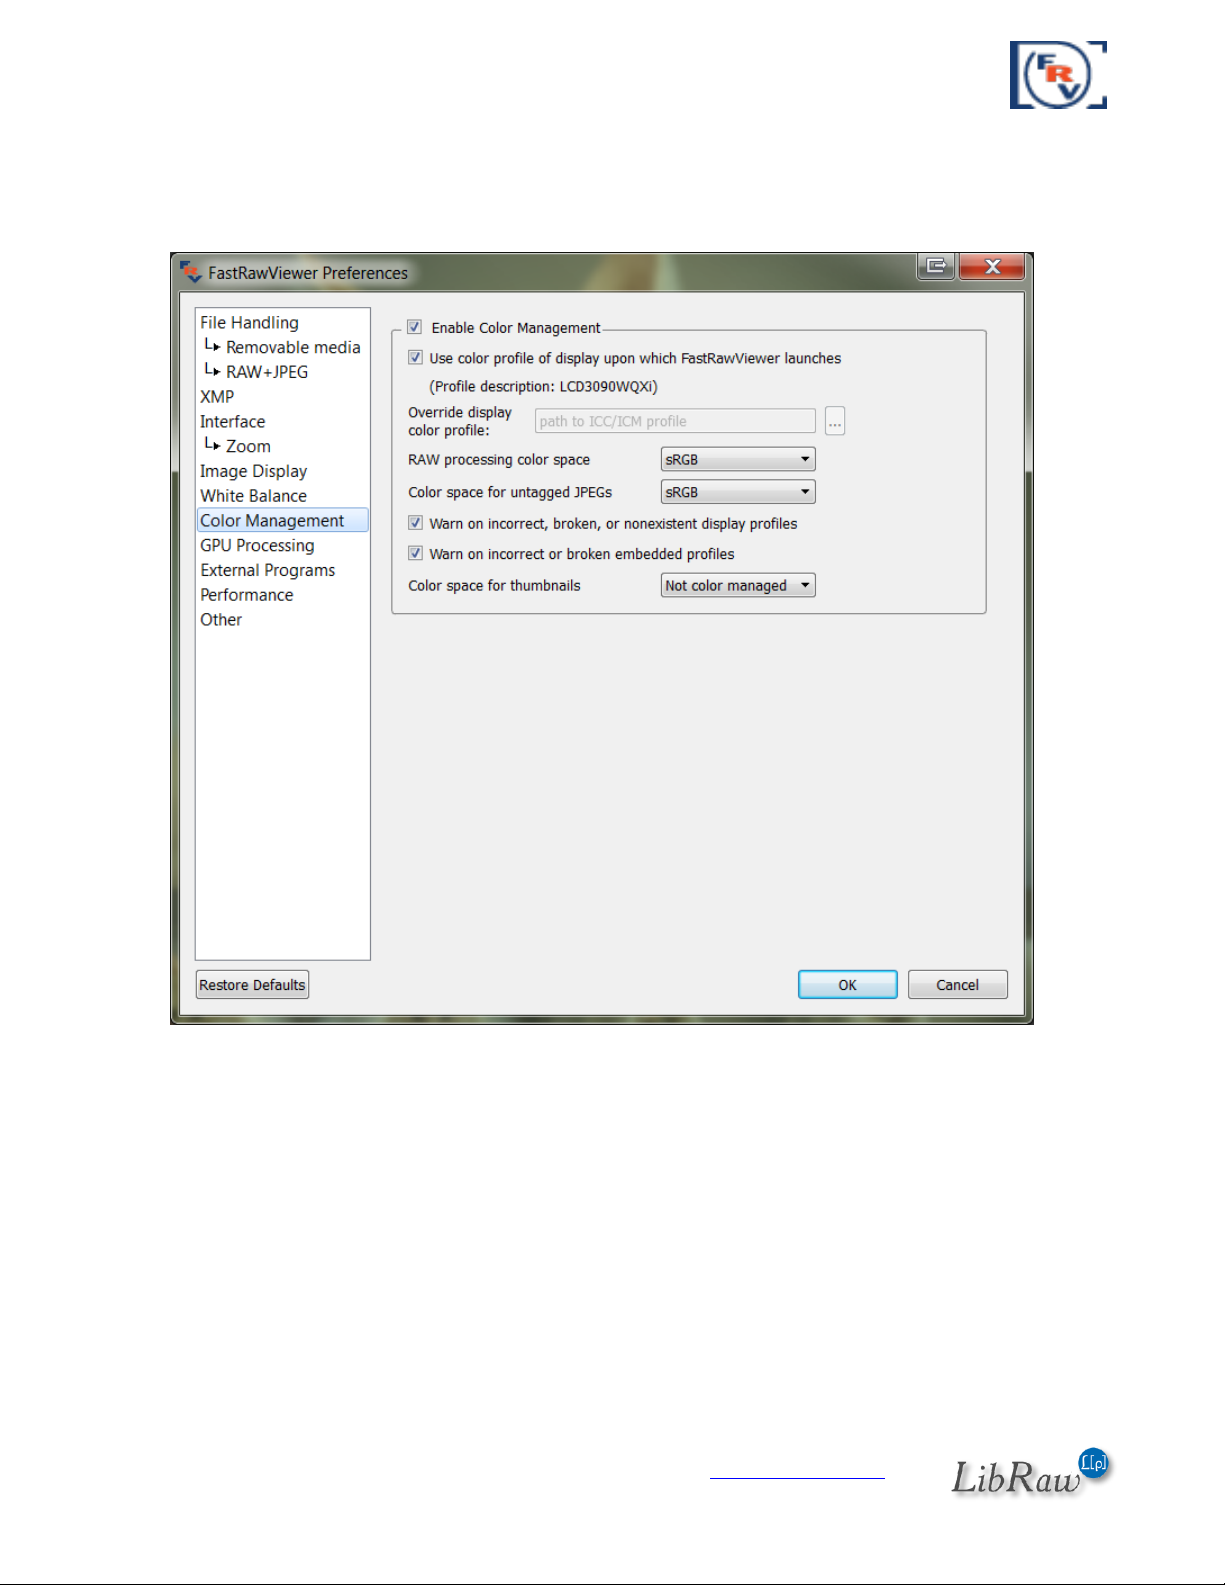
FastRawViewer – user manual
Color Management
This group of settings controls the appearance of the color on-screen in respect to color
management:
o Enable Color Management – turns on ICC-compatible color management.
o Use system profile (for monitor where program starts) – The ICC profile chosen in the
system for that monitor where the program is being started will be used as the profile for
the monitor.
o Display Color profile – allows one to specify a file with the ICC profile for the monitor.
o RAW processing color space – allows one to set a color space in which the last steps of the
RAW data processing are done (the first steps are performed in the camera’s color space).
o Color space for untagged JPEGs – allows one to set a color space for JPEG files for which
the color space is not specified (not recorded in EXIF tags or ICCProfile of JPEG sections).
o Warn on incorrect, broken or nonexistent display profiles – turns on a warning for when
one tries to use an incorrect display profile.
Page 83 of 127 Copyright © 2014-2015, LibRaw LLC, www.libraw.com
Page 84

FastRawViewer – user manual
o Warn on incorrect or broken embedded profiles – turns on a warning for incorrect profiles
built into the JPEG data.
o Color space for thumbnails: sets the mode for color space for previews (thumbnails)
GPU Processing
This group controls the video card modes and how the sharp areas of the image will be displayed.
Image resampling method:
o No resampling – for large zoom factors, the image will look as if it is constituted of
small square tiles. The fastest method.
o Bilinear resampling – pretty fast, mid-quality method
o Bicubic resampling – high-quality method, can be slow, a relatively fast vast video
card is recommended
Downsampling options:
o None – no additional processing, the downsized image may have a low quality look.
Page 84 of 127 Copyright © 2014-2015, LibRaw LLC, www.libraw.com
Page 85

FastRawViewer – user manual
o Generate low resolution previews – low-resolution previews are rendered in
advance with the help of video card driver. Requires additional memory for the
graphic textures, compatible with all video cards.
o Suppress downsampling artifacts – suppresses the colored noise on the high ISO
images. Not supported on all video cards.
Focus peaking mode:
o High contrast edges – enables the outlines for contrasty details using color
contouring. Edges display color sets the color for the contours.
o Fine details – enables the outlines for the areas with plenty of smaller sharp details
using color contouring. Details display color sets the color for the contours.
o Focus Peaking layer opacity – controls the fading of the main image for the Focus
Peaking contours to be visible better.
GPU compatibility settings
This group of settings is helps with the cases when certain compatibility problems are
encountered (for instance, the image is not completely refreshed):
o Store compile GPU programs (shaders) – on those video cards on which this is
supported, compiled GPU programs will be saved on the disk during the first
startup. Program will start faster ever after.
o Synchronous GPU operations turns on the synchronous mode of video card work
(slower, but more reliable).
o Force window refresh by slight resize – turns on bouncing to force image redraw
o Exit program on OS Sleep/suspend – forces the program to exit when the computer
goes to sleep (that is to address the issue with some older OS being unable to
correctly restart OpenGL operations after the wake up).
Page 85 of 127 Copyright © 2014-2015, LibRaw LLC, www.libraw.com
Page 86
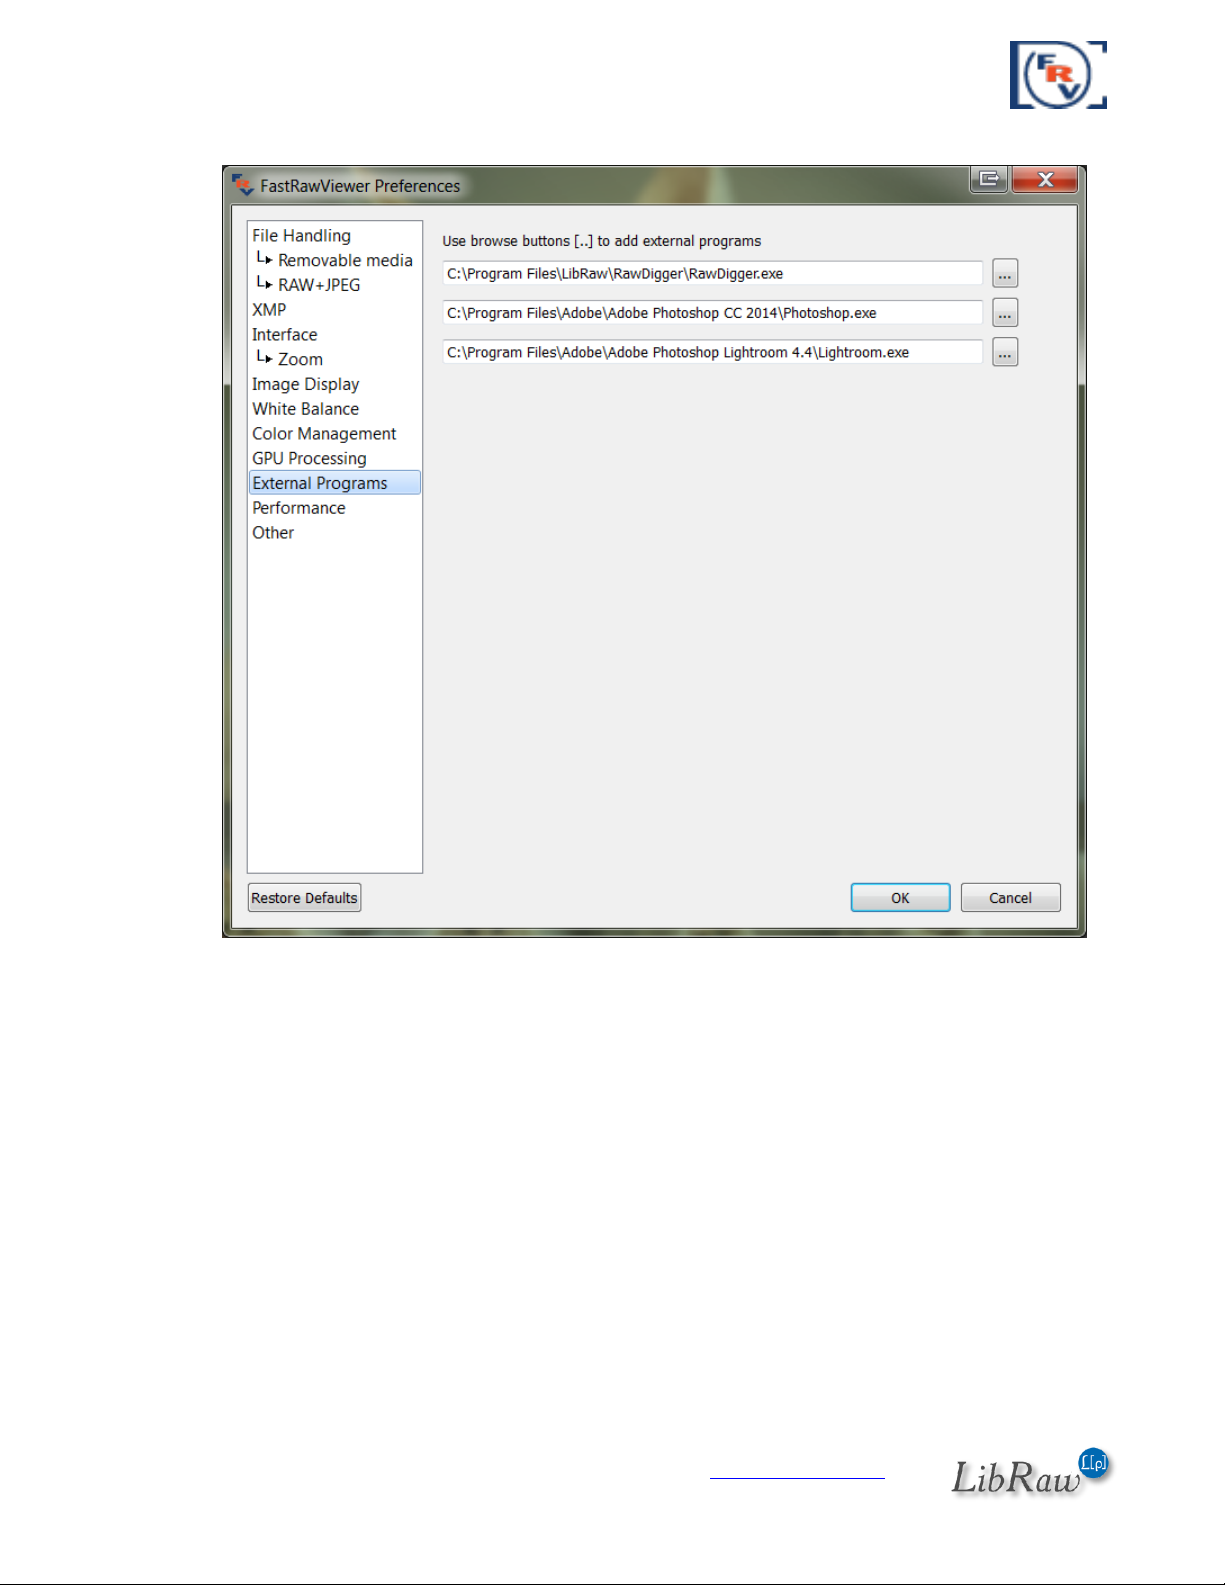
FastRawViewer – user manual
External Programs
This window displays the paths to external programs. FastRawViewer can launch those, passing to
them the name of the currently displayed file
Page 86 of 127 Copyright © 2014-2015, LibRaw LLC, www.libraw.com
Page 87

FastRawViewer – user manual
Performance
Memory usage and performance Group
o Decoded RAW cache size – the number of decoded RAW files that are kept in the
operational memory (RAM) to boost the speed of the browsing.
o JPEG cache size – the number of JPEG files that are kept in the operational memory
to boost the speed of the browsing.
o Number of simultaneous RAW decode threads – the number of concurrent
processes of RAW decoding.
o Downscale JPEGs larger than NN Mpix – JPEG files larger than the specified size will
be down-sampled during the decoding process, so less memory will be required,
while decoding and display will happen faster.
o Do not decode RAW files larger than NN Mpix – RAW data with a pixel count more
than the specified will not be decoded; only an internal JPEG will be shown (if it
exists)
Page 87 of 127 Copyright © 2014-2015, LibRaw LLC, www.libraw.com
Page 88

FastRawViewer – user manual
All changes made to this group of settings come into effect only after restarting
FastRawViewer.
o Use high speed preview for Fujifilm X-Trans – this preference turns on faster (but
lower quality) processing for files created by Fujifilm X-Trans sensors.
This mode is recommended if you are not satisfied with the display rate of these
files in standard mode.
Automatically turns on during the first start-up, and when resetting to default the
preferences if the system has one of the following processors:
Intel Core2Duo and older.
Intel i7 1st generation with fewer than 4 cores.
Thumbnail cache Group:
Prefetch thumbnails for preceding images: to decode previews for the files “before” those
visible on the screen.
Thumbnail cache size: maximum size of the cached previews in the memory (each preview
is stored in 4-byte per pixel format, so standard 200x133 preview is about 100kb, so
200Mbytes cache limit translates to ~2000 images).
Thumbnail prefetch depth: how many files (relative to those viewed on the screen) to read
ahead and decode previews.
Thumbnail decoder thread count: how many parallel decode streams (threads) are
enabled.
Other settings:
Re-read current folder in – sets the refresh rate for the list of files in the current folder (if
the folder changes, for instance other files are copied into it, then it won’t be reread very
often).
Page 88 of 127 Copyright © 2014-2015, LibRaw LLC, www.libraw.com
Page 89

FastRawViewer – user manual
Other
This section contains other settings that cannot be grouped with any other preceding group:
Write RPPS files – saves an .rpps file (for RawPhotoProcessor) if manual changes of
WB/exposure are applied to the image
o Force RPPS files creation – saves an .rpps file with automatic settings for
WB/Exposure when a RAW file is opened.
Check for updates – this parameter schedules the checks for updates - at each program
launch or once in every 1-3-7-15-30 days.
Enable debug log – turns on the debug mode, the debug messages are available through
Menu – Help – Debug log.
Run single program instance – (Windows only) turns on the “one instance” mode of the
program. At an attempt of starting the second instance, the file is displayed in the already
existing program window.
Faster program close – (Windows only) turns on the fast program completion mode.
Page 89 of 127 Copyright © 2014-2015, LibRaw LLC, www.libraw.com
Page 90

FastRawViewer – user manual
Manage File Associations – (Windows-only, not supported in Legacy Windows version):
activates the system dialogue to edit file association with FastRawViewer:
Informational panel settings
The settings icon (“gear”) is located in the header of the informational panels, allowing one to
perform actions or change preferences for the current panel. These setting can be changed at any
moment while the program is running and are effective immediately.
Page 90 of 127 Copyright © 2014-2015, LibRaw LLC, www.libraw.com
Page 91

FastRawViewer – user manual
Folders Panel
Refresh folders tree – re-reads the folder tree. This action is intended to sync the displayed
file structure with the current one on the disk; useful if the monitoring of the creation of
new files/folders (default setting for network collections and memory cards) is turned off.
Show system/special files: turns on the display of files/folders which are usually hidden:
o Mac: bundles (applications and disk images); folders, the names of which start with
a dot; standard Unix folders like /usr, /bin etc.
o Windows: C:\Windows folder
o All systems: Lightroom folders
Show Drive/Folder icons – allows drive and folder icon display.
Monior removable media changes – allows automatic discovery and monitoring of
removable media.
Show unmoumted volumes (Windows only) – allows drive letter display when the media is
offline
Page 91 of 127 Copyright © 2014-2015, LibRaw LLC, www.libraw.com
Page 92
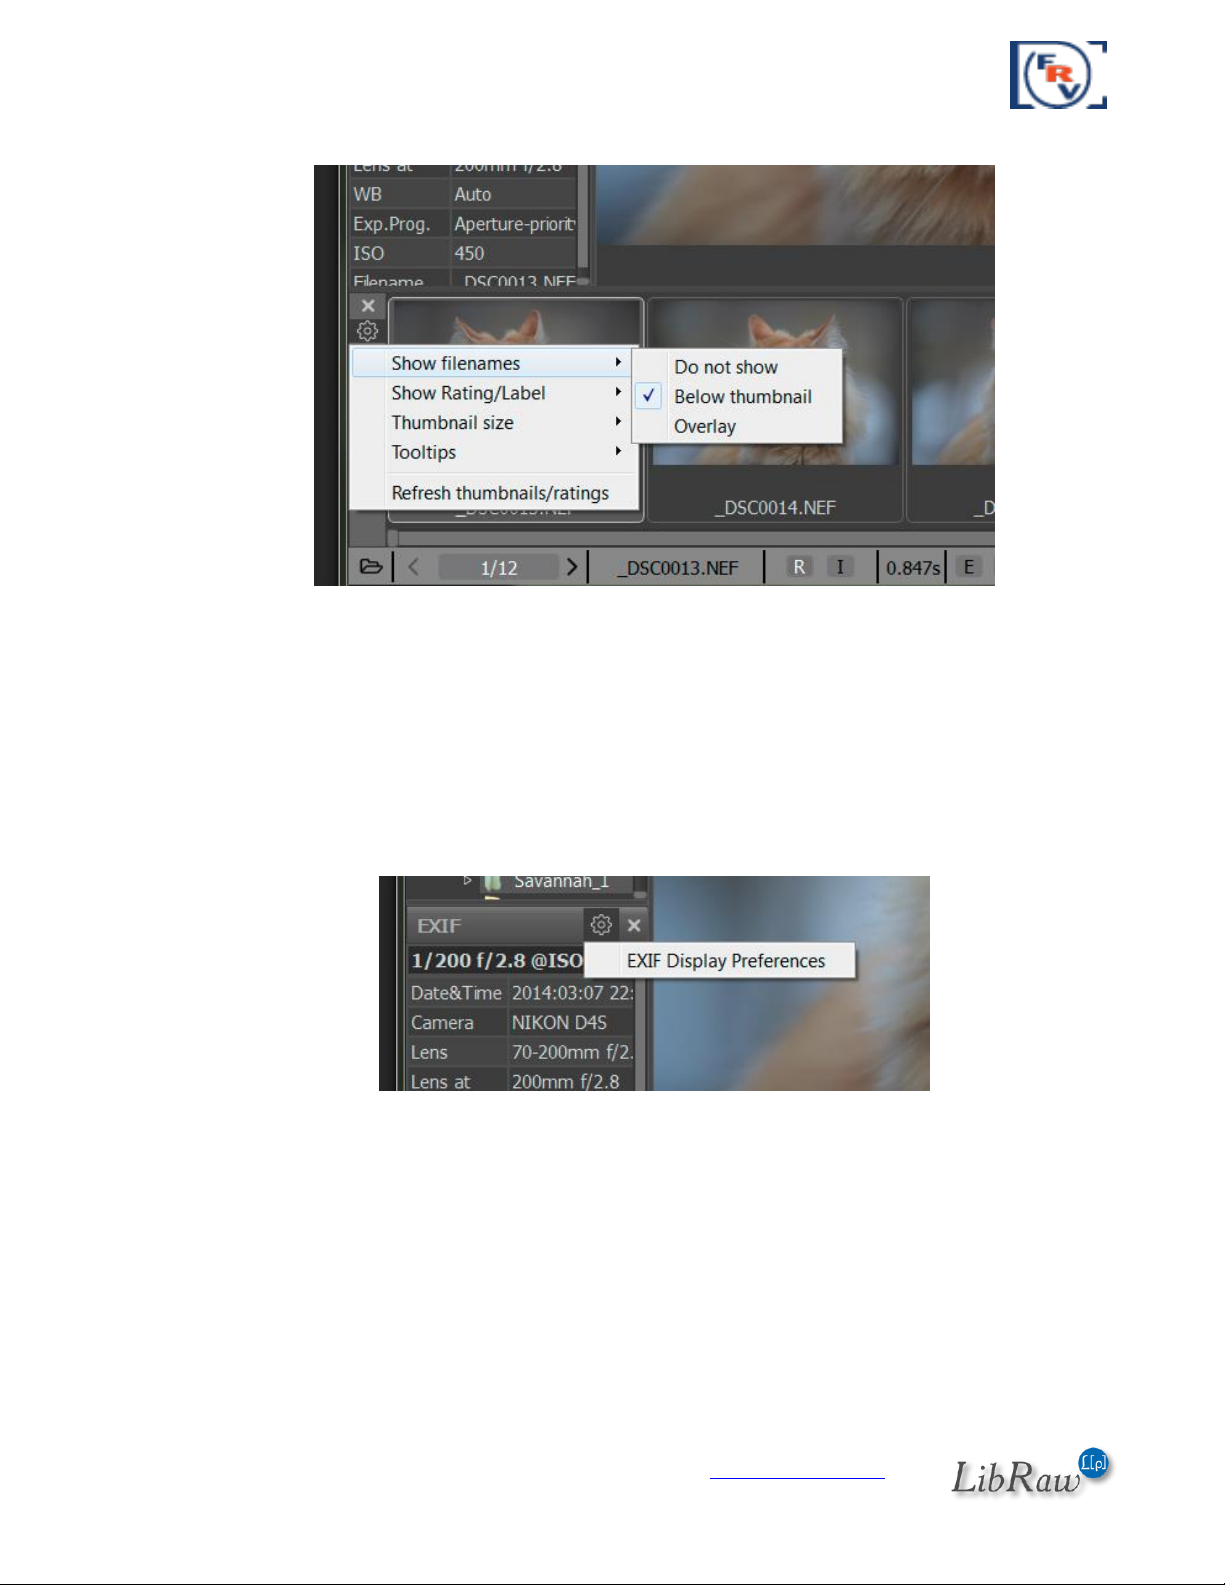
FastRawViewer – user manual
Filmstrip/Thumbnails Panel
Show filenames – sets a mode for file name display in the Filmstrip: don’t show, show
under the icon, or show over the icon.
Show Rating/Label – sets a mode for XMP Rating/Label display in the Filmstrip: don’t show,
show under the icon, or show over the icon..
Thumbnail size: choose the size of the file icons: 5 sizes with aspect ratio 2:3 or 1:1
Tooltips – what to display in the floating hints: Title, Description.
Refresh thumbnails/ratings: action for re-reading the file icons in the current folder.
EXIF Panel
EXIF Display preferences runs a dialog for editing EXIF display:
Page 92 of 127 Copyright © 2014-2015, LibRaw LLC, www.libraw.com
Page 93
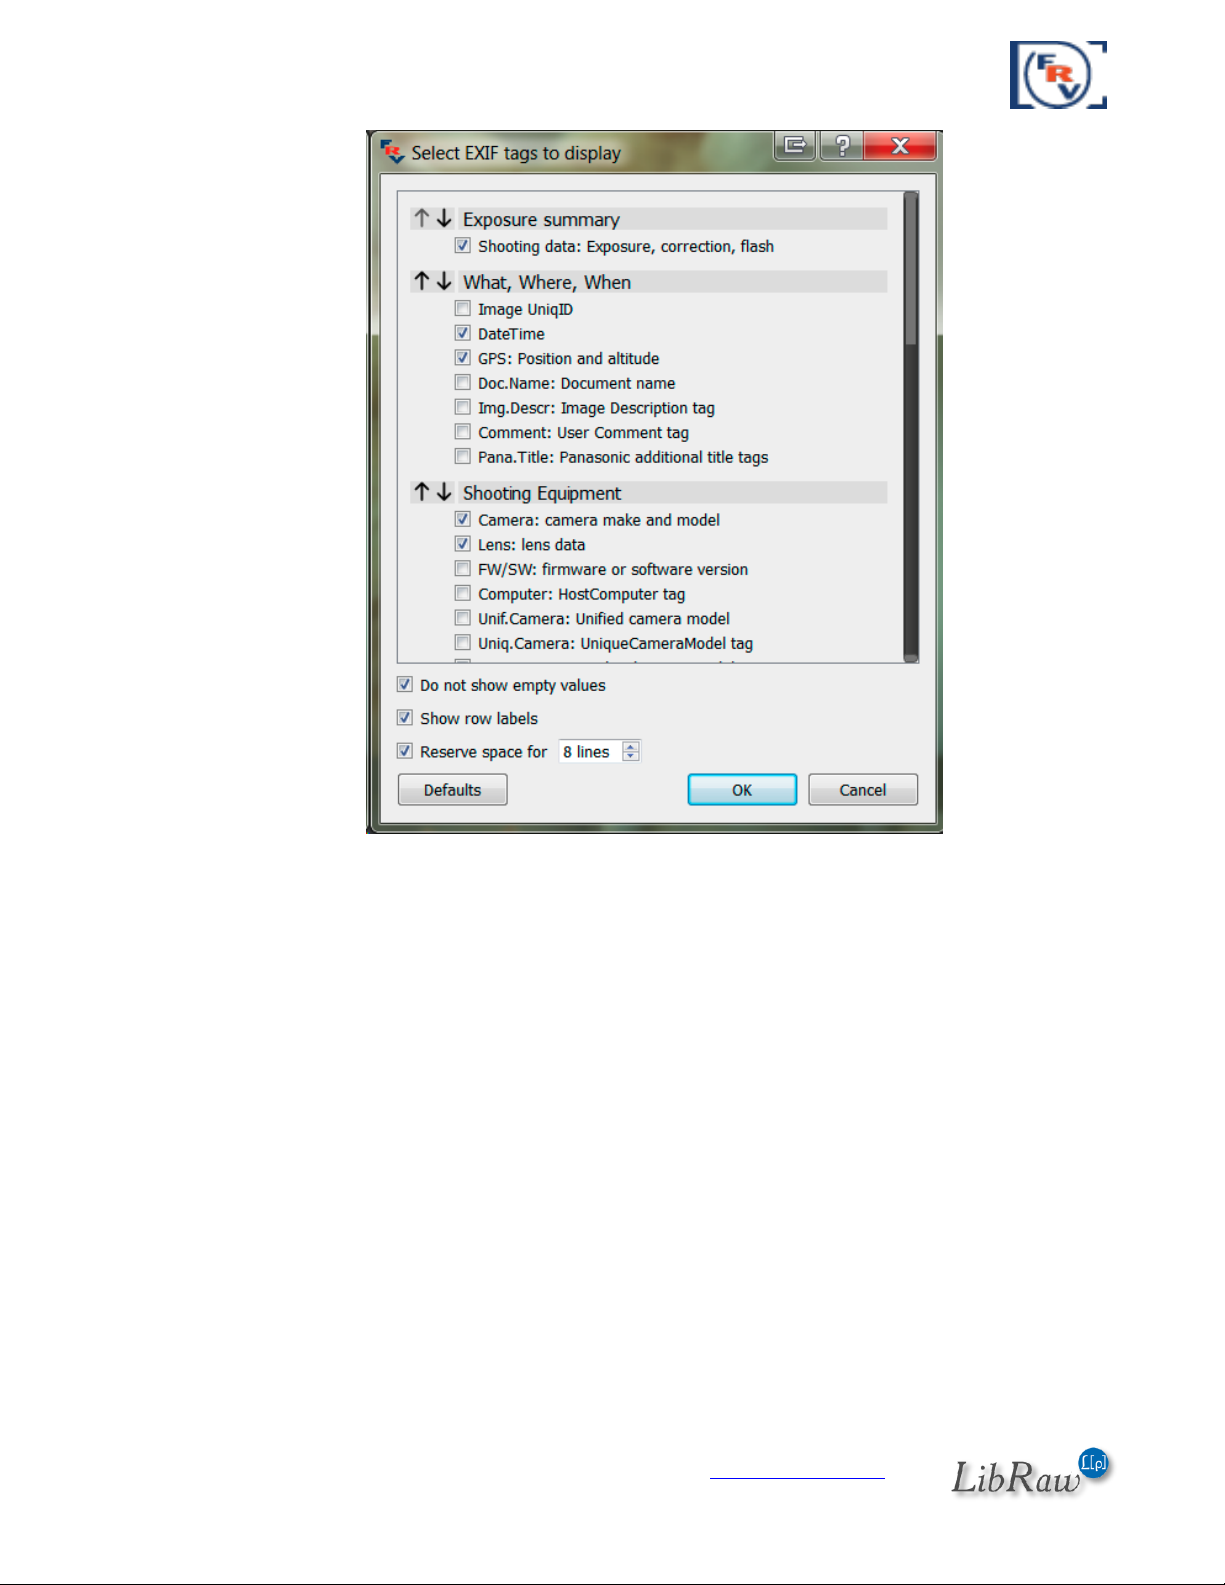
FastRawViewer – user manual
In this dialog:
The up/down arrows allow one to move the groups of the displayed information.
In each group, one can choose the elements that are necessary during display
Do not show empty values – forbids the output of empty lines (for which the displayed
RAW has no data).
Show row labels: turns the left column of the EXIF-table (field names) on/off.
Page 93 of 127 Copyright © 2014-2015, LibRaw LLC, www.libraw.com
Page 94

FastRawViewer – user manual
XMP Metadata Panel
Move to next file after – sets the automatic progression to the next file after setting a rating
or mark:
o Do not move – doesn’t move
o Rating is set – moves when a rating is set
o Label is set – moves when a mark is set
o Rating or label – moves when setting either parameter.
Show Title/Description – Shows the title and description in the XMP panel
Exposure statistics panel
Always display OE+Corr column: turns on the display of the third column of statistics
(OE+Corr), even if it has the same values as the OveExp column.
Display statistics in color: turns on the output of table rows in the color corresponding to the color
of the pixels.
Page 94 of 127 Copyright © 2014-2015, LibRaw LLC, www.libraw.com
Page 95

FastRawViewer – user manual
Customizing the Status Bar
Many control and information display elements characterizing the displayed image can be placed
in the status bar. As a rule, all possible elements are not needed to the user (and they won’t all fit
on a monitor of average resolution), so the display of these elements can be customized.
For customization choose File – Customize bottom bar in the menu, or choose Customize Bottom
Bar in the menu that pops up when pressing the settings button in the lower right corner of the
program window (if you have not switched off the display of this icon).
This settings window pops up:
Each line on the table corresponds to one element of the program’s status bar, and can be set to
one of three positions:
Page 95 of 127 Copyright © 2014-2015, LibRaw LLC, www.libraw.com
Page 96

FastRawViewer – user manual
Visibility always: always shows the element. If the program window size is too small, then
the elements will overlap.
If fits: The element is shown only if the size of the window is such that the elements do not
get in each other’s way.
Hide: The element is not shown.
The following elements can be customized:
File Navigation
o Open File Button: Open file icon
o File navigation buttons: Prev File/Next file button and current file number
indication (this button opens up the set file by number dialog).
o Current folder: current folder being browsed.
o Current filename: File name (without the name of the folder).
File and Display information
o Current image size: size of the image in pixels
o EXIF summary: shooting data (exposure, flash, lens’s focal length).
o Zoom ratio and zoom buttons: current file zoom (clicking causes Fit to Window)
Zoom In,/Zoom Out buttons.
o File load/processing time: time spent on reading-decoding-processing the file in
FastRawViewer.
Controlling the current file display
o RAW/JPEG switch buttons: Buttons for switching between RAW/JPEG
o R-G-B-BW channel selector: Buttons for switching RGB channels and black and
white representation.
o Focus peaking and shadow boost: Buttons for turning those modes on
Exposure analysis, exposure compensation control
o Exposure control buttons: current exposure compensation value (clicking on this
turns on/off exposure compensation).
o Over/Underexposure buttons: Buttons for turning on/off the display of
over/underexposed areas.
White balance and contrast control
o White balance presets: choose preset WB
o White balance manual tune: current white balance indication; pressing on it
summons a dialog for adjusting white balance manually
o Contrast curve selector: drop-down list of contrast curve choices.
Rotation control buttons: control of the image rotation, current orientation display
Controlling XMP ratings and labels:
o XMP Rating buttons: indication and control of XMP ratings
o XMP Label indicator: indication of current XMP labels.
o XMP Label buttons: indication and control of XMP labels.
o Fullscreen, hide/show filmstrip/dock, and customize buttons: Fullscreen,
hide/show filmstrip panel/all panels, and program settings block buttons.
Page 96 of 127 Copyright © 2014-2015, LibRaw LLC, www.libraw.com
Page 97

FastRawViewer – user manual
Setting the keyboard shortcuts
FastRawViewer allows you to re-define all keyboard shortcuts, assigning an arbitrary amount of
alternative keystroke and mouse button combinations to each of the actions possible in
FastRawViewer.
To define or modify the sequences for the actions use the editor under Menu – File – Keyboard
Shortcuts (Ctrl-K):
The left pane contains the list of groups of actions. The right pane displays the names of the
actions in the highlighted group and current shortcuts for those actions.
Looking to the right of every action name:
[+] – adds a new keyboard shortcut for the action
[keyboard combination] – currently assigned shortcut
[x] to the right of every keyboard combination – deletes this combination.
When pressing the buttons to add or edit the combination the following dialogue appears:
Page 97 of 127 Copyright © 2014-2015, LibRaw LLC, www.libraw.com
Page 98

FastRawViewer – user manual
Hit the combination of keys (and mouse buttons), which you want to assign to the action, and it
will be memorized. To close the window without modifying the current status (that is, to cancel the
assignment), press the Shift key three times.
It is possible that the selected combination is already in use somewhere, and then the program will
prompt with the following:
For some actions, only a specific mouse button can be assigned (this applies to the actions, which
are done with the mouse: setting the white balance for the “click-on-gray” method, etc.). In this
case, the dialogue to assign the combination changes a bit:
Page 98 of 127 Copyright © 2014-2015, LibRaw LLC, www.libraw.com
Page 99

FastRawViewer – user manual
Settings for Apple Magic Mouse/Trackpad
The standard settings for Apple Magic Mouse in OS X 10.9 и 10.10 are designed for smooth
scrolling (Natural Scroll). With these settings trackpad and Magic Mouse continue to send scrolling
events for some time even after the user stopped moving his finger.
The settings are very suitable for panning; but cause erratic behavior if we want to associate some
action to the trackpad or mouse. For example, if we associate “go to next/previous image” to the
Magic Mouse with default natural scroll settings several files will be skipped.
To disable Natural Scroll, please visit Accessibility - Mouse & Trackpad and there select Scrolling
without inertia and slow scrolling speed:
Page 99 of 127 Copyright © 2014-2015, LibRaw LLC, www.libraw.com
Page 100

FastRawViewer – user manual
Action
Key Sequence(s),
Windows
Key Sequence(s),
Mac
File Handling
Open file
Ctrl+O
⌘O
Close file (cancel image display and current folder
monitoring)
Ctrl-U
⌘U
Open next file (in current folder)
Ctrl+Right
Space
Ctrl+Num+Right
⌘→Space
⌘+Num→
Open previous file
Ctrl+Left
Backspace
Ctrl+Num+Left
⌘←
⌫
⌘+Num←
Open the first file in folder
Ctrl+Shift+Left
Ctrl+Shift+Num+Left
⇧⌘←
⇧⌘+Num←
Open the first file in folder
Ctrl+Shift+Right
Ctrl+Shift+Num+Right
⇧⌘→
⇧⌘+Num→
Set file by number in current folder
Alt+O
⌥O
Open folder
Ctrl+Shift+O
⇧⌘O
Move file to folder (ask destination)
M
M
Move file to folder
Shift+M
⇧M
Standard FastRawViewer Keyboard Shortcuts
Page 100 of 127 Copyright © 2014-2015, LibRaw LLC, www.libraw.com
 Loading...