

Page 1
1
Quick Start Guide
See more information on
www.fasmedo.com or scan
FM-100 MediCam
Page 2
2
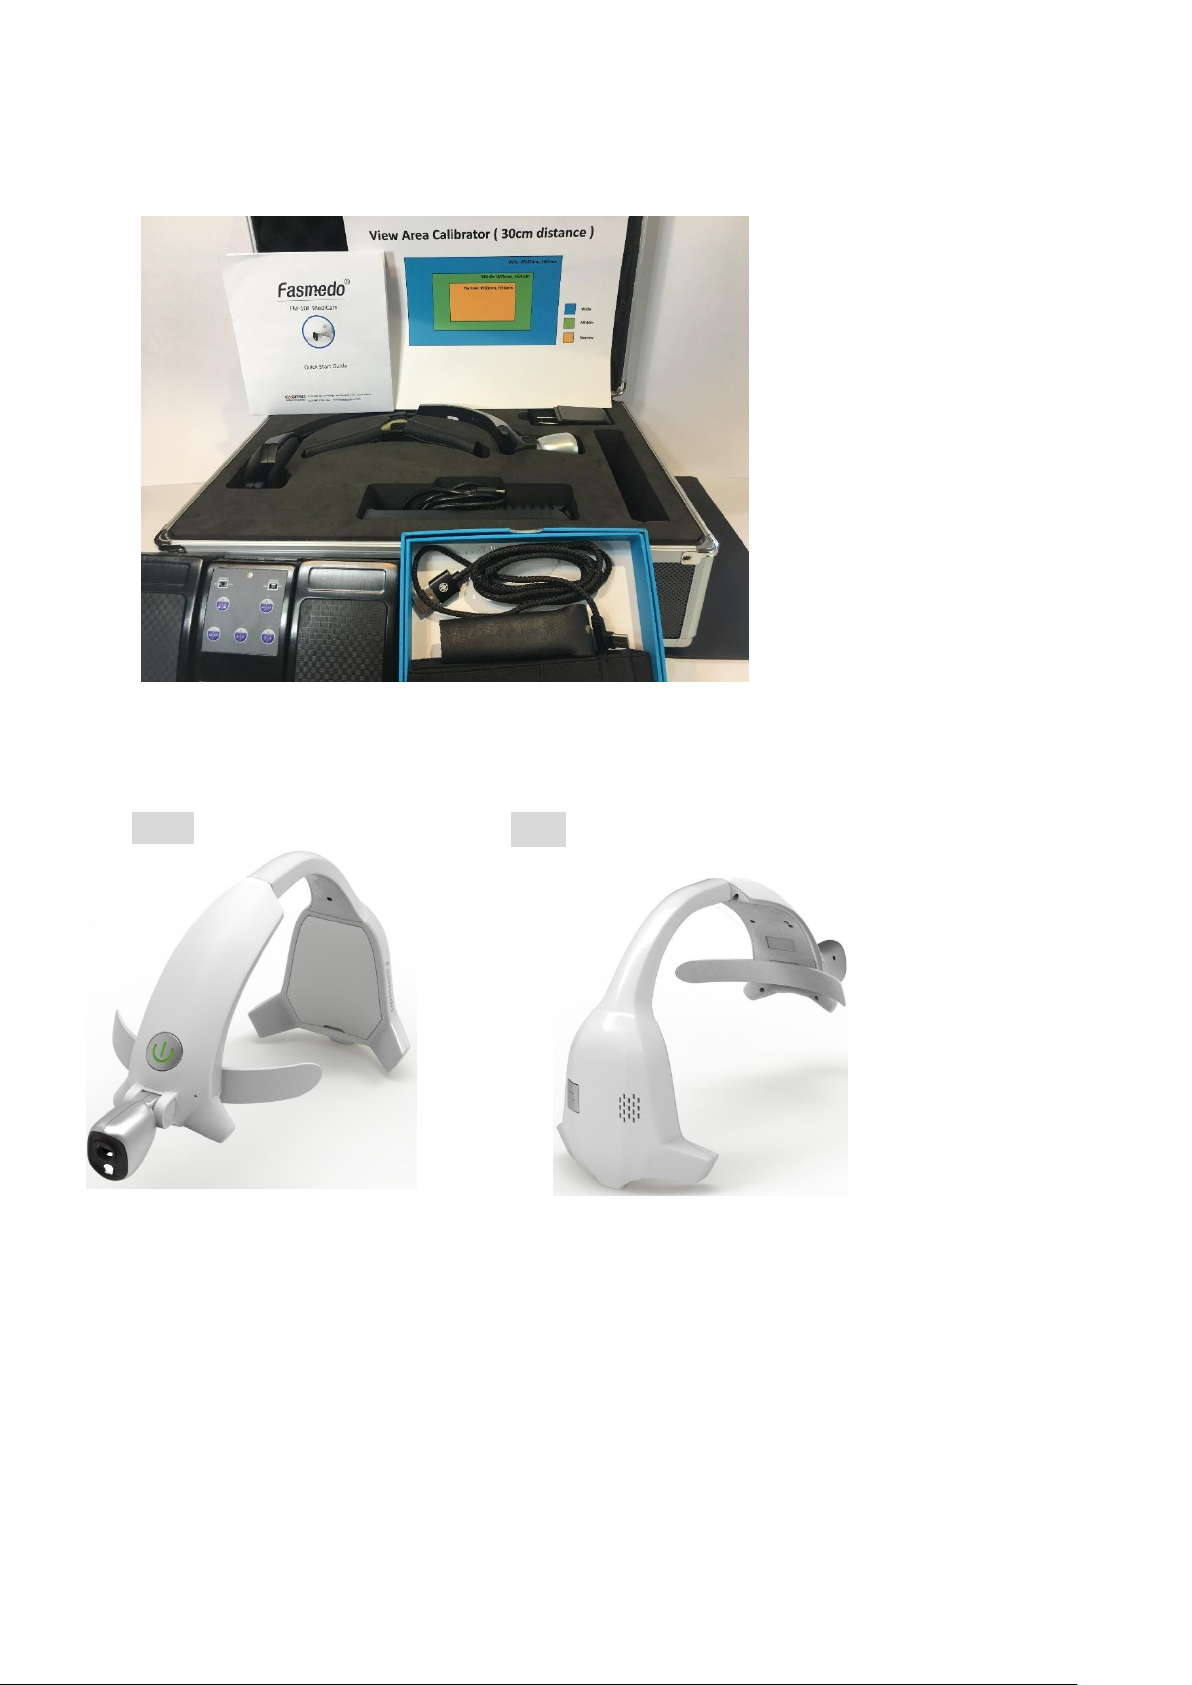
1. Package contents
2. Appearance introduction
3. Before using your MediCam
A. Charge the battery fully at least 4 hours before using your
MediCam for the first time.
B. Do not use cables or power adaptors from other products.
○
1
○
2
○
3
○
5
Front
Back
○
6
○
7
○
8
○
9
○
4
1. Lens
2. LED
3. Hinge
4. Power button
5. Front holder
6. Battery cover
7. Record button
8. Speaker
9. USB-C Port
10. Factory Reset
button
1. Quick start guide
2. View Area Calibrator x 1
3. Silicone pad x 1
4. MediCam x 1
5. Plastic steel sheet with
leather cover x 1
6. 18650 battery x 2,
power adaptor x 1
7. Battery charger with power
cable x 1
8. Bluetooth pedal x 1
9. Type C cable x 1
10. Spare leather cover x 1
11. Belt x 1
○
1
○
2
○
3
○
4
○
5
○
6
○
7
○
8
○
9
○
10 ○11 ○10
Page 3
3
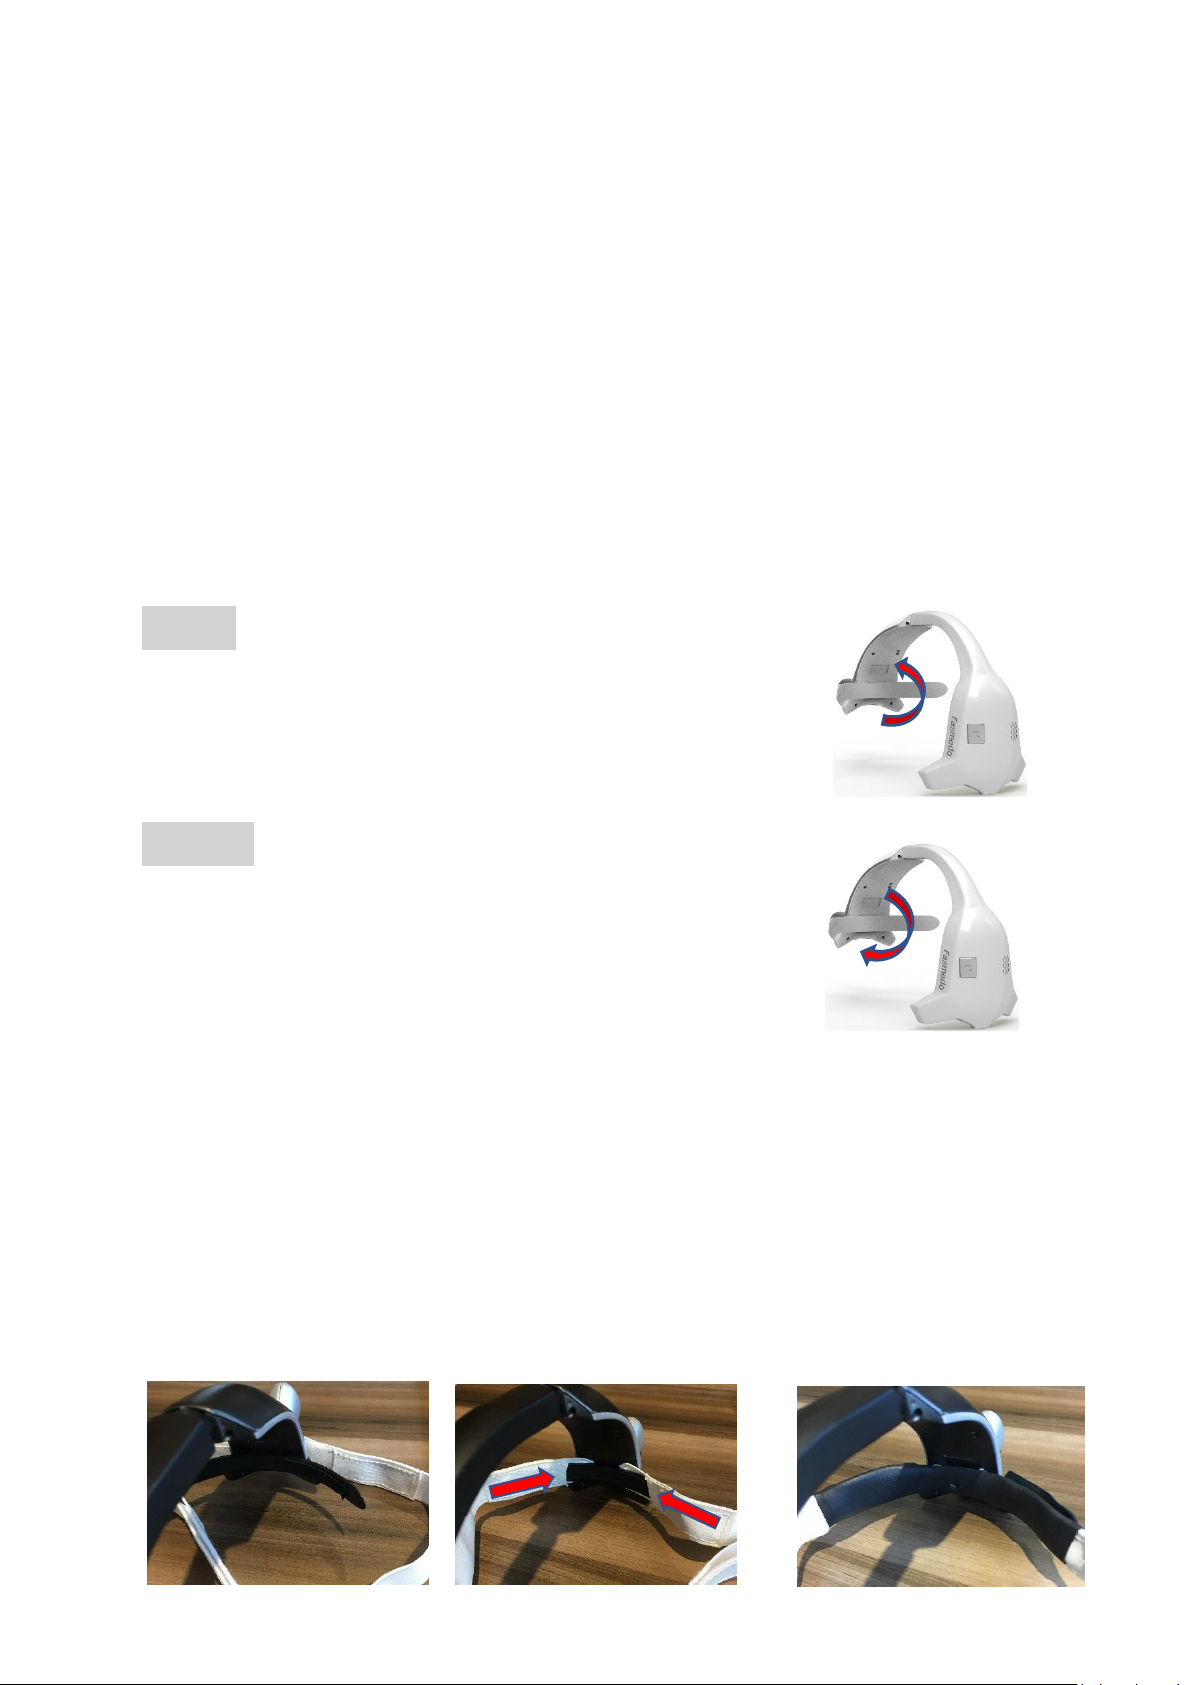
4. Insert the battery
Use a coin to remove the cover from bottom edge. Insert one
battery carefully noting the “+” and “–“markings, with the
“+” side placed on the bottom. Replace the cover and snap
back in place.
5. Attach /Detach the optional front holder
Attach: Insert the bottom arm into the bottom
groove then snap up-wards into place.
Detach: Pull the front holder out from upper
Groove and remove.
5.1 How to attach the belt (Optional)
A. Remove the leather cover from the front holder.
B. Lock the screw in the middle of the front holder.
C. Insert the sides of the front holder to the holes on the belt.
D. Put the leather cover back into the front holder.
2
Page 4
4
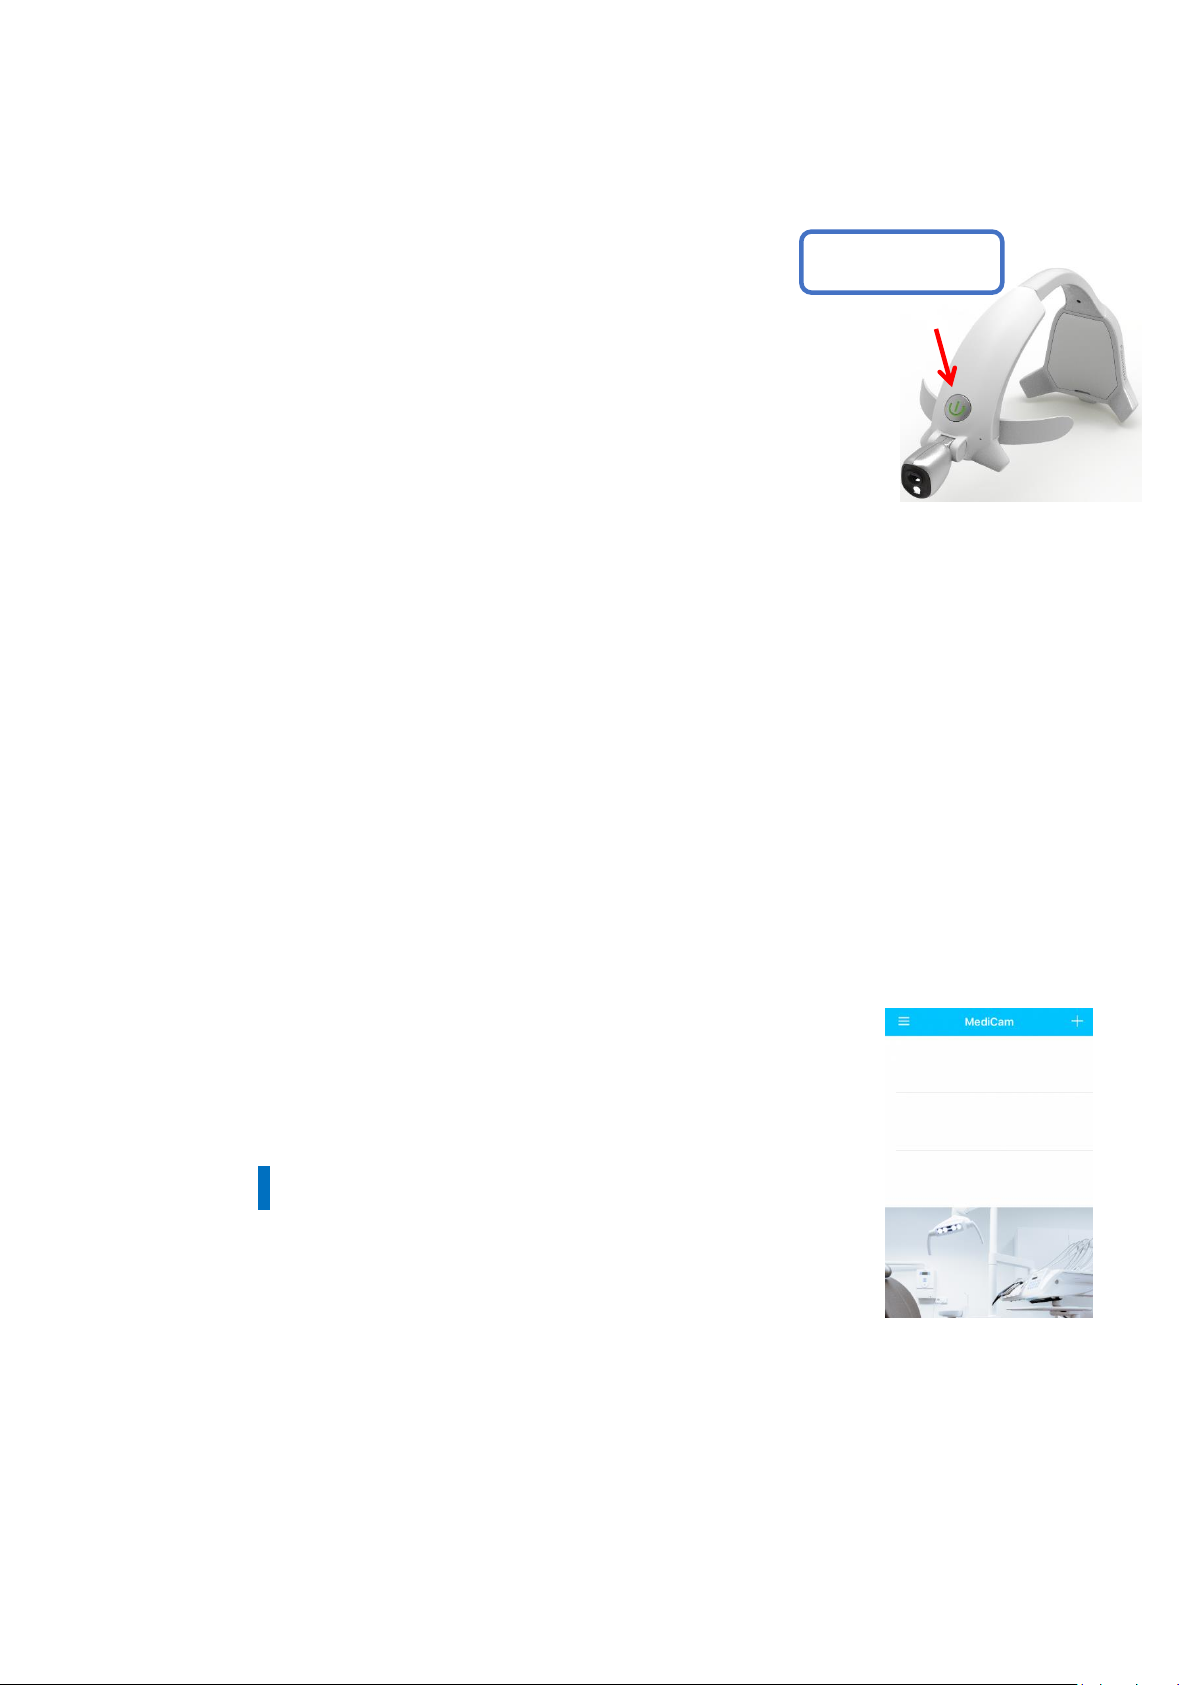
6. Turn on your MediCam
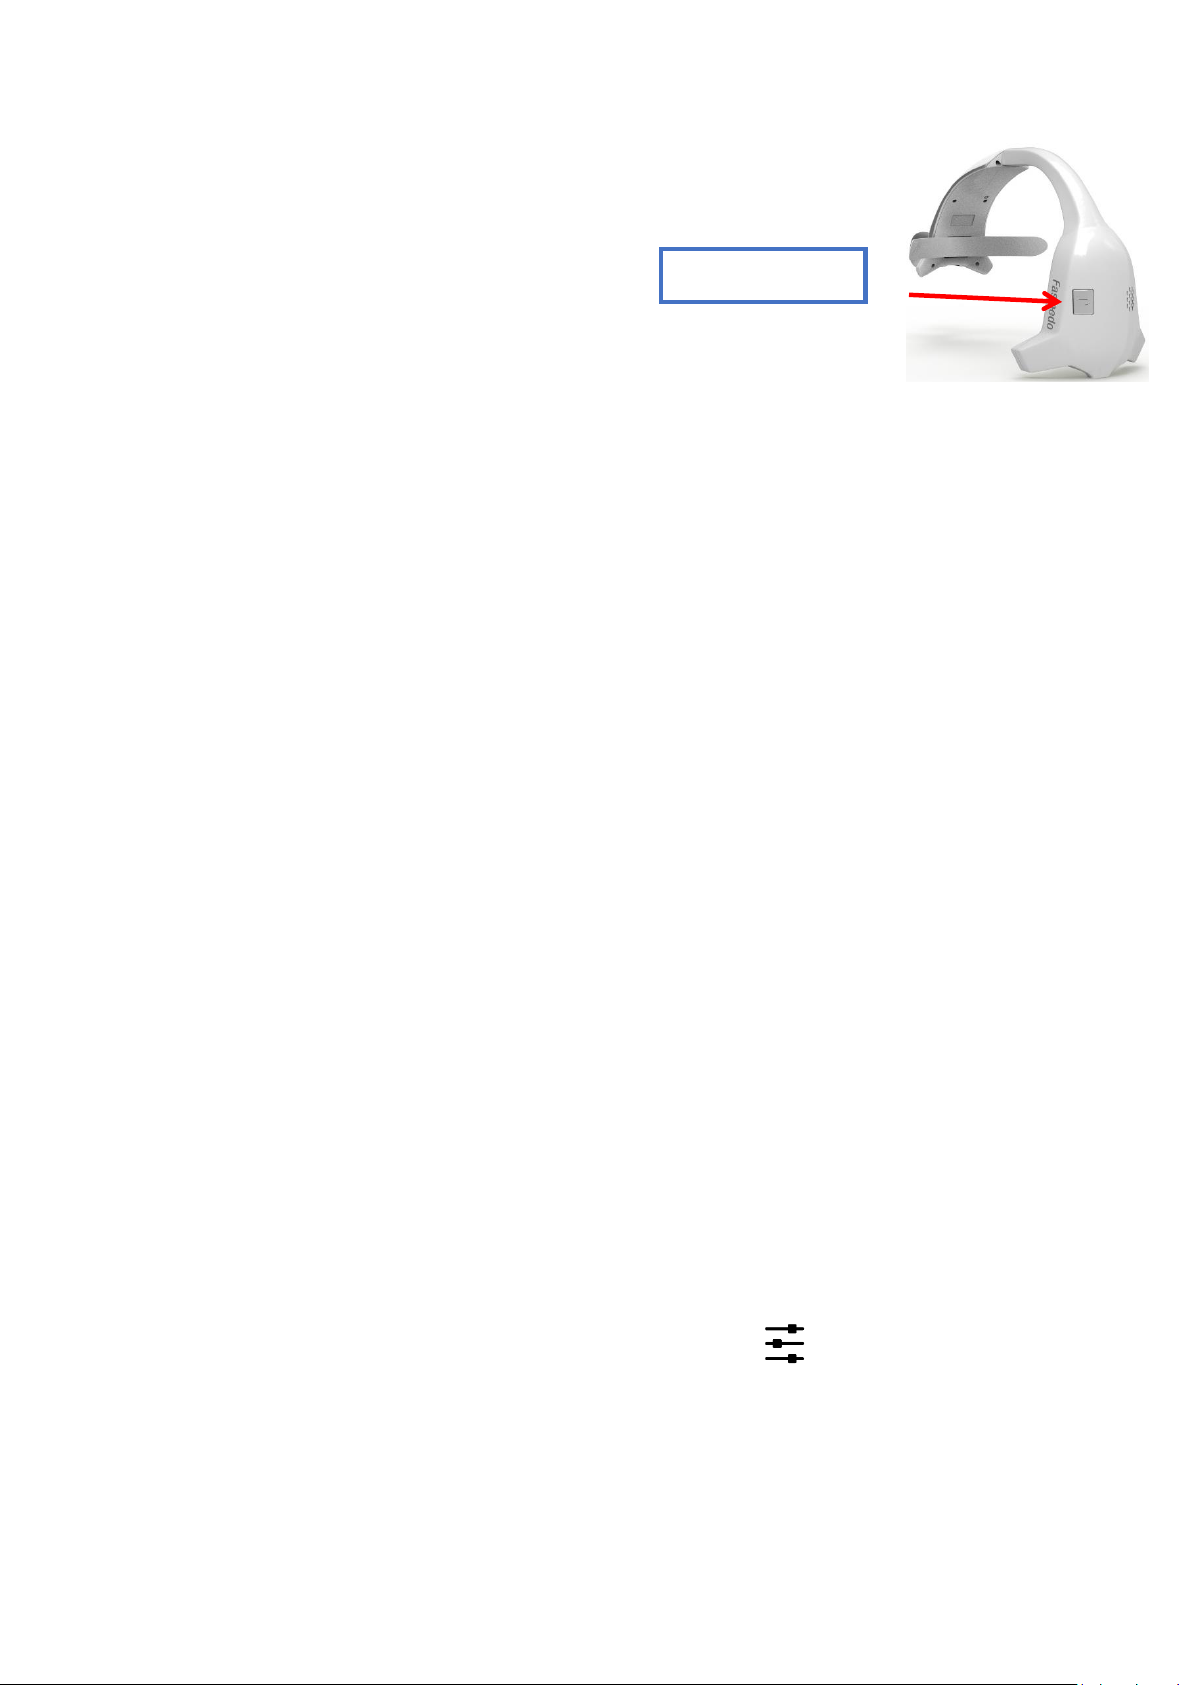
A. ON/OFF: Press and hold the Power Button
for 3 seconds to turn ON/OFF your MediCam.
Once on, the LED should show a solid green light.
B. LED: Click on the Power Button for different
levels of LED. (Low -> Medium -> High -> Off -> repeats)
We recommend to have LED on when recording.
7. Connect your MediCam with App
(Go to Step 8 if you have iPad paired with MediCam already.)
7.1 Download the App
Search for “MediCam” in the App Store to download the app
to your smart device.
7.2 Pair your MediCam
The start screen should show a blank list.
Tap the + icon in the top right corner of your
screen to add a MediCam.
7.3 Setup
Power Button
Page 5
5
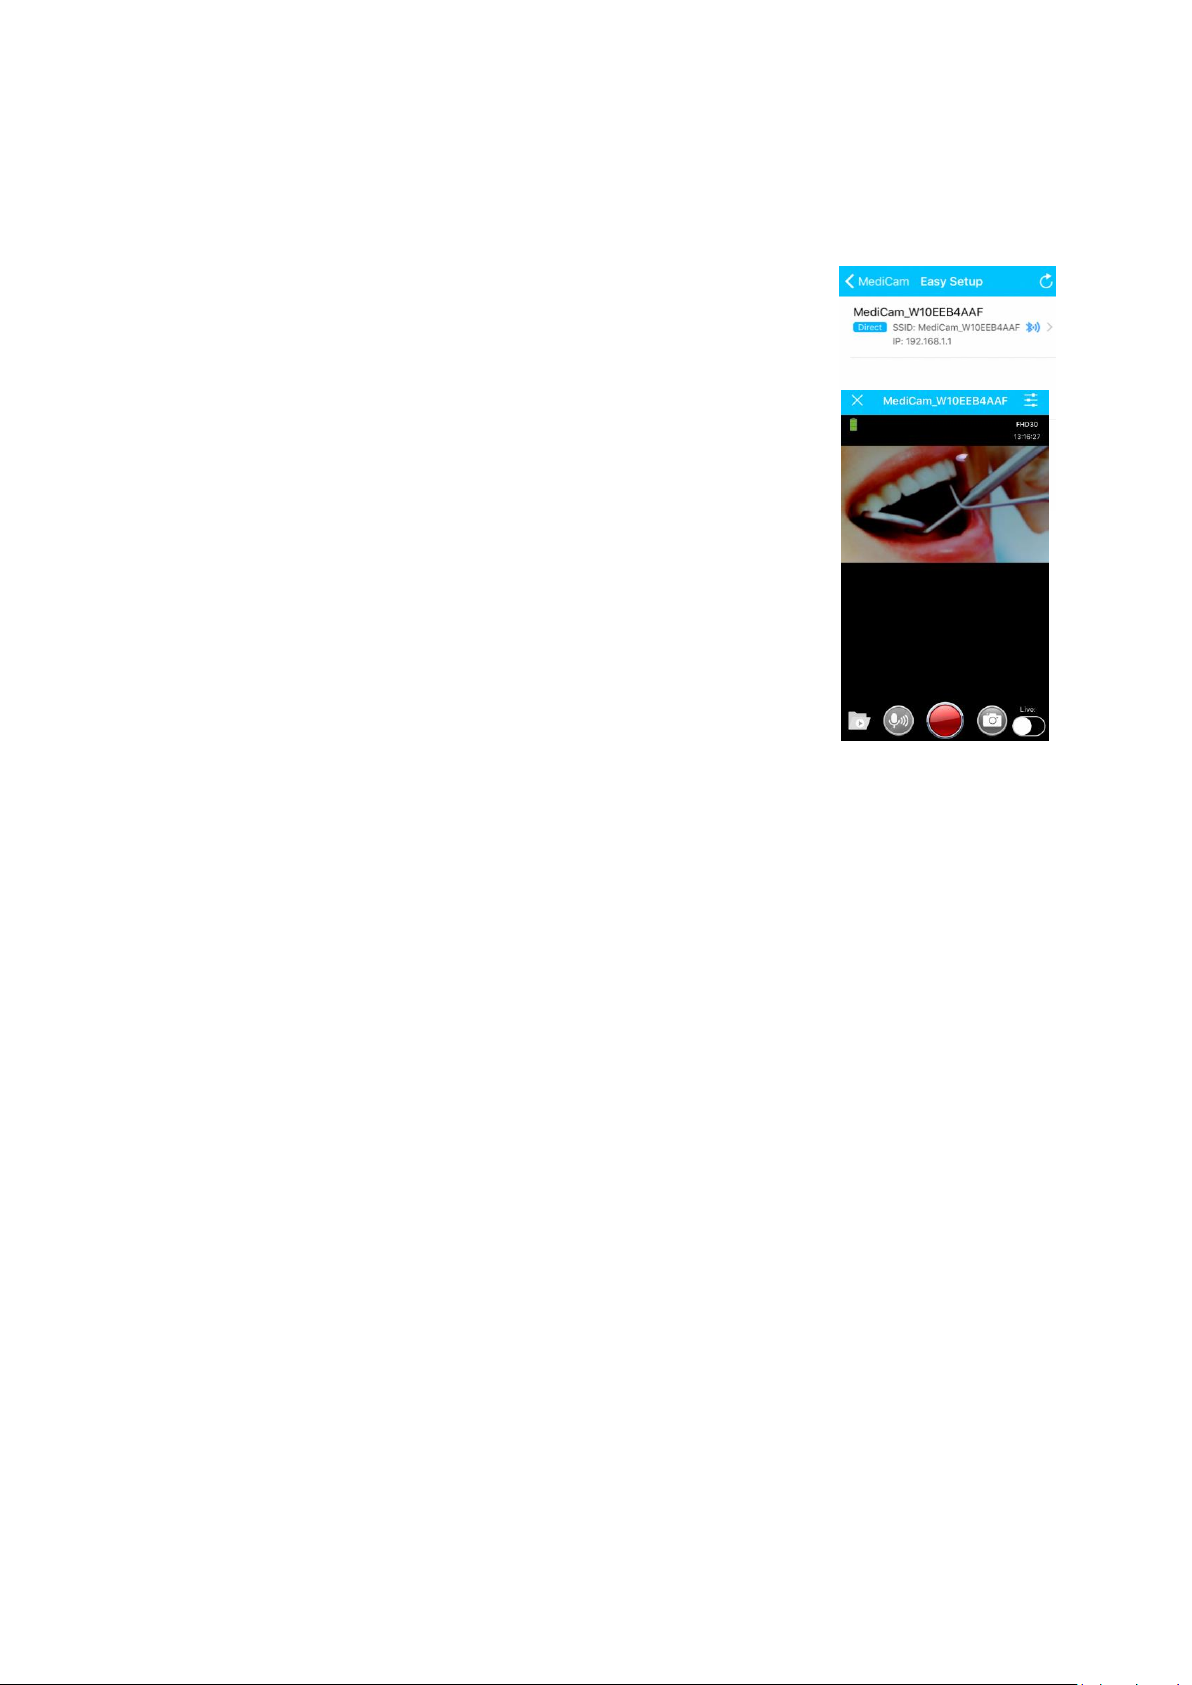
Make sure WiFi and Bluetooth are enabled on your smart
device.
A. New MediCam is found. Tap the
new MediCam on the list to continue.
B. Confirm to “Join MediCam’s network”.
C. Now you see a preview on your smart
device for the area being filmed.
8. How to take videos
Before start recording, place the “View Area Calibrator” near
your comfortable working distance (usually
around 1-2 feet), then adjust the lens to aim
at the area being filmed. (Hinge adjustable
angle is about 0~78 degrees.)
Use the color-coded filming area guide to help decide what
zoom level you would like. (narrow, medium or wide)
8.1 By clicking the Record button
Press the Record button to start recording, press again to stop
recording. (A high-pitched tone will sound to signal
Page 6
6
the start of recording. A low-pitched tone will sound
to signal the stop of recording.)
8.2 By tapping the screen on the app
When in the preview mode, videos and photos can be taken
by tapping the red record button.
8.3 By using the Pedal
A. Before using the Pedal, have it charged at least 3 hours.
B. Press the POWER switch to turn on the Pedal for set up.
C. Pair the Pedal by connecting to Bluetooth. Select
“Bluetooth Music Pedal” to make the connection.
D. The Pedal’s LED will flash in multiple colors during pairing
process. LED will stop flashing once the pairing is
completed. (Charge the Pedal when red LED is flashing.)
E. Use the left pedal to take videos, the right pedal to take
photos.
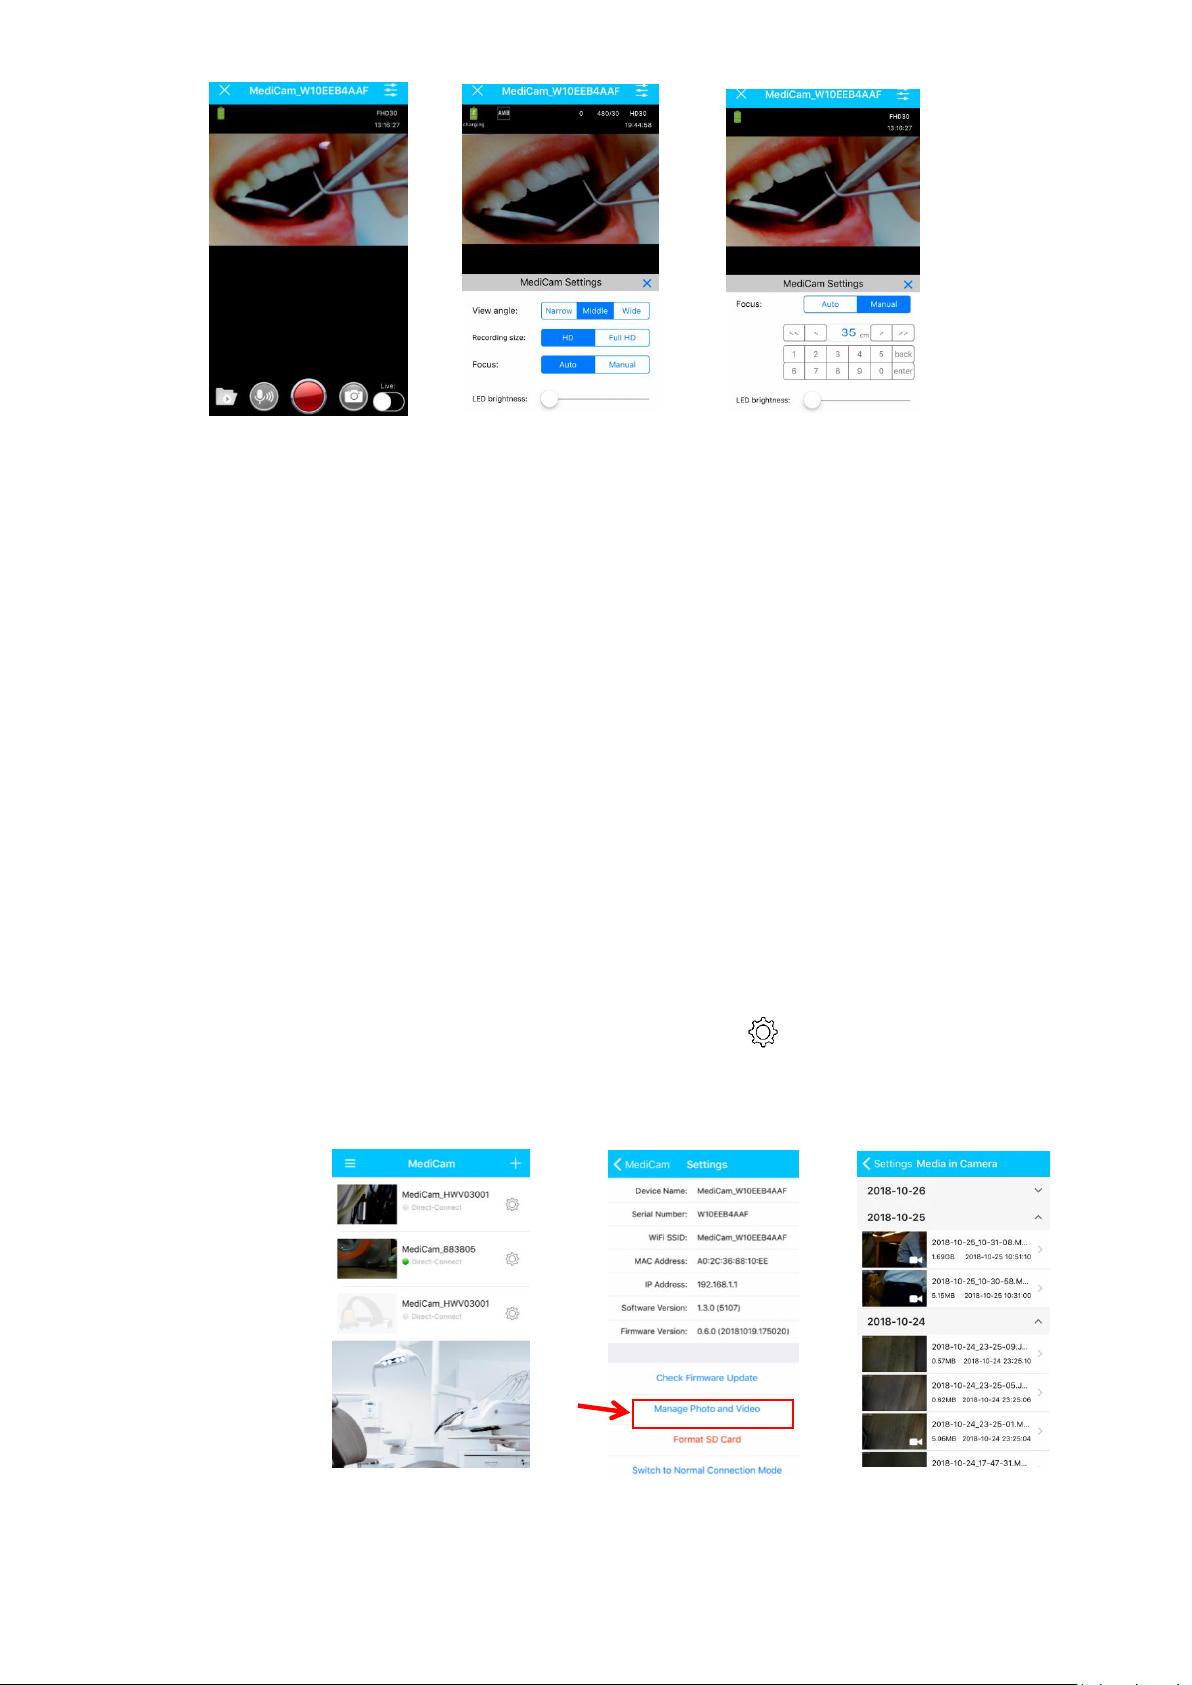
9. Device Settings
On the preview screen, tap the Tools icon( ) on the top
right corner to configure the display of Videos/ Photos.
Record button
Page 7
7
10. Manage MediCam Videos/ Photos
10.1 Save media files from MediCam to PC
A. Connect your MediCam to PC by USB cable.
B. Turn on the MediCam to access the media files stored in
internal memory card.
C. View the videos (VIDEOS folder) and photos (PHOTOS
folder) on PC, select to view/save the files you need.
10.2 Save media files from app to your smart device
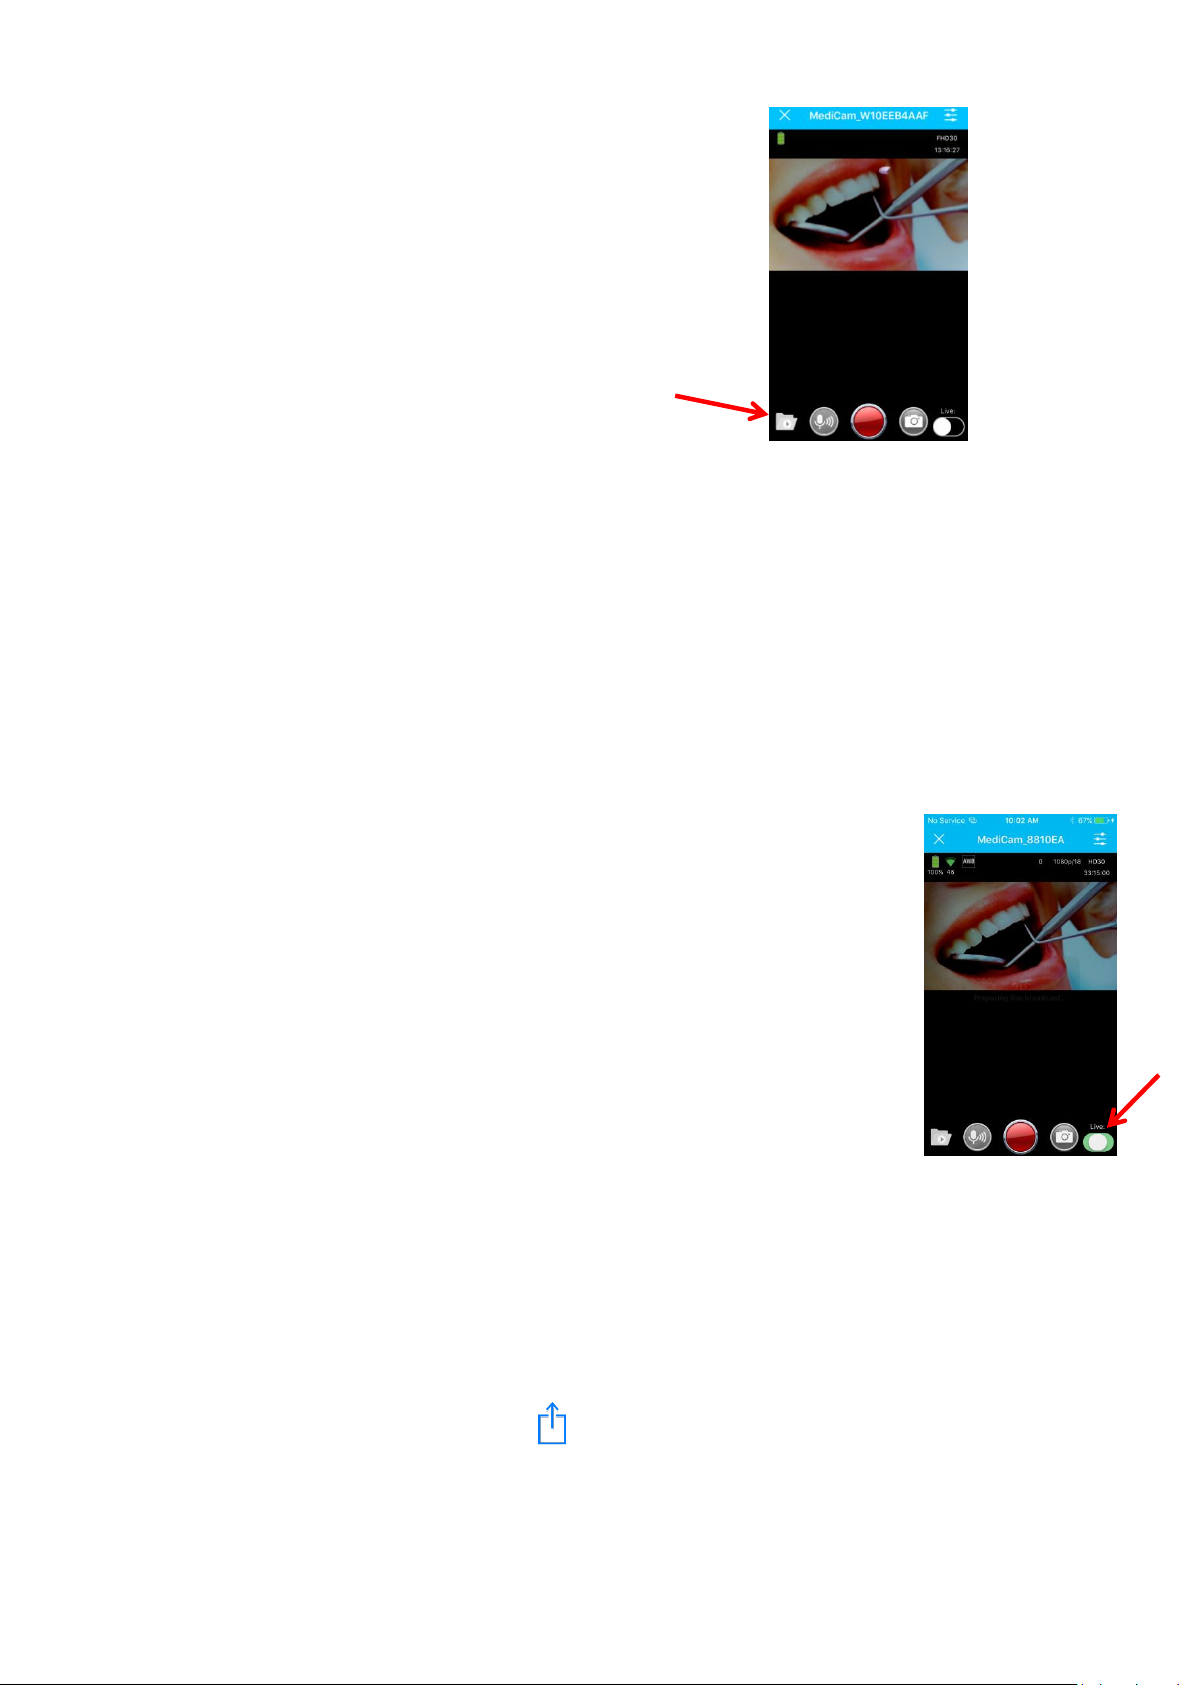
A. On the Start screen, click the Gear icon , tap “Manage
Photo and Video” to save files needed to your smart
device.
Page 8
8
B. Or in the Preview mode, tap the
folder icon to save files needed
to your smart device.
11. Live Streaming
Before start using Live Streaming, you must possess a
cellular-4G-enabled smart device and your smart device must
be connected to a cellular 4G network. (cellular plan NOT
included)
11.1 Host Live Event
(Default view time is 1,000hours, each viewer would
accumulate consumed time)
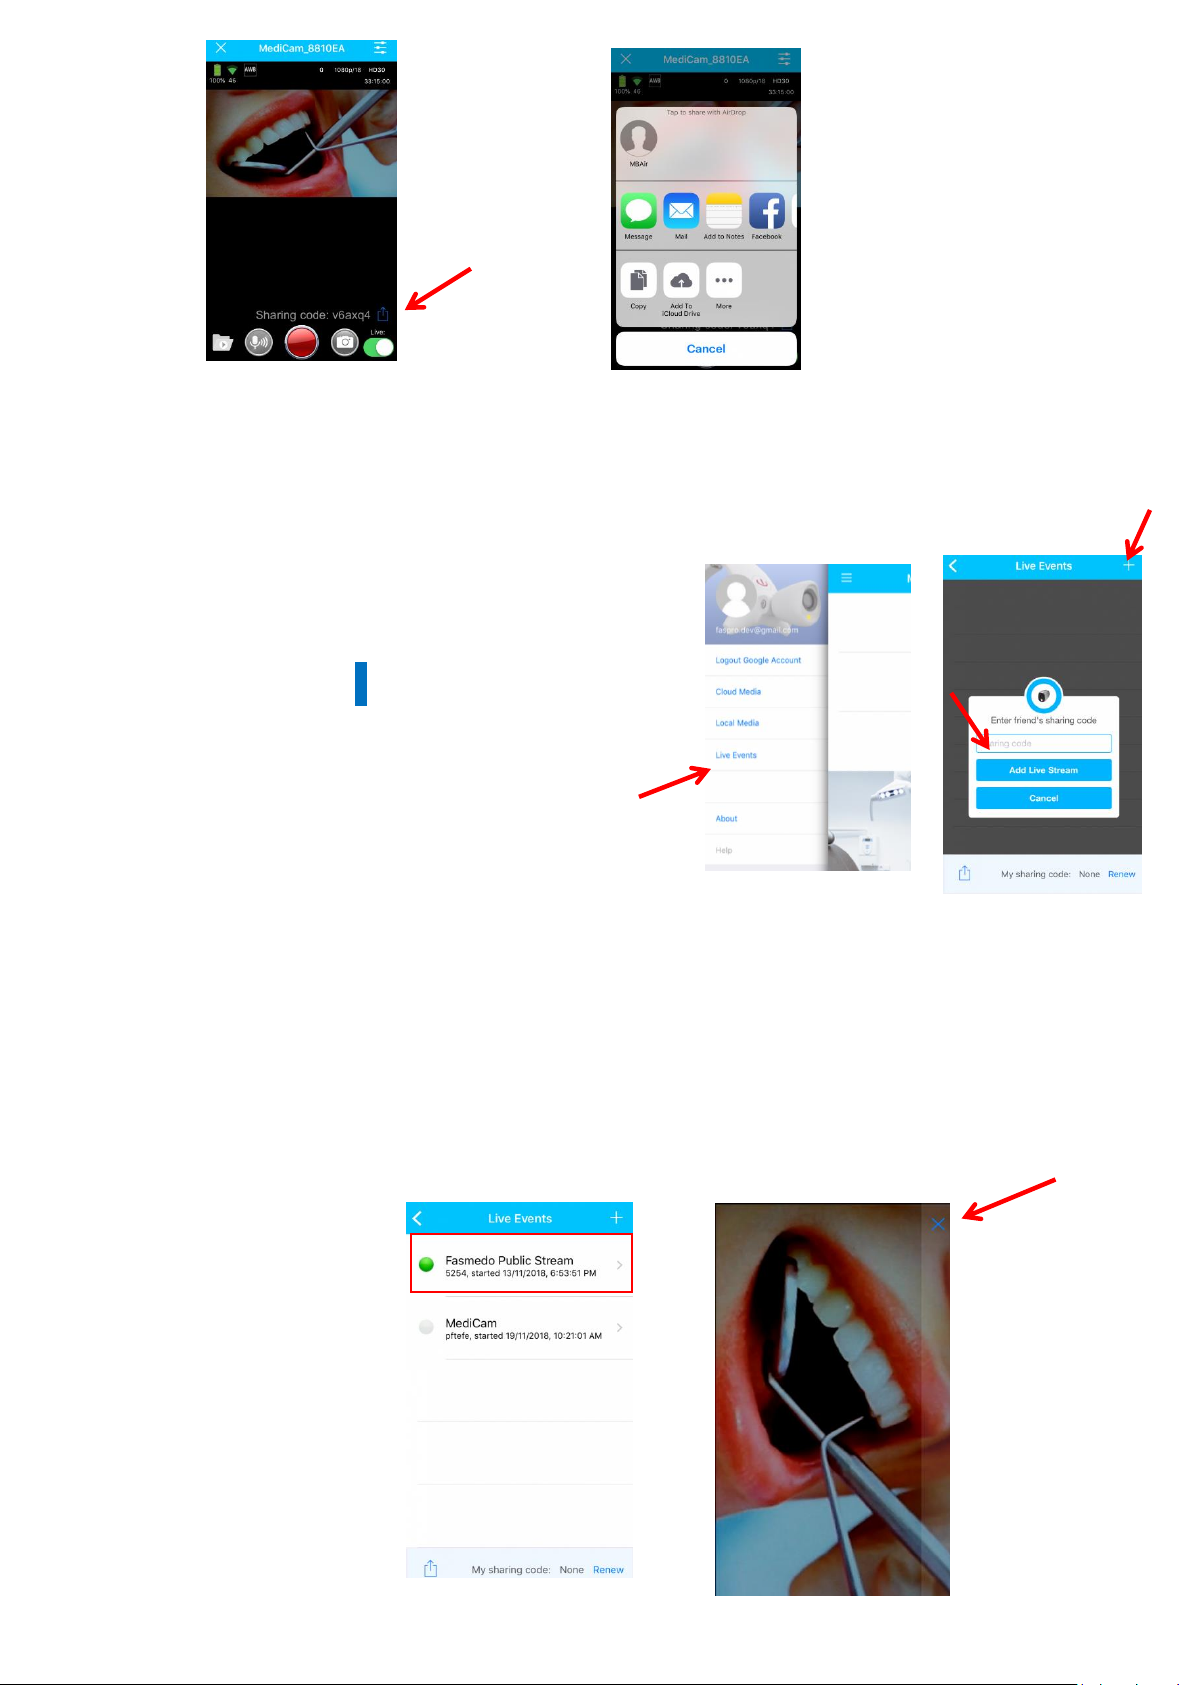
A. When viewing video streaming on app, tap
“Live” to switch to live broadcasting.
B. The app will show “Prepare
live streaming…” Then “Started live
streaming…”
C. You will receive a Sharing code when live streaming starts.
Tap on the “Share” icon to share it with friends.
Page 9
9
11.2 Watch Live Events
A. All invited parties must download MediCam App before
watching live events.
B. Tap “ Live Events” to proceed,
and tap the + icon to add live event,
then enter the sharing code you
have received.
C. The Live event will be added to the list. The green
light indicates the event is live now.
D. Tap on the live event will lead audiences to the live
streaming view. There is no playback control. Tap the “X”
icon to exit.
Page 10
10
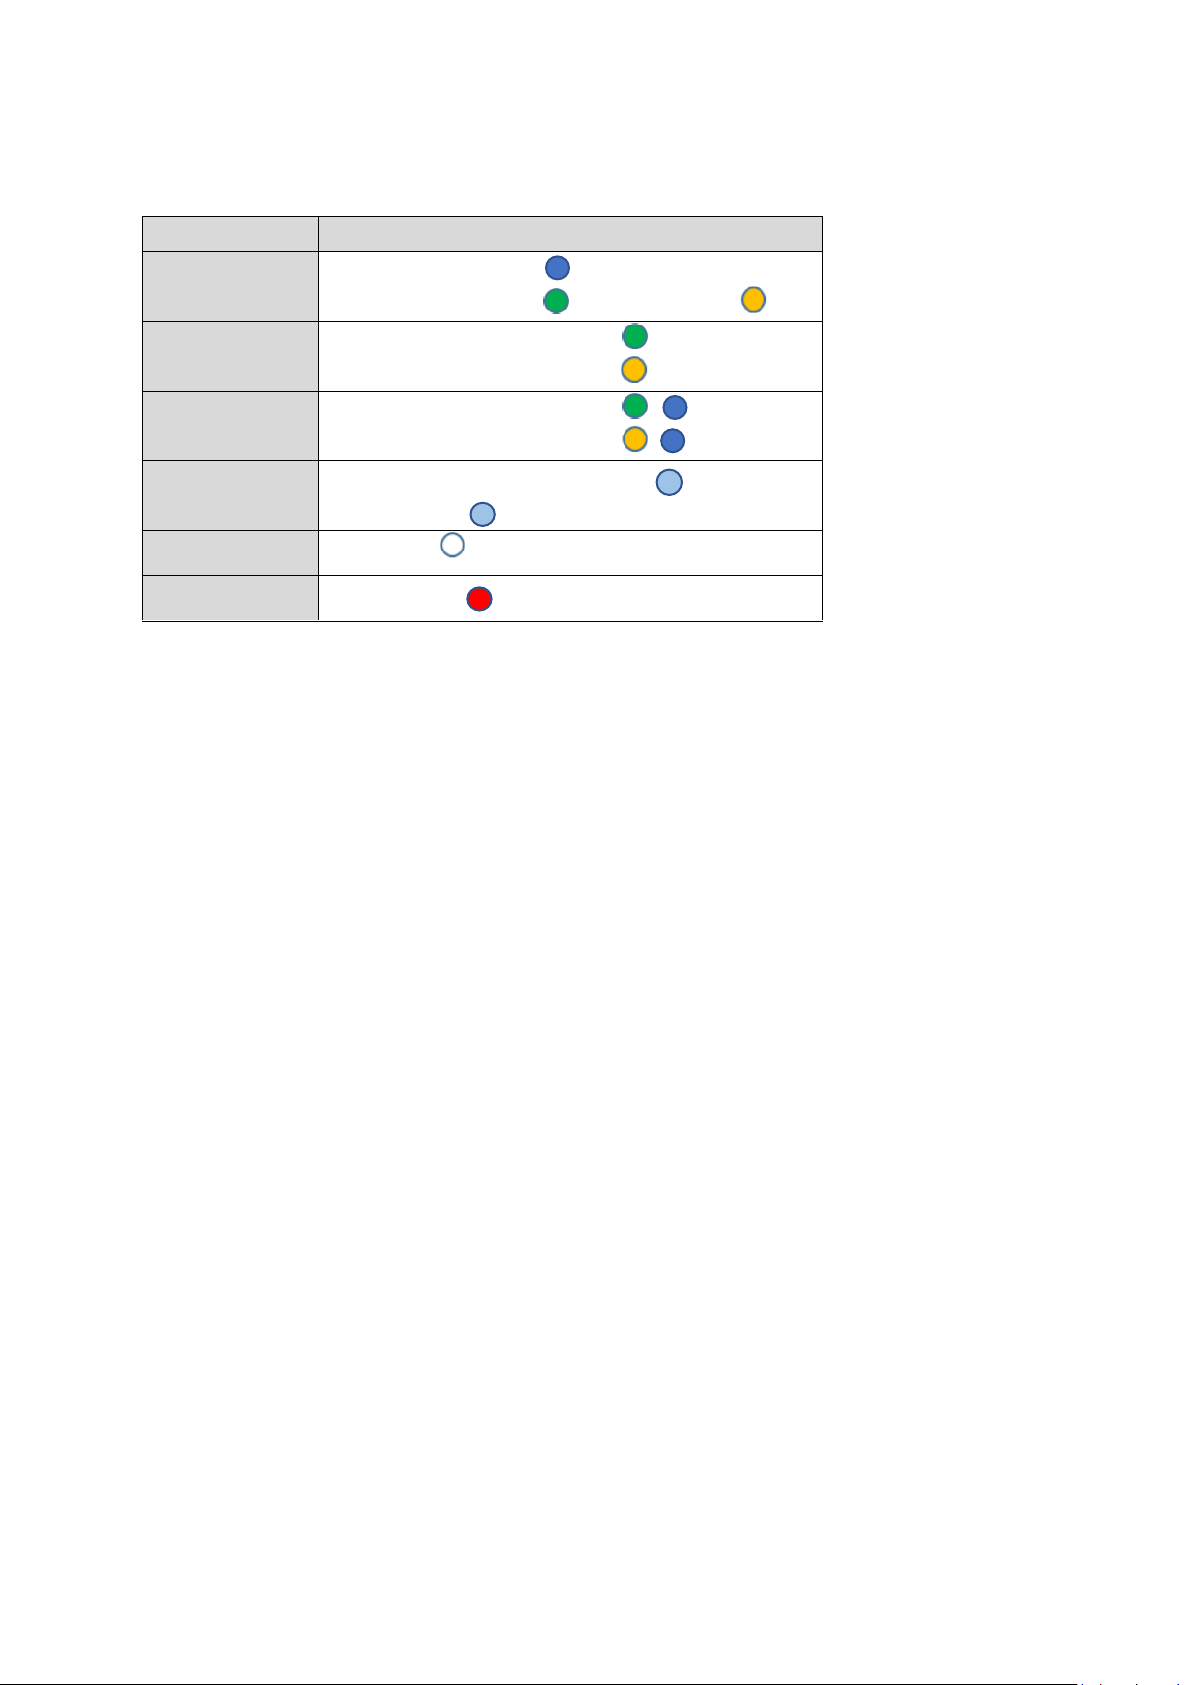
12. Button/LED Functions
MODE
Front LED Behavior
Power ON
Boot up: Fast flash
Idle: Battery>20 % , Battery<20 %
Recording
Battery>20 % : Slow flash
Battery<20 % : Fast flash
WiFi
Disconnected
Battery>20 % : Slow flash
Battery<20 % : Slow flash
Charging
Battery <100 % : Slow flash
Battery full:
Power OFF
Light Off:
Memory Full
Slow flash
13. Safety Instruction
The wireless signal generated by the device may cause
interference or malfunction of the medical device ( such as
a pacemaker or hearing aid ), please use the MediCam
carefully.
This Medicam device has been tested to meet the specific
absorption rate (SAR) limits of body worn devices. The EU's
maximum allowable level is 2.0 W/kg, and Medicam is
lower than this value
Not to look at LED directly at all times to avoid damaging
your vision.
It is recommended to use only Medicam adapters or
Page 11

11
chargers designed or approved specifically for Medicam
Avoid exposing Medicam to fire and other direct heat
sources, including hair dryers, microwave ovens and other
appliances.
It is recommended that you do not disassemble the unit for
any reason.
Do not force objects into your device connection,
connection or button. If the connector is not easily
inserted, it may not match.
Do not use spray cleaners on your MediCam, as this could
damage the system.
14. FCC STATEMENT
This device complies with part 15 of the FCC Rules. Operation
is subject to the following two conditions: (1) This device may
not cause harmful interference, and (2) this device must
accept any interference received, including interference that
may cause undesired operation.
Changes or modifications not expressly approved by the party
responsible for compliance could void the user‘s authority to
operate the equipment.
This equipment has been tested and found to comply with
the limits for a Class B digital device, pursuant to part 15 of
Page 12
12
the FCC Rules. These limits are designed to provide
reasonable protection against harmful interference in a
residential installation. This equipment generates, uses and
can radiate radio frequency energy and, if not installed and
used in accordance with the instructions, may cause harmful
interference to radio communications. However, there is no
guarantee that interference will not occur in a particular
installation. If this equipment does cause harmful
interference to radio or television reception, which can be
determined by turning the equipment off and on, the user is
encouraged to try to correct the interference by one or more
of the following measures:
—Reorient or relocate the receiving antenna.
—Increase the separation between the equipment and
receiver.
—Connect the equipment into an outlet on a circuit different
from that to which the receiver is connected.
—Consult the dealer or an experienced radio/TV technician
for help.
RF Exposure Information (SAR)
This device is designed and manufactured not to exceed the
emission limits for exposure to radio frequency (RF) energy
set by the Federal Communications Commission of the U.S.
Government.
15. Operator Temperature and Humidity
Temperature: 0°C ~ 40°C, Humidity: 10%~80%
Page 13

13
16. NCC 警語
經型式認證合格之低功率射頻電機,非經許可,公司、商號或使用者均不得擅自變更頻率、加大
功率或變更原設計之特性及功能。
低功率射頻電機之使用不得影響飛航安全及干擾合法通信;經發現有干擾現象時,應立即停用,
並改善至無干擾時方得繼續使用。
前項合法通信,指依電信法規定作業之無線電通信。低功率射頻電機須忍受合法通信或工業、科
學及醫療用電波輻射性電機設備之干擾。
Page 14

14
TEL: +1 510-918-3284
20410 Town Center Lane Ste 190
Cupertino, CA 95014
All rights reserved© 2018 Faspro Systems Co., Ltd.
 Loading...