

Page 1

VirtualDrive
Version 10
®
Pro
For Windows 2000/XP-SP2/Server 2003
User’s Guide
Page 2

Copyright Notice
No part of this publication may be copied, transmitted, stored in a retrieval system or translated into any
language in any form or by any means without the expressed written permission of FarStone Technology,
Inc.
FarStone grants you the right to use one copy of the enclosed software program ("SOFTWARE") on a single
computer. If the SOFTWARE is installed on a network, or more than one user can run the SOFTWARE at the
same time, you must purchase an additional license for each additional user or computer.
Trademarks
FarStone
®
, VirtualDrive®, VirtualDrive® Network and VirtualDrive® Professional are trademarks of
FarStone Technology, Inc. Rapid Cache® is a registered trademark of FarStone Technology, Inc. Microsoft®,
Windows® and MS-DOS® are registered trademarks of Microsoft Corporation. Other product names
mentioned in this User’s Guide may be trademarks or registered trademarks of their respective companies.
FarStone Technology, Inc.
U.S. Headquarters:
6 Morgan, Suite 160
Irvine, CA 92618
Phone: (949) 458-3666
Asia-Pacific Offices
10F-1B, No. 207, DunHua North Rd., Taipei, 105, Taiwan
Phone: 886-2-2546-9898
Fax: 886-2-2546-3838
Technical Support:
Please contact your retailer or use our online support system at
you will find answers to frequently asked questions on our website, at
links to the support section or contact a technical support representative using this link:
http://www.FarStone.com/home/ensite/support/support.shtml
Copyright
Rapid Cache
©
2004-2006 FarStone Technology, Inc. All rights reserved.
®
Copyright © 2004-2006 FarStone Technology, Inc.
www.FarStone.com. For your convenience,
www.FarStone.com. Follow the site
2
Page 3

Software License Agreement
FARSTONE TECHNOLOGY, INC. (FARSTONE) END USER LICENSE AGREEMENT FOR VIRTUALDRIVE®, HEREAFTER
REFERRED TO AS THE "SOFTWARE"
PLEASE READ CAREFULLY: THE USE OF THIS "SOFTWARE" IS SUBJECT TO THE "SOFTWARE" LICENSE TERMS OF
FARSTONE AND OTHER LICENSORS WHO’S SOFTWARE MAY BE BUNDLED WITH THIS PRODUCT.
BY YOUR USE OF THE "SOFTWARE" INCLUDED WITH THIS PRODUCT YOU AGREE TO THE LICENSE TERMS REQUIRED
BY THE LICENSOR OF THE "SOFTWARE", AS SET FORTH BELOW. IF YOU DO NOT AGREE TO THE LICENSE TERMS
APPLICABLE TO THE "SOFTWARE", YOU MAY RETURN THE ENTIRE UNUSED PRODUCT FOR A FULL REFUND.
LICENSE AND WARRANTY:
The software that accompanies this license (the "Software") is the property of FARSTONE or its licensors and is
protected by copyright law. While FARSTONE continues to own the Software, you will have certain rights to use the
Software after your acceptance of this license. Except as may be modified by a license addendum which accompanies
this license, your rights and obligations with respect to the use of this Software are as follows:
A. Single User License:
(a) Use the "Software" on a single computer system or network, and o nly by a sin gle user at a time. I f you wish to use
the "Software" for more users, you will need an additional License for each user.
(b) Make one copy of the "Software" in machine-readable form solely for back-up purposes provided you reproduce
FarStone's copyright proprietary legends. Notwithstanding the foregoing, the "Software" may be used on the home,
laptop or other secondary computer of the principal user of the "Software", and an additional copy of the "Software"
may be made to support such u se. As used in this License, the "Software" is "in use" when it is either loaded into RAM
or installed on a hard disk or other permanent memory device. The "Software" may be "in use" on only one computer
at any given time. (Different License terms and fees are applicable for networked or multiple user applications.) As
a specific condition of this License, you agree to use the "Software" in compliance with all applicable laws, including
copyright laws, and that you will not copy, transmit, perform or distribute any audio or other content using the
"Software" without obtaining all necessary Licenses or permissions from the owner of the content.
B. Multiple User License:
Make one copy of the "Software" in machine-readable form solely for back-up purposes, provided you reproduce
FarStone's copyright proprietary legends.
You must acquire and dedicate a License for each separate computer on which any part or portion of the "Software" is
installed or run As used in this License, the "Software" or any part or portion of the "Software" is "in use" when it is
either loaded into RAM or installed on a hard disk or other permanent memory device including any networked or
shared environment where either direct or indirect connections are made through software or hardware which pools or
aggregates connections.
As a specific condition of this License, you agree to use the "Software" in compliance with all applicable laws, including
copyright laws, and that you will not copy, transmit, perform or distribute any audio or other content using the
"Software" without obtaining all necessary Licenses or permissions from the owner of the content.
C. Restrictions: You may not distribute copies of the "Software" to others or electronically transfer the "Software"
from one computer to another over a network. You may not post or otherwise make available the "Software", or any
portion thereof, in any form, on the Internet. You may not use the "Software" in a computer service business,
including in time-sharing applications. The "Software" contains trade secrets and, in order to protect them, you may
not decompile, reverse engineer, disassemble, or otherwise reduce the "Software" to a human-perceivable form. YOU
MAY NOT MODIFY, ADAPT, TRANSLATE, RENT, LEASE, LOAN, RESELL FOR PROFIT, DISTRIBUTE, NETWORK OR CREATE
DERIVATIVE WORKS BASED UPON THE "SOFTWARE" OR ANY PART THEREOF.
3
Page 4

D. Limited Warranty:
FarStone warrants that the media on which the Software is distributed will be free from defects for a period of fifteen
(15) days from the date of delivery of the Software to you. Your sole remedy in the event of a breach of this warranty
will be that FarStone will, at its option, replace any defective media returned to FarStone within the warranty period or
refund the money you paid for the Software. FarStone does not warrant that the Software will meet your requirements
or that operation of the Software will be uninterrupted or that the Software will be error-free.
THE ABOVE WARRANTY IS EXCLUSIVE AND IN LIEU OF ALL OTHER WARRANTIES, WHETHER EXPRESS OR IMPLIED,
INCLUDING THE IMPLIED WARRANTIES OF MERCHANTABILITY, FITNESS FOR A PARTICULAR PURPOSE AND
NONINFRINGEMENT. THIS WARRANTY GIVES YOU SPECIFIC LEGAL RIGHTS. YOU MAY HAVE OTHER RIGHTS, WHICH
VARY FROM STATE TO STATE.
E. Limitation of Liability: IN NO EVENT WILL FARSTONE OR ITS LICENSORS BE LIABLE TO YOU FOR ANY
INCIDENTAL, CONSEQUENTIAL OR INDIRECT DAMAGES, INCLUDING ANY LOST PROFITS, LOST SAVINGS, OR LOSS
OF DATA, EVEN IF FARSTONE OR A LICENSOR HAS BEEN ADVISED OF THE POSSIBILITY OF SUCH DAMAGES, OR FOR
ANY CLAIM BY ANY OTHER PARTY. Some states do not allow the exclusion or limitation of special, incidental, or
consequential damages, so the above limitation or exclusion may not apply to you.
F. General: You acknowledge that you have read this Agreement, understand it, and that by using the "Software" you
agree to be bound by its terms and conditions. You further agree that it is the complete and exclusive statement of the
agreement between FarStone and you, and supersedes any proposal or prior agreement, oral or written, and any other
communication between FarStone and you relating to the subject matter of this Agreement. No additional or any
different terms will be enforceable against FarStone unless FarStone gives its express consent, including an express
waiver o f t he terms of thi s A greemen t, in w ri ting sig ned by an of ficer of Fa rS tone. You assum e full re sponsib ility fo r the
use of the "Software" and agree to use the "Software" legally and responsibly.
Should any provision of this Agreement be declared unenforceable in any jurisdiction, and then such provision shall be
deemed severable from this Agreement and shall not affect the remainder hereof. FarStone reserves all rights in the
“Software” not specifically granted in this Agreement.
Should you have any questions concerning this Agreement, you may contact FarStone by writing to:
FarStone Technology, Inc.
Legal Department
6 Morgan, Suite 160
Irvine, CA 92618
4
Page 5

Contents
Chapter 1 Introduction 8
41.1 What is VirtualDrive® Pro? 8
1.2 Features and Benefits 8
Chapter 2 Installation 11
2.1 System Requirements 11
2.2 Installing VirtualDrive® Pro 11
2.3 Uninstalling VirtualDriv e® Pro 11
Chapter 3 Getting Started with VirtualDrive® Pro 14
3.1 Starting VirtualDrive® Pro 14
3.2 VirtualDrive® Pro Start Menu 15
Chapter 4 Backing up Data to Discs 18
4.1 Easy Backup 18
4.1.1 Searching for Files to Back up 18
Search Files Using the Easy Backup Wizard 20
Searching for Files Using Windows Explorer Search 20
4.1.2 Backing up Files 20
4.1.3 Customizing Search Types 21
4.2 Cloning Discs 21
4.3 Backing Up Image Files 23
4.4 Restore Burning an Image 24
4.5 Burning Data CDs & DVDs 25
4.5.1 Creating a Project 26
4.5.2 Burning a Project to Disc 32
4.6 Burning Multiple Discs 33
4.6.1 Burning Data on Multiple Discs 33
4.6.2 Retrieving Data from Multiple Discs 33
4.6.3 Using Multiple Disc Sets in a Virtual Drive 35
4.7 Burning Settings 35
4.7.1 Disabling the CD/DVD Drive Auto-run Feature 35
4.7.2 How to Choose Burning Settings 36
Chapter 5 Multimedia Creation 39
5.1 Creating an Audio CD 39
5.2 Creating an MP3 CD 39
5.3 Creating a Movie/Video 39
5.4 Creating a Slideshow 42
Chapter 6 Working with VirtualDrive® 46
6.1 How to Make an Image 46
6.1.1 Making an Image from a Project 46
6.1.2 Making an Image from an Existing Disc 47
6.2 Working around in VCD Manger 52
6.2.1 Adding Images to Run on Your Virtual Drives 53
6.2.3 Using Cabinets to Organize Images 53
6.2.4 Creating a VCD Shortcut 54
6.2.5 Searching Images 54
6.2.6 Extracting Files from an Image 54
6.2.7 Adding Additional Virtual Drives 56
6.2.8 Changing the Auto-run Function of Disc Drives 56
6.2.9 VCD Manager Settings 57
6.4 Converting between ISO 9660 Images and Virtual CDs 57
Chapter 7 Virtual Hard Drive 60
7.1 Creating a RAM Disk 60
7.2 Mounting an Image into the RAM Disk 61
7.3 Working with Virtual Hard Drive Manage r 62
5
Page 6

7.3.1 Moving Files and Folders to a RAM Disk 62
7.3.2 Saving the RAM Disk Image 63
7.3.3 Removing RAM Disk from the System 63
7.3.4 Virtual Hard Drive Settings 63
Chapter 8 InstantBurning 66
8.1 Starting Instant Burning 66
8.2 Getting Prepared for using Instant Burning 66
8.2.1 Choosing right type of disc to use 66
8.2.2 Choosing the Default Recorder 67
8.2.3 Formatting a Rewritable Disc 67
8.3 Instant Burning Basics 68
8.3.1 Adding Files to Disc 68
8.3.2 Deleting Files from a Disc 69
8.3.3 Viewing Contents of a Disc 69
View Disc Contents on Another Computer 69
8.3.4 Ejecting a Disc 69
8.3.5 Renaming a Disc 70
8.3.6 Erasing a Disc 70
8.3.7 Viewing Disc Status 70
8.4 Instant Burning Settings 70
Chapter 9 VirtualDrive Pro Utility 73
9.1 Erase Disc 73
9.1 View the Device Information 73
9.3 Rapid Cache 74
9.3.1 Rapid Cache Features 74
9.3.2 Rapid Cache Settings 75
Chapter 10 Live Update 77
Chapter 11 Appendix 79
11.1 Definitions 79
10.2 Technical Support and Product Update 83
6
Page 7

Chapter 1
Introduction
7
Page 8

Chapter 1 Introduction
41.1 What is VirtualDrive® Pro?
VirtualDrive® Pro is the most comprehensive CD/DVD software package ever created. In addition to the
CD and DVD burning features you will find in many media suites, VirtualDrive® Pro gives you two
additional unique bonus features: Virtual Hard Drive, for hard drive emulation and VirtualDrive®, the No.1
CD/DVD Emulator worldwide.
Features you receive with VirtualDrive® Pro include:
CD/DVD Burning: Allows users to back up, share or archive various file types from the hard drive to
a CD/DVD, clone CD/DVD discs and backup VCDs (VirtualDrive® CD/DVD Image files) to a physical
disc.
Multimedia: Allows users to create audio CDs, MP3 CDs, movie CDs/DVDs and slideshow CDs from
their multimedia collections, which can be played on computers and/or home entertainment
equipment.
VirtualDrive®: A revolutionary software program that emulates your computer’s CD/DVD-ROM drive,
which enables you to run CD/DVD programs directly from your hard drive without the use of the
physical CD/DVD-ROM drive or the actual disc.
Virtual Hard Drive: Emulates a RAM Disk Drive to store files in non-swappable physical memory.
Virtual Hard Drive works almost the same as a physical hard drive in your computer and the data can
be automatically saved if any changes are made to the Virtual Hard Drive.
Instant Burning: With a recordable disc in the drive, you can use the CD/DVD drive as easily as any
of the drives on your local hard drive. Burning data to the disc is as easy as dragging-and-dropping
files to the drive in Windows Explorer.
1.2 Features and Benefits
• Customize your own CD & DVD Discs
Customize your own CDs, DVDs and Images (Virtual CDs/VCDs) with selected files from other media, such
as a CD, DVD or from the hard drive. The compiled Images can be configured to automatically run when
inserted into a virtual drive.
• Create you own Movie or Video
Create customized home movies or videos from your multimedia collections. The CD/DVD you create can
be played on personal computers as well as on home entertainment equiptment.
• Easy Backup
Searches and organizes all types of files to allow you to quickly and easily back up data onto a CD/DVD.
• Clone CD/DVD
Make an exact copy of an existing CD/DVD (copy protected content excluded) to another recordable
CD/DVD disc.
• Supports most CD/DVD formats
VirtualDrive® supports the following CD/DVD formats: CD-ROM, CD-Extra, CD-Text, Audio CD, Mixed
Mode CD, Photo CD, Video CD, DVD-ROM, Multi-session CD and unprotected DVD Video.
• Copy protection support
VirtualDrive® Pro is compatible with SafeDisc, SecuROM, LaserLock, StarForce and more.
• Fully integrated with Windows
8
Page 9

The XP-style user interface is completely integrated with Windows Explorer and the Windows Device
Manager. Easily insert, eject and browse an Image from a familiar interface. Enable/Disable a CDs
auto-run function, change CD/DVD drive letters or set your own hot-keys to insert and run VCDs
quickly.
• Create shortcuts for your Images
This feature allows users to create desktop shortcuts to local or network Images. Double-clicking on
the shortcut will insert the Image into the virtual drive quickly and easily.
• Add Images from the Internet
With VirtualDrive® Pro, you can add an Image that is shared on the Internet or a LAN into VirtualDrive®
Pro.
• VCD Cabinet
Instead of storing Images all in one place, the new Cabinet function allows you to sort your Images and
place them into different “cabinets” in the VCD Manager.
• Export Audio Tracks
Extract audio tracks from an existing audio CD, either a real CD or a virtual CD, and store them as audio
files (*.WAV) or MP3 files (*.MP3) on the hard drive.
• Compression
VirtualDrive® Pro incorporates a high-performance compression engine for building VCD files.
Compressed VCD files are automatically decompressed when accessed.
• Optimized CD performance
VirtualDrive® Pro plays VCDs at hard drive speed (equivalent to a 200x CD-drive). With its advanced
caching technology, VirtualDrive® Pro can reduce CD access times by up to 75%.
• Optimized application performance
Virtual Hard Drive allows once disk-based data to be accessed from physical memory. At physical memory
speeds, this will boost the performance of your programs by reading information in nanoseconds.
9
Page 10

Chapter 2
VirtualDrive Pro
Installation
10
Page 11

Chapter 2 Installation
2.1 System Requirements
• Windows 2000/XP/Server 2003
• CD/DVD drive or recorder
• 50 MB of hard drive space
• Intel Pentium (or compatible) 233MHz processor or better
2.2 Installing VirtualDrive® Pro
Step 1: Close any applications that are running before starting the installation.
Step 2: Insert the VirtualDrive® Pro CD-ROM into the drive. The setup program should start automatically.
If the auto-run function does not start, run the setup.exe file directly from the disc. Also, if you are
installing from a network or a hard drive, double-click setup.exe to launch the Windows Installer
program.
Step 3: Select the language you prefer for the installation. After the Windows installation program has
configured your system, the VirtualDrive® Pro installation wizard will be launched.
Step 4: Carefully read the software license agreement. If you accept the terms of the agreement, select
I Accept the License Agreement, and then click Next to continue.
Step 5: Enter your Name, Company (optional) and Serial Number; click Next to continue.
Step 6: The Installation Wizard will suggest a folder in which to install the VirtualDrive® Pro program files.
If you would like to store the program files in another location, select Change to open the file browser and
select a new folder.
Step 7: Confirm the setup configuration and then click OK to start the installation process.
Step 8: Set the number of virtual drives in your system. (Note: You must select at least one virtual drive
to install VirtualDrive
Step 9: You can place a shortcut on the desktop after the installation, by selecting the appropriate
checkbox as the installation completes. After the installation process has completed, select Finish and the
setup program should prompt you to restart the computer. Click Yes to restart the computer and launch
the VirtualDrive® Pro program, or click No to restart later.
Note: The VirtualDrive® Pro program is unusable until the system has been restarted.
2.3 Uninstalling VirtualDrive® Pro
Step 1: Close all other programs that are running. If the VirtualDrive® Pro icon is displayed in the System
Tray, right-click the icon and select Exit.
Step 2: To uninstall the VirtualDrive® Pro program, use either of the following methods.
● Select Start in the Windows taskbar, then select All Programs VirtualDrive® Pro Uninstall
VirtualDrive® Pro or
● Select Start Control Panel and double-click the Add or Remove Programs icon to open the Add
or Remove Programs screen. Select VirtualDrive® Pro, and then select Add/Remove.
Step 3: Either method will launch the VirtualDrive® Pro Uninstall Wizard. Select Remove to continue. The
uninstall program will now remove all files created by VirtualDrive® Pro.
®
Pro) Click Next to start the installation process.
11
Page 12

Note: The uninstall program will remove all files created by VirtualDrive® Pro, except the Image files
(VCDs, with the “VCD” or “D00…” extension), the project files (files with the “CIF” extension), and some log
files that keep a record of the VCD list in VCD Manager. These files are located in the VirtualDrive® Pro
install path and can be accessed or deleted through Windows Explorer.
12
Page 13

Chapter 3
Getting Started with VirtualDrive®
Pro
13
Page 14
Chapter 3 Getting Started with VirtualDrive® Pro
3.1 Starting VirtualDrive® Pro
After installation, you can launch VirtualDrive® Pro using any of these methods:
Double-click the program icon
Select Start All Programs VirtualDrive® Pro.
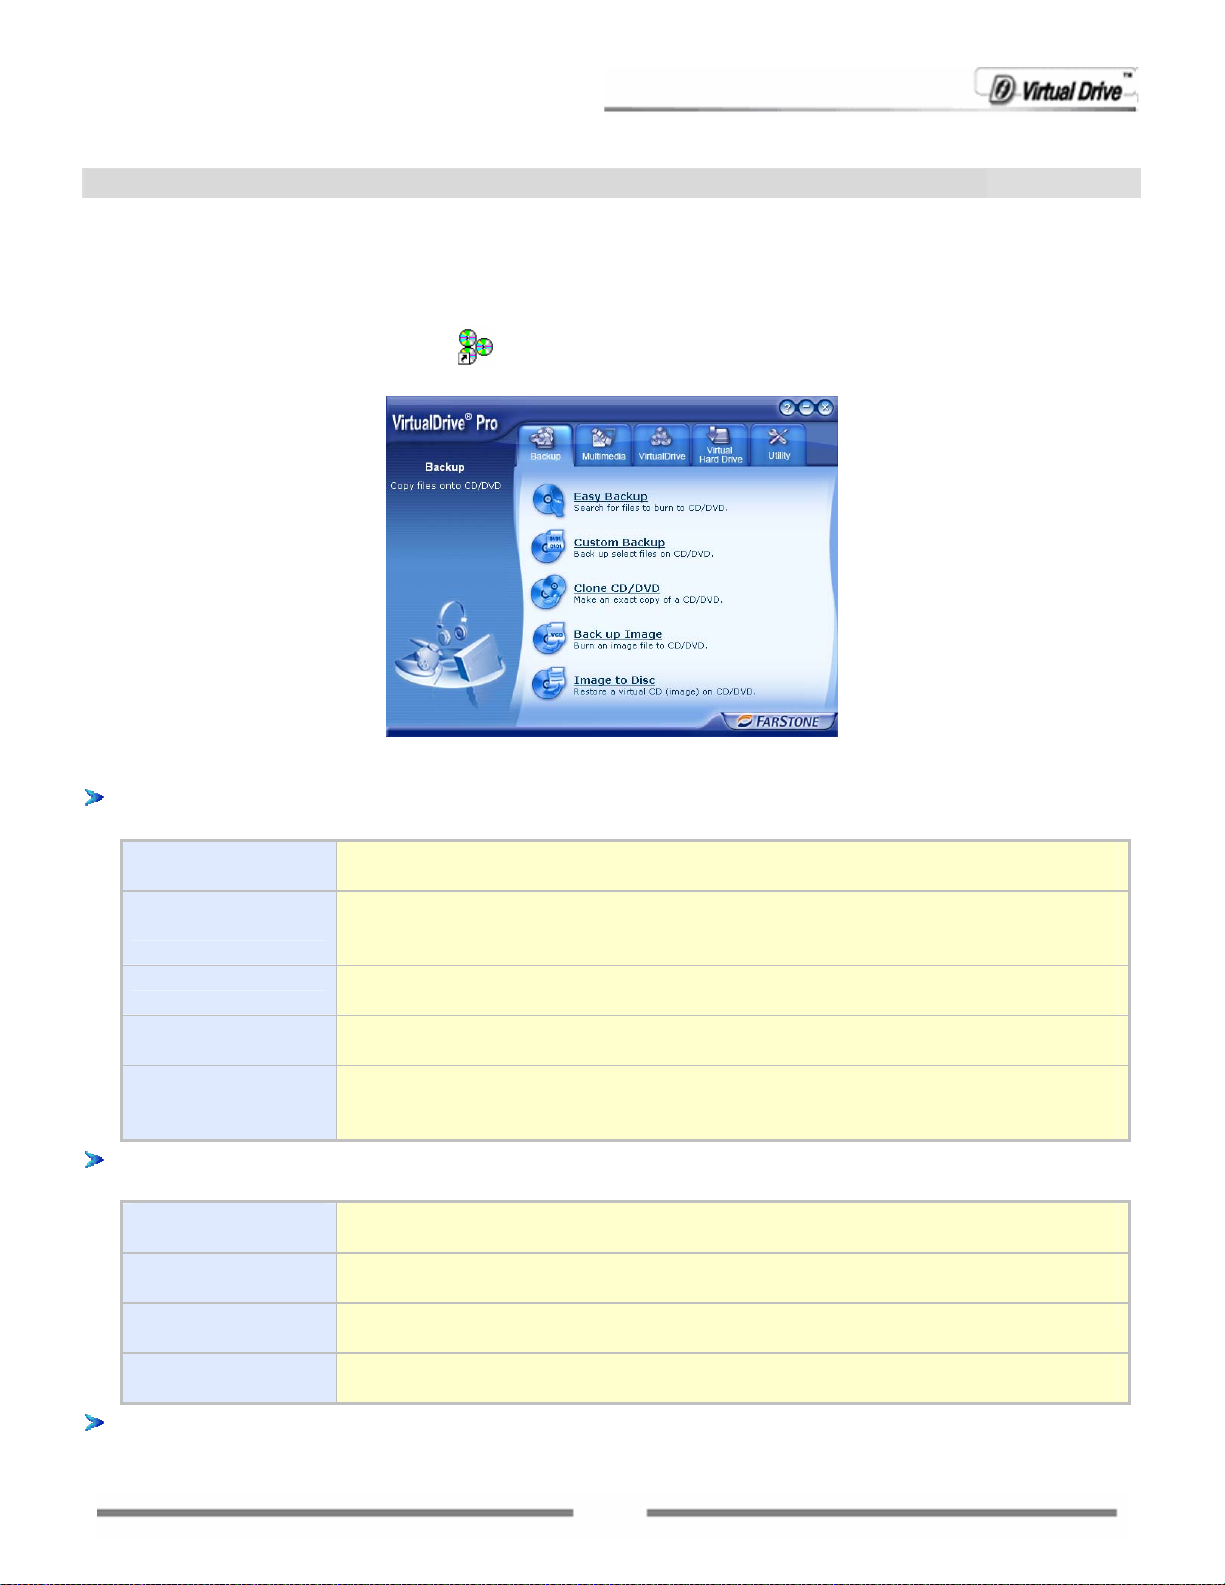
The main functions of VirtualDrive® Pro include:
Backup: Allows users to backup, share or archive various files from the hard drive to a CD/DVD, clone
CD/DVD discs, or back up Images to a real disc. From this page, you can:
Easy Backup Search for a specified file type on your local hard drive and burn the found files
to a CD/DVD disc(s) all at once.
Make Data
CDs/DVDs
Clone CD/DVD Make an exact copy of an existing CD/DVD to another recordable CD/DVD
Back up Image Back up and burn an Image file from the hard drive to a recordable CD/DVD
Restore Burning Restore an Image and burn the contents of the Image file to a CD/DVD disc.
Multimedia: Allows you to create an audio CD, an MP3 CD, a movie CD/DVD or a slideshow CD from
your collections.
Create an Audio
CD
Create an MP3
CD
Create a
Video/Movie
Create a Slide
Show
VirtualDrive®: A revolutionary software program that emulates your computer’s CD/DVD-ROM
drive, which enables you to run CD/DVD programs directly from your hard drive without the use of the
Backup or archive your various files from the hard drive to a recordable
CD/DVD disc such as a Data DVD, Data CD, Audio CD, MP3 CD, Mixed-Mode
CD, CD Extra, UDF CD and Multi-Session CD.
disc.
disc.
The files on the burned disc are the original files selected to initially build the
Image.
Use MP3, WMA or other types of audio files to make an audio CD that can be
played on your computer, home stereo equipment and car stereo.
Create an MP3 CD that can be played on a stereo that supports the MP3
format.
Create a movie from your video collections.
Create a slideshow accompanied by background music and transition effects
from your digital photo collections.
on the desktop
14
Page 15

physical CD/DVD-ROM drive or the actual disc. From this page, you can:
Create VCD Create an Image file of a CD/DVD disc and store it on the hard drive.
VCD Manager Launch VCD Manager and enjoy the more powerful functions of VirtualDrive®
Pro.
ISO Conversion Convert an Image to an ISO image, and vice versa.
Virtual Hard Drive: Emulate a RAM Disk Drive to store files in non-swappable physical memory. The
Virtual Hard Drive works almost the same as the physical hard drive in your computer. The data can
be automatically saved if any changes are made to the Virtual Hard Drive. You can launch Virtual Hard
Drive Manager from this page.
Create a New
RAM Drive
Mount Image as
a RAM Drive
VCD Manager Launch VCD Manager and enjoy the more powerful functions of
Utilities: Provides tools to erase all data from a re-writable CD/DVD disc and displays detailed
information about CD/DVD devices and the disc inserted in the device. From this page, you can:
Erase Disc Erase all data from a re-writable CD/DVD disc (CD-RW, DVD-RW, DVD+RW,
Create a new RAM Drive on your system.
Mount a previously created Image file as a RAM Drive
VirtualDrive®.
DVD-RAM).
Device info View detailed information about your CD/DVD device, including the CD/DVD
recorder and the disc inserted in the recorder
Rapid Cache Set caching configurations and view disc and CD/DVD device properties.
About: Click the Company logo on the VirtualDrive® Pro interface to view
information about VirtualDrive® Pro and FarStone. You can register your product by clicking Product
Registration on this page and you’ll be guided to the corresponding page at FarStone’s website
http://www.FarStone.com/).
(
3.2 VirtualDrive® Pro Start Menu
After installation, the VirtualDrive® Pro icon will be displayed in the Taskbar Notification area.
Double-click the icon to launch the VirtualDrive® Pro main interface.
Right-click the icon to open the VirtualDrive® Pro Start Menu. (shown below) The Start Menu provides a
quick entry point to the most commonly used functions of VirtualDrive® Pro.
15
Page 16
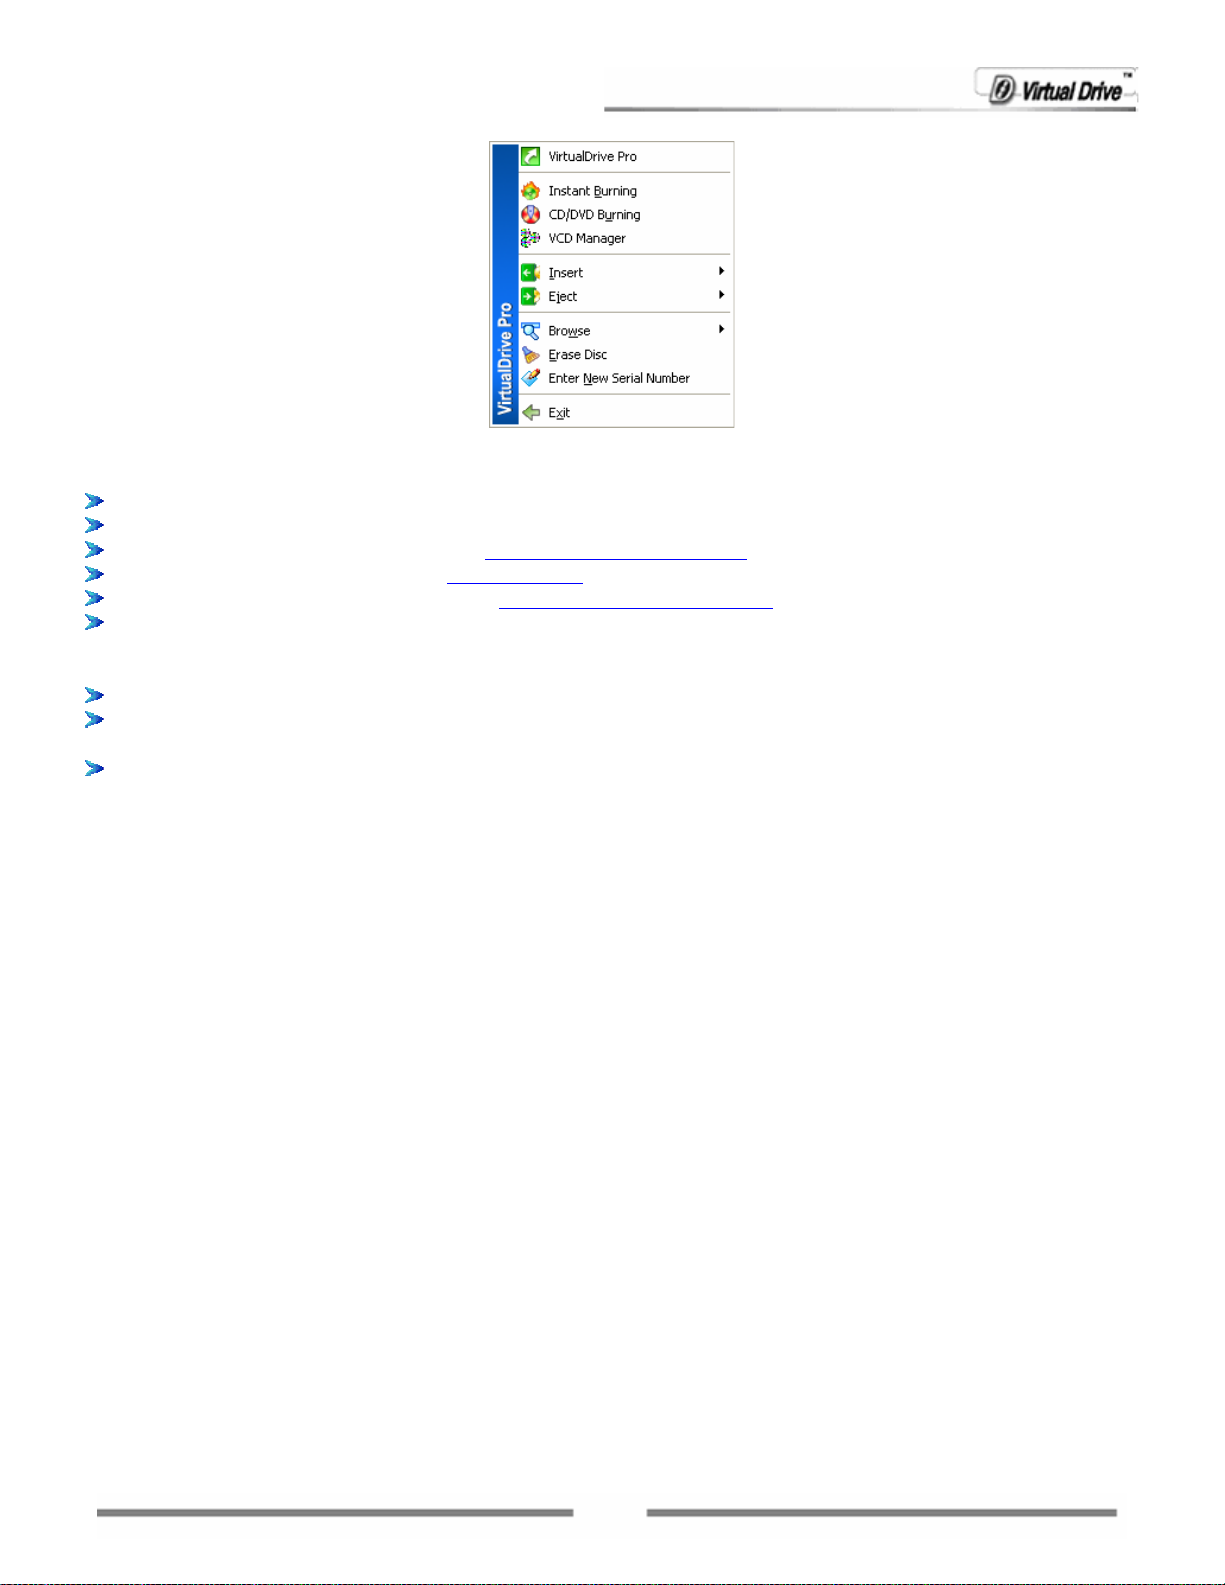
Using the VirtualDrive® Pro Start Menu, you can perform the following functions quickly:
VirtualDrive® Pro: Launch the VirtualDrive® Pro main interface.
Instant Burning: Click to launch Instant Burning.
CD/DVD Burning: Click to launch CD/DVD Burning Manager.
VCD Manager: Click to launch VCD Manager.
Virtual Hard Drive: Click to launch Virtual Hard Drive Manager.
Insert: Click to select a virtual drive, and the Image to be inserted. (All virtual CDs that have been
added into the VCD Manager will be listed for you to choose from. You can also click Open and choose
an Image from the hard drive.)
Eject: Click to select a virtual drive and eject the Image inserted in it.
Browse: Click to select a virtual drive and view the contents of the VCD inserted in this drive through
Windows Explorer.
Erase Disc: Click to erase the rewritable disc inserted in the CD/DVD recorder.
Note:
If the auto-run function of your recorder is enabled, an Auto-run dialog will be displayed.
Choosing to disable the auto-run function will log you off Windows. Please save your
documents and close all other applications before clicking the OK button.
Enter New Serial Number: Click to enter a new serial number to activate VirtualDrive® Pro.
Note:
A serial number can only be used on one computer on a LAN. If a serial number is used to
install this program on a second computer on a LAN, the installed program will not be
available. You can purchase another serial number and enter it, to activate VirtualDrive®
Pro.
Exit: Click to exit the VirtualDrive® Pro program.
16
Page 17

Chapter 4
Baking up Data
to CD/DVD
17
Page 18

Chapter 4 Backing up Data to Discs
4.1 Easy Backup
Easy Backup allows you to search for specific file types (extensions) and back them up to a data CD/DVD.
If you ever forget the location of the files you want to back up, Easy Backup will search your computer for
you and return a list of files for you to back up.
To start using Easy Backup:
Select Easy Backup from the Backup page on the VirtualDrive® Pro main interface. The window below
will be displayed.
(to be modified)
Note: Easy Backup will initialize your system to prepare the search engine when you run Easy Backup for
the FIRST TIME. The time it takes to complete this operation may take up to 1 hour, depending on the
amount of data on your hard drive and the speed of your system.
4.1.1 Searching for Files to Back up
Follow the steps below to search for and add files to a Data CD/DVD project.
1. First specify your search options in the left pane of the program window. You can specify the following
options:
• File name or type: In this box, type in the name or partial name of file you want to search for. You
can also specify a type of file to search for. (Eg. If you want to search for word document, type in
*.doc).
You can also select a file type for the dropdown list to search by. By default, the program lists Image,
Audio and Video file types for you to select. You can include your own file type(s) to search for (as
shown in chapter
• Look in: search for files in the selected directory or folder only.
In the lower part of the search options pane are advanced search options, which include:
• When was it modified?
Specify a time range to search in. Only files within the time range you specified will be displayed in
the results box.
• What size is it?
Specify a size limitation to search in. Only files within the size range you specified will be displayed
in the results box.
• More advanced options.
Specify to include system files, hidden files and/or subfolders when searching.
4.1.3 Customizing Search Types).
2. After you finish defining your options, click one of the following three buttons to start searching for
files on your system:
18
Page 19
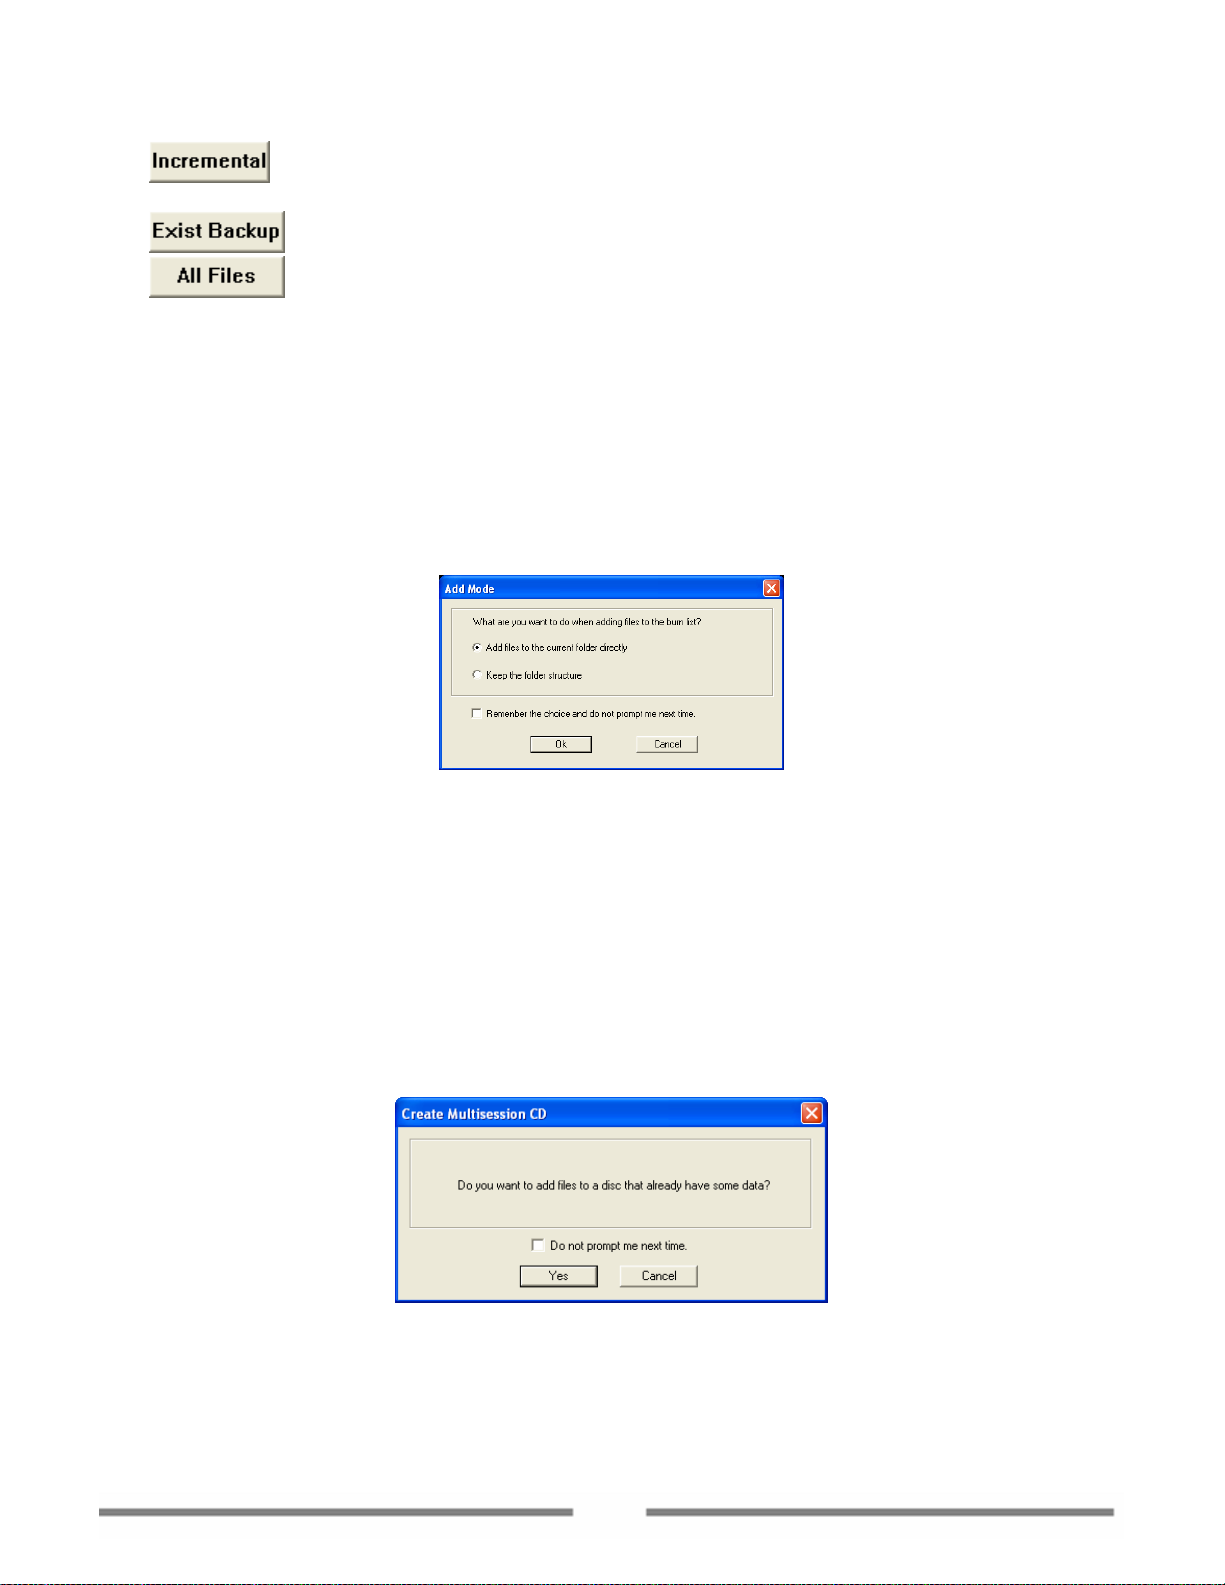
•
Click this button to search for new files or files modified since the last time Easy Backup
was used to backup your files.
•
•
Click this button to search for files that have already been backed up before.
Click this button to search all files regardless if they have been backed up or not.
Click one of the three buttons to start the search engine. The progress bar in top of the left pane
indicates the status of the search engine. You can click Stop to cancel the search process at any time.
3. When the search process has completed, the search results will be displayed in the results box (the
upper right pane in the Easy Backup interface.) You can view the detailed information of each file in the
box by right clicking on the file and selecting Properties from the popup menu. You also can preview
a file by selecting Open from the file’s right-click menu.
To add files to the disc project, you can drag and drop the file(s) you want to back up, to the box below.
Or you can right click on a file and select Add to add an individual file.)
Upon adding files to the disc, a notice will displayed to asked you if would like to add the file only or to
preserve the original folder structure.
Select “Add files to the current folder directly”; all files will be added to the same folder on the disc.
Select the “Keep the folder structure” option. Easy Backup will automatically create folder on the disc
and keep the original folder structure of the added files.
Check the box “Remember the choice and do not prompt next time”; this prompt window will not
appear when you add files in future. Your selected settings will then be applied to all future file adding
operations.
If you want to change the add method, you can re-enable the prompt window in the Tools Options
menu. On the General tab, check the “Show Add Mode window when add files” button.
Easy Backup support creating multisession disc. You can add file to a disc that already contain some
data on it. If you have checked the box “Prompt to create a multisession disc” in Tools/Options/General,
you will see a prompt window asking you if you want to create a multisession disc.
Click Yes to select a session on the inserted disc. Now you can add files to the inserted disc. Files added
this time will be burned in another session on the disc.
19
Page 20
Search Files Using the Easy Backup Wizard
The Backup Wizard will automatically launch the first time you use Easy Backup. You can disable the
auto-run feature of the wizard as described in step 1 below.
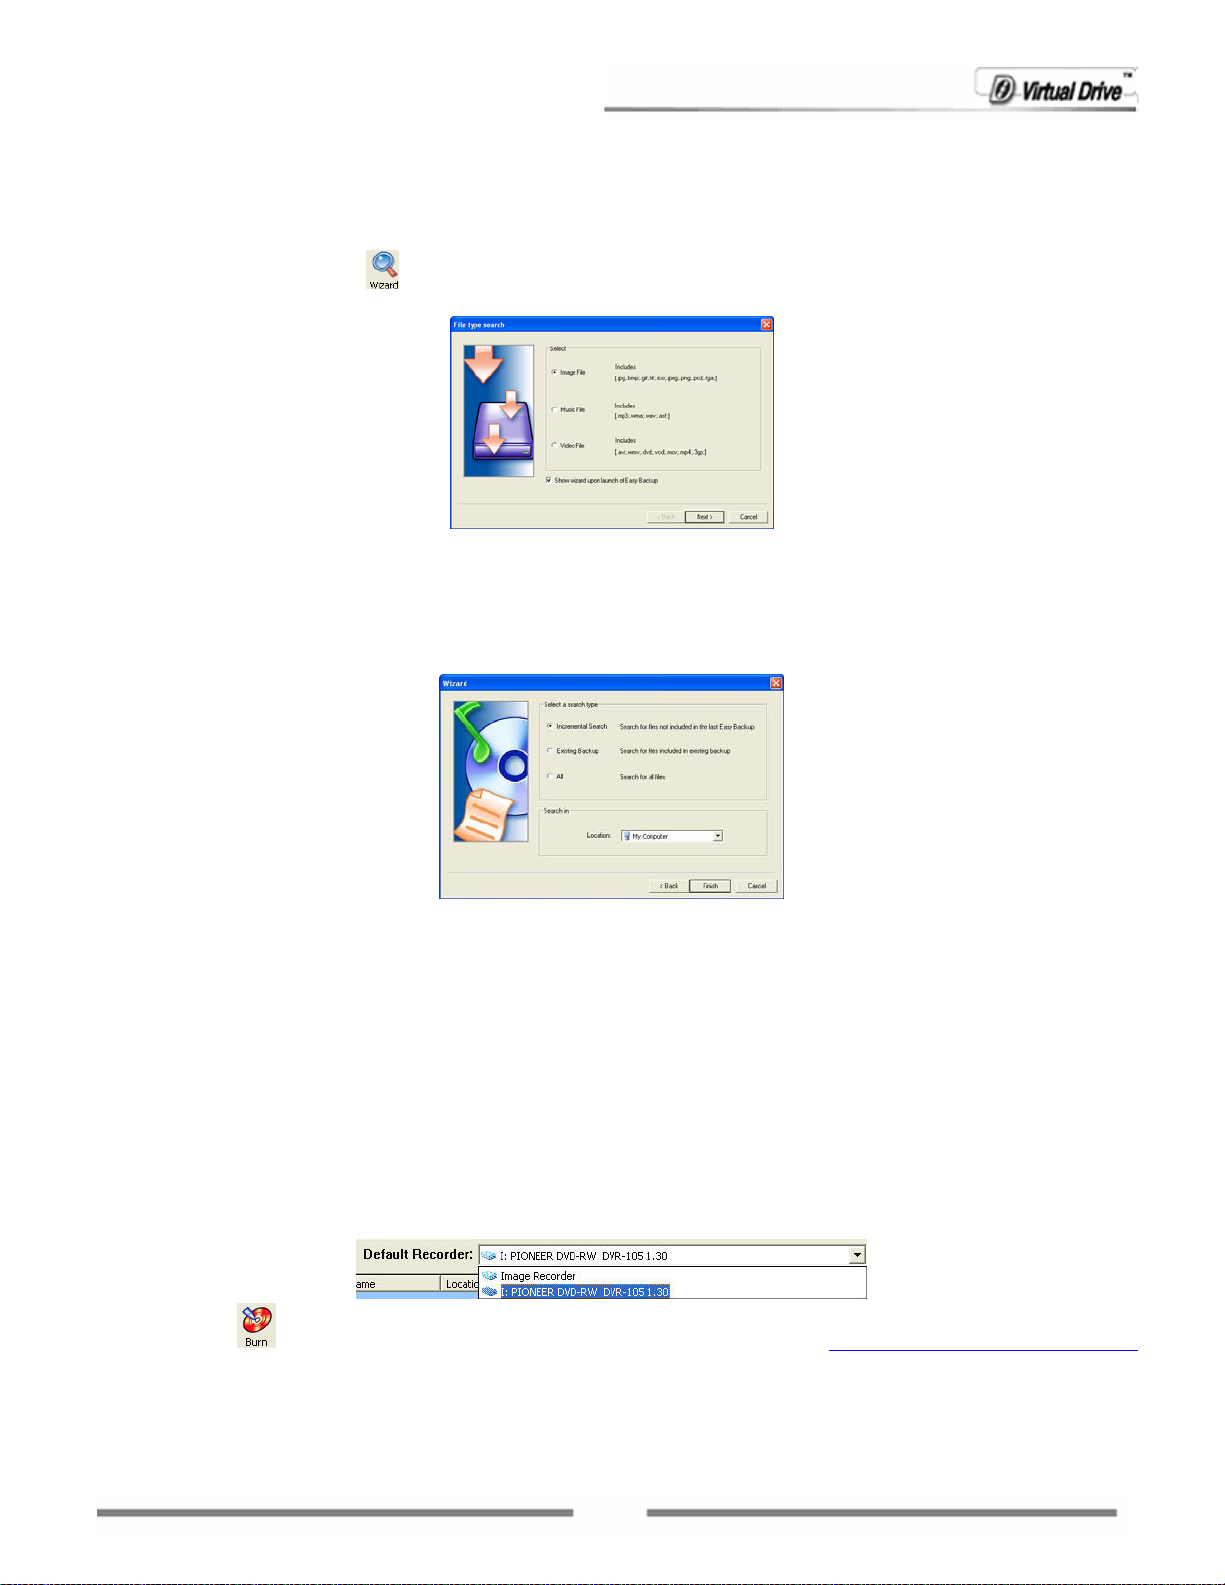
To use the Easy Backup Wizard
1. Click the Wizard button
displayed, as shown below.
2. Select a file type to search for. Please refer back to the beginning of chapter 4.1.1 for more detailed
information on searching for file types.
Clear the box “Auto display wizard at program startup” below to disable the auto-run feature of this
wizard each time Easy Backup is run.
3. Click Next to continue.
4. Specify a Search Mode and a Search Scope and click Finish to start the search engine.
on the toolbar on the Easy Backup program interface. The wizard will be
Searching for Files Using Windows Explorer Search
If you would like to use the Windows Explorer search engine, select Tools Windows Search from the
Easy Backup menu bar. The Windows Explorer search program will be launched. To add files from the
search results, simply drag and drop the files from Windows Explorer to the Easy Backup program.
4.1.2 Backing up Files
Once you have added a file to the project, you can burn the project to a CD/DVD disc or create an Image
file.
To back up files to disc
1. Set the Default Recorder to the physical disc recorder in your computer by selecting the appropriate
drive from the drop-down menu.
2. Click burn
for instructions needed to complete this operation.
Note:
VirtualDrive® Pro supports split-volume. When you have added more data to the disc project
to start the burning process. Please refer to chapter 4.5.2 Burning a Project to Disc
20
Page 21
than the disc has capacity for, it can divide the data and burn them onto multiple discs. Please
refer to chapter
4.7 Burning Settings.
To back up files as an Image
1. Set the recorder to the Image Recorder.
2. Click burn
Project for instructions needed to complete this operation.
4.1.3 Customizing Search Types
You can customize your search for a certain file type by following the steps below.
To customize a file type search
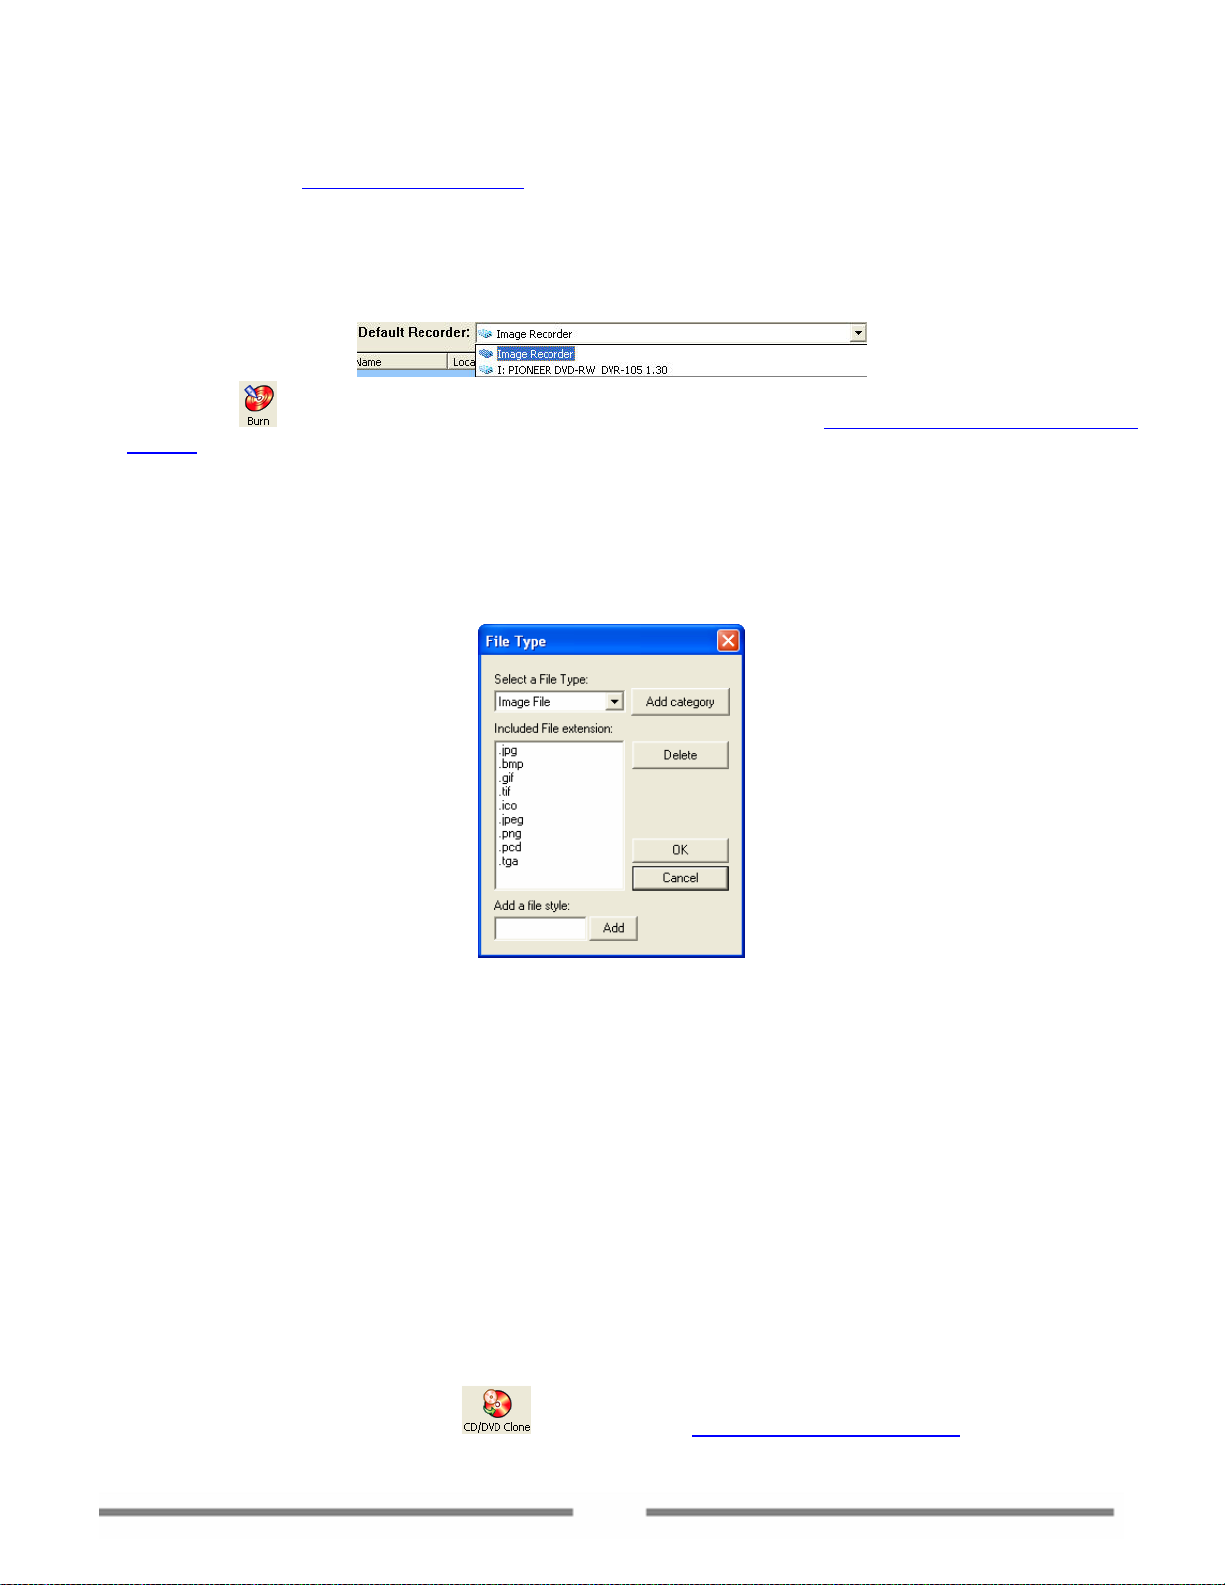
1. Select Tools Edit File Type from the Easy Backup menu. The window below will be displayed.
2. Select a category from the Select a File Type dro pdo wn m enu. To ad d a n ew f ile typ e to t his cat ego ry,
enter the suffix of this file type into the text box located at the bottom of the File Type window and
click Add. You can delete a file type by highlighting it in the list and clicking Delete.
3. After you finish configuring the File Type search parameters, click OK. You’ll now see the newly added
file type(s) in the File Name and File Type dropdown menu in the search options pane.
to start creating the Image. Please refer to chapter 6.1.1 Making an Image from a
4.2 Cloning Discs
With VirtualDrive® Pro, you can make an exact copy of an existing CD/DVD to another recordable disc,
quickly and conveniently.
To clone an existing disc to another disc:
Select one of the following methods to launch the Burning Setup dialog box (shown below).
Select Clone CD/DVD on the Backup page.
Click the CD/DVD Clone button
located on the CD/DVD Burning Manager toolbar.
21
Page 22
Note:
If the auto-run function of your recorder is currently enabled, an Auto-run warning dialog box
should pop up before the dialog box shown above. For instructions on how to deal with the
warning dialog box, please refer to section
There are two cases of cloning discs. This depends on the number of CD/DVD drives connected to your
computer. (At lease one drive needs to have CD/DVD burning capabilities.)
Case 1: Cloning a Disc with Two Disc Drives
4.7 Burning Settings.
If you have two CD/DVD drives connected to the computer (at least one of them needs to be a recorder),
the setup process is explained below:
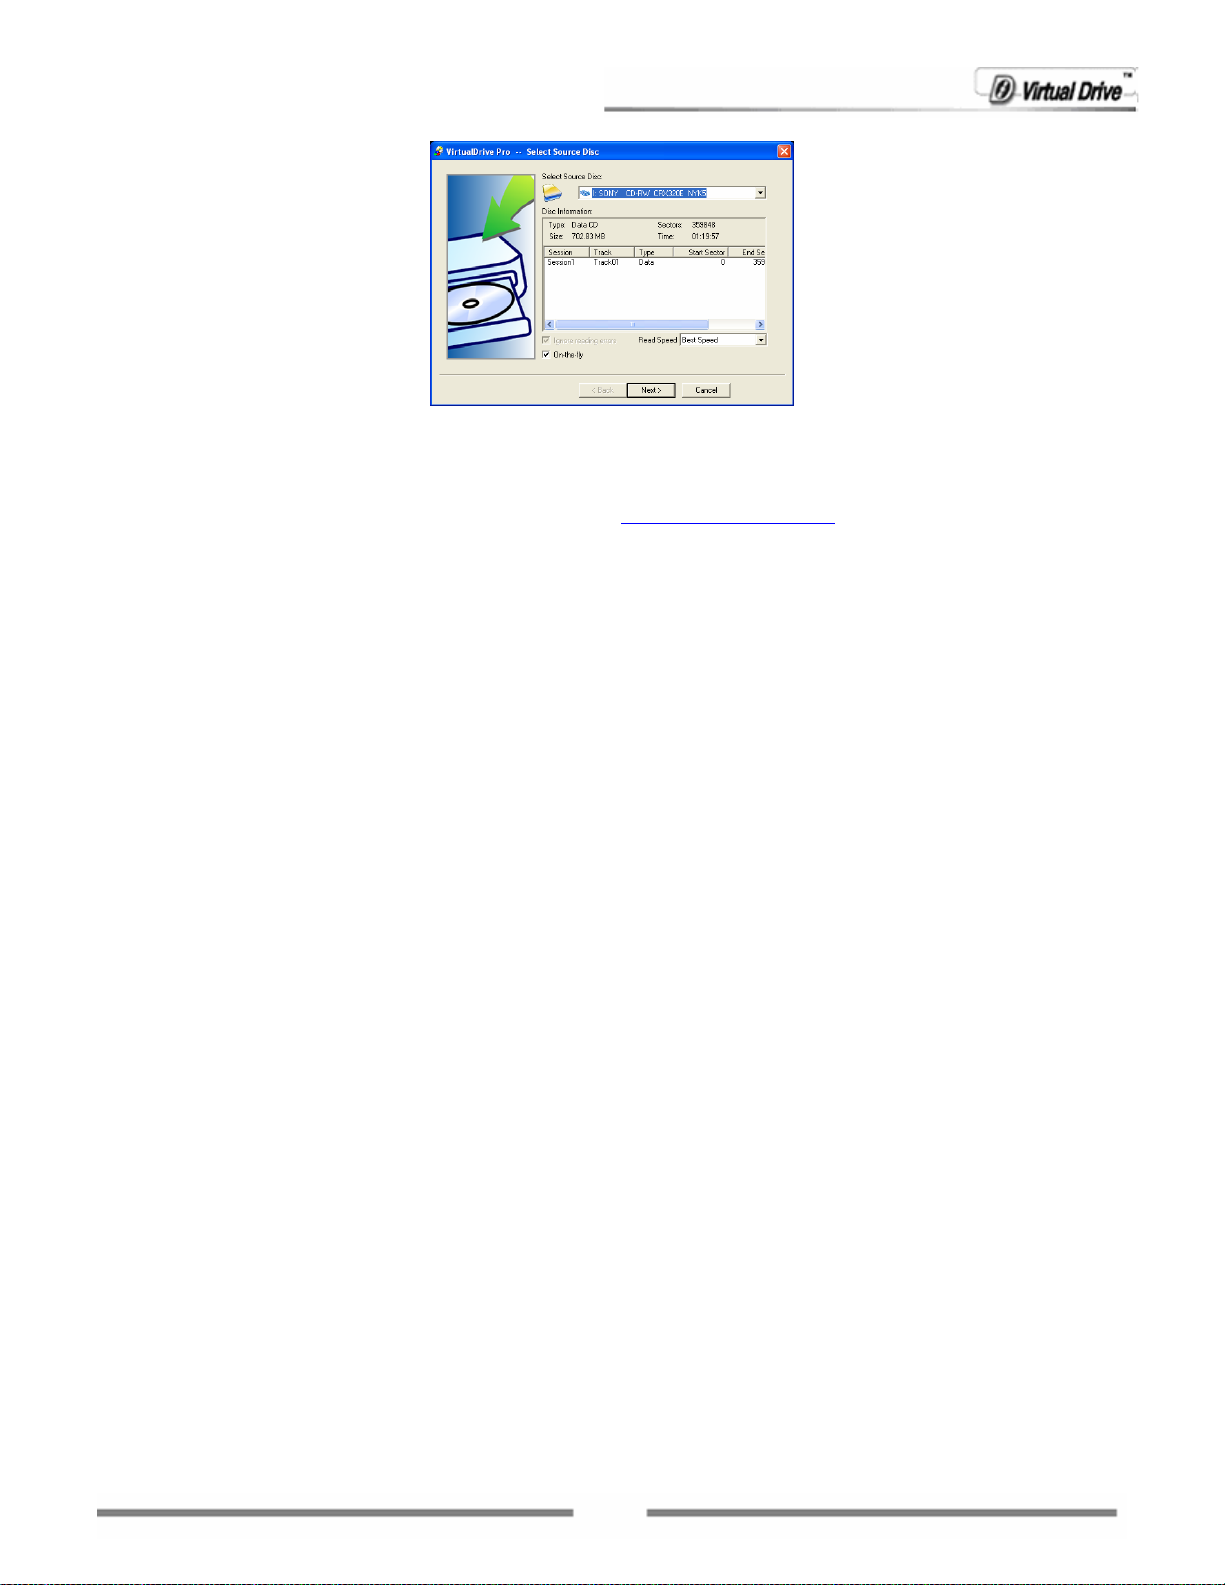
1 Insert a Blank disc into the CD/DVD recorder, and then insert the Source disc into your other drive.
2 Select the drive containing the Source Disc in the drop-down menu at the top of the dialog box.
Other options in this dialog box include:
Disc Information: You can view disc type, number of sectors, disc size, time and sessions, tracks,
start sector and end sector of the Source disc.
Read Speed: Select a read speed from the dropdown menu. It’s recommended that you choose the
Best Speed option.
Ignore read errors: A read error may occur during the reading process for certain reasons.
Checking this box will ignore read errors when reading from the Source disc.
On-the-fly: To quickly clone a disc, make sure this option is checked.
Note:
If the On-the-fly option is checked, data will be read from the Source disc and then burned
directly to the Target disc.
If this is not checked, the data in the Source disc will first be compressed as an Image and
stored in a temporary files folder. The original contents of the Source disc will then be
burned to the Target disc. The setup process in this case is the same as Cloning a Disc
with One Disc Drive. Please refer to the instructions in Case 2.
This option is not available if there is only one CD or DVD drive in your computer.
Select options according to your needs and click Next.
3 A Burning Setup dialog box is displayed. Select your burning settings and click Record to begin
burning.
Note:
22
Page 23

For instructions on how to configure the burning settings, please refer to section 4.7 Burning
Settings.
4 Click Cancel to end the burning process if needed.
Case 2: Cloning a Disc with One Disc Drive
If you have only one recordable CD/DVD drive in your computer, disc cloning can also be accomplished with
VirtualDrive® Pro.
To clone a disc using one recordable CD/DVD drive:
1 Insert the Source disc into your CD/DVD drive.
2 Select your physical CD/DVD drive in the drop-down menu located at the top of the dialog box. Set
other options according to your needs and click Next.
(Note: The On-the-fly option is not available if there is only CD/DVD disc drive on your computer.)
3 A Burning Setup dialog box is displayed. Choose your burning settings and click Record to continue.
(Note: For instructions on how to configure the burning settings, please refer to section
Settings.)
Note: The next two steps are settings for making an Image.
4 Select the CD/DVD read method and use Data Compression if desired. The default read method
“Intelligent Extraction” is successful for most CD formats.
In most cases, you can use the “Intelligent Extraction” read method to make the Image. If you know
that a certain protection type is used on the CD, you can choose to build with that protection by using
Other Protected CD type option.
Using Data Compression will save hard disk space but will also require a longer build time.
5 Enter a description for the Image in the description field.
Optional: If the CD does not have an auto-run file, you can specify a program to run when the Image
is inserted into a virtual drive. You can use the Browse button
file.
6 Select Next to begin cloning discs or click Back to edit your settings.
7 When the Image of the Source disk has been successfully created, the disc will eject automatically.
8 Replace the Source disc with a writable disk and click OK to continue.
9 When recording has ended, click OK to close the Burning window.
to locate the executable program
4.7 Burning
4.3 Backing Up Image Files
With the “Back up Image” function, you can burn an Image (VCD) or several Images directly to a
recordable disc. You can use the Image file(s) on the disc, as you would Image files stored on your hard
drive (i.e. inserting it into a virtual drive and using it like a real CD or DVD).
To back up an Image:
1. Do any of the following:
On the VirtualDrive® Pro main interface, select Back up Image on the Backup page.
23
Page 24
Click Make Data CD/DVD to launch the CD/DVD Burning manager, and then select File
Back up Image.
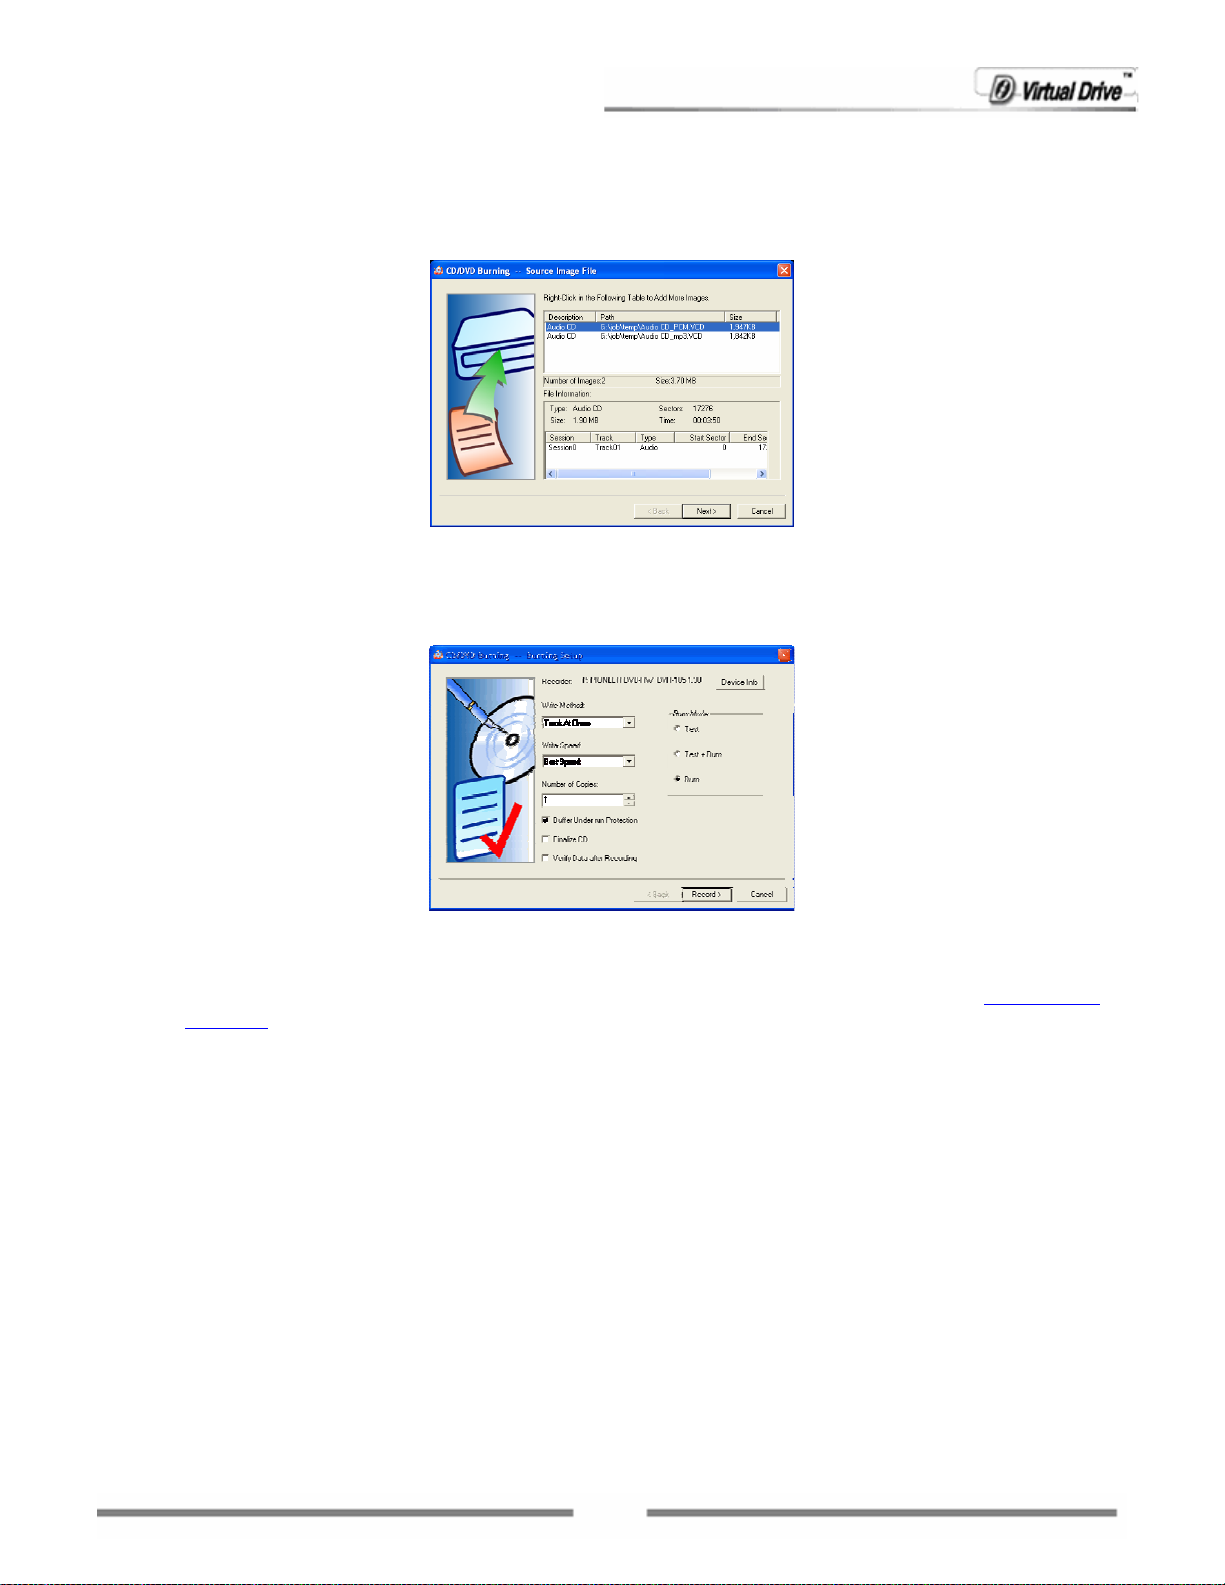
2. Select the Image files you want to burn and then select Open.
3. All selected Images and their detailed information are displayed in this window.
You can also add new Images or remove selected Images by right clicking in the window above and
selecting Add.
4. After confirming your selection of the Image(s) to be burned, click Next to proceed to the screen
shown below:
Choose the burning settings and click Record to begin burning.
Note:
For instructions on how to configure the burning settings, please refer to section
Settings.
4.7 Burning
4.4 Restore Burning an Image
Unlike backing up an Image to disc, you can restore an Image and burn the contents of it back to a disc.
The files are the original files you initially selected to build the Image.
To restore and burn an Image:
1. From the VirtualDrive® Pro main interface, select Restore Burning on the Backup page.
2. In the Open window, select the Image file you want to burn and then click Open.
Note: Only one Image can be selected at a time.
3. The selected Image and its detailed information are displayed on the page shown below.
24
Page 25
You can also replace the selected Image with another one by right clicking in the above box and
selecting Add.
4. After confirming the Image to be burned, click Next to open the screen shown below:
Choose the burning settings and click Record to begin burning.
Note:
For instructions on how to configure the burning settings, please refer to section
Settings.
4.7 Burning
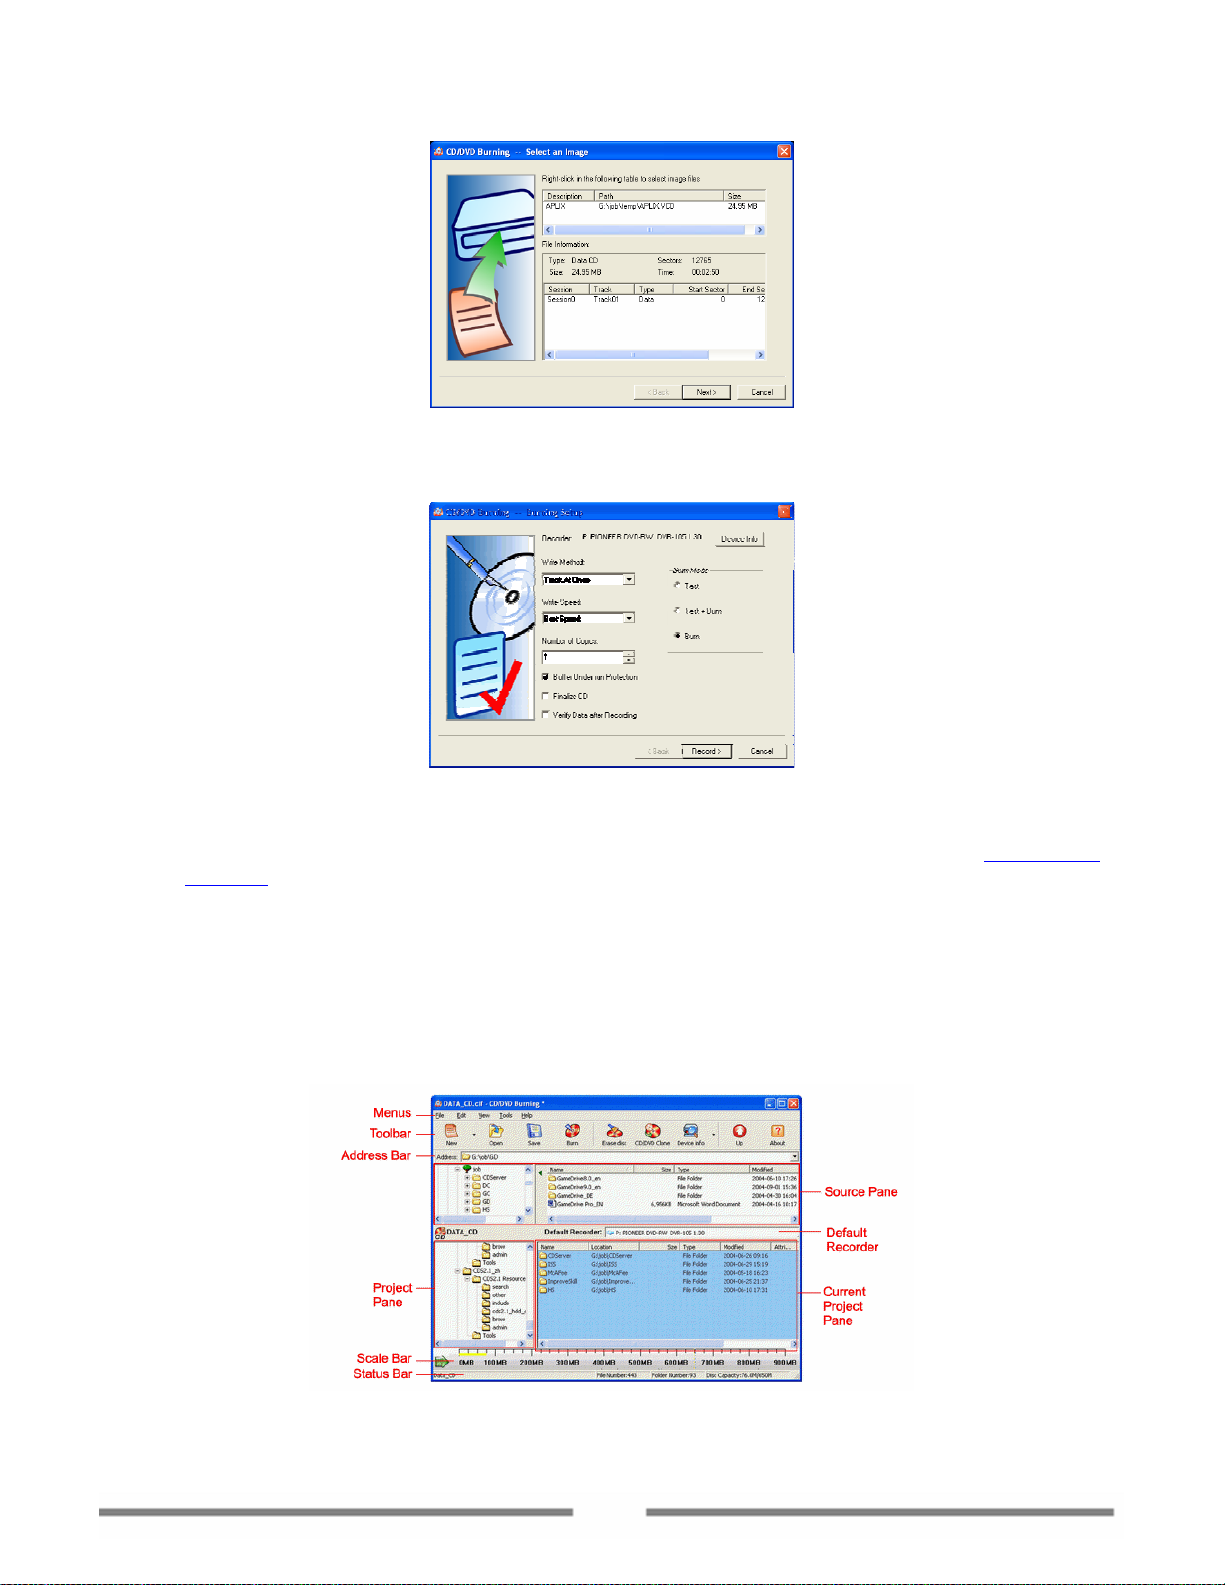
4.5 Burning Data CDs & DVDs
Clicking the Make Data CD/DVD button will launch the CD/DVD Burning Manager (shown below). Here you
can create various types of discs, including Audio CDs, MP3 CDs, Mixed-mode CDs, CD Extra, UDF CDs, etc.
Fig. CD/DVD Burning Manager
25
Page 26

4.5.1 Creating a Project
To begin creating any kind of disc, you should first create a project. You can then burn a project onto a
CD/DVD disc or burn it as a VCD (VirtualDrive® Image file).
Here we only describe how to make a Data CD/DVD as an example, because all of the other disc types are
created using the same method.
Starting a New Project
To start a new Data CD/DVD project, select any of the following options from the CD/DVD Burning
Manager:
Select File New Data CD/Data DVD.
Click the small triangle on the right side of the New button
Right-click on any part of the Project Pane and choose New Data CD/Data DVD.
To determine what type of disc to create, or to learn more about the different disc types, please refer to the
appendix
preference.
Adding Files and Folders to the Project
You can now add files and folders from your hard disk and other storage media to your project.
Definitions. You can follow the same procedures outlined above to select the disc type of your
Note:
If you are burning a UDF CD, CD/DVD Burning uses Unicode in the file name and supports only
127 characters.
If creating a multi-session disc, an unclosed CD cannot be used.
Tips:
When you open a multi-session disc in Windows Explorer; you can see the content of the last
session only. With VirtualDrive® Pro CD/DVD Burning, you can view the contents of all
sessions through CD/DVD Burning manager / Tools / Device Info / Disc Contents.
Note:
1. When adding files to the project, you can preview documents, photos, videos, and audio
files. To preview a file, double-click on the file in the Source Pane or right-click it and choose
Open. (You can also preview an audio file by right-clicking it in the Current Project Pane and
selecting Play. This is available for audio files in an audio CD project or in the audio session
of a Mixed-Mode CD or a CD Extra only.
2. You can also view the contents of a folder. Right-click the folder to be viewed and select
either Open or Search to open the folder in Windows Explorer.
, then select Data CD/Data DVD.
You can add files and folders in any of the following ways:
Drag files and folders from the Source Pane or from Windows Explorer to the Current Project Pane.
Copy and Paste files and folders from the Source Pane or Windows Explorer to the Current Project
Pane.
Select files and folders from the Source Pane, right-click on the selected objects and then click
Add.
Select files and folders from the Source Pane and select Edit Add to Project.
26
Page 27

Select Edit Add File to display the Open dialog box; then select your files and folders.
Right-click the Destination Project (to which the file will be added) or a destination folder from the
Project Pane, and choose Add File. This will display the Open dialog box, where you can select your
files and folders.
Right-click any blank part of the Current Project Pane and select Add File to display the Open dialog
box; then select your files and folders.
Note:
1. If adding files to an Audio CD project, or to audio tracks in a Mixed-Mode CD or a CD Extra, only
audio files (MP3, WAV or CDA files) can be added to your project.
2. If adding files to a MP3 project, only MP3 files can be added to your project.
Note:
The horizontal scale bar at the bottom of the Project Pane displays the total size of the project, with
the file size already added to it. The default scale is automatically set according to the project type
you are creating. You can change the scale by clicking the
toolbar.
Working with Files and Folders in a project
Once you have added one or more files to your project, you can complete the following operations:
Creating a new folder: You can create a new folder in your project, and then add files and folders to
the new folder. You can create a new folder in any of the following ways:
Click anywhere in the Current Project Pane and then choose Edit New Folder.
Right-click on any blank part of the Current Project Pane and select New Folder.
Deleting files and folders: You can remove files and folders from your project. This does not remove
the original files or folders from your hard drive. You can delete a file or folder in any of the following
ways:
Select the file or folder in the project, and select Edit Delete from the menu bar.
Right-click the file or folder in the project and select Delete.
Select the file or folder in the project and press the Delete key.
Renaming files and folders: You can rename files and folders in your project. This does not change
the original names of files or folders from your hard drive. You can delete a file or folder using any of
these methods:
Select the file or folder in the project, and select Edit Rename from the menu bar.
icon on the left corner of the
Right-click the file or folder in the project and select Rename.
Select the file or folder in the project and press the F2 key.
Viewing File Properties: Right-click a file or folder anywhere in the CD/DVD Burning Manager, select
Properties, or select a file or folder then choose File Properties from the menu bar. A Properties
dialog window will display to show general information about the file, including Type, Location, Size,
Created time and Attributes.
If you right-click an audio file in a Audio CD project, or in the audio track of a Mixed-Mode CD or a CD
Extra, an additional Audio tab will display in the Properties dialog window.
27
Page 28

You can edit or view the audio information on this tab, including:
Song Name of the audio track
Artist
Album
Lyricist
Composer
ISRC The ISRC consists of twelve characters representing country (2 characters), Registrant (3
The artist who sings the track
The title of the album from which the track comes
The lyricist of the audio track
The composer of the audio track
characters), Year of Reference (2 digits) and Designation (5 digits).
The structure of the ISRC is shown in the following example:
ISRC FR - Z03 – 98 – 00212
ISRC FR Z03 98 00212
Code
identif
ier
Interval The time interval between two consecutive audio tracks
Format General information about the audio format
Tips:
The ISRC (International Standard Recording Code) is the international identification system for
sound recordings and music video recordings. Each ISRC is a unique and permanent identifier for a
specific recording, which can be permanently encoded into a product as its digital fingerprint.
Encoded ISRC provides an accurate and efficient means of exchanging and controlling audio
information.
Country
Code
(2
characte
rs)
FR =
France
Registra
nt Code
(3
characte
rs)
Z03 –
Mercury
France
Year of
Referen
ce
(2
digits)
98 =
1998
Designation Code
(5 digits)
Saving and Opening a Project
28
Page 29

You can save your current project or open an existing project.
To save a new project or to save a copy of an existing project with a different name:
1. Choose File Save As from the menu bar.
2. Type a file name, and select a location for the file.
3. Click Save.
To overwrite the current project:
Do any of the following:
Choose File Save.
Click the Save button
Right-click the project in the Project Pane, then choose Save.
on the toolbar.
To open a project: Choose any of the following options to open a project:
Click File Open from the menu bar.
Click the Open button
Right-click anywhere in the Project Pane and click Open.
Right-click a project file (CIF extension) in Windows Explore and click Open.
2.
on the toolbar.
Renaming and Deleting a Project
Once a project is opened in the Project Pane, you can view, rename and delete the open project.
Renaming a project: You can rename a project in the Project Pane. (Note: The project name is
different from the name of the project file (file with CIF extension). It is the CD label when burning the
project to a CD/DVD. You can rename a project in three ways:
Select the project, and click Edit Rename from the menu bar.
Right-click the project and select Rename.
Select the project and press the F2 key.
Deleting a project: You can remove a project from the Project Pane. This does not remove the
original project file (file with CIF extension) from your hard drive. You can delete a file or folder in one
of two ways:
Select the project, and click Edit Delete Project from the menu bar.
Right-click the project and select Delete Project.
Setting Project Properties
The project Properties dialog box displays the General, File System, CD Archives and Audio properties of a
project.
29
Page 30

To view a projects properties you can :
Select the project, and then click File Properties from the menu bar.
Right-click the project and select Properties.
The tab of the Properties dialog box will be displayed as shown below.
General
The first tab is General. You can edit the CD Label in the text filed near the top. (Note: The CD Label is the
same as the project name. You can also edit it by renaming the project.)
You can view type, location, size, attributes of the project, the number of files and folders contained in the
project, the create time, last modified time, and last accessed time.
File System
On the File System tab, you can set the file system of the disc as UDF, ISO9660, or ISO9660+Joliet.
You can edit: Volumes, Serial No, CD Publisher, CD Processor, Copyright file, CD Application, Summary file,
ISBN file, Volume create time, Volume modify time, Volume end time and Volume Validate time.
Note:
1. If you choose ISO9660 (+Joliet), please note the following limitations of a ISO9660 disc:
The maximum interleaf depth is restricted to 8 levels (including root directory).
ISO9660 supports file names in 8.3 format (8 characters for the file name and 3 characters
for the file extension.
An ISO9660 disc has the best compatibility with other operating systems, computers and other
devices. It can be read from all operating systems.
30
Page 31

2. If you choose UDF, the burned disc can only be used on operating systems with a UDF file system
reader installed. Currently, Microsoft Windows 2000 (SP3), Windows XP and later versions
support UDF discs.
Advanced
On the Advanced tab, you can set the disc format and create time for files and folders in the disc.
Format:
CD-ROM Mode 1: Data is stored in sectors, with each sector holding 2,352 bytes of data. For Mode 1
CD-ROM data storage, the sectors are further broken down. 2,048 bytes are used for the expected
data, while the other 304 bytes are devoted to Sync, Header, EDC (Error Detection Code) and ECC
(Error Correction Code). CD-ROM Mode 1 is used for error-intolerant discs such as software, game
discs and documentation discs.
Create Time:
Use the date and time of the original file: The date and time stamps of the files and folders on the
burned disc are the original date and time from when they were created.
Use the current data and time: The date and time stamps of the files and folders on the burned disc
are the current date and time from when the disc was burned.
Use this time: Specify a date and time as the date and time stamps of the files and folders on the
burned disc.
Audio
Note:
The Audio tab is available for Audio CDs, Mixed-Mode CDs and CD Extra discs that contain audio
tracks.
31
Page 32

On the Audio tab, you can edit:
Disc Title: The name of an album
Artist Name: The artist of the album
UPC/EAN: Universal Product Code or European Article Number
Tips:
1. A UPC-A consists of 12 digits: 1 digit number system, 5 digits manufacturer code, 5 digits
product code and 1 check digit.
2. An EAN number consists of: the country code (2 or 3 digits), the manufacturer code (5 or 4
digits), the product code (5 digits) and a check digit (1 digit).
4.5.2 Burning a Project to Disc
After you have added, organized and reviewed all of the files that you want to record in your project, and
set the project properties, you are now ready to burn your project to disc.
To burn your project to disc:
1. Set the Default Recorder to a physical CD/DVD recorder in your computer.
2. Choose either of the following methods to launch the Burning Setup window:
Select File Burn from the menu bar.
Click the Burn icon
3. A Burning Setup dialog box displays. Choose the burning settings and click Record to begin burning.
Note:
If the auto-run function of your recorder is currently enabled, an Auto-run warning dialog box
should pop up before the Burning Setup dialog box is displayed.
For instructions on how to deal with the warning dialog box, and on how to configure the burning settings,
please refer to section
.
4.7 Burning Settings.
4. Click OK to end the burning process.
32
Page 33

Note:
VirtualDrive Pro supports split-volume. When you have added more data to a data disc project
than the disc has capacity for, it can devide the data and burn it onto multiple discs. Please refer
to chapter
4.6 Burning Multiple Discs.
4.6 Burning Multiple Discs
4.6.1 Burning Data on Multiple Discs
When creating a Data CD in CD/DVD Burning or Easy Backup, if you have added more data to a disc than
the disc has capacity for, the program will divide the data and burn each part as an image to multiple discs.
With an integrated tool burned onto the disc, you can insert only the first volume and view all data on the
multiple discs, then retrieve which ever file/folder back to your hard drive.
To burn multiple discs:
Create a Data CD/DVD project in CD/DVD Burning or Easy Backup, and work with it as you would with any
Data CD/DVD project.
When you burn the project to disc, the program automatically divides the data and prompts you to tag
each volume.
Click OK to start the burning process.
When the first volume is burned, it will prompt you to insert another disc, until all discs are burned.
Note: Only DATA CD/DVD projects can be burned onto multiple discs and only when the file system of
the disc is set as an ISO 9660 disc. You can set the disc file system in the Disc properties / File System
area.
4.6.2 Retrieving Data from Multiple Discs
When you insert the first volume of a multiple disc set, the integrated tool Retriever, should run
automatically.
Note: If Retriever does not run upon inserting the disc, you can manually run it by executing START.EXE
on the disc.
The Retriever interface is displayed as shown below:
33
Page 34

Click on the disc entry in the left pane and you can view all data in the right pane, including the data on the
other discs in the set.
To retrieve any file or folder to your hard drive:
1. Select the file(s) or folder(s) to be retrieved by checking the corresponding check boxes. You can
check the box before the disc entry in the left pane, to select all of the data from the multiple disc set.
2. Click the Retrieve button
and the Data Retrieve window appears. Select a location to save the
retrieved data.
You can choose the first option and click Browse to select a location, or choose the second option and
click Retrieve to save the retrieved files to their original location. The files are then copied from the
CD/DVD disc back to the hard drive.
3. Click Retrieve to start the process. If it needs to retrieve any data located on another volume, it will
prompt you to insert the corresponding disc.
You can search files on the discs to retrieve.
To search for files on multiple disc sets:
1. Click search button
. The search window appears as shown below:
34
Page 35

2. Enter the file name in the box. Note: The name entered should be full name with the file extension.
But you can use “*” as the extension to search for all type of files.
3. Choose a search mode. You can choose to search the multiple disc set, or search the original file
locations on the hard drive. This is useful when you have renamed a file after adding it to the disc
project.
4. Click Search to start the search process.
5. When the search is finished, the search results are listed in the box below. You can select the file and
click Retrieve to retrieve it back to your hard drive.
4.6.3 Using Multiple Disc Sets in a Virtual Drive
If you do not want to retrieve any data from the discs back to your hard drive, you can directly use the
image on the multiple disc set in a virtual drive.
To use the image on disc with a virtual drive:
1. Copy the image file on each disc to the same location on your hard drive. Typically, the first volume of
the entire image (the image file copied from the first disc) is named as “DATA_CD.VCD.000”, and the
second as “DATA_CD.VCD.001”.
2. Insert the first volume into a virtual drive. Now you can work with the image as you would do with any
image created in VirtualDrive Pro.
Note: Please make sure all volumes are copied to the same location before you insert the first volume.
4.7 Burning Settings
4.7.1 Disabling the CD/DVD Drive Auto-run Feature
The auto-run function of a CD/DVD disc drive may result in an unexpected error when erasing or burning
a disc. If the auto-run function of your CD/DCD disc drive is enabled, a warning dialog should pop up before
you choose Burning Setup in most operations.
35
Page 36

You can choose to auto-disable the auto insert notification by clicking the first radio button. Note: This will
log you off Windows. Please save your existing documents and close all applications before proceeding.
You can select Cancel and manually disable the auto-run function. Choose Tools Options General
Disable CD-ROM drive auto-run function from the
Note: A message saying “The changes will not take effect until you restart your computer” will be
displayed. Click No, and the auto-run function should be disabled already.
You can also select Continue to ignore the warning and continue the burning setup.
4.7.2 How to Choose Burning Settings
CD/DVD Burning Manager to manually disable it.
Before your burn a disc from either a project, an Image or from another disc, you must choose your
burning settings first.
Here is a detailed description of the available options in the dialog box above:
Recorder: Shows the recorder to be used to burn the disc. Click the Device Info button to view the
detailed information about the recorder.
Write Method: Select a write method from the dropdown menu. The available write methods include:
DAO, SAO, TAO, and Raw. The available method may differ depending on different operations. E.g. If
you restore a disc from an Image, the only available choice here is RAW.
Tips:
Disc At Once (DAO): This method writes all data onto a CD in a single operation, starting from
lead-in and ending at lead-out (start and end zone) without the write laser being switched off.
Because there is no gap between tracks, a disc cloned using this method is exactly the same size
as the source disc. If you cancel this operation after the lead-out has been recorded; the disc
cannot be used again.
Track At Once (TAO): This method writes data to the disc in multiple passes and allows you to
record a single track (data or music) at a time. The Lead-in and Lead-out is written after all tracks
36
Page 37

to be written have been recorded. Tracks recorded in Track-at-Once mode are separated by gaps.
If a data track is followed by a music track, the gap is two or three seconds. The gap between two
music tracks is usually two seconds.
Session At Once (SAO): This method writes data to the disc in a single operation, and finalizes
the session at the end of the process. A “Session-at-Once” recording is similar to a “Disc-at-Once”.
The only difference is that the disc is not closed after a “Session-at-once” recording, and you can
write a further session on the disc at a later date. SAO is usually used to make a multi-session
disc. There is a 13MB space between sessions.
If you are making a music CD, this option eliminates the two-second gap between tracks and
write-protects the CD. The CD can be played on home stereo equipment.
Write Speed: Select a write speed from the dropdown menu. It is recommended that you choose the
Best Speed option.
Number of Copies: Select the number of discs to be burned.
Buffer Under-run Protection: Select this option to enable protection against Buffer Under-run
errors during the recording process.
Tips:
Buffer-under-run is an error that occurs when the data transfer rate is slower than the write
speed to a CD/DVD disc. The CD/DVD recorder itself has a buffer that is constantly filled with data
in the event of a system slowdown or interruption. If the buffer is emptied before the system can
recover, a buffer under-run occurs.
Buffer-under-run Technology is an efficient method to avoid corruption of CDs/DVDs resulting
from Buffer under-run errors. This technology allows the laser of a recorder to be stopped
temporarily after a Buffer under-run without rendering the CD/DVD useless.
Finalize CD: Check this box to finalize the disc after recording. (Note: No track or session can be
added to the disc once it is finalized. A finalized disc has better compatibility between different
computers and devices. It can be read on most CD/DVD drives.
Verify Data after Recording: To ensure data accuracy, check this box to allow data to be verified
after recording. (Note: This option is not available for a music CD.)
Burn Mode:
Test: Simulate the burning process before burning to the CD/DVD. No physical disc is needed in
the test. The purpose is to verify if there are any errors occurring during the burning process. The
data will be reported to users in real-time. Choose this mode when:
You are not sure whether the disc and the recorder are compatible, or:
You are not sure whether the burning settings are correct.
Test+Burn: First simulates the burning process. If no errors occur, begins to burn data to the
physical disc.
Burn: Burn data to the physical disc immediately.
37
Page 38

Chapter 5
Multimedia Creation
38
Page 39

Chapter 5 Multimedia Creation
5.1 Creating an Audio CD
An Audio CD is a compact disc (CD) that can be played by both an Audio CD player and a computer CD-ROM
drive. The CD contains audio tracks only and no computer data. With VirtualDrive® Pro, you can make
your own Audio CD by recording tracks from other Audio CDs, or from audio files (MP3, WAV or CDA files)
located on a hard drive or from the Internet.
To create an Audio CD:
Select Create an Audio CD from the Multimedia page on the VirtualDrive® Pro main interface. Please
refer to chapter
Note: When you are adding files to create the Audio CD, only audio files (MP3, WAV or CDA files) can be
added to your project.
5.2 Creating an MP3 CD
An MP3 CD is a compact disc (CD) that can be played on an MP3 player and any player that supports MP3
data files. The CD contains MP3 files and a playlist only. With VirtualDrive® Pro, you can make your own
MP3 CD by recording MP3 files from your hard drive or other storage media.
To create an MP3 CD:
Select Create an MP3 CD from the Multimedia page on the VirtualDrive® Pro main interface. Please refer
to chapter
4.5 Burning Data CD/DVDs for detailed instructions on how to create an Audio CD.
4.5 Burning Data CD/DVDs for detailed instructions on how to create an MP3 CD.
Note: When adding files to create an Audio CD, only MP3 files can be added to your project.
You can edit the Playlist for the MP3 CD. Click the Playlist menu in a MP3 project to change the track
sequence (shown below).
5.3 Creating a Movie/Video
VirtualDrive® Pro Video Express, allows you to use a movie or video clip, downloaded from the Internet,
captured from other video files or self-filmed by DC, DV or webcam, to create your own movie or video and
record them to a Video CD (VCD), Super Video CD (SVCD) or DVD-Video.
The supported video formats are AVI, MPEG, ASF, WMV, VOB and MPEG4.
39
Page 40

Note: Some formats need other software to provide support; e.g. Microsoft Windows, Media Format
Runtime must be installed to support the WMV video format.
To create a new movie or video, select Create a Video/Movie from the Multimedia page on the
VirtualDrive® Pro main interface. The Video Express window will open.
Video Express Window
Follow the steps below to create your own movie or video.
Step 1: Adding files to the Material Pane.
Click the Add button
and select the desired video files, to add them to the Material Pane. You can add
to the selected group or choose another group from the dropdown menu at the top of the Material Pane
(shown below).
Other buttons located at the bottom of the Material Pane include:
Delete: deletes the selected video file from the Material Pane (not from the hard drive).
Delete All: delete all video files in the current group from the Material Pane (not from the hard drive).
Add: add the selected video to the Content Editor.
Step 2: Adding Video to your movie.
You can add video files to your movie now. Double click or drag-and-drop the required files to the
Content Editor.
The following operations can be executed with the added files.
Changing the Video Sequence
You can change the play sequence of the video files by dragging-and-dropping each file to the correct
place.
Editing Transition Effects between Videos
The box
in the Content Editor which appears between two video files indicates that no transition
effect has been applied.
Click on the Transition tab in the Material Pane and the available transition effects appear (shown below).
To add an effect, just drag one to the appropriate box in the Content Editor.
40
Page 41

Deleting Videos
To delete a video file from the Content Editor, right click on the undesired video and select Delete. You can
also select Delete All or Delete all transitions from the popup menu.
Previewing and Trimming Video
To preview your video/movie, click the Play button
to be previewed or select none (click on any blank part in the Content Editor) to preview the whole
video/movie.
Click the Preview button
preview mode, click Enter or Esc button on the keyboard to return to the original view.
You can edit each video individually. You can cut out unwanted video segments at the beginning and/or end
of the file.
To trim a video, highlight the file you want to edit in the Content Editor. The slider bar below the preview
monitor represents the video file from start to finish. Drag the beginning bar (shown below) to a desired
location to cut out the beginning. Use the same method to cut the unwanted end part.
Note:
At any stage in the previous steps, you can save your movie/video project with all the changes or
modifications that were made. Click the Save button
extension of .fvm. This is useful when you cannot finish the creation and would like to continue it
later. You can also click the Save As button
Step 3: burning your movie/video
When you have your movie/video ready, you can burn it to disc or burn it as an Image (a VCD) that can be
played on a virtual CD/DVD drive. Before burning, you must configure the following settings first:
Temporary File Location:
During the burning process, some temporary files will be produced and saved to the default temporary file
location. As you click the Burn button, the program will first check to see if this folder has enough free
space to contain all the temporary data. If it does not, it will prompt you with the message “not enough disk
to preview you movie or video in full screen mode. When in full screen
below the preview monitor. You can select one file
to save your project as a file with the
to save the project as a new file.
space”. In this case, click the
folder, which has enough space to allow the process to start. The temporary data will be cleared
automatically after burning has finished.
Burning Device:
From the Device dropdown menu, select the recorder you would like to use to burn the disc.
If you choose “Image File”, the movie/video will be saved as an Image file on your hard drive that can be
played on a virtual CD/DVD drive. For more information on about Image files, please refer to Chapter 6.1
How to Make an Image
Disc Format:
button in the upper left corner of the program to specify another
41
Page 42
From the Format dropdown menu, select a disc format you wish to burn with. The choices you can select
from are VCD, SVCD and DVD.
Video Standard:
From the video dropdown menu, select a video standard from PAL or NTFS. For more information on the
two standards, please refer to the appendix
Definitions.
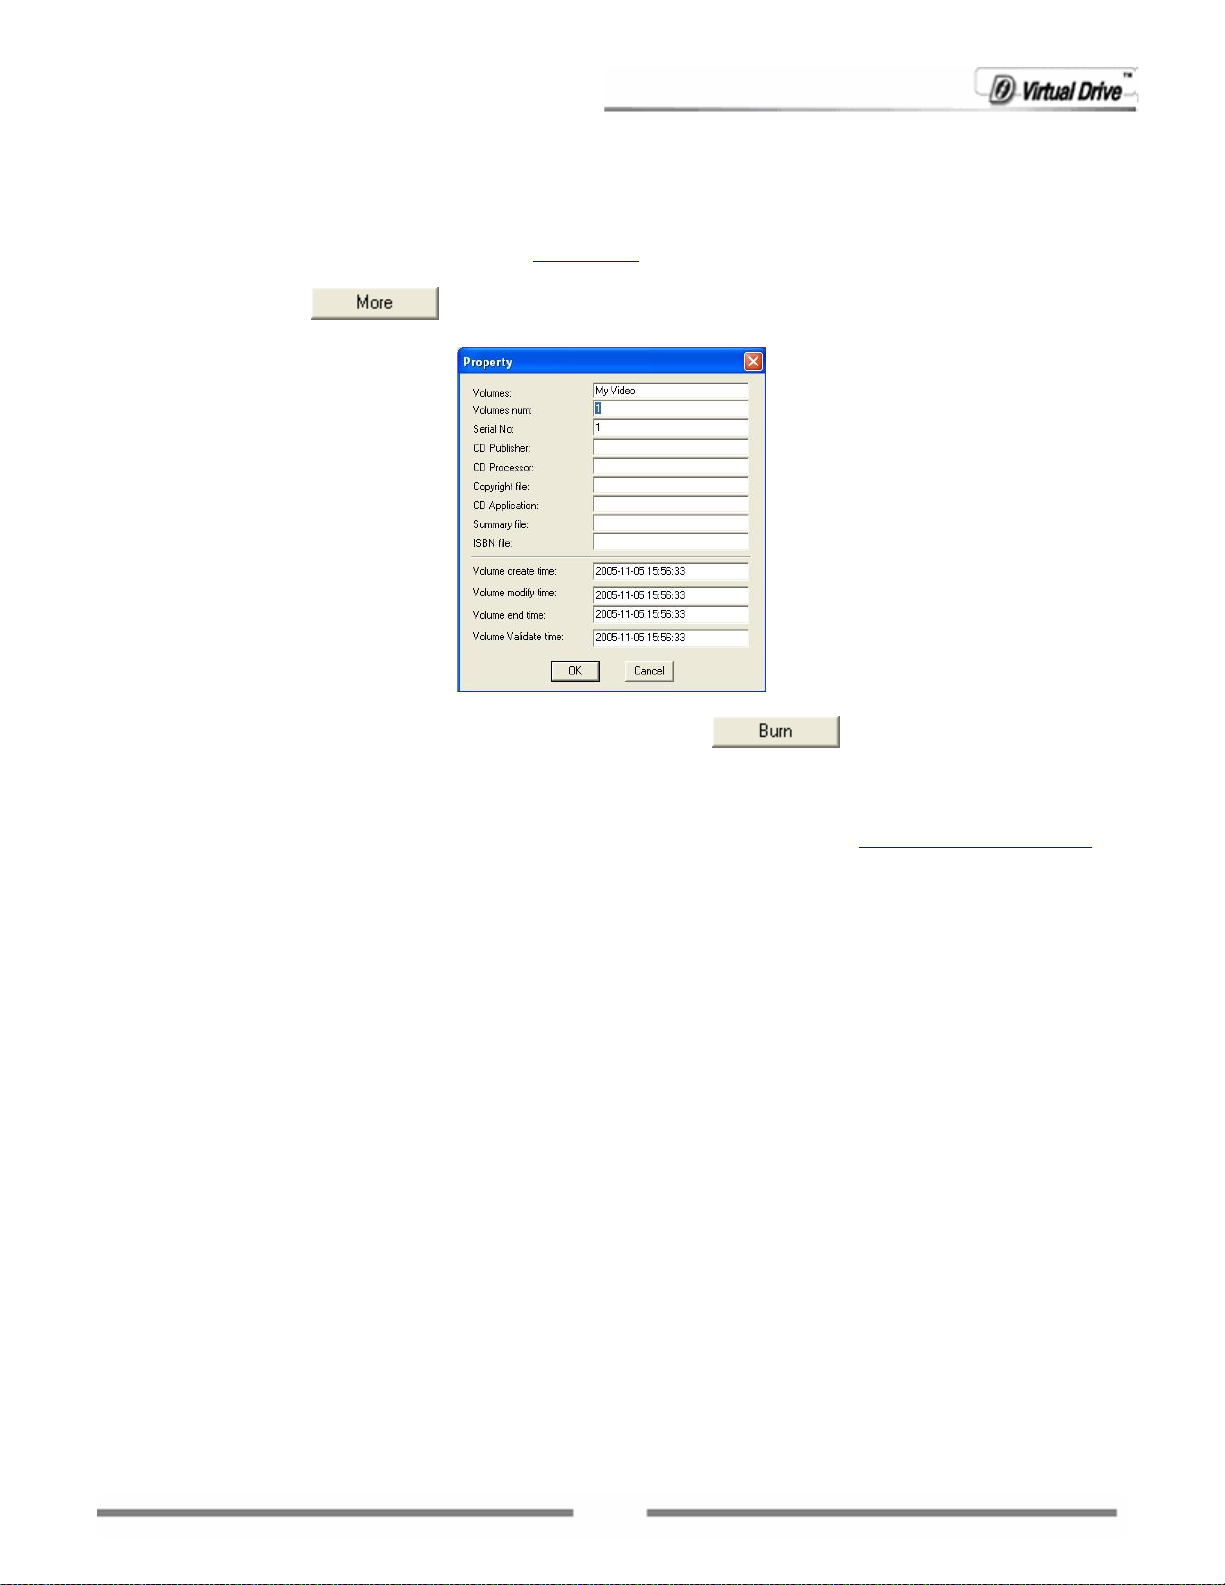
Disc Properties:
Click the More button
to edit the disc properties including volume name, version, disc create
time etc.
After these settings have been chosen, click the Burn button
to start the burning process.
Please wait while the program writes data to the disc. After the data has been burned, click OK to finish and
eject the disc from the drive.
If you have chose to save your movie/video as an Image file, you’ll be prompted to choose a location and
configure other settings in a new dialog window. Please refer to Chapter 6.1
How to Make an Image
After the disc is burned, you can play it on home stereo equipment or with a video player on a computer.
5.4 Creating a Slideshow
VirtualDrive® Pro allows you to use your photos to create a Slideshow and record them to a Video CD
(VCD), Super Video CD (SVCD) and DVD-Video.
The supported picture formats are bmp, gif and jpeg.
To create a new Slideshow, select Create a Slideshow from the Multimedia page on the VirtualDrive® Pro
main interface. The Video Express window will launch as shown below.
42
Page 43

Video Express Window
Follow the steps below to create a new Slideshow:
Step 1: Adding Images to the Material Pane.
Click the Add button
and select pictures to add them to Material Pane. You can add to the selected
group or choose another group from the dropdown menu at the top of the Material Pane.
Step 2: Adding pictures to your Slideshow.
Now you can add the Images to your Sideshow. Double click or drag-and-drop your Images into
Content Editor below.
The following operations can be executed with the added files.
Changing the Picture Display Sequence
You can change the play sequence of your pictures by dragging-and-dropping each file to the correct
location.
Adding Background Music
You can one or more audio clips as background music, while displaying your Slideshow. Right-click on any
blank part in the Content Editor and select Background music. The Background music window will display
(shown on the next page). Here you can add audio file(s) and set their play sequence.
Editing Transition Effects between Pictures
The
box in the Content Editor, which appears between two pictures, indicates that no transition
effect has been applied.
Click on the Transition tab on Material Pane and the available transition effects appear in the window.
Double click a transition effect to add it to the next free box, or just drag one to the appropriate box in the
Content Editor.
Deleting Pictures
To delete a video file from the Content Editor, right click on the video and select Delete. You can also select
Delete All to delete all pictures from the Content Editor or Delete all transitions to delete all cross fade
transition effects (these options do not delete the video files from your hard drive).
43
Page 44

Specifying the Display Time
You can specify the Slideshow duration. Select All time in the dropdown menu and enter the desired time
in the box. The Slideshow will play for the specified time duration, with each picture displaying an average
time of the total.
If you have added background music for the slideshow, you can select Music Time in the Mode box to set
the music duration as the total display time.
You can also specify the display time of one picture. Select “One time” in the Mode drop-down menu and
then enter the desired time in the Time box below.
Step 3: Previewing your Slideshow
The Slideshow can be viewed in the preview window accompanied by your background music, to preview
your progress.
To preview your slideshow, click the play button
below the preview monitor. Click the Preview button
to preview your movie/video in full screen mode. When in full screen preview mode, click Enter or Esc
button on the keyboard to return to the original view.
Step 4: Burning your Slideshow to disc
Choose the final settings before burning. Click the Burn button to start the burning process.
Note: Please refer to the final step in
Chapter 5.3 Creating a Movie/Video for detailed instructions on
how to choose the final settings.
44
Page 45

Chapter 6
Working with
VirtualDrive®
45
Page 46

Chapter 6 Working with VirtualDrive®
6.1 How to Make an Image
An Image file (with .VCD extension) is actually a Virtual CD or VCD that can be inserted into a virtual CD
drive. There are two ways to make an Image file: building from a real (physical) disc and burned from a
disc project created in CD/DVD Burning.
6.1.1 Making an Image from a Project
You can make an Image (VCD) from a CD/DVD project created in the
To make an Image from a project:
1. Launch the CD/DVD Burning program either from Backup Make Data CD/DVD or Multimedia
Create an Audio(MP3) CD
2. Open a project.
3. Set the default recorder to the Imager Recorder.
4. Choose either of the following:
Select File Burn
or
Click the Burn icon
5. Verify that the selected hard drive has sufficient free space to store the new Image, and then use the
file Browse button
and select Next to continue. (If no new name is entered, the new Image will use the name of the folder
in which it is to be stored as the default Image file name.)
to select a location to save the new Image file. Give the new Image file a name
CD/DVD Burning program.
6. Enter a description of the new Image in the description box.
46
Page 47

(Optional) You can set a password for Image files. The password will be required if you attempt to
insert the Image or view the content of the Image.
(Optional) If the CD does not have an auto-run file, you can specify a program to run when the Image
is inserted. You can use the Browse button
to locate the executable program.
Using Data Compression will save hard drive space but will also require a longer Image building time.
7. A dialog box will display the attributes of the Image about to be created. Select Next to begin building
the Image or Back to edit your settings.
8. When the Image has been successfully built, select Finish to close the Build Image window.
6.1.2 Making an Image from an Existing Disc
With VirtualDrive®, you can build an Image (VCD) from almost any type of disc, including:
• CD-ROM • Audio CD
• DVD-ROM • Video CD
• Mixed-Mode CD • Photo CD
• DVD Video
• Multi-Session CD
(unprotected)
• CD-Extra • CD-Text
• CD-Cops
VirtualDrive® supports DVD-ROM games, encyclopedias, multimedia content and other large file formats.
To start making an Image:
Select VirtualDrive® from the VirtualDrive® Pro main interface and then Create VCD.
There are different cases depending on the disc type being built:
Case 1: Building an Image from a CD-ROM, DVD-ROM, Video CD, DVD Video or Photo CD.
Case 2: Building an Image from an Audio CD.
Case 3: Building an Image from a Mixed Mode CD.
Case 1: Building an Image from CD-ROM, DVD-ROM, Video CD, DVD Video or Photo CD
If you are using a CD-ROM, DVD-ROM, Video CD, DVD Video or Photo CD to build your Image, follow
the steps below:
1. Insert the disc to be built. Select the corresponding physical CD drive. Verify the disc type and general
information of the inserted disc. You can preview the disc contents in the Preview area on the right.
Click Next to continue.
47
Page 48
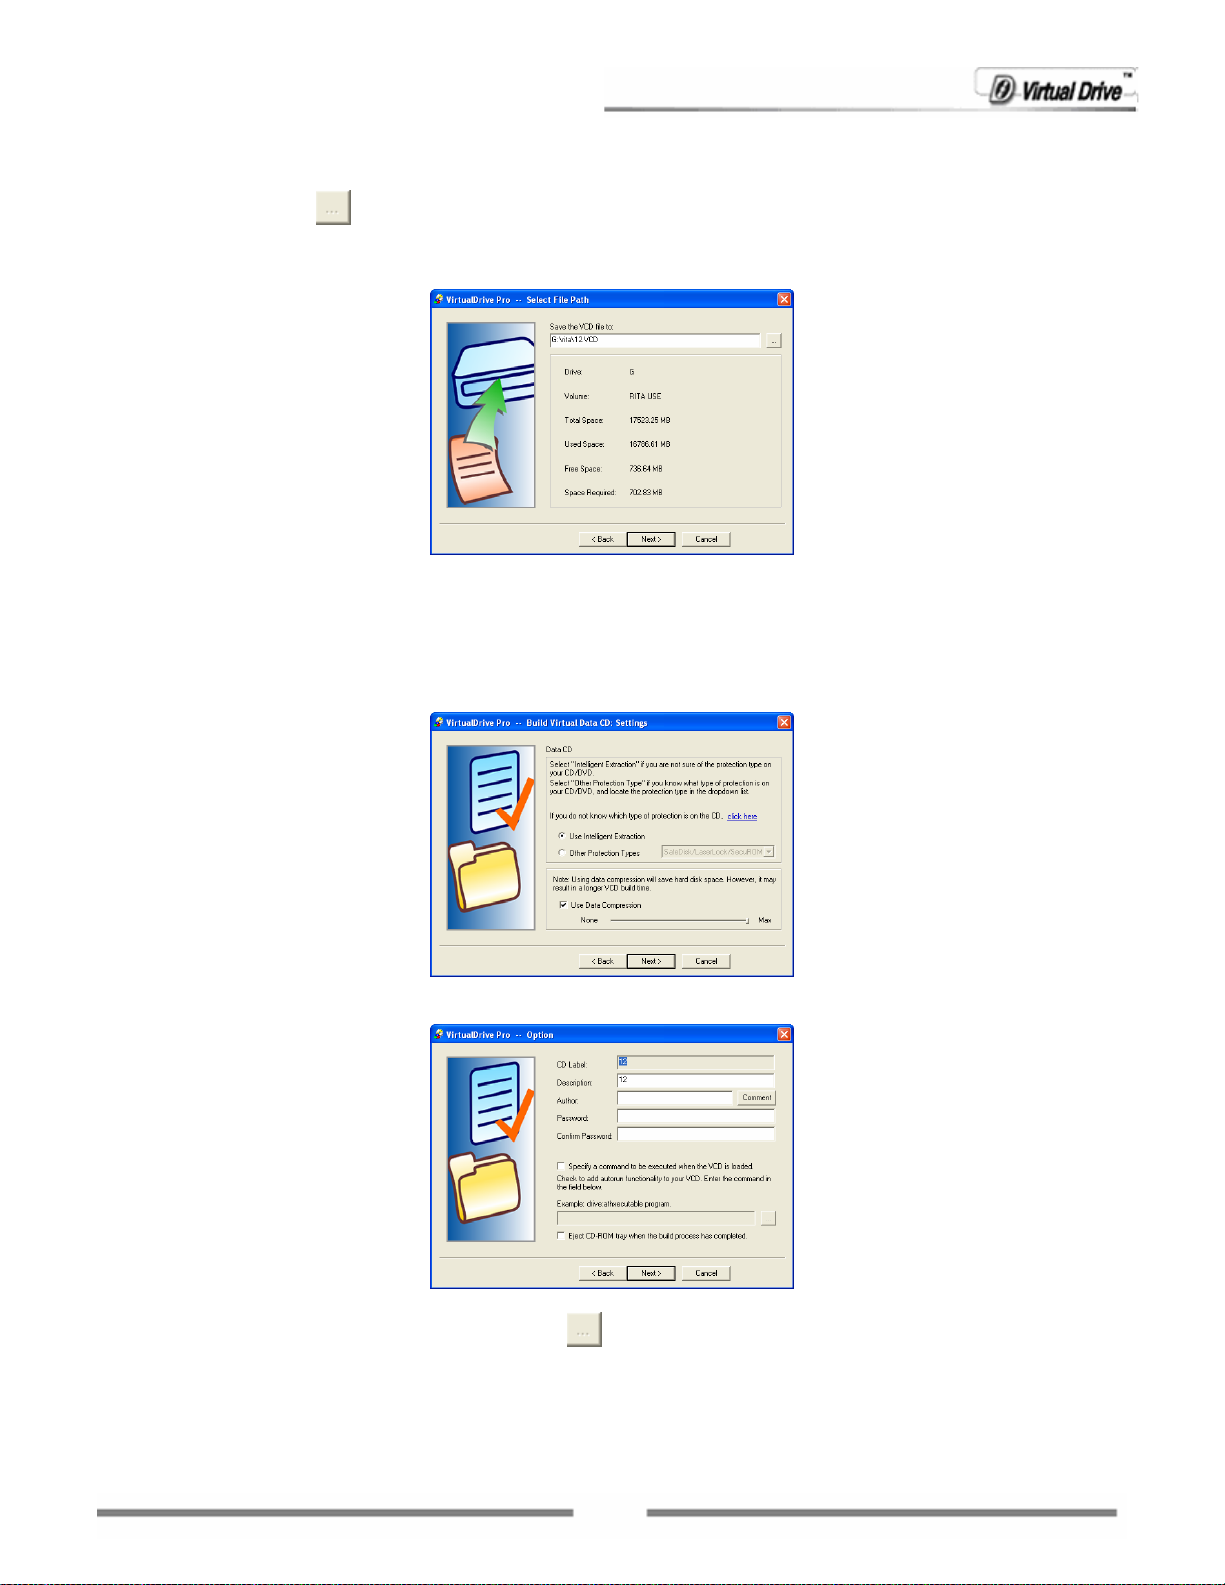
2. Verify that the selected hard drive has sufficient free space to store the new Image, and then use the
file Browse button
to select a location to save the new Image file. Give the new Image file a name
and select Next to continue. (If no new name is entered, the new Image will use the name of the folder
in which it is to be stored as the default Image file name.)
3. Se lect the CD read meth od and use Data Compression if desired. The default read method “Intelligent
Extraction” is successful for most CD formats.
In most cases, you can use “Intelligent Extraction” to build your Images. If you know what type of
protection is on the CD, you can choose to build your Image with that protection by using the Other
Protected CD type Option.
Using Data Compression will save hard disk space but will also require a longer Image building time.
4. Enter a description of the new Image in the description field.
(Optional) If the CD does not have an auto-run file, you can specify a program to run when the Image
is inserted. You can use the Browse button
to locate the executable program.
(Optional) If you want to eject the CD from the drive once the build operation is complete, check the
Eject the CD-ROM when the build process has completed Box. Select Next to continue.
(Optional) You can set a password for Image files. The password will be required if you attempt to
48
Page 49

insert the Image or view the contents of the Image.
5. Review the attributes of the Image about to be created. Select Next to begin building the Image or
click Back to edit your settings.
6. When the Image has been successfully built, click OK and then click Finish to close the Build Image
window.
Case 2: Building an Image from an Audio CD
If you are building an Audio CD, follow the steps below:
1. Insert the disc to be built. Select the corresponding physical CD drive. Verify the disc type and general
information of the inserted disc.
You can preview the disc contents in the Preview area on the right side. Click Next to continue.
2. Verify that the selected hard drive has sufficient free space to store the new Image, and then use the
file Browse button
and select Next to continue. (If no new name is entered, the new Image will use the name of the folder
in which it is to be stored as the default Image file name.)
to select a location to save the new Image file. Give the new Image file a name
3. Select the tracks you want to include on the audio VCD by checking the appropriate boxes in the Tracks
list.
49
Page 50

Note: If the CD player is running, the Select Tracks window will not be able to show the track list.
Select the Preview Track ‘Play’ button
to listen to the track. Click the Volume button
to set the preview track’s volume level.
Click the Select Wave Format button
to set the quality and audio
compression format. There is a range of recording quality settings provided by the Windows operating
system. You can also save your own custom audio settings by clicking the Save As button.
Audio Settings
Step 1: From the Format list, select an appropriate audio compression format.
If you have installed Microsoft Windows Media Player MP3 software or other MP3 player programs,
you can select MPEG Layer-3 from the Format list and build the selected tracks as an MP3
formatted audio VCD.
Step 2: Select the recording sample quality.
Note: The sound format and sound sampling rate will determine the quality and size of an audio file.
A high quality audio file will take up more hard drive space than a lower quality file.
50
Page 51

Step 3: Save your settings. Any combination of settings provided in the Sound Selection window
can be saved to a file by selecting Save As and giving your custom audio settings a name. The next
time you open the Sound Selection window, the given name will be presented as a choice in the
Name selection box.
4. Select Next to begin the build process. Please refer back to steps 4 - 6 in case 1 Building an Image
from CD-ROM, DVD-ROM, Video CD, DVD Video or Photo CD.
Case 3: Building an Image from a Mixed Mode CD
If you are building a Mixed Mode CD, follow the steps below:
1. Insert the disc to be built. Select the corresponding physical CD drive. Verify the disc type and general
information of the inserted disc.
You can preview the disc contents in the Preview area on the right side. Click Next to continue.
2. Verify that the selected hard drive has sufficient free space to store the new Image, and then use the
file Browse button
to select a location to save the new Image file. Give the new Image file a name
and select Next to continue. (If no new name is entered, the new Image will use the name of the folder
in which it is to be stored as the default Image file name.)
3. If you want to include Data tracks only, uncheck the Record Audio Tracks box.
Choose a read method for data tracks. The default read method “Normal” is successful for most CD
formats. However, some CDs contain inaccurate volume information. If an Image has been
successfully built but does not run properly, use the “Intelligent extraction” read method.
If you know which type of protection is being used on the CD, you can choose to build with that
protection by using the Other Protected CD type option.
Using Data Compression will save hard drive space but will require a longer Image building time.
Select the Record Audio Tracks box to include both Audio and Data Tracks in the Image.
4. If you have selected Record Audio Tracks, selecting Next will open the Select Tracks window. (If
Record Audio Tracks was not selected, the Build VCD manager will go directly to Step 5.)
If you do not need to build all audio tracks into the Image, select only the audio tracks to be included
in the Image by checking the appropriate boxes in the Tracks list.
Select the Preview Track ‘Play’ button
to listen to the track. Select the Volume button
to set the preview track’s volume level.
51
Page 52

5. Select Next to begin the build process. Please refer back to steps 4 - 6 in case 1 Building an Image
from CD-ROM, DVD-ROM, Video CD, DVD Video or Photo CD.
6.2 Working around in VCD Manger
Click VirtualDrive® Manger on the VirtualDrive® page. The VCD Manager (shown below) will launch.
Fig. VCD Manager
The figure above shows VirtualDrive® emulating three CD drives – drives H, R and T. The left pane lists
each virtual drive and drive letter with the description of the Image that is currently inserted. The upper
right pane displays all of the Images and cabinets available.
The address bar in the middle enables you to select a cabinet quickly. Click the dropdown menu button to
select a cabinet. Click the UP button to go to an upper level cabinet.
To view an Image’s content, select a VCD from the VCD Manager and you can view the content of it in the
pane below. Right-click a file or several selected files in the content pane and you will see three options:
Open: Open the selected file.
Export: Export the selected file and store it on the hard drive. With this function, you can:
Export any file in a multi-session VCD and store it on the hard drive. (Note: Some files in a
multi-session disc cannot be seen or accessed through Windows Explorer.)
Export tracks from an audio VC D, Mixed-Mode CD or CD-E xt ra such as *. wav files, a nd store them
on the hard drive.
Properties: View the properties of the selected file.
52
Page 53

6.2.1 Adding Images to Run on Your Virtual Drives
To use an existing Image on your hard drive, the Internet or on another computer in a network, you must
first add an Image icon to the VCD Manager window.
Adding Images from the Hard Drive
To use an Image file that is on your hard drive or on another computer in a network, use any of these
methods:
Method 1: Click the Add button
to open the Add Image window.
Method 2: Select File from VCD Manager, and then select Add to open the Add Image browser. Use the
Add Image file browser to select and add Image files.
Method 3: Right-click in the upper-right pane of the VCD Manager and select ADD to open the Add Image
window.
Adding Images from the Internet
To use an Image file that is located on the Internet, first you must confirm the IP address (or website
name/URL) and the name of the Image file. Also make sure it is a shared file. Use any of these methods
to add Internet Images:
Method 1: Select File from the VCD Manager, and then select Add Internet Image to open the Add
Internet Image dialog box (shown below). Type in the IP address and file name to add the Image file.
Method 2: Click the Internet Image button
to open the Add Internet Image dialog box.
6.2.3 Using Cabinets to Organize Images
A cabinet is similar to a folder in Windows Explorer, it is used to store multiple Images. You can sort your
Images by different categories and put them into different cabinets in the VCD Manager. Using cabinets to
organize your various Images, you can save time locating a specific Image from many Images all in one
manager.
You can create as many cabinets as you like. And cabinets are easy to manage. You can easily add or delete
a cabinet at any time.
To add a new cabinet, use any of these methods:
Method 1: Select File from VCD Manager, and then select New Cabinet to open the New Cabinet window.
Type a name and a description and click Create to continue creating the next cabinet.
Method 2: Right-click on any cabinet icon in the left pane of the VCD Manager and select New Cabinet
to open the New Cabinet window.
Method 3: Right-click in the upper-right pane of the VCD Manager and select New Cabinet to open the
New Cabinet window.
53
Page 54

To add Images to an existing cabinet, simply drag-and-drop Images from the VCD Manager (the root
cabinet). You can also add an Image directly into a cabinet by using any of the methods described in
section 5.8 Adding Image Files to Run on Your Virtual Drives.
To delete a cabinet, right-click the desired cabinet and then select Delete or click the Delete button
.
Note: Choosing to delete a cabinet will remove all subcabinets and all Image icons in them; this will not
delete the VCD files from their physical locations.
6.2.4 Creating a VCD Shortcut
You can create a shortcut for an Image on the desktop. Double-clicking on the shortcut will insert the
Image into the first free virtual drive automatically.
To create a shortcut for an Image, use any of the following methods:
Select an Image, and select Tools Shortcut from the menu bar.
Right-click the Image and select shortcut from the popup menu.
Select an Image, and press Ctrl+U.
Note: Select one Image at a time. Only one shortcut can be created at a time.
6.2.5 Searching Images
Search Image allows you to search for wanted Image files and add them into the VCD Manager.
To locate Images, follow the steps below:
Step 1: Select File and select Search from the drop menu or use CTRL+F, to open the Search VCD
dialog box.
Name: You can determine what kind of file to search for by selecting a file format in the Name drop-down
menu. You can also choose to search subfolders by checking the Search Subfolders box.
Path: You can specify a drive to search by choosing a drive in the Path drop-down menu. To select a
detailed path, click on the Browse but t on
to open Windows Explorer.
Step 2: Select Search. The files that are found will be displayed in the window. Select a certain file or
multiple files (by pressing and holding the CTRL key and selecting each file you would like to add) and click
ADD to add them into the VCD Manager window.
6.2.6 Extracting Files from an Image
Extracting Files from an Image
54
Page 55

Users can extract files from an Image file without inserting them into the virtual drive. Click on an Image
icon in the VCD Manager and all of its contents will be displayed in the bottom-right pane. Then right-click
on the selected file and select Extract.
Extracting Audio Tracks
VirtualDrive® allows you to extract audio tracks from an audio CD, or from the audio track of a Mixed-Mode
CD or a CD Extra, either a real CD or a virtual CD, and store them as an audio file (*.WAV) or an MP3 file
on the hard drive.
Use any of the methods below to open the Extract Audio Track screen, shown below.
Method 1: Click the Export Track button
Method 2: Select Tools from the VCD Manager menu. Then select Export Track.
Method 3: Press Ctrl+T.
Click the Drive drop-down menu button and select a virtual drive with the desired Image inserted, or select
the physical drive with an existing disc inserted.
You can preview a track. To preview a track, select one track by title, and click the Play button
Note: Clicking this button
Before extracting a track, you can set the wave format for the MP3 file by clicking the Select Wave Format
button.
will eject the disc. The other controls are similar to any other audio player.
.
.
Wave Format Settings:
From the Format list, select an appropriate audio compression format.
55
Page 56

Note: If you want to export the track as an MP3 file, select MPEG Layer-3 from the drop-down
menu. Selecting the other three formats will save the exported track as a *.WAV file.
Select a sampling rate from the Attribute dropdown menu.
Note: The sound format and sound sampling rate will determine the quality and size of an audio file.
A high quality audio file will take up more hard drive space than a lower quality file.
Click OK to save your settings.
Note: Any combination of settings provided in the Sound Selection window can be saved by
selecting the Save As button and giving your custom audio settings a name. The next time you open
the Sound Selection window, the given name will be presented as a choice in the Name selection box.
After you have set the wave format for each track to be exported, click Extract and choose a location to
save the file(s).
6.2.7 Adding Additional Virtual Drives
Adding Additional Virtual Drives
To change the number of virtual drives on your system (the maximum is 23), select View on the menu bar, and then
select Drives, or select the Drives button
select OK.
Note: The number of virtual drives
is not the same on all computers. The symbols indicate the number of
. Check the box next to each virtual drive to be added, and then
usable drives. If new devices such as another physical CD-ROM drive are to be installed, you will have to
leave a drive letter free so the system can accommodate the new drive.
Changing a Drive Letter
You can change the drive letter for any drive on your system, including a physical drive. Right-click the
desired drive and select Edit Drive to change the drive letter.
6.2.8 Changing the Auto-run Function of Disc Drives
You can set whether or not enable the auto-run function for either the physical CD-ROM or a virtual drive.
To ena ble Auto -Run for one virtual/physical drive, right-click on the target drive in the left pane of the VCD
Manager and select Auto-Run.
56
Page 57

To set the Auto-Run function for all drives, right-click “Virtual Drives” (the heading) and select Auto-run
(All Drives) to enable the auto-run function for all drives, including the physical drive(s). The current user
will need to log off and log back on to the computer for the changes to take affect.
To set the Auto-Run function for all virtual drives, right-click “Virtual Drives” (the heading) and select
Auto-run (All Virtual Drives) to enable the auto-run function for all virtual drives. The current user will
need to log off and log back on to the computer for changes to take affect.
6.2.9 VCD Manager Settings
From the VCD Manager, select View Options or press Ctrl+S to open the Options window. Below are the
detailed instructions for the settings on each of the four tabs:
Toolbar Settings
Use large icons: Sets the size of the toolbar button icons.
Show button text length: Sets the number of text characters to be displayed within the toolbar buttons.
Show Control Tip text: Sets whether to display the 'control tips' pop-up text when the mouse pointer
hovers over a toolbar button.
Flatten toolbar buttons: Merges the toolbar button outline into the toolbar.
Select Buttons: Choose Select Buttons to open a dialog box offering a range of alternative buttons.
From here you can add, remove or change the order of toolbar buttons used on the VirtualDrive® toolbar.
Animation
Turn the VCD Insert/Eject animation ON or OFF.
Device
From here, you can view or edit the device information such as the Manufacturer, the Product Info and the
Model. Click the Reset button to apply the default settings.
Miscellaneous Settings
Keep VCDs in the drive at system boot: VCDs that were inserted into any virtual drive on shutdown will
be remain inserted at startup.
6.4 Converting between ISO 9660 Images and Virtual CDs
You can convert an ISO 9660 Image file (*.ISO file) into a VCD file (*.VCD file) and vice versa.
To convert files, follow the steps below:
Step 1: Select File Convert, or press Ctrl+G to open the Convert File window.
Step 2: Select the file Browse button
file.
to open the Windows file browser and locate the ISO or VCD
Step 3: Select the desired Image file, and then select Open to continue.
Step 4: Select Convert to start the conversion process.
Note: Audio, DVD and compressed VCD files cannot be converted into ISO files.
57
Page 58

Chapter 7
Virtual Hard Drive
58
Page 59

59
Page 60

Chapter 7 Virtual Hard Drive
7.1 Creating a RAM Disk
To use Virtual Hard Drive, you will first emulate a disk drive based on the physical memory that is installed
in your computer. This disk drive is known as a RAM Disk.
Select Virtual Hard Drive on the VirtualDrive® Pro main interface and then click Create a RAM Disk.
The following window will appear.
Note: If a RAM Disk is already running in your system, the message shown below will be displayed to
warn you to remove the existing RAM Disk and the Virtual Hard Drive manger will be launched
automatically. Click the “Delete” button in the Virtual Hard Drive manager to remove the existing RAM
Disk before you create a new one.
Follow the steps below to create a RAM Disk.
Step 1 Select the first option “Create and configure a new RAM Disk” and click Next.
Step 2 Select the three parameters (explained below) for the RAM Disk and then click Next to precede.
File system: Select a file system for your RAM Disk from the drop-down menu. Virtual Hard
Drive supports three kinds of file systems: FAT, FAT32 and NTFS.
Note: The file system is the overall structure in which files are named, stored and organized in an
operating system. FAT, FAT32 and NTFS are three typical types of file systems. Users can select the
file system according to the desired RAM Disk size:
RAM Disk Size File
System
FAT 1 MB 2048 MB
FAT32 33 MB 4 GB
NTFS 3 MB Maximum memory size supported by operating system
Minimum Maximum
60
Page 61

Drive letter: Assign a drive letter for your RAM Disk.
Note: Only the drive letters that are not used by other drives, including virtual drives, can be
assigned. For example, you can set yours to G: if A:, B:, C:, D:, E: and F: are already being used.
Size: Allocate the desired amount of space from physical memory for the RAM Disk.
Note: Some of the programs might not work properly if there is not enough physical memory
available on your PC. Therefore, we recommend that you allocate no more than 70% of the
physical memory for the RAM Disk.
Below is the size of the RAM Disk supported by the different versions of Virtual Hard Drive:
VHD Standard ≤ 900 MB
VHD Pro No limitation
Step 3 Click Next, to open the window shown below. You can place a check in the box next to Create an
image, to create an image file before creating the RAM Disk. This process can also be completed at a later
time (before shutting-down the computer or deleting the RAM Disk) from the Virtual Hard Drive main
interface and selecting the Save button. Check the “Create an Image” box and choose a location to save
the Image file. Then click Complete to begin creating the RAM Disk.
Note: You can also create a RAM Disk by clicking the
button on the Virtual Hard Drive manager.
7.2 Mounting an Image into the RAM Disk
You can mount a previously created Image file on your hard disk as a RAM Disk.
Select Mount the Image Files into the RAM Disk on the Virtual Hard Drive page from the
VirtualDrive® Pro main interface. The following window will be displayed.
Note: When exiting a RAM Disk, a notice window will appear to prompt you save your data from the
existing RAM Disk. Click Yes to save the data to an Image file.
61
Page 62

If no Image is in use for the existing RAM Disk, the Save As window (shown below) will be displayed to
prompt users to select/create an Image file…
7.3 Working with Virtual Hard Drive Manager
Virtual Hard Drive manager provides you with additional options for use with the RAM Disk. Select Virtual
Hard Drive Manager on the Virtual Hard Drive page, from the VirtualDrive® Pro main interface. You
will see the Virtual Hard Drive interface, shown below.
Fig. Virtual Hard Drive Manager
7.3.1 Moving Files and Folders to a RAM Disk
After creating a RAM Disk, you can move files and folders to the RAM Disk and experience the “ultra fast”
running speed Virtual Hard Drive gives you.
For example, redirect the Internet Explorer Caches to the RAM Disk. Open up the Internet Explorer
Properties -> General -> Settings (Temporary Internet Files) -> Move Folder. Now direct it to your
newly created RAM Disk. At the same time, adjust the "Amount of disk space to use" to an appropriate size
according to the size of your RAM Disk.
If you are using any kind of FTP Manager or Client, redirecting the Local Initial Folder to the RAM Disk
would enhance performance too. You will notice a dramatic difference in your upload speed.
If the size of your physical memory is large enough, you can allocate more space for the RAM Disk. By
doing so, you can even install a program directly into the RAM Disk.
You can click the
button at the center of the interface to view the contents in the RAM Disk.
62
Page 63

7.3.2 Saving the RAM Disk Image
According to the nature of physical memory, the data in the memory-based RAM Disk will be lost after the
computer is turned off. Virtual Hard Drive provides a special way to keep the data in the RAM Disk
(actually the data is in the physical memory). Users can save the data as an Image file and store it on a
hard drive.
Note: The size of the Image is the same as the size of the RAM Disk you created.
Click the
RAM Disk.
Note: 1. The current Image file refers to a previously created Image file from which the existing RAM Disk
is mounted.
2. If no Image file is currently being used, the following window will be displayed and Virtual Hard
Drive will prompt users to create a new Image.
Specify a file name and location for the Image file, and then click Save to save it to your hard drive.
“Save” button on the interface to save to the current Image file with any file changes in the
7.3.3 Removing RAM Disk from the System
If you would like to “free up” the memory used by the RAM Disk, or modify the file system, drive letter and
disk space of the RAM Disk, you need to remove the current RAM Disk.
To remove the current RAM Disk, click the “Delete” button
The message shown below will be displayed and prompt you to save the data in the RAM Disk. Select
“Yes” and choose a location to save the data as an Image file or select “No” to discard the data.
After the RAM Disk is removed, the physical memory used for the RAM Disk will be “freed”. You can create
another RAM Disk according to the instructions in chapter
Mounting an Image into the RAM Disk.
on the Virtual Hard Drive Manager interface.
7.1 Creating a RAM Disk and Chapter 7.2
7.3.4 Virtual Hard Drive Settings
From the Virtual Hard Drive interface, click the Options button to open the Options window, shown
below.
63
Page 64

Auto-load most recent image: Keep the Image that was last mounted in the RAM Disk after
restarting the VHD program.
Save image upon restart or shutdo wn: Each time the computer is turned off or restarted, the
Image file will automatically be saved to your hard drive.
Save image during hibernation: Each time the computer goes into the Sleep or Hibernate mode,
the Image file will automatically be saved on your hard drive.
Back up image before saving it: If this option is enabled, Virtual Hard Drive will make another
backup for the data in the RAM Disk when you save it to an Image. Even if an unexpected accident
such as a system crash or power failure occurs, the Image file will not be lost.
Note: The next time you load the Image after an accident, Virtual Hard Drive will display a
message asking you whether to repair the Image. Select Yes to continue.
Save the image every N (Note: N is a number between 1 and 60) minute(s): The data in the
RAM Disk will be saved to the Image at a specified interval of time.
Save changes to the Image file in real-time: The Image file will be automatically saved if any
changes are made to the RAM Disk.
Note: The setting will not take effect until you reload an Image or re-create a RAM Disk.
64
Page 65

Chapter 8
Instant Burning
65
Page 66

Chapter 8 InstantBurning
Instant Burning allows you to back up your data to a recordable CD/DVD disc just as you might do with a
floppy disc. You can add files simply by dragging and dropping them to the program or to the disc drive in
Windows Explorer.
8.1 Starting Instant Burning
Once VirtualDrive Pro is installed, Instant Burning automatically launches each time you start your
computer.
You can also launch the program by selecting StartAll Programs VirtualDrive Pro Instant
Burning.
When Instant Burning is running, you can see the Instant Burning icon
taskbar and the Instant Burning program (shown below) in the lower-right corner of your desktop.
displayed in the Windows
8.2 Getting Prepared for using Instant Burning
Before you begin using Instant Burning to back up data to a new disc, you must first choose the right type
of disc to use and format it if necessary.
8.2.1 Choosing right type of disc to use
Instant Burning supports rewritable CD/DVD discs only. While these types of discs allow you to add or
delete your files just as you would with a hard drive, different media types may experience compatibility
issues with different types of CD/DVD drives.
Check the CD/DVD drive on your computer and refer to the table below to choose the right type of disc to
use with Instant Burning.
Media
Type
CD-RW 185MB,
DVD-RW 4.7GB
Original
Capacity
210MB,
650MB, or
700MB
Compatible Drives
Re-recordable
Readable by nearly
any drive
Recordable by
CD-RW, DVD-RW or
DVD+RW recorders
Re-recordable
Readable by
DVD-ROM or
DVD-RW drives
Recordable by
66
Page 67

DVD-RW recorders
DVD+RW 4.7GB
Re-recordable
Readable by
DVD-ROM or
DVD+RW drives
Recordable by
DVD+RW recorders
DVD-RAM 4.7GB
Re-recordable
Readable by
DVD-ROM or
DVD-RAM drives
Recordable by
DVD-RAM recorders
8.2.2 Choosing the Default Recorder
When there’s more than one CD/DVD drive in your computer, you may need to set the default drive of
Instant Burning to the appropriate recorder.
To set the default recorder
1. Click the drop-down menu button on the Instant Burning program interface, and select Choose
Recorder.
2. A new dialog box will display and allow you to select the desired drive..
8.2.3 Formatting a Rewritable Disc
Before files can be added to a blank disc, the disc must be prepared (formatted).
Note: If you are using a previously-formatted or used rewritable disc that was not formatted by Instant
Burning, you may need to format it again, before using it with Instant Burning. Formatting, will erase any
content on the rewritable disc.
To format a disc
1. With Instant Burning open, insert the disc you want to format into your disc recorder.
2. Click the menu button
on the Instant Burning window, and choose Format Disc. (You can also
right-click the drive letter and choose Format in Windows Explorer.)
The Format options box appears as shown below:
67
Page 68

3. In the Format option box, you can change the following settings:
• Volume Label: Type a name for this disc. The name may be up to 14 characters (including
spaces).
• File System: Instant Burning supports up to 3 levels of the UDF file system. They are:
UDF 1.50: CDs burned in this file system can be played only on systems supporting UDF1.50.
UDF 2.00: CDs burned in UDF 2.00 are compatible with most home electronic devices such as
video players.
UDF 2.01: CDs burned in VDF2.01 have the best compatibility with various devices.
• Format Mode: You can choose between Quick Format and Full Format.
Quick Format: Select this option for the fastest format time, which usually takes no more
than a few minutes. Note this mode will not check the physical condition of this disc after
formatting. Your data will not be erased from the disc; the table of contents will be overwritten.
There are tools which can still access your data after performing a Quick Format.
Full Format: Select this option for a full format. This method will check the disc’s physical
integrity and can take a long time to complete; this depends on the speed of your recorder
and the media.
4. Click Start. The format process begins, with the progress bar indicating the current status. After the
format operation has completed, the disc will be ejected automatically.
8.3 Instant Burning Basics
Together with Windows Explorer, Instant Burning allows you to perform nearly any task you would
normally undertake, to manage your files and folders on your local hard drive.
Note: Certain tasks, such as deleting files and creating folders for organizing your files, are available for
rewritable CD/DVD discs only.
8.3.1 Adding Files to Disc
Once Instant Burning is running, you can burn files to a writable CD/DVD disc instantly.
To add files to a disc
Use any of the following methods:
• Select the files that you want to add to the disc, and drag and drop them to the Instant Burning
program.
68
Page 69

• In Windows Explorer, select the files that you want to add to the disc and drag them to the drive letter
of your recorder.
Once you finish burning your files to a disc, you can add more files to the disc as long as the disc has the
remaining free space to store the files.
You can use Windows Explorer to create and delete folders, as well as organize your files in the
folders—just as you would do with a floppy disk or hard drive.
8.3.2 Deleting Files from a Disc
You can delete files from any type of rewritable disc, just as you would do from a hard drive or floppy disk.
After the files are deleted, the amount of space the files originally took up is recovered and you can re-use
it.
To delete files from a disc
1. Open a disc by clicking the Open button
the drive in Windows Explorer.)
2. Use any of the following methods to delete files:
• Right-click files and select Delete.
• Select the files you want to delete and drag them to the Windows Recycle Bin.
• Click a file to select it, and press the Delete key on your keyboard.
from the Instant Burning interface. (You can also open
Note: Once you delete your files from a disc, you will not be able to retrieve them from the Windows
Recycle Bin
8.3.3 Viewing Contents of a Disc
You can view the contents of a disc any time as long as it stays in the drive.
To view disc contents
Click on open button
on the Instant Burning program interface.
View Disc Contents on Another Computer
Once you have ejected a disc, you can also view the disc’s content on other computers, if the drive on the
other computer is compatibile with the media type.
To view disc contents on other computers
Insert the disc into the drive on the other computer and open the CD/DVD drive in Windows Explorer.
Note: If VirtualDrive Pro is not installed on the computer you want to view the disc on, you can just see the
root folder structure of the disc. Please visit
http://www.FarStone.com/home/ensite/support/patchesupdates.shtml a patch to download the patch for
it and install it. This tool allows you to read the disc on any computer.
8.3.4 Ejecting a Disc
Once you finish adding files to disc, you can eject the disc from the recorder.
To eject a disc
Use any of the following methods to eject a disc:
• Click the Eject button
• Click the Menu button
on the Instant Burning program interface.
on the Instant Burning program interface and choose Eject/Close Disc.
• In Windows Explorer, right on the on the disc drive and select Eject.
69
Page 70

8.3.5 Renaming a Disc
With Instant Burning, you can change the name/label of the disc any time as long as the disc stays in the
drive.
To rename the disc
Click the Menu button
on the Instant Burning program interface and choose Rename Disc. Enter a
new name in the Rename dialog box.
8.3.6 Erasing a Disc
If you are using a rewritable disc, you can erase it so that it is blank again. The disc must be formatted
again, before it can store new files.
To erase a disc
1. Insert the disc you want to erase into the disc recorder.
2. From the Instant Burning menu, select Erase Disc. (You can also right-click the drive letter and
choose Erase in Windows Explorer.
3. The Erase Disc window appears. Choose the desired erase option. Please refer to chapter
9.1 Erase
Disc for detailed instructions on how to choose these options.
4. Click OK to start erasing the disc.
8.3.7 Viewing Disc Status
You can view the status of a disc very conveniently with Instant Burning.
To view the status of a disc
Click the Menu button
on the Instant Burning program interface and choose Instant Burning
Manager. The manager window will open and the Instant Burning Status tab will be displayed by
default.
On this tab you can select a CD/DVD drive and view information about the inserted disc.
8.4 Instant Burning Settings
The Instant Burning Settings allow you to alter how Instant Burning behaves on your screen, and lets you
set the read/write speeds when burning.
To change Instant Burning settings
Click the Menu button
on the Instant Burning program interface and choose Instant Burning
Settings. The manager window will launch and the Instant Burning Settings tab will be displayed by
default.
70
Page 71

Manager window options
• Display the disc status when insert the Instant Burning Disc: Check this box to display the Disc Status
tab in the Instant Burning manager each time you insert a disc into the drive.
• Hide Instant Burning window at the next run time: Check this box and the Instant Burning window will
not be displayed the next time you insert a disc.
• Record Speed: In the drop-down menus, select a read and write speed for your CD/DVD drive.
71
Page 72

Chapter 9
®
VirtualDrive
Pro Utility
72
Page 73

Chapter 9 VirtualDrive Pro Utility
9.1 Erase Disc
The Erase Disc function enables users to delete data on a re-writable CD/DVD (CD-RW, DVD-RW,
DVD-RAM, DVD+RW).
To erase a disc:
1. Insert the disc you want to erase into the CD/DVD recorder.
2. Click Erase Disc on the Utility page from the VirtualDrive
3. Select the CD recorder with a re-writable disc inserted from the Please Select a Device drop-down
list.
4. Choose an erase mode from the Erase Mode drop-down menu.
®
Pro Manager.
There are two erase modes:
Quick Erase: Using this method, discs that are erased appear to be empty but the data is not
physically removed.
Quick Erase will take a shorter time to complete and will only erase the Table
of Contents (TOC) from the disc. The erased data can still be recovered by using special tools.
Full Erase: Full Erase will physically erase the entire disc. Compared to Quick Erase, Full Erase will
take much longer to complete.
5. Click Erase to begin erasing the disc.
6. The CD/DVD device will auto-eject the disc, after the erasing process has completed.
9.1 View the Device Information
Device Info provides detailed information about the installed CD/DVD device and the inserted CD/DVD
media.
To view the device information:
Click Disc Info on the Utility page from the VirtualDrive
®
Pro Manager.
There are two buttons on the top right side of the Device Info tab:
73
Page 74

Refresh current device information.
Save your current device information as a text file on your hard drive.
There are two tabs on this page, Device Info and Disc Info.
Device Info
On the Device Info tab (shown above), you can view the detailed information about a CD/DVD device
(including a virtual drive) on the left side of the window. You can also view the disc formats that are
readable or writable on this drive in the area on the right side.
Disc Info
On the Disc Info tab (shown below), you can view the properties of the disc inserted into the selected
CD/DVD device.
You can extract a specific file or folder from the disc and store it on the hard drive by right-clicking the
desired file or folder and then selecting Extract.
9.3 Rapid Cache
Rapid Cache® is a unique CD/DVD caching utility program that uses an incremental caching algorithm
found only in VirtualDrive®.
9.3.1 Rapid Cache Features
®
• Rapid Cache
• Rapid Cache
• Rapid Cache
• Rapid Cache
system.
• Rapid Cache
caching programs or memory managers.
• Rapid Cache
1. CD/DVD Browser- Lets you see the features and attributes of a CD/DVD.
2. Performance Evaluation tool- The Performance Evaluation tool can test the performance and
abilities of a CD/DVD drive, including:
Data transfer rate, Track segment access time for Inner/Outer tracks, 1/3, 1/2 or full strokes.
This feature enables you to objectively compare performance differences between various CD/DVD
drives.
does not use your valuable hard drive space for caching.
®
uses the latest incremental caching technology.
®
makes your CDs, DVDs or VCDs run at “lightning-fast” speeds.
®
provides one-step cache mode reconfiguration, without requiring you to reboot your
®
is completely transparent to your system. Therefore it will not conflict with other
®
comes with:
74
Page 75

9.3.2 Rapid Cache Settings
Select Rapid Cache
on the Utility page from the VirtualDrive® Pro Manager.
You can view detailed information on a virtual disc drive on the CD Drive information tab, or a vi rtu al d i sc
inserted in a virtual drive on the CD-ROM Properties tab.
The Cache Settings tab allows you to choose a cache configuration that can be tailored to the type of file
access that works best for your hardware.
Fig. Rapid Cache Manager
From this tab, you can:
Control cache file size: Allows you to control the cache file read size. Above the cache mode
checkboxes is a drop-down list, where the cache file cut-off size can be set. By choosing an appropriate
cache file size in combination with the cache size, you can minimize the number of file block reads and
maximize the use of your cache space.
Control cache mode: Rapid Cache can implement three different cache modes, Incremental mode,
MAX mode, and MIN mode. Clicking on one of the cache mode options immediately switches Rapid
Cache's cache mode.
When you request data from your CD/DVD, Rapid Cache® will read the data as
a logical block, and then place part of the data into the cache buffer. The next
Incremental
caching mode
time you need the data from this block, Rapid Cache® will increase the cache
size for this block and store more of the data block into the cache buffer. Using
this incremental algorithm, Rapid Cache® makes more intelligent use of your
cache by retaining the most significant data in the cache buffer.
Max caching mode
Maximum caching mode reads whole data blocks into the cache buffer together
with the relevant index and directory files.
Min caching mode
Minimum caching mode will read only directories and index files into the cache
buffer. Minimum caching mode is recommended if you set the cache size to less
than 514 KB in Rapid Cache®.
No caching mode
Allows Windows to handle all caching activity.
By experimenting with each of the three different caching modes to gain a maximum “save ratio”, overall
CD/DVD and VCD performance can be dramatically improved.
When experimenting with various settings to maximize CD or VCD performance, you should flush the
cache buffer (by selecting Reset Cache) each time you change the settings to give a more precise
evaluation of performance.
75
Page 76

Chapter 10
Live Update
76
Page 77

Chapter 10 Live Update
If your computer is connected to the Internet and Automatic Live Update is enabled, your VirtualDrive
program will automatically notify you whenever a newer update is available.
You can also manually update your VirtualDrive
To run Live Update and get the latest files from the FarStone website, please follow these instructions:
®
software periodically.
Step 1 Click the LiveUpdate button
from the Utilities page in the VirtualDrive® Pro manager to launch
the Live Update program.
If you have not registered your personal information with FarStone, follow the process below:
Step 2 Select the Register right now button and click Next to continue.
Step 3 Enter the required registration information in the Register window and click Next. A window will
display prompting you that you have registered successfully. Click OK to continue.
Note: FarStone will send you an E-mail containing your Registered ID; this ID will be needed the next
time you run Live Update manually. Be sure to enter a correct E-mail address and remember it. If you
forget your Registered ID, especially when switching ISPs (internet service providers), we can resend it to
you upon request.
If you have registered before, follow the process below:
Step 2 Select I have registered before and click Next to continue.
Step 3 Enter the Registered ID that was sent to you via email, when you first registered your information
with FarStone. Click Next to continue.
Note: If you cannot find your Registered ID, you can enter your E-mail address and click the Find button.
We will immediately resend your Registered ID to you. BE SURE THE E-MAIL ADDRESS ENTERED HERE IS
THE SAME ONE YOU PROVIDED WHEN YOU REGISTERED THE FIRST TIME. Otherwise, we cannot identify
your information or help you find your Registered ID.
Step 4 Live Update will automatically search for new components for VirtualDrive
®
Pro. Once it collects
all of the updates, click Next to download and install them. You may be required to restart your computer
after the updates have been installed. Please be sure to save and close any open files or programs, before
restarting your computer.
Step 5 After all of the components are installed on your computer, click Next to close Live Update.
Note: There may be times when Live Update requires that your computer restarted, but additional
updates are still available; please launch Live Update after the computer has restarted, to ensure you have
received all of the latest updates.
77
Page 78

Chapter 11
Appendix
78
Page 79

Chapter 11 Appendix
11.1 Definitions
Data CD:
A Data CD is a CD that contains all types of files, including data files and audio files. With CD/DVD Burning,
you can make a Data CD project, and then burn it on various CD types such as ISO9660, ISO9660+Joliet
and UDF. You can set the disc format as CD-ROM Mode 1 or CD-ROM Mode 2XA.
Data DVD:
A Data DVD is a DVD that contains all types of files, including data and audio files. With VirtualDrive® Pro,
you can make a DVD Data project, then burn it on various DVD disc types such as ISO and UDF formats.
Audio CD:
An Audio CD is a compact disc (CD) that can be played by both an Audio CD player and a computer CD-ROM
drive. The CD contains audio tracks only and no computer data. With VirtualDrive® Pro, you can make
your own Audio CD by recording tracks from other Audio CDs, or from audio files (MP3, WAV or CDA files)
located on a hard drive or audio files located on a network share.
MP3 CD:
An MP3 CD is a compact disc (CD) that can be played on an MP3 player and any player that supports MP3
data files. The CD contains MP3 files and a playlist only. With VirtualDrive® Pro, you can make your own
MP3 CD by recording MP3 files from a hard drive or other storage media. You can also edit the playlist for
the MP3 CD.
Mixed-Mode CD:
A Mixed-Mode CD is a single-session CD that contains both computer data and music tracks, and is
typically used for entertainment and educational programs. Data is written to the first track on the CD
followed by one or more music tracks.
CD Extra:
A CD Extra is a multi-session disc that contains both music tracks and computer data. The music tracks are
written to the first session with data written to the second session. With VirtualDrive® Pro, you can make
a CD Extra of your own, putting program files in a data session and background music in an audio session.
UDF CD:
A UDF CD is a data CD/DVD burned with a UDF file system format. Compared with an ISO9660 disc, a UDF
has the following advantages:
Large Capacity- able to store more data and a larger number of files than current operating systems
(meaning it can overcome file size limitations imposed by some operating systems). Often used to
make capacity-demanding DVD discs.
More Efficient Space Allocation
Use of the Unicode Character Set
File Name up to 255 Characters (Using ASCII)
System Independent
Multi-session CD:
A multi-session CD is one containing several sessions with a 30MB space between two successive sessions.
Each session has a Table of Contents which links into the next free area of the disc, until the last track
which is closed. If you have an existing data CD-R/CD-RW disc that was not closed, you can append
additional data to the disc with VirtualDrive® Pro.
79
Page 80

Sector (or Block):
The smallest unit of storage read from or written to a disk. A group of disk or tape records that is stored
and transferred as a single unit. On a CD, a block consists of 98 frames of 33 bytes for a total of 3,234 bytes,
or 1/75th of a second.
Lead-In Area:
The lead-in area is the first area in a session on a disc; it stores such information as the "
(the directory of the CD) and other "management information" about the CD (e. g. "
Table of Contents"
CD-Text data" on
CD-Text CDs).
Lead-Out Area:
The Lead-out area marks the end of each session on the disc. Actually the lead-out is only a kind of
"ending" for the CD; e.g. the CD player recognizes the end of the CD (just like the last groove on a record).
If you burn a CD without lead-out, the CD Player will get stuck at the end of the CD.
On a "
Multi-Session-CD" each session has its own lead-out.
Session:
A session is the "recording unit" on a CD. A session consists of a "
one or more "
Trac ks" and a "Lead-out".
Lead-in", a data area that can contains
Sub-channel:
The Sub-Channel Data is used to store extra information. This can be part of a protection method (a digital
ID) or simply to add extra information to a disc like CD-Text for audio discs. Some protection methods that
use Sub-Channel Data are SecuROM, LibCrypt (PlayStation) and LaserLock.
CD-Text:
The extra information added to a disc, like CD-Text for audio discs. It is stored in the sub-channel on the
disc.
Gap:
Also called an inter-record gap (IRG) or inter-block gap. It is the space between two consecutive physical
blocks on a data-recording medium.
Track:
The storage channel on a disk or tape. On magnetic disks (hard, floppy, Zip, etc.), tracks are concentric
circles. CD and DVD tracks have one continuous, spiral-shaped channel starting near the center of the disc
and moving outward. On magnetic tapes, tracks are parallel lines along the length of the tape. Helical scan
tapes use diagonal lines.
Multi-Session:
A multi-session CD is a recordable CD format that allows the recording of a compact disc to be conducted
in more than one recording session. If there is free space left on the CD after the first session, additional
data can be written to it at a later date. Each session has its own lead-in, program area, and lead-out. This
takes up about 20 megabytes of space for each additional session, and therefore, it is less efficient than
recording data all at once.
Packet:
A packet is the unit of data that is routed between an origin and a destination on the Internet or any other
packet-switched network.
LBA:
Short for logical block addressing, a method used with SCSI and IDE disk drives to translate the cylinder,
head, and sector specifications of the drive into addresses that can be used by an enhanced BIOS. LBA is
used with drives that are larger than 504
MB.
UPC (Universal Product Code):
The Universal Product Code (UPC) is a 12-digit number and associated machine-readable bar code used to
identify products being purchased.
ISRC (International Standard Recording Code):
80
Page 81

The ISRC (International Standard Recording Code) is the international identification system for sound
recordings and music video recordings. Each ISRC is a unique and permanent identifier for a specific
recording, which can be permanently encoded into a product as its digital fingerprint. Encoded ISRC
provides the means to automatically identify recordings for royalty payments.
CD-ROM:
(Compact Disc - Read Only Memory) A compact disc format used to hold text, graphics and hi-fidelity
stereo sound. It uses a different format for recording data than the audio CD (CD-DA), from which it
evolved. An audio CD player cannot play CD-ROMs, but CD-ROM players can play audio discs.
CD-ROM Mode 1:
Data is stored in sectors which each hold 2,352 bytes of data. For mode 1 CD-ROM data storage, the
sectors are further broken down. 2,048 bytes are used for the expected data, while the other 304 bytes are
devoted to Sync, Header, EDC (Error Detection Code) and ECC (Error Correction Code). CD-ROM Mode 1 is
used for error-intolerant discs such as software, game discs and documentation discs.
CD-ROM Mode 2:
Among the 2,352 bytes of data in a sector, no EDC or ECC is included. Thus, CD-ROM Mode 2 XA has a
larger data capacity, but lower data detect and correct ability. It is often used for error-tolerant discs such
as audio CDs or Videodiscs
CD-DA (Audio CD):
The standard for audio
Compact Disc-Digital Audio (CD-DA). It specifies up to 74 minutes of
The first
CD-ROM players also transmitted data at this rate, so they came to be called single-speed drives.
CDs, developed by Phillips and Sony. The specification is formally known as
digital audio transferred at 150 Kbps.
Mixed Mode CD:
A mixed mode disc combines data and audio tracks on the same disc. Data recording and audio recording
require different "modes," so that the reader can interpret the information correctly. A mixed mode disc
allows you to record a data track followed by one or more audio tracks.
Video CD:
A compact disc format used to hold full-motion video developed by Matsushita, Philips, Sony and JVC and
introduced in 1993. A Video CD holds 74 minutes of VHS-quality video and CD-quality sound using MPEG-1
compression.
Photo CD:
standard for storing photographic Images on CD-ROM, produced by Kodak.
A
CD-Extra:
Also called enhanced music CD, the first session contains up to 98 audio tracks; the second session
contains the data track. When played on an audio player, it only sees the first session and does not try to
play the data session.
PAL:
Short for Phase Alternating Line, the dominant television standard in Europe. The United States uses a
different standard,
delivers 625 lines at 50 half-frames per second. Many
be used as television screens support both NTSC and PAL signals.
NTSC:
Short for National Television System Committee. The NTSC is responsible for setting television and
standards
are PAL and SECAM). The NTSC standard for television defines a
rate of 60 halfdifferent colors.
in the United States (in Europe and the rest of the world, the dominant television standards
NTSC. Whereas NTSC delivers 525 lines of resolution at 60 half-frames per second, PAL
video adapters that enable computer monitors to
video
composite video signal with a refresh
frames (interlaced) per second. Each frame contains 525 lines and can contain 16 million
Disc At Once (DAO):
81
Page 82

This method writes all data onto a CD in a single operation, starting from lead-in and ending at lead-out
(start and end zone) without the write laser being switched off.
Because there is no gap between tracks, a disc cloned using this method is exactly the same size as the
source disc. But if canceling the operation when burning, after lead-out has been recorded, the disc cannot
be used again.
Track At Once (TAO):
This method writes data to the disc in multiple passes and allows you to record a single track (data or music)
at a time. Lead-in and Lead-out is written after all tracks to be written are recorded. Tracks recorded in
Track-at-Once mode are separated by gaps.
If a data track is followed by a music track, the gap is two or three seconds. The gap between two music
tracks is usually two seconds.
Session At Once (SAO):
This method writes data to the disc in a single operation, and finalizes the session at the end of the process.
A “Session-at-Once” recording is similar to a “Disc-at-Once” recording. The only difference is that the disc
is not closed after a “Session-at-once” recording, and you can write a further session on the disc at a later
date. It is usually used to make a multi-session disc. There is a 13MB space between sessions.
If you are making a music CD, this option eliminates the two-second gap between tracks and
write-protects the CD. The CD can be played on home stereo equipment.
Packet Writing (PW):
This method allows you to write data to a CD in small increments instead of large blocks as with
disc-at-once and track-at-once. It eliminates the session closing overheads inherent in the multi-session
method of adding data to a disc in more than one write. However, you cannot write CD-DA (a.k.a. Red Book)
audio discs using packet writing. With packet writing, you can use your CD-R just like a hard drive. With
packet writing, there is no need to open or close a session each time data is written.
Buffer Under-run:
A Buffer Under-run is an error that occurs when the data transfer rate is slower than the write speed to a
CD/DVD disc. The CD/DVD recorder itself has a buffer that is constantly filled with data, for use in the
event of a system slowdown or interruption. If the buffer is emptied before the system can recover, a buffer
under-run occurs.
Buffer under-run Technology:
Buffer under-run Technology is an efficient method to avoid Buffer under-run errors by enlarging the buffer
size to contain more data.
ISO9660:
ISO9660 is a file system standard for discs. An ISO9660 disc has the best compatibility with other
operating systems. It can be read on all operating systems. The maximum interleaf depth is restricted to
8 levels (including the root directory). ISO9660 supports file names in 8.3 format (8 characters for the file
name and 3 in the file extension).
UDF/ISO:
A UDF CD is a data CD/DVD burned with a UDF file system format. Compared with an ISO9660 disc, UDF
has some advantages such as large capacity, more efficient space allocation, the use of the Unicode
Character Set, file name up to 255 characters and system Independence. If you choose UDF, the burned
disc can only be used on operating systems with a UDF file system reader installed. Currently, Microsoft
Windows 2000(SP3), Windows XP and later versions support UDF discs.
Joliet:
Joliet is an extension of the ISO 9660 standard, developed by Microsoft for Windows 95, to allow CDs to be
recorded using long filenames (it also allows for using the Unicode international character set). For files
recorded to CD, Joliet allows you to use filenames up to 64 characters in length, including spaces. Joliet
82
Page 83

also records the associated DOS-standard name for each file so that the disc may be read on DOS systems
or earlier versions of Windows.
RAW Mode:
Raw mode allows a program to transfer bits directly to or from an
abstraction, or interpretation by the
operating system.
I/O device without any processing,
10.2 Technical Support and Product Update
Please contact your retailer or use our online support system at
http://www.FarStone.com/home/en/shtml/support_ticket.shtml
For your convenience, you will also find answers to frequently asked questions (FAQs) on our website at
http://www.FarStone.com/home/ensite/support/faqmain.shtml
FarStone Technology, Inc.
U.S. Headquarters:
6 Morgan, Suite 304
Irvine, CA 92618
Phone: (949) 458-3663
83
 Loading...