

®
VirtualDrive
Network 2005
Windows 2000
SP4/XP/2003/Server 2003
User Guide
FarStone Technology Inc

Copyright Notice
No part of this publication may be copied, transmitted, stored in a
retrieval system, or translated into any language in any form or by any
means without the express written permission of FarStone
Technology Inc.
FarStone grants to you the right to use one copy of the enclosed
software program (The "SOFTWARE") on a single computer. If the
Software is installed on a network or more than one user can run the
Software at the same time, you must purchase an additional license
for each user or workstation.
Trademarks
FarStone, Rapid Cache® are registered trademarks of FarStone
Technology Inc. VirtualDrive®, VirtualDrive® Network are trademarks
of FarStone Tech. Inc. Microsoft®, Windows® and MS-DOS® are
registered trademarks of Microsoft Corporation. Other product names
mentioned in this manual may be trademarks or registered
trademarks of their respective companies.
FarStone Technology Inc.
America Headquarters:
15 Hammond Dr., Suite 304
Phone: (949) 458-3666
Fax: (949) 458-3633
Technical support:
Please contact your retailer, or use our online support system at
www.farstone.com
frequently asked questions on our website at www.farstone.com
. For your convenience, you will find answers to
.
For Technical Support, follow the links to the support section:
http://www.farstone.com/home/en/shtml/contactus.shtml
Copyright® 1993-2005 FarStone Technology Inc. All rights reserved.
Rapid Cache
®
: Copyright® 1993-2005 FarStone Technology
Inc.
2

Software License Agreement
FARSTONE TECHNOLOGY, INC. (FARSTONE) END USER LICENSE
AGREEMENT FOR VirtualDrive Network, HEREAFTER REFERRED TO AS THE
"SOFTWARE"
PLEASE READ CAREFULLY: THE USE OF THIS "SOFTWARE" IS SUBJECT TO
THE "SOFTWARE" LICENSE TERMS OF FARSTONE AND OTHER LICENSORS
WHOSE SOFTWARE MAY BE BUNDLED WITH THIS PRODUCT.
BY YOUR USE OF THE "SOFTWARE" INCLUDED WITH THIS PRODUCT YOU
AGREE TO THE LICENSE TERMS REQUIRED BY THE LICENSOR OF THE
"SOFTWARE", AS SET FORTH BELOW. IF YOU DO NOT AGREE TO THE
LICENSE TERMS APPLICABLE TO THE "SOFTWARE", YOU MAY RETURN THE
ENTIRE UNUSED PRODUCT FOR A FULL REFUND.
LICENSE AND WARRANTY:
The software which accompanies this license (the "Software") is the property of
FARSTONE or its licensors and is protected by copyright law. While FARSTONE
continues to own the Software, you will have certain rights to use the Software after
your acceptance of this license. Except as may be modified by a license addendum
which accompanies this license, your rights and obligations with respect to the use of
this Software are as follows:
A. Single User License:
(a) Use the "Software" on a single computer system or network and only by a single
user at a time. If you wish for additional users to use the "Software", you will need an
additional License for each user or additional computer system.
(b) Make one copy of the "Software" in machine-readable form solely for back-up
purposes, provided you reproduce FarStone's copyright proprietary legends.
Notwithstanding the foregoing, the "Software" may be used on the home, laptop or
other secondary computer of the principal user of the "Software", and an additional
copy of the "Software" may be made to support such use. As used in this License,
the "Software" is "in use" when it is either loaded into RAM or installed on a hard disk
or other permanent memory device. The "Software" may be "in use" on only one
computer at any given time. (Different License terms and fees are applicable for
networked or multiple user applications.) As a specific condition of this License, you
agree to use the "Software" in compliance with all applicable laws, including copyright
laws, and that you will not copy, transmit, perform or distribute any audio or other
content using the "Software" without obtaining all necessary Licenses or permissions
from the owner of the content.

B. Multiple User License:
Make one copy of the "Software" in machine-readable form solely for back-up
purposes, provided you reproduce FarStone's copyright proprietary legends.
You must acquire and dedicate a License for each separate computer on which any
part or portion of the "Software" is installed or run As used in this License, the
"Software" or any part or portion of the "Software" is "in use" when it is either loaded
into RAM or installed on a hard disk or other permanent memory device including any
networked or shared environment where either direct or indirect connections are
made through software or hardware which pools or aggregates connections.
As a specific condition of this License, you agree to use the "Software" in compliance
with all applicable laws, including copyright laws, and that you will not copy, transmit,
perform or distribute any audio or other content using the "Software" without
obtaining all necessary Licenses or permissions from the owner of the content.
C. Restrictions: You may not distribute copies of the "Software" to others or
electronically transfer the "Software" from one computer to another over a network.
You may not post or otherwise make available the "Software", or any portion thereof,
in any form, on the Internet. You may not use the "Software" in a computer service
business, including in time-sharing applications. The "Software" contains trade
secrets and, in order to protect them, you may not decompile, reverse engineer,
disassemble, or otherwise reduce the "Software" to a human-perceivable form. YOU
MAY NOT MODIFY, ADAPT, TRANSLATE, RENT, LEASE, LOAN, RESELL FOR
PROFIT, DISTRIBUTE, NETWORK OR CREATE DERIVATIVE WORKS BASED
UPON THE "SOFTWARE" OR ANY PART THEREOF.
D. Limited Warranty:
Farstone warrants that the media on which the Software is distributed will be free
from defects for a period of thirty (30) days from the date of delivery of the Software
to you. Your sole remedy in the event of a breach of this warranty will be that
Farstone will, at its option, replace any defective media returned to Farstone within
the warranty period or refund the money you paid for the Software. Farstone does not
warrant that the Software will meet your requirements or that operation of the
Software will be uninterrupted or that the Software will be error-free.
THE ABOVE WARRANTY IS EXCLUSIVE AND IN LIEU OF ALL OTHER
WARRANTIES, WHETHER EXPRESS OR IMPLIED, INCLUDING THE IMPLIED
WARRANTIES OF MERCHANTABILITY, FITNESS FOR A PARTICULAR PURPOSE
AND NONINFRINGEMENT. THIS WARRANTY GIVES YOU SPECIFIC LEGAL
RIGHTS. YOU MAY HAVE OTHER RIGHTS, WHICH VARY FROM STATE TO
STATE.
4

E. Limitation of Liability: IN NO EVENT WILL FARSTONE OR ITS LICENSORS BE
LIABLE TO YOU FOR ANY INCIDENTAL, CONSEQUENTIAL OR INDIRECT
DAMAGES, INCLUDING ANY LOST PROFITS, LOST SAVINGS, OR LOSS OF
DATA, EVEN IF FARSTONE OR A LICENSOR HAS BEEN ADVISED OF THE
POSSIBILITY OF SUCH DAMAGES, OR FOR ANY CLAIM BY ANY OTHER PARTY.
Some states do not allow the exclusion or limitation of special, incidental, or
consequential damages, so the above limitation or exclusion may not apply to you.
F. General: You acknowledge that you have read this Agreement, understand it, and
that by using the "Software" you agree to be bound by its terms and conditions. You
further agree that it is the complete and exclusive statement of the agreement
between FarStone and you, and supersedes any proposal or prior agreement, oral or
written, and any other communication between FarStone and you relating to the
subject matter of this Agreement. No additional or any different terms will be
enforceable against FarStone unless FarStone gives its express consent, including
an express waiver of the terms of this Agreement, in writing signed by an officer of
FarStone. You assume full responsibility for the use of the "Software" and agree to
use the "Software" legally and responsibly.
Should any provision of this Agreement be declared unenforceable in any jurisdiction,
then such provision shall be deemed severable from this Agreement and shall not
affect the remainder hereof. FarStone reserves all rights in the “Software” not
specifically granted in this Agreement.
Should you have any questions concerning this Agreement, you may contact
FarStone by writing to:
FarStone Technology, Inc.
Legal Department
15 Hammond Dr., Suite 304
Irvine, CA 92618

Contents
Chapter 1 Introduction ...................................................................... 10
1.1 What is VirtualDrive® Network ................................. 10
1.2 Features and benefit................................................ 11
1.3 Benefits for Schools and Businesses ............................ 14
Chapter 2 Installing VDN .................................................................. 16
2.1 System requirements ............................................... 16
2.2 Installing the VDN Server .......................................... 16
2.3 Installing the VDN Administrator or Client programs ........... 18
2.3.1 Manual Installation ............................................. 18
2.3.2 Silent Installation ...............................................22
Chapter 3 Using the VDN Administrator Program ............................ 24
3.1 Starting the VDN Administrator.................................... 24
3.1.1 The VDN Administrator Manager ............................ 25
3.1.2 Administrator Settings ......................................... 26
3.3 Building Virtual CDs (VCDs)....................................... 30
3.3.1 Building VCDs from the CD Drive............................ 30
3.3.2 Building VCDs from Selected Files .......................... 33
3.3.3 Building VCDs from Audio CDs ..............................35
3.3.4 Building VCDs from Mixed-Mode CDs ......................41
3.3.5 Conversion Between an ISO 9660 Image File and a VCD
File ...................................................................... 43
3.4 Managing VCDs in the VDN Server .............................. 44
3.4.1 Adding VCD folders (CD Jukebox) .......................... 44
3.4.2 Changing a VDN Folder Description ........................ 45
3.4.3 Adding VCDs to a VCD Folder ............................... 45
3.4.4 Deleting a VCD Icon or VCD File ............................48
3.4.5 VCD properties & Custom Auto-run Function .............. 48
3.4.6 Searching VCD ................................................. 49
3.4.8 License Manager ............................................... 50
3.5 Managing VCD access on the VDN Server .....................51
3.5.1 Users and Groups – Overview ...............................51
3.5.2 Adding/Removing Users....................................... 51
3.5.2.1 Adding/Removing Groups .................................. 52
3.5.2.2 Adding Users to Groups..................................... 53
6

3.5.3 Sharing VCD Folder ........................................... 55
3.5.3.1 Sharing a VCD folder........................................ 55
3.5.3.2 New Sharing .................................................. 55
3.5.4 VCD License .................................................... 56
3.5.4.1 Set License for a VCD File ................................. 56
3.5.4.2 View License ................................................. 57
3.6 Viewing Client VCD Usage ........................................57
3.6.1 Viewing VCD Usage ...........................................58
3.6.2 Viewing User Statistics ........................................58
3.7 Backing up VCD List................................................ 59
3.7.1 Backing Up VCD list ...........................................59
3.7.2 Restoring VCD List............................................. 60
3.8 Extracting Files/Audio Tracks from VCD......................... 60
Chapter 4 VDN Command Program................................................. 64
4.1 VDN Command Program (VDRIVE.EXE) ....................... 64
4.2 Using the Command Line for Creating Shortcuts to Run VCDs
............................................................................. 65
Chapter 5 VirtualDrive CD/DVD Burning Program ........................... 69
5.1 Copying disc .........................................................69
5.2 Copying images to a recordable disc ............................ 72
5.3 Erasing a Disc .......................................................74
5.4 Viewing Device Info................................................. 75
Chapter 6 Using the VDN Client Program ........................................ 77
6.1 Starting the VDN Client Program ................................. 77
6.2 Running Virtual CD-ROMs (VCDs) ............................... 78
6.3 Ejecting a VCD ......................................................79
6.4 Viewing VCD Properties ........................................... 80
6.5 Searching VCD ...................................................... 80
6.6 Setting the Number of Virtual Drives .............................80
6.7 Change a Drive Letter .............................................. 81
6.8 Viewing Changes of the CD Folders ............................. 81
6.9 Client Settings .......................................................81
6.9.1 Toolbar ........................................................... 81
6.9.2 Animation ON/OFF ............................................. 82
6.9.3 Device ........................................................... 82
6.9.4 Other ............................................................. 83
Chapter 7 Rapid Cache ® ................................................................ 85
7.1 Rapid Cache
®
Overview ........................................... 85

7.2 Rapid Cache
7.3 The Rapid Cache
®
Features ............................................85
®
Manager....................................... 85
7.3.1 The Cache Settings............................................ 86
7.3.2 Caching Modes................................................. 87
7.3.3 Cache File Read Size ......................................... 87
7.3.4 Total Read, Saved Read and the Saved Ratio............. 88
7.3.5 Resetting the Cache Buffer ................................... 88
7.3.6 Changing the Cache Buffer Size............................. 89
7.3.7 Rapid Cache and Video Files ................................ 89
7.4.2 Viewing CD-ROM Properties ................................. 90
Chapter 8Uninstalling VirtualDrive® Network................................... 92
8.1 Uninstalling VirtualDrive® Administrator Program Group ..... 92
8.2 Uninstalling VirtualDrive® Client .................................. 92
8.3 Uninstalling VirtualDrive® Network Server ......................92
Chapter 9 Appendix.......................................................................... 94
Notes: ..................................................................... 94
FAQ ........................................................................ 95
8

Chapter 1
Introduction
9
Chapter 1 Introduction
1.1 What is VirtualDrive® Network
VirtualDrive® Network (VDN) is a product that includes Virtual CD (VCD)
Server, VDN Administrator, and VDN Client programs. VCDs
using the VDN Administrator program, can be stored on your network and
run from client PCs or workstations using the VDN Client program.
Using the revolutionary VirtualDrive
application, you can turn your CDs' into VCDs, that will run on a
VirtualDrive
® just like a physical CD drive.
® Administrator CD emulation
created by
With VDN Client, you can create up to 23 Virtual CD drives, which are
accessible through Windows Explorer just like any other drive. Finding CDs
is no longer a problem and the need to physically load CDs into a drive, wait
for a CD drive to start up or change CDs by hand in order to run other CD
applications is eliminated.
10

1.2 Features and benefit
1. Add VCDs from the Internet (new)
With VirtualDrive®, you can add a VCD (*.VCD) that is shared on the
Internet or a LAN into the VirtualDrive®.
2. Export Audio Tracks (new)
Extract audio tracks from an existing audio CD, either a real CD or a virtual
CD, and store them as an audio file (*.WAV) or a MP3 file on the hard disk.
3. Runs applications without CD-ROM:
Select and insert a VCD into the VirtualDrive® Network and the VCD
appears as though a CD is actually in a physical CD drive.
4. Supports most disc formats, including:
VirtualDrive
Extra, Audio CDs, Mixed-Mode CDs, Photo CDs, Video CDs, CD Cops,
DVD-ROMs (Data Mode), Multi-Session CDs, and Unprotected DVD Videos.
5. Automatically recognize CD format:
VirtualDrive
the correct program.
6. Faster than a 200X CD-ROM drive:
Run CDs directly from the hard drive with incredible 200X speed.
7. 1000 Virtual Jukeboxes:
VirtualDrive
folders), with each folder able to hold an unlimited number of CDs.
8. Easy Management:
The Administrator creates and configures the VirtualDrive
Changes affect clients instantly. VirtualDrive
title. Rather, it actually creates a CD image file on the hard drive. Only this
image file needs to be created or removed.
9. Burn your VCDs onto a recordable disc:
VirtualDrive
CD/DVD burning capabilities. It allows users to copy CD/DVD images from
the hard disk to a recordable medium.
® Network supports the following disk formats: CD-ROMs, CD-
® Network can determine the type and format of the CD, and run
® Network supports up to 1000 Virtual CD Jukeboxes (CD
® Network.
® doesn’t copy files from the CD
® combines the functions of CD/DVD emulation software with
11

10. Compression:
VirtualDrive
® Network incorporates a high-performance compression engine
for building VCD files. Compressed VCD files are automatically
decompressed when accessed.
11. Command Line Support:
You can access VirtualDrive
® Network from the command line. With this
features you can mount VCDs and auto-run applications, or create shortcuts
to your VCDs.
12. Removable Drives:
Save VCD files on any removable media. You can also create custom VCDs
from files on removable media, such as Magneto-Optical (MO) disk and burn
VCDs to a CD.
13. Saves space and hardware costs:
Takes no physical space in your office, and no hardware maintenance costs.
14. Network Capable:
VirtualDrive
® Network is fully compatible with most CD applications. Some
CD applications only run from a physical CD drive. These applications will
not run from a mapped network drive, like a drive mapped to your server CD
drive (or Jukebox). VDN supports all such CD applications. Storing Virtual
CD’s on a file server allows CD resources to be shared throughout the
network.
15. Rapid Cache
VirtualDrive
®
:
® comes with Rapid Cache®
CD caching system, utilizing the
latest incremental caching technology. Rapid Cache can increase VCD and
CD performance.
16. Built in CD benchmark and browser:
Evaluate the data transfer rate and access time for any of your CD drive(s).
17. MP3 Audio Compression:
Choose your favorite CD tracks to create top quality music VCDs
(compress up to 95%) and listen directly from your hard drive.
18. Create Custom Virtual CDs from selected files:
Customize your own VCDs by removing unnecessary files from the source
12

CD.
19. Security:
The VirtualDrive® Network can set security property according to clients’
demand. Each client can only use the Virtual CD authorized by administrator.
13

1.3 Benefits for Schools and Businesses
Benefits for Schools:
1. Easy management: As many as 500 CD-ROMs may be needed for a
class with 25 computers and 20 educational CD titles. With VDN, you need
only the original copy of each CD title, which can be archived once the VCD
is created. No need to worry about scratched or lost CDs. No hassles!
2. Supports clients without any CD-ROM drive: No need to install CD drives
on Client PCs. Without a CD-ROM drive; students are unable to install their
own personal CD software, which will reduce technical
3. VDN CD Server: VDN CD server gives everyone access, at any time; from
computer classrooms to school offices; 24 hours a day.
Benefits for Businesses:
1. R&D departments: Information is at your fingertips. Keep everything on
the VDN CD server such as MSDN resource CDs, and reference guides
2. Education: By storing training materials on the VDN CD server, employee
education can be more efficient and cost effective.
3. Information Management: The amount of data to be stored is always
increasing. VDN CD server can be used to efficiently manage data
resources or totally replace CD Jukebox systems.
support costs.
14

Chapter 2
Installing VDN
15

Chapter 2 Installing VDN
2.1 System requirements
1. VDN Server:
Windows 2000/XP/ 2003
45 MB HDD space
2. VDN Administrator:
Windows 2000/XP/2003
A CD-ROM Drive (or DVD-ROM)
(25 MB HDD space if working peer to peer)
3. VDN Clients:
Windows 2000/XP/2003
45 MB HDD space
Note
ª
VDN supports Windows and Novell long file names. If your Novell
server does not support long file names, use Dos 8.3 file naming
conventions for VCD files.
2.2 Installing the VDN Server
Installing VDN Server
Setting up VDN requires that all the VDN Server and associated program
files are placed in a common ‘shared’’ directory. Files stored in this
directory can be called from any PC on the network to install both the
VDN Administrator and/or Client programs. Because VDN directory also
stores Administrator settings and statistics on Client’s VCD usage, full
read/write privileges need to be made available to the Administrator and
all Clients of VirtualDrive® Network.
Note
ª
Since VDN directory contains some important files and data, it is
strongly recommended that you hide the directory by suffixing a $ to
the folder name (e.g. VDN$). In this way, the shared folder is invisible
to others on network.
16
Follows the steps below:
Step 1 Insert the VDN CD into the CD drive and run the VDN installation
program (Setup.exe).
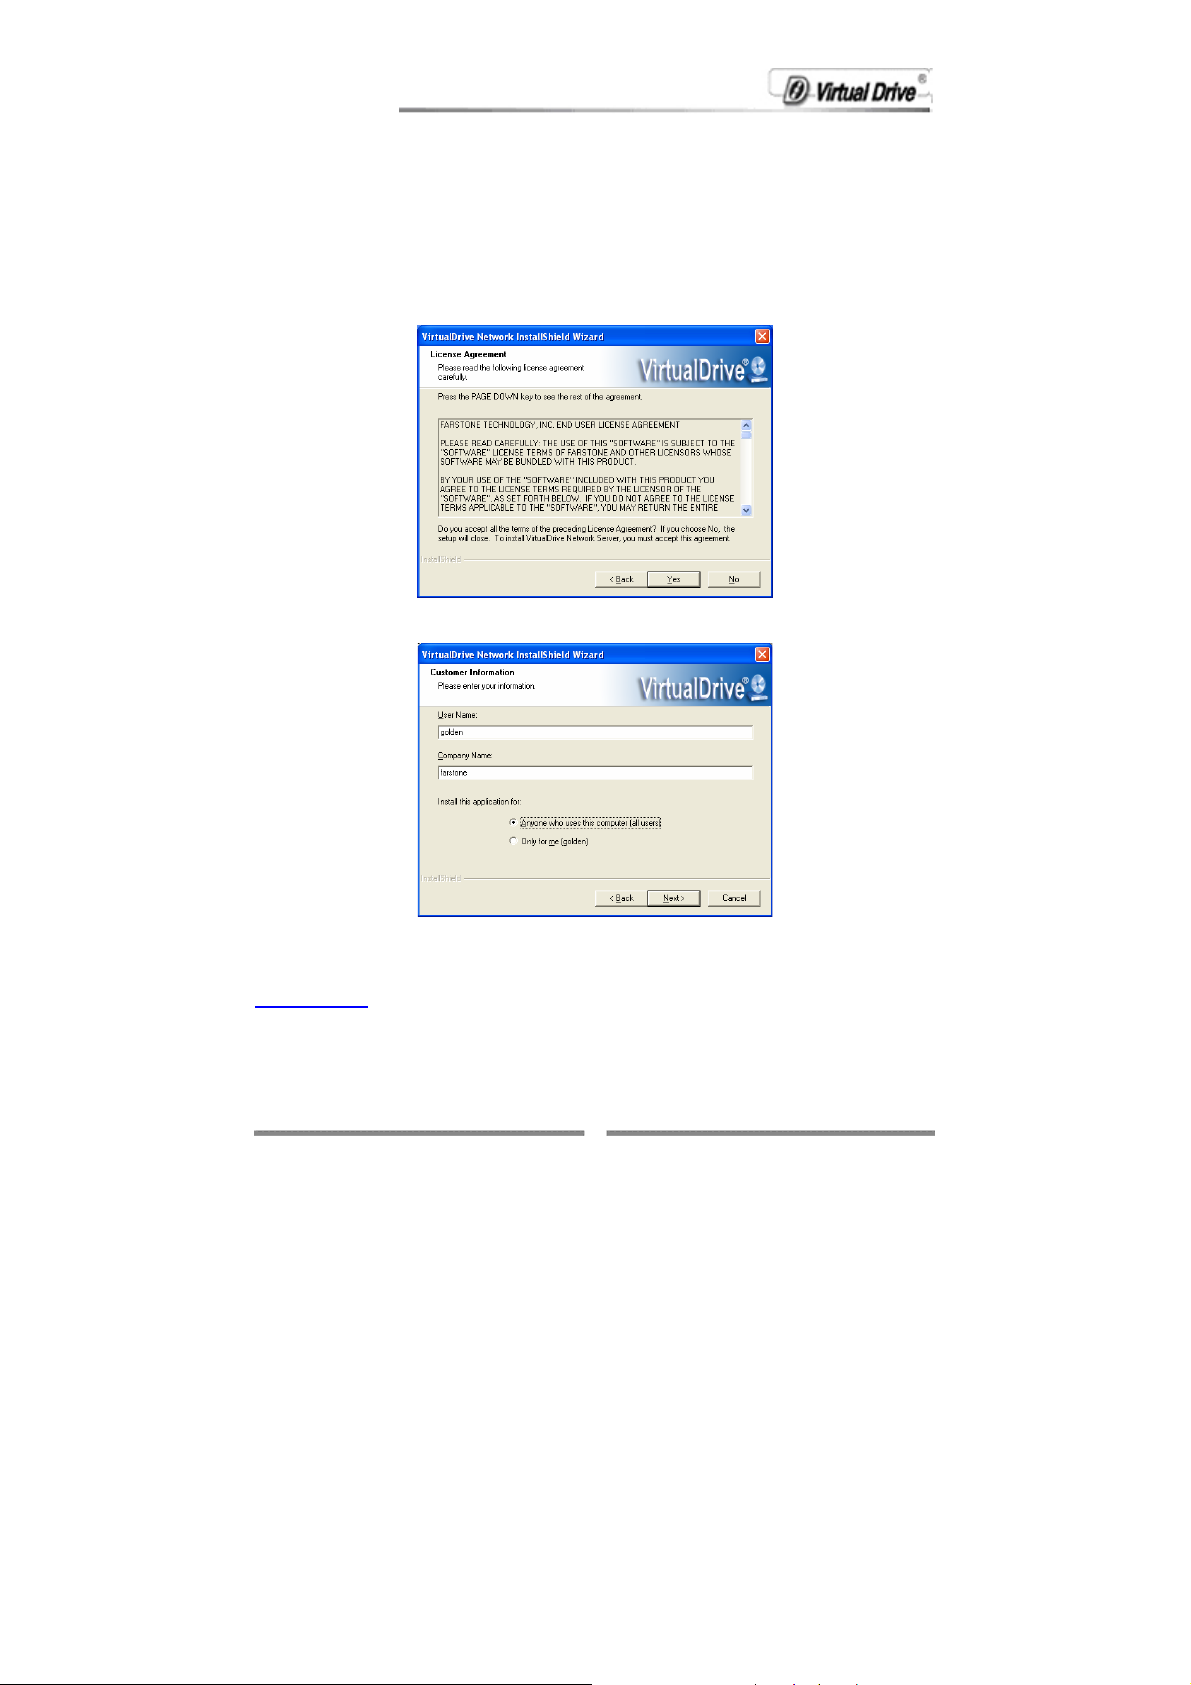
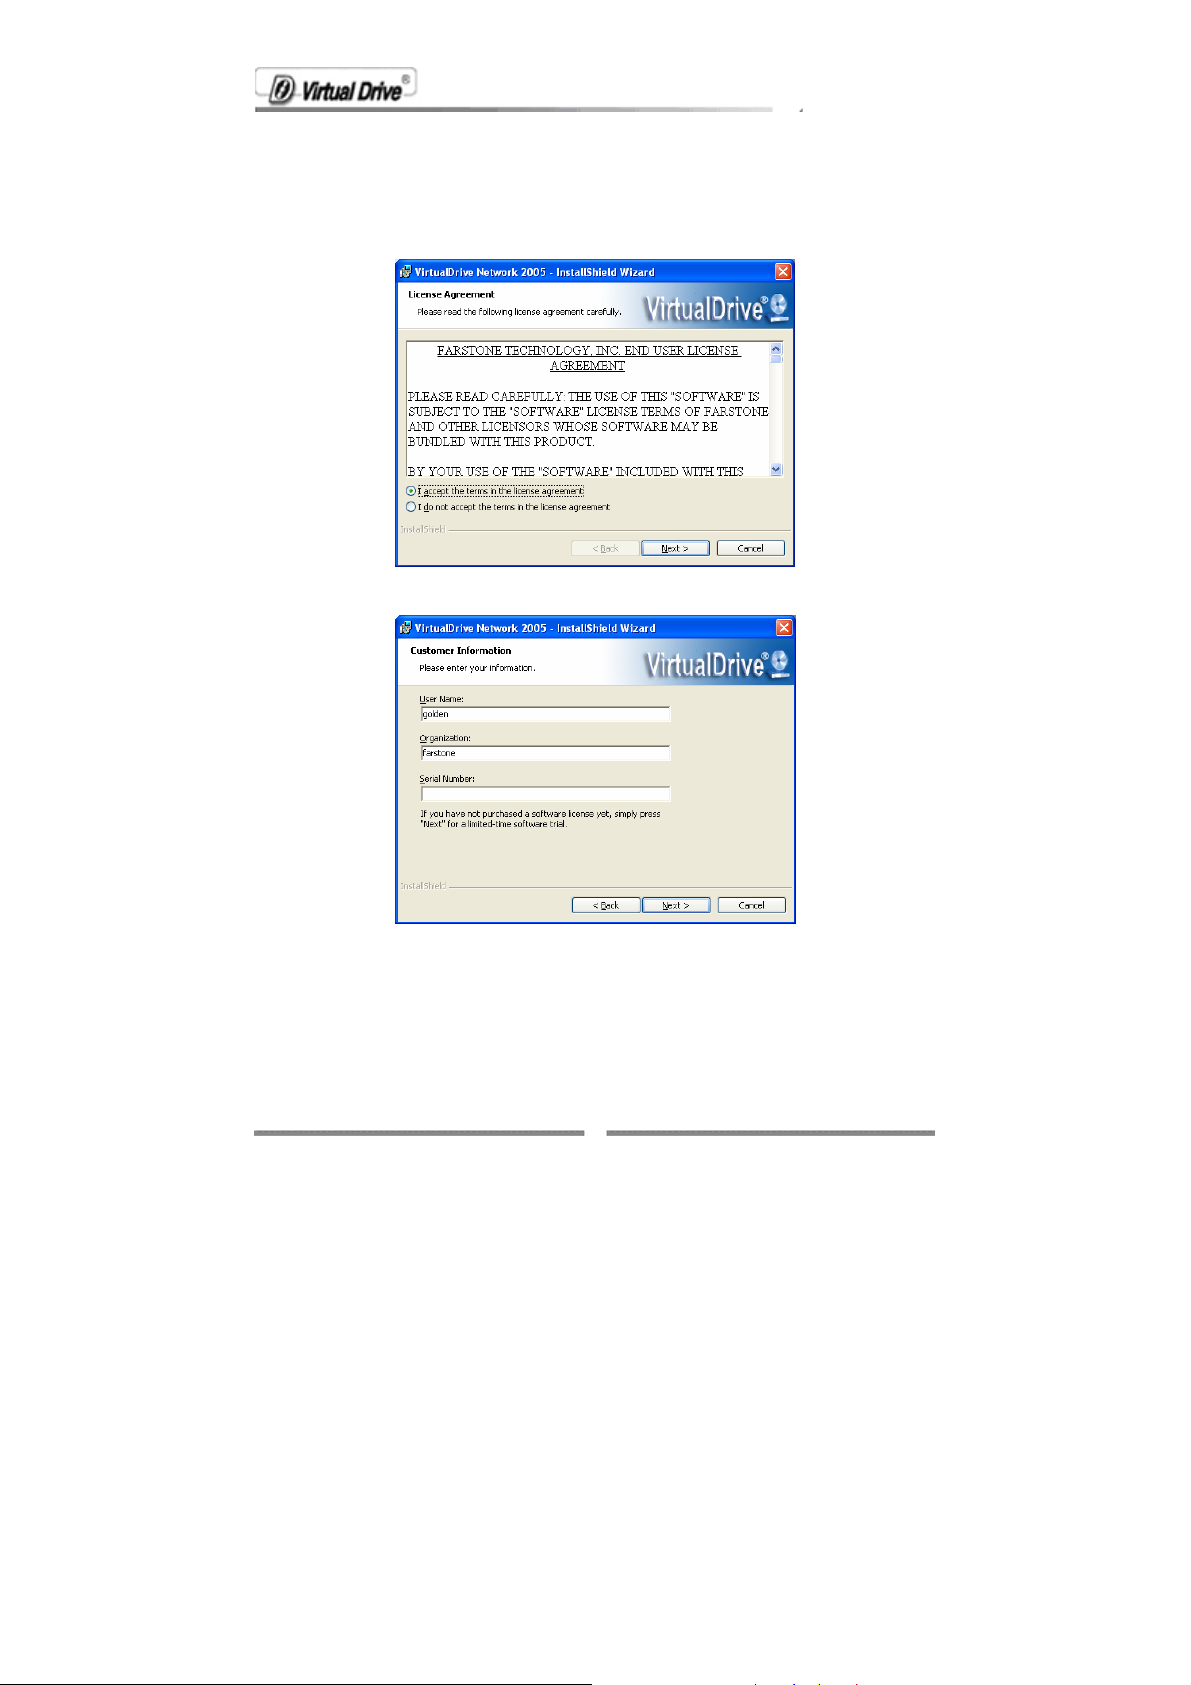
Step 2 Carefully read the License Agreement and select Yes, if you accept
the license conditions.
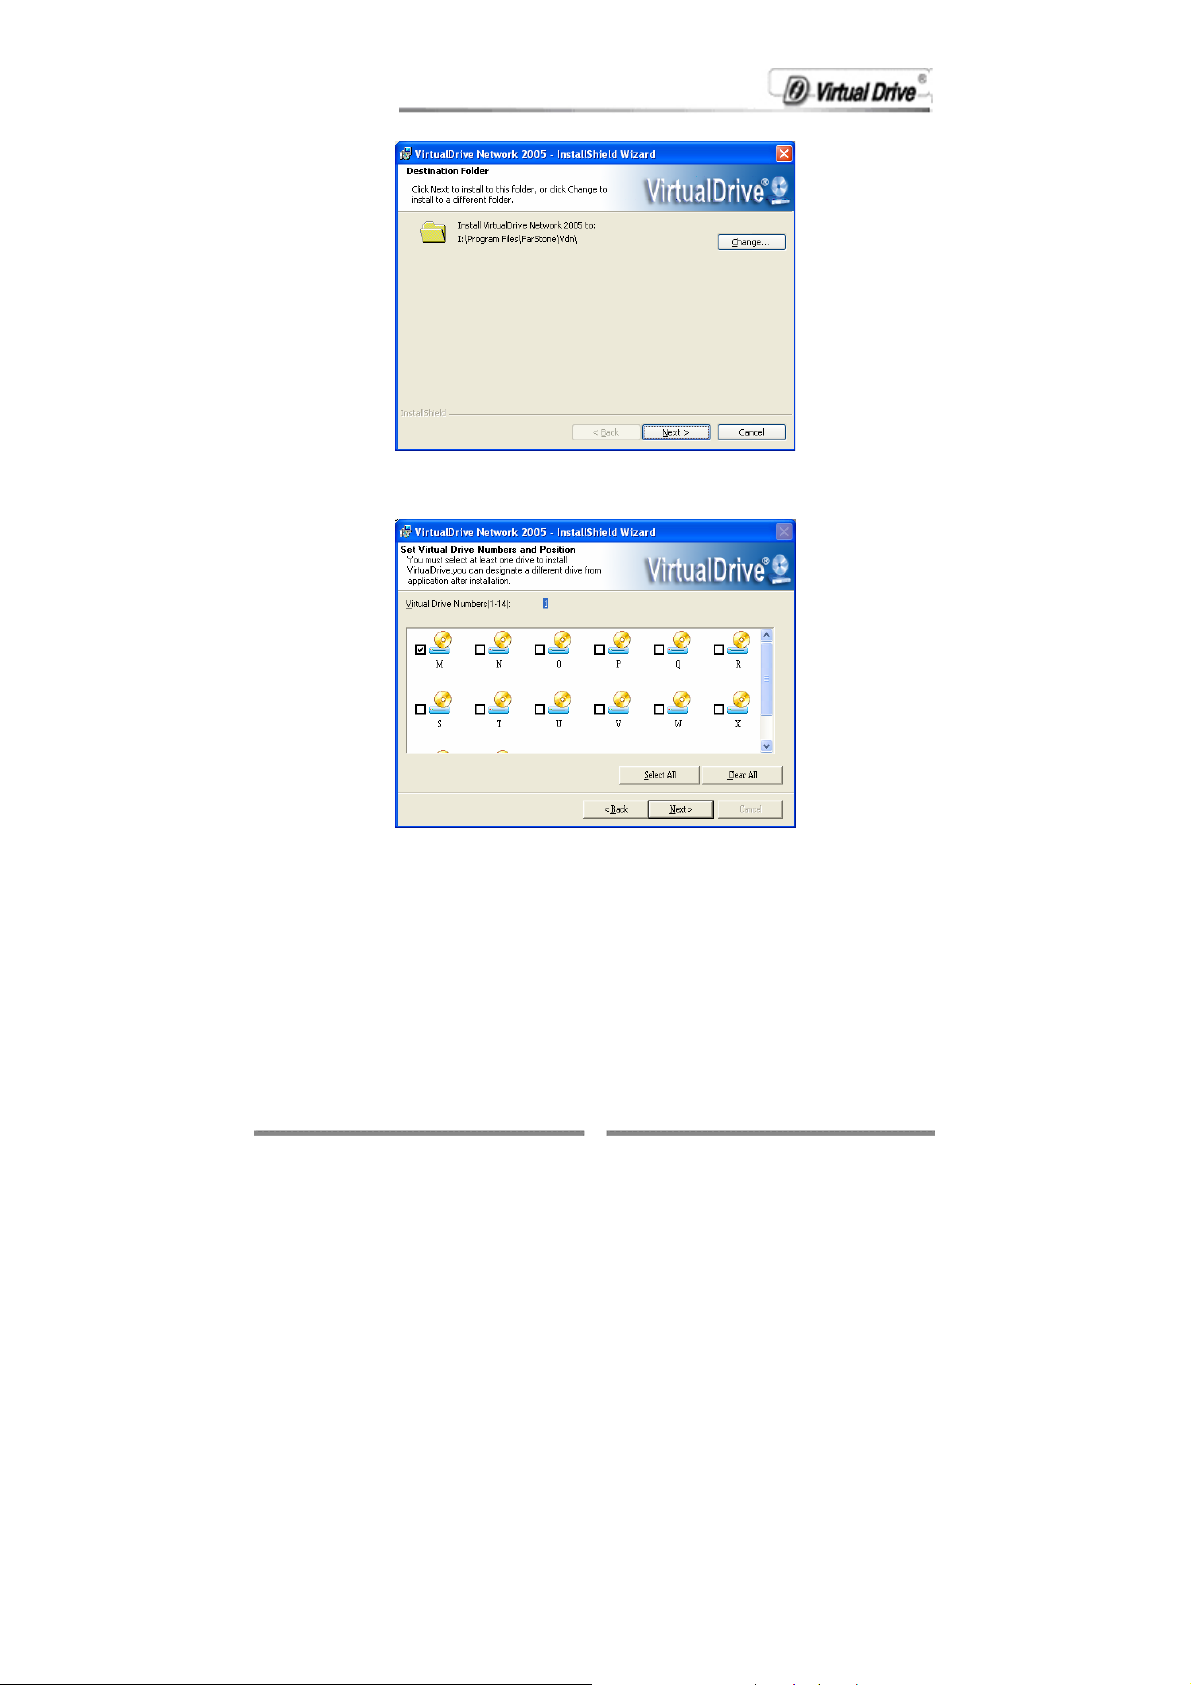
Step 3 Enter your details and then Next to proceed.
Step 4 The "VDN Server Directory" box should contain the path to a shared
local directory, (e.g. C:\VDN) or a shared network directory (e.g.
\\Server\vdn\
). Select Next to begin the installation.
17
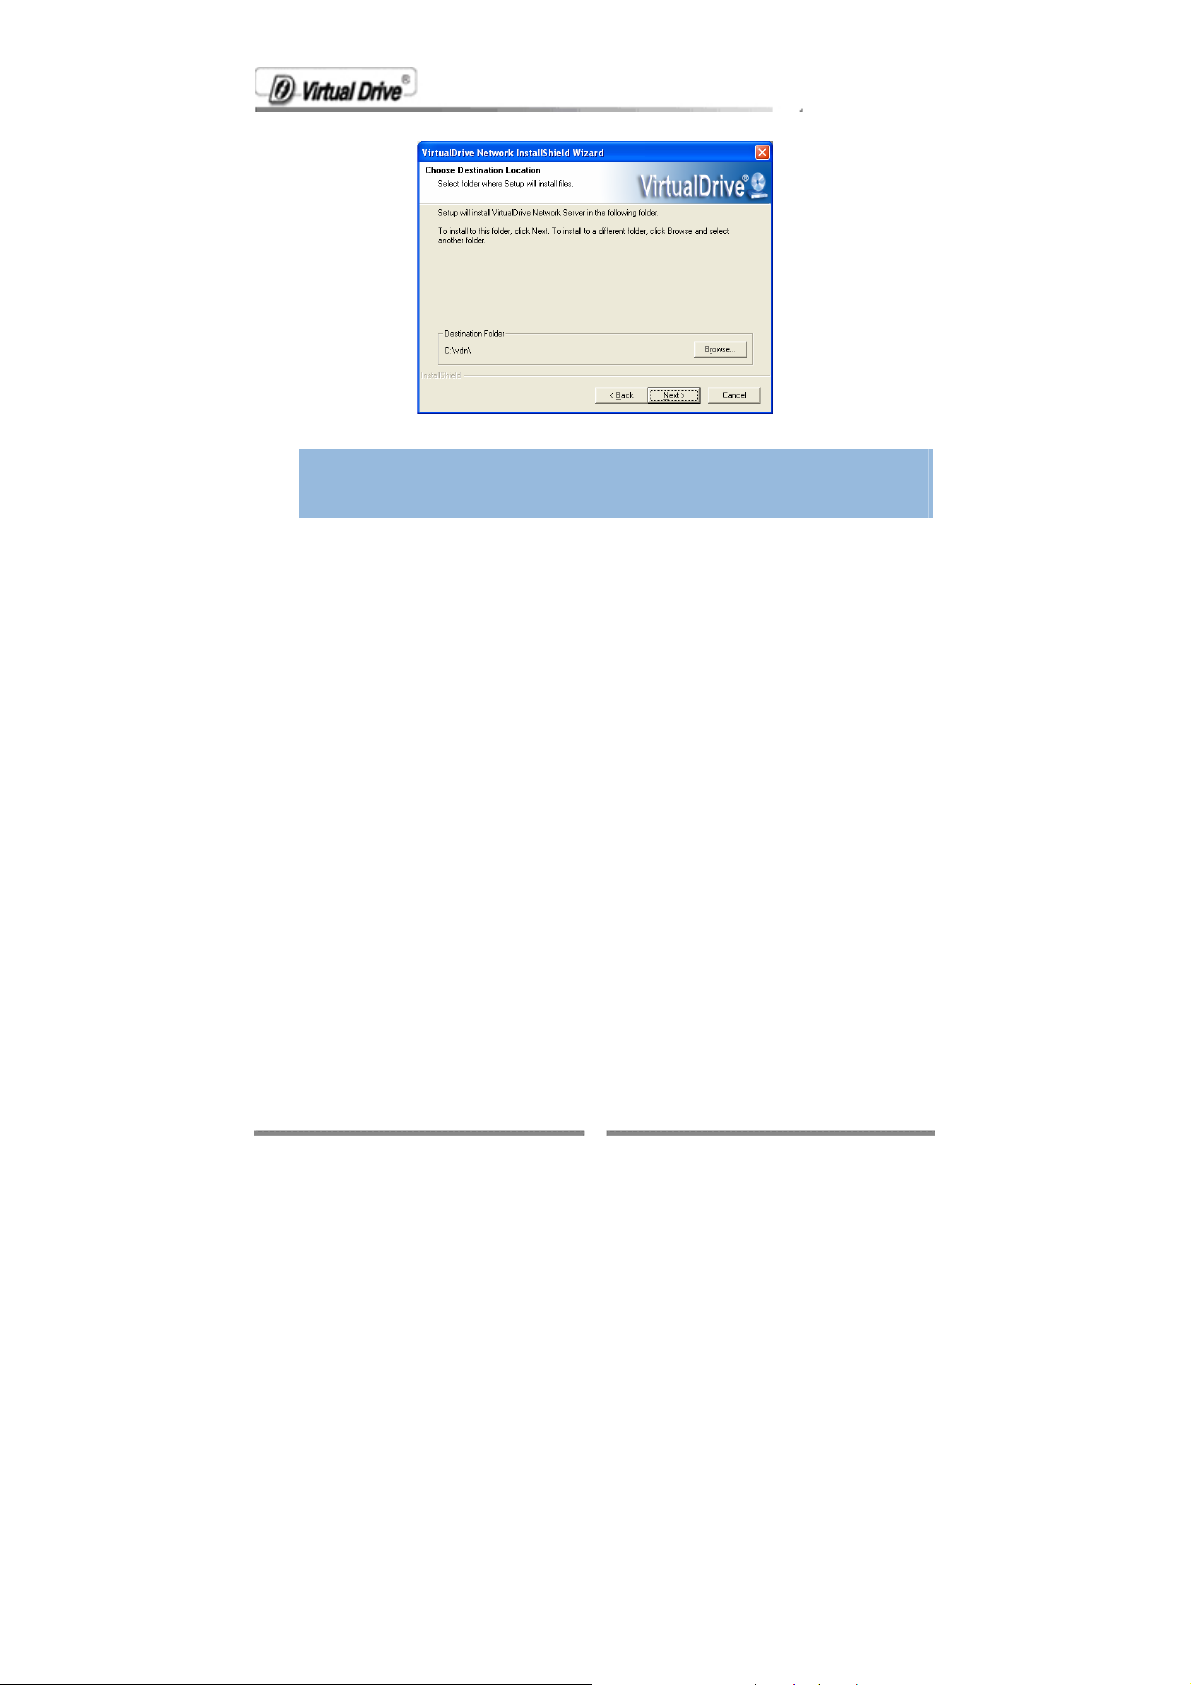
Note
ª
If the directory does not exist, the Install program will automatically
add a new directory and set its properties to "shared."
Step 5 Select Finish to complete installation of the VirtualDrive® Network
program files.
2.3 Installing the VDN Administrator or Client programs
2.3.1 Manual Installation
Once the VDN Server files have been installed into a shared directory, both
the VDN Administrator and the VDN Client installations can be executed by
running the setup.exe file from the VDN Server shared directory. There are
two methods to install the VDN Admin and Client programs ---manual
installation and silent installation.
Follow the steps below to execute manual installation:
Step 1 Select Start on the Windows taskbar, then Run.
Step 2 Enter the UNC path to the setup program, the 'shared' VDN Server
directory.
18

Note
ª
The shared VDN Sever directory is composed of the computer name
and shared folder name where VirtualDrive® Network sever program
is installed. (e.g. \\server\vdn\setup). The “sever” is the computer
name, and "vdn" is the shared folder name.
Step 3 Click OK to launch the VDN Setup Wizard.
Step 4 Select either Install VDN Administrator or Install VDN Client.
Selecting Install VDN Administrator will require you to enter the product
serial number:
Note
ª
Only one PC may be used as an administrator workstation.
Selecting Install a VDN Client will install the VDN Client program only and
19
skip to step 7.
Step 5 Carefully read the License Agreement and select I accept the terms
in the license agreement, if you accept the conditions.
Step 6 Enter your details and the serial number.
Step 7 The Install Wizard will suggest a folder to install the VirtualDrive®
Network program files. If you would like to store the program files in another
location, select Change to open the file browser and select a new folder.
20
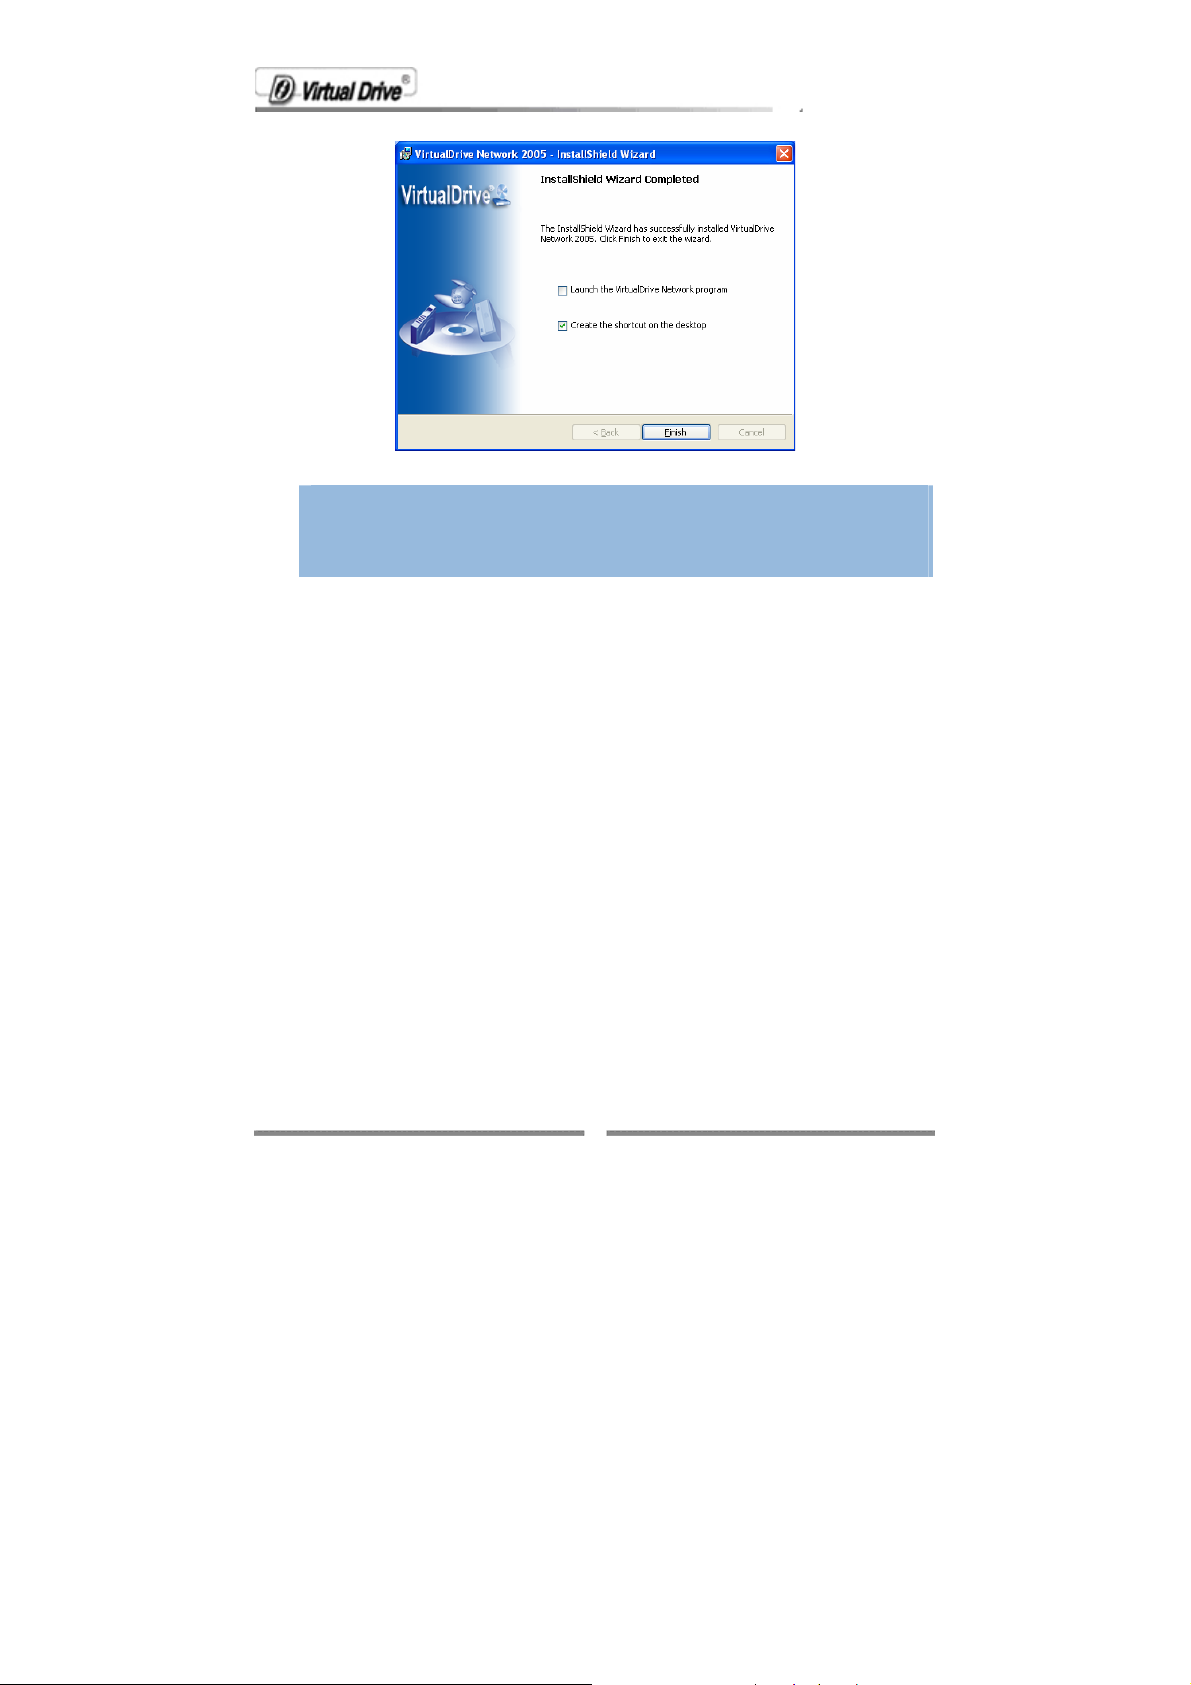
Step 8 Check the box to set the number of virtual drives in the system. You
must select at least one drive to install VirtualDrive®.
Step 9 You can launch VirtualDrive® Network manager and/or place a
shortcut on the desktop after installation by selecting the checkboxes. Select
Finish to complete the installation.
21
Note
ª
A virtual CD drive does not take any appreciable amount of hard drive
space. However, 19KB of RAM is reserved for each Virtual Drive
when a VCD is inserted.
2.3.2 Silent Installation
With the silent installation feature, once the VDN Server files have been
installed into a shared directory, both the VDN Administrator and the VDN
Client can be installed through just a command line.
Follow the steps bellow to execute silent installation:
Step 1: Remember the path of the VDN Server directory. (e.g. C:\VDN). It
will be used in the command line in step 2.
Step 2: If you would like to install the Admin silently, Then select Start-
>Run and type “C:\VDN \setup.exe /s /a /sn:"xxxxxxxxxxxxxxx"”and
press enter to start the installation. (Note: "xxxxxxxxxxxxxxx" is the serial
number we provide on purchase.)
If you wish to install the Client silently, then select Start->Run and type "
C:\VDN \setup.exe /s” and press enter to start the installation.
Step 3: Then VDN will install on its own, without any end-user intervention,
until it finishes installation.
22

Chapter 3
Using the VDN
Administrator
Program
23
Chapter 3 Using the VDN Administrator Program
3.1 Starting the VDN Administrator
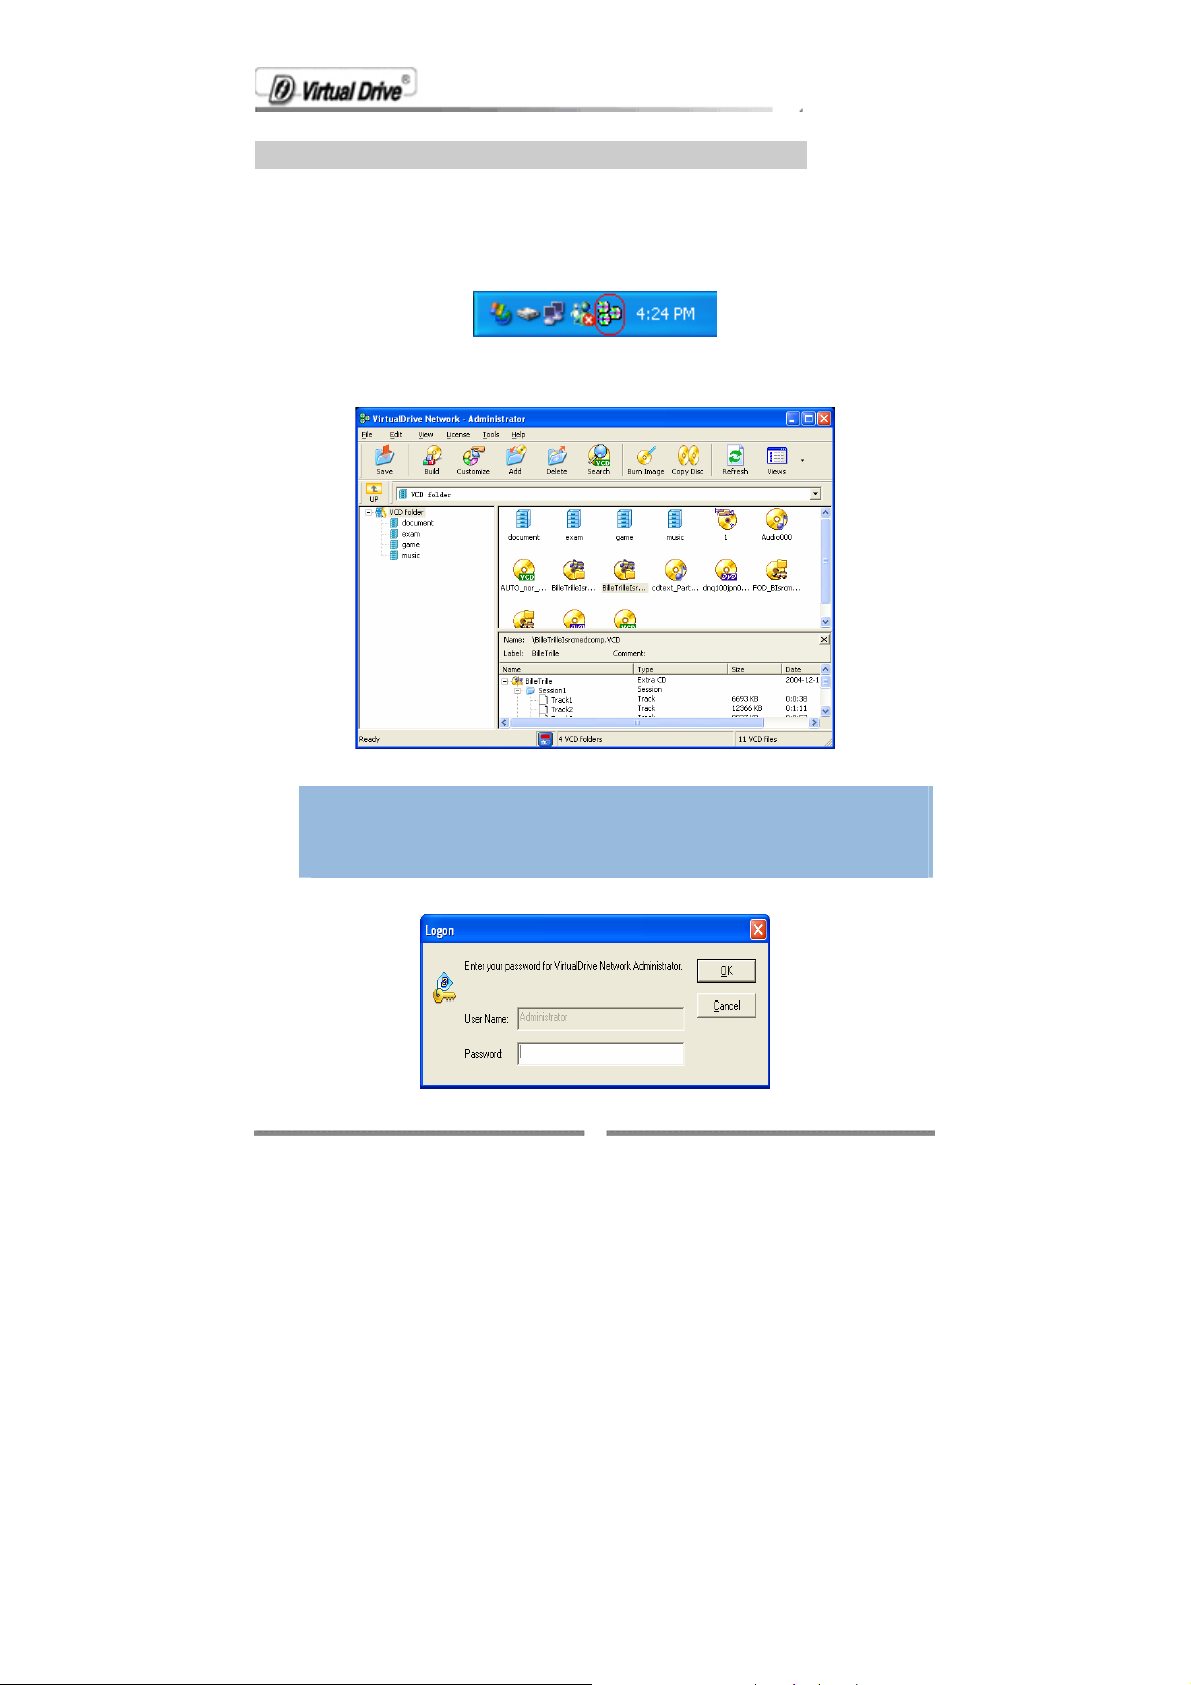
After successfully activating the VDN administrator program on the
administrator workstation, the VirtualDrive® icon will be displayed in the
bottom-right corner of the Windows taskbar.
To start the VDN Administrator program, double click on VirtualDrive icon or
right click on the icon and select VirtualDrive Network Administrator
Note
ª
If you enable Views->Settings->Other->Verify the authority for
VCD folder, a popup window will prompt you to enter your password
when launching VirtualDrive® Network Administrator.
24
Note
ª
The Default password is blank.
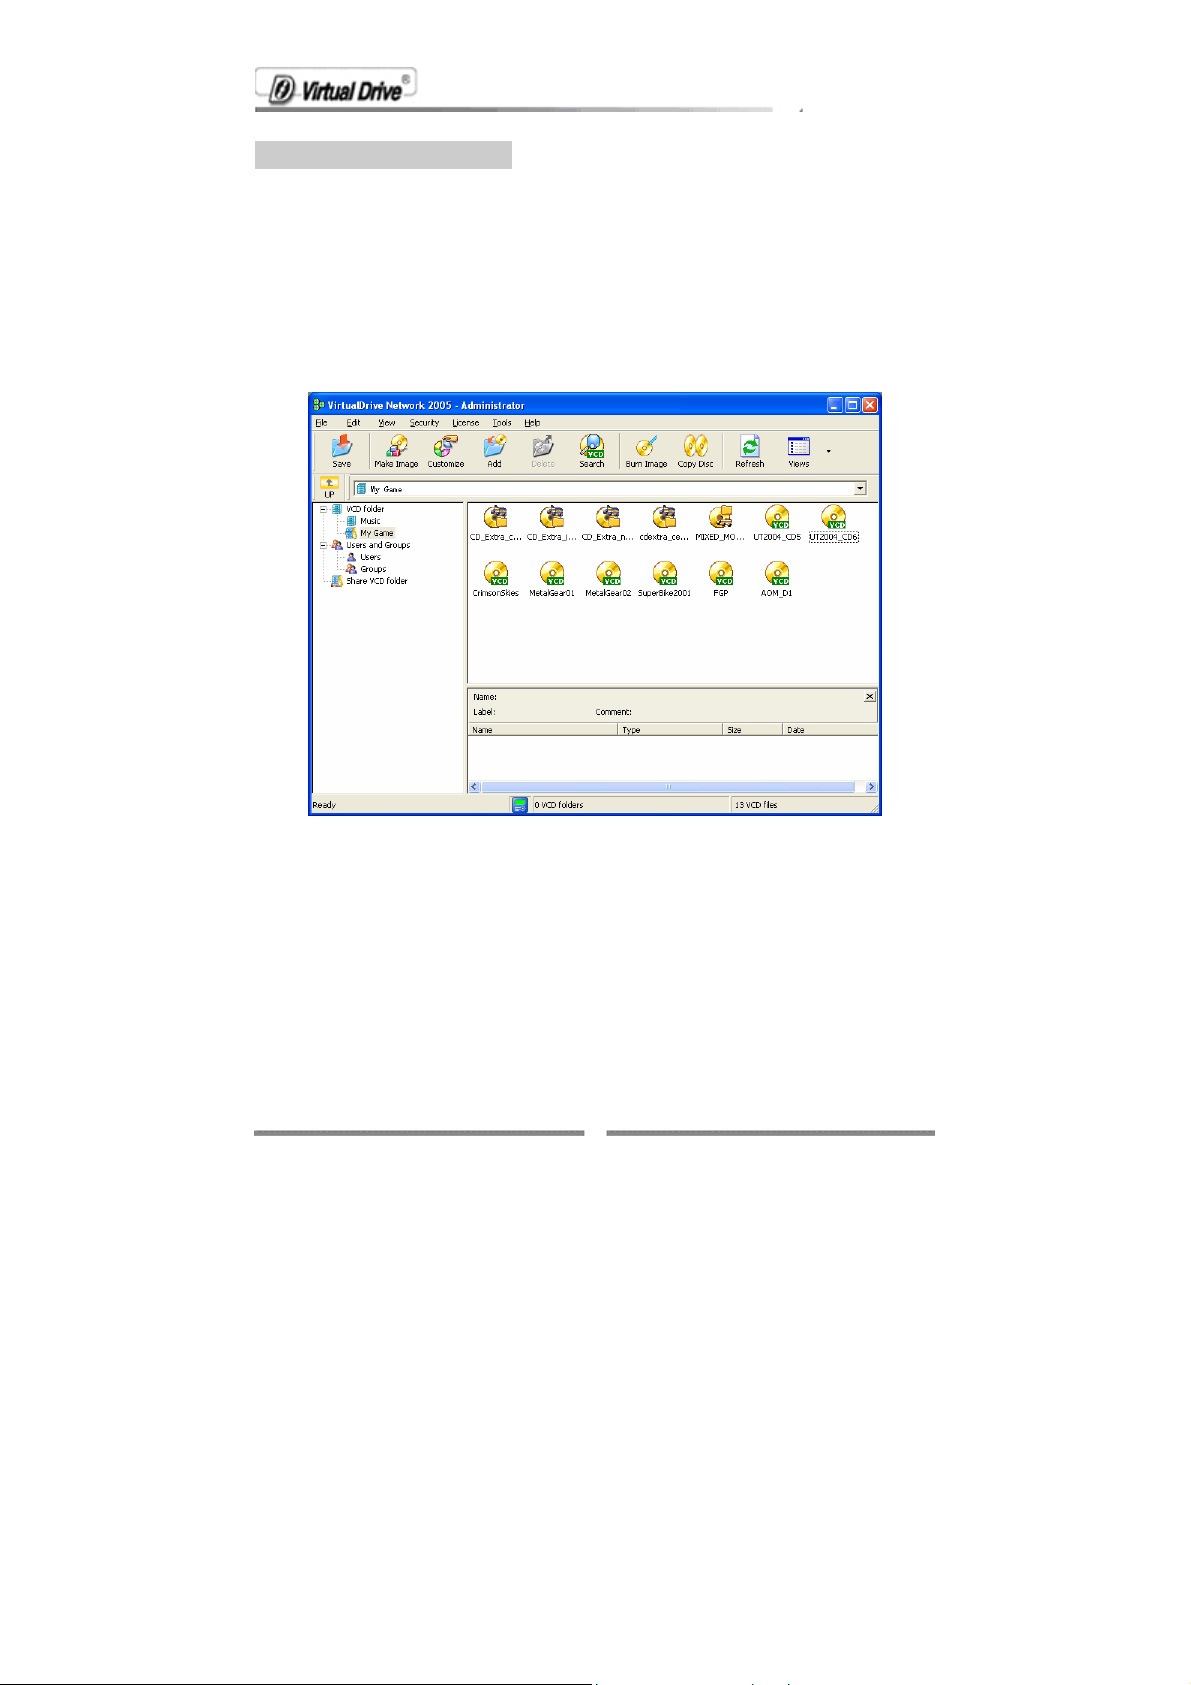
3.1.1 The VDN Administrator Manager
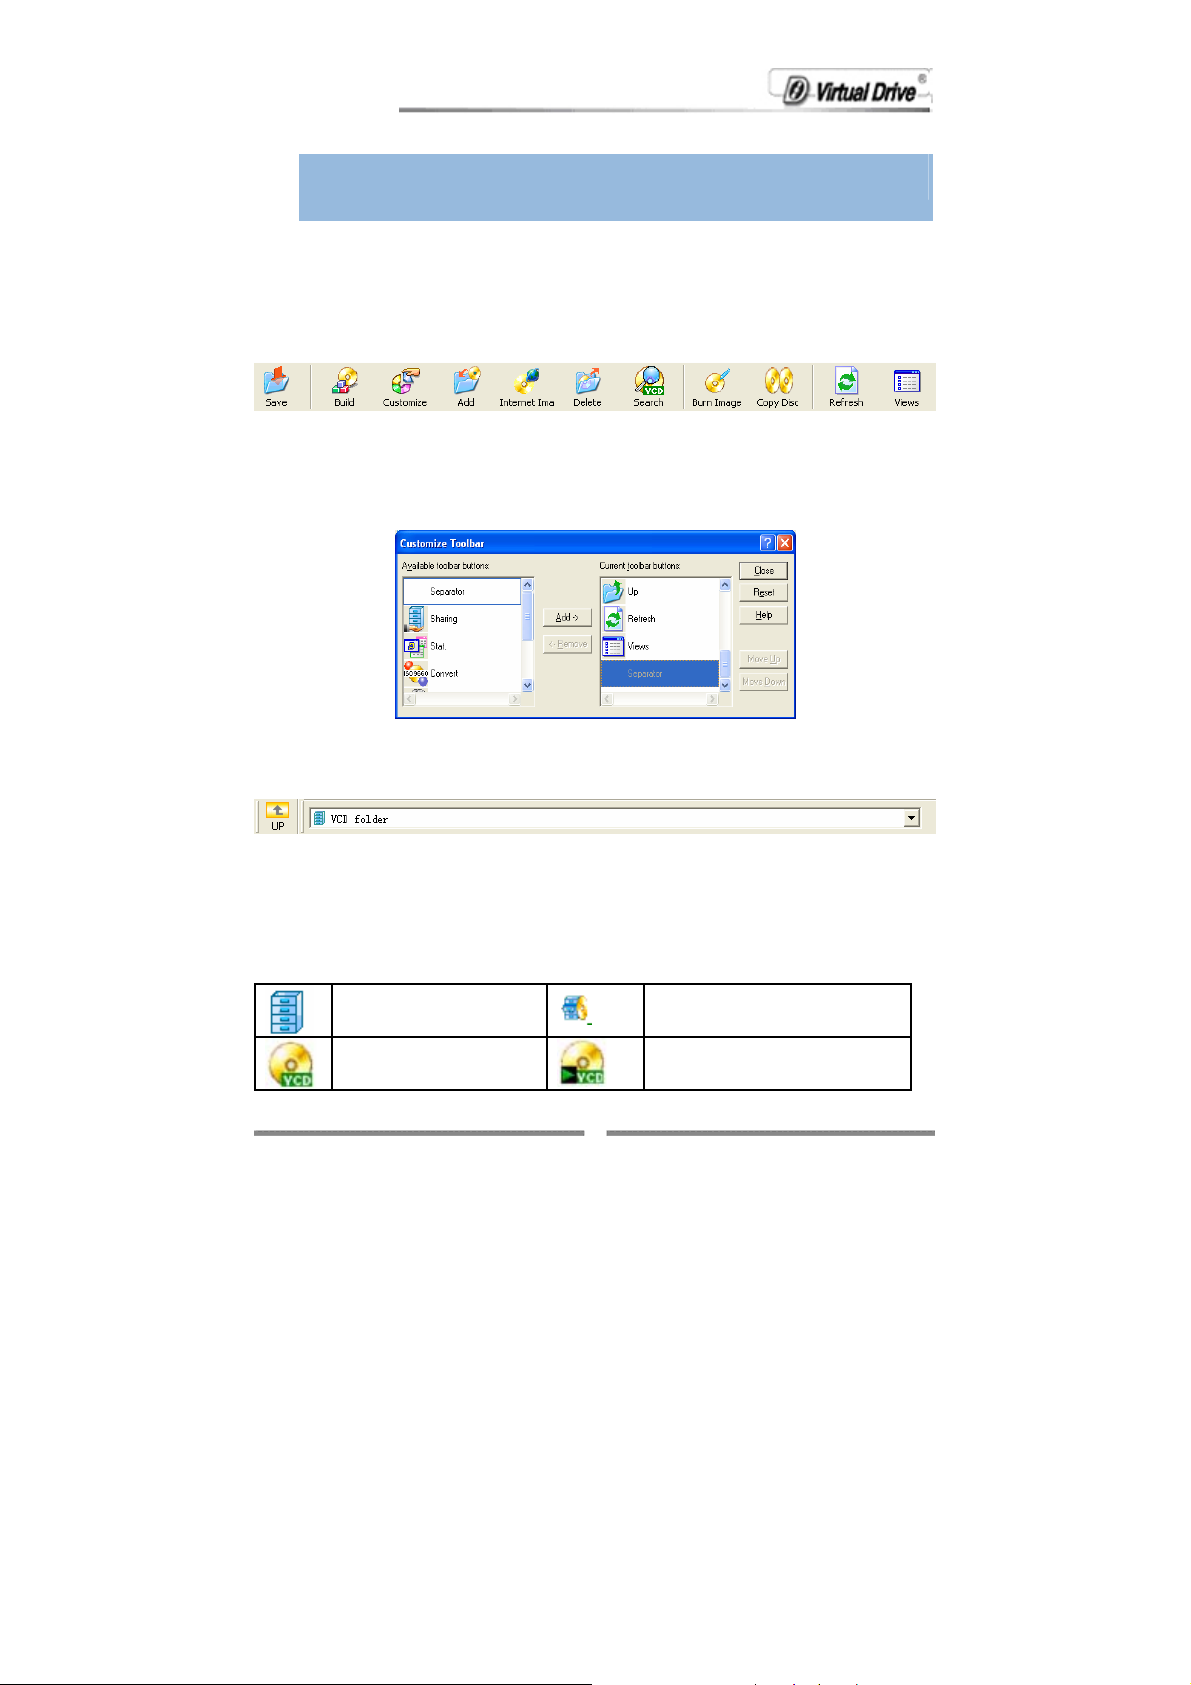
Toolbar:
The figure above is the default toolbar of VDN Administrator.
You can arrange toolbar by Selecting View->Settings->Customize (figure
below).
Address Bar:
The address bar in the middle enables you to select a VCD folder quickly.
Click the drop button to select a VCD folder. Click the UP button to go to the
up level cabinet.
Icons:
VCD folder
Virtual CD (VCD)
25
Selected VCD folder
Inserted VCD
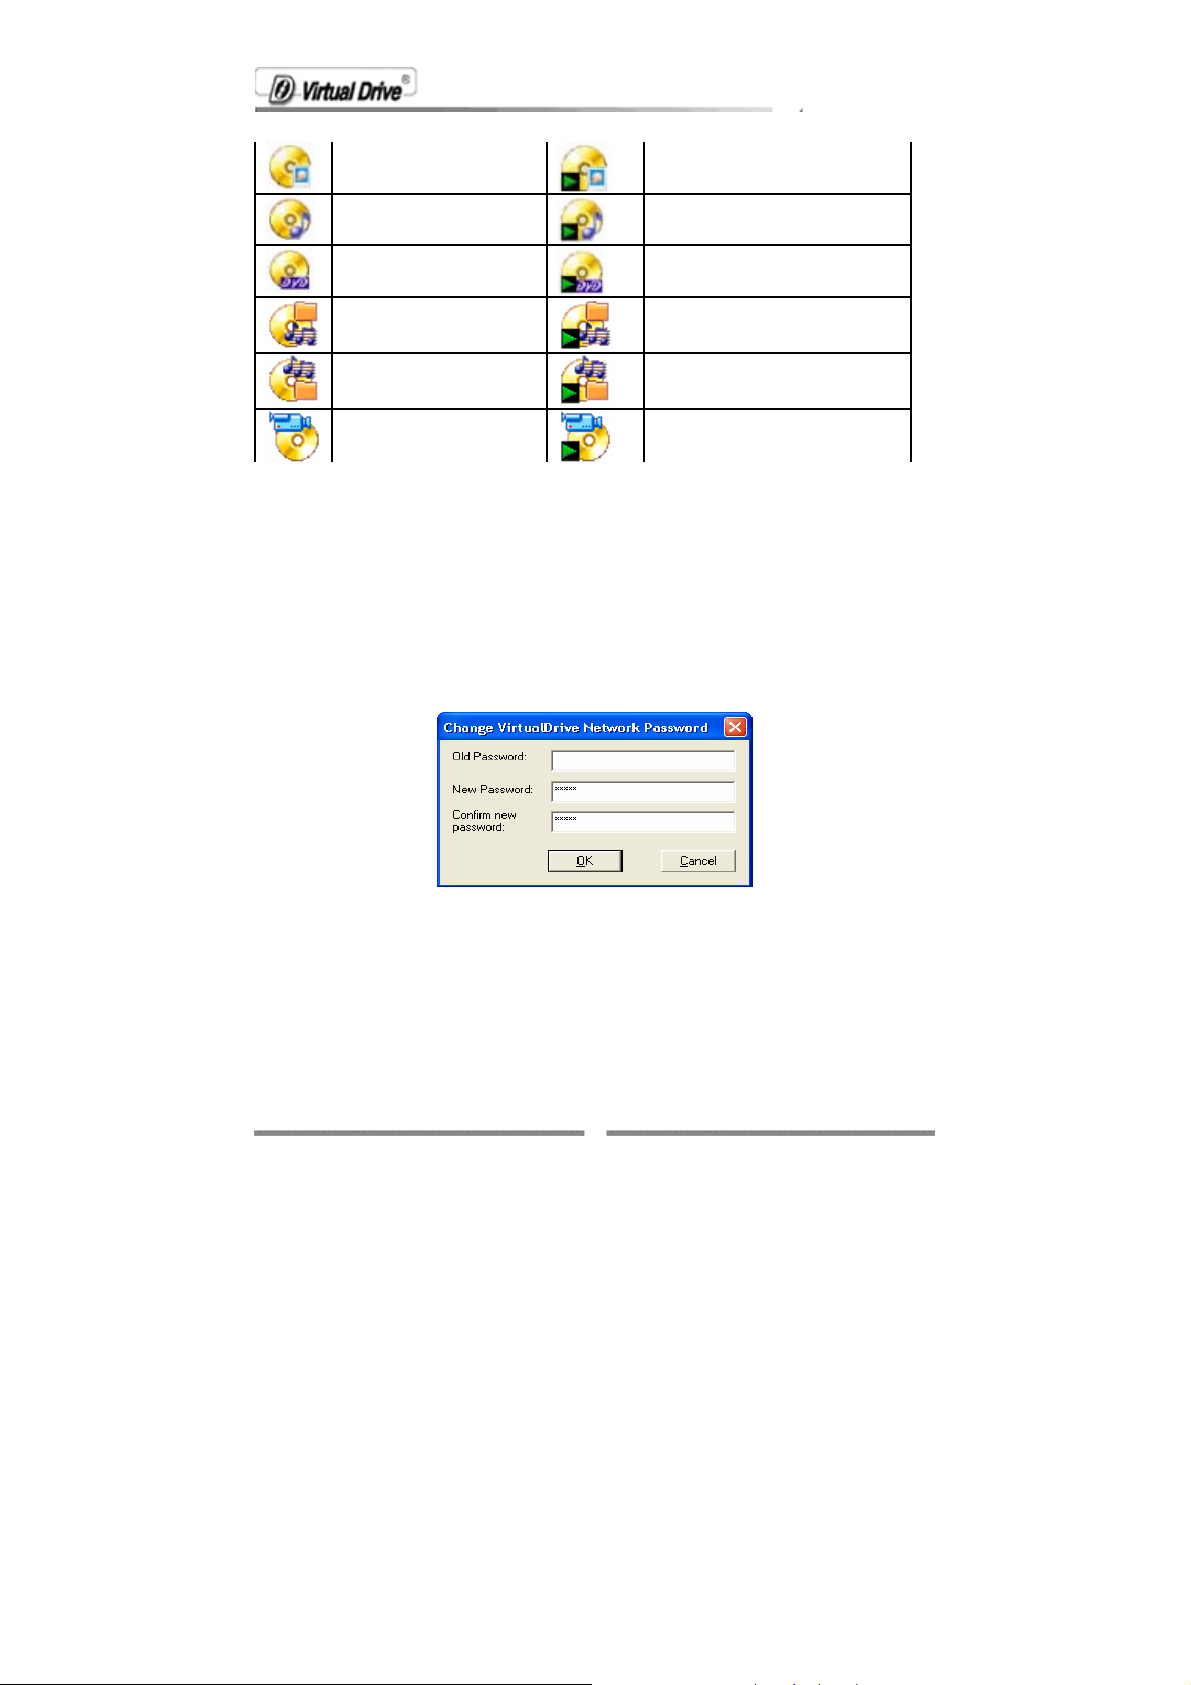
Photo VCD
Audio VCD
DVD VCD
Mixed-Mode VCD
CD-Extra VCD
Video VCD
Inserted Photo VCD
Inserted audio VCD
Inserted DVD VCD
Inserted Mixed-Mode VCD
Inserted CD-Extra VCD
Inserted Video VCD
3.1.2 Administrator Settings
Changing the Password
You can set or change the password to the VDN Administrator by selecting
Security on the menu bar then Change VirtualDrive Network Password
You will be required to enter the current Administrator Password. Type in the
new password and then re-enter the new password to confirm.
Administrator Setup –Toolbar
To open the Administrator Settings dialog, select View on the menu bar then
Settings.
26
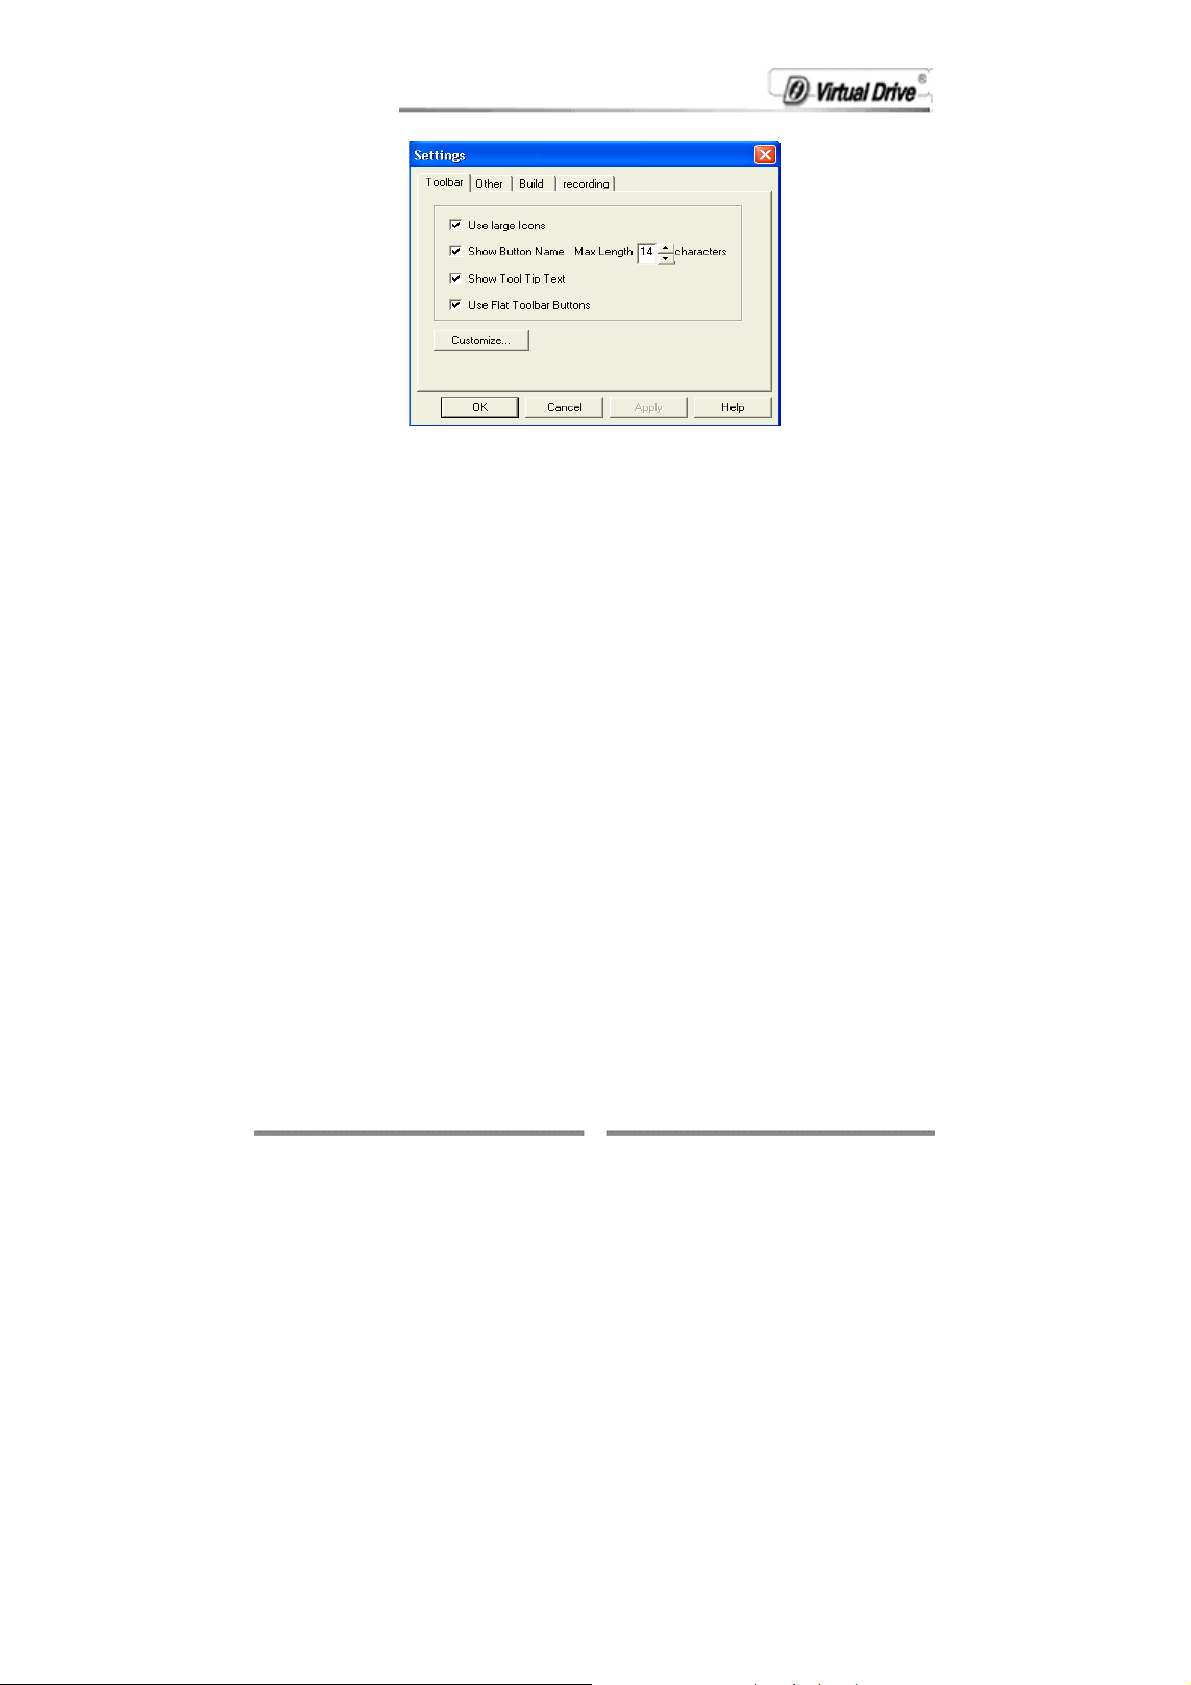
The available Toolbar settings are shown below:
Use large Icons: Set the size of the buttons icons on the toolbar.
Show Button Name: Set the number of text characters to be displayed
within the toolbar buttons.
Show Control Tips Text: Set to display control tips popup
Use Flat Toolbar Buttons: Merge the toolbar button outline into the toolbar.
Customize: Open a dialog offering a selection of buttons available within the
VDN Administrator. From here you can add/remove or change the order of
toolbar buttons used on the VirtualDrive® toolbar.
Administrator Setup- Other Settings
To open the Administrator Settings dialog, select File on the menu bar then
Settings and select the Other tab.
Descriptions of the settings on this tab are shown below:
27
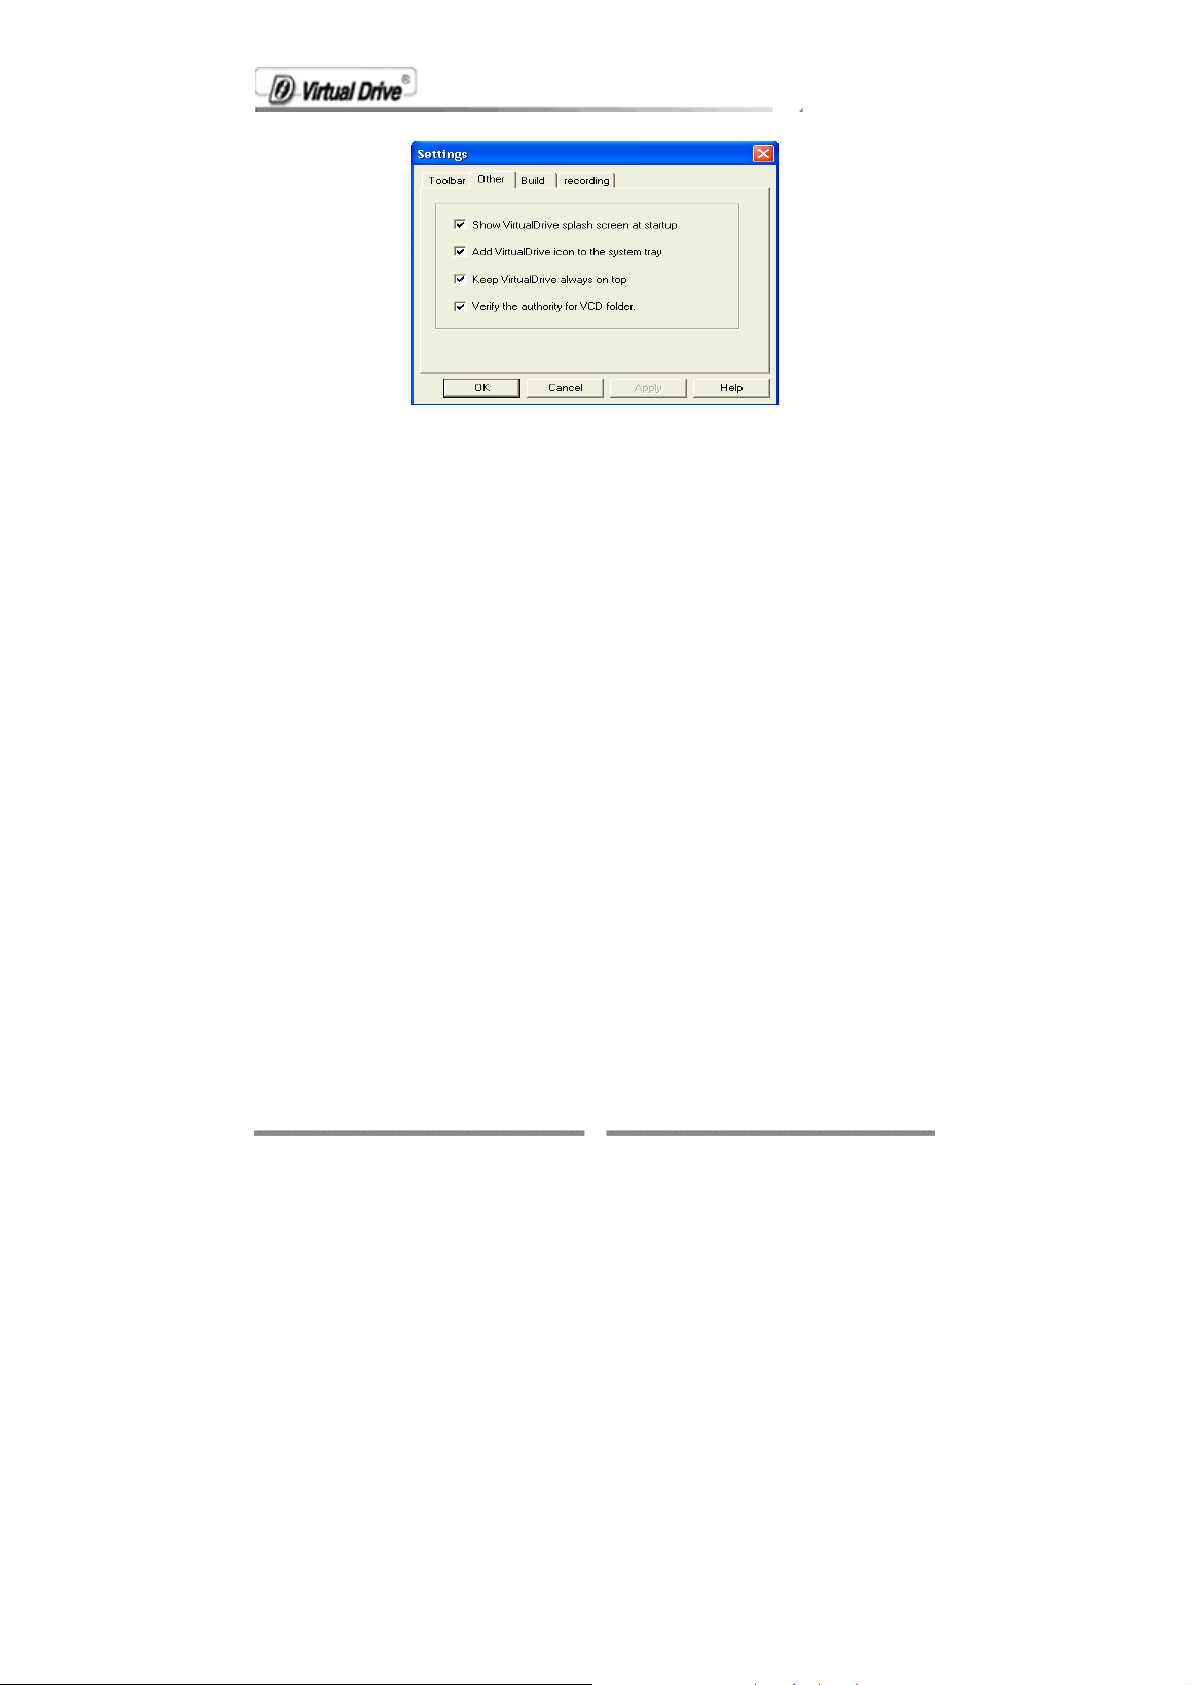
Show VirtualDrive splash screen at startup: Display the VirtualDrive®
logo when the program loads.
Add VirtualDrive icon to the system tray: Add the VirtualDrive® icon to
the bottom right hand side of the Windows taskbar.
Keep VirtualDrive always on top:
Keeps the VirtualDrive® interface always visible (i.e. above all other
application windows).
Verify the authority for VCD folder:
Enables the Password dialog on client side computers.
Administrator Setup- Builder
From here, you can set the volume size from 1MB to 2048MB for each
virtual CD. This feature is designed for building large size files only (e.g.
building customized files and DVD). If the files you are building exceed the
size you set, the remainder will be created as *.D (01, 02…).
28
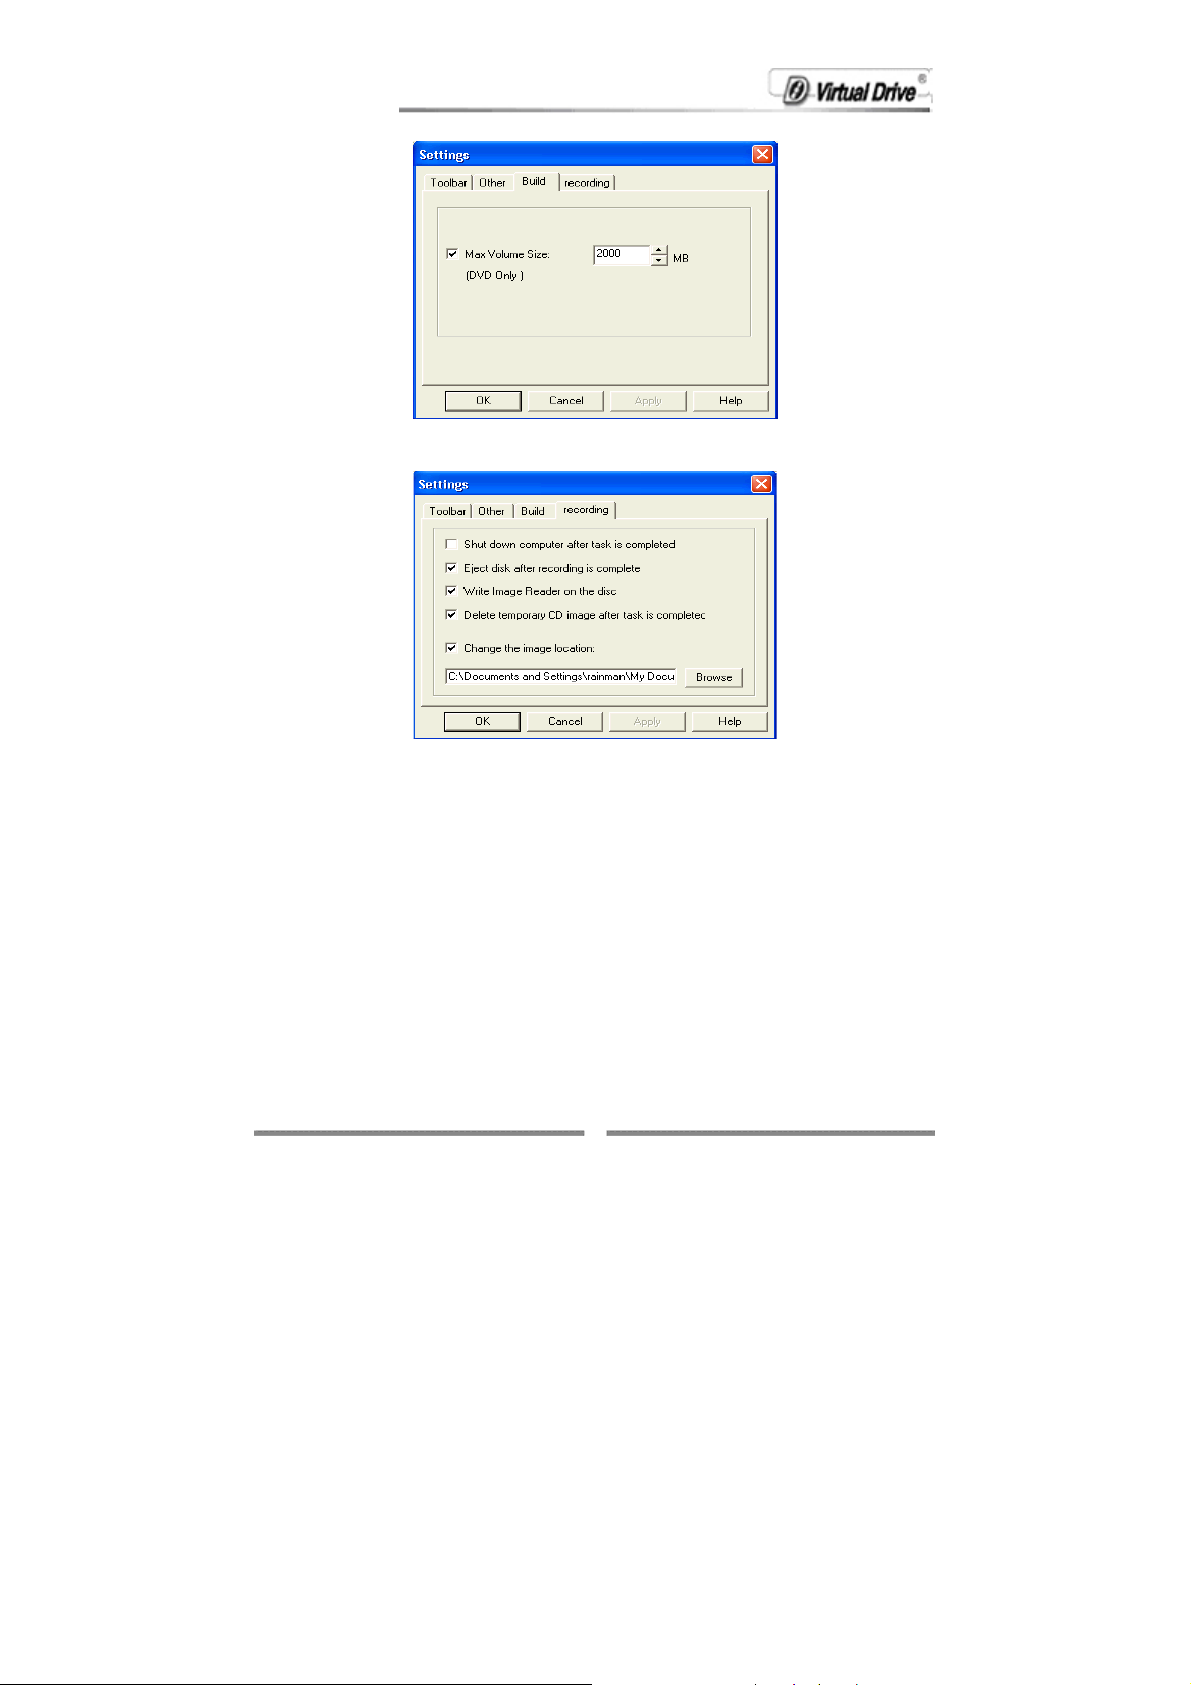
Recording options
Shut down computer after task is complete: If this option is enabled,
VirtualDrive® will turn off your computer after the Building Image or Burning
Image process is complete.
Eject disc after recording is complete: This option allows VirtualDrive® to
eject the disc from the CD recorder once the build operation is complete.
Write Image Reader on the disc: VirtualDrive® burns the image, which is
created from a physical CD, to the re-writable medium. The use of the
images burned on the disc requires the support of a virtual drive. Therefore,
you still need either VirtualDrive® or another emulation program installed on
the PC where the disc is to be used. The Image Reader program can help
you to create a virtual drive on the computer system.
Delete temporary CD image after task is complete: This option is
designed for the Copy Disc feature. You can choose whether to remove the
29

temporary image file, which is created during the “Building Image” process,
or keep it after the burning process is complete.
Change image location: Specify a location on your hard disk to hold the
temporary image file that is created in the Copy Disc section.
3.3 Building Virtual CDs (VCDs)
3.3.1 Building VCDs from the CD Drive
To use VirtualDrive®, you first create an image of a CD on your hard drive.
This image is known as a Virtual CD or VCD. You can build a VCD from
almost any type of CD, including:
•CD-ROM •Audio CD
•DVD-ROM •Video CD
•Mixed Mode CD •Photo CD
•DVD-Video •Multi-Session CD
•CD-Extra • CD-Text
•CD-Cops
VirtualDrive® supports DVD-ROM games, encyclopedias, multi-media
content, and other very large file formats.
You can begin to build a VCD, using one of the following methods:
1. Select Build
2. Select File from the menu bar and select Build.
3. Right-click the VirtualDrive icon in the system tray and select Build.
4. Use the shortcut key Ctrl+B.
5. Opening Windows Explorer and right-click the inserted physical drive and
select Build VCD File.
Note
ª
These are steps for building a VCD from a CD-ROM, DVD-ROM,
Video CD, DVD-Video, Multi-Session CD or Photo CD. To build a
on the toolbar.
30

VCD from an Audio CD, see Section 4.3 or to build a VCD from a
Mixed-Mode CD, see Section 4.4.
Follow the steps below:
Step 1 Select the physical CD drive then select Next.
Step 2 VirtualDrive® will verify that the selected hard drive has sufficient free.
space to store the new VCD. Use the file browser button
location to save the new VCD file and give the new file a name. (If no new
name is entered, the new VCD will use the name of the folder in which it is to
be stored as the VCD file name.).
to select a
Step 3 Select the CD read method and use data compression if desired.
The default read method “Normal” is successful for most CD formats.
However some CDs contain inaccurate volume information. If a VCD has
31

been successfully built but does not run as expected, use the “Intelligent
extraction” read method.
In most cases, you can use the Normal Build method and Intelligent
extraction to build your VCDs. However, due to the nature of encryption,
some of the CDs require that they be built using the Intelligent Extraction
method. Or if you know which protection is on the CD, you can choose to
build with that protection in using Other Protected CD type.
Using data compression will save hard disk space but will also require a
longer VCD build time.
Step 4 Enter a description of the new VCD in the description box.
Step 5 (optional) If the CD does not have an auto-run file, then you can
specify a program to run when the VCD is inserted. You can use the file
browse button to locate the executable program.
32

Step 6 (optional) If you want to eject the CD from the CD drive once the
build operation is complete, check ‘Eject the VCD on completion of the
Build process. Select Next to continue.
Step 7 VirtualDrive® will then display the attributes of the VCD about to be
created. Select Next to begin the build or Back to edit your settings.
Step 8 With the VCD successfully built, select Finish to close the VCD Build
window.
3.3.2 Building VCDs from Selected Files
You may build a customized VCD from selected files by using one of the
following methods.
33

1. Select Customize on the toolbar.
2. Select File from the menu bar and select Customized.
3. Right-click the VirtualDrive® icon in the system tray and select
Customized.
4. Open Windows Explorer, right-click on the selected files or folders and
select Build VCD File.
Follow the steps below:
Step 1 Add the files/folders you want to include in the new VCD.
There are three ways in which files can be added to the VCD.
Method 1 Drag selected files (folders) from top frame and drop them
into bottom frame of the Customize window.
Method 2 Copy selected files (folders) and them into the bottom frame
of the Customize window.
Method 3 Select File from the menu bar and select Add to include the
selected files. Files or folders may be added to the VCD that you want
to build.
VirtualDrive® Network supports VCD files up to 18 Gigabytes in size.
34

Note
ª
VCD files created using this method are subject to the ISO9660
standard. See Appendix-Notes for details.
The current attributes of the new VCD can be viewed by right-clicking the
CD icon in bottom-left frame and select Properties from the drop menu.
Step 2 Designate a location to save virtual CD. Once you have finished
adding files, select Build
Step 3: Select Next to begin the build process. Please refer back to steps 4
- 8 in section 4.1 to complete the building process.
. Enter the location and name for virtual CD.
3.3.3 Building VCDs from Audio CDs
To create an audio VCD, open the Build VCD dialog box by 5 methods.
(a) Click on the Build button
(b) Select File from the menu bar and choose Build from the drop menu
(c) Right click on the VirtualDrive icon in the System tray and select Build.
on the toolbar.
35

(d) Using shortcut key Ctrl+B.
(e) Open Windows Explore, right click on the inserted physical drive and
select Build VCD File from the popup menu.
Then follow the steps as described below.
Note: VirtualDrive will automatically detect the CD type and run the Build
Audio VCD process.
Step 1. Select the physical CD drive then click on Next.
Step 2 Check that selected hard drive has sufficient ‘Free Space’ to store
the new VCD.
36

Step 4 Use the File Browser button to select a location to save the
VCD.
Step 5 Give the new VCD file a name and click on Next.
Note: If no new name is entered then the new VCD will use the name of the
folder in which it is to be stored, as the VCD file name.
Step 6 Select the tracks you want to include on the Audio VCD by clicking
on the check boxes of Tracks column.
Note: If the CD player is running the Track selection will not be able to view
the track list.
Step 7 Set the Preview track
If you don’t need to build all tracks, you can click on the Preview track
play
Volume
one track and click on the Preview track play
button to select which track you like to build and click on the
button to set the Preview track’s level. When you select
button, you can see the
track’s playing progress bar from Progress.
Step 8 Select a Name for the quality and audio compression format. There
are a range of recording quality settings provided by the Windows operating
system.
37

You can also save your own custom audio settings by selecting a Format
and Attribute from the drop boxes Audio settings-Step 1 In the “Format”
drop list, select an appropriate audio compression format
If you have installed Microsoft Windows Media Player MP3 groupware or
other including MP3 coding/decoding links storeroom, you can select
MPEG Layer-3 In the Format drop list and build selected tracks as MP3
Format Audio VCD.
Audio settings-Step 2 Select the sound recording sample quality.
38

Audio settings-Step 3 Save your settings.
Any combination of settings provided in the "Sound Selection" window can
be saved to a file by clicking on the "Save As" button and giving your
custom audio settings a Name. The next time you open the "Sound
Selection" window this name will be presented as a choice in the "Name"
selection box.
Step 9.Add a description for the new Audio VCD.
Note: This is not the VCD file name.
Step 10 To Auto-Run the Audio VCD when it is inserted into a VirtualDrive,
you should specify a program to run when the VCD is loaded. To do this,
click on the file Browser
button and select an appropriate multi-media
program.
Figure 4-3i above, shows the Windows Cdplayer.exe has been chosen to
play the Audio VCD.
Step 11. Check the 'Eject the VCD' check box if you want the CD to be
ejected from the CD drive. When the Build has competed, then click on
Next to open the System Settings dialog. From here you can review the
39

chosen VCD attributes. To continue, click on Next to open the Build VCD
window.
Step 12 If any audio player application is using physical drive, close it now
and begin building the Audio VCD.
Step 13 With the VCD successfully built, click on OK to exit the Build popup
then click on Finish to close the VCD Build window.
40

3.3.4 Building VCDs from Mixed-Mode CDs
Follow the steps below:
Step 1 Select the physical CD drive then select Next.
Step 2 Select the CD read method and the CD record method.
The default read method “Normal' is successful for most CD formats.
However some CDs contain inaccurate volume information. If a VCD has
been successfully built but does not run properly, use the “Intelligent
extraction” read method. If you know which protection is on the CD, you can
choose to build with that protection in using Other Protected CD type.
41

Using data compression will save hard disk space but will require a longer
VCD build time.
Select Record Data Tracks to include only the data tracks of the mixed-
mode CD in the VCD.
Select Record Audio Tracks to include only the audio tracks of the mixedmode CD in the VCD.
Select both Record Data Tracks and Record Audio Tracks to include both
the Audio and Data Tracks in the VCD.
Step 3 If you have selected Record Audio Tracks, select Next button will
open Select Tracks window. (If selecting Record Data Tracks only, the Build
VCD manager will go directly to Step 5.).
Select the audio tracks to be included in the VCD by checking the
appropriate boxes in the Tracks list.
Select the Preview track play button
to listen to the track. Select Volume
to set the Preview track’s volume level.
Step 4: Select Next to begin the build process. Please refer back to steps 4
- 8 in section 4.1 to complete the building process.
42

3.3.5 Conversion Between an ISO 9660 Image File and a
VCD File
You may convert an ISO 9660 image file into a VCD file as well as convert a
VCD file into an ISO 9660 image file.
Step 1 Select File on the menu bar, then Convert to open the Convert File
window.
Step 2 select the file browser button to open the Windows file browser and
locate the ISO or VCD file.
Step 3 Select the desired ISO file, then select Open to continue.
Step 4 Select Convert to start the conversion.
43

A
ª
Note
udio VCD, DVD and compressed VCD files cannot be converted
into ISO file.
3.4 Managing VCDs in the VDN Server
3.4.1 Adding VCD folders (CD Jukebox)
Before VCDs can be added to the VDN server, a folder or CD Jukebox must
first be created to hold the VCDs.
Step 1
Right click on the blank space in right panel of the VDN Administrator
window and select New Folder.
(The same function can also run from the Menu bar by selecting FileÆ VCD
Folder Æ New).
Step 2 Type in the new VCD folder name and description, then select
Create to add the folder. When you have finished adding new folders select
Cancel to close the window.
44

Step 3 Save the new configuration by select save
on the Menu bar and select Save. VDN Clients will see the new
configuration only after refreshing their screen or restarting the Client
program.
or by selecting File
3.4.2 Changing a VDN Folder Description
Open the Folder Properties dialog by right-clicking on the VDN Folder icon
then selecting the VCD Folder, or select File->VCD folder->VCD Folder
Properties from the Menu bar.
The Folder Properties dialog only allows the description of the VCD folder.
3.4.3 Adding VCDs to a VCD Folder
You can add an existing VCD from your local network or from the Internet.
z Adding VCDs from the Local Network:
Step 1 To add VCD files into a VCD folder, select the VCD folder name listed
on the left side of the VDN Administrator program window. Then right click on
the blank space in right panel of the VDN Administrator window. A popup
45

menu will be displayed. Select Add VCD file.
The same function can also be accessed from the Menu bar by selecting
File -> VCD files ->Add.
Select the files that you want to add to the VCD folder and then select Open.
All of the selected VCD files will be added to the VCD folder.
Note
ª
VCDs should be added to the VDN server Administrator from “My
network places”. And cannot be added from:
- a local drive (e.g. C:\vcds\mykids play.vcd), or a mapped drive (e.g.
F:\math1.vcd while f: is mapped to \\server\vdn). VCD files must be
stored within shared folders and can be located on different file
servers (as in a distributed network system).
Tips
ª
To add multiple VCD files at a time. Hold down the Ctrl key and click
on each VCD to select, or hold the SHIFT down key to select block of
46

VCD files in the file list.
Step 2 Save the new configuration by select Save or File on the menu bar
and select Save Configuration. VDN Clients will see the new configuration
only after refreshing their screen or restarting the Client program.
Note
ª
The VDN configuration file is stored in the \\server\vdn\TvConfg.Bny.
Before updating the configuration file, the VDN Administrator program
will make a backup copy to “$TvConfg.nnn”. VDN backs up for the
lastest four configurations.
z Adding VCDs from the Internet:
To use a VCD file that is on the Internet, first you must confirm the IP
address (or website name) and name of the image file. Also make sure it is a
shared file.
Step 1: To add VCD from the Internet, click the Internet Image button
to open the Add Internet Image dialog box. (The same box can
also launch from the Menu bar by selecting File -> Add Internet Image.) Type
in the IP address and file name to add the VCD file.
47

Step 2 Save the new configuration by select Save or File on the menu bar
and select Save Configuration. VDN Clients will see the new configuration
only after refreshing their screen or restarting the Client program.
3.4.4 Deleting a VCD Icon or VCD File
Right click on the VCD icon and select Delete to delete VCD.
Select OK to delete the VCD icon from the VDN Administrator.
Only the VCD icon displayed in the VDN Administrator is removed from the
VDN CD server, the VCD file remains on the network and may be added to
the VDN Server again.
To delete the VCD file and its icon check Delete VCD files in the disk then
click OK. This will remove the VCD icon from the VDN server and VCD file
from the network.
3.4.5 VCD properties & Custom Auto-run Function
To view VCDs properties, right click on the VCD icon and select Properties,
to open the VCD Properties window.
Additionally, VDN provides a comprehensive way to startup VCDs created
from CD-ROMs with no built-in auto-run feature.
To set up an auto-run function for a VCD, follow the steps below:
1. Check the Run next command when VCD is inserted.
48

2. Enter path and the name of the program file to be run
e.g.“\setup.exe”or"\mydocFolder1\myFile.doc"or"\mydocFolder1\myPage.ht
m".
3.4.6 Searching VCD
To open Search VCD window, select Search or select File from
menu bar, then Search VCD from the drop menu to open Search VCD Box.
Path: Select VCD folder in Path drop menu or browse for folders by clicking
on file browser button
.
Select Search, the files being searched will be displayed in the window.
Select a certain file or multiple files (by holding down CTRL) you have found,
and select Add to put them into a folder (figure below).
49

Path: If select Search in VCD folder, you can select a CD folder by clicking
on file browser button
for folder from network drives by selecting search on drives.
or in search path box; otherwise, you may browse
3.4.8 License Manager
To increase the user count, you need to buy additional licenses from
FarStone. Select Help->License manager. Then select Buy Additional
Licenses to purchase licenses from FarStone over the Internet. Select
Enter New License and enter the license number you just get in the text
box and then Add License (figure below). Now, you can see the number of
users increased.
50

3.5 Managing VCD access on the VDN Server
3.5.1 Users and Groups – Overview
A Group is created to simplify user access of the VCD folder(s) that contain
applications or data that is relevant only, to the selected users.
For access to general applications like word processors you can set up a
group (For example: AllEmployees).
People using VirtualDrive® Network
can be added to a group.
Having added the users then added these users to groups you can then
assign group access to shared VCD folders.
must be added as a user before they
3.5.2 Adding/Removing Users
Add a new user by selecting Users in the Users and Groups window, then
right click and select New User to open the New User windows.
51

Enter the username and password if required.
Select Create to add the user then Cancel to close the dialog.
Finally select Save to save the new configuration.
Note
ª
No period, blank, or characters as [\ / [ ] : | < > + = :, ? *] can be
contained in the user name.
The new user is added to guests group by default. Please refer to section
3.5.2.2 Adding users to group if you want to assign users to another group.
To remove a user right-click on the selected user, then select Delete User.
3.5.2.1 Adding/Removing Groups
Right click on the Groups icon and select Ne w Group to open New Group
52

window.
Give the new group a name and description then select Create.
To remove a group, you can either (a) right click the group and select Delete
or (b) select the group and press Delete on keyboard.
3.5.2.2 Adding Users to Groups
Select the User Name, right-click and select User Properties from the popup
menu. In the popup box, you can either assign single user by using
or assign all users by selecting
contrary, use
or to remove users from groups.
to any of the listed groups. On the
53

Note
ª
A user has the same access as the group he is subject to.
Changing a User Password
Right-click on the selected user and select Change Password.
Enter the password and enter it again to confirm.
54

3.5.3 Sharing VCD Folder
Users have access to the contents in VCD folder only if they have the
privilege.
3.5.3.1 Sharing a VCD folder
First select a VCD folder, then select File->Share or right click on it and
select Sharing.
You can share the folder with users and groups by add or remove them in
right pane of the Window.
3.5.3.2 New Sharing
Right click on Share VCD Folder in left pane of VirtualDrive® Administrator,
select New Sharing to open select folder window.
55

Select a folder in this window, then Next to continue.
If you want to share this folder with users or groups, add them into the right
pane of this window.
3.5.4 VCD License
By using VCD license, you can specify how many users may access
VCD files at one time.
3.5.4.1 Set License for a VCD File
You may set the license for a VCD file by (a) Selecting a VCD file and
pointing to License->Set License on the file menu or (b) Right clicking on a
56

VCD and clicking Set License from the drop menu, either method will open
the license window (figure below).
The default setting is NO Limitation. You may change the license count by
entering a number in the blank box.
As well, you may set VCD license number for a VCD folder and VCDs in it by
repeating the process.
3.5.4.2 View License
You may inspect current license usage of a VCD file by (a) Selecting a VCD
and pointing to License->View License on the file menu or (b) Right clicking
on a VCD and clicking View License from the drop menu, either method
shall open the window as below.
VCD license information is displayed in this window, includes: VCD license
number, the location of this VCD and who are using it.
3.6 Viewing Client VCD Usage
57

3.6.1 Viewing VCD Usage
To view the usage of any particular VCD, right-click on a VCD and select
Statistic or select Stat
Note
ª
Statistic function can take effect only after enable the authority for
VCD folder.
.
Select Statistic to display the network usage statistics.
3.6.2 Viewing User Statistics
To view the statistics of any user, select the user then right-click and select
Statistic or select Stat
to open the Statistic dialog.
58

You may view the usage status in a period of time by select appropriate date
rage in the drop list.
To backup the statistic result, select Output and enter a path for the backup
file.
3.7 Backing up VCD List
Using this feature you can back up the information of current VCD list in
VirtualDrive® and restore it at any time you want.
Select File from VirtualDrive® Manger menu, then Backup to save the VCD
list in the hard disk.
3.7.1 Backing Up VCD list
Using this tool you can back up the information of the current VCD list in
VirtualDrive and restore it at any time you like.
Select File from VirtualDrive® Manger menu, then Backup to save the VCD
list in the hard disk.
Enter a location to save the backup file (*.vdl).
59

3.7.2 Restoring VCD List
Select File from VirtualDrive® Manger menu, select Restore.
Select the VCD list you want to restore, and then select Open.
3.8 Extracting Files/Audio Tracks from VCD
● Extracting Files from VCD
Users may obtain files from the VCDs without inserting them into the virtual
drive. Click on a VCD icon in VirtualDrive tray, all its contents will be
displayed in the bottom-right frame. And then right click on the selected file,
then select Extract from the drop menu.
Specify a folder to save the extracted file.
60

● Extracting Audio Tracks from VCD
VirtualDrive® allows you to extract audio tracks from an audio CD, or from
the audio track of a Mixed-Mode CD or a CD Extra, either a real CD or a
virtual CD, and store them as an audio file (*.WAV) or a MP3 file on the hard
disk. This feature allowed you to extract your favorite audios from different
CDs and customize them onto one CD.
To extract audio tracks, select Tools Æ Export Track from the VirtualDrive
Manager menu to launch the following window.
Click the Drive drop button and select a virtual drive with the desired VCD
inserted, or select the physical drive with an existing disc inserted.
You can preview a track. To preview a track, select one track by title, and
click the Play button.
Note: Clicking this button
similar to any audio player.
will eject the disc. The other controls are
Before extracting a track, you can set wave format for the MP3 file by
clicking Select Wave Format button.
Wave Format Settings:
From the Format list, select an appropriate audio compression format.
61

Note: If you want to export tracks as a MP3 file, select MPEG Layer3 from the dropdown menu. Selecting the other three formats will
save the exported track as a *.WAV file.
Select a sampling rate from the Attribute dropdown menu.
Note: The sound format and sound sampling rate will determine the
quality and size of an audio file. A high quality audio file will take more
hard drive space.
Click OK to save your settings.
Note: Any combination of settings provided in the Sound Selection
window can be saved by selecting Save As and giving your custom
audio settings a name. The next time you open the Sound Selection
window, the given name will be presented as a choice in the Name
selection box.
After you have set the wave format for each track to be exported, click
Extract and choose a location to save the file.
62

Chapter 4
VDN Command
Program
63

4.2 VDN
Command Program (VDRIVE.EXE) -VDN Command Program
Chapter 4 VDN Command Program
4.1 VDN Command Program (VDRIVE.EXE)
VDRIVE.EXE enables you to create shortcuts to insert, play or eject VCDs.
Double-click a shortcut to insert and play a title. To launch VDrive.exe select
Start on the windows taskbar then select:
/Programs/VirtualDriveNetwork/VirtualDriv e Command.
Examples for Vdrive.exe:
1. VDRIVE D: \\Server\vcds\Age of Empires.vcd /I
This command will insert the Age of Empires.VCD from server into the virtual
drive® D: and automatically starts the program.
2. VDRIVE 1: \\Server\vcds\Age of Empires.vcd /I /M
This command will insert the Age of Empires.VCD from server into the first
virtual drive and automatically starts the program.
64

4.2 Using the Command Line for Creating Shortcuts to Run
VCDs
Using the command line syntax for VirtualDrive® is a powerful way of
automating repetitious tasks.
The basic syntax is described below:
Each command starts with the term "VDrive." A virtual drive can be
referenced by its drive letter, (e.g. E:, F:, G:) or a number corresponding to
the position of the virtual drive. For example, if drives E, F and G are virtual
drives, then drive F can be referred to as “2:”. Once a virtual drive is
referenced, you can then issue a command to tell VirtualDrive® what to do
next.
Available commands are:
1. Vdrive <drive letter:> <VCDfilename> /I [@cmd] [/M] [/NA] => Insert VCD
2. Vdrive <drive letter:> /E [/M] => Eject VCD
If successful, returns 0, otherwise 1.
3. VDrive /drive: Returns the number of virtual drives available
Note: Commands shown in square brackets [ ] are optional.
4. /I Insert a VCD
5. /E Eject a VCD
6. [/M] Show message
7. [@<path><filename>] Run a program on the VCD. To use this, you
must include the full path showing the location of the program to be run
and the name of the executable file.
Using the command line for creating shortcuts to run VCDs
Using command line instructions is an ideal way to create customized
shortcuts to run your VCDs.
Step 1 - Write down what you want the shortcut to do, e.g. Vdrive •E:•
"C:\VCDCollection\Age of Kings"• /I •@E:\Age.exe
Note: • - The dot shows where a blank space must be inserted.
The above example, read from left to right works as follows:
Vdrive -tells Windows that the following commands will be
executed by Vdrive program.
E: -selects virtual drive E:
65

"C:\VCDCollection\Age of Kings"-adds the path and the name of the VCD
file to load
Note: If there are any spaces in the character string, quotation marks must
be used.
/I -tells the Vdrive program to insert the VCD
@ -tells Vdrive to execute a program
E:\Age.exe - tells Vdrive where the program is by specifying the drive (E:)
and the name of the file to run (Age.exe).
Step 2 Create a shortcut by right-clicking on an empty space on the
Windows desktop and select New then Shortcut.
Step 3 In the “Create Shortcut” dialog box, enter the command line from
Step 1.
66

Example:
Vdrive E: "C:\VCDCollection\Age of Kings" /I @E:\Age.exe
67

Chapter 5
VDN CD/DVD
burning program
68

Chapter 5 VirtualDrive CD/DVD Burning Program
VirtualDrive® combines the functions of CD/DVD emulation software with
CD/DVD burning capabilities. It allows users to copy CD/DVD images from
the hard disk to a recordable medium.
5.1 Copying disc
With the Copy Disc function, you can combine the reading and writing
processes. You can create an image (VCD) from the source CD/DVD and
copy it directly to a recordable CD/DVD disc. The Copy Disc process
consists of two main parts: the “Building Image” process and the “Copying
Image” process. The “Building Image” process allows you to create an
image (VCD) of a source CD on your hard disk. The Copying Image process
allows you to burn the image file onto a recordable medium.
To use the Copy Disc feature, Click on the
Manager Toolbar or select Tools->Copy Disc from the menu bar to open the
Copy Disc dialog.
Step 1: Select a physical CD drive to read from and then select Next.
Step 2 : Find your CD recorder from the dropdown menu, and then insert a
recordable disc into the CD recorder. Click the Device Info button on the
right-hand side of the recorder to learn more detailed information about the
CD Recorder and the inserted disc.
button on the VirtualDrive®
69

Note
ª
If you have only one CD drive (CD recorder), you can insert the
recordable disc later according to the system prompt after the
“Building Image” process is completed.
Before starting the “Building Image” process, you can specify the write speed
to use. The write speed you select will depend on the speed of your CD
writer and the type of recordable medium you are using.
We strongly recommend that you try a Test Burn before physically burning
the image onto the re-writable disc. The ‘Test Burn’ option lets users verify
whether their devices are able to complete the burning process without
ruining the disc. The Test Burning does not actually write any data on the
physical disc.
There are other options on this page:
• Number of copies: Set how many copies will be burned at this time.
• Buffer under-run protection: Buffer Under-run errors are a
common problem due to the lower transfer rate of data from the hard
drive or CD/DVD reader to the CD/DVD recorder. This function will
prevent Buffer Under-run.
• Finalize CD: This option lets users decide whether to close the last
session of the re-writable disc or not. Checking this box will close the
last session, which means that no further data can be written onto
this disc after the burning process is finished. If this option is not
selected, data can be written on the disc next time if there is enough
capacity on the disc. However, we still suggest users enable this
function, as some CD/DVD readers cannot read multi-session discs
properly.
70

• Verify data after recording: Select this option to check whether the
data on the CD/DVD is readable after recording.
Step 3 Click the Next button to open the screen shown below. Select the
CD read method and use data compression if desired. The default read
method “Intelligent Extraction” is successful for most CD formats.
Step 4 Enter a Description of the new VCD in the Description box.
Step 5 (optional) If the CD does not have an Auto-Run then you can specify
a program to run when the VCD is inserted. You can use the Browse button
to locate the executable program.
Step 6 (optional) Choose whether or not to eject the CD from the CD drive
once the Build is complete by checking the ‘Eject the VCD on completion of
the Build process’ box (Figure .4-1b above). Click on Next to continue.
Step 7: If you have only one CD drive (CD recorder), when the image has
been successfully built, VirtualDrive® will prompt you to insert a recordable
71

disc. Insert a recordable medium and click on OK to burn the image onto
the disc.
5.2 Copying images to a recordable disc
Step 1: Use either of the following methods to open the VirtualDrive®
burning program:
Select Tools from the menu bar and then select Burn Image.
In VirtualDrive® Manager, right-click on the VCDs you want to burn and
select Burn Image from the dropdown menu.
Click
Step 2: All selected images (Virtual CDs) and their detailed information are
displayed in this window. You can also right-click in the above box and
select Add/Delete from the dropdown menu to add new images or remove
existing images.
Step 3: After confirming the images to be burned, click Next to open the
screen shown below:
button on VirtualDrive® toolbar.
72

Find your CD recorder in the dropdown menu, and then insert a recordable
disc into the CD recorder. Click the Device Info button on the right-hand
side of the recorder to learn more detailed information about the CD
Recorder and the inserted disc.
Before starting the “Building Image” process, you can specify the write speed
to be used. ‘Best Speed’ means the maximum speed your CD writer
supports. The write speed you select will depend on the capabilities of the
CD writer and the recordable medium.
We strongly recommend that you try a Test Burn before physically burning
the image onto the recordable disc. The Test Burn option helps users to
determine whether their devices are able to complete the burning task
without risking destroying a medium. Test Burning does not actually write
any data on the disc.
There are other options on this page:
Number of copies: Set how many copies of the recordable disc will be
burned.
Buffer under-run protection: Buffer under-run errors are a common
problem due to the lower transfer rate of data from the hard drive or CD/DVD
reader to the CD/DVD recorder. This function will eliminate Buffer Under-run.
Finalize CD: This option lets users decide whether or not to close the last
session of the recordable disc. Checking this box will close the last session,
which means that no further data can be written onto this disc after the
burning process is finished. If this option is not selected, data can be written
73

on the disc next time if there is enough capacity on the disc. However, we
still suggest users enable this function because some CD/DVD readers
cannot read multi-session discs properly.
Verify data after recording: Select this option to check whether the data on
the CD/DVD is readable after recording.
Step 6: The burning progress displays in the following window. After the
burning task is completed successfully, click on OK to finish the process.
5.3 Erasing a Disc
Erase Disc enables users to delete the data on a re-writable CD/DVD.
Please do the following to erase a disc using VirtualDrive® burning program.
Step 1 Select Tools from the menu bar and then Erase to open the Erase
Disc screen.
Step 2 Choose the CD recorder in which a re-writable disc is already
inserted.
Step 3 Choose an Erase Mode from the dropdown menu.
There are two Erase Modes in the dropdown menu:
Quick Erase: Discs erased using this option appears to be empty but data is
not physically removed. A quick erase will take a short amount of time to
complete and will only erase the Table of Contents (TOC) of the disc. The
erased data may be recovered using some special tools.
Full Erase: Full Erase will physically erase the whole disc. Compared to
74

Quick Erase, Full Erase will take a longer time to complete.
Step 4 Click Erase to begin to erase the disc.
Step 5 The CD/DVD device will auto-eject after the erasing process is
complete.
5.4 Viewing Device Info
The Device Info provides the detailed information of the installed CD/DVD
device and the inserted CD/DVD.
Select Tools from the VirtualDrive® menu bar and then select Device Info
from the dropdown menu to display the device information.
There are three buttons on top right side of the Device Info page:
Refresh current device information.
Save your current device information as a text file on your hard
disk.
Send an e-mail about your device information to FarStone
Technology. This feature will be helpful for users to collect their
system information and report it to FarStone technical support
when errors occur when they are using VirtualDrive®.
75

Chapter 6
76

Using the VDN Client
program
Chapter 6 Using the VDN Client Program
6.1 Starting the VDN Client Program
To launch VDN Client program, you can either (a) right click on the
VirtualDrive® icon and select VirtualDrive® Network client or (b) select Start-
>Programs-> VirtualDrive Network-> V i rtualDrive Network client.
77

6.2 Running Virtual CD-ROMs (VCDs)
There are several methods of inserting a VCD file. If the VCD has auto-run
function, it will be auto started when the VCD is inserted. Select
VirtualDrive® tab on the left-hand-side of the VDN window to display all
Virtual Drives.
There are several methods for inserting a VCD.
Method 1 Select then VCD then select Insert
available drives. Select a drive to insert the VCD.
Method 2 Double-click on the VCD icon will open a list of available virtual
drives. Select a drive to load the VCD.
78
will open a list of

Note
ª
If only one virtual drive has been created, double-click on the VCD
will automatically insert the VCD into this drive.
Method 3 Left click on the VCD and without release the mouse button, drag
the VCD icon onto a virtual drive.
Method 4 Select a VCD icon and then select Edit->Insert.
Method 5 Select a VCD icon then press insert on keyboard.
Method 6 Right-click on a VCD icon and select Insert will open a list of
available drives. Select a drive to insert the VCD.
6.3 Ejecting a VCD
Select the VirtualDrive® tab on the right-hand-side of the VDN window to
display all virtual drives.
There are several methods to eject a VCD.
Method 1 Right click on the inserted VCD and select Eject.
Method 2 Select a VCD, then select Eject .
Method 3 Select a drive and without release the mouse button drag the icon
into the left-hand-side frame.
Method 4 Select an inserted VCD icon and press Delete on the keyboard.
Method 5 Select an inserted VCD icon and select Edit->Eject.
Method 6 Right click on the virtual drive and select Eject.
79

6.4 Viewing VCD Properties
To view the VCD properties, right-click on a VCD icon and select Properties.
VCD properties cannot be edited from the VDN Client program.
6.5 Searching VCD
Search VCD facilitates users to search the wanted VCD files in VCD folder.
Select File->Search or use the hot-key Ctrl+F to open Search VCD File
window (figure below).
Path: Select VCD folder in the Path drop menu or browse for folders by
using file browser
.
Note: You can search a certain file by specify its name.
6.6 Setting the Number of Virtual Drives
To change the number of Virtual Drives in your system (the maximum
number is 23), select View->Drivers or select
Number dialog. Check the desired Virtual Drive(s) to be added, then select
OK.
80
to open the Set

The Set number of Virtual Drives window shows the maximum number of
drives that may be added to your system. If new devices such as another
physical CD-ROM are to be installed, you will have to leave a drive letter free,
so the system can accommodate the new drive.
6.7 Change a Drive Letter
You can change the drive letter for any drive on your system, including the
physical drive. Right-click the desired virtual drive and select Edit Drive to
change the drive letter.
6.8 Viewing Changes of the CD Folders
If you know that the Administrator has made changes to the CD folder
configuration, the VDN Client program can be updated to reflect these
changes by either restarting the Client program or selecting View then
Refresh.
6.9 Client Settings
6.9.1 Toolbar
To open the Administrator Settings window, select File then Settings.
81

The available Toolbar settings are described below:
Use large icons: Set the size of the buttons icons on the toolbar.
Show button button: Set the number of text characters to be displayed
within the toolbar buttons.
Show tool Tips: Set to display control tips popup.
Use Flat Toolbar Buttons: Merge the toolbar button outline into the toolbar.
Customize: Open a window offering a selection of buttons available within
the VDN Administrator. From here you can add/remove or change the order
of toolbar buttons used on the VirtualDrive® toolbar.
6.9.2 Animation ON/OFF
Sets the VCD Insert/Eject animation ON or OFF.
6.9.3 Device
Modify the manufacturer name, driver model and edition directly for your
virtual drive.
82

6.9.4 Other
Show VirtualDrive® Splash screen at startup: The VirtualDrive® Manager
will display the VirtualDrive® logo when the program loads.
Keep VCDs inserted when restarting: VCDs that were inserted into any
virtual drive on shutdown will be inserted at startup (this function will not be
available unless you unchecked Verify the authority for VCD folder from -
>View->settings->other in VirtualDrive® Administrator).
Add VirtualDrive® icon to the System Tray: The VirtualDrive® icon will be
added to the right side of the Windows taskbar.
83

Chapter 7
Rapid Cache
84

Chapter 7 Rapid Cache ®
7.1 Rapid Cache® Overview
Rapid Cache® is a unique CD caching utility program that uses an
incremental caching algorithm found only in VirtualDrive®.
7.2 Rapid Cache® Features
• Rapid Cache® does not use your valuable hard drive space for
caching.
• Uses the latest incremental caching technology.
• Makes your CDs or VCDs drive run at lightning speed.
• Provides one-step cache mode reconfiguration, without having to
reboot your system.
• Rapid Cache
will not conflict with other caching programs or memory managers.
• Rapid Cache
• CD Browser: lets you see the features and capabilities and
• Performance Evaluation tool: The Performance evaluation
®
is completely transparent to your system. Therefore, it
®
comes with:
attributes of a CD.
tool can test the performance and abilities of a CD drive.
Including:
• data transfer rate
• track segment access time for Inner/Outer
tracks, 1/3, 1/2 or full strokes
This feature enables you to objectively compare
performance differences between various CD drives.
7.3 The Rapid Cache® Manager
Rapid Cache® Manager offers four utility packages spread over four pages.
Each of these pages will be described in detail hereafter.
Note: Rapid Cache
ahead function enabled. The VirtualDrive® setup program will disable it
®
gets better performance without the Windows CD read-
85

automatically. However, there are some CD titles that may turn it on again. In
these cases, you may need to follow steps below to disable "read-ahead"
manually.
(1) From the "Control Panel" double-click on the System icon to open the
System Properties window.
(2) Select the Performance tab then select File System.
(3) Select the CD-ROM tab.
(4) In the Optimize access pattern for: drop-down list, select No read-
ahead.
(5) Select OK to affect the new setting.
7.3.1 The Cache Settings
The Cache Settings page allows you to choose a cache configuration that
can be tailored to the type of file access that works best for your hardware.
By experimenting with each of the three different caching modes to gain a
maximum “save ratio”, overall CD and VCD performance can be dramatically
improved.
When experimenting with various settings to maximize CD or VCD
performance, you should flush the cache buffer (by selecting Reset Cache)
each time you change the settings to give a more precise evaluation of
performance.
86

7.3.2 Caching Modes
Rapid Cache can implement 3 different cache modes.
• Incremental mode
• MAX mode
• MIN mode
Clicking on the cache mode option radio boxes immediately switches Rapid
Cache's cache mode.
1. Incremental caching mode:
When you request data from your CD, Rapid Cache® will read the data as a
logical block, and then place part of the data into the cache buffer. The next
time you need the data from this block, Rapid Cache
cache size for this block and store more of the data block into the cache
buffer. Using this incremental algorithm, Rapid Cache
®
will increase the
®
makes more
intelligent use of your cache by retaining the most significant data in the
cache buffer.
2. Max caching mode:
Maximum caching mode reads whole data blocks into the cache buffer
together with the relevant index and directory files.
3. Min caching mode:
Minimum caching mode will read only directories and index files into the
cache buffer. Minimum caching mode is recommended if you set the cache
size to less than 514 KB in Rapid Cache
®
.
4. No caching mode:
Allows Windows to handle all caching activity.
7.3.3 Cache File Read Size
Above the Cache mode check boxes is a drop list where the cache file cutoff size may be set. By choosing an appropriate cache file size in
combination with the cache size, you can minimize the number of file block
reads and maximize the use of your cache space.
87

7.3.4 Total Read, Saved Read and the Saved Ratio
Statistical information maintained by the Rapid Cache® Manager creates a
detailed profile about the CD or VCD activity for the current cache settings.
Total read: The total number of sectors requested from a CD drive or
virtual drive.
Saved read: The number of sectors that are read from the cache
buffer rather than from the CD or VCD. The greater the number of
sectors read from the cache buffer, the greater the caching efficiency.
Saved (or Hit) Ratio: Saved Read divided by the Total Read. The
higher the saved ratio, the better overall caching efficiency.
7.3.5 Resetting the Cache Buffer
Select Reset will flush the cache buffer and reset any statistical data
collected. When experimenting with various settings to maximize CD or VCD
performance, you should flush the cache buffer each time you change the
settings to give a more precise evaluation of performance.
88

7.3.6 Changing the Cache Buffer Size
Rapid Cache® allows you to reconfigure the cache setup instantly, without
having to reboot the system. To change the cache size, select a cache size
from the “New Cache Size” drop-down list, then select Reset Cache
Note
ª
Rapid Cache® reserves at least 3MB of system RAM for other
Windows applications.
®
.
7.3.7 Rapid Cache and Video Files
A video file is intended to be played at a constant rate. Video files are
generally very large in size; therefore storing video file information in cache
will just waste your valuable cache space. Rapid Cache is able to detect
video files when they are accessed, and automatically sets an appropriate
cache size.
89

7.4.1 Viewing CD Drive Information
On this page, Rapid Cache® shows the properties of your CD or VCD drives.
It includes data mode, write capability, audio channel support, sub-channel,
vendor and product revision information.
7.4.2 Viewing CD-ROM Properties
The CD properties inspector displays a range of information:
Volume ID, CD size, CD type, copyright information, written date,
publisher, and tracks information.
90

Chapter 8
Uninstalling
VirtualDrive®
Network
91

Chapter 8Uninstalling VirtualDrive® Network
8.1 Uninstalling VirtualDrive® Administrator Program Group
Select Start in the Windows taskbar then select: Programs-> VirtualDrive®
->Uninstall VirtualDrive® and follow the instructions.
The uninstall program will delete all files created by VirtualDrive® Network
except files ending with the extension 'VCD'. Your VCDs can be deleted by
using the file manager. These files can be manually added to the
VirtualDrive® Administrator when it is re-installed.
8.2 Uninstalling VirtualDrive® Client
Repeat the uninstall VirtualDrive®
8.3 Uninstalling VirtualDrive® Network Server
Step 1 Select Start->Setti ngs->Control Panel and double-click on the
Add/Remove Programs icon to open the Add/Remove Programs windows.
Select VirtualDrive® then select Add/R
.
Administrator process on the client PC.
emove.
Step 2 To confirm uninstall, click on OK
Step 3 Click on Finish complete uninstall.
92

Chapter 9
Appendix
93

Chapter 9 Appendix
Notes:
Server Setup: (Peer-to-Peer network)
Create a shared directory on the administrator (or teachers) computer (for
example: \\server\shared\vdn).
Note: You may want to select multiple clients as administrator workstations.
Note: To share a directory, use Windows Explorer to browse your hard drive,
then right click on the folder (for example d:\vdrive) and select Sharing.
94

FAQ
Q1: Can I use VirtualDrive® for playing digital CD audio?
Yes, you can play digital audio with VirtualDrive®. However, you must
keep it in your mind that the building process must strictly comply with
these 2 rules:
(1) Audio CD must be built as the following: PCM wave format, 44.100kHz,
16kBit/s, stereo, 172kb/s.
(2) All sound tracks must be included into virtual CD.
You can have VirtualDrive® play digital CD audio by following these
settings:
For Windows XP user, right-click on My Computer and select Properties
from the drop menu, then point to Hardware->Device Manager to open
the window as below:
95

Double click on the virtual drive to open new window and point to
properties on it. Check the bottom box to enable digital audio for this virtual
drive.
Q2: Why the time for building protected CD is much longer than
building other sorts of CDs?
You must build protected CDs with intelligent extraction, otherwise the
building is hard to finish because it cost overmuch time or the VCD is
unreadable after the building. Another reason for this phenomenon is that
at the beginning of the building, VirtualDrive® slows down the speed while
reading data from some protected area on the CD (as Laserlock, Safedisk,
Securom), so the time estimate to finish will be prolonged. VirtualDrive®
will speed up once finish the building on this area and the time remains
will be reduced as well.
Q3: Does the building time vary depending on the quality of the real
CD-ROM drive?
96

The reading speed of CD-ROM drives produced by different manufacturer
diverse varies a lot due to their error-correction ability and other
mechanisms. Therefore, the building speed mostly depends on the quality
of CD-ROM drive instead of VirtualDrive® program.
Q4: Can I convert a VCD file, which is built by intelligent extraction, into
an ISO file?
The standard of the VCD file that is built by using Intelligent Extraction is
different from an ISO file. So it can't be converted into an ISO file.
Q5: Why can't I use VirtualDrive® to build audio tracks of CD into MP3
format?
VirtualDrive® need MP3 coding/decoding tools to build audio tracks into
MP3 format, please make sure you have installed Microsoft Windows
Media Player MP3 groupware or other including MP3 coding/decoding
links storeroom in your computer.
Q6: Does VirtualDrive® support IEEE1394 or USB CD-ROM?
VirtualDrive 7.03 or later version supports IEEE1394 or USB CD-ROM. If
you still possess the old version, you can download the newer one from
our website.
Q7: VirtualDrive® auto-plays the contents of virtual CD at system start-
up. How can I stop the auto-play?
Uncheck Enable CD autorun box from View-> Settings ->
Miscellaneous settings in VirtualDrive menu bar.
Q8: Can VirtualDrive® automatically eject all inserted VCDs from virtual
drive(s) after the computer restarted?
Yes, just uncheck Keep VCDs in drive when system boots box from
View->Settings->Miscellaneous settings in VirtualDrive® menu bar.
Q9: I'm upgrading VirtualDrive6 to version 8. I'm sure I have
successfully removed the old program, but it still prompts me to
uninstall it when I try installing VirtualDrive8. How can I resolve this
97

problem?
Search and delete the following files from your system: cda.pdr、cdant.sys
and cda.sys. And then restart the computer and continue the installation.
Q10: Why does the game application still ask me to insert the CD when
the virtual CD is already inserted?
You may resolve this problem by trying either of the following methods:
a. Change the virtual drive as the first CD-ROM.
b. Build this game CD by using intelligent extraction.
Q11: Why the maximum number of virtual drive is 23?
There are 26 letters in alphabet. We suppose that A: and B: are floppy
drives on your computer, C: is the entire hard disk, and therefore there are
23 letters left (D-Z), each one can be assigned to a drive. So you can
create at most 23 virtual drives.
Q12: Can I backup the settings of VirtualDrive®?
The answer is yes.
You just need to backup the following two files located at
Files\FarStone\VirtualDrive\Data.
File Remarks
mgr.dat VCD information
mgr.hky VCD hotkey settings
Note: VirtualDrive install/uninstall program will not replace or remove
these two files.
Q13: Does VirtualDrive® support protected game CD?
The answer is yes, VirtualDrive® supports various protected game CDs as:
98

Mixed-Mode protected, Safedisk1,Safiedisk2,Securom,Laserlock, etc.
Q14: Why can’t I hear the background music while playing game?
The background music of some mixed-mode CD is available only if the CD
is inserted in the first CD-ROM on the system.
Q15: Some games require more than one CD for playing. How can I
replace CD without interrupting the game?
VirtualDrive® enables users to use hot-key to insert a CD. Preset a hotkey and virtual drive for the CDs and you can insert them into the
designated drive by using the hot-key without stopping the game.
Q16: What sort of CD need to be built by using ‘Intelligent Extraction’?
Some protected CDs as Securom should use intelligent extraction to build.
Q17: After I set the number and position of virtual drives on
Windows2000/XP/Server 2003, VirtualDrive® regards virtual drive as
real CD-ROM drive. How can I correct this?
There are two ways to resolve this problem: (1) Restart your computer (2)
Refresh in Device Manager
Q18: The drive letter of real CD-ROM was arranged to the tail. How can I
change the drive letter sequence? ( e.g. change F: to E:)
You can assign a drive letter to a CD-ROM drive by the following steps:
(1)Right click on ‘my computer’ from desktop, select manage --> disk
management .
(2)Make sure which one is virtual drive.
(3)Right click on virtual drive icon, select ‘change drive letter or paths’
from the drop menu.
Q19: I installed VirtualDrive® Network on Windows Server 2003, why I
99

constantly got the error “Unable to initialize drive, please restart your
computer!” even after restarting my computer when launching VDN
Client? How can I solve this problem.
This may be caused by the conflict between Windows Terminal Server and
VDN. In this case, you have to reinstall VirtualDrive® Network. Please
follow the steps below:
(1) Uninstall Terminal Server and its Licensing. Go to Control Panel / Add
or Remove Programs / Add/Remove Windows Components, unselect
“Terminal Sever” and “Terminal Server Licensing” to uninstall them.
(2) Reinstall VirtualDrive® Network.
(3) Repeat the first step to reinstall Terminal Server components if needed.
100
 Loading...