

Page 1

VirtualDrive
VirtualDrive 11.5
®
Version 11.5
for Windows® XP, Vista, 2000 & Server 2003
User’s Guide
Page 2

VirtualDrive 11.5
Copyright Notice
No part of this publication may be copied, transmitte d, stored in a retrieval system, or tr anslated into
any language in any form or by any means without the express written permission of FarStone
Technology, Inc.
FarStone gr ants you the ri ght to use one copy of the enclo sed software progr am (“SOFTWARE”) on a
single computer. If the SOFTWARE is installed on a network, or more than one user can run the
SOFTWARE at the same time, you must purchase an additional license for each additional user or
computer.
Trademark
FarStone®, VirtualDrive®, VirtualDrive Network. and VirtualDrive are trademarks of FarStone
Technology, Inc. Microsoft®, Windows® and MS-DOS® are registered trademarks of Microsoft
Corporation. Other product names mentioned in this User’s Guide may be trademarks or registered
trademarks of their respective companies.
FarStone Technology, Inc.
U.S. Headquarters:
6 Morgan, Suite 160
Irvine, CA 92618
Phone: (949) 458-3666
Fax: (949) 458-3633
Asia-Pacific Offices
10F-1B, No. 207, DunHua North Rd., Taipei, 105, Taiwan
Phone: 886-2-2546-9898
Fax: 886-2-2546-3838
Technical Support
Please contact your retailer or use our online support system at
answers to frequently asked questions on our website, at
site links to the support section or contact a technical support representative using this link:
www.farstone.com/company/contact.htm.
Copyright© 2004-2006 FarStone Technology, Inc. All rights reserved.
www.farstone.com/support. Y ou’ll find
www.farstone.com/support/faqs. F ollow the
2
Page 3

VirtualDrive 11.5
Software License Agreement
FARSTONE TECHNOLOGY, INC. (FARSTONE) END USER LICENSE AGREEMENT FOR VIRTUALDRIVE,
HEREAFTER REFERRED TO AS THE “SOFTWARE”
PLEASE READ CAREFULLY : THE USE OF THIS “SOFTWARE” IS SUBJECT TO THE “SOFTWARE” LI CENSE
TERMS OF FARSTONE AND OTHER LICENSORS WHOSE SOFTWARE MAY BE BUNDLED WITH THIS
PRODUCT.
BY YOUR USE OF THE “SOFTWARE” INCLUDED WITH THIS PRODUCT YOU AGREE TO THE LICENSE
TERMS REQUIRED BY THE LICENSOR OF THE “SOFTWARE”, AS SET FORTH BELOW. IF YOU DO NOT
AGREE TO THE LICENSE TERMS APPLICABLE TO THE “SOFTWARE”, YOU MAY RETURN THE ENTIRE
UNUSED PRODUCT FOR A FULL REFUND.
LICENSE AND WARRANTY:
The software that accompanies this license (the “Software”) is the property of FARSTONE or its
licensors and is protected by copyright law. W hile F ARST ONE conti nues to own the Softwa re, you will
have certain rights to use the Software after your acceptance of this license. Except as may be
modified by a license addendum which accompanies this license, your rights and obligations with
respect to the use of this Software are as follows:
A. Single User License: (a) Use the “Software” on a single computer system or network and only by
a single user at a time. If you wish to use the “Software” for more users, you will need an additional
License for each user.
(b) Make one copy of the “Software” in machine-readable form solely for back-up purposes provided
you reproduce FarStone’s copyright proprietary legends. Notwithstanding the foregoing, the
“Software” may be used on the home, laptop or othe r secondary computer of the principal user of the
“Software” , and an additional copy of the “Software” ma y be made to support such use. As used in this
License, the “Software” is “in use” when it is either loaded into RAM or installed on a hard disk or other
permanent memory device. The “Software” may be “in use” on only one computer at an y given time.
(Different License terms and fees are applicable for netw orked or multiple user applications.) As a
specific condition of this Licens e, you agree to use the “Software” in compliance with all applicab le
laws, including copyright laws, and that you will not copy, transmit, perform or distribute any audio or
other content using the “Software” without obtaining all necessary Licenses or permissions from the
owner of the content.
B. Multiple User License: Make one copy of the “Software” in machine-readable form solely for
back-up purposes, provided you reproduce FarStone’s copyright proprietary legends.
You m ust acquire and dedicate a Li cense for each se par ate computer o n which an y part or porti on of
the “Software” is installed or run As used in this License, the “Software” or any part or portion of the
“Software” is “in use” when it is either loaded into RAM or installed on a hard disk or other permanent
memory device including any networked or shared environment where either direct or indirect
connections are made through software or hardware which pools or aggregates connections.
As a specific condition of this License, you agree to use the “Softw are” in compliance with all applicable
laws, including copyright laws, and that you will not copy, transmit, perform or distribute any audio or
other content using the “Software” without obtaining all necessary Licenses or permissions from the
owner of the content.
C. Restrictions: You may not distribute copies of the “Software” to others or electronically transfer
3
Page 4

VirtualDrive 11.5
the “Software” from one computer to another over a network. You may not post or otherwise make
available the “Software”, or any portion thereof, in any form, on the Internet. You may not use the
“Software” in a computer service busines s, including in time-sharing applications. The “Software”
contains trade secrets and, in order to protect them, you may not decompile, reverse engineer,
disassemble, or otherwise reduce the “Software” to a human-perceiv able form. YOU MAY NO T MODIFY ,
ADAPT, TRANSLATE, RENT, LEASE, LOAN, RESELL FOR PROFIT, DISTRIBUTE, NETWORK OR CREATE
DERIVATIVE WORKS BASED UPON THE “SOFTWARE” OR ANY PART THEREOF.
D. Limited Warranty: F arStone warrants that the media on which the Software is distributed will be
free from defects for a period of fifteen (15) day s from the date of delivery of the Software to you. Y our
sole remedy in the event of a breach of this warranty will be that FarStone will, at its option, replace
any defective media returned to F arStone within the warranty period or refund the money you paid for
the Software. FarStone does not warrant that the Software will meet your requirements or that
operation of the Software will be uninterrupted or that the Software will be error-free.
THE ABOVE WARRANTY IS EXCLUSIVE AND IN LIEU OF ALL OTHER WARRANTIES, WHETHER
EXPRESS OR IMPLIED, INCLU DING THE IMPLIED W ARRANTIES OF MERCHANTABILITY, FITNESS FOR
A PARTICULAR PURPOSE AND NONINFRINGEMENT. THIS WARRANTY GIVES YOU SPECIFIC LEGAL
RIGHTS. YOU MAY HAVE OTHER RIGHTS, WHICH VARY FROM STATE TO STATE.
E. Limitation of Liability: IN NO EVENT WILL FARSTONE OR ITS LICENSORS BE LIABLE TO YOU FOR
ANY INCIDENTAL, CONSEQUENTIAL OR INDIRECT DAMAGES , INCLUDING ANY LOST PROFITS, LOST
SAVINGS, OR LOSS OF DATA, EVEN IF FARSTONE OR A LICENSOR HAS BEEN ADVISED OF THE
POSSIBILITY OF SUCH DAMAGES, OR FOR ANY CLAIM BY ANY OTHER PARTY. Some states do not
allow the exclusion or limitation of special, incidental, or consequential damages, so the above
limitation or exclusion may not apply to you.
F. General: Y ou acknowledge that you have read this Agreement, understand it, an d that by using the
“Software” you agree to be bound by its terms and conditions. You further agree that it is the complete
and exclusive statement of the agreement between Fa rStone and you, and supe rsedes an y proposal
or prior agreement, oral or written, and any other communication between F arStone and you relating
to the subject matter of this Agreement. No additional or any different terms will be enforceable
against FarStone unless F arStone gives its express co nsent, including an express w aiver of the terms
of this Agreement, in writing signed by an offic er of FarStone. You assume full responsibility for the
use of the “Software” and agree to use the “Software” legally and responsibly.
Should any provision of this Agreement be declared unenforceable in any jurisdiction, and then such
provision shall be deemed severable from this Agreement and shall not affect the remainder hereof.
FarStone reserves all rights in the “Software” not specifically granted in this Agreement.
Should you have any questions co ncerning t his Agreement, y ou ma y contact FarStone by writing to:
FarStone Technology, Inc.
Legal Department
6 Morgan, Suite 160
Irvine, CA 92618
4
Page 5

VirtualDrive 11.5
Contents
Chapter 1: Product Overview··············································································· 7
1.1 Product Features ...................................................................................................... 7
Chapter 2: Installation ························································································ 8
2.1 System Requirements ............................................................................................... 8
2.2 Installing VirtualDrive ............................................................................................... 8
2.3 Uninstalling VirtualDrive ............................................................................................ 9
Chapter 3: Getting Started················································································· 10
3.1 Launching VirtualDrive ............................................................................................ 10
3.2 VirtualDrive Start Menu ........................................................................................... 11
3.3 VirtualDrive Main Console ........................................................................................ 12
3.4 Creating a Virtual CD .............................................................................................. 12
Building an Image from CD or DVD-ROM, Video CD/DVD, or Photo CD······························ 13
Building an Image from Audio CD ················································································ 13
Building an Image from a Mixed Mode CD····································································· 14
3.5 Creating a Virtual Drive........................................................................................... 14
3.6 Custom Backup ...................................................................................................... 15
Creating a Project······································································································ 15
Adding Files and Folders····························································································· 15
Working with Project Files and Folders·········································································· 16
Setting Project Properties ··························································································· 16
Burning a Project to Disc···························································································· 17
Using Multiple Discs for a Project················································································· 18
Burning a Project to Virtual CD (VCD)··········································································· 19
3.7 Restoring a Virtual CD to CD/DVD............................................................................. 19
3.8 Burning Settings .................................................................................................... 19
Disabling the CD/DVD Drive Autorun Feature································································· 19
Choosing Burning Settings·························································································· 19
3.9 Cloning a CD/DVD .................................................................................................. 21
3.10 The VCD Manager ................................................................................................. 21
Using Virtual Drives in the VCD Manager······································································· 22
Using Physical Drives in the VCD Manager····································································· 22
Adding VCDs to the VCD Manager················································································ 23
Hot Keys·················································································································· 23
Erasing a Disc··········································································································· 23
Viewing Device and Disc Information············································································ 23
Organizing VCDs in Cabinets······················································································· 24
Searching for VCDs···································································································· 24
Extracting Files from a VCD ························································································ 24
Inserting a VCD into a Virtual Drive·············································································· 24
Ejecting a VCD from a Virtual Drive·············································································· 25
Importing and Exporting a VCD List ············································································· 25
3.11 Enabling and Disabling Physical Drives..................................................................... 25
5
Page 6

VirtualDrive 11.5
3.12 Converting VCDs and ISO 9660 Images................................................................... 25
Chapter 4: Command Line Support ···································································· 26
4.1 Running VCDs with Command Line Syntax ................................................................. 26
4.2 Creating Shortcuts to Run VCDs ............................................................................... 26
Chapter 6: Live Update ······················································································ 28
6.1 Technical Support and Product Updates ..................................................................... 28
Glossary ············································································································ 29
6
Page 7

VirtualDrive 11.5
Chapter 1: Product Overview
VirtualDrive is a CD emulation utility that creates disc images, or “virtual CDs” from game and
application CDs and DVDs. This lets you run games and applications without loading the physical disc
in a CD/DVD-ROM drive. Your virtual CDs (VCDs) play when inserted in any on e of up to 23 “v irtual
drives” that you configure in the software and that appear as drive letters in Windows Explorer.
1.1 Product Features
CD/DVD Support
VirtualDrive supports CD-ROM, CD Extra, CD T ext, audio CD , mixed-mode CD, photo CD , video
CD, DVD-ROM, multi-session CD, and unprotected DVD video.
Copy Protection Support
VirtualDrive is compatible with many (but not all) titles using SafeDisc, SecuROM, LaserLock,
StarForce, and other protection types.
Full Windows Integration
The user interface is integrated with Windows Explorer and Device Manager. You can insert,
eject, and browse your VCDs in a familiar environment.
VCD Cabinet
Sort your virtual CDs in your VCD library and place them in customized “cabinets,” or
categories.
Image Compression
VirtualDrive uses a high-performance compression engine when it builds VCDs. VCDs are
automatically decompressed when you access them.
Optimized Disc Performance
Virtual CDs have access rates up to 200 times faster than physical CDs in CD-ROM drives.
7
Page 8
VirtualDrive 11.5
Chapter 2: Installation
2.1 System Requirements
Windows 2000, XP (including 64-bit systems), Server 2003 (including 64-bit systems), or
Vista (32-bit and 64-bit systems)
CD/DVD drive or recorder
50 MB of hard drive space
256 MB RAM or more
Intel Pentium (or compatible) 233MHz processor or better
2.2 Installing VirtualDrive
1. Close any running applications.
2. Click on the VirtualDrive executable file.
3. If you accept the terms of the license agreement, select I Accept the License Agreement
and click Next.
4. Enter your Name, Organization (optional), and serial number. Click Next.
5. The installation wizard will recommend a default folder for VirtualDrive program files. If you
would like to store program files in another location, select Change to open the file browser
and designate a new folder.
6. Confirm the setup configuration and clic k Next.
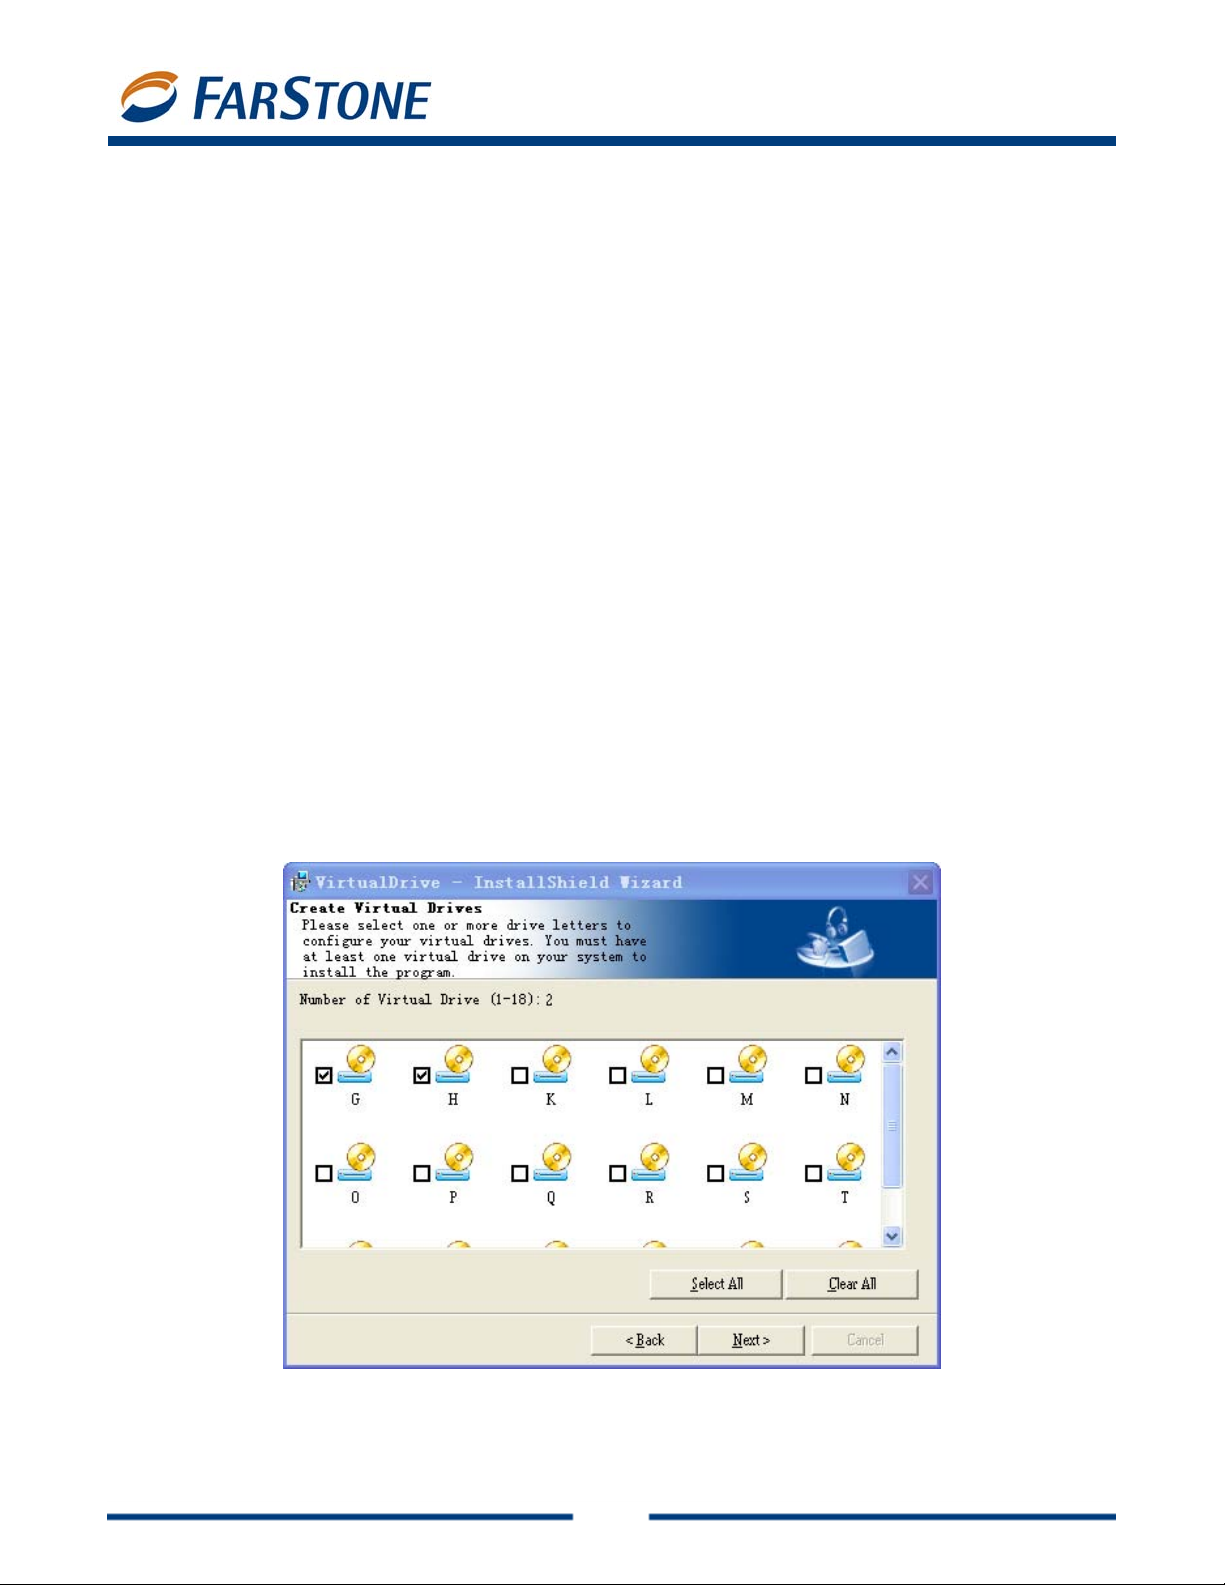
7. Select the number of virtual drives you would like to configure on your system and click Next.
You must have at least one virtual drive for the program to install.
8. Select the appropriate checkbox to place a program shortcut on your desktop.
9. Click Finish. You must reboot your computer before launching VirtualDrive.
8
Page 9

VirtualDrive 11.5
2.3 Uninstalling VirtualDrive
Close all running programs, including VirtualDrive.
To launch the Virtu a lDrive uninstall wizard:
a. In the Windows taskbar, select Start Æ All Programs Æ VirtualDrive Æ Uninstall
VirtualDrive.
Or:
b. Select Start Æ Control Panel and double click the Add or Remove Progra ms icon to
open the Add or Remove Programs screen. From the list, select VirtualDrive Æ
Add/Remove.
The uninstall program will remove all files created by VirtualDrive, ex cept image fi les (VCDs with the
“VCD” or “D00…” extension), project files (“CIF” extension) and some log files that keep a record of
the VCD list in your VCD library. These files can be deleted in Windows Exp lorer.
Note
ª
Select the corresponding checkb ox to automatically delet e VCD files and lists from your VCD
Cabinets while uninstalling VirtualDrive.
9
Page 10

VirtualDrive 11.5
Chapter 3: Getting Started
3.1 Launching VirtualDrive
Double click the program icon on the desktop, or select Start Æ All Programs Æ VirtualDrive
Æ VirtualDrive Manager.
The VCD Manager lets you organize your virtual discs a VCD libr ary , insert them into virtual drives for
play, and open them up to examine their contents. You’ll find more info rmation on the V CD Manager
in Chapter 3.
To view other functions of VirtualDrive, click on the Feature List tab (under the VirtualDrive logo in
the upper left-hand corner). This will launch the Main Console, with shortcuts to virtual CD creation,
and program settings. On the left side of the Main Console are buttons for the following program
components:
VirtualDrive
Live Update
10
Page 11

VirtualDrive 11.5
A. VirtualDrive: Software that emulates your computer’ s CD/DV D-ROM drive, allowi ng you to run
converted CD/DVD programs directly on your hard drive. Click on the VirtualDrive tab to:
Create a Virtual CD
Make an image file from a physical CD/DVD.
Create a Virtual Drive
Configure up to 23 virtual drives to play your virtual CDs (limited only by the number of
available drive letters on your computer).
C. Live Update: Use this link to check for the latest program updates.
3.2 VirtualDrive Start Menu
The VirtualDrive icon should be d isplayed in your Taskbar Notification area.
Double click the icon to launch VirtualDrive, or rig ht c lick on t he icon to open th e Virtua lDrive Start
Menu. The Start Menu offers a quick entry point to commonly used functions:
VirtualDrive: Select this option to launch VirtualDrive.
Insert: Select an image (VCD) to insert into a virtual drive. You can choose an image from
your VCD library or from any other location on your hard drive.
11
Page 12

Eject: Click to eject a VCD from a virtual drive.
Browse: View the contents of an inserted VCD via Windows Explorer.
Exit: Select this option to quit VirtualDrive.
VirtualDrive 11.5
3.3 VirtualDrive Main Console
By default, the Main Console displays a Quick Start menu. Click on the Settings tab to change your
preferences.
Quick Start
1. Create a Virtual CD/DVD
Refer to Creating a Virtual CD for details.
Settings
1. Global Settings
a. Show Animation when you insert or eject a VCD: Select this checkbox to display
the action of inserting or ejecting a VCD.
b. Keep VCDs loaded upon system reboot: Select this checkbox to keep VCDs loaded
in VirtualDrive when you restart your system.
Virtual Drive Settings
c. If VirtualDrive does not work with certain games or protected discs, you may want to
change your device information.
d. You can enable or disable Autorun in all drives on your system—virtual and physical.
Serial Numbers and Support
To activate a full version of VirtualDrive, click Help Æ Evaluation Starter and enter your serial
number. A serial number can be used on only one computer on any given LAN.
FarStone posts game and disc support information at
Center link is also available from the VirtualD rive Help menu.
Should you experience a problem with your software, FarStone encourages you to submit a support
ticket at
www.farstone.com/support.
www.farstone.com/gamecenter. The Game
3.4 Creating a Virtual CD
A virtual CD or VCD (.VCD extension) is an image f ile cr eated from a p hysical disc . Virtua lDrive let s
you build VCDs from the following disc types:
CD-ROM
DVD-ROM
Mixed-mode CD
Video CD
Unprotected (non-CSS) video DVD
12
Page 13

VirtualDrive 11.5
CD Extra
CD-Cops
Audio CD
Photo CD
Multi-Session CD
CD-Text
VirtualDrive supports many (but not all) DVD-ROM games, encyclopedias, multimedia content, and
other large file formats.
Building an Image from CD or DVD-ROM, Video CD/DVD, or Pho to CD
1.
Insert the application disc. In the Main Console, select VirtualDrive Æ Create Virtual CD.
2.
Select the physical drive from which you will build an image and click Next.
3.
If wish to change the default path for saving your VCD, click the browse button, select a
location, enter a name for your VCD, and click Next.
4.
You can change the default settings for your VCD build:
a. Choose Intelligent Extraction if you don’t know what type of protection is on your
CD/DVD.
b. Choose Other Protection Type if you would like specify a protection type in the
dropdown list.
c. Select Use Data compression to save hard drive space; however, this option will
extend the time it takes to build a VCD.
5.
Click Advanced to change the default file name of yo ur VCD and enter a password, description,
etc.
a. CD Label: Show the name of your VCD.
b. Description: Add a description of your VCD.
c. Author: Enter the name of the CD’s publisher or author (i.e., FarStone Technology).
d. Comments: Add comments to your VCD.
6.
(Optional) You can set a password for a VCD. You will need to en ter th is pass word when ever
you access the VCD.
7.
(Optional) If the source CD does not have an A utorun file, you can specify a progr am to run the
VCD when you insert it in a virtual drive. Click the b rowse button to select th e program you
would like to use.
8.
Once you have modified the properties of the VCD yo u are about to create, click Next to begin
the build process.
Note
ª
For your VCD to work, you may still have to install the game or supplemental software required
to run the disk-based application that you have converted into a VCD.
Building an Image from Audio CD
1.
Insert the application disc. In the Main Console, select VirtualDrive Æ Create Virtual CD.
2.
Select the physical drive from which you will build an image and click Next.
3.
To change the default save path, click the browse button, select a location, enter a name for
your VCD, and click Next.
13
Page 14

4.
Select the tracks you want to include in your audio VCD.
Note
ª
If your CD player is running, the Select Tracks window will not be able to show the tracks list.
Select the Preview Track Play button
5.
Click Next to begin building your audio VCD.
to listen to the track.
VirtualDrive 11.5
Building an Image from a Mixed Mode CD
1. Insert the application disc. In the Main Console, select VirtualDrive Æ Create Virtual CD.
2. Select the physical drive from which you will build an image and click Next.
3. To change the default save path, click the browse button, select a location, enter a name for
your VCD, and click Next.
4. You can change the default settings for your VCD build:
a. Choose Intelligent Extraction if you don’t know what type of protection is on your
CD/DVD.
b. Choose Other Protection Type if you would like specify a protection type in the
dropdown list.
c. Select Use Data Compression to save hard drive space; however, this option will
prolong the build process.
5. Click Advanced to change the default file name of yo ur VCD and enter a password, description,
etc.
a. CD Label: Show the name of your VCD.
b. Description: Add a description for your VCD.
c. Author: Enter the name of the CD’s publisher or author (i.e., FarStone Technology).
d. Comments: Add other comments to your VCD.
6. (Optional) You can set a password for a VCD. You will need this password to access the VCD.
7. (Optional) If the source CD does not have an Autorun file, you can specify a program to run
your VCD when you insert it in a virtual drive.
Select the audio tracks you want to include in your VCD. Select the Preview Track Play
button
to listen to the track.
Note
ª
If your CD player is running, the Select Tracks window will not display the track list.
8. Click Next to begin the build process.
3.5 Creating a Virtual Drive
A virtual drive emulates the functionality of a physical drive and appears as a drive letter in Windows
Explorer. To create a virtual drive:
1. In the Main Console, select VirtualDrive Æ Create a Virtual Drive.
14
Page 15

2. Select one or more available drive letters and click Start.
Note
You can create up to 23 virtual drives, depending on available drive letters.
VirtualDrive 11.5
3.6 Custom Backup
VirtualDrive lets you create custom data and UDF virtual CDs.
Creating a Project
You can burn a selection of files to CD/DVD or save them as a virtual CD (VirtualDrive image file).
Because the same method is used to create all d is c types, we will describe only one method.
Select any of the following options from the CD/DVD Burning Manager:
1. File Æ New Æ Data CD/Data DVD, or;
2. Click the small triangle to the right of the New button, then select Data CD/Data DVD, or;
3. Right click in the Project Pane and select New Æ Data CD/Data DVD.
For more information on disc types, please refer to Definitions in the appendix.
Note
ª
With a UDF CD, CD/DVD burning uses Unicode in the file name and supports only 127
characters.
An unclosed CD cannot be used for a multi-session disc.
Tip: Windows Explorer lets you view only the last session of a multi-session disc. With VirtualDrive,
you can view all sessions through CD/DVD Burning Manager Æ Tools Æ Device Info Æ Disc
Contents.
Adding Files and Folders
Use any of the following methods to add files and folders to a project:
Drag files and folders from the Source Pane or from Windows Explorer to the Current Project
Pane, or use a copy and paste method.
Select files and folders in the Source Pane. Right click on the selected objects and click Add.
There are several other ways to add files and folders by right clicking.
Note
ª
As you add files to your project, you can preview documents, photos, videos, and audio fil es by
double-clicking on their ic ons in the Source Pane.
15
Page 16

The horizontal scale bar at the bottom of the Proj ect Pane displays the total size of the project.
The default scale is set automatically according to the project type you are creating. You can
change the scale by clicking the icon in the left corner of the toolbar.
VirtualDrive 11.5
Working with Project Files and Folders
Once you have added one or more files to your project, you can perform the following operations:
1. Create a new folder
a. Click anywhere in the Current Project Pane and choose Edit Æ New Folder.
2. Delete files and folders: You can add or remove any files and folders from your project.
a. Select a file or folder and choose Edit Æ Delete from the menu bar.
b. Select the file or folder in the project and press the Delete key.
3. Rename files and folders
a. Select a file or folder and choose Edit Æ Rename from the menu bar.
4. View File Properties
a. Right click on a f ile or folder anywhere in the CD/DVD Burning Manager and select
Properties. A dialog box will show general information about the file, in clud ing type,
location, size, time created, and attributes.
Saving a Project
1. Choose File Æ Save As from the menu bar.
2. Type in a file name and select a location for the file.
3. Click Save.
Opening a Project
1. Click File Æ Open from the menu bar and browse for the project you want to open.
Renaming or Deleting a Project
You can rename a project in the Project Pane. This will be your CD label when you burn the project to
CD/DVD.
1. Select the project and click Edit Æ Rename from the menu bar.
To delete a project from the Project Pane (this does NOT remove the file from your hard drive):
Select the project and click Edit Æ Delete Project from the menu bar.
1.
Setting Project Properties
The project properties dialog box displays the gener a l, file system, CD archi ve, and audi o properties
of a project.
16
Page 17

To view project properties:
1. Select the project and click File Æ Properties from the menu bar.
Property Types
1. General
Edit the CD label and view the type, location, size , and attributes of the project, the number of
files and folders it contains, etc.
2. File System
Set the disc file system as UDF, ISO9660, or ISO9660+Joliet. Edit volumes, serial number, CD
publisher, etc.
Note
ª
1. An ISO9660 disc has the best compatibility with other operating syste ms and devices, a nd
can be read from all operating systems. However, ISO9660 (+Joliet) discs have the
following limitations:
The folder depth is restricted to 8 levels, including the root directory.
ISO9660 supports file names in 8.3 format: 8 characters for the file name and 3
characters for the file extension.
2. If you choose UDF, the burned disc can only be used on operating systems with a UDF file
system reader installed. Currently, Microsoft Windows 2000 (SP3), Windows XP and later
versions support UDF discs.
VirtualDrive 11.5
3. Advanced
Set the disc format and times.
Format
CD-ROM Mode 1: CD-ROM Mode 1 is used for error-into ler ant discs li ke softw are CDs, game
discs, and documentation discs. Data is stored in sectors, with each sector holding 2,352 bytes
of data. For Mode 1 CD-ROM data storage, the sectors are broken down even further. 2,048
bytes are used for the expected data, while the other 304 bytes are devoted to Sync, Header,
EDC (Error Detection Code) and ECC (Error Correction Code).
Create Time
Use the date and time of the original file: Sets the date and time stamps of the files and
folders on the burned disc as the date when the source files or folders were created.
Use the current data and time: Sets the date and time stamps of the files and folders on the
burned disc as the date and time when the disc was burned.
Use this time: Lets you specify a date and time stamp for the files and folders on the burned
disc.
Burning a Project to Disc
1. Set the Default Recorder to a physical CD/DVD recorder in your computer.
17
Page 18

2. To launch the Burning Setup window, select File Æ Burn from the menu bar.
3. The Burning Setup dialog box will display. Choose your settings and click Record.
Note
If the Autorun function of your recorder is enab led, an Autorun w arning dialog bo x will appear
before the Burning Setup dialog box is displayed.
4. Click OK to end the burning process.
VirtualDrive 11.5
Using Multiple Discs for a Project
Burning Data onto Multiple Discs
VirtualDrive supports split-volumes. When your data exceeds disc capacity , VirtualDrive will burn the
project onto multiple discs. Later, you will need to insert only the first volume of a multiple disc set to
view and retrieve data.
1. Create a Data CD/DVD project in CD/DVD Burning or Easy Backup.
2. When you burn the project to disc, VirtualDrive will automatically divide the data and prompt
you to tag each volume.
3. After the first volume has been burned, Virtu alDrive will promp t you to insert more disc s, as
needed.
Note: Only DATA CD/DVD projects can be burned onto multiple discs and only when the file system
of the disc is set as an ISO 9660 disc. Y ou ca n set the disc file system in the Disc properti es / File
System area.
Retrieving Data from Multiple Discs
1. When you insert the first volume of a multiple disc set, the integrated tool retriever wil l run
automatically . If the retriever does not run auto matically , you can run it manually b y launching
START.EXE on the disc.
2. Clicking on the disc entry in the left pane will display all disc data in the right pane, including
data from other discs in the set.
3. Select the file(s) or folder(s) to be retrieved by checking the corresponding check boxes.
4. Click the Retrieve button to launch the Data Retrieve window. Sel ect a location to sa ve the
retrieved data.
Searching for Files on Multiple Disc Sets
1. Click the Search button to launch the search window.
2. Enter a file name in the search box. You should enter a full file name with its file extension, but
can use “*” as the extension to search for all file types.
3. Choose a search mode and click Search.
4. Once the search results are displayed, select the fil e and click Retrieve to save it to yo ur hard
drive.
Using a Virtual Drive to Retrieve Data on Multiple Disc Sets
18
Page 19

1. Copy the image file on each disc to the same location on your hard drive. Typically, the first
volume of the entire image (the image file copied from the first disc) is named as
“DATA_CD.VCD.000”, and the second as “DATA_CD.VCD.001”.
2. Insert the first volume into a vi rtual drive. Y ou can now wor k with the image as you woul d with
any other virtual CD created in VirtualDrive.
VirtualDrive 11.5
Burning a Project to Virtual CD (VCD)
1. T o create a virtual CD from the sel ected files, set the default recorder to the Image Recorder.
Select File Æ Burn.
2. Click the browse button
Next.
3. Enter a description of the VCD in the description box.
4. (Optional) You can set a password. If you do, you will need the password to insert the VCD
image or view its contents.
5. (Optional) If the source CD does not have an A utorun file, you can specify a progr am to run the
VCD when it is inserted.
6. Using data compression will save hard drive space but extend the build time.
7. A dialog box will display the attributes of the VCD about to be created. Select Burn to begin the
build process.
and select a location to save the VCD. Name the VCD and click
3.7 Restoring a Virtual CD to CD/DVD
You can restore a Virtual CD by burning its contents back to disc. This will rec reat e th e origin al files
you used to build the image.
1. From the VirtualDrive Main Console, select Image to Disc.
2. Select the VCD you want to burn and click Open. Only one image can be selected at a time.
3. The selected VCD and its relevant information will be di splayed i n a dialog box. To replace the
selected VCD with another image, right click in the dialog box and select Add.
4. Click Next, choose your burning settings, and click Burn.
3.8 Burning Settings
Disabling the CD/DVD Drive Autorun Feature
If the Autorun function of your CD/DVD disc driv e is enabled, a warning dialog box may appear. This
can cause an error when you try to erase or burn a disc.
Click the first radio button in this dialog box to disable the auto insert notification. This will log you off
of Windows, so be sure to first save your open documents and close all applications.
If you have canceled out of the dialog box, you can disable the Autorun function in the CD/DVD
Burning Manager. Choose Tools Æ Options Æ General Æ Disable CD-ROM drive Autorun
function.
Choosing Burning Settings
19
Page 20

VirtualDrive 11.5
You must choose your burning settings before you can burn a disc from a project, a VCD, or from
another disc.
Recorder: Shows the recorder to be used for burning. Click the Device Info button to view
information about the recorder.
Write Method: Available write methods include DAO, SAO, T AO, and Raw . Write methods will
vary according to operation you wish to perform.
Tips
Disc-at-Once (DAO): Writes all data onto CD in a single operation, starting with lead-in and
ending with lead-out (start and end zone). Because there is no gap between tracks, a disc
cloned with Disc-at-Once is exactly the same size as the source disc. If you cancel this
operation after the lead-out has been recorded, you will not be able t o re-use the disc.
Track-at-Once (TAO): Writes data to disc in multiple passes and allows you to record a single
data or music track at a time. The lead-in and lead-out are written after all tracks have been
recorded. Tracks recorded in Track-at-Once mode are separated by gaps of two to three
second.
Session-at-Once (SAO): Writes data to disc i n a single operation and finalizes the sessi on. A
Session-at-Once recording is similar to Disc-at-Once, except that the disc is not closed,
allowing you to write another session on the disc at a later date. Session-at-Once is typically
used to make a multi-session disc. If you are making a music CD, this option eliminates the
two-second gap between tracks and write-protects the CD.
Write Speed: We recommend the Best Speed option.
Number of Copies: Select the number of discs to be burned.
Buffer Under-Run Protection: Select this option to reduce buffer under-run errors
during the recording process (see below).
Tip
Buffer Under-Run errors occur when the data transfer rate is slower than the write speed to
CD/DVD. In the event of a system sl owdown or interrupti on, the CD/DV D recorder buffer fills
with data. A buffer under-run occurs if the buffer is emptied before the system can recover.
Buffer-under-run technology temporarily stops the recorder’s laser without damaging the CD
or DVD.
Close CD: Check this box to close the disc after recording. A closed disc has better
compatibility on different computers and devices, and can be read on most CD/DVD drives.
Once the disc is closed, no track or session can be added.
Verify Data after Recording: Check this box to allow recorded data verification for
accuracy. Music CDs do not have this option.
Burn Mode:
o Test: Checks for errors that occur during the burning process. No physical disc is
needed for this test. Choose this mode if:
You are not sure whether the disc and the recorder are compatible, or;
You are not sure if the burning settings are correct.
o Test+Burn: Simulates the burning process. If no errors occur, it then burns data to
disc.
o Burn: Burns data to disc immediately.
20
Page 21

VirtualDrive 11.5
3.9 Cloning a CD/DVD
You can make an exact copy of a CD/DVD on another recordable disc.
1. Insert a blank disc into your CD/DVD recorder and insert the source disc into your other
CD/DVD-ROM drive.
2. From the drop-down menu in the dialog box, select the drive loaded with the source disc.
3. Other options in this dialog box include:
Disc Information: View disc type, number of sectors, disc size, time and sessions, tr acks,
start sector, and end sector of the source disc.
Read Speed: For best results, choose the Best Speed option.
Ignore read errors: Checking this box will set the burner to ignore read errors from the
source disc.
On-the-fly: Checking this option enables quick cloning.
Note
ª
If the on-the-fly option is checked, data will be taken directly from the source disc and burned
on the target disc.
If on-the-fly is not checked, data from the source disc will first be compressed as an image and
stored in a temporary files folder. The original co ntents of the source disc will then b e bu rned
to the target disc.
This option is not available if your computer has only one CD/DVD-ROM.
Click Next to display a dialog box. Choose your burning settings and click Burn.
3.10 The VCD Manager
Click the VCD Manager tab in the upper left-hand corner of the software interface.
21
Page 22

VirtualDrive 11.5
The left window will display a directory tree of:
All CD/DVD drives on your system, physical and virtual
All VCD cabinets, in which you can organize your virtual CDs
Right click on a VCD to view its properties, password information, to rename a VCD, etc.
Using Virtual Drives in the VCD Manager
Your virtual drives are displayed in the left window of the VCD Manager . Right click on a Virtual Drive
icon to view the following options:
Eject All: From the top-level Virtual Drives icon, you can eject all VCDs from all your virtual
drives.
Eject: Eject an inserted VCD from the selected virtual drive.
Browse: View the contents of an inserted VCD.
Autorun: Play an inserted VCD automatically from the selected virtual drive.
Edit Drive: Change the drive letter of the selected virtual drive.
Using Physical Drives in the VCD Manager
Your physical CD/DVD-ROM drives are also displayed in the left window of the VCD Manager. Right
click on a CD/DVD-ROM drive to view the follow in g op tions.
22
Page 23

Eject All: From the top-level Other Drives icon, yo u can eject all ph ysical discs from all your
CD/DVD-ROM drives.
Eject: Eject a CD or DVD from a CD/DVD-ROM drive.
Close: Close a CD/DVD-ROM drive.
Autorun: Play an inserted CD or DVD automatically from the selected CD/DVD-ROM drive.
Edit Drive: Change the drive letter of a CD/DVD-ROM drive.
Build: Enter the Create Virtual CD interface.
VirtualDrive 11.5
Adding VCDs to the VCD Manager
You must add a VCD to the VCD Manager before you can play it.
1. Click the Add VCD button
or from a local network; or
2. Right click in the upper right window of the VCD Manager. Select Add to open the Add VCD
dialog box and browse for an image; or
3. Click the Internet VCD button
or paste in the URL of the image. You must first make sure the VCD is a shared file.
to import a VCD from your hard drive, another computer ,
to open the Add Internet VCD dialog bo x. T ype in
Hot Keys
Right click on a VCD to open the VCD Properties window. Click on the Settings tab. Tab down to the
hot-keys box and press a key. As an example, pressing “C” will create Ctrl +Alt + C as the hot key.
Erasing a Disc
1. Insert the disc you want to erase in a rewritable CD/DVD-ROM d r ive.
2. Select the Utility option and click Erase Disc.
3. Select the CD/DVD-ROM drive with the inserted disc. Choose an erase mode from the
dropdown menu:
a. Quick Erase: Quick Erase takes less time but only erases the table of contents of the
disc. Erased data can still be recovered by means of special tools.
b. Full Erase: This completely erases the disc, but takes longer to complete.
2. Click Erase to begin to begin the process. The disc will auto-eject when the process is
complete.
Viewing Device and Disc Information
Device Info
Click on the Device Info tab to view details about a CD/DVD device, a virtual drive, or to view disc
format information.
Disc Info
Click on the Disc Info tab to view the properties an inserted disc. To extract files or folders from the
disc and store them on your hard drive, right click on a file or folder and select Extract.
23
Page 24

VirtualDrive 11.5
Organizing VCDs in Cabinets
A cabinet is similar to a folder in Windows E xp lorer and stores multiple images by category. As your
library grows, organizing your images in cabinets will reduce the time it takes to locate your VCDs.
VirtualDrive creates several default cabinets: Music, Games, Software, Photos, Movies, and Most
Recently Used.
Cabinets are listed on the left side of the VCD manager. You can organize cabinets and sub-cabinets
by dragging them around, just as you might organize folders in Window Explorer.
To add a new cabinet category:
1. Right click on a cabinet icon.
2. Select New Cabinet to open the New Cabinet window.
3. Follow the instructions in the window.
To delete a cabinet:
Right click on a cabinet and select Delete Cabinet. Deleting a cabinet will remove the cabin et icon
and sub-cabinets. It will no t delete actual VCD files.
Searching for VCDs
1. Click the Search button to open the Search VCD dialog box.
2. In the Path field, specify a drive to search. To select a custom path, click the browse button
and click Search.
3. Located files will be dis played in the right bottom window.
Extracting Files from a VCD
In the VCD manager, right click a VCD and select its contents to display them. You will be presented
with three options:
1. Open: Open the selected file.
2. Extract: Extract the selected file and store it on the hard drive. You can extract any file from
a multi-session VCD. Use this function to extract files in a multi-session which cannot be seen
or accessed through Windows Explorer.
3. Properties: View properties of the selected file.
Inserting a VCD into a Virtual Drive
In the VCD Manager:
1. Select a VCD icon in the upper right window and d rag it to an available virtual drive; or
2. Double click a VCD icon in the upper righ t window. This will insert you r VCD into th e default
virtual drive, or the first available virtual drive; or
3. Select a VCD icon in the upper right window and click the Insert button; or
4. Open Windows Explorer, right click on a virtual drive, and choose Insert from the popup
24
Page 25

menu.
5. Open the VCD Manager, right click on a virtual CD, and select Shortcut to create a desktop
shortcut. Double-click the desktop shortcut to insert the virtual CD into the first Virtual Drive
listed.
VirtualDrive 11.5
Ejecting a VCD from a Virtual Drive
In the VCD Manager:
1. Click the Eject button on the menu bar. From the dropdown menu, select the VCD you wish to
eject; or
2. Open Windows Explorer, right click on a loaded virtual drive, and select Eject from the popup
menu.
Importing and Exporting a VCD List
To export a VCD list:
1. From the menu bar, select File Æ Export VCD List.
2. Select a location to save the VCD list and enter a name for it. Click Save.
Importing a VCD List
1. From the top menu bar, select File Æ Import VCD List.
2. Browse to select any saved VCD list you wish to import. Click Open.
3.11 Enabling and Disabling Physical Drives
You may need to disable your physical drives to play certain games as VCDs.
1. Select Tool from VCD Manager menu bar.
2. Click Disable IDE CD/DVD ROMs to disengage your physical drive.
3. Click Enable IDE CD/DVD ROMs when you wish to re-engage your physical drive.
3.12 Converting VCDs and ISO 9660 Images
You can convert an ISO 9660 image file into a VCD file, or conversely convert a VCD file into an ISO
9660 CD file.
1. From the top menu bar, select Tools Æ Convert VCD/ISO.
2. Click Browse to locate the ISO or VCD file.
3. Select the VCD or ISO 9660 image you would like to convert and click OK.
4. Click Convert to start the conversion process.
5. To play an .iso file d irectly, add it to the VCD Manager or insert it into a VCD.
Note
ª
Audio, DVD, and compressed VCD files cannot be converted into ISO files.
25
Page 26

VirtualDrive 11.5
Chapter 4: Command Line Support
4.1 Running VCDs with Command Line Syntax
Command line syntax is a powerful way of automating repetitious tasks in VirtualDrive.
The basic syntax is as follows:
Each command starts with the term "VDrive." A virtual driv e can be referenced by its drive letter (e.g. ,
E:, F:, G:) or by a number corresponding to the positi on of the virtual drive. For example, if drives E,
F and G are virtual drives, then driv e F can be referred to as “2:” Once a virtual drive is referenced, you
can then issue a command telling Virtu a lDrive what to do next.
Available commands are:
1. Vdrive <drive letter:> <VCDfilename> /I [@cmd] [/M] [/NA] => Insert VCD
2. Vdrive <drive letter:> /E [/M] => Eject VCD.
If successful, returns 0, otherwise 1
3. VDrive /drive: Returns the number of virtual drives available
4. /I Insert a VCD
5. /E Eject a VCD
6. [/M] Show message
7. [@<path><filename>] Run a program on the VCD. T o use this, you must includ e the full
path showing the location of the program to be run and the name of the executable file.
Note: Commands shown in square brackets [ ] are optional.
4.2 Creating Shortcuts to Run VCDs
You can use command line instructions to create custom shortcuts to your VCDs.
1. Write down what you want the shortcut to do, e.g. Vdrive •E:• "C:\VCDCollection\Age of
Kings"• /I •@E:\Age.exe
Note: • The dot shows where a blank space must be inserted.
The above example, read from left to right, works as follows:
Vdrive -- T e lls Windows that the following commands will be executed by the Vdri ve program.
E: -- selects virtual drive E:
"C:\VCDCollection\Age of Kings" -- Adds the path and the name of the VCD to load.
Note: Any spaces in the character string must be replaced by quotation marks.
/I -- Tells Vdrive to insert the VCD
@ -- Tells Vdrive to execute a program
E:\Age.exe -- T ells Vdrive where the progr am is by specifying the drive (E :) and the name of
26
Page 27

VirtualDrive 11.5
the file to run (Age.exe).
2. Create a shortcut by right clicking on an empty space on the Windows desktop and selecting
New Æ Shortcut.
3. In the “Create Shortcut” window, enter the command line from Step 1.
Example: Vdrive E: "C:\VCDCollection\Age of Kings" /I @E:\Age.exe
27
Page 28

VirtualDrive 11.5
Chapter 6: Live Update
If your computer is connected to the Internet, VirtualDrive will automatically notify you whenever an
update is available. You can also manually update your software.
1. In the Live Update Console, click Live Update.
2. Click Start.
3. Live Update will automatically search for new product components. Once it collects all available
updates, click Next to download and install them. You may then be required to restart your
computer.
6.1 Technical Support and Product Updates
Should you encounter a technical issue with our products, please contact your vendor or use the
FarStone online support system at
Answers to frequently asked questions (FAQs) about FarStone products are posted on the corporate
web site at T
www.farstone.com/support/faqs.
www.farstone.com/support.
FarStone Technology, Inc.
6 Morgan, Suite 160
Irvine, CA 92618
Phone: (949) 458-3666
28
Page 29

VirtualDrive 11.5
Glossary
CD Emulator: A program that imitates a physical CD-ROM device, creating MP3-like files out of game,
application, and data discs.
CD Extra: A multi-session disc containing both music tracks and computer data.
CD-ROM: A disc format that holds text, graphics, and hi-fidelity stereo sound. It uses a different
format for recording data than the audio CD (CD-DA) from which it evolved. An audio CD player
cannot play CD-ROMs, but CD-ROM players can play audio discs.
CD-Text: The extra information added to a disc, like CD-Text for audio discs. It is stored in the disc
subchannel.
Data CD/DVD: A CD/ DVD containing all types of files, including data files and audio files.
ISO 9660: A file system standard for discs which can be read on all operating systems. ISO9660
supports file names in 8.3 format (8 characters for the file name and 3 characters for the file
extension).
Mixed-Mode CD: A single-session CD containing both computer da ta and music tracks. It is typically
used for entertainment and educational programs.
Multi-session CD: A CD containing several sessions with a 30MB space between two successive
sessions. Each session has a table of contents linking to the next free area of the disc until the final
track is closed. If a CD-R/CD-RW disc is left unclosed, you can append data to it.
Virtual CD/DVD: An image file created from the digital contents of a physical CD or DVD. A virtual CD
runs directly on a computer’s hard drive, but m ust be inserted into a virtual drive c reated by your CD
emulation software.
Virtual Drive: A CD emulation device that emulates the functionality of a CD/DVD-ROM drive, and
appears as a drive letter in Windows Explorer.
29
 Loading...