

Page 1

®
VirtualDrive
Version 10
P ersonal Edition
For Windows 2000/XP-SP2/Server 2003
User’s Guide
Page 2

Copyright Notice
No part of this publication may be copied, transm itted, stored i n a retriev al system or tr anslated into any
language in any form or by any means without the expressed written permission of FarStone Technology,
Inc.
FarStone gr ants you the right to use one copy of the enclosed software program ("SOFTWARE" ) on a single
computer . If the SOFTWARE is installed on a network, or more than one user can run the SOFTWARE at the
same time, you must purchase an additional license for each additional user or computer.
Trademarks
FarStone is a trademark of FarStone Technology, Inc. Rapid Cache® VirtualDrive
®
, and VirtualDrive®
Network are registered trademarks of F arStone T echnology , Inc. Microsoft®, Windows® and MS-DOS® are
registered trademarks of Microsoft Corporation. Other product names mentioned in this User’s Guide ma y
be trademarks or registered trademarks of their respective companies.
FarStone Technology, Inc.
U.S. Headquarters:
6 Morgan, Suite 160
Irvine, CA 92618
Phone: (949) 458-3666
Asia-Pacific Offices
10F-1B, No. 207, DunHua North Rd., Taipei, 105, Taiwan
Phone: 886-2-2546-9898
Fax: 886-2-2546-3838
Technical Support:
Please contact your retailer or use our online support system at
you will find answers to frequently asked questions on our website at
to the support section:
Copyright
Rapid Cache
©
1993-2005 FarStone Technology, Inc. All rights reserved.
®
Copyright © 1993-2006 FarStone Technology, Inc.
http://www.farstone.com/home/en/shtml/contactus.shtml
Software License Agreement
www.farstone.com. For your convenience,
www.farstone.com. Follow the links
FARSTONE TECHNOLOGY, INC. (FARSTONE) END USER LICENSE AGREEMENT FOR VIRTUALDRIVE, HEREAFTER
REFERRED TO AS THE "SOFTWARE"
PLEASE READ CAREFULLY: THE USE OF THIS "SOFTWARE" IS SUBJECT TO THE "SOFTWARE" LICENSE TERMS OF
FARSTONE AND OTHER LICENSORS WHOSE SOFTWARE MAY BE BUNDLED WITH THIS PRODUCT.
BY YOUR USE OF THE "SOFTWARE" INCLUDED WITH THIS PRODUCT YOU AGREE TO THE LICENSE TERMS REQUIRED
BY THE LICENSOR OF THE "SOFTWARE", AS SET FORTH BELOW. IF YOU DO NOT AGREE TO THE LICENSE TERMS
APPLICABLE TO THE "SOFTWARE", YOU MAY RETURN THE ENTIRE UNUSED PRODUCT FOR A FULL REFUND.
LICENSE AND WARRANTY:
The software which accompanies this license (the "Software") is the property of FARSTONE or its licensors and is
protected by copyright law. While FARSTONE continues to own the Software, you will have certain rights to use the
Software after your acceptance of this license. Except as may be modified by a license addendum which accompanies
this license, your rights and obligations with respect to the use of this Software are as follows:
A. Single User License:
(a) use the "Software" on a single computer system or network, and only by a single user at a time. If you wish to use
2
Page 3

the "Software" for more users, you will need an additional License for each user.
(b) make one copy of the "Software" in machine-readable form solely for back-up purposes, provided you reproduce
FarStone's copyright proprietary legends. Notwithstanding the foregoing, the "Software" may be used on the home,
laptop or other secondary computer of the principal user of the "Software", and an additional copy of the "Software"
may be made to support such use. As used in this License, the "Software" is "in use" when it is either loaded into RAM
or installed on a hard disk or other permanent memory device. The "Software" may be "in use" on only one computer
at any given time. (Different License terms and fees are applicable for networke d or multiple us er applications .) As
a specific condition of this License, you agree to use the "Software" in compliance with all applicable laws, including
copyright laws, and that you will not copy, transmit, perform or distribute any audio or other content using the
"Software" without obtaining all necessary Licenses or permissions from the owner of the content.
B. Multiple User License:
Make one copy of the "Software" in machine-readable form solely for back-up purposes, provided you reproduce
FarStone's copyright proprietary legends.
You must acquire and dedicate a License for each separate computer on which any part or portion of the "Software" is
installed or run As used in this License, the "Software" or any part or portion of the "Software" is "in use" when it is
either loaded into RAM or installed on a hard disk or other permanent memory device including any networked or
shared environment where either direct or indirect connections are made through software or hardware which pools or
aggregates connections.
As a specific condit ion of this License , you agree to us e the "Software" in compliance with al l applicable laws , including
copyright laws, and that you will not copy, transmit, perform or distribute any audio or other content using the
"Software" without obtaining all necessary Licenses or permissions from the owner of the content.
C. Restrictions: You may not distribute copi es of the "Software" to others or electronically transfer the "Software"
from one computer to another over a network. You may no t post or otherwise make available the "Software", or any
portion thereof, in any form, on the Internet. You may not use the "Software" in a computer service business,
including in time-sharing applications. The "Software" contains trade secrets and, in order to protect them, you may
not decompile, reverse engineer , d isassemble, or otherwise reduce the "Software" to a human-perceivable form. YOU
MAY NOT MODIFY , AD APT , TRANSLATE, RENT , LEA SE, LOAN, RESELL FOR PROFIT, DISTRIBUTE, NETWORK OR CREA TE
DERIVATIVE WORKS BASED UPON THE "SOFTWARE" OR ANY PART THEREOF.
D. Limited Warranty:
Farstone warrants that the media on which the Software is distributed will be free from defects for a period of fifteen
(15) days from the date of delivery of the Software to you. Y our sole remedy in the event o f a breach of this warranty
will be that Farstone will, at its option, replace any defective media returned to F arstone within the warranty period or
refund the money you paid for the Software. Farstone does not warr ant that the Software will meet your requirements
or that operation of the Software will be uninterrupted or that the Software will be error-free.
THE ABOVE WARRANTY IS EXCLUSIVE AND IN LIEU OF ALL OTHER WARRANTIES, WHETHER EXPRESS OR IMPLIED,
INCLUDING THE IMPLIED WARRANTIES OF MERCHANTABILITY, FITNESS FOR A PARTICULAR PURPOSE AND
NONINFRINGEMENT. THIS WARRANTY GIVES YOU SPECIFIC LEGAL RIGHTS. Y OU MA Y HAVE O THER RIGHTS, WHICH
VARY FROM STATE TO STATE.
E. Limitation of Liability: IN NO EVENT WILL FARSTONE OR ITS LICENSORS BE LIABLE TO YOU FOR ANY
INCIDENTAL, CONSEQUENTIAL OR INDIRECT DAMAGES, INCLUDING ANY LOST PROFITS, LOST SAVINGS, OR LOSS
OF DAT A, EVEN IF F ARST ONE OR A LICENSOR HAS BEEN ADVISED OF THE POSSIBILITY OF SUCH DAMAGES, OR FOR
ANY CLAIM BY ANY OTHER PARTY. Some states do not allow the exclusion or limitation of special, incidental, or
consequential damages, so the above limitation or exclusion may not apply to you.
F. General: You acknowle dge that you have read this Agreement, understand it, and that by using the "Software" you
3
Page 4

agree to be bound by its terms and conditions. You further ag ree that it is the complete and exclusive statement of the
agreement between FarStone and you, and supersedes any proposal or prior agreement, oral or written, and any other
communication between FarStone and you relating to the subject matter of this Agreement. No additional or any
different terms will be enforceable against FarStone unless FarStone gives its express consent, including an express
waiver of the terms of this Agreement, in writing signed by an officer of FarStone. You assume full responsibility for the
use of the "Software" and agree to use the "Software" legally and responsibly.
Should any provis ion of this Agree ment be declared une nforceable in an y jurisdiction, and t hen such provis ion shall be
deemed severable from this Agreement and shall not affect the remainder hereof. FarStone reserves all rights in the
“Software” not specifically granted in this Agreement.
Should you have any questions concerning this Agreement, you may contact FarStone by writing to:
FarStone Technology, Inc.
Legal Department
6 Morgan, Suite 160
Irvine, CA 92618
4
Page 5

Contents
Chapter 1 Introduction 7
1.1 What is VirtualDrive®? 7
1.2 Features and Benefits 7
Chapter 2 Installation 10
2.1 System Requirements 10
2.2 Installing VirtualDrive® 10
2.3 Uninstalling VirtualDrive® 10
Chapter 3 Starting VirtualDrive® 13
3.1 Starting VirtualDrive® 13
3.2 The VirtualDrive® Start Menu 14
Chapter 4 Backing up Data to Discs 16
4.1 Creating Data CD/DVD 16
4.1.1 Creating a New Project 16
4.1.2 Burning a Project to Disc 18
4.2 Backing up Images to Disc 18
4.3 Burning Settings 18
4.3.1 Disabling Auto-run of Disc Drive 18
4.3.2 How to Choose Burning Settings 18
Chapter 5 Multimedia Creation 21
5.1 Creating an Audio CD 21
5.2 Creating an MP3 CD 21
Chapter 6 Working with VirtualDrive® 23
6.1 How to make an Image 23
6.1.1 Creating an Image from the CD Drive 23
6.1.2 Making an Image from a Project 28
6.2 VCD Manager 29
6.2.1 Launching the VCD Manager 29
6.2.2 Adding VCD Files to Run on Your Virtual Drives 30
6.2.3 Using Cabinets to Organize VCDs 30
6.2.4 Inserting a VCD 31
6.2.5 Ejecting a VCD 32
6.2.6 VCD Properties 32
6.2.7 Creating a VCD Shortcut 33
6.2.8 Setting a Password for a VCD 34
6.2.9 Extracting Files from VCD 34
6.2.10 Extracting Audio Tracks 34
6.2.11 Searching VCDs 35
6.2.12 Deleting VCD Icons or VCD Files 36
6.2.13 Adding Additional Virtual Drives 36
6.2.14 Changing a Drive Letter 37
6.2.15 Setting Auto-Run for a Drive 37
6.2.16 Backing up the VCD List 37
6.2.17 Changing the VCD Manager View 37
6.2.18 VCD Manager Settings 37
6.2.19 Running VCDs Using Command Line Syntax 38
6.3 Converting between ISO 9660 Image Files and VCD Files 40
Chapter 7 VirtualDrive® Utilities 42
7.1 Erase Disc 42
7.2 View the Device Info 42
7.3 RapidCache® 43
7.3.1 RapidCache® Features 44
7.3.2 The RapidCache® Settings 44
7.4 Live Update 45
Chapter 8 Appendix 48
8.1 FAQ 48
5
Page 6

Chapter 1
Introduction
6
Page 7

Chapter 1 Introduction
1.1 What is VirtualDrive
VirtualDrive
®
is a revolutionary software program that emulates the computer’s physical CD/DVD-ROM
drive.
You ca n create an unlimited numb er of virtual CDs (VCDs) and up to 23 virtual dri ves. Y o u no longer need
to insert the actual CD and wait for the disc to lo ad - you simply double-click the VCD icon. Another great
advantage is that you no longer need to swap discs while playing games that have multiple CDs. Just
pre-load all the VCDs you need and enjoy.
In addition, the new integrated CD/DVD burning program allows you to back up, share or archive various
files from the hard disk to a CD/DVD, or burn MP3 files to a recordable CD that can be played on home
stereo equipment.
1.2 Features and Benefits
• Improved copy protection support
VirtualDrive
®
is compatible with StarForce V 1/2/3, SecuROM *New V5, DVD SecuROM *New, SafeDisc
V1/2/3/4 SecuROM, LaserLock and more
• Add VCDs from the Internet
With VirtualDrive
®
, you can add a VCD (*.VCD) that is shared on the Internet or a LAN into the virtual
drive.
• VCD Cabinet
Instead of adding VCDs all in one place, the new added cabinet function allows you to sort your VCDs and
put them into different “cabinets” in VCD Manager.
• Export Audio Tracks
Extract audio tracks from an existing audio CD, either a real CD or a virtual CD , and store them as an audio
file (*.WAV) or a MP3 file on the hard disk.
• Supports most CD/DVD formats
VirtualDrive
®
supports the following CD/DVD formats: CD-ROMs, CD-Extras, CD-Texts, Audio CDs, Mixed
Mode CDs, Photo CDs, Video CDs, DVD-ROMs, Multi-session CDs and unprotected DVD Videos.
• Customize your own virtual CDs
With VirtualDrive
®
, you can customize your own VCDs with selected files from a CD or from the hard drive.
VCDs you compiled yourself can be configured to automatically run when inserted in a virtual drive.
• #1 in CD-ROM Game Support
VirtualDrive
®
supports the newest and most popular games available today.
• Run Multiple CDs Simultaneously
VirtualDrive
®
allows you to run multiple CDs at the same time. For example, you can browse the Great
Britain Encyclopedia in a virtual drive while checking new words from a dictionary in another and enjoying
music from a CD in a physical CD-ROM drive.
• Optimized CD performance
VirtualDrive
®
plays the VCDs at hard drive speed (equivalent to a 200x CD driv e). And with its advanced
caching technology, VirtualDrive
®
?
®
can reduce CD access time by up to 75%.
7
Page 8

• Fully integrated with Windows
The VirtualDrive
®
XP-style user interface is completely integrated with Windows Explorer and the
Windows Device Manager. Enable/disable CD auto-run, change CD drive letters or set your own
hot-keys to run CDs.
• ISO 9660 support
VirtualDrive
®
enables you to convert VCDs to and from ISO 9660 format.
• Create shortcuts for your VCDs
This feature allows users to create desktop shortcuts to local or network VCDs. Double-clicking on the
shortcut will insert the VCDs into the virtual drive quickly and easily.
• MP3
If Windows Media Player MP3 subassembly or other MP3 coding/decoding programs are installed on
your system, VirtualDrive
®
allows you to compress audio CDs into MP3 files.
• Easy Management
VirtualDrive
®
converts the entire contents of the CD into a single VCD file on the hard drive. Disk and file
management are greatly simplified.
• Compression
VirtualDrive
®
incorporates a high-performance compression engine for building VCD files. Compressed
VCD files are automatically decompressed when accessed.
• Command Line Support
You can ac cess VirtualDrive
®
from the command line. With this feature you can mount VCDs and auto-run
applications or create shortcuts to your VCDs.
• Ideal for Notebook Computers
VirtualDrive
®
eliminates the need to carry CD/DVDs when you travel.
• Network Capability
Some CD applications only run from a CD drive and will not run on a mapped network drive. With
VirtualDrive, VCDs can be shared across the network without needing to map network drives.
• RapidCache
VirtualDrive comes with RapidCache
technology. RapidCache
®
®
can increase VCD and CD performance.
®
CD caching system, which utilizes the latest incremental caching
8
Page 9

Chapter 2
Installation
9
Page 10

Chapter 2 Installation
2.1 System Requirements
• Windows 2000/XP-SP2/Server 2003
• CD/DVD drive
• 100 MB of hard disk space
• 128 MB RAM or better
Note: A virtual CD drive does not take any appreciable amount of hard drive space. However , 19 KB of RAM
is reserved for each
virtual drive when a VCD is inserted.
2.2 Installing VirtualDrive
®
Step 1: Close any applications that are running before starting the installation.
Step 2: Insert the VirtualDrive® CD-ROM disc. The setup program should start automatically. If the
auto-run function does not work, run the setup.exe file directly. Similarly, if you are installing fr om a
network or hard drive, double-click setup.exe to launch the Installer program.
Step 3: Select the language you prefer for the installation.
Step 4: After the Windows installation program has configured your system, the installation wizard will be
launched.
Step 5: Carefully read the software license agreement. If you accept the terms of the agreement, select
I Accept the License Agreement, and then click Next to continue.
Step 6: Enter your Serial Number . (If you have purchased the CD-ROM, the serial number can be found on
the back of the CD jewel case.)
Step 7: The Install Wizard will suggest a folder in which to install the program files. If you would like to
store the program files in another location, select Change to open the file browser and select a new folder.
Step 8: Set the number of virtual drives in your system. (Note: You must select at least one virtual drive
to install VirtualDrive
Step 9: Y ou can launch VirtualDrive
by selecting the checkboxes. Select Finish to complete the installation.
2.3 Uninstalling VirtualDrive
Step 1: Close any other programs that are running.
Step 2: If the VirtualDrive
Step 3: T o uninstall the VirtualDrive® program, select Start in the Windows task bar and then select either
Programs/VirtualDrive/ Uninstall VirtualDrive or Start/Settings/Control Pane and double-click
on the Add or Remove Programs icon to open the Add or Remove Programs screen. Select VirtualDrive
from the list of installed programs, and then select Remove to continue. Either method will launch the
VirtualDrive
®
Uninstall Wizard.
®
.) Click Next to start the installation process.
®
Manager and/or place a shortcut on the desktop after the installation
®
®
icon is displayed in the system tray, right-click on the icon and select Exit.
®
10
Page 11

The uninstall program will remove all files created by VirtualDrive
®
, except the VCD files (files with the
“VCD” extension). These VCD files can be deleted by using Windows Explorer.
11
Page 12

Chapter 3
®
Starting VirtualDrive
12
Page 13
Chapter 3 Starting VirtualDrive®
3.1 Starting VirtualDrive
®
After installation, you can launch VirtualDrive® directly without restarting the computer.
You can launch VirtualDrive
®
using either of these two methods:
z Double-click the shortcut icon
on the desktop;
z Select Start Æ All Programs Æ VirtualDrive Æ VCD Manager.
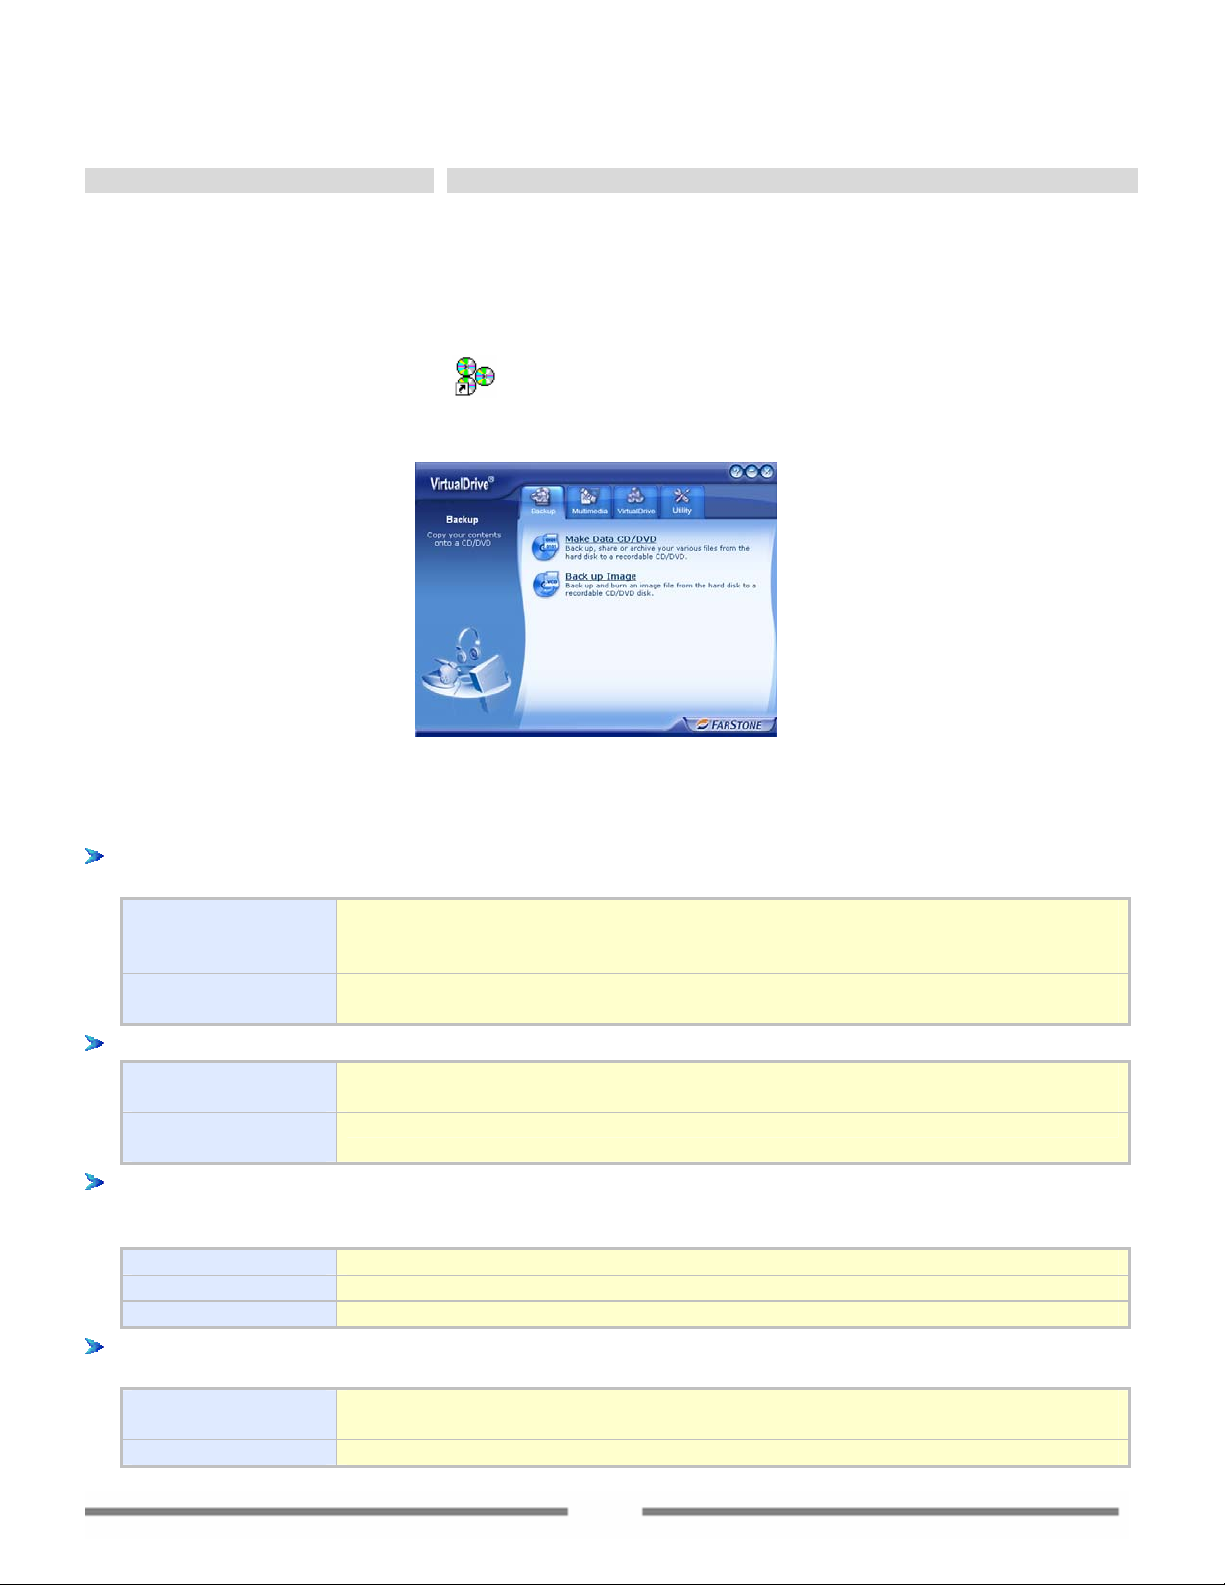
Fig. VirtualDrive
The main functions of VirtualDrive
®
include:
®
Manager Interface
Backup: Allows users to backup, share or archive various files from the hard disk to a CD/DVD, or
back up disc images to real disc.
Make Data
CD/DVD
Back up or archive your various files from the hard disk to a recordable
CD/DVD disc such as a Data DVD, Data CD, Audio CD, MP3 CD, Mixed-Mode
CD, CD Extra, UDF CD or Multi-Session CD.
Back up Image Back up and burn an image file from the hard disk to a recordable CD/DVD
disc.
Multimedia: Allows you to create an audio CD or an mp3 CD from your collections.
Create an Audio
CD
Create an MP3
Create an audio CD from an audio track from an existing audio CD or your
collection of mp3, wav or other type of audio files.
Create an MP3 CD from your MP3 collection.
CD
VirtualDrive: A revolutionary software program that emulates your computer’s CD/DVD-ROM drive,
which enables you to run CD/DVD programs directly from your hard drive without the use of the
physical CD/DVD-ROM drive or the actual disc. From this page, you can :
Create VCD Create an image file (a VCD) for a CD/DVD disc and store it on the hard disk.
VCD Manager Launch VCD Manager and enjoy the more powerful f unctions of VirtualDrive®.
ISO Conversion Convert a VCD image to an ISO image, and vice versa.
Utilities: Provides tools to erase all data from a re-writable CD/DVD disc, to display detailed
information of the CD/DVD device and the disc inserted in the device. From this page, you can:
Erase Disc Erase all data from a re-writable CD/DVD disc (CD-RW, DVD-RW, DVD+RW,
DVD-RAM).
Device info View detailed information about your CD/DVD device, including the CD/DVD
13
Page 14
RapidCache
®
Set caching configurations and view disc and CD/DVD device properties.
Live Update Click LiveUpdate to check for any new VirtualDrive updates.
recorder and the disc inserted in the recorder.
About: Click the Company name on the right bottom of the Manager interface to view information
about VirtualDrive
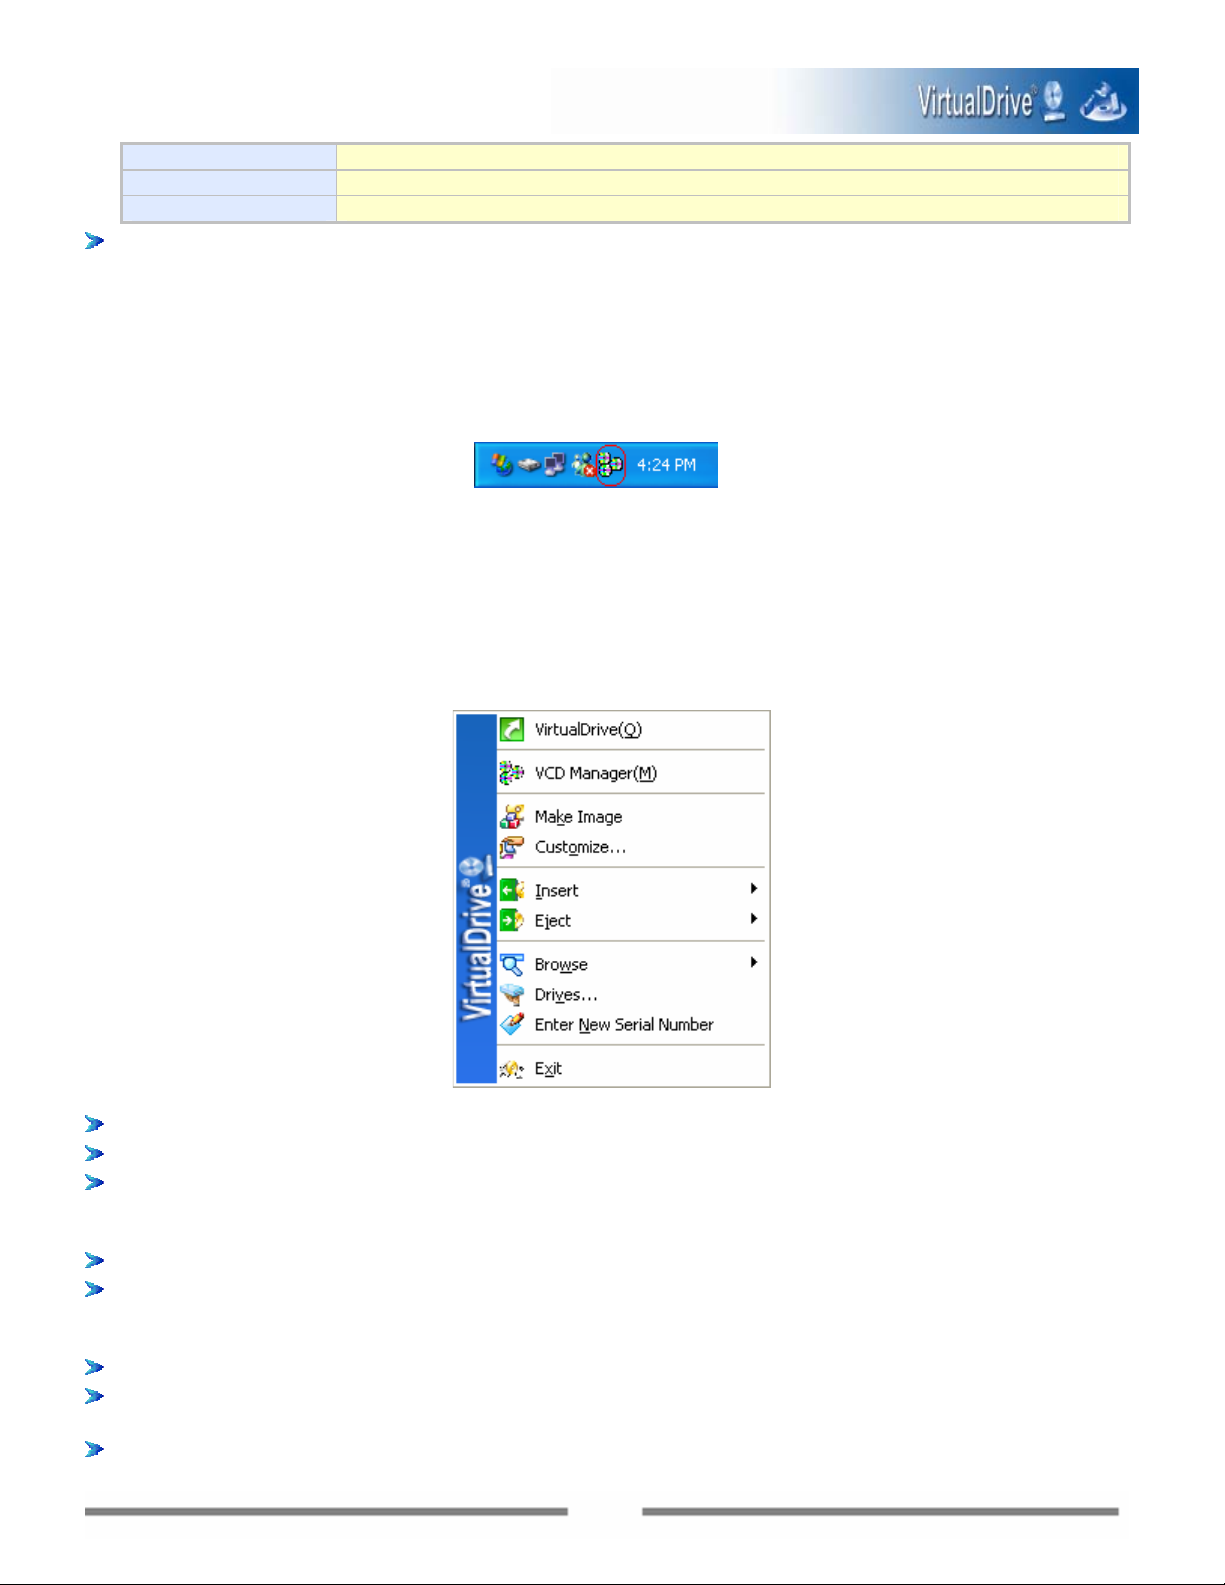
3.2 The VirtualDrive
After launching VirtualDrive
®
and FarStone.
®
Start Menu
®
, a VirtualDrive® icon will be displayed in the Windows system tray near
the clock.
®
Note: The VirtualDrive
VirtualDrive
®
Task, select View Æ Options Æ Miscellaneous Settings and clear the “Run VD Task while
launching VCD Manger” box from the VirtualDrive
Double-click the icon to launch the VirtualDrive
Right-click
the system tray icon to open the VirtualDrive
The Start Menu provides quick access to the most commonly used functions of VirtualDrive
icon will not be displayed if you have disabled the VD T ask function. To disable
®
Manager.
®
Manager.
®
Start Menu.
®
.
With the VirtualDrive
®
Start Menu, you can perform the following functions quickly:
VCD Manager: Start the VCD Manager interface.
VCD Manager: Launch the VCD Manager.
Make Image: Converts the contents of a CD into a VCD file. Supported media includes CD-ROMs,
Audio CDs, Mixed Mode CDs, Photo CDs, Video CDs, DVD-ROMs (Data Mode) and Unprotected DVD
Videos.
Customize: Converts a selection of files into a VCD file.
Insert: Click to select a virtual drive, and then select an image file (VCD) to insert. (All virtual discs
that have been added in VirtualDrive
®
Manager will be listed for you to select. You can also choose a
VCD from the hard disk by clicking the Open option on the top of the VCD list.)
Eject: Click to select a virtual drive, the inserted VCD will then be ejected.
Browse: Click to select a virtual drive, then view the content of the VCD inserted in this drive through
Windows Explorer.
Drives: Set the number of virtual drives and their drive letters.
14
Page 15

Enter New Serial Number: Click to enter a new serial number to activ ate VirtualDrive® when it is not
available.
Note:
A serial number can only be used on one computer on a LAN. If a serial number is used to install this
program on a second computer on a LAN, the installed program will not be av ailable. You can p urchase
another serial number and enter it to activate VirtualDrive
Exit: Click to exit the VirtualDrive
®
program.
®
.
15
Page 16
Chapter 4
Baking up Data to CD/DVD
Chapter 4 Backing up Data to Discs
4.1 Creating Data CD/DVD
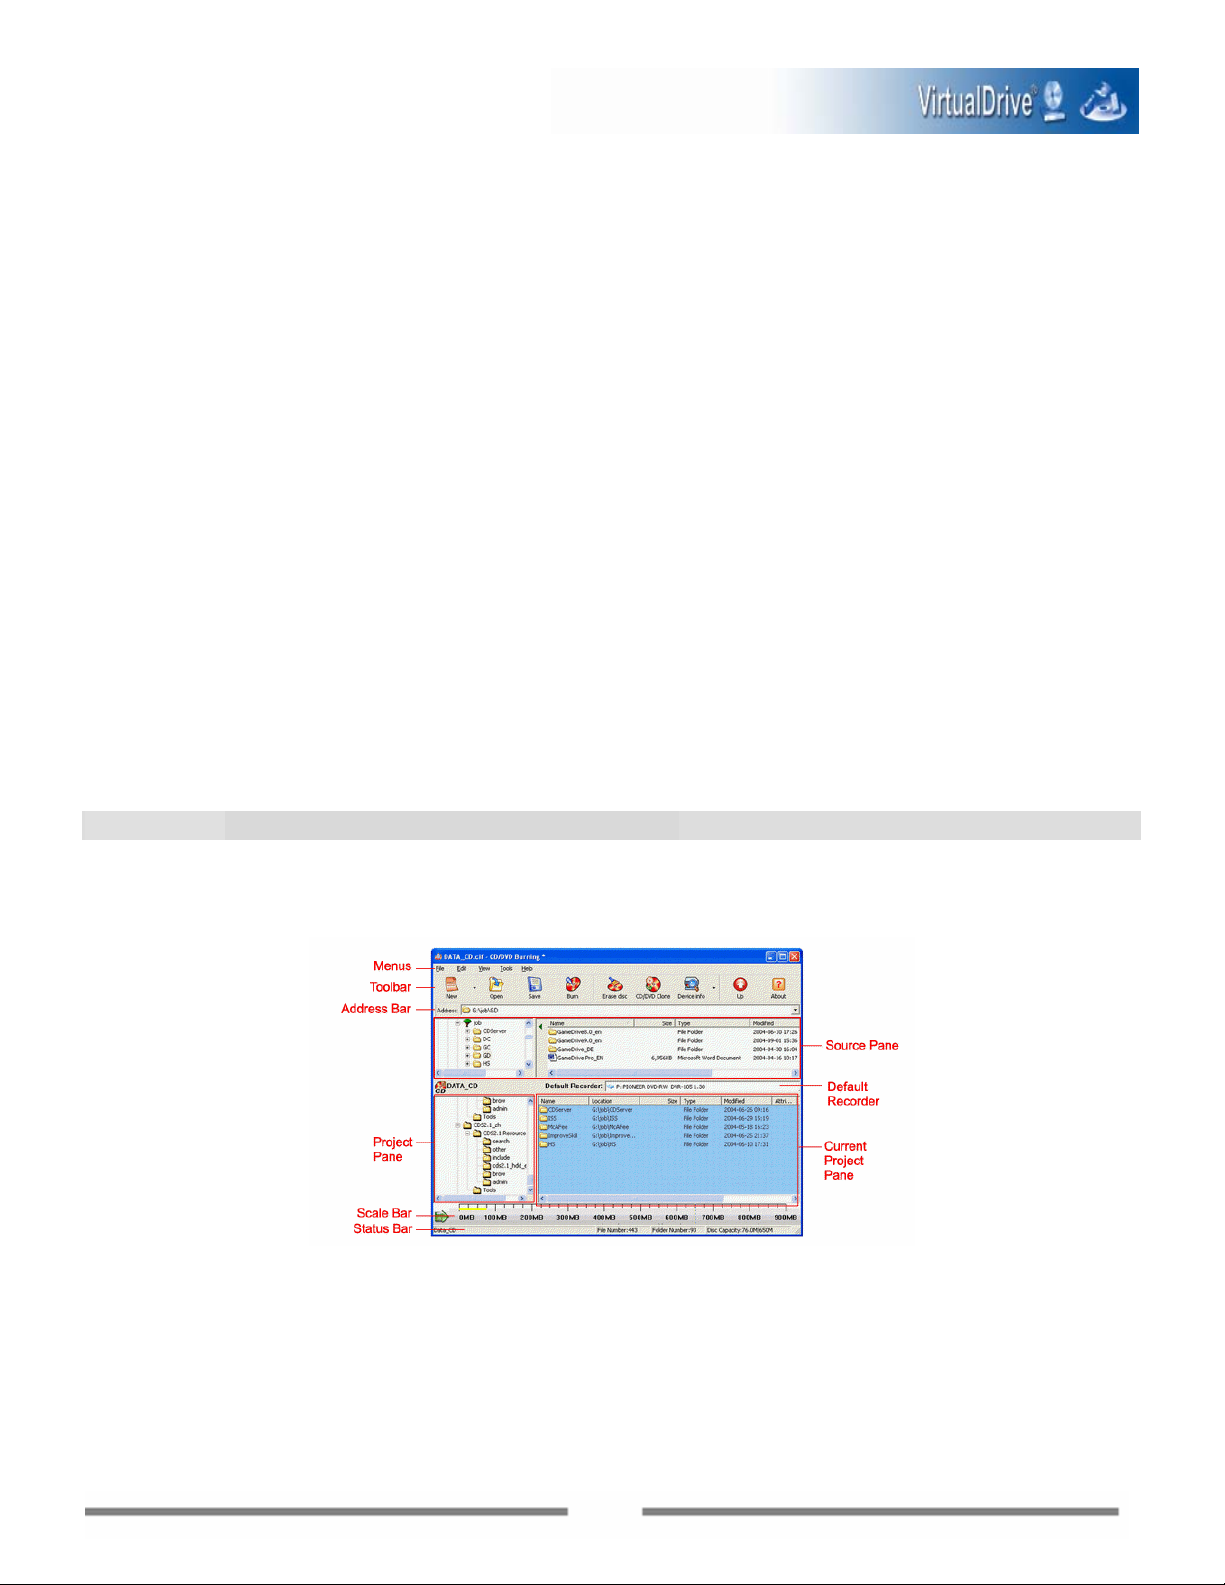
Click Make Data CD/DVD will launch the CD/DVD Burning Manager (shown below), where you can create
various types of discs such as Audio CD, MP3 CD, Mixed-mode CD, CD Extra, or UDF CD.
CD/DVD Burning Manager
4.1.1 Creating a New Project
To start creating any kind of disc, you should first create a project. You can then burn a project onto a
CD/DVD disc or to a VCD.
Shown below is an example of creating a Data CD/DVD.
16
Page 17

Starting a New Project
To start a new Data CD/DVD project, choose any of the following options from the CD/DVD Burning
Manager:
y Select File Æ New Æ Data CD/Data DVD.
y Click the small triangle on the New button
y Right-click on any part of the Project Pane, then choose New Æ Data CD/Data DVD.
Tips:
When you open a multi-session disc in Windows Explorer; you can see the content of the last
session only. With VirtualD rive Pro CD/DVD Burning, you can view the content of all sessions
through CD/DVD Burning manager / Tools / Device Info / Disc Contents.
Adding Files and Folders to the Project
You ca n add files and folders from your hard disk and other storage media to your project by d ragging and
dropping files and folders from the Source Pane or from Windows Explorer to the Current Project Pane.
You ca n preview document, photo , video, and a udio files, by double-clicking the file in the Source Pane or
right-click on the document and select Open. Y ou can al so preview an audio file by right-clicking the file
in the Current Project Pane and selecting Play.
Note: The Play option is only available for audio files in an audio CD project, in the audio session of a
Mixed-Mode CD or in a CD Extra project only.
Working with Files and Folders in the project
You can rename and view properties of a file or folder in your project.
, then select Data CD/Data DVD.
Note: 1. The project name is different from the name of the project file (file with CIF extension). The
project name will be used as the CD label when burning the project to a CD/DVD.
2. Deleting a project does not remove the original project file (file with CIF extension) from your hard disk.
Setting Project Properties
Right-click the project and select Properties to set the project properties.
General
You can edit the CD Label in the blank area near the top. (Note: The CD Label is the same as the project
name. You can also edit the CD Label title by renaming the project.)
File System
You can set the file system of the disc to UDF, ISO9660, or ISO9660+Joliet. You can also edit the volumes,
serial number, CD publisher, CD processor, copyright file, CD application, summary file, ISBN file, volume
create time, volume modify time, volume end time and volume validate time.
Advanced
You can set the disc format and create time for files and folders in the disc.
Audio
You can edit the disc title, artist name and UPC/EAN.
17
Page 18

4.1.2 Burning a Project to Disc
1. Set the Default Recorder to the physical drive.
2. Click Burn
.
3. Choose the burning settings and click Burn to begin burning. ( Note: For instructions on how to deal
with the warning dialog, and on how to configure the burning settings, please refer to section 4.3
Burning Settings.)
4. Click OK to end the burning process.
4.2 Backing up Images to Disc
The Backup Image function allows you to burn an Image file (VCD) or several Images directly to a
recordable disc. Y ou can use the Image file on the disc just as you would any Image fil e stored on your hard
disk (insert the Image into a virtual drive and use it like a real disc).
®
To back up an Image, select Back up Image on the Backup page from the VirtualDrive
Manager.
Follow the step-by-step instructions to complete the operation. For more detailed instructions on how t o
configure the burning settings, please refer to section 4.3 Burning Settings.
4.3 Burning Settings
4.3.1 Disabling Auto-run of Disc Drive
On some occasions, if the auto-run function of the disc drive is enabled an error might occurred when
erasing or burning a disc. Therefore a warning dialog will pop up before you choose the burning settings.
You can choose to auto-disable the auto insert notifi cation by clicking the first button “Disable Auto Insert
Notification and logoff Windows”.
Note: This will log you off Windows. Please save and close any open files or programs before clicking on
the button.
You can also select Continue to ignore the warning and continue the burning setup.
4.3.2 How to Choose Burning Settings
Before your burn a disc from either a project or an image, you must choose burning settings first. The
Burning Setup page is shown as below.
18
Page 19

Below is a detailed description of the options in the Burning Setup dialog box:
y Recorder: Show the name of the recorder to be used to burn the disc. Click Device Info to view
detailed information about the recorder.
y Write Method: Select a write method from the dropdown menu. The write methods include DAO , SAO,
TAO , and Raw. The av ailable method may differ depending on different operations. E.g. If you perform
Restore Burn an Image, the only available choice here is RAW.
y Write Speed: Select a write speed from the dropdown menu.
y Number of Copies: Select the number of discs to be burned.
y Buffer Underrun Protection: Select this option to enable protection against buffer underrun errors
during recording.
y Finalize CD: Check this box to finalize the disc after recording. (Note: No track or session can be
added to the disc once it is finalized. A finalized disc has better compatibility. It can be read on most
CD/DVD drives.
y Verify Data after Recording: To ensure data accuracy, check this box to verify data after recording.
(Note: This option is not available for music CDs.)
y Burn Mode:
Test: Simulates the burning process before the actual burning process begins. No physical disc is
needed in the test. The purpose is to verify if there are any errors occurring while burning.
Test+Burn: First simulates the burning process. If there are no errors, then starts to write data
to the physical disc.
Burn: Burn data to the physical disc directly.
19
Page 20

Chapter 5
Multimedia Creation
20
Page 21

Chapter 5 Multimedia Creation
5.1 Creating an Audio CD
An Audio CD is a compact disc (CD) that can be played by both an Audio CD pla yer and a computer CD-ROM
drive. The CD contains audio tracks only and no computer data. With VirtualDrive Pro, you can make your
own Audio CD by recording tracks from other Audio CDs, from audio files (MP3 , WAV or CDA files) on the
hard disk or from the Internet.
To create an Audio CD:
Select Create an Audio CD from the Multimedia page on the VirtualDrive
chapter 4.1 Creating Data CD/DVD for detailed instructions on how to create an Audio CD.
Note: when you are adding files to create an Audio CD, only audio files (MP3, WAV or CDA files) can be
added to the project.
5.2 Creating an MP3 CD
An MP3 CD is a compact disc (CD) that can be played on an MP3 player and any player that supports MP3
data files. The CD contains MP3 files and a playlist only . With VirtualDrive Pro, you can make your own MP3
CD by recording MP3 files from the hard disk or other storage media.
To create an MP3 CD:
Select Create an MP3 CD from the Multimedia page on the VirtualDrive
4.1 Creating Data CD/DVD for detailed instructions on how to create an MP3 CD.
®
®
Manager. Please refer to
Manager . Please refer to chapter
Note: when you are adding files to create the MP3 CD, only MP3 files can be added to the project.
You can edit the playlist for the MP3 CD by clicking the “playlist.meu” in the project to change the track
order (shown below).
21
Page 22

Chapter 6
®
Working with VirtualDrive
22
Page 23

Chapter 6 Working with VirtualDrive
®
6.1 How to make an Image
An Image file (with .VCD extension) is actually a Virtual CD or VCD that can be inserted into a virtual CD
drive. There are two ways to make an Image file: building from a real di sc and burned from a disc project
created in CD/DVD Burning.
6.1.1 Creating an Image from the CD Drive
With VirtualDrive
• CD-ROM • Audio CD
• DVD-ROM • Video CD
• Mixed-Mode CD • Photo CD
• DVD Video
(unprotected)
• CD-Extra • CD-Text
• CD-Cops
VirtualDrive
formats.
To Create an Image:
Select VirtualDrive from the VirtualDrive manager and select Create VCD.
There are different cases depending on the disc type being built:
Case 1: Building an Image from a CD-ROM, DVD-ROM, Video CD, DVD Video or Photo CD.
Case 2: Building an Image from an Audio CD.
Case 3: Building an Image from a Mixed Mode CD.
Case 1: Building an Image from CD-ROM, DVD-ROM, Video CD, DVD Video or Photo CD
®
, you can build an Image (VCD) from almost any type of disc, including:
• Multi-Session CD
®
supports DVD-ROM games, encyclopedias, multimedia content and other very large file
If you are using a CD-ROM, DVD-ROM, Video CD, DVD V ideo or Photo CD to build, follow the st eps
below:
1. Insert the disc to be built. Select the corresponding ph ysical CD drive. Verify the disc type and general
information of the inserted disc. You can preview the disc content in the Preview area on the right.
Click Next to continue.
2. Verify that the selected hard drive has sufficient free space to store the new Image, and then use the
file browser button
to select a location to save the new Image file. Give the new Image file a name
and select Next to continue. (If no new name is entered, the new Image will use the name of the folder
in which it is to be stored as the Image file name.)
23
Page 24

3. Select the CD read method and use data compression if desired. The default read method “Intelligent
Extraction” is successful for most CD formats.
In most cases, you can use the “Intelligent Extraction” read method to build your Images. But if
you know which protection is on the CD, you can choose to build with that protection by using Other
Protected CD type.
Using data compression will save hard disk space but will also require a longer Image build time.
4. Enter a description of the new Image in the description box.
(Optional) If the CD does not have an auto-run file, you can specify a program to run when the Image
is inserted. You can use the Browse button
to locate the executable program.
(Optional) You can set a password for Image files. The password will be required if you attempt to
insert the Image or view the content of the Image.
(Optional) If you want to eject the CD from the CD drive once the build operation is complete, check
Eject the CD-ROM when the build process has completed. Select Next to continue.
5. Review the attributes of the Image about to be created. Select Next to begin building the Image or
click Back to edit your settings.
24
Page 25

6. When the Image has been successfully built, click OK and then click Finish to close the Image Build
window.
Case 2: Building an Image from an Audio CD
If you are building an Audio CD, follow the steps below:
1. Insert the disc to be built. Select the corresponding ph ysical CD drive. Verify the disc type and general
information of the inserted disc.
You can preview the disc content in the Preview area on the right side. Click Next to continue.
2. Verify that the selected hard drive has sufficient free space to store the new Image, and then use the
file browser button
and select Next to continue. (If no new name is entered, the new Image will use the name of the folder
in which it is to be stored as the Image file name.)
to select a location to save the new Image file. Give the new Image file a name
3. Select the tracks you want to include on the audio VCD by checking the appropriate boxes in the T r acks
list.
Note: If the CD player is running, the Select Tracks window will not be able to show the track list.
25
Page 26

Select the Preview Tr ack ‘Play’ button
to listen to the track. Select Volume to set the
preview track’s volume level.
Click the Select Wave Format button
to set quality and audio compression
format. There is a range of recording quality settings provided by the Windows operating system. You
can save your own custom audio settings by selecting the Save As button.
Audio settings
Step 1: From the Format list, select an appropriate audio compression format.
If you have installed Microsoft Windows Media Player MP3 software or other MP3 player programs,
you can select MPEG Layer-3 from the Format list and build selected tracks as an MP3 format
audio VCD.
Step 2: Select the recording sample quality.
Note: The sound format and sound sampling rate will determine the quality and size of an audio file.
A high quality audio file will take more hard drive space.
Step 3: Save your settings. Any combination of settings provided in the Sound Selection window
can be saved to a file by selecting Save As and giving your custom audio settings a name. The next
26
Page 27

time you open the Sound Selection window, the given name will be presented as a choice in the
Name selection box.
4. Select Next to begin the build process. Please refer back to steps 4 - 6 in case 1 Building an Image
from CD-ROM, DVD-ROM, Video CD, DVD Video or Photo CD.
Case 3: Building an Image from a Mixed Mode CD
If you are building a Mixed Mode CD, follow the steps below:
1. Insert the disc to be built. Select the corresponding ph ysical CD drive. Verify the disc type and general
information of the inserted disc.
You can preview the disc content in the Preview area on the right side. Click Next to continue.
2. Verify that the selected hard drive has sufficient free space to store the new Image, and then use the
file browser button
to select a location to save the new Image file. Give the new Image file a name
and select Next to continue. (If no new name is entered, the new Image will use the name of the folder
in which it is to be stored as the Image file name.)
3. If you want to include data tracks only, uncheck the Record Audio Tracks box.
Choose a read method for data tracks. The default read method “Normal' is successful for most CD
formats. However, some CDs contain inaccurate volume information. If an Image has been
successfully built but does not run properly, use the “Intelligent extraction” read method.
If you know which type of protection is on the CD, you can choose to build with that protection by
using Other Protected CD type.
Using data compression will save hard disk space but will require a longer Image build time.
Select Record Audio Tracks to include both the Audio and Data Tracks in the Image.
4. If you have selected Record Audio Tracks, selecting Next will open the Select Tracks window. (If
Record Audio Tracks was not selected, the Build VCD manager will go directly to Step 5.)
If you do not need to build all audio tracks, select the audio tracks to be included in the Image by
checking the appropriate boxes in the Tracks list.
Select the Preview Track ‘Play’ bu tton
to listen to the track. Select Volume to set the
preview track’s volume level.
27
Page 28

5. Select Next to begin the build process. Please refer back to steps 4 - 6 in case 1 Building an Image
from CD-ROM, DVD-ROM, Video CD, DVD Video or Photo CD to complete the operation.
6.1.2 Making an Image from a Project
You can make an Image (VCD) from a CD/DVD project created in the
CD/DVD Burning program.
To make an Image from a project:
1. Launch the CD/DVD Burning program either from Backup Æ Make Data CD/DVD or Multimedia Æ
Create an Audio(MP3) CD
2. Open a project.
3. Set the default recorder to the Imager Recorder.
4. Choose either of the following options:
y Select File Æ Burn.
y Click the Burn icon
5. Verify that the selected hard drive has sufficient free space to store the new Image, and then use the
file browser button
to select a location to save the new Image file. Give the new Image file a name
and select Next to continue. (If no new name is entered, the new Image will use the name of the folder
in which it is to be stored as the Image file name.)
6. Enter a description of the new Image in the description box.
28
Page 29

(Optional) You can set a password for Image files. The password will be required if you attempt to
insert the Image or view the content of the Image.
(Optional) If the CD does not have an auto-run file, you can specify a program to run when the Image
is inserted. You can use the Browse button
to locate the executable program.
Using data compression will save hard disk space but will also require a longer Image build time.
7. A dialog box will display the attributes of the Image about to be created. Select Recored to begin
building the Image or Back to edit your settings.
8. When the Image has been successfully built, select Finish to close the Image Build window.
6.2 VCD Manager
6.2.1 Launching the VCD Manager
On the VCD Manager, select VCD Manger on the VirtualDrive
launch.
Fig. VCD Manager
The figure above shows VirtualDrive
®
emulating three CD drives – drives H, R and T. The left column lists
each virtual drive and drive letter with the description of the Image that is cu rrently loaded. The upper
right pane displays all Images and cabinets available.
The address bar in the middle enables you to select a cabinet quickly. Click the drop button to select a
cabinet. Click the UP button to go to the upper level cabinet.
®
page. The VCD Manager (shown below) will
To view the contents of an image, select a VCD added in the VCD Manager and you can view the content
of it in the pane below. Right-click a file or several selected files in the content pane and you will see three
options:
¾ Open: Open the selected file.
¾ Export: Export the selected file and store it on the hard disk. With this function, you can:
29
Page 30

Export any file in a multi-session VCD and store it on the hard disk. (Note: Some files in a
multi-session disc cannot be seen or accessed through Windows Explorer.)
Export tracks from an audio VCD, Mixed-Mode CD or CD-Extra such as *.wav files, and store them
on the hard disk.
¾ Properties: View the properties of the selected file.
6.2.2 Adding VCD Files to Run on Your Virtual Drives
T o use an existing VCD file on your hard drive, or on the Internet or on another computer in a network, you
must first add a VCD icon to the VCD Manager window.
Adding VCD Files from the Hard Drive
T o use a VCD file that is on your hard drive or on another computer in a network, use any of these methods:
Method 1: Click the Add button
Method 2: Select File from VCD Manager, and then select Add to open the Add Image browser. Use the
file browser to select and add Image files.
Method 3: Right-click in the right pane (upper pane) of the VCD Manager and select ADD to open the Add
VCD window.
Adding VCD Files from the Internet
to open the Add VCD window.
T o use a VCD file that is on the Internet, first you must confirm the IP address (or website name) and name
of the image file. Also make sure it is a shared file. Use any of these methods to add Internet images:
Method 1: Select File from VCD Manager , and then select Add Intern et Image to open the Add Internet
Image dialog box. Type in the IP address and file name to add the VCD file.
Method 2: Click the Internet Image button
to open the Add Internet Image dialog box.
6.2.3 Using Cabinets to Organize VCDs
A cabinet, which is similar to a folder in Windows Explorer , is used to store multiple VCDs. You can sort your
VCDs into different categories and put them into different cabinets in the VCD Manager. Using cabinets to
organize your various VCDs, you can save time locating a specific VCD from many VCDs all in one manager .
30
Page 31

You ca n create as many cabinets as you like. And cabinets are easy to manage. Y ou can easily add or delete
a cabinet at any time.
To add a new cabinet, use any of these methods:
Method 1: Select File from VCD Manager, and then select New Cabinet to open the New Cabinet window.
Type a name and any description and click Create to continue creating the next cabinet.
Method 2: Right-click on any cabinet icon in the left pane of the VCD Manager and select New Cabinet
to open the New Cabinet window.
Method 3: Right-click in the right pane (content pane) of the VCD Manager and select New Cabinet to
open the New Cabinet window.
T o add VCDs to an existing cabinet, simply drag and drop VCDs from the VCD Manager (the root cabinet).
You ca n also add a VCD directly into a cabinet by using any of the methods described in sectio n 5.8 Adding
VCD Files to Run on Your Virtual Drives.
T o delete a cabinet, right -click the desired cabinet, and then select Delete or click the Delete button
Note: Choosing to delete a cabinet will remove all sub-cabinets and all VCD icon s in them. VCD files will
not be deleted from your computer.
6.2.4 Inserting a VCD
There are several different ways to insert a VCD file.
Method 1: Click on a VCD to select it, and then select Insert.
Method 2: If there is no virtual drive highlighted, double-clicking on a VCD icon will insert the VCD into an
available drive.
Note: If a default drive has been specified for the VCD, the VCD will be loaded into that drive. If the drive
already contains a VCD, then that VCD will be ejected and the currently selected VCD will be inserted.
Method 3: Click and drag a VCD icon over to a virtual drive.
Note: If a virtual drive already has a VCD loaded, then the loaded VCD will be ejected and replaced with
the current selection
Method 4: Select the VCD icon, and then Edit and Insert.
Method 5: Right-click on a VCD icon and then select Insert.
Method 6: Right-click on the VirtualDrive
®
icon in the system tray and then select Insert.
Method 7: Open Windows Explorer and right-click on the virtual drive and select Insert.
Method 8: Open Windows Explorer and right-click on the VCD File and then select Insert.
Method 9: In VCD Manager, select a VCD file and press the Insert key on the keyboard.
.
31
Page 32

Method 10: Specify a hot-key for inserting a VCD file.
6.2.5 Ejecting a VCD
There are several different ways to eject a VCD file.
Method 1: Click on the loaded virtual drive and then select Edit and Eject.
Method 2: Drag and drop the loaded virtual drive to anywhere in the right pane.
Method 3: Right-click on the loaded virtual drive and then select Eject.
Method 4: Click on an inserted VCD to select it and select Eject
Method 5: Right-click on the VirtualDrive
Method 6: Click on an inserted VCD to select it and then push the Delete key on the keyboard.
Method 7: Open Windows Explorer, right-click on the loaded virtual drive and select Eject.
®
icon in the system tray and select Eject VCD.
.
6.2.6 VCD Properties
The VCD Properties window shows VCD attributes such as its storage location, file size and CD type. From
the Properties window you can also edit the VCD description, add an auto-run command, set its default
virtual drive or assign a hot-key to insert the VCD.
Opening the VCD Properties Window
To open the VCD Properties, right-click on a VCD icon and select Properties.
Changing the VCD Description
Open the VCD Properties window and select the General tab. Enter the new description into the Description
box.
Changing the Auto-run Command
32
Page 33

Open the VCD Properties window and select the Setting tab. Use the browse button to select the locati on
of the program.
Changing the Creator’s Name
Open the VCD Properties window and select the Setting tab. Type the creator’s name in the Author box.
Changing the Default Virtual Drive
Open the VCD Properties window and select the Setting tab. Click on the Default Drive dropdown bo x and
select a new default drive.
Using Hot-Keys to run VCDs
Open the VCD Properties window and select the Setting tab. Tab down to the hot-keys box and press a key
(for example, pressing “C” will create Ctrl +Alt + C as the new hot-ke y).
Press Ctrl, then Alt, then the character key to insert the VCD.
Viewing the Contents of a VCD
There are several methods of viewing the contents of a VCD.
Method 1: Right-click on the icon of an inserted VCD, and then select Browse.
Method 2: Click on a virtual CD icon and you can view its contents in the bottom right pane.
Method 3: Launch Windows Explorer and select the VCD drive.
6.2.7 Creating a VCD Shortcut
Users can create shortcuts to their frequently used VCDs on the desktop. Double-clicking on the shortcut
will insert the VCD into a virtual drive.
To create a shortcut for a VCD, use any of the following methods:
y Select a VCD, and select Tools Æ Shortcut from the menu bar.
y Right-click the VCD and select Shortcut from the popup menu.
y Select a VCD, and press Ctrl+U.
Note: Select one VCD at a time. Only one shortcut can be created at a time.
Note: Once a shortcut has been created on your desktop, you can move or copy it to a new location on
your computer, if needed.
33
Page 34

6.2.8 Setting a Password for a VCD
VCD Manager allows users to set a password for VCD files. The password will be required if you atte mpt to
insert the VCD or view the content of the VCD.
Right-click on a VCD file in the VCD Manager tray and select Password from the dropdown menu to set
password for the VCD file.
6.2.9 Extracting Files from VCD
Users can obtain files from the VCDs without inserting them into the virtual drive. Click on a VCD icon in
the VCD Manager and all of its contents will be displayed in the bottom right pane. Then right-click on the
selected file and select Extract from the drop menu.
6.2.10 Extracting Audio Tracks
VirtualDrive® allows you to extract audio tracks from an audi o CD, or from the audio track of a Mix ed-Mode
CD or a CD Extra, either a real CD or a virtual CD, an d store them as an audio file (*.WAV) or a MP3 file on
the hard disk.
Use any of these methods to open the Extract Audio Track window.
Method 1: Select Tools from the VCD Manager menu. Then select Export Track.
Method 2: Click the Export Track button
Method 3: Press Ctrl+T.
.
34
Page 35

Click the Drive drop button and select a virtual drive with the desired VCD inserted, or select the physical
drive with an existing disc inserted.
You can preview a track. To preview a t rack, select one track by title, and click the Play button.
Note: Clicking this button
Before extracting a track, you can set wave format settings for the MP3 file by clicking the Select Wave
Format button.
Wave Format Settings:
From the Format list, select an appropriate audio compression format.
Note: If you want to export the track as an MP3 file, select MPEG Layer-3 from the dropdown menu.
Selecting the other three formats will save the exported track as a *.WAV file.
Select a sampling rate from the Attribute dropdown menu.
Note: The sound format and sound sampling rate will determine the quality and size of an audio file.
A high quality audio file will take more hard drive space.
Click OK to save your settings.
Note: Any combination of settings provided in the Sound Selection window can be saved by
selecting Save As and giving your custom audio settings a name. The next time you open the Sound
Selection window, the given name will be presented as a choice in the Name selection box.
will eject the disc. The other controls are similar to any audio player.
After you have set the wave format for each track to be exported, click Extract and choose a location to
save the file.
6.2.11 Searching VCDs
Search VCD allows you to search for wanted VCD files and to add them into VCD Manager.
Follow the steps below:
Step 1: Select File and select Search from the drop menu or use CTRL+F, to open the Search VCD
dialog box.
35
Page 36

Name: You can determine what kind of file to search by selecting a file format in the Name dropdown
menu. You can also choose to search subfolders by checking Search Subfolders.
Path: You can specify a drive to search by choosing a drive in the Path drop menu. T o select a detailed
path, click on the browser button
Step 2: Select Search. The files being searched will be displayed in the window. Click on a single file or
multiple files (by pressing CTRL) and select ADD to add them into the VCD Manager window.
to open Window s Explorer.
6.2.12 Deleting VCD Icons or VCD Files
Step 1: Click on the VCD you w ant to remove f rom the VCD Manager. Then either (a) select File and then
Delete VCD on the menu bar; (b) right-click i n the right pane of the VCD Manager and select Delete VCD;
or (c) press the Delete key on the keyboard.
Step 2: Select OK to remove only the VCD icon from
VCD Manager, and its corresponding VCD file from the hard disk, check Delete both the VCD icon and
the VCD file, and then select OK.
VCD Manager. To remove both the VCD icon from
6.2.13 Adding Additional Virtual Drives
T o change the number of virtual drives on your system (the maximum is 23), select View on the menu bar ,
and then select Drives , or click on the Drives button
to be added, and then select OK.
Note: The number of virtual drives
usable drives. If new devices such as another physical CD-ROM drive are to be installed, you will have to
leave a drive letter free so the system can accommodate the new drive.
is not the same on all computers. The symbols indicate the number of
. Place a checkmark next to each virtual drive
36
Page 37

6.2.14 Changing a Drive Letter
You can change the drive letter for any drive on your system, including the physical drive. Right-click the
desired virtual drive and select Edit Drive to change the drive letter.
6.2.15 Setting Auto-Run for a Drive
You can enable the auto-run function for the selected virtual drives, or for all (virtual) drives.
Right-click a virtual drive and select Auto-Run to enable the auto-run function for it.
Right-click “Virtual Drives” (the heading) and select Auto-run (All Virtual Drives) to enable the auto-run
function for all virtual drives.
Right-click “Virtual Drives” (the heading) and select Auto-run (All Drives) to enable the auto-run
function for all drives, including the physical drive.
6.2.16 Backing up the VCD List
You can back up the information from the current VirtualDrive® VCD list and restore it any time.
Exporting the VCD List
Select File from the VCD Manager menu. Then select Export List to save the VCD list on the hard disk.
Importing the VCD List
Select File from the VCD Manager menu. Then select Import List to open the window.
Choose the VCD list you want to restore and then click Open.
6.2.17 Changing the VCD Manager View
Select Views , and then you can choose to display the VCDs with large icons, small icons or in a
detailed file list.
6.2.18 VCD Manager Settings From View in VCD Manager, select Options to open the Option window.
Toolbar Settings
Use large icons: Sets the size of the toolbar button icons.
Show button text length: Sets the number of text characters to be displ ayed within the toolbar buttons.
37
Page 38

Show Control Tip text: Sets whether to display the 'control tips' pop-up text when the mouse pointer
hovers over a toolbar button.
Flat buttons: Merges the toolbar button outline into the toolbar.
Select Buttons: Choose Select Buttons to open a dialog box offering a range of alternative buttons.
From here you can add, remove or change the order of the buttons on the VirtualDrive
®
toolbar.
Animation ON/OFF
Turn the VCD Insert/Eject animation ON or OFF.
Build Size Settings
From here, you can set the volume size from 1 MB to 2048 MB for each virtual CD . This feature is designed
for building large size files only (e.g. building customized files an d DVDs). If the VCD you are building
exceeds the size you set, it will be created as *.D01, 02, etc.
Device Information
From here, you can view or edit the device information such as the Manufacturer, the Product Info and the
Model. Click the Reset button to restore the manufacturer settings.
Miscellaneous Settings
Keep VCDs in drive when system boots: VCDs that were inserted into any virtual drive on shutdown
will be inserted at startup.
Show VirtualDrive logo when launching: The VirtualDrive
®
Manager will display the VirtualDrive® logo
when the program loads.
Add VirtualDrive icon to Windows System Tray: The VirtualDrive
®
icon will be added to the bottom
right hand side of the Windows taskbar at system start-up.
Run VDtask while launching VirtualDrive: The VirtualDrive
system tray while launching VirtualDrive
®
.
®
icon will be displayed in the bottom right
Enable Automatic Live Update: If your computer is connected to the Internet and Live Update is
enabled, you can get the latest files to update VirtualDrive
®
. This feature will prompt you when updates are
available to be downloaded and installed.
6.2.19 Running VCDs Using Command Line Syntax
Using the command line syntax for VirtualDrive® is a powerful way of automating repetitious tasks.
The basic syntax is described below:
Each command starts with the term "VDrive." A virtual dri ve can be
F:, G:) or by a number
G are virtual drives, then drive F can be referred to
issue a
command to tell VirtualDrive what to do next.
corresponding to the position of the virtual drive. F or exam ple, if drives E, F anad
as “2:” Once a virtual drive is referenced, you can then
referenced by its drive letter (e.g. E:,
38
Page 39

Available commands are:
1. Vdrive <drive letter:> <VCDfilename> /I [@cmd] [/M] [/NA] => Insert VCD
2. Vdrive <drive letter:> /E [/M] => Eject VCD
If successful, returns 0, otherwise 1.
3. VDrive /drive: Returns the number of virtual drives available
Note: Commands shown in square brackets [ ] are optional.
4. /I Insert a VCD
5. /E Eject a VCD
6. [/M] Show message
7. [@<path><filename>] Run a program on the VCD. To use this, you must include the full path
showing the location of the program to be run and the name of the executable file.
Using the command line for creating shortcuts to run VCDs
Using command line instructions is an ideal way to create customized shortcuts to run your VCDs.
Step 1 Write down what you want the shortcut to do, e.g. Vdrive •E:• "C:\VCDCollection\Age of Kings"• /I
•@E:\Age.exe
Note: • - The dot shows where a blank space must be inserted.
The above example, read from left to right, works as follows:
Vdrive -Tells Windows that the following commands will be executed by the Vdrive program.
E: -selects VirtualDrive E:
"C:\VCDCollection\Age of Kings"-adds the path and the name of the VCD file to load.
Note: If there are any spaces in the character string, quotation marks must be used.
/I -tells the Vdrive program to insert the VCD
@ -Tells Vdrive to execute a program
E:\Age.exe - tells Vdrive where the program is by specifying the drive (E :) and the name of the file to run
(Age.exe).
Step 2 Create a shortcut by right-clicking on an empty space on the Windows desktop and selecting New
and then Shortcut.
Step 3 In the “Create Shortcut” window, enter the command line from Step 1.
39
Page 40

Example: Vdrive E: "C:\VCDCollection\Age of Kings" /I @E:\Age.exe
6.3 Converting between ISO 9660 Image Files and VCD Files
You can con v ert an ISO 9660 image file into a VCD file as well as convert a VCD file into an ISO 9660 CD
file.
Step 1: Select ISO Conversion on the VirtualDrive page form the VCD Manager.
Step 2: Select the file browser button to open the Windows file browser and locate the ISO or VCD file.
Step 3: Select the desired ISO file, and then select Open to continue.
Step 4: Select Convert to start the conversion.
Note: Audio, DVD and compressed VCD files cannot be converted into ISO files.
40
Page 41

Chapter 7
VirtualDrive® Utilities
41
Page 42

Chapter 7 VirtualDrive® Utilities
7.1 Erase Disc
The Erase Disc function enables users to delete the data on a re-writable CD/DVD (CD-RW, DVD-RW,
DVD-RAM, DVD+RW).
To erase a disc:
1. Insert the disc you want to erase in the disc drive.
®
2. Click Erase Disc on the Utility page from the VirtualDrive
3. Choose the CD recorder with a re-writable disc inserted.
4. Choose an erase mode from the dropdown menu.
Manager interface.
There are two erase modes:
Quick Erase: Using this method, discs that are erased appear to be empty but the data is not
physically removed.
Quick Erase will take a shorter time to complete and will only erase the Table
of Contents (TOC) of the disc. The erased data can still be recovered by using special t ools.
Full Erase: Full Erase will physically erase the entire disc. Compared to Qui ck Erase, Full Erase will
take a longer time to complete.
5. Click Erase to begin erasing the disc.
6. The CD/DVD device will auto-eject after the erasing process has completed.
7.2 View the Device Info Device Info provides detailed information about the installed CD/DVD device and the inserted CD/DVD.
To view the device information:
Click Disc Info on the Utility page from the VirtualDrive
®
Manager interface.
42
Page 43

There are two buttons on the top right side of the Device Info page:
Refresh current device information.
Save your current device information as a text file on you r ha rd disk.
There are two tabs on this page, Device Info and Disc Info.
Device Info
On the Device Info tab (show above), you can view the detailed information about a CD/DVD device
(including a virtual drive) on the left. You can also view the disc formats that are readable or writable on
this drive in the area on the right side.
Disc Info
On the Disc Info tab (show below), you can view the properties of the disc inserted in the selected CD/DVD
device.
You can extract a specif ic file or folder from the disc and store it on the hard disk by right-clicking the
desired file or folder and then selecting Extract.
7.3 RapidCache
®
RapidCache® is a unique CD caching utility program that uses an incremental caching algorithm found only
in VirtualDrive.
43
Page 44

7.3.1 RapidCache
®
Features
• RapidCache® does not use your valuable hard drive space for caching.
• RapidCache
• RapidCache
• RapidCache
• RapidCache
programs or memory managers.
• RapidCache
CD Browser: Lets you see the features and attributes of a CD.
Performance Evaluation tool: The P erformance Evaluation tool can test the performance and abilities of
a CD drive, including Data transfer rate and T r ack segment access time for Inner/Outer tracks, 1/3, 1/2
or full strokes. This feature enables you to objectively compare performance differences between
various CD drives.
®
uses the latest incremental caching technology.
®
makes your CDs or VCDs run at “lightning” speed.
®
provides one-step cache mode reconfiguration, without having to reboot your system.
®
is completely transparent to your system. Therefore it will not conflict with other caching
®
comes with:
7.3.2 The RapidCache® Settings
Click Rapid Cache on the Utility page from the VirtualDrive
You can view detailed information on a (virtual) disc drive on the CD Drive information tab, or a (virtual)
disc inserted in a drive on the CD-ROM Properties tab.
The Cache Settings tab allows you to choose a cache configuration that can be tailored to the type of file
access that works best for your hardware.
®
Manager interface.
RapidCache® Manager
From this tab, you can:
Control cache file size: Allows you to control the cache file read size. Above the cache mode
checkboxes is a drop list where the cache file cut-off size can be set. By choosing an appropriate cache
file size in combination with the cache size, you can minimize the number of file block reads and
maximize the use of your cache space.
Control cache mode: RapidCache® can implement three different cache modes, Incremental mode,
MAX mode, and MIN mode. Clicking on one of the cache mode options immediately switches Rapid
Cache's cache mode.
When you request data from your CD, RapidCache® will read the data as a
logical block, and then place part of the data into the cache buffer. The next
Incremental
caching mode
time you need the data from this block, RapidCache® will increase the cache
size for this block and store more of the data block into the cache buffer. Using
this incremental algorithm, RapidCache® makes more intelligent use of your
cache by retaining the most significant data in the cache buffer.
44
Page 45

Max caching mode
Maximum caching mode reads whole data blocks into the cache buffer
together with the relevant index and directory files.
Min caching mode
Minimum caching mode will read only directories and index files into the cache
buffer. Minimum caching mode is recommended if you set the cache size to
less than 514 KB in RapidCache®.
No caching mode
Allows Windows to handle all caching activity.
By experimenting with each of the three different caching modes to gain a maximum “save r atio”, overall
CD and VCD performance can be dramatically improved.
When experimenting with various settings to maximize CD or VCD performance, you should flush the
cache buffer (by selecting Reset Cache) each time you change the settings to give a more precise
evaluation of performance.
7.4 Live Update
If your computer is connected to the Internet and the Automatic Live Update is enabled, your V irtualDrive
program will automatically notify you whenever a newer version is available.
You can also manually update your VirtualDrive
To run Live Update and get the latest files from the FarStone website, please follow these instruction s :
Step 1 Click LiveUpdate
on the Utility page from the VirtualDrive® Manager interface to run
LiveUpdate program. LiveUpdate will check any FarStone product on your system. Click Next to continue.
z If you have not registered your personal information with FarStone, follow the process below:
®
software periodically.
Step 2 Select the Register now button and click next to continue.
Step 3 Enter the required registration information in the Register window and click Next.
Note: FarStone will send you an E-mail containing your Registration ID, which will be needed the next time
you run Live Update manually. Be sure to enter a correct E-mail address and remember it. If you forget
your Registration ID, we can resend it to you upon request.
Step 4 A prompt window will display to confirm that you have registered successfully. Click Next to close
LiveUpdate window.
z If you have registered before, follow the process below:
Step 2 Select I have registered before and click next to continue.
Step 3 Enter your Registration ID that was sent to your mailbox when you first registered your information
with FarStone. Click Next to continue.
Note: If cannot find the Registration ID, you can enter your E-mail address and click the Retrieve ID
button. We will immediately resend your R egistration ID to you. BE SURE THE E-MAIL AD DRESS ENTERED
HERE IS THE SAME ONE YOU PROVIDE D WHEN YOU REGISTERED THE FIRST TIME. Otherwise, we cannot
identify your information nor help you find your Registration ID.
Step 4 Live Update will automatically search for new components for VirtualDrive
®
. Once it collects all of
the updates, click Next to download and install them. You may be required to restart your computer after
the updates have been installed. Please be sure to save and close any open files or programs before
accepting this action.
Step 5 After all of the components are installed on your computer, click Next to close Live Update.
45
Page 46

46
Page 47

Chapter 8
Appendix
47
Page 48

Chapter 8 Appendix
8.1 FAQ
Q1: Can I use VirtualDrive for playing digital CD audio?
Yes, you can play digital audio with VirtualDrive. However, you must keep it in your mind that the
building process must strictly comply with these 2 rules:
(1) audio CD must be built as the following: PCM wave format, 44.100kHz, 16kBit/s, stereo, 172kb/s
(2) all sound tracks must be included into virtual CD.
You can have VirtualDrive play digital CD audio by following these settings:
For Windows XP user, right-click on My Computer and select Properties from the drop menu, then
point to Hardware->Device Manager to open the window as below:
Double click on the virtual drive to a open new window and point to properties on it. Check the bottom
box to enable digital audio for this virtual drive.
Q2: Why the time for building protected CD is much longer than building other sorts of CDs?
You m ust build protected CDs with intellig ent extraction, otherwise the building is hard to finish because
it cost overmuch time or the VCD is unreadable after the building. Another reason for this phenomenon
is that at the beginning of the building, VirtualDrive slows down the speed while reading data from some
protected area on the CD (as laserlock, safedisk, securom), so the time estimate to finish will be
prolonged. The VirtualDrive will speed up once finish the building on this area and the time remains will
be reduced as well.
48
Page 49

Q3: Does the building time vary depending on the quality of the real CD-ROM drive?
The reading speed of CD-ROM drives produced by different manufacturer diverse v aries a lot due to their
error-correction ability and other mechanisms. Therefore, the buildin g speed mostly depends on the
quality of CD-ROM drive instead of VirtualDrive program.
Q4: Can I convert a VCD file, which is built by intelligent extraction, int o an ISO file?
The standard of the VCD file that built by using Intelligent Extraction is different from ISO file. So it can't
be converted into a ISO file.
Q5: Why can't I use VirtualDrive to build audio tracks of CD into MP3 format?
VirtualDrive need MP3 coding/decoding tools to build audio tracks into MP3 format, please make sure you
have installed Microsoft Windows Media Player MP3 groupware or other including MP3 coding/decoding
links storeroom in your computer.
Q6: Does VirtualDrive support IEEE1394 or USB CD-ROM?
VirtualDrive 7.03 or later version supports IEEE1394 or USB CD-ROM. If you still possess the old version,
you can download the newer one from our website.
Q7: Does VirtualDrive support Multi-Session CD and CD-Extra?
Yes, VirtualDrive7.1 or later version supports both kinds of CD.
Q8: VirtualDrive auto-plays the contents of virtual CD at system start-up. How can I stop the
auto-play?
Uncheck Enable CD autorun box from View-> Settings -> Miscellaneous settings in VirtualDrive
menu bar.
Q9: Can VirtualDrive automatically eject all inserted VCDs from virtual drive(s) after the
computer restarted?
Yes, just uncheck Keep VCDs in drive when system boots box from
View->Settings->Miscellaneous settings in VirtualDrive menu bar.
Q10: I'm upgrading VirtualDrive6 to higher version. I'm sure I have successfully removed the
old program, but it still prompt me to uninstall it when I try installing VirtualDrive. How can I
resolve this problem?
Search and delete the following files from your system: cda.pdr、cdant.sys and cda.sys. And then restart
the computer and continue the installation.
Q11: Why does the game application still ask me to insert the CD when th e virtual CD is already
inserted?
You may resolve this problem by trying either of the following methods:
a. Change the virtual drive as the first CD-ROM.
49
Page 50

b. Build this game CD by using intelligent extraction.
Q12: Why the maximum number of virtual drive is 23?
There are 26 letters in alphabet. We suppose that A: and B: are floppy drives on your computer, C: is the
entire hard disk, and therefore there are 23 letters left (D-Z), each one can be assigned to a drive. So
you can create at most 23 virtual drives.
Note: VirtualDrive install/uninstall program will not replace or remove these two files.
Q13: Does VirtualDrive support protected game CD?
The answer is yes, VirtualDrive supports various protected game CDs as: Mixed-Mode protected,
Safedisk1, Safiedisk2, Securom, Securom*New, CD Cops, Laserlock, etc.
Q14: Why can’t I hear the background music while playing game?
The background music of some mixed-mode CD is available only if the CD is inserted in the first CD-ROM
on the system.
Q15: Some games require more than one CD for playing. How can I replace CD without
interrupting the game?
VirtualDrive enables users to use hot-key to insert a CD. Preset a hot-key and virtual drive for the CDs
and you can insert them into the designated drive by using the hot-key without stopping the game.
Q16: What sort of CD need to be built by using ‘Intelligent Extraction’?
Some protected CDs as Securom should use intelligent extraction to build.
Q17:After I set the number and position of virtual drives on Windows2000/XP/Server 2003,
VirtualDrive regards virtual drive as real CD-ROM drive. How can I correct this?
There are two ways to resolve this problem: (1) Restart your computer (2) Refresh in Device Manager
Q18: The drive letter of real CD-ROM was arranged to the tail. How can I change the drive letter
sequence? ( e.g. change F: to E:)
You can assign a drive letter to a CD-ROM drive by the following steps:
Win98, ME only
(1) Click on System in Control Panel Window.
(2) In the System window, select Device Manager
(3) Click on the CD-ROM item, then double click the physical CD-ROM drive icon.
(4) Select Settings, and then set the drive letter.
50
Page 51

Windows 2000/XP/Server 2003 only
(1) Right click on ‘my computer’ from desktop, select manage --> disk management .
(2) Make sure which one is virtual drive.
(3) Right click on virtual drive icon, select ‘change drive letter or paths’ from the drop menu.
Q19: Why does the system always prompt me that the version of wnaspi32.dll is incorrect once
I run virtual CD in VirtualDrive?
You need the newer version of ASPI32 to run virtual CD on Win98/Me. T o correct this error , just download
ASPI32 from
Q20: Why can’t I use Win98 CD player to play audio CD?
There might be too many virtual drives have been set in your system. Win98 CD player is un able to
recognize these drives. Please try other kinds of media player.
http://www.farstone.com/ or www.adaptec.com
Q21: Should I remove VirtualDrive before upgrade Windows?
When you are preparing to upgrade your system from Win98/Me to Win2000/XP/Server 2003, please
uninstall VirtualDrive from the computer. After successfully u pgrade Windows, reinstall Game drive on
the new system.
Q22: Why do I fail to enable IDE disc drive in VCD Manager?
When disabling IDE disc drive, the device manager first disables IDE controller and then the disc drive.
Similarly it has to first enable the IDE controller and then the disc drive when you try to re-enable the
IDE drive. If you failed to re-enable the IDE drive, it is very possible that enabling IDE controller is not
activated. Restarting the computer before you perform this action any resolve this problem.
51
 Loading...