


Total Backup Recovery 7
Small Business Server
User’s Guide

Copyright Notice
No part of this publication may be copied, transmitted, stored in a retrieval system or
translated into any language in any form or by any means without the expressed written
permission of FarStone Technology, Inc.
FarStone gr ants you the right to use one copy of the enclosed softw are program (“SOFTWARE”)
on a single computer . If the SOFTWARE is installed on a network, or more than one user can run
the SOFTWARE at the same time, you must purchase an additional license for each additional
user or computer.
Trademark
FarStone® is a trademark of FarStone Technology, Inc. Microsoft, Windows® and MS-DOS®
are registered trademarks of Microsoft Corporation. Other product names mentioned in this
User’s Guide may be trademarks or registered trademarks of their respective companies.
FarStone Technology, Inc.
U.S. Headquarters:
1758-B North Shoreline Blvd
Mountain View, CA 94043
Phone: (650)969-4567
Fax: (650)968-4567
www.farstone.com
Asia-Pacific Offices
9F-4, No.87, Sec 4
Jhongsiao E. Rd.
Taipei City 106,Taiwan
Phone: 886-2-2777-2887
Fax: 886-2-2777-2857
www.farstone.com.tw
Technical Support
Answers to frequently asked questions are posted on our website at
www.farstone.com/support/faqs
Support at www.farstone.com/support
Copyright
©
2000-2010 FarStone Technology, Inc. All rights reserved.
. For other support issues, please contact FarStone Technical
.

Software License Agreement
FARSTONE TECHNOLOGY, INC. (FARSTONE) END USER LICENSE AGREEMENT FOR TOTAL
BACKUP RECOVERY, HEREAFTER REFERRED TO AS THE “SOFTWARE”
PLEASE READ CAREFULLY: THE USE OF THIS “SOFTWARE” IS SUBJECT TO THE “SOFTWARE”
LICENSE TERMS OF FAR STONE AND O THER LICENSORS WHO’S SOFTWARE MAY BE BUNDLED
WITH THIS PRODUCT.
BY YOUR USE OF THE “SOFTWARE” INCLUDED WITH THIS PRODUCT YOU AGREE TO THE
LICENSE TERMS REQUIRED BY THE LICENSOR OF TH E “SOFTWARE” , AS SET FOR TH BELOW . IF
YOU DO NOT AGREE TO THE LICENSE TERMS APPLICABLE TO THE “SOFTWARE”, YOU MAY
RETURN THE ENTIRE UNUSED PRODUCT FOR A FULL REFUND.
LICENSE AND WARRANTY:
The software that accompanies this license (the “Software”) is the property of FARSTONE or its
licensors and is protected by copyright law. While FARSTONE continues to own the Software,
you will have certain rights to use the Software after your acceptance of this license. Except as
may be modified by a license addendum which accompanies this license, your rights and
obligations with respect to the use of this Software are as follows:
A. Single User License:
(a) Use the “Software” on a single computer system or network, and only by a single user
at a time. If you wish to use the “Software” for more users, you will need an additional
License for each user.
(b) Make one copy of the “Software” in machine-readable form solely for back-up purposes
provided you reproduce FarStone’s copyright proprietary legends. Notwithstanding the
foregoing, the “Software” may be used on the home, laptop or other secondary computer
of the principal user of the “Software”, and an additional copy of the “Software” may be
made to support such use. As used in this License, the “Software” is “in use” when it is
either loaded into RAM or installed on a hard disk or other permanent memory device. The
“Software” may be “in use” on only one computer at any given time. (Different License
terms and fees are applicable for networked or multiple user applications.) As a specific
condition of this License, you agree to use the “Software” in compliance with all applicable
laws, including copyright laws, and that you will not copy, transmit, perform or distribute
any audio or other content using the “Software” without obtaining all necessary Licenses or
permissions from the owner of the content.
B. Multiple User License:
Make one copy of the “Software” in machine-readable form solely for back-up purposes,
provided you reproduce FarStone’s copyright proprietary legends.

You must acquire and dedicate a License for each separate computer on which any part or
portion of the “Software” is installed or run As used in this License, the “Software” or any part
or portion of the “Software” is “in use” when it is either loaded into RAM or installed on a hard
disk or other permanent memory device including any network ed or shared environment where
either direct or indirect connections are made through software or hardware which pools or
aggregates connections.
As a specific condition of this License, you agree to use the “Software” in compliance with all
applicable laws, including copyright laws, and that you will not copy, transmit, perform or
distribute any audio or other content using the “Software” without obtaining all necessary
Licenses or permissions from the owner of the content.
C. Restrictions:
You may not distribute copies of the “Software” to others or electronically transfer the
“Software” from one computer to another over a network. Y ou may not post or otherwise make
available the “Software”, or any portion thereof, in any form, on the Internet. You may not use
the “Software” in a computer service business, including in time-sharing applications. The
“Software” contains trade secrets and, in order to protect them, you may not decompile,
reverse engineer, disassemble, or otherwise reduce the “Software” to a human-perceivable
form. YOU MAY NOT MODIFY, ADAPT, TRANSLATE, RENT, LEASE, LOAN, RESELL FOR PROFIT,
DISTRIBUTE, NETWORK OR CREATE DERIVATIVE WORKS BASED UPON THE “SOFTWARE” OR
ANY PART TH EREOF.
D. Limited Warranty:
FarStone warrants that the media on which the Software is distributed will be free from defects
for a period of fourteen (14) days from the date of delivery of th e Software to you. Your sole
remedy in the event of a breach of this warranty will be that FarStone will, at its option, replace
any defective media returned to F arStone within the warr anty period or refund the money you
paid for the Software. FarStone does not warrant that the Software will meet your
requirements or that operation of the Software will be uninterrupted or that the Software will
be error-free.
THE ABOVE WARRANTY IS EXCLUSIVE AND IN LIEU OF ALL OTHER WARRANTIES, WHETHER
EXPRESS OR IMPLIED, INCLUDING THE IMPLIED WARRANTIES OF MERCHANTABILITY,
FITNESS FOR A PAR TICULAR PURPOSE AND NONINFRINGEMENT. THIS WARRANT Y GIVES YOU
SPECIFIC LEGAL RIGHTS. YOU MAY HAVE OTHER RIGHTS, WHICH VARY FROM STATE TO
STATE.
E. Limitation of Liability:
IN NO EVENT WILL FARSTONE OR ITS LICENSORS BE LIABLE TO YOU FOR ANY INCIDENTAL,
CONSEQUENTIAL OR INDIRECT DAMAGES, INCLUDING ANY LOST PROFITS, LOST SAVINGS,
OR LOSS OF DATA, EVEN IF FARSTONE OR A LICENSOR HAS BEEN ADVISED OF THE
POSSIBILITY OF SUCH DAMAGES, OR FOR ANY CLAIM BY ANY O THE R PARTY. Some states do
not allow the exclusion or limitation of special, incidental, or consequential damages, so the

above limitation or exclusion may not apply to you.
F. General:
You acknowledge that you have read this Agreement, understand it, and that by using the
“Software” you agree to be bound by its terms and conditions. You further agree that it is the
complete and exclusive statement of the agreement between FarStone and you, and
supersedes any proposal or prior agreement, oral or written, and any other communication
between FarStone and you relating to the subject matter of this Agreement. No additional or
any different terms will be enforceable against FarStone unless FarStone gives its express
consent, including an express waiver of the terms of this Agreement , in writing sign ed by an
officer of FarStone. Y ou assume full responsibility for the use of the “Software” and agree to use
the “Software” legally and responsibly.
Should any provision of this Agreement be declared unenforceable in any jurisdiction, and then
such provision shall be deemed severable from this Agreement and shall not affect the
remainder hereof. F arStone reserves all rights in the “Software” not specifically granted in this
Agreement.
Additional Terms and Conditions:
In addition to the above agreement, the following terms and conditions will also apply to Your
use of the Software:
A. You may use the Software on one Device to clone, or apply an image of a hard drive on that
Device, or to another hard drive on the same Device, a replacement Device, secondary media,
or network drive.
B. You may use the Software on a Device to create an image file of a hard drive on that Device
and store the image file on fixed or removable media for disaster recovery purposes.
C. You may use the Software as a boot disk to re-apply the hard drive image that was created
for disaster recovery purposes to the hard drive on the Device from which the disaster recovery
image was made or on a replacement Device provided that the software has been removed
from the original Device.
D. You may use the Softw are to clone a hard drive from a Device to a replacement Device, in
the manner described in the Software documentation and to use the Software on the
replacement Device provided that the Software has been removed from the original Device.
E. Y ou may not use the Software commercially or non-commercially for the purpose of creating
an image on multiple Devices or hard drives, except for multiple hard drives installed in or
attached directly to the original Device.
F. For the purposes of this License Agreement, a virtual device is considered the same as a
physical device.

G. If the Software you have licensed includes the Recovery Manager the following uses and
restrictions apply to the Software:
(i) The Recovery Manager contains Windows® softw are licensed from Microsoft Corpor ation.
Microsoft Corporation has no liability to You for the Component. Any support for the
Component will be provided by FarStone in accordance with FarStone’s then-current support
guidelines.
(ii) THE RECOVERY MANAGER CONTAINS A TIME-OUT FEATURE THAT WILL AUTOMATICALLY
RE-BOOT THE DEVICE AFTER SEVENTY-TWO HOURS OF CONTINUOUS USE. THIS TIME-OUT
FEATURE WILL RESET EACH TIME THE COMPONENT IS RE-LAUNCHED.
(iii) The Recovery Manager may be used as a boot, diagnostic, disaster recovery, setup,
restoration, emergency service, installation, test, and configuration utility program. Use of
the Component as a general purpose operating system or as a sub stitute for a full y functional
version of any operating system product is strictly prohibited.
Windows® is a registered trademark of Microsoft Corporation.
Should you have any questions concerning this Agreement, you may contact FarStone by
writing to:
FarStone Technology, Inc.
Legal Department
1758-B North Shoreline Blvd
Mountain View, CA 94043

Contents
Chapter1:Introduction ........................................................................................................................ 9
1.1ProductOverview............................................................................................................................... ............. 9
1.2PowerfulBackupFeatures............................................................................................................................... 9
1.3OtherFeaturesandBenefits .........................................................................................................................10
1.4 Newly‐addedFeatures.............................................................................................................................. 11
Chapter2:InstallingandUninstallingTotalBackupRecovery ...............................................................12
2.1SystemRequirements ................................................................................................................................... 12
2.2StartTotalBackupRecoveryInstallation....................................................................................................... 12
2.2.1InstallingTot a l BackupRecovery7SmallBusinessServer.......................................................................... 12
2.3UninstallingTotalBackupRecovery............................................................................................................... 13
Chapter3:Tot a lBackupRecoverySpecificTerminology .......................................................................14
3.1FileBackup.................................................................................................................................................... 14
3.2SystemSnapshot ........................................................................................................................................... 14
3.3HardDriveImaging ....................................................................................................................................... 14
3.4FullandIncrementalBackups ....................................................................................................................... 14
3.5Total BackupRecoveryUniversalRestore...................................................................................................... 14
3.6Total BackupRecoverySecureArea .............................................................................................................. 14
Chapter4:StartUsingTot a lBackupRecovery ......................................................................................16
4.1ActivationandDeactivation .......................................................................................................................... 16
4.1.1Activation................................................................................................................................................... 16
4.1.2Deactivation............................................................................................................................................... 18
4.1MainConsole ................................................................................................................................................ 20
4.2.1QuickStart ................................................................................................................................................. 20
4.2.2Jobs ............................................................................................................................................................ 21
4.2.3ViewLogs................................................................................................................................................... 23
4.2.4Settings ............................................................................................................................... ....................... 23
4.3BackupConsole............................................................................................................................................. 25
4.3.1CreateaSystemSnapshot.......................................................................................................................... 25
4.3.2FileBackup................................................................................................................................................. 26
4.3.3BackUpMyComputer............................................................................................................................... 29
4.4RestoreConsole ............................................................................................................................................ 30
4.4.1ReturntoaSystemSnapshot ..................................................................................................................... 30
4.4.2RestoreFiles............................................................................................................................................... 31
4.4.3RestoreYo u r Computer .............................................................................................................................. 33
4.4.4PerformUniversalRestore .........................................................................................................................34
4.5CloneConsole ............................................................................................................................................... 35
4.5.1CloneDrive................................................................................................................................................. 35
4.5.2ClonePartition ........................................................................................................................................... 36
4.6ToolsTab........................................................................................................................................................ 37
4.6.1CreateaBootableRescueDisk................................................................................................................... 37
4.6.2PreviewBackupImage............................................................................................................................... 37
4.6.3CheckImageIntegrity................................................................................................................................38
4.6.4ExportPXEImage....................................................................................................................................... 38
4.6.5ConvertBackuptoVirtualDisk .................................................................................................................. 39
4.5.6iSCSIInitiator.............................................................................................................................................. 40
Chapter5:RecoveryManager .............................................................................................................42

5.1EnterRecoveryManager............................................................................................................................... 42
5.1.1BootfromBootableRescueDisk ................................................................................................................ 42
5.1.2BootintoWindowsviaaUSBDriveorUSBKey......................................................................................... 42
5.1.3BootfromPXEServer ................................................................................................................................. 42
5.2RecoveryManagerMainConsole ................................................................................................................. 44
5.2.1QuickStart ................................................................................................................................................. 44
5.2.2Backup(Computers)................................................................................................................................... 44
5.2.3ReturntoaSystemSnapshot ..................................................................................................................... 45
5.2.4RestoreYo u r Computer .............................................................................................................................. 46
5.2.5CloneTab ................................................................................................................................................... 47
5.2.6DataShredding .......................................................................................................................................... 49
5.2.7AnalyzeTab ................................................................................................................................................ 49
5.2.8NetworkTab ............................................................................................................................................... 50
5.2.9ToolsTa b .................................................................................................................................................... 52
Chapter6:Glossary .............................................................................................................................55
Chapter7:Appendix............................................................................................................................56
7.1FrequentlyAskedQuestions..........................................................................................................................56

Chapter 1: Introduction
1.1 Product Overview
Total Backup Recovery 7 Small Business Server is a powerful data backup and hard disk
imaging application. It creates a complete disk image of a hard drive or a single hard drive
partition and stores it on a local computer , network share and even on an FTP server. The image
can be used for backup and recovery, to quickly transfer all information from a server’s hard
drive to a new hard drive. The image file can also be compressed and distributed across
multiple hard drives or partitions.
T otal Backup Recovery 7 Small Business Ser ver’s compressed image file contains all of the hard
drive data files, partition information and security settings, by copying only the used data
sectors – this keeps the size of the image to a minimum. The complete disk image can be
updated quickly with incremental backups; the incremental backup contains only the hard
drive changes that have occurred since the complete backup was created, or since the last
incremental backup.
This offers the administrator an easy and reliable way to keep the system backup da ta current,
by storing the images on an external USB hard drive, CD or DVD set, or on a network share. The
administrator would then be able to quickly recover from any type of data disaster, including
data corruption or hard drive failure.
With a special recovery environment (T otal Backup R ecovery Pre-OS), you can run T otal Backup
Recovery to back up and restore damaged partitions even if Windows won't start for some
reason. Also some other features of Total Backup Recovery are still available in this recovery
environment.
T otal Backup Recovery 7 Small Business Ser ver offers the administrator flexible ways to protect
all involved computers. System administrators will appreciate Total Backup Recovery 7 Small
Business Server’s ability to dramatically reduce the time they spend configuring multiple
systems, installing software, or restoring multiple systems to an original image.
1.2 Powerful Backup Features
Total Backup Recovery’s Suite of backup features includes:
• Hard Drive Imaging: Backs up and restores a system with a complete copy of all files,
installed software, partition information, and system settings.
• Incremental Backup: Manually or automatically updates save disk images without
ever leaving Windows. Incremental backup points log only the changes that have
occurred since the last Complete Backup.
• System Snapshots: Backs up an entire computer system automatically to the Secure
Area. The system snapshots also provide a fast method to recover from
software-related data disasters.
• File Backup: Manually or automatically backs up selected file/folder, file extension,
9

etc.
• Universal Restore: Restores a complete system image of a particular configuration
to a different hardware configuration system or a Virtual Machine.
1.3 Other Features and Benefits
• Microsoft Volume Shadow Copy Service (VSS) Support (for Windows Server
2003 and higher): Easily back up VSS compatible databases (Exchange, Oracle, SQL
Server) without taking databases offline and ensuring data consistency.
• Preboot Execution Environment (PXE) Support: Boot and recover any system
from PXE server without the need for a Bootable Rescue Disk.
• Complete External Backup: Store a complete system image on a USB hard drive, or
on a network share.
• Easy Disk Image Updates: Incremental Backup lets you quickly update your saved
disk image without ever leaving Windows.
• Flexible Backup: Back up your client’s hard drive to another local hard drive, network
drive, or a USB device.
• Rapid, Controlled Recovery: Rebuild system via Complete Restore or System
Snapshot in minutes, not hours or days.
• Partition Support: Supports FAT,FAT32, NTFS and other unknown partitions.
• Hardware Support: Supports IDE, EIDE, SATA, and SCSI/RAID hard drives.
• 100% Protection: Restore an operating system damaged by corrupt software,
human error, a virus attack, or a software bug.
• Quick and Safe Try: Y ou have the choice to return your computer to its original state
in seconds as long as a System Snapshot is created before a new application is
installed.
• Unlimited System Snapshots: Total Backup Recovery has no limit for multiple
system snapshots as long as adequate space is allocated in the hard drive for Tota l
Backup Recovery’s Secure Area.
• FTP Support: Save another data copy onto a remote FTP server to enhance the
protection of files and even the whole computer.
• Virtual Machine Support: Convert the backup image into a VMware file image
format to run it on a virtual machine.
10

1.4 Newly-added Features
• Set Password: Enable users to set a password to prevent other unauthorized users from
changing program settings.
• Resize Secure Area: Secure area is a hidden, secure area on the primary hard drive,
used to store Total Backup Recovery 7 Small Business Server backup data. By using the
Resize Secure Area feature, users can allocate more backup space.
• Simplified Quota Mangement: One base backups one folder when backuping , and users
can choose to maintain several base backup.
• Google Desktop Search: Enable search engine support if you want to use Google
Desktop to locate and recover files and folders contained in Backup Images.
• Customized File Backup Search: Users can restore file(s) by customized searching of
backup file(s).
• Windows 2008 Local Account Authentication: If the console i s CBP Schedul e backup
of 2008 system, a dialog box containing user name and password is displayed to let users
input a local account. Then CBP will call the corresponding interface accordinbg to the
account.
11

Chapter 2: Installing and Uninstalling Total Backup Recovery
2.1 System Requirements
• CPU: Pentium or higher
• RAM: 512 MB or more (1 GB or more for Vista)
• Hard Drive: 250 MB free space
• Supported Server Oper ating Systems: Microsoft Windows Small Business Server 2003
/2008
• Supported Desktop Operating Systems: Windows® XP (32-bit & x64), Windows®
Vista (32-bit & 64-bit),Window ® 7 (32-bit & x64)
2.2 Start Total Backup Recovery Installation
If you purchased a CD:
Insert the CD into your CD-ROM drive. The setup program should start automatically. If it
doesn’t, browse the CD and double-click on the Autorun.exe. Follow the prompts displayed
to finish your installation.
If you purchased an electronic download:
Save the executable file to your hard drive. Double-click on the file to laun ch the Total
Backup Recovery installer. Follow the prompts displayed to finish your installation.
2.2.1 Installing Total Backup Recovery 7 Small Business Server
1. Select Setup, and click Next.
2. Select the language preference of the application, and click Next.
3. Carefully read the software license agreement. If you accept the terms of the agreement,
select I accept the terms in the license agreement, and click Next.
4. Enter your personal information and serial number, and click Next.
Note
Installation without purchasing a serial number will acti vate a ti me-limited
evaluation version of Total Backup Recovery.
5. Click Next to install to the default folder, or Change to select another location.
6. Click Install to launch the installation process.
12

7. Click Finish to complete the installation. Y ou are required to restart your computer to launch
Total Backup Recovery 7 Small Business Server.
2.3 Uninstalling Total Backup Recovery
1. From the Windows Start menu, select Start Æ Settings Æ Control Panel.
2. Double-click Add/Remove Programs, and select Change or Remove Programs.
3. Select Total Backup Recovery 7 Small Business Server, and click Remove to begin
uninstalling the associated component. A deactivation dialog box will pop up,click Yes to
uninstall the product.
13

Chapter 3: Total Backup Recovery Specific Terminology
3.1 File Backup
Total Backup Recovery File Backup monitors file changes. When a change is detected, Total
Backup Recovery will record it and back it up according to your schedule. File backups can be
stored locally or externally.
3.2 System Snapshot
System Snapshot and Hard Drive Imaging are both sector level backup functions. System
Snapshot stores only the changed data sectors into the Total Backup Recovery Secure Area.
The amount of storage capacity required for each snapshot is substantially less than the entire
amount of data on the hard drive. As a result, snapshots offer a significant savings of hard drive
space and an increased restoration speed when compared with hard drive imaging or complete
disk cloning methods.
3.3 Hard Drive Imaging
Hard Drive Imaging can be used for bare-metal disaster recovery when hard drive failure
occurs.
3.4 Full and Incremental Backups
Full and incremental backup solutions aim to make storing several copies of the source data
more feasible. To accomplish this, a complete backup is taken initially and then incremental
backups can be scheduled or run manually (Inc remental backup only stores the files or sectors
that have changed since the previous full or incremental backup). Restoring a system to a
certain point involves locating the complete backup and the incremental backups executed
between the time of the complete backup and the time of the restore.
3.5 Total Backup Recovery Universal Restore
With Total Backup Recovery Universal Restore, there is no need to reinstall the operating
system, applications, configuration files, individual files, and folders into the new system with
different hardware configuration, or to a virtual machine. With Universal Restore, you can
restore your system onto a similar or a different (than original) hardware configur ati on with a
few mouse-clicks.
3.6 Total Backup Recovery Secure Area
T otal Backup Recovery’ s Secure Area is a virtual partition which is created onto the hard drive’s
free space. This location is hidden, protected, and accessible only by Total Backup Recovery.
The secure area is used to store the system snapshots and the Total Backup Recovery Pre-OS.
It will not be influenced by most computer disasters, so it ensures the protection of your data
and the efficiency of Total Backup Recovery recovery.
14

15
Chapter 4: Start Using Total Backup Recovery
T o launch T otal Backup Recovery , double-click the FarStone Total Backup Recovery 7 Small
Business Server icon on your desktop, or select Start Æ All Programs Æ FarStone Total
Backup Recovery Æ FarStoneÆ FarStone Total Backup Recovery 7 Small Business
Server.
4.1 Activation and Deactivation
4.1.1 Activation
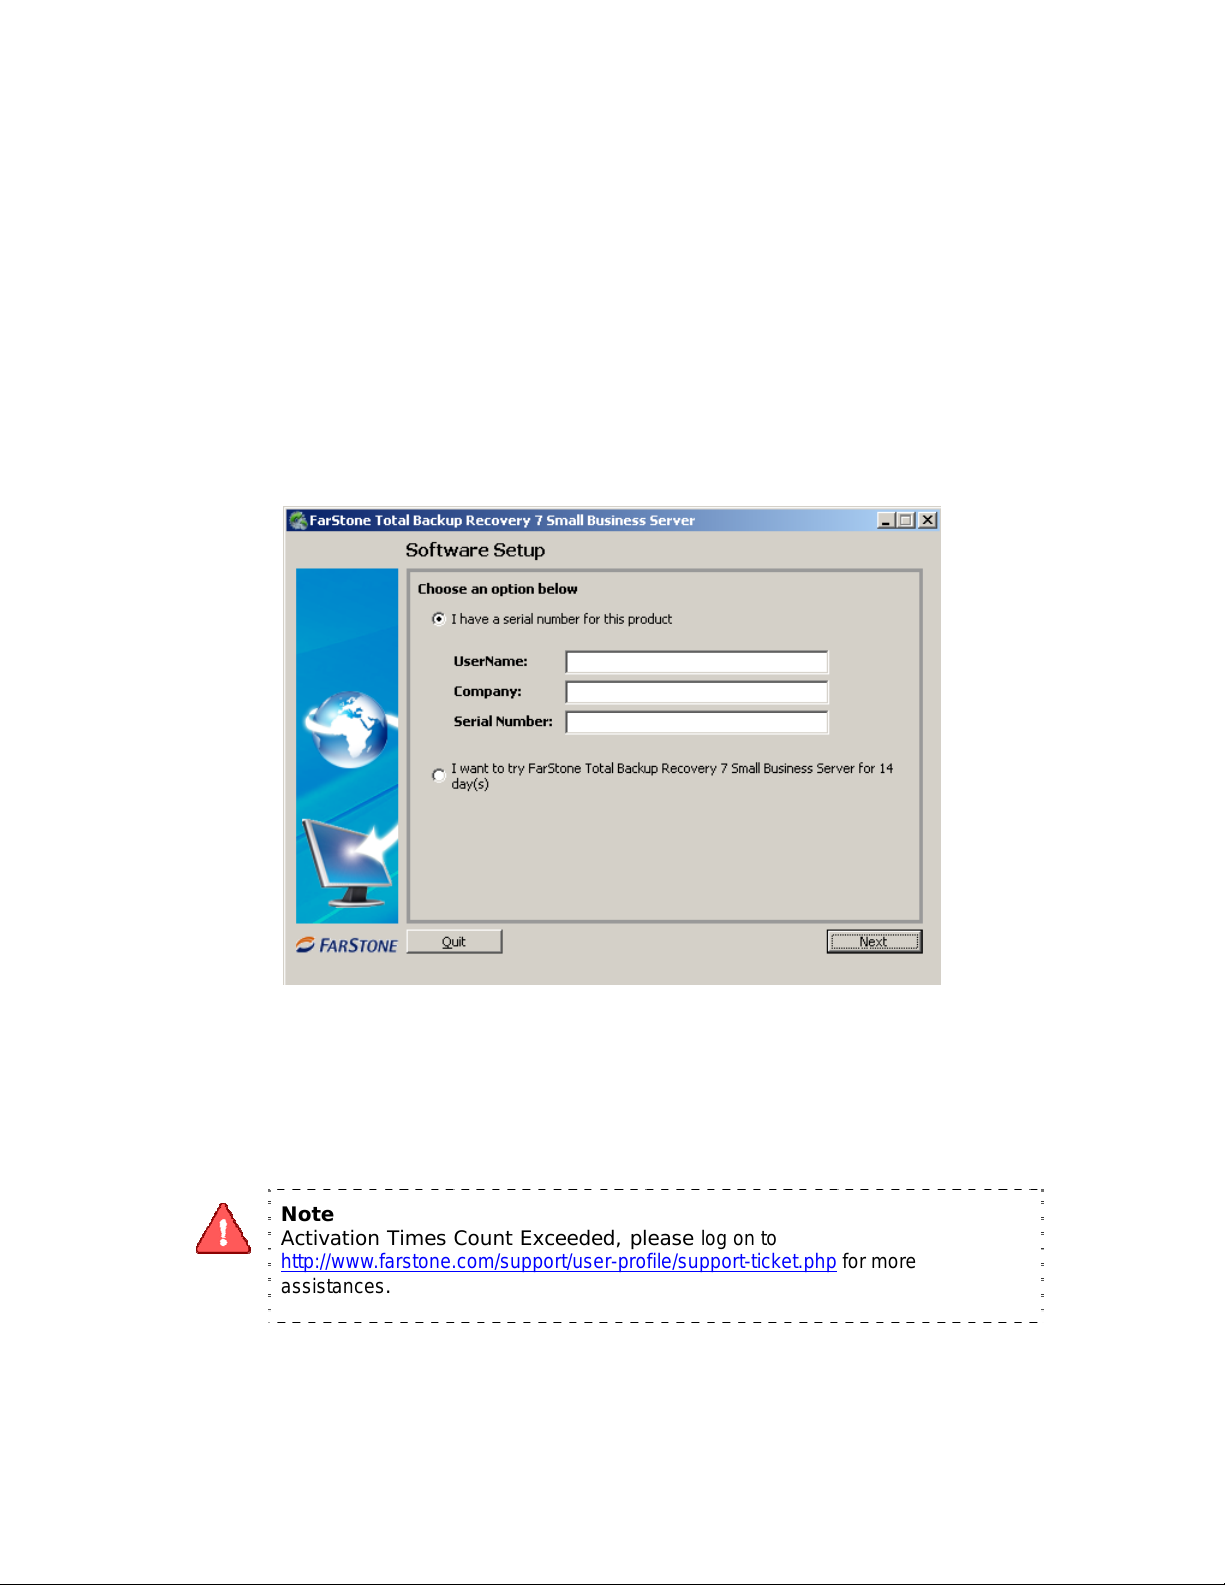
If you don’t purchase a serial number when installing the product, you will see the following
dialog box:
If you select I have a serial number for this product, please enter your personal
information and serial number, then click Next to continue.
If you select I want to try FarStone Total Backup Recovery 7 Small Business Server for
14 day(s), you can use the product within 13 days. Then click Next to continue.
Note
Activation Times Count Exceeded, please log on to
http://www.farstone.com/support/user-profile/support-ticket.php
assistances.
If you input a serial number when installing the product, you will see the following dialog box:
16
for more
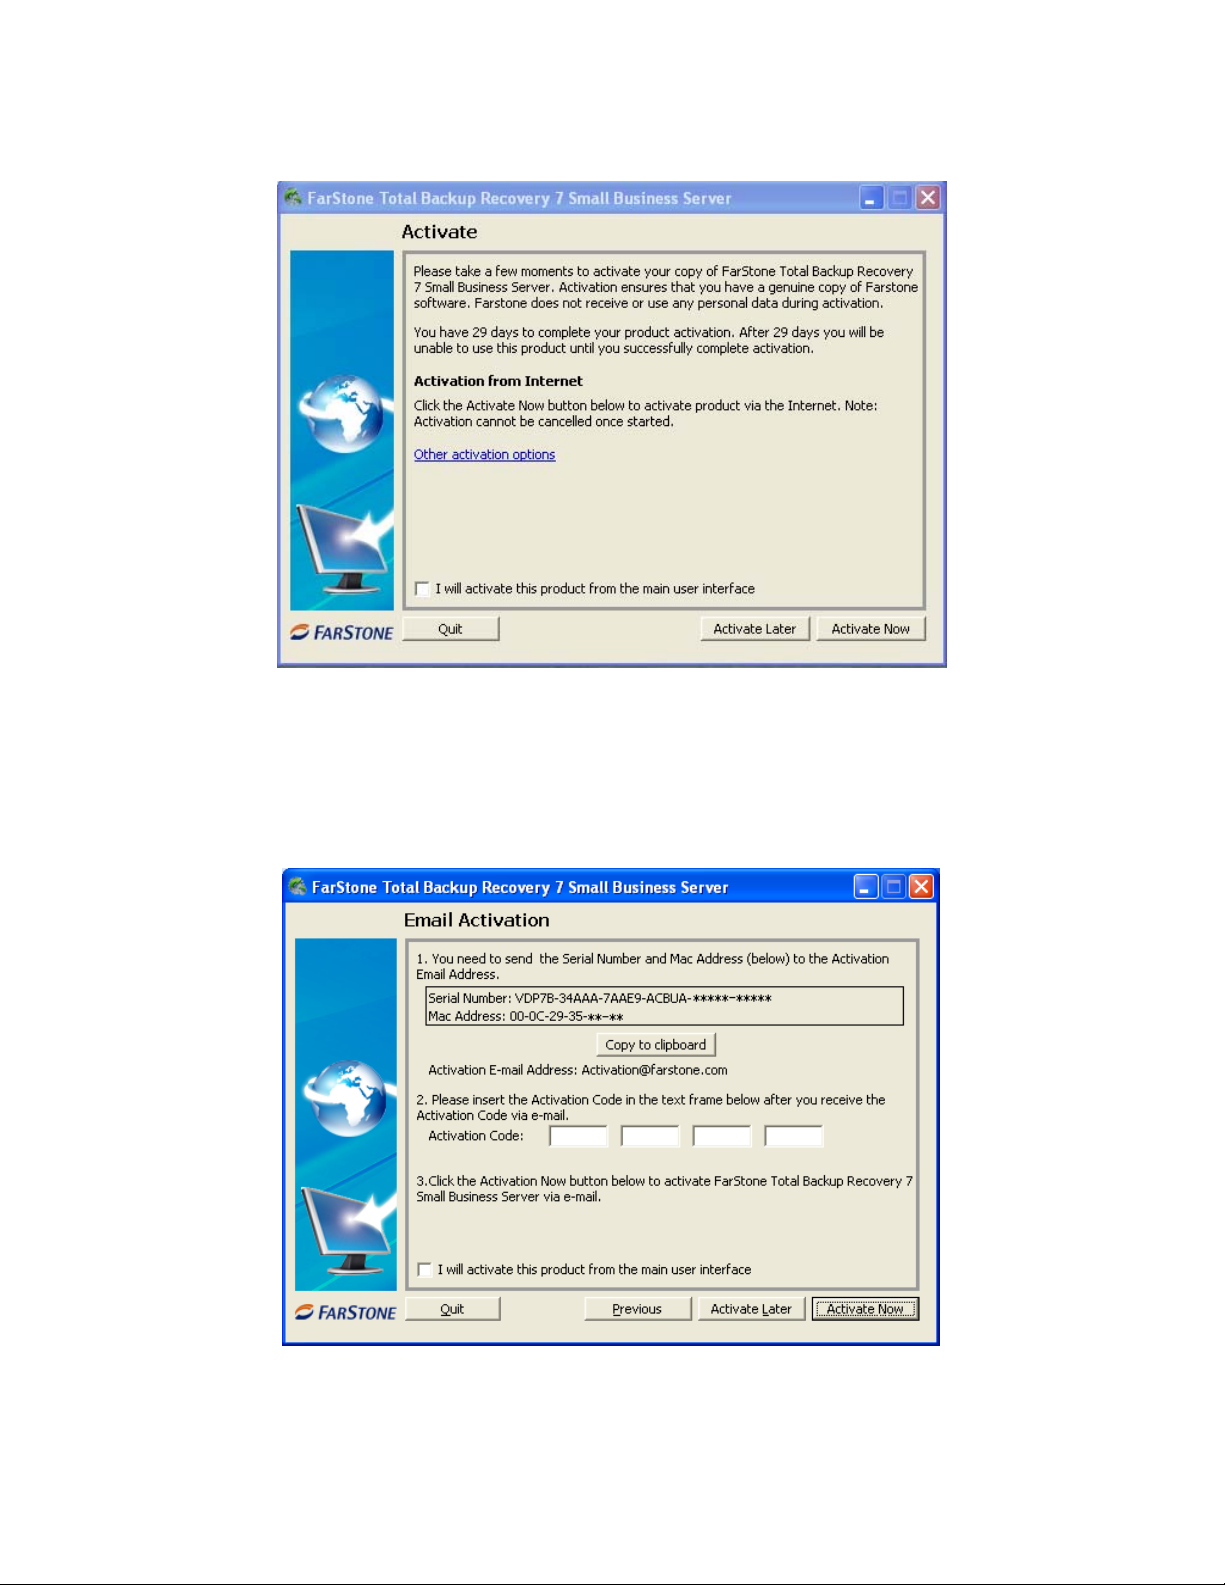
If you click Activate Now, you will activate the product successfully , then click Next, a dialog
box will pop up, click Yes to enter a web site to register the product. Then you will enter the
main console.
If you click Other activation options, you will activate the product via e-mail. A dialog box
will pop up:
17
1. Click Copy to clipboard button to copy the serial number and Mac address to send to the
activation address:
2. Our technical support engineer will send you a Activation Code via e-mail, just input the
activation code to the specified frame.
Activation@farstone.com.
3. Click Activate Now.
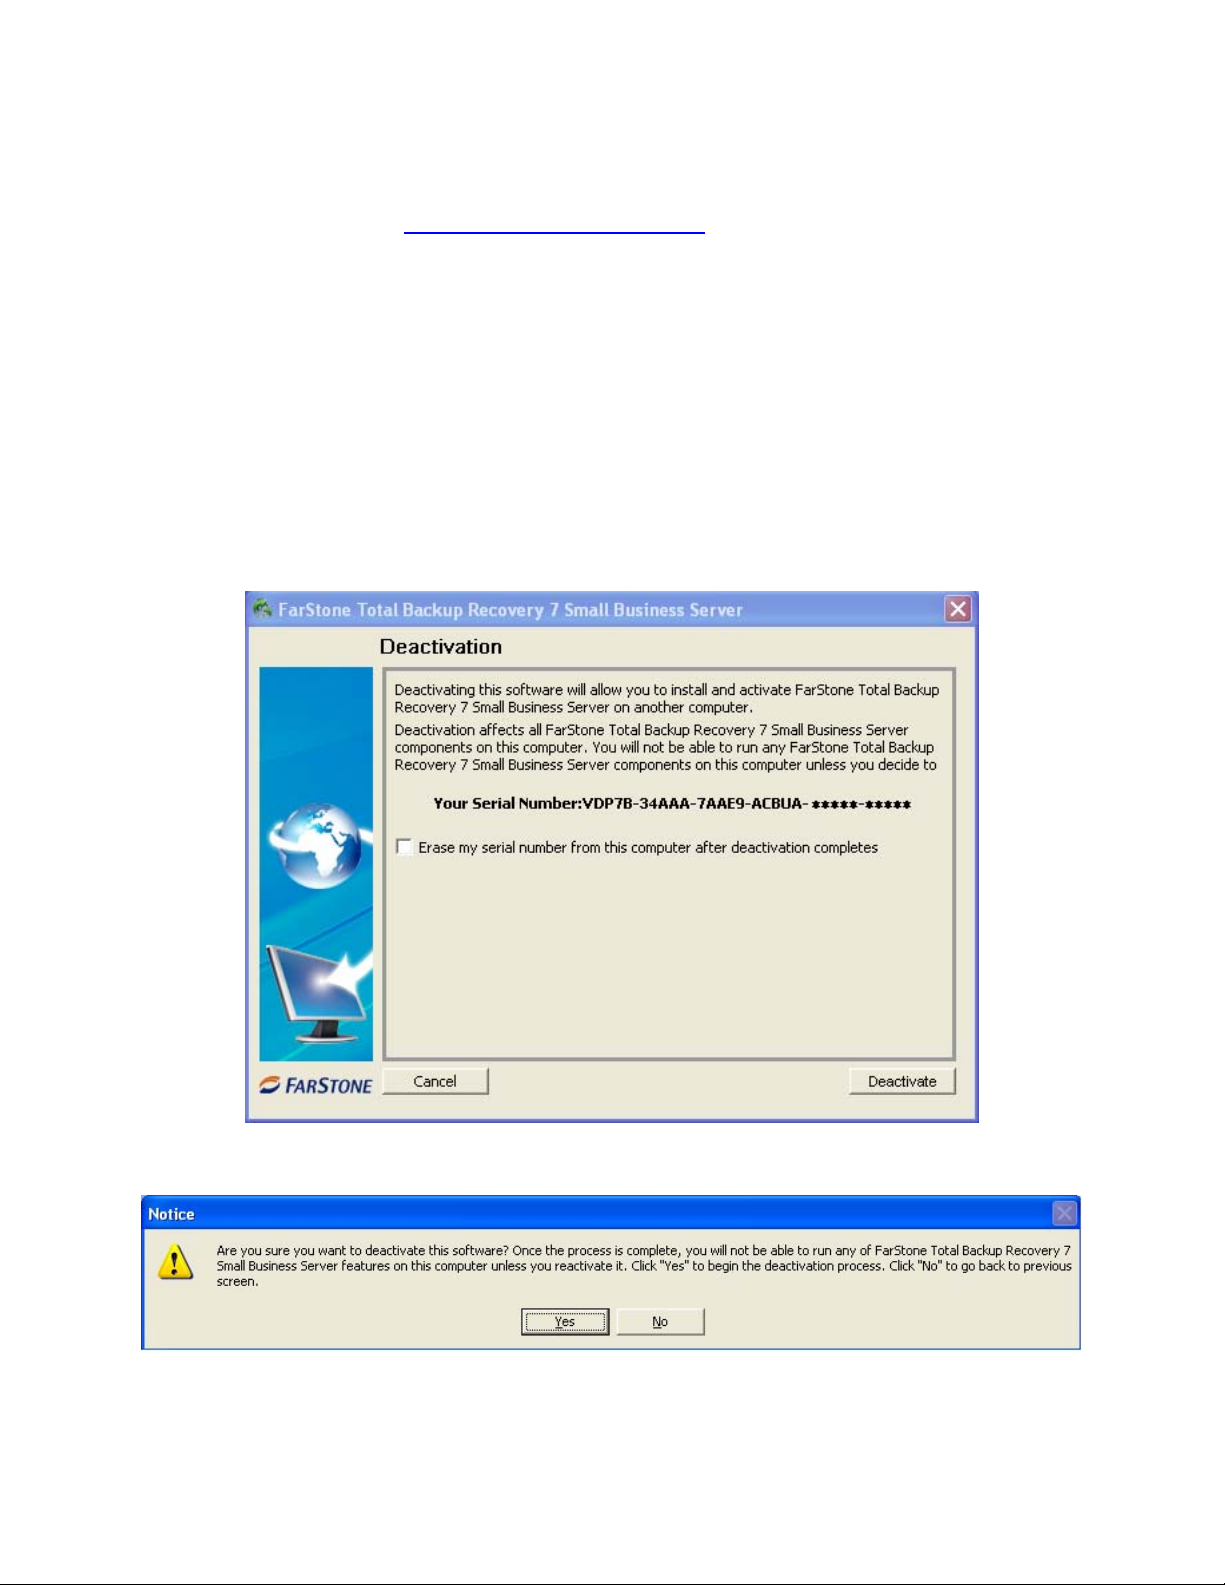
4.1.2 Deactivation
Deactivation steps:
1. Click Help on the main console, select Deactivation, you will see the following dialog box:
Click Deactivation, a dialog box will pop up:
2.
3. Click Yes to deactivate successfully, then click Quit, you will see the following dialog box:
18

You can choose whether to uninstall the product from this computer.
Note
If you select Erase my serial number from this computer after
deactivation completes, and continue using the product, the produc t will
be a trial version.
Tip
If you want to run the activated program on ot her computers with the same
serial number, please run the deactivation program from this computer.
19

4.1 Main Console
*Total Backup Recovery Main Console
4.2.1 Quick Start
This displays a shortcut menu for File Backup, Back up Computer and Install System Snapshot
(Undo).
File Backup – Click here to back up the selected files and folders.
Back Up Computer(s) – Click here to back up the entire hard drive or partition(s) to an
external location.
Install System Snapshot (Undo) – Click here to install system snapshot feature, which
backs up the whole computer and saves the backup data on its Secure Area.
Note
All system snapshots created within the trial period will be cleared once
upgraded to a formal version. Once upgraded, Total Backup Recovery will
create a new system snapshot.
To in stall System Snapshot, please do the following:
1. Click OK to continue after carefully reading the warning message.
2. Allocate the space for Secure Area (at least 1200 MB), you can also choose the partition
manually(only for system partition ha rd drive),and click Next.
20

3. Check or uncheck Disable System Restore, click Next.
4. Then wait patiently until the system reboots automatically.
If you don’t want to use the system snapshot feature an y more, you can also uninstall it from
here by clicking OK to continue after carefully reading the warning message. Then the system
will reboot automatically.
4.2.2 Jobs
View existing Snapshot, Complete Backup, and File Backup jobs.
• Snapshot – Set the frequency for the automatic creation of a S ystem Snaps hot,
and intervals for automatic restoration. Also you can enable/disable System
Snapshot by clicking the button Turn On or Turn Off.
Automatic creation of System Snapshots
a. Create a Snapshot every x hour(s) – Create a Snapshot every 1 to 24 hours.
*Automatic System Snapshot
Note
If the system is set to create a snapshot every hour, Total Backup Recovery
will take the first snapshot an hour after the creation of the most recent
system snapshot.
b. Create a Snapshot at system startup – Create a new System Snapshot
automatically every time the computer boots up.
21

• Intervals for Automatic Restoration
a. Restore computer at every startup – Check this box if you want T otal Backup
Recovery to restore from the most recent S ystem Snapshot every time you start
your computer . Y ou can either just restore the system partition or the entire hard
drive. If you choose to only restore the system partition, all Snapshots created
before the restore point will be available for system partition restoration only.
b. Set the time for rebooting your computer – You can also select a time to
automatically restart the computer. The computer will be restarted and restored
according to these set times as well as at system startup. This option can be
enabled only if you select option a.
• Back Up Computers – Total Backup Recovery shows all file backup jobs related
to this computer. There are four functions you can perform on the each backup
computer job.
a. Detail – View detailed information about the backup jobs you’ve created,
including the job name, source, destination, scheduled settings, description and
FTP address for the selected backup.
b. Edit Schedule – Schedule incremental updates for the backup job you’ve
created; change other scheduled settings.
c. Offsite Copy – Change FTP settings or click Restore Defaults to restore the
FTP settings to be the same as it in Settings
.
d. Back Up Now – Create an Incremental Backup immediately.
e. Delete – Delete the selected job.
Scheduling Complete Backups
1.Complete backups and incremental updates can be created according to
the pre-set schedule.
2. If the system is busy, Total Backup Recovery will not be able to perform
the scheduled backup job, and will automatically try again later.
• File Backup – T otal Backup Recovery displays all of the file backup jobs related to
this computer, you’ll see the following options under each job:
a. Detail - View detailed information about a backup job you’ve created, including
the job name, job location, scheduled settings and FTP address.
b. Edit Schedule – Change scheduled settings for the backup job you’ve created.
c. Offsite Copy – Change FTP settings or click Restore Defaults to restore the
22

FTP settings to be the same as it in Settings.
d. Add Files - Add files to your File Backup list.
e. Back Up Now - Run the selected incremental File Backup job immediately.
f. Delete - Delete the selected job.
Scheduling File Backups
1. If your system is busy , Total Backup Recovery will not be able to initiate
the backup process. Total Backup Recovery will attempt to perform the
backup after 5 minutes.
2. The following files are not backed up:
a. Files in the Recycle Bin
b. Files in the System Volume Information directory,
pagefile.sys, and the _$temp directory
c. Hiberfil.sys
d. Files with “.rit” and “.tmp” extensions
e. Microsoft Office temporary files
f. Files in Total Backup Recovery’s installation folder
g. Files in the Backup Destination directory of the backup job
currently running
h. Files in the Temp directory
4.2.3 View Logs
This feature records all events of Total Backup Recovery, including warnings, errors and
operations.
Save - Export the logs and save the event record as an excel file.
Delete - Delete the selected event(s).
Delete All - Delete all the saved events.
4.2.4 Settings
• Set Password – Enable users to set a password to prevent other unauthori zed users
from changing program settings.
23

• Resize Secure Area – By using the Resize Secure Area feature, users can allocate
more backup space. Secure area is a hidden, secure area on the primary hard drive,
used to store Total Backup Recovery 7 Small Business Server backup data.
• System Snapshot – When users select this check box, users can set the percentage
of secure area free space. Total Backup Recovery will automatically display a warning
message if the ratio is smaller than this space.
• Offsite Copy - By setting the following options, users can save another image copy on
an FTP server to ensure the data protection. It is the default one for your file backup
and complete backup.
a. FTP information – Enter the address and port.
b. FTP account – Enter the username and password of the FTP. You can select
Anonymous if the FTP server is shared to all users in the network.
c. FTP connection retry frequency – Enter Retry attempts (Maximum of 100 times),
Delay between retries (Maximum of 600s).
• E-mail Notification - By configuring the below set tings, Total Backup Recovery will
send an E-mail to your specified E-mail account when the backup is completed.
a. E-mail configuration - Enter preferred E-mail address and other server settings.
b. Send test email – Click here to test proper setting functionality.
c. Notification events – Specify the events for which you would like to receive
notification via E-mail regarding the backup operation.
24

*E-mail Notification Setup
4.3 Backup Console
4.3.1 Create a System Snapshot
This feature is available only if you install it by clicking Install System Snapshot(Undo) on
the main console.
1. Click Back Up to create a System Snapshot. You can also click Create a System
Snapshot on the main interface of Total Backup Recovery to start creating a System
Snapshot.
2. Enter a name for the System Snapshot. Cli ck Next to continue. To return to the previous
menu, click Cancel.
3. After you choose a way to create the system snapshot, click Next.
i. If you select Start Now, Total Backup Recovery will initiate the process after
clicking Next twice.
ii. If you set a schedule, specify the frequency for creating or restoring from a
System Snapshot automatically . (F or more detail about scheduling, please refer
to 4.2.2)
4. Confirm all the settings, and then click Next to launch the backup process or click
Previous to modify any setting.
5. If any program is currently writing data to the hard drive, T otal Backup R ecovery may not
25

be able to create a System Snapshot.
6. Click Finish when a System Snapshot has been successfully created. Yo u can also click Edit
Schedule to specify how often a System Snapshot should be automatically created and
specify if the system need to be restored automatically.
4.3.2 File Backup
1. Start the Total Backup Recovery Program. Select Back Up and then click File Backup.
2. Select New File Backup to create a new job.
3. Enter a name for your new job.
4. Select the file(s) you want to back up. You can also click Add Files/Folders or Add File
Types to add file type, folder or individual file to back up according to your preference.
Click Next to continue.
*Select Files for Backup or Add File/Folders or Add File Types
Add Files/Folders: Click this to select the files or folders you want to add from Windows
Explorer.
Add File Types: Click this to enter the Select File Types interface, as shown below.
a. Click Delete Type to remove file types you don’t want to back up.
b. Click Add New Type to add new file type in to t he back up list. You will need to
enter a file type extension and a description. Or click Add Group to create a new
file type group. You will need to enter a group name.
26
®

5. Select a location to store the backup file, such as a shared folder or locally on the system.
Click Next to continue. If you want to save one more image copy on the FTP, select
Enable offsite copy (optional), and click Settings to configure these below.
*Enable Offsite Copy
a. FTP information – Enter the address and port.
b. FTP account – Enter the username and password of the FTP. You can select
Anonymous if the FTP server is shared to all users in the network.
c. FTP connection retry frequency – Enter Retry attempts (Maximum of 100 times),
Delay between retries (Maximum of 600s).
d. Restore Defaults – Clear all FTP settings.
Tip
This feature only supports local image files. If you want to use the image file on
the network or disc, you should save it on the local computer first.
The entire FTP upload process executes in the background. If the program fails
to upload backup data onto FTP server, it will be recorded in logs which can be
checked through View Logs. Total Backup Recovery will retry three times
automatically until the next startup.
6. Click Start Now to proceed. Y ou can also choose to run daily , weekly , or monthly backups.
27

Note
If you select daily, weekly or monthly, and then uncheck “Create a full
backup at 1 st backup of each month” checkbox, so this item can’t be
for option. And X latest catalog is retained, the default value is “3”
7. Click Advanced for optional settings including: backup priority , network connection speed,
compression mode, password protection, image split, backup description, configuration of
E-mail notification and Pre/Post command:
*Optional Advanced Settings
8. Review your information and settings, and click Next to launch the backup proce ss. For best
results, close all of the files you want to back up prior to launching your backup job.
9. Click Finish to return to the main console. Or to specify your preferred Schedule Settings,
click here to create a schedule now. By doing so, you can choose to repeat the backup
operation at a specific scheduled time.
Updating a File Backup Job
1. Launch Total Backup Recovery.
2. Select Back Up, and click File Backup.
3. Select Incremental File Backup, and click Next.
4. Select an existing job from the Job List.
28

5. Review your information and settings, and click Next to launch the incremental backup.
6. Click Finish to return to the main console.
4.3.3 Back Up My Computer
1. Start the Total Backup Recovery Program. Select Back Up and then click Back Up
Computer(s).
2. Select Create a New Complete Backup.
3. Enter a name for your new Complete Backup and click Next.
4. Select the partition(s) or the entire hard disk to back up, and click Next.
Tip:
If you want to restore with Universal Resto re later, you must choose your
system partition (e.g. C:) to back up.
5. Enter the stor age path and click Goto. Or select a destination location on a hard drive, USB
storage medium, or a network location to store the image file. If you want to save one
more image copy on the FTP , select Enable offsite copy (optional), and click Settings to
configure these below.
a. FTP information – Enter the address and port.
b. FTP account – Enter the username and password of the FTP. You can select
Anonymous if the FTP server is shared to all users in the network.
c. FTP connection retry frequency – Enter Retry attempts (Maximum of 100 times),
Delay between retries (Maximum of 600s).
d. Restore Defaults – Clear all FTP settings.
Tip
This feature only supports the local image file. If you want to use the image
file on the network or disc, you should save it on the local computer first.
The entire FTP upload process executes in the background. If the program
fails to upload backup data onto FTP server, it will be recorded in log files
which can be checked through View Logs; Total Backup Recovery will retry
three times automatically until the next startup.
6. Click Next to continue.
7. Click Start Now to proceed. Y ou can also choose to run dail y , weekly or monthly backups.
29

Note
If you choose daily, weekly or monthly, and then uncheck “Create a full
backup at 1 st backup of each month” checkbox, so this item can’t be
for option. And X latest paths is(are) retained, the default value is “3”
8. Optional settings will pop-up if you click Advanced. These settings include: backup
priority , network connection speed, compression mode, password prote ction, image split,
backup description, configuration of E-mail notification and Pre/Post command.
9. Click Next.
Review the information and settings that have been specified. Click Next to launch the
10.
backup process. Or click Previous to modify setting(s).
Tip
If the system is busy, and Total Backup Recovery cannot start the backup
process successfully, Total Back up Recovery will try to back up again
automatically.
Click Finish to return to the main console. If you would like to edit the schedule for this job,
11.
click here to create a schedule now.
Creating an Incremental Backup
1. Launch Total Backup Recovery.
2. Select Back Up and click Back Up Computer(s).
3. Select Incremental Backup and click Next.
4. Select an existing job from the Job List.
5. Review your information and settings, and click Next to launch the incremental
backup.
6. Click Finish to return to the main console.
4.4 Restore Console
4.4.1 Return to a System Snapshot
This feature is only available if you install System Snapshot and take system snapshots on your
system.
30

1. Click Restore and then click Return to a System Snapshot on the main interface.
2. Select the date you want to restore to from the calendar on the left pane and select the
System Snapshot of that day you would like to restore to on the right pane and click Next.
You can also click Preview System Snapshot to view its content prior to restoration.
Then if you want to close the Preview Drives, click Unmount Preview Drive in the Tools
tab or in the menu to close the Preview Drives.
3. Choose to restore the Entire Hard Drive or C : Drive Only and then click Next to
begin
the restoration.
Tip
If the user chooses to restore the C Drive only, Total Backup Recovery only
restores the files of the active partition. All of the System Snapshots created
before the restoration point can only be used to restore the C: drive.
4. Carefully read the warning message. Click OK to proceed to the next step. You can also
click Cancel to exit.
5. Y o ur computer wi ll restart automatically to start the restoration process.
4.4.2 Restore Files
To restore file(s), please do the following:
1. Select Restore and then click Restore Files.
2. Select a backup image file from the drop down list. You can also click here to select it on
a network share. Click Next to continue.
31

*Select backup image from network share
3. Select Files from the most recent backup or Files from a previous backup and click
Next. If you select Files from a previous backup, please select the backup point you w ant
to restore from the list.
4. Then click Next . If you select “Please select common restoration or special
restoration”, click Next, and skip to step 6; if you select “Search special files for the
restoration”, then click Next, skip to step 5.
5. Input the file name you want to restore, then click Search or click Search directly to
choose the file(s).
6. Select the file(s) you want to restore.
7. Select a location to save the restored files:
a. If New Desktop Folder is selected, the restored files will be saved in a new
folder on the client’s desktop, with the folder hierarchy preserved exactly as it
was backed up.
b. If Original Location is selected, the restored files will be saved to their original
folder and will overwrite existing files in that folder with the same name.
c. If Another Folder is selected, click Select a folder to browse a folder on the
network. The restored files will be kept in their original folder h ierarchy.
8. Click Next to start the restore after confirming the source and the destination.
32

9. Click Finish to return to the main console.
4.4.3 Restore Your Computer
To rest ore a partition or the entire hard drive, please do the following:
1. Launch Total Backup Recovery.
2. Select Restore, and click Restore Your Computer.
3. Select a backup image from the list, or click here to select an image file stored on a network
share. Click Next to continue.
4. Select a Complete Backup point or any Incremental Backup point to restore from, and click
Next.
If you want to restore your entire physical disk drive, click One-Click Restore, then click
Restore to begin the restoration process; or click No to exit.
5. Select Do not use Universal Restore, and click Next.
6. Select to restore a single partition or the entire hard drive, and click Next.
7. Click OK to return to the original location, or click Cancel to select another location. If you
choose OK, skip to step 11.
8. Select a destination partition or a destination hard drive to be restored from the image file,
and click Next.
9. To restore a single partition, skip to step 10. To restore the entire hard disk, please select a
restore option.
a. Select the checkbox if you would like to modify th e destination partition size.
b. Do not check the box if you have multiple systems or a hidden partition.
If you selected option a, double click the partition capacity to be resized from the list. If you
selected option b, skip to step 10.
10. When it displays the structure of the destination part ition, double-click the h ighlight and
modify its size, and click Next to continue.
Tip
The restoration process will require your computer to reboot into the
FarStone Recovery Environment.
11. Click Next to start the restoration after confirming the source and the destination.
12. Click OK to enter the FarStone recovery environment to complete the restoration process
33

automatically.
Your computer will restart to complete the restoration. After that, it will reboot into Windows
automatically.
You will need to reallocate space for the secure area if you installed System Snapshot and want
to continue to use the system snapshot feature:
1. Click OK to start the allocation.
2. Click Next to continue.
3. Click Yes to restart your computer and complete the process.
4.4.4 Perform Universal Restore
You ca n restore the system partition or the entire hard drive of the selected client to dissimilar
hardware.
1. Launch Total Backup Recovery.
2. Select Restore, and click Restore Your Computer.
3. Select a backup image from the list, or click here to select an image file stored on a network
share. Click Next to continue.
4. Select a Complete Backup point or any Incremental Backup point to restore from, and click
Next.
5. Select to restore with Universal Restore, and click Next.
6. When the dialog box appears, click OK to restart your system into FarStone Recovery
Environment to begin the restoration process, or Cancel to exit.
After your computer restarts to complete the Universal Restore, you need to do t he
following:
1. Select to restore a single partition or the entire hard drive, and click Next.
2. Click OK to restore to the original location, or click Cancel to select another location. If you
choose OK, skip to step 6.
3. Select a destination partition or a destination hard drive to be restored from the image file,
and click Next.
4. To restore a single p artition, skip to step 6. To restore the entire hard disk, please select a
restore option.
a. Select the checkbox to modify the destination partition size.
b. Do not check the box if you have information on multiple systems
34

5. If you selected option a, double click the partition Capacity to be resized from the list. If you
selected option b, skip to step 5.
6. When it displays the structure of the destination partit ion, double click the highlight and
modify its size, and click Next to continue.
. Click Next to begin the restoration process after confirming all settings.
7
After the restore, it will reboot into Windows.
You will need to reallocate space for the secure area if you installed system snapshot and want
to continue to use the system snapshot feature:
1. Click OK to start the allocation.
2. Click Next to continue.
3. Click Yes to restart your computer and complete the process.
4.5 Clone Console
4.5.1 Clone Drive
Clone Drive duplicates one hard drive to another. It eliminates the need to re-install the
operating system, drivers and applications, and enables you to upgr ade a new hard drive wit h
only a few mouse clicks.
Tip
To use this function, you will need to have at least two hard drives on your
computer.
The target hard drive should have enough space to store the data of the
source hard drive.
1. Select Clone and then click Clone Drive.
2. Select the Source Disk (top pane) and then the Destination Disk (bottom pane). You can
choose to modify the Destination Partition Size manually by selecting Modify the
destination partition size. You can also choose not to modify the Destination Parti ti o n
Size by selecting Keep the partition size of the destination drive the same as the
source drive. Click Next to continue.
Tip
If you select Keep the partition size of Destination Hard Drive the
same as the Source Hard Drive, please skip to step 4.
If the Hard Drive you want to clone is going to boot your system, for best
35

result, please select Keep the partition size of Destination Hard Drive
the same as the Source Hard Drive.
3. You can alter the Destination Partition size by double-clicking the entry of Destination
Partition and change the size in a popup dialog box. Click Next to continue.
4. After confirming your selections, click Clone Now to proceed or you can click Previous to
change your selection. If the system is busy , Total Backup Recovery will try to clone again
automatically.
Note
The cloning process will overwrite all data on the destination disk. Click
Continue to begin the cloning process. You can also click Cancel to exit.
5. Click Shutdown to complete the cloning process.
4.5.2 Clone Partition
With Total Backup Recovery, you can copy data from the source partition into the destination
partition.
1. Select Clone and then click Clone Partition.
2. Select a Source Partition in the Hard Drive (top pane).
Note
You can only choose one partition at a time.
The Source Partition and the Destination Partition cannot be the same.
3. Select a D estination Partition in the original Hard Drive or another Hard Drive (bottom
pane), then click Next to continue.
Tip
The selected destination partition must have enough space to hold the data
of the source partition.
4. Aft er confirming your selections, click Clone Now to start the duplicating process or you
can click Previous to change your selections. Y ou can start the cloning process by clicking
Start Clone. If the system is busy, Total Backup Recovery will try to clone again
automatically.
36

Tip
The cloning process will overwrite all data on the destination disk. Click
Continue to begin the cloning process. You can also click Cancel to exit.
5. Click Return to Main Console to complete the process.
4.6 Tools Tab
4.6.1 Create a Bootable Rescue Disk
Create a bootable disk to recover from a system crash or hard drive failure
1. Insert a blank Disc or USB device.
Note
Before creating a Bootable Rescue Disk, data on the disk should be
formatted.
2. Click Tools tab on the left or Tools menu on the top of the interface, and then select
Bootable Rescue Disk.
3. Select the CD/DVD drive or the USB device you’ll be using to create your Bootable
Rescue Disk, and click Next.
Tip
If there is some data on the inserted device, you will be asked whether you
wish to erase the disc. If you want to continue, click Erase. Click Change
to insert another blank CD/DVD, or Cancel to stop the creation process.
4. Click Finish to complete the process.
4.6.2 Preview Backup Image
Preview the content of the specified partition of a complete backup image to make sure you can
only restore the needed partition(s).
1. Click on the Tools tab, and then select Preview Backup Image.
37

Note
If you have mounted an image before, you will be prompted to dismount
the previous image. Click Continue to dismount the previous image, or
Cancel to exit this process.
2. Enter the storage path of the image you want to preview and click on Goto to select the
image, or select the storage path of the image you want to preview and click Next.
3. Select a complete backup point or an incremental backup point, and click Next.
4. Select the partition you want to preview, and click Mount to load the image into the
system.
5. You can now browse and copy data on the preview drive in Windows® Explorer.
6. You can click Yes to mount another image. Click No to return to main console.
If you do not want to preview the image anym ore, select Unmount Preview Drive on the
the Tools tab, or select the Tools menu and click Unmount Image to close the preview
partition.
4.6.3 Check Image Integrity
Use this function to check if a complete backup image file is valid and can be used for
restoration.
1. Click the Tools tab in the left or the Tools menu on the top of the interface, and then select
Check Image Integrity.
2. Enter the storage path of the image you want to check, and click Goto to select the image.
You can also select the storage path of the image you want to check and click Next.
3. Select to validate either the Complete or Incremental Backup point, and click Next to
continue.
4. After validating the backup point, click Finish to complete the Image Integrity Check.
4.6.4 Export PXE Image
Export the PXE image to restore system without using the Bootable Rescue Disk.
1. Click on the Tools tab or Tools menu, and select Export PXE Image.
2. Enter the destination path where you w ant to save the exported image and click Goto, or
select the destination path locally or remotely and click Next.
38

3. Click Finish to return to the main console, or click the storage path to view the PXE Image.
4.6.5 Convert Backup to Virtual Disk
With the tool “Convert Backup to Virtual Disk”, you can convert a Complete Backup image to
a VMware-format one, and then implement your virtual applications .
1. Login the VMwareofficial website, download “VMware Virtual Disk Development Kit”
from http://www.vmware.com/support/developer/vddk/, and then install it;
2. Run “Convert Backup to Virtual Disk” under the T ab page “Tools”. First, you need to
choose a Complete Backup image, whose filename extension should be “sco”;
3. Then, you need choose conv erting type(a partition or entire hard drive to be converted),
VMware format, and destination path(where to store the converted image);
After converting process finishes, a virtual disk file will be gener ated, whose filename extension
is “vmdk”. You can refer to the VMware help file to load this virtual disk file to an existing
VMware machine, or follow the below steps to create a new VM machine based on the file:
1. New a VMware machine from the menu ”File->New->Virtual Machine”;
2. Make sure you choose the following options: in the ”What type of configuration do you
want?” page, choose ”Custom(advanced)”; in the ”Guest Operating S ystem Installation”
page, choose ”I will install the operating system later”;in the ”Select a Disk” page,
choose ”use an existing virtual disk”, and then in the ”Select an Existing Disk” page,
browse the vmdk file you have converted.
3. Except the above options, set your configurations as you need. After finishing all
configurations, please reboot the new VMware machine.
After converting the complete backup image as a *.vmdk format successfully, you can
conveniently load it as a new hard disk on your virtual machine. In doing so, all data on the
original hard disk is available on that virtual machine.
Tip
If you did not install VMware Virtual Disk Development Kits, this
function will be disabled. You can visit the provided link to download it.
1. Click on the Tools tab, and select Convert Backup to Virtual Disk.
2. Enter the storage path of the backup image and click Goto, or select it locally or remotely and
click Next.
3. Select a complete backup point or an incremental backup point, and click Next.
4. Select to convert a single partition or the entire hard drive, and click Next.
5. Choose to either convert to VMware 5 or VMware 6, and click Next.
39

6. Select a local or remote destination path to save the conversion backup. Click Next to launch
the conversion process.
7. Confirm all information about this conversion. Click Next to launch the conversion process.
8. Click Finish to return to the main console when the process completes.
4.5.6 iSCSI Initiator
First, ensure that the iSCSI initiator is install ed on the machine. On Windows Vista, it is
installed by default; other Windows systems require a download and manual installation. With
this feature, users may connect to the iSCSI device and a ccess a great deal of information and
configuration options.
1. Click on the Tools tab, and select iSCSI Initiator.
2. Select the Discovery tab.
3. Click Add and enter the IP address or DNS name and Port number for the Target Portal
on which you would like to log on.
4. If your T arget Portal requires Cha p for authentication, click Advanced. Then select the Chap
logon information option and enter the Target secret. Click OK twice to return to the
iSCSI Initiator Properties dialog.
5. Verify the Target Portals properties displayed on the Discovery tab.
6. Select the Targets tab to view a list of available targets whi ch you can l og on to . Note that
the Status for these targets is shown as Inactive prior to login.
Tip
a. If your targets are not listed in the Targets tab, verify discovery and
successful login by repeating Steps 3 through 6.
b. If you successfully log into the Target portal but the target is still not
listed, verify that the target has Logical Unit Numbers (LUNs) assigned to
the server.
c. If the target is still not listed, check the System Event Log for errors,
resolve any issues noted in the log, and repeat Steps 2 through 5 to log on
to the Target Portal.
7. Select the target that you want to log on to and click Log On.
8. Click Advanced and enter the username and password of the iSCSI target.
40

9. Verify that your target indicates “Connected” in the Status column.
Once connected, you can operate the connected iSCSI hard drive as you would a physi cal hard
drive on your system (such as backup and restore)
41

Chapter 5: Recovery Manager
5.1 Enter Recovery Manager
To launch the T Recovery Manager, press the space bar after the system POST
(Power-On-Self-Test), but before Windows
manager via the following means, a bootable rescue disk, USB drive, USB key and PXE server.
Tip
T o prevent its use as a pirated operating syste m, Windows PE automatically
stops running the shell and reboots after 72 hours of continuous use.
This time period is not configurable.
®
begins to load. Also you can enter the Pre-OS
5.1.1 Boot from Bootable Rescue Disk
1. Insert the Bootable Rescue Disk and restart your computer, and then enter the BIOS to set
the CD/DVD ROM as the first boot device.
2. After entering the Total Backup Recovery Pre-OS main console, you can then back up and
restore your computer, return to a system snapshot, clone a hard disk and many other
useful functions.
5.1.2 Boot into Windows via a USB Drive or USB Key
With the USB Hot Drive, you can restore the entire system from a Windows environment.
Follow the steps below to use the USB Hot Drive:
1. Connect the USB device, start your computer, enter the BIOS to set the USB device as the
first bootable option, and save your settings.
2. Restart the system and boot from the USB device.
3. After entering Windows, use T otal Backup Recovery to restore the system. All of T otal Backup
Recovery’s other features will also be available to you.
5.1.3 Boot from PXE Server
If the operating system of the PXE Server is Windows Server 2003, you can enable and
configure Windows Deployment Services (WDS), and then set the boot image as Total
Backup Recovery boot.wim i n the configuration options of Windows Deployment Services.
If you failed to configure WDS, you have to configure the TFTP Server and DHCP Server
prior to booting from the PXE Server.
42

5.1.3.1 System Requirements for PXE
• Intel 486 (or compatible) processor or higher
• VBE2.0 Display Card or higher
• 256 MB of RAM or higher
5.1.3.2 Configuration of PXE Restore
When the operating system on a client PC cannot be accessed after a system crash, the
System Administrator can use Total Backup Recovery’s Pre-OS mode (from the Client PC)
to restore the system to a working status by using PXE Restore.
To do this, your Server PC and Client PC must have a network card which supports PXE Boot.
You will also have to configure a DHCP Server and a TFTP Server to support the function of
PXE Restore.
5.1.3.3 Configuration of a TFTP Server
Please follow the steps below to configure a TFTP Server.
1. Set the IP address of your server (example: 192.168.0.1). For best results, start the IP
address with xxx.xxx.xxx.1.
2. Create a Root directory for the TFTP Server. For instance, set the C:\pxe_boot to be the
Root directory (You can create the directory in any location on the TFTP Server and the
directory can have any name). Then, copy all the files of Boot folder from directory of your
exported PXE image to your root directory.
3. Select a tsize option for the TFTP Server.
5.1.3.4 Configuration of DHCP Server
1. Set the Boot File as boot\wdsnbp.com.
2. Configure the Boot Server with the same IP address of your TFTP Server.
3. Create a new port for DHCP Server (The port can be named with any name). Then, set
the IP Address to be the IP Address of the TFTP Server, such as 192.168.0.1.
5.1.3.5 Configuration of Client PC
1. Enter the BIOS and set the boot mode as LAN Boot.
2. Turn on the DHCP and TFTP Servers. Restart the client PCPE.
3. You will be prompted to press F12 within 3 seconds to launch PXE booting process.
4. In the Pre-OS, specify your network settings (R efer to 5.2.8.1
43
) and restore your computer .

5.2 Recovery Manager Main Console
After you enter the Recovery Manager, you will see the following window.
5.2.1 Quick Start
Back Up Computer(s) – Click here to back up partition(s) or the entire hard drive for your
system.
Return to a System Snapshot – Click here to restore from a specified system snapshot.
Restore Your Computer – Click here to restore from a complete backup point.
Data Shredding (Eradication) US DoD Standard Co mpli ed – Click here to 100% clean
your data by wiping hard drive contents beyond recovery.
5.2.2 Backup (Computers)
5.2.2.1 Back up My Computer in Recovery Manager
1. Click Back Up Computer(s).
2. Enter a name for your new Complete Backup, and click Next.
3. Select the partition(s) or the entire hard disk to back up, and click Next.
44

Tip
This backup performed in Recovery Manager is not supported by Universal
Restore.
4. Enter the storage path and click Goto, or select a destination location on a hard drive, USB
storage medium, or a network location to store the image file. Some optional settings will b e
displayed if you click Advanced; these include: compression mode, password protection,
image split, integrity check, backup description, backup priority, and network connection
speed.
5. Click Next.
6. Review the information and settings that have been specified. Click Next to launch the
backup process, or click Previous to modify setting(s).
7. Click Finish to return to main console.
5.2.3 Return to a System Snapshot
5.2.3.1 Return to a System Snapshot in Recovery Manager
1. Click on Return to a System Snapshot icon to displa y a list of System Snapshots. The first
System Snapshot listed will be the most recently created snapshot.
2. Select the date you want to restore to from the calendar on the left pane and select S ystem
Snapshot of that day you would like to restore on the right pane and click Next.
3. Choose to restore the Entire Hard Drive or C : Drive Only and then click Next to begin
restoration.
Tip
If the user chooses to restore the C Drive only, Total Backup Recovery only
restores the files of the active partition. All of the System Snapshots created
before the restoration point can only be used to restore C: drive.
4. Carefully read the warning message. And then click OK to proceed to next step. Y ou can also
click Cancel to exit.
5. Your computer will restart automatically to start the restoration process.
A complete restore can take from 20 seconds up to 10 minutes, depending on the number of
files affected. Once the system has restarted, your SYSTEM will be r estored from th e chosen
System Snapshot. All file modifications and additions made after System Snapshot date will be
removed.
45

5.2.4 Restore Your Computer
5.2.4.1 Restore Your Computer in Recovery Manager
To rest ore a partition or the entire hard drive, please do the following:
1. Enter into Recovery manager.
2. Click Restore Your Computer.
3. Select a backup image from the list, or click here to select an image file stored on a network
share. Click Next to continue.
4. Select a Complete Backup point or any Incremental Backup point to restore from, and click
Next.
5. Select to restore a single partition or the entire hard drive, and click Next.
6. Select a destination partition or a destination hard drive to be restored from the image file,
and click Next. If you choose to restore a single partition, click Yes to launch the restoration
process.
7. To restore the entire hard disk, please select a restore option.
a. Select the checkbox to modify the destination partition size.
b. Don’t select it for fear of information loss on multiple systems or hidden partition.
If you selected option a, double click the partition Capacity to be resized from the list. If
you selected option b, skip to step 9.
8. When it shows the structure of the destination partition, double click the highlight and
modify its size, and click Next to continue.
9. Click OK to begin the restoration process.
After the restoration completes, it will reboot into Windows automatically.
If you want to continue to use system snapshot fe ature, you will need to reallocate space for the
secure area as prompted.
5.2.4.2 Perform Universal Restore
You can restore the system partition or the entire hard drive of the selected client to a dissimilar
hardware.
1. Launch Total Backup Recovery Pre-OS manager.
2. Select Restore, and click Restore Your Computer.
3. Select a backup image from the list, or click here to select an image file supported by
Universal Restore. Click Next to continue.
46

4. Select a Complete Backup point or any Incremental Backup point to restore from, and click
Next.
5. Select to restore with Universal Restore, and click Next.
6. Select to restore a single partition or the entire hard drive, and click Next.
7. Select a destination partition or a destination hard drive to be restored from the image file,
and click Next. If you choose to restore a single partition, click Yes to launch the
restoration process.
8. To restore the entire hard disk, please select a restore option.
a. Select the checkbox to modify the destination partition size.
b. Don’t select it for fear of information loss on multiple systems.
If you selected option a, double click the partition Capacity to be resized from the list. If
you selected option b, skip to step 10.
9. When it shows the structure of the destination partition, double click the highlight and
modify its size, and click Next to continue.
10. Click Next to begin the restoration process.
11. Click Finish to complete the process.
5.2.5 Clone Tab
5.2.5.1 Clone Drive
Clone Drive duplicates one hard drive to another. It eliminates the need to re-install the
operating system, drivers and applications, and enables you to upgr ade a new hard drive wit h
only a few mouse clicks.
Tip
To use this function, you will need to have at least two hard drives on your
computer.
The target hard drive should have enough space to store the data of the
source hard drive.
1. Select Clone and then click Clone Drive.
2. Select the Source Disk (top pane) and then the Destination Disk (bottom pane). You can
choose to modify the Destination Partition Size manually by selecting Modify the
destination partition size. You can also choose not to modify the Destination Parti ti o n
Size by selecting Keep the partition size of the destination drive the same as the
47

source drive. Click Next to continue.
Tip
If you select Keep the partition size of Destination Hard Drive the
same as the Source Hard Drive, please skip to step 4.
If the Hard Drive you want to clone is going to boot your system, for best
result, please select Keep the partition size of Destination Hard Drive
the same as the Source Hard Drive.
3. You can alter the Destination Partition size by double-clicking the entry of Destination
Partition and change the size in a popup dialog box. Click Next to continue.
4. After confirming your selections, click Clone Now to proceed or you can click Previous to
change your selection. If the system is busy , Total Backup Recovery will try to clone again
automatically.
Note
The cloning process will overwrite all data on the destination disk. Click
Continue to begin the cloning process. You can also click Cancel to exit.
5. Click Shutdown to complete the cloning process.
5.2.5.2 Clone Partition
With Total Backup Recovery, you can copy data from the source partition into the destination
partition.
1. Select Clone and then click Clone Partition.
2. Select a Source Partition in the Hard Drive (top pane).
Note
You can only choose one partition at a time.
The Source Partition and the Destination Partition cannot be the same.
3. Select a D estination Partition in the original Hard Drive or another Hard Drive (bottom
pane), then click Next to continue.
Tip
The selected destination partition must have enough space to hold the data
of the source partition.
48

4. Aft er confirming your selections, click Clone Now to start the duplicating process or you
can click Previous to change your selections. Y ou can start the cloning process by clicking
Start Clone. If the system is busy, Total Backup Recovery will try to clone again
automatically.
Tip
The cloning process will overwrite all data on the destination disk. Click
Continue to begin the cloning process. You can also click Cancel to exit.
5. Click Return to Main Console to complete the process.
5.2.6 Data Shredding
5.2.6.1Data Shredding (Eradication) in Recovery Manager
Total Backup Recovery can erase all data on specified partition(s) or the entire hard drive; the
erased data cannot be recovered after eradi cation. Be cautious before operating thi s function.
1. Select Data Shredding on the left pane, then click Data Shredding (Eradication) US
DoD Standard Complied or click Data Shredding (Eradication) US DoD Standard
Complied on Quick Start console.
2. Select the partition(s) or the entire hard drive and enter number of the times (maximum of
49) you would like to operate eradication.
3. Confirm all information and then click Start Now.
4. Carefully read the warning message and click OK to continue, or click Cancel to return to
main console.
5. Click Finish to return to main console.
5.2.7 Analyze Tab
5.2.7.1 Check Backup Image
In this section, you can check if the backup data in your complete backup image file is valid.
1. Select Tools tab and click on Check Backup Image icon.
2. Enter the storage path of the image you want to check, and click Goto to select the image.
You can also select the storage path of the image you want to check and click Next.
Tip
Total Backup Recovery can also check the image file stored on a mapped
drive. For more detail about map network drive, please refer to section
5.2.8.2.
49

3. Select to validate either the Complete or Incremental Backup point, and click Next to
continue.
4. After validating the backup point, click Finish to complete the Image Integrity Check.
5.2.7.2 Check Hard Disk Errors
In this section, you can check if the backup data in your complete backup image file is valid.
1. Select Analyze tab and click on Check Hard Disk for Errors icon.
2. Select the disk to be checked.
3. Do one of the following to launch checking process.
a. To check for errors without repairing them, click Check Now without selecting either of
the check boxes above.
b. To check for and correct system errors, make the appropriate selections in the check
boxes. And then click Check Now.
4. Click OK to complete the process.
5. Click Finish to return to the main console.
5.2.7.3 Run Command Shell
The command shell executes programs and displays their output on the screen by using
individual characters similar to the MS- DOS command interpreter Command.com. You can use
the command shell to create and edit batch files (also called scripts) and to a uto mate routi ne
tasks. You can perform operations more efficiently by using batch files than you can by using
the user interface.
1. Select Tools tab and click on Open Command Shell Window icon.
2. Put in the command in the pop-up window and press Enter key.
3. Ty pe exit and press Enter key to return to main console.
5.2.8 Network Tab
5.2.8.1 Network Adapter Configuration
Total Backup Recovery can back up to, or restore from a network location. To use this feature,
you should first configure your network se ttings. From here, you can configure the IP Address
Settings and DNS Server Settings.
Click the Network tab and then select Network Adapter Configuration, you will see the
following screen.
50

You can setup your network adaptor, IP address, Subnet mask and Default gateway
from here.
If you have more than one network adaptor on your system, select the adaptor to be
used from the dropdown menu.
IP Address Settings:
z Obtain an IP address automatically: If your network supports DHCP (Dynamic
Host Configuration Protocol), this option will obtain an IP address automatically
from a DHCP server or a Point-to-Point Protocol (PPP) dial-up network access
server. Total Backup Recovery Client sets DHCP as the default option.
z IP address: Choose this option to manually specify an IP address for your network.
This option can be used when automatically obtaining an IP address fails or when
there is an IP address conflict.
If your computer is on a Local Area Network (LAN), you can configure the LAN settings
to back up images to or restore from a network location.
DNS Server Settings:
z Obtaining a DNS server address automatically: DNS (Domain Name S ystem) is an
internet service that translates domain names into IP addresses. It is a system for
name resolution, suitable for network computers with fixed IP addresses. Total
Backup Recovery sets DHCP as the default option.
z Use the following DNS server address: Manually specify the DNS server address if
needed. Yo u can enter a preferred one and an alternative one (if the former one is
unavailable).
51

5.2.8.2 Map Network Drive
In this section, you can use the network folder as the local one, and assign a drive letter for it.
In doing so, you can access the image files in that folder more conveniently.
After the network resource is connected successfully , you can access all data in it just like they
were on your local computer.
1. Select Tools tab and click on Map Network Drive icon.
2. Select a drive letter from the drop-down list to map the shared resource
3. Enter the computer share name of the resource in this format: \\Server name\share
name. Or click Browse to locate the resource.
4. Click Save.
5. In the User name and password dialogue box, type your user name in this format:
domain name\username. Enter password if prompted.
Note
All mapped drive(s) will be removed if you reboot or shut down this
computer.
5.2.8.3 iSCSI Initiator
First, ensure that the ISCSI initiator is install ed on the machine. On Windows Vista, it is
installed by default; other Windows systems require a download and manual installation. With
this feature, users may connect to the iSCSI device and a ccess a great deal of information and
configuration options. For more details regarding the configuration of iSCSI initiator, please
refer to 4.5.6
.
5.2.8.4 Launch Web Brower
Click the button, users will go through the website in PE.
5.2.9 Tools Tab
5.2.9.1 Preview Backup Image
Preview the content of the specified partition of a complete backup image to make sure you can
only restore the needed partition(s).
1. Click on the Tools tab, and then select Preview Backup Image.
Note
If you have mounted an image before, you will be prompted to dismount
the previous image. Click Continue to dismount the previous image, or
Cancel to exit this process.
52
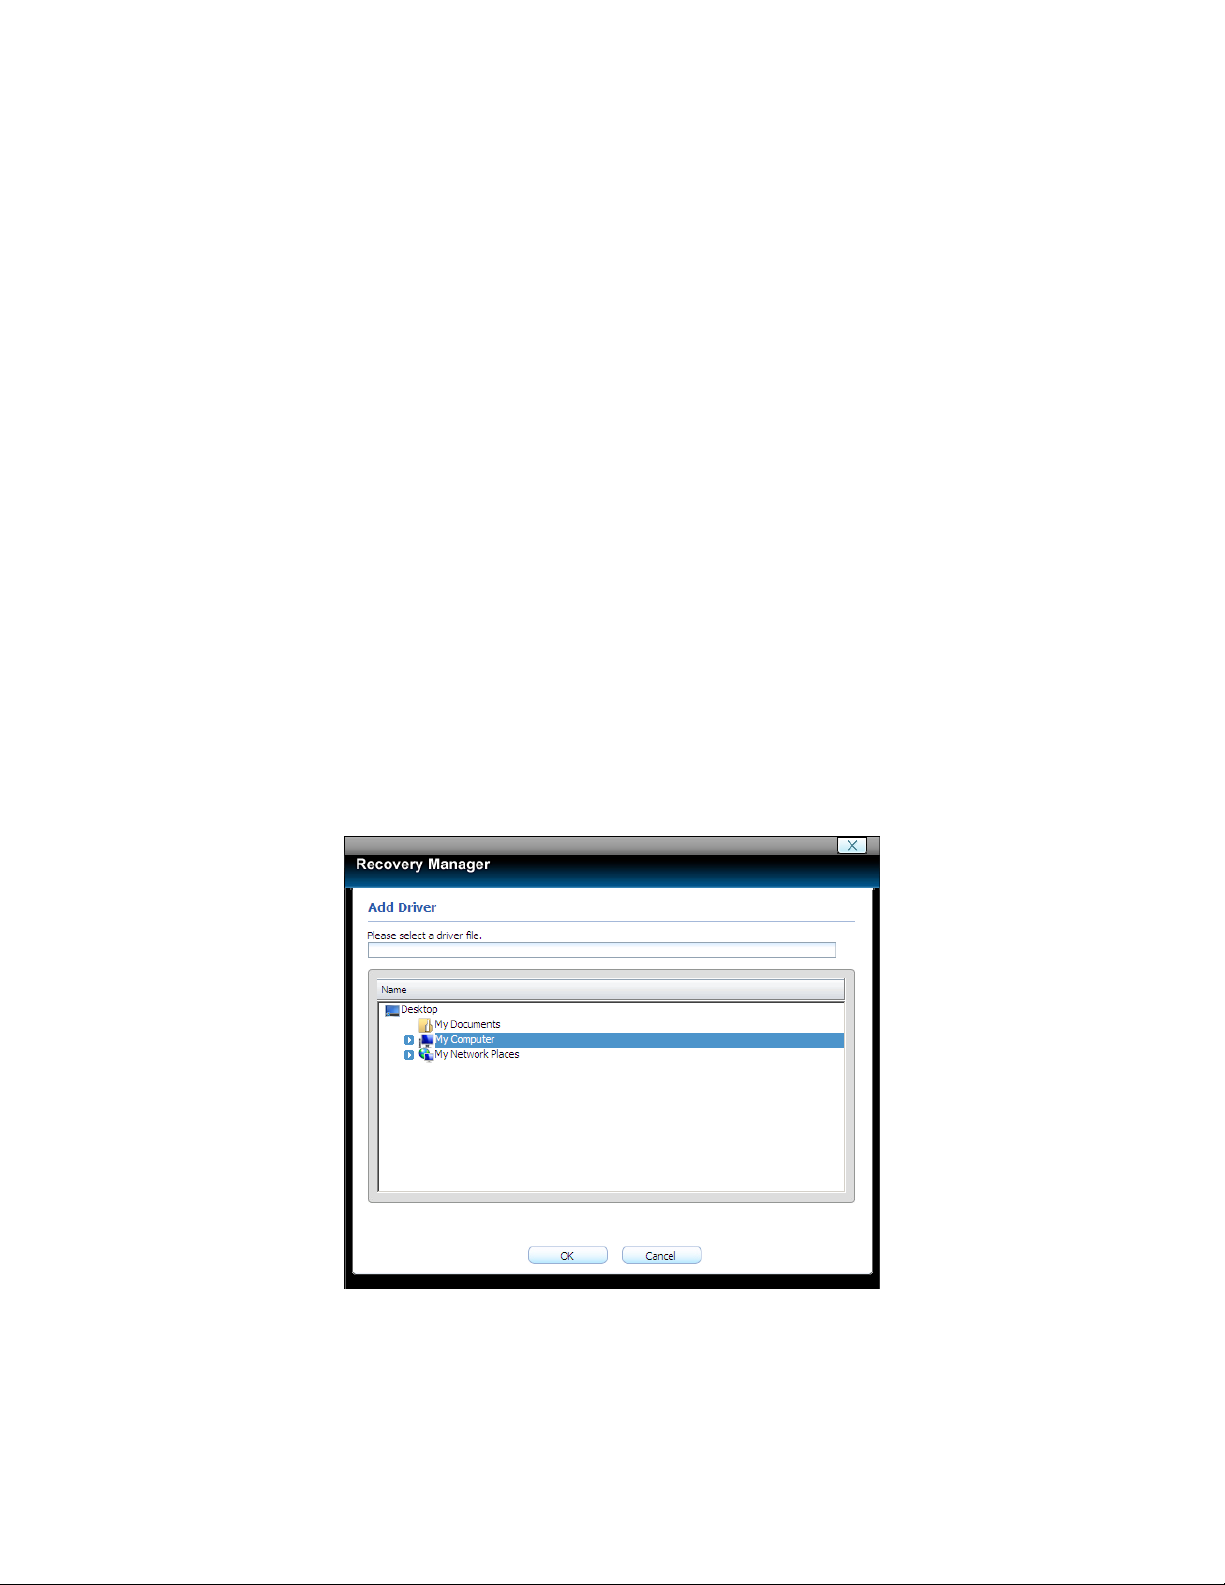
2. Enter the storage path of the image you want to preview and click on Goto to select the
image, or select the storage path of the image you want to preview and click Next.
3. Select a complete backup point or an incremental backup point, and click Next.
4. Select the partition you want to preview, and click Mount to load the image into the
system.
5. You can now browse and copy data on the preview drive in Windows® Explorer.
6. You can click Yes to mount another image. Click No to return to main console.
If you do not want to preview the image anymore, select Unmou nt Preview Drive on the
the Tools tab, or select the Tools menu and click Unmount Image to close the preview
partition.
5.2.9.2 Add Driver
If Total Backup Recovery cannot detect the compatible and available driver for the application
you need, you can install a third party driver manually.
1. Select Tools tab and click on Add Driver icon.
2. Select the driver file on the local computer or on the network.
3. Click OK.
*Select a driver file on your l ocal computer or shared network.
53

Note
All mapped drive(s) will be removed if you reboot or shut down this
computer.
The added driver(s) can now work with the matched applications.
5.2.9.3 Fix System MBR
Click Fix System MBR to quickly fix the MBR of the primary bootable hard disk to boot the
system normally, but the System Snapshot feature will be unavailable and Total Backup
Recovery may not work normally.
Note
You must carefully read the shown warning message prior to processing.
1. Select Tools tab and click on Fix System MBR icon.
2. Click OK to confirm this operation.
3. Click Next to continue.
4. Select a disk from the list and click Next. If your disk doesn’t display on the list, you can
click Load Driver to search matched driver for your disk.
5. Click Next to launch the fix process after you select the checkbox.
6. Click Finish to complete the process. And you need to restart your computer to Windows
manually.
5.2.9.4 Open Explorer Window
Select T ools tab, then click Open Explorer Win dow, files and folders on your computer will be
displayed.
54

Chapter 6: Glossary
• Total Backup Recovery Image
A Tota l Backup Recovery image is a file containing a complete copy of a computer ’s hard
drive or partitions on that hard drive. With this image, you can transfer the contents of a
hard drive to a portable medium such as a recordable CD/DVD, USB drive, or to another
hard drive, for later restoration when needed.
• Recovery CD/DVD
The Recovery CD/DVD allows users to restore their system by inserting this disc into their
CD/DVD-ROM drive. Once the system is booted up, the Recovery CD/DVD will restore the
system automatically based on the content contained on the Recovery CD/DVD.
• Clone (Copy) Partition/Drive
The term "cloning" refers to the physical reading of all sectors of a source partition / disk
and the subsequent writing of this raw sector information to the corresponding sectors of
a destination partition or disk. The size, file system formats, brand of the source
partition/disk and target partition/disk can be different.
• Secure Area
The Secure Area is a Virtual Partition on the primary hard drive. It uses dispersed free hard
drive space to create a logically continuous storage area. This area is hidden in Windows
and protected and accessible only by Total Backup Recovery 7 Small Business Server.
• System Snapshot
System Snapshots are incremental points-in-time of a computer system’s state at a given
moment. T otal Backup Recovery 7 Small Business Server monitors all sector-level changes
from the last Snapshot and writes any changes to a new Snapshot. This backup usually
takes only seconds to complete. Snapshots offer the quickest way to restore a damaged
Windows system to a working state.
• System Partition
The system partition refers to the disk volume that contains the hardware-specific files that
are needed to launch Windows (for example: Ntldr, Boot.ini, and Ntdetect.com). On
dynamic disks, this is known as the system volume.
• Boot Partition
The boot partition refers to the disk volume that cont ains the Win dows operating system
files (by default, in the WINDOWS folder) and its support files (by default in the
WINDOWS\System32 folder). The boot partition can, but is not required, to be the same
partition as the system partition. There will be one (and only on e) system partition, but
there will be one boot partition for each operating system in a multi-boot system. On
dynamic disks, this is known as the boot volume.
• Universal Restore
Universal Restore allows you to restore your system partition and active partitions to
different hardware configurations or virtual machines, such as a replaced motherboard or
hard drive controller.
55

Chapter 7: Appendix
7.1 Frequently Asked Questions
Q. How long does it take Total Backup Recovery 7 Small Business Server to back up
or restore a system?
A: This depends on the amount of data on your system. However, Total Backup Recovery 7
Small Business Server’s technology minimizes the time it takes to perform a backup.
Q. I started Total Backup Recovery in Windows immediately after installation
completed, but a message says that I have to restart my computer in order to run
it. Why?
A: You h ave to restart your computer after installing Tot al Backup Recovery, in order for all
configuration changes to take effect.
Q. When I restored a partition from an image file, Total Backup Recovery 7 Small
Business Server prompted me that “There is not enough spac e on the Destination
Partition”. But I’m sure the free space on the Destination Partition is larger than
the used space in the Source Partition. Why am I getting this prompt ?
A: If data at the end of the source partition cannot be moved, Total Backup Recovery 7 Small
Business Server will prompt you with this notice.
Q. I created an image for Drive C: on two CD-R discs. Why can’t the disc be mounted
as a temporary partition?
A: Mounting a partition requires all the backup data of the drive. If you use one of two discs,
it cannot provide the complete information. To solve this problem, copy the image files from
the two discs to the hard drive and then mount it as a temporary partition. This problem
cannot be overcome by using multiple CD/DVD drives.
Q. While creating a Recovery CD/DVD, an error message appears.
A: This error may occur if the quality of the recordable CD/DVD media is not good, or the disc
is incompatible with the recorder. To solve this problem, please try a differen t brand of
CD/DVD media or upgrade your CD/DVD recorder.
Q. Do I need to do anything before i nstalling Total Backup Recovery 7 Small Business
Server?
A: We recommend running Windows Check Disk to scan for hard drive errors.
Q. Bad Sectors have already been detected on a hard drive. How does this affect my
backup and restore options?
56

A: Total Backup Recovery will try to copy all used sectors when performing a Complete or
Incremental backup. You may be prompted to skip a bad sector or a job could fail due to
bad sectors. Therefore, it’s recommended to run Windows Check Disk command to detect
and repair hard drive errors, or use utilities provided by your hard drive manufacturer,
when attempting to resolve this type of problem.
Q. Can Total Backup Recovery 7 Small Business Server fix my system after my hard
drive has been accidentally formatted or repartitioned?
A: Yes — if T otal Backup R ecovery 7 Small Business Server was installed prior to the incident.
Q. Can I use disk tools such as Fdisk, PartitionMagic and Norton Speed Disk after
installing Total Backup Recovery 7 Small Business Server on my computer?
A: Currently there is no known resou rce conflicting with those utilities.
Q. I’ve installed three operating systems on my computer, including Linux. Can Total
Backup Recovery 7 Small Business Server protect all three systems?
A: Total Backup Recovery 7 Small Business Server protects multiple Windows operating
systems completely, and we recommend using Back Up Computers to protect the
non-windows systems.
Q. Does Total Backup Recovery 7 Small Business Server work in Windows Safe
Mode?
A: Total Backup Recovery 7 Small Business Server does not work in Windows Safe Mode.
Q. Can Total Backup Recovery 7 Small Business Server protect my PC from a
destructive virus?
A: While Total Backup Recovery 7 Small Business Server cannot prevent the actual virus
attack, it can restore your computer to a point before the attack occurred, recovering your
files and effectively removing the virus.
Q. Does Total Backup Recovery 7 Small Business Server Provide support for
Windows® advanced power management?
®
A: Total Backup Recovery 7 Small Business Server supports all Windows
advanced power
management features (Standby, Sleep, Hibernate).
Q. Why was my System Snapshot deleted automatically?
A: 1. If there are two operating systems on your computer with only one of the systems
installed with Total Backup Recovery 7 Small Business Server, when you enter the
operating system which does not have Total Backup Recovery 7 Small Business Server
installed and modify the hard disk data, the system snapshot will be deleted
automatically.
2. If you connect your hard dive physically to another computer and modify your data, the
system snapshot will be deleted automatically.
57

3. If you use DOS Bootable Rescue Disk to start the system and modify your data, the
system snapshot will be deleted automatically.
Q. I’ve installed Total Backup Recovery 7 Small Business Server on Windows 2003
Server. Why can’t I back up data through VSS?
A: VSS requires an NTFS partition in the system. Please check to see if your computer has an
NTFS partition and that all other VSS requirements are met.
Q. Why does it take more time to install System Snapshot on my computer than on
other systems?
A: If there are too many dispersed/fragmented files in your system partitions, Total Backup
Recovery 7 Small Business Server will defragment them to free up continuous space for the
application’s kernel file Secure Area. This may take several minutes. Moreover, when you
install System Snapshots on a FAT32 partition, Total Backup Recovery 7 Small Business
Server will divide the Secure Area, which takes much longer time than an installation on
NTFS partitions.
Q. How can a PC be restored following a data disaster?
A: There are three ways to boot the PC:
1. Press the space bar upon boot up to enter the Recovery Manager.
2. Use a Bootable Rescue Disk to enter the Recovery Manager.
3. Configure PXE and remotely boot the Client to the Recovery Manager.
Upon entering the Recovery Manager:
a. Select a System Snapshot to restore from.
b. Connect to the network or other locally attached storage and select a Complete or
Incremental Backup Image to restore from.
Q. How can I restore without having a DHCP Server on the network?
A: If the DHCP service is not running on your network, you’ll have to manually enter a static
IP address to access the network through Network Adapter Configuration in Recovery
Manager.
Q. What happens if my PC misses a scheduled backup?
A: Total Backup Recovery will start the missed backup automatically at next boot up if you
select the checkbox in the setting interface saying If the computer shuts down, run the
missed tasks when it boots next time. If you don’t select that checkbox, Total Backup
Recovery will start the next schedule backup at next boot up.
Q. Does the Total Backup Recovery 7 Small Business Server conflict with any other
applications?
58

A: Please close the following applications when launching Total Backup Recovery 7 Small
Business Server: Utimaco SafeGuard,
Besides, be aware of the following applications, which is conflict with system snapshot:
Norton GoBack, RecoveryGenius, Acronis OS Selector, Acronis TrueImage, SafeguardV4.2,
OSL2000
Q. Which partition types does Total Backup Recovery 7 Small Business Server
recognize?
A: NTFS, FAT, FAT32, Linux Ext2 and Ext3.
Q. Why is my backup image larger than the source partition or hard disk?
A. The source partition or hard disk may have too much of fragmentation. Please Defr agment
it and then run the backup again.
Q. How can I access the computer outside the Workgroup through the network
under the Recovery Manager?
A. Click on the Tools tab and select Map Network Drive. And then map the directory on the
remote computer as you wish.
Q. How can I get SDK download location correctly before I use Convert Backup to
Virtual Disk feature?
A. VMware Home Page (www.vmware.com
) ->Download ->VMware SDK&APIs ->Virtual Disk
->VMware Virtual Disk Development Kit
59
 Loading...